— TV — Mode d'emploi PDF")
LIFE X8652505 (MD 865700) - TV MEDION - Free user manual and instructions
Find the device manual for free LIFE X8652505 (MD 865700) MEDION in PDF.

User questions about LIFE X8652505 (MD 865700) MEDION
0 question about this device. Answer the ones you know or ask your own.
Ask a new question about this device
Download the instructions for your TV in PDF format for free! Find your manual LIFE X8652505 (MD 865700) - MEDION and take your electronic device back in hand. On this page are published all the documents necessary for the use of your device. LIFE X8652505 (MD 865700) by MEDION.
USER MANUAL LIFE X8652505 (MD 865700) MEDION
natural_image
Front view of a black desktop computer monitor with a stand and 'medion' logo at the bottom (no additional text or symbols visible)QLED Ultra HD Google TV
MEDION LIFE
X8432505 (MD 843700) / X8502505 (MD 850700) / X8552505 (MD 855700) / X8652505 (MD 865700)
Inhaltsverzeichnis
MD 865700: Vesa Standard, Lochabstand
400 x 200 mm

text_image
Diagram of a mechanical device with labeled component 'x4' and directional arrows indicating motion or force②
natural_image
Mechanical assembly diagram showing a lever mechanism with a labeled component 'x4' (no text or symbols beyond the label)③
text_image
Floor plan diagram of a computer room with labeled rooms and an arrow indicating orientation or movement.4
text_image
Technical diagram of a computer room layout with labeled areas and a zoomed-in view showing internal components. MD 843700 MD 850700 MD 843700 MD 850700 |  |
 MD 855700 MD 865700 MD 855700 MD 865700 |  |
HDMI ^TM
HIGH-DEFINITION MULTIMEDIA INTERFACE
Covered by patents at patentlist.accessadvance.com
26. Serviceinformationen
natural_image
Front view of a black horizontal monitor with a stand labeled 'medion' (no additional text or symbols visible)QLED Ultra HD Google TV
MEDION LIFE
X8432505 (MD 843700) / X8502505 (MD 850700) / X8552505 (MD 855700) / X8652505 (MD 865700)
Sommaire
13.3. Menu Audio....28
text_image
Diagram of a mechanical device with labeled component 'x4' and directional arrows indicating motion or force②

natural_image
Mechanical assembly diagram showing a lever mechanism with a labeled component 'x4' (no text or symbols beyond the label)③
natural_image
Architectural floor plan showing room layouts and furniture layout (no text or labels)4
natural_image
Architectural floor plan of a room with furniture and equipment, showing layout and lighting connections (no text or labels)DONNÉES PHOTO PERSONNELLES
RECHERCHE TOUJOURS DISPONIBLE
- RACCOURCI D'ACCESSIBILITÉ
APPLICATIONS UNIQUEMENT
RECHERCHE TOUJOURS DISPONIBLE
ACCÈS DES APPLIS AU MICRO
- PAIEMENT ET ACHATS
PARAMÈTRES DES APPLICATIONS
- GÉRER LES MISES À JOUR
MISE À JOUR AUTOMATIQUE DES AP- PLIS
VOIR LES MISES À JOUR DISPONIBLE
- AUTORISATIONS APPLIS
 MD 843700 MD 850700 MD 843700 MD 850700 |  |
 MD 855700 MD 865700 MD 855700 MD 865700 |  |
HDMI
Covered by patents at patentlist.accessadvance.com
natural_image
Front view of a black desktop computer monitor with a stand and 'median' label (no additional text or symbols visible)QLED Ultra HD Google TV
MEDION LIFE
X8432505 (MD 843700) / X8502505 (MD 850700) / X8552505 (MD 855700) / X8652505 (MD 865700)
Inhoudsopgave
Multi Media Player 37
WAARSCHUWING! Explosiegevaar!
text_image
median 3 2 1text_image
Diagram of a mechanical device with labeled component 'x4' and directional arrows indicating motion or force②

natural_image
Mechanical assembly diagram showing a lever mechanism with a labeled component 'x4' (no text or symbols beyond the label)③

text_image
Floor plan diagram with labeled rooms and a directional arrow indicating movement or placement4

text_image
Floor plan diagram of a room with labeled furniture and a central device, showing layout and lighting connections.12. On-Screen-displaymenu's (OSD-menu's)
12.1. Navigeren in de menu's
DYNAMISCHE KLEURENBOOSTER
DOLBY-AUDIOBEWERKING
- AUDIOUITVOERAPPARAAT
WEERGEGEVEN VÓÓR ANDERE APPS
WEKKERS EN HERINNERINGEN
 MD 843700 MD 850700 MD 843700 MD 850700 |  |
 MD 855700 MD 865700 MD 855700 MD 865700 |  |
HDMI HIGH-DEFINITION MULTIMEDIA INTERFACE
Covered by patents at patentlist.accessadvance.com
26. Service-informatie
natural_image
Front view of a black desktop computer monitor with a stand and 'median' label (no additional text or symbols visible)QLED Ultra HD Google TV
MEDION LIFE
X8432505 (MD 843700) / X8502505 (MD 850700) / X8552505 (MD 855700) / X8652505 (MD 865700)
Índice
14.
Multi Media Player 36
16.1. Menú principal del reproductor multi-media....36
Google Cast 39
Sistema HbbTV.... 39
text_image
Diagram of a mechanical device with labeled component 'x4' and directional arrows indicating motion or force②

natural_image
Mechanical assembly diagram showing a lever mechanism with a labeled component 'x4' (no text or symbols beyond the label)③
text_image
Floor plan diagram with labeled rooms and a directional arrow indicating movement or placement4

text_image
Architectural floor plan with room labels and a small diagram showing a battery and device placement.BÚSQUEDA MANUAL ANALÓGICA
BÚSQUEDA SIEMPRE DISPONIBLE
BÚSQUEDA SIEMPRE DISPONIBLE
 |  |
| MD 843700 MD 850700 | |
 |  |
| MD 855700 MD 865700 |

HIGH-DEFINITION MULTIMEDIA INTERFACE
Covered by patents at patentlist.accessadvance.com
MEDION Service Center
ENAME, S.A
natural_image
Front view of a black desktop computer monitor with a stand and 'median' label (no additional text or symbols visible)QLED Ultra HD Google TV
MEDION LIFE
X8432505 (MD 843700) / X8502505 (MD 850700) / X8552505 (MD 855700) / X8652505 (MD 865700)
Contenuto
13.3. Menu Audio....28
13.4. Menu Sottotitoli....29
13.5. Menu Teletext....29
Multi Media Player 37
text_image
Floor plan diagram of a computer room with labeled rooms and an arrow indicating orientation or movement.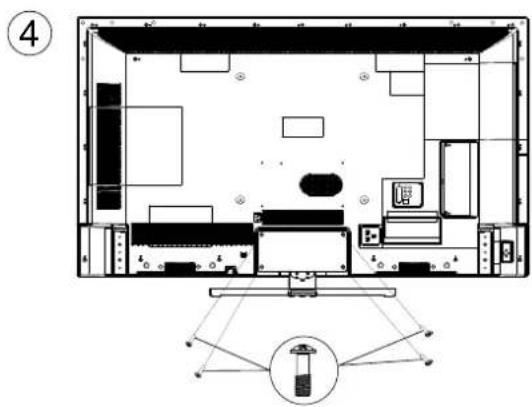
text_image
Floor plan diagram of a computer room with labeled furniture and a central device componentRICERCA MANUALE ANALOGICA
AUDIO E TESTO SU SCHERMO
- DESCRIZIONE AUDIO
TELECOMMANDI E ACCESSORI
- AGGIUNGI UN ACCOUNT
TIPO ORA DI ACCENSIONE
- IMPOSTA FUSO ORARIO
Covered by patents at patentlist.accessadvance.com
Antenna....13, 14, 36
natural_image
Front view of a black desktop computer monitor with a stand and 'median' label (no additional text or symbols visible)QLED Ultra HD Google TV
MEDION LIFE
X8432505 (MD 843700) / X8502505 (MD 850700) / X8552505 (MD 855700) / X8652505 (MD 865700)
Table of Contents
14.
1. Information about this user manual .... 3
1.1. Explanation of symbols ......3
1.2. Proper use 3
2. Package contents
3. General instructions for use and safety instructions....4
4. Safety instructions
4.1. Operating safety 5
4.2. Installation location 15.6
4.3. Ambient temperature 7
4.4. Repairs 7
4.5. Safety when connecting ....7
4.6. Handling batteries 8
5. EU – Declaration of Conformity ...... 9
5.1. Information on WLAN....9
6. Device overview
6.1. Front 10
6.2. Rear and right-hand side.....10
6.3. Remote control....11
7. Getting started 16. ^12
7.1. Unpacking....12
7.2. Mounting 12
7.3. Inserting batteries in the remote control 12 18.
7.4. Connecting the antenna....13
7.5. Connecting the power supply .....13
7.6. Switching the Smart TV on and off......13
7.7. Initial installation after switching on for the first time....13 21.
7.8. Using the multimedia connections .....16
8. Bedienung 1723.
8.1. Channel selection 24,17
8.2. Sound settings 17 25.
8.3. Displaying information .....17 26.
8.4. Recording menu 2718
9. Channel list....28,19
9.1. Editing channels 20
9.2. Selecting input source.....21
10. Teletext.... 21
10.1. Using the teletext .....21
11. Home page menu 22
12. On-screen display menus (OSD menus) ...... 22
12.1. Navigating in the menus .....22
13. Live TV menu.... 23
13.1. Setup menu....23
13.2. Parental control settings menu .....27
13.3. Audio menu....27
13.4. Subtitles menu....28
13.5. Teletext menu....28
13.6. HBBTV settings menu 28
13.7. Recording/timeshift menu .....28
13.8. CAM information menu .....29
13.9. System information menu .....29
13.10. Open source licences menu .....29
Settings menu 29
14.1. Screensaver menu 29
14.2. Inputs menu....30
14.3. Display menu....30
14.4. Audio menu....30
14.5. Wi-Fi / LAN menu ....30
14.6. Google Home menu 30
14.7. Accessibility menu....31
14.8. Bluetooth menu....31
14.9. Other options....31
All settings menu.... 32
15.1. Channels and inputs ....32
15.2. Display and sound ......32
15.3. Network and Internet ....32
15.4. Account and sign-in ....32
15.5. Privacy....33
15.6. Apps....34
- System....34
15.8. Accessibility menu 35
15.9. Remotes and accessories menu....35
15.10. Help and feedback......35
Multi media player.... 35
16.1. Main menu for the media player .....35
Google Cast 38
HbbTV system 38
MEDION Smart TV privacy 38
Troubleshooting 39
20.1. Do you need more help? 40
20.2. Pixel errors on Smart TVs....40
Cleaning 41
Storing the device when not in use.... 41
Disposal 41
Technical specifications 42
Product data sheet 44
Service information.... 44
Legal notice 45
Index 46
1. Information about this user manual

Thank you for choosing our product. We hope you enjoy using this device. Read the safety instructions carefully before using the device for the first time. Note the warnings on the device and in the user manual.
Always keep the user manual close to hand. If you sell the device or give it away, please ensure that you also pass on this user manual. It is an essential component of the product.
1.1. Explanation of symbols
If a block of text is marked with one of the warning symbols listed below, the hazard described in that text must be avoided to prevent the potential consequences described there from occurring.
| DANGER!Warning: risk of fatal injury! | |
| WARNING!Warning: risk of possible fatal injury and/or serious irreversible injuries! | |
| CAUTION!Warning: risk of minor and/or moderate injuries! | |
| NOTICE!Follow these instructions to prevent damage to the device! | |
| More detailed information about using the device | |
| Follow the instructions in the user manual! | |
| Due to the 5 GHz frequency range of the wireless LAN solution used, the device may only be used inside buildings in the EU. | |
| WARNING!Warning: risk of electric shock! | |
| WARNING!Warning: danger due to loud volume! |

Protection class II
Electrical devices in protection class II are electrical devices that permanently have double and/or reinforced insulation and do not have the option of connecting a protective earth.
1.2. Proper use
This is an information electronics device and is also suitable for multimedia applications. This device is designed to receive and play back television channels. The various connection options enable the additional extension of the reception and playback sources (receiver, DVD player, DVD recorder, video recorder, PC etc.). Your device can be used in a variety of ways.
The device is only intended for private use and not for industrial/commercial use.
- Please note that we shall not be liable in cases of improper use.
- Do not modify the device without our consent and do not use any auxiliary equipment that we have not approved or supplied.
- Only use replacement parts or accessories that we have supplied or approved.
- Comply with all the information in this user manual, especially the safety instructions. Any other use is considered improper and can cause personal injury or property damage.
- Do not use the device in extreme environmental conditions.
- This device is only suitable for use in dry interior rooms.
- This device is not suitable for use as a data monitor for office workstations.

Please note that this device is not suitable for mobile use and must only be used when stationary at a designated place. Proper functionality cannot be guaranteed during mobile use, since this could result in reception issues or similar.
2. Package contents
Please check your purchase to ensure that all items are included. If anything is missing, contact us within 14 days of purchase.
The following items are supplied with your product:
- Smart-TV
- Remote control (RC1850) incl. 2 x LR03 (AAA) 1.5 V batteries
- Power cord
- Foot incl. fixing screws
- Documentation

DANGER!
Risk of choking and suffocation!
Packaging film can be swallowed or used improperly, creating a risk of choking and suffocation.
- Keep packaging material such as plastic film or plastic bags away from children.
3. General instructions for use and safety instructions
 | Select a suitable location for the TV set. Place it in a clean location, away from heat sources (sun, radiators, fireplaces), plants (pollen, dust, water) and the floor (risk of impact, dust). |
 | Do not place any cloths, paper or other materials over the openings on the top, bottom or sides of the appliance. |
 | Switch off the TV set after use (this does not apply to OLED TV sets) and unplug the mains plug when it is not in use (for OLED TV sets, leave it in standby mode before disconnecting it from the mains). |
 | Store the remote control carefully, keep liquids away from it and check the condition of the batteries regularly to prevent contacts from becoming corroded. |
 | Clean the screen with a soft, dry cloth after you have switched off the TV set and disconnected it from the power supply. Avoid the use of glass and other household cleaners. |
4. Safety instructions
4.1. Operating safety
– Before using the device for the first time, check the device for damage. A defective or damaged device may not be operated.
- This device may be used by children over the age of 8 and by persons with limited physical, sensory or mental abilities or by those without experience and knowledge, if they are supervised or have been instructed in the safe use of the device and have understood the dangers that result from it.
– Children must not be allowed to play with the device. Cleaning and user maintenance must not be carried out by children unless they are supervised.
DANGER!
Risk of choking and suffocation!
The packaging material is not a toy! Packaging film can be swallowed or used improperly, creating a risk of choking and suffocation.
- Keep packaging material such as plastic film or plastic bags away from children.

DANGER!
Risk of electric shock!
Risk of electric shock, short circuit and fire!
■ Never open the housing of the Smart TV and do not push objects inside the Smart TV through the slots and openings.

WARNING!
Overheating! Risk of fire!
Overheating may result in damage to the Smart TV and the risk of fire!
■ The slots and openings on the TV set are for ventilation purposes. Do not cover these openings, for example with newspapers, table cloths, curtains etc.
DE
FR
NL
ES
IT
EN
- Do not subject the display to pressure. There is a risk of the screen glass breaking.
- The remote control has a Class 1 infrared diode. Never use optical equipment to look at the LED

CAUTION!
Risk of injury!
Risk of injury due to broken display!
■ Do not touch the display with fingers or sharp objects to avoid damage.
■ Use protective gloves when wrapping up cracked parts.
■ Wash your hands with soap afterwards, as the risk of chemicals escaping cannot be excluded.
■ Send the broken parts to your Service Centre for proper disposal.
■ Disconnect the device from the mains supply immediately and only use it again after it has been checked by a qualified person or customer services. It is an emergency situation if, for example, the device produces smoke or unusual noises, water has penetrated the device, the mains cable or housing is damaged.
Contact customer services if:
– the mains cable is burnt or damaged
– liquid has penetrated the device
– the device is not operating correctly
– the device has fallen or its housing is damaged
– the device produces smoke
4.2. Installation location
- The TV must not be mounted at heights exceeding 2 m. The device must be mounted on a solid surface such as cement or concrete.
- Place the TV set on a sturdy, level surface. Several aggressive varnishes can corrode the rubber feet on the device.
- When used for the first time, new devices may give off a typical, unavoidable but completely harmless odour. This will fade over time. We recommend you ventilate the room regularly to help dissipate this odour. We have taken appropriate measures during the development of this product to ensure that levels are well below legal limits.
- Keep your Smart TV and all connected devices away from moisture and avoid dust, heat and direct sunlight. Non-compliance with these instructions can cause faults or damage to the Smart TV.
- Do not use the device outdoors as it could be damaged by weather such as rain, snow etc.
- The device may not be exposed to water droplets or spray. Do not place any liquid-filled containers (vases or similar) on or next to the device. Such containers may tip over and the liquid may impair the electrical safety of the device.

NOTICE!
Risk of damage!
Risk of injury due to candles and other open flames.
- Keep candles and other open flames away from this product at all times, to prevent fire from spreading.
- Make sure that there is enough clearance between the device and any surrounding furniture or walls. Ensure a minimum clearance of 10cm around the device for sufficient ventilation.
- Avoid glare, reflections and extreme dark-light contrasts to protect your eyes.
- The optimal viewing distance is 3 times the screen diagonal

DANGER!
Risk of injury! Risk of fatal injury!
Only place the TV set on stable surfaces. Falling televisions may cause serious injuries and even death.
Many injuries, particularly for children, can be avoided by taking the following precautions.
■ Only operate the Smart TV and its components on a sturdy, level and vibration-free surface to prevent it from falling.
- Only use the TV with the supplied feet and screws.
- Only use furniture that ensures that the TV is positioned safely.
- Take care to ensure that the TV does not protrude over the edges of the furniture.
- Do not place the TV on suspended furniture, such as wall cupboards or shelves, without safely and securely fixing both the furniture and the TV set. Take care to ensure that the furniture is mounted correctly and do not exceed its maximum load.
- Do not place any covers or similar be-
neath the TV to ensure that it is securely positioned.
- Warn children of the dangers of climbing on furniture when trying to reach the TV set or its controls.
If you store or change your TV, also observe the safety instructions specified above.
4.3. Ambient temperature
- The device can be operated at an ambient temperature of +5^ to +35^ and at a relative humidity of 20% to 85% (non-condensing).
- When switched off, the Smart TV can be stored at temperatures of between -20^ and +60^ .
- Keep the device at least one metre away from sources of high-frequency or magnetic interference (televisions, loudspeakers, mobile telephones etc.) to avoid malfunctions.
- Remove the plug from the power socket and the antenna cable from the antenna socket during a thunderstorm or if the device is not going to be used for a long period.

NOTICE!
Risk of damage!
Major changes in temperature or fluctuations in humidity can cause moisture to build up within the Smart TV due to condensation – this can cause an electrical short circuit.
■ After transporting the Smart TV, wait until it has reached ambient temperature before switching it on.
4.4. Repairs
– Repairs to your Smart TV should only be carried out by qualified specialists.
– If a repair must be carried out, please contact only our authorised service partners.
- Take care to ensure that only spare parts specified by the manufacturer are
used. The use of unsuitable spare parts can cause damage to the device or the risk of fire.
4.5. Safety when connecting
4.5.1. Powersupply
- Even when deactivated, some of the device components are live. To disconnect the power to your Smart TV or to completely isolate the device from voltage sources, disconnect the device from the power supply completely. To do so, remove the mains plug from the socket

DANGER!
Risk of electric shock!
Risk of death due to electric shock when the housing is open.
■ Do not open the device housing. It does not contain any parts that require maintenance by the user.
- Only operate the Smart TV from an earthed 220 to 240 V\~ 50 Hz socket. Contact your local energy supplier if you have any questions about the power supply at the installation location.
- The socket must always be easily accessible so that the plug can be quickly removed from the socket in an emergency.
- To disconnect the power supply from your TV, pull the plug from the socket.
- For additional safety, we recommend using a surge protection device to protect your Smart TV against damage due to voltage spikes or lightening strike from the power supply.
- Position the cables so that no one can tread on them or trip over them.
- Do not place any objects on the cables as they may be damaged.
- Never touch the plug with wet hands.
- Always hold the housing and never pull on the cable when removing the plug from the socket.
- Please note that the TV continues to use power when in standby mode.

If the device switches off and restarts due to electrical discharge while in USB mode (media player), optional HbbTV mode or optional LAN/WLAN mode (media player/portal), it may not be able to independently restore the last operating mode. Please start the respective media or applications again.
The last user settings entered may not be restored following an electrical discharge that causes the TV to switch off because these settings are only saved 5 minutes after switching channels.

All multimedia devices that can be connected to the corresponding connections of the TV must comply with the requirements of the Low Voltage Directive.
4.6. Handling batteries

WARNING! Risk of explosion!
Batteries may contain combustible materials and leak, heat up excessively, ignite or even explode.
■ Avoid improper handling of the batteries to prevent damage to your device and your health.
Please follow the safety advice below closely:
- Keep batteries away from children. Consult a doctor immediately if batteries are swallowed.
– Never charge batteries (unless they are designed to be recharged).
– Never discharge batteries by means of high power output.
– Never short-circuit the batteries. - Never expose the batteries to excessive heat (such as direct sunlight, fire or similar).
- Do not dismantle or deform the batteries.
- You could injure your hands or fingers, or battery fluid could get into your eyes or onto your skin. If you do come into contact with battery fluid, rinse the affected area with plenty of water and consult a doctor immediately.
– Avoid heavy impacts and vibrations.
– Always observe the correct polarity. - Take care to ensure that the plus (+) and minus (−) poles are correctly inserted to avoid short circuits.
- Do not mix up new and old batteries or different types of batteries.
This could cause your remote control to malfunction. In addition, the weaker batteries would discharge too much. - Remove used batteries from the device immediately. There is an increased risk of leakage with flat batteries.
- Remove the batteries from the remote control if it is not going to be used for a long period of time.
- Replace all used batteries in the remote control at the same time with new batteries of the same type.
- Cover the contacts of the batteries with sticky tape if you want to store or dispose of them.
- If necessary, clean the battery and device contacts before insertion.
– If the batteries have leaked, wear pro-
tective gloves and clean the contacts thoroughly.
5. EU – Declaration of Conformity
Medion AG hereby declares that this device complies with the required regulations in the EU and the fundamental requirements and the other relevant provisions of the following:
• Radio Equipment Directive 2014/53/EU
• Ecodesign Directive 2009/125/EC
• RoHS Directive 2011/65/EU
You can download the complete EU Declaration of Conformity at www.medion.com/conformity.

Due to the 5 GHz frequency range of the integrated wireless LAN solution, the device may only be used inside buildings in the EU (see table).
 | ||||
| AT BE | BG CZ D | K | ||
| EE FR | DE IS IE | |||
| IT EL | ES CY LV | |||
| LI LT | LU HU MT | |||
| NL | NO | PL PT | RO | |
| SI | SK | TR FI | SE | |
| CH | UK(NI) | HR | ||
AT = Austria, BE = Belgium, BG = Bulgaria, CZ = Czech
Republic, DK = Denmark, EE = Estonia, FR = France,
DE = Germany, IS = Iceland, IE = Ireland, IT = Italy,
EL = Greece, ES = Spain, CY = Cyprus, LI = Liechtenstein,
LV = Latvia, LT = Lithuania, LU = Luxembourg, HU = Hungary,
MT = Malta, NL = Netherlands, NO = Norway, PL = Poland,
PT = Portugal, RO = Romania, SI = Slovenia, SK = Slovakia,
TR = Turkey, FI = Finland, SE = Sweden, CH = Switzerland,
UK(NI) = Northern Ireland, HR = Croatia
5.1. Information on WLAN
| WLAN | ||
| Frequency range | 2.4 GHz/5 GHz | |
| WLAN standard 802.11 | a/b/g/n | |
| Encryption | WEP/WPA/WPA2 | |
| Frequency range/MHz | Channel | Max. transmitting power/dBm |
| 2400–2483.5 | 1–13 | 19.9 |
| 5150–5250 | 36–48 | 22.4 |
| 5250–5350 | 52–64 | 22.5 |
| 5470–5725 | 100–140 | 22.5 |
6. Device overview
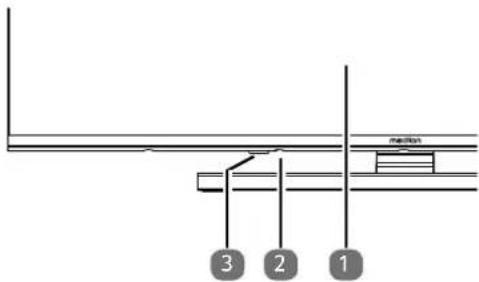
6.1. Front
text_image
3 2 1- Screen
- ⏻: Switch the device on and off
- Infrared sensor: Reception field for the infrared remote control signals.
Operating light: lights up when the device is in stand-by mode.
6.2. Rear and right-hand side
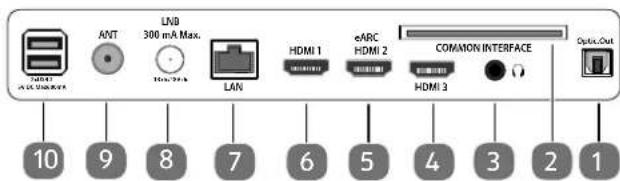
text_image
ANT LNB 300 mA Max. LAN HDMI 1 eARC HDMI 2 COMMON INTERFACE HDMI 3 Optic-Out 10 9 8 7 6 5 4 3 2 1- SPDIF OPTIC. OUT: Digital audio output (optical)
- COMMON INTERFACE (CI+): Card slot for connecting pay TV cards
- For connecting headphones with 3.5 mm jack
- HDMI 3: HDMI connection for devices with HDMI output
- eARC HDMI 2: HDMI connection for devices with HDMI output (eARC)
- HDMI 1: HDMI connection for devices with HDMI output
- LAN: Network connection for connection to the Internet
- LNB 300 MA MAX. (13V/18V DC ===): For connecting the antenna (satellite)
- ANT: For connecting the antenna (analogue, DVB-T or DVB-C)
- 2XUSB (5V DC === MAX500MA): USB connection for media playback/recording (PVR)

text_image
12 11- Connection for mains plug (depending on the model)

Please only use the mains cable supplied for this purpose.
- Fixing holes for a wall mount
MD 843700: Vesa standard, hole spacing 100 x 100 mm
MD 850700 / MD 855700: Vesa standard, hole spacing 200 x 200 mm
MD 865700: Vesa standard, hole spacing 400 x 200 mm

Wall mount not included in package contents. When mounting the device, make sure that you use M6 (MD843700: M4) screws. The maximum length of the screws corresponds to the thickness of the wall mount plus 7 mm.
The TV must not be mounted at heights exceeding 2 m. The device must be mounted on a solid surface such as cement or concrete.
6.3. Remote control
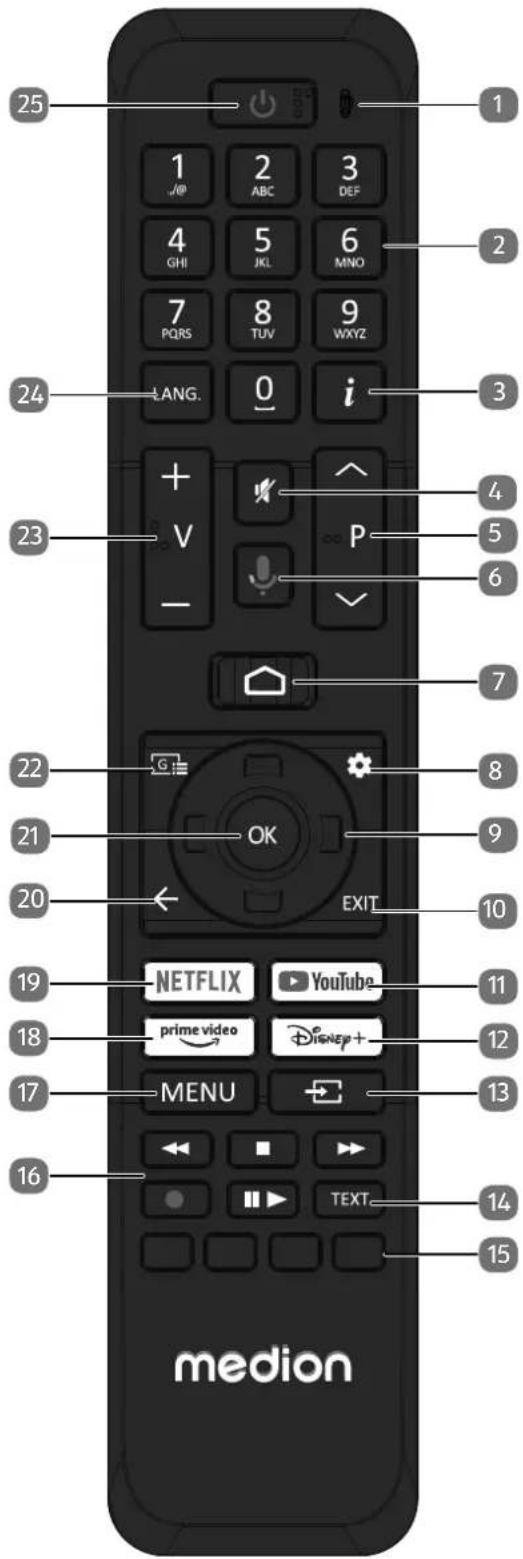
text_image
25 1 2 ABC 3 DEF 4 GHI 5 JKL 6 MNO 7 PQRS 8 TUV 9 WXYZ LANG. 0 i 24 + V - P 4 5 6 7 23 22 G OK EXIT 8 21 9 20 10 19 NETFLIX YouTube 11 18 prime video Disney+ 12 17 MENU 13 16 TEXT 14 15 medion-
Microphone
-
Number buttons:
TV: Channel selection, teletext: Page selection
-
i (INFO): Digital TV: Show information (e.g. current channel number). Multiple presses opens further information / functions (depending on the selected programme type)
-
Mute
-
P ▼/ ▲: Channel selection buttons
TV: select next (+) / previous (−) channel; teletext: select next (+) / previous (−) page
-
: Microphone button for activating voice control
-
: Open the start screen
-
⚙ : Call up the settings menu
-
Direction button ▲: Move up in menu
Digital TV: Select the info bar of the current channel; Teletext: Select the next page;
Direction button ▼: Move down in menu,
Digital TV: Select the info bar of the current channel, Teletext: Select the previous page;
Direction button ◀ : Move left in menu
Teletext: Call up subpage;
Direction button ▶: Move right in menu
Teletext: Call up subpage
-
EXIT: Exit the menu
-
YOUTUBE: Open the YouTube app
-
DISNEY+: Open the Disney+ app
-
(SOURCE): Select input signal of connected devices
-
TEXT: Switch teletext on and off
-
Red button: For teletext or menus, HbbTV
Green button: For teletext or menus
Yellow button: For teletext or menus
Blue button: For teletext or menus
- Media buttons
◀:Rewind;
■: Stop playback;
▶: Fast forward;
●: Start recording (PVR);
II ▶: Start playback / pause playback / start timeshift
-
MENU: Open and close menu
-
PRIME VIDEO: Call up the Prime Video app
-
NETFLIX: Open the Netflix app
-
←: Move back one step in the menu
-
OK: Confirm selection in certain menus
-
G: Digital TV: call up the electronic programme guide
-
V-/+ : Increase (+) or decrease (−) volume.
-
LANG.: Analogue TV: Stereo/mono;
Digital TV: Select audio language (if available)
- ⏻: Switch Smart TV on/off (switch standby mode on/off)
7. Getting started

Before using for the first time, ensure you read the "Safety instructions" section.
7.1. Unpacking
- Select a suitable place for setting up the device before unpacking.
- Open the box very carefully, to avoid damaging the device. The device might get damaged if you use a knife with a long blade to open the box.
- The box contains a number of small items (including batteries). Keep these out of the reach of children, as they represent a choking hazard.
- Store the packaging material in a safe place. Only use this box to transport the TV.

DANGER!
Risk of choking and suffocation!
Packaging film can be swallowed or used improperly, creating a risk of choking and suffocation.
- Keep packaging material such as plastic film or plastic bags away from children.
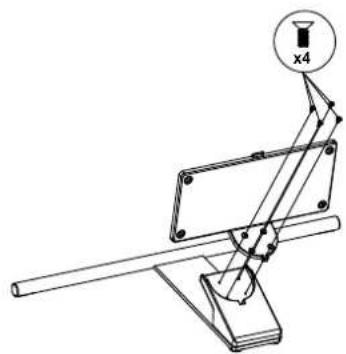
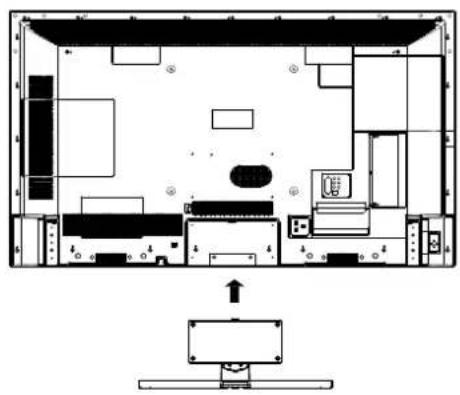
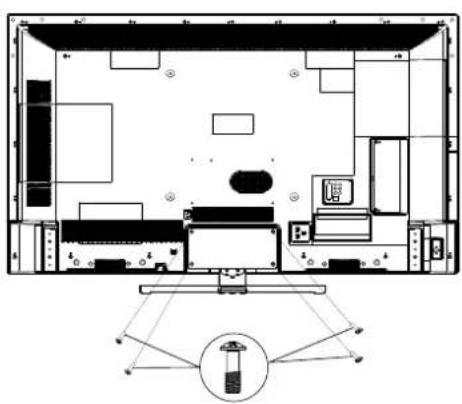
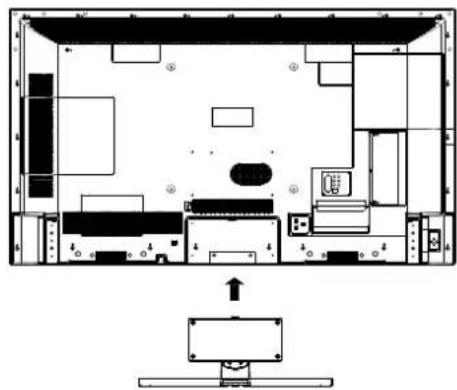
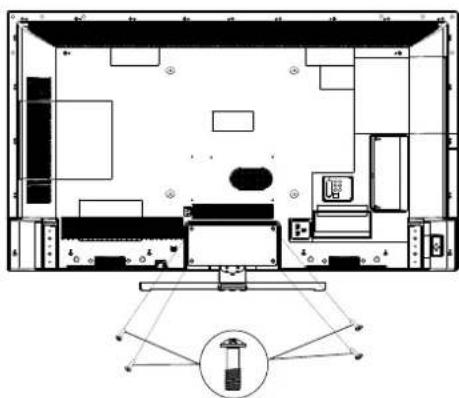
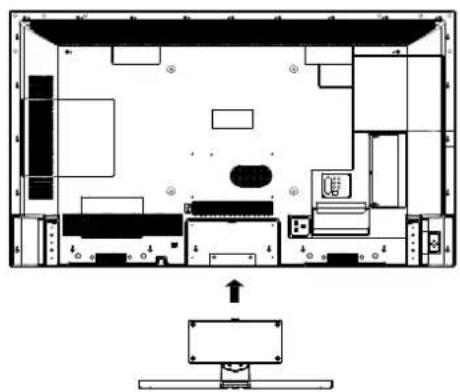
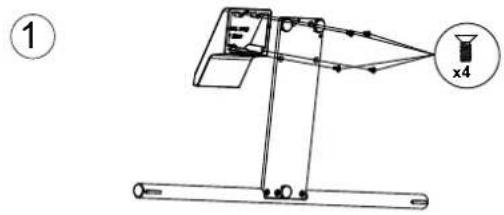
7.2. Mounting
Attach the feet as shown in the illustration. Carry out this step before connecting the Smart TV.
text_image
① x4
text_image
② x4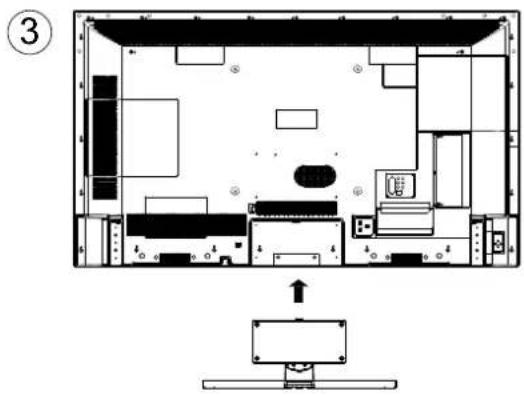
text_image
Floor plan diagram of a computer room with labeled rooms and an arrow indicating orientation or movement.
text_image
Floor plan diagram of a computer room with labeled furniture and a central device component7.3. Inserting batteries in the remote control
Remove the battery compartment cover on the back of the remote control.
▶ Insert two LR03/AAA/1.5 V batteries in the battery compartment of the remote control. Check the battery polarity (as shown on the bottom of the battery compartment).
▶ Close the battery compartment.

NOTICE!
Risk of damage!
The remote control can be damaged by leaking batteries if not used for a long period of time!
■ Remove the batteries from the remote control if the device is not going to be used for a long period.
7.4. Connecting the antenna
Your Smart TV supports different antenna signals.
You can input the following picture signals to the television through the connection labelled ANT.:
• Via analogue cable/an analogue house aerial
• Via a DVB-T2/ DVB-T ^1 antenna or
- Via a DVB-C ^2 connection (digital cable connection)
▶ Insert the antenna cable either from the house antenna/analogue cable connection, a DVB-T antenna or the DVB-C connection in the antenna socket on the Smart TV.
You also have the option of connecting a digital satellite system to the connection labelled LNB.
- Screw a coaxial antenna cable's F connector onto the connector on the Smart TV.

To receive encrypted/subscription channels you will need to use a CI module (Conditional Access Module) and an appropriate card. Insert a CI module (available in specialist shops) in the slot provided for this purpose on the left-hand side of the device (COMMON INTERFACE). You can then insert your provider's card in the CI module.
7.5. Connecting the power supply
- Connect the supplied mains cable to the mains socket of the device.
Connect the mains plug on the device to an easily accessible 220 to 240 V \~ 50 Hz mains socket.
7.6. Switching the Smart TV on and off
The device will be in standby mode as soon as you have connected the mains plug to the mains socket.
To switch on the device, press
- the standby/on button, a number button or one of the P ▼/▲ buttons on the remote control;
- the multifunction button ⏻ on the device.
▶ Use the standby/on button on the remote control to switch the device back into standby mode. The device will be switched off, but will continue to use power.

If there is no input signal, the device automatically switches to standby mode. A countdown timer will be displayed on the screen until this time. This function is not available for all sources.
7.7. Initial installation after switching on for the first time

Depending on the selected country, you may need to set a password and parental control settings during the initial installation.
You will be guided through the initial installation after you switch on the device for the first time. You can call up the initial installation at any time via the ALL SETTINGS > SYSTEM > ABOUT > RESET > FACTORY RESET menu and perform it again.
▶ First, you will be asked to pair your remote control with the TV set via Bluetooth. To do this, hold down the △ and ← buttons simultaneously for a few seconds until a green tick appears. The connection has now been established.
text_image
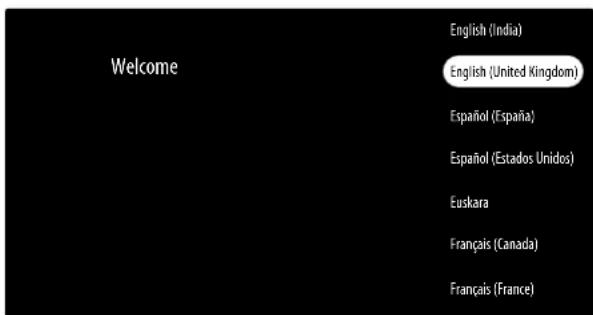
Welcome English (India) English (United Kingdom) Español (España) Español (Estados Unidos) Euskara Français (Canada) Français (France)▶ Then use the ▼▲ buttons to select the language.
▶ Then confirm with OK.
text_image
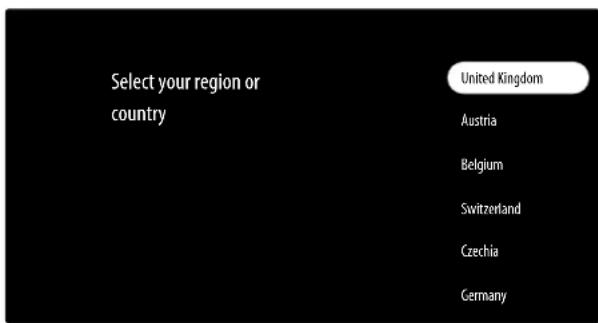
Select your region or country United Kingdom Austria Belgium Switzerland Czechia GermanyThen use ▼▲ to select the region and country you want. The country setting will influence the order in which the channels are stored. In addition, there are a number of options preset for the individual countries.
▶ Then press OK to continue.
Then decide whether you want to carry out quick set-up of your device with your smartphone.
▶ To do this, activate the Bluetooth and WLAN options on the smartphone.

On Android smartphones, a notification which you can use to start setup will then appear.
Now scan the displayed QR code with your smartphone and follow the further instructions. The network/Internet connection and Google Account sign in will then be established.
▶ If you do not want to carry out quick set-up, press the
▼ button and select MANUAL SETUP (WITH REMOTE CONTROL).
▶ Then pressK to continue with manual setup.
Then select TV mode. Select the HOME option to optimise energy consumption for private use and press OK. Then confirm this with YES.
7.7.1. Network/Internet settings
Next, you can establish a connection to the network/Internet.
text_image
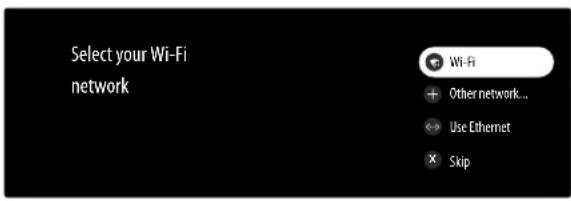
Select your Wi-Fi network Wi-Fi + Other network... → Use Ethernet × SkipAll available WLAN networks are displayed directly.
▶ Use the ▼▲ buttons to select the WLAN network you want and press OK. If necessary, then use the virtual keyboard to enter the relevant password using the ◀▶▲▼ direction buttons, select the return key √ and press OK. The connection will then be established.
To establish a LAN connection via a network cable, select the USE ETHERNET option and press OK. If necessary, then use the virtual keyboard to enter the relevant password using the ◀ ▶ ▲ ▼ direction buttons, select the return key √ and press OK. The connection will then be established.
▶ Select the OTHER NETWORK... option if you want to establish a connection to another network. Then specify the name of the network. If necessary, then use the virtual keyboard to enter the relevant password using the ◀ ▶ ▲ ▼ direction buttons, select the return key √ and press OK. The connection will then be established.
7.7.2. Google sign in

Signing in with a Google Account is required to use the TV set. If you do not have one yet, please create one first.
Now sign in to Google with your Google Account sign-in details.

Make sure that your smartphone/computer and the TV set are connected to the same WLAN network during setup.
7.7.3. Terms of Service, Privacy Policy and useful information
You will then be asked to agree to the Google Terms of Service, the Google Play Terms of Service and the Google Privacy Policy. This is necessary in order to use Google services.
Read these carefully and select the LEARN MORE > ACCEPT option to confirm and press OK.
You will then be shown useful information on how to improve the performance by using location and diagnostic data.
7.7.4. Google services
In the subsequent overview of Google services, you can now activate or deactivate location detection and the sending of diagnostic data to Google.
▶ Under LEARN MORE you can call up additional information on the individual Google services.
▶ Then select ACCEPT and preOK.
Then decide whether the installed apps should be included in your Assistant search queries. This optimises the search results.
You can now select your favourite apps to be installed with the initial installation.
▶ Select CONFIRM and preOK.

Depending on the country/region you have selected, you will now be asked to set up a password and, if necessary, make parental control settings and assign a device PIN.
7.7.5. Selecting energy mode
Then select the energy mode you want and press OK. This determines which functions remain active in standby mode.

Bear in mind that the higher the setting, the higher the energy consumption.
7.7.6. Privacy statement of the network
▶ Confirm the privacy statement of the network with OK.
7.7.7. Sett ing up TV reception
text_image
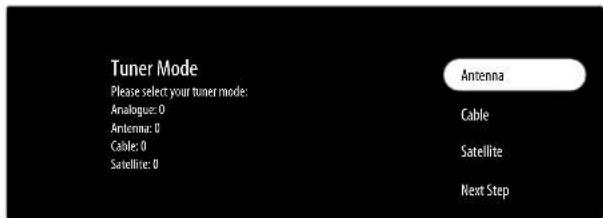
Tuner Mode Please select your tuner mode: Analogue: 0 Antenna: 0 Cable: 0 Satellite: 0 Antenna Cable Satellite Next StepSelect the reception mode you want ANTENNA, CABLE or SATELLITE and press OK: If you do not want to set up any TV channels, select NEXT STEP and press the OK button.
7.7.8. Antenna

Make sure that you have connected a DVB-T2 antenna to the ANT. connection.
▶ Choose whether you want to search only analogue, only digital or digital and analogue channels and press OK. The search then begins.
7.7.9. Cable

Make sure that your cable connection is connected to the ANT. connection.
- Select the desired provider. - Choose whether you want to search only analogue, only digital or digital and analogue channels and press OK.
The following options are then available:
| Cable search configuration | |
| SCAN MODE | Select the search mode you want FULL here (only for provider selection OTHERS), ADVANCED or QUICK. |
| FREQUENCY (KHZ) (only in search mode ADVANCED or QUICK) | Set the frequency here. |
| NETWORK-ID (only in search mode ADVANCED or QUICK) | Set the network ID here. |
▶ Select SCAN and press the OK button to start the search.
7.7.10. Satellite

Make sure that your satellite cable is connected to the LNB connection.
▶ Select NEXT STEP if you do not want to make any further settings. Select MORE if you want to make additional settings. The following options are available here:
| SATELLITE ANTENNA TYPE | |
| SINGLE | Select the required satellite here. |
| TONE BURST | If your satellite system requires a tone burst, you can set it to TONE BURST A or B here. |
| DISEQC 1.0 | If you have connected multiple LNBs or a DiSEqC switch to your satellite antenna, select DiSEqC 1.0 here. |
| DISEQC 1.1 | If you have connected multiple LNBs or a DiSEqC switch to your satellite antenna, select DiSEqC 1.1 here. |
| DISEQC 1.2 | If you have connected multiple LNBs or a DiSEqC switch to your satellite antenna, select DiSEqC 1.2 here. |
| UNICABLE I | Select the Unicable I settings (TU-NER and BAND FREQUENCY) here |
| UNICABLE II | Select the Unicable II settings (TU-NER and BAND FREQUENCY) here |
If under MORE you select the setting UNICABLE I or UNICABLE II, the following setting options are available to you:
| UNICABLE I/II SETTINGS | |
| TUNER Select | the required USER BAND 1 - 8. |
| BAND FREQUENCY | Select one of the preset band frequencies or SET USER DEFINED. You can set a band frequency of your choice under SET USER DEFINED > BAND FREQUENCY using the virtual keyboard. |
To start the LNB search, select the NEXT STEP option and press OK. The LNB search is started.
▶ If necessary, you can now configure satellite settings for the relevant satellite under LNB LIST:
| LNB SETTINGS | |
| The signal quality and signal strength are displayed as a percentage. Settings here cannot be changed. | |
| SATELLITE STATUS | Activate/deactivate the satellite status. When deactivated, LNB settings can be changed or a search started. |
| SATELLITE SELECTION | The selected satellite is displayed here. |
| SCAN MODE | Select whether you wish to search for only encrypted, only freely available channels or for all channels here. |
| SCAN TYPE | Select whether you wish to search for only digital channels, only radio stations or for all channels here. |
| STORE TYPE | Select the storage type here. |
| TRANSPON-DER | Select the transponder on which the search will be started. |
| LNB CONFIGURATIONS | You can configure the LNB settings here. |
▶ Then select the NEXT STEP option and press OK.
After finishing the search, you must agree to the manufacturer's liability disclaimer.
Finally, accept the information on manufacturer use and diagnosis to transmit your user data to the device manufacturer. This enables them to ensure optimal functionality of the device.
The TV setup is now completed.

Depending on the Internet connection, the setup may take some time.
After completion, further Google Accounts can be selected/set up. A child account can also be set up with corresponding access restrictions. If you do not want to make any further settings, select CALL UP GOOGLE TV. The home page is then displayed.
To switch to TV mode, press the EXIT button or use the
button to call up the inputs and select LIVE TV. When you open the live TV app, you will also enter TV mode.

The TV can be reconfigured at any time. To do this, select the FACTORY RESET option in the menu ALL SETTINGS > SYSTEM > ABOUT > RESET.
7.8. Using the multimedia connections

NOTICE!
Risk of damage!
Incorrect operation can cause damage to the devices used.
■ Before wiring and first use, you must also read the user manual of the devices you are connecting. Take care to ensure that all devices are switched off during wiring.

NOTICE!
Risk of damage!
If plugs and sockets are connected incorrectly it can cause damage to the contacts.
■ Take care to ensure that the plugs and corresponding sockets fit together precisely in order to avoid any damage to the contacts. Due to the arrangement of the contacts, many plugs will only fit into the socket in one position.
7.8.1. HDMI
HDMI (High Definition Multimedia Interface) is an interface for digital video and audio transmission. It has the best transmission quality. Use a standard HDMI cable:
- Connect the corresponding HDMI ports of the devices used with an HDMI cable.
7.8.2. HDMI ARC (Audio Return Channel)
If you want to use a TV set as a signal receiver AND signal source (to transmit an audio signal to an audio receiver), you must use the HDMI2 port with audio return channel (ARC). The HDMI connection to the TV then works in both directions. It can receive image and sound signals from a video device and the audio signal of the TV set can also be sent to the audio receiver via the audio return channel.
Connect the video device (e.g. Blu-ray player) to the audio receiver via HDMI.
- Connect the audio receiver to the TV set via HDMI/ARC.
▶ Take care to ensure that the speaker control of the TV set is routed to the external amplifier.
7.8.3. HDMI CEC (Consumer Electronics Control)
CEC is the abbreviation for Consumer Electronics Control. If you connect different devices via CEC-enabled HDMI connections, you can control certain functions of the entire HDMI network with a single remote control (e.g. standby or record functions):
Connect all devices via CEC-enabled HDMI ports with HDMI cables. The HDMI ports on your TV set are all CEC-enabled.
▶ Take care to ensure that the CEC functions are enabled for all ports and that all devices are connected accordingly.
7.8.4. USB
A USB port can be used to connect and read storage media such as USB sticks or external hard drives. Use a suitable USB cable. If a suitable USB cable is supplied, you should use this (e.g. for hard drives). Always verify the power consumption of the USB storage medium used and use the corresponding USB connections.
Connect the corresponding USB ports of the devices used with a suitable USB cable. Whenever possible, do not use a USB extension cord as this can cause problems, depending on the voltage.
7.8.5. SPDIF
SPDIF (Sony-/Phillips Digital Interface) is an interface for transmitting digital stereo or multi-channel audio signals between different devices. Usually, the digital audio signal is output via a coaxial (cinch) or an optical connection.
Connect the corresponding SPDIF ports of the devices used with a corresponding SPDIF cable.
7.8.6. LAN
You can connect the TV set to the Internet via the LAN connection and receive online content (e.g. streaming services) via your device.
Connect the LAN connection of the TV set to your network or router using a network cable (Ethernet cable).
▶ Make all the necessary network settings on the devices.
7.8.7. Headphone output (Headphones Out)
The headphone socket is used for connecting a pair of headphones with a stereo mini jack connection.
- Connect the headphones to the stereo mini jack of the device.
▶ You can set the volume of the headphone signal in the sound menu. If necessary, mute the speaker of the TV set.

WARNING!
Risk of hearing damage!
To prevent possible damage to your hearing, avoid listening at high volume over long periods of time.
■ Before pressing play, set the volume to the lowest setting.
■ Start playback and increase the volume to a comfortable level.
8. Operation
8.1. Channel selection
To select a channel, press either one of the P ▼/▲ buttons on the remote control or select the channel directly using the number buttons.
For a two- or three-figure number, press the number buttons in the corresponding order.
▶ Press the OK button on the remote control to call up the channel list; use the ▲ and ▼ buttons to select the channel and press OK to open.
8.2. Sound settings
▶ Use the V-/+ volume buttons on the remote control to increase or decrease the volume.
▶ Press the mute button ⚙️ to switch the volume fully off and on again.
▶ Press the LANG. button several times to select from the available language tracks for a programme.
8.3. Displaying information

PLEASE NOTE: Depending on the country/region selected, the following TV menus may be displayed differently.
▶ Press the (INFO) button or the ▶ button to display information on the current channel. The infobar is also displayed if different signal inputs are used.
▶ If you press the (INFO) button twice (or the ▶ button once and the i button once (INFO)), a description of the current TV programme will be displayed (if available). These can be selected with the arrow buttons ◀ and ▶ to scroll left and right. The detailed channel description can also be called up using the OK button.
The following options are available under the channel information:
- WATCH: Close the channel information and return to the current channel.
- RECORD: Start a PVR recording of the current channel.

Before starting a recording, ensure that you have connected a USB storage device to one of the USB ports.
- KEYBOARD: Search option via a virtual keyboard. This option is not available with HbbTV.
- AUDIO: Make audio and language settings for the current channel here.
- SUBTITLES: Select from the available subtitles or deactivate the subtitle function.
The following additional options can be found in the more detailed description of the channel:
- ADD TO FAVOURITES: Add the current channel to one of five favourite lists.
- SEARCH: Start an Internet search for suitable content for the current channel.
8.4. Recording menu

Before starting a recording, ensure that you have connected a USB device to one of the USB ports.

As soon as you connect a USB device, you will be asked whether you want to format it. Remember that formatting deletes ALL data stored on the USB device!
8.4.1. Device info sett ings
This option can be used to make settings for the connected USB devices. In TV mode, press the MENU or G button and select the RECORD/TIMESHIFT option. The available USB devices are listed under DEVICE INFO. You can also activate/deactivate the TIMESHIFT MODE option for the USB devices.
▶ Select a USB device under DEVICE INFO and press OK. The following options are then displayed:
| Menu option Settings | |
| SET TIMES-HIFT | You can also specify whether the selected USB device should be used for the timeshift recording function here. |
| SET RECOR-DING | Specify whether the selected USB device is to be used for the PVR re-cording. |
| SPEED TEST | Start a speed test for the selected USB device. |
8.4.2. Starting recording
You can create a PVR recording in various ways. The following options are available for this:
▶ You can start recording and playback directly using the media buttons.
| ● | Press this button to start recording the current programme. |
| II ▶ | Pause and restart playback with this button. |
| ■ | Stop the recording and playback with this button. |
| ◀◀ | Use this button during playback to activate slow or fast rewind at different speed levels: x1/2, x1/4, x2, x4, x8, x16, x32Press the ▶ button to return to normal playback. |
| ▶ | Use this button during playback to activate slow or fast forward at different speed levels: x1/2, x1/4, x2, x4, x8, x16, x32Press the ▶ button to return to normal playback. |
- Via the RECORD option in the channel information. To do this, press the i (INFO) button or the ▶ button.
- Press the OK button to open the channel list. Select the channel you want and press the ▶ button. On the right, the RECORD option appears. Select this and press OK to start the recording.
- Press the MENU on G button and select the BROADCAST option. Select the channel list you want above and the current programme in the corresponding channel below. Press and hold OK and then select RECORD to start recording.
8.4.3. Programming recording
You can programme a recording for an upcoming programme in the following way:
▶ Press the MENU or G button and select the BROADCAST option.
▶ Select the channel list you want above and the channel and the corresponding programme which is not currently running below.
▶ Press and book and then select RECORD. The recording is then scheduled and starts at the beginning of the programme.
▶ Select DELETE if you want to undo the programming.
8.4.4. Recording list
You can access the list of PVR recordings via the media player. To do this, proceed as follows:
▶ Select the media player app on the home page and press OK.
▶ Under VIDEO you will find the COM.MEDIATEK folder.
In the FILES folder, you will find a list of all PVR recordings on the data media under PVR, again divided into folders. Open the folder you want, select a recording and press OK to start. Press the ■ button to stop.
The following options are available in the recording list:
| Menu option Settings | |
| BROWSE MODE(blue button) | Use this option to call up the list view. |
| USBAUTOPLAY OFF(yellow button) | Activate/deactivate the USB autoplay function. If this function is activated, the system automatically searches for playable files when the device is switched on and a USB storage device is connected. These are played automatically. |
8.4.5. Timeshift mode

To enable the timeshift function, make sure that you have connected a USB storage device to one of the USB ports.
To enable timeshift recording and therefore enable you to watch television delayed, proceed as follows:
▶ In TV mode, press the MENU or G≡ button.
▶ Select the RECORD/TIMESHIFT option.
▶ Activate the SET TIMESHIFT option.
This gives you the option of stopping the programme in TV mode and continuing to watch it at a later point in time. To do so, proceed as follows:
| II | Press this button during the current programme. The programme stops there and the timeshift recording runs in the background. Press this button again to start the timeshift playback. The channel now runs again with the delay. |
| ▶ | If you have previously started timeshift recording with the II button, you can also use this button to start timeshift playback. |
| ■ | Stop the timeshift playback with this button. The channel is then played back normally and not with a time delay. |
9. Channel list
In TV mode, press the OK button to open the channel list.
▶ Navigate to the top with the ▲ button to select the filter categories.
▶ Use the ◀ ▶ buttons to select the categories and then press OK to call them up. Only channels matching this category will then be displayed.

The order and availability of the individual categories varies depending on the reception type and usage behaviour.
ALL
All available channels are displayed.
PUBLIC CHANNELS
Channels with news content are displayed.
FAVOURITE 1 - 5
If you have created favourites lists, these will be displayed here.
SATELLITE
Only channels received via satellite are displayed.
ANTENNA
Only channels received via DVB-T2 antenna are displayed.
CABLE
Only channels received via cable are displayed.
RADIO
Only the radio stations are displayed.
TV
Only the TV channels are displayed.
SORT BY
The sorting of the selected channel list can be changed here. By default, the list is sorted by number in ascending order. However, it can also be displayed alphabetically by name in descending or ascending order.
9.1. Editing channels
Use the ▲▼ buttons to select a channel and press and hold the OK button to call up the following editing options:
LOCK
Select this option and press OK to assign a lock PIN for the relevant channel. Then enter your Google Account password. This will take you to the parental control settings and provide you with a description of how to create the lock PIN.
▶ Use the ▲▼ buttons to select one of the number series in the virtual number field.
▶ Use the OK or ▶ buttons to select the right, centre or left number from the relevant number series.
▶ Press the button to delete numbers.
▶ Confirm the lock PIN a second time. The channel in question can then only be viewed after entering the lock PIN.
UNLOCK
▶ To unlock channels, use the ▲▼ buttons to select the channel in question and press and hold the OK button.
▶ Select the UNLOCK option and enter the previously assigned lock PIN. The channel is then enabled again.
SKIP
▶ Select this option if the currently selected channel is to be skipped when switching through with the P ▼/▲ button.
UNSKIP
▶ Select this option if the channel should no longer be skipped.
DELETE
Select this option to delete the selected channel from the channel list.
EDIT CHANNEL
The following options are available under this option:
- SKIP CHANNEL: Here you can select several channels in the current channel list, which can then be skipped when switching through with the P ▼/ ▲ button.
- SWAP CHANNEL: Under this option, select two channels whose positions are to be swapped.
- MOVE CHANNEL: Under this option, select the channels whose position is to be moved.
- DELETE CHANNEL: Here you can select and delete several channels from the current channel list.
- CLEAR ALL CHANNELS: You can use this option to delete the contents of the channel list.
- RESORT CHANNELS: To reset the changes to the channel list, select this option.
9.1.1. Recording via the channel list
▶ Open the channel list in TV mode with OK and press the ▶ button.
▶ Select the RECORD option and preOK. The recording is then started.

Before starting a recording, ensure that you have connected a USB storage device to one of the USB ports.
9.1.2. Creating favourites lists
▶ Open the channel list in TV mode with OK and use the ▼▲ buttons to select the desired channel that you want to add to one of the favourites lists.
▶ Press the ▶ button, select the EDIT FAVOURITES option and press OK.
▶ Select the relevant favourites lists (FAVOURITE 1 - 5) in which the currently selected channel is to be included.
The relevant favourites lists are then displayed above the channel list and can be selected.
9.1.3. Programme guide
Press the button to open the programme guide (EPG
– Electronic Programme Guide). The following categories can be accessed here:
- DISCOVER: The transmitted TV channels and personal programme recommendations are displayed.
- BROADCAST: The programmes of the individual TV channels are displayed.
– PUBLIC CHANNELS: The programmes of the individual TV channels with news and educational content are displayed.
In the table of the BROADCAST and PUBLIC
CHANNELS category you can see the current and next programmes of the available channels. Above the table, you can select the desired channel list whose programme guide is to be displayed.
▶ Select a programme with ▲▼ and scroll through the programme with ◀▶.

The programme information displayed is created by the broadcaster. If no programme information is displayed, this does not mean that your Smart TV is faulty.
▶ Use the ▲▼ buttons to select the current programme on the channel you want and press OK to call it up. Press and hold the OK button to call up the following options:
- WATCH: Call up the currently selected programme.
- RECORD: If you have connected a USB device, you can start a PVR recording directly using this option.
- EDIT FAVOURITES: Add the currently selected channel to one of five favourites lists.
- MORE INFO: Call up information on the currently selected programme.
▶ If the programme is still in the future, press OK to call up the following options:
- WATCHLIST: The selected programme will be added to your watch list.
- RECORD: If you have connected a USB device, you can program a PVR recording using this option. The recording will then start as soon as the programme in question begins.
- EDIT FAVOURITES: Add the currently selected channel to one of five favourites lists.
- MORE INFO: Call up information on the currently selected programme.
9.2. Selecting input source
text_image
Inputs Google TV Home Live TV HDMI 1 No signal HDMI 2 (ARC/eARC) No signal HDMI 3 No signal Input settings▶ Use the → (SOURCE) button to select the inputs of the connected devices.

If you call up the settings with the ⚙ button, you also have the option under INPUTS to select the desired input source and make settings for the individual inputs.
GOOGLE TV
Open the home page
LIVE TV
Switch to TV mode (antenna, cable and satellite signals are played back)
HDMI1
HDMI input 1
HDMI2
HDMI input 2 (can be used for ARC/eARC)
(ARC/eARC)
HDMI input 3
▶ Use the ▼▲ direction buttons to select the desired source.
▶ Confirm your selection with the K button.
9.2.1. Input settings
The input sources can be customised in this menu. You can assign lock PINs, change names and make a few other settings here. Further information on this can be found in the chapter "All settings menu" on p.32.

An input source that you want to select must be marked as visible in the INPUT SETTINGS menu.

If the CEC function is activated, the HDMI sources could be renamed from the external player if necessary. In this case, the remote control of the TV set controls the connected devices.
10. Teletext
Teletext is a free service broadcast by most channels and provides the latest news, weather, TV listings, share prices, subtitles and other information. Your TV set offers many useful functions for using teletext including multipage text, subpage saving and quick navigation.

Use and display of teletext may vary depending on the TV channel selected.
10.1. Using the teletext
Your remote control has special buttons for operating the teletext.
▶ Select a TV channel that broadcasts teletext.
▶ Press the TEXT button to display the start/index page for the teletext.
- Pressing the TEXT button switches the device back to TV mode.

Depending on the channel, it may be necessary to press several times to return to TV mode.
10.1.1. Selecting a teletext page
10.1.2. Number butt ons
▶ Enter the number of the desired teletext page as a three-digit number using the number buttons.
The selected page number is displayed in the top left corner of the screen. The teletext counter searches as long as it takes to find the selected page number.
10.1.3. Scrolling through pages
▶ Use the channel selection buttons or the direction buttons ▲ and ▼ to scroll forwards and backwards through the teletext pages.
10.1.4. Colour buttons
▶ If coloured fields or text entries are displayed at the lower edge of the screen then you can select these contents directly by pressing the appropriately coloured button: RED, GREEN, YELLOW, and BLUE.
10.1.5. Subpages
Some teletext pages have subpages. The lower edge of the screen may contain something like 1/3, for example. The subpages are displayed one after another at an interval of about half a minute. You can call up these subpages by pressing the ◀ ▶ button.
11. Home page menu
To enjoy the benefits of your Google TV, the device must be connected to the Internet. Connect the TV to a home network via an Internet connection. You can connect your TV via WLAN or LAN. Further information on the Internet connection can be found in the chapter "Initial installation after switching on for the first time" on p.13 or in the menu description NETWORK AND INTERNET.
The home page (Home menu) is your TV's hub and is called up as soon as you switch on the device.
To call up the home page when the TV is in use, press the button (Home button) on the remote control.
From the Home menu, you can start an application, switch to a TV channel, watch a film or switch to connected devices.

Depending on your TV setup and your country selection in the initial setup, the Home menu may contain different items. Updates can also lead to changes here.
▶ To start an app, select it using the direction buttons
◀ ▶ ▲ ▼ and press OK.
To start a search by voice, press the microphone button and say your desired search term.
The following options are displayed above the screen:
- Account: Here you can sign in using an existing Google Account or create a new account.
- For you: Recommendations based on your TV behaviour are displayed.
– Films: Film suggestions are displayed.
– Series: Series suggestions are displayed.
- Apps: Your apps are displayed.
– Media library: Your watch list, purchases and rental media are displayed.
- Search: Use the magnifying glass to enter a search term using the virtual keyboard.
- Settings: Use this option to call up the SETTINGS menu.
- Notifications: This is where you can view and edit notifications.
- Change account: If you have set up several accounts on the device, you can change them here.
The live TV app and the multi media player app are listed together with other apps.
▶ Select the live TV app and preOK to switch to TV mode. You can also use the (SOURCE) button or the SETTINGS menu to call up the inputs and select the input source LIVE TV.
▶ Select the multi media player app (MMP) and press OK to call up media content from an external USB device.
12. On-screen display menus (OSD menus)
12.1. Navigating in the menus
▶ Press the ⚙ button to activate the OSD for the settings.
▶ Press the MENU button in TV mode to activate the OSD for the live TV settings.
▶ Use the direction buttons ▲▼ to select the main menus.
▶ Use the direction buttons ◀ ▶ to select the submenus of the main menus.
▶ Press the OK button to call up the selected option in the submenu.
▶ You can use the direction buttons ▲▼ to select the options from a menu.
▶ Press the ← button to return to the main menu one menu step at a time.
▶ You can use the direction buttons ◀ ▶ ▲ ▼ to enter a value or make another selection.
▶ Close the menu with the EXIT button.
Please note that the menu closes automatically if no button is pressed for a certain amount of time.

Due to technical changes, the menus described here may differ from the menus actually displayed on your screen. Not all menus are available, depending on the source you selected.
13. Live TV menu

PLEASE NOTE: Depending on the country/region selected, the following TV menus may be displayed differently.
Select the input source LIVE TV and press the button (or the MENU button) to open the live TV menu. In this menu, you will find the options for displaying the programme information above (see also "Programme guide" chapter on p.20). You will find the TV menu options below the options for the programme guide. These are displayed when the settings symbol selected at the top right.
13.1. Setup menu
text_image
Setup Parental control Audio Subtitles Teletext HBBTV settings Channel scan Channel edit > No Signal Pw... 15 minutes > Picture Screen SoundThe following options are available here:
CHANNEL SCAN
Configure channel search settings here.
- CHANNELS
The available options differ slightly here depending on the reception type:
ANALOGUE / ANTENNA / CABLE
CHANNEL SCAN
Start a search for analogue and digital channels. You can press the button to cancel the search. The stations already found are stored in the station list.
UPDATE SCAN
(only antenna reception type)
Use this option to search for updates. This does not delete any stations. Only newly found stations are added to the existing station list.
ANALOGUE MANUAL SCAN
(optional, only antenna reception type)
Use this to start a manual search for analogue channels. Enter START FREQUENCY and then select SCAN UP or SCAN DOWN. When a station is found, the search is completed and the station is stored in the station list.
SINGLE RF SCAN
Select an RF channel using the ◀ ▶ direction buttons. The SIGNAL LEVEL and the SIGNAL QUALITY of the selected channel are displayed. Press OK to start the search on the selected RF channel. The stations found are stored in the station list.
MANUAL SERVICE UPDATE
Start a service update manually.
CHANNEL SCAN TYPE
Specify which channels you want to search for: ONLY FREE CHANNELS, ONLY ENC-RYPTED CHANNELS or ALL (free and encrypted channels).
CHANNEL STORE TYPE
Select the channel memory type here.
ALL: Search for digital TV channels and digital radio stations.
ONLY DIGITAL CHANNELS: Search for digital TV channels.
ONLY RADIO CHANNELS: Search for digital radio stations.
AUTO CHANNEL UPDATE
Activate/deactivate the automatic channel update.
CHANNEL UPDATE MESSAGE
Activate/deactivate the channel update messages.
SATELLITE
Select this option to start a satellite search. If the Preferred Satellite option is selected, some search configurations are not available. Therefore, the settings you made during the initial installation may not be changed. After you have selected this option, select the satellite to be searched and press OK.
CHANNEL INSTALLATION MODE
Select the channel installation mode you want: GENERAL SATELLITE, PREFERRED SA-TELLITE
SATELLITE RE-SCAN
Select this option and then the desired search. For a conventional search, select the NORMAL SCAN option. Confirm NEXT STEP each time to start the search. If required, you can make the following settings on the corresponding satellite:
| SATELLI-TE STA-TUS | Activate/deactivate the satelli-te status | |
| SATELLI-TE SELEC-TION | Displays the name of the sa-tellite | |
| SCAN MODE | Select the desired search mode. | |
| SCAN TYPE | Select the desired search type. | |
| SHOPTYPE | Select the desired storage type. | |
| TRANS-PONDER | Select the desired frequency, symbol rate and polarisation for the transponder here. | |
| LNB CONFIGURA-TIONS | LNB POWER | Set the LNB pow-er here. |
| LNB FRE-QUEN-CY | Set the desired LNB frequency here. | |
| TONE 22 KHZ | Set the sound here. The default setting is AUTO. | |
| SIGNA QUALITY | Displays the signal quality. | |
| SIGNAL LEVEL | Displays the signal level. | |
Under the MORE option, you can make the following settings:
| SINGLE | Select the required satellite here. |
| TONE BURST | If your satellite system requires a tone burst, you can set it to TONE BURST A or B here. |
| DISEQC 1.0 | If you have connected multiple LNBs or a DiSEqC switch to your satellite antenna, select DiSEqC 1.0 here. |
| DISEQC 1.1 | If you have connected multiple LNBs or a DiSEqC switch to your satellite antenna, select DiSEqC 1.1 here. |
| DISEQC 1.2 | If you have connected multiple LNBs or a DiSEqC switch to your satellite antenna, select DiSEqC 1.2 here. |
| UNI-CABLE I | Select the Unicable I settings (TUNER and BAND FRE-QUENCY) here |
| UNI-CABLE II | Select the Unicable II settings (TUNER and BAND FRE-QUENCY) here |
SATELLITE UPDATE
Update the satellite by repeating the previous scan with the same settings. You can also change these settings before the search. The setting options are the same here as under SATELLITE RE-SCAN.
SATELLITE MANUAL TUNING
Use this option to start a manual satellite search.
AUTO CHANNEL UPDATE
Activate/deactivate the automatic channel update.
CHANNEL UPDATE MESSAGE
Activate/deactivate the channel update messages.
CHANNEL EDIT
-SKIP CHANNEL
Set channels to be skipped when switching the channels on the remote control. Select the relevant channels and press OK to highlight them.
- SWAP CHANNEL
Select two channels here whose positions are to be swapped. Select the relevant channels and press OK to highlight them. Confirm the subsequent prompt with YES.
-MOVE CHANNEL
Move a channel to the position of another channel. Highlight the channel you want to move and press OK to select it. Select the second channel in the same way. If you then press and hold the OK button, you will be asked whether you want to move the corresponding channels. If you confirm this with YES the first selected channel is moved to the position of the second channel.
- DELETE CHANNEL
You can delete individual channels here.
-CLEAR ALL CHANNELS
You can use this option to delete the contents of the channel list.
-RESORT CHANNELS
You can use this option to undo all changes to the channel list.
NO SIGNAL POWER OFF
Specify a time period after which the input is deactivated if no signal is present.
PICTURE

Depending on the input source selected, some menu options may not be available.
- PICTURE MODE
Select picture mode: STANDARD, VIVID, SPORT, MOVIE, GAME
i
When changing the setting, a message may occasionally appear stating that the energy consumption could increase as a result. You then have the option of cancelling or confirming with OK.
- ENERGY SAVING
Select an energy-saving mode here: OFF, MINIMUM, MEDIUM, MAXIMUM; AUTO
- BACKLIGHT
Select a value for the backlighting. This option is only available if the setting ENERGY SAVING has been selected under the OFF option.
-BRIGHTNESS
Increase or reduce brightness (on a scale of 0 to 100)
-CONTRAST
Increase or reduce contrast (on a scale of 0 to 100)
-COLOUR
Increase or reduce saturation (on a scale of 0 to 100)
- HUE
Increase or reduce colour tone (on a scale of -50 to 50)
- SHARPNESS
Increase or reduce sharpness (on a scale of 0 to 20)
- ADVANCED SETTINGS
The following options are available here:
PICTURE OFF
Deactivate/activate picture playback
COLOUR TEMPERATURE
Select colour tone: USER, COOL, STANDARD, WARM. You can also individually adjust the red, green and blue tones.
DOLBY VISION NOTIFICATION
If the option is activated, the Dolby Vision logo is displayed briefly, as soon as you view contents with Dolby Vision. If this option is deactivated, the Dolby Vision logo is not displayed.
HDR
Activate/deactivate the high dynamic range function for a better display of colours and contrasts.
DNR
The dynamic noise reduction function reduces picture noise and improves picture quality when the analogue signal is weak. Choose between
OFF, LOW, MEDIUM and STRONG.
MPEG NR
MPEG noise reduction removes image noise in MPEG-compressed video data for enhanced picture quality. Choose between OFF, LOW, MEDIUM and STRONG.
MAXVIVID
Activate/deactivate the MaxVivid function to achieve a more dynamic and smoother picture display.
ADAPTIVE LUMA CONTROL
This function adjusts the contrast settings to provide deeper black and brighter white perception. Choose between OFF, LOW, MEDIUM and STRONG.
This function divides the screen into smaller zones. The contrast settings for individual screen zones can then be optimised differently according to the content. This adds more depth to dark and bright zones, without losing the details and compromising other parts of the image. Choose between OFF, LOW, MEDIUM and HIGH.
DYNAMIC COLOR BOOSTER
This option enables a more intense colour display. Choose between OFF, LOW, MEDIUM and HIGH.
FLESH TONE
Activate/deactivate the skin tone function.
DI FILM MODE
This function smooths the juddering effect that occurs with 24 fps image reproduction. This function converts the content to 60/120 fps, enabling significantly more fluid image reproduction.
Choose between OFF and AUTO. This function is not available in PC and game mode.
BLUE STRETCH
Cooler white tones are commonly perceived as bright white. This function adjusts the white balance and allows mid and high greyscales to appear in a cooler colour temperature through the addition of blue tones.
GAMMA
Select the gamma setting: DARK, MIDDLE, BRIGHT
GAME
In game mode, some of the picture processing algorithms are reduced to be able to process video games that have fast frame rates. The DI FILM MODE function is not available in this mode.
ALLM (only for HDMI)
Activate/deactivate the 'Auto Low Latency Mode' for the most delay-free picture reproduction possible. When this function is activated, the setting with the lowest latency is automatically selected.
PC MODE
In PC mode, some of the picture processing algorithms are reduced to keep the signal type as it is. It can be used especially for RGB inputs.
MJC
Select the MJC settings.
HDMI RGB RANGE
Select this setting according to the input RGB signal range of the HDMI source. The range can be limited (16-235) or full (0-255). Select FULL, LIMIT or AUTO accordingly. This option is only available when the input source is set to HDMI.
COLOUR SPACE
Activate/deactivate the colour space function to optimise colour reproduction.
LOW BLUE LIGHT
Activate/deactivate the low blue light function to reduce blue tones in the television image.
COLOUR TUNER
Use this function to fine tune the colour. This must be activated so that changes to the HUE, COLOUR, BRIGHTNESS, OFFSET and GAIN options can be made.
11-POINT WHITE BALANCE CORRECTION
This function calibrates the TV's colour temperature in detailed greyscale. This improves the greyscale uniformity. This function must be activated so that changes to the GAIN, RED, GREEN and BLUE options can be made.
- RESET TO DEFAULT
This function restores the factory settings for the video settings.
SCREEN
Select the desired image format here: AUTOMATIC, SUPER ZOOM, 4:3, MOVIE EXPAND 14:9, MOVIE EXPAND 16:9, FULL, UNSCALED

Please note that not all picture formats are available depending on the chosen picture source.
SOUND
- SOUND STYLE
Select the sound style here: USER, SMART, LEBHAFT, STADIUM, NEWS, MUSIC, MOVIE.
- BASIC SETTINGS
You can only access this function if the DOLBY AUDIO PROCESSING was previously deactivated.
BALANCE
Set the balance between the left and right speakers (-50 - 50).
BASS
Set the low frequencies (0 - 100)
TREBLE
Set the high frequencies (0 - 100)
SURROUND SOUND
Activate/deactivate the surround sound effect.
EQUALISER DETAILS
You can customise the sound setting in the frequency range of 125 HZ, 250 HZ, 500 HZ, 1000 HZ, 2000 HZ, 4000 HZ and 8000 HZ.
You can only access this function if you have selected the USER setting under SOUND STYLE.
AUTO VOLUME CONTROL
This function sets the sound so that a constant output volume is maintained between programmes. If this function is deactivated, you will hear the original volumes. When activated, you will hear a steady volume.
- DOLBY AUDIO PROCESSING
Activate/deactivate Dolby Audio sound processing here. When activated, you can choose between the SMART, LEBHAFT, STADIUM, NEWS, MUSIC, MOVIE and USER settings under SOUND STYLE.
- DOLBY AUDIO PROCESSING SETTINGS
If Dolby Audio processing is activated, the following settings can be made under this option:
VOLUME LEVELER
Activate/deactivate the volume balancing function. This function sets the sound so that a constant output volume is maintained between programmes. If this function is deactivated, you will hear the original volumes. When activated, you will hear a steady volume.
Activate/deactivate the device's internal speakers.
- SPEAKER DELAY
Select the desired speaker delay here.
-eARC
Activate/deactivate the eARC function.
- DOWNMIX MODE
Select the desired Downmix mode STEREO or SURROUND.
- DIALOGUE ENHANCER
Activate/deactivate dialogue optimisation for better speech intelligibility.
- RESET TO DEFAULT
Use this function to restore the factory settings for the audio settings.
BLUE MUTE
Activate the blue screen display while muting at the same time.
13.2. Parental control sett ings menu
text_image
Setup Parental control Audio Subtitles Teletext HBBTV settings Parental control > Channel block > Rating System > Rating Lock None >If you confirm this point with OK, a dialogue window opens. You must now assign a lock PIN. If you have already assigned a PIN, you must now enter it and confirm it a second time.
PARENTAL CONTROL
Activate/deactivate the parental control settings.
CHANNEL BLOCK
Select the channels that you want to block from the channel list. Highlight a channel and press OK to select or deselect it. To watch a blocked channel, a password must be entered first.
RATING SYSTEM
Select the approval system from the country of your choice according to which the programmes are evaluated.
RATING LOCK
Block programmes according to the age rating information that is being broadcast with them. You can select predefined age restrictions or make individual settings.
13.3. Audio menu
text_image
Setup Parental control Audio Subtitles Toletext H8BTV settings Audio Type Normal First language English Second langua.. GermanAUDIO TYPE
Select the audio type you want here.
-NORMAL
Select this setting if you do not require any accessibility aids.
- AUDIO DESCRIPTION
If the station broadcasts special audio signals for visually impaired users, you can activate this function to receive these signals.
As soon as the AUDIO DESCRIPTION option is activated, you can make settings in the VISU-ALLY IMPARED menu.
- SPOKEN SUBTITLE
Activate this function if you want the subtitles of a programme to be audible. The relevant information must be provided by the respective channel.
- HEARING IMPARED
If the channel broadcasts special signals for hearing impaired users, you can activate this function to receive these signals. The relevant information must be provided by the respective channel.
- AUDIO DESCRIPTION AND SPOKEN SUBTITLE
Both options described above can be activated here.
VISUALLY IMPARED
As soon as the AUDIO DESCRIPTION option is activated, you can make the following settings in this menu:
- SPEAKER
Activate this option if you want to listen to the audio description via the speakers.
-HEADPHONE
Activate this option if you want to listen to the audio description via the headphones.
- VOLUME
Adjust the volume of the audio description here.
- PANE AND FADE
Activate this option if you want to listen to the audio description more clearly.
- AUDIO FOR VISUALLY IMPAIRED
Select the audio type for visually impaired users. The options available depend on the selected programme.
- FADER CONTROL
Set the volume ratio between the main audio signal of the TV set (MAIN) and the audio description (AD) here.
WARNING!
Risk of hearing damage!
To prevent possible damage to your hearing, avoid listening at high volume over long periods of time.
■ Before pressing play, set the volume to the lowest setting.
■ Start playback and increase the volume to a comfortable level.
FIRST LANGUAGE
Here you can set the audio language of the current programme, if more than one audio language is supported.
SECOND LANGUAGE
Select your second preferred audio language here.
13.4. Subtitles menu
text_image
Setup Parental control Audio Subtitles Teletext HBBTV settings Analog Subtitle Off > Digital Subtitle Aus > First language English > Second lingua.. German >ANALOG SUBTITLE
Activate/deactivate analogue subtitles.
DIGITAL SUBTITLE
Activate/deactivate digital subtitles.
FIRST LANGUAGE
You set the first subtitle language here.
SECOND LANGUAGE
You set the second subtitle language here.
13.5. Teletext menu
text_image
Audio Subtitles Teletext HBBTV settings Recording/Timeshift Digital language German > Sprache zum D.. West Eur >DIGITAL LANGUAGE
Set the teletext language for digital broadcasts.
DECODING PAGE LANGUAGE
Select the language of the decoding page for the teletext display.
13.6.HBBTVsettings menu
text_image
Audio Subtitles Teletext HBBTV settings Recording/Timeshift HBBTV support Do Not Track > Off Cookie settings Block third-part. > Persistent star.. Off Block tracking.. Off Device ID Off Reset device IDHBBTV SUPPORT
Activate/deactivate the HbbTV function
DO NOT TRACK
Activate/deactivate the HbbTV/Internet Tracking option. With the DEFAULT and ON settings, you allow your HbbTV/Internet behaviour to be evaluated in order to optimally modify the service according to your preferences. If you do not want this, select the OFF setting.
COOKIE SETTINGS
Select the cookie settings for HBBTV services here: BLOCK THIRD -PARTY COOKIES, DEFAULT. PERSISTENT STORAGE
Activate/deactivate the permanent memory function. With the ON setting, cookies with an expiry date are stored in the TV set's memory.
Reset the device ID for the HBBTV services. Confirm the prompt with OK or press ← to cancel.
13.7. Recording/timeshift menu
text_image
Teletext HBBTV settings Recording/Timeshift CAM-Info System information Device Info > Timeshift Mode Off >DEVICE INFO
Select a USB device and press OK to make settings. Read the "Device info settings" chapter on p.18.
TIMESHIFT MODE
You can activate/deactivate the timeshift recording function here.
13.8. CAM information menu
text_image
Recording/Timeshift CAM info system informationen Cam Menu > User Preference Default > Cam Type Pref.. PCMCIA CAM >If you want to watch subscription channels, you must first register with the channel provider. Once you have registered, you will receive a Conditional Access Module (CA module) and a special card from your provider. You will find information about the settings in the documentation supplied with the module.
Install the CI components on your television in the following way:
▶ Switch the television off and pull out the mains plug.
▶ First insert the CI module in the slot on the side of the Smart TV. Then insert the card.

Please note: only insert or remove the CI module after you have disconnected the device from the power supply.

NOTICE!
Risk of damage!
The CI module or the television could be damaged if you attempt to insert the CI module by force.
■ The CI module must be inserted correctly:
it cannot be inserted if it is the wrong way round.
■ Connect the television to the power sup
ply, switch it on, and wait for a moment until the card is recognised.
CAM MENU
Additional setup steps may be required for some CI modules, which you can complete here in the CI card menu. If no module is plugged in, NO CAM CARD is displayed.
USER PREFERENCE
Select DEFAULT, AMMI or BROADCAST from the CAM information.
CAM TYPE PREFERENCE
Select the CAM card type PCMCIA CAM or USB CAM

The appearance and operation of the menu may vary depending on the module used.
13.9. System information menu
Information on the received signal is displayed.
13.10. Open source licences menu
Displays the licence information of the open source software.
14. Sett ings menu
Press the 📣 button or select the symbol on the home page to call up the settings menu. Below the menu, you can call up the legal notice and obtain further information on how your Google TV set works.
text_image
Fri, 27 Jun 09:15 All settings Screensaver Inputs Display Sound Wi-Fi Accessibility Bluetooth Import How Google TV works14.1. Screensaver menu
Edit the screensaver options here.
▶ Select this option and preOK to activate the screen-saver.
▶ Press the ▼ button to select a picture from the GOOGLE PHOTOS, ART GALLERY or CUS-y: TOM AI ART categories for the screensaver.
▶ Press the ▼ button and select SETTINGS to call up the INAKTIVMODUS menu.
AMBIENT MODE
The following options are available:
- START NOW
Select this option and press OK to start the screensaver.
- CHANNELS
You can activate the picture categories GOOGLE PHOTOS, ART GALLERY or CUSTOM AI ART and set them up individually here.
- MORE SETTINGS WEATHER
Activate/deactivate the weather display and make settings.
TIME
Activate/deactivate the time display.
PERSONAL PHOTO DATA
Activate/deactivate the display of names and album for your own photos.
PORTRAIT GOOGLE PHOTOS
Customise the display of Google Photos pictures.
PERSONAL PHOTO CURATION
Select the albums from which Google Photos pictures are displayed.
SLIDESHOW SPEED
Select the display time of the pictures in a slide-show.
14.2.Inputsmenu
Edit the input source options here.
INPUT SETTINGS
The following options are available:
- SWITCH INPUT
This option corresponds to source selection with the →(SOURCE) button.
- MANAGE INPUTS
HDMI 1 - 3
| SHOW THIS INPUT | Activate/deactivate the input source |
| PIN LOCK | Assign a lock PIN for this input. |
| EDIT NAMES | Change the name of the input here. |
| NO SIGNAL STANDBY TIMEOUT | Specify a time period after which the input is deactivated if no signal is present. |
| HDMI EDID VERSION | Select the desired HDMI EDID version. |
- CONSUMER ELECTRONIC CONTROL (CEC
Activate this function to allow all devices that are connected via HDMI to communicate with each other. In this way, you can, for example, control the basic functions of all devices in an HDMI network using only one remote control.
First activate the following options and select an HDMI input as the source. If you have already connected a CEC-enabled device, the name of the device is listed instead of HDMI. The basic functions of the device can then be automatically controlled using the remote control of the Smart TV.
GLOBAL CEC CONTROL
Activate/deactivate the CEC function.
ALLOW TV TO TURN OFF CONNECTED DEVICES
Activate/deactivate the function for controlling other CEC-capable devices via the TV set.
ALLOW CONNECTED DEVICES TO TURN ON TV
Activate/deactivate the function for switching on the TV set via other CEC-capable devices.
14.3. Display menu
In this menu, you can make the same settings as under the PICTURE option in the live TV menu.
14.4. Audiomenu
In this menu, you can make the same settings as under the SOUND option in the live TV menu.
14.5. Wi-Fi / LAN menu
Make network and Internet settings here
NETWORK AND IINTERNET
- WI-FI
Activate/deactivate the WLAN function
- AVAILABLE NETWORKS
When the WLAN function is activated, the available networks are displayed here. Select the network you want and press OK. If a password is required for a network, a virtual keyboard will appear which you can use to enter it using the direction buttons ◀ ▶ ▲ ▼ and the OK button. After entering the password, select √ on the keyboard and confirm by pressing the OK button.
- OTHER OPTIONS
ADD NEW NETWORK
You can use this option to add new networks.
SCANNING ALWAYS AVAILABLE
Activate this function if you want Google's location services and other apps to search for networks even when WLAN is deactivated.
- OTHERS
NETWORK PRIVACY POLICY
Call up the network privacy statement.
- ETHERNET
NOT CONNECTED
The status of the Internet connection is displayed here via Ethernet, IP and MAC addresses.
PROXY SETTINGS
Manually set an HT-TP proxy for the browser. This proxy must not be used by other apps.
IP SETTINGS
Configure the IP settings of your TV set.
Select the DHCP or STATIC setting. Once you have selected STATIC, you must enter the IP address you want using the virtual keyboard.
14.6. Google Home menu
If you have added your TV to a Smart Home network via the Google Home app, you can call up a Smart Home control panel here.
14.7. Accessibility menu
You can set accessibility aids for the visually impaired in this menu.
SCREENREADERS
- TALKBACK (SCREENREADER)
ENABLE
Activate/deactivate the read-aloud function for menu options and other elements on the screen.
CONFIGURATION
The talkback function can be configured individually here.
- TEXT TO SPEECH
Configure voice output settings here.
PREFERRED ENGINE
| SPEECH RECOGNITION AND SYNTHESIS FROM GOOGLE | Activate/deactivate Google speech recognition and optimisation. |
| ENGINE CONFIGURATION | Make individual settings on the language module. |
GENERAL
| SPEECH RATE | Set the talkback speech speed. |
| LISTEN TO AN EXAMPLE | Check your settings using an audio example. |
| DEFAULT LANGUAGE STATUS | The status of the default language is determined. |
DISPLAY
- TEXT SCALING
Set magnification of the displayed text here.
- BOLD TEXT
Activate/deactivate the bold display.
- COLOUR CORRECTION
Set adjustment of the colour rendering for users with colour vision deficiencies here.
INTERACTION CONTROLS
- ACCESSIBILITY SHORTCUTS
Activate/deactivate the shortcut function for the accessibility aids. If this function is activated, the accessibility aids are launched when you press the
← and ▼ buttons at the same time.
- KEYBOARD ACCESSIBILITY
Set the display duration of messages that require an action here. You can also set a keystroke delay for key repetitions.
- SWITCH ACCESS
Activate/deactivate switch access and make any necessary configurations.
AUDIO & ON-SCREEN TEXT
- AUDIO DESCRIPTION
If the station broadcasts special audio signals for visually impaired users, you can activate this function to receive these signals.
-CAPTIONS
Activate the subtitles for a programme and set the language, text size and display.
EXPERIMENTAL
- HIGH-CONTRAST TEXT
Activate/deactivate the high-contrast text function.
14.8. Bluetoothmenu
You can make Bluetooth settings in this menu.
REMOTES AND ACCESSORIES
Here you can rename your remote control or disconnect it from the TV set. You can also integrate other Bluetooth devices into your system.
-PAIR ACCESSORY
Use this option to start the search for Bluetooth devices in your surroundings.
-TV REMOTE
Here you can change the name of your Bluetooth remote control (RENAME) and disconnect (FORGET) or establish (PAIR) a connection.
The battery status of the remote control is also displayed.
- REMOTE CONTROL SETTINGS
Activate/deactivate automatic pairing here and call up the battery status of your remote control.
14.9. Other options
In addition, the battery level of your remote control and some other status information is displayed when you call up the menu. This is optional information that may vary in nature. Select CLEAR ALL to hide it.
Below the menu, you can call up the legal notice and obtain further information on how your Google TV set works.
HELP AND FEEDBACK
You can use this function to send feedback to Google, call up a history of the latest functions and set up additional functions.
15. All sett ings menu
Press the button or select the symbol on the home page to call up the settings menu. Then select the symbol again and press OK to open the ALL SETTINGS menu. In Internet mode, you can also call up this menu directly using the MENU button.
text_image
Einstellungen SUGGESTIONS Set your device name Use this name when casting photos, videos and more GENERAL SETTINGS Channels and inputs Channels, external inputs Display and sound Picture, screen, sound Network and internet Network name Accounts and sign-in Privacy Apps System Accessibility Remotes and accessories Help and feedback15.1. Channels and inputs
In this menu, you can make the same settings as under the CHANNELS option in the live TV menu and INPUTS in the SETTINGS menu.
15.2. Display and sound
DISPLAY
Corresponds to the PICTURE menu in the live TV menu. SCREEN
Corresponds to the SCREEN menu in the live TV menu. SOUND
Corresponds to the SOUND menu in the live TV menu. AUDIO OUTPUT
- DIGITAL OUTPUT
Set the audio type for the digital output here. The standard format for outputting the stereo signal is PCM. Select BYPASS to output a digital data stream, e.g. on an end stage with Dolby Digital decoder With the AUTO setting, the digital output is automatically set on the external devices. In addition, the digital type DOLBY DIGITAL or DOLBY DIGITAL PLUS can be activated.
- DIGITAL OUTPUT DELAY
Set a delay for digital output here.
- BLUETOOTH DELAY
Set a delay for the Bluetooth signal here.
- AUDIO OUTPUT DEVICE
Select the desired output device or the relevant audio output. When activating outputs with a speaker with which also active (SPK+BT, SPK+HP, SPK+SPDIF), you can use the MULTIOUTPUT SPK VOLUME option to control the volume of the internal speaker.
15.3. Network and Internet
In this menu, you can make the same settings as under the NETWORK AND INTERNET option in the live TV menu.
15.4. Account and sign-in
Your Google Account is displayed here if you have used it to sign in. Settings for data synchronisation can be configured here.
GOOGLE TV ACCOUNTS
- Active account
Make settings for your active account:
PROFIL LOCK
Activate/deactivate the lock function. Assign a four-digit lock PIN for this.
YOUR SERVICES
Activate/deactivate the relevant services from which you want to receive content recommendations.
CONTENT PREFERENCES
Rate TV content to optimise your recommendations.
AUTOPLAY VIDEO
Activate/deactivate the automatic playback of videos on the home page.
HIDDEN PURCHASES AND RENTALS
You can use this option to hide your purchased and rented content listed in your media library.
PAYMENT AND PURCHASES
You can configure authentication for purchases via Google Play here.
GOOGLE ASSISTANT
| PERSONAL SETTINGS | |
| VOICE CONTROL | Activate/deactivate voice control. |
| ACCEPT PERMISSIONS | You can view your permissions here. |
| PERSONAL RESULTS | Activate/deactivate the personal results. If you have previously assigned a lock PIN, you must enter this during activation. |
| SEARCHABLE APPS | Determine which apps should be included in the search results. |
| SHARED SETTINGS | |
| SAFE-SEARCH FILTER | Activate/deactivate the safe search filter. |
GOOGLE HOME
If you have added your TV to a Smart Home network via the Google Home app, you can call up a Smart Home control panel here.
APPS-ONLY MODE
In active mode, the Google recommendations on the home screen are deactivated. In addition, you cannot give feedback on content or edit your watch list.
REMOVE
Remove the current account.
i
If you remove an account, all settings and associated data will be deleted from the device.
- ADD AN ACCOUNT
Use this option to add another account.
CHILDREN'S ACCOUNT
- ADD A CHILD
This option allows you to create a personalised area with relevant access restrictions for children.
15.5. Privacy
Data-protection-relevant settings can be made here.
DEVICE SETTINGS
- LOCATION
LOCATION STATUS
Activate/deactivate WLAN for location determination.
SCANNING ALWAYS AVAILABLE
Activate/deactivate this function if you want the location services to be active even when WLAN is deactivated.
- MICROPHONE
MICROPHONE ACCESS
Activate/deactivate microphone access for all apps and services. The last accesses are listed under RECENTLY ACCESSED BY.
APP ACCESS TO MICROPHONE
Edit the access authorisation settings for the microphone here.
-CAMERA
CAMERA ACCESS
Activate/deactivate camera access for all apps and services. The last accesses are listed under RE-CENTLY ACCESSED BY.
APP ACCESS TO CAMERA
Edit the access authorisation settings for the camera here.
- USAGE & DIAGNOSTICS
Activate/deactivate the function for transmitting diagnostic information to Google.
- ADS
Advertising settings can be made here.
RESET ADVERTISING ID
A new advertising ID is generated, which is used by apps.
DETETE ADVERTISING ID
The advertising ID is deleted and can no longer be used by apps.
ACCOUNT SETTINGS
- GOOGLE ASSISTANT
Corresponds to the GOOGLE ASSISTANT option under ACCOUNT AND SIGN-IN
- PAYMENT AND PURCHASES
Corresponds to the PAYMENT AND PURCHASES option under ACCOUNT AND SIGN-IN
APP SETTINGS
- MANAGE UPDATES
AUTO-UPDATE APPS
Activate/deactivate automatic app updating.
SEE AVAILABLE UPDATES
You can call up available apps, uninstall apps to free up storage space and manage your apps here.
- APP PERMISSIONS
You can manage the app permissions here
- SPECIAL APP ACCESS
You can make additional settings for your apps here.
ENERGY OPTIMISATION
Optimise the energy consumption for individual apps.
USAGE ACCESS
Allow individual apps to access usage data.
NOTIFICATION ACCESS
Allow all apps to access your notifications.
ALL FILES ACCESS
Allow individual apps to access your files that are located on the device or on connected data media.
DISPLAY OVER OTHER APPS
Set whether individual apps can be displayed over other apps.
MODIFY SYSTEM SETTINGS
Allow individual apps to change system settings.
ALARM AND REMINDERS
Allow individual apps to be available for time-based actions such as alarms or reminders.

Bear in mind that this could increase power consumption.
TURN SCREEN ON
Allow individual apps to switch on the screen. The app in question could then switch on the screen at any time.
- SECURITY
You can make additional security settings for your apps here.
SCAN APPS WITH PLAY PROTECT
Activate/deactivate the Play Protect Scan, which warns you of malicious apps.
IMPROVE HARMFUL APP PROTECTION
Activate/deactivate the detection of malicious apps to send unknown apps to Google for checking.
15.6. Apps
Make settings for your apps here.
SEE ALL APPS
All installed apps are listed.
- ADVANCED SETTINGS
You can make settings for each app here. You can make notification and permission settings, delete data and default settings, clear the cache, view the version number and the storage space used and open the app from there.
UNUSED APPS
All apps that have not been used for a month are displayed. To protect your data, all permissions are automatically removed from these apps. In addition, temporary files are deleted to free up storage space.
PERMISSIONS
Corresponds to the APP SETTINGS menu under PRI-VACY.
15.7. System
Make the following settings here.
AMBIENT MODE
Corresponds to the AMBIENT MODE menu under SCREENSAVER in the live TV menu.
POWER AND ENERGY
Make settings here to optimise power and energy consumption.
- ENERGY MODES
Select the energy mode you want. This determines which functions remain active in standby mode.

Bear in mind that the higher the setting, the higher the energy consumption.
- SHUT-OFF TIMER
Make switch-off timer settings here.
WHEN INACTIVE
Depending on the setting, the device is switched off after a certain period of inactivity.
WHEN WATCHING
Depending on the setting, the device is switched off after a certain time has elapsed.
COUNTDOWN FROM NOW
Set a countdown time after which the device is switched off.
- POWER-ON BEHAVIOUR
Set what is displayed when the device is switched on.
- SCHEDULED POWER ON/OFF
POWER ON TIME TYPE
Select the ON or ONCE option to activate the switch-on timer setting and the OFF option to deactivate it. With the ONCE setting, the TV set only switches on once at the specified time.
AUTO POWER ON TIME
Select the switch-on time here.
AUTO POWER OFF TYPE
Select the ON or ONCE option to activate the switch-off timer setting and the OFF option to deactivate it. With the ONCE setting, the TV set only switches off once at the specified time.
AUTO POWER OFF TIME
Select the switch-off time here.
AFTER TURNING ON
Set a time period after which the device switches off if no action is performed.
- ADVANCED SETTING
STANDBY LIGHT
Activate/deactivate the standby LED.
ABOUT
Here you will find a range of information about your system, including your Netflix ESN number. The ESN number is a unique ID number created to identify your TV set. You can also log out of Netflix here.
You can also search for system updates under SYSTEM UPDATE, change the name of your TV set under DEVICE NAME and perform initial installation again via RESET > FACTORY RESET. You can also view legal information and call up the TV LIFETIME option.
DATE AND TIME
Set the date and time options of your TV set here.

The timer settings only work properly if the correct time is set.
- AUTOMATIC DATE & TIME
Select the USE NETWORK-PROVIDED
TIME option if the date and time should be updated automatically via the network. Select the OFF setting if you want to make the settings manually. In this case, the desired settings can be made under SET TIME and SET DATE.
- SET TIME ZONE
Select the desired time zone here.
- USE 24-HOUR FORMAT
Select the desired format for the time display.
LANGUAGE
Select the desired menu language.
KEYBOARD
Select your keyboard type and manage the keyboard settings.
STORAGE
This shows the storage status of the TV set and the connected devices and storage devices. Select a corresponding medium and press OK to display detailed information on the usage details. In addition, there are options for ejecting and formatting the connected storage devices.
CAST
Manage streaming access rights for other Android devices in the same WLAN network.
You can use this option to perform a system service update.
SYSTEM SOUNDS
Activate/deactivate system sounds.
RESTART
The device can be re-started using this option. In doing so, all settings and installations that you have previously configured are retained.
15.8. Accessibility menu
In this menu, you can make the same settings as under the ACCESSIBILITY AID option in the settings menu.
15.9. Remotes and accessories menu
In this menu, you can make the same settings as under the BLUETOOTH option in the settings menu.
15.10. Help and feedback
You can use this function to send feedback to Google, call up a history of the latest functions and set up additional functions.
16. Multi media player
If you connect a USB data medium to the TV, you can play back the photos, music, videos or text stored on it. Select multi media player (MMP) on the home page □ and press OK to open it and browse the connected USB devices or media servers and play or display content.
Information about using USB
▶ Certain types of USB devices (MP3 player) may not be compatible with this Smart TV.
▶ Connect the USB device directly.
▶ Do not use a separate cable, because this may cause compatibility problems.
▶ Never remove the USB device while a file is being played.
NOTICE!
Risk of damage!
Connecting and disconnecting USB devices quickly and repeatedly is dangerous and can physically damage the USB device and the Smart TV itself.
■ Do not insert and then remove the USB device repeatedly in quick succession.
All folders and playable data are shown in the media player. Use the direction buttons ◀ ▶ ▲ ▼ to navigate in the media player. Media files can be opened using the OK button.
16.1. Main menu for the media player
The media player's main menu appears as soon as you have accessed the media player as described above.
The following selection options are available:
- VIDEO - for playback of video files
- PHOTO - for playback of photo files
- MUSIC - for playback of music files
- TEXT - for playback of all existing media files
▶ Press ◀ ▶ to select the relevant menu and confirm the selection with OK.
Now select the source from which you want to play the files (e.g. USB stick or hard drive).
▶ Then navigate through the folders and find the desired media files. The following button functions are available here:
| Direction buttons | Navigate through the folder structure. |
| OK | Select the folders and start the files |
| EXIT | Exit the media player |
| BROWSE MODE(blue button) | Use this option to call up the list view. |
| USB AUTO-PLAY OFF(yellow button) | Activate/deactivate the USB autoplay function. If this function is activated, the system automatically searches for playable files when the device is switched on and a USB storage device is connected. These are played automatically. |
| MENU | The following options appear here:SORT: Select how the files are to be sortedMEDIA TYPE: Select which files are to be displayedTHUMBNAIL SIZE: Enlarge/reduce the folder viewCOPY: Copy selectionPASTE: Paste selectionDELETE: Delete selectionPARSERTYPE- RECURSIVE PARSER: Only the corresponding media files are displayed.- NORMAL PARSER: The corresponding media files and folders are displayed.PHOTO FRAME: Set a picture frame mode. |
16.1.1. Video
If you select VIDEO in the main menu, the available video files are filtered and displayed on the screen.
▶ If the data medium has several folders, press the
◀ ▶ ▲ ▼ buttons to first select a folder and then press OK to open it.
▶ Select the desired file using the arrow buttons and press the OK button. Playback then starts.
The following media button functions can be used here:
| II ▶ | Start/pause playback of the selected video. |
| ■ | Stop playback with this button. |
| ◀◀ | Use this button during playback to activate fast rewind at different speed levels: x2, x4, x8, x16, x32Press the ▶ button to return to normal play-back. |
| ▶▶ | Use this button during playback to activate fast forward at different speed levels: x2, x4, x8, x16, x32Press the ▶ button to return to normal play-back. |
| ◀ ▶ | Forwards/backwards in 10-second increments |
If you press the MENU button during playback, the following options appear:
| PLAY STATE | Start/stop playback. |
| REPEAT | Repeat the video. |
| SHOW INFO | Shows information about the displayed video file. |
| SCREEN MODE | Select the screen mode here:FULL-SCREEN, 4:3, 16:9,AUTO, OVERSCAN |
| PICTURE SETTINGS | You can make picture settings here.These are the same as in the SET-TINGS > DISPLAY menu. |
| SOUND SETTINGS | You can make sound settings here.These are the same as in the SET-TINGS > SOUND menu. |
| AUDIOAUS-GABE | You can make settings for the audio output here. These are the same as in the menu SETTINGS > ALL SETTINGS > DISPLAY AND SOUND > AUDIO OUTPUT |
| SOUND-TRACKS | Select the audio track you want here. |
| LAST ME-MORY | Here you can save a specific part of the video. |
| SEEK | You can enter a specific time (hour/minute/second) here. Then press OK to start playback from this point. |
| PLAY SPEED | Set the playback speed: 0.5x,0.75x, 1x 1.25x, 1.5x, 2x |
| ROTATION | Rotate the picture: 0°, 90°, 180°,270° |
| SUBTITLE | Available subtitles can be activated/deactivated here. |
16.1.2. Photo
If you select PHOTO in the main menu, the available photo files are filtered and displayed on the screen.
▶ If the data medium has several folders, press the ◀ ▶ ▲ ▼ buttons to first select a folder and then press OK to open it.
▶ Select the desired file using the arrow buttons and press the OK button. Playback then starts.
The following media button functions can be used here:
| II ▶ | Start/pause playback. |
| P+ | Previous photo |
| P- | Next photo |
If you press the MENU button during playback, the following options appear:
| PLAY STATE | Start/stop playback. |
| REPEAT | Repeat a series of photos. |
| SHUFFLE | Activate/deactivate random play-back |
| DURATION | Set the display duration for the photo: SHORT, MEDIUM, LONG |
| EFFECT | You can set the type of fade-in and fade-out of the photo, determine repeat behaviour and activate/deactivate random playback here |
| ROTATE | Rotates the selected image by 90 degrees clockwise. If you press the green button during playback, you can rotate the photo in the same way. |
| ZOOM | Magnifies the displayed image in three stages (1 X, 2 X or 4 X). If you press the yellow button during playback, you can also skip through these three magnification levels. |
| SHOW INFO | Shows information about the displayed photo file. |
| PHOTO FRAME IMAGE | Here you can add a picture frame to photos. |
| PICTURE SETTINGS | You can make picture settings here. These are the same as in the SET-TINGS > DISPLAY menu. |
16.1.3. Music
If you select MUSIC in the main menu, the available music files are filtered and displayed on the screen.
▶ If the data medium has several folders, press the
◀ ▶ ▲ ▼ buttons to first select a folder and then press OK to open it.
▶ Select the desired file using the arrow buttons and press the OK button. Playback then starts.
The following media button functions can be used here:
| II ▶ | Start/pause playback of the selected track. |
| ■ | Stop playback with this button. |
| ◀◀ | Rewind |
| ▶▶ | Fast forward |
If you press the MENU button during playback, the following options appear:
| PLAY STATE | Start/stop playback. |
| REPEAT | Repeat the track. |
| SHUFFLE | Activate/deactivate the random function |
| SHOW INFO | Shows information about the displayed music file. |
| HIDE SPEC-TRUM | Activate/deactivate the frequency spectrum display. |
| DISPLAY LINE | If available, you can access song text options here. |
| PICTURE OFF | You can make settings in the menu here. These are the same as in the menu. |
| SOUND SETTINGS | You can make sound settings here. These are the same as in the SETTINGS > SOUND menu. |
| AUDIOAUS-GABE | You can make settings for the audio output here. These are the same as in the menu SETTINGS > ALL SETTINGS > DISPLAY AND SOUND > AUDIO OUTPUT |
16.1.4. Text
If you select TEXT in the main menu, the available text files are filtered and displayed on the screen.
▶ If the data medium has several folders, press the
◀ ▶ ▲ ▼ buttons to first select a folder and then press OK to open it.
▶ Select the desired file using the arrow buttons and press the OK button. Playback then starts.
▶ Use the ◀ ▶ ▲ ▼ direction buttons to navigate through the pages of a document.
The following media button functions can be used here:
| II ▶ | Start/pause playback of the selected text. |
If you press the MENU button during playback, the following options appear:
| PLAY STATE | Start/stop playback. |
| REPEAT | Repeat the text. |
| SHUFFLE | Activate/deactivate the random function |
| FOND | Edit the font in SIZE, STYLE and COLOUR. |
| SHOW INFO | Shows information about the displayed text file. |
17. Google Cast
With the integrated Google Cast technology, you can stream content from your mobile device directly to the TV set. If your mobile device has the Google Cast function, you can mirror the screen of your mobile device to the TV via WLAN.
To stream the screen of your device to the TV screen:
▶ Slide the notification box down
▶ Tap on "Wireless projection".
▶ Select the TV set you want to stream to. If the mobile app is enabled for streaming (e.g. YouTube, Netflix etc.), you can stream the content to your TV. Look for the Google Cast icon in the app and tap it. Available devices are then recognised and listed. Select your TV from the list and tap it to start the transmission.
You can call up the network name of your TV set via the SETTINGS > ALL SETTINGS > SYSTEM > ABOUT menu. You can also change the name of the device. Select the DEVICE NAME option and press OK. Then select CHANGE and press OK again. You can then select one of the predefined names or enter a custom name.
To transfer an app to the TV screen:
▶ Open an app on your mobile device that supports Google Cast
Tap the Google Cast icon
▶ Select the TV set you want to stream to.
The app you selected should now play on the TV set.
Google Cast works on Android and iOS. Make sure that your mobile device is connected to the same network as the TV set. The menu options and labels for the Google Cast feature on your mobile device may vary or change depending on the brand. For information on the Google Cast function, refer to the manual of your mobile device.

Errors may occur during streaming on older smartphones or smartphone operating system versions that are not up to date. It may not be possible to establish a connection to the TV set at all.
18. HbbTV system
HbbTV (Hybrid Broadcast Broadband TV) enables a combination of broadcasting and Internet content that can usually be accessed and displayed by pressing the red button on the remote control.
HbbTV services include conventional radio/TV stations, catch-up TV, video on demand, EPG, interactive advertising, customisation options, polls, games, social networks and other multimedia applications.
HbbTV applications can only be called up if the broadcasting station transmits these signals and the TV is connected to the internet. The scope and operation vary depending on the programme and channel.
Whether a channel offers HbbTV applications or not, is shown via a brief on-screen display. The exact form and position depends on the individual application. Use the red button to open and close the application pages. Navigation within the applications is carried out by using the colour buttons on the remote control, but this can vary depending on the channel and the programme. Observe the messages within the applications.
19. MEDION Smart TV privacy
Your Internet-enabled MEDION Smart TV has Internet service functions. These functions enable you to access services, content, software and products provided by third parties on the Internet. In addition, you have access to open Internet content. Your device checks automatically via this route whether new software versions are available for your device. When doing so, your device sends out the IP address, the software version and the MAC address of the device to ensure software updates run correctly.
Access to applications on the Internet or via HbbTV may, depending on the provider, require registration, setting up a user account and/or a fee when using certain services. Registration may require the provision of your personal data and the selection of a unique and secret password. Please check the privacy policy of the provider beforehand.
MEDION shall not be liable if the HbbTV or a service does not comply with the user's requirements, nor does it guarantee that safe and error-free use of such services can always occur without restrictions, or continuously, at the required time.
MEDION shall not be liable for the information or content provided via HbbTV or the open Internet, nor for its use and reliability. When you purchase your Smart TV, special warranties are provided. The validity of these warranties, including the related disclaimers, remains in force.
If you have any further questions on the subject of data protection when using your Smart TV, please contact the respective provider of the Internet service functions or contact MEDION directly on www.medion.com under the heading Data Protection.
20. Troubleshooting
Malfunctions can sometimes have quite trivial causes, but they may also be the result of defective components. We have included a brief troubleshooting guide below which may help to solve any problems. If these measures don't solve the problem, we'll be more than pleased to help you further. Just call us!
There is no picture and no sound.
- Check if the mains cable is inserted in the socket properly.
- Check if the signal reception is set to LIVE TV.
No picture appears.
- Check to ensure that the contrast and brightness settings are correct.
- Check to ensure that all external devices have been connected properly.
- Check to ensure that you have selected the correct source.
There is no sound.
- Ensure that the volume has not been set to the minimum level.
- Ensure the mute setting is not active. Do this by pressing the button with the crossed out speaker symbol on the remote control.
There is no picture and no sound. I can hear noise, though.
- The reception might be poor. Check if the antenna is connected properly.
The picture is not clear.
• The reception might be poor.
- Check if the antenna is connected properly.
The picture is too bright or too dark.
- Check the contrast and brightness settings.
The picture is not sharp.
• The reception might be poor.
- Check if the antenna is connected properly.
- Check the sharpness and noise reduction settings.
There is a double/triple picture.
- Check if the antenna is aligned properly.
- Waves might be reflected off buildings or hills.
The picture is pixelated.
- There might be interference from cars, trains, power lines, neon lights etc.
- There might be interference between the antenna and power cables. Position the cables further apart.
There are stripes on the screen or the colours are faded.
• Is there interference from another device?
- Transmission antennae on radio stations, ham radios and portable phones can also cause interference.
- Operate the device as far away as possible from the device that might be causing the interference.
TV switches off.
- Check whether automatic TV switch-off is activated under POWER AND ENERGY > SCHEDULED POWER ON/OFF.
- TV was in battery mode and the battery charge is flat.
The multifunction button ☐ on the device does not work
• The child lock might be on.
No reception/poor signal via a wireless network connection (WLAN).
- Make sure that all required settings have been made.
The remote control is not working.
- Check if the batteries are fully functioning and have been inserted the right way round.
- Ensure the sensor field is not exposed to strong light.
The menu cannot be opened.
- Check whether CEC is enabled. In this case, the menu cannot be opened. This is not a defect. The menu of the device connected via HDMI will open if necessary. This is dependent on the playback device and must be supported accordingly.
- Change the input source.
Certain options cannot be accessed because you have forgotten your password.
- Perform an initial installation again and set a new password.
No Bluetooth ^® connection
- Ensure that all settings on the device are correct and that the Bluetooth function has been activated.
- Check whether the device to be connected is switched on and is in search mode.
- Ensure that all settings on the device to be connected are correct and that the Bluetooth function has been activated. If necessary, refer to the user manual for the device concerned.

In many cases, it is sensible to reset to the factory settings with subsequent reinstallation.
20.1. Do you need more help?
If the suggestions in the previous sections did not solve your problem, please contact us. To make it easier for us to help you, please have the following information to hand:
• What external devices are connected?
• What messages appear on the screen?
- When operating the device, at which step did the problem occur?
- If you have a PC connected to the device:
– How is your computer configured?
- What software were you using when the problem occurred?
- What steps have you already taken to try and rectify the problem?
- Please provide us with your customer number if you have one.
20.2. Pixel errors on Smart TVs
Despite the state-of-the-art production methods, in rare cases there may be individual or multiple pixel drop-outs (dead pixels) due to the highly complex technology.
For active matrix TFTs with a resolution of 3840 x 2160 pixels, which are each made up of four sub-pixels (red, green, blue, white), there are a total of approx. 33.2 million control elements in use. Occasionally pixels or individual sub-pixels can fail or become incorrectly controlled because of this very high number of transistors and the extremely complex manufacturing process used in this context.
| Pixel defect class | Defect type 1 Continuously lit pixel | Defect type 2 Continuously black pixel | Defect type 3 Defective sub-pixel | |
| lit black | ||||
| 0 | 0 | 0 | 0 | |
| I | 1 | 1 | 2 | |
| 1 | 3 | |||
| 0 | 5 | |||
| II 2 2 5 | 5-n* | 0 | ||
| 0 | 2xn* | |||
| 10 | ||||
| III | 5 | 15 | 50 | 0 |
| 50-n* | 2xn* | |||
| 0 | 100 | |||
| IV | 50 | 150 | 500 | 0 |
| 500-n* | 2xn* | |||
| 0 | 1000 | |||
$$ n ^ {*} = 1. 5 $$
The permitted number of defects for every type named above in each class of pixel defect refers to one million pixels and must be converted accordingly to match the physical resolution of the display.
Your device complies with the European ISO 9241-307 Class II standard (pixel defect class). Pixel defects up to the specified maximum number are not covered by the warranty.
21. Cleaning

DANGER!
Risk of electric shock!
There is a risk of death due to an electric shock when the housing is open and you touch parts inside the device!
■ Do not open the device housing. It does not contain any parts that require maintenance by the user. Always unplug the device and disconnect all cables before cleaning.
You can increase the lifespan of your Smart TV by taking the following measures:
- Protective film has been applied to the high-gloss finish to protect the television from scratches. Remove the film after you have set up the TV correctly.
- If the high-gloss finish becomes dirty, wipe off the dust first. Then wipe down gently with a cleaning cloth. If you do not wipe off the dust first, or wipe the high-gloss finish too vigorously you could scratch the high-gloss finish.
- Do not use solvents or corrosive or gaseous cleaning agents.
- Clean the display screen with a soft, lint-free cloth.
• Take care to ensure that no water droplets remain on the Smart TV. Water can cause permanent discolouration. - To avoid damage to the device, water must not penetrate into the interior of the device under any circumstances.
- Do not place the screen in strong sunlight or near ultraviolet light.
- Store the packaging material in a safe place. Only use this box to transport the Smart TV.
22. Storing the device when not in use
If you do not intend to use the TV over a longer period of time, store it in a cool, dry place and make sure that it is protected from dust and extreme temperature fluctuations. Remove all connections and take the batteries out of the remote control in advance.
23. Disposal

PACKAGING
Your device has been packaged to protect it from damage in transit. The packaging is made of materials that can be disposed of in an environmentally friendly manner and recycled properly.

DEVICE (only in Germany)
All electrical or electronic devices marked with the symbol shown must not be disposed of in normal household waste. Instead, the end consumer must dispose of these devices at a collection point separately from unsorted urban waste at the end of their service life.
End consumers must separate used batteries and accumulators that are not enclosed in the waste equipment from the equipment, as well as bulbs that can be removed from the waste equipment, without causing damage before it is handed over at a collection centre and taken to a separate collection point.
Distributors with a sales area for electrical and electronic devices of at least 400 square metres and distributors of foodstuffs with a total sales area of at least 800 square meters, who offer electrical and electronic devices several times a calendar year or on a permanent basis and make them available on the market, are obliged to take back waste equipment free of charge if the end consumer buys a new piece of electrical or electronic equipment of the same type and functionality at the point of supply or in the immediate vicinity and up to three items of waste equipment per device type that are less than 25 cm in length on their longest side at the request of the end consumer in the retail store or in the immediate vicinity.
In case of distribution by means of remote communication, all storage and shipping areas for electrical and electronic devices of the distributor are considered to be the sales area and all storage and shipping areas as the total sales area. In addition, the collection of waste equipment in categories 1, 2 and 4 of Annex 1 as defined in Section 2 Para. 1 of the German Electrical Devices Act (heat exchangers, screens, monitors and devices containing screens with a surface area of more than 100 cubic centimetres, large devices) free of charge is also applicable to distribution through remote communication when new electrical or electronic devices are purchased by and delivered to a private household.
Free collection centres and, if applicable, additional collection points for the recycling of waste equipment are available to take back waste equipment in your area. You can obtain the relevant addresses from your local authority.

If the waste equipment contains data storage, all data must be backed up externally and then permanently, irretrievably deleted from the waste equipment. End consumers are solely responsible for ensuring that all personal data is deleted from the waste equipment to be disposed of.
DEVICE (all other German-speaking countries)
All old devices marked with the symbol shown must not be disposed of in normal household waste.
In accordance with Directive 2012/19/EU, the device must be properly disposed of at the end of its service life.
This involves separating the materials in the device for the purpose of recycling and minimising the environmental impact.
Take old devices to an electrical scrap collection point or a recycling centre.
Contact your local waste disposal company or your local authority for more information on this subject.
24.Technicalspecifi cations
| Smart TV X8432505(MD 843700) | medion |
| Device name X8432505 (MD 843700) | |
| Rated voltage 220–240 V ~ 50 Hz | |
| Rated voltage/current for satellite connection | 13 V/18 V=---, 300 mA max. |
| Screen size | 108 cm (43") LCD; 16:9 display |
| Power consumption Max. 120 W | |
| Power consumption in standby mode | < 0.50 W |
| Power consumption in networked standby mode (WAKE ON mode) | ≤ 2.00 W |
| Speaker output | 2 x 10 W RMS, DTS X-compatible |
| Physical resolution 3840 x 2160 | |
| TV system Pal | |
| Channel positions 199 (ATV), 10,000 (DTV) |
| Smart TV X8502505 (MD 850700) | medion |
| Device name X8502505 (MD 850700) | |
| Rated voltage 220–240 V ~ 50 Hz | |
| Rated voltage/current for satellite connection | 13 V/18 V=---, 300 mA max. |
| Screen size | 125.7 cm (50") LCD; 16:9 display |
| Power consumption Max. 135 W | |
| Power consumption in standby mode | < 0.50 W |
| Power consumption in networked standby mode (WAKE ON mode) | ≤ 2.00 W |
| Speaker output | 2 x 10 W RMS, DTS X-compatible |
| Integrated subwoofer | 1 x 12 W RMS |
| Physical resolution 3840 x 2160 | |
| TV system Pal | |
| Channel positions 199 (ATV), 10,000 (DTV) | |
| Smart TV X8552505 (MD 855700) | medion |
| Device name | X8552505 (MD 855700) |
| Rated voltage | 220-240 V ~ 50 Hz |
| Rated voltage/current for satellite connection | 13 V/18 V---300 mA max. |
| Screen size | 138.8 cm (55") LCD; 16:9 display |
| Power consumption | Max. 140 W |
| Power consumption in stand-by mode | < 0.50 W |
| Power consumption in networked standby mode (WAKE ON mode) | ≤ 2.00 W |
| Speaker output | 2 x 10 W RMS, DTS X-compatible |
| Integrated subwoofer | 1 x 12 W RMS |
| Physical resolution | 3840 x 2160 |
| TV system | Pal |
| Channel positions | 199 (ATV), 10,000 (DTV) |
| Smart TV X8652505(MD 865700) | medion |
| Device name X8652505 (MD 865700) | |
| Rated voltage 220–240 V ~ 50 Hz | |
| Rated voltage/current for satellite connection | 13 V/18 V=300 mA max. |
| Screen size | 163.9 cm (65") LCD; 16:9 display |
| Power consumption Max. 200 W | |
| Power consumption in standby mode | < 0.50 W |
| Power consumption in networked standby mode (WAKE ON mode) | ≤ 2.00 W |
| Speaker output | 2 x 12 W RMS, DTS X-compatible |
| Integrated subwoofer 1 x 12 W RMS | |
| Physical resolution 3840 x 2160 | |
| TV system Pal | |
| Channel positions 199 (ATV), 10,000 (DTV) |
| Channels |
| VHF (Band I/III) |
| UHF (BAND U) |
| HYPERBAND |
| CABLE TV (S1-S20) / (S21-S41) |
| HD DVB-T |
| DVB-T2 HD (H.265) |
| HD DVB-C |
| DVB-S2 |
| Connections |
| Antenna connection (analogue TV, DVB-T/DVB-T2 or DVB-C) |
| Satellite connection (DVB-S/S2) |
| 2 x USB connection |
| 1 x LAN RJ-45 |
| Video |
| 3 x HDMI® 2.1 with HDCP 2.2 decoding |
| Audio |
| Headphone output (3.5 mm jack) |
| Digital Audio Out (SPDIF, optical) |
| Drives/storage media | |
| Drives | USB, Common Interface (CI+) Slot |
| Supported formats via USB2 | Photo: JPG, JPEG, JPE, BMP, PNG |
| Music: MP3, WMA, WAV | |
| Film: H.263, H.264, H.265, MKV, mp4, MPEG2-TS (AAC audio only), HEVC, 3GPP, MOV | |
| Capacities | USB max. 1 TB |
| Remote control | |
| Transmission type | Infrared |
| LED classification | 1 |
| Battery type | 2 x 1.5V AAA R03/LR03 |
| Ambient temperatures | |
| Permissible ambient temperature | +5°C to +35°C |
| Permissible relative humidity | 20% to 85% |
| Dimensions/weight X8432505 (MD 843700) | |
| Dimensions without base (W x H x D) | Approx. 956 x 560 x 74 mm |
| Dimensions with base (W x H x D) | Approx. 956 x 605 x 225 mm |
| Weight without base | Approx. 6.7 kg |
| Weight with base | Approx. 8.2 kg |
| Wall mounting ^3 | Vesa standard, hole spacing 100 x 100 mm |
| Dimensions/weight X8502505 (MD 850700) | |
| Dimensions without base (W x H x D) | Approx. 1111 x 653 x 74 mm |
| Dimensions with base (W x H x D) | Approx. 1111 x 690 x 225 mm |
| Weight without base | Approx. 9.7 kg |
| Weight with base | Approx. 11.2 kg |
| Wall mounting ^3 | Vesa standard, hole spacing 200 x 200 mm |
| Dimensions/weight X8552505 (MD 855700) | |
| Dimensions without base (W x H x D) | Approx. 1233 x 718 x 75 mm |
| Dimensions with base (W x H x D) | Approx. 1233 x 753 x 225 mm |
| Weight without base | Approx. 12.7 kg |
| Weight with base | Approx. 14.2 kg |
| Wall mounting ^3 | Vesa standard, hole spacing 200 x 200 mm |
| Dimensions/weight X8652505 (MD 865700) | |
| Dimensions without base (W x H x D) | Approx. 1446 x 845 x 71 mm |
| Dimensions with base (W x H x D) | Approx. 1446 x 905 x 229 mm |
| Weight without base | Approx. 17.6 kg |
| Weight with base | Approx. 20.1 kg |
| Wall mounting3 | Vesa standard, hole spacing 400 x 200 mm |
CE

MD843700: ID 1111220771

MD850700: ID 1111220767

MD855700: ID 1111220809

MD865700: ID 1111223267
25. Product data sheet

Scan the QR code shown on the energy label or alternatively in the user manual to download the product data sheet.
 MD 843700 MD 850700 MD 843700 MD 850700 |  |
 MD 855700 MD 865700 MD 855700 MD 865700 |  |
HDMI HIGH-DEFINITION MULTIMEDIA INTERFACE
^TM The terms HDMI and HDMI High-Definition Multimedia Interface and the HDMI
logo are trademarks or registered trademarks of HDMI Licensing Administrator, Inc. in the United States and other countries.
Other trademarks are the property of their respective owners.

Advance™
Covered by patents at patentlist.accessadvance.com
26. Service information
Please contact our Customer Service team if your device ever stops working the way you want or expect it to. There are several ways for you to contact us:
- In our Service-Community, you can meet other users, as well as our staff, and you can exchange your experiences and pass on your knowledge there.
You will find our Service-Community at community.medion.com.
• Alternatively, use our contact form at www.medion.com/contact. - You can also contact our Service team via our hotline or by post.
| Hotline number UK |
| 0333 3213106 |
| Hotline number Ireland |
| 1800 992508 |
| Opening times |
| Mon – Fri: 08.00 – 20.00Sat – Sun: 10.00 – 16.00 |
| Service address |
| MEDION Electronics Ltd.120 Faraday Park,Faraday Road, DorcanSwindon SN3 5JF, WiltshireUnited Kingdom |
You can download this and many other sets of operating instructions from our service portal at www.medionservice.com.
We have stopped providing printed copies of our warranty terms and conditions as part of our commitment to sustainability, but you can access the warranty terms and conditions on our service portal.
You can also scan the QR code below and to download the operating instructions onto your mobile device from the service portal.

27. Legal Notice
Copyright 2025
Date: 16.07.2025
All rights reserved.
These operating instructions are protected by copyright. Mechanical, electronic and any other forms of reproduction are prohibited without the written permission of the manufacturer.
Copyright is owned by the company:
medion GmbH
Am Zehnthof 77
45307 Essen
Germany
Please note that you cannot use the address above for returns. Please always contact our Customer Service team first.
28. Index
A
Ambient temperature....7, 43
B
Batteries....8, 12
Bluetooth....39
C
Channel list....17, 19
Channel search 13
CI module ....10
Connection....7
Antenna....13, 14, 34
Power supply 13
D
Data protection 38
Device overview ....10
E
EU - Declaration of Conformity 9
F
Fault....39
G
Getting started 12
H
HbbTV....38
Home page 22
|
Initial installation 13
Installation location 6
L
Live TV 23
M
Mounting....12
Multimedia connections
HDMI....16
HDMI ARC 16
HDMI CEC 16
LAN....17
SPDIF 17
USB....17
Music....43
O
Operating safety ....5
P
Package contents ....3
Photo 43
Pixel faults ....40
Power supply 7,42,43
Connecting the power supply 13
Programme selection 17
R
Recording....18
Remote control ....11
Repairs....7
s
Safety instructions ....5
Connection....7
Operating safety 5
Power supply 7
Screen settings....17
Selecting the source 21
Sound settings 17
T
Technical specifications 42
Teletext....21
Troubleshooting 39
U
USB 35
V
Videos 43