BC2005 - Vacuum Cleaner KENMORE - Free user manual and instructions
Find the device manual for free BC2005 KENMORE in PDF.


User questions about BC2005 KENMORE
0 question about this device. Answer the ones you know or ask your own.
Ask a new question about this device
Download the instructions for your Vacuum Cleaner in PDF format for free! Find your manual BC2005 - KENMORE and take your electronic device back in hand. On this page are published all the documents necessary for the use of your device. BC2005 by KENMORE.
USER MANUAL BC2005 KENMORE
Canister Vacuum Cleaner
Vacuum Cleaner Help Line:
1-877-531-7321 (US) / 1-844-608-3081 (CA)
8:00am - 5:00pm EST, M-F
www.kenmorefloorcare.com

text_image
Kenmore ®/MDTABLE OF CONTENTS
SECTION PAGE
Before Using Your New Vacuum Cleaner .... 2
Vacuum Cleaner Warranty 3
Important Safety Instructions....4-5
Parts and Features....6-8
Assembly Instructions....9-10
Operating Instructions 10-15
Performance/Safety Features ....16
Canister Care....17-21
Troubleshooting 22-23
Requesting Assistance or Service......Back page
BEFORE USING YOUR NEW VACUUM CLEANER
Read this Use & Care Guide. It will help you assemble and operate your new Kenmore vacuum cleaner in the safest and most effective way.
For more information about vacuum cleaner care and operation, call the Vacuum Cleaner Help Line at 1-877-531-7321 (US) / 1-844-608-3081 (CA). You will need the complete model and serial numbers when requesting information.
Your vacuum cleaner's model and serial numbers are located on the Model and Serial Number Plate. Use the space below to record the model number and serial number of your new Kenmore vacuum cleaner.
Model No.
Serial No. ____
Date of Purchase ____
Keep this book and your sales check (receipt) in a safe place for future reference.
PACKING LIST
Your KENMORE VACUUM CLEANER is packaged with the following parts and components assembled separately in the carton:
- Canister Vacuum Cleaner
- Floor Nozzle
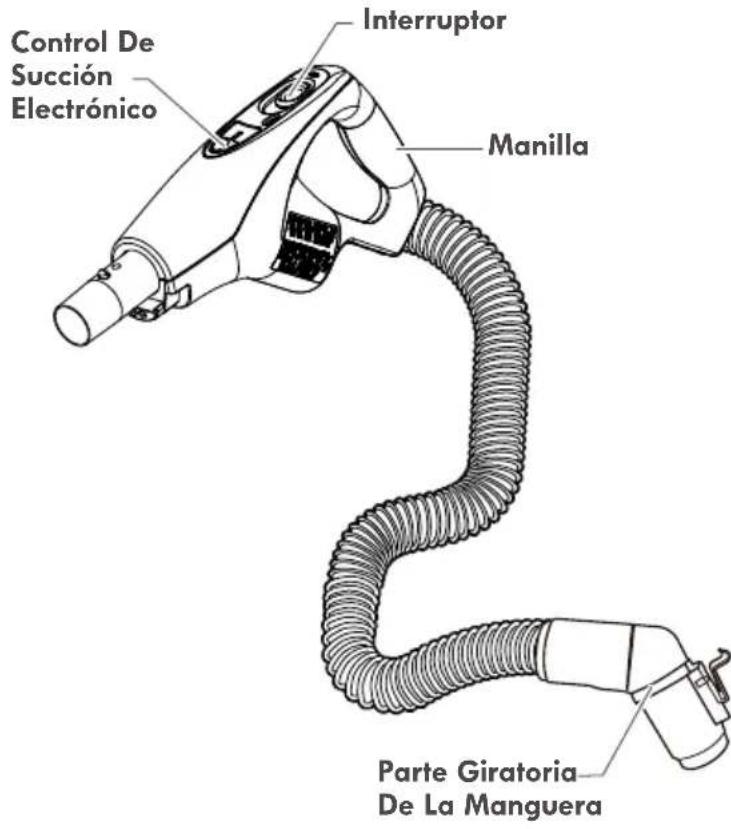
- Handle & Hose Assembly
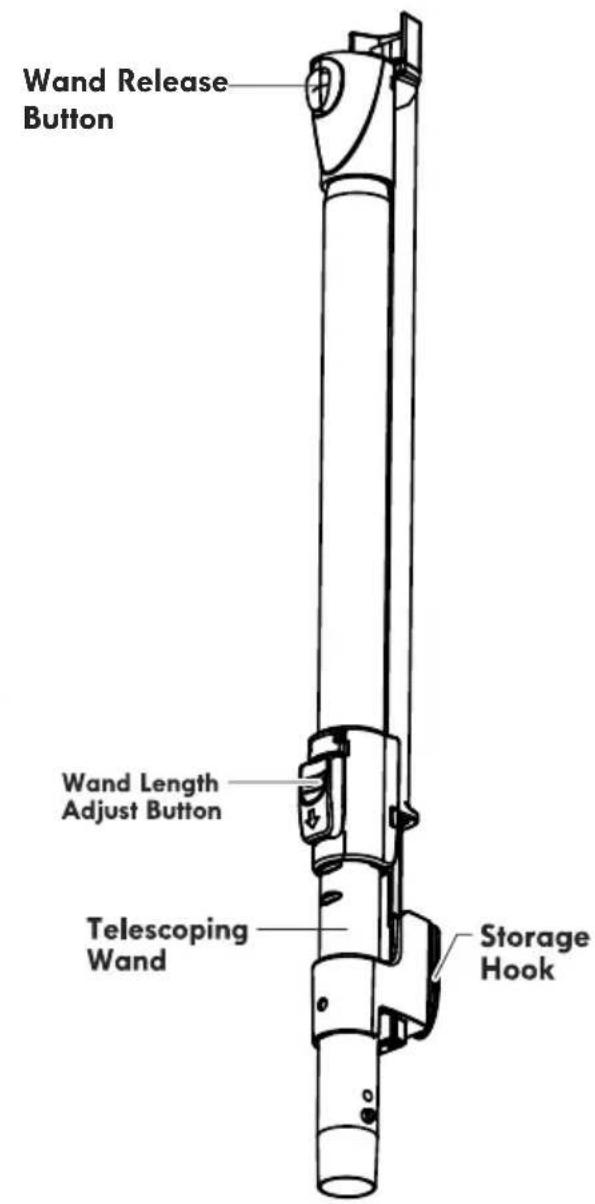
- Telescoping Wand
- Bare Floor Tool
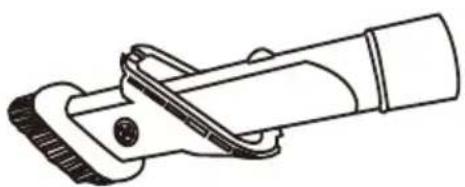
• 3-in-1 Combination Tool
- Dust Bag (2-pack)
- Use & Care Guide
VACUUM CLEANER WARRANTY
LIMITED WARRANTY
FOR ONE YEAR from the date of sale this product is warranted against defects in material or workmanship.
WITH PROOF OF SALE a defective product will be replaced free of charge.
The Kenmore brand is used under license. Direct all claims for warranty service to:
1-877-531-7321 (US) / 1-844-608-3081 (CA).
This warranty does not cover filters or belts, which are expendable parts that can wear out from normal use within the warranty period.
This warranty is void if this product is ever used for other than private household purposes.
This warranty gives you specific legal rights, and you may also have other rights which vary from state to state.
Cleva North America, Inc., Greenville SC 29607
IMPORTANT SAFETY INSTRUCTIONS
Read all instructions in this guide before assembling or using your vacuum cleaner.

WARNING!
Your safety is important to us. To reduce the risk of fire, electrical shock, injury to persons or damage when using your vacuum cleaner, follow basic safety precautions including the following:
- Use your vacuum cleaner only as described in this guide. Use only with manufacturer's recommended attachments.
- Do not leave vacuum cleaner when plugged in. Unplug from outlet when not in use and before performing maintenance.
- To reduce the risk of electrical shock – Do not use outdoors or on wet surfaces.
- Do not allow to be used as a toy. Close attention is necessary when used by or near children.
- Do not use with a damaged cord or plug. If vacuum cleaner is not working as it should, has been dropped, damaged, left outdoors, or dropped in water, immediately discontinue use and call 1-877-531-7321 (US) / 1-844-608-3081 (CA) for assistance.
- Do not pull or carry by cord, use cord as a handle, close a door on cord, or pull cord around sharp edges or corners. Do not run vacuum cleaner over cord. Keep cord away from heated surfaces.
- Do not unplug by pulling on cord. To unplug, grasp the plug, not the cord.
- Do not handle plug or vacuum cleaner with wet hands.
- Do not put any objects into openings.
- Do not use with any opening blocked; keep free of dust, lint, hair, and anything that may reduce air flow.
- Keep hair, loose clothing, fingers, and all parts of body away from openings and
moving parts.
- Turn off all controls before unplugging.
- Use extra care when cleaning on stairs.
- Do not put on chairs, tables, etc. Keep on floor.
- Do not use vacuum cleaner to pick up flammable or combustible liquids (gasoline, cleaning fluid, perfumes, etc.), or use in areas where they may be present. The fumes from these substances can create a fire hazard or explosion.
- Do not pick up anything that is burning or smoking, such as cigarettes, matches, or hot ashes.
- Do not use vacuum cleaner without dust bag and/or filters in place.
- Always change the dust bag after vacuuming carpet cleaners or freshener, powders, and fine dust. These products clog the bag, reduce airflow and can cause the bag to burst. Failure to change the bag could cause permanent damage to the vacuum cleaner.
- Do not use the vacuum cleaner to pick up sharp hard objects, small toys, pins, paper clips, etc. They may damage the vacuum cleaner.
- Do not operate the vacuum cleaner without the exhaust filter or filter door in place.
- The hose contains electrical wires. Do not use when damaged, cut, or punctured. Replace if cut or worn. Do not pick up sharp objects.
• Always turn off and unplug vacuum
IMPORTANT SAFETY INSTRUCTIONS
cleaner before connecting or disconnecting either hose or wand.
- Hold plug when rewinding onto cord reel. Do not allow plug to whip when rewinding.
- You are responsible for making sure that your vacuum cleaner is not used by anyone unable to operate it properly.
SAVE THESE INSTRUCTIONS
Proper assembly and safe use of your vacuum cleaner are your responsibilities. Your vacuum cleaner is intended for Household Use. Read this Use & Care Guide carefully for important use and safety information. This guide contains safety statements under warning and caution symbols.
AllergenSeal ^TM system lets you know that this vacuum traps 99.97% of dust and particles down to 0.3 microns inside your vacuum, keeping them out of the air you breathe.
PARTS AND FEATURES
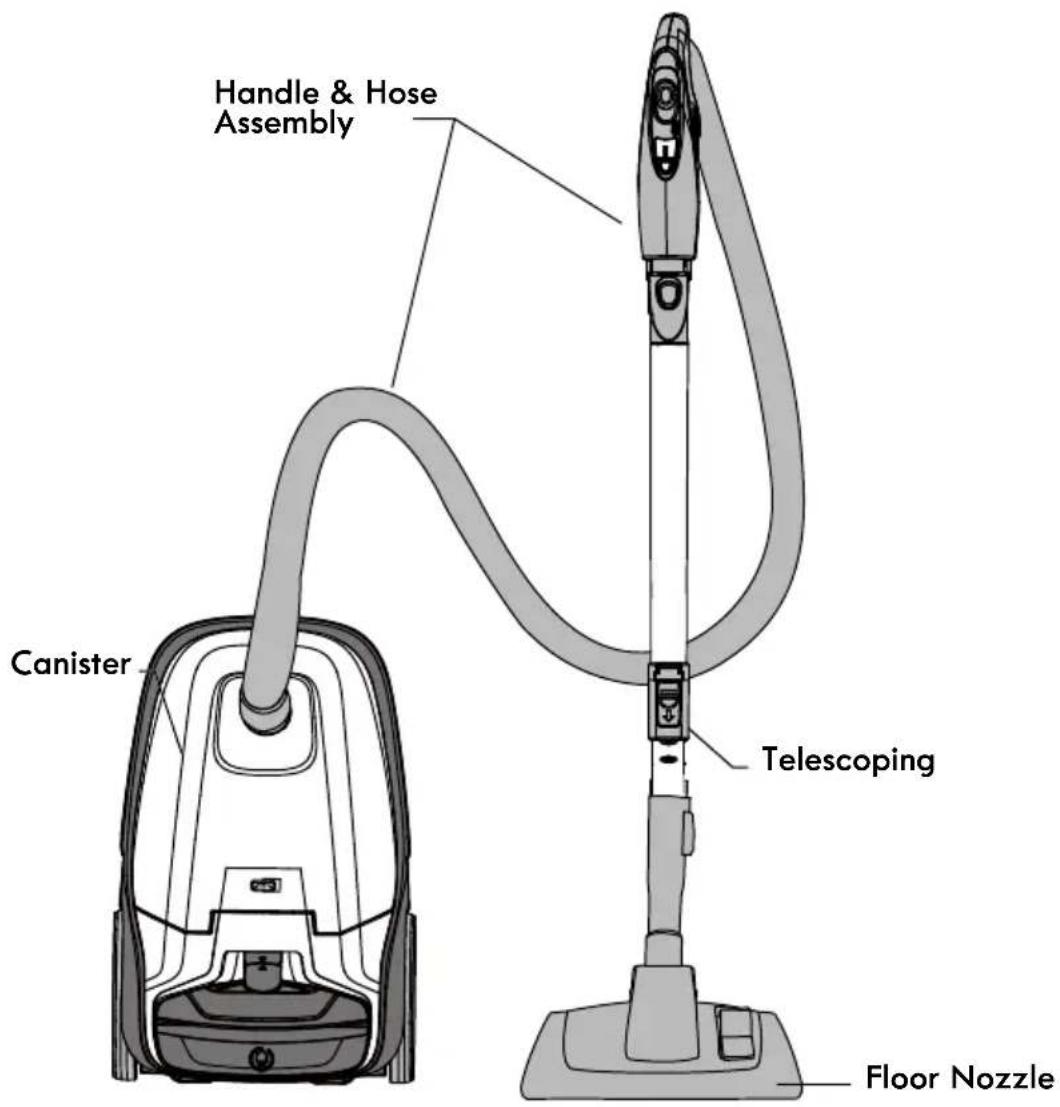
It is important to know your vacuum cleaner's parts and features to ensure its proper and safe use. Review these before using your vacuum cleaner.
text_image
Handle & Hose Assembly Canister Telescoping Floor NozzleREPLACEMENT PARTS
| Part Part No. (US) Part No. (CA) | ||
| Dust Bag (2-pack) 53291 - | ||
| Dust Bag (6-pack) 53292 63292 | ||
| HEPA Media Exhaust Filter 591040103 591040103 | ||
| Motor Safety Filter 81002 81002 | ||
| Floor Nozzle 591030101 591030101 | ||
| Bare Floor Tool | KC83QEEXZV06 | KC83QEEXZV06 |
| 3-in-1 Combination Tool | 561055134 | 561055134 |
| PowerMate® Motorized Nozzle | BC1001 | BC1001 |
| To order a replacement part, call 1-877-531-7321 (US) / 1-844-608-3081 (CA). | ||
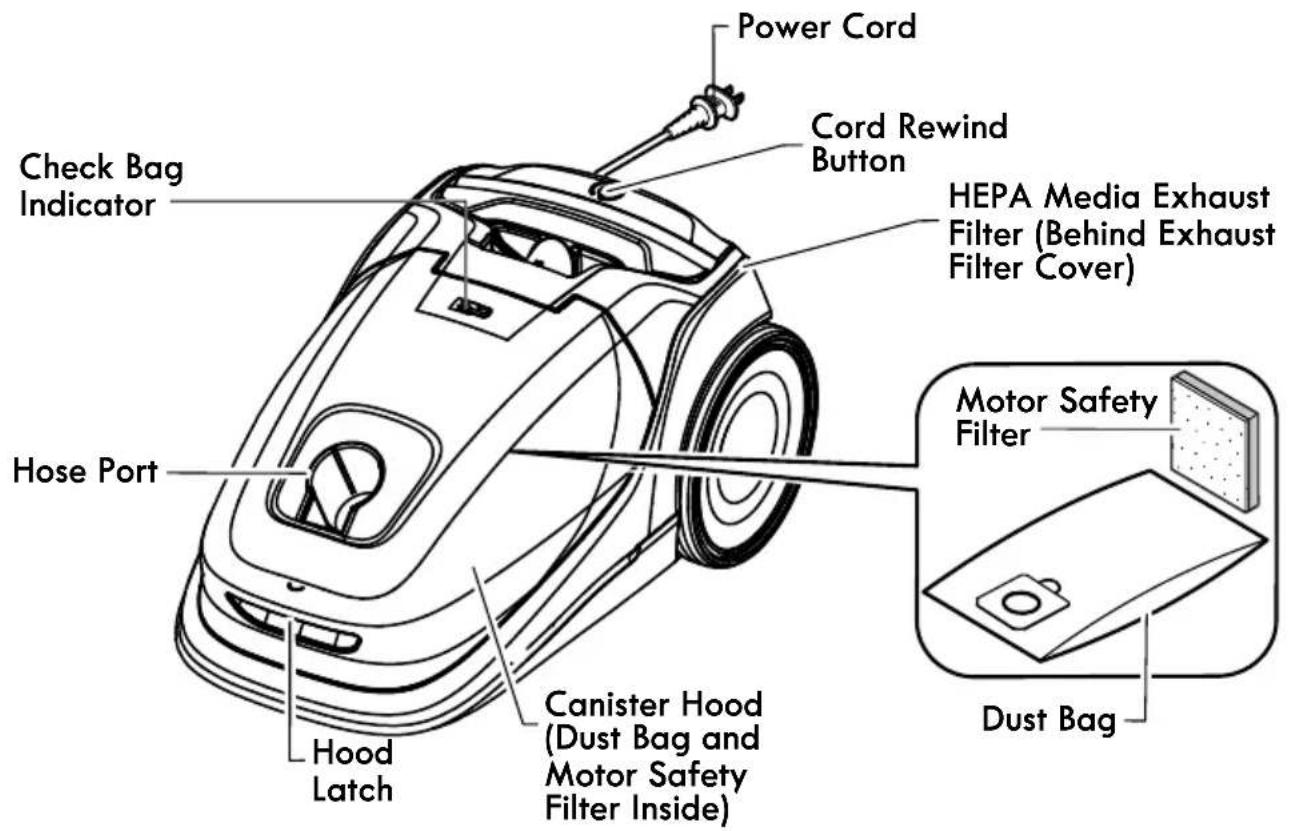
CANISTER
text_image
Power Cord Cord Rewind Button Check Bag Indicator HEPA Media Exhaust Filter (Behind Exhaust Filter Cover) Hose Port Motor Safety Filter Dust Bag Canister Hood (Dust Bag and Motor Safety Filter Inside)ATTACHMENTS
Bare Floor Tool (Stored in Canister)
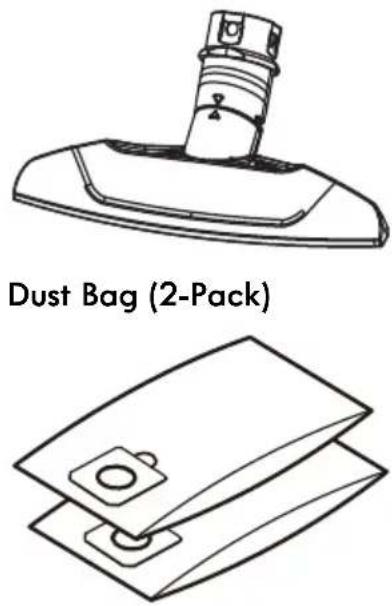
3-in-1 Combination Tool
natural_image
Line drawing of a mechanical tool or device with a textured handle and cylindrical body (no text or symbols)HANDLE & HOSE ASSEMBLY

text_image
Electronic Suction Control Switch Handle Hose SwivelTELESCOPING WAND
text_image
Wand Release Button Wand Length Adjust Button Telescoping Wand Storage HookFLOOR NOZZLE
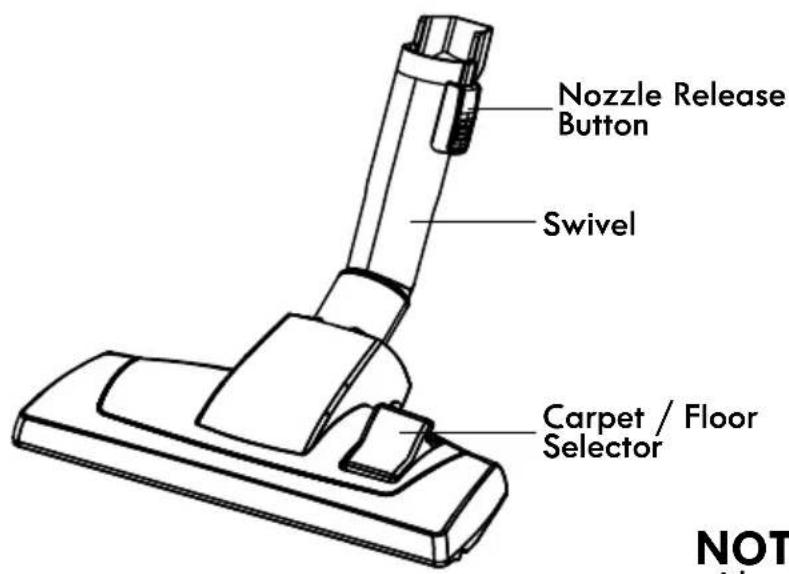
text_image
Nozzle Release Button Swivel Carpet / Floor Selector NOTNOTE: This model is not equipped with a PowerMate® motorized nozzle. A PowerMate® is available for additional purchase. For details call the Vacuum Cleaner Help Line or visit kenmorefloorcare.com.

Please pay special attention to these hazard alert boxes, and follow any instructions given. WARNING statements alert you to such hazards as fire, electric shock, burns and personal injury. CAUTION statements alert you to such hazards as personal injury and/or property damage.
ASSEMBLY INSTRUCTIONS
Before assembling the vacuum cleaner, check the PACKING LIST (page 2). Use this list to verify that you have received all the components of your new Kenmore vacuum cleaner.

WARNING
Electrical Shock Hazard
DO NOT plug into electrical supply until assembly is complete. Failure to do so could result in electrical shock or injury.
FLOOR NOZZLE
Align wand and insert onto floor nozzle until the wand locks into place.
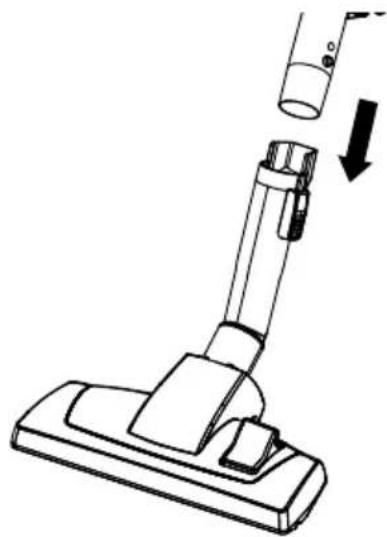
natural_image
Line drawing of a vacuum cleaner's handle and lever assembly (no text or symbols)HANDLE ASSEMBLY
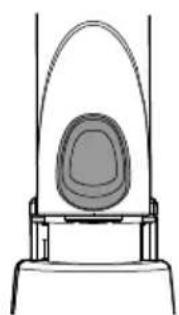
Insert wand into handle until lock button snaps in place.
natural_image
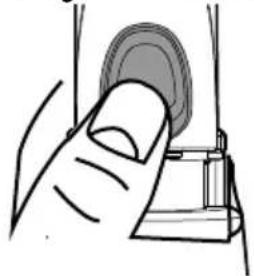
Simple line drawing of a mechanical component or device with a circular housing and curved top (no text or symbols)To remove: Press wand release button and pull up on handle.
To store: Disconnect hose from wand and canister to prevent stress on hose during storage.
Store hose in a loosely coiled position so the hose covering is not stressed.
natural_image
Illustration of a hand pressing a circular object on a mechanical component (no text or symbols)WAND (TELESCOPING)
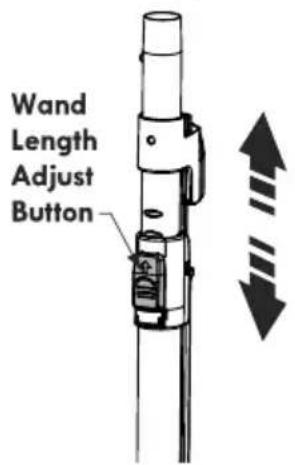
The wand length is adjustable and requires no assembly. To adjust, simply push on the wand adjust button and slide the upper wand to the desired height.
text_image
Wand Length Adjust ButtonNOTE: When adjusting the wand length you may have to hold the floor nozzle with your hand or foot.
ASSEMBLY INSTRUCTIONS
HOSE
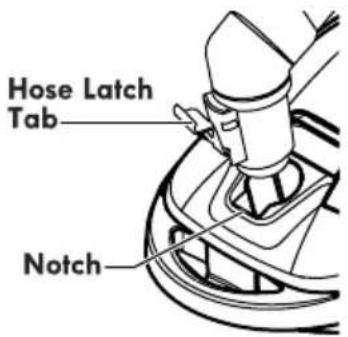
To install: Line up the hose latch tab with the notch in the canister hood, and insert hose into canister until it snaps into place.
text_image
Hose Latch Tab NotchIMPORTANT: Push hose firmly into the canister until the hose latch tab snaps into place. The vacuum cleaner will not operate until hose is fully connected.
To remove: Do not open hood before removing hose. With hood closed, press the hose latch tab in to release and remove hose.
CANISTER
-
Open the canister hood.
-
Check to see that the dust bag is properly installed. See DUST BAG CHANGING (page 18-19) for instructions.
-
Check to see that the motor safety filter is properly installed. See MOTOR SAFETY FILTER CLEANING (page 19-20) for instructions.
OPERATING INSTRUCTIONS
HOW TO START

WARNING
Personal Injury and Product Damage Hazard
- ALWAYS turn off the vacuum cleaner before unplugging.
• The cord moves rapidly when rewinding. Keep children away and provide a clear path when rewinding the cord to prevent personal injury. - DO NOT use outlets above counters. Damage from cord to items in surrounding area could occur.
- When any abnormality/failure occurs, stop using the product immediately and disconnect the power plug.
HOW TO START
NOTE: To reduce the risk of electric shock, this vacuum cleaner has a polarized plug; one blade is wider than the other. This plug will fit in a polarized outlet only one way. If the plug does not fit fully in the outlet, reverse the plug. If it still does not fit, contact a qualified electrician to install the proper outlet. Do not change the plug in any way.

WARNING
Personal Injury and Product Damage Hazard
• DO NOT run over power cord with floor nozzle. Personal injury or product damage could result.
• DO NOT pull plug from wall by the power cord. If there is damage to the cord or plug, personal injury or property damage could result.
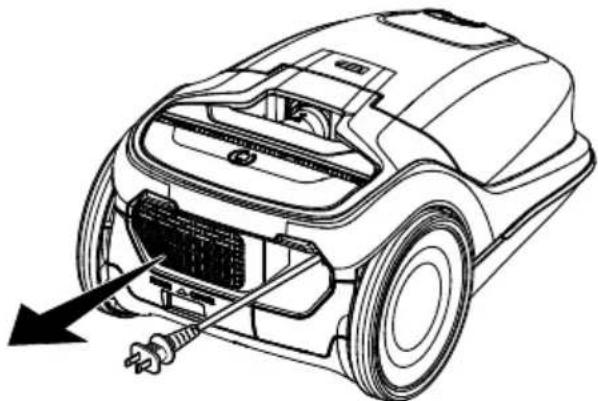
- Pull cord out of canister to desired length. The cord will not rewind until the cord rewind button is pushed.
natural_image
Line drawing of a car's internal components with a tool inserted, showing no text or symbols- Plug the polarized power cord into a 120 Volt outlet located near the floor.
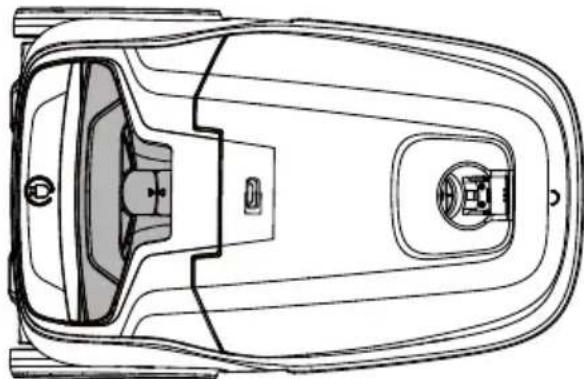
To rewind: Turn off and unplug the vacuum cleaner. Hold the plug while rewinding to prevent damage or injury from the moving cord. Push cord rewind button.
natural_image
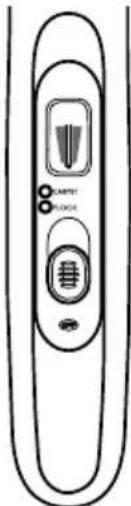
Top-down line drawing of a car interior layout (no text or symbols)- Select a position on the handle 3-way On/Off switch. Slide the switch forward to the CARPET or FLOOR position to turn on suction to the floor nozzle. Slide the switch all the way back to turn the vacuum cleaner off.
text_image
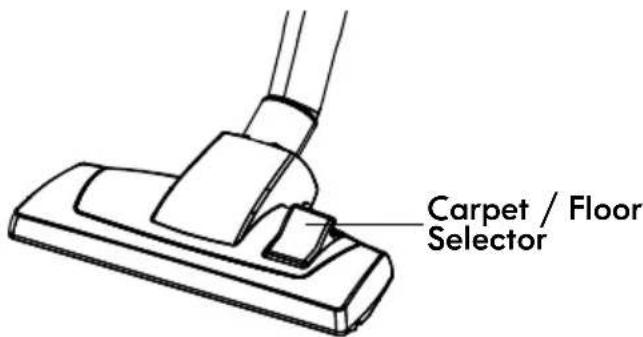
LARPET FLOCK- Press the carpet / floor selector on the floor nozzle to release the brush and squeegee for cleaning bare floors. When cleaning carpets, press the carpet / floor selector on the floor nozzle to retract the brush and squeegee.
text_image
Carpet / Floor SelectorHOW TO START
NOTE: This 3-way On/Off switch can also be fitted with a PowerMate® motorized nozzle, which is sold separately. When using the PowerMate® :
Slide the switch forward to the CARPET position to turn on suction from the canister motor and the PowerMate ^® brushroll. The CARPET indicator button will turn green, and the PowerMate ^® brushroll will start to spin.
Slide the switch forward to the FLOOR position to turn on canister motor suction only. The FLOOR indicator button will turn green, and the PowerMate brushroll will not spin. Slide the switch all the way back to turn the vacuum cleaner off. The CARPET and FLOOR indicators will both become gray.
VACUUMING TIPS
FOR BEST CLEANING RESULTS
- Slide suction control toward HIGH to increase suction for carpets, and bare floors.
- Slide suction control towards LOW POWER to decrease suction for lightweight rugs or drapes.
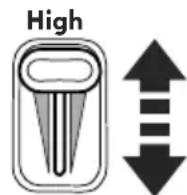
Low power
Increase Suction
Increase suction for upholsteries, carpets, and bare floors.
Decrease Suction
Decrease suction for draperies and lightweight rugs.
- Keep the airflow passage open. Check each assembly area in REMOVING CLOGS (page 17) occasionally for clogs. Turn off and unplug vacuum cleaner from outlet before checking.
SUGGESTED SWEEPING PATTERN
For best cleaning action, the floor nozzle should be pushed straight away from you and pulled straight back. At the end of each pull stroke, the direction of the floor nozzle should be changed to point into the next section to be cleaned. This pattern should be continued across the carpet with slow, gliding motions.
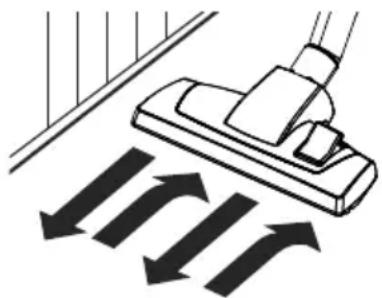
natural_image
Diagram showing a hand using a vacuum cleaner to lift down an airfoil, with multiple arrows indicating airflow or pressure direction (no text or symbols present)NOTE: Fast, jerky strokes do not provide complete cleaning.
FLOOR NOZZLE STORAGE
The wand has a "U" shaped storage hook that slides into the "U" shaped slot on the canister. The storage hook allows the wands and floor nozzle to be stored with the canister to conserve storage space. The canister must be stored on end for this feature to be used.
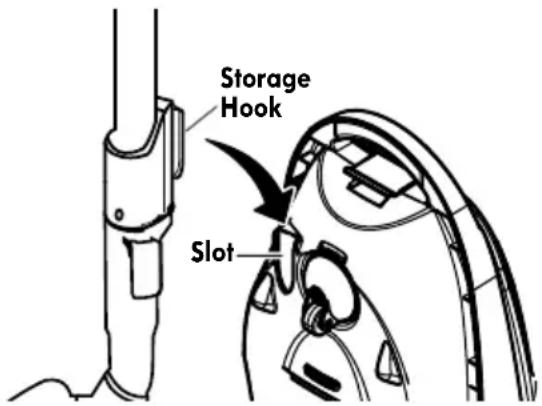
text_image
Storage Hook SlotATTACHMENTS
CAUTION
DO NOT attach or remove handle or wands while vacuum cleaner is ON. This could cause sparking and damage the electrical contacts or electronic controls.
ATTACHMENT STORAGE
This vacuum cleaner is equipped with onboard attachment storage. The bare floor tool is stored in the canister, See ATTACHMENT USE TABLE on page 15.
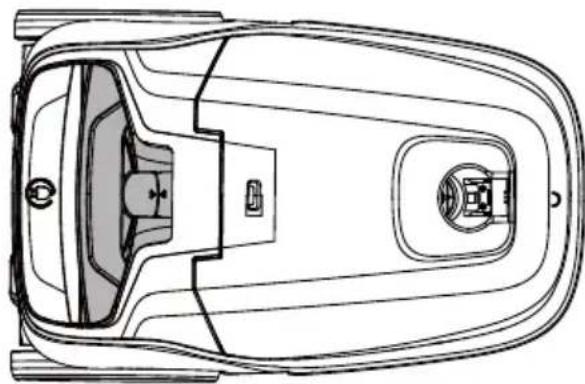
natural_image
Top-down technical line drawing of a car interior showing internal compartments and structural elements (no text or symbols)3-IN-1 COMBINATION TOOL
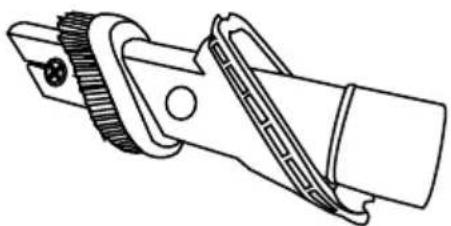
The 3-in-1 combination tool can be attached to the end of the wand and the handle.
Slide the collar of the tool over the open end of the wand or handle.
Use the 3-in-1 combination tool in crevice tool mode for cleaning in tight spaces such as furniture, between cushions, and stairs. See ATTACHMENT USE TABLE (page 15).
natural_image
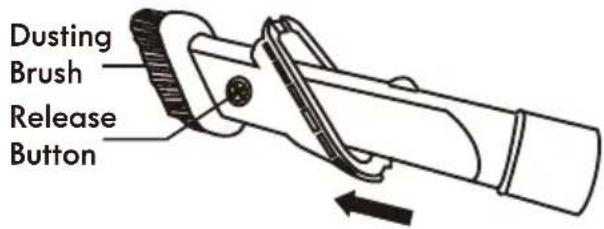
Technical line drawing of a mechanical clamp or connector (no text or symbols)Set the combination tool in dusting brush mode by pressing the release button and sliding the dusting brush side of the brush tool to the end of the combination tool.
Use in dusting brush mode for cleaning loose surfaces such as drapes. See ATTACHMENT USE TABLE (page 15).
text_image
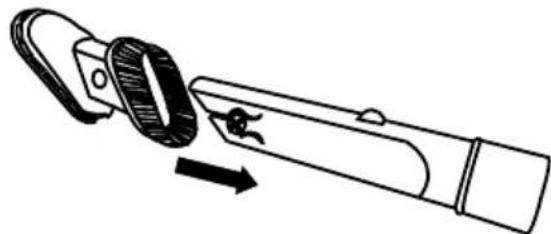
Dusting Brush Release ButtonPress the release button to remove the brush tool. Set the combination tool in upholstery brush mode as shown. Use in upholstery brush mode for cleaning fabric surfaces such as fabric sofa. See ATTACHMENT USE TABLE (page 15).
natural_image
Line drawing of a mechanical tool with an arrow indicating motion (no text or symbols)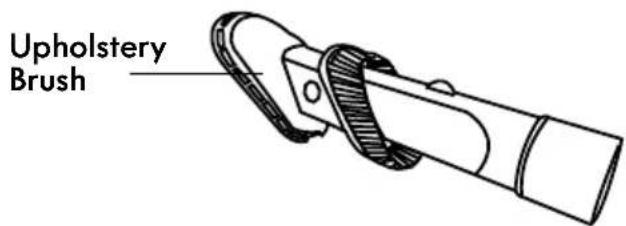
text_image
Upholstery BrushTo return the combination tool to crevice tool mode, press the release button and slide the brush tool down the combination tool.
ATTACHMENTS
ATTACHMENTS ON HANDLE
NOTE: If the floor nozzle is attached, turn vacuum cleaner off before removing handle from wand.
- Press wand release button and pull up on the handle.
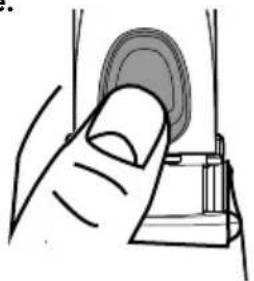
natural_image
Illustration of a hand pressing a button on a device (no text or symbols visible)- Slide attachments onto handle as needed. To use the bare floor tool, align the middle hole on the bare floor tool with the tab on the handle and push together. The bare floor tool will click into place. See ATTACHMENT USE TABLE (page 15).
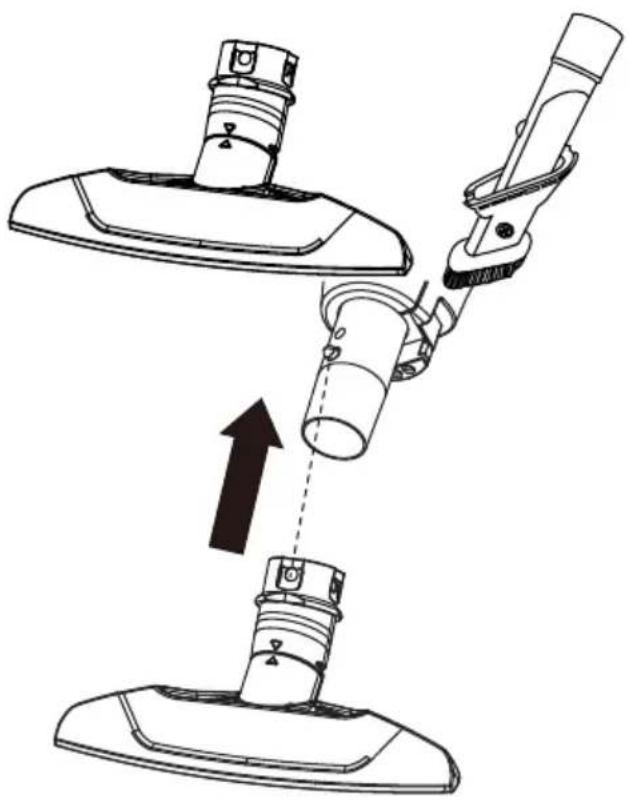
natural_image
Diagram of a vacuum cleaner assembly showing step-by-step assembly from base to top (no text or symbols)ATTACHMENTS ON WAND
- To remove floor nozzle from wand, press the nozzle release button and pull to remove.
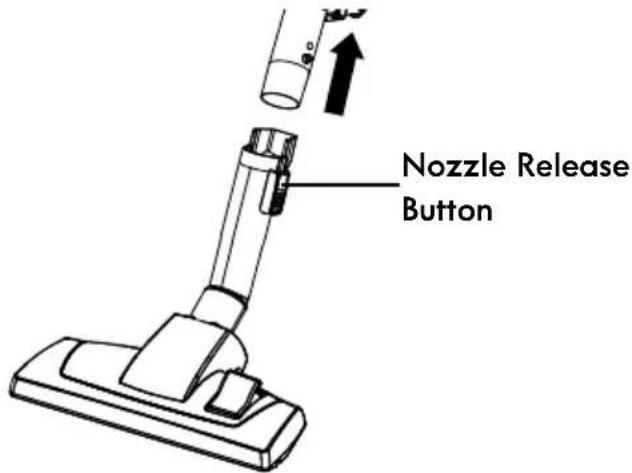
text_image
Nozzle Release Button- Slide attachments onto wand as needed. To use the bare floor tool, align the side hole on the bare floor tool with the tab on the wand and push together. The bare floor tool will click into place. See ATTACHMENT USE TABLE (page 15).
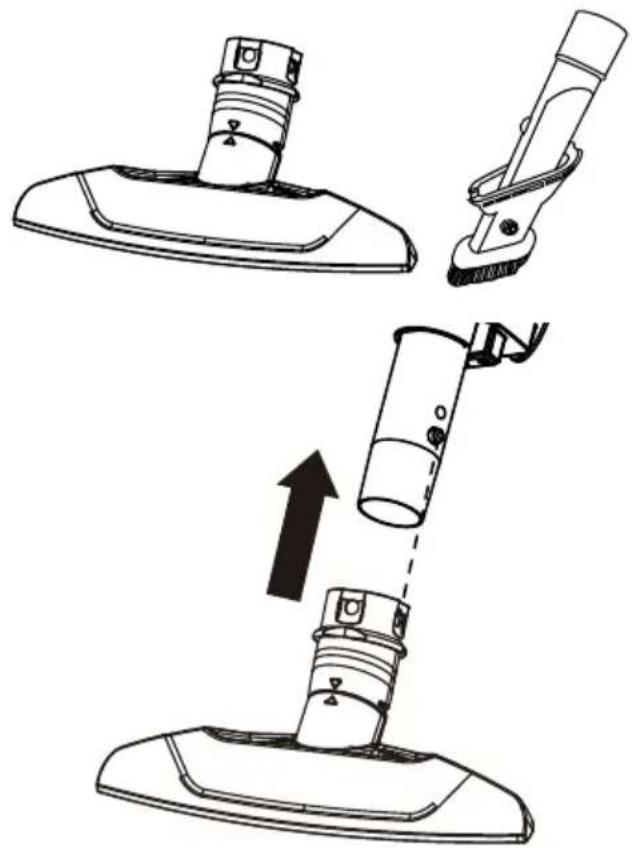
natural_image
Diagram showing three steps of a hairdryer tool: top view, side view, and bottom view with an arrow indicating the process (no text or symbols present)ATTACHMENT USE TABLE
| CLEANING AREA | ||||||||
| ATTACHMENT | 1 | Between Cushions1 | Drapes1 | Stairs | Bare Floors | Carpeted Floors/Rugs | WallsFurniture | |
| Bare Floor Tool |  | √ | √ | √ | ||||
| Floor Nozzle |  | ^2 | √ | |||||
| Dusting Brush | 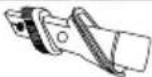 | √ | √ | √ | ||||
| Floor Nozzle | 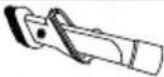 | √ | √ | √ | √ | |||
| Upholstery Brush | 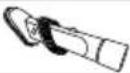 | √ | √ | |||||
- Always clean attachments before using on fabrics.
- Press the carpet / floor selector on the floor nozzle to release the brush and squeegee for cleaning bare floors.
PERFORMANCE/SAFETY FEATURES
CHECK BAG INDICATOR
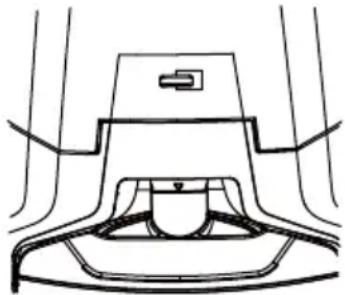
When the vacuum cleaner is running with normal airflow, the CHECK BAG indicator is green. The indicator turns to dark red whenever the airflow becomes blocked. If that occurs, check the disposable dust bag, motor safety filter and other possible clog locations shown in REMOVING CLOGS (page 17).
natural_image
Line drawing of a mechanical component or bracket with no visible text or symbolsTo correct problem: See "Check Bag Indicator activates" in TROUBLESHOOTING (page 22).
NOTE: The indicator may activate when using certain attachments due to reduced airflow through attachment.
THERMAL PROTECTOR
This vacuum cleaner has a thermal protector which automatically trips to protect the vacuum cleaner from overheating. If a clog prevents the normal flow of air to the motor, the thermal protector turns the motor off automatically. This allows the motor to cool in order to prevent possible damage to the vacuum cleaner.
To correct problem: Turn off and unplug vacuum cleaner to allow the vacuum cleaner to cool and the thermal protector to reset. Check for and remove clogs, if necessary. Also check and clean or replace any clogged filters. Wait approximately fifty (50) minutes and plug the vacuum cleaner in and turn back on to see if the motor protector has reset.
If the canister motor does not resume operation after the reset procedure described above, immediately discontinue use and call 1-877-531-7321 (US) / 1-844-608-3081 (CA) for assistance.
CANISTER CARE
REMOVING CLOGS
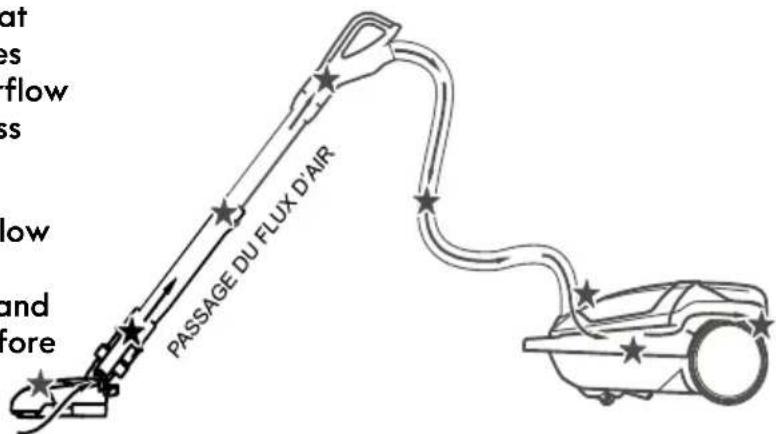
The vacuum cleaner creates suction that picks up dirt. Rapidly moving air carries the dirt to the dust bag through the airflow passages. The dust bag lets the air pass through, while it traps the dirt.
For best cleaning results, keep the airflow passage open. Check the starred (★) areas occasionally for clogs. Turn off and unplug vacuum cleaner from outlet before checking.
text_image
at es flow ss low and fore PASSAGE DU FLUX D'AIRTO CHECK FOR CLOGS:
- Check dust bag and change if full. See DUST BAG CHANGING (page 18-19).
- Check motor safety filter and HEPA media exhaust filter and clean or replace if dirty. See MOTOR SAFETY FILTER CLEANING (page 19-20) and HEPA MEDIA EXHAUST FILTER CHANGING (page 20-21).
- Check floor nozzle for any dirt.
If the vacuum cleaner still has poor suction, do the following:
-
Connect the hose to the canister and turn vacuum cleaner on. Check the end of the hose for suction. If there is good suction on the hose handle, there is no clog in the hose. If the suction is bad, remove any dirt or debris in the hose and handle.
-
Connect hose handle to wand. Check the end of the wand for suction. If there is good suction at the end of the wand, there is no clog in the wand. If the suction is bad, remove any dirt or debris in the wand.
- Check floor nozzle swivel. Remove any dirt or debris.
CLEANING EXTERIOR AND ATTACHMENTS
-
Turn off and unplug vacuum cleaner. DO NOT drip water on vacuum cleaner.
-
To clean exterior, or to reduce static electricity and dust build-up, wipe outer surface with a clean, soft cloth that has been dipped in a solution of mild liquid detergent and water, then wrung dry. Wipe dry after cleaning.

CAUTION
Do not use attachments if they are wet. Attachments used in dirty areas, such as under a refrigerator, should not be used on other surfaces until they are washed. They could leave marks.
DUST BAG CHANGING
For best cleaning results, the dust bag should be changed often. The CHECK BAG indicator will turn red when the bag needs to be changed or the airflow is blocked.
NOTE: See REPLACEMENT PARTS for part number and purchase details (page 6).
- Turn off and unplug vacuum cleaner.
- Remove hose from canister.
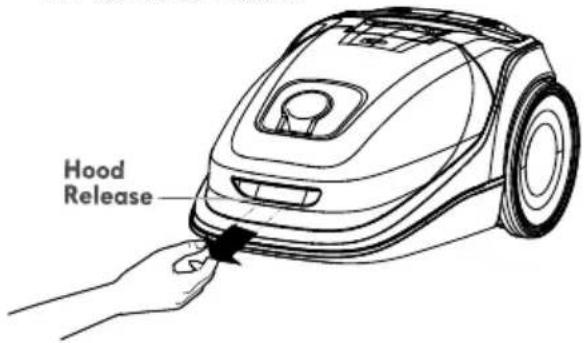
- Squeeze the hood release button, then lift canister hood.
text_image
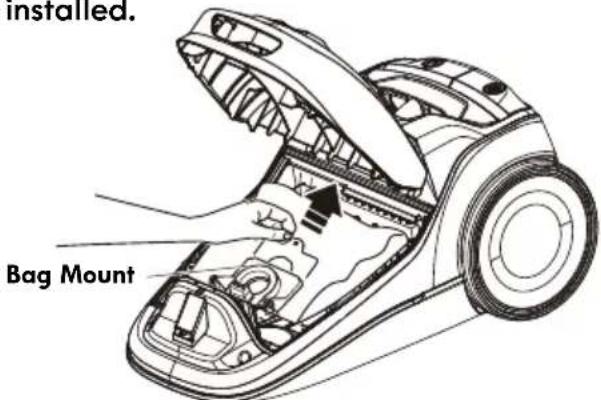
Hood Release- Pull bag out of the bag mount.
NOTE: The bag mount will flip forward
after removing bag. This will prevent the hood from closing until a new bag is installed.
text_image
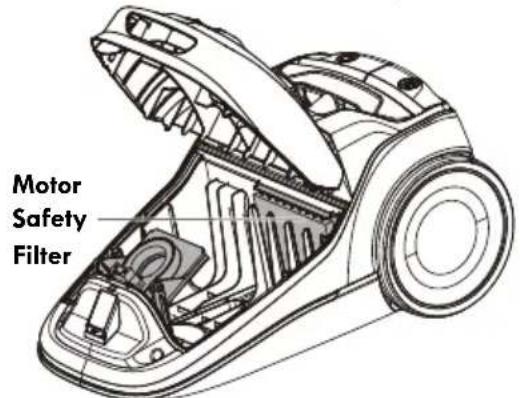
installed. Bag Mount- Check the motor safety filter and clean or, if necessary replace. See MOTOR SAFETY FILTER CLEANING (page 19-20).
text_image
Motor Safety FilterDUST BAG CHANGING
NOTE: DO NOT bend or crease the middle of the cardboard when installing the bag into the bag mount slots.
- Rotate bag mount down and install bag into slots per illustration, pushing down until the cardboard tab locks into position and the holes align.
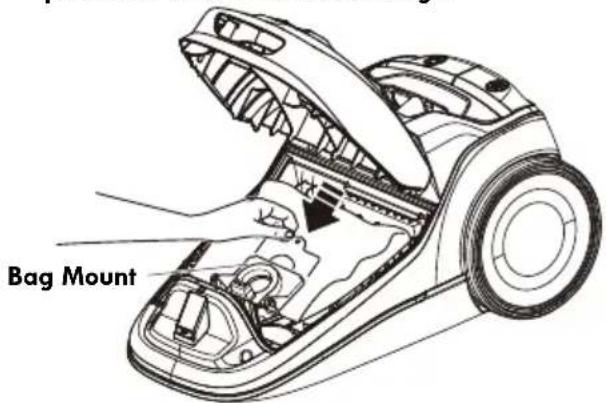
text_image
Bag Mount-
Tuck the bag securely into the bag cavity so that none of the bag will be pinched by the hood.
-
Close and latch canister hood.
-
Insert hose into canister until it snaps in place.
-
Plug cord into wall outlet.
CAUTION NEVER REUSE A DUST BAG.
Very fine materials, such as carpet freshener, face powder, fine dust, plaster, soot, new carpet lint, etc. can clog the bag and cause it to burst before it is full, which may damage the vacuum cleaner motor. Change bag more often when vacuuming these materials.
MOTOR SAFETY FILTER CLEANING
WARNING
Electrical Shock Hazard
Turn off and unplug vacuum cleaner from electrical outlet. Do not operate the vacuum cleaner without the motor safety filter. Be sure the filter is dry and properly installed to prevent motor failure and/or electrical shock.
MOTOR SAFETY FILTER
Check motor safety filter occasionally and clean when dirty.
NOTE: See REPLACEMENT PARTS for part number and purchase details (page 6).
-
Remove the bag as outlined in the DUST BAG CHANGING (page 18-19) section.
-
Lift the rubber retainer and pull out motor safety filter as shown.
MOTOR SAFETY FILTER CLEANING
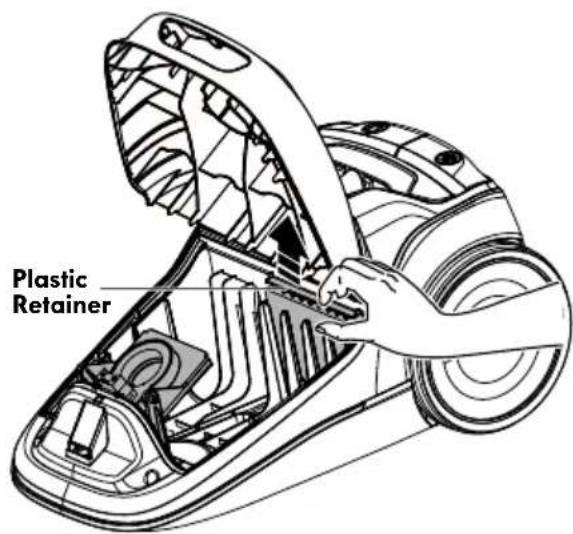
text_image
Plastic Retainer-
Wash filter in warm soapy water, rinse, then dry. Do not clean in dishwasher or install while damp.
-
Slide the filter back into place under the ribs in the bag cavity.
-
Replace the bag as outlined in the DUST BAG CHANGING (page 18-19) section.
HEPA MEDIA EXHAUST FILTER CHANGING
WARNING
Fire and/or Electrical Shock Hazard
Do not operate with a clogged exhaust filter or without the exhaust filter installed. Do not operate without filter cover installed.
EXHAUST FILTER - HEPA MEDIA
The HEPA media exhaust filter cartridge must be replaced when dirty. Replace the filter when the entire surface area is covered evenly. The filter CANNOT be washed as it will lose its dust trapping ability.
NOTE: See REPLACEMENT PARTS for part number and purchase details (page 6).
- Push latch up to release the exhaust filter cover from slot in canister.
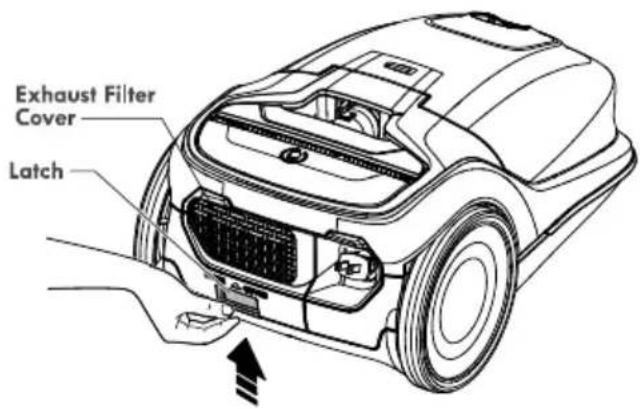
text_image
Exhaust Filter Cover Latch-
Pull filter cover and outward to remove it from filter chamber in the canister.
-
Remove the HEPA media exhaust filter cartridge from the filter cover.
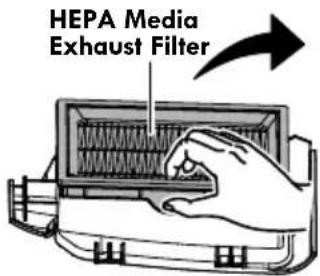
text_image
HEPA Media Exhaust FilterHEPA MEDIA EXHAUST FILTER CHANGING
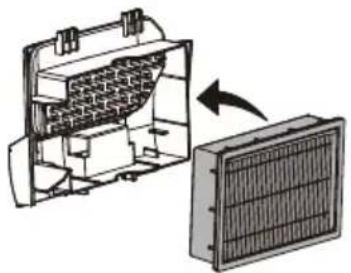
- Insert the new HEPA media exhaust filter cartridge into the filter cover with the rubber seal upward.
natural_image
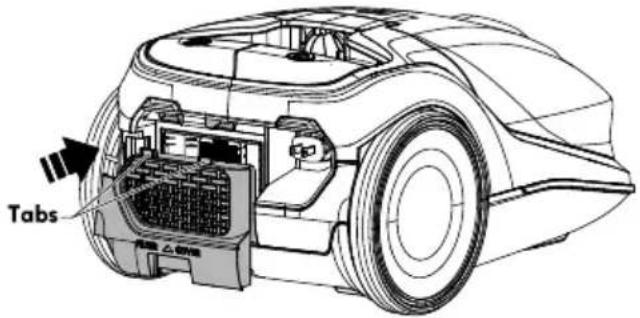
Diagram showing a device inside a housing with an arrow indicating transformation or assembly (no text or symbols present)- To replace the exhaust filter cover, insert the two tabs on the cover into the slots at the top of the filter chamber.
text_image
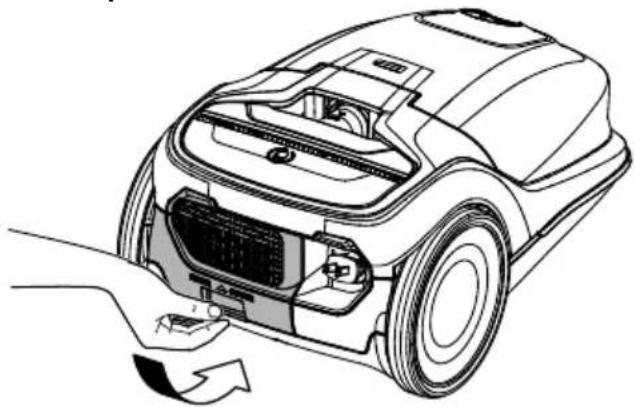
Tabs- Rotate filter cover down until it snaps into place.
natural_image
Technical line drawing of a robotic car interior showing engine compartment and handle (no text or symbols)TROUBLESHOOTING
Review this table to find do-it-yourself solutions for minor performance problems. Any other service needed call 1-877-531-7321 (US) / 1-844-608-3081 (CA) for assistance.

WARNING
Always turn off and unplug vacuum cleaner before performing maintenance to the vacuum cleaner. Failure to do so could result in electrical shock or personal injury.
| PROBLEM POSSIBLE CAUSE SOLUTION | ||
| Vacuum cleaner won't start | Unplugged at wall outlet. Plug in firmly, press On/Off switch. | |
| Tripped circuit breaker/blown fuse at household service panel. | Reset circuit breaker or replace fuse. | |
| Loose hose electrical connections. | Reconnect hose ends. | |
| Poor job of dirt pick-up. | Full or clogged dust bag. Change bag. | |
| Clogged airflow passages. Clear airflow passages. | ||
| Dirty filters. | Clean/change filters. | |
| Wrong power level selected. Adjust control. | ||
| Hole in hose. Replace hose. | ||
| Worn floor nozzle. Change floor nozzle. | ||
| Canister hood open. Close and latch hood. | ||
| Vacuum cleaner starts but shuts off. | Hose or hood electrical connections. | Check connections, reconnect hose ends. |
| Tripped thermal protector in canister. | See THERMAL PROTECTOR (page 16). | |
| CHECK BAG Indicator activates. | Full or clogged dust bag. Change bag. | |
| Dirty filters. Clean/change filters. | ||
| Blocked airflow passage. Clear blockage from airflow passage. | ||
| Certain attachment tools. | This is normal. The indicator will turn to green when tool is removed. | |
TROUBLESHOOTING
| Vacuum cleaner picks up moveable rugs-or- floor nozzle pushes too hard. | Suction too strong. | Slide the electronic suction control to a lower power setting. |
| Cord won’t rewind. | Dirty power cord. Clean the power cord. | cord. |
| Cord jammed. Pull out cord and rewind. | wind. | |
| Vacuum cleaner leaves marks on carpet. | Wrong vacuuming pattern. See VACUUMING TIPS (page 12). | |
TABLA DE CONTENIDOS
Cleva North America, Inc., Greenville SC 29607
natural_image
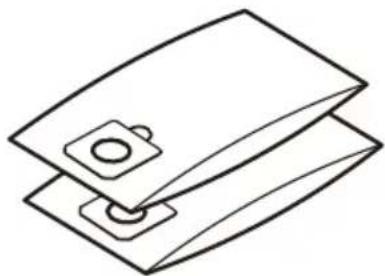
Line drawing of a mechanical component with a cylindrical top and base (no text or symbols)Bolsa para polvo (paquete de 2)
natural_image
Simple line drawing of two overlapping sheets with a small square object on top (no text or symbols)natural_image
Line drawing of a mechanical tool or clamp device (no text or symbols)MANILLA Y CONJUNTO DE
PIEZAS DE LA MANGUERA
natural_image
Line drawing of a vacuum cleaner's handle with a downward arrow indicating motion (no text or symbols)ENSAMBLAJE DE LA MANILLA
natural_image
Simple line drawing of a mechanical device with a circular component mounted on a base (no text or symbols)natural_image
Illustration of a hand pressing a button on a mechanical component (no text or symbols visible)VARA (TELESCÓPICA)
natural_image
Line drawing of a car's internal components with a black arrow pointing to a plug (no text or symbols present)natural_image
Top-down technical line drawing of a car interior showing front, side, and top views with no text or symbolsnatural_image
Diagram of a vacuum cleaner emitting black arrows, no text or symbols presentnatural_image
Top-down technical line drawing of a car interior showing front, side, and top views (no text or symbols)natural_image
Technical line drawing of a mechanical clamp or connector assembly (no text or symbols)natural_image
Illustration of a finger pressing a button on a mechanical device (no text or symbols visible)natural_image
Diagram showing three steps of a hairdryer tool application, with no text or symbols present.ACCESORIOS EN LA VARA
natural_image
Diagram showing three steps of a vacuum cleaner's internal structure, including top, side, and bottom views with an upward arrow indicating motion (no text or symbols present)TABLA DE USO DE ACCESORIOS
natural_image
Technical line drawing of a mechanical component or bracket (no text or symbols)natural_image
Diagram of a mechanical component with internal structure and external force arrow (no text or symbols)natural_image
Line drawing of a car's front engine compartment showing internal components and airflow direction (no text or symbols)Cleva North America, Inc., Greenville SC 29607
CONSIGNES DE SÉCURITÉ IMPORTANTES
natural_image
Line drawing of a mechanical component with a cylindrical top and base (no text or symbols)natural_image
Line drawing of a mechanical tool or clamp device (no text or symbols)natural_image
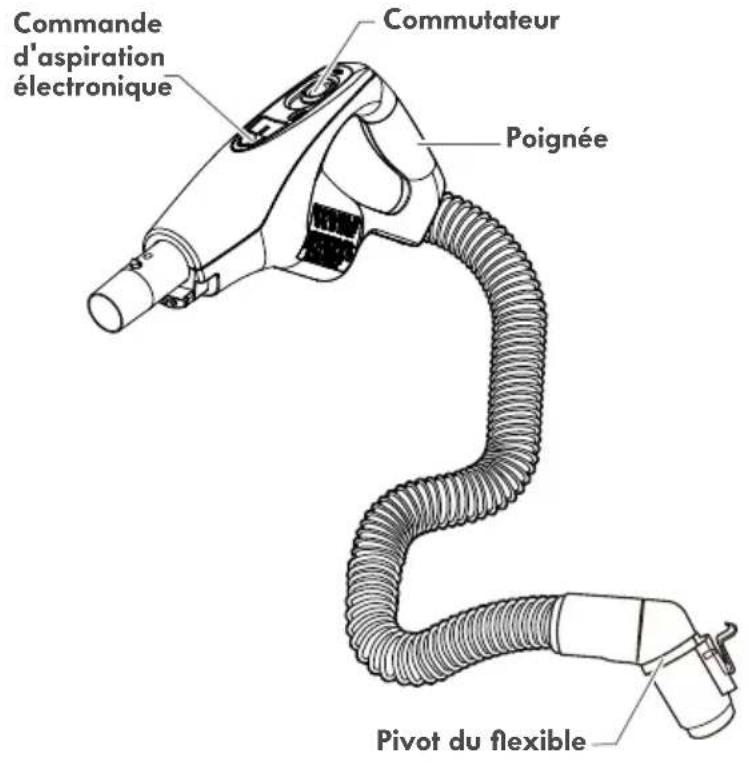
Simple line drawing of two overlapping sheets with a small square object on top (no text or symbols)POIGNÉE ET FLEXIBLE
natural_image
Simple line drawing of a mechanical component with an arch and base (no text or symbols)natural_image
Illustration of a hand pressing a circular object on a mechanical device (no text or symbols)TIGE (TÉLESCOPIQUE)
natural_image
Line drawing of a robotic car with visible engine compartment and sensor assembly (no text or symbols)natural_image
Top-down technical line drawing of a car interior showing internal compartments and structural elements (no text or labels)natural_image
Illustration of a vacuum cleaner with directional arrows indicating airflow or movement (no text or symbols)natural_image
Top-down technical line drawing of a car interior layout (no text or symbols)OUTIL À USAGES MULTIPLES 3 EN 1
natural_image
Technical line drawing of a mechanical clamp or connector assembly (no text or symbols)natural_image
Illustration of a hand pressing a button on a mechanical component (no text or symbols visible)natural_image
Technical line drawing showing three steps of a vacuum cleaner's installation, including top, side, and bottom views with an arrow indicating assembly direction (no text or symbols present)natural_image
Diagram showing three steps of a hairdryer tool application: top view, side view, and bottom view with an arrow indicating process (no text or symbols present)TABLEAU D'UTILISATION DES ACCESSOIRES