Fasssauna 7 - Sauna Sonnenkönig - Free user manual and instructions
Find the device manual for free Fasssauna 7 Sonnenkönig in PDF.


User questions about Fasssauna 7 Sonnenkönig
0 question about this device. Answer the ones you know or ask your own.
Ask a new question about this device
Download the instructions for your Sauna in PDF format for free! Find your manual Fasssauna 7 - Sonnenkönig and take your electronic device back in hand. On this page are published all the documents necessary for the use of your device. Fasssauna 7 by Sonnenkönig.
USER MANUAL Fasssauna 7 Sonnenkönig
natural_image
Exterior view of a circular wooden steamer with a transparent cylindrical lid, labeled 'NNENKÖNG' above (no other text or symbols visible)
FIRMA
Armin Schmid
Olensbachstrasse 9-15
CH-9631 Ulisbach
Tel. Int. +41 58 611 60 00
Tel. Nat. 0848 870 850
Armin Schmid
natural_image
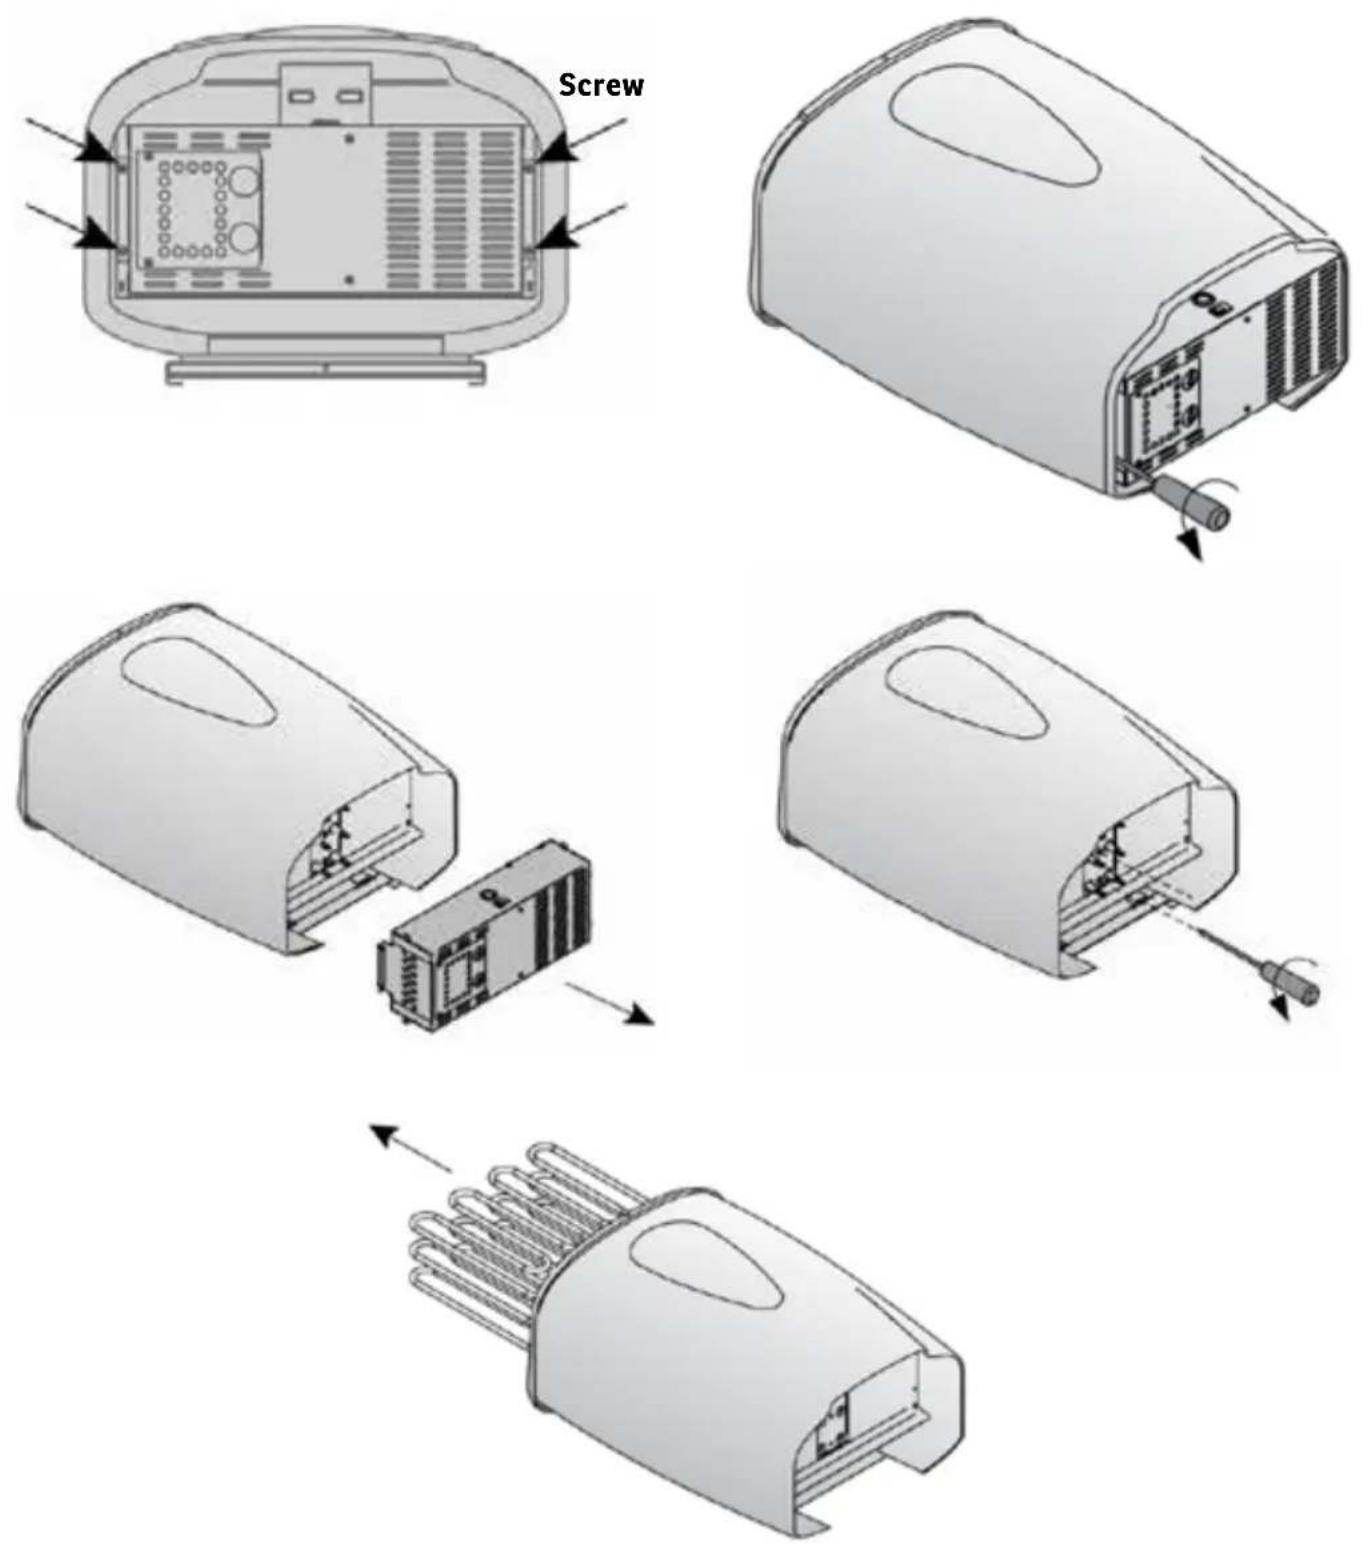
Technical line drawings of industrial components including a cylindrical barrel, a mechanical tool, and a bracket (no text or symbols present)natural_image
Diagram of a mechanical device with a lever and handle, showing motion direction (no text or symbols)natural_image
Exterior view of a circular wooden steamer with a transparent cylindrical lid, labeled 'HNNENKÖNIG' above (no other text or symbols visible)
MAISON
Armin Schmid
Olensbachstrasse 9-15
CH-9631 Ulisbach
Tel. Int. +41 58 611 60 00
Tel. Nat. 0848 870 850
Armin Schmid
natural_image
Diagram of a mechanical device with a lever and handle, showing motion direction (no text or symbols)natural_image
Exterior view of a circular wooden steamer with open door and internal storage unit (no signage)
DITTA
Armin Schmid
Olensbachstrasse 9-15
CH-9631 Ulisbach
Tel. Int. +41 58 611 60 00
Tel. Nat. 0848 870 850
Armin Schmid
natural_image
Technical line drawings of industrial components including a cylindrical barrel, a mechanical tool, and a bracket (no text or symbols present)natural_image
Diagram of a mechanical device with a lever and handle, showing motion direction (no text or symbols)natural_image
Exterior view of a circular wooden steamer with a transparent cylindrical lid, labeled 'HNNENKÖNG' above (no other text or symbols visible)
COMPANY
Armin Schmid
Olensbachstrasse 9-15
CH-9631 Ulisbach
Tel. Int. +41 58 611 60 00
Tel. Nat. 0848 870 850
Armin Schmid
Item No. d i v e r s
Version 13.09.2023
01 - CONTENT
01 - CONTENT 56
02 - GUIDELINES 57
03 - WOOD CARE INSTRUCTIONS 58
04 - ELECTRIC OVEN 60
05 - CONTROL AND SETTING 62
06 - WARNINGS 64
07 - TROUBLESHOOTING 65
08 - INSTALLATION 66
Please read and fully understand this manual before attempting to assemble, operate, or install the product.
A sauna barrel is an outdoor barrel-shaped sauna and offers one of the best sauna forms. The barrel shape allows for quick heating as the air circulates better in the round interior. The design and rustic curves of a Sonnenkönig Outdoor Sau-na are an attractive focal point wherever you place it.
The assembly of a barrel sauna requires careful preparation. For example, it is advisable to think about the location and the accompanying foundation before starting the sauna assembly. Ensure that the sauna is not placed directly on the regular ground, as the „wooden legs“ of the sauna would not withstand it for long. A strip foundation is certainly the most suitable foundation for the sauna. You can easily pour it yourself with some DIY knowledge.
Before establishing your sauna oasis, you should inquire about building permits. In different cantons, a building permit may be required. Regulations vary by region, but your local building department can provide you with the relevant information. Please also consult your chimney sweep. All the wood stoves and electric heaters we offer have the CE certificate and are approved for use in Europe.
- Do not enter the sauna on an empty stomach or immediately after eating.
- Enter the sauna unclothed.
- Always take a shower before entering the sauna, not only for hygiene but also to remove the oily film from your skin.
- Dry off thoroughly before entering the sauna (dry skin sweats better).
- A warm foot bath beforehand acclimates your body and prepares you for the heat.
- The sauna is for relaxation, so keep calm and quiet.
- Place a large bath towel on the seating bench. Remember that warm air rises, so it's hotter on the upper benches. For sauna beginners, it's advisable to prefer the lower or middle benches.
- To avoid dizziness or fainting, stand up during the last 2 minutes of your session and sit upright. Move your legs to prevent blood from pooling in your lower body.
- Prioritize your health! Exit the sauna early if you don't feel well.
- A sauna session typically lasts between 8 and 12 minutes but should not exceed 15 minutes.
- In some saunas, it's customary to perform a steam infusion. After a pre-sweating phase (5-10 minutes), the infusion takes place as the "highlight" (6-8 minutes), followed by a possible post-sweating phase of 1-2 minutes.
- Do not enter or exit the sauna during the infusion.
- It's customary to spend about 2 minutes in the fresh air to cool your respiratory system and replenish oxygen.
• Always take a shower after leaving the sauna, as well as before using the plunge pool. - You can only achieve health benefits if the cooling with cold water and fresh air is strong enough.
- A warm foot bath is also recommended after cooling down.
-
This helps dissipate any remaining body heat and cools the body. It's also a good preventive measure against colds. Additionally, the warm foot bath prevents further sweating.
-
If you want to relax, you can retreat to a relaxation room.
- Only start drinking again after your last sauna session. No alcohol! Recommended beverages are calcium- and magnesium-rich mineral water or diluted fruit juices (at least 1 liter).
- Children under 3 years should definitely not use the sauna. Even for children over 3 years, the temperature should be significantly lower to avoid health problems.
03 - WOOD CARE INSTRUCTIONS
As the material of the sauna is made from natural Canadian cedar wood and thermo-wood, please observe the following care and assembly instructions:
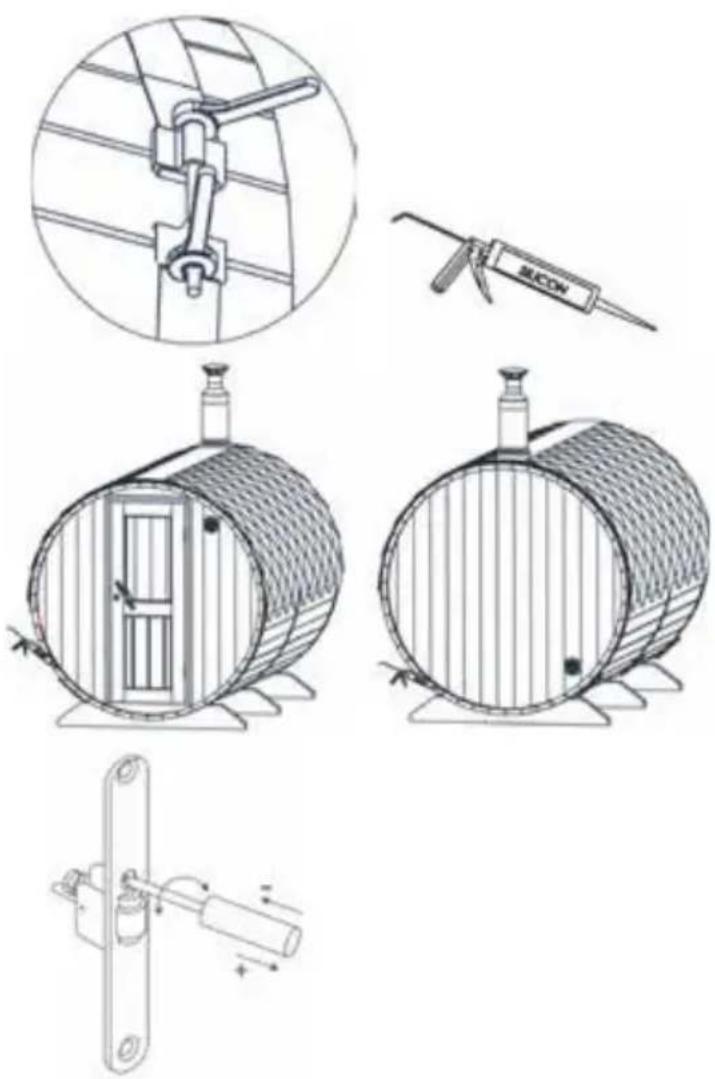
- During the first two years, closely monitor the wood's drying behavior. To do this, periodically relax the barrel sauna.
- In colder seasons, the barrel should be relaxed using the adjustment device. To do this, loosen the nuts slightly. If the door becomes stuck, you can gently tap the outer planks outward with a hammer and a piece of wood.
- In warmer seasons, the sauna should be tensioned as the wood expands. You can lightly tighten the nuts for this purpose. (Caution: place a piece of wood in the middle of the door frame when tightening the nuts to prevent it from being pressed in.)
- The round exterior covers attached externally should have a clearance of approximately 5 mm at the joints. Please check this during re-tensioning. It may be necessary to release the covers in the case of extreme tensioning.
- If the door becomes stuck, you must relax your barrel sauna using the tensioning device.
- Certain areas inside your sauna may darken over time. These are normal signs of use and a result of sweating. Improvement is possible, but complete removal is not. Clean the interior of your sauna with baking soda and water.
- Always place towels on the sauna benches before using them.
- We recommend placing a filled bucket of water in the sauna after each use to maintain some humidity inside.
- Treat the exterior surface of the sauna with wood preservatives or wood antiseptics at least every two years. The minimum temperature for applying these substances is +5^ .
- To protect the ends of the wooden planks from cracking, treat them with special products. If you use the same product for the ends as you did for the entire sauna, apply it in three layers.
- To protect your sauna from fungi, mold, or wood pests, treat all interior surfaces with special products at least once a year.
Tightening the Stainless Steel Bands
After transportation, tighten the stainless steel bands. Ensure that the bands are tightened during spring, autumn, and rainy weather (avoid excessive tension). In hot weather, slight sagging of the bands is permissible. You can tighten the stainless steel bands as needed, but it's not urgently required. It's essential to monitor the tension of the bands and adjust them according to weather conditions. Only regulate the bands when necessary, as premature adjustments can lead to door sagging or damage to the sauna profiles. Once you have securely installed the sauna in its designated location, seal the gaps between the sauna walls and the profiles with appropriate silicone.
If your sauna has a glass door with a roller lock, adjust the lock before using the sauna. This can be easily done by turning the adjustment screw of the roller lock. The lock should move freely and securely lock the door.
natural_image
Technical line drawings of industrial components including a cylindrical barrel, mechanical lock, and a tool (no text or symbols present)The stove is used for heating sauna cabins to sauna temperature. Its use for other purposes is prohibited.
Stacking Sauna Heater Stones

text_image
Fig. 1The suitable stones for an electric sauna heater have a diameter of 5-10 cm. Specifically designed solid, well-known sauna heater stones should be used. The use of lightweight, porous, and uniformly sized ceramic stones is prohibited as they can overheat and damage the resistors. Soft pot stones should not be used as sauna heater stones. The stones should be free of dust before stacking. The stones are placed on the grid in the sauna heater in the gaps between the heating elements so that they support each other. The weight of the stones should not be borne by the heating elements. The stones should not be placed too close together to avoid obstructing airflow. Also, the stones should not be tightly wedged between the heating elements; they should be loosely stacked. Very small stones should not be placed in the sauna heater. The stones should cover the heating elements completely but should not protrude significantly above the top of the sauna heater. See Fig. 1. During use, the stones become brittle. For this reason, the stones should be restacked at least once a year, more frequently with heavy use. During this process, please also remove dust and rock splinters from the lower part of the sauna heater and replace damaged stones. The warranty does not cover damage caused by the use of sauna heater stones other than those recommended by the factory. The warranty also does not cover damage to the sauna heater caused by blockage of airflow due to brittle stones or stones that are too small. No objects or devices that change the quantity or direction of the airflow through the sauna heater and thereby cause overheating of the resistors and a fire hazard to the wall surfaces should be placed in the stone chamber or near the sauna heater!
Infusion
Sauna air dries out when heated, so water should be poured onto the hot stones of the sauna heater to achieve a pleasant humidity level. The amount of water regulates the desired infusion humidity. When the humidity level is appropriate, the bather's skin sweats, and breathing in the sauna becomes easier. It is advisable to start by pouring only small amounts of water on the stones to test the effect of moisture on the skin. Excessive temperatures and humidity can be uncomfortable. Prolonged stays in a hot sauna can lead to an increase in body temperature, which can be dangerous. The capacity of the sauna ladle should not exceed 0.2 liters. Large quantities of water should not be poured onto the stones at once, as boiling hot water could splash onto the bathers when it evaporates. Also, be careful not to pour water onto the stones when someone is nearby, as the hot steam could cause burns.
Water for infusion
Only water that meets the quality standards for household water should be used as infusion water. Key factors affecting water quality include:
- Humus content (color, taste, deposits): Recommended below 12 mg/l.
- Iron content (color, odor, taste, deposits): Recommended below 0.2 mg/l.
- Hardness level; the main substances are manganese (Mn) and calcium (Ca) or lime: Recommended for manganese below 0.05 mg/l and for calcium below 100 mg/l.
When using water with a high calcium content, a light, creamy layer remains on the sauna heater stones and metal surfaces. The calcification of the stones weakens their infusion properties. When using water with high iron content, a rusty layer remains on the heater's surface and resistors, causing corrosion. The use of water containing humus, chlorine, or seawater is prohibited. Only fragrances designated for this purpose should be used in infusion water. Follow the instructions on the packaging.
Temperature and Humidity in the Sauna Cabin
There are instruments suitable for use in a sauna to measure temperature and humidity. However, it is impossible to specify universally and precisely the temperatures or humidity percentages suitable for sauna use, as the effect of infusion in the sauna is perceived differently by each individual. Your own perception is the best thermometer! Proper ventilation in the sauna is essential because sauna air must be rich in oxygen and easy to breathe. See „Ventilation in the Sauna Cabin“ on page 8. People find sauna bathing to be healthy and refreshing. Sauna bathing cleanses, warms, relaxes, soothes, alleviates mental stress, and provides a peaceful place for reflection.
text_image
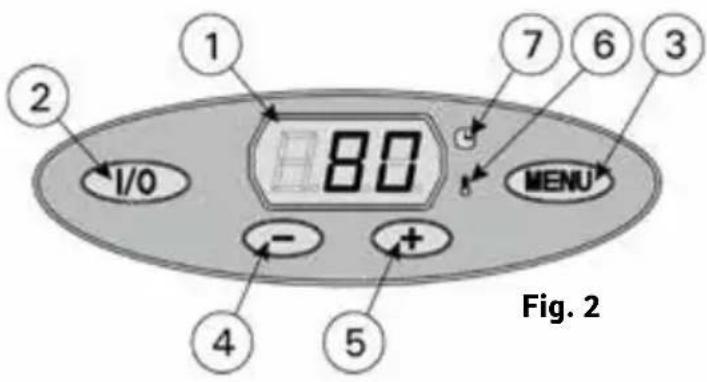
1 2 I/O 80 7 6 3 MENU 4 5 Fig. 2Turning On and Off the Sauna Heater
When the heater is connected to the power source, and the power switch (located at the front of the control panel behind the protective cover at the bottom of the front of the heater) is in the „On" position (Position 1), the heater is in standby mode (the indicator light on the I/O switch is lit).
Press the I/O button on the control panel to turn on the heater.
You will hear a clicking sound to indicate that the safety switch is activated. Once the heater is turned on, signal light 6 will flash, and the display will show the set temperature. After five seconds, the display will show the current temperature inside the sauna. When the desired temperature in the sauna has been reached, the heating elements will automatically turn off. To maintain the desired temperature, the control unit will periodically turn the heating elements on and off. The last decimal point on the display will light up when the heating elements are on. The heater will turn off when you press the I/O button again, when the set timer has expired, or if an error occurs.
- Display
- Oven on/off switch
- Change mode
- Decrease value *)
- Increase value *)
- Temperature control light
- Time selection indicator light
*) Keep pressed so that the values change more quickly.
Sauna Heater Control
Through the control panel of the heater, sauna temperature and operating time can be individually adjusted by each user as desired (see Fig. 2). The heater can also be programmed to turn on at a specific time using a button on the control panel. The factory settings for the heater are as follows:
• Temperature: +80°C
- Operating Time: 4 hours
• Preheat Time: 0 hours
Fig. 3a Basic settings
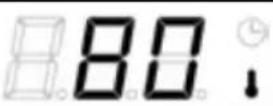 | Basic Mode (Heater On)The display shows the temperature inside the sauna cabin. |
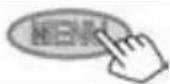
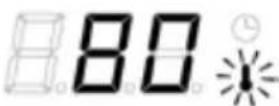
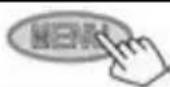
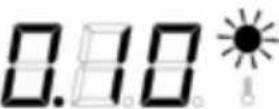
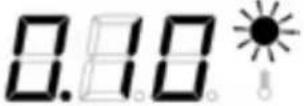
Open the settings menu by pressing the MENU button.
Sauna Cabin Temperature
The display shows the temperature setting for the sauna cabin. The indicator light 6 is blinking.
- Change the setting using the - and + buttons to the desired temperature. The adjustment range is 40–110 °C.
Proceed to the next setting by pressing the MENU button.
Remaining switch-on time
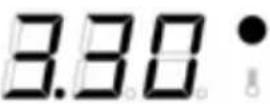
Set the remaining on-time using the - and + buttons.
Example: The sauna heater will run for 3 hours and 30 minutes.
Preset time (time-controlled switch-on)
- Press the + button until the maximum preheat time is exceeded. The indicator light 7 will blink.
- Use the - and + buttons to select the desired preheat time. The time can be set for up to 10 hours in 10-minute increments, and from 10 to 18 hours in 1-hour increments.
Example: The sauna heater will start in 10 minutes.
Press the MENU button to exit the settings.
Basic Mode (Countdown Timer, Oven Off)
The decreasing preheat time is displayed until it reaches zero, and then the oven is turned on.
Fig. 3b Further settings
| Heater Standby | |
 | Interrupt the power supply to the oven's electronics (see Fig. 7).Press and hold the MENU button, then turn the power supply back on. |
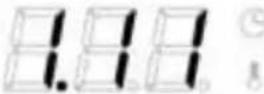 | Wait for the program version number to appear on the display.Press + to change the maximum on-time setting.Press – to change the sensor value setting. |
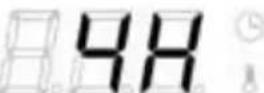 | Maximum on-timeThe maximum on-time can be changed using the – and + buttons. Adjustment range: Family saunas 2–6 hours, public saunas in apartment buildings 2–8 hours.Example: The sauna stove will run for 4 hours from the beginning. (The remaining on-time can be changed, see Fig. 3a.) |
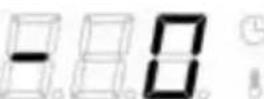 | Setting the sensor valueThe measured values can be corrected by -10 units. The setting does not directly affect the measured temperature value but changes the measurement curve. |
 | Press the MENU button. The oven switches to standby mode. |
06 - WARNINGS
- Sea and humid climates can cause the metal surfaces of the sauna oven to rust.
- Do not use the sauna for drying clothes or laundry due to the risk of fire, and high humidity can damage electrical appliances.
- Caution should be exercised around the hot sauna oven. The stones and the housing become very hot and can burn the skin.
- Do not pour too much water onto the stones at once, as the water evaporating on the hot stones can cause burns to the skin.
- Children, individuals with mobility limitations, the sick, and the weak should not be left alone in the sauna.
• Health restrictions related to sauna use should be discussed with a doctor. - Parents should not allow their children near the sauna oven.
- Regarding the sauna use by infants, it is advisable to seek advice from a maternal health clinic. Consider the child's age, sauna temperature, and duration of sauna exposure.
• Exercise caution when moving around in the sauna, as the benches and the floor may be slippery. - Do not enter the sauna if you are under the influence of narcotics (alcohol, medications, drugs, etc.).
If the sauna oven is not heating up, please check the following:
- Ensure that the power is turned on.
- Check that the thermostat is set to a higher temperature than the current temperature in the sauna.
- Verify that all three fuses of the sauna oven are intact.
- Ensure that the temperature protection has not been unlocked (refer to Figure 12).
- Make sure the timer switch is set to the range where the sauna oven heats up.
If a malfunction occurs, the oven will shut off, and an error message in the format „E (number)“ will be displayed on the control panel, providing guidance on how to troubleshoot the issue.
IMPORTANT: All maintenance procedures should be carried out by qualified technical personnel.
Table 1 Error messages
| Description Remedy | ||
| ER 1 | The temperature sensor circuit is inter-rupted. | Check the red and yellow wires to the temperature sensor and their connections (see Figure 11) for faults. |
| ER 2 | Short circuit in the temperature sensor circuit. | Inspect the red and yellow wires leading to the temperature sensor and their connections (refer to Figure 11) for any faults. |
08 - INSTALLATION
Before assembly
Before installing the sauna heater, make sure to read the installation instructions and check the following:
- Is the sauna heater you are installing suitable in power and type for the sauna cabin? The room volume values in Table 2 should not be exceeded or undershot.
- Do you have enough good-quality sauna heater stones?
- Is the electrical supply voltage compatible with the sauna heater?
- If the house is electrically heated, the control circuit (contactor) of the heating system will require an intermediate relay to set the control function to potential-free, as the sauna heater transmits voltage control during use.
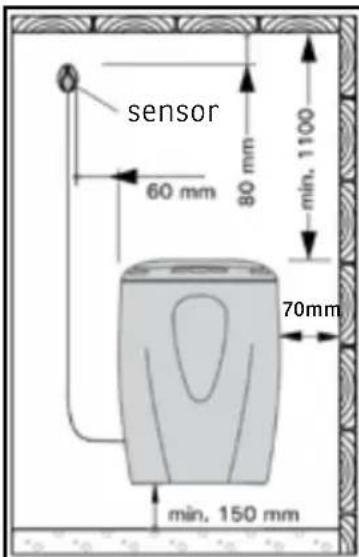
- Ensure that the installation location of the heater complies with the safety minimum distances specified in Figure 5 and Table 2.
These clearances must be strictly adhered to, as deviating from them can pose a fire hazard. Only one sauna heater should be installed in a sauna.
text_image
sensor 60 mm 80 mm min. 1100 70mm min. 150 mm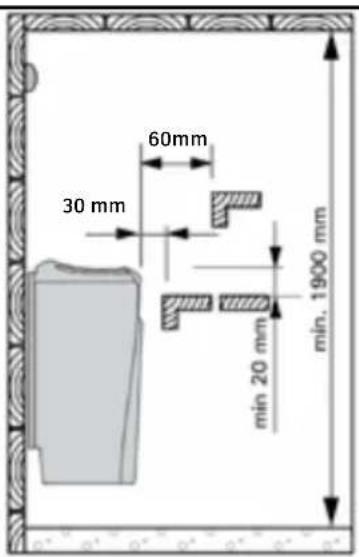
text_image
60mm 30 mm min. 20 mm min. 1900 mmFig. 5 Safety Minimum Distances for the Sauna Heater
text_image
>1000 mm 360° 180° >500 mmFig. 6 Safety Minimum Distances for the Sauna Heater
text_image
Electric Switch On/OffFig. 7 Attachment of the Connection Cable
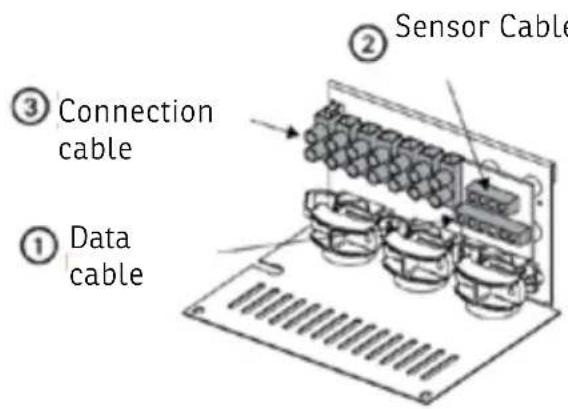
text_image
① Data cable ③ Connection cable ② Sensor CableAttachment of the connection cable to the sauna heater
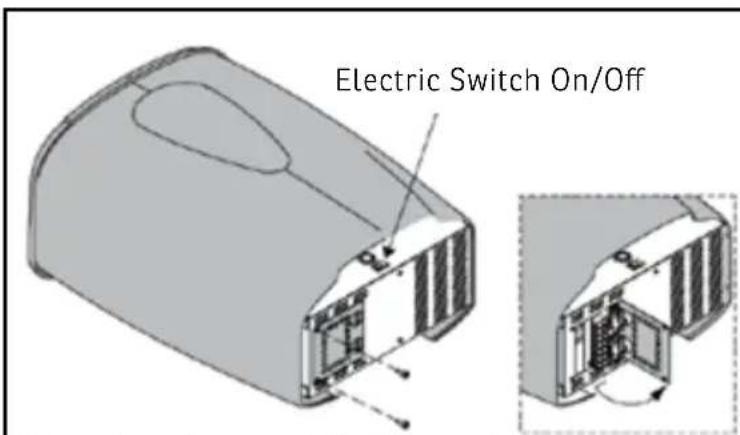
Attachment of the connection cable to the sauna heater is easiest when the sauna heater is not yet firmly mounted. See Figure 7. Connect the conductors of the data cable to the cable clamp (1) of the data cable based on the color-matching principle.
Attachment of the sauna heater to the wall
The mounting frame of the sauna heater is attached to the sauna heater. Remove the locking screw of the mounting frame and remove the frame from the sauna heater. 1. Attach the mounting frame to the wall using the supplied screws, and observe the safety minimum distances indicated in Figure 5 and Table 2. The attachment of the mounting frame is shown in Figure 8.
WARNING! Behind the panels where the attachment screws are placed, there should be a support, such as a board, where the screws can securely sit. If there are no boards behind the panels, they can also be attached in front of the panels.
- Lift the sauna heater onto the frame on the wall so that the attachment hooks at the bottom of the frame go behind the edge of the sauna heater body, and the groove at the upper part of the heater is pressed against the mounting frame. 3. Tighten the upper edge of the sauna heater onto the mounting frame.
Installation of the sauna heater in a recess
The sauna heater can be installed in a wall recess with a minimum height of 1900 mm. See Figure 9.
Protective railing
If a protective railing is built around the sauna heater, it must be done in consideration of the minimum safety distances indicated in Figure 5
and Table 2.
Electrical connections
The connection of the sauna heater to the power network must only be carried out by an authorized electrician in accordance with the applicable regulations. See the chapter „Attachment of the connection cable to the sauna heater.“ The cables from the sauna heater to the heat control and signal light must have a cross-sectional area that corresponds to the power cable of the sauna heater. The sauna heater is semi-permanently attached to the terminal box on the sauna wall. See Figure 10. A rubber cable of type H07RN-F or an equivalent cable is used as the connection cable.
WARNING! PVC-insulated cables should not be used as the connection cable for the sauna heater due to their poor heat resistance. The terminal box must be splashproof and may be mounted no more than 50 cm above the floor.
If the connection or mounting cables lead into the sauna or sauna walls at a height above 100 cm from the floor, they must withstand a load of at least 170 °C (e.g., SSJ). Electrical appliances that are installed higher than 100 cm from the sauna floor must be approved for use at an ambient temperature of 125 °C (designation T125). In addition to the power connection, VE sauna heaters (excluding the 230 V, 1-phase model) are equipped with a terminal (P) that provides the possibility of controlling the electric heating. See Figure 11a. The control cable for electric heating is run directly to the terminal box of the sauna heater, and from there, a rubber cable of the same thickness continues to the terminal block of the sauna heater.
| HeaterModel undDimension | Output | Sauna room | Minimum distances | Connection cable | |||||||
| Cubic vol. hight A | min. | Bmin. | Cmin. | toceiling | toflor | 400 V 3N~ | Fuse | ||||
| Width 410 mmDepth 310 mmHeight 580 mmWeight 15 kgStones max. 25 kg | kW | refer to page 68«Sauna Heater Performance» See | Fig. 5. | *)mm mm | **)mm | min.mm | min.mm | See Fig. 10.The measurements exclusively refer to the connection cable (2)! | |||
| min m^3 | max m^3 | minmm | ^2 | A | |||||||
| V80E-1 | 8,0 | 7 | 12 | 1900 | 70 | 30 | 60 | 1100 | 150 | 3 x 6,0 | 1 x 35 |
Table 2. Installation Information for the Sauna Heater
*) from the side surface to the wall or the upper bench
**) from the front surface to the upper bench or the upper railing
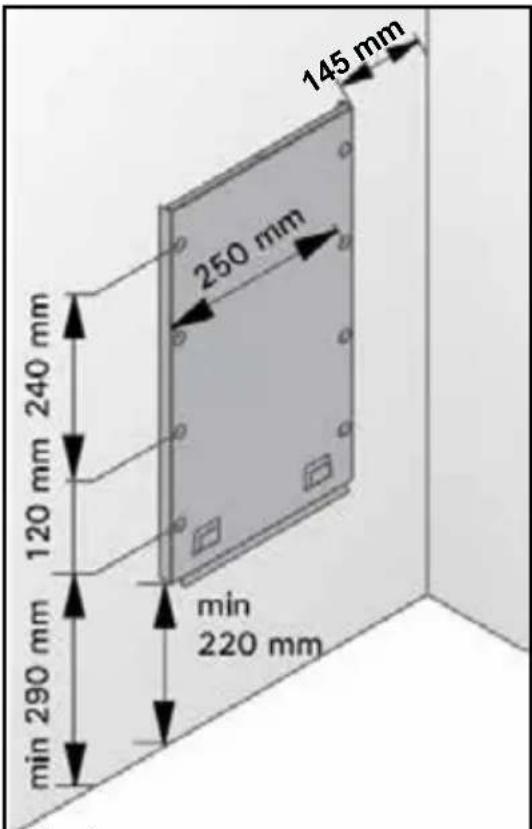
text_image
145 mm 250 mm 120 mm 240 mm min 290 mm min 220 mmFig. 8 Location of the mounting rack of the heater
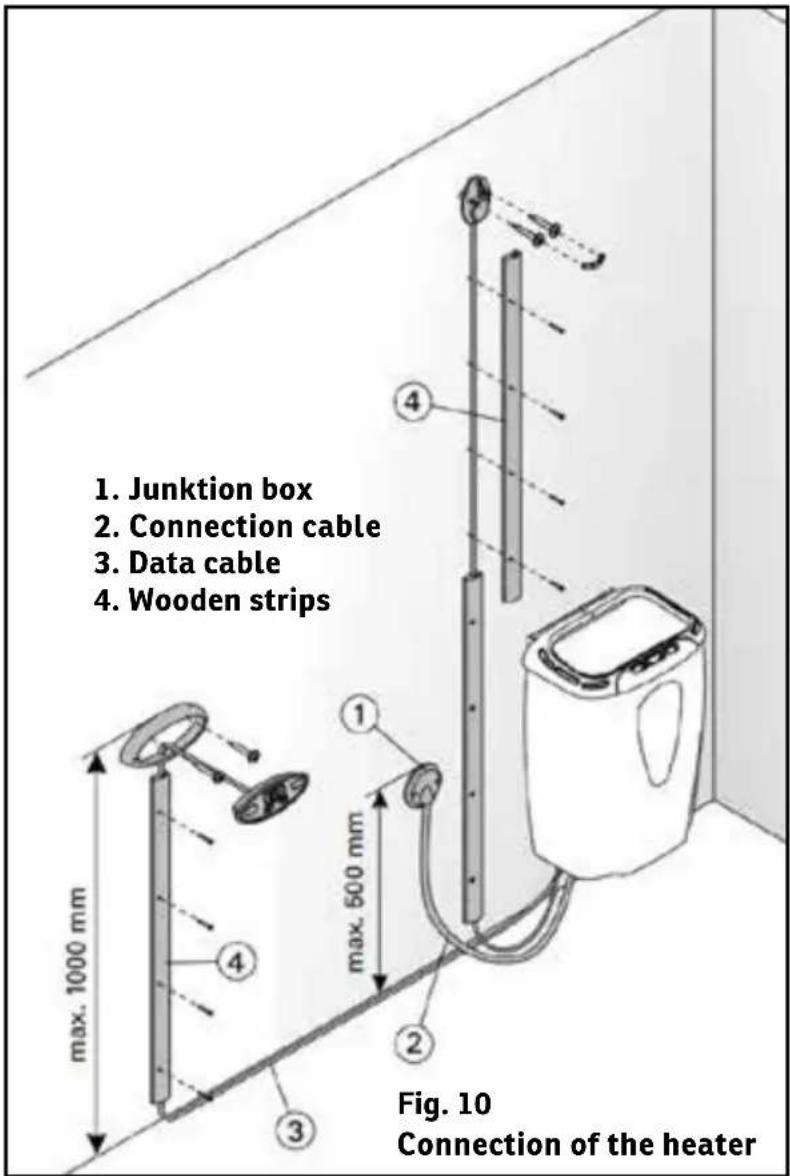
text_image
1. Junktion box 2. Connection cable 3. Data cable 4. Wooden strips max. 1000 mm max. 500 mm Fig. 10 Connection of the heater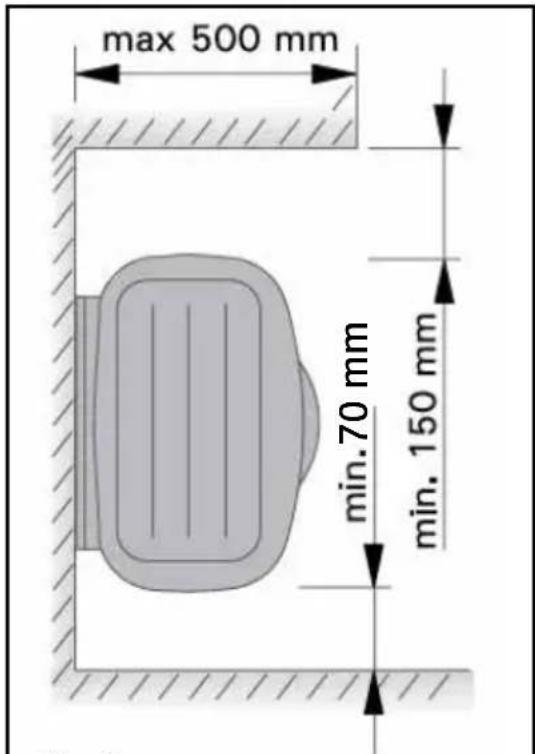
text_image
max 500 mm min.70 mm min. 150 mmFig. 9 Installation of the heater in a recess
Installation of the temperature sensor
Install the sensor as shown in Fig. 5. Connect the sensor cable color to color with the connector in the heater.
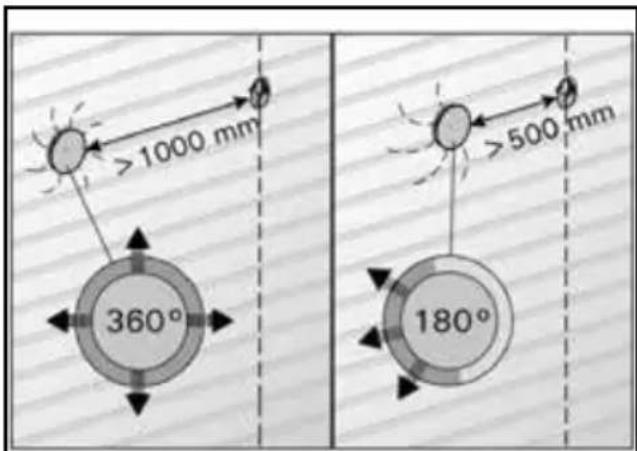
CAUTION! The temperature sensor must not be installed closer than 1000 mm to a multi-directional air vent or closer than 500 mm to an air vent pointing away from the sensor. See Figure 6.
The draft near air vents cools the sensor, leading to inaccurate temperature measurements at the control unit. This can result in overheating of the heater.
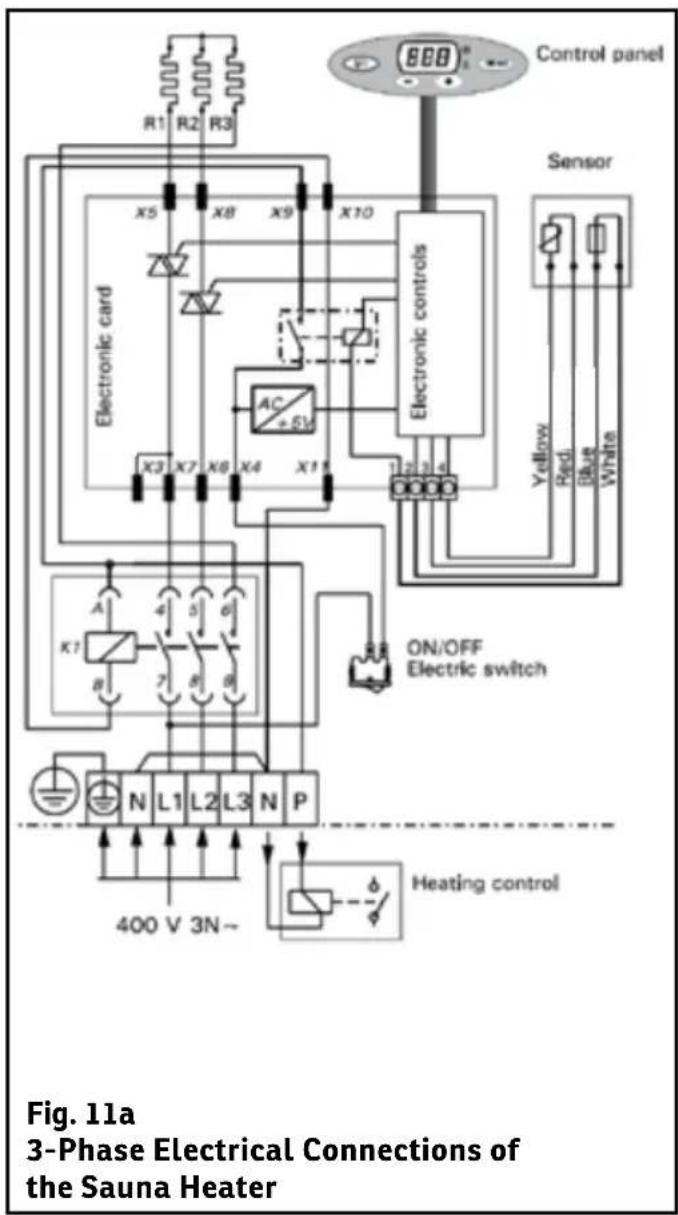
text_image
Control panel Sensor Electronic card X5 X8 X9 X10 AC +5V X3 X7 X8 X4 X1 ON/OFF Electric switch K1 A 4 5 6 B 7 8 9 N L1 L2 L3 N P 400 V 3N~ Heating control Fig. 11a 3-Phase Electrical Connections of the Sauna Heater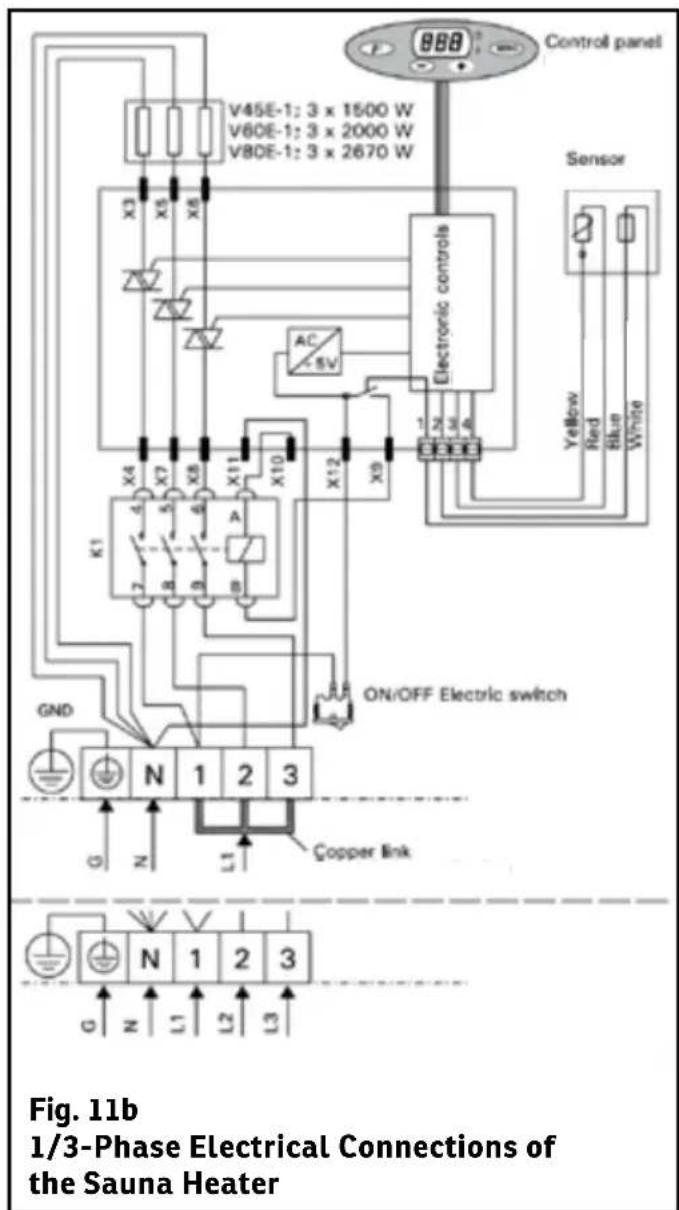
text_image
V45E-1: 3 x 1500 W V80E-1: 3 x 2000 W V80E-1: 3 x 2670 W Control panel Sensor Electronic controls X3 X5 X6 AC +5V X4 X7 X8 X10 X12 X9 X11 K1 ON/OFF Electric switch GND N 1 2 3 Copper link G Z L1 L2 L3 Fig. 11b 1/3-Phase Electrical Connections of the Sauna HeaterResetting the Overheating Protection
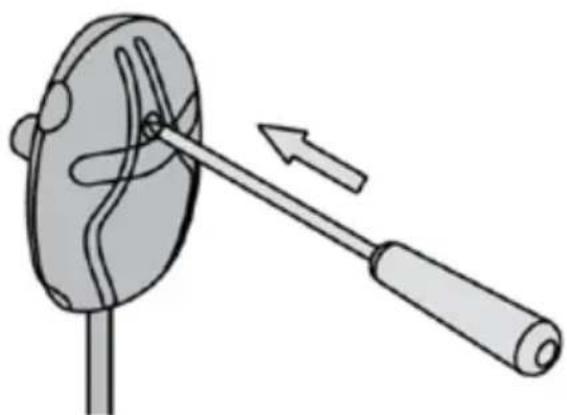
The sensor housing contains a temperature sensor and an overheating protection system. If the temperature in the vicinity of the temperature sensor rises too high, the overheating protection system will cut off the power supply. Resetting the overheating protection is shown in Figure 12.
WARNING! Before pressing the button, you must identify the cause of the overheating protection activation.
Mounting the Control Panel
The low-voltage control panel is splash-proof and can be freely mounted. If the control panel is installed in the sauna room, it must maintain a minimum safety distance from the sauna heater and should not be mounted higher than one meter (1 m). In the sauna room, it can be attached, for example, to the sauna heater's protective railing, the wall, or a sturdy part of the sauna bench. The control panel can also be mounted in the washroom, changing room, or living room. The control panel comes with a data cable that is approximately 3 meters long and can be shortened if needed. There are also 5-meter and 10-meter cables available. With the VE sauna heater's control panel, three wooden cover strips for the data cable are included, as well as a mounting collar with two screws to secure the control panel at the desired height. Using cable ducts in wall structures allows you to route the cable discreetly to the control panel's mounting location; otherwise, surface installation should be done. See Figure 10. The data cable's signals are low-voltage signals, allowing the control panel to be securely mounted on various materials. Installation Instructions for the VE Sauna Heater's Control Panel
- The control panel's mounting collar is attached to a suitable location for the control panel, with the data cable passed through it so that it runs through the slot made in the collar. The cable remains between the mounting base and the collar. Two mounting screws for securing the control panel come in the packaging.
- The control panel is attached to the collar by pulling an additional cable loop through the collar. The control panel locks into the mounting collar using the side spring clips.
- If necessary, the data cable can be covered with wooden strips (3 pieces). The free end of the data cable is connected to the control panel's data cable terminal (Figure 7: 1).
IMPORTANT! The color-coded conductors of the cable should be connected according to the instructions in the section „Attachment of the Connection Cable to the Sauna Heater.“
Insulation Resistance of the Electric Sauna Heater
During the final checks of the electrical installations, a "leak" may occur when measuring the insulation resistance, which is due to moisture entering the insulation material of the heating resistors (during storage and transport). The moisture dissipates from the resistors after two heatings. Do not switch on the mains power of the electric sauna heater through the residual current protection device!
natural_image
Diagram of a mechanical device with a lever and handle, showing motion direction (no text or symbols)Fig. 12 Reset button for overheating limiter
Changing Heating Elements