
P334 - Surveillance Camera REOLINK - Free user manual and instructions
Find the device manual for free P334 REOLINK in PDF.

| Product Type | IP Dome Surveillance Camera |
| Brand | Reolink |
| Model | P334 |
| Resolution | Up to 4 MP (2560x1440) |
| Night Vision | Infrared LEDs, range up to 10 m |
| Viewing Angle | Horizontal: 100°, Vertical: 55° (estimated) |
| Power Supply | PoE (802.3af) or 12 V DC power adapter |
| Power Consumption | ≤ 6 W (max) |
| Protection Rating | IP67 (weatherproof) |
| Operating Temperature | -10 °C to 55 °C |
| Operating Humidity | 10% – 90% (non-condensing) |
| Dimensions (diameter × height) | Approx. 100 × 80 mm (estimated) |
| Weight | Approx. 280 g (estimated) |
| Connectivity | Ethernet RJ45 10/100 Mbps |
| Audio | Built-in microphone |
| Main Features | Motion detection, push alerts, 24/7 recording, automatic day/night mode |
| Storage | Reolink NVR, microSD card (up to 256 GB, not included), cloud (optional) |
| Mounting | Ceiling or wall, rotatable bracket |
| Maintenance and Cleaning | Clean the lens with a soft, dry cloth. Check the sealing of connections. |
| Safety | Do not disassemble, use within recommended temperature and humidity ranges, keep out of reach of children |
| Spare Parts and Repairability | Power adapter, Ethernet cable, mounting kit available. Repair only by authorized professional. |
| General Information | Limited 2-year warranty. Compatible with Reolink App and Client. |
Frequently Asked Questions - P334 REOLINK
User questions about P334 REOLINK
0 question about this device. Answer the ones you know or ask your own.
Ask a new question about this device
Download the instructions for your Surveillance Camera in PDF format for free! Find your manual P334 - REOLINK and take your electronic device back in hand. On this page are published all the documents necessary for the use of your device. P334 by REOLINK.
USER MANUAL P334 REOLINK
If you need any technical help, please visit our official support site and contact our support team before returning the products, https://support.reolink.com
Operational Instructions
Apply to: RLC-520A/RLC-820A


@ReolinkTech
https://reolink.com
EN
Contents
What's in the Box 2
Camera Introduction 3
Camera Connection Diagram 4
Set up the Camera 5
Mount the Camera 6
Troubleshooting 9
Specifications 10
Important Safety Instructions 11
Legal Disclaimer 12
Notification of Compliance 13
What's in the Box
Camera lm

Waterproof Lid
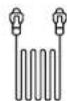
Ethernet Cable
Operational Instructions
Surveillance Sign Mounting
Hole Template

Pack of Screws
NOTE: Camera and accessories vary with different camera models that you purchase.
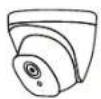
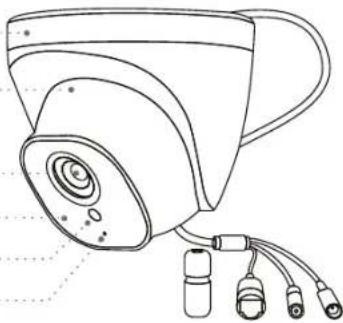
Camera Introduction
Mount
Metal Case
Lens
Infrared Lights
Daylight Sensor
Built-in Mic
Waterproof Lid
Network Cable
Reset Button
* Press and hold for 10 seconds to restore camera to factory settings.
Power Port(Optional)
natural_image
Line drawing of a surveillance camera with multiple cables (no text or symbols)Camera Connection Diagram
Before using the camera, please connect your camera as instructed below to finish initial setup.
-
Connect the camera to a Reolink NVR (not included) with an Ethernet cable.
-
Connect the NVR to your router, and then power on the NVR.
NOTE: The camera should be powered with a 12V DC adapter or a PoE powering device such as PoE injector, PoE switch or Reolink NVR (not included in the package).
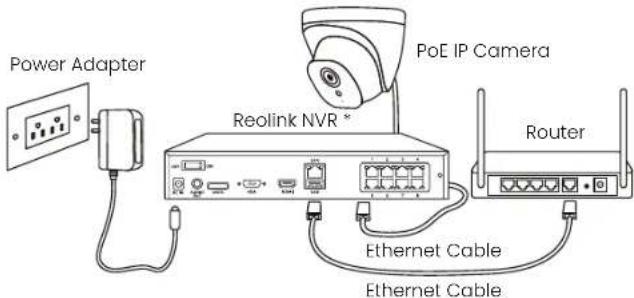
* You may also connect the camera to a PoE switch or PoE injector.
Set up the Camera
Download and launch the Reolink App or Client software, and follow the onscreen instructions to finish initial setup.
- On Smartphone
Scan to download the Reolink App.


- On PC
Download path of the Reolink Client: Go to https://reolink.com > Support > App & Client.
NOTE: If you are connecting the camera to a Reolink PoE NVR, please set up the camera via the NVR interface.
Mount the Camera
Installation Tips
- Do not face the camera towards any light sources.
- Do not point the camera towards a glass window. Or, it may result in poor image performance because of the window glare by infrared LEDs, ambient lights or status lights.
- Do not place the camera in a shaded area and point it towards a well-lit area. Or, it may result in poor image performance. For better image quality, please make sure that the lighting condition for both the camera and the capture object is the same.
- For better image quality, it's recommended to clean the lens with a softcloth from time to time.
- Make sure the power ports are not exposed to water or moisture or blocked by dirt or other elements.
- The camera comes with waterproof design so it can work properly under conditions like rain and snow. However, it doesn't mean the camera can work underwater.
- Do not install the camera at places where rain and snow may hit the lens directly.
- The camera may work in extreme cold conditions as low as -25^ . Because when it is powered on, the camera will produce heat. You may power on the camera indoors for a few minutes before installing it outdoors.
natural_image
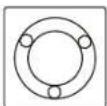
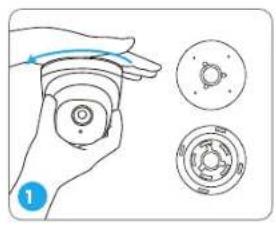
Illustration of a hand holding a circular device with three separate views (no text or symbols)To separate mounting plate from the dome camera, hold and press on the camera top and turn anticlockwise.
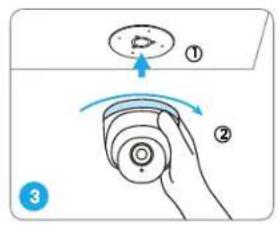
Mount the camera to the mounting plate and turn the camera clockwise to lock it tightly. If the camera is not locked properly, the camera may fall when you turn it anticlockwise to adjust the surveillance angle.
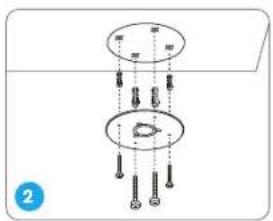
Drill holes according to the mounting hole template and screw the mounting plate to the mounting holes on the ceiling.
NOTE: Use the drywall anchors included in the package if needed.
natural_image
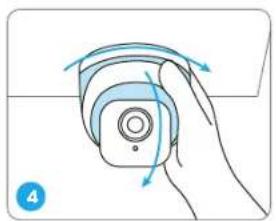
Illustration of a hand holding a device with rotating arrows indicating motion (no text or symbols)NOTE: Run the cable through the cable notch on the mount base.
Once the camera is installed, you may rotate the camera body manually to adjust the camera's surveillance angle.
Troubleshooting
Camera is not Powering on
If your camera is not powering on, please try the following solutions:
- Make sure your camera is powered on properly. The PoE camera should be powered by a PoE switch/injector, a Reolink NVR or a 12V power adapter.
- If the camera is connected to a PoE device as listed above, connect the camera to another PoE port and see if the camera will power on. - Try again with another Ethernet cable.
If these won't work, contact Reolink Support https://support.reolink.com/
Infrared LEDs Stop Working
If the Infrared LEDs on your camera stop working, please try the following solutions:
- Enable infrared lights on Device Settings page via Reolink App/Client.
- Check if the Day/Night mode is enabled and set up auto infrared lights at night on Live View page via Reolink App/Client.
- Upgrade the firmware of your camera to the latest version.
- Restore the camera to factory settings and check out the infrared light settings again.
If these won't work, contact Reolink Support https://support.reolink.com/
Failed to Upgrade Firmware
If you cannot upgrade firmware for the camera, try the following solutions:
- Check out the current camera firmware and see if it is the latest one.
• Make sure that you download the correct firmware from Download Center. - Make sure that your PC is working on a stable network.
If these won't work, contact Reolink Support https://support.reolink.com/
Specifications
Hardware Features
Night Vision: 30 meters (100ft)
Day/Night Mode: Auto switchover
General
Operating Temperature: -10^ to 55^ ( 14^ to 131^ )
Operating Humidity: 10%-90%
Waterproof Rating: IP67
For more specifications, visit https://reolink.com/
Important Safety Instructions
Please read the instructions carefully before using the device.
- Replace only with the same or equivalent type of accessories recommended by Reolink.
- Do not use the device in an environment that exceeds the recommended temperature range.
- Do not use the device in an environment that exceeds the recommended humidity range.
- Do not attempt to disassemble, repair, or alter the device by yourself.
- Always follow the local safety laws and regulations when using the device.
- The device contains (or comes with) small components, small plastic elements, and other small parts that may cause choking hazards. Keep the device and its accessories out of reach of children. Consult a physician immediately if small parts are swallowed.
- The device contains (or comes with) cables or cords that may cause strangulation hazards. Keep the device and its accessories out of reach of children.
Legal Disclaimer
To the maximum extent permitted by applicable law, this document and the product described, with its hardware, software, firmware, and services, are delivered on an 'as-is' and 'as-available' basis, with all faults and without warranty of any kind. Reolink disclaims all warranties, express or implied, including but not limited to, warranties of merchantability, satisfactory quality, fitness for a particular purpose, accuracy, and non-infringement of third-party rights. In no event will Reolink, its directors, officers, employees, or agents be liable to you for any special, consequential, incidental or indirect damages, including but not limited to damages for loss of business profits, business interruption, or loss of data or documentation, in connection with the use of this product, even if Reolink has been advised of the possibility of such damages.
To the extent permitted by applicable law, your use of the Reolink products and services is at your sole risk and you assume all risks associated with internet access. Reolink does not take any responsibilities for abnormal operation, privacy leakage or other damages resulting from cyber attacks, hacker attacks, virus inspections, or other internet security risks. However, Reolink will provide timely technical support if required.
The laws and regulations related to this product vary by jurisdiction. Please check all relevant laws and regulations in your jurisdiction before using this product to ensure that your use conforms to the applicable law and regulation. During the use of the product, you must comply with
relevant local laws and regulations. Reolink is not responsible for any illegal or improper use and its consequences. Reolink is not liable in the event that this product is used with illegitimate purposes, such as third-party rights infringement, medical treatment, safety equipment, or other situations where the product failure could lead to death or personal injury, or for weapons of mass destruction, chemical and biological weapons, nuclear explosion, and any unsafe nuclear energy uses or anti-humanity purposes. In the event of any conflicts between this manual and the applicable law, the latter prevails.
Notification of Compliance
ISED Compliance Statements
CE SIMPLIFIED EU AND UK DECLARATION OF CONFORMITY
Hereby, REOLINK INNOVATION LIMITED declares that the equipment [refer to the cover of the Operational Instructions] is in compliance with Directive 2014/30/EU. The full text of the EU and UK declaration of conformity is available at the following internet address: https://support.reolink.com/hc/en-us/articles/36788378727065/
13 English

Correct Disposal of This Product
This marking indicates that this product should not be disposed with other household wastes throughout the EU. To prevent possible harm to the environment or human health from uncontrolled waste disposal, recycle it responsibly to promote the sustainable reuse of material resources. To return your used device, please use the return and collection systems or contact the retailer where the product was purchased. They can take this product for environmentally safe recycling.
Limited Warranty
This product comes with a 2-year limited warranty that is valid only if purchased from Reolink Official Store or a Reolink authorized reseller. Learn more: https://reolink.com/warranty-and-return/.
NOTE: We hope that you enjoy the new purchase. But if you are not satisfied with the product and plan to return, we strongly suggest that you reset the camera to factory default settings and take out the inserted SD card before returning.
Terms and Privacy
Use of the product is subject to your agreement to the Terms of Service and Privacy Policy at reolink.com
Terms of Service
By using the Product Software that is embedded on the Reolink product, you agree to the terms & conditions between you and Reolink. Learn more: https://reolink.com/terms-conditions/
Technical Support
If you need any technical help, please visit our official support site and contact our support team before returning the products, https://support.reolink.com.
Trademarks Acknowledgement
"Reolink" and other Reolink's trademarks and logos are the properties of Reolink. Other trademarks and logos mentioned are the properties of their respective owners.
DE
Überblick
Lieferumfang 18
natural_image
Line drawing of a surveillance camera with multiple cables (no text or symbols)natural_image
Illustration of a hand holding a circular device with three separate views (top, front, side) showing different mechanical components (no text or symbols)natural_image
Hand holding a device with curved arrows indicating rotation or movement (no text or symbols)natural_image
Line drawing of a surveillance camera with multiple cables (no text or symbols)natural_image
Illustration of a hand holding a circular device with three separate views (no text or symbols)natural_image
Hand holding a remote control device with blue arrows indicating rotation (no text or symbols)https://reolink.com/fcc-compliance-notice/
natural_image
Line drawing of a surveillance camera with multiple cables (no text or symbols)natural_image
Illustration of a hand holding a circular object with a blue arrow indicating rotation, alongside two circular diagrams showing internal components (no text or symbols)natural_image
Hand holding a device with blue circular button and curved arrows indicating rotation (no text or symbols)https://support.reolink.com/hc/en-us/articles/36788378727065/

natural_image
Line drawing of a surveillance camera with multiple cables (no text or symbols)natural_image
Illustration of a hand holding a circular device with three separate views showing internal components (no text or symbols)natural_image
Illustration of a hand holding a device with rotating arrows indicating motion (no text or symbols)https://support.reolink.com/hc/en-us/articles/36788378727065/


- Operational Instructions
- EN
- Contents
- What's in the Box
- Camera Introduction
- Camera Connection Diagram
- Set up the Camera
- Mount the Camera
- Installation Tips
- Troubleshooting
- Camera is not Powering on
- Infrared LEDs Stop Working
- Failed to Upgrade Firmware
- Specifications
- General
- Important Safety Instructions
- Legal Disclaimer
- Notification of Compliance
- ISED Compliance Statements
- CE SIMPLIFIED EU AND UK DECLARATION OF CONFORMITY
- Correct Disposal of This Product
- Limited Warranty
- Terms and Privacy
- Terms of Service
- Technical Support
- Trademarks Acknowledgement
- DE
- Überblick
Brand : REOLINK
Model : P334
Category : Surveillance Camera