
1GP-ALK35 - Pneumatic nailer Prebena - Free user manual and instructions
Find the device manual for free 1GP-ALK35 Prebena in PDF.


| Product Type | Pneumatic Nailer |
| Brand | Prebena |
| Model | 1GP-ALK35 |
| Dimensions (L x W x H) | 220 x 50 x 208 mm |
| Weight | 0.97 kg |
| Operating Pressure | 4 – 7 bar |
| Air Consumption (at 6 bar) | approx. 0.36 L per ejection |
| Magazine Type | Side |
| Trigger System | Single Sequential Trigger |
| Compatible Fasteners | Prebena staples (series AL and ALK, see nameplate) |
| Operating Temperature | -5 °C to +45 °C |
| Storage/Transport Temperature | Ambient temperature |
| Vibration Level | < 2.5 m/s² |
| Sound Level (LpA,1s) | < 70 dB |
| Anti-trigger Safety | Yes |
| Dry Fire Protection | Yes |
| Ergonomic Handle | Yes |
| Side Protection | Yes |
| Maintenance | Clean with a dry cloth or soapy water; lubricate with Prebena special oil |
| Warranty | 1 year |
| Manufacturer | PREBENA WILFRIED BORNEMANN GMBH & CO.KG |
Frequently Asked Questions - 1GP-ALK35 Prebena
User questions about 1GP-ALK35 Prebena
0 question about this device. Answer the ones you know or ask your own.
Ask a new question about this device
Download the instructions for your Pneumatic nailer in PDF format for free! Find your manual 1GP-ALK35 - Prebena and take your electronic device back in hand. On this page are published all the documents necessary for the use of your device. 1GP-ALK35 by Prebena.
USER MANUAL 1GP-ALK35 Prebena
Original Operating Instructions for pneumatic Fastener driving tools
natural_image
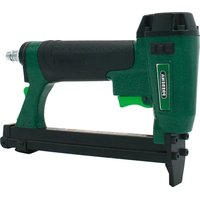
Green and black prebene knur pad kit (no visible text or symbols on body)PREBENA

GEFAHR

WARNUNG

VORSICHT
Bedeutung
These operating instructions will help you to operate the pneumatic tacker 1GP-ALK35
- correctly in accordance with its intended use,
- safely and
- cost-effectively.
In these operating instructions, this pneumatic nailer is simply referred to as a tacker.
We assume that every person using the tacker has knowledge of how to handle pneumatic equipment and the materials used. People who do not have this knowledge must be instructed by an experienced user about how to use the tacker.
These operating instructions are intended for the following persons:
- Persons who operate this tacker,
- Persons who clean this tacker, or
- Persons who dispose of this tacker.
All of these persons must have read and understand these operating instructions for use.
These operating instructions for use are considered a part of the product. Always keep them with the tacker. Pass on the operating instructions for use if you sell the tacker or hand it on in any other manner.
Table of contents
Foreword 2
Table of contents....3
Layout characteristics .... 5
General layout characteristics .... 5
Features of the danger warnings....5
Features of the notices on damage to property or the environment . 6
Safety 7
Correct use 7
Improper use ....7
Avoiding the risk of fatal injuries....8
Preventing the risk of explosion 8
Avoiding the risk of injury....9
Avoiding damage to the tacker....9
Description....10
Tool overview 10
Scope of delivery 11
How it works 11
Product features .... 11
Accessories 11
Information on the rating plate....12
Preparing the tacker....13
Unpacking the tacker....13
Checking the condition 13
Connecting the tacker to the compressed air supply 14
Opening the magazine 17
Inserting fasteners....17
Closing the magazine....18
Checking the function 19
Operating the tacker....20
Regulating the driving depth via the operating pressure 20
Checking the driving depth 20
Driving in fasteners....21
Triggering the tacker 22
After operation....23
Disconnecting the compressed air supply 23
Emptying the magazine 23
Transporting and storing the tacker....24
Packing 24
Transporting....24
Transport over short distances 24
Transport over long distances 25
Storing....25
Servicing the tacker....26
Cleaning the housing and external surfaces 26
Slight contamination 26
Heavy contamination 26
Oiling the tacker....27
Faults 28
Overview of faults 29
Ordering accessories....31
Reordering fasteners 31
Ordering other accessories 32
All types 32
Disposing of the tacker....33
Technical data....34
Manufacturer's address 35
Warranty 36
Index....37
Layout characteristics
General layout characteristics
Various elements in the operating instructions for use are marked with specific layout characteristics. They make it easy for you see whether you are reading normal text,
- lists or
▶ actions.

Tips contain additional information such as specific information on the cost-effective use of the tacker.
Features of the danger warnings
All danger warnings in these operating instructions for use are based on the same pattern. On the left you will find a symbol indicating the type of danger. To the right of that you will see another symbol and a signal word which identifies the severity of the danger. Below this, you will see a description of the source of the danger and information on how you can avoid this danger.


Notices with the word DANGER indicate hazards which can directly lead to serious or even fatal injuries.


Notices with the word WARNING indicate hazards that can lead to serious or even fatal injuries.


CAUTION
Notices with the word CAUTION indicate hazards that can lead to minor or moderate injuries.
Features of the notices on damage to property or the environment
CAUTION
These notices indicate hazards that can lead to damage to property or the environment.
Safety

Read the operating instructions for use prior to initial operation.
Observe and follow all the warnings and instructions in these operating instructions for use and those on the tacker when using the tacker. The enclosed spare parts list is part of these operating instructions for use.
Correct use
The tackers are used to fasten film, padding, fabrics, leather, insulating mats and paper and cardboard materials on wood. Use of the tacker on other materials is only permissible after consultation with the manufacturer. Correct use also includes complying with the health and safety regulations, legal regulations and/or standards applicable at the site of use. Any other type of use shall not be deemed correct use and may lead to damage to property or even injury to persons.
Improper use
Improper use refers, in particular, to operation
- by persons without any knowledge of how to use tackers and the materials used.
• of tackers modified without the authorisation of the manufacturer. - with accessories other than those stipulated in these operating instructions for use.
- connected to compressed air sources not listed in these operating instructions for use.
PREBENA WILFRIED BORNEMANN GMBH & CO. KG accepts no liability for any damage resulting from improper use.
Avoiding the risk of fatal injuries
- During the triggering sequence and whenever the tacker is connected to the air supply, ensure that no body parts are near the opening.
- Ensure that the fasteners are not driven into power cables.
- Never direct the tacker at people, animals or their body parts.
- Only trigger the tacker when the tool lug is pressed onto the workpiece.
- Disconnect the tacker from the compressed air supply before handing it over to other persons.
- Do not allow children to play with packaging films – these pose a risk of suffocation.
Preventing the risk of explosion
- Do not use the tacker in potentially explosive areas.
- Never operate the tacker with oxygen or other explosive gases or gas mixtures.
- Only operate the tacker on suitable compressed air systems (see page 14).
- Only use the tacker if it is in perfect working order (see page 13).
Avoiding the risk of injury

Wear suitable ear protection when operating the tacker.

Wear suitable safety goggles when operating the tacker.
- Store the tacker out of the reach of children and other unauthorised persons.
- Disconnect the tacker from the compressed air supply before transportation, before performing any cleaning work, before loading and emptying the magazine and after operation.
- Make sure that you and any other persons in the danger area wear suitable protective equipment when operating the tacker.
- Hold the tacker in a way that eliminates any possibility of injury due to kickback.
- Only use the tacker if your footing is secure.
- Do not position the tacker at an angle < 30° to the fixing level.
Avoiding damage to the tacker
- Never open the tacker. Always have repair work carried out by qualified staff.
- Do not use the tacker if it has been dropped or is damaged. Have it inspected by qualified staff before putting it into use again.
- Do not connect the tacker to a compressed air supply where the maximum operating pressure of 7 bar is exceeded.
- Install fixed tackers only in securely positioned mounts. It must not be possible to rotate or shift the tacker. The mount must not cause damage to the tacker and its accessories.
Description
Tool overview
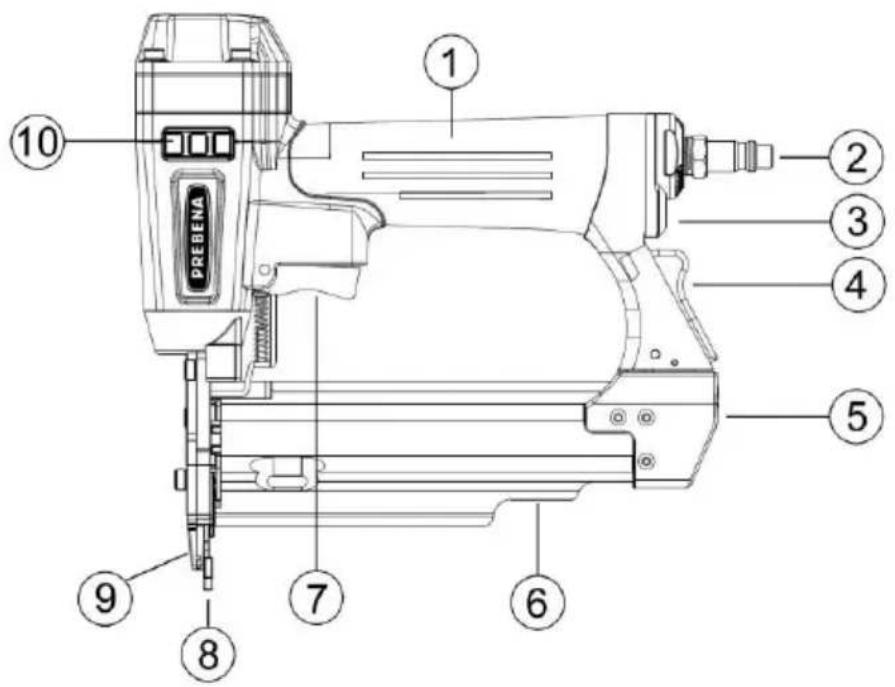
| No. | Explanation |
| 1 | Handle |
| 2 | Compressed air connection, NW7.2 |
| 3 | Ventilation |
| 4 | Locking mechanism for lateral slider |
| 5 | Lock for lateral slider |
| 6 | Magazine with lateral slider |
| 7 | Trigger lever |
| 8 | Trigger lock with empty shot safety device |
| 9 | Opening |
| 10 | Lateral contact protection |
| - | Rating plate on the magazine (not shown) |
Scope of delivery
- Tacker
- Packaging box
- Operating instructions
- Declaration of conformity
How it works
The tacker drives individual PREBENA fasteners into wooden or textile materials using compressed air. The tacker uses compressed air corresponding to at least quality class 4 in accordance with DIN ISO 8573-1. The compressed air source used is PREBENA compressors or the PREBENA PKT compressed air cartridge technology. They can be ordered from the manufacturer's accessories range (see page 31).
Product features
The tackers have the following common features:
- Sound absorbers
- Individual triggering
• Empty shot safety device - Trigger lock
- Ergonomic handle design
- Lateral resting surface protection
Accessories
- Compressors for compressed air supply (see manufacturer, page 35)
- PKT compressed air cartridge technology for compressed air supply (see manufacturer, page 35)
-
Fasteners (see overview, page 31 onwards)
-
PREBENA special nailer oil Z 200.10
- Micro-mist oiler Z 200.00
- Hose set 9 mm Z 200.20
- Spiral hose Z 160.12
- Hose drum Z 180.00
Information on the rating plate
The rating plate is adhered to the top of the magazine. It contains the following information:
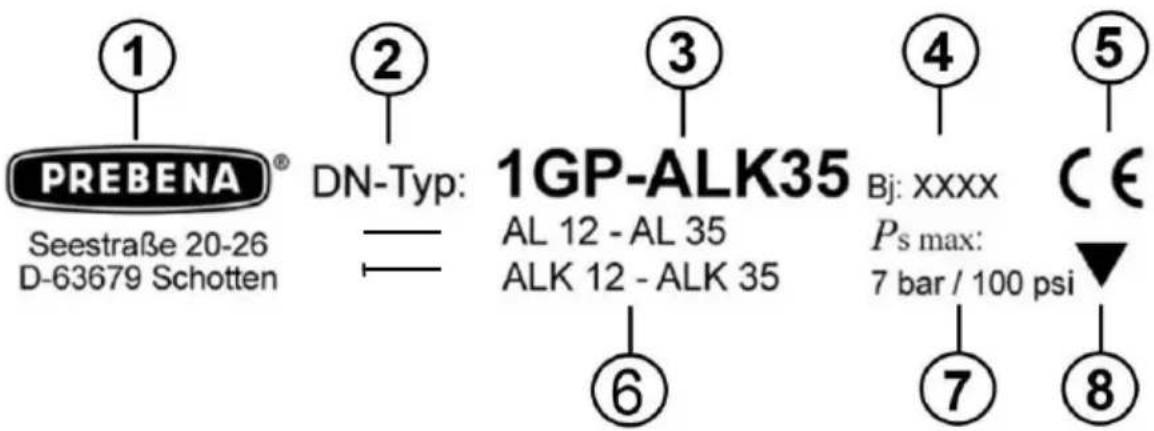
| No. | Explanation |
| 1 | Company name and full address of the manufacturer |
| 2 | Machine designation – DN = Druckluftbetriebenes Eintreibgerät (pneumatic tacker) |
| 3 | Model designation |
| 4 | Year of manufacture |
| 5 | CE mark (the product corresponds to the standards listed in the accompanying declaration of conformity) |
| 6 | Model designation of fasteners used |
| 7 | Maximum permissible operating pressure |
| 8 | Marking for an existing trigger lock |
There is another pictogram next to the rating plate. This has the following meaning:
Label

Meaning
The product was inspected on a voluntary basis by the German testing and inspection organisation TÜV SÜD for compliance with the basic requirements.
Preparing the tacker
Unpacking the tacker
▶ Remove the tacker from the packaging.
▶ Remove all packaging materials, such as films, filler material and the packaging box.


WARNING
There is a risk of suffocation for children playing with packaging films.
▶ Do not allow children to play with packaging films.
▶ Keep the packaging material out of the reach of children.
▶ Save the packaging material for later use.
▶ Store the cardboard box for transporting the tacker.

The tacker must only be transported in the cardboard box.
Checking the condition


WARNING
There is a risk of injury when operating a damaged tacker and if the accessories are not correctly attached.
▶ Check the condition of the tacker before each use.
▶ Ensure that the tacker is in perfect condition.
▶ Check the following points in particular:
- The hose line must not be damaged.
- All parts of the tacker and all accessory parts must be securely attached.
- The safety devices must not be blocked or otherwise impaired in their function.
- No parts of the tacker or the accessories may show visible signs of damage, such as scratches or dents.
i Scratches on the housing paint or the magazine do not constitute damage.
▶ Do not connect a damaged tacker to a compressed air supply.
▶ Have a damaged tacker repaired by qualified staff before putting it into operation.
Connecting the tacker to the compressed air supply
You can connect the tacker to a compressor or a compressed air system.
Operation with a compressor or a compressed air system is only permitted if the following preconditions are met:
- The operating pressure of the compressor or compressed air system must not be more than 10% above the maximum operating pressure of the tacker. Specifications on the operating pressure of the tackers are provided in this section on page 14.
- On compressed air systems with higher pressure, a pressure regulating valve (pressure reducer) with a downstream pressure relief valve must be installed in the compressed air line.
- The compressed air must be filtered, dry and lubricated with PREBENA special nailer oil.
- At the outlets for the compressed air line to the tacker, a compressed air maintenance unit must be installed on the coupling side. It should contain
- a filter,
- a water separator and
-
an oiler.
-
If no oiler is installed, the length of the air line to the tacker must not exceed 10 m. Otherwise, three to five drops of PREBENA special nailer oil must be filled directly into the air inlet of the tacker every day prior to operation.
- The compressed air system must be able to maintain the operating pressure even during the required air removal.
- The inner diameter of the air line must be at least 6 mm.
- The connection for the tacker must be equipped with a quick-action coupling, ID 7.2, and have an inner diameter of at least 6.5 mm.

CAUTION
Operation on compressed air systems that do not meet the above-mentioned preconditions can lead to damage to the tacker.
▶ Only operate the tacker on suitable compressed air systems.
▶ Only use the tacker if it is in perfect working order.
▶ Check the condition of the tacker (see page 13).
▶ Check the connection for the compressed air hose for foreign matter and contamination and clean it if necessary.
▶ Set the operating pressure at the pressure regulator of the compressor to 4.0 – 7.0 bar.

WARNING
Accidental triggering when connecting to the compressed air supply can lead to serious or even fatal injuries.
▶ Never direct the tacker at people or animals.
▶ Empty the magazine prior to connection.

CAUTION
Damaged hose lines can burst and cause injury.
▶ Check the compressed air system and tacker for damage before connecting them.
▶ Only connect the tacker to a functioning compressed air system.
CAUTION
Damaged hose lines can burst and cause damage to property due to compressed air escaping.
▶ Check the compressed air system and tacker for damage before connecting them.
▶ Only connect the tacker to a functioning compressed air system.
▶ Push the quick coupler (1) of the compressed air hose onto the connection (2) until it audibly locks into place.
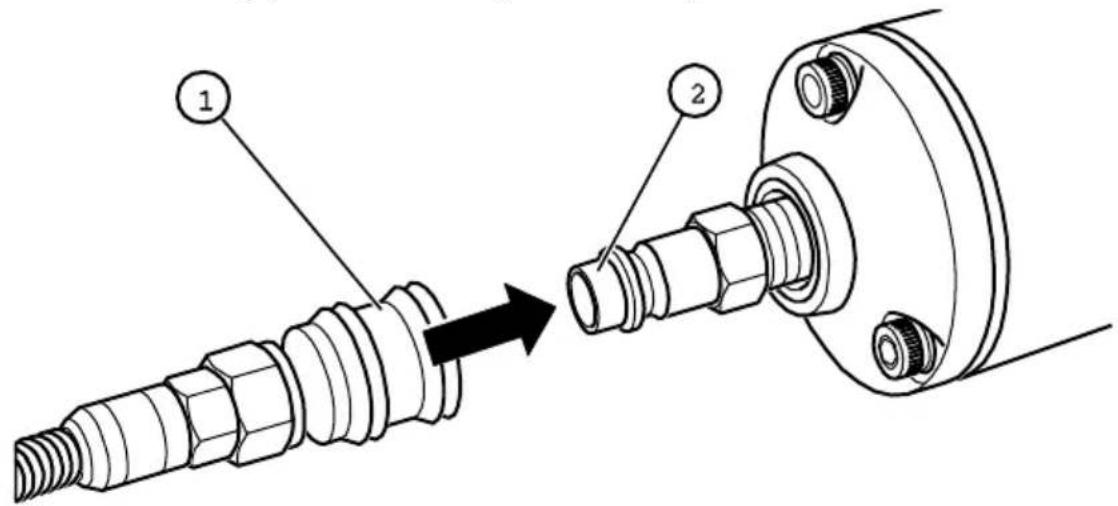
▶ Check the operating pressure on the pressure gauge of the compressor.
The maximum permissible operating pressure of the tackers is 7.0 bar.


WARNING
Risk of explosion if the maximum operating pressure is exceeded.
In this case, immediately disconnect the compressed air hose from the tacker.
Opening the magazine
▶ To open the magazine (6), push the locking mechanism (4) forwards in the direction of the arrow.
▶ Pull out the lateral slider at the lock (5) towards the rear.
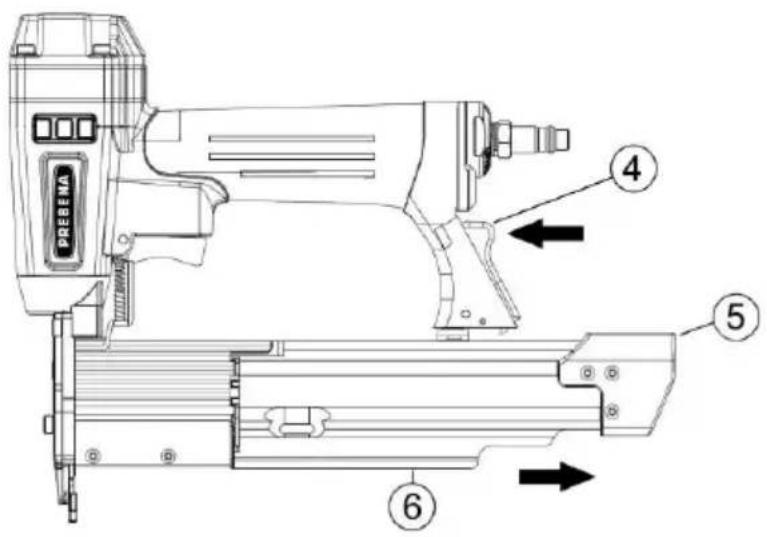
Inserting fasteners
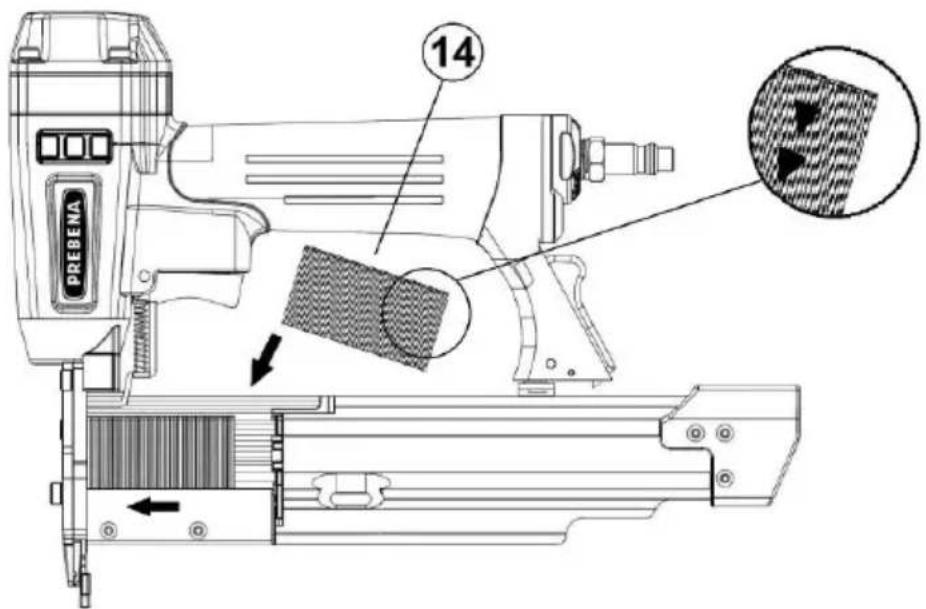
▶ To insert the fasteners (14) in the magazine, tilt the tacker to the side and insert the strips into the magazine with the crown upwards (type: ALK).
▶ Make sure that the tip of the printed arrow (type: AL) on the fastener is pointing downwards.
▶ Push the fasteners as far as they will go to the left into the inlet.
Closing the magazine
▶ To close the magazine (6), push the lateral slider forwards again at the lock (5).
▶ Make sure that the lateral slider audibly locks into place in the locking mechanism (4).
▶ Push the locking mechanism (4) forwards if necessary.
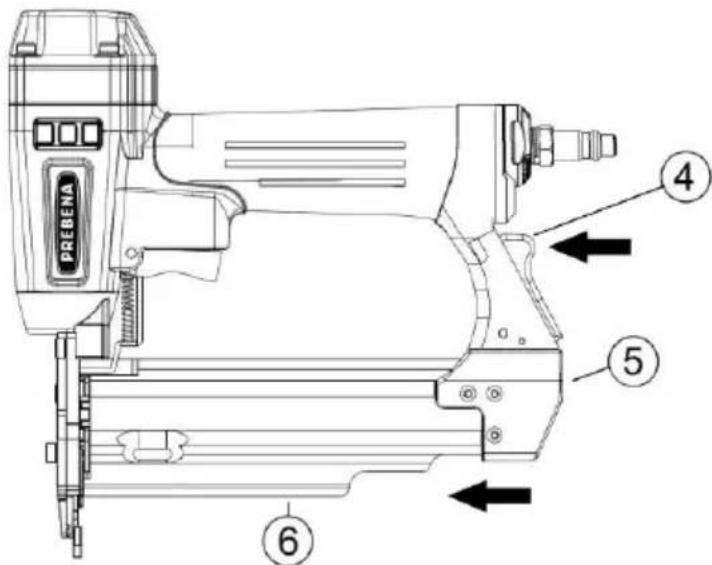
The magazine is closed.
Checking the function
Proceed as follows to check the function of the tacker:
CAUTION
▶ Note the danger warnings in the section on "Safety" from page 7 onwards.
▶ Set the tool lug of the tacker on a piece of wood with a minimum thickness of 40 mm.
Trigger the tacker (see the "Triggering tool" section on page 22).
▶ Check the following properties:
- Every time the tool is triggered, a fastener must be driven into the piece of wood.
- To achieve the desired driving depth, alter the operating pressure of the compressor (see page 15).
▶ Repeat these steps if necessary.
The tacker is now ready to use.
Operating the tacker
Regulating the driving depth via the operating pressure
You can adjust the driving depth of the fasteners in the material by regulating the operating pressure. At a higher operating pressure, the fasteners are driven in deeper and at a lower operating pressure, they are not driven in as deep.
Adjust the operating pressure so that the required driving depth is reached exactly. This offers the following advantages:
- You save energy (compressed air),
- You reduce the noise level, and
- You reduce the wear on the tacker.
Proceed as follows to adjust the operating pressure:
▶ Hold the tacker so that the tool lug faces down.
▶ Adjust the pressure at the pressure valve of the compressor.
▶ Observe the pressure gauge of the compressor.
Checking the driving depth
▶ Press the tool lug onto a sample piece of wood with the same properties as the material to be worked on.
▶ Check the setting by triggering a single shot on the sample material.
▶ Repeat these steps until the required driving depth is set.
Driving in fasteners


WARNING
Risk of injury due to electric shock.
▶ Before triggering the tacker, ensure that no power cables can be struck.


WARNING
During operation, injuries to the eyes and other body parts are possible due to flying splinters.
▶ Make sure that you and any other persons in the danger area wear suitable safety goggles and suitable protective clothing during operation.
▶ Observe the valid health and safety regulations.


WARNING
Loud operating noises can cause damage to hearing.
▶ Make sure that you and any other persons in the danger area wear suitable ear protection.
▶ Observe the valid noise protection regulations.
▶ Select the lowest possible operating pressure.


WARNING
Risk of injury when nails slide off or are driven in too deep, or due to kickback.
▶ Only use the tacker for wooden objects.
▶ Ensure that the driving depth is not set deeper than the thickness of the piece of wood.
▶ When triggering, press the tacker firmly against the wood
▶ Do not position the tacker at an angle <30° to the fixing level.
When fasteners are driven into workpieces that are too hard, or into other fasteners, a powerful kickback is generated. This can cause the tacker to slip off.
The driving depth of the fasteners depends on the hardness and thickness of the piece of wood and the set operating pressure.
▶ Ensure that there are no persons behind the piece of wood.
▶ Then check the function of the tacker at a low operating pressure by triggering it once.
▶ Regulate the operating pressure according to the strength of the wood used.
The correct operating pressure is set when the required driving depth of the fasteners is achieved at the lowest possible pressure.
Triggering the tacker
Proceed as follows to trigger the tacker once:
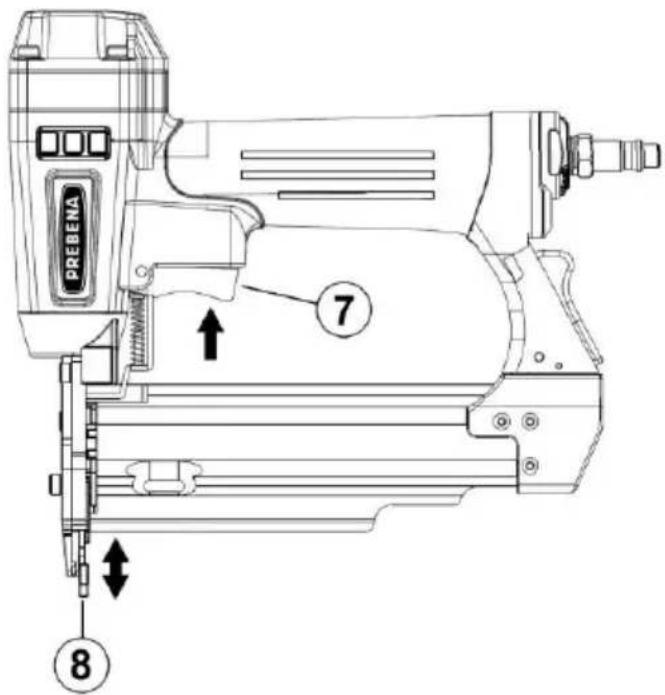
▶ Push the trigger lock (8) on the tacker at a right angle, but no more than an angle of <30° , onto the piece of wood.
▶ Press the trigger (7).
A fastener is driven into the piece of wood.
▶ Release the trigger.
▶ Lift the tacker off the piece of wood.
▶ Repeat these steps to drive in further fasteners.
After operation
After operation, or during long periods when the tool is not in use, perform the steps described below.
Disconnecting the compressed air supply
▶ Switch off the compressor.
▶ Pull the quick coupler of the compressed air hose away from the handle.
The quick coupler is now released.
▶ Remove the compressed air hose from the connection on the tacker.
The compressed air contained in the tacker escapes audibly.
Emptying the magazine
▶ Open the magazine as described from page 17 onwards.
▶ Remove the remaining fasteners.
▶ Ensure that there are no single fasteners in the magazine and shot channel.
▶ Close the magazine as described from page 18 onwards.
Transporting and storing the tacker
Packing
Pack the tacker prior to storage or before the following types of transport:
• Distances of more than 10 m
- Transport over unstable ground
- Transport that involves an unusual posture.
Carry out the following preparatory steps:
▶ Disconnect the tacker from the compressed air supply.
▶ Allow the pressure to be completely released from the tacker.
▶ Empty the magazine.
▶ If necessary, clean the compressed air connections to remove any foreign matter and contamination.
▶ Place the tacker in the cardboard box.
▶ Close the cardboard box.
Transporting
The type of transport differs according to whether you are transporting the tacker over short or long distances.
Transport over short distances
Short distances are distances of a maximum of 10 metres.


WARNING
Accidental triggering can lead to serious or even fatal injuries.
▶ Always disconnect the tacker from the compressed air supply prior to transport.
▶ Disconnect the tacker from the compressed air supply before handing it over to other persons.
▶ Carry the tacker only by the handle.
▶ Do not touch the trigger during transport.
▶ Disconnect the tacker from the compressed air supply.
CAUTION
Impacts and knocks can result in damage to the tacker.
▶ Do not drop the tacker.
▶ Protect the tacker from knocking against obstacles.
- Carry the tacker by the handle with the tool lug facing the ground.
▶ Only connect the compressed air supply when you have reached the new place of use.
Transport over long distances
The following distances for transporting the tacker are regarded as "long distances":
• Distances of more than 10 m,
- Transport over unstable ground and
- Transport that involves an unusual posture.
Proceed as follows to transport the tacker over long distances:
▶ Pack the tacker in the cardboard box supplied.
- Carry the cardboard box with both hands to the required place of use.
▶ Always set down the box in a horizontal position with the lid facing upwards.
Storing
▶ Oil all metal parts of the tacker thinly with PREBENA special nailer oil.
▶ Pack the tacker in the cardboard box.
- Store the tacker at room temperature in a dry place protected from dust.
Servicing the tacker
The tacker must only be serviced by persons with the required knowledge, skills and experience. Any work not described here must only be carried out by the manufacturer's customer service department or at the manufacturer.

WARNING
Accidental triggering when emptying the magazine can lead to serious or even fatal injuries.
▶ Disconnect the tacker from the compressed air supply prior to cleaning work.
▶ Empty the magazine.
Cleaning the housing and external surfaces
CAUTION
Unsuitable cleaning agents can cause damage to the tacker or accessories.
▶ Clean only with a dry or slightly damp cloth, or a cloth dampened with a mild soap solution.
Slight contamination
▶ Wipe the tacker housing with a dry cloth.
▶ Oil all metal parts of the tacker thinly with PREBENA special nailer oil.
Heavy contamination
▶ Wipe the tacker housing with a cloth dampened slightly with a mild soap solution.
▶ Then wipe the housing with a cloth dampened slightly with tap water.
▶ Rub down with a soft, dry cloth afterwards.
▶ Oil all metal parts of the tacker thinly with PREBENA special nailer oil.
Oiling the tacker
CAUTION
Insufficient lubrication or the use of the wrong lubricants can cause damage to the tacker.
The tacker features PREBENA OPTIWEAR TECHNOLOGY.
This requires only a small amount of lubrication.
▶ Use only PREBENA special nailer oil.

If no oiler is installed and the length of the air line to the tacker is over 10 m, sufficient lubrication is not guaranteed.
In this case, two to five drops of PREBENA special nailer oil must be filled directly into the connection for the compressed air source once a week prior to operation.
Faults


WARNING
Operation of damaged or malfunctioning tackers can lead to serious or even fatal injuries.
▶ In case of a fault, immediately disconnect the tacker from the compressed air supply.
▶ Empty the magazine.
▶ Do not use the tacker until the fault has been corrected.
CAUTION
The tacker may be damaged if repaired by unauthorised persons.
▶ Ensure that repairs to the tacker are only carried out by the manufacturer.
If faults occur on the tacker that you are unable to correct through the measures in the fault overview, you must notify PREBENA Service.
▶ Do not perform any repair work on the tacker.
▶ Ensure that all faults on the tacker are rectified by PREBENA Service.
Overview of faults
The following overview lists possible faults and the necessary measures.
| Symptom | Possible cause | Corrective measure |
| The tacker is losing air. | The fastening screws are loose. | ▸ Tighten the fastening screws. |
| A seal is defective. | ▸ Notify customer services (see page 35). | |
| Fasteners are not driven in completely. | The operating pressure is too low. | ▸ Increase the operating pressure. |
| The driver tip on the tacker is worn. | ▸ Notify customer services (see page 35). | |
| Triggering is not possible. | The operating pressure is too low. | ▸ Increase the operating pressure of the compressed air system to the maximum permissible level (see page 15).▸ Then actuate the trigger several times. |
| Moving parts are stuck together with lubricant following a long storage period. | ▸ Clean the tacker and oil it again.▸ Set the maximum operating pressure.▸ Then actuate the trigger several times.▸ After triggering, set the desired operating pressure.▸ Otherwise notify customer services (see page 35). | |
| Triggering without a fastener being driven in | The magazine is contaminated.The wrong fasteners were loaded in the magazine | ▸ Clean the magazine.▸ Empty the magazine.▸ Fill the magazine with PREBENA fasteners (see page 17). |
| The tacker is insufficiently lubricated. | ▸ Fill PREBENA special nailer oil into the compressed air connection used.▸ Actuate the trigger several times. | |
| The operating pressure is too low. | ▸ Increase the operating pressure. | |
| The piston with the driver does not return to its initial position after the drive-in procedure. | ▸ Notify customer services (see page 35). | |
| The triggering sequence is not performed completely. | ▸ Notify customer services (see page 35). | |
| The driver is bent. | ▸ Notify customer services (see page 35). |
Ordering accessories
You can reorder accessories from the manufacturer (see page 35). Only use original PREBENA accessories or accessories approved by PREBENA for operation of the tacker.
Reordering fasteners
The tackers must only be used with the appropriate PREBENA fasteners shown on the rating plate.
Special device types with lengths other than those on the rating plates are available upon request.
| Type | Wire dimensions | Length |
| AL12 | 0.59 x 0.67 mm | 11.90 mm |
| AL15 | 0.59 x 0.67 mm | 14.70 mm |
| AL17 | 0.59 x 0.67 mm | 17.90 mm |
| AL20 | 0.59 x 0.67 mm | 18.90 mm |
| AL22 | 0.59 x 0.67 mm | 21.70 mm |
| AL25 | 0.59 x 0.67 mm | 24.00 mm |
| AL28 | 0.59 x 0.67 mm | 27.90 mm |
| AL30 | 0.59 x 0.67 mm | 29.00 mm |
| AL35 | 0.59 x 0.67 mm | 30.00 mm |
| Type | Wire dimensions | Length |
| ALK12 | 0.65 x 0.65 mm | 12.00 mm |
| ALK15 | 0.65 x 0.65 mm | 15.00 mm |
| ALK18 | 0.65 x 0.65 mm | 18.00 mm |
| ALK21 | 0.65 x 0.65 mm | 21.00 mm |
| ALK25 | 0.65 x 0.65 mm | 25.00 mm |
| ALK30 | 0.65 x 0.65 mm | 30.00 mm |
| ALK35 | 0.65 x 0.65 mm | 35.00 mm |
Ordering other accessories
All types
| Item no. | Accessories |
| Z 200.10 | Special oil for pneumatic nailer, 12 litre |
| Z 200.00 | Micro-mist oiler, complete |
| Z 160.11 | Spiral hose, 6 x 9 mm |
| Z 180.00 | Compressed air hose drum, 30 m, compressed air hose, 8 x 12 mm |
| Z 200.25 | Air hose set, 6 x 3 mm (10) |
| Z 200.50 | Attachable pressure reducer |
| Z 150.15 | Spiral hose set, 6.5 x 10 mm, 6 m, safety version |
| Z 150.16 | Spiral hose set, 6.5 x 10 mm, 8 m, safety version |
Disposing of the tacker
CAUTION
Incorrect disposal results in environmental damage.
▶ Clean the tacker prior to disposal (see page 26).
▶ Observe the valid regulations for the disposal of oil.


Never dispose of the tacker or parts of it with normal household rubbish. If you wish to dispose of the tacker, send it to PREBENA. PREBENA can guarantee the correct disposal of the tacker. Contact data can be found on page 35.
Technical data
1GP-ALK35
| Dimensions of tacker (L x W x H): | 220 x 50 x 208 mm |
| Weight of tacker: | 0.97 kg |
| Dimensions of packaging box (L x W x H): | 275 x 245 x 65 mm |
| Weight of packaging box including contents: | 1.34 kg |
| Operating pressure: | 4 – 7 bar |
| Air consumption:(at an operating pressure of 6 bar) | approx. 0.36 lper drive-in procedure |
| Type of magazine: | Side loader |
| Triggering system: | Individual triggering |
| Fasteners: | PREBENA staples (see rating plate) |
| Operating temperature: | -5 °C to + 45 °C |
| Storage/transport temperature: | Room temperature |
| Vibration characteristic value: | < 2.5 m/s 2 |
| Noise characteristic values(according to DIN 12549:1999): | LWA,1s = < 70 dB |
| LpA,1s = < 70 dB |
Manufacturer's address
PREBENA
PREBENA shall provide a one-year warranty for the tool specified here starting from the date of sale in accordance with the following warranty conditions. PREBENA warrants the rectification of defects resulting from material or manufacturing defects free of charge. The free of charge warranty shall not cover faults or damage caused by improper handling.
Furthermore, only original PREBENA fasteners may be used; failure to comply with this requirement shall render the product liability and, therefore, the warranty claim null and void. The warranty shall not cover wear parts, e.g. O rings, etc. It shall be at the discretion of PREBENA to implement the warranty by replacing the defective part or arranging a replacement delivery. No further claims shall be accepted.
In order for the warranty to take effect, the certificate of warranty – completed in full – must be accompanied by the dealer's stamp and date of sale, or by an invoice document from which the dates and details to be listed in accordance with the certificate of warranty can be taken.
Shipment: The tool to which the claim relates must be packed carefully in order to avoid breakage during transport and sent postage paid to PREBENA.

Certificate of warranty
Model name:
Date of purchase:
Dealer:
(Stamp)
Index
Accessories
Ordering 31
After operation
Disconnecting the compressed air supply....23
Emptying the magazine......23
Avoiding risk 8
Checking
Driving depth....20
Checking the condition ..... 13
Checking the function ..... 19
Connecting the compressed air supply....14
Danger warnings 5
Description 10
How it works 11
Product features 11
Scope of delivery 11
Tool overview......10
Driving depth
Checking....20
Fasteners
Driving in 21
Inserting 17
Ordering 31
Faults....28
Overview of faults ...... 29
Layout characteristics .... 5
Magazine
Closing....18
Emptying 23
Filling 17
Opening......17
Manufacturer's address ...... 35
Operating
Tacker....20
Packing 24
Rating plate 12
Safety 7
Servicing 26
Cleaning the housing and external surfaces ....26
Oiling 27
Tacker
Checking the condition......13
Checking the function ..... 19
Closing the magazine ..... 18
Connecting the compressed air supply....14
Disposing 33
Inserting fasteners...... 17
Oiling 27
Opening the magazine ..... 17
Operating 20
Packing 24
Preparing 13
Servicing 26
Storing 25
Transporting 24
Triggering 22
Unpacking......13
Technical data 34
Transporting 24
Triggering 22
Unpacking......13
Warranty 36
Introducción
PELIGRO
ADVERTENCIA
PRECAUCIÓN
Significado
DANGER
AVERTISSEMENT

ATTENTION
NIEBEZPIECZEŃSTWO
OSTRZEŻENIE

OSTROŻNIE

ОПАСНО

ОСТОРОЖНО
ВНИМАНИЕ
Значение

PREBENA


- GEFAHR
- WARNUNG
- VORSICHT
- Bedeutung
- Table of contents
- Foreword 2
- Table of contents....3
- Layout characteristics .... 5
- Safety 7
- Description....10
- Preparing the tacker....13
- Operating the tacker....20
- Layout characteristics
- General layout characteristics
- Features of the danger warnings
- CAUTION
- Features of the notices on damage to property or the environment
- Safety
- Correct use
- Improper use
- Avoiding the risk of fatal injuries
- Preventing the risk of explosion
- Avoiding the risk of injury
- Avoiding damage to the tacker
- Description
- Scope of delivery
- How it works
- Product features
- Accessories
- Information on the rating plate
- Meaning
- Preparing the tacker
- Unpacking the tacker
- WARNING
- Checking the condition
- Connecting the tacker to the compressed air supply
- Opening the magazine
- Inserting fasteners
- Closing the magazine
- Checking the function
- Operating the tacker
- Regulating the driving depth via the operating pressure
- Checking the driving depth
- Driving in fasteners
- Triggering the tacker
- After operation
- Disconnecting the compressed air supply
- Emptying the magazine
- Transporting and storing the tacker
- Packing
- Transporting
- Transport over short distances
- Transport over long distances
- Storing
- Servicing the tacker
- Cleaning the housing and external surfaces
- Slight contamination
- Heavy contamination
- Oiling the tacker
- Faults
- Overview of faults
- Ordering accessories
- Reordering fasteners
- Ordering other accessories
- Disposing of the tacker
- Technical data
- Manufacturer's address
- PREBENA
- Certificate of warranty
- Index
- Avoiding risk 8
- Checking
- Checking the condition ..... 13
- Checking the function ..... 19
- Danger warnings 5
- Description 10
- Driving depth
- Fasteners
- Faults....28
- Magazine
- Manufacturer's address ...... 35
- Operating
- Packing 24
- Rating plate 12
- Servicing 26
- Tacker
- Technical data 34
- Transporting 24
- Triggering 22
- Unpacking......13
- Warranty 36
- Introducción
- PELIGRO
- ADVERTENCIA
- PRECAUCIÓN
- Significado
- DANGER
- AVERTISSEMENT
- ATTENTION
- NIEBEZPIECZEŃSTWO
- OSTRZEŻENIE
- OSTROŻNIE
- ОПАСНО
- ОСТОРОЖНО
- ВНИМАНИЕ
- Значение
Brand : Prebena
Model : 1GP-ALK35
Category : Pneumatic nailer