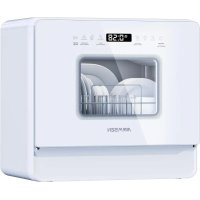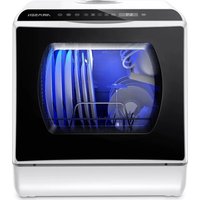
TDQR03A - Dishwasher AIRMSEN - Free user manual and instructions
Find the device manual for free TDQR03A AIRMSEN in PDF.


User questions about TDQR03A AIRMSEN
0 question about this device. Answer the ones you know or ask your own.
Ask a new question about this device
Download the instructions for your Dishwasher in PDF format for free! Find your manual TDQR03A - AIRMSEN and take your electronic device back in hand. On this page are published all the documents necessary for the use of your device. TDQR03A by AIRMSEN.
USER MANUAL TDQR03A AIRMSEN
natural_image
Modern kitchen appliance with a white display unit and a circular 'AIRMSEN' logo, set on a wooden table with bread rolls and a plate of juice (no visible text or symbols on main objects)COMPLETE PORTABLE COUNTERTOP DISHWASHER
English Page 2\~22
If you are having problems using this dishwasher
Please email : support@airmsen.com
for assistance :www.airmsen.com
THANK YOU FOR MAKING AIRMSEN APPLIANCES A PART OF YOUR HOME.
CONSTANT INNOVATION TO ALLOW CONSUMERS TO GET BETTER PRODUCTS
Take “technology, innovation, health” as its core value, to be the preferred brand of household products in your healthy and quality life.
AIRMSEN focus on researching, developing and manufacturing various kinds of household supplies with advanced technologies and the idea of sustainable development, to promote the evolution and transform of our lifestyle, to make it more healthy, green, intelligent and with high quality, and to bring a happy, healthy and eco-friendly home life to around the world.
Among other things, registration of your appliance ensures that we can deliver important product information and warranty details when you need them.
Register your AIRMSEN appliance now online. Website: www.airmsen.com
AIRMSEN
SAFETY
Your safety and the safety of others is very important.
We have provided many important safety messages in this manual and on your appliance. Always read and obey all safety messages.

This is the safety alert symbol.
This symbol alerts you to potential hazards that can cause serious injury to you and others.
All safety messages will follow the safety alert symbol.
All safety messages will tell you what the potential hazard is, tell you how to reduce the chance of injury, and tell you what can happen if the instructions are not followed.
CONTENTS
specifications and parameters 4
important safeguards 5
getting to know your dishwasher 6
Dishwasher Features 6
Built-in LED Lamp 6
Control Panel 7
LED Display....7
Parts List....8
installation 8
Connecting the Drain Hose to the Machine. 8
Install Filter 9
Adding Water to Dishwasher....9
Connecting the Drain Hose to a Sewer 9
operating instructions 11
Loading the Dishwasher Basket....11
Recommended Layout for 4 Place Settings....11
Detergent Use. 12
mode selection 12
Wash Cycle 12
AIR REFRESH Mode....13
Starting a Wash Cycle 13
Forget to Add a Dish? 14
At the End of a Wash Cycle....14
cleaning & maintenance 15
Filter System....15
Spray Arms....16
caring for the dishwasher 17
error codes 18
troubleshooting 18
warranty information 21
customer support 22
CONGRATULATIONS ON YOUR PURCHASE OF A AIRMSEN PROFESSIONAL 5-LITER COMPLETE PORTABLE COUNTERTOP DISHWASHER
FEATURES INCLUDE:
- 5 Wash Programs
- Choice of Built-in Tank or Faucet Hookup
• Steam generated during clean cycle cleans baby bottles
• LED Digital controls - Use any place there is water and electricity
• Automatic Air circulation dries dishes
specifications and parameters
| Power supply | 220-240V 50Hz |
| Rated power | 950W |
| Specification of the socket | 10A 220-240V |
| Capacity | 4 Place Settings |
| Inlet pressure | 0.03 ~ 1 Mpa |
| Water tank capacity | 1.3 gallons (5 L) |
| Dry mode | PTC hot air |
| Product size (H × W × D) | 458 × 428 × 425 mm / 18.05 × 16.86 × 16.75 in |
| Product weight | 12 kg / 26.46 lbs |
THIS PRODUCT IS FOR USE IN 220-240V AC OUTLET ONLY.
important safeguards
Always follow basic safety precautions when using your countertop dishwasher. Read all instructions.
General Safety
- Power socket must be grounded, avoiding to possible electric leakage or shock;
- Any of new parts or power cord will be replaced by service man after damages;
- Dispose of the machine in an environmentally friendly manner under local regulations;
- To protect against electrical shock do not immerse cord, plug or any part of this unit in water or other liquids.
- Unplug from outlet when not in use, before removing parts and before cleaning. Allow to cool before putting on or taking off any parts and before cleaning.
- The manufacturer does not recommend the use of accessory attachments other than what is provided by the manufacturer. Use of attachments may cause injuries.
- Do not use the appliance for other than its intended use.
- Do not place the machine in an environment under 0°C, like outside door in cold weather;
- Please use the salt and detergent which is special for automatic dishwasher;
- Do not place and use the machine in the platform which is not stable, wet, smooth, inflammable avoiding to any damage;
- Do not place and use the machine within 150mm far from gas stove or other heating source;
- Do not place any heavy object on the door when door open avoiding to the machine turn over;
- Do not splash water into the machine avoiding to electric shock or fire;
- Do not drink the left water in the machine;
- Do not let children operate the machine independently avoiding to any danger;
Operating Safety Precautions
- Do not open the door when washing avoiding to hot water flying out causing any hurts;
- Do not touch or block the side air outlet;
- Do not tilt or move the machine when washing;
- When loading the dishwasher locate sharp objects in the basket with sharp edges facing down so that they do not damage the door seal;
- Please stop washing, power off, and close tap when any faults;
- Please check and clean the machine time from time in order to the best performance;
- Please fix the drain hose avoiding to the stained water outflow;
- Do not forced pull power cord, drain hose, press cutlery tray avoiding any damage;
- Do not use wet hand to operate the machine avoiding electric shock;
• Children should be far from the chemical material such as salt, detergent avoiding to any hurt. - Do not modify the plug provided with the appliance.
- Improper connection can result in risk of an electric shock.
- Check with a qualified electrician or service representative if you are in doubt whether the appliance is being used correctly.
SAVE THESE INSTRUCTIONS
getting to know your dishwasher
Dishwasher Features
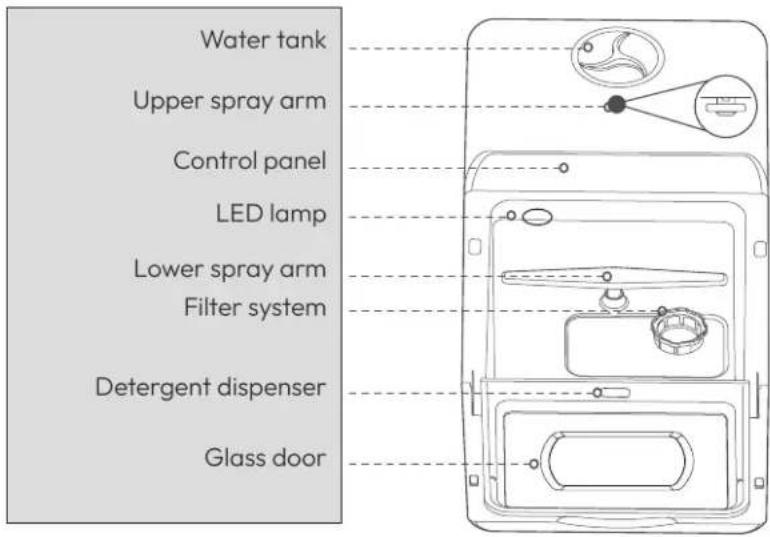
text_image
Water tank Upper spray arm Control panel LED lamp Lower spray arm Filter system Detergent dispenser Glass door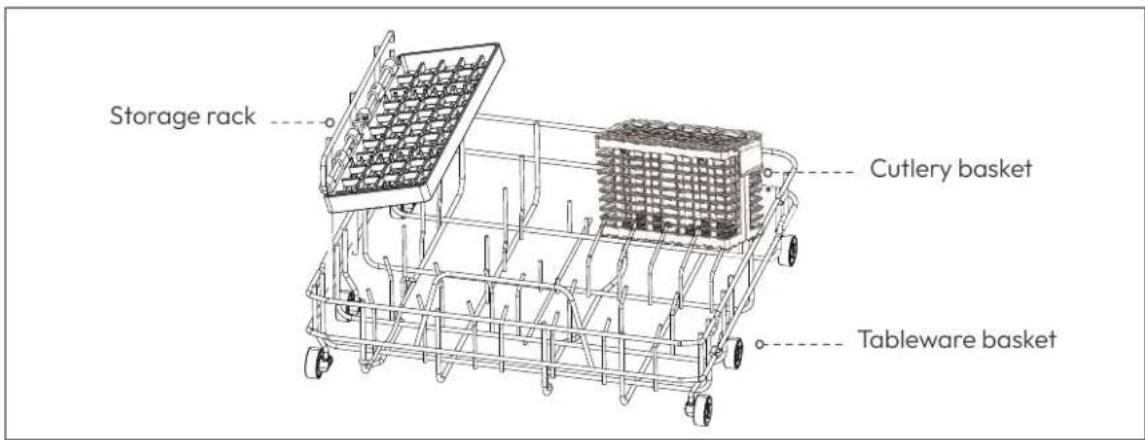
text_image
Storage rack Cutlery basket Tableware basketBuilt-in LED Lamp
The LED lamp allows you to clearly check the working status of the dishwasher. When the glass door is opened, the lamp will automatically turn on and when the glass door is closed, it will automatically turn off within 2 minutes. If the door is kept open for more than 5 minutes, it will automatically turn off. In the last 10 minutes of the drying process, the LED lamp will turn on, indicating that the drying is almost complete.
Control Panel

flowchart
graph LR
    A["AIR REFRESH"] --> B["10"]
    B --> C["9"]
    C --> D["8"]
    D --> E["7"]
    E --> F["6"]
    F --> G["5"]
    G --> H["4"]
    H --> I["3"]
    I --> J["2"]
    J --> K["1"]
    style A fill:#f9f,stroke:#333
    style K fill:#ccf,stroke:#333
| NO. | BUTTON / INDICATOR | FUNCTION |
| 1 | POWER | Press and hold this button for 3 seconds to turn on or turn off the machine. |
| 2 | START / PAUSE | Press this button to start or pause a wash cycle. |
| 3 | MODE | Press this button to choose a wash cycle and dry mode. |
| 4 | FRUIT | Use this mode to wash hard surface fruits with room temperature water. There is no need to add detergent. |
| 5 | BABY CARE | Suitable for washing baby bottles, oily and grimy tableware, or pet products. |
| 6 | ECO | This is the standard program suitable for normally soiled loads, such as pots, plates, glasses and lightly soiled pans. |
| 7 | QUICK | A shorter wash for lightly soiled loads. |
| 8 | NORMAL | For normal soiled loads such as dishes, glasses, and other tableware. |
| 9 | DISPLAY | Displays temperature, time, error code, etc. |
| 10 | AIR REFRESH | 72 hours of automatic intermittent ventilation to remove odors and facilitate storage. |
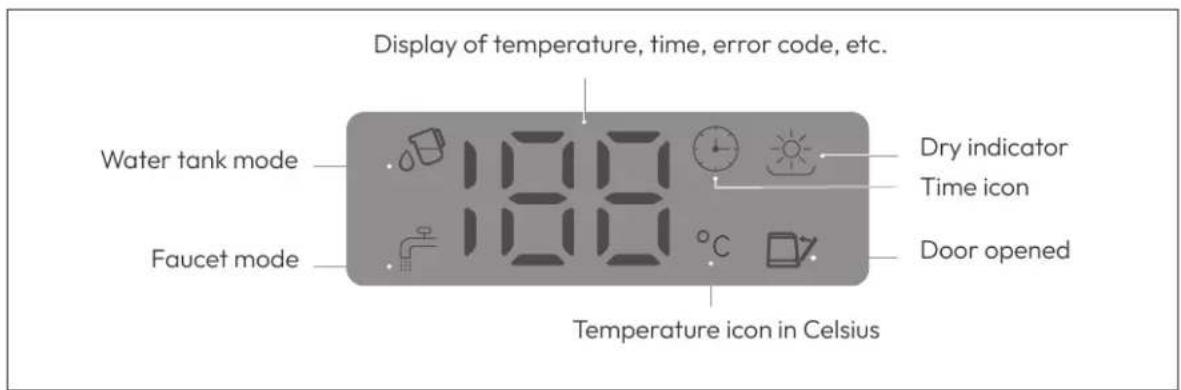
LED Display
text_image
Display of temperature, time, error code, etc. Water tank mode 100 Faucet mode 100 Dry indicator Time icon Door opened Temperature icon in CelsiusParts List
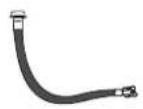
Inlet Hose × 1 (61 in/154 cm)
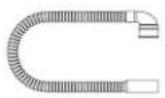
Drain Hose × 1 (61 in/154 cm)
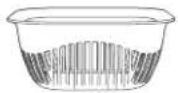
Fruit Basket × 1
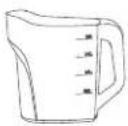
Pitcher × 1

Hose Collar × 1
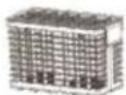
Cutlery Basket × 1
Notice: If you need an extension for your inlet hose or Drain hose, please purchase one at www.airmsen.com.
installation
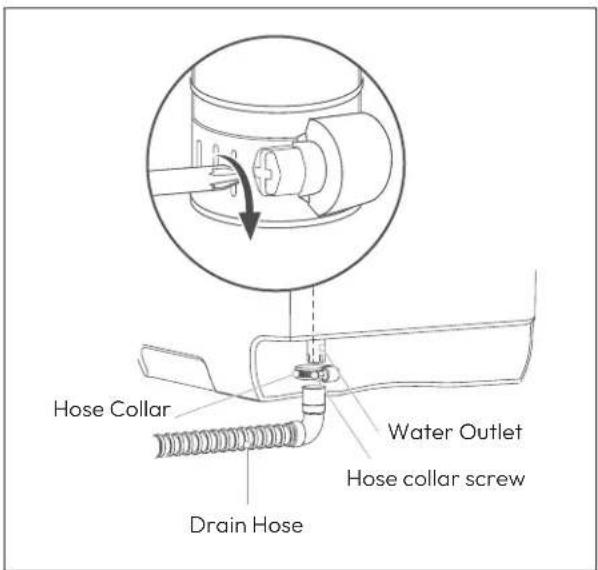
Connecting the Drain Hose to the Machine
text_image
Hose Collar Water Outlet Hose collar screw Drain HoseWARNING: The dishwasher drain hose is an essential part of the machine, so it must be installed correctly to drain water and perform its job effectively.
- Connect the drain hose to the water outlet located on the back of the machine.
- Tighten the hose collar screw with a screwdriver.
Connecting the Drain Hose to a Sewer
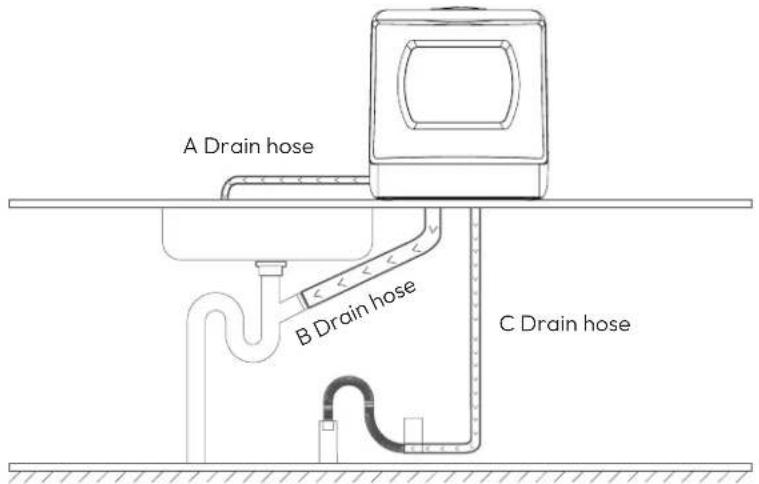
- There are three options for sewer connection, A(sink), B(sink drainpipe), and C(drainage pipe). For options B and C, it is required to drill a hole on or under the counter so that the pipe can go through the counter.
- The drain hose must be property fitted to its containment source (such as a sink, bucket, etc.) to avoid water leaks, Ensure that the drain hose is not kinked or impeded in any way.
text_image
A Drain hose B Drain hose C Drain hoseInstall Filter
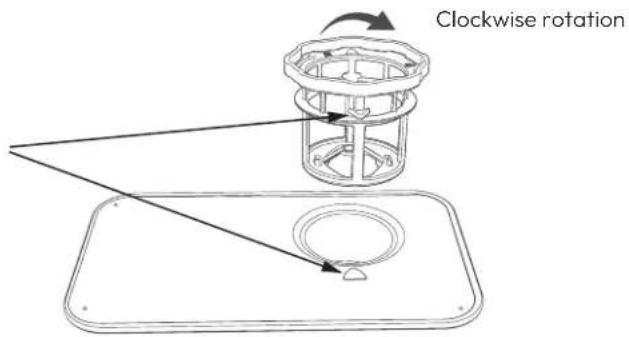
Before using the machine, you need to turn the filter clockwise to tighten the filter and align the triangle indicator arrow.
text_image
Clockwise rotationAdding Water to Dishwasher
NOTE: This machine supports two water supply modes, including faucet mode and water tank mode.
Faucet Mode
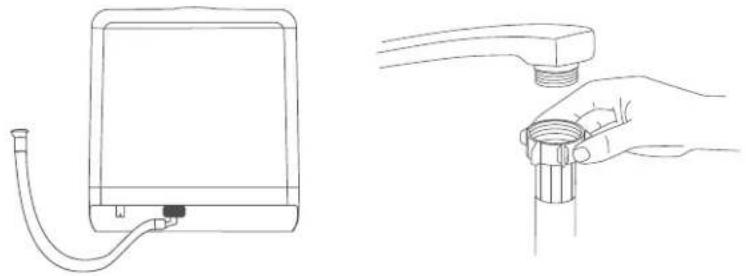
- Remove the silica gel plug from the water inlet on the back of the machine. Then, attach one end of the water inlet hose onto water inlet of the machine.
- Connect the other end of the water inlet hose to your faucet and make sure it is fastened tightly in place. The included water inlet hose has a 3/4" GHT female connector, so it matches the faucet with a 3/4" GHT male connector.
NOTE: If the included water inlet hose does not fit your faucet, you may need to buy a 3/4" GHT threaded faucet adapter from a plumbing supply manufacturer. If you are unsure of what to do, please feel free to contact our after-sales service team.
- Turn on the dishwasher and press the MODE button to choose a wash cycle. Then, press the START/PAUSE button to start the wash cycle. The panel will display a white indicator , meaning the faucet is properly connected and turned on.
NOTES:
- While in the faucet mode, DO not disconnect the faucet. Otherwise, the wash cycle cannot be completed.
- A red flashing water shortage indicator means that this machine is not connected to a faucet, the faucet is not turned on, and/or the water tank is not full. If the water tank is full, the panel will display a white indicator.
natural_image
Line drawings of a device with a bulb and a hand holding a pipe fitting (no text or symbols)Water Tank Mode
REMINDER: If the machine is being used for the first time or has not been used in a long time, insufficient water flow may occur when the water tank is filled due to trapped air in the machine's water pipe system, which prevents the water from flowing into the machine interior. In this case, you can slightly shake the machine 5-6 times to exhaust all trapped air. This will ensure a smooth water flow.
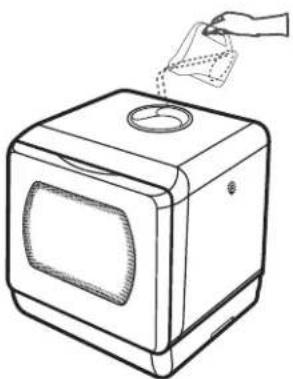
- Open the water tank lid and fill with about 1.3 gallons(5 L) of water, or approximately 3 pitchers. When the tank is full, 3 beeps will be heard. There is no need to add more water during the washing process.
NOTE: To prevent loss of the tank lid, attach it to the water tank.
- If the water tank is not full when you start a wash cycle, a red flashing water shortage indicator will display on the panel and the buzzer will beep. When the water tank is full, a white water tank mode indicator will appear.
- Before starting any wash cycle, if the machine detects that the water tank is full, it will automatically switch to the water tank mode.
- To drain the water tank by hand. Pause the wash cycle and press and hold both the AIR REFRESH button and POWER button simultaneously for 3 seconds. If the water tank will not be used for a long time, it is recommended to empty the water tank.
- The system will automatically check all water supplies. If the red water shortage indicator appears, you will need to fill the water tank or turn on the faucet. Once the water tank is filled, the machine will automatically start the wash cycle you selected with no need to press the START/PAUSE button again. In the faucet mode, it is required to press the START/PAUSE button again to start the wash cycle after you open the faucet.
natural_image
Line drawing of a microwave oven with a hand holding a paper airplane (no text or symbols)NOTE: In the case of a water shortage, if you press the START/PAUSE button 5 times and there is still no adequate water supply, the machine will automatically enter standby mode. Or, if there is no user operation or water supply for 10 minutes, the machine will automatically enter standby mode.
operating instructions
Loading the Dishwasher Basket
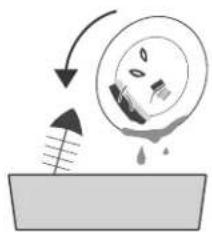
- Remove large, hard food scraps before loading tableware into the dishwasher
natural_image
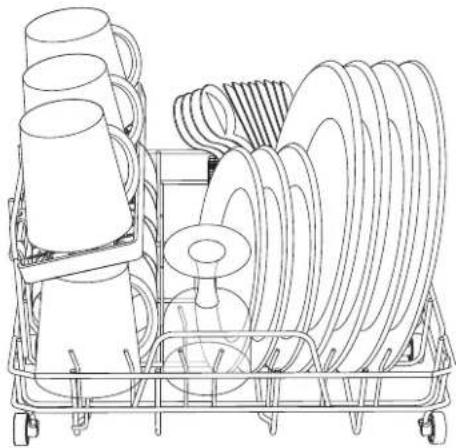
Diagram showing a mechanical or fluid system with an arrow indicating direction, no text or symbols present- Refer to the illustration when loading the dishwasher. All tableware and cutlery should be tilted to improve cleaning performance, with the dirty side facing toward the spray arm. Load tableware such that they are leaning against each other, and load hollow items such as cups, glasses, etc. with the opening facing downwards. Ladies should face open side down. Improper placement of tableware and cutlery may block the spray arm, which may affect the cleaning.
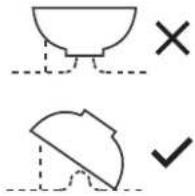
Try to leave the dirty facing toward the spray arm.
Recommended Layout for 4 Place Settings
natural_image
Line drawing of a shopping cart filled with various items including mugs, spools, and accessories (no text or symbols)4 × Dinner Plates (10")
3 × Small Plates (8")
1×Glass
4 × Cups
4 × Spoons
4 × Forks
4 × Knives
4 × Serving Bowls
IMPORTANT
For the best cleaning performance, follow these loading guidelines:
- Scrape off any large food particles.
- Soften and/or soak remnants of burnt food in pans.
-
It is not necessary to rinse all dishes under running water.
-
Load hollow items such as cups, glasses, pans etc. with the opening facing downwards.
- Curved items or items with recesses should be loaded at a slant so that water can run off.
-
All tableware and cutlery should be placed such that the spray arms can rotate freely during washing.
-
Knives and other utensils with sharp points should be loaded in the storage rack or cutlery basket with their points down or placed in a horizontal position so that they do not damage the inside of the dishwasher.
• Very small items should not be washed in the dishwasher, as they could fall out. - Dishes and cutlery should not lie inside, be stacked with, or lie against each other.
• To avoid damage to glasses, ensure they are not touching each other. - Do not overload the dishwasher. Position the dishes and cookware such that they will not be moved by the water spray.
Detergent Use
Pods, liquid, or powder detergent are all acceptable. Add detergent to the detergent dispenser located on the bottom of the glass door (depicted in the figure below).
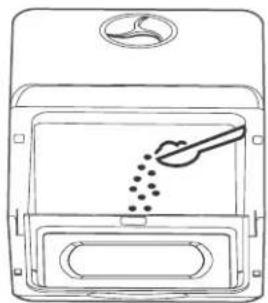
natural_image
Line drawing of a device with a spoon and particles inside, no text or symbols presentWARNING: Only use detergent made specifically for dishwashers. Do not use rinse aids. Dishwasher detergent is corrosive! Keep away from children.
- Do not add detergent when using the Fruit mode.
- The use of normal washing mode in combination with low alkaline concentrated detergents with natural enzymes reduces pollution and is good for your dishes.
- The detergent must be refilled before the start of each wash cycle.
• Generally, only one tablespoon of detergent is needed for a normal wash load. - Always add the detergent just before starting the dishwasher. Otherwise it could become damp and will not dissolve properly.
mode selection
Wash Cycle
| MODE | DESCRIPTION OF CYCLE | TEMPERATURE | DETERGENT | TIME | AIR DRYING TIME |
| NORMAL | 1. Hot water washing2. Cold water rinsing3. Cold water rinsing4. Hot water rinsing | 1. 55°C4. 68°C | 0.28 oz (8 g) | 69 minutes | 60 minutes |
| QUICK | 1. Hot water washing2. Cold water rinsing3. Hot water rinsing | 1. 50°C3. 62°C | 0.28 oz (8 g) | 29 minutes | 60 minutes |
| ECO | 1. Hot water washing2. Cold water rinsing3. Hot water rinsing | 1. 55°C3. 68°C | 0.28 oz (8 g) | 59 minutes | 60 minutes |
| BABY CARE | 1. Hot water washing2. Hot water rinsing3. Cold water rinsing4. Hot water rinsing | 1. 55°C2. 55°C4. 75°C | 0.42 oz (12 g) | 89 minutes | 60 minutes |
| FRUIT* | 1. Cold water rinsing2. Cold water rinsing | Constant temperature, not heating | Not required | 19 minutes | / |
NOTES:
- For washing tableware in the water tank mode, add water with a temperature below 40°C. For washing fruits and vegetables, add room temperature water. The default cleaning time is 19 minutes in FRUIT mode. You can stop the wash cycle in this mode to prevent the fruits from becoming over-washed or damaged.
• The AIR REFRESH mode can be used with any washing mode other than FRUIT mode.
AIR REFRESH Mode
What is AIR REFRESH Mode?
The AIR REFRESH mode can be used to keep your dishes clean and dry for long periods. Hot air drying and automatic ventilation can also prevent bacteria and odors, allowing you to keep your tableware sanitary while storing them.
How Does it Work?
When this mode is selected, in the next 3 days, a 15-minute automatic ventilation will start every 75 minutes.
Working Modes
The AIR REFRESH mode can be used with any washing mode other than FRUIT mode and can also be turned on separately.
- To combine with a wash cycle: After choosing the wash cycle of NORMAL, QUICK, ECO, BABY CARE, add an extra air-drying time by pressing the AIR REFRESH button. To cancel, simply press the AIR REFRESH button again if the drying process does not start.
- To use separately: Simply press the MODE button and then press the AIR REFRESH button to select the AIR REFRESH mode. Then, press the START/PAUSE button to start.
NOTE: The AIR REFRESH mode cannot be paused or canceled during operation of air-drying and intermittent circulation. If you want to cancel the AIR REFRESH mode, press and hold the POWER button for 3 seconds to turn off the dishwasher.
How the Working Status Panel Displays the Air-Dry Function
| Air Dry in any wash cycle(except FRUIT mode) | POWER button, START/PAUSE button, and MODEL button will stay illuminated with remaining time and ⚙ on the working status panel. |
| Air Dry in AIR REFRESH mode | AIR REFRESH button and POWER button will stay illuminated with "b" and ⚙ on the working status panel. |
Starting a Wash Cycle
- Load the dishwasher. See Loading the Dishwasher Basket (page 11) for instructions.
- Add detergent. See Detergent Use (page 12) for instructions.
- Connect the water inlet hose to the faucet. Ensure that the faucet is turned on to full pressure. Alternatively, add water to the water tank manually. See Adding Water to Dishwasher (page 9) for instructions.
- Insert the plug into the socket. The power supply is 220-240 V/50 Hz. The POWER button should light up and pulse.
- Press and hold the POWER button for 3 seconds to turn on the appliance. The POWER button.
START/PAUSE button, and MODE button will light up.





- Press the MODE button repeatedly to select the desired wash cycle. The options are: AIR REFRESH, NORMAL, QUICK, ECO, BABY CARE, and FRUIT, Refer to the wash cycle table for details.







- When a wash cycle is selected, the corresponding indicator will illuminate.
- Press the START/PAUSE button to start the wash cycle.




- If needed, press the AIR REFRESH button either before or after a wash cycle is started, or when the wash cycle is finished to add an extra 72 hours of intermittent ventilation for storage.




- To pause the dishwasher, press the START/PAUSE button. The button will flash until it is pressed again to resume the wash cycle.
NOTE: The AIR REFRESH mode cannot be paused or canceled during operation of air-drying and intermittent circulation. If you want to cancel the drying, press and hold the POWER button for 3 seconds to turn off the dishwasher.
Forget to Add a Dish?
You can only add a dish if the dishwasher has been running for a short time prior to detergent being released and water being drained.
NOTE: It is dangerous to open the door when the wash cycle has commenced as the hot water may scald you. If you do need to open the door completely, press the START/PAUSE button and then slowly open the door.
- Press the START/PAUSE button to stop the wash cycle.
- After the spray arms stop moving, you can open the door. The LED lamp will then turn on.
- Add forgotten dishes.
- Close the door.
- Press the START/PAUSE button. The dishwasher will then resume operation.
At the End of a Wash Cycle
When the cleaning cycle is completed, the machine will drain out the water for 1 minute, and 6 beeps will be heard. It will then begin the drying cycle. When the entire wash cycle is completed, the machine will automatically enter the standby mode.
NOTE: If the AIR REFRESH mode is turn on, the machine will begin the AIR REFRESH mode after the wash cycle is completed. After the air drying is finished, the machine will automatically enter the standby mode.
- Turn off the water supply, if connected. If the water tank will not be used for a long time, it is recommended to drain the water tank by pressing and holding both the AIR REFRESH button and POWER button simultaneously for 3 seconds.
- Unplug the appliance from the power source.
NOTE: When the wash cycle is completed, there may be a few droplets on the dishwasher's interior or on the tableware. This is normal.
cleaning & maintenance
Filter System
NOTES:
- Never run the dishwasher without the filters in place. Improper placement of the filters may reduce the performance level of the dishwasher and damage dishes and utensils.
• Make sure the filters are properly assembled. - The entire filter system should be cleaned once a week Remove food remnants and clean the filters under running water.
- When cleaning the filters, do not knock them against surfaces. This can contort the filters and affect the performance of your dishwasher.
The filters prevent larger remnants of food or other objects from getting inside the pump. For best performance and results, regularly clean the filter system.
The filter system consists of a coarse filter, a flat filter (main filter), and a micro filter (fine filter).
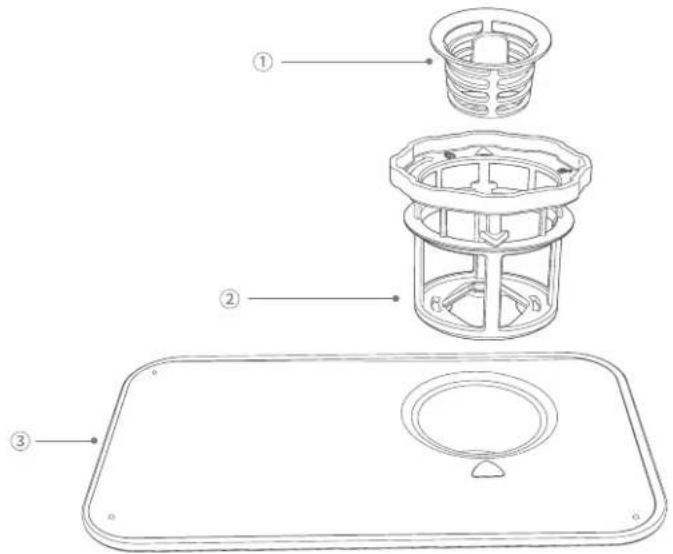
text_image
Technical diagram of a mechanical component with labeled parts in Chinese①. Coarse filter: This filter traps larger items, such as pieces of bone or glass that could block the drain.
②. Fine filter: This filter catches soil and food residue in the cylindrical base and prevents the soil from being redeposited on the dishes during wash cycle.
③. Main filter: Food and soil particles trapped by this filter are broken down by a special jet on the spray arm and flushed down the drain
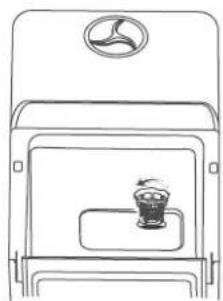
To Remove the Filter System
- Turn the fine filter counterclockwise to remove it from the machine.
natural_image
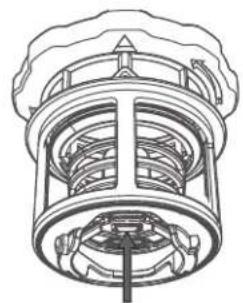
Line drawing of a car front panel with a logo and a small cup on the side panel (no text or symbols)- Push the tabs at the bottom center of the fine filter to separate the coarse filter from the fine filter.
natural_image
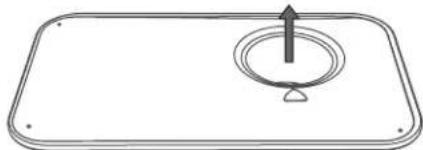
Technical line drawing of a mechanical component with internal cavities and mounting brackets (no text or symbols)- Remove the main filter by pulling upwards.
natural_image
Simple line drawing of a rectangular tray with a circular hole and an upward arrow, no text or symbols present.To Clean the Filter System
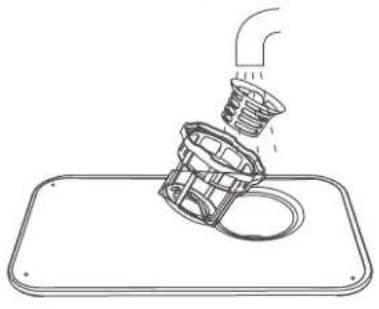
Rinse the filter system under running water. Use a soft cleaning brush to clean the coarse filter and the fine filter.
natural_image
Line drawing of a mechanical component being lifted by a pipe, with no visible text or symbolsTo reinstall the filter system, position the main filter on its seat and push downwards, align the tabs on the bottom of the coarse filter with the corresponding hole of the fine filter, and then insert the coarse filter into the fine filter. Then place the fine filter into its seat and rotate clockwise to tighten.
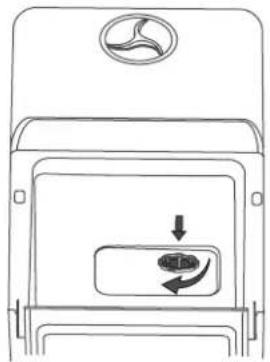
text_image
Diagram showing a car exhaust system with a logo, directional arrow, and circular component indicating fuel or airflow.Spray Arms
The upper and lower spray arms can be easily removed for periodic cleaning of the nozzles, preventing potential clogging. Wash them under running water and carefully replace them in their seats, checking that rotary movement is in no way impeded.
To Remove and Clean the Spray Arms
- Open the door and take out the basket.
- Remove the lower spray arm by grasping the middle arm and pulling upwards. Unscrew the upper spray arm by rotating counterclockwise.
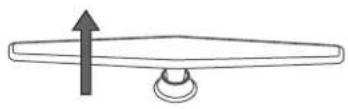
Lower
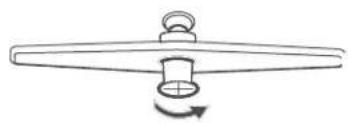
natural_image
Simple line drawing of a mechanical component with a rotating arrow (no text or symbols)Upper
- Wash the arms under running water and brush each spray arm. Use tools with a sharp point, such as a needle, to clean nozzles if needed.
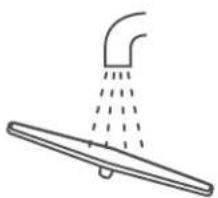
natural_image
Simple line drawing of a showerhead with liquid spray (no text or symbols)- Replace the lower spray arm to its seat by pushing downward until it clicks into place. Replace the upper spray arm by screwing clockwise into its seat. Ensure that the spray arm movement is not impeded before running another cycle.
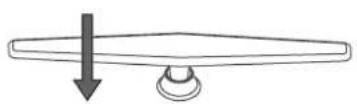
Lower
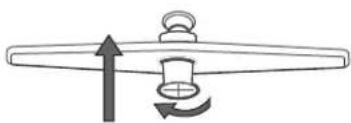
natural_image
Simple line drawing of a mechanical component with an upward arrow and a circular button, no text or symbols present.Upper
caring for the dishwasher
Daily Maintenance
- The control panel and exterior should be cleaned by using a lightly damp cloth. After cleaning, make sure to dry thoroughly. Never use sharp objects, scouring pads, or harsh cleaners on any part of the dishwasher. To remove spots or stains from the surface of the interior, use a cloth dampened with water and a little vinegar.
- There may be some oil stains left on the edge of the dishwasher's interior wall or door after heavily soiled loads have been washed. To clean the edge around the door, only use a soft, warm, damp cloth. Avoid getting water inside the door lock and electrical components.
• Regularly clean the door seals with a damp sponge to prevent odors from trapped food particles in the door seal.

WARNING: Never use a spray cleaner to clean the door panel, as it may damage the door lock and electrical components. Abrasive agents or paper towels should not be used due to risk of scratching or leaving spots on the stainless-steel surface.
Protecting the Dishwasher from Freezing
Please take frost protection measures during the wintertime. After every wash cycle, take the following steps:
- Turn off the dishwasher. Cut off electrical power from the dishwasher.
- Turn off the water supply and disconnect the water inlet hose from the back of the unit.
- Drain the water from the inlet hose and inlet port (Use a pan or bucket to catch the water).
- Reconnect the water inlet hose to the inlet port.
- Remove the filter system and use a sponge to absorb the water that is in the filter(sump) area.
If your dishwasher no longer works due to freezing or ice, please contact our after-sales service team.
General Tips
In order to keep your dishwasher in good working order, the following suggestions should be observed:
- Before cleaning or performing maintenance, always remove the plug.
- After every wash - Turn off the water supply to the appliance and leave the door slightly ajar so that moisture and odors are not trapped inside.
- If the dishwasher will not be used for an extended period of time - It is recommended that you run a wash cycle with the dishwasher empty, then power off the dishwasher, remove the plug from the socket, turn off the water supply, force drain the water tank, and leave the appliance door slightly open. This will help the door seals to last longer and prevent odors.
- Moving the appliance – If the appliance must be moved, try to keep it in a vertical position. Do not transport the unit on its side or upside down.
- Water connection - Our water hose has a 3/4^II GHT female connector, so it matches with faucets with a 3/4^II GHT male connector. Connect the female connector to your faucet and make sure it is fastened tightly in place.
PLEASE NOTE: If the supplied water inlet hose does not fit your faucet, you may need to buy a 3/4" GHT threaded faucet adapter from a plumbing supply manufacturer. If you are unsure of what to do, please feel free to contact our after-sales service team. - Water drainage – The drain hose must be properly fitted to avoid water leaks. Ensure that the water drain hose is not kinked or in any way impeded. If the sink is higher than the surface where you have placed your dishwasher, it will be necessary to drain excess water into a bucket that is in a lower position than the dishwasher. If you need a drain hose extension, be sure to use a similar drain hose, and that it is no longer than 12 feet long. Otherwise, the cleaning effect of the dishwasher could be reduced.
error codes
| CODES | BUZZER SOUND | ERROR TYPE | SOLUTIONS |
| (Water shortage icon keeps flashing red) | 10 beeps (once every second) | A fault in the water inflow | Make sure the faucet is connected and turned on, or the water tank is full.Restart the appliance. If the icon still flashes red, please contact Airmsen support team. |
| E2 | 5 beeps every 2 seconds | Draining error | Check the drain hose and make sure the hose is not kinked or obstructed.Turn off the appliance and check if anything is blocking the filter system or drain hose.Make sure all hoses are not blocked. |
| E3 | Overflow | Tilt the machine backwards to a 30-45 degree and hold it in this position for at least 2 minutes, allowing water to flow out from the machine. Restart the appliance.If theerror code still persists, please contact Airmsen support team. | |
| E4 | Thermistor error | Restart the appliance. If the error code still persists, please contact Airmsen support team. | |
| E5 | Internal communication error | ||
| E6 | Heating system failure | ||
| E7 | Pressure switch failure |
troubleshooting
| PROBLEMS | POSSIBLE CAUSES | SOLUTIONS | |
| TECHNICAL PROBLEMS | Dishwasher doesn't start | Fuse is blown, or the circuit breaker is tripped. | Replace the fuse or reset the circuit breaker.Remove any other appliances sharing the same circuit with the dishwasher. |
| Power supply is not turned on. | Make sure the power cord is properly plugged into the wall socket.Make sure the dishwasher is turned on and the door is closed securely. | ||
| Water shortage. | Open the faucet or add water to the tank until the water shortage indicator turns off. | ||
| Dishwasher door is not properly closed. | Make sure the door is fully closed. | ||
| Insufficient water flow | There is trapped air in the machine's water pipe system. | Slightly shake the machine 5-6 times to exhaust all trapped air. |
troubleshooting
| PROBLEMS | POSSIBLE CAUSES | SOLUTIONS | |
| TECHNICAL PROBLEMS | Water is not pumped from the dishwasher | Kinks in the drain hose. | Check the drain hose. |
| Filter system is clogged. | Check the coarse filter. | ||
| Kitchen sink is clogged. | Check your kitchen sink to make sure it is draining.If the kitchen sink is not draining, contact a plumber. | ||
| Can't select a wash cycle | The dishwasher is in operation. | Re-select a program by stopping the in-progress program or wait for the in-progress program to finish. | |
| GENERAL PROBLEMS | Suds in the tub | Wrong detergent. | Only use special detergents for dishwashers. Open the dishwasher and remove foam by hand. Pour 1.3 gallons of water into machine, or open the connected faucet, select any program, and let it run for 1-2 minutes. The foam will then be drained. Repeat process if needed.NOTE: If the water tank is not full, the machine cannot be activated. |
| Stained tub interior | Detergent with colorant was used. | Do not use detergents with colorants. | |
| Discoloration of plastic tableware. | Washing temperature is too high. | Select a wash cycle with lower temperatures. | |
| White film on the inside surface | Hard water minerals. | This problem is difficult to avoid in areas with hard water.To clean the interior, use a damp sponge with dishwasher detergent, wearing rubber gloves.Never use any cleaner other than dishwasher detergent, as there is a risk of foaming or suds. | |
| There are rust stains on cutlery | The affected items are not corrosion resistant. | Avoid washing items that are not corrosion resistant in the dishwasher. | |
| NOISE | Knocking noise inside the tub while running | The spray arm is knocking against an item in the basket. | Pause the program and rearrange items obstructing the spray arms. |
| Rattling noise inside the tub while running | Items are not securely placed in the basket. | Pause the wash cycle and secure the items in the basket. | |
| Knocking noise in the water pipes | The dishwasher is in operation. | This has no influence on dishwasher function. If unsure, contact a qualified plumber. |
troubleshooting
| PROBLEMS | POSSIBLE CAUSES | SOLUTIONS | |
| UNSATISFACTORY WASHING RESULT | Tableware is not cleaned | Dishes were not loaded properly. | See “Loading the Dishwasher Basket” for instructions. |
| The wash cycle was not powerful enough. | Select a more intense wash cycle. Refer to the wash cycle table for details. | ||
| Items are blocking the path of spray arms. | Rearrange the items so that the spray arms can rotate freely. | ||
| The filter system is not clean or is not correctly installed. | Clean and/or fit the filter system correctly. | ||
| Not enough detergent was dispensed. | Use more detergent or change detergent type. | ||
| Cloudiness on glassware | Combination of soft water and not enougt detergent. | ||
| Egg custard left on the tableware | Protein solidification. | Wash the tableware with egg custard by hand. | |
| Black or gray marks on dishes | Aluminum utensils have rubbed against dishes. | Check that dishes are loaded properly and not rubbing against each other. | |
| Detergent left in dispenser | Dishes are blocking the detergent dispenser. | Check that dishes are loaded properly. | |
| UNSATISFACTORY DRYING RESULT | The dishes are not drying | Improper loading. | Check that dishes are loaded properly. |
| Inappropriate wash cycle. | Select an appropriate wash cycle. | ||
| Poor drying effect for plastic/wooden tableware. | Dry tableware by hand. | ||
| Drying cycle has not finished yet. | Wait for the drying cycle to finish. | ||
| Cutlery has low-quality coating. | Water drainage is more difficult with these types of items. These types of cutlery and dishware are not suitable for washing in the dishwasher. | ||
| Water drops left inside of machine | Not enough drying time. | Select the AIR REFRESH mode to add more air-drying time. |
warranty information
| Product Name | Compact Dishwasher |
| Model Number | TDQR03A |
| Default Warranty Period | 2 year |
| For your own reference, we strongly recommend that you record your order number and date of purchase. | |
| Date of Purchase | |
| Order Number | |
TERMS & POLICY
Airmsen warrants all products to be of the highest quality in material, craftsmanship, and service, effective from the date of purchase to the end of the warranty period.
Airmsen will replace any product found to be defective due to manufacturer flaws based on eligibility. Refunds are available within the first 30 days of purchase. Refunds are only available to the original purchaser of the product. This warranty extends only to personal use and does not extend to any product that has been used for commercial, rental, or any other use in which the product is not intended for. There are no warranties other than the warranties expressly set forth with each product.
This warranty is non-transferrable. Airmsen is not responsible in any way for any damages, losses, or inconveniences caused by equipment failure by user negligence, abuse, or use noncompliant with the user manual or any additional safety or usage warnings included in the product packaging and manual.
This warranty does not apply to the following:
- Damage due to abuse, accident, alteration, misuse, tampering, or vandalism.
- Improper or inadequate maintenance.
• Damage in return transit.
• Unsupervised use by children under 18 years of age.
Airmsen assume no liability for damage caused by the use of the product other than for its intended use or as instructed in the user manual. Some states do not allow this exclusion or limitation of incidental or consequential losses, so the foregoing disclaimer may not apply to you. This warranty gives you specific legal rights and you may also have other rights, which may vary from state to state.
ALL EXPRESSED AND IMPLIED WARRANTIES, INCLUDING THE WARRANTY OF MERCHANTABILITY, ARE LIMITED TO THE PERIOD OF THE LIMITED WARRANTY.
Defective Products & Returns
Should your product prove defective within the specified warranty period, please contact Customer Support via support@airmsen.com with your order number. DO not dispose of your product before contacting us. Once our Customer Support Team has approved your request, please return the unit with a copy of your invoice and order number.
customer support
We're Here to Help!
If you encounter any issues or have any questions regarding your new product, please contact our helpful Customer Support Team. Your satisfaction is our goal!
Customer Support
Email: support@airmsen.com
Website: www.airmsen.com
If you need to purchase product accessories, please visit www.airmsen.com.
* Please have your order confirmation number ready before contacting Customer Support.

https://www.facebook.com/Airmsen

https://www.youtube.com/@AIRMSEN
For product operation videos, please subscribe to AIRMSEN's official Youtube account.
natural_image
Line drawing of a simple microwave oven (no text or symbols)English Page 2\~22
natural_image
Line drawings of a device with a bulb and a hand holding a pipe fitting (no text or symbols)Wassertank-Modus
natural_image
Line drawing of a microwave oven with a hand holding a paper clip (no text or symbols)natural_image
Diagram showing a container with liquid and a droplet inside, with arrows indicating flow or process (no text or symbols)natural_image
Line drawing of a shopping cart filled with various items including mugs, spools, and bottles (no text or symbols)natural_image
Line drawing of a food delivery box with a spoon lifting a quantity into the tray (no text or symbols)text_image
Technical diagram of a mechanical component with labeled parts including a spring-loaded housing, internal structure, and a tray with a circular hole.natural_image
Line drawing of a car front view showing the logo and side panel (no text or symbols)natural_image
Technical line drawing of a mechanical component with internal cavities and mounting flanges (no text or symbols)natural_image
Simple line drawing of a rectangular tray with a circular hole and an upward arrow, no text or symbols present.Reinigen des Filtersystems
natural_image
Line drawing of a mechanical component being lifted by a pipe, mounted on a tray (no text or symbols)text_image
Diagram showing a car intake tray with a logo and directional arrow indicating flow or movementSprüharme
natural_image
Simple line drawing of a mechanical component with a curved arrow indicating rotation (no text or symbols)Obere
natural_image
Simple line drawing of a showerhead spraying water onto a flat surface (no text or symbols)natural_image
Simple line drawing of a mechanical component with an upward arrow and a circular button, no text or symbols present.Obere
Email: support@airmsen.com
Website: www.airmsen.com
https://www.facebook.com/Airmsen

https://www.youtube.com/@AIRMSEN
natural_image
Line drawing of a rectangular machine with a recessed top and front panel (no text or symbols)English Page 2\~22
natural_image
Line drawing of a device with a hose and plug, alongside a hand holding a pipe fitting (no text or symbols)natural_image
Line drawing of a microwave oven with a hand holding a paper tag (no text or symbols)natural_image
Diagram showing a droplet falling into a container with an arrow indicating motion (no text or symbols)text_image
Diagram showing two geometric shapes with checkmark indicators, one marked with X and the other with ✓natural_image
Line drawing of a shopping cart filled with plastic cups and coiled sheets of goods (no text or symbols)natural_image
Line drawing of a food delivery box with a spoon lifting a quantity into the tray (no text or symbols)text_image
Technical diagram of a mechanical component with labeled parts including a spring-loaded housing, a filter, and a tray.natural_image
Line drawing of a car interior with a logo on the top (no text or symbols)natural_image
Technical line drawing of a mechanical component with internal cavities and mounting features (no text or symbols)natural_image
Simple line drawing of a rectangular tray with a circular hole and an upward arrow, no text or symbols present.natural_image
Line drawing of a pipe pouring into a circular component on a tray (no text or symbols)text_image
Diagram of a vehicle exhaust system with labeled components and directional arrow indicating airflow or movementnatural_image
Simple line drawing of a mechanical component with a rotating arrow (no text or symbols)Supérieure
natural_image
Simple line drawing of a showerhead with liquid spray (no text or symbols)natural_image
Simple line drawing of a mechanical component with an upward arrow and a circular button, no text or symbols present.Supérieure
CONDITIONS ET POLITIQUE
E-mail: support@airmsen.com
Site web: www.airmsen.com
https://www.facebook.com/Airmsen

https://www.youtube.com/@AIRMSEN
natural_image
Line drawing of a rectangular machine with a recessed top and front panel (no text or symbols)English Page 2\~22
natural_image
Line drawing of a medical device with a tube and connector (no text or symbols)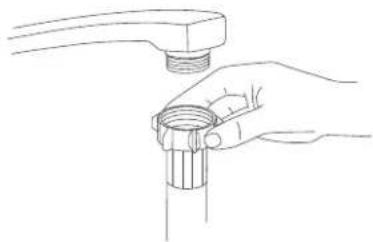
natural_image
Line drawing of a hand holding a pipe fitting with a faucet (no text or symbols)natural_image
Line drawing of a microwave oven with a hand holding a paper tag (no text or symbols)natural_image
Diagram showing a droplet falling into a container with an arrow indicating flow (no text or symbols)text_image
Diagram showing two geometric shapes with checkmark indicators, one marked with X and the other with ✓natural_image
Line drawing of a shopping cart filled with various items including mugs, spools, and accessories (no text or symbols)natural_image
Line drawing of a food delivery box with a spoon lifting a quantity into the tray (no text or symbols)text_image
Technical diagram of a mechanical component with labeled parts including a spring-loaded housing, a filter, and a tray.natural_image
Line drawing of a car interior with a Mercedes-Benz logo on the top (no text or symbols)natural_image
Technical line drawing of a mechanical component with internal cavities and mounting brackets (no text or symbols)natural_image
Simple line drawing of a rectangular tray with a circular hole and an upward arrow, no text or symbols present.natural_image
Line drawing of a mechanical component being lifted by a pipe, placed on a tray (no text or symbols)text_image
Diagram of a vehicle air intake system with directional arrows and a circular logo on the top panelBracci spruzzatori
natural_image
Simple line drawing of a mechanical component with a rotating arrow (no text or symbols)Superiore
natural_image
Simple line drawing of a showerhead with liquid spray (no text or symbols)natural_image
Simple line drawing of a mechanical component with an upward arrow and a circular button, no text or symbols present.Superiore
Email: support@airmsen.com
Sito web: www.airmsen.com
https://www.facebook.com/Airmsen

https://www.youtube.com/@AIRMSEN
natural_image
Line drawing of a rectangular machine with a recessed top and front panel (no text or symbols)English Page 2\~22
natural_image
Line drawings of a device with a hose and plug, alongside a hand holding a threaded pipe fitting (no text or symbols)natural_image
Line drawing of a microwave oven with a hand holding a paper tag above it (no text or symbols)natural_image
Diagram showing a droplet falling into a container with an arrow indicating motion (no text or symbols)text_image
Diagram showing two geometric shapes with checkmark indicators, one marked with X and the other with ✓natural_image
Line drawing of a shopping cart filled with various items including mugs, spools, and accessories (no text or symbols)natural_image
Line drawing of a food delivery box with a spoon lifting a quantity into the tray (no text or symbols)At the End of a Wash Cycle
text_image
Technical diagram of a mechanical component with labeled parts including a spring-loaded housing, a filter, and a tray.natural_image
Line drawing of a car interior with a Mercedes-Benz logo on the top (no text or symbols)natural_image
Technical line drawing of a mechanical component with internal cavities and mounting brackets (no text or symbols)natural_image
Simple line drawing of a rectangular tray with a circular hole and an upward arrow, no text or symbols present.natural_image
Line drawing of a pipe pouring into a circular component on a tray (no text or symbols)text_image
Diagram showing a vehicle exhaust system with a circular logo and directional arrow indicating flow or movement.Brazos de rociado
natural_image
Simple line drawing of a mechanical component with a rotating arrow (no text or symbols)Superior
natural_image
Simple line drawing of a showerhead with liquid spray (no text or symbols)natural_image
Simple line drawing of a mechanical component with an upward arrow and a circular button, no text or symbols present.Superior
Cuidado del lavavajillas
https://www.facebook.com/Airmsen

https://www.youtube.com/@AIRMSEN