GT-5R Mini - Ham Radio BaoFeng - Free user manual and instructions
Find the device manual for free GT-5R Mini BaoFeng in PDF.


| Product type | Portable amateur radio |
| Brand | BaoFeng |
| Model | GT-5R Mini |
| Weight (with battery) | 200 g |
| Power supply | Rechargeable Li-ion battery, charging via USB Type-C port |
| Max transmission current | ≤ 1600 mA |
| Antenna | Removable antenna, screw mounting |
| Display | LCD screen with status icons |
| Frequency bands | VHF (136-174 MHz) and UHF (400-520 MHz) typical |
| Transmission power | High (5 W) / Low (1 W) selectable |
| Memory channels | 128 channels (estimated) |
| Sub-band tones | Programmable CTCSS and DCS |
| Main functions | Dual standby, VFO/MR, VOX, FM radio, flashlight, emergency alarm, monitor, frequency search, talk-around, frequency reversal, repeater activation tone (1750 Hz), wireless programming via Bluetooth mobile app, stopwatch |
| Keypad | Backlit numeric keypad |
| LED indicator | Red while transmitting, green while receiving, charging (solid red = charging, solid green = charged) |
| Keyboard lock | Yes, by holding [+] key |
| Operating temperature | Not specified (estimated -10°C to +50°C) |
| Maintenance and cleaning | Do not use harsh solvents, wipe with a dry soft cloth |
| Spare parts and repairability | Replaceable antenna, battery, belt clip; repair by authorized Baofeng service |
| Included accessories | Radio, antenna, battery, belt clip, user manual; charger and adapter depending on configuration |
| Compliance | Compliant with European directive 2014/53/EU |
Frequently Asked Questions - GT-5R Mini BaoFeng
User questions about GT-5R Mini BaoFeng
0 question about this device. Answer the ones you know or ask your own.
Ask a new question about this device
Download the instructions for your Ham Radio in PDF format for free! Find your manual GT-5R Mini - BaoFeng and take your electronic device back in hand. On this page are published all the documents necessary for the use of your device. GT-5R Mini by BaoFeng.
USER MANUAL GT-5R Mini BaoFeng
Items in the Package
| Item Quantity (PCS) Item Quantity (PCS) | |
| Radio 1 1 | Operation Manual |
| Battery 1 | |
| Antenna 1 | |
| Belt Clip 1 |
*Charger and power adapter are subject to the final configuration of the dealer. Please understand that the charging instructions in this manual may not be appropriate if Type-C charging method.
Product Overview
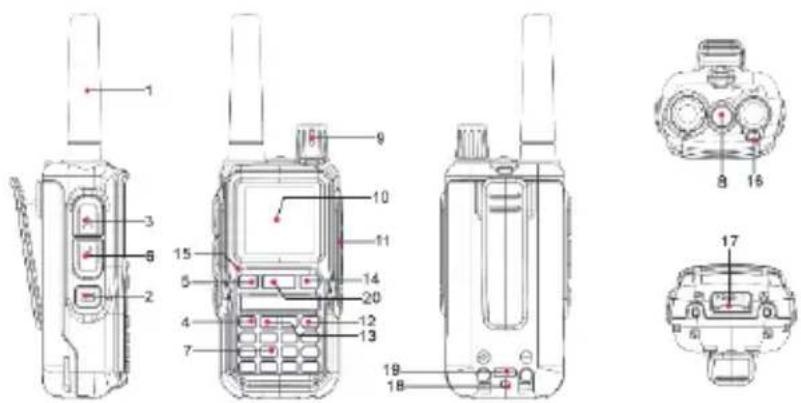
1.Antenne
2.SK1-Customized Function Keys
3.PTT-A Button
4.OK/Menu button
5.V/M-VFO/MR
6.PTT-B Button
7.Numeric Keypad
- Flashlight
9.Volume/Power Knob
10.Screen
11.Accessory Port
12.Cancel/Back button
13.▲Up button/Down button
14.A/B
15.Microphone
16. LED Indicator
17.Battery Latch
18.Type-C Charging indicator light
19.Type-C Charging Port
20] Scan/Flashlight
Side Key [SK1] Customization Function
The function of the "SideKey SK1" allows the setting of shortcut functions via the CPS programming software or via the menu - Radio settings - "SideKey SK1".
-FM Radio: Quickly turns the radio function on or off.
-Scan: Quickly turns the scanning function on or off. The scan function can also be turned on or off by long pressing the # key.
-SEARCH: Quickly turn on or off the one-touch sweep function.
-VOX: Quickly turn on or off the VOX function.
-LAMP: Quickly turn on or off the flashlight.
-SOS: Quickly turn on or off the alarm function.
LCD Display
| Icon Description | |
| RSSI | Squelch Open/ Close Indicator |
| H/L | Transmit power level indicator, According to Power |
| √ | Make sure you can hear the DTMF side tone from the radio speaker, set to DT-ST, ANI-ST, DT+ANI. |
| D | DCS enabled |
| C | CTCSS enabled |
| + | Enables access of repeaters in VFO/Frequency Mode. TX will be shifted higher in frequency than RX. |
| - | Enables access of repeaters in VFO/Frequency Mode. TX will be shifted lower in frequency than RX |
| D | Dual watch enabled |
| Keypad lock enabled | |
| VOX enabled | |
| The confidential calling feature is activated | |
| N | Narrowband enabled |
| Battery level indicator | |
| R | Reverse function enabled |
| T | The terminal is switched from transit mode to pass-through mode. |
| SCR | The voice scramble function has been activated |
Before Use
When using the terminal for the first time, a low battery warning may occur. It is recommended to turn off the radio during charging. The battery's LEDs provide an indication of the current state of charge, as shown in the table below.
| Indicator light | Charging status |
| Red light is always on | Charging |
| Green light is always on | Charging complete |
Attaching the Antenna
Turn the antenna clockwise until it is tight. To remove the antenna, turn it counterclockwise.
CAUTION
Do not hold the radio antenna in your hand, as this will reduce the performance of the radio and the life of the antenna. Do not shake the radio with the top of the antenna in your hand, as this will degrade the performance and life of the radio antenna.
Attaching the Belt Clip
- Use a Phillips screwdriver to turn the screw on the back of the radio counter-clockwise and remove it.
- Align the screw holes on the belt clip with the screw holes on the back of the radio. Align the screw holes on the back of the radio.
- Put the screws back in place and use a Phillips screwdriver to turn the screws clockwise. Turn the screwdriver clockwise until it is hand-tight.
Basic operations
Turning your Radio On and Off
To turn your radio ON, turn the [Volume/Power] rotaryknob clockwise.
To turn your radio OFF, turn the [Volume/Power] rotary knob counterclockwise.
Setting the Volume
Increase volume by turning the [Volume/Power] rotary knob clockwise.
To decrease volume, turn the [Volume/Power] rotary knob counterclockwise.
Do not hold the radio close to your ear. If the volume is set to an uncomfortable level, it could hurt your ear.
Locking or Unlocking Keypad
To avoid accidentally changing radio settings:
- Press and hold the [ ] key to lock the keypad until the screen displays the " " icon.
- In lock mode, you can turn the intercom on and off, adjust the volume, receive, transmit, send call tones, send emergency alerts, and listen to channels. All other functions remain locked.
- In lock mode, press and hold the [ ] key to unlock the keypad until the ” icon is no longer displayed to unlock the radio.
Keypad Entry
You can enter radio aliases, channel aliases, numbers, etc. using the radio's numeric keypad.
- To switch between input methods, press #.
- Press 1 to enter a special character (except in numeric input mode, where the number 1 is entered)
- Press 0 to enter a space (except in the numeric input mode, in which special characters are entered).
Selecting a Channel
The channel is the channel through which the signal is transmitted. Press the [V/M] button to toggle between VFO and channel mode to select channel mode.
Press the / buttons or the rotary encoder to select the desired channel.
Enter the channel number using the keypad. For example, to switch to channel 64, enter 064 totaling 3 digits to switch to channel 64.
Channel Memory
In Frequency and in Standby mode, you can store frequencies and parameters.
Press [MENU] [3] [MENU] [1] [5], the screen will display "MEMCH".
Press [MENU] to enter the function. Press the / buttons to select the channel, then press [MENU] to store it. A sound tone will confirm that the storing succeeded. Press [EXIT] to exit to return to standby mode.
NOTES
If you want to set CTCSS tones, DCS codes or the frequency offset, you have to do it before storing the channel. Stored channels are displayed as CH-, other channels have no CH- display.
Deleting a channel (DEL-CH)
VFO mode and in standby mode, press [MENU] [3] [MENU] [1] [6], the screen will display "DELCH".
Press [MENU] to enter the function. Press the / buttons or rotate the encoder to select the channel you want to delete, then Press [MENU] to confirm.
To return to the standby mode Press [EXIT].
NOTE: Channel 1 cannot be deleted.
Main Band/Sub Band Switch
In standby mode, press the [A/B] key to toggle between the A and B bands to switch between the main/sub bands.
The main band is the highlighted band. The darker displayed band is the sub-band.
VFO/Channel Switch
Press the [V/M] button to switch between VFO and channel display.
VFO mode will display the VFO icon.MR mode will display the channel serial number.
Setting the VFO Frequency
Turn the radio to VFO mode, then press the [A/B] key to switch to the main channel.
Operation 1: Input the VFO frequency directly with the keypad.
Operation 2: Press the / button or rotary encoder to adjust the VFO frequency in the set frequency step.
Call Service
All radios in the group must be set to the same channel and sub-code to communicate.
To ensure optimal reception volume, keep the distance between the microphone and your mouth at 2.5cm to 5cm when transmitting.
- Initiate a call: Select a channel, press and hold the [PTT-A] key, the radio transmits on segment A (upper screen) and the red indicator light is always on. Then speak into the microphone with normal voice tone.
Press and hold the [PTT-B] key, the radio transmits on the B segment (lower screen), and the red indicator light is always on. Then
speak into the microphone in a normal voice tone.
-Receive a call: After releasing the [PTT] key, the radio is in a receivable state. When receiving a call, the green indicator light is always on.
Emergency Alarm
Emergency alarm means that the terminal can initiate an emergency alarm to seek help from the companion or the control center when it encounters an emergency.
In standby mode, press the preset [SOS] shortcut key to enable or disable the emergency alarm function.
Flashlight
In standby mode, press the preset [LAMP] shortcut key or key to turn the flashlight on or off.
FM Radio Function
Set the [SK1] key to the radio function via Menu >> Radio Set >> Press SK1.
Turn on the radio and press the SK1 key [FM Radio] to enter radio mode and the screen displays the tuning frequency. The following operations can be performed:
-Press / key to search for radio channels at the preset step frequency.
-Press the [# ] key to search for radio channels automatically, the screen displays 'SEEK...
-Press [EXIT] key to switch frequency band between 65.0/75.0MHz.
-Press SK1 key [FM Radio] to exit radio mode.
Monitor
Press and hold the pre-programmed [Monitor] key to enter monitor mode and listen for weak signals on the current channel.
You can also listen to the volume level of the radio when you are not receiving. This allows you to adjust the volume, if necessary.
Release the [Monitor] key to exit the monitor mode.
Frequency Search
Press the pre-programmed [SEARCH] shortcut key or press and hold key, the radio enters into frequency search state, the
screen displays "SEARCH...". Press [#z] key to switch the searching band, such as VHF/UHF, etc. The frequency and CTCSS/DCS code will be displayed after searching is completed.
Press [MENU] to save the channel.
Reverse Frequency Function
Short press the [^*] key in relay mode can invert the receive frequency and transmit frequency, the screen shows R icon.
- This function is often used in repeater channels, and is effective when there is a frequency difference between the receive frequency and the transmit frequency.
Talk Around Function
In repeater mode, press [^*] to switch between Talkaround Mode and Repeater Mode, the screen displays between T icon and R icon.
-In Talkaround mode, the receive frequency is equal to the transmit frequency.
Repeater Activation Tone
Turn on the radio, press and hold the [PTT] key, then press the [SK1] to transmit 1750Hz audio to activate a repeater in hibernation.
Voice-activated transmit (VOX)
Enable VOX function, you don't need to press PTT key to transmit, through the voice of normal speech automatically transmit, after the speech stops, it will stop transmitting automatically and wait for receiving. VOX function is enabled:
(1) Standby status, press [MENU][2][MENU][4] to enter Vox Switch;
(2) Press [MENU][2][[MENu][5] to enter Vox Level, press / to select VOx level (level 1-9);
-Open VOx,select VOx level 1 level-9, the smaller the value , the higher the sensitivity, the V icon is displayed at the top of the screen. Default is off.
-Turn off VOX,select OFF OFF,V icon disappears.
(3) Press [MENU] key to save the setting and return to the upper menu.
-Repeat the above operation and select OFF to turn off the VOX function.
Dual Watch
When in Dual watch mode, the radio can receive the frequency set for channel A or B. Operation is as follows:
- Press [MENU] [2] to enter Radio Set.
- Press [MENU] + / to select "15 Dual Watch".
- Press [MENU] key to enter Dual Watch Setting, press / key to select "On".
- Press [MENU] key to save and return to the upper menu. The dual watch function will be turned on, and the icon 'D' will be displayed on the first line of the screen.
-Repeat the above operation and select "Off", the Dual Watch function is turned off and the icon 'D' disappears from the first line of the screen. The sub-band displays the icon.
Stopwatch Function
Press and hold the [MENU] key to enable the stopwatch function. The stopwatch timing operates as follows:
-Press the [MENU] key to start the stopwatch.
-Press the [MENU] key again to stop the stopwatch.
-Press the [EXIT] key to exit the stopwatch function.
Use of menu functions
Basic use
Using the menu with arrow keys
- Press the [MENU] button to enter the menu.
- Use the / buttons or the encoder to navigate between menu items.
- Once you find the desired menu item, press [MENU] again to select that menu item.
- Use the / buttons or the encoder to select the desired parameter.
- When you've selected the parameter you want to set for a given menu item;
A) To confirm your selection, press [MENU] and it will save your setting and bring you back to the main menu.
B) To cancel your changes, press [EXIT] and it will reset that menu item and bring you out of the menu entirely.
6. To exit out of the menu at any time, press the [EXIT] button.
Using the menu with short-cuts
- Press the [MENU] button to enter the menu.
- Use the numerical keypad to enter the number of the menu item.
- To enter the menu item, press the [MENU] button.
- For entering the desired parameter you have two options:
A) Use the arrow buttons as we did in the previous section; or
B) Use the numerical keypad to enter the numerical short-cut code. - And just as in the previous section;
A) To confirm your selection, press [MENU] and it will save your setting and bring you back to the main menu.
B) To cancel your changes, press [EXIT] and it will reset that menu item and bring you out of the menu entirely. - To exit out of the menu at any time, press the [EXIT] button.
Wireless Program Radio
You can program the radio wirelessly. Before programming the radio wirelessly, you need to install the APP program. Download at www.baofengradio.com or scan


The radio operates as follows:
- Press [MENU] + [4] to enter Wireless CPS.
- Press [MENU] + ▲/▼ to select "On";
The icon will be displayed on the first line of the screen.
Download baofengradio APP
You can program the terminal through the baofengradio APP. Download and install baofengradio APP on your Android phone.
After the APP is opened, allow the Bluetooth of the cell phone and open the location function, select the brand Baofeng in the APP, select the walkie-talkie model 5Rmini Series, connect the radio, click Walkie-talkie. prompt the connection success and return to the home page.
Read the radio data: After finishing the frequency reading, click the program to enter the program details. In the program details interface you can program channel information, frequency mode, optional functions.
Save Profile: The programmed profile allows you to save the profile as a new profile and name the new profile.
If you select Replace Program, click Replace Program and save.
Write data to radio: click home page, select program, click 'Write' to enter write frequency, the radio will restart automatically when finish writing frequency.
Technical Specifications
General
Receiver Frequency FM 76-108 MHz;
VHF 144-146MHz, UHF 430-440MHz
Transmission Frequency VHF 144-146MHz, UHF 430-440MHz
Channel Spacing 25.0KHz(Wide)/12.5KHz(Narr)
Memory Channel 999 Groups
Operation Voltage DC 7.4 V ±10%
Dimensions 108mm×52mm×37mm (No antenna)
Weight 200g (Battery pack included)
Transmission current ≤ 1600mA
Receive Sensitivity 0.25 V (12dB SINAD)
Rated Audio Power Output 1W @16 ohms
Receive current ≤ 380mA
Connection for accessories 2 pin Kenwood jack
Antenna impedance 50 Ohm
NOTE: All specifications may be modified without prior notice or liability. Thank you.
Amateur Radio
5R Mini Series
USER'S MANUAL
François
Éléments du paquet
Commutation VFO/Canal
Technical Specifications
General
Receiver Frequency FM 76-108 MHz;
VHF 144-146MHz, UHF 430-440MHz
Transmission Frequency VHF 144-146MHz, UHF 430-440MHz
Channel Spacing 25.0KHz(Wide)/12.5KHz(Narr)
Memory Channel 999 Groups
Operation Voltage DC 7.4V± 10%
Dimensions 108mm×52mm×37mm (sans antenna)
Receive Sensitivity 0.25 V (12dB SINAD)
Rated Audio Power Output 1W @16 ohms
Receive current ≤ 380mA
Connection for accessories 2 pin Kenwood jack
Antenna impedance 50 Ohm
NOTE: All specifications may be modified without prior notice or liability. Thank you.
Amateur Radio
5R Mini Series
USER'S MANUAL
Deutsch
Technical Specifications
General
Receiver Frequency FM 76-108 MHz;
VHF 144-146MHz, UHF 430-440MHz
Transmission Frequency VHF 144-146MHz, UHF 430-440MHz
Channel Spacing 25.0KHz(Wide)/12.5KHz(Narr)
Memory Channel 999 Groups
Operation Voltage DC 7.4V± 10%
Dimensiones 108mm x 52mm 37mm sin antenna
Receive Sensitivity 0.25 V (12dB SINAD)
Rated Audio Power Output 1W @16 ohms
Receive current ≤ 380mA
Connection for accessories 2 pin Kenwood jack
Antenna impedance 50 Ohm
NOTE: All specifications may be modified without prior notice or liability. Thank you.
Amateur Radio
5R Mini Series
USER'S MANUAL
Italiano
Technical Specifications
General
Receiver Frequency FM 76-108 MHz;
VHF 144-146MHz, UHF 430-440MHz
Transmission Frequency VHF 144-146MHz, UHF 430-440MHz
Channel Spacing 25.0KHz(Wide)/12.5KHz(Narr)
Memory Channel 999 Groups
Operation Voltage DC 7.4 V ±10%
Receive Sensitivity 0.25 V (12dB SINAD)
Rated Audio Power Output 1W @16 ohms
Receive current ≤ 380mA
Connection for accessories 2 pin Kenwood jack
Antenna impedance 50 Ohm
NOTE: All specifications may be modified without prior notice or liability. Thank you.
Amateur Radio
5R Mini Series
USER'S MANUAL
Espanol
Articulos del paquete
Para garantizar un volumen de recepción optimo, Maintain the distance between the microfondo and to bocas between 2,5 cm y 5 cm when transmits.
Technical Specifications
General
Receiver Frequency FM 76-108 MHz;
VHF 144-146MHz, UHF 430-440MHz
Transmission Frequency
VHF 144-146MHz, UHF 430-440MHz
Channel Spacing
25.0KHz(Wide)/12.5KHz(Narr)
Memory Channel
999 Groups
Operation Voltage DC 7.4 V ±10%
Dimensioni
108mm×52mm×37mm (Antenna esclusa)
Transmission current
≤1600mA
Receive Sensitivity 0.25 V (12dB SINAD)
Rated Audio Power Output 1W @16 ohms
Receive current ≤ 380mA
Connection for accessories
2 pin Kenwood jack
Antenna impedance
50 Ohm
NOTE: All specifications may be modified without prior notice or liability. Thank you.
EU Declaration of Conformity
Baofeng and Pofung hereby declares that the radio equipment type listed in Technical Specifications is in compliance with Directive 2014/53/EU. The full text of the EU Declaration of Conformity is available at the following link: http://www.pofung.cn/download.asp?EnBigClassName=EU%20DOC. Via your local Baofeng helpdesk, your dealer from where you purchased this radio or send an email to wangjianhui@baofengradio.com.
ATTENTION: conditions of use!
The band of frequencies on which this device operates is administrated by limitations and/or permissions for their usage. Consequently, in the EU Countries mentioned in the sheet, operators must consult the entrusted authorities. In particular, they must possess a license or a frequency assigned to them by their respective competent authority.
All articles displaying this symbol on the body, packaging or instruction manual of same, must not be thrown away into normal disposal bins but brought to specialised waste disposal centres. Here, the various materials will be divided by characteristics and recycles, thus making an important contribution to environmental protection.
EU Declaration of Conformity
In accordance with EU Directives and Regulations
PO FUNG ELECTRONIC (HK)INTERNATIONAL GROUP COMPANY LIMITED
Add: Room 1508, 15/F, Office Tower II, Grand Plaza, 625 Nathan Road, Kowloon, Hong Kong
as the manufacturer, hereby declares under our sole responsibility that
product(s): Amateur Radio
Model name: UV-5R Mini, 5R Mini, EU-5R Mini, BF-5R Mini, AR-5R Mini, GT-5R Mini, TH5R
Mini, 5R Mini-B, BF-5R Mini-B, UV-5R EU Mini, EU-5R Mini V2
are in conformity with the essential requirements of the Radio Equipment Directive 2014/53/EU:
Radio
Article 3.2
FN 301 783 V2.1.1 (2016-01)
FN 303 345-1 V1.1.1 (2019-06)
EN303345-3V1.1.1(2021-06)
EN 300 328 V2.2.2 (2019-07)
EMC
Article 3.1(b)
EN301489-1V2.2.3(2019-11)
EN 301 489-15 V2.2.1 (2019-04)
EN 301 489-17 V3.3.1 (2024-09)
EN 55032:2015+A1:2020
EN55035:2017+A11:2020
ENIEC61000-3-2:2019+A2:2024
EN61000-3-3:2013+A2:2021-AC:2022-01
Safety
Article 3.1(a)
ENIEC62368-1:2020+A11:2020
Health
Article 3.1(a)
EN 50566:2017
EN 50566:2017/A1:2023
FN 62479:2010
EN 50663:2017
The notified body Bay Area Compliance Labs Corp.(BACL) (EU Identification Number: 1313)
performed a conformity assessment according to Annex III, Module B.
Signed on behalf of PO FUNG ELECTRONIC (HK) INTERNATIONAL GROUP COMPANY
LIMITED

(Signature of authorized person)
Printed Name: Peter Wang
Title: Manager
Date:2025-07-29
Disclaimer
The accuracy and completeness of the contents are sought in the process of compilation, but we do not bear any responsibility for the possible errors or omissions. With the continuous development of technology, we reserve the right to change the design and specification of the product without notice. No copy, modification, translation and dissemination of this handbook may be made in any form without the prior written authorization of our department.





TB EC REP EUROPEAN SL
Calle Marcelo Usera 60, LC. Madrid 28026 Spain
EUREG@TBVAT.COM
+34682797075
PO FUNG ELECTRONIC (HK) INTERNATIONAL GROUP COMPANY LIMITED
Address: Room 1508, 15/F, Office Tower II, Grand Plaza, 625 Nathan Road, Kowloon, Hong Kong
Http://www.pofungshop.com
E-mail: sales@pofungshop.com
Print version: 5R Mini_V1.0
- Items in the Package
- Product Overview
- Side Key [SK1] Customization Function
- LCD Display
- Before Use
- Attaching the Antenna
- CAUTION
- Attaching the Belt Clip
- Basic operations
- Turning your Radio On and Off
- Setting the Volume
- Locking or Unlocking Keypad
- Keypad Entry
- Selecting a Channel
- Channel Memory
- Deleting a channel (DEL-CH)
- Main Band/Sub Band Switch
- VFO/Channel Switch
- Setting the VFO Frequency
- Call Service
- Emergency Alarm
- Flashlight
- FM Radio Function
- Monitor
- Frequency Search
- Reverse Frequency Function
- Talk Around Function
- Repeater Activation Tone
- Voice-activated transmit (VOX)
- Dual Watch
- Stopwatch Function
- Use of menu functions
- Basic use
- Using the menu with short-cuts
- Wireless Program Radio
- Technical Specifications
- General
- Amateur Radio
- 5R Mini Series
- USER'S MANUAL
- Éléments du paquet
- Commutation VFO/Canal
- EU Declaration of Conformity
- ATTENTION: conditions of use!
- Disclaimer
Brand : BaoFeng
Model : GT-5R Mini
Category : Ham Radio