
Mini Mulch - Food waste composter FRITEL - Free user manual and instructions
Find the device manual for free Mini Mulch FRITEL in PDF.

| Product type | Electric food waste composter |
| Brand | Fritel |
| Model | Mini Mulch |
| Power supply voltage | 230 V ~ 50 Hz |
| Processing cycle duration | 3 to 5 hours (depending on quantity and type of waste) |
| Main functions | Food waste reduction by drying, grinding, cooling, and automatic cleaning |
| Audio guidance | Voice announcements of steps and malfunctions (can be disabled) |
| Preservation function | Keeps waste from rotting before processing |
| Self-cleaning | Cycle of about 1 hour with water (no detergent) |
| Filter type | Activated carbon filters (2 pieces) |
| Filter replacement | Every 4 to 6 months or if there is a vinegar smell |
| Enclosure maintenance | Clean with a damp cloth |
| Container maintenance | Washable in soapy water or dishwasher (do not use metal objects) |
| Compostable materials | Vegetables, fruits, meat, fish, chicken bones, coffee grounds, etc. (no hard pits, metal, glass, plastic) |
| Non-compostable materials | Non-food items, large bones, cardboard, paper, nectarine pits, peaches, mangoes, plums, mussel shells |
| Safety | Automatic stop at end of cycle, locked lid, hot surfaces, motor overload protection |
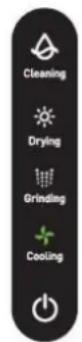
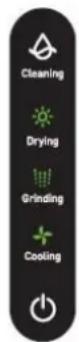
| LED indicators | Drying, Grinding, Cooling, Cleaning (cycle steps) |
| Accessories included | Pipette for water drainage, ventilation caps |
| Spare parts available | Container, activated carbon filters (at www.themulch.eu) |
| Warranty | Legal warranty according to country of purchase (domestic use only) |
| Intended use | Indoor domestic use on a stable heat-resistant surface |
Frequently Asked Questions - Mini Mulch FRITEL
User questions about Mini Mulch FRITEL
0 question about this device. Answer the ones you know or ask your own.
Ask a new question about this device
Download the instructions for your Food waste composter in PDF format for free! Find your manual Mini Mulch - FRITEL and take your electronic device back in hand. On this page are published all the documents necessary for the use of your device. Mini Mulch by FRITEL.
USER MANUAL Mini Mulch FRITEL
In association with smart Cara

The Mini MULCH Food Waste Reducer

natural_image
Modern kitchen appliance with a black lid and circular vent, no visible text or symbolsGEBRUIKSAANWIJZING
Attentively read the user manual before using this appliance.
Keep the manual carefully!
BEDIENUNGSANLEITUNG
natural_image
Hand pressing a button on a white appliance with a green circular badge labeled 'a' (no text or symbols on the device itself)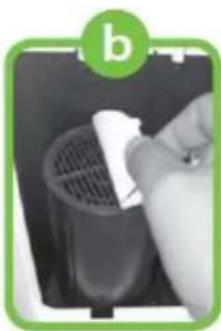
natural_image
Close-up of a hand cleaning a small white object with a mesh grille (no text or symbols visible)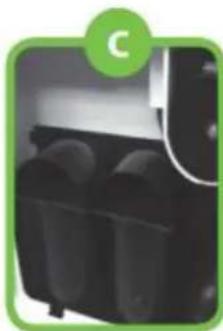
natural_image
Close-up of a mechanical device with three circular components and a green circular label (no readable text or symbols)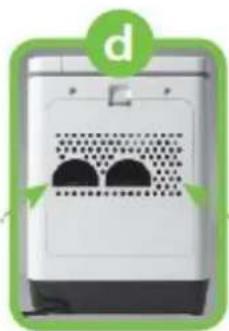
natural_image
Illustration of a white washing machine with two black circular buttons on the front panel, enclosed in a green circular badge with the letter 'd' (no text or symbols on the machine itself)natural_image
Hand pressing down on a mechanical component with a red curved arrow indicating rotation (no text or symbols visible)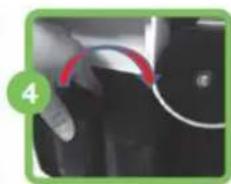
natural_image
Close-up of a mechanical component with a red curved arrow indicating rotation (no text or symbols visible)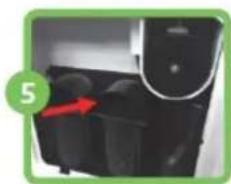
natural_image
Close-up of a black plastic bag with a red arrow pointing to it, next to a white cylindrical object (no text or symbols visible)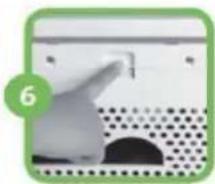
natural_image
Close-up of a hand interacting with a wall-mounted device, no visible text or symbolsnatural_image
Hand placing a small component into a white appliance with circular patterns (no visible text or symbols)Fig. 7 Fig. 8

natural_image
Hand inserting a device into a clean appliance (no visible text or symbols)Fig. 9
natural_image
Hand holding a plastic bottle into a black tray (no visible text or symbols)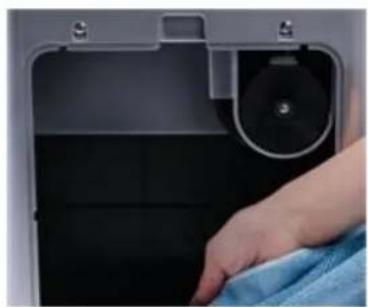
natural_image
Close-up of a hand cleaning a dark interior space with a circular device and a blue cloth (no text or symbols visible)
natural_image
Close-up of hands installing or adjusting a portable air conditioner unit with two circular vented slots (no text or symbols visible)Fig. 10 Fig. 11
natural_image
Hand pressing a button on a white appliance with a green circular badge labeled 'a' (no text or symbols on the device itself)
natural_image
Close-up of a hand cleaning a car interior with a white spray bottle (no visible text or symbols)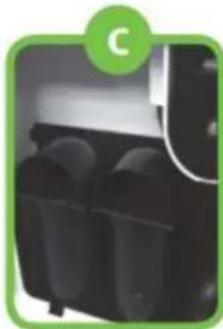
natural_image
Close-up of a black cylindrical container with three side compartments, no visible text or symbols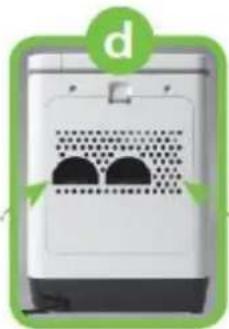
natural_image
Illustration of a white portable air conditioner unit with two black vented slots, enclosed in a green circular badge with the letter 'd' (no text or symbols on the device itself)natural_image
Close-up of a hand pressing down on a device with a red curved arrow indicating rotation (no text or symbols visible)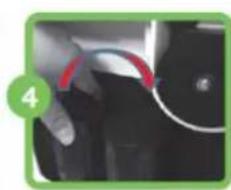
natural_image
Close-up of a hand holding a black object with a red arrow and number 4 label (no readable text or symbols)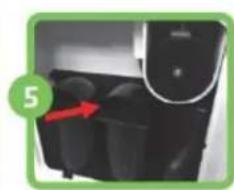
natural_image
Close-up of a black electronic device with a red arrow pointing to a cluster of circular components (no visible text or symbols)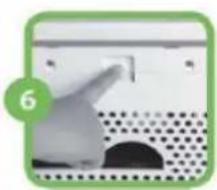
natural_image
Close-up of a hand interacting with a wall-mounted device, no visible text or symbolsd) Enlèvement d'eau
Congratulations! You have just bought a high-quality appliance, which will guarantee you years of pleasure. Please read the user manual carefully before you take the appliance into use. Save these instructions carefully, so you can consult it at all times! All persons who have NOT read the instruction manual are NOT allowed to use this appliance. Also do NOT forget to pay attention to the guarantee conditions.
For additional information and useful tips about our appliances, you can always visit our website www.themulch.eu.
1. SAFETY PRESCRIPTIONS
This appliance has been built in accordance with the European CE safety standards, carries the CE label, is only suited for domestic use and is compliant with the general recognized standards and prescriptions with regard to the safety of appliances. As for all electrical appliances, the necessary precautions need to be taken in order to avoid accidents or damages.
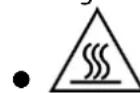
CAUTION! Burning danger! When using this appliance, certain cases will get hot. Only touch the operating display while the ance is functioning.
- CAUTION! Even after switching off the appliance, some surfaces will remain hot for some time, causing the risk of burns. Always let the appliance cool off entirely before moving, cleaning or storing it.
- This appliance may be used by children of min. 8 years old, by persons with reduced physical, sensory or mental capabilities or lack of experience and knowledge on condition they are supervised and instructed to use the appliance in a safe way and understand the hazards involved. Children may NOT play with the appliance. Cleaning and user maintenance shall not be made by children unless they are older than 8 years and supervised. Keep the appliance and its cord out of reach of children younger than 8 years.
- This appliance is only intended to be used in household at room temperature and similar applications such as: staff kitchen areas in shops, offices and other working environments; farm houses; by clients in hotels, motels and other residential type environments; bed and breakfast type environments.
- The appliance is intended also for indoor use. NEVER use it outdoor.
- NEVER touch the operating display, power cord or plug with wet hands. NEVER IMMERSE the appliance and the power cord in water or
any other liquid. They are to be cleaned only with a damp cloth. If the appliance should get wet or moist, immediately plug out the appliance.
- A damaged power cord can cause electric shocks. NEVER use the appliance if the power cord or plug is damaged, or if the appliance has fallen or shows a malfunction. In all these cases, return the appliance to your sales point or authorized after sales service.
- After use remove the plug from the electric socket. Also proceed this way when the appliance is not in use, before cleaning and moving. NEVER pull by the power cord, but only by the plug.
-
NEVER use separate timers or remote control systems.
-
The appliance is only to be used when completely and correctly mounted.
- Only use the appliance on the mains voltage as indicated on the identification label.
- This appliance is only intended for pulverizing organic household waste. The appliance may not be used for other purposes or be combined with other appliances.
- NEVER leave the appliance unattended or move it while it is functioning.
- NEVER let the cord hang over the edge of the table or the counter.
- NEVER take or move the appliance by the power cord. NEVER bend, squeeze or turn the power cord around the appliance, or pull it over a sharp edge.
- NEVER place the power cord and/or appliance near heat sources such as cookers, heatings or ovens, and NEVER in direct sunlight.
- Never use extension cords or sockets. Place the device close to an electric socket and always connect it directly. Always completely unroll power cord during use.
- NEVER cover the appliance when it is functioning or when it is still warm.
- Only use original accessories, filters or parts.
• Repairs may only be done by a recognized repairer or service center. - ALWAYS place the appliance on a heat-proof, solid and flat base, such as a kitchen counter or table, so that the appliance won't move or turn over.
- NEVER place the appliance near curtains, wall decoration, clothing, towels or other inflammable objects.
- NEVER place inflammable or heat conductive objects in the container.
• Install the appliance in a permanent location, e.g. near the kitchen sink or on the kitchen island. - Leave at least 15 cm of free space between the rear side of the appliance and the wall or other objects, so that ventilation is not impeded.
- Immediately switch off the appliance and unplug the power cord:
- when it is NOT being used for a long time;
- when it is NOT functioning properly;
- when cleaning it.
2. BEFORE THE FIRST USE
- Remove all packaging and labels, except for the label in the container which indicates the maximum filling line.
- Keep packaging materials away from children.
- Check the appliance and power cord for defects. If any damage is noticed, do NOT use the appliance and immediately return it to your point of sale.
- Check if the mains voltage of your appliance (230 Volt) corresponds with the mains voltage in your home. Only use The Mini MULCH in 230 Volt alternating current.
• Prepare the appliance for use:
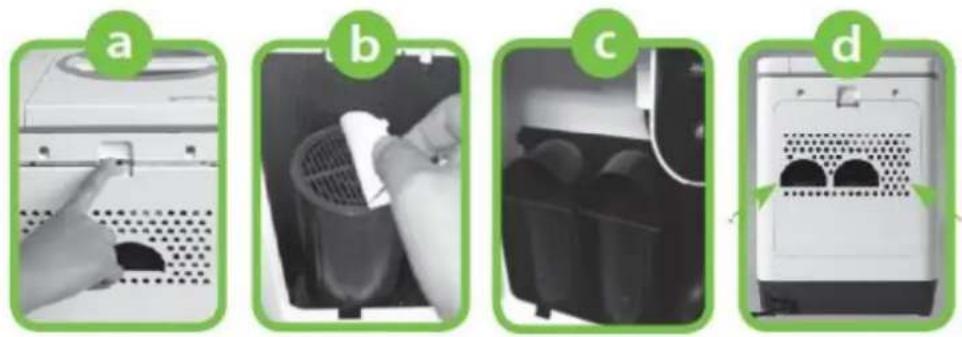
- Open the filter cover plate on the rear side of the appliance (see fig. a).
- Remove the protective layer of the active carbon filters (see fig. b).
- Put the filter caps on the filters. These can be found in a pouch in the container (see fig. c).
- Close the filter cover plate by gently pressing the points marked by the arrows (see fig. d).
- Remove the container by lifting it from the appliance using the handle and remove the yellow label at the bottom. Put the container back in the appliance by placing the 3 bolts in the provided fitting and push the handle down. Make sure the drive wheel at the bottom of the container fits correctly into the appliance. If not, lift the container from the appliance and replace it with care.
CAUTION: When using it for the first time, the appliance may diffuse a slight scent. This is normal. This scent is only temporary and will quickly disappear.
3. GENERAL USE
a) Filling the appliance and starting the food waste reducing process
- Switch on the appliance by connecting the power cord to the electric socket. The LED lights up and the message "Hello, thank you for using The MULCH" resonates.
- Unlock the appliance by turning the lid counterclockwise to the position 🔍 and lift the lid.
CAUTION: When the appliance is not locked, the LED will flash and the message "Please close the lid" will resonate.
- Fill the container with organic household waste (see point 4. Suitable for processing by The Mini MULCH) and lock the appliance by turning the lid clockwise to the position. The LED stays on.
CAUTION: Fill the appliance at most up to the filling line at the inside of the container. When the content exceeds the filling line, this may cause irreversible damage to the appliance.
CAUTION: NEVER put hard objects (glass, metal, stones) or hard food waste (seeds from nectarines, plums, mangos etc.) in the appliance. This may cause irreversible damage to the appliance and can even completely break it down. Small biological waste such as chicken bones, fishbones, grape seeds, ... can be processed in small amounts.
CAUTION: After a certain amount of time, the coating on the inside of the container can show scratches or scratches, or even disappear. This is normal wear and does not affect the functioning of the appliance. If required, the container can be bought separately through www.themulch.eu.
- Shortly press the power button ⏻ to start the food waste reducing process. The appliance announces that the food waste reducing process starts: "Starting food waste reducing".
CAUTION: Do NOT open the appliance during the reducing process.
CAUTION: Switching off the appliance when (partly) filled will make the content dissolve gradually and spread a scent.
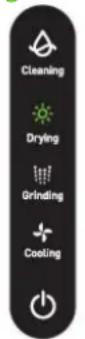
- The food waste reducing process takes about 3 to 5 hours, depending on the amount and the nature of food waste. The LED light on the operating display shows the actual phase of the reducing process:
Drying Grinding Cooling Cleansing

- The built-in multi sensor checks the required drying time and reduces it when necessary in order to avoid unnecessary energy consumption.
- When the reducing cycle is completed, the appliance will automatically switch to standby mode.
CAUTION: To manually switch off the appliance when not in use, press the power button ⏻ on the operating display for about 7 seconds. Two beeps will resonate and the LED light goes on. To switch the appliance back on, shortly press the power button. The LED lights up.
- The dry residue can now be used to fertilize plants or can be stored without odour in the green container or other matters.
b) Audio guidance function
- The audio guidance function orally indicates the actual phase of the reducing cycle and possible anomalies.
CAUTION: When anomalies are detected, multiple LEDs will flash (see point 7. Useful tips in case of malfunctions). In case you prefer to have the anomaly repeated orally, shortly press the power button ⏻ on the operating display.
- To deactive the audio guidance function:
- Open the lid and push the self-cleansing button for about 5 seconds. The deactivation of the function will be confirmed orally: "Voice assistance deactivated".
CAUTION: Anomalies will always be announced orally, even with a deactivated audio guidance function.
- Repeat this step to reactivate the function.
c) Storage function
When the container is (partly) filled with food waste, and the appliance is switched on and locked (but not functioning), the appliance will automatically activate the storage function. This will prevent food waste from rotting, but will partly reduce it, so food waste can be added later on for just one reducing cycle. This way you save energy.
4. SUITABLE FOR PROCESSING BY THE MINI MULCH
| SUITABLE | NOT SUITABLE |
| Vegetables | Non-food such as rocks, metal, glass, plastic,... |
| Lettuce | Large bones, e.g. prime rib, pork chops |
| Cabbage | Cardboard, paper |
| Bread | All kinds of solid objects |
| Fried food | Living animals, insects,... |
| Dried fruits | Seeds of nectarines, peaches, avocados, mangos, plums,... |
| Berries | Mussel and oyster shells, ... |
| Fruit | |
| Eggs (with or without shell) | |
| Poultry | |
| Chicken bones | |
| All kinds of meat | |
| Coffee grounds, tea leaves and paper tea bags | |
| Fish and sea fruit, e.g. lobster, crab, ... | |
| Snails | |
| All kinds of food waste |
5. ENERGY-SAVING TIPS
- Start the food waste reducing process with a maximum-filled container.
- Let watery substances, e.g. fruit, leak as much as possible in a strainer before adding them to the container. The dryer the substances, the shorter the processing time.
- Cut food waste into small pieces before adding them to the container.
6. CLEANING AND MAINTENANCE
Pull out the plug from the electric socket and always let the appliance cool down entirely before disassembling it.
a) Housing and lid
Clean the housing and the lid with a wet cloth and dry thoroughly.
b) Container
- Remove the container by lifting it out of the appliance using the handle.
- Clean the container with a soft brush or cloth in hot soapy water, or put it in the dishwasher.
CAUTION: Never use sharp or metal objects, or abrasive and hard brushes to clean the container, as they can damage the surface.
- Put the container back in the appliance by placing the 3 bolts in the provided fitting and push the handle down. Make sure the drive wheel at the bottom of the container fits correctly into the appliance. If not, lift the container from the appliance and replace it with care.
CAUTION: The drive wheel at the bottom of the container should always be completely dry before replacing the container into the appliance.
- The appliance is equipped with a self-cleansing function. To activate this function:
- Fill the empty container with water up to the filling line, without adding detergents or vinegar.
- Lock the appliance by turning the lid clockwise to the position
- Push the self-cleansing button.
- The self-cleansing starts after the beep signal. All 3 function buttons will light up and the message "Starting container cleansing" will resonate. The self-cleansing process takes about 1 hour. When completed, the appliance automatically switches to standby mode. The fan will keep on turning until the appliance is switched off manually by pushing the power button.
- Pour away the dirty water and dry the container thoroughly with a cloth.
c) Filters
- The active carbon filters should be replaced every 4 to 6 months, or when the appliance diffuses an acetic scent.
-
Both filters must be replaced at the same time as follows:
-
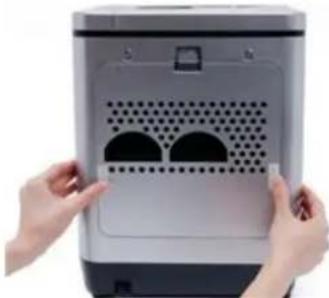
Open the filter cover plate at the rear side of the appliance (see fig. 1).
- Remove the protective layer of both new filters (see fig. 2).
- Remove the filter caps and remove the old filters from their support by turning them counterclockwise (see fig. 3).
- Place the new filters by turning them clockwise (see fig. 4).
- Put the filter caps back on the filters (see fig. 5).
- Close the filter cover plate by means of the clip (see fig. 6).

flowchart
graph LR
    A["Step 1: Insert the container with a mouse"] --> B["Step 2: Insert the container with a mouse"]
    B --> C["Step 3: Insert the container with a mouse"]
    C --> D["Step 4: Insert the container with a mouse"]
    D --> E["Step 5: Insert the container with a mouse"]
    E --> F["Step 6: Insert the container with a mouse"]
d) Water removal
When water leaks from the housing, the error message "Remove the water under the filter" resonates and the water must be removed as follows:
- Open the filter cover plate at the rear side of the appliance (see fig. 7).
- Remove the filter caps and active carbon filters (see fig. 8).
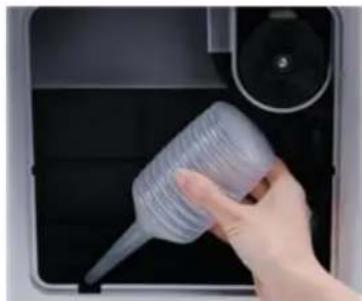
- Remove excess water under the active carbon filters by using the supplied suction pump (see fig. 9).
• Use a dry cloth to absorb remaining water (see fig. 10). - Close the filter cover plate (see fig. 11).

natural_image
Hand placing a small button into a white appliance with circular vent slots (no text or symbols visible)natural_image
Hand inserting a device into a clean appliance (no visible text or symbols)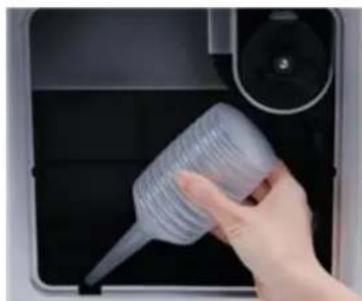
natural_image
Hand holding a plastic bottle into a black container with a digital camera (no visible text or symbols)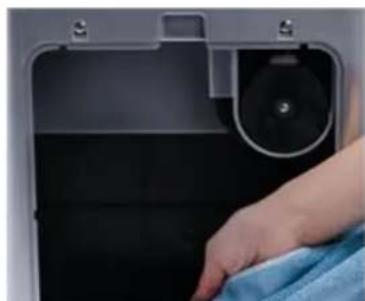
natural_image
Close-up of a hand cleaning a device with a circular dial and blue cloth (no visible text or symbols)Fig. 10 Fig. 11
natural_image
Close-up of hands installing or adjusting a microwave oven with two circular vent grilles (no text or symbols visible)CAUTION: When excess water is not removed, the appliance can diffuse a bad scent or even cause irreversible damage.
7. USEFUL TIPS IN CASE OF MALFUNCTIONS
Do NOT use the appliance when it is malfunctioning. First go through the below mentioned check points below (see table). For more information about the error messages, FAQs and practical tips, visit www.themulch.eu.
| Error message> | Error 1 | Error 2 | Error 3 | Error 4 | Error 5 | Error 6 | Error 7 | Error 8 | Lid open | |
| Display> |  | |||||||||
 | ||||||||||
 | ||||||||||
| [6ww8] | ||||||||||
| Low beep | 5 beeps | |||||||||
Legend:
Error message 1: Motor overloaded
Error message 2: Motor has no contact
Error message 3: Problem with heating
Error message 4: Problem with heat sensor
Error message 5: Problem with air temperature
Error message 6: Problem with air sensor Error message 7: Problem with ventilation Error message 8: Other substances detected Lid open : Lid open

Static LED

Flashing LED
The appliance does NOT function or the power button does NOT light up:
- Check if your appliance is connected to the right mains voltage, whether there is mains voltage, and if the appliance was plugged in correctly.
- If the power cord is damaged, do NOT use your appliance and return it to your sales point immediately.
If there is still a malfunctioning, please return the appliance to your sales point.
THE APPLIANCE HAS BEEN DESIGNED FOR DOMESTIC USE. THE GUARANTEE CONDITIONS EXPIRE UPON PROFESSIONAL USE. DEFECTS AND/OR DAMAGES FOLLOWING TO THE NON-OBSERVANCE OF THE USER MANUAL ARE NOT COVERED BY THE GUARANTEE.
WE RESERVE THE RIGHT TO MAKE TECHNICAL CHANGES AT ANY TIME.
8. WARRANTY CONDITIONS
The legal warranty is valid from the date of purchase. The proof of purchase determines the date of purchase. The duration and conditions of the warranty depend on the national legislation of the country of purchase. If you have a defective appliance, contact your seller with your proof of purchase.
The user is responsible for cleaning and proper packaging of the defective appliance before presenting it for repair. It is insufficient to wrap the device in cardboard packaging with paper. Fritel is not liable for damage resulting from insufficient packaging, which also irrevocably invalidates the warranty.
Determination of warranty:
- The warranty covers every repair and/or replacement free of charge of the parts recognized defective by our after-sales service if the damage is due to faulty design, material or construction. The warranty does not cover damage or normal wear of the components.
- The warranty is only valid for the first/original user.
- The transport costs are at the expense of the purchaser.
- The warranty is only granted after presentation of your original purchase invoice (no copy).
- The warranty cannot be invoked for normal wear, such as scratches and damages to the container.
The warranty expires automatically in the following cases:
- Incorrect connection, e.g. electric voltages.
- Abnormal or professional use or misuse handling
- Lack of care and cleaning
- Modifications or repairs made to the appliance by persons not authorized by us as a manufacturer.
- When reference numbers have been altered, or been removed.
- When not respecting the instructions in the user instructions.
For appliances that are not under warranty for any of the above reasons, all costs (transport, administration, research, handling) will be charged.
The most recent version of the detailed legal warranty conditions, as well as the detailed commercial warranty conditions can always be consulted on www.fritel.com.
9. ENVIRONMENT
Do NOT throw the appliance away with the normal household waste at the end of its life, but hand it in at an official collection point for recycling. By doing this you will help to preserve the environment.
10. LIABILITIES
All liabilities, towards both consumer(s) and third parties, that could result from not observing all the safety regulations prescribed in this user manual, can under no circumstances be charged to the manufacturer. In case of non-observation of these safety regulations, the user of the appliance, or any other person not having observed these safety regulations, protects the manufacturer from all responsibilities that he could be charged with.
11. ACCESSORIES, PARTS AND FAQ'S
Visit our website www.themulch.eu for frequently asked questions, available parts and accessories!
natural_image
Hand inserting a small component into a white appliance with circular patterns (no text or symbols visible)natural_image
Hand inserting a device into a clean appliance (no visible text or symbols)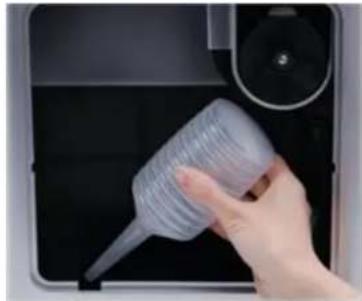
natural_image
Hand holding a transparent plastic bottle into a black appliance (no visible text or symbols)
natural_image
Close-up of a hand cleaning a dark interior space with a cloth (no text or symbols visible)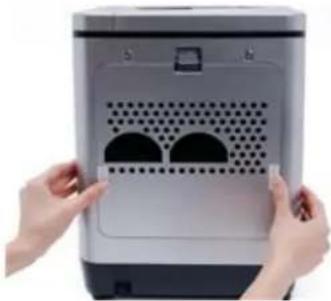
natural_image
Close-up of hands installing or adjusting a white appliance with two circular vent slots (no text or symbols visible)Fig. 10 Fig. 11