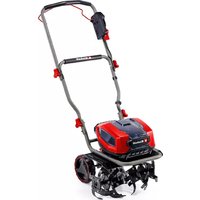
GP-CR 36/45 Li E BL - Electric tiller EINHELL - Free user manual and instructions
Find the device manual for free GP-CR 36/45 Li E BL EINHELL in PDF.


User questions about GP-CR 36/45 Li E BL EINHELL
0 question about this device. Answer the ones you know or ask your own.
Ask a new question about this device
Download the instructions for your Electric tiller in PDF format for free! Find your manual GP-CR 36/45 Li E BL - EINHELL and take your electronic device back in hand. On this page are published all the documents necessary for the use of your device. GP-CR 36/45 Li E BL by EINHELL.
USER MANUAL GP-CR 36/45 Li E BL EINHELL
GB Original operating instructions Cordless Tiller
natural_image
Close-up of a mechanical vehicle with visible wheels and stent, labeled '3c' and '12' (no text or symbols on the vehicle itself)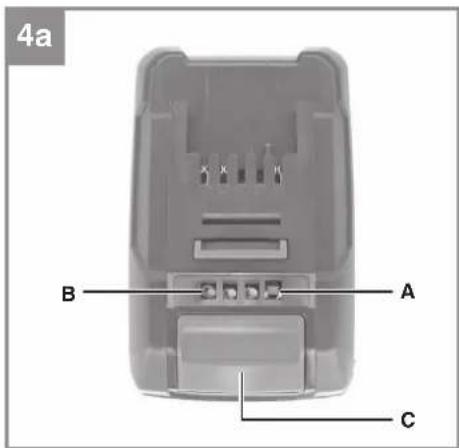
text_image
4a B A C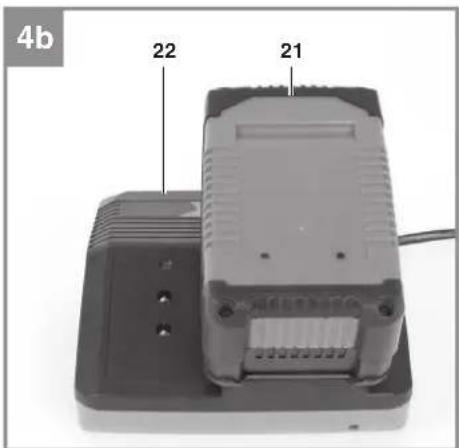
text_image
4b 22 21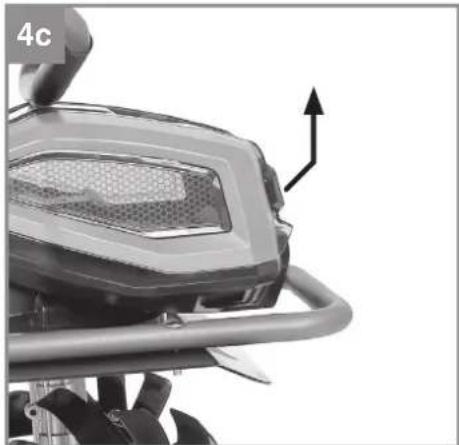
natural_image
Close-up of a motorcycle's front bumper with a visible intake arrow (no text or symbols)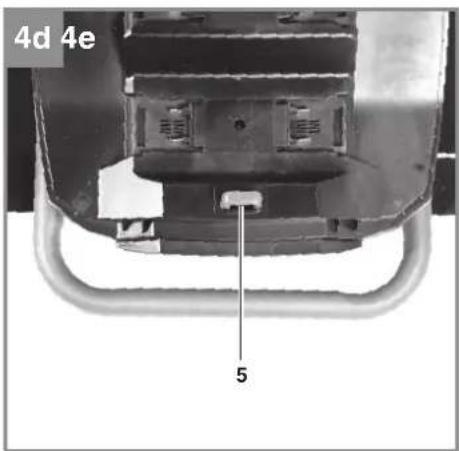
text_image
4d 4e 5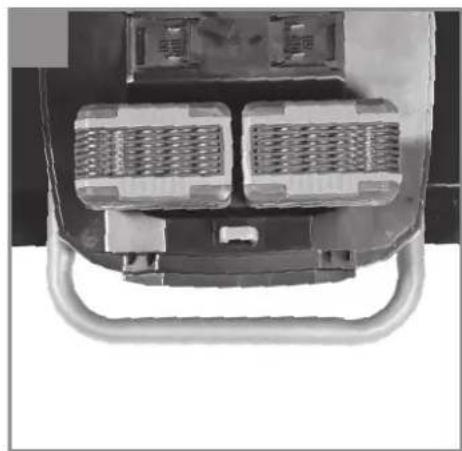
natural_image
Close-up of a mechanical component with two meshed slots and a curved handle (no visible text or symbols)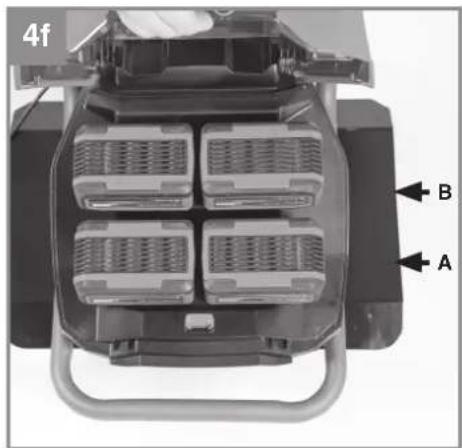
natural_image
Top-down view of a robotic device with labeled parts A and B (no text or symbols beyond labels)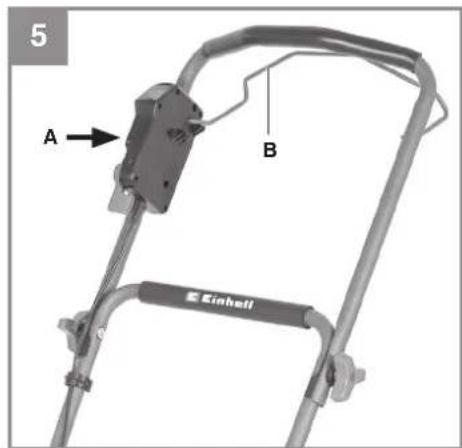
text_image
5 A B Einhell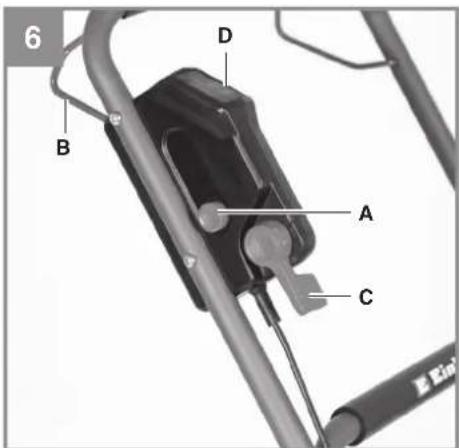
text_image
6 B D A C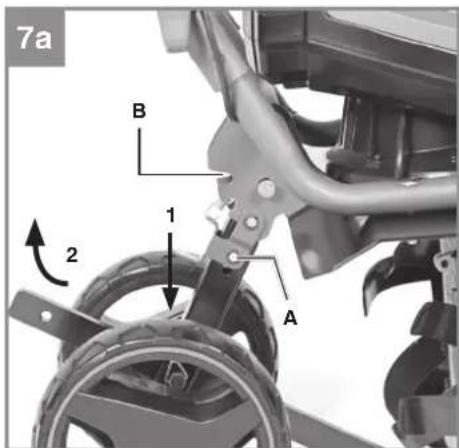
text_image
7a B 1 A 2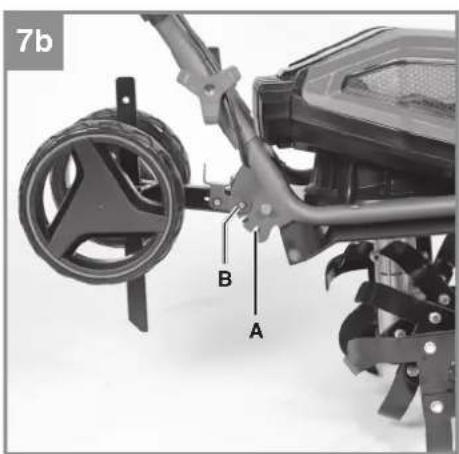
text_image
7b B A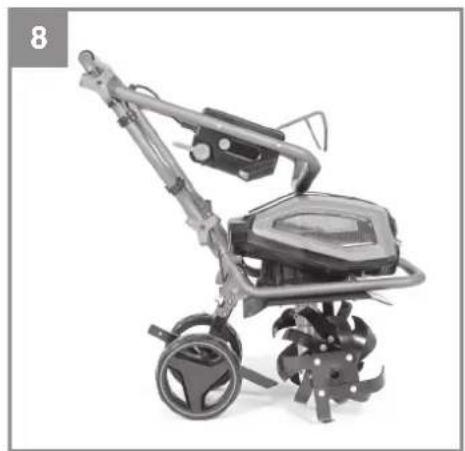
natural_image
Exterior view of a modern stroller with metal frame and wheels (no text or symbols visible)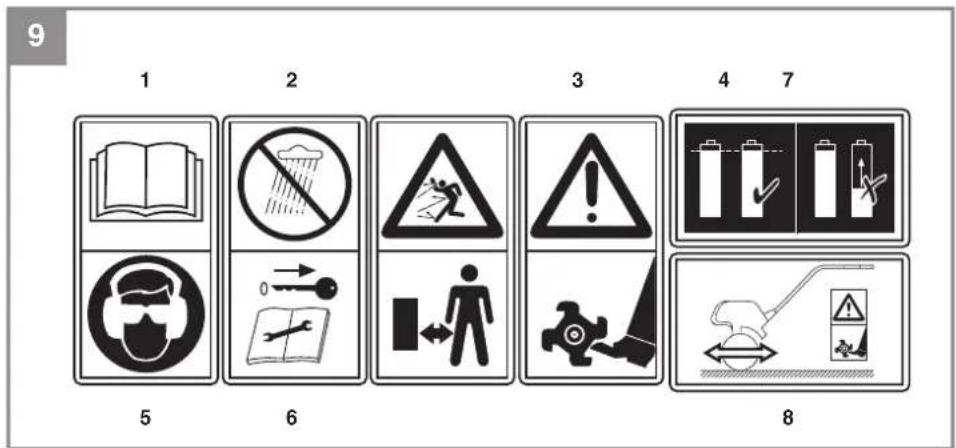
text_image
9 1 2 3 4 7 5 6 8D
Gefahr!
When using the equipment, a few safety precautions must be observed to avoid injuries and damage. Please read the complete operating instructions and safety regulations with due care. Keep this manual in a safe place, so that the information is available at all times. If you give the equipment to any other person, hand over these operating instructions and safety regulations as well. We cannot accept any liability for damage or accidents which arise due to a failure to follow these instructions and the safety instructions.
1. Safety regulations
The corresponding safety information can be found in the enclosed booklet.
Danger!
Read all safety regulations and instructions. Any errors made in following the safety regulations and instructions may result in an electric shock, fire and/or serious injury.
Keep all safety regulations and instructions in a safe place for future use.
Explanation of the warning signs on the equipment (see Fig. 9)
- Danger! Note the instructions for use!
- Danger! Never use the equipment in damp locations.
- Caution! Danger from catapulted parts; keep a safe distance.
- Danger! Rotating tool.
- Caution! Wear goggles and ear defenders.
- Danger! Pull the safety plug out before carrying out maintenance, cleaning and repair work.
- Use only batteries which are charged to the same level.
- For better results, move the equipment both forwards and backwards while using it. Important! Be particularly careful when pulling the machine toward yourself.
2. Layout and items supplied
2.1 Layout (Fig. 1/2)
- Top push bar
- Bottom push bar
- Motor unit
- Hoe blades
-
Safety plug
-
Two-hand safety switch
- Cable clips
- Star nut (4x)
- Screw (4x)
- Transport wheel (2x)
- Plate
- Brake shoe
2.2 Items supplied
Please check that the article is complete as specified in the scope of delivery. If parts are missing, please contact our service center or the sales outlet where you made your purchase at the latest within 5 working days after purchasing the product and upon presentation of a valid bill of purchase. Also, refer to the warranty table in the service information at the end of the operating instructions.
- Open the packaging and take out the equipment with care.
- Remove the packaging material and any packaging and/or transportation braces (if available).
• Check to see if all items are supplied. - Inspect the equipment and accessories for transport damage.
- If possible, please keep the packaging until the end of the guarantee period.
Danger!
The equipment and packaging material are not toys. Do not let children play with plastic bags, foils or small parts. There is a danger of swallowing or suff ocating!
- Engine unit
- Lower push bar
- Top push bar
- Safety plug
- Brake shoe
• Cable securing clip (2x)
• Star nut (4x) - Screw (4x)
- 2x plate
• Original operating instructions
• Safetyinstructions
3. Proper use
The machine is designed for digging soil (for example garden beds). Be sure to observe the restrictions in the safety instructions.
GB
The operating instructions as supplied by the manufacturer must be kept and referred to in order to ensure that the equipment is properly used and maintained. The instructions contain valuable information on operating, maintenance and servicing conditions.
For safety reasons, the machine may not be used as a drive unit for other work tools or tool sets of any kind.
The equipment is to be used only for its prescribed purpose. Any other use is deemed to be a case of misuse. The user / operator and not the manufacturer will be liable for any damage or injuries of any kind caused as a result of this.
4. Technical data
Protectionclass....III
Voltage 36 Vd.c.
Working width 45 cm
Hoe diameter 25 cm
Idle speed: 103-128 min ^1
Number of blades ....6 pieces
Weight 23 kg
Danger!
Sound and vibration
L_pA sound pressure level ..... 74.8 dB(A)
K_pA uncertainty 3 dB
L_wA sound power level 93 dB(A)
K_WA uncertainty ....3 dB
Wear ear-muff s.
The impact of noise can cause damage to hearing.
Total vibration values (vector sum of three directions) determined in accordance with EN 786.
Vibration emission value a_n ≤ 2.5 m/s^2
K uncertainty = 1.5 m/s ^2
The specified vibration value was established in accordance with a standardized testing method. It may change according to how the electric equipment is used and may exceed the specified value in exceptional circumstances.
The specified vibration value can be used to compare the equipment with other electric power tools.
The specified vibration value can be used for initial assessment of a harmful effect.
The equipment is supplied without batteries and without a charger is allowed to be used only with the lithium-ion batteries of the Power X-Change series!
The lithium-ion batteries of the Power X-Change series are allowed to be charged only with the Power X-Charger.
Keep the noise emissions and vibrations to a minimum.
- Only use appliances which are in perfect working order.
• Service and clean the appliance regularly.
• Adapt your working style to suit the appliance.
• Do not overload the appliance. - Have the appliance serviced whenever necessary.
• Switch the appliance off when it is not in use.
• Wear protective gloves.
Caution!
Residual risks
Even if you use this electric power tool in accordance with instructions, certain residual risks cannot be rules out. The following hazards may arise in connection with the equipment's construction and layout:
- Lung damage if no suitable protective dust mask is used.
- Damage to hearing if no suitable ear protection is used.
- Health damage caused by hand-arm vibrations if the equipment is used over a prolonged period or is not properly guided and maintained.
5. Before starting the equipment
Important!
The equipment is supplied without batteries and without a charger is allowed to be used only with the lithium-ion batteries of the Power X-Change series!
GB
Warning!
Always pull out the safety plug before performing any adjusting, repair, maintenance or cleaning work on the equipment.
Assembly (Fig. 3a-3c)
• Fit all the components as shown in Fig. 3a-3c.
- Adjust the brake shoe to the required height.
Charging the battery (Fig. 4a/4b)
The equipment is supplied without batteries and without a charger!
- Take the battery pack out of the equipment. Do this by pressing the pushlock buttons. (Fig. 4a/Item C)
- Check that your mains voltage is the same as that marked on the rating plate of the battery charger. Insert the power plug of the charger into the socket outlet. The green LED will then begin to fl ash.
- Insert the battery pack into the battery charger.
- In the section entitled „Charger indicator“ you will find a table with an explanation of the LED indicator on the charger.
The battery pack can become a little warm during the charging. This is normal.
If the battery pack fails to charge, check:
• whether there is voltage at the socket outlet
- whether there is good contact at the charging contacts
If the battery pack still fails to charge, send
• the charging unit
• and the battery pack
to our customer service center.
To ensure that items are properly packaged and delivered when you send them to us, please contact our customer service or the point of sale at which the equipment was purchased.
When shipping or disposing of batteries and cordless tools, always ensure that they are packed individually in plastic bags to prevent short circuits and fl res.
To ensure that the battery pack provides long service, you should take care to recharge it promptly. You must recharge the battery pack when you notice that the performance of the device drops. Never allow the battery pack to become fully discharged. This will cause it to develop a defect.
Installing the battery (Fig. 4c-4f)
Open the battery cover. To do so, fl ip up the cover as shown in Fig. 4c. Then insert the two batteries into the mounts as shown in Fig. 4d and push them forward until you hear the batteries engage.
For optimum mowing results and battery power performance it is always best to use batteries with the same capacity.
In battery mount A you can use batteries with a different capacity than that of the batteries in battery mount B (Fig. 4f).
Please note, however, that a particular battery bank should always be fitted with batteries of the same capacity and must always contain 2 batteries (Fig. 4f).
For example, you could use two 4.0 Ah batteries in one battery bank while using two 5.2 Ah batteries in the opposite battery bank.
Note!
Use only batteries which are charged to the same level. Never combine full and half-full batteries. Always charge the two batteries simultaneously. The equipment's operating time depends on the battery with the lower charge level. The two batteries must always be fully charged before use. Close the battery cover by swinging it down, and make sure that it latches in place correctly.
Battery capacity indicator (Fig. 4a)
Press the switch for the battery capacity indicator (Fig. 4a/Item A). The battery capacity indicator (Fig. 4a/Item B) shows the charge status of the battery using 3 LEDs.
The charge level can also be read from the indicator (Fig. 6 / Item D) on the upper long handle. The indicator does not work in the case of batteries with switching function (e.g. 4-6 Ah).
All 3 LEDs are lit:
The battery is fully charged.
2 or 1 LED(s) are lit:
The battery has an adequate remaining charge.
1 LED fl ashes:
The battery is empty, recharge the battery.
GB
All LEDs blink:
The battery temperature is too low. Remove the battery from the equipment, keep it at room temperature for one day. If the fault reoccurs, this means that the rechargeable battery has undergone exhaustive discharge and is defective. Remove the battery from the equipment. Never use or charge a defective battery.
6. Operation
Caution!
The device is equipped with a safety switch to prevent unauthorized use. Immediately before using the device, insert the safety plug (Fig. 4d/Item 5). Remove the safety plug again when interrupting or terminating your work.
Danger! To prevent accidental start-up of the machine, the push-bar is equipped with a two-point switch (Fig. 5/6/Item A) which must be pressed before the lever switch (Fig. 5/6/Item B) can be pressed. If the lever switch is released, the machine switches off.
Repeat this process several times so that you are sure that your machine functions properly. Before you perform any repair or maintenance work on the machine, ensure that the hoe blades are not rotating and that the power supply is disconnected.
The equipment must be moved into operating position before you begin with your work. First pull the locking pin (Fig. 7a/Item A) in the direction of the arrow as shown in Fig. 7b and swing up the wheel unit until the locking pin engages again in position B. Proceed in reverse order to move the equipment into transport position.
Always ensure that a safe distance (provided by the long handles) is maintained between the machine and the user. Be especially careful when changing direction on slopes and inclines. Maintain a solid footing and wear sturdy, non-slip footwear and long trousers. Always work along the incline (not up and down).
Use special caution when backing up and pulling the machine (tripping hazard).
Tips for proper working
Place the machine in front of the area you wish to hoe and hold it securely on the push bar before you switch on the machine. Guide the hoe blades over the area.
To achieve cleanly hoed soil always ensure that you guide the machine in straight lines wherever possible. Insodoing, the aeration swaths should always overlap each other by a few centimeters in order to avoid bare strips.
Switch off the motor promptly when you arrive at the end of the area you wished to hoe. The motor must be switched off when you raise the machine (for example to change direction).
Keep the underside of the machine clean and remove soil deposits. Deposits make it more difficult to start the machine and decrease the working depth. Work perpendicular to the slop on inclined areas. The machine must be switched off and the mains cable disconnected before you make any checks on the hoe blades.
Warning!
The hoe blades will continue to rotate for a few seconds after the motor is switched off. Never attempt to manually stop them. In the event that the rotating hoe blade strikes an object, immediately switch off the machine and wait for the hoe blades to come to a complete stop. Then inspect the condition of the hoe blades. Replace any parts that are damaged.
7. Cleaning, maintenance and ordering of spare parts
Danger!
Always pull out the safety plug before making adjustments or carrying out maintenance, cleaning and repair work on the equipment. Make sure that the blade shaft is not turning.
7.1 Cleaning
- Keep all safety devices, air vents and the motor housing free of dirt and dust as far as possible. Wipe the equipment with a clean cloth or blow it with compressed air at low pressure.
• We recommend that you clean the device immediately each time you have finished using it. - Clean the equipment regularly with a moist cloth and some soft soap. Do not use cleaning agents or solvents; these could attack the plastic parts of the equipment. Ensure that no water can seep into the device. The ingress of water into an electric tool increases the risk of an electric shock.
GB
7.2 Replace the hoe blades
For safety reasons, we recommend having the hoe blades replaced by an authorized professional (see address on warranty certifi cate).
Warning!
Wear working gloves. Use only genuine spare parts since otherwise the function and safety of the machine cannot be guaranteed.
7.3 Maintenance
Ensure that all mounting components (i.e. screws, bolts, nuts etc.) are always tightened so that the machine can be safely operated at all times. Store the device in a dry room. All the metal parts should be cleaned and then oil to ensure that they provide a long life. For best results, clean the plastic parts of the machine with a brush or rag. Do not use any solvents to remove dirt. For space saving storage undo the star nuts (Fig. 3b, 3f /Item 8) and fold together the push bars as shown in Fig. 8. Ensure that you do not damage the cable. At the end of the season, perform a general inspection of the machine and remove any deposits which may have accumulated. At the start of each season, ensure that you check the condition of the machine. If repairs are necessary, please contact one of our customer service centers (see address on warranty certifi cate).
7.4 Ordering replacement parts:
Please quote the following data when ordering replacement parts:
• Type of machine
• Article number of the machine
• Identification number of the machine
• Replacement part number of the part required
For our latest prices and information please go to www.isc-gmbh.info
8. Disposal and recycling
The equipment is supplied in packaging to prevent it from being damaged in transit. The raw materials in this packaging can be reused or recycled. The equipment and its accessories are made of various types of material, such as metal and plastic. Never place defective equipment in your household refuse. The equipment should be taken to a suitable collection center for proper disposal. If you do not know the whereabouts of such a collection point, you should ask in your local council offices.
9. Storage
Store the equipment and accessories in a dark and dry place at above freezing temperature. The ideal storage temperature is between 5 and 30 °C. Store the electric tool in its original packaging.
GB
10. Charger indicator
| Indicator status Explanations and actions | ||
| Red LED Green LED | ||
| Off | Flashing | Ready for useThe charger is connected to the mains and is ready for use; there is no battery pack in the charger |
| On Off Charging | The charger is charging the battery pack in quick charge mode. The charging times are shown directly on the charger.Important! The actual charging times may vary slightly from the stated charging times depending on the existing battery charge. | |
| Off | On | The battery is charged and ready for use. (READY TO GO)The unit then changes over to gentle charging mode until the battery is fully charged.To do this, leave the rechargeable battery on the charger for approx. 15 minutes longer.Action:Take the battery pack out of the charger. Disconnect the charger from the mains supply. |
| Flashing Off | Adapted charging | The charger is in gentle charging mode.For safety reasons the charging is performed less quickly and takes more time. The reasons can be:- The rechargeable battery has not been used for a very long time.- The battery temperature is outside the ideal range.Action:Wait for the charging to be completed; you can still continue to charge the battery pack. |
| Flashing Flashing Fault | Charging is no longer possible. The battery pack is defective.Action:Never charge a defective battery pack.Take the battery pack out of the charger. | |
| On On Temperature fault | The battery pack is too hot (e.g. due to direct sunshine) or too cold (below 0^ ).Action:Remove the battery pack and keep it at room temperature (approx. 20^ ) for one day . | |
GB
11. Troubleshooting guide
| Fault Possible causes Remedy | ||
| Motor does not start | - Safety plug is not inserted- Battery is not correctly inserted- Motor terminals or capacitor disconnected- Excessive working depth- Battery empty | - Insert the safety plug (see 6.)- Remove the battery and reinsert (see 5.)- By customer service workshop- Reduce the working depth- Charge the battery (see 5.) |
| Motorperformance drops | -Soiltoohard- Blades badly worn | -Correctworkingdepth- Replace hoe blades |
Notice! For protection, the motor is equipped with a thermal switch which cuts out when the motor is overloaded and switches on again automatically after a short cooling period.
GB
Disposal

Power tools, rechargeable batteries, accessories and packaging should be sorted for environmental-friendly recycling.
Do not dispose of power tools and batteries/rechargeable batteries into household waste!
Only for EU countries:
According to the Directive 2012/19/EU on waste electrical and electronic equipment and its transposition into national law, power tools that are no longer usable, and, according to the Directive 2006/66/EC, defective or drained batteries must be collected separately and disposed of in an environmentally correct manner.
If disposed incorrectly, waste electrical and electronic equipment may have harmful effects on the environment and human health, due to the potential presence of hazardous substances.
Only for United Kingdom:
According to The Waste Electrical and Electronic Equipment Regulations 2013 (SI 2013/3113) (as amended) and the Waste Batteries and Accumulators Regulations 2009 (SI 2009/890) (as amended), products that are no longer usable must be collected separately and disposed of in an environmentally friendly manner.
The reprinting or reproduction by any other means, in whole or in part, of documentation and papers accompanying products is permitted only with the express consent of the Einhell Germany AG.
Subject to technical changes.
GB
Service information
We have competent service partners in all countries named on the guarantee certificate whose contact details can also be found on the guarantee certificate. These partners will help you with all service requests such as repairs, spare and wearing part orders or the purchase of consumables.
Please note that the following parts of this product are subject to normal or natural wear and that the following parts are therefore also required for use as consumables.
| Category Example | |
| Wear parts* cultivator blade, battery | |
| Consumables* | |
| Missing parts |
* Not necessarily included in the scope of delivery!
In the effect of defects or faults, please register the problem on the internet at www.Einhell-Service.com. Please ensure that you provide a precise description of the problem and answer the following questions in all cases:
• Did the equipment work at all or was it defective from the beginning?
• Did you notice anything (symptom or defect) prior to the failure?
• What malfunction does the equipment have in your opinion (main symptom)?
Describe this malfunction.
F
Danger!
Negotovost K _nA ....3 dB
Negotovost K_WA .....3 dB
Monteerimine (joonised 3a–3c)
X 2000/14/EC_2005/88/EC
□ Annex V
X Annex VI
Noise: measured L_WA = 87.19 dB (A); guaranteed L_WA = 93 dB (A). P = 1.4 kW; L/Ω = cm
Notifi ed Body: TÜV Rheinland LGA Products GmbH (NB 0197)
□2012/46/EU_(EU)2016/1628
Emission No.:
Standard references: EN 62841-1; EN IEC 55014-1; EN IEC 55014-2; EN 709
Subject to change without notice
Archive-File/Record: NAPR026771
Documents registrar: Markus Jehl
Wiesenweg 22, D-94405 Landau/Isar
- SB Cordless Ho - F. Motinobiusso ans till - I Zappatrice a betiera - DVN Akse-jordfrass - S Batterkirken Jordfhas - CZ Akulatumorosa motyuka - SK Akulatumorosa levtator - NL Acuò-bodanthes E Motozade da betiera - FIM Akseydyttonan mblyhenysskuoka - SI.O Akulatumorski protokainik - N Akti-koříkoda - RD Mosopaká cu accumulator - GR Xkmeto jumatrané - P Enirada elotchica sem iro HRBIN Akumutorski kullivator za oestru ta - RS Akumutorski kullivator za oestru ta, PL Gibbogyrzarka kullivatora - TR Aktiča česna makiniu - RUS Xtprskmáci do ejeksvihonia noceja - RS Akumutorski kullivator - EE Akua sinaluava - LV Akumutorski zemes Irize - LT Akumutorsniis kullivatorus - DG Lycunjatorec (grádenica spesa) LXTK Akuyutornirn cunayasnotoj - LG Podra sinaluva rea afateri

Declaration of conformity
We, Einhell UK Ltd
Champions Business Park, First Floor Unit 10, Arrowe Brook Rd, Upton, Wirral CH49 0AB, United Kingdom
declare the conformity to UK standards and legislation was assessed for:
Cordless Tiller GP-CR 36/45 Li E BL (Einhell)
UK legislation
□ Simple Pressure Vessels (Safety) Regulation
□ Electrical Equipment (Safety) Regulation
□ Radio Equipment Regulation
□ Personal Protective Equipment Regulation
☐ The Ecodesign for Energy-Related Products and Energy Information Regulation
X The Restriction of the Use of Certain Hazardous Substances in Electrical and Electronic Equipment Regulation
X Noise Emission in the Environment by Equipment for use Outdoors Regulation
X Electromagnetic Compatibility Regulation
□ Measuring Instruments Regulation
☐ Pressure Equipment (Safety) Regulation
Annex V
X Annex VI
Noise:measured L_w = 87,19 dB (A); guaranteed L_w = 93 dB (A)
P = 1.4 kW; L/∅ = cm
UK Approved Body: TÜV Rheinland LGA Products GmbH (NB 0197)
X Supply of Machinery (Safety) Regulation
Annex IV
UK Approved Body:
UKTE Certifi cate No.:
Standards: BS EN 62841-1; BS EN IEC 55014-1; BS EN IEC 55014-2; BS EN 709
Wirral, 2023.12.06

Archive-File/Record: NAPR026771
Article Number: 34.312.20 I.-No.: 21013
Subject to change without notice Wiesenweg 22, 94405 Landau/Isar, Germany
Documents registrar: Markus Jehl
EH 02/2024 (01)