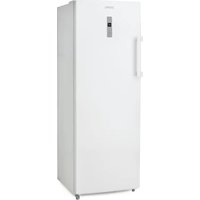
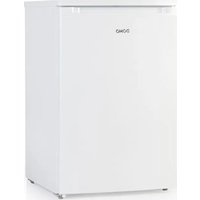
DO91205F - Freezer DOMO - Free user manual and instructions
Find the device manual for free DO91205F DOMO in PDF.


| Product Type | Freezer |
| Brand | DOMO |
| Model | DO91205F |
| Dimensions (H x W x D) | 172.2 x 59.5 x 63.2 cm |
| Net Weight | Approximately 70 kg (estimate) |
| Total Volume | Not specified in the manual |
| Climate Class | SN, N, ST, T (from 10 °C to 43 °C) |
| Refrigerant | R600a (isobutane) |
| Defrost Type | NoFrost (automatic) |
| Special Functions | Super Freeze, Super Cool, Open door alarm, Touch screen |
| Adjustable Temperature | Freezer: -16 °C to -24 °C; Refrigerator: 2 °C to 8 °C (if used in fridge mode) |
| Power Supply | 220-240 V ~ 50 Hz (standard estimate) |
| Energy Consumption | Not specified in the manual |
| Noise Level | Not specified |
| Warranty | 2 years |
| After-Sales Service | Linea 2000: +32 14 21 71 91, info@linea2000.be |
| Included Accessories | Handle, adjustable feet, freezer drawers, XL drawer |
Frequently Asked Questions - DO91205F DOMO
User questions about DO91205F DOMO
0 question about this device. Answer the ones you know or ask your own.
Ask a new question about this device
Download the instructions for your Freezer in PDF format for free! Find your manual DO91205F - DOMO and take your electronic device back in hand. On this page are published all the documents necessary for the use of your device. DO91205F by DOMO.
USER MANUAL DO91205F DOMO
natural_image
White rectangular refrigerator with 'DOMO' branding on top (no other text or symbols visible)EN Instruction booklet Freezer
Read all instructions carefully.
Save this instruction manual for future reference.
INSTALLATIE
natural_image
Diagram showing three views of a door frame: front view, side view, and top view (no text or symbols present)natural_image
Diagram showing a 3D model before and after assembly, with no visible text or symbolsnatural_image
Symbol of a trash bin crossed with no text or numbers, indicating no waste or discharge (no text present)natural_image
Simple line drawing of a refrigerator with a door and label (no text or symbols on the diagram itself)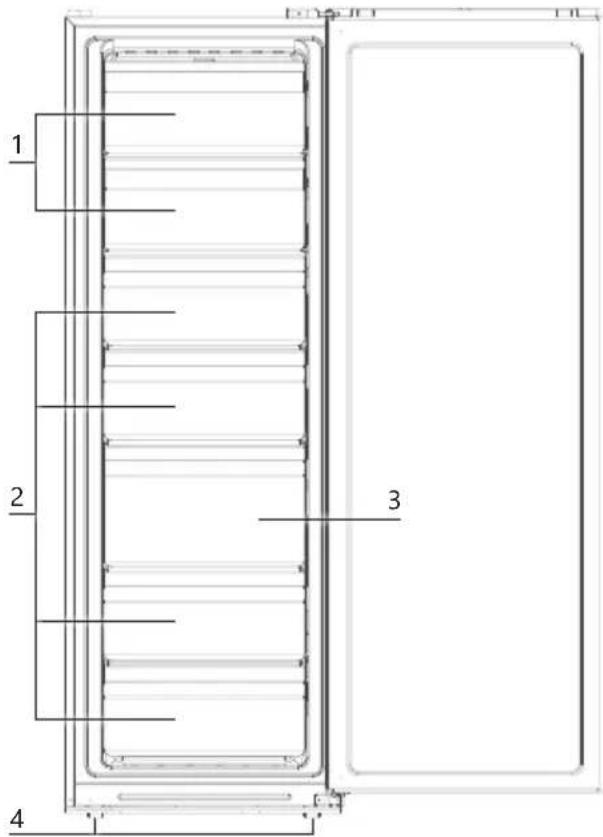
AVANT LA PREMIÈRE UTILISATION
natural_image
Technical line drawing showing three views of a door panel: front view, side view with circular opening, and side view with bracket (no text or symbols)CHANGEMENT DU SENS D'OUVERTURE DE LA PORTE
natural_image
Isometric line drawing of a refrigerator with door and side panels (no text or symbols)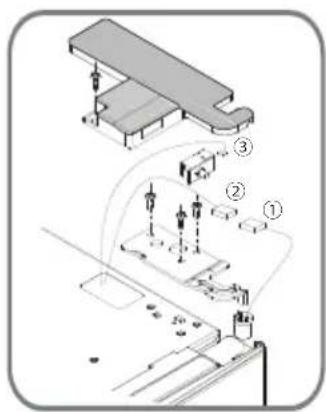
natural_image
Diagram showing a 3D object being processed into a box, with a close-up of the final component (no text or symbols present)natural_image
Symbol of a trash bin crossed with no text or numbers, representing waste sorting or disposal (no text present)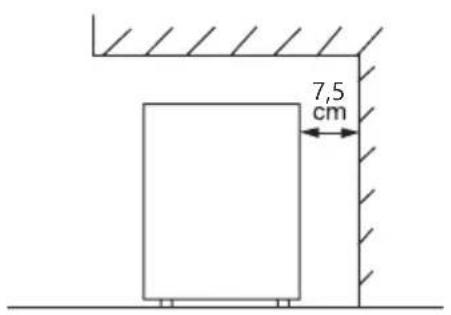
natural_image
Technical line drawing showing three views of a door panel: front view, top view, and side view (no text or symbols)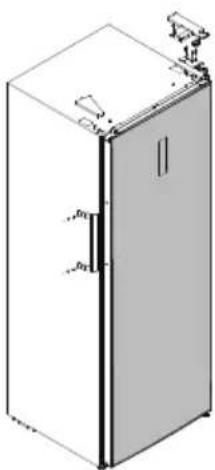
natural_image
Isometric line drawing of a refrigerator with doors and frontrest (no text or symbols)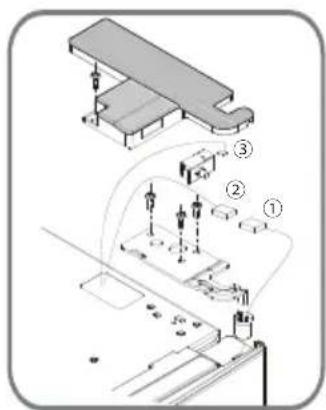
natural_image
Diagram showing a 3D model of a cube being processed into a 2D model, with a close-up view of the final component (no text or symbols present)ALARM BEI OFFENER TÜR
natural_image
Symbol of a trash bin crossed with two crossed lines and a solid black rectangle below (no text or labels)Thank you for your confidence in DOMO. We do hope you enjoy your new purchase. Before reaching you, all our products undergo a strict quality inspection. Should you still encounter problems with your appliance, then we are truly sorry and will do everything possible to resolve the situation quickly. Do not hesitate to contact our customer service. Our staff will do all they can to help you!
+32 14 21 71 91 info@linea2000.be

Monday - Thursday: 8.30 - 12.00 and 13.00 - 17.00
Friday: 8.30 - 12.00 and 13.00 - 16.30
This device has a warranty period of 2 years from the date of purchase. During this warranty period, the distributor will assume responsibility for any defects that can be shown to be the result of material, construction or manufacturing errors. Such defects will be remedied by repair or replacement of the device. The 2-year warranty period will be suspended during the repair period and will continue after the repair has taken place for the remaining duration of the warranty period. The warranty will be honoured if proof of purchase clearly showing the date of purchase is provided. If your device becomes defective within the 2-year warranty period, please return it with your proof of purchase to the store you purchased it from or follow the procedure of the relevant webshop if you bought it online.
The warranty does not cover damage to the device, accessories or parts caused by:
• normal wear and tear from use;
• non-compliance with the instructions for use, maintenance and cleaning in the manual;
- incorrect connection, e.g. electrical voltage too high;
- incorrect, heavy-handed or abnormal use;
• repairs or alterations carried out by the consumer or unauthorised third parties;
- use of parts or accessories not recommended nor supplied by the distributor.
SAFETY INSTRUCTIONS
When using electrical appliances, basic safety precautions should always be taken, including the following. Any injury or damage caused by failure to comply with these rules are at your own risk. Neither the manufacturer, importer, or the supplier may be held liable.
- Read all instructions carefully.
• Make sure all packaging materials and promotional stickers have been removed before using the appliance for the first time. Make sure children cannot play with the packaging materials. -
This appliance is only suitable for use in domestic and similar environments, such as:
-
staff kitchen areas in shops, offices and other working environments;
- farm houses;
- by clients in hotels, motels and other residential type environments;
• bed and breakfast type environments.
• Children should be supervised to ensure that they do not play with the appliance.
- This appliance can be used by children aged from 16 years and above and persons with reduced physical, sensory or mental capabilities or lack of experience and knowledge if they have been given supervision or instruction concerning use of the appliance in a safe way and understand the hazards involved.
• Children shall not play with the appliance.
- Cleaning and user maintenance shall not be made by children unless they are older than 16 or supervised.
- Keep the appliance and its cord out of reach of children younger than 16 years.
- All repairs should be carried out by the manufacturer or its aftersales service.
• Make sure that children do not touch the cord or appliance.
- Your appliance uses isobutane (R600a) as a refrigerant. Despite the fact that R600a is an environmentally friendly and natural gas, it is highly flammable. Therefore you should be careful
during shipment and installation to prevent your appliance's cooler elements from being damaged. In the event of a leak caused by damage to the cooler elements, move your freezer from open flames or heat sources and ventilate the room where the appliance is located for a few minutes.
- Using the appliance incorrectly may cause an injury. Any injury or damage caused by failure to comply with these rules are at your own risk. Neither the manufacturer, importer, or the supplier may be held liable.
▲ELECTRICAL WARNINGS
- In order to avoid a hazard this appliance must not be supplied through an external switching device, such as a timer or a separate remote control, or connected to a circuit that is regularly switched on and off by the utility.
- Before use, check carefully that the electric tension and frequency of the power net at your home match the indications on the rating label of the appliance.
- The appliance must be plugged into an appropriate outlet that is installed and grounded in accordance with local installation regulations.
- The appliance must be disconnected from its power source when not in use, during service and when replacing parts. If present, first turn all the buttons to the 'off' position, then pull the plug out of the socket by grasping the plug itself. Never pull the cord or appliance to remove the plug from the socket.
- Do not let the power supply cord hang over the edge of a counter, or touch hot surfaces.
- Keep the power cord away from hot parts and don't cover the appliance.
- Unwrap the cord completely to prevent overheating of the cord. Do not allow the power cord supply to run underneath or around the unit.
- For safety reasons, never use the appliance if the cord, plug, or appliance itself is damaged, or after a malfunction of the appliance. Return the appliance to the DOMO Service Department or its service agent for examination, repair, or electrical or mechanical adjustment. Do not try to repair the appliance yourself.
- It is prohibited to alter or modify the device and its specifications.
- When disposing of the appliance, remove the plug from the power socket, cut the power cord (as closely as possible to the appliance), and remove the door to prevent playing children getting an electrical shock or shutting themselves in the appliance.
- Unplug the appliance when it is not in use, before assembling or disassembling any parts and before cleaning the appliance. Put all buttons and knobs into the 'off' position and unplug the appliance by grasping the plug. Never unplug by pulling the cord.
⚠️INSTALLATION
- Do not place near flammable materials, gases or explosives.
• Always use the appliance on a steady, level and dry surface.
- Never place this appliance near a gas stove or electrical stove or in a place where it may come into contact with a warm appliance.
- Keep the ventilation openings free of obstructions.
- Avoid long exposure to direct sunlight.
- Make sure that you have access to the plug of the appliance.
- Make sure the plug and cord are not crushed or damaged by the back of the appliance. This can cause short circuits and, as a result, overheating and fire.
- This is a heavy appliance. Be careful when moving it.
- This cooling unit is not intended for use as a built-in appliance.
- Do not place a power strip or other portable power supply behind the appliance.
• After installation, it is advisable to wait 6 hours before connecting the appliance to allow the oil to flow back in the compressor.
⚠ USE
- Do not use or store this appliance outdoors.
- Do not use this appliance for other than intended use.
- Do not use any other electrical appliance inside the freezer, unless they are approved for this purpose by the manufacturer.
- Do not keep any explosive substances inside the appliance, like for instance aerosol cans with a flammable propellant.
- The use of accessories that are not recommended or sold by the manufacturer can cause fire, electrical shock or injuries. Only use the utensils delivered with the appliance.
- Ensure the food in the appliance does not touch the back wall.
- Do not touch anything that comes out of the freezer with damp or wet hands. This could cause skin burns.
- Be careful when consuming ice cubes or ice creams that come from the freezer. These can cause frostbite on the lips or tongue.
-
Follow the instructions below to prevent contamination of food:
-
Keeping the door open for long periods may cause the temperature in the compartments of the appliance to rise considerably.
- Clean the surfaces that could come into contact with food regularly.
- If the appliance is left empty for longer periods, it should be turned off, defrosted and cleaned. Allow it to dry and leave the door ajar to prevent mould from growing in the appliance.
⚠ CLEANING AND MAINTENANCE
- To protect against electrical shock or burns, do not immerse unit, cord, or plug in water or other liquid.
- Do not place warm or hot objects on top of the appliance.
- Do not clean the appliance with anything made of metal.
- Make sure that the refrigerant circuit does not get damaged, for instance during transportation or installation.
- Do not use mechanical appliances or other means to speed up the defrosting process, unless approved by the manufacturer.
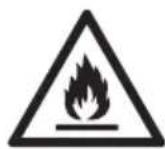
WARNING: Never place this appliance on or in the neighbourhood of a gas or electric fire or in a place where it could come into contact with a heat source. There are flammable materials located on the back of the appliance.
Pay attention to the symbol 'Fire risk – flammable materials' located on the back of the appliance.
SAVE THESE INSTRUCTIONS FOR FUTURE REFERENCE
All images and descriptions in this manual are purely indicative and may differ slightly from the actual device.
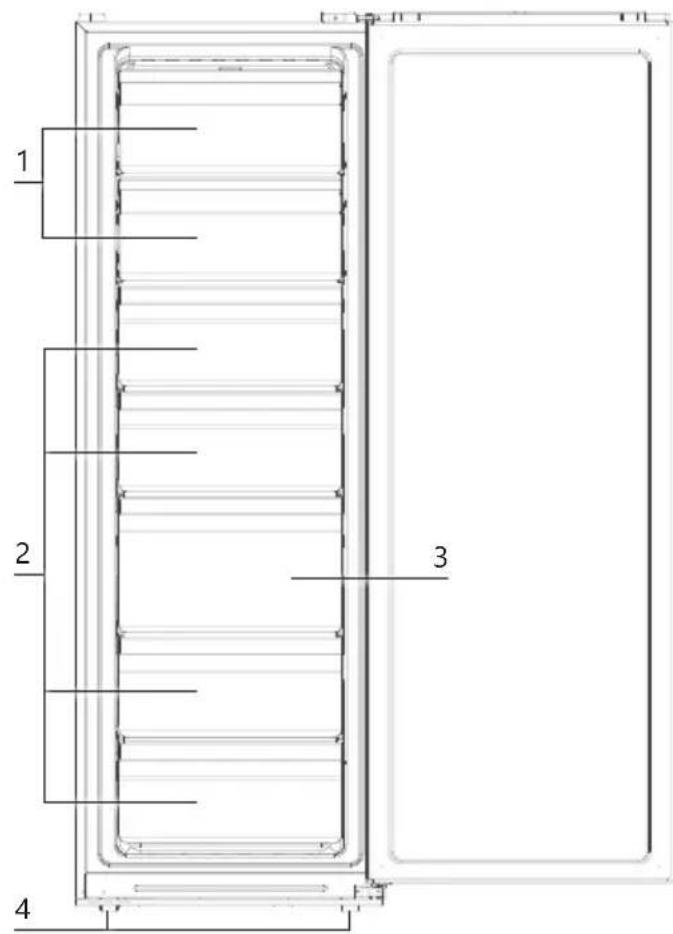
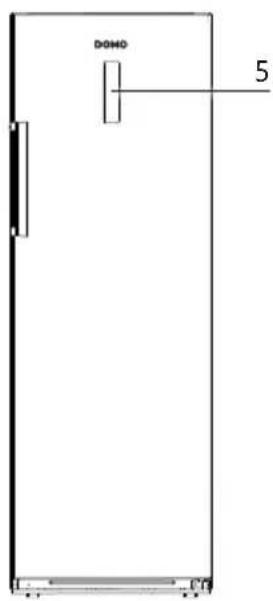
PARTS
- Freezer compartment with hinged door
- Freezer drawers
- Big box drawer
- Levelling feet
- Display with electronic temperature control
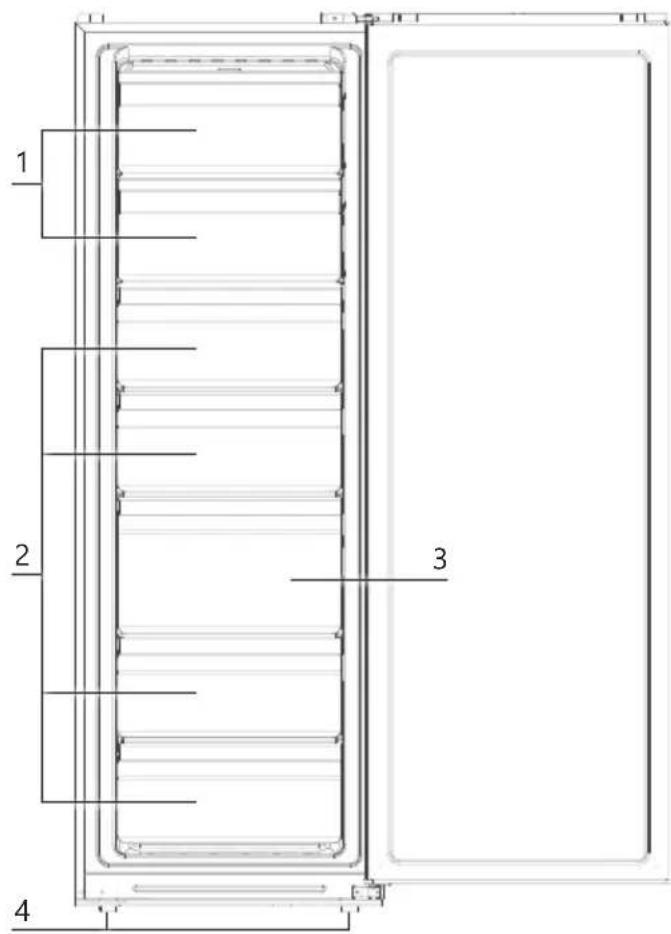
INSTALLATION
- Remove the exterior and interior packing, wipe the outside thoroughly with a soft dry cloth and the inside with a wet, lukewarm cloth. Dry the appliance off well.
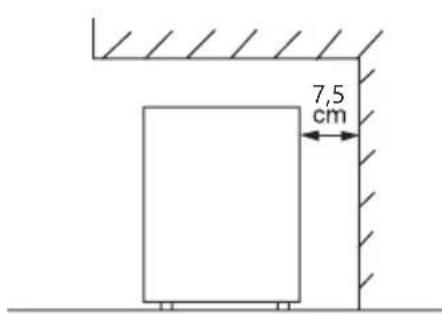
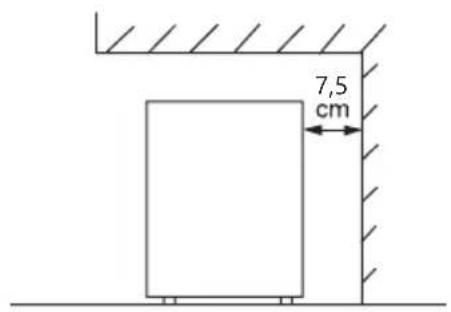
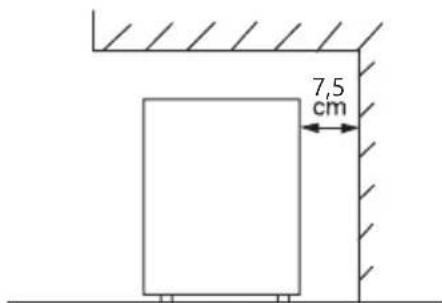
- Let air circulate freely around the cabinet.
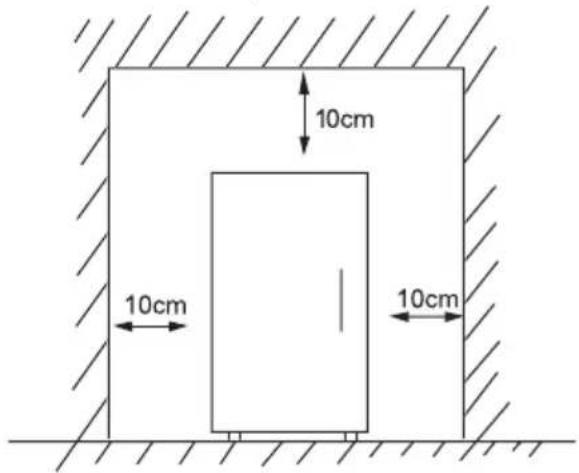
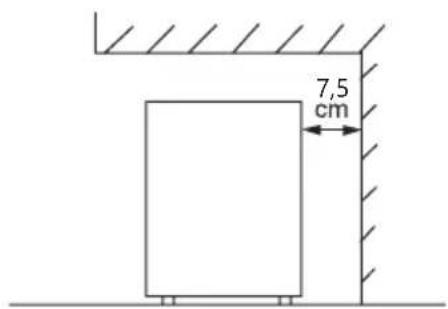
- Make sure there is sufficient space to open the door.
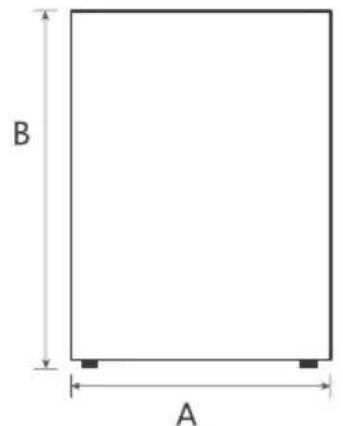
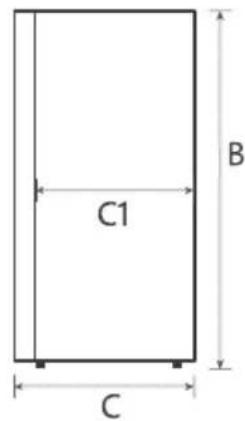
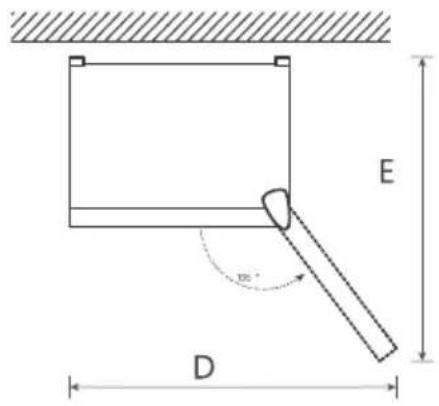
A B C C1 | D E
59,5 cm 172,2 cm 63,2 cm 54,5 cm 101,5 cm 117,2 cm
- This cooling unit is not intended for use as a built-in appliance.
- Select a place with a strong, level floor.
- Avoid direct sunlight and heat. Direct sunlight may affect the acrylic coating. Heat sources nearby will cause higher electricity consumption.
- Avoid very moist places. Too much moisture in the air will cause frost to form very quickly in your freezer.
- Before connecting your freezer to the power supply, check that the voltage stated on the rating label of your appliance corresponds to the voltage in your home. A different voltage could damage the appliance.
- The plug is the only way to disconnect the device from the power supply, make sure it is always easily accessible. To disconnect power to the device, turn off the device and then unplug it.
• After installation, leave the freezer for 6 hours before turning it on. This way the refrigerant can settle. - Allow the appliance to run empty for 12 hours so the compartment can cool to the appropriate temperature.
- You can level the appliance using the adjustable legs. The adjustable legs can be adjusted by screwing them in or out of the appliance.
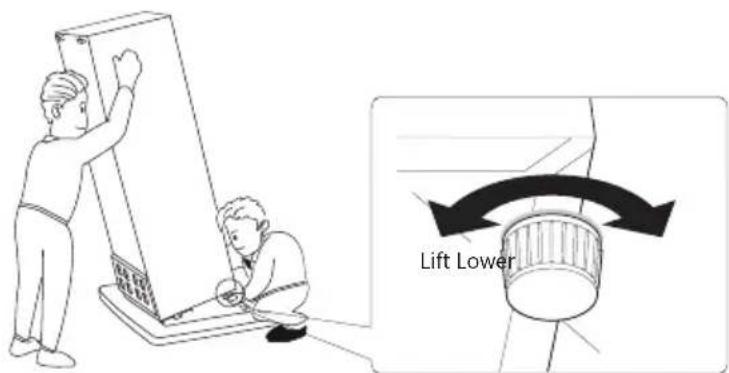
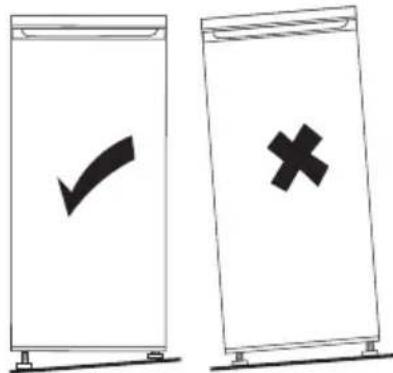
- The climate class indicates the minimum and maximum ambient temperature for the proper operation of an appliance. You can find the climate class on the type plate on the inside or back of the appliance.
• SN: Subnormal: ambient temperature between 10°C and 32°C
• N: Normal: ambient temperature between 16°C and 32°C
• ST: Subtropical: ambient temperature between 16°C and 38°C
• T: Tropical: ambient temperature between 16°C and 43°C
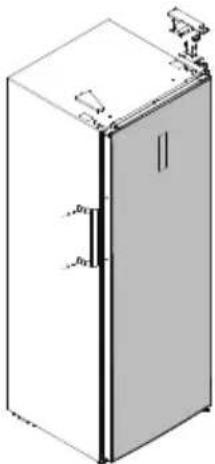
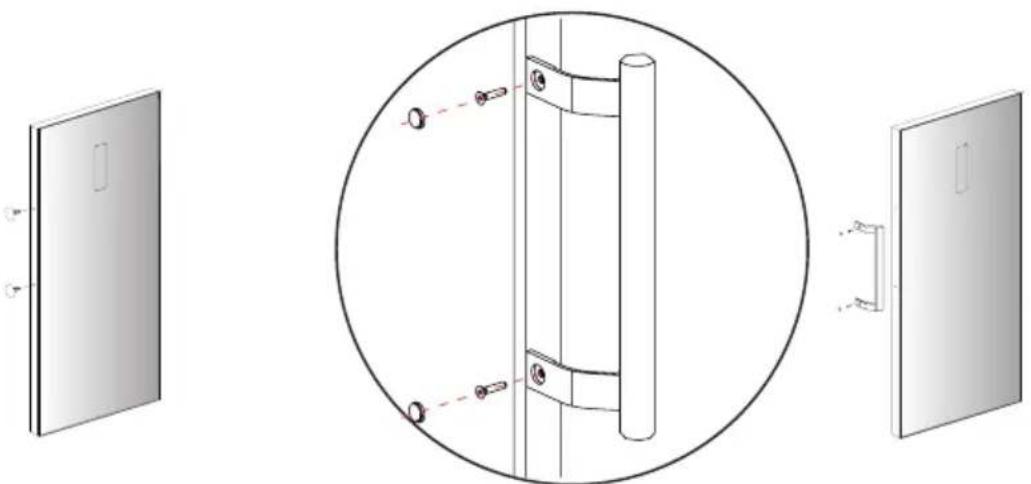
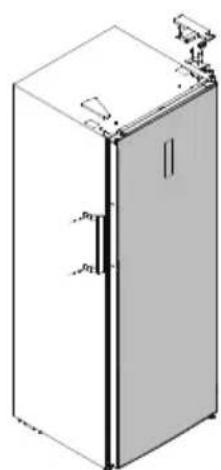
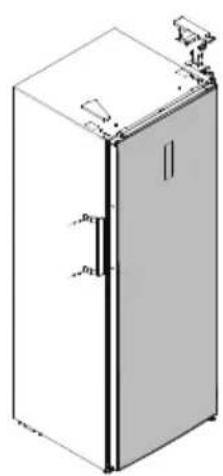
- Install the handle. Remove the covers from the door. Attach the handle with the bolts provided.
natural_image
Diagram showing three views of a door panel: front view, side view with circular frame, and side view with bracket (no text or symbols)DOOR CONVERSION
If you need to hinge your door on the opposite side, it is recommended that you call your local authorised service agent to make this conversion or ask a technician. Before you reverse the door, you should ensure the appliance is unplugged and empty. After reversing the door, leave the appliance alone for at least 2 hours before switching it on. This allows the coolant to set.
It is recommended to use a Phillips screwdriver, a flathead screwdriver, and the hex key provided.
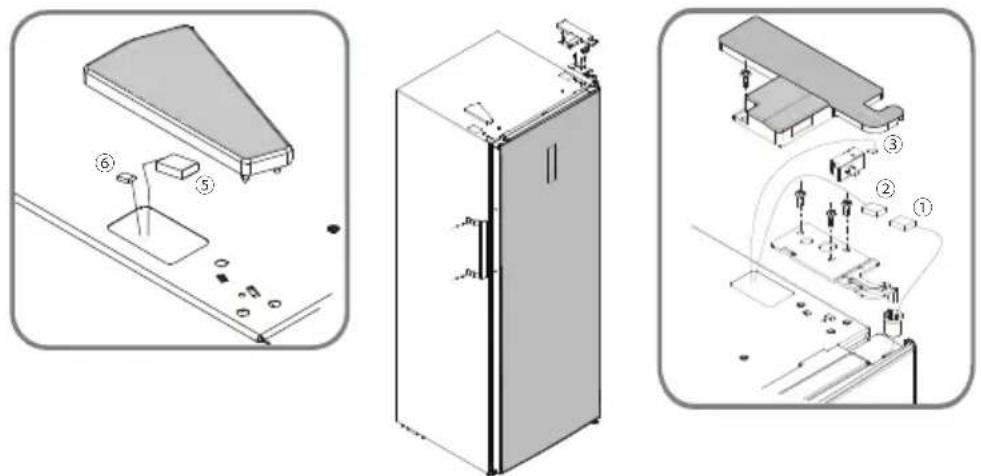
- Remove the handle from the door. Move the cover plates from one side to the other.
- Remove the upper hinge cover plates. Disconnect the connector from the cables (1, 2 & 3). Loosen the screws of the upper hinge and remove the hinge.
-
Lift the door and place it on a padded surface to prevent it from being scratched.
-
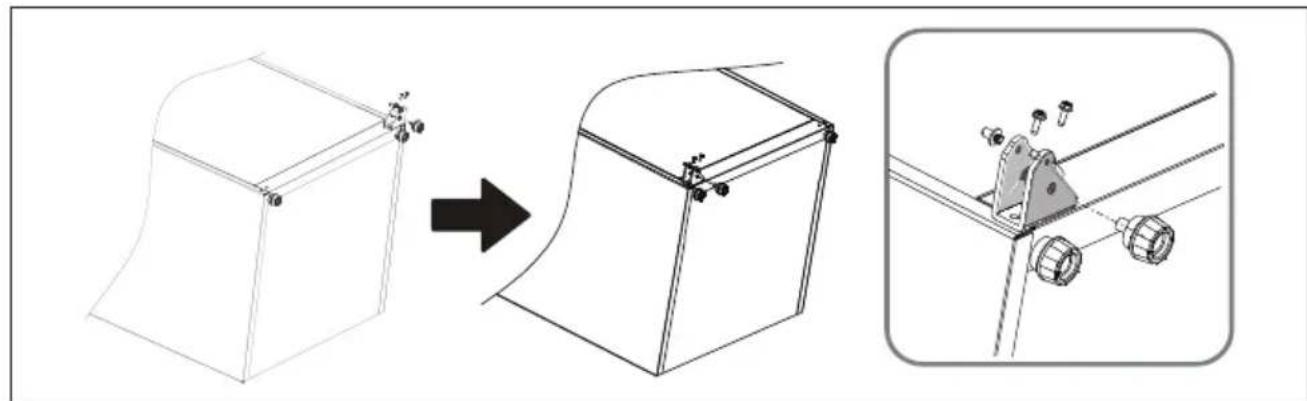
Carefully tip the appliance backward. Remove the bottom hinge (including hinge pin and adjustable foot) by unscrewing the screws. Remove the hinge pin from the plate. Flip the plate over and remount the pin and base to the hinge plate. Attach the adjusted hinge plate to the left side of the freezer.
natural_image
Technical illustration showing a 3D model before and after assembly, with no visible text or symbolsAttention: the inclination of the refrigerator must be less than 45^ so that the compressor oil does not enter the cooling circuit. If you do shut down the unit completely, wait 8 hours before turning it back on.
-
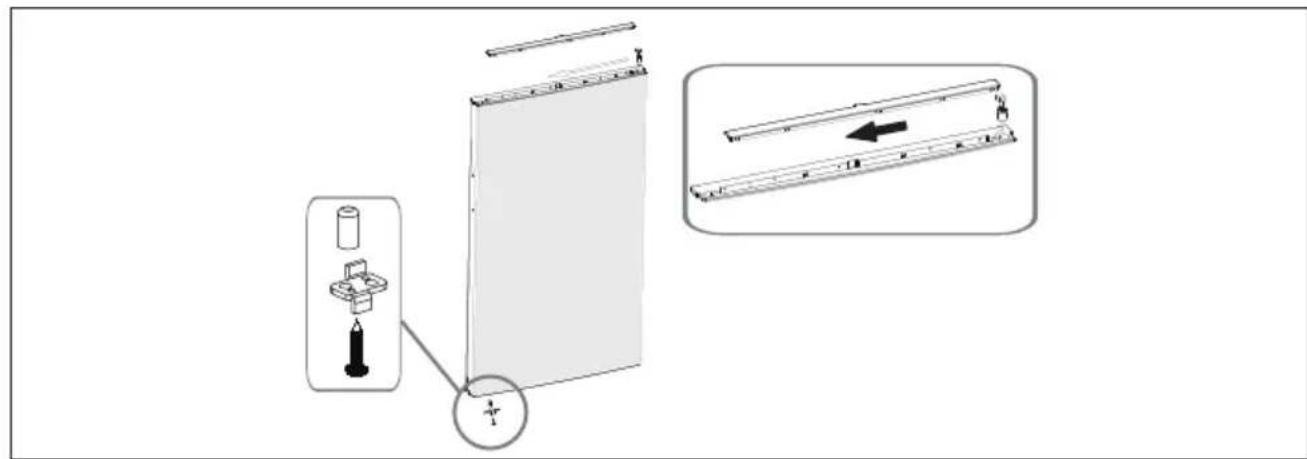
Remove the finishing panel of the top of the door. Move the cables and the hinge pin holder from right to left. Reattach the finishing panel to the top of the door.
-
Remove the hinge pin holder and door stop from the bottom of the door. Install this hinge pin holder and the door stop on the left.
- Replace the door. Ensure the door is aligned horizontally and vertically so that the seals are closed on all sides. The packaging contains the replacement hinge cover plate and hinge for the left side. Use this hinge to attach the door and screw it tight.
- Connect the electrical connector of the cables. Connect connector 6 to the door switch and connect connectors 5 & 1 (see figure). Attach the hinge cover plate.
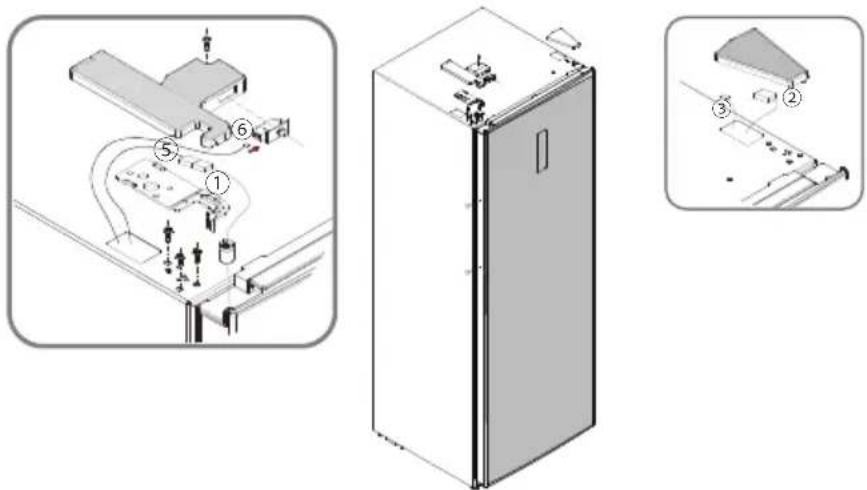
- Install the handle.
USE
CONTROL PANEL
Touch screen buttons
A. Increase temperature button
B. Lower temperature button
C. Cooling/freezing button
Display
- Fridge icon
- Freezer icon
- Temperature
- Super-cooling
- Super-freezing
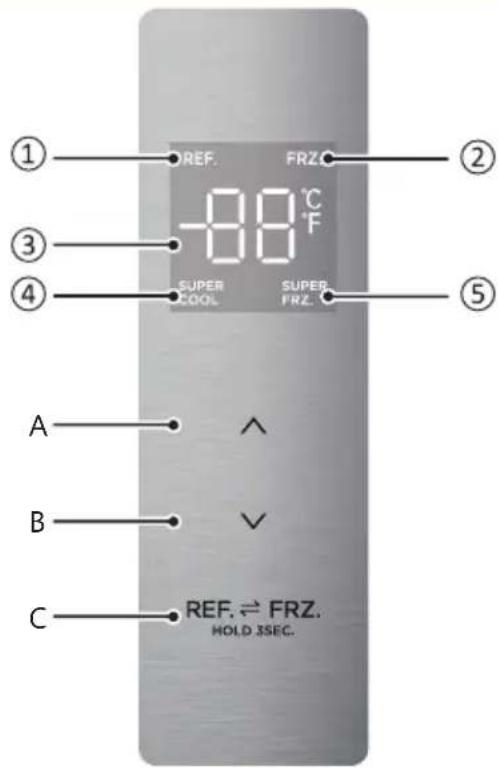
COOLING/FREEZING
Once you plug in, the display lights up and the appliance switches on by default as a -20°C freezer. Press the cooling/freezing button for 3 seconds to switch between use as a refrigerator or freezer. The corresponding temperature is shown on the display.
TEMPERATURE CONTROL
- Adjust the temperature using the increase and decrease buttons. Each time the button is pressed, the temperature will go up or down by 1^ .
- The temperature of the fridge can be set between 2 and 8^ . Under normal conditions, it is best to select 4^ .
- The freezer can be set between -16 and -24^ . Under normal conditions, it is best to select -18^ .
⚠ The operating time and temperature is influenced by the location of the freezer, the number of times the door is opened and the temperature of the room the freezer is in.
SUPERCOOLING
- Select this function if the standard temperature does not cool sufficiently. For example: with extremely hot weather, if the doors are opened often, with a high environmental temperature, etc. Or if you want to cool food quickly.
- By selecting this function, the temperature of the refrigerator is reduced to 2^ for 6 hours.
- You can turn on this function by first setting the fridge temperature to 2°C and then pressing the lower temperature button again. The symbol "SUPER COOL" will be displayed.
- This function is switched off automatically after the time has elapsed. If you want to turn off the function earlier, press the increase temperature button. The previously set temperature will once again be maintained.
SUPER-FREEZING
- Select this function if the standard temperature does not cool sufficiently. For example: with extremely hot weather, if the doors are opened often, with a high environmental temperature, if a large quantity of uncooled/unfrozen food is placed in the appliance, etc.
- By selecting this function, the freezer temperature is lowered to -24^ for a maximum of 40 hours. It is recommended that this function be selected 12 hours prior to the freezing.
- You can turn on this function by first setting the freezer temperature to -24^ and then pressing the lower temperature button again. The symbol "SUPER FRZ" will be displayed.
- This function is switched off automatically after the time has elapsed. If you want to turn off the function earlier, press the increase temperature button. The previously set temperature will once again be maintained.
OPEN DOOR ALARM
If the door remains open for 120 seconds, you will hear a signal. This alarm is a warning so that you do not accidentally leave the door open and spoil your food. If you do not close the door, the alarm will be audible every 60 seconds. The alarm stops as soon as the door is closed again or press a key on the control panel.
STORAGE GUIDE
The higher up in your appliance, the warmer. So whatever spoils fastest (fish, meat, etc.) is best put at the bottom. For the best storage, set up your freezer appliance as follows:
| Freezer compartment Type of food | |
| Top drawer • Ice cream, frozen fruit, frozen baked goods | |
| Middle drawer • Frozen vegetables and fries | |
| Bottom drawer • Raw meat, poultry, fish |
MOVING YOUR APPLIANCE
If the appliance is turned off for any reason, wait for 10 minutes before turning it back on. This will allow the cooling system pressures to equalise before restarting.
- Unplug it from the mains socket. Remove all food. Also remove all mobile parts (shelves, accessories, etc.) or fix them into the freezer to avoid any shock.
- Relocate and install. If the appliance has been left on its side for any length of time, leave it standing upright for at least 2 hours before turning on.
FREEZING AND STORING FOOD IN THE FREEZER
Use the freezer
• To store deep-frozen food.
- To make ice cubes.
- To freeze food.
⚠ Ensure that the freezer door has been closed properly. Avoid opening the freezer door unnecessarily.
Purchasing frozen food
- Packaging must not be damaged.
- Use by the 'use by/best before/best by/' date.
- If possible, transport deep-frozen food in an insulated bag and place quickly in the freezer.
Freezing fresh food
Freeze fresh and undamaged food only. To retain the best possible nutritional value, flavour and colour, vegetables should be blanched before freezing.
Aubergines, peppers, zucchini and asparagus do not require blanching.
⚠️Keep food to be frozen away from food which is already frozen.
- The following foods are suitable for freezing: Cakes and pastries, fish and seafood, meat, game, poultry, vegetables, fruit, herbs, eggs without shells, dairy products such as cheese and butter, ready meals and leftovers such as soups, stews, cooked meat and fish, potato dishes, soufflés and desserts.
- The following foods are not suitable for freezing: Types of vegetables, which are usually consumed raw, such as lettuce or radishes, eggs in shells, grapes, whole apples, pears and peaches, hard-boiled eggs, yoghurt, soured milk, sour cream, and mayonnaise.
Packing frozen food
To prevent food from losing its flavour or drying out, place food in airtight packaging.
- Place food in packaging.
- Remove air.
- Seal the wrapping.
- Label packaging with contents and dates of freezing.
Suitable packaging: plastic film, tubular film made of polyethylene, aluminium foil, freezer containers.
Recommended storage times of frozen food in the freezer
These times vary depending on the type of food. The food that you freeze can be preserved from 1 to 12 months (minimum at -18°C).
| Food Storage time | |
| Bacon, casseroles, milk 1 month | |
| Bread, ice cream, sausages, pies, prepared shellfish, oily fish 2 months | |
| Non-oily fish, shellfish, pizza, scones and muffins 3 months | |
| Ham, cakes, biscuits, beef and lamb chops, poultry pieces 4 months | |
| Butter, vegetables (blanched), eggs whole and yolks, cooked crayfish, minced meat (raw), pork (raw) | 6 months |
| Fruit (dry or in syrup), egg whites, beef (raw), whole chicken, lamb (raw), fruit cakes | 12 months |
Never forget:
When you freeze fresh foods with a 'use by/best before/best by/' date, you must freeze them before the expiry of this date.
⚠️ Check that the food was not already frozen. . Frozen foods that have been completely or partially thawed should not be refrozen.
⚠️Once defrosted, food should be consumed quickly.
VACATION
For short vacation periods, leave the control knobs at their usual settings. During longer absences take the following measures:
- Remove all foods.
- Disconnect from electrical outlet.
- Clean the appliance thoroughly.
- Leave the door open to avoid possible formations of condensate, mould or odours.
POWER FAILURE
- Most power failures are corrected within an hour or two and will not affect your freezer temperatures. However, you should minimize the number of door openings while the power is off.
- During power failures of longer duration, take steps to protect your food by putting dry ice on top of packages.
SOME IMPORTANT RULES FOR THE CORRECT USE OF THE REFRIGERATOR
- Never place hot foods in the freezer.
- Never place spoiled foods in the freezer.
- Don't overload the cabinet.
- Don't open the door unless necessary.
- Keep all accessories, such as shelves and drawers, in the appliance to minimise energy consumption.
- Do not place carbonated drinks in the freezer. The bottle/can is pressurised and may explode.
- Be careful when consuming ice creams that come from the freezer. These can cause frostbite.
- An empty freezer consumes more energy. After all, when the door is opened, warm air enters the space and needs to be cooled. More air enters when there are fewer products, meaning that more energy needs to be consumed to cool that air. So fill your freezer properly or choose a model sized for your needs.
⚠️Not for outer camping use (e.g. in a tent).
⚠️ For indoor use only.
⚠ The appliance can not be used in public transportation.
CLEANING AND MAINTENANCE
A layer of frost in the freezer will impair cooling of the frozen food and increases power consumption. Remove the layer of frost regularly.
⚠ Do not scrape off frost or ice with a knife or pointed object. Doing this may damage the refrigerant tubes.
⚠️Do not use abrasive cleaning agents or solvents.
DEFROSTING THE FREEZER
The freezer is frost-free – NoFrost. If used correctly, there will be no ice formation. If an ice layer does form, defrost the freezer compartment.
- Remove the frozen food and place temporarily in a cool location.
- Disconnect the appliance from the mains socket.
- To accelerate the defrosting process, place a pan of hot water on a stand in the freezer.
- Wipe up condensation with a cloth or sponge. Wipe dry the freezer compartment.
- Plug in the appliance and adjust the temperature control knob as desired.
- Put the frozen food back in the freezer.
PROBLEMS AND SOLUTIONS
| PROBLEMS SOLUTIONS | |
| An error message is shown on the display.E2: The temperature sensor of the freezer is not working.E5: The freezer defrosting sensor is not working.E6: Communication error.E7: The ambient temperature sensor is broken. | ·If you see any of these error messages, please contact our after-sales service. |
| The freezer does not work. ·Check connection | of power cord to power source.Plug in unit.Check that the voltage stated on the rating label of your appliance corresponds to the voltage in your home. |
| The freezer cools too frequently. • The temperature setting is too cool.• Close door securely.• Be sure that food is cool before inserting.• Do not keep door open for too long and minimize door openings.• Check that the voltage stated on the rating label of your appliance corresponds to the voltage in your home.• Do not place unit close to heat sources or direct sunlight. | |
| The internal temperature is not cold enough. • Check connection of power cord to power source.• Plug in unit.• Check setting and adjust as needed.• Close door securely.• Be sure that food is cool before inserting.• Do not keep door open for too long and minimize door openings.• Allow room for air to circulate around unit.• Check that the voltage stated on the rating label of your appliance corresponds to the voltage in your home.• Do not place unit close to heat sources or direct sunlight. | |
| Unusual sounds. • The appliance is not level. Readjust the adjusting feet and level the unit.• The unit is touching a wall or another object. Gently move the appliance. | |
| The door does not close properly. • The door seal is deformed. Heat it gently using a hairdryer. The rubber seal will become flexible and the magnetic strip in the rubber will automatically pull towards the appliance. After cooling, the rubber stays in that position. | |
GUIDELINES
natural_image
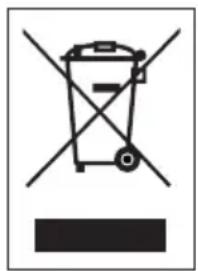
Symbol of a trash bin crossed with two crossed lines, no text or numbers presentThis symbol on the product or on its packaging indicates that this product may not be treated as household waste. Instead it must be brought to the applicable collection point for recycling of electrical and electronic equipment. By ensuring this product is disposed of correctly, you will help prevent potential negative consequences for the environment and human health, which could otherwise be caused by inappropriate waste handling of this product. For more detailed information about recycling of this product, please contact your local city office, your household waste disposal service or the shop where you purchased the product.

The packaging is recyclable. Please treat the packaging ecologically.

This appliance conforms to all European requirements in the areas of safety, health, and environmental protection.
The EU declaration concerning this appliance can be requested at any time from info@linea2000.be
GARANTIA
Estimado cliente,
natural_image
Simple line drawing of a door with a label '5' and a vertical bar on the left side (no text or symbols beyond the number)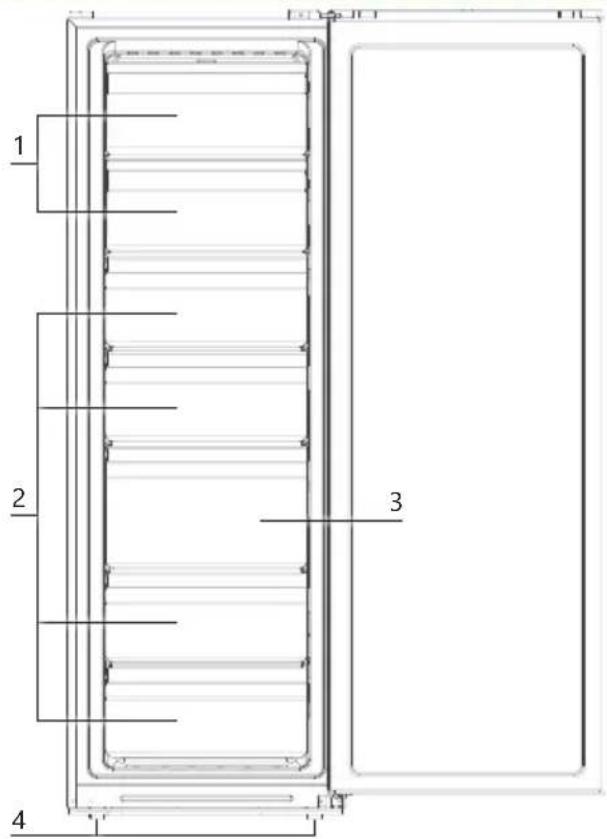
INSTALACIÓN
natural_image
Diagram showing three views of a door panel: front view, side view with circular frame, and side view with bracket (no text or symbols)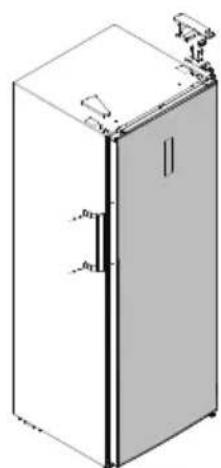
natural_image
Isometric line drawing of a refrigerator with doors and ventilation slots (no text or symbols)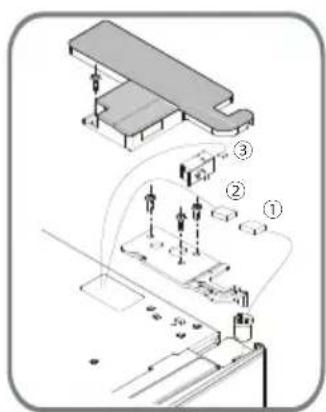
natural_image
Technical illustration showing a 3D model of a mechanical part being processed into a 2D model, with no visible text or symbols.- Instala el asa.
USO
PANEL DE CONTROL
natural_image
Symbol of a trash bin crossed with two crossed lines and a black rectangular base (no text or numbers present)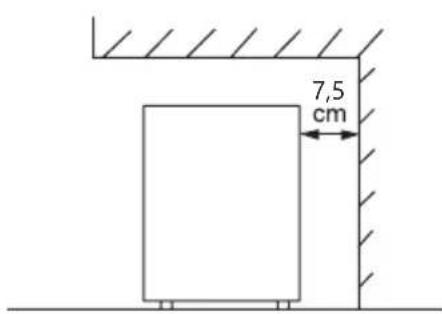
natural_image
Diagram showing three views of a door frame: front view, side view, and top view (no text or symbols present)INVERSIONE DELL'APERTURA DELLO SPORTELLO
natural_image
Symbol of a trash bin with crossed lines indicating no waste or discharge, and a solid black rectangle below (no text or labels)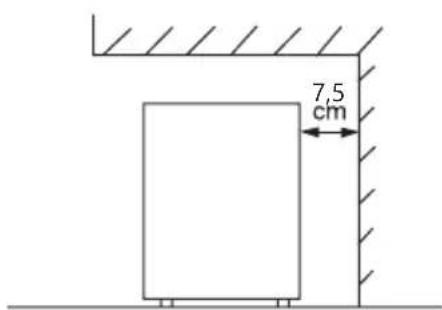
natural_image
Diagram showing three views of a door frame: front view, side view, and close-up of a cylindrical panel with mounting holes (no text or symbols)PŘEHOZENÍ PANTŮ DVERÍ
natural_image
Isometric line drawing of a refrigerator with doors and frontrest (no text or symbols)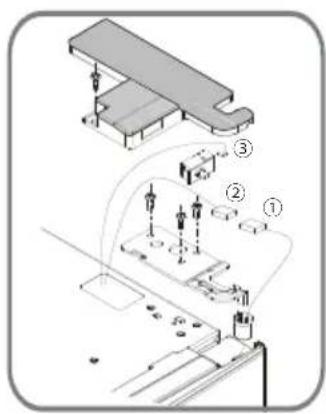
natural_image
Technical illustration showing a 3D model transformation from a flat panel to a curved panel, with a close-up of the final component (no text or symbols present)- Nainstalujte rukojeť.
POUŽITÍ
Dotyková tlačítka:
MANIPULACE S PŘÍSTROJEM
natural_image
Symbol of a trash bin with crossed lines indicating no waste or discharge, and a solid black rectangle below (no text or labels)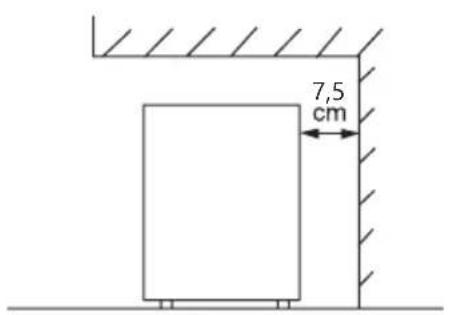
natural_image
Diagram showing three views of a door frame with mounting fixtures and a circular panel assembly (no text or symbols)PREHODENIE PÁNTOV DVERÍ
Ak potrebujete prehodit' otváranie dverí na opačnú stranu, musí sa premontovat' pánty.
natural_image
Isometric line drawing of a refrigerator with doors and front-mounted appliances (no text or symbols)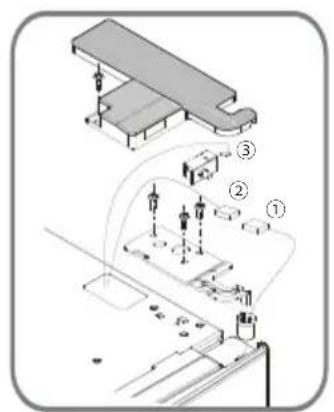
natural_image
Diagram showing a 3D model of a cube being processed into a 2D model, with a close-up view of the final component (no text or symbols present)9. Nainštalujte rukovät'
POUŽITIE
Dotykové tlačidlá:
natural_image
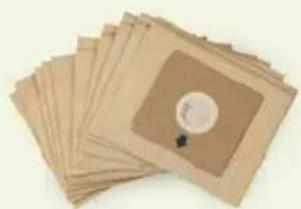
Symbol of a trash bin crossed with two crossed lines, no text or numbers presentLooking for extra accessories or you have a broken piece?
ORDER the original DOMO accessories and parts on our webshop.
Webshop

natural_image
Stack of sheets of paper with a circular inset showing a small object, no visible text or symbols
natural_image
Two white plastic electrical connectors with mounting holes (no text or symbols visible)
natural_image
White rectangular container with black interior, no visible text or symbols
natural_image
Clear glass coffee maker with black handle and lid (no text or symbols visible)
- INSTALLATIE
- AVANT LA PREMIÈRE UTILISATION
- CHANGEMENT DU SENS D'OUVERTURE DE LA PORTE
- ALARM BEI OFFENER TÜR
- SAFETY INSTRUCTIONS
- ▲ELECTRICAL WARNINGS
- ⚠️INSTALLATION
- ⚠ USE
- ⚠ CLEANING AND MAINTENANCE
- SAVE THESE INSTRUCTIONS FOR FUTURE REFERENCE
- PARTS
- INSTALLATION
- DOOR CONVERSION
- USE
- CONTROL PANEL
- Touch screen buttons
- Display
- COOLING/FREEZING
- TEMPERATURE CONTROL
- SUPERCOOLING
- SUPER-FREEZING
- OPEN DOOR ALARM
- STORAGE GUIDE
- MOVING YOUR APPLIANCE
- FREEZING AND STORING FOOD IN THE FREEZER
- Use the freezer
- Purchasing frozen food
- Freezing fresh food
- Packing frozen food
- Recommended storage times of frozen food in the freezer
- Never forget:
- VACATION
- POWER FAILURE
- SOME IMPORTANT RULES FOR THE CORRECT USE OF THE REFRIGERATOR
- CLEANING AND MAINTENANCE
- DEFROSTING THE FREEZER
- GUIDELINES
- GARANTIA
- INSTALACIÓN
- USO
- PANEL DE CONTROL
- INVERSIONE DELL'APERTURA DELLO SPORTELLO
- PŘEHOZENÍ PANTŮ DVERÍ
- POUŽITÍ
- Dotyková tlačítka:
- MANIPULACE S PŘÍSTROJEM
- PREHODENIE PÁNTOV DVERÍ
- Nainštalujte rukovät'
- POUŽITIE
- Dotykové tlačidlá:
Brand : DOMO
Model : DO91205F
Category : Freezer