Bolero CoolMarket Combi 356 E - Fridge CECOTEC - Free user manual and instructions
Find the device manual for free Bolero CoolMarket Combi 356 E CECOTEC in PDF.

User questions about Bolero CoolMarket Combi 356 E CECOTEC
0 question about this device. Answer the ones you know or ask your own.
Ask a new question about this device
Download the instructions for your Fridge in PDF format for free! Find your manual Bolero CoolMarket Combi 356 E - CECOTEC and take your electronic device back in hand. On this page are published all the documents necessary for the use of your device. Bolero CoolMarket Combi 356 E by CECOTEC.
USER MANUAL Bolero CoolMarket Combi 356 E CECOTEC
natural_image
Exterior view of a modern white refrigerator with two doors (no text or symbols visible)
natural_image
Exterior view of a modern white refrigerator with a single door and side panel (no visible text or symbols)
natural_image
Exterior view of a modern stainless steel refrigerator (no visible text or symbols)
natural_image
Exterior view of a modern refrigerator with front panels and side door (no signage or text visible)
natural_image
Exterior view of a modern refrigerator with black and white panels (no text or symbols visible)
natural_image
White refrigerator with two doors, no visible text or symbolsbolero
Safety instructions 11
-
Parts and components 83
-
Before use 83
-
Installation 84
-
Operation 88
-
Instructions on food storage 92
-
Cleaning and maintenance 94
-
Troubleshooting 95
-
Technical specifications 96
-
Disposal of old electrical and electronic appliances 97
-
Technical support and warranty 97
-
Copyright 98
SOMMAIRE
Read these instructions thoroughly before using the appliance. Keep this instruction manual for future reference or new users.
- It is important to make sure all users are familiar with the operation and safety features of the appliance to prevent faults and unnecessary accidents.
- Make sure that the mains voltage in your house matches the voltage stated on the rating label of the appliance.
- This appliance can be used by children aged 8 years and above and people with reduced physical, sensory, or mental capabilities or lack of experience and knowledge if they have been given supervision or instruction concerning use of the appliance in a safe way and understand the hazards involved. Children must not play with the appliance. Cleaning and user maintenance should not be carried out by unsupervised children.
- Do not store explosive substances such as aerosol cans with flammable propellant in this appliance.
- This device is designed for domestic use only and is not intended for bars, restaurants, farmhouses, hotels, motels, and offices.
- To avoid food contamination, please follow the instructions below:
- Opening the door for a long period of time may cause a significant increase in temperature in the appliance's compartments.
- Regularly clean food contact surfaces and accessible drainage systems.
- If the freezer appliance remains empty for a long period of time, unplug it, defrost it, clean it, dry it, and leave the door open to prevent interior mould formation.
- WARNING: when positioning the appliance, make sure the power cable does not get trapped or damaged. A crushed or damaged connector may heat up and cause a fire.
- Make sure the appliance plug is accessible after installation.
- WARNING: do not attach multi-socket adaptors or multiple power supplies to the rear part of the appliance.
- WARNING: keep the ventilation grilles on the enclosure of the appliance or the cabinet in which the appliance is located clear.
- WARNING: do not use mechanical appliances or other means to accelerate the defrosting process other than those recommended by Cecotec.
- WARNING: do not use electrical appliances inside the refrigerator.
- WARNING: do not damage the refrigeration circuit.
- If the cable is damaged, it must be replaced by the manufacturer, the supplier, or qualified personnel to avoid hazards.
- We recommend you check the power cable regularly to detect any sign of possible damage. Do not use the appliance if the cable is damaged.
- WARNING: to avoid any risk due to the instability of the refrigerator, you must install it according to the instructions.
- WARNING! It is dangerous for anyone other than authorised personnel to carry out maintenance or repairs involving the removal of covers. To prevent the electric shock risk do not attempt to repair the appliance yourself.
- Do not place carbonated beverages in the freezer compartment. Ice cream can cause "freezer burns". This can happen if they are ingested after removal from the freezer.
- Do not remove items from the freezer with wet/moist hands, as this may cause skin abrasions or "frostbites". Bottles and
cans should not be placed in the freezer, as they may burst when their contents freeze.
- Frozen food can cause ice burns if consumed right after removing it from the freezer compartment.
- See the storage times recommended by the manufacturer.
- Do not allow children to play with the controls or the freezer. The appliance is a heavy appliance. Caution must be taken when moving the appliance. It is dangerous to alter specifications or attempt to modify this appliance in any way.
- WARNING: doors or covers fitted with locks and keys must be kept out of the reach of children and not in the vicinity of the freezing appliance to prevent children from being locked inside.
- WARNING: the refrigerant used in your appliance and the insulation materials must be disposed of correctly.
- Keep the packaging material away from children, as there is a risk of suffocation.
- WARNING: if the interior light is damaged, contact the official Cecotec Technical Support Service. Do not try to repair it on your own.
- Make sure the appliance plug is accessible after installation.
- Do not place food directly against the air outlet on the interior of the appliance.
- Do not place hot food or drinks in the refrigerator, allow them to cool down to room temperature beforehand.
- This appliance has a built-in earthed plug. Make sure the power supply in your house is properly earthed.
- Keep the ventilation openings clear from obstructions.
- Wait 5 minutes after a power failure before turning the appliance back on. Otherwise, the compressor may get damaged.
- Do not place carbonated or fizzy drinks in the freezer compartment, as this creates pressure in the container, which could explode and damage the appliance.
- To avoid injuries or death caused by electric shock, do not use the appliance with your hands wet or over a wet surface.
- You should never use this refrigerator with an extension lead or a multi-socket adaptor. Make sure the appliance is plugged in directly to a power supply.
- When positioning the appliance, make sure there is enough free space at the rear, as it is the main heat outlet. This will allow for adequate ventilation.
- Do not place any other appliance on the refrigerator and do not wet it.
- This appliance is not intended to be operated by means of an external timer or separate remote-control system.
- It is advisable to wait for at least four hours before connecting the appliance to allow oil to flow through the compressor.
- Do not use the appliance outdoors or in damp environments.
- Always handle the appliance carefully to avoid any damage on it.
- Never use the base, drawers, or door as support.
- Do not overload the door shelves or place too much food on the drawers to prevent items from falling off and damaging the appliance.
- Store raw meat and fish in proper containers in the freezer, so they do not come into contact with or leak on other food.
- The two-star compartments are suitable for storing pre-frozen food, storing, or making ice cream, and making ice cubes.
- Compartments with one, two, or three stars are not suitable for freezing fresh food.
- Air must flow around the appliance. Lack of air leads
to overheating. To achieve good ventilation, follow the installation instructions.
- Make sure the power cord is accessible after installation.
- All electrical work required to maintain this appliance must be carried out by a qualified electrician.
Temperature range
- The appliance temperature range information can be found on its marking. Indicates the optimum room temperature for proper operation of the appliance.
| Climate range O | Optimum room temperature |
| SN From +10 °C to +32 °C | |
| N From +16 °C to +32 °C | |
| ST From +16 °C to +38 °C | |
| T From +16 °C to +43 °C | |
WARNING: if the refrigerator is operated outside the climate class for which it is rated (SN/N/ST/T), it may not be able to maintain satisfactory internal temperatures.
Note:
- Bearing in mind the limiting values of the room temperature range for the climates for which the cooling appliance is designed and that internal temperatures may be affected by factors such as the location of the cooling appliance, room temperature and frequency of door opening, it may be necessary to modify the setting of any temperature-control device according to these factors.
- If the appliance is operated in an environment other than the specified climate type (i.e. beyond the rated ambient temperature range), it may not be able to maintain the desired compartment temperatures.
Cooling
- This refrigerator uses freon-free refrigerant (R600a) and foaming insulation material (cyclopentane), which are environmentally friendly, do not cause damage to the ozone layer, and have a very low impact on global warming. R600a is flammable and does not leak during normal use when sealed in a refrigeration system. In the event of refrigerant leakage due to damage to the refrigerant circuit, be sure to keep the appliance away from open flames and open the windows to ventilate as soon as possible.
- WARNING: the refrigerant and the insulator gas are flammable. When disposing of the appliance, only dispose of it at an authorised waste-disposal facility. Do not expose it to flames.
- WARNING: the appliance contains refrigerant and gases in the insulation. The appliance and gases must be disposed of professionally, as they may cause injuries to eyes or ignition. Make sure the refrigeration-circuit pipe is not damaged before disposing of it correctly.
- This symbol means: Warning: Risk of fire/flammable materials
- If the refrigeration circuit is damaged:
- Avoid open flames and sources of ignition.
- Completely air the room where the appliance is located.
INSTRUCTIONS DE SÉCURITÉ
- Refrigerator compartment shelves
- Drawer cover
- Crisper drawer
- Freezer compartment drawers
- Adjustable feet
- Door shelves
Note:
The graphics in this manual are schematic representations and may not exactly match the appliance.
2. BEFORE USE
- This appliance is packaged in a way as to protect it during transport. Take the appliance out of its box and remove all packaging materials. You can keep the original box and other packaging elements in a safe place. This will help you prevent damage to the appliance when transporting it in the future. In case the original packaging is disposed of, make sure all packaging materials are recycled accordingly.
- Make sure all parts and components are included and in good conditions. If there is any piece missing or in bad conditions, contact the official Cecotec Technical Support Service immediately.
Box content
- Refrigerator
- Instruction manual
Levelling
- Make sure you level your refrigerator with the front levelling feet. If it is not levelled, the refrigerator performance will be affected, or it can even cause a malfunction.
- After installing the refrigerator, wait 4 hours before using it to allow the refrigerant to stabilise.
ENGLISH
3. INSTALLATION
Place of installation
Ventilation condition
The location you choose for the installation of the refrigerator must be properly ventilated and away from heat sources. Do not place the refrigerator near heat sources, like a cooker or pot, and avoid direct sunlight to ensure the cooling effect and save on energy consumption. Do not place the refrigerator in a damp place to avoid rust or loss of power. The result of dividing the total space of the room in which the refrigerator is installed by the amount of refrigerant load in the refrigerator must not be less than 8 g/m^3 .
Note:
The amount of refrigerant used by the refrigerator is specified on the rating plate.
Heat dissipation space
During operation, the refrigerator releases heat into the environment. Therefore, you should leave at least 30 mm of free space at the top chamber, more than 100 mm on both sides, and more than 50 mm at the rear of the refrigerator. Fig. 2
| W (mm) | D (mm) | H (mm) | A (mm) | B (mm) | C (°) | E (mm) | F (mm) |
| 595 635 2 | 000 966 12 | 02 130 50 | 100 |
Note:
Figure 2 only illustrates the space required for the appliance.
Stable surface
Place the refrigerator on a solid, flat surface (the floor) to keep it stable, otherwise vibrations and noises will occur. When the refrigerator is placed on a carpet, straw mat, or polyvinyl chloride, solid support plates should be placed under the refrigerator to avoid colour change due to heat dissipation.
Preparing for use
Waiting time
Once the refrigerator is properly installed and cleaned, do not switch it on immediately. Be sure to wait at least one hour before switching the refrigerator on to ensure normal operation.
Cleaning
Check the placement of the interior accessory parts and clean the inside of the refrigerator with a soft cloth.
Switch on
Connect the plug into a power socket to switch on the compressor. After one hour, open the freezer door: if the temperature inside the freezer compartment has dropped, the cooling system is running normally.
Food storage
- After the refrigerator has been in operation for some time, the user may adjust its internal temperature. Once the refrigerator has reached a suitable interior temperature, put in the food. These will take 2 to 3 hours to cool down completely. In summer, when the temperature is high, it may take more than 4 hours for food to cool down completely (try to open the refrigerator door as rarely as possible).
- If the refrigerator is installed in a wet place, be sure to check if the earth wire and the leakage circuit breaker are working normally. If vibration noises occur due to contact of the refrigerator with the wall or if the wall turns black due to air convection around the compressor, keep the refrigerator further away from the wall. The installation of the refrigerator may cause noise interference or image problems in mobile phones, landline phones, radio receivers, or TVs near the appliance, so in this case, keep the latter as far away from these objects as possible.
Changing the opening direction of the door
If desired, you can change the direction in which the door opens, from the right side (by default) to the left side.
Warnings:
- The refrigerator must not be connected to the power socket when you change the opening direction of the door. Make sure to disconnect the plug from the power socket.
- It is advisable that two people change the opening direction of the door.
If the appliance is turned upside down or on its side during this process, it should be left in an upright position for 6 hours before plugging it in to prevent damage to the internal components.
- Make sure the refrigerator is unplugged.
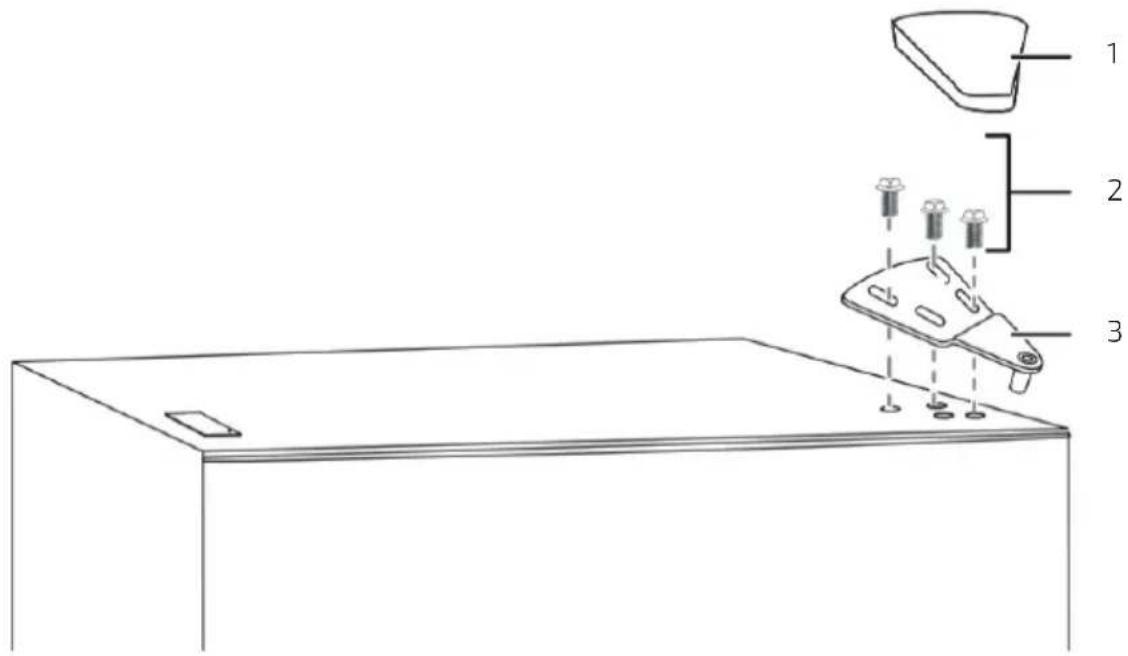
- Remove the screw that secures the right hinge (if present), pry up and remove the top hinge cover, remove the screws that attach the top hinge to the door, remove the cable terminal that connects the door and the refrigerator body (this step is only suitable for models with external display) and then remove the hinge. Fig. 3
Fig. 3 key:
- Hinge cover
- Screws
- Top hinge
ENGLISH
- Remove the refrigerator-compartment door from the refrigerator body.
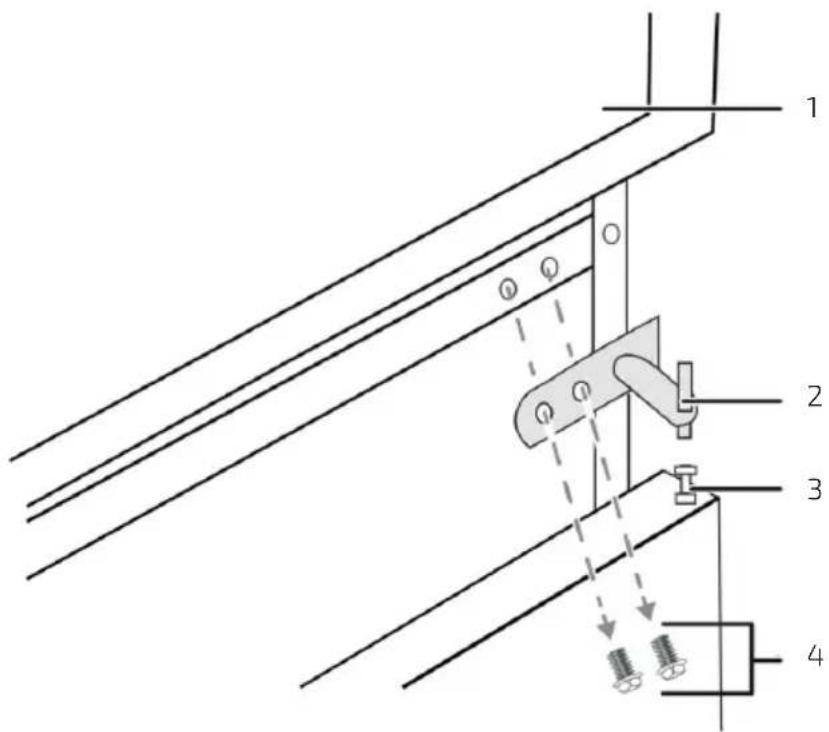
- Remove the screws securing the centre hinge and remove it. Fig. 4
Fig. 4 key:
- Refrigerator compartment door
- Centre hinge
- Door bushing
-
Screws
-
Remove the freezer-compartment door.
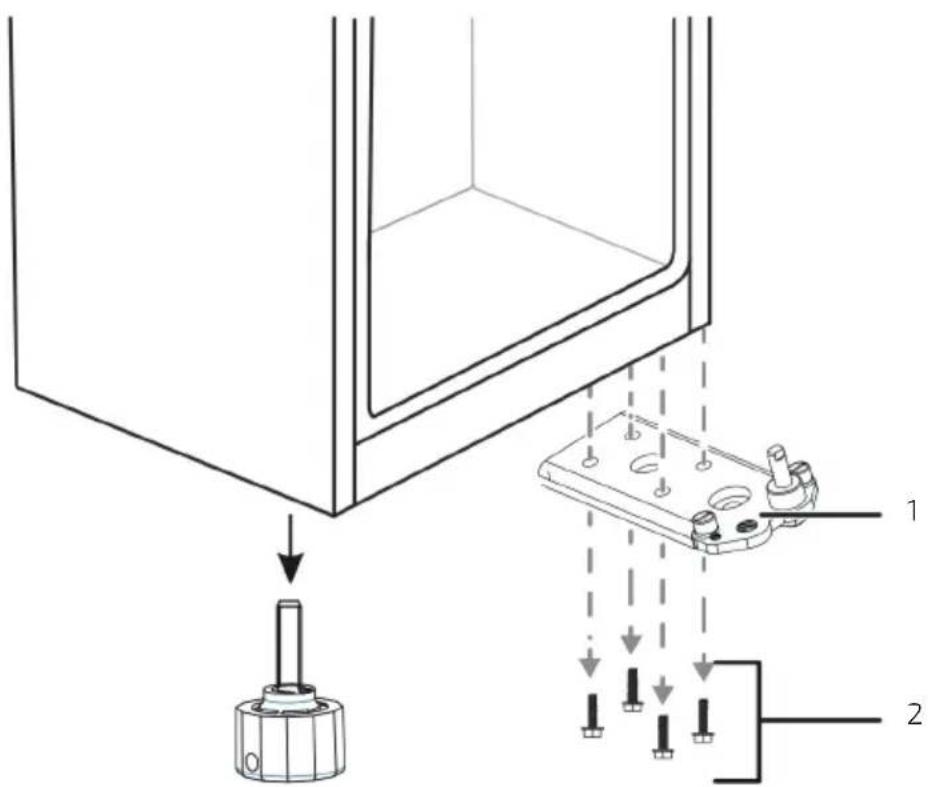
- Remove the screws securing the bottom hinge from the bottom right side and remove the hinge. Then, remove the adjustable foot from the left side of the refrigerator. Fig. 5
Fig. 5 key:
- Bottom hinge
-
Screws
-
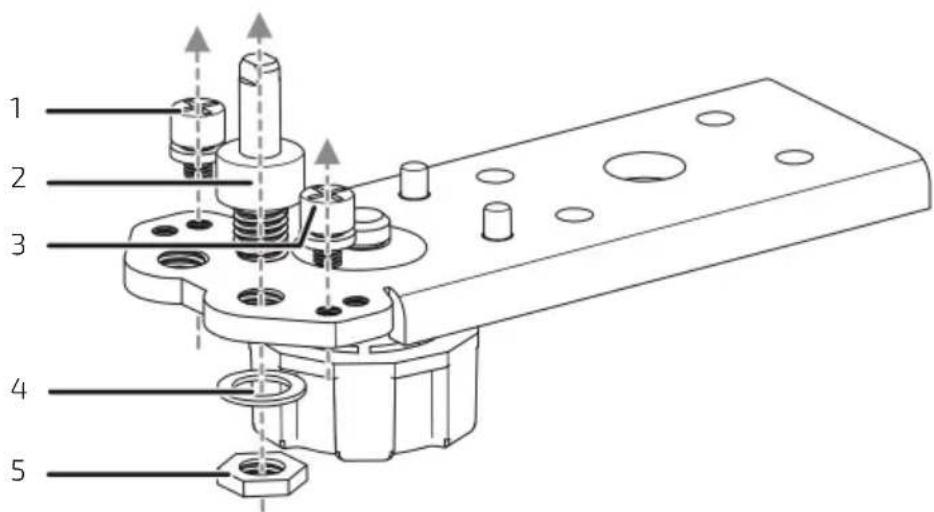
Remove the washer and nut fixing the pin screw to the right side hole of the bottom hinge. Next, remove the pin screw and the two pin shafts from the bottom hinge. Fig. 6.
Fig. 6 key:
- Pin shaft
- Pin screw
- Pin shaft
- Washer
-
Nut
-
Install the pin screw in the left side hole and insert the pin shafts into the adjacent holes. After that, secure the pin screw using the washer and nut.
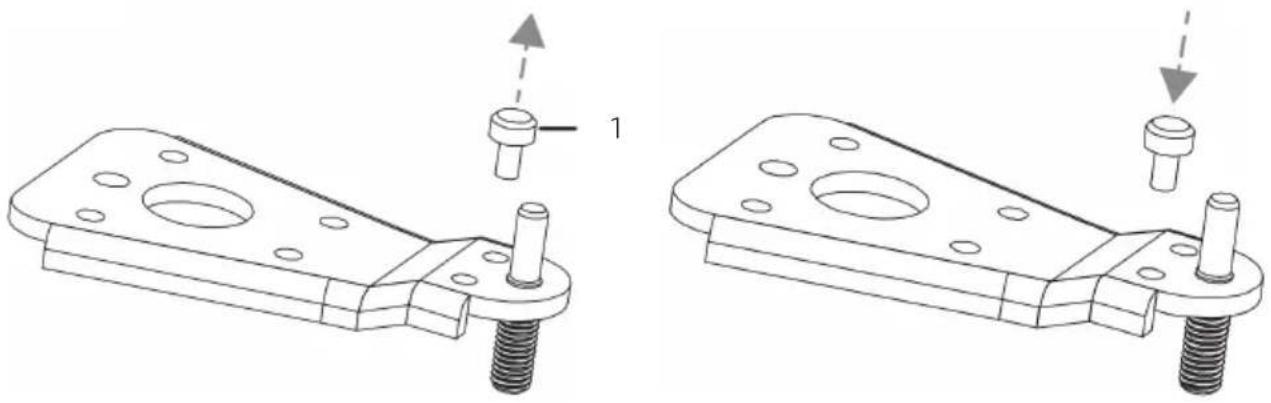
NOTE: if your model uses bottom hinges, refer to the following steps:
- Remove the pin shaft from the right side hole of the bottom hinge. Fig. 7
Fig. 7 key:
-
Pin shaft
-
Insert the pin shaft into the left side hole of the bottom hinge. Fig. 8
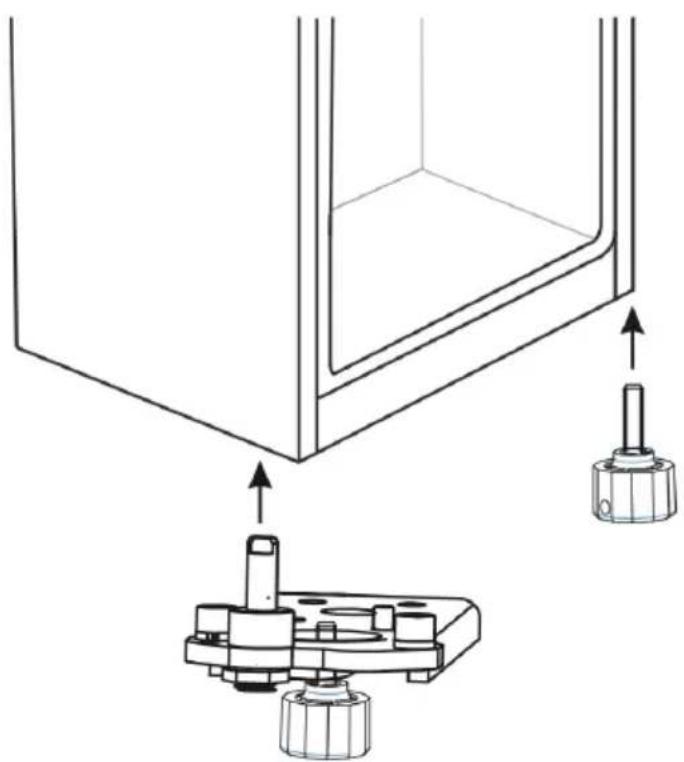
- Install the bottom hinge on the left side of the refrigerator body and install the adjustable foot on the right side of the refrigerator body. Fig. 9
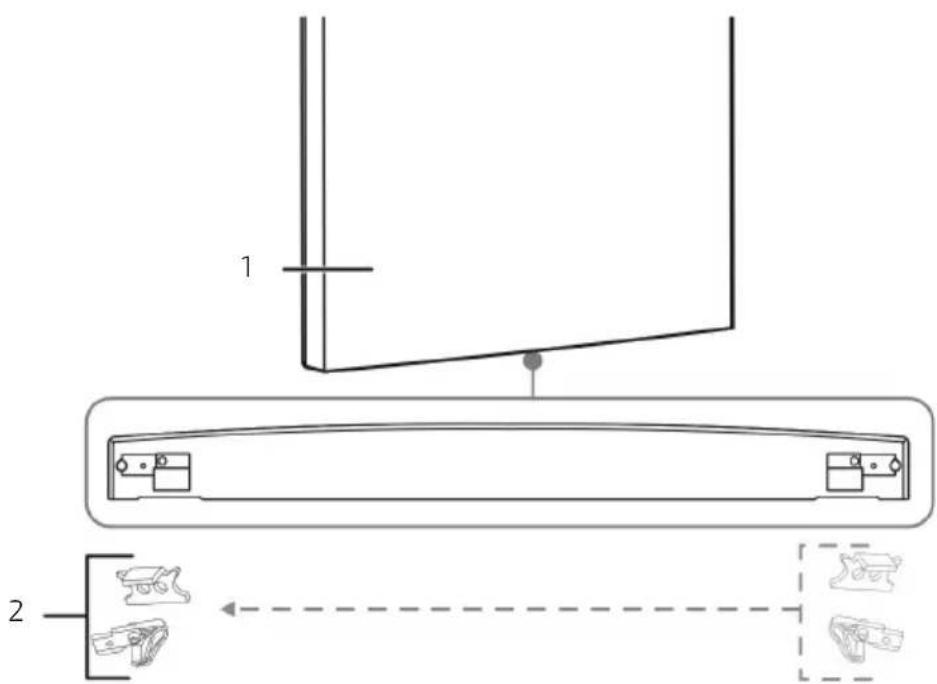
- Remove the screw securing the door stops on the bottom right side of the freezer-compartment door, then remove the door stops and install them on the bottom left side. Fig. 10
Fig. 10 key:
- Freezer compartment door
- Door stops
NOTE: some models use this type of door stops, please reverse them using the same method. Fig. 11
- Install the freezer-compartment door.
- Remove the cover from the door bushing hole in the top left side of the freezer door, then move the door bushing from the top right side of the door to the top left side of the door. Install the hole cover into the bushing hole at the top right side of the door. Fig. 12
Fig. 12 key:
- Door bushing
- Bushing hole cover
-
Freezer compartment door
-
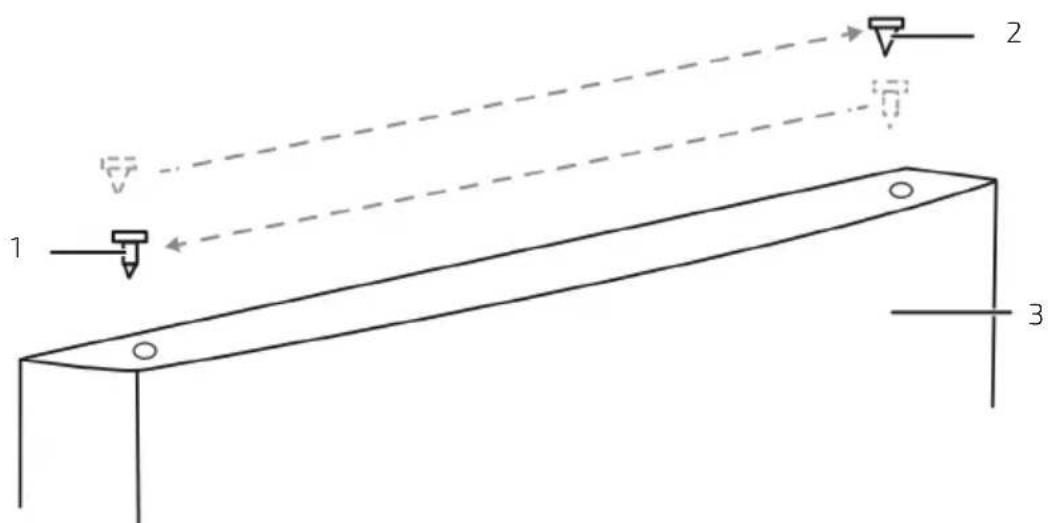
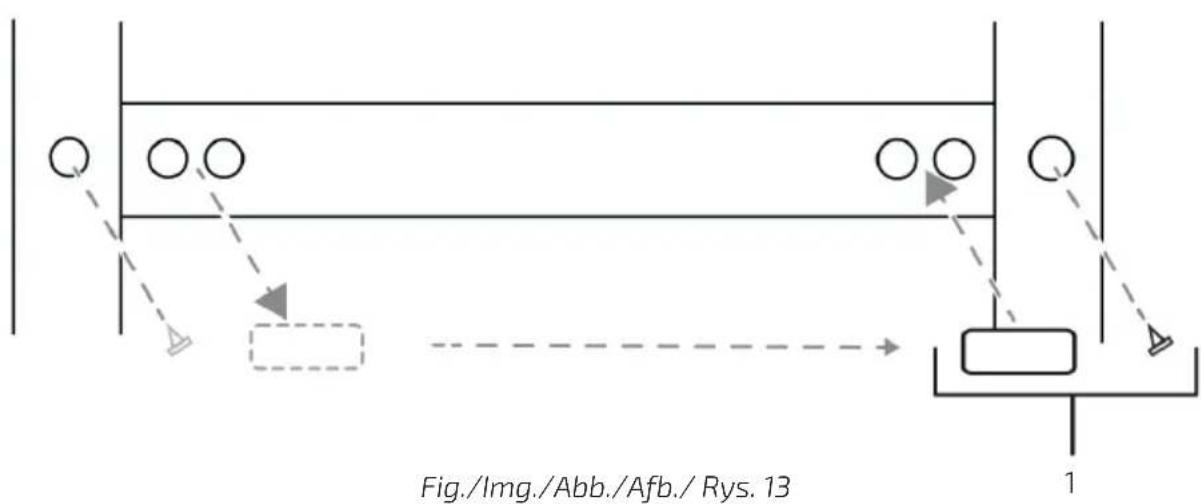
Remove the plugs from the screw holes of the centre hinges on the left side of the refrigerator body and install the plugs in the screw holes on the right side of the refrigerator body. Fig. 13
Fig. 13 key:
-
Plugs
-
Install the centre hinge on the left side with the two screws previously removed. Fig. 14
Fig. 14 key:
- Centre hinge spacer
- Centre hinge
- Door bushing
-
Screws
-
Remove the screw securing the door stops from the bottom of the refrigerator door, then remove the door stops and install them on the bottom left side. Fig. 15
Fig. 15 key:
- Refrigerator-compartment door
- Door stops
NOTE: some models use this type of door stops, please reverse them using the same method. Fig. 16
- Install the refrigerator-compartment door.
- Remove the cover from the door bushing hole at the top left of the refrigerator compartment door and move the door bushing from the top right side of the door to the top left side of the door. Fig. 17
ENGLISH
Fig. 17 key:
- Door bushing
- Bushing hole cover
-
Refrigerator compartment door
-
Remove the hinge screw hole cover from the top left side of the refrigerator body and install it on the top right side of it. Fig. 18
Fig. 18 key:
-
Hinge screw hole cover
-
Remove the cable terminal from the top left side of the refrigerator compartment door, connect the cable terminal to the refrigerator body on the left side (only suitable for models with external display). Attach the top hinge to the top left side of the refrigerator body with the screws you removed earlier. Before tightening the top hinge screws, make sure that the top of the door is level with the refrigerator and that the rubber gasket makes a good seal.
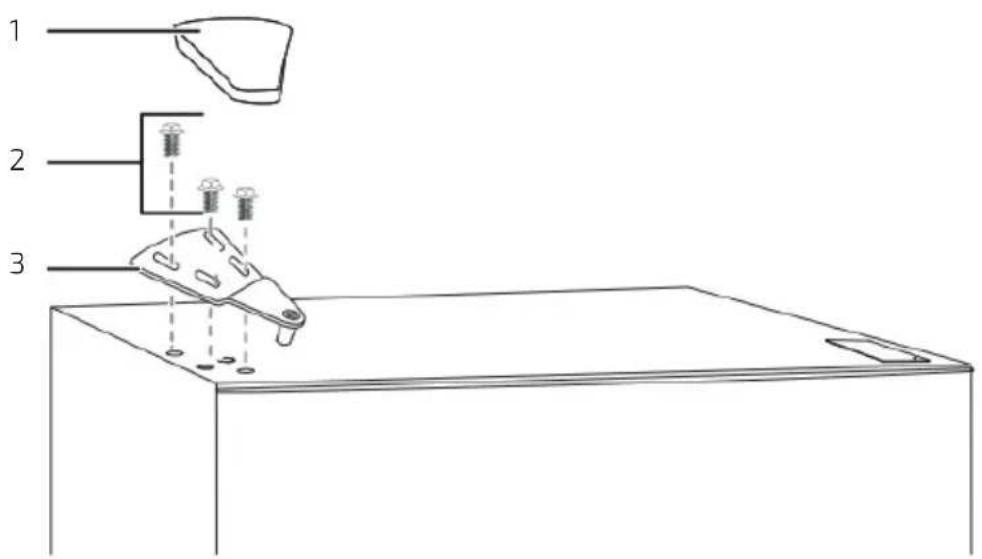
- Place the cover on top of the hinge on the top left side of the refrigerator. Fig. 19
Fig. 19 key:
- Hinge cover
- Screws
- Top hinge
4. OPERATION
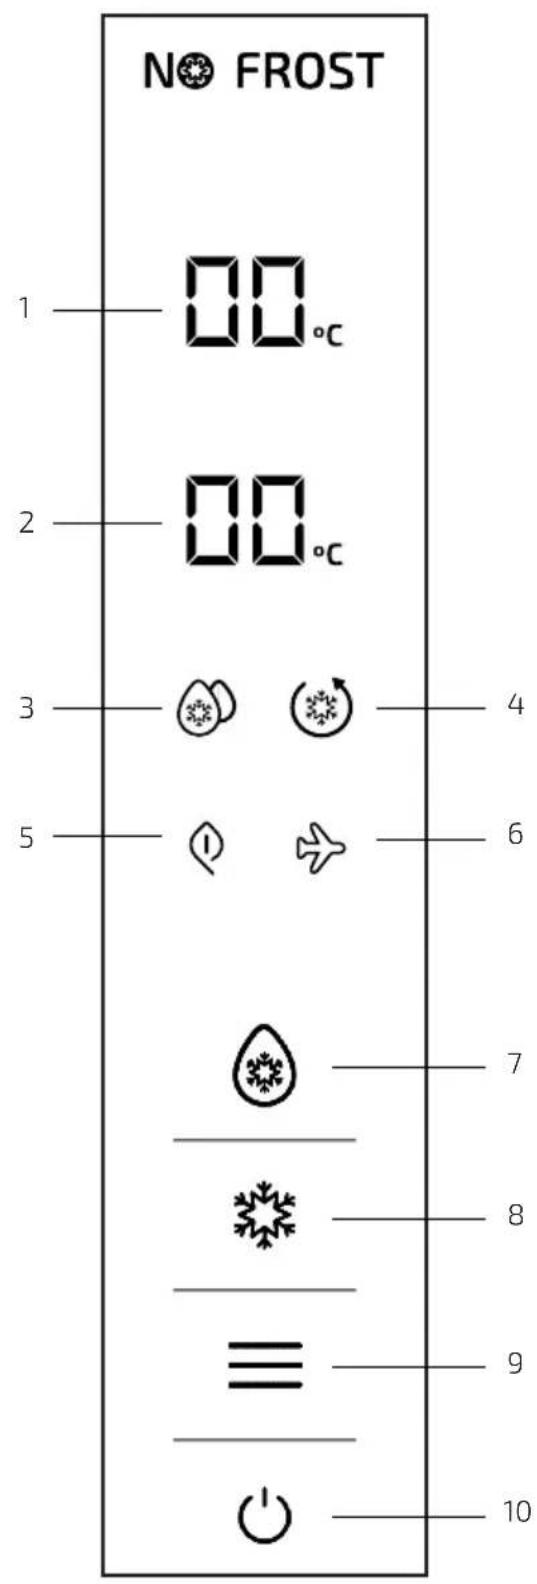
The display panel is located on the refrigerator door, as shown in the figure below.
Fig. 20
- Refrigerator-compartment temperature indicator light
- Freezer-compartment temperature indicator light
- Fast cooling indicator light
- Fast freezing indicator light
- Smart (ECO mode) indicator light
- Holiday indicator light
- Refrigerator icon
- Freezer icon
- Function icon
- OK icon
- When connecting the refrigerator to the mains for the first time, all indicator lights on the display light up for 2 seconds.
- When all doors are closed, the display will automatically switch off if no icon is pressed within 3 minutes (approx.).
- If the display is off, it will light up upon opening a door or pressing an icon.
The following functions can be performed when icons are unlocked and light up on the display.
Temperature settings
- Setting the refrigerator compartment temperature
- Press the Refrigerator icon for the refrigerator temperature digits to start flashing and press it again to set the temperature, then press OK to confirm the temperature setting.
- The refrigerator temperature setting functions are as follows:
5^ 6^ 7^ 8^ OFF 2^ 3^ 4^ 5^.
- OFF refers to switching off the refrigerator. When this function is activated, the refrigerator will stop cooling.
- Setting the freezer compartment temperature
- Press the Freezer icon until the freezer temperature digits start flashing. Press it again to set the temperature and finally press OK to confirm the temperature setting.
- The freezing temperature setting cycles are as follows:
-18 °C → -17 °C → -16 °C → -24 °C → -23 °C → -22 °C → -21 °C → -20 °C → -19 °C → -18 °C
Smart function (ECO mode)
- When you activate the Smart function, the temperature in the refrigerator compartment will be set to 4 °C and the freezer-compartment temperature will be set to -18 °C, so that food will be preserved in the best possible conditions and the refrigerator will operate as efficiently as possible.
- With the Smart function active, you cannot modify the temperature of any compartment.
- Activating the Smart function
- Press the Function icon until the corresponding indicator light starts flashing; then, press the OK icon within the next 5 seconds to confirm your choice. If you do not press the OK icon within the next 5 seconds, the function will not be activated.
- Deactivating the Smart function
- With the Smart function activated, press the Function icon until the Smart indicator light (ECO mode) starts flashing; then, press the OK icon for 5 seconds to confirm your choice. The Smart function will be deactivated.
- If you activate the Holiday, Fast freezing, or Fast cooling function, the Smart function deactivates automatically.
Fast cooling
- When this function is activated, the refrigerator temperature is automatically set to 2 ^ , lowering the temperature quickly to preserve the freshness and nutritional properties of food.
ENGLISH
- If the Fast cooling function is activated, the refrigerator-compartment temperature cannot be adjusted.
- Activating the Fast cooling function
- Press the Function icon until the corresponding indicator light starts flashing, then press the OK icon within the next 5 seconds to confirm your choice. If you do not press the OK icon within the next 5 seconds, the function will not be activated.
- Deactivating the Fast cooling function
- With the Fast cooling function active, press the Function icon until the Fast cooling indicator light starts flashing, then press the OK icon for 5 seconds to confirm your choice. The Fast cooling function will be deactivated.
- If you activate the Holiday, or Smart (ECO mode) function, the Fast cooling function deactivates automatically.
Fast freezing
- When you activate the Fast freezing function, the freezer-compartment temperature will drop to -32^ automatically, and will deactivate after 26 hours of operation. The Fast freezing function is used to prevent loss of nutritional quality and to preserve food freshness.
- If the Fast freezing function is activated, the freezer compartment temperature cannot be adjusted.
- Activating the Fast freezing function
- Press the Function icon until the corresponding indicator light starts flashing, then press the OK icon within the next 5 seconds to confirm your choice. If you do not press the OK icon within the next 5 seconds, the function will not be activated.
- Deactivating the Fast freezing function
- After 26 hours of operation, the Fast freezing function will deactivate automatically.
- With the Fast freezing function active, press the Function icon until the Fast freezing indicator light starts flashing, then press the OK icon to confirm and deactivate the Fast freezing function.
- If you activate the Smart function, the Fast freezing function deactivates automatically.
Holiday
- When you activate the Holiday function, the refrigerator-compartment temperature is set to 14 °C.
- When you are away for an extended period of time, you can activate the Holiday function to keep the refrigerator compartment running on low energy consumption, while preventing undesirable odours and ensuring a correct operation of the freezer compartment.
- Make sure you remove all the food from the refrigerator compartment before activating this function.
- If the Holiday function is active, the refrigerator-compartment temperature cannot be adjusted.
- Activating the Holiday function
- Press the Function icon until the corresponding indicator light starts flashing, then press the OK icon within the next 5 seconds to confirm your choice. If you do not press the OK icon within the next 5 seconds, the function will not be activated.
- Deactivating the Holiday function
- With the Holiday function activated, press the Function icon until the Holiday indicator light starts flashing, then press the OK icon within 5 seconds to confirm your choice. The Holiday function will deactivate.
- If you activate the Smart or Fast cooling function, the Holiday function deactivates automatically.
Function memory after power failure
In the event of a power failure, the refrigerator will save the functions set before the power failure and will activate them when the power is restored.
Delay start after power failure
To prevent damage to the refrigerator compressor in the event of a short power failure (i.e. less than 5 minutes), the compressor will not start immediately after switch-on.
Overheating warning (only after a power failure)
When the refrigerator cooling system is on, if the freezer-compartment temperature is above -10 ^ , the freezer-compartment temperature digits will flash on the display. The display will show the freezer-compartment temperature when you press any icon, and it will return to its usual state when you press any icon again or after 10 seconds.
Open door alarm
If the door stays open for more than 3 minutes, the refrigerator will emit an alarm sound, which can be shut off by pressing any key, but will sound again if the door is still open 3 minutes later. The alarm sound will not stop until the door is closed.
Fault alarm
If the display shows E0, E1, E2, EH, or EC, it means there's a fault in the refrigerator. Contact the official Cecotec Technical Support Service.
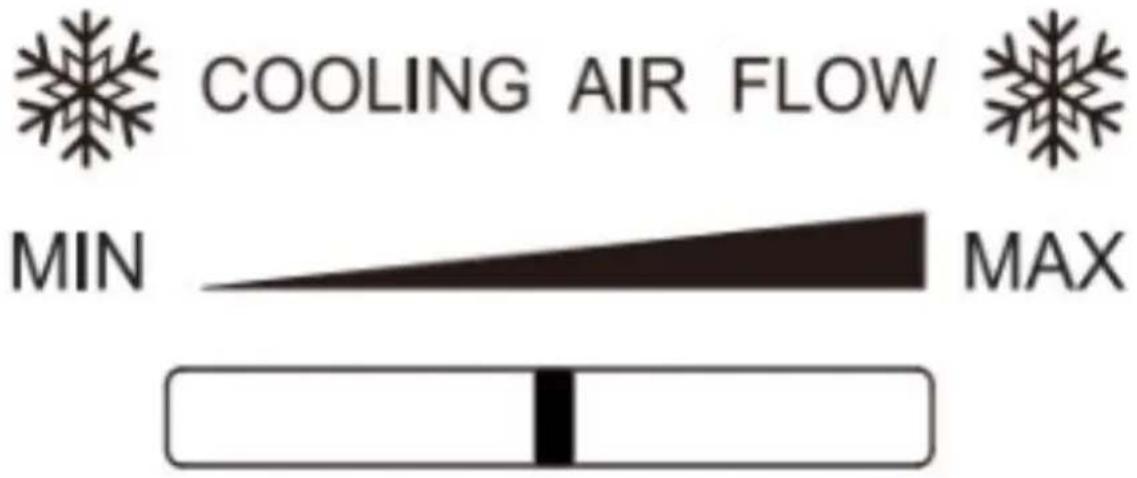
Adjusting the refrigerator air (humidity) regulator
The cold air entering the fresh-food storage compartment will gradually increase as the air regulator is adjusted from the MIN. to the MAX. position.
Fig. 21
ENGLISH
5. INSTRUCTIONS ON FOOD STORAGE
Use precautions
- The refrigerator may not operate consistently (there may be some defrosting of the contents, or the temperature may become too hot in the freezer compartment) if placed in locations with a temperature outside of the temperature range for which it's designed for a long period of time.
- The internal temperature may be affected by factors such as the location of the refrigerator room temperature, and door opening frequency, etc., and you should take these factors into account if you decide to use any temperature-control device.
- Effervescent or carbonated drinks should not be stored in the freezer compartment or drawer of the refrigerator.
Food location
- Due to the circulation of cold air in the refrigerator, the temperature in each zone is different, so food must be placed in different zones.
- The refrigerator compartment is suitable to store food that does not need to be frozen, cooked food, beer, eggs, some seasonings that need to be kept cold, milk, fruit juice, etc. The crisper drawer is the best place to store fruit and vegetables.
- The freezer compartment is suitable to store ice cream, frozen foods, and foods that need to be kept for a long time.
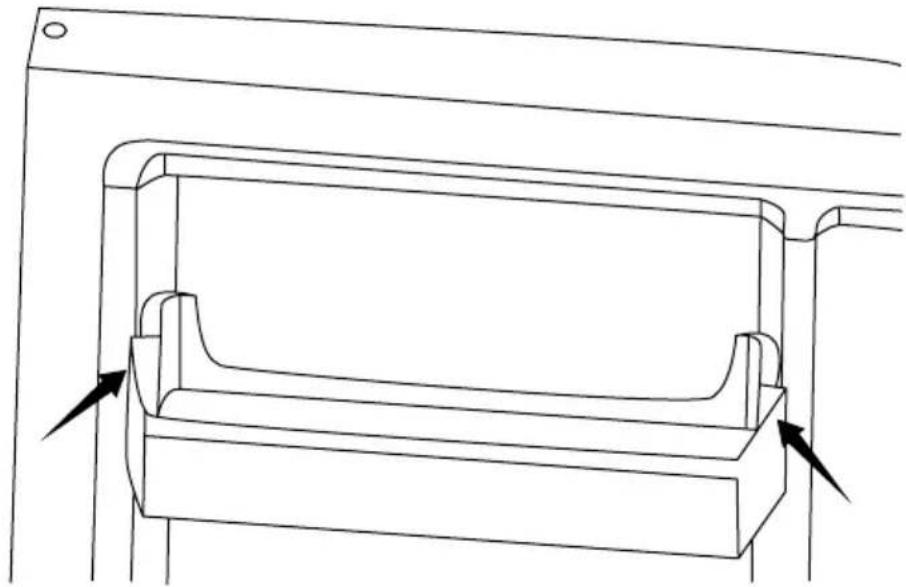
Using the refrigerator compartment (Crisper Box/Humidity Box)
- Shelves: To remove the shelves, first lift them up and then pull them out; to put them back, put them into their position before lowering them. (For the two-section shelf, push the first section towards the rear end and pull the second section out). Keep the rear edge of the shelf facing upwards to prevent food from coming into contact with the wall. When removing and fitting shelves, hold them firmly and handle them carefully to avoid damage.
- Crisper drawer: Pull out the crisper drawer to access the food. After using or cleaning the bottom shelf of the refrigerator (the drawer cover), put it back in place so that the internal temperature of the drawer is not affected.
Humidity control of the drawer
- The humidity regulator of the drawer is designed to keep moisture steady and the vegetable freshness.
- If you slide the humidity regulator to the right, more gaps will be exposed, and the drawer will have a lower humidity level.
- If you slide the humidity regulator to the left, less gaps will be exposed, and the drawer will have a higher humidity level.
Using the ice cube tray
Place the ice cube tray in the upper part of the freezer compartment so that it freezes as quickly as possible.
Care for food storage
- Clean and dry food completely before storing it in the refrigerator. Before introducing food in the refrigerator, it is advisable to seal it to prevent water evaporation and thus keep fruit and vegetables fresh on the one hand, and to prevent odours on the other.
- Leave enough space between the food; if they are too close together, they will block the flow of cold air, which will affect the cooling effect. Do not store too much or too heavy food to prevent the shelves from bending. When storing food, leave a distance from the interior wall; do not place water-rich food too close to the inner wall of the refrigerator to prevent it from freezing on the interior wall.
- Food storage by category: place daily food items at the front of the shelf so that you can reduce the door opening time and avoid food spoilage due to expiry.
- Energy saving tips: let hot food cool down to room temperature before putting it in the refrigerator. Place frozen food in the refrigerator compartment to defrost it.
Storing fruits and vegetables
Please note that some types of fresh vegetables and fruits are sensitive to cold and therefore not suitable for storage in the refrigerator crisper drawer.
Using the freezer compartment
- The freezer-compartment temperature is kept at -18^ , so it is advisable to store food that you wish to keep for a long period of time in the freezer compartment, always respecting the storage time indicated on the food packaging.
- The freezer-compartment drawers are suitable to store food which needs to be frozen. Large fish and meat should be cut into small pieces and placed in freezer bags before placing them in the freezer-compartment drawers.
- Let hot food cool down to room temperature before putting it in the freezer compartment.
- Do not place a glass container with liquid or sealed canned liquid in the freezer compartment to prevent them from exploding due to volume expansion after freezing the liquid.
- Divide food into small portions.
- Food should be packed or covered with suitable materials that are firm, tasteless, impermeable to air and water, non-toxic, and non-polluting to avoid cross-contamination and odour transfer.
ENGLISH
6. CLEANING AND MAINTENANCE
If the refrigerator will not be used for a long period of time:
- Turn off the refrigerator and unplug it from the power supply.
- Remove all the food.
- Clean and dry the interior completely. To prevent mould or unpleasant odours, leave the door slightly open: lock it open or remove it if necessary.
- Store the appliance in a ventilated and dry place, away from heat sources; place the appliance carefully and do not place heavy objects on it.
- The unit must be kept out of the reach of children to prevent them from playing with it.
- Before cleaning, disconnect the power plug; do not connect or disconnect the power plug with your hands wet, as there is a risk of electric shock and injury. Do not spill water directly on the refrigerator to avoid rust, electrical leakage and accidents. Do not reach into the bottom of the refrigerator, as you may get scratched by the sharp metal corners.
Cleaning the interior and exterior
- Food residues in the refrigerator can cause undesired odours, so you should clean the refrigerator regularly. The refrigerator compartment should be cleaned once a month.
- Remove all shelves, the crisper drawer, etc., and clean them with a soft cloth or sponge dampened with warm water or neutral detergent.
- Clean the dust that accumulates on the rear panel and side plates of the refrigerator regularly.
- After using detergent, make sure you rinse it with clean water, and then dry it with a cloth.
- Do not use bristle brushes, steel wire brushes, detergent, soap powder, alkaline detergent, benzine, petrol, acid, hot water, or other corrosive elements to clean the refrigerator surface, door gasket, plastic decorative parts, etc. to avoid damage.
- Carefully dry the door gasket and clean the slot with a wooden stick wrapped with cotton. After cleaning, fix the four corners of the door gasket and then gradually push it into the slot in the door.
Power failure or cooling system fault
- If you receive an early power failure warning:
- Activate the fast freezing function, so that food is completely frozen. Set the temperature back to the original setting when the power supply returns to normal.
Note:
It is advisable to run the refrigerator uninterruptedly once you start using it.
Defrost
This refrigerator includes an automatic defrost function, so there is no need to defrost it manually.
Replacing the light bulb
- The refrigerator has a LED light with low consumption and a long shelf life. In the event of an anomaly, please contact the technical support service. Lights or other parts of the appliance may only be replaced by the manufacturer.
- Energy efficiency level: G
Removing the shelves
- Hold the shelves with both hands and push them upwards.
- Hold one end of the shelf and lift it up while pulling it out. (Fig. 22)
7. TROUBLESHOOTING
For the following minor malfunctions, please try to solve the problem yourself before contacting the official Cecotec Technical Support Service.
| Fault Possible | causes Possible solutions | |
| The refrigerator does not work | The refrigerator is not connected to the mains.The circuit breakers or fuses are damaged.There is no power or the fuse trips. | Plug the refrigerator into the mains.Open the door and check the light is on. |
| Abnormal noise | The refrigerator is not stable.The refrigerator is in contact with the wall. | Set the adjustable feet of the refrigerator.Separate the refrigerator from the wall. |
| Low cooling efficiency | The food inside is hot or there is too much food.You open the door too often.The door gasket has objects that do not allow to close it completely.The refrigerator receives direct sunlight or is close to a heat source.The refrigerator is not well ventilated.The selected temperature is too high. | Store food in the refrigerator when at room temperature.Check and close the door.Remove the refrigerator from the heat source.Keep the recommended distances in the installation section so the refrigerator is well ventilated.Set a suitable temperature. |
| Unpleasant smells in the refrigerator | There is spoiled food inside.The refrigerator is dirty.Food with a strong odour stored inside the refrigerator. | Dispose of food which is spoiled.Clean the refrigerator.Pack food, especially if it has a strong smell. |
ENGLISH
| You cannot set the temperature | Check if the Smart or fast freezing functions are not active on the control panel. | Deactivate the special functions and then set the temperature (for more details, check the Functions section). |
| The freezer-compartment temperature is shown on the panel, but it flashes | Check that the power supply has not been cut off before. | Press any icon to activate the alarm (check the overheating warning section) and check that the food inside the refrigerator is not spoiled. |
Note:
If none of these situations match your problem, do not attempt to disassemble, or repair the appliance by yourself. Repairs carried out by unqualified persons may result in injury or serious malfunctions. Please contact the local store where you made your purchase. The repair must be carried out by an authorised technician, and you must use only original spare parts.
8. TECHNICAL SPECIFICATIONS
| Product Bolero Cool-Market Combi 356 White E | Bolero Cool-Market Combi 356 Inox E | Bolero Cool-Market Combi 356 Dark E | Bolero CoolMarket Combi 356 White Glass E | Bolero CoolMarket Combi 356 Grey Glass E | Bolero CoolMarket Combi 356 Black Glass E |
| Reference 02146 02147 | 02148 02149 | 02150 02151 | |||
| QR code |  |  |  |  |  |
| Voltage 220-240 V~ | |||||
| Rated frequency | 50 Hz | ||||
| Rated current | 1 A | ||||
| Climate class | SN/N/ST/T* | ||||
| Refriger-ant | R600a/48g | ||||
| Base plate Cyclopentane | |||||
(*) Refrigerator intended for use at room temperatures between 10 °C and 43 °C.
This appliance features a light source with an energy efficiency grade G.
Technical specifications may change without prior notice to improve product quality. Made in China | Designed in Spain
9. DISPOSAL OF OLD ELECTRICAL AND ELECTRONIC APPLIANCES
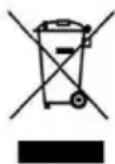
This symbol indicates that, according to the applicable regulations, the product and/or batteries must be disposed of separately from household waste. When this product reaches the end of its shelf life, you should dispose of the batteries/accumulators and take them to a collection point designated by the local authorities.
Consumers must contact their local authorities or retailer for information concerning the correct disposal of old appliances and/or their batteries.
Compliance with the above guidelines will help protecting the environment.
10. TECHNICAL SUPPORT AND WARRANTY
Cecotec shall be liable to the end user or consumer for any lack of conformity that exists at the time of delivery of the product under the terms, conditions, and deadlines established by the applicable regulations.
It is recommended that repairs are carried out by qualified personnel.
If at any moment you detect any problem with your product or have any doubt, do not hesitate to contact the official Cecotec Technical Support Service at +34 96 321 07 28.
ENGLISH
11. COPYRIGHT
The intellectual property rights over the texts in this manual belong to CECOTEC INNOVACIONES, S.L. All rights reserved. The contents of this publication may not, in whole or in part, be reproduced, stored in a retrieval system, transmitted, or distributed by any means (electronic, mechanical, photocopying, recording or similar) without the prior authorization of CECOTEC INNOVACIONES, S.L.
1. PIÈCES ET COMPOSANTS
Img. 1
7. PROBLEEMOPLOSSING
text_image
Technical diagram of a refrigerator with numbered components and internal layoutFig./Img./Abb./Afb./Rys.1
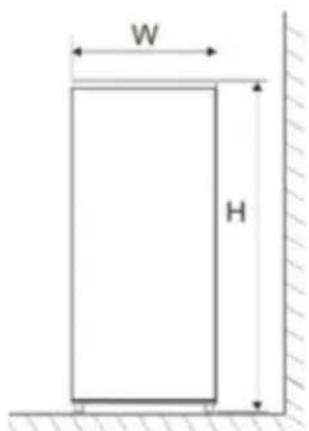
text_image
W H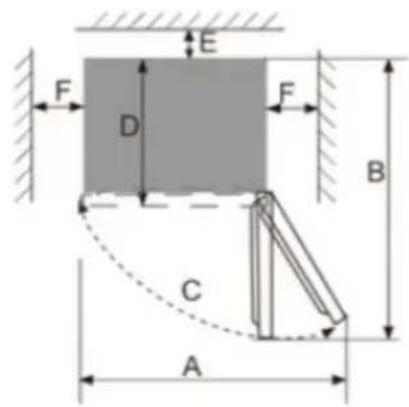
text_image
E F D F B C AFig./Img./Abb./Afb./Rys.2
text_image
Technical diagram showing a device with labeled parts including a tray, connector, and housing.Fig./Img./Abb./Afb./Rys. 3
text_image
Technical diagram showing a mechanical assembly with labeled components and directional arrows indicating motion or force.Fig./Img./Abb./Afb./Rys. 4
text_image
Technical diagram showing a mechanical assembly with labeled components and directional arrows indicating assembly steps.Fig./Img./Abb./Afb./Rys. 5
text_image
1 2 3 4 5Fig./Img./Abb./Afb./Rys. 6
natural_image
Technical line drawings of two mechanical components with threaded fasteners and mounting holes (no text or symbols)Fig./Img./Abb./Afb./Rys. 7 Fig./Img./Abb./Afb./Rys. 8
natural_image
Technical line drawing of a mechanical assembly with two components and directional arrows indicating assembly steps (no text or symbols)Fig./Img./Abb./Afb./Rys. 9
text_image
Technical diagram showing a mechanical assembly with labeled components and two zoomed-in views of a device.Fig./Img./Abb./Afb./Rys. 10

natural_image
Simple line drawing of a mechanical component with two arrows pointing left and right (no text or symbols)Fig./Img./Abb./Afb./Rys. 11
text_image
1 2 3Fig./Img./Abb./Afb./Rys. 12
text_image
Fig./Img./Abb./Afb./ Rys. 13 1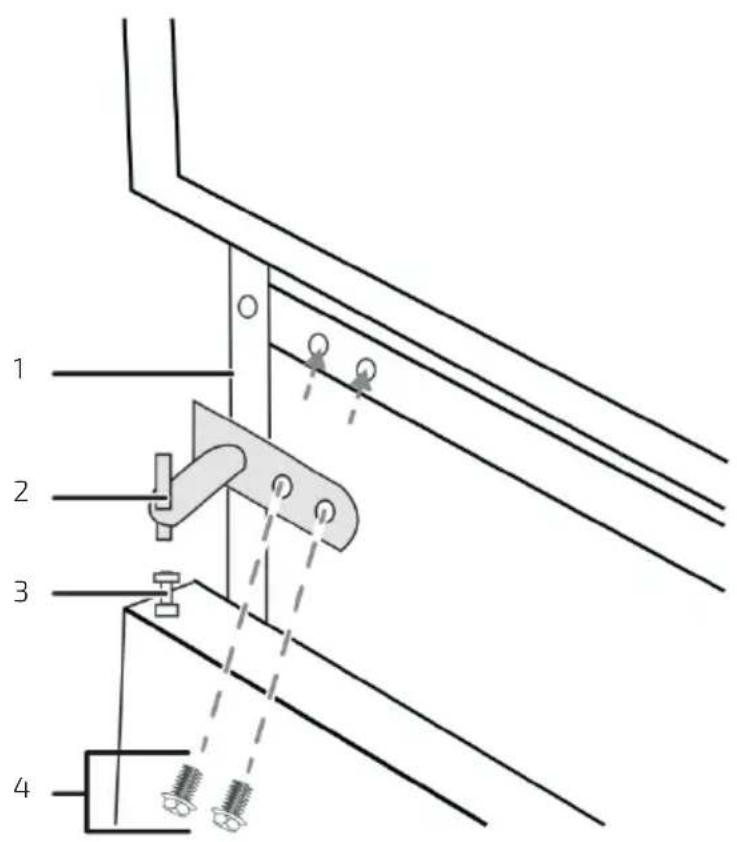
text_image
1 2 3 4Fig./Img./Abb./Afb./Rys. 14

text_image
Technical diagram showing a mechanical assembly with labeled components and two zoomed-in views of the component.Fig./Img./Abb./Afb./Rys. 15

natural_image
Simple line drawing of a mechanical component with two arrows pointing left and right (no text or symbols)Fig./Img./Abb./Afb./Rys. 16

text_image
1 2 3Fig./Img./Abb./Afb./Rys. 17

natural_image
Simple line drawing of a rectangular container with two small objects on top, connected by dashed lines to a box (no text or symbols)Fig./Img./Abb./Afb./Rys. 18
text_image
1 2 3Fig./Img./Abb./Afb./Rys. 19
text_image
NO FROST 1 2 3 4 5 6 7 8 9 10Fig./Img./Abb./Afb./Rys. 20
text_image
COOLING AIR FLOW MIN MAXFig./Img./Abb./Afb./Rys. 21
natural_image
Technical line drawing of a mechanical component with mounting brackets and directional arrows indicating movement (no text or symbols)Fig./Img./Abb./Afb./Rys. 22
www.cecotec.es