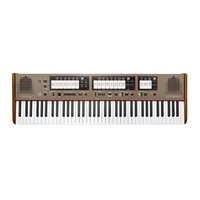
Classico L4 - Electronic musical instrument Dexibell - Free user manual and instructions
Find the device manual for free Classico L4 Dexibell in PDF.


| Product type | Digital organ |
| Brand | Dexibell |
| Model | Classico L3 |
| Keyboard | 76 keys with velocity |
| Sound generator | T2L (Technology of Sampling & Modelling), 24-bit - 48 kHz |
| Maximum polyphony | Unlimited with 320 oscillators |
| Organ types | Classical, Symphonic, Romantic, Baroque, Positive, User 1/2 |
| Orchestral voices | 34 |
| Reverb | 7 types |
| Audio playback | .wav, .aiff, .mp3 via USB drive |
| Audio recorder | .wav (48 kHz, 32-bit) via USB drive |
| Connectivity | Bluetooth audio, MIDI In/Out/Thru, USB Computer, USB Memory, Audio In (mini-jack), outputs L/Mono and R, headphone |
| Pedals | Damper (sustain), expression, crescendo programmable |
| Speakers | 2 x 8.9 cm (3.5 inches), 35 W x 2 max. |
| Power supply | AC adapter 24 VDC 2.5 A (DEXIBELL DYS602-240250W) |
| Power consumption | Standby < 0.2 W, on 10 W, average 14 W, max 30 W |
| Dimensions | 1116 (W) x 335 (D) x 130 (H) mm |
| Weight | 14 kg (without adapter) |
| Included accessories | Quick guide, AC adapter, USB LED lamp |
| Care and cleaning | Wipe with a soft cloth slightly damp. Do not use solvents, alcohol or benzene. |
| Safety | Use only the supplied adapter. Do not open the device. Avoid liquids and shocks. Disconnect during storms or prolonged non-use. |
| Repairability | Contact the authorized Dexibell assistance center. Do not attempt to repair yourself. |
| Operating temperature | 5 °C to 40 °C (41 °F to 104 °F) |
Frequently Asked Questions - Classico L4 Dexibell
User questions about Classico L4 Dexibell
0 question about this device. Answer the ones you know or ask your own.
Ask a new question about this device
Download the instructions for your Electronic musical instrument in PDF format for free! Find your manual Classico L4 - Dexibell and take your electronic device back in hand. On this page are published all the documents necessary for the use of your device. Classico L4 by Dexibell.
USER MANUAL Classico L4 Dexibell
Quick guide
English 3
Español 19
Italiano 35
Deutsch 49
Français 65
Regulatory and Safety Information
Users in U.S.A
This product has been tested and found to comply with the limits for a Class B digital devices, pursuant to Part 15 of the FCC Rules. These limits are designed to provide reasonable protection against harmful interference in a residential installation. This equipment generates, uses, and can radiate radio frequency energy and, if not installed and used in accordance with the instructions, may cause harmful interference to radio communications. However, there is no guarantee that interference will not occur in a particular installation. If this equipment does cause harmful interference to radio or television reception, which can be determined by turning the equipment off and on, the user is encouraged to try to correct the interference by one or more of the following measures:
– Reorient or relocate the receiving antenna.
– Increase the separation between the equipment and receiver.
- Connect the equipment into an outlet on a circuit different from that to which the receiver is connected.
- Consult the dealer or an experienced radio/TV technician for help.
This device complies with part 15 of the FCC Rules. Operation is subject to the following two conditions:
1) This device may not cause harmful interference.
2) This device must accept any interference received, including interference that may cause undesired operation.
FCC CAUTION: Any unauthorized changes or modifications not expressly approved by the party responsible for compliance could void the user's authority to operate the equipment.
Note: The manufacturer is not responsible for any radio or tv interference caused by unauthorized modifications to this equipment. Such modifications could void the user's authority to operate the equipment.
Radiation Exposure Statement
The available scientific evidence does not show that any health problems are associated with using low power wireless devices. There is no proof, however, that these low power wireless devices are absolutely safe. Low power Wireless devices emit low levels of radio frequency energy (RF) in the microwave range while being used. Whereas high levels of RF can produce health effects (by heating tissue), exposure of low-level RF that does not produce heating effects causes no known adverse health effects. Many studies of low-level RF exposures have not found any biological effects. Some studies have suggested that some biological effects might occur, but such findings have not been confirmed by additional research. This device has been tested and found to comply with FCC radiation exposure limits set forth for an uncontrolled environment and meets the FCC radio frequency (RF) Exposure Guidelines in Supplement C to OET65.
Users in Canada
This device complies with Industry Canada licence-exempt RSS standard(s). Operation is subject to the following two conditions:
(1) this device may not cause interference, and
(2) this device must accept any interference, including interference that may cause undesired operation of the device.
Under Industry Canada regulations, this radio transmitter may only operate using an antenna of a type and maximum (or lesser) gain approved for the transmitter by Industry Canada. To reduce potential radio interference to other users, the antenna type and its gain should be so chosen that the equivalent isotropically radiated power (e.i.r.p.) is not more than that necessary for successful communication.
Radiation Exposure Statement
The available scientific evidence does not show that any health problems are associated with using low power wireless devices. There is no proof, however, that these low power wireless devices are absolutely safe. Low power Wireless devices emit low levels of radio frequency energy (RF) in the microwave range while being used. Whereas high levels of RF can produce health effects (by heating tissue), exposure of low-level RF that does not produce heating effects causes no known adverse health effects. Many studies of low-level RF exposures have not found any biological effects. Some studies have suggested that some biological effects might occur, but such findings have not been confirmed by additional research. This device has been tested and found to comply with IC radiation exposure limits set forth for an uncontrolled environment and meets RSS-102 of the IC radio frequency (RF) Exposure rules.
You can download the full version of the owner's manual from www.dexibell.com site.
Welcome to the quick guide of the CLASSICO L3 and congratulations for purchasing this instrument.
The CLASSICO L3 represents a new type of organ with numerous features, allowing you to enjoy full-fledged pipe organ sound in your performances. Thanks to the 320 Oscillators with an unlimited notes polyphony and the crystal-clear definition of the sounds (24 bit - 48KHz) you can recreate the specific atmosphere for a very immersive experience! To ensure that you obtain the maximum enjoyment and take full advantage of the organ functionality, please read all sections of the complete owner's manual carefully (It is downloadable from the dexibell web site).
Keep this manual handy for future reference.

Start to take advantage of valuable benefits available simply registering your product on www.dexibell.com.
- You can benefit of DEXIBELL's 3 years extended warranty (The extended warranty is subject to terms and conditions. Please refer to the related section).
- You can download the full version of the owner's manual.
- Keeps you updated on special offers.
- You can be updated on any new software release and new sounds.
1 IMPORTANT SAFETY INSTRUCTIONS
PLEASE READ CAREFULLY BEFORE PROCEEDING

WARNING
Always follow the following precaution listed below to avoid user to the risk of serious injury or even death from electrical shock, fire or other hazard.
Only use non-tropical weather
This unit and its AC adaptor can only be safely used in non-tropical weather. The operating temperature range is 5° - 40°C (41° - 104°F).
Do not repair, modify or replace parts by yourself
Do not attempt to repair the unit, modify or replace parts of the product. Please contact all the nearest Dexibell Service Center.
Do not disassemble or modify by yourself
Do not open the unit or its AC adaptor or attempt to disassemble or modify the internal component in any way.
Use only the supplied AC adaptor (DEXIBELL DYS602-240250W).
Use only the AC adaptor included with the unit. Connecting a different AC adaptor can cause serious damage to the internal circuitry and may even pose a shock hazard.
Use only the supplied power cord
Use only the AC power cord supplied with the AC adaptor included in the package.
Do not excessively bend the power cord
Do not excessively twist or bend the power cord otherwise you damage it. Damaged cords may cause fire and shock hazards!.
Do not place the unit in an unstable location
Do not place the unit in a unstable position where it might accidentally fall over.
Take care not to allow liquid or foreign objects to enter unit; Do not place containers with liquid on unit
Do not place object filled with liquid (glass of water on this product. Never allow foreign objects (e.g., flammable objects, coins, wires) or liquids (e.g., water or juice) to enter this product. Doing so may cause short circuits, faulty operation, or other malfunctions.
Never place or store the product in the following types of locations
- Exposed to extreme cold or heat (such as in direct sunlight, near a heater, or in a car during the day)
- Subject to steam or smoke
• Damp (such washroom, baths, on wet floors)
- Subject to salt water exposure
- Exposed to rain
- Dusty or sandy
- Subject to extreme changes of temperature or humidity (The condensation may occur and water may collect on the surface of the instrument. Wooden parts may absorb water and be damaged)
- Subject to high levels of vibration and shakiness.
Do not drop the unit or subject it to strong impact
Do not drop the unit. Protect it from strong impact!
Do not connect the unit to an outlet with an unreasonable number of other devices
Do not connect the unit's power-supply cord to an electrical outlet with an unreasonable number of other devices. This could cause the outlet to overheat and possibly cause a fire.
Adults must provide supervision in places where children are present
When using the unit in locations where children are present, never leave the unit unattended. Keep a special watch over any children so that they don't mishandling of the unit can take place.
Avoid extended use at high volume
This unit, either alone or in combination with an amplifier and headphones or speakers, may be capable of producing sound levels that could cause permanent hearing loss. DO NOT operate for a long period of time at a high volume level, or at a level that is uncomfortable. If you experience any hearing loss or ringing in the ears, you should immediately stop using the unit, and consult an audiologist.
If you notice any abnormality turn off the unit immediately
Turn off the unit and remove the AC adaptor from the outlet when:
- If the AC adaptor, the power-supply cord, or the plug has been damaged
• If smoke or unusual smells occurs.
• If the product has been exposed to rain.
- If objects have fallen into, or liquid has been spilled into the unit.
- If the unit does not operate or exhibits a marked change in performance.
- If the unit has been dropped, or the enclosure of the product has been damaged.
Contact the nearest qualified Service Center.






CAUTION
Always follow the following precaution listed below to avoid user to the risk of serious injury or even death from electrical shock, fire or other hazard.
Grasp the plug connecting or disconnecting the AC adaptor
When removing the electric plug from the instrument or an outlet, always hold the plug itself and not the cord. Pulling by the cord can damage it.

Do not use wet hands to connect or disconnect AC adaptor
Never handle the AC adaptor or its plugs with wet hands when plugging into, or unplugging from, an electrical outlet.

Keep clean the AC adaptor's plug
At regular intervals, unplug the AC adaptor and using a dry cloth clean the adaptor's plug.

If the unit will be unused for an extended period of time, unplug the AC power cord from the AC outlet.
Keep cables from getting entangled
Try to prevent cords and cables from becoming entangled. Place all cords and cables away from children.

Before cleaning the unit, unplug the AC adaptor from the outlet
To avoid electric shock or damage the unit, before cleaning the unit, turn it off and unplug the AC adaptor from the outlet (p. 12).

If there is a possibility of lightning strike in your area, disconnect the AC adaptor from the outlet
If you know a thunderstorm is predicted in your area, disconnect the AC adaptor from the outlet.

Do not rest your weight on or place heavy objects on the unit.
Avoid to climb on top of, nor place heavy objects on the unit.

Cautions when moving this unit
- When transporting or moving the unit always use two or more people. Attempting to lift the unit by yourself may damage your back, result in other injury, or cause damage to the unit itself.

- The unit should be handled carefully, all the while keeping it level.
- Disconnect the power cord and all connected cables.
Place in a well ventilated location
The unit and the AC adaptor should be located so their location or position does not interfere with their proper ventilation.

Do not use in tropical climates
Use the unit and the AC adaptor only in a moderate climates (not in tropical climates).

Place near the socket outlet
This equipment should be installed near the socket outlet and disconnection of the device should be easily accessible

For European countries

 | This Symbol indicates that in EU countries, this product must be collected separately from household waste, as defined in each region. Products bearing this Symbol must not be discarded together with household waste. | Tento symbol vyjadruje, że v krajinách EÚ sa musí zber tohto produktu vykonávať oddelene od domového odpadu, podlá nariadení platných v konkrétnej krajine. Produkty s týmto symbolom sa nesmú vyhadzovať spolu s domovým odpadom | |
 | Questo simbolo indica che nei paesi della Comunità europea questo prodotto deve essere smaltito separatamente dai normali rifiuti domestici, secondo la legislazione in vigore in ciascun paese. I prodotti che riportano questo simbolo non devono essere smaltiti insieme ai rifiuti domestici. Ai sensi dell’art. 13 del D.Lgs. 25 luglio 2005 n. 151. | Ez a szimbólum azt jelenti, hogy az Európai Unióban ezt a terméket a háztartási hulladéktól elkülönítve, az adott régióban érvényes szabályozás szerint kell gyűjteni. Az ezzel a szimbólummal ellátott termékeket nem szabad a háztartási hulladék közé dobni. | |
 | Ce symbole indique que dans les pays de l’Union européenne, ce produit doit être collecté séparément des ordures ménagères selon les directives en vigueur dans chacun de ces pays. Les produits portant ce symbole ne doivent pas être mis au rebut avec les ordures ménagères | Tämä merkintä ilmaisee, että tuote on EU-maissa kerättävä erillään kotitalousjätteistä kunkin alueen voimassa olevien määräysten mukaisesti. Tällä merkinnällä varustettuja tuotteita ei saa hävittää kotitalousjätteiden mukana. | |
 | Dieses Symbol bedeutet, dass dieses Produkt in EU-Ländern getrennt vom Hausmüll gesammelt werden muss gemäß den regionalen Bestimmungen. Mit diesem Symbol gekennzeichnete Produkte dürfen nicht zusammen mit den Hausmüll entsorgt werden. | To σύμβολο αυτό υποδηλώνει ότι στις χώρες της Ε.Ε. το συγκεκριμένο προϊόν πρέπει να συλλέγεται χωριστά από τα υπόλοπα οικιακά απορρίμματα, σύμφωνα με όσα προβλέπονται σε κάθε περιοχή. Τα προϊόντα που φέρουν το συγκεκριμένο σύμβολο δεν πρέπει να απορρίπτονται μαζί με τα οικιακά απορρίμματα | |
 | Este símbolo indica que en los países de la Unión Europea este producto debe recogerse aparte de los residuos domésticos, tal como esté regulado en cada zona. Los productos con este símbolo no se deben depositar con los residuos domésticos. | See sümbol näätab, et EL-i maades tuleb see toode olemprügist eraldi koguda, nii nagu on igas piirkonnas määratletud. Selle sümboliga märgitud tooteid ei tohi ära visata koos olmeprügiga. | |
 | Dit symbool geeft aan dat in landen van de EU dit product gescheiden van huishoudelijk afval moet worden aangeboden, zoals bepaald per gemeente of regio. Producten die van dit symbool zijn voorzien, mogen niet samen met huishoudelijk afval worden verwijderd. | Ta simbol označuje, daje treba proizvod v državah EU zbirati ločeno od gospodinjskih odpadkov, tako kot je določeno v vsaki regiji. Proizvoda s tem znakom ni dovoljeno odlagati skupaj z gospodinjskimi odpadki. | |
 | Este símbolo indica que nos países da UE, a recolha deste produto deverá ser feita separadamente do lixo doméstico, de acordo com os regulamentos de cada região. Os produtos que apresentem este símbolo não deverão ser eliminados juntamente com o lixo doméstico. | Šis simbols noráda, ka ES valstīs šo produktu jäievāc atsevišķi no mājsaimniecības atkritumiem, kā noteikts katrā régionā. Protfuktus ar šo simbolu nedrikst izmest kopā ar mājsaimniecības atkritumiem. | |
 | Dette symbol angiver, at i EU-lande skal dette produkt opsamles adskilt ffa husholdningsaffald, som defineret i hver enkelt region. Produkter med dette symbol må ikke smides ud sammen med husholdningsaffald. | Šis simbolis rodo, kad ES šalyse šis produktas turi būti surenkamas atskirai nuo buitinių atlieku, kaip nustatyta kiekviename regione. Šiuo simboliu paženklinti produktai neturi būti išmetami kaitų su buitinėmis atliekomis. | |
 | Dette symbolet indikerer at produktet må behandles som spesialavfall i EU-land, iht. til retningslinjer for den enkelte regionen, og ikke kastes sammen med vanlig husholdningsavfall. Produkter som er merket med dette symbolet, må ikke kastes sammen med vanlig husholdningsavfall. | Symbolen anger att i EU-länder måste den här produkten kasseras separat från hushållsavfall, i enlighet med vaije regions bestämmelser. Produkter med den här symbolen får inte kasseras tillsammans med hushållsavfall. | |
 | Symbol oznacza, że zgodnie z regulacjami w odpowiednim regionie, w krajach UE produktu nie należy wyrzucać z odpadami domowymi. Produktów opatrzonych tym symbolem nie można utylizować razem z odpadami domowymi. | Tento symbol udává, že v zemích EU musí být tento výrobek sbírán odděleně od domácího odpadu, jak je urěeno pro kaźdý region. Výrobky nesoucí tento symbol se nesmí vyhazovat spolu s domácím odpadem. |
2 RELEVANT INDICATIONS
In addition to the items listed under "Important Safety Instructions" on p. 4, please read and observe the following:

Power supply related
- Do not plug this unit into the same electrical outlet used same by an electrical appliance that is controlled by an inverter or a motor (such as a refrigerator, washing machine or air conditioner). Doing so, can result in audible noise.
- The power adapter may become warm after long hours of consecutive use. It can be a normal dissipation of heat through the adapter casing. To reduce the possibility of overheating place the power adapter on the floor in a well-ventilated location.
- Before connecting the unit to other equipment, turn off the power to all equipment. Otherwise, electrical shock or damage to the equipment may occur.
- If the unit is not operative for 120 minutes (2 hours), to prevent unnecessary power consumption, this unit features an "AUTO OFF" function that automatically turns the unit off. If you don't want the unit to turn off automatically, change the "AUTO OFF" setting to "OFF". Please refer to the owner's manual.
NOTE
The ^AUTO OFF ^ setting is memorized when you switch off the unit.

Related to appropriate location
- Do not place the unit near power amplifiers (or other equipment containing large power transformers) to avoid induced hum. In case of hum, to reduce the problem, change the orientation of your unit or place it away from the source of interference.
- Do not use this unit in the vicinity of a TV or radio. This unit may interfere with radio and television reception.
- When using this unit along with application on your iPhone/iPad, we recommend that you set "Airplane Mode" to "ON" on your iPhone/iPad in order to avoid noise caused by communication.
- Noise may be produced if cell phones are operated in the vicinity of this unit. In case of noise you should relocate such wireless devices so they are at a greater distance from this unit, or switch them off.
- Do not expose the unit to extreme cold or heat, to direct sunlight or near devices that radiate heat. Do not leave the unit inside an vehicle during the day. Extreme temperature can damage the unit.
- Take care when move the unit from one location to another with drastic changes in ambient temperature. Condensation can occur in the unit due to drastic change of temperature. Using the device while condensation is present can cause damage. If there is reason to believe that condensation might have occurred, leave the device for several hours until the condensation has completely dried out.
- Do not place, for long periods of time, vinyl, plastic or rubber objects on this unit. Such objects can discolor or otherwise harmfully affect the finish.
- Do not place objects for long period of time on top of the keyboard. This can be the cause of malfunction of the keys of the keyboard.
- Do not apply any stickers, decals or self-adhesive material to this unit. The glue is difficult to remove and solvents are damaging the exterior finish.
- Do not place object filled with liquid (glass of water on this unit. Avoid to use alcohol, perfume, hairspray, nail polish, etc., near the unit. In the event of liquid spill on the unit, swiftly wipe away the surface using a dry, soft cloth.

Maintenance related
• To clean the unit, put a soft cloth in lukewarm water, squeeze it well, then wipe the entire surface using an equal amount of strength. Rubbing too hard in the same area can damage the finish.
- If your unit has a polished finish, it needs careful, periodic care. Dust should be removed using a soft feather or wool-type duster. Care should be taken not to apply pressure to the finish or to drag the dust across the finish, which can create fine scratches in the surface. Fingerprints or similar marks can be cleaned with a dampened soft cloth, followed by a dry cloth. In cases of stubborn greasy dirt, using a small amount of mild detergent (such as mild dishwashing liquid) on the damp cloth may help. Do not use any cleaners or detergents, since they might deteriorate the surface of the cabinet, and produce cracks. Do not use dusting cloths that contain chemicals.
- Do not wipe this unit with benzene, alcohol or solvent of any kind. Doing so may result in discoloration and/or deformation of the unit.

Related to repairs
- Always back up your data on a USB memories before you send this unit for repair to an authorized center. All data contained in the unit's memory my be lost. Important data should always be backed up, or written down on paper (when possible). Dexibell assumes no liability concerning such loss of data.

Related to external memories
- Insert the USB Memory (commercially available) into the slot with care and at the correct angle.
• Take particular care when handling USB Memory:
• Always ground yourself to something metal before handling an USB Memory
- Do not touch the pins of the USB Memory connector, or allow them to become dirty.
- Do not subject the USB Memory to temperature extremes (e.g., direct sunlight in an enclosed vehicle)
- Do not allow the USB Memory to become wet
-
Do not drop or subject it to excessive shock or vibration.
-
Do not disconnect the USB Memory while writing and reading data (i.e., while the USB Memory indicator blinks).
- Never use USB hub to connect USB Memory to the unit.
- This unit allows you to use commercially available USB Memory. You can purchase such devices at a computer store, a digital camera dealer, etc
- The audio recording require a USB storage device to support high sustained transfer rates. Not all USB devices will guarantee flawless performance.

Related to copyright and trademarks
- Dexibell do not assume legal liability regarding any infringements of the user through the use of this unit.
- Recording, copying, distribution of copyrighted material (songs, live performance, etc.) belonging to a third party in part or in whole without the permission of the copyright owner is forbidden by law.
- iPad® and iPhone® are registered trademarks of Apple Inc.
- App Store™ is an Apple's Service Mark
- Bluetooth ° is registered trademarks of Bluetooth SIG, Inc.

Other precautions
- The contents of memory could be lost due to malfunction or improper operation. To help prevent the loss of your data, we highly recommend that you periodically save a backup copy of important data you have stored in the unit's memory on another storage device. (e.g., USB memories).
- Unfortunately, an error may occur during the data restore previously stored in the USB memories. Dexibell shall not be liable for loss of profits or any consequential loss, loss of data.
- Do not use excessive force when handling unit's buttons, switches, sliders and controls and when use connectors and jacks. Rough handling can cause damage to malfunctions.
- Always pull by the connector when disconnecting a cable, never pull the cable. Not doing so you will cause shorts, or damage to the cable's internal elements.
- Keep the unit's volume levels down. The instrument should be used at a reasonable volume, to avoid disturbing neighbours, especially at night and in the early morning. Use headphones if you want to play your music loud or late at night.
- When you need to transport the unit, put it in its original packaging with padding in the box. Otherwise, you will need to use equivalent packaging materials. When transporting or moving the unit always use two or more people.
• To prevent possible damage, avoid applying excessive force to the music stand. - For connecting this unit use cable low impedance cables. The use of cables that contain resistor can cause the sound level to be extremely low, or impossible to hear.
Conventions Used in This Manual
The following symbols are used.
NOTE
It indicates an important note; be sure to read it.
MEMO
It indicates a memo regarding the setting or function; It's up to you read it.
TIPS
It indicates a useful hint for operation; read it as necessary.
3
PANEL DESCRIPTION

[Non-Text]
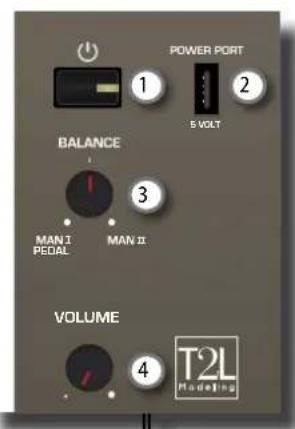
Turns the power on or off (p. 12).
With the factory settings CLASSICO L3's power will automatically be switched off 120 minutes after you stop playing or operating the CLASSICO L3.
If CLASSICO L3's power has been turned off automatically, you can use the [" ] switch to turn the CLASSICO L3 back on. If you don't want the power to turn off automatically, set the "AUTO OFF" parameter to "OFF".
NOTE
To avoid malfunctions, never disconnect the AC/DC adapter while the instrument is turned on.

POWER PORT
Use this connector to connect the USB LED lamp.
WARNING
Do not connect any other devices to this power port. An excessive current consumption can damage the instrument.

BALANCE
Use this knob to balance the volume between the Manual I/Pedal and Manual II division.

VOLUME
Use this knob to set CLASSICO L3's overall volume.

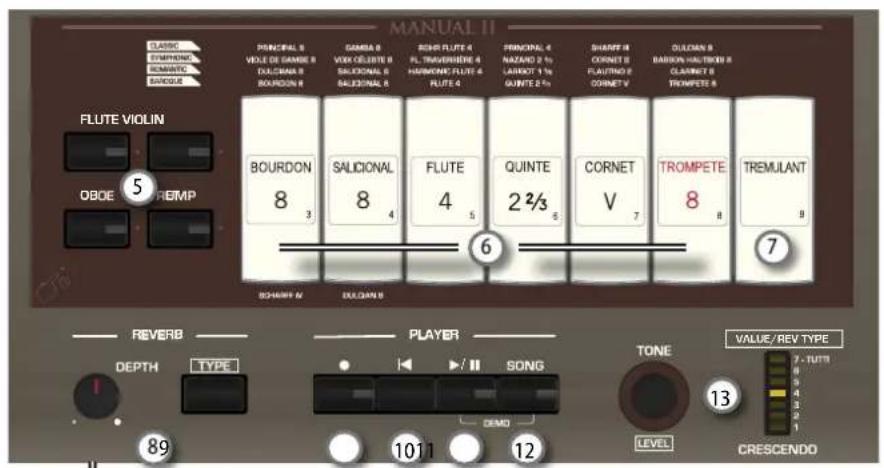
FLUTE, VIOLIN, OBOE, TRUMPET
These buttons allow you to select an orchestral sounds for the MANUAL II division. One of those sounds can be added to the organ section.

MANUAL II Tilt Tabs
These tilt tabs allow you to select register of organ sound. You can use several registers simultaneously.

TREMULANT Tilt Tabs
These apply a tremulant effect to the selected organ sound.

REVERB section
This section adjusts the DEPTH and TYPE of reverberation.

(Rec)
This button is used to start the audio recording of your song..

\$
Press this button to return to the beginning of the song.

* _,
Press this button to start playing. Press it again to stop playing.

SONG
This button allows you to switch in Song Mode to reproduce song via USB memory.
Press it together with the [*-, ] button to listen the demo song.

TONE/LEVEL knob
Using this knob you can adjusts:
• the high-frequency tone for the sound selected.
• the volume of the Orchestral sections. See p.15.
• the volume of the Piano and Harpsichord sections. See p.15.
• the volume each Organ register. See p.15.
The (CRESCENDO) LED meter temporarily shows the value set.

STRINGS, CHOIR
These buttons allow you to select orchestral (STRING,CHOIR) sounds for the MANUAL I division. One of those sounds can be added to the organ section.

PIANO, HARPSICHORD
These buttons allow you to select piano and harpsichord sounds for the MANUAL I division..
MEMO
The selection of a sound of Piano section (PIANO or HARPSICHORD) exclude the organ section.
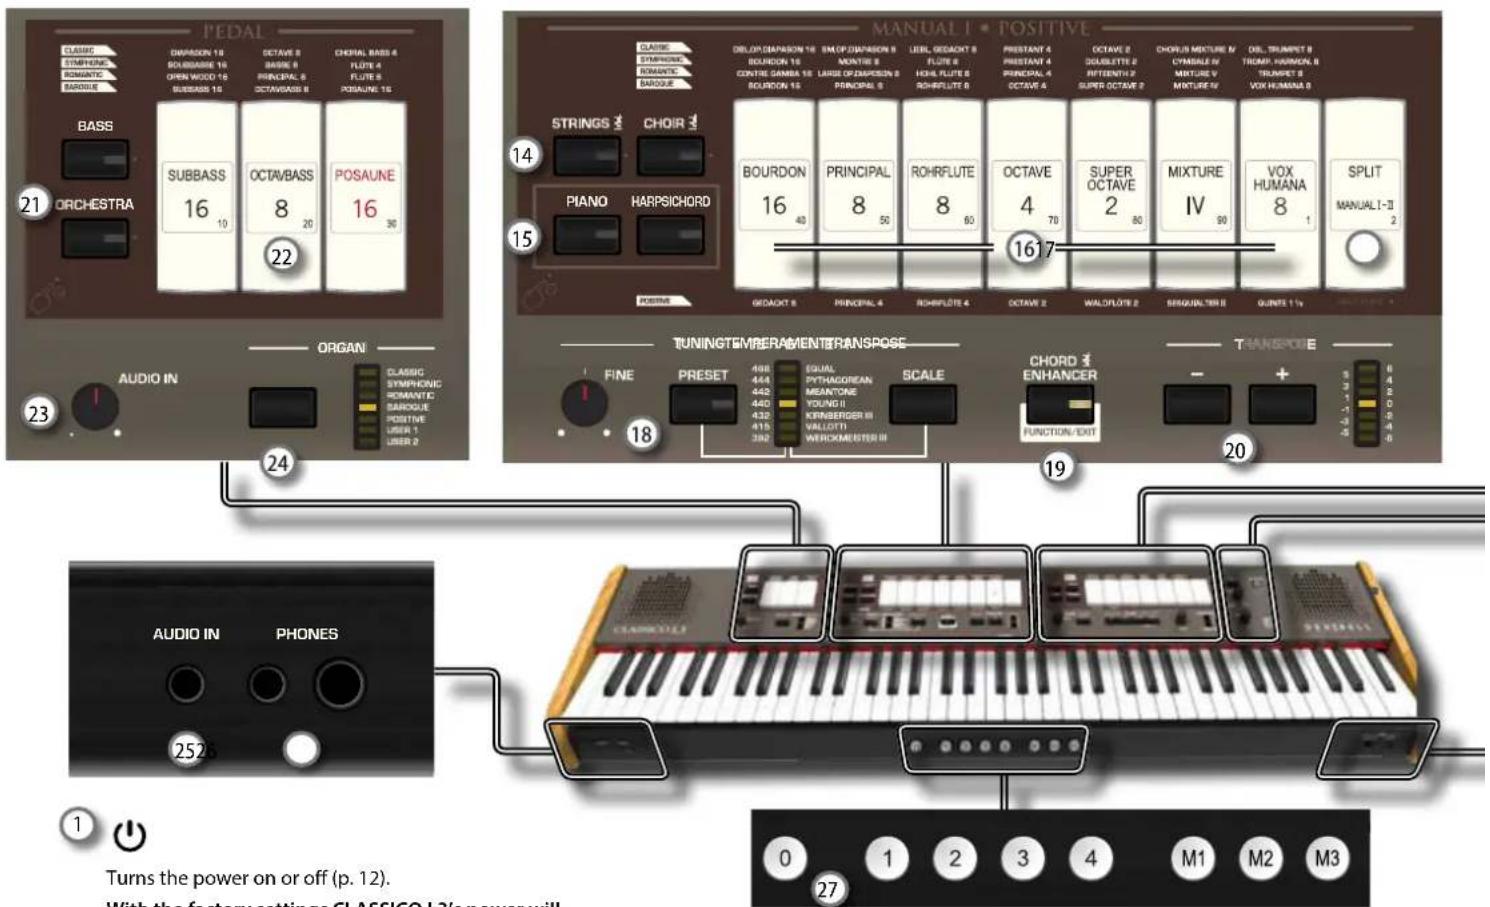
16 MANUAL I Tilt Tabs
These tilt tabs allow you to select an organ sound. You can use several organ sounds simultaneously.
17 SPLIT/MANUAL I/II
This tilt tab allows you to:
- split the keyboard and play different sounds with your left (MANUAL I) and right (MANUAL II) hands (tilt tab lit).
- couple the sounds of manual II (right hand) to manual I (left hand), allowing you to play both from the entire keyboard (tilt tab light off).
- change the split point of the MANUAL II and MANUALI.
At the power on the keyboard is in coupled mode (Split off).
18 TUNING ♦ TEMPERAMENT
This section allows you to select the desired reference pitch tuning [PRESET] and, if you need, adjust the organ's reference pitch to the other instrument by the "FINE" knob.
Use the [SCALE] button to select the desired temperament.
19 CHORD ENHANCER
This button enable the Enhancer function. This function improve the sound adding notes to the played chord.
NOTE
The ENHANCER function works only with the following families sound:
STRINGS and CHOIR
20 TRANSPOSE
This button calls up the transpose function. The transpose function lets you shift the pitch in semitone steps without changing the keys you play on the keyboard. The LED meter shows the transpose value.
21 BASS, ORCHESTRA
These buttons allow you to select orchestral sounds for the PEDAL division. One of those sounds can be added to the organ section.
MEMO
Only one orchestral sound at a time in this group can be selected.
22 PEDAL Tilt Tabs
These tilt tabs allow you to select an organ sound. You can use several organ sounds simultaneously.
23 AUDIO IN knob
This knob allows you to set the level of the audio source connected to the AUDIO IN socket.
24 ORGAN (Sound set)
By switching between sound set, you can change the overall tonal character and feel of the entire organ; for example, you can change from a Baroque organ to a Romantic organ.
25 AUDIO IN socket
This mini jack allows you to connect the audio outputs of an external signal source (CD/mp3 player, etc.).
26 PHONES outputs
This is where you can connect one or two pairs of optional headphones.
Doing so switches off the internal speakers.
27 MEMORY pistons
Each of these pistons can store the combination of sounds for the entire organ. There are three banks of memories (M1, M2, M3). The [0] piston (CANCEL) sets the organ to the condition in which all tilt tabs and orchestral sounds are cancelled, so that no sounds are selected.
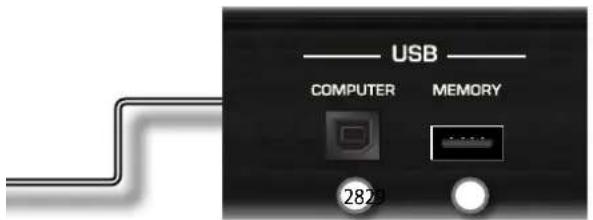
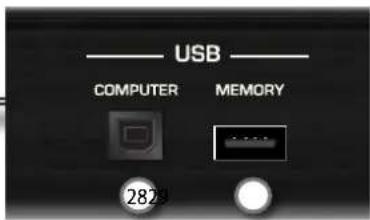
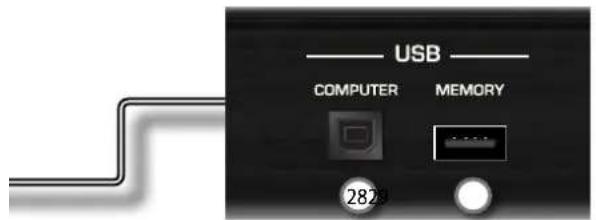
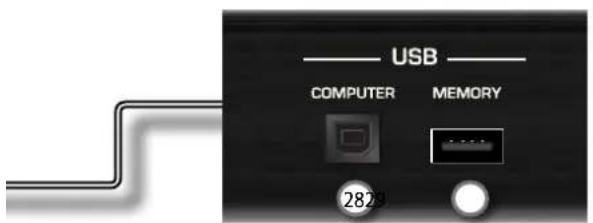
28 USB Computer Port
Use an USB cable to connect the CLASSICO L3 to your computer via this connector.
29 USB Memory Port
Connect an commercially available USB Memory here.
NOTE
* Carefully insert the USB Memory making sure that the connector on the device is appropriate and that it is connected in the proper direction.
* Dexibell does not recommend using USB hubs, irrespective of whether they are active or passive. Please connect only one USB Memory to this port.
Rear Side
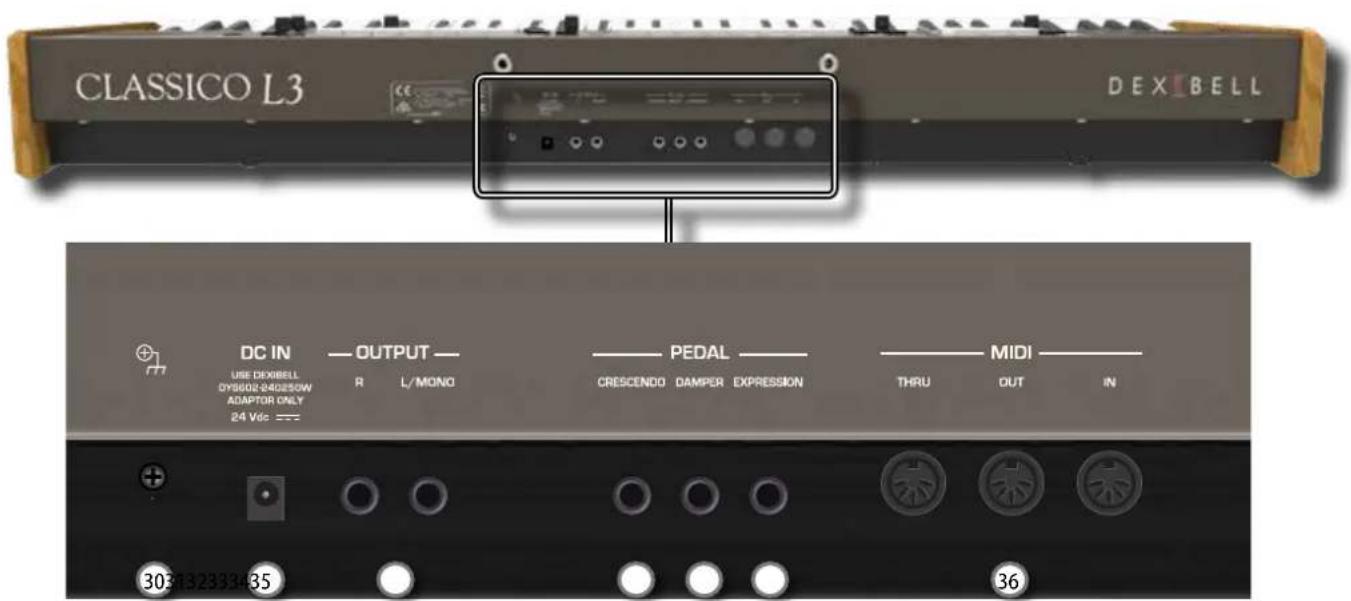
30 Ground terminal
Depending on the circumstances of a particular setup, you could feel a tingling sensation at the point where you touch this device.
You can eliminate this sensation connecting the ground terminal with an external ground. For details see p. 11.
31 DC IN socket
Connect the supplied AC/DC adapter here (p. 11).
NOTE
Be sure to use only the AC adaptor (DEXIBELL DYS602-240250W) supplied with the unit. Also, make sure the line voltage at the installation matches the input voltage specified on the AC adapter body. Other AC adapters may use a different polarity, or be designed for a different voltage, so their use could result in damage, malfunction, or electric shock.
32 AUDIO OUTPUT R, L/MONO sockets
This socket allows you to connect an external amplified speakers, a mixer or a subwoofer.
33 CRESCENDO pedal
Use this socket to connect an crescendo pedal (expression pedal). The crescendo pedal incrementally activates tilt tabs as it is pressed forward and removes tilt tabs as it is depressed backward.
This socket can also be used as a continuous Damper pedal. Please refer to the owner's manual.
34 DAMPER pedal
Use this pedal to sustain the sound..
35 EXPRESSION pedal
Use this socket to connect an expression pedal.
36 MIDI THRU/OUT/IN sockets
These sockets allow you to connect the CLASSICO L3 to external MIDI devices to transmit (OUT) and receive (IN) MIDI messages.
The IN socket allows you to connect a commercial available pedal unit so as to play the bass section with your feet. If you connect a pedal unit here, the PEDAL section becomes polyphonic.
Connecting the AC Adaptor
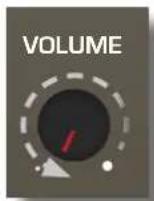
- Rotate the [VOLUME] knob toward the left position to minimize the volume.
- Connect the included power cord to the AC adapter.
The indicator will light once you plug the AC adaptor into a wall outlet.
To an AC outlet

NOTE
Depending on your area, the included power cord may differ from the one shown above.
NOTE
Be sure to use only the AC adaptor (DEXIBELL DYS602-240250W) supplied with the unit. Also, make sure the line voltage at the installation matches the input voltage specified on the AC adapter body. Other AC adapters may use a different polarity, or be designed for a different voltage, so their use could result in damage, malfunction, or electric shock.
NOTE
If you won't be using the CLASSICO L3 for an extended period of time, disconnect the power cord from the electrical outlet.
NOTE
To avoid malfunctions, never disconnect the AC/DC adapter while the instrument is turned on.
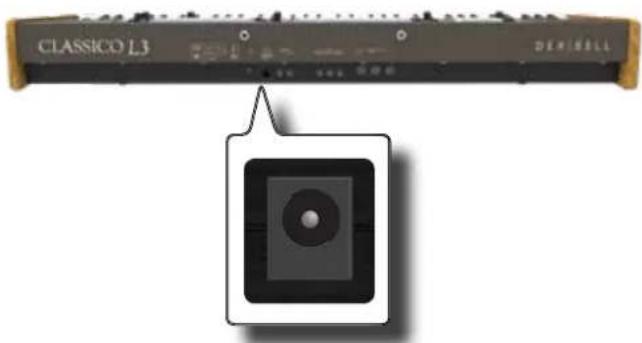
- Connect the AC adaptor to the CLASSICO L3's DC IN jack positioned to the rear bottom panel.
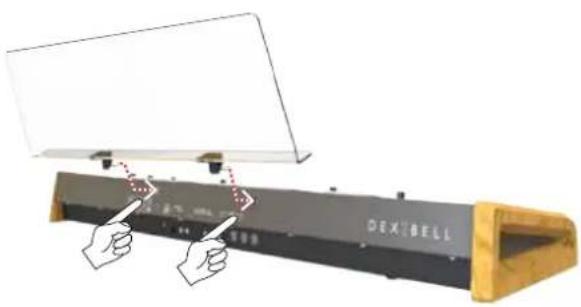
Installing Music Rest
Install the included music rest as shown in the illustration below.
Installing LED Lamp
CLASSICO L3 is equipped with a 5 Volt POWER PORT. When the light is not enough to read music, you can connect the flexible USB LED lamp.
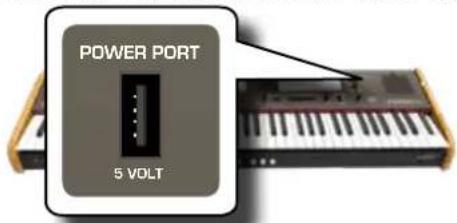
- Connect the flexible LED lamp to the POWER PORT.
NOTE
Carefully insert the LED lamp making sure that the connector on the device is appropriate and that it is connected in the proper direction.
WARNING
Do not connect any other devices to this power port. An excessive current consumption can damage the instrument.
Ground Terminal
Depending on the circumstances of a particular setup, you could feel a tingling sensation at the point where you touch this device.
You can eliminate this sensation connecting the ground terminal with an external ground.
CLASSICO L3 REAR SIDE
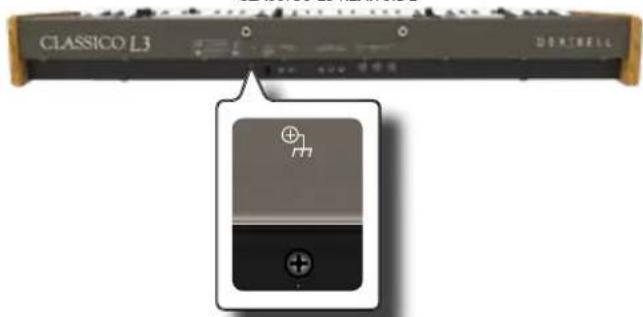
- Use the screw-type ground terminal to connect to ground or to connect to the chassis of the mixer, preamp, or other device in your system.
Turning the Power On
Once everything is properly connected, be sure to follow the procedure below to turn on their power.
- Rotate the [VOLUME] knob toward the left position to minimize the volume.
NOTE
Before turning the CLASSICO L3 on/off, always be sure to turn the volume down. Even with the volume turned down, you might hear some sound when switching the CLASSICO L3 on/off. However, this is normal and does not indicate a malfunction.
- Press the CLASSICO L3's [" ] button located on the right panel to switch it on.
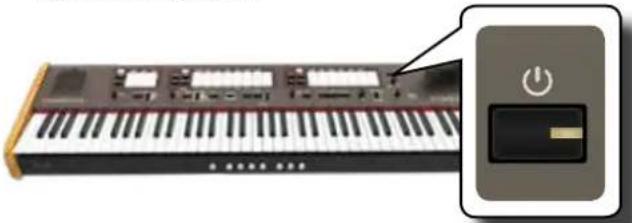
The power will turn on, the tilt tab indicators light in sequence. After a brief interval, CLASSICO L3 will be ready to produce sound.
- Use the [VOLUME] knob to adjust the volume.
NOTE
This unit is equipped with a protection circuit. A brief interval (a few seconds) after power up is required before the unit will operate normally.
Turning the Power Off
- Rotate the [VOLUME] knob toward the left position to minimize the volume.
NOTE
To avoid malfunctions, never disconnect the AC/DC adapter while the instrument is turned on.
- Press and hold for a while the CLASSICO L3's [" ] switch. All indicators go dark and the LED meter of TRANSPOSE flashes to indicate that the unit will turn off after few seconds.
NOTE
If you need to turn off the power completely, first turn off the [POWER] switch, then unplug the power cord from the power outlet. Refer to "Connecting the AC Adaptor" (p. 11).
If you do not operate the unit for a certain period of time while the power is on, this unit turns off automatically.
If you don't want the power to turn off automatically, turn the "AUTO OFF" setting off!
With the factory settings, the unit's power will automatically be switched off 120 minutes after you stop playing or operating the unit.
Shortly before the CLASSICO L3 shuts down automatically, the indicators go dark and the tilt tab indicator light in sequence. If you want to keep using the CLASSICO L3 at this stage, press any button.
If you don't want the power to turn off automatically, change the "AUTO OFF" setting to "OFF". Please refer to the owner's manual.
Demo of the CLASSICO L3
Your CLASSICO L3 contains a demo that introduces all the best of its tones.
- To start playback of all demo songs simultaneously press the [*-] and [SONG] buttons.
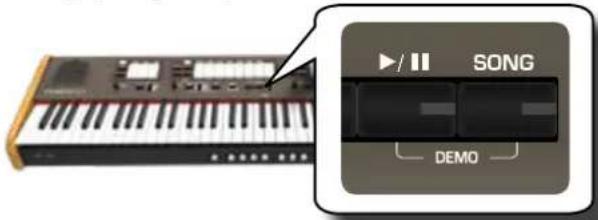
The first tilt tab flashes and playback of all songs starts automatically in sequence.
- Press the tilt tab that is assigned to the desired demo song to start playback of that song.
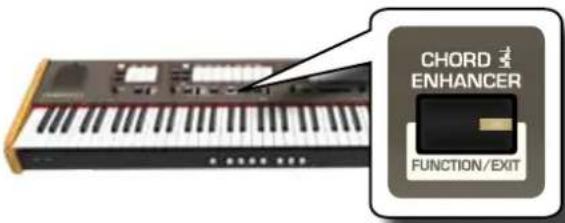
- Press the [FUNCTION/EXIT] button to leave the demo function.
NOTE
No data of the music that is played back will be out putted from MIDI OUT.
NOTE
All rights reserved. Unauthorized use of this material for purposes other than private, personal enjoyment is a violation of applicable laws.
Peripheral Devices
NOTE
Before to connect any external device to Audio IN socket, rotate the [VOLUME] knob toward the lower position to minimize the volume.
![Before to connect any external device to Audio IN socket, rotate the [VOLUME] knob toward the power position to minimize the volume. Audio Bluetooth LED Lamp Audio IN 2 Headphones USB to Computer (MIDI) USB to Memory](/content/2026/04/728062/images/7ed6bc032ad53e73ee42f3974ed74c5ca1f5cf82f5fcbf0bd8e672eba08a2c00.jpg)
![CLASSICO L3 DEXIBELL R L MIDI IN MIDI PedalBoard Amplified Speakers Expression Pedal (CRESCENDO) NOTE Before to connect external Amplified Speakers, move the [VOLUME] slider toward the lower position to minimize the volume. Damper Pedal Expression Pedal MIDI OUT MIDI Expander](/content/2026/04/728062/images/efe43123d663ccb9a987e7d2048ffba912659e60725bd863fa399fa341506867.jpg)
![```mermaid graph TD A["Organ Sound"] --> B["Orchestral Sound"] B --> C["Selecting a Piano Sound"] C --> D["Tuning Temperature Transpose"] D --> E["Select a Temperament (SCALE)"] E --> F["Improve the sound (CHORD ENHANCER)"] F --> G["Change the Pitch of the Keyboard (TRANSPOSE)"] subgraph Section 1 A…](/content/2026/04/728062/images/5db83b3027661f9d3b5e03cc24b3315ee697b1cfafc058e6e744427d91d21519.jpg)
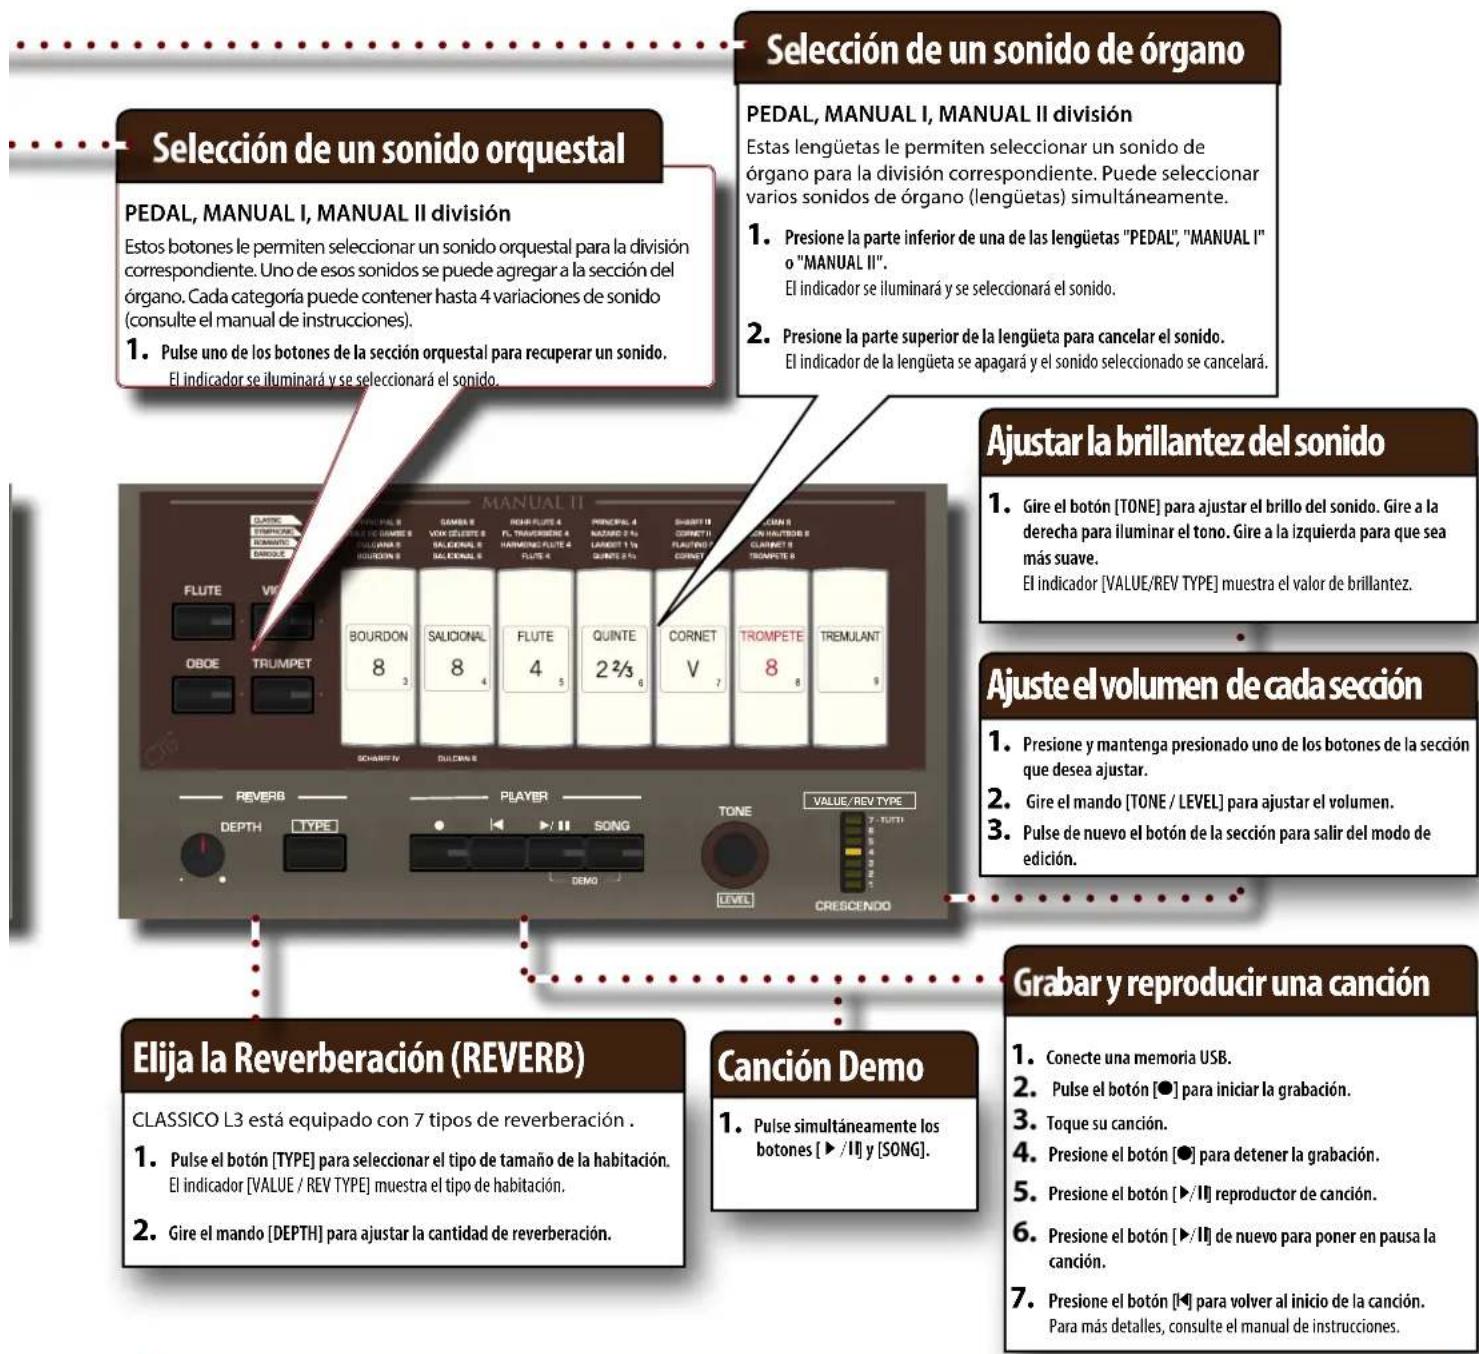
Selecting an Orchestral Sound
PEDAL, MANUAL I, MANUAL II division
These buttons allow you to select an orchestral sound for the relative division. One of those sounds can be added to the organ section. Each category can contain up to 4 sound variations (Refer to the owner's manual).
- Press one of buttons of the orchestral section to recall a sound. The indicator will light, and the sound will be selected.
Selecting an Organ Sound
PEDAL, MANUAL I, MANUAL II division
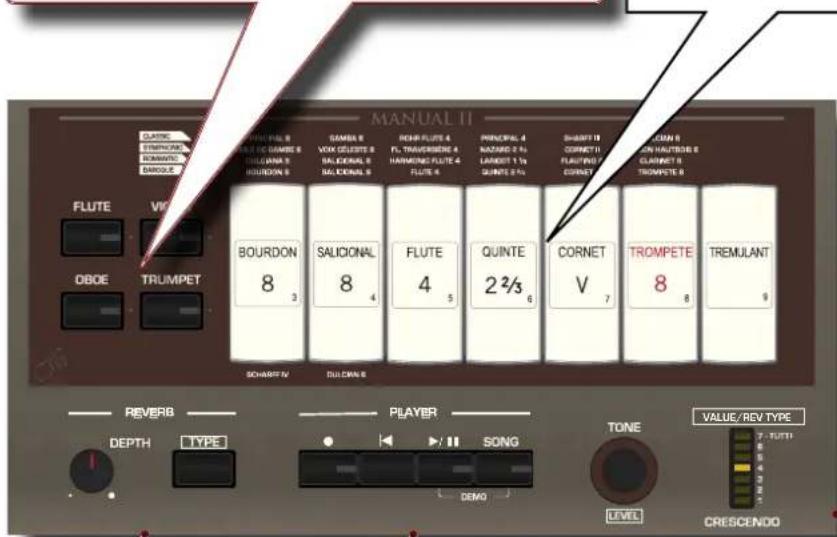
These tilt tabs allow you to select an organ sound for the relative division. You can select several organ sounds (tilt tabs) simultaneously.
- Press the lower part of one of the "PEDAL," "MANUAL I," or "MANUAL II" tilt tabs.
The indicator will light, and the sound will be selected.
- Press the upper part of the tilt tab to cancel the sound.
The titl tab indicator will turn off and the selected sound will be cancelled.
Adjust the Brilliance of the Sound
- Rotate the [TONE] button to adjust the brilliance of the sound. Turn to right to brighten the tone. Turn to left to make it more mellow. The [VALUE/REV TYPE] indicator shows the brilliance value..
Adjust the Volume of Each Section
- Press and hold one of the button of the section you want to adjust.
- Turn the [TONE/LEVEL] knob to adjust the volume.
- Press the button of the section again to leave edit mode.
Choose the Reverberation (REVERB)
CLASSICO L3 is equipped with 7 types of reverb.
- Press the [TYPE] button to select the room size type. The [VALUE/REV TYPE] indicator shows the room type.
- Rotate the [DEPTH] knob to adjust the amount of reverberation.
Demo Song
- Simultaneously press the [*-,] button and [SONG] buttons.
Record and Play Back a Song
- Connect an USB Memory.
- Press the [!] button to start recording.
- Play your song.
- Press the [!] button to stop recording.
- Press the [*-] button play song.
- Press the [*-,] button again to pause the song.
- Press the [\$] button to return to the beginning of the song. For more details please refer to the owner's manual.
Use the Memories (registrations)
Your CLASSICO L3 comes with four memories and three banks (for a total of 12 memories) that can be accessed via the[M1/2/3] and[1]\~ [4] memory piston. Press the [0] pistons to cancel the settings of the currently selected memory and mute all organ and orchestral sounds.

Please refer to the owner's manual how to export or import Registration Set to an USB Memory.
Recall a Memory Save a Memory
- Press the [M1/2/3] piston to select the memory bank. The round button lights.
-
Press one of the [1]\~[4] pistons to recall the memory.
-
Press the [M1/2/3] piston to select the memory bank you want to save. The round button lights.
- Press and hold the [1]\~[4] piston button to save the memory.
The CLASSICO L3's [FUNCTION/EXIT] button provides access to the available parameters and functions. For details please refer to the owner's manual.
General procedure
- Press and hold the [FUNCTION/EXIT] button.
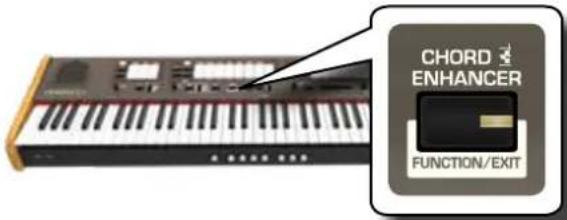
The [FUNCTION/EXIT] button flashes to indicate that we are in function mode. All other indicators go dark.
- Press the lower part of the tilt tab associated with the function you want to recall.
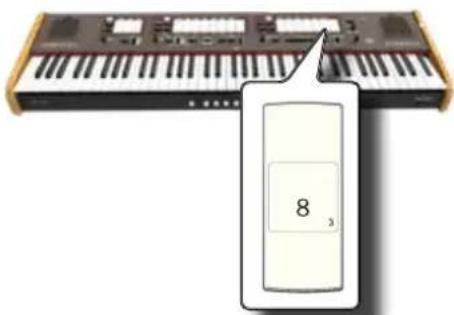
In the example above we selected the Expression Pedal Settings.
- According to the called function, press the [1,2,3,4] piston that corresponds to the parameter you want to set.
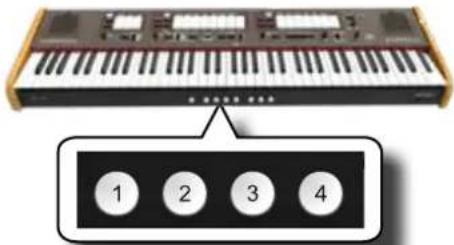
The following parameters and functions are available:
Functions List
Import Memory Function
[FUNCTION/EXIT] button → 1
Export Memory Function
[FUNCTION/EXIT] button → 2
Expression Pedal Settings
[FUNCTION/EXIT] button → 3
Damper Pedal Settings
[FUNCTION/EXIT] button →4
Speakers Settings
[FUNCTION/EXIT] button → 5
AUTO OFF Settings
[FUNCTION/EXIT] button →6
ImportingOrganSoundSet(User1/2)
[FUNCTION/EXIT] button → 10
Deleting Organ Sound Set (User 1/2)
[FUNCTION/EXIT] button →20
USB Remove
[FUNCTION/EXIT] button →30
Keyboard Touch Response
[FUNCTION/EXIT] button →40
BLUETOOTH (make it visible)
[FUNCTION/EXIT] button → 50
CRESCENDO PEDAL
[FUNCTION/EXIT] button →60
CRESCENDO SETTING MODE
[FUNCTION/EXIT] button →70
IMPORT CRESCENDO SETTING
[FUNCTION/EXIT] button →80
EXPORT CRESCENDO SETTING
[FUNCTION/EXIT] button →90
| ITEMS | CLASSICO L3 | |
| KEYBOARD TYPE • 76 Keys with dynamic | ||
| TONE GENERATOR T2L: Sampling and Modelling Technology | ||
| MODELLING Reactive to player articulation (Orchestral sounds) | ||
| SAMPLING XXL wave size, holophonic recording up to 15 seconds on lower piano notes | ||
| SOUND WAVE FORMAT 24 bit linear - 48 KHz (Internal processing and DSP at 32 bit floating) | ||
| DIGITAL ANALOG CONVERTION (DAC) 24 bit linear - 48 KHz, Dynamic Range, S/N:106dB | ||
| MAXIMUM POLYPHONY Unlimited with 320 Oscillator | ||
| ORGAN TYPES | Baroque, Romantic, Symphonic, Classic, Positive, User1*, User2* * downloadable with file extensions .DXS | |
| PEDAL STOP 3 | ||
| MANUAL I STOP 7 | ||
| MANUAL II STOP 6 | ||
| ORCHESTRAL VOICES 34 | ||
| MEMORY PISTONS | 4 x 3 Banks under the keyboard (The data can be saved or loaded on the USB Memory) | |
| KEYBOARD MODE 3 Parts (MANUAL I, MANUAL II, PEDAL) | ||
| TOUCH SENSITIVITY | 4 Types + Fixed | |
| REVERB | 7 Types | |
| TREMULANT | 3 Types | |
| MASTER EQUALIZER | Tone control | |
| MASTERTUNING | 7 hysterical presets + fine adjustable | |
| TRANSPOSER | '+6, - 6 semitones | |
| CHORD ENHANCER | Yes | |
| TEMPERAMENT | 7 Types | |
| PLAYER AUDIO | .wav, .aff, .mp3, in all format, frequency and bit rate | |
| RECORDER AUDIO | .wav (48 kHz, 32-bit floating) on USB Memory | |
| MASTER TUNING | YES: 415,4Hz to 466,1 Hz (adjustable increments of 0,1 Hz) + 2 Preset (440 Hz, 442 Hz) | |
| WIRELESS CONNECTION | Bluetooth° audio streaming | |
| RHYTHM PATTERNS | X MURE APP for i-Phone and i-Pad (FREE) with multitracks audio patterns | |
| POWER PORT | to connect the USB LED lamp | |
| CONNECTORS | DC IN socket | for supplied AC adaptor |
| AUDIO IN jack | Stereo miniature phone type | |
| Output (L/Mono, R) jacks | 1/4-inch phone type x 2 | |
| Phones jacks | 1 x Stereo miniature phone type1 x Stereo 1/4-inch phone type | |
| USB COMPUTER port | Type B | |
| USB MEMORY port | Type A | |
| EXPRESSION socket | Assignable | |
| DAMPER Pedal (HOLD) socket | Assignable | |
| CRESCENDO PEDAL | Assignable | |
| SPEAKERS | 2 Full range x 8.9 cm (3,5 inches) | |
| RATED POWER OUTPUT | 35 W x 2 max @ THD+N < 0.1% | |
| VOLUME LEVEL SPL | 108.1 dB max | |
| DSP on AMPLIFIER | Digital Bass Enhancer | Yes |
| Dynamic Eq | Yes | |
| 3 Band Compressor | Yes | |
| Power Supply | 24V DC 2.5A , supplied AC/DC adaptor | |
| POWER CONSUMPTION | Stand By: < 0,2 WPower On: 10 WAverage: 14 WMaximum: 30 W"ErP" LEVEL VI for Echo efficiency on stand-by consumption | |
| ITEMS | CLASSICO L3 | |
| DIMENSIONS | 1116 (W) x 335 (D) x 130 (H)43-15/16 (W) x 15-3/16 (D) x 5-1/8 (H) inches | |
| WEIGHT | 14 kg (excluding AC adaptor)3 lbs 2 oz (excluding AC adaptor) | |
| SUPPLIED ACCESSORIES | Quick guideAC adaptor (DEXIBELL DYS602-240250W)USB LED lamp | |
| OPTIONS (sold separately) | DX CP1 Continuous Pedal with ON-OFF Switch, DX HF7 Professional Headphones | |
- Bluetooth ® is registered trademarks of Bluetooth SIG, Inc.
NOTE
In the interest of product, the specification and description are subject to change without notice.
CLASSICO L3 Orchestral Tone List
| Num. Name | |
| MANUAL I | |
| STRINGS | |
| 0001 STRINGS ENS | |
| 0002 SLOW STRINGS | |
| 0003 ORCHESTRA | |
| 0004 HARP | |
| CHOIR | |
| 0005 MHCHOIR | |
| 0006 CLASSIC CHOIR | |
| 0007 SPACE VOX | |
| 0008 CELESTA | |
| PIANO | |
| 0009 CLASSIC GRAND | |
| 0010 DYNO STAGE | |
| 0011 BLUES ORGAN | |
| 0012 GOSPEL ORGAN | |
| HARPSICHORD | |
| 0013 HARPSI 8' | |
| 0014 HARPSI 4' | |
| 0015 HARPSI COUPLED | |
| 0016 LUTE | |
| MANUAL II | |
| FLUTE | |
| 0017 FLUTE | |
| 0018 PICCOLO | |
| VIOLIN | |
| 0019 VIOLIN | |
| 0020 VIOLA | |
| OBOE | |
| 0021 OBOE | |
| 0022 CLARINET | |
| 0023 BASSOON | |
| 0024 ENGLISH HORN | |
| TRUMPET |
| Num. Name | |
| 0025 TRUMPET | |
| 0026 BAROQUE TRUMP | |
| 0027 TROMBONE | |
| 0028 FRENCH HORN | |
| PEDAL | |
| BASS | |
| 0029 BASS SECT | |
| 0030 AC.BASS | |
| 0031 FINGERED BASS | |
| ORCHESTRA | |
| 0032 ORCHESTRA | |
| 0033 TUBA | |
| 0034 TUBULAR BELL |
CLASSICO L3
digital organ
Guía rápida
FLUTE, VIOLIN, OBOE, TRUMPET (FLAUTA, VIOLÍN, OBOE, TROMPÉTA)

15 PIANO, HARPSICHORD (PIANO, CLAVECÍN)
17 SPLIT/MANUAL I/II
Esta lengüeta inclinada le permite:
FLUTE, VIOLIN, OBOE, TRUMPET
17 SPLIT/MANUAL I/II
[FUNCTION/EXIT] button → 1
Esportare Memorie
[FUNCTION/EXIT] button → 2
[FUNCTION/EXIT] button → 3
Bottone [FUNCTION/EXIT] → 4
Bottone [FUNCTION/EXIT] → 5
AUTO OFF
Bottone [FUNCTION/EXIT] → 6
Bottone [FUNCTION/EXIT] → 7
Factory Reset
Bottone [FUNCTION/EXIT] → 8
Pedaliera MIDI
Bottone [FUNCTION/EXIT] → 9
Bottone [FUNCTION/EXIT] → 10
Bottone [FUNCTION/EXIT] → 30
Bottone [FUNCTION/EXIT] → 40
Bottone [FUNCTION/EXIT] → 50
PEDALE CRESCENDO
Bottone [FUNCTION/EXIT] → 60
Bottone [FUNCTION/EXIT] → 80
Bottone [FUNCTION/EXIT] → 90
CLASSICO L3 Orchestral Tone List
| Num. Name | |
| MANUAL I | |
| STRINGS | |
| 0001 STRINGS ENS | |
| 0002 SLOW STRINGS | |
| 0003 ORCHESTRA | |
| 0004 HARP | |
| CHOIR | |
| 0005 MMHCHOIR | |
| 0006 CLASSIC CHOIR | |
| 0007 SPACE VOX | |
| 0008 CELESTA | |
| PIANO | |
| 0009 CLASSIC GRAND | |
| 0010 DYNO STAGE | |
| 0011 BLUES ORGAN | |
| 0012 GOSPEL ORGAN | |
| HARPSICHORD | |
| 0013 HARPSI 8' | |
| 0014 HARPSI 4' | |
| 0015 HARPSI COUPLED | |
| 0016 LUTE | |
| MANUAL II | |
| FLUTE | |
| 0017 FLUTE | |
| 0018 PICCOLO | |
| VIOLIN | |
| 0019 VIOLIN | |
| 0020 VIOLA |
| Num. Name | |
| OBOE | |
| 0021 OBOE | |
| 0022 CLARINET | |
| 0023 BASSOON | |
| 0024 ENGLISH HORN | |
| TRUMPET | |
| 0025 TRUMPET | |
| 0026 BAROQUE TRUMP | |
| 0027 TROMBONE | |
| 0028 FRENCH HORN | |
| PEDAL | |
| BASS | |
| 0029 BASS SECT | |
| 0030 AC.BASS | |
| 0031 FINGERED BASS | |
| ORCHESTRA | |
| 0032 ORCHESTRA | |
| 0033 TUBA | |
| 0034 TUBULAR BELL |
CLASSICO L3
digital organ
Kurzanleitung
FLUTE, VIOLIN, OBOE, TRUMPET
14 STRINGS, CHOIR
17 SPLIT/MANUAL I/II
2 INDICATIONS IMPORTANTES

15 PIANO, CLAVECIN
17 SPLIT/MANUAL I/II
18 TUNING ♦ TEMPÉRAMENT
Bouton [FUNCTION/EXIT] → 1
Bouton [FUNCTION/EXIT] → 2
Bouton [FUNCTION/EXIT] → 3
Bouton [FUNCTION/EXIT] → 6
Paramètres LOCAL ON/OFF
Bouton [FUNCTION/EXIT] →7
Bouton [FUNCTION/EXIT] → 8
Bouton [FUNCTION/EXIT] → 9
Bouton [FUNCTION/EXIT] → 40
BLUETOOTH (se rendre visible)
Bouton [FUNCTION/EXIT] → 50
PÉDALE CRESCENDO
Bouton [FUNCTION/EXIT] → 60
MODE CONFIGURATION CRESCENDO
Bouton [FUNCTION/EXIT] → 70
IMPORTERCONFIGURATIONCRESCENDO
Bouton [FUNCTION/EXIT] →80
EXPORTERCONFIGURATIONCRESCENDO
Bouton [FUNCTION/EXIT] → 90
This Class B digital apparatus meets all requirements of the Canadian Interference-Causing Equipment Regulations.
AVIS
For European Countries
EUROPEAN COMMUNITY DECLARATION OF CONFORMITY Radio and Telecommunications Terminal Equipment.
Dexibell declares that the wireless module of this unit is in compliance with the essential requirements and other relevant provisions of Directive 1999/5/EC.
IMPORTANT NOTICE FOR THE UNITED KINGDOM
IMPORTANT: THE WIRES IN THIS MAINS LEAD ARE COLOURED IN ACCORDANCE WITH THE FOLLOWING CODE.
BLUE: NEUTRAL
BROWN: LIVE
As the colours of the wires in the mains lead of this apparatus may not correspond with the coloured markings identifying the terminals in your plug, proceed as follows:
The wire which is coloured BLUE must be connected to the terminal which is marked with the letter N or coloured BLACK. The wire which is coloured BROWN must be connected to the terminal which is marked with the letter L or coloured RED.
Under no circumstances must either of the above wires be connected to the earth terminal of a three pin plug.
DEXIBELL
DEXIBELL
is a brand of
PROEL SPA
(Worldwide Headquarters)


- REGULATORY AND SAFETY INFORMATION
- USERS IN U.S.A
- RADIATION EXPOSURE STATEMENT
- USERS IN CANADA
- 1 IMPORTANT SAFETY INSTRUCTIONS
- PLEASE READ CAREFULLY BEFORE PROCEEDING
- WARNING
- ONLY USE NON-TROPICAL WEATHER
- DO NOT REPAIR, MODIFY OR REPLACE PARTS BY YOURSELF
- DO NOT DISASSEMBLE OR MODIFY BY YOURSELF
- USE ONLY THE SUPPLIED AC ADAPTOR (DEXIBELL DYS602-240250W)
- USE ONLY THE SUPPLIED POWER CORD
- DO NOT EXCESSIVELY BEND THE POWER CORD
- DO NOT PLACE THE UNIT IN AN UNSTABLE LOCATION
- TAKE CARE NOT TO ALLOW LIQUID OR FOREIGN OBJECTS TO ENTER UNIT; DO NOT PLACE CONTAINERS WITH LIQUID ON UNIT
- NEVER PLACE OR STORE THE PRODUCT IN THE FOLLOWING TYPES OF LOCATIONS
- DO NOT DROP THE UNIT OR SUBJECT IT TO STRONG IMPACT
- DO NOT CONNECT THE UNIT TO AN OUTLET WITH AN UNREASONABLE NUMBER OF OTHER DEVICES
- ADULTS MUST PROVIDE SUPERVISION IN PLACES WHERE CHILDREN ARE PRESENT
- AVOID EXTENDED USE AT HIGH VOLUME
- IF YOU NOTICE ANY ABNORMALITY TURN OFF THE UNIT IMMEDIATELY
- CAUTION
- GRASP THE PLUG CONNECTING OR DISCONNECTING THE AC ADAPTOR
- DO NOT USE WET HANDS TO CONNECT OR DISCONNECT AC ADAPTOR
- KEEP CLEAN THE AC ADAPTOR'S PLUG
- KEEP CABLES FROM GETTING ENTANGLED
- BEFORE CLEANING THE UNIT, UNPLUG THE AC ADAPTOR FROM THE OUTLET
- IF THERE IS A POSSIBILITY OF LIGHTNING STRIKE IN YOUR AREA, DISCONNECT THE AC ADAPTOR FROM THE OUTLET
- DO NOT REST YOUR WEIGHT ON OR PLACE HEAVY OBJECTS ON THE UNIT
- CAUTIONS WHEN MOVING THIS UNIT
- PLACE IN A WELL VENTILATED LOCATION
- DO NOT USE IN TROPICAL CLIMATES
- PLACE NEAR THE SOCKET OUTLET
- 2 RELEVANT INDICATIONS
- POWER SUPPLY RELATED
- NOTE
- RELATED TO APPROPRIATE LOCATION
- MAINTENANCE RELATED
- RELATED TO REPAIRS
- RELATED TO EXTERNAL MEMORIES
- RELATED TO COPYRIGHT AND TRADEMARKS
- OTHER PRECAUTIONS
- CONVENTIONS USED IN THIS MANUAL
- MEMO
- TIPS
- 3
- PANEL DESCRIPTION
- [NON-TEXT]
- POWER PORT
- BALANCE
- VOLUME
- FLUTE, VIOLIN, OBOE, TRUMPET
- MANUAL II TILT TABS
- TREMULANT TILT TABS
- REVERB SECTION
- (REC)
- SONG
- TONE/LEVEL KNOB
- STRINGS, CHOIR
- PIANO, HARPSICHORD
- 16 MANUAL I TILT TABS
- 17 SPLIT/MANUAL I/II
- 18 TUNING ♦ TEMPERAMENT
- 19 CHORD ENHANCER
- 20 TRANSPOSE
- 21 BASS, ORCHESTRA
- 22 PEDAL TILT TABS
- 23 AUDIO IN KNOB
- 24 ORGAN (SOUND SET)
- 25 AUDIO IN SOCKET
- 26 PHONES OUTPUTS
- 27 MEMORY PISTONS
- 28 USB COMPUTER PORT
- 29 USB MEMORY PORT
- REAR SIDE
- 30 GROUND TERMINAL
- 31 DC IN SOCKET
- 32 AUDIO OUTPUT R, L/MONO SOCKETS
- 33 CRESCENDO PEDAL
- 34 DAMPER PEDAL
- 35 EXPRESSION PEDAL
- 36 MIDI THRU/OUT/IN SOCKETS
- CONNECTING THE AC ADAPTOR
- INSTALLING MUSIC REST
- INSTALLING LED LAMP
- GROUND TERMINAL
- TURNING THE POWER ON
- TURNING THE POWER OFF
- DEMO OF THE CLASSICO L3
- PERIPHERAL DEVICES
- SELECTING AN ORCHESTRAL SOUND
- PEDAL, MANUAL I, MANUAL II DIVISION
- SELECTING AN ORGAN SOUND
- ADJUST THE BRILLIANCE OF THE SOUND
- ADJUST THE VOLUME OF EACH SECTION
- CHOOSE THE REVERBERATION (REVERB)
- DEMO SONG
- RECORD AND PLAY BACK A SONG
- USE THE MEMORIES (REGISTRATIONS)
- RECALL A MEMORY SAVE A MEMORY
- GENERAL PROCEDURE
- FUNCTIONS LIST
- DAMPER PEDAL SETTINGS
- SPEAKERS SETTINGS
- AUTO OFF SETTINGS
- IMPORTINGORGANSOUNDSET(USER1/2)
- DELETING ORGAN SOUND SET (USER 1/2)
- USB REMOVE
- KEYBOARD TOUCH RESPONSE
- BLUETOOTH (MAKE IT VISIBLE)
- CRESCENDO PEDAL
- CRESCENDO SETTING MODE
- IMPORT CRESCENDO SETTING
- EXPORT CRESCENDO SETTING
- CLASSICO L3
- GUÍA RÁPIDA
- FLUTE, VIOLIN, OBOE, TRUMPET (FLAUTA, VIOLÍN, OBOE, TROMPÉTA)
- 15 PIANO, HARPSICHORD (PIANO, CLAVECÍN)
- KURZANLEITUNG
- 14 STRINGS, CHOIR
- 2 INDICATIONS IMPORTANTES
- 15 PIANO, CLAVECIN
- 18 TUNING ♦ TEMPÉRAMENT
- PARAMÈTRES LOCAL ON/OFF
- BLUETOOTH (SE RENDRE VISIBLE)
- PÉDALE CRESCENDO
- MODE CONFIGURATION CRESCENDO
- IMPORTERCONFIGURATIONCRESCENDO
- EXPORTERCONFIGURATIONCRESCENDO
- AVIS
- EUROPEAN COMMUNITY DECLARATION OF CONFORMITY RADIO AND TELECOMMUNICATIONS TERMINAL EQUIPMENT
Brand : Dexibell
Model : Classico L4
Category : Electronic musical instrument