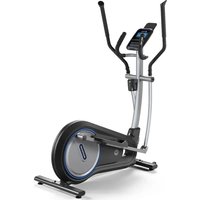
Milos 3.0 - Elliptical bike Horizon Fitness - Free user manual and instructions
Find the device manual for free Milos 3.0 Horizon Fitness in PDF.


| Product type | Elliptical trainer |
| Brand | Horizon Fitness |
| Model | Milos 3.0 |
| Dimensions (L x W x H) | 135.9 x 66.0 x 163.0 cm |
| Maximum user weight | 130 kg / 286 lbs |
| Power supply | Mains power via power cord (wall outlet) |
| Display | LCD screen: Time, RPM, Distance, Calories, Heart rate, Speed, Resistance level |
| Workout programs | Manual, Intervals, Weight loss, Rolling, Cadence, Distance goal, Calorie goal, Challenge, FCC zone (target heart rate), Custom 1 |
| Resistance | Adjustable resistance levels via ▲▼ keys or quick keys |
| Heart rate sensors | Integrated pulse grips + Bluetooth compatibility (optional chest strap) |
| Movement | Forward and reverse pedaling; multiple foot positions |
| Transport | Integrated transport wheels in front stabilizer tube |
| Leveling | Adjustable leveling feet under the frame |
| Safety standard | EN957-1/9, class HB (domestic use) |
| Use | Household use only |
| Maintenance | Clean with a slightly damp cloth and soap; do not use solvents |
| Included accessories | Reading/tablet holder, bottle holder |
| Adjustable feet | Yes, 4 leveling feet |
| Bluetooth | Yes, for heart rate belt and app |
| Energy saving mode | Yes, goes to standby after 15 min of inactivity (can be activated) |
| Warranty | Warranty void if used for non-household purposes (see manual) |
Frequently Asked Questions - Milos 3.0 Horizon Fitness
User questions about Milos 3.0 Horizon Fitness
0 question about this device. Answer the ones you know or ask your own.
Ask a new question about this device
Download the instructions for your Elliptical bike in PDF format for free! Find your manual Milos 3.0 - Horizon Fitness and take your electronic device back in hand. On this page are published all the documents necessary for the use of your device. Milos 3.0 by Horizon Fitness.
USER MANUAL Milos 3.0 Horizon Fitness
Read the ELLIPTICAL GUIDE before using this OWNER'S MANUAL.
SAVE THESE INSTRUCTIONS
Read this ELLIPTICAL GUIDE before using the OWNER'S MANUAL. When using an electrical product, basic precautions should always be followed, including the following: Read all instructions before using this elliptical. It is the responsibility of the owner to ensure that all users of this elliptical are adequately informed of all warnings and precautions.



WARNING
TO REDUCE THE RISK OF BURNS, FIRE, ELECTRICAL SHOCK OR INJURY TO PERSONS:
- If you experience any kind of pain, including but not limited to chest pains, nausea, dizziness, or shortness of breath, stop exercising immediately and consult your physician before continuing.
- When exercising, always maintain a comfortable pace. Do not sprint above 80 RPMs on this machine. Incorrect or excessive exercise may damage your health.
- To maintain balance, it is recommended to keep a grip on the handlebars while exercising, mounting or dismounting the machine.
- Do not turn pedal arms by hand.
- Make sure handlebars are secure before each use.
- Keep the topside of the foot support clean and dry.
- Care should be taken when mounting or dismounting the equipment. Before mounting or dismounting, move the pedal on the mounting or dismounting side to its lowest position and bring the machine to a complete stop.
- Do not wear clothes that might catch on any part of the elliptical.
• Always wear athletic shoes while using this equipment. - Do not jump on the elliptical.
- At no time should more than one person be on the elliptical while in operation.
- This elliptical is intended for in-home use only. Do not use this elliptical in any commercial, rental, school or institutional setting. Failure to comply will void the warranty.
- Do not use elliptical in any location that is not temperature controlled, such as but not limited to garages, porches, pool rooms, bathrooms, car ports or outdoors. Failure to comply will void the warranty.
• This elliptical complies with the EN957-1/9 standard, class of elliptical: HB; braking system is adjustable.
• To prevent electrical shock, never drop or insert any object into any opening. - Keep power cord away from heated surfaces. Do not carry this unit by it's supply cord or use the cord as a handle.
- Disconnect all power before servicing or moving the equipment. To clean, wipe surfaces down with soap and slightly damp cloth only; never use solvents. (See MAINTENANCE)
- Do not use other attachments that are not recommended by the manufacturer. Attachments may cause injury.
- Do not operate where aerosol (spray) products are being used or when oxygen is being administered.
- Use the elliptical only as described in the elliptical guide and owner's manual.
- The equipment shall be installed on a stable base.
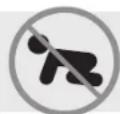
At NO time should children under the age of 14 be closer to the elliptical than 10 feet.
At NO time should children under the age of 14 use the elliptical.
Children over the age of 14 or disabled persons should not use the elliptical without adult supervision.
It is essential that your elliptical is used only indoors, in a climate controlled room. If your elliptical has been exposed to colder temperatures or high moisture climates, it is strongly recommended that the elliptical is warmed up to room temperature before first time use. Failure to do so may cause premature electronic failure.
GROUNDING INSTRUCTIONS
If an elliptical should malfunction or breakdown, grounding provides a path of least resistance for electrical current to reduce the risk of electrical shock. This product is equipped with a cord having an equipment-grounding conductor and a grounding plug. The plug must be plugged into an appropriate outlet that is properly installed and grounded in accordance with local codes and ordinances.
Improper connection of the equipment-grounding conductor can result in a risk of electric shock. Check with a qualified electrician or serviceman if you are in doubt as to whether the product is properly grounded. Do not modify the plug provided with the product. If it will not fit the outlet, have a proper outlet installed by a qualified electrician.

WARNING
Connect this exercise product to a properly grounded outlet only.
Never operate product with a damaged cord or plug even if it is working properly. Never operate any product if it appears damaged, or has been immersed in water. Contact your Locad Dealer for replacement or repair.

ENSOLID
BASIC OPERATION
CONGRATULATIONS ON CHOOSING YOUR ELLIPTICAL!
You've taken an important step in developing and sustaining an exercise program! Your elliptical is a tremendously effective tool for achieving your personal fitness goals. Regular use of your elliptical can improve the quality of your life in so many ways.
Here are just a few of the health benefits of exercise:
- Weight loss
• A healthier heart - Improved muscle tone
- Increased daily energy levels
The key to reaping these benefits is to develop an exercise habit. Your new elliptical will help you eliminate obstacles that prevent you from exercising. Inclement weather and darkness won't interfere with your workout when you use your elliptical in the comfort of your home. This guide provides you with basic information for using and enjoying your new machine.


LOCATION OF THE ELLIPTICAL
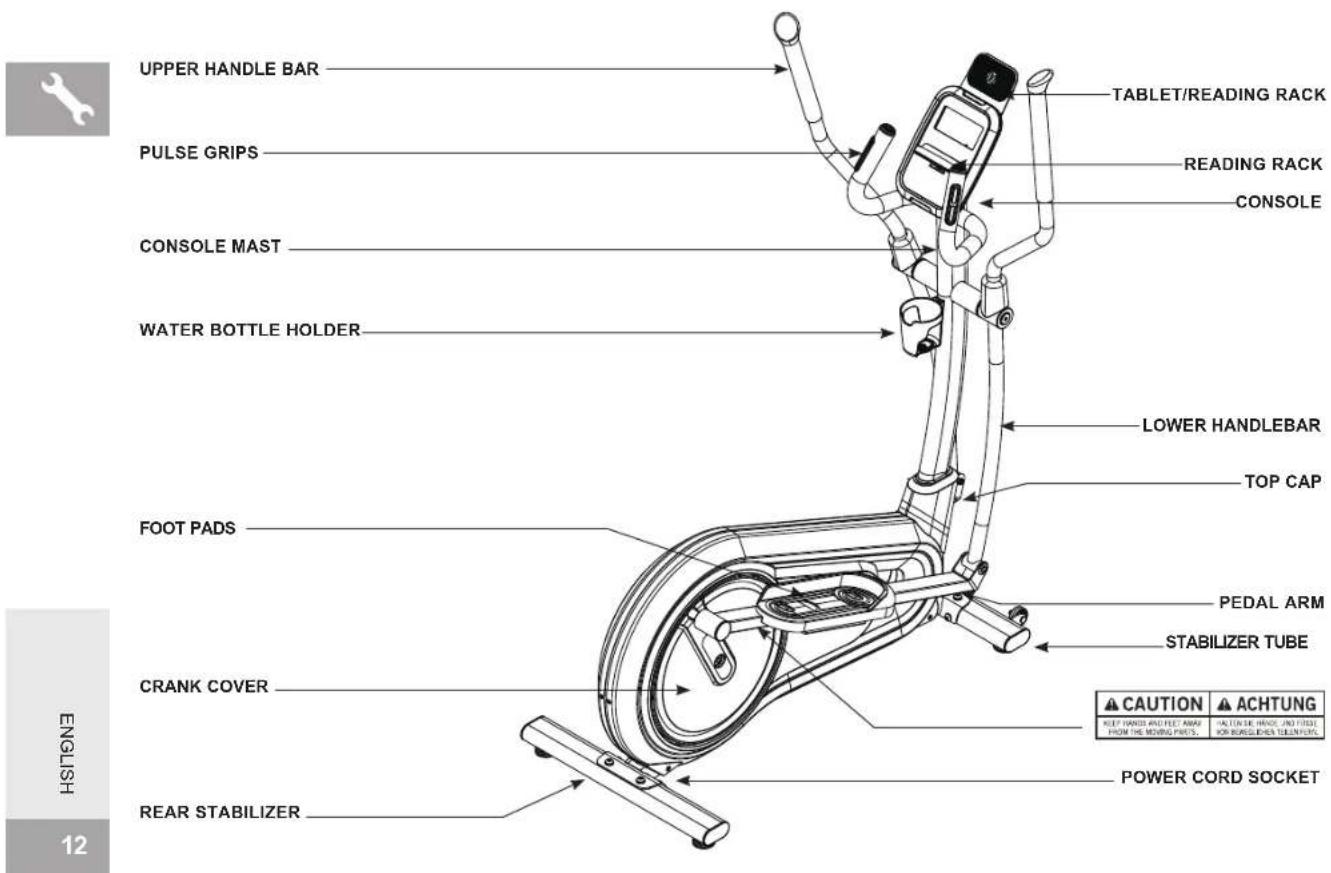
Place the elliptical on a level surface. We advice there should be clearance around your elliptical trainer (see guide). Do not place the elliptical in any area that will block any vent or air openings.
POWER
Your elliptical is powered by a power supply. The power must be plugged into the power jack, which is located in the bottom of the machine near the stabilizer tube. Some ellipticals have a power switch, located next to the power jack. Make sure it is in the ON position. NOTE: Some ellipticals have an ON/OFF switch located behind the console.
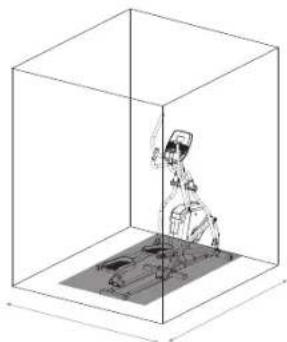
TRAINING AREA
173 x 63.5 x 200 cm / 68" x 25" x 78.7"
FREE AREA
418 x 247.5 x 300 cm / 164.6" x 97.4" x 118"

WARNING
Never operate product if it has a damaged cord or plug, if it is not working properly, if it has been damaged, or immersed in water. Please contact our service centre for technical support, repair or new parts.
FOOT POSITIONING
Your elliptical offers a variety of foot positions. Moving your foot to the forward most position of the foot pad increases your step height, which will create a feel similar to a step machine. Placing your foot toward the back of the foot pad decreases your step height and creates more of a gliding feel, similar to a smooth walk or run. Always make sure your entire foot is secured on the foot pad.
Your elliptical also allows you to pedal both forward and backwards to offer a variation to your workout and to focus on other major leg muscle groups such as your hamstrings and calves.
WORKOUT OPTIONS
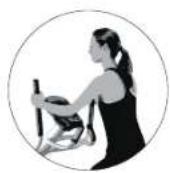
FULL BODY WORKOUT
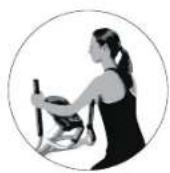
For a full body workout, push and pull continuously on the dual action arms while pedaling.
MOUNTING THE ELLIPTICAL
- Stand on the side of the elliptical next to the lowest foot pedal.
- While holding both of the stationary handlebars, place your foot on the lowest foot pedal and pull yourself up onto the elliptical.
- Wait until the elliptical finds its resting place and then place your other foot on the opposite pedal.

MOVING THE ELLIPTICAL
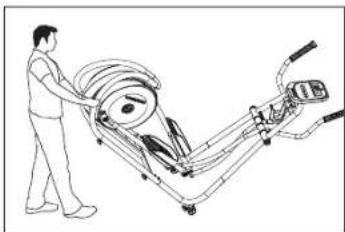
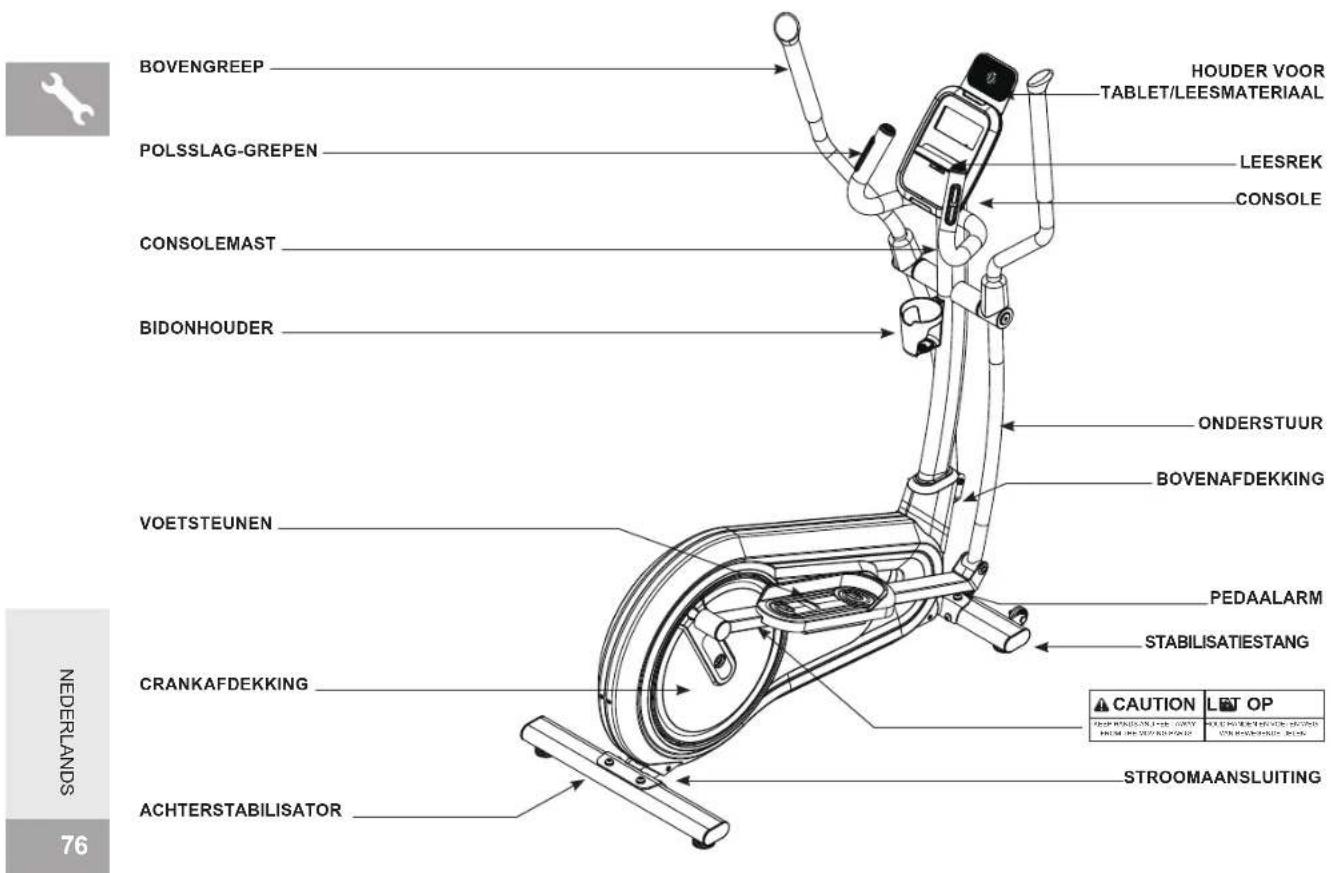
Your elliptical has a pair of transport wheels built into the front stabilizer tube. To move, first remove the power supply and firmly grasp the steel portion of the rear stabilizer bar, carefully tilt and roll. NOTE: be sure to grab the steel bar and not the plastic cover.
WARNING
Our ellipticals are heavy, use care and additional help if necessary when moving. Failure to follow these instructions could result in injury.
LEVELING THE ELLIPTICAL
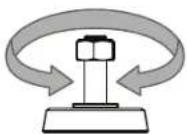
Your elliptical should be leveled for optimum use. Once you have placed your elliptical where you intend to use it, raise or lower one or both of the adjustable levelers located on the bottom of the elliptical frame*. A carpenter's level is recommended. Once you have leveled your elliptical, lock the levelers in place by tightening the nuts against the frame. *NOTE: Some ellipticals do not have levelers.
ADJUST
HEIGHT

USING THE HEART RATE FUNCTION
Your elliptical could be equipped with either heart rate pulse grips or a thumb pulse sensor. To find out what your model has, refer to the beginning of the ASSEMBLY section of your OWNER'S MANUAL.
The heart rate function on this product is not a medical device. While heart rate grips or a thumb pulse sensor can provide a relative estimation of your actual heart rate, they should not be relied on when accurate readings are necessary. Some people, including those in a cardiac rehab program, may benefit from using an alternate heart rate monitoring system like a chest or wrist strap. Various factors, including movement of the user, may affect the accuracy of your heart rate reading. The heart rate reading is intended only as an exercise aid in determining heart rate trends in general. Please consult your physician.
PULSE GRIPS
Place the palm of your hands directly on the grip pulse handlebars. Both hands must grip the bars for your heart rate to register. It takes 5 consecutive heart beats (15-20 seconds) for your heart rate to register. When gripping the pulse handlebars, do not grip tightly. Holding the grips tightly may elevate your blood pressure. Keep a loose, cupping hold. You may experience an erratic readout if consistently holding the grip pulse handlebars. Make sure to clean the pulse sensors to ensure proper contact can be maintained.

CAUTION
Do not press excessively hard on the sensor as this may cause damage.
ASSEMBLY

WARNING
There are several areas during the assembly process that special attention must be paid. It is very important to follow the assembly instructions correctly and to make sure all parts are firmly tightened. If the assembly instructions are not followed correctly, the elliptical could have frame parts that are not tightened and will seem loose and may cause irritating noises. To prevent damage to the elliptical, the assembly instructions must be reviewed and corrective actions should be taken.
SERIAL NUMBER LOCATION
ENTER YOUR SERIAL NUMBER AND MODEL NAME IN THE BOXES BELOW:
SERIAL NUMBER:

MODEL NAME:


TOOLS REQUIRED:
□ 13/15 mm Flat Wrench
□ 5 mm L-Wrench
□ 6 mm L-Wrench
□ Screwdriver
PARTS INCLUDED:
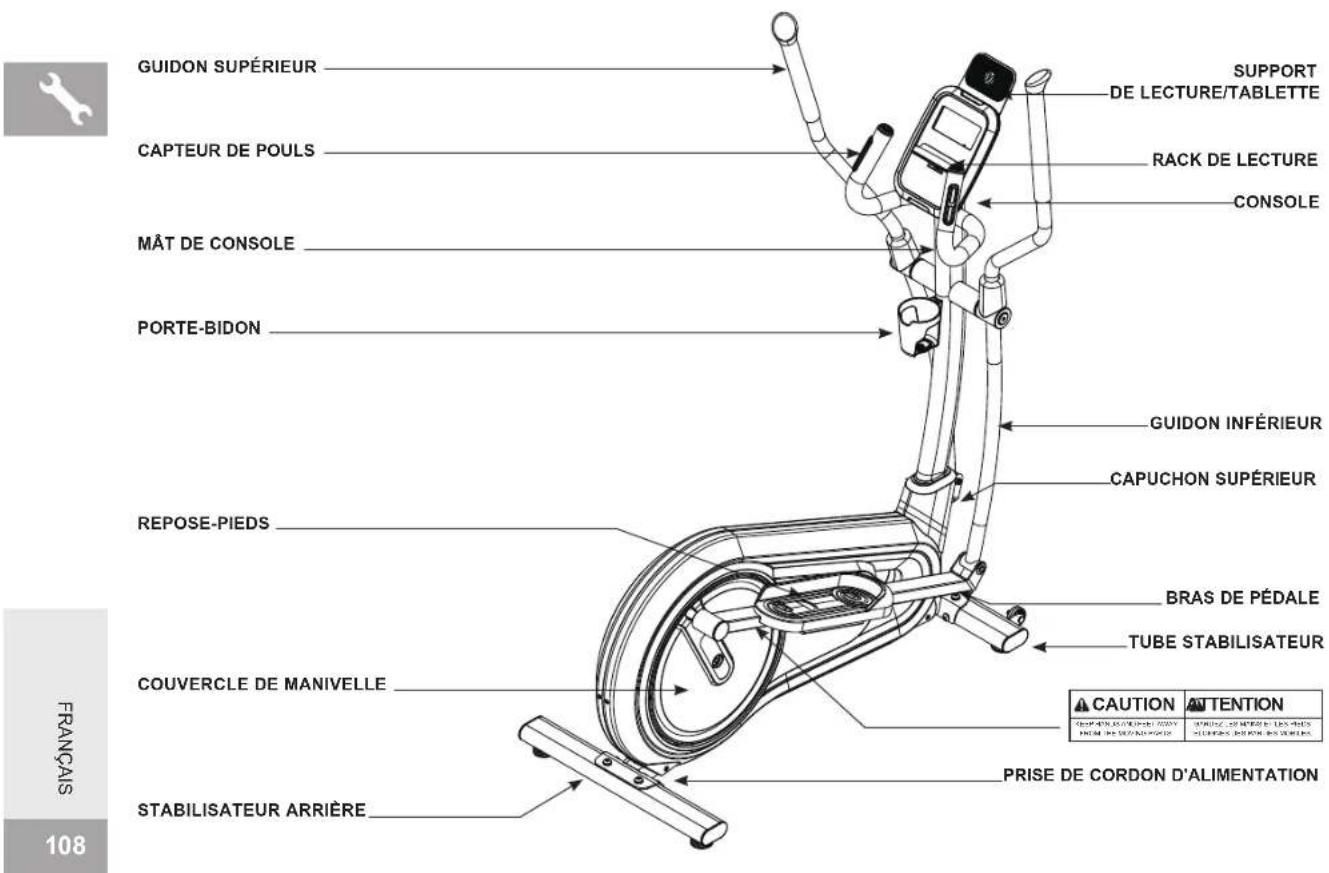
□ 1 Console
□ 2 Upper Handlebars
□ 2 Upper Handlebars Covers
□ 1 Console Mast
□ 1 Console Mast Covers
□ 1 Stabilizer Tube
□ 1 Rear Stabilizer
□ 1 Water Bottle Holder
□ 2 Pedal Arms
2 Lower Handlebars
□ 2 Foot Pads
□ 1 Main Frame Assembly
□ 1 Adapter Cable
□ 1 Tablet/Reading Rack
PRE ASSEMBLY
UNPACKING
Unpack the product where you will be using it. Place the elliptical carton on a level flat surface. It is recommended that you place a protective covering on your floor. Never open box when it is on its side.
WARNING
- It is recommended that two people work together for ease and efficiency while assembling an elliptical.
- During each assembly step, ensure that ALL nuts and bolts are in place and partially threaded. It is recommended you complete the full assembly of your unit before completely tightening any ONE bolt.
- Several parts have been pre-lubricated to aid in assembly and usage. Please do not wipe this off. If you have difficulty, a light application of lithium bike grease is recommended.
NEED HELP?
If you have questions or if there are any missing parts, please refer to safety sticker on product to contact Customer Tech Support.
ASSEMBLY STEP 1
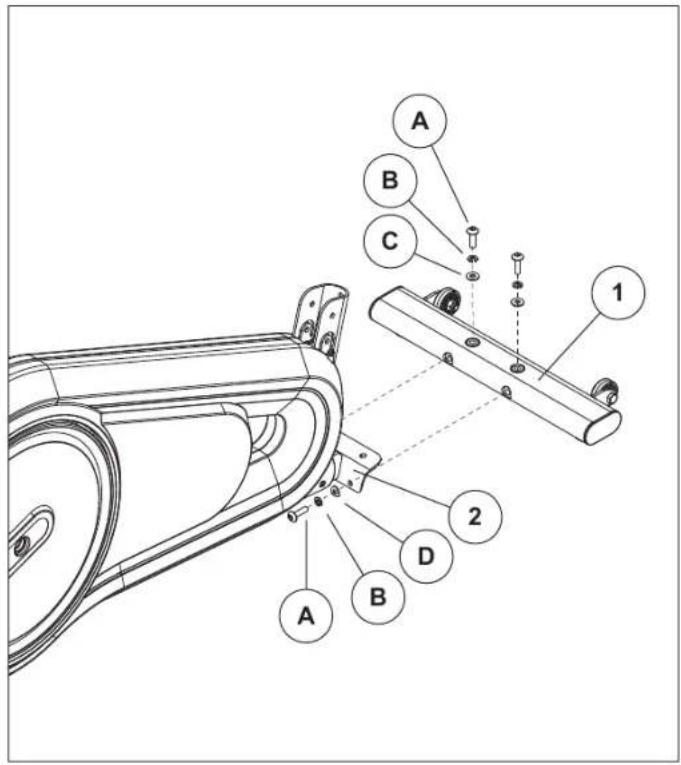
| HARDWARE FOR STEP 1 | |||
| PART TYPE DESCRIPTION QTY | |||
| A BOLT M8 4 | |||
| B SPRING WASHER ∅8.0 4 | |||
| C FLAT WASHER ∅8.2 2 | |||
| D ARC WASHER ∅8.2 2 | |||
A Open HARDWARE.
B Attach the STABILIZER TUBE (1) to the MAIN FRAME (2) using 4 BOLTS (A), 4 SPRING WASHERS (B), 2 FLAT WASHER (C) and 2 ARC WASHERS (D).
ASSEMBLY STEP 2

| HARDWARE FOR STEP 2 | |||
| PART TYPE DESCRIPTION QTY | |||
| A BOLT M8 4 | |||
| B SPRING WASHER ∅8.0 4 | |||
| C FLAT WASHER ∅8.2 2 | |||
| D ARC WASHER ∅8.2 2 | |||
A Attach REAR STABILIZER(3) with MAIN FRAME (2) as shown using 4 BOLTS (A), 4 SPRING WASHERS (B), 2 FLAT WASHER (C) and 2 ARC WASHERS (D).
ASSEMBLY STEP 3
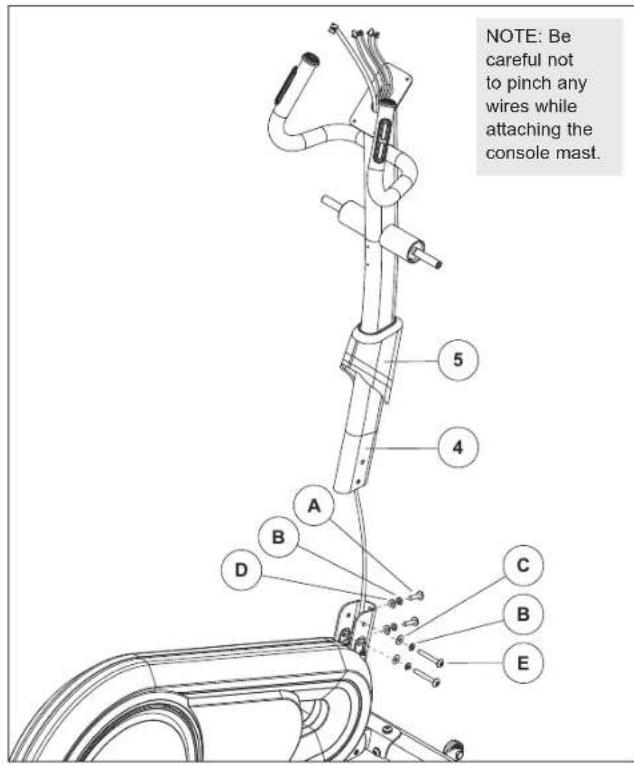
| HARDWARE FOR STEP 3 | |||
| PART TYPE DESCRIPTION QTY | |||
| A BOLT M8 2 | |||
| B SPRING WASHER ∅8.2 4 | |||
| C FLAT WASHER ∅8.2 2 | |||
| D ARC WASHER ∅8.2 2 | |||
| E BOLT M8 2 | |||
A Attach CONSOLE MAST COVER (5), LEAD WIRE to bottom end of CONSOLE CABLE. Pull LEAD WIRE through CONSOLE MAST (4). After pulling the lead wire through the mast, the top of the CONSOLE CABLE should be located at the top of the mast.
B Attach CONSOLE MAST (4) to MAIN FRAME (2) using 2 BOLTS (A), 2 SPRING WASHERS (B), and 2 ARC WASHERS (D).
C Attach CONSOLE MAST (4) to MAIN FRAME (2) using 2 BOLTS (E), 2 SPRING WASHERS (B), and 2 FLAT WASHERS (C).
ASSEMBLY STEP 4
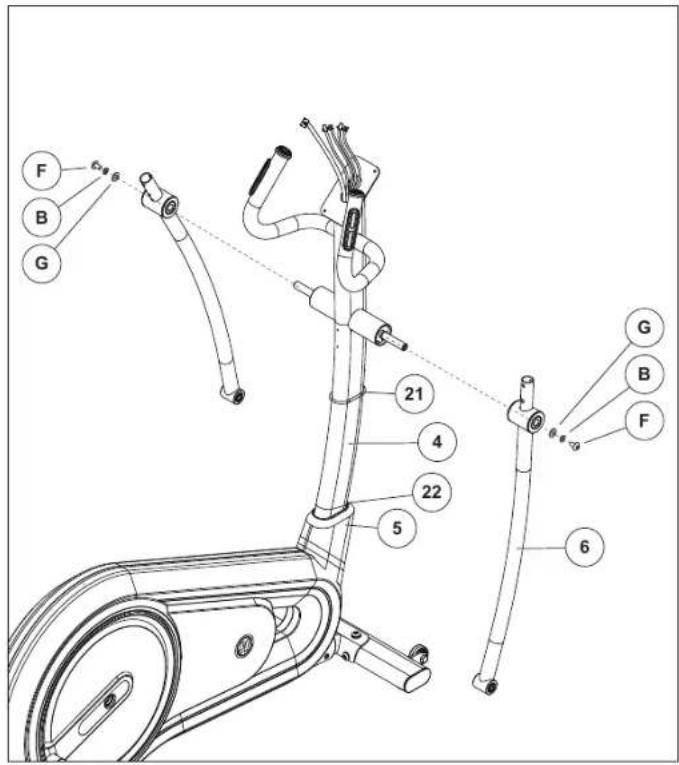
| HARDWARE FOR STEP 4 | |||
| PART TYPE DESCRIPTION QTY | |||
| B SPRING WASHER ∅8.2 2 | |||
| F BOLT M8 2 | |||
| G FLAT WASHER ∅8.2 2 | |||
A Slide O-RING (21) down to position (22) to secure CONSOLE MAST GROMMET (5).
B Attach the LOWER HANDLEBARS (6) to the CONSOLE MAST (4) using 2 BOLTS (F), 2 SPRING WASHERS (B), and 2 FLAT WASHERS (G).
ASSEMBLY STEP 5
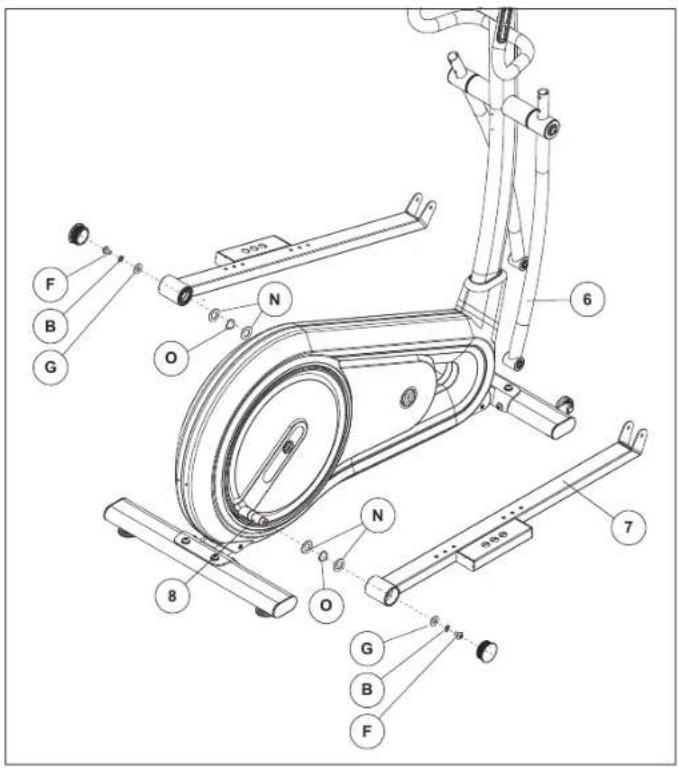
| HARDWARE FOR STEP 5 | |||
| PART TYPE DESCRIPTION QTY | |||
| B SPRING WASHER ∅8 2 | |||
| F BOLT M8 2 | |||
| G FLAT WASHER ∅8.2 2 | |||
| N FLAT WASHER ∅20.2 4 | |||
| O | WAVE WASHER | ∅20.7 | 2 |
A Using 4 FLAT WASHER (N), 2 WAVE WASHER (O) and attach the PEDAL ARMS (7) to the CRANK COVER (8) using 2 BOLTS (F), 2 SPRING WASHERS (B), and 2 FLAT WASHERS (G).
ASSEMBLY STEP 6
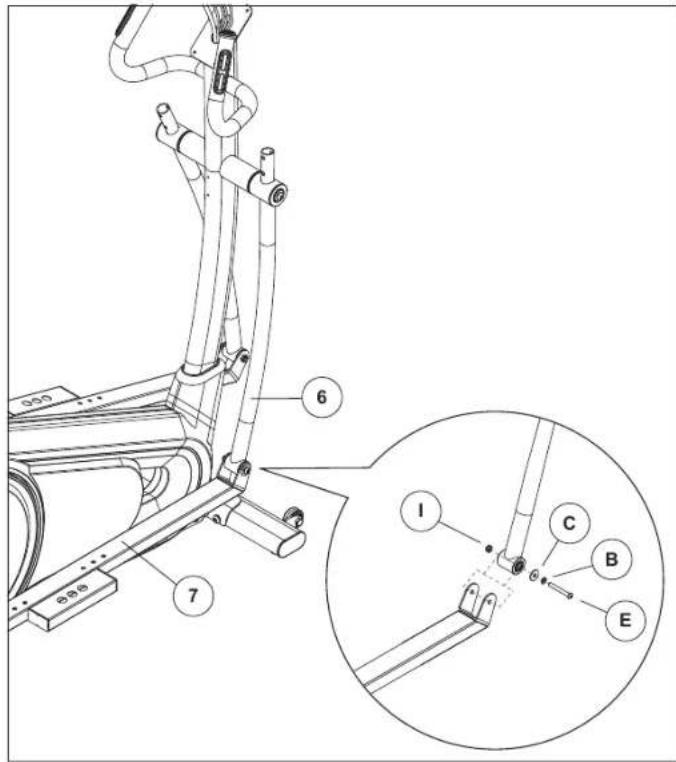
| HARDWARE FOR STEP 6 | |||
| PART TYPE DESCRIPTION QTY | |||
| B SPRING WASHER ∅8.2 2 | |||
| C FLAT WASHER ∅8.2 2 | |||
| E BOLT M8 2 | |||
| I NUT M8 2 | |||
A Attach the PEDAL ARMS (7) to the LOWER HANDLEBARS (6) using 2 BOLTS (E), 2 SPRING WASHERS (B), 2 FLAT WASHERS (C) and 2 NUT(I).
ASSEMBLY STEP 7
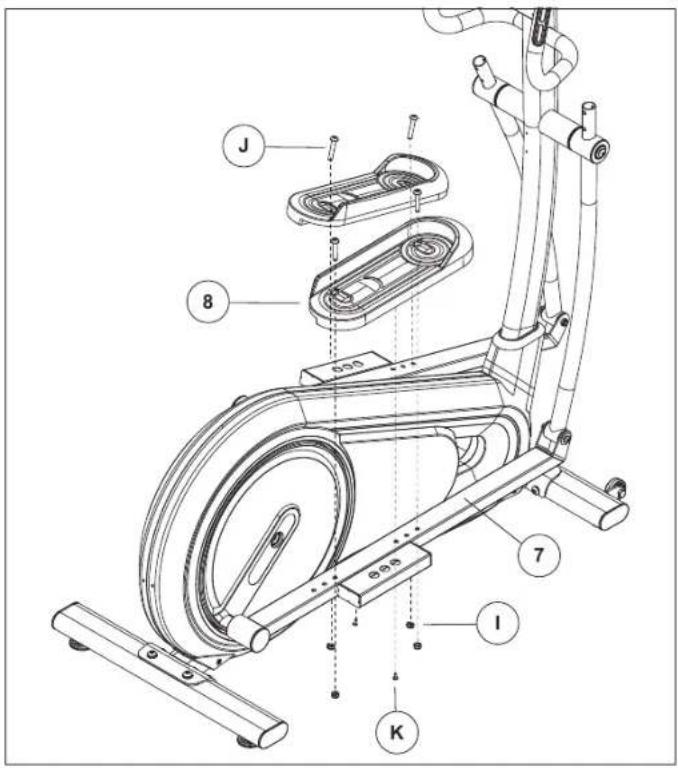
| HARDWARE FOR STEP 7 | |||
| PART TYPE DESCRIPTION QTY | |||
| I NUT M8 4 | |||
| J BOLT M8 4 | |||
| K SCREW ∅4 2 | |||
A Attach the FOOT PADS (8) to the PEDAL ARMS (7) using 4 BOLTS (J), 2 SCREW (K) and 4 NUT(I).
ASSEMBLY STEP 8
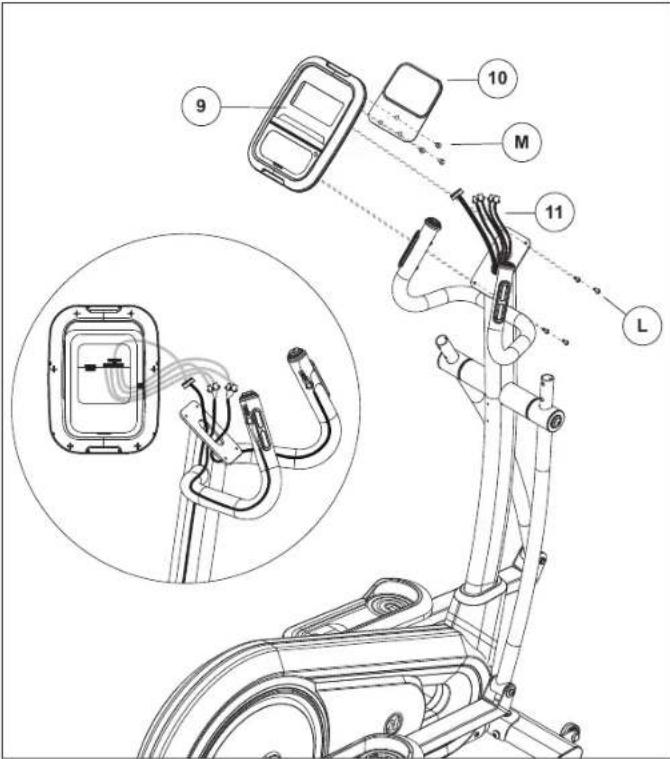
| HARDWARE FOR STEP 8 | |||
| PART TYPE DESCRIPTION QTY | |||
| L SCREW M5 4 | |||
| M SCREW M6 3 | |||
NOTE: Do not to pinch any wires while attaching the console.
A Attach the CONSOLE (9) to the TABLET/READING RACK (10) using 3 SCREW (M).
B Attach the CONSOLE (9) to the WIRE (11) using 4 SCREW (L).
ASSEMBLY STEP 9
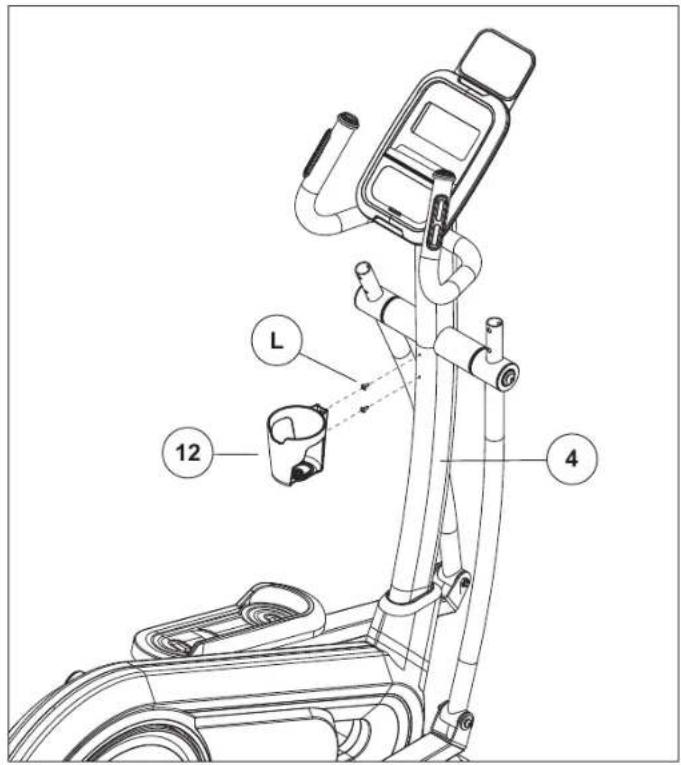
| HARDWARE FOR STEP 9 | |||
| PART TYPE DESCRIPTION QTY | |||
| L SCREW M5 2 | |||
A Attach the WATTER BOTTLE HOLDER (12) to the CONSOLE MAST (4) using 2 SCREW (L).
ASSEMBLY STEP 10
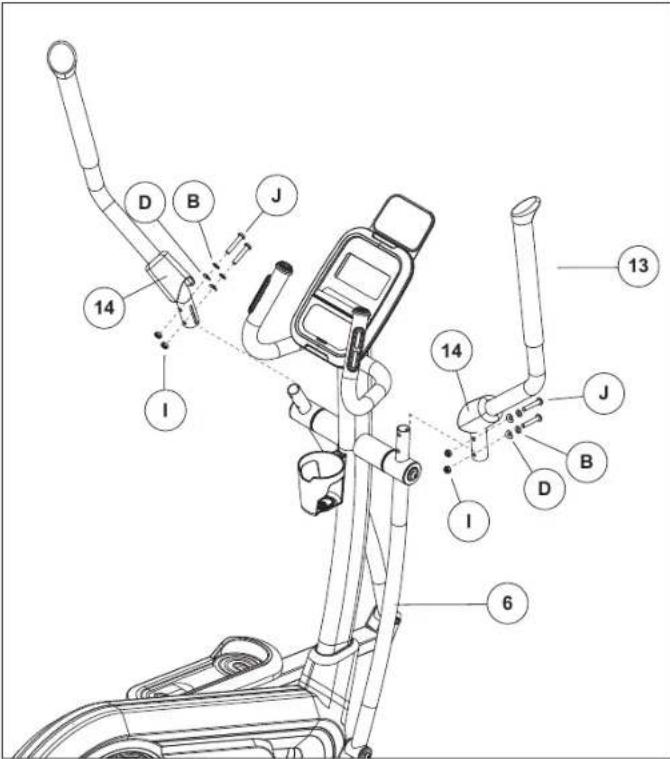
| HARDWARE FOR STEP 10 | |||
| PART TYPE DESCRIPTION QTY | |||
| B SPRING WASHER ∅8.2 4 | |||
| D ARC WASHER ∅8.2 4 | |||
| I NUT M8 4 | |||
| J BOLT M8 4 | |||
A Attach the UPPER HANDLEBAR COVER (14), UPPER HANDLEBAR (13) to the LOWER HANDLEBAR (6) using 4 BOLT (J), 4 SPRING WASHERS (B), 4 ARC WASHERS (D) and 4 NUT (I).
ASSEMBLY STEP 11
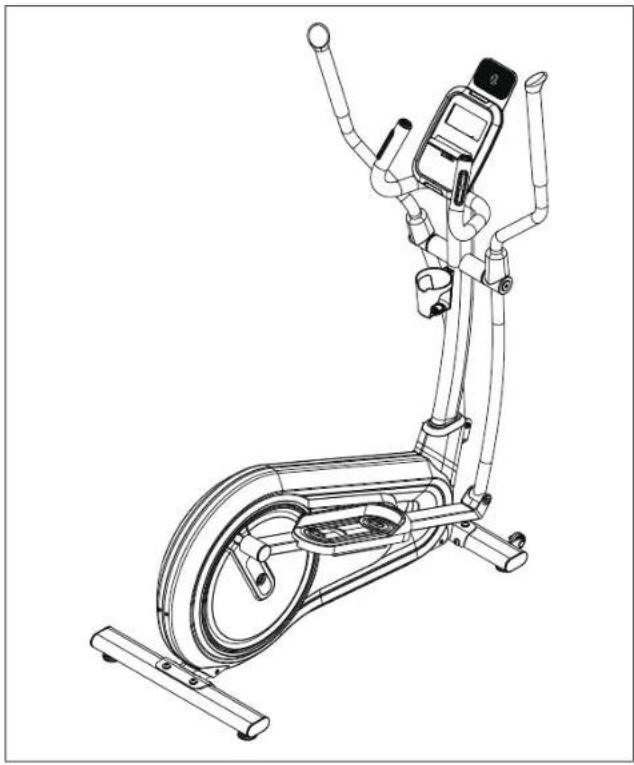
ASSEMBLY COMPLETE!
Milos 3.0
Max. User Weight: 130 kg / 286 lbs.
Overall Dimensions: 135.9 x 66.0 x 163.0 cm
This section explains how to use your elliptical's console and programming. For the BASIC OPERATION please see the ELLIPTICAL GUIDE.


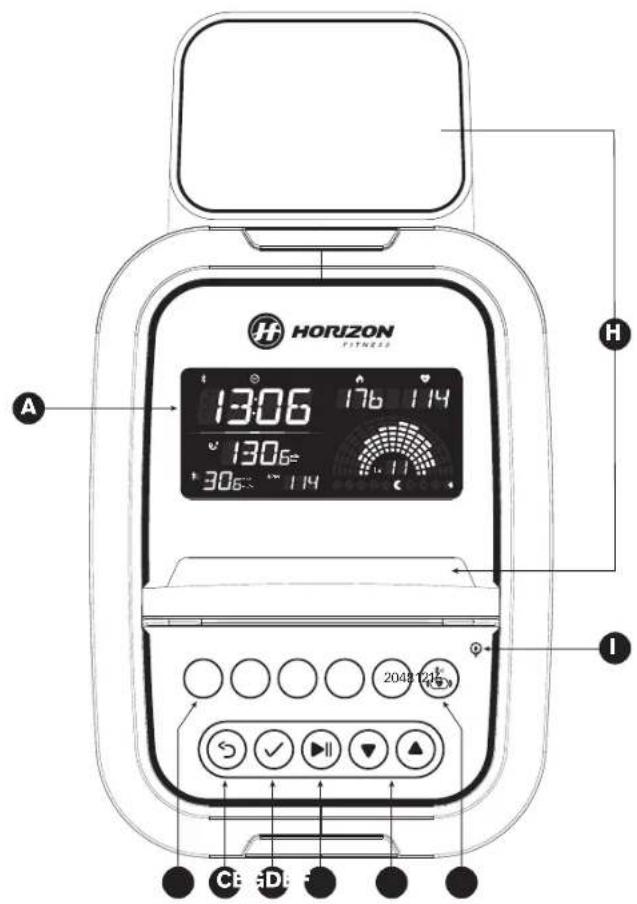
CONSOLE OPERATION
Note: There is a thin protective sheet of clear plastic on the overlay of the console that should be removed before use.
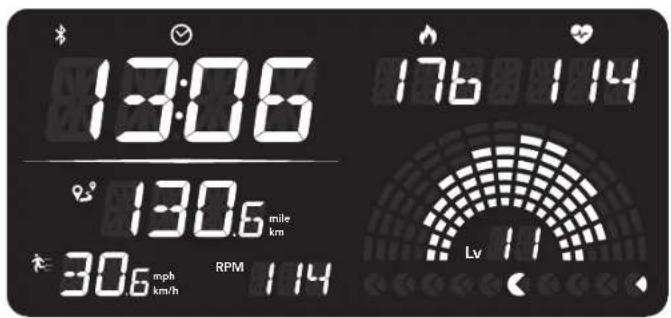
A) LCD DISPLAY WINDOW: time, RPM, distance, calories, heart rate, speed, resistance level.
B) QUICK KEYS: used to reach desired resistance quickly.
C) RETURN: return to the last step.
D) ENTER: used to confirm selection.
E) START / PAUSE HOLD TO RESET : used to start workout, pause workout, and restart after pause.
F) ▼▲KEYS: used to adjust resistance level and to cycle through selections during program set up.
G) BLUETOOTH HEART RATE: press and hold 3 sec to connect to the Bluetooth heart rate strap. (APP & BT heart rate strap could only connect one at a time).
H) TABLET/READING RACK: holds reading material.
I) ENERGY SAVER MODE: indicates if the machine is in energy saver mode.

DISPLAY WINDOW
• ✅ TIME: Shown as minutes : seconds. View the time remaining or the time elapsed in your workout.
• 9° DISTANCE: Indicates distance traveled during your workout.
• CALORIES: Total calories burned or remaining for your workout.
- SPEED: Indicates how fast the foot pads is moving.
• HEART RATE: Shown as BPM (beats per minute). Used to monitor your heart rate (displayed when contact is made with both pulse grips or Bluetooth heart rate was connected).
- BLUETOOTH: Indicates the Bluetooth was connected to the machine.
• RPM: Indicates Revolutions Per Minute.
• LEVEL: Indicates the current resistance level.
GETTING STARTED
1) Check to make sure no objects are nearby that will hinder the movement of the elliptical.
2) Plug in the power cord to power the elliptical ON. (Switch is located at the bottom-front of the elliptical.)
3) Set User Weight using ▼ and press ENTER.
4) You have the following options to start your workout:
A) QUICK START UP
Simply press ▶ begin working out. Time, distance and calories will all count up from zero. The resistance level will default to level 1.
B) SELECT A PROGRAM
1) Use ▼o▲roll through programs
2) Press √ to select your desired program.
3) Set workout level using ▼ ▲nd press . √
4) Press ▶∥ to begin workout.
NOTE: You can adjust the resistance level during your workout.
When your workout is complete, the console will display "workout complete" and beep. Your workout information will stay displayed on the console for 60 seconds and then reset.
TO RESET THE CONSOLE
Hold ▶▼▼ for 3 seconds.
TO CLEAR CURRENT SELECTION
To clear the current program selection or screen, hold the button for 3 seconds.
PROGRAM INFORMATION
1) MANUAL: Allows you to adjust the resistance level to your preference, without a preset program. Adjust your resistance manually during your workout. User sets time and resistacne using (up/down arrow) and ENTER.
2) INTERVALS: Improves your strength, speed and endurance by raising and lowering the resistance levels through-out your workout to involve both your heart and muscles. Time based program with 12 levels to choose from.
| INTERVALS | ||||||||||||||||||||
| Warm Up Program Segments-Repeat Cool Down | ||||||||||||||||||||
| Seconds | 60 60 | 60 60 | 30 60 | 60 30 | 30 60 | 30 30 | 60 60 | 60 30 | 30 60 | 60 60 | 60 60 | 60 60 | 60 60 | 60 60 | 60 60 | 60 60 | 60 60 | 60 60 | 60 60 | 60 60 |
| Sement | 1 2 3 | 4 5 6 7 | 8 9 10 | 1 1 2 13 | 14 15 | 16 17 | 18 | 19 20 | ||||||||||||
| Level 1 | 1 2 2 | 3 5 1 1 | 5 5 1 5 | 1 1 5 5 | 3 2 2 1 | |||||||||||||||
| Level 2 | 1 2 2 | 3 6 2 2 | 6 6 2 6 | 2 2 6 6 | 2 3 2 2 1 | |||||||||||||||
| Level 3 | 1 2 2 | 4 7 3 3 | 7 7 3 7 | 3 3 7 7 | 3 4 2 2 1 | |||||||||||||||
| Level 4 | 1 2 2 | 5 8 4 4 | 8 8 4 8 | 4 4 8 8 | 4 5 2 2 1 | |||||||||||||||
| Level 5 | 2 3 5 | 6 9 5 5 | 9 9 5 9 | 5 5 9 9 | 6 5 3 2 | |||||||||||||||
| Level 6 | 2 3 5 | 7 10 6 6 | 10 10 | 8 10 6 6 | 10 10 6 | 7 5 3 2 | ||||||||||||||
| Level 7 | 2 3 5 | 8 11 7 7 | 11 11 | 7 11 7 7 | 11 11 7 | 8 5 3 2 | ||||||||||||||
| Level 8 | 2 3 5 | 9 12 8 8 | 12 12 | 8 12 8 8 | 12 12 8 | 9 5 3 2 | ||||||||||||||
| Level 9 | 3 4 5 | 10 13 9 | 9 13 13 | 9 13 13 | 9 13 13 | 9 10 5 4 | 3 | |||||||||||||
| Level 10 | 3 4 8 | 11 14 1 | 10 10 14 | 14 10 14 | 14 10 14 | 14 14 10 | 11 8 4 | 3 | ||||||||||||
| Level 11 | 3 6 10 | 12 15 | 11 11 15 | 15 11 15 | 15 11 15 | 15 15 15 | 11 12 10 | 6 3 | ||||||||||||
| Level 12 | 3 6 10 | 13 16 | 12 12 15 | 16 12 15 | 16 12 15 | 16 16 15 | 12 13 10 | 6 3 | ||||||||||||
3) WEIGHT LOSS: Promote weight loss by rasing and lowering the resistance level, while keeping you in your fat burning zone. Time based program with 12 levels to choose from. User sets time and level using (up/down arrows) and ENTER. Please drink enough water while and after doing exercise to enhance the weight loss results.
| WEIGHT LOSS | ||||||||||||||||||||
| Warm Up Program Segments-Repeat Cool Down | ||||||||||||||||||||
| Seconds | 60 60 | 60 60 | 60 60 | 60 60 | 60 60 | 60 60 | 60 60 | 60 60 | 60 60 | 60 60 | 60 60 | 60 60 | 60 60 | 60 60 | 60 60 | 60 60 | 60 60 | 60.60 | 60.60 | 60.60 |
| Sement | 1 2 3 | 4 5 6 7 | 8 9 10 | 1 12 13 | 14 15 | 16 17 18 | 19 20 | |||||||||||||
| Level 1 | 1 2 2 | 3 3 3 4 | 4 5 5 5 | 5 4 4 3 | 3 3 2 2 1 | |||||||||||||||
| Level 2 | 1 2 2 | 3 4 4 5 | 5 6 6 6 | 5 5 5 4 | 4 3 2 2 1 | |||||||||||||||
| Level 3 | 1 2 2 | 4 5 5 6 | 6 7 7 7 | 7 6 6 5 | 5 4 2 2 1 | |||||||||||||||
| Level 4 | 1 2 2 | 5 6 6 7 | 7 8 8 8 | 8 7 7 6 | 6 5 2 2 1 | |||||||||||||||
| Level 5 | 2 3 5 | 6 7 7 8 | 8 9 9 9 | 9 8 8 7 | 7 6 5 3 2 | |||||||||||||||
| Level 6 | 2 3 5 | 7 8 8 9 | 9 10 10 | 10 10 9 | 9 8 8 7 | 5 3 2 | ||||||||||||||
| Level 7 | 2 3 5 | 8 9 9 10 | 10 11 11 | 11 11 11 | 10 10 9 | 9 8 5 3 2 | ||||||||||||||
| Level 8 | 2 3 5 | 9 10 10 | 11 11 12 | 12 12 12 | 12 11 11 | 11 10 10 | 9 5 3 2 | |||||||||||||
| Level 9 | 3 4 5 | 10 11 11 | 11 12 12 | 13 13 13 | 13 13 12 | 12 11 11 | 10 5 4 3 | |||||||||||||
| Level 10 | 3 4 8 | 11 12 12 | 13 13 13 | 14 14 14 | 14 13 13 | 13 12 12 | 11 8 4 3 | |||||||||||||
| Level 11 | 3 6 10 | 12 13 13 | 14 14 14 | 15 15 15 | 15 15 14 | 14 13 13 | 13 12 10 | 6 3 | ||||||||||||
| Level 12 | 3 6 10 | 13 14 14 | 15 15 15 | 16 16 16 | 16 16 15 | 15 14 14 | 13 10 6 3 | |||||||||||||
4) ROLLING: Maintains weight by gradually raising and lowering the resistance level to gradually raise and lower your heart rate.
| ROLLING | |||||||||||||||||||
| Warm Up Program Segments-Repeat Cool Down | |||||||||||||||||||
| Seconds | 60 60 | 60 60 | 30 | 30 30 | 30 30 | 30 30 | 30 30 | 30 30 | 60 60 | 60 | |||||||||
| Sement | 1 2 3 | 4 5 6 7 | 8 | 9 10 | 1 12 | 13 | 14 15 | 16 17 18 | |||||||||||
| Level 1 | 1 1 2 | 2 1 2 3 | 4 | 3 2 1 | 2 3 2 1 | 1 1 1 | |||||||||||||
| Level 2 | 1 2 2 | 3 2 3 4 | 5 | 4 3 2 | 1 2 3 2 | 1 1 1 | |||||||||||||
| Level 3 | 2 2 3 | 3 3 4 5 | 6 | 7 8 7 | 6 5 4 2 | 1 1 1 | |||||||||||||
| Level 4 | 2 3 3 | 4 4 5 6 | 7 | 8 9 8 | 7 6 5 3 | 1 1 1 | |||||||||||||
| Level 5 | 3 4 4 | 4 5 6 7 | 8 | 9 10 | 9 8 7 6 | 3 3 2 1 | |||||||||||||
| Level 6 | 3 5 4 | 5 6 7 8 | 9 | 10 10 | 10 9 8 | 7 4 3 2 1 | |||||||||||||
| Level 7 | 4 5 5 | 5 7 7 8 | 8 | 9 9 10 | 10 9 8 | 4 3 2 1 | |||||||||||||
| Level 8 | 4 5 5 | 5 8 8 9 | 9 | 10 10 | 11 11 | 10 9 4 3 | 2 1 | ||||||||||||
| Level 9 | 4 5 5 | 5 9 9 10 | 10 | 11 11 | 11 12 | 12 11 10 | 5 4 3 1 | ||||||||||||
| Level 10 | 4 5 6 | 6 10 10 | 11 | 11 12 | 12 13 | 13 12 | 11 6 5 4 | 1 | |||||||||||
| Level 11 | 4 5 7 | 7 11 11 | 12 | 12 13 | 13 14 | 14 13 | 12 6 5 4 | 1 | |||||||||||
| Level 12 | 4 5 8 | 8 12 12 | 13 | 13 14 | 14 15 | 15 14 | 13 7 6 5 | 1 | |||||||||||
| Level 13 | 4 5 9 | 9 13 13 | 14 | 14 15 | 15 16 | 16 15 | 14 7 6 5 | 1 | |||||||||||
| Level 14 | 4 5 9 | 9 14 14 | 15 | 15 16 | 16 16 | 17 16 | 15 8 7 6 | 1 | |||||||||||
5) CADENCE: Special designed chart based program that will simulate resistance being changed randomly.
| CADENCE | |||||||||||||||||||
| Warm Up Program Segments-Repeat Cool Down | |||||||||||||||||||
| Seconds | 60 60 | 60 60 | 90 45 | 90 30 | 45 90 | 30 45 | 90 30 | 45 90 | 60 60 | 60 | |||||||||
| Sement | 1 2 3 | 4 5 6 7 | 8 9 10 | 1 12 | 13 | 14 15 | 16 17 | 18 | 19 20 | ||||||||||
| Level 1 | 2 1 1 | 2 3 2 3 | 1 2 3 1 | 2 3 1 | 2 3 | 2 1 1 1 | |||||||||||||
| Level 2 | 1 1 1 | 2 4 3 4 | 2 3 4 2 | 3 4 2 | 3 4 | 2 1 1 1 | |||||||||||||
| Level 3 | 1 1 1 | 2 5 4 5 | 3 4 5 3 | 4 5 3 | 4 5 | 2 1 1 1 | |||||||||||||
| Level 4 | 1 1 1 | 3 6 5 6 | 4 5 6 4 | 5 6 4 | 5 6 | 3 1 1 1 | |||||||||||||
| Level 5 | 1 2 3 | 3 7 6 7 | 5 6 7 5 | 6 7 5 | 6 7 | 3 3 2 1 | |||||||||||||
| Level 6 | 1 2 3 | 4 8 7 8 | 6 7 8 6 | 7 8 6 | 7 8 | 4 3 2 1 | |||||||||||||
| Level 7 | 1 2 3 | 4 9 8 9 | 7 8 9 7 | 8 9 7 | 8 9 | 4 3 2 1 | |||||||||||||
| Level 8 | 1 2 3 | 5 10 9 | 10 8 9 10 | 10 8 9 10 | 10 8 9 10 | 8 9 10 | 5 3 2 1 | ||||||||||||
| Level 9 | 1 1 1 | 2 11 10 | 11 9 10 | 11 9 10 | 11 9 10 | 11 2 1 | 1 1 | ||||||||||||
| Level 10 | 1 1 1 | 2 12 11 | 12 10 1 | 11 12 10 | 11 12 10 | 11 12 12 | 2 1 1 1 | ||||||||||||
| Level 11 | 2 2 2 | 3 13 12 | 13 11 1 | 12 13 11 | 12 13 11 | 12 13 13 | 2 1 1 1 | ||||||||||||
| Level 12 | 3 3 3 | 4 14 13 | 14 12 1 | 13 14 12 | 13 14 12 | 13 14 14 | 3 1 1 1 | ||||||||||||
| Level 13 | 3 4 4 | 5 15 14 | 15 13 1 | 14 15 13 | 14 15 13 | 13 14 15 | 3 3 2 1 | ||||||||||||
| Level 14 | 3 4 5 | 6 16 15 | 16 14 1 | 15 16 14 | 15 16 14 | 14 15 16 | 4 3 2 1 | ||||||||||||
6) DISTANCE GOAL: Resistance changes and all segments every 0.16 km and repeat (warm up does not repeat).
| DISTANCE GOAL | |||||||||||||||
| Warm Up Program Segments-Repeat | |||||||||||||||
| DISTANCE | 0.16 km 0 | 16 km 0.16 km | 0.16 km 0 | 16 km 0.16 km | 0.16 km 0.16 km | 0.16 km 0.16 km | 0.16 km 0.16 km | 0.16 km 0.16 km | 0.16 km 0.16 km | 0.16 km 0.16 km | 0.16 km 0.16 km | 0.16 km 0.16 km | 0.16 km | 0.16 km | 0.16 km |
| Sement | 1 2 3 4 | 5 6 7 8 9 | 10 11 12 13 | 14 | |||||||||||
| Level 1 | 1 1 1 1 | 1 1 1 1 1 | 1 1 1 1 1 | ||||||||||||
| Level 2 | 1 2 2 3 | 3 5 7 4 6 | 1 4 5 6 3 | ||||||||||||
| Level 3 | 2 2 3 3 | 4 6 8 5 7 | 8 5 6 7 4 | ||||||||||||
| Level 4 | 2 3 3 4 | 6 8 10 7 9 | 10 7 8 9 6 | ||||||||||||
| Level 5 | 3 4 4 4 | 8 10 12 9 | 11 12 9 10 | 11 8 | |||||||||||
| Level 6 | 3 5 4 5 | 10 12 14 | 11 13 14 11 | 12 13 10 | |||||||||||
| Level 7 | 4 5 5 5 | 11 13 15 | 12 14 15 12 | 13 14 11 | |||||||||||
| Level 8 | 4 5 5 5 | 13 15 17 | 14 16 17 14 | 15 16 13 | |||||||||||
| Level 9 | 4 5 5 5 | 15 17 19 | 16 18 19 16 | 17 18 15 | |||||||||||
| Level 10 | 4 5 6 6 | 16 18 20 | 17 19 20 17 | 18 19 16 | |||||||||||
7) CALORIES GOAL: Resistance changes and all segments every 20 calories and repeat (warm up does not repeat).
| CALORIES GOAL | |||||||||||||||
| Warm Up Program Segments-Repeat | |||||||||||||||
| CALORIES | 20 cal 20 | cal 20 cal 20 | cal 20 cal 20 | cal 20 cal 20 | cal 20 cal 20 | cal 20 cal 20 | cal 20 cal 20 | cal 20 cal 20 | cal 20 cal 20 | cal 20 cal 20 | cal 20 cal 20 | cal 20 cal 20 | cal 19 cal 20 | cal 19 cal 20 | cal 19 cal 20 |
| Sement | 1 2 3 4 | 5 6 7 8 9 | 10 11 12 13 | 14 | |||||||||||
| Level 1 | 1 1 1 1 | 1 1 1 1 1 | 1 1 1 1 1 | ||||||||||||
| Level 2 | 1 2 2 3 | 3 5 7 4 6 7 | 4 5 6 3 | ||||||||||||
| Level 3 | 2 2 3 3 | 4 6 8 5 7 8 | 5 6 7 4 | ||||||||||||
| Level 4 | 2 3 3 4 | 6 8 10 7 9 | 10 7 8 9 6 | ||||||||||||
| Level 5 | 3 4 4 4 | 8 10 12 9 | 11 12 9 10 | 18 | |||||||||||
| Level 6 | 3 5 4 5 | 10 12 14 | 11 13 14 11 | 12 13 10 | |||||||||||
| Level 7 | 4 5 5 5 | 11 13 15 | 12 14 15 12 | 13 14 11 | |||||||||||
| Level 8 | 4 5 5 5 | 13 15 17 | 14 16 17 14 | 15 16 13 | |||||||||||
| Level 9 | 4 5 5 5 | 15 17 19 | 16 18 19 16 | 17 18 15 | |||||||||||
| Level 10 | 4 5 6 5 | 16 18 20 | 17 19 20 17 | 18 19 16 | |||||||||||
8) CHALLENGE: During this work out, record as a record based on the value of the distance goal program. Compare the speed between the sport and record per 0.16 km. For example, the speed of the first 0.16 km of the record is 10, when the distance of the first 0.16 km of this sport is 11. In the second 0.16 km, the motion icon of sport will advance two grids, the record will only advance one, simply put, faster, two grids forward, slower, only one grid forward.
9) THR ZONE: Simulate the intensity of your sport as the program resistance automatically adjust to maintain a set Target Heart Rate range. (Suggest to use bluetooth chest belt with this program. You may purchase chest belt separately from your dealer).
| RESISTANCE ADJUST | ||
| Heart Rate | Resistance Function Resistance Adjust | |
| 20+ under target | Increase every 10 seconds 1 | |
| 6-19 under target | Increase every 35 seconds 1 | |
| +/- 5 of target | No Change 0 | |
| 6-10 over target | Decrease every 35 seconds 1 | |
| 11-19 over target | Decrease every 10 seconds 1 | |
| 20-24 over target | Decrease every 10 seconds Half of current | |
| 25+ over target | Console reset N/A reset | |

CUSTOM1: Customized workout, time defaults to 15 minutes.
1) First enter the program setting and profile display will guide you through all the work out column.
2) Use upper and lower arrow to change the resistance and press enter to confirm. Console will display your current segment number and guide you through segment 1 to segment 15.
3) After finish all setting press START to begin.

ENERGY SAVER (STANDBY MODE)
This machine has a special feature called Energy Saver mode. This mode is NOT automatically activated. When Energy Saver mode is activated, the display will automatically enter standby mode (Energy Saver mode) after 15 minutes of inactivity. This feature saves energy by disabling most power to the machine until a key is pressed on the console.
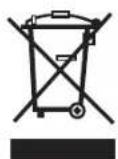
Waste Disposal
HORIZON Fitness products are recyclable.
At the end if its useful life please dispose of this article correctly and safely (local refuse sites).
TRAININGSBEREICH 173 x 63,5 x 200 cm
FREIER BEREICH 418 x 247,5 x 300 cm

WARNUNG
UMSTELLEN DES ELLIPTICAL TRAINERS

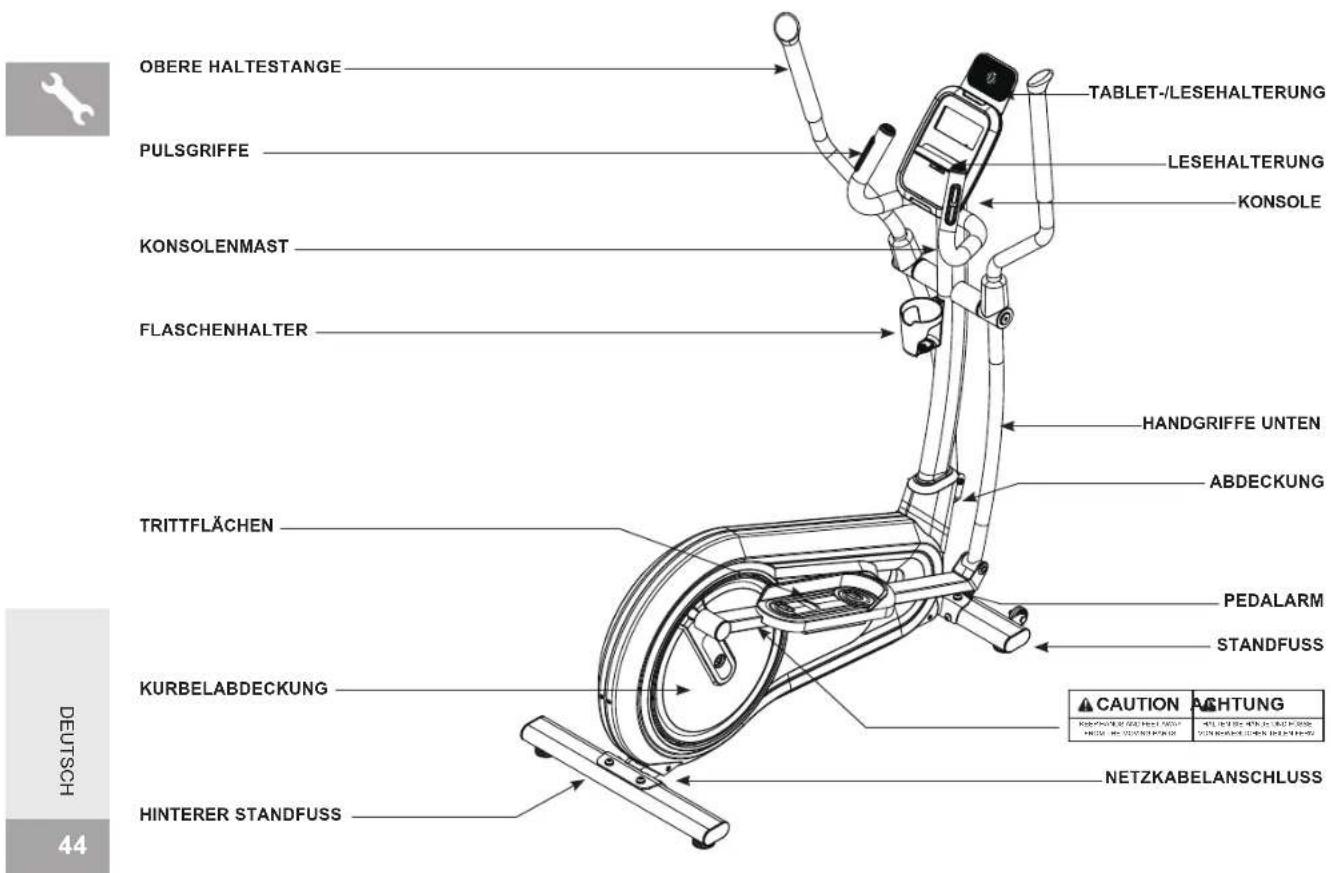
13/15 mm Gabelschlüssel
5 mm L-Schraubenschlüssel
6 mm L-Schraubenschlüssel
Schraubendreher
IM LIEFERUMFANG ENTHALTENE TEILE:
PROGRAMMINFORMATIONEN
TRAININGSGEBIED
173 x 63,5 x 200 cm / 68" x 25" x 78,7"
VRIJE RUIMTE
418 x 247,5 x 300 cm / 164,6" x 97,4" x 118"

WAARSCHUWING
DE ELLIPTICAL VERPLAATSEN

BENODIGD GEREEDSCHAP:
| MONTAGEMATERIAAL VOOR STAP 5 | |||
| ONDERDEEL | TYPE BESCHRIJVING | AANTAL | |
| B VEERRING ∅8 2 | |||
| F BOUT | M8 2 | ||
| G SLUITRING ∅8,2 2 | |||
| N SLUITRING ∅20,2 4 | |||
| O GOLFRING ∅20,7 2 | |||
| MONTAGEMATERIAAL VOOR STAP 6 | |||
| ONDERDEEL | TYPE BESCHRIJVING AANTAL | ||
| B VEERRING ∅8,2 2 | |||
| C SLUITRING ∅8,2 2 | |||
| E BOUT M8 2 | |||
| I MOER M8 2 | |||
| MONTAGEMATERIAAL VOOR STAP 7 | |||
| ONDERDEEL | TYPE BESCHRIJVING | AANTAL | |
| I MOER | M8 4 | ||
| J BOUT | M8 4 | ||
| K SCHROEF ∅4 2 | |||
| MONTAGEMATERIAAL VOOR STAP 8 | |||
| ONDERDEEL | TYPE BESCHRIJVING AANTAL | ||
| L SCHROEF M5 4 | |||
| M SCHROEF M6 3 | |||
| MONTAGEMATERIAAL VOOR STAP 9 | |||
| ONDERDEEL | TYPE BESCHRIJVING AANTAL | ||
| L SCHROEF M5 2 | |||
| MONTAGEMATERIAAL VOOR STAP 10 | |||
| ONDERDEEL | TYPE BESCHRIJVING AANTAL | ||
| B VEERRING 8,2X15,4X2,0T 4 | |||
| D | GEGOLFDEVEERRING | 8,2X18,0X1,5T 4 | |
| I MOER | M8X1,25P 4 | ||
| J | BOUT | M8X1,25PX45L | 4 |
MONTAGE VOLTOOID!
Milos 3.0
PROGRAMMA-INFORMATIE
SUPERFICIE D'ENTRAÎNEMENT
173 x 63,5 x 200 cm / 68" x 25" x 78,7"
SUPERFICIE LIBRE
418 x 247,5 x 300 cm / 164,6" x 97,4" x 118"

AVERTISSEMENT
OPTIONS D'ENTRAÎNEMENT
ENTRAÎNEMENT DE LA TOTALITÉ DU CORPS
DÉPLACEMENT DE L'ÉLLIPTIQUE

| VISSERIE DE L'ÉTAPE 1 | |||
| PIÈCE TYPE DESCRIPTION QTÉ | |||
| A BOULON M8 4 | |||
| B RONDELLE ÉLASTIQUE | ∅8.0 | 4 | |
| C RONDELLE PLATE | ∅8.2 | 2 | |
| D RONDELLE EN ARC | ∅8.2 | 2 | |
| MATÉRIEL POUR L'ÉTAPE 5 | |||
| PIÈCE | TYPE DESCRIPTION QTÉ | ||
| B RONDELLE ÉLASTIQUE | ∅8 | 2 | |
| F BOULON M8 2 | |||
| G RONDELLE PLATE | ∅8.2 | 2 | |
| N RONDELLE PLATE | ∅20.2 | 4 | |
| O RONDELLE ONDULÉE | ∅20.7 | 2 | |
| MATÉRIEL POUR L'ÉTAPE 6 | |||
| PIÈCE TYPE DESCRIPTION QTÉ | |||
| B RONDELLE ÉLASTIQUE | 8.2 | 2 | |
| C RONDELLE PLATE | 8.2 | 2 | |
| E BOULON M8 2 | |||
| I ÉCROU M8 2 | |||
| MATÉRIEL POUR L'ÉTAPE 7 | |||
| PIÈCE | TYPE DESCRIPTION QTÉ | ||
| I ÉCROU M8 4 | |||
| J BOULON M8 4 | |||
| K VIS ∅4 2 | |||
| VISSERIE DE L'ÉTAPE 8 | |||
| PIÈCE T | YPE DESCRIPTION QTÉ | ||
| L VIS | M5 4 | ||
| M VIS | M6 3 | ||
| VISSERIE DE L'ÉTAPE 9 | |||
| PIÈCE TYPE DESCRIPTION QTÉ | |||
| L VIS | M5 2 | ||
| VISSERIE DE L'ÉTAPE 10 | |||
| PIÈCE TYPE DESCRIPTION QTÉ | |||
| B RONDELLE ÉLASTIQUE | ∅8.2 | 4 | |
| D RONDELLE EN ARC | ∅8.2 | 4 | |
| I ÉCROU M8 4 | |||
| J BOULON M8 4 | |||
LE MONTAGE EST TERMINÉ !
Milos 3.0
| 2017 | 2016 | |
| Cost of sales | 3,459 | 3,380 |
| Gross profit | 1,084 | 1,046 |
| Net profit | 1,084 | 1,046 |
| 2017 | 2016 | |
| Cost of sales | 3,849 | 3,569 |
| Gross margin | 1.4% | 1.3% |












Horizon MILOS 3.0 | Rev. 1.2
©2022 Horizon Fitness
- SAVE THESE INSTRUCTIONS
- WARNING
- TO REDUCE THE RISK OF BURNS, FIRE, ELECTRICAL SHOCK OR INJURY TO PERSONS
- GROUNDING INSTRUCTIONS
- BASIC OPERATION
- CONGRATULATIONS ON CHOOSING YOUR ELLIPTICAL
- LOCATION OF THE ELLIPTICAL
- POWER
- TRAINING AREA
- FREE AREA
- FOOT POSITIONING
- WORKOUT OPTIONS
- FULL BODY WORKOUT
- MOUNTING THE ELLIPTICAL
- MOVING THE ELLIPTICAL
- LEVELING THE ELLIPTICAL
- USING THE HEART RATE FUNCTION
- PULSE GRIPS
- CAUTION
- ASSEMBLY
- TOOLS REQUIRED
- PARTS INCLUDED
- PRE ASSEMBLY
- UNPACKING
- NEED HELP
- ASSEMBLY STEP 1
- ASSEMBLY STEP 2
- ASSEMBLY STEP 3
- ASSEMBLY STEP 4
- ASSEMBLY STEP 5
- ASSEMBLY STEP 6
- ASSEMBLY STEP 8
- ASSEMBLY STEP 9
- ASSEMBLY STEP 10
- CONSOLE OPERATION
- DISPLAY WINDOW
- GETTING STARTED
- QUICK START UP
- SELECT A PROGRAM
- TO RESET THE CONSOLE
- TO CLEAR CURRENT SELECTION
- PROGRAM INFORMATION
- ENERGY SAVER (STANDBY MODE)
- WASTE DISPOSAL
- WARNUNG
- UMSTELLEN DES ELLIPTICAL TRAINERS
- IM LIEFERUMFANG ENTHALTENE TEILE
- PROGRAMMINFORMATIONEN
- TRAININGSGEBIED
- VRIJE RUIMTE
- WAARSCHUWING
- DE ELLIPTICAL VERPLAATSEN
- BENODIGD GEREEDSCHAP
- PROGRAMMA-INFORMATIE
- SUPERFICIE D'ENTRAÎNEMENT
- SUPERFICIE LIBRE
- AVERTISSEMENT
- OPTIONS D'ENTRAÎNEMENT
- ENTRAÎNEMENT DE LA TOTALITÉ DU CORPS
- DÉPLACEMENT DE L'ÉLLIPTIQUE
Brand : Horizon Fitness
Model : Milos 3.0
Category : Elliptical bike