
NZR 1.5 B3 - Interdental cleaner NEVADENT - Free user manual and instructions
Find the device manual for free NZR 1.5 B3 NEVADENT in PDF.

| Product type | Interdental cleaner |
| Power source | 1.5 V battery (AA/LR6) |
| Protection rating | IPX4 (protected against water splashes) |
| Number of speeds | 2 levels (low and high) |
| Tips included | 30 cleaning tips |
| Storage case | Included |
| Warranty | 3 years |
| After-sales service France | 0800 919270 |
| Spare parts | Cleaning tips available through after-sales service |
| Maintenance | Clean surfaces with a damp cloth, rinse the head under running water, dry before reassembly |
| Safety | Do not use if damaged, keep out of reach of children, do not swallow tips, do not immerse in water |
| Intended use | Cleaning interdental spaces only |
| Recommended tip lifespan | Approximately 3 days |
Frequently Asked Questions - NZR 1.5 B3 NEVADENT
User questions about NZR 1.5 B3 NEVADENT
0 question about this device. Answer the ones you know or ask your own.
Ask a new question about this device
Download the instructions for your Interdental cleaner in PDF format for free! Find your manual NZR 1.5 B3 - NEVADENT and take your electronic device back in hand. On this page are published all the documents necessary for the use of your device. NZR 1.5 B3 by NEVADENT.
USER MANUAL NZR 1.5 B3 NEVADENT

natural_image
Exterior view of a dental or medical device with internal components and a vertical tool (no visible text or symbols)ZAHNZWISCHENRAUMREINIGER POWER FLOSSER NETTOYEUR INTERDENTAIRE NZR 1.5 B3
DE AT CH
ZAHNZWISCHENRAUMREINIGER
Bedienungsanleitung
GB IE
POWER FLOSSER
Operating instructions
FR BE
NETTOYEAR INTERDENTAIRE
Mode d'emploi
NL BE
TANDTUSSENRUIMTEREINIGER
Gebruiksaanwijzing
PL
Before reading, unfold the page containing the illustrations and familiarise yourself with all functions of the device.
FR BE
GB/IE Operating instructions Page 17
Inhaltsverzeichnis
Einführung....2
natural_image
Illustration of dental crowns with a toothbrush touching them (no text or symbols)natural_image
Close-up of a hand inserting a plug into a plastic component with an arrow indicating direction (no text or symbols visible)KOMPERNASS HANDELS GMBH
BURGSTRASSE 21
44867 BOCHUM
DEUTSCHLAND
www.kompernass.com
natural_image
Two identical plastic dental arches with needle-like extensions, shown against a plain white background (no text or symbols)HINWEIS
Information about these operating instructions....18
Copyright 18
Intended uses....18
Warnings 19
Safety 19
Basic safety instructions....19
Information on using batteries 21
Operating components .....22
Operation 22
Package contents and transport inspection....22
Power supply 23
Handling and use 23
Fitting the cleaning attachment....23
Cleaning the interdental spaces....24
Cleaning....26
Storage/disposal 26
Storage....26
Disposal of the appliance....26
Disposal of (rechargeable) batteries ..... 27
Disposal of packaging 27
Appendix....27
Technical details....27
Kompernass Handels GmbH warranty 28
Service 29
Importer 30
Ordering replacement parts .... 30
Introduction
Information about these operating instructions
Congratulations on the purchase of your new appliance.
You have selected a high-quality product. The operating instructions are part of this product.
They contain important information about safety, usage and disposal. Before using the product, please familiarise yourself with all operating and safety instructions. Use the product only as described and for the range of applications specified. Please pass on all documentation incl. these operating instructions to any future owner(s) if you sell this product or give it away.
Copyright
This documentation is protected by copyright.
Any copying or reproduction, including in the form of extracts, or any reproduction of images (even in a modified state), is permitted only with the written authorisation of the manufacturer.
Intended uses
This appliance is designed for cleaning the gaps between your teeth (interdental spaces). The appliance is not intended for any other purpose, nor for use beyond the scope described. The appliance is not intended for use in commercial or industrial environments.
The manufacturer accepts no responsibility for damage caused by failure to observe these instructions, improper use or repairs, unauthorised modifications or the use of unapproved replacement parts. The operator bears sole liability.
Warnings
The following warning notice types are used in these operating instructions:
CAUTION
A warning notice at this hazard level indicates a risk of property damage.
Failure to avoid this situation could result in material damage.
▶ Follow the instructions in this warning notice to prevent material damage.
NOTE
▶ A note provides additional information that will assist you in using the appliance.
Safety
This section contains important safety instructions for using the appliance.
This appliance complies with statutory safety regulations. Improper use may result in personal injury and property damage.
Basic safety instructions
To ensure safe operation of the appliance, follow the safety guidelines set out below:
■ Check the appliance for visible external damage before use. Do not operate an appliance that has been damaged or dropped.
■ Cleaning and user maintenance should not be performed by children unless they are under supervision.
■ Cleaning attachments may be used by children and people with reduced physical, sensory or mental capabilities or lack of experience and/or knowledge if they are supervised or have been instructed how to use the appliance safely and have understood the potential risks.
■ Children must not play with the appliance.
■ Do not allow children to play with packaging materials. There is risk of suffocation.
■ The cleaning attachments ② may not be swallowed or inhaled. If this does happen, however, contact a doctor immediately.
■ All repairs must be carried out by authorised specialist companies or by the Customer Service department. Improper repairs may put the user at risk. It will also invalidate any warranty claims. The hand element may not be dis assembled by the user.
■ Repairs to the appliance during the warranty period may only be carried out by a customer service department authorised by the manufacturer. Otherwise, no warranty claims will be held for any subsequent damages.
■ Defective components must always be replaced with original replacement parts. Compliance with safety requirements can only be guaranteed if original replacement parts are used.
■ Do not place any objects on the appliance.
■ Never operate the appliance in the direct vicinity of open flames (e.g. candles) or in extreme environmental conditions (e.g. in an explosive atmosphere).
If you notice any unusual noises, smoke or similar uncertain situations, remove the batteries and disconnect any attached mains adapter from the power supply and contact Customer Service (see section Service).
Information on using batteries
CAUTION
▶ Do not throw batteries into a fire.
▶ Never short-circuit batteries.
▶ Do not attempt to recharge the batteries.
▶ Check the condition of the battery regularly. Leaking battery acid can cause permanent damage to the appliance.
▶ Special care should be taken when handling damaged or leaking batteries. Risk of acid burns! Wear protective gloves.
CAUTION
▶ Store batteries in a place that is inaccessible to children. If a battery is swallowed, seek medical attention immediately.
▶ If you do not intend to use the appliance for a long time, remove the battery.
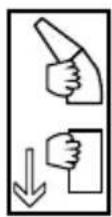
Operating components
(See fold-out page for illustrations)
① Appliance head
② Cleaning attachment
③ Attachment fitting
4 Hand element
⑤ Slider switch:
• 0 (stop)
• 1 (low speed)
• 2 (high speed
6 Battery
⑦ Housing
⑧ Storage box
Operation
Package contents and transport inspection
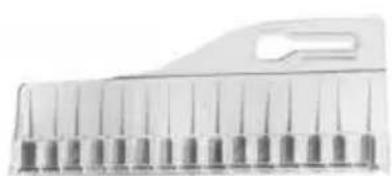
Check the contents of the package. The product includes the following components:
- Power flosser
- 1 x 1.5 V battery
• 30 cleaning attachments - Operating instructions
NOTE
▶ Check the package for completeness and signs of visible damage.
▶ If the delivery is incomplete or damage has occurred as a result of defective packaging or during transport, contact the Service hotline (see section Service).
◆ Remove all parts of the appliance and the operating instructions from the carton.
◆ Remove all packaging material.
Power supply
Use a 1.5 V battery ⑥ to operate the appliance. To insert the supplied battery ⑥ proceed as follows:
1) Carefully pull the housing ⑦ off the hand set ④ and place it to one side.
2) Insert the battery Ⓐ. Pay attention to the polarity markings given in the battery compartment.
3) Push the housing ⑦ back onto the hand set ④ until it sits firmly in place and the gap is fully closed. The anti-slip dimples on the housing ⑦ must be on the same side as the anti-slip dimples on the hand set ④. The writing on the housing ⑦ must be on the same side as the slider switch ⑤.
NOTE
▶ If the effectiveness of the cleaning starts to decrease, the battery ⑥ needs to be replaced.
Handling and use
This section provides important information about proper handling and operation of the appliance.
Fitting the cleaning attachment
1) Remove the appliance head ① by turning it slightly so that the dot on the appliance head ① is aligned with the
symbol on the hand set ④. Then pull the appliance head ① upwards and off.
2) Push the attachment fitting ③ into the hole of one of the cleaning attachments ② in the storage box ⑧. You will feel a slight click.
3) Pull the hand set ④ away from the storage box ⑧. The cleaning attachment ② comes out of the storage box ⑧.
4) Check that the cleaning attachment ② is firmly attached to the attachment fitting ③. If necessary, push the cleaning attachment ② onto the attachment fitting ③ with slightly more force.
5) Replacing the appliance head ①: guide the fitted cleaning attachment ② through the hole in the appliance head ①. The dot on the appliance head ① must align with the symbol. Turn the appliance head ① until the dot is lined up with the symbol
Cleaning the interdental spaces
NOTE
▶ We recommend using the appliance in front of a mirror so that you can guide the appliance more confidently and avoid injuring your gums.
▶ You can use this appliance every day to clean your interdental spaces. If you do so, we recommend changing the cleaning attachment ② roughly every 3 days, as every use causes the edges of the cleaning attachment ② to round off a little, reducing the cleaning effectiveness.
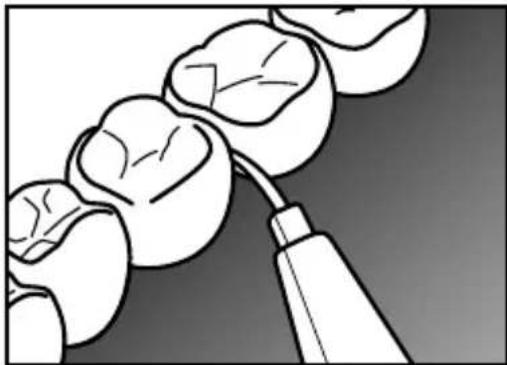
1) Hold the appliance vertically during the entire cleaning process.
2) Guide the cleaning attachment ② from the outside into the interdental space you wish to clean. The cleaning attachment ② is long enough: there is no need to also clean the interdental spaces from the rear.
natural_image
Illustration of dental crowns with a toothbrush touching them (no text or symbols)3) Push the slider switch ⑤ to position 1 for low speed or to position 2 for high speed. The cleaning attachment ② starts moving.
4) Move the appliance up and down to clean the entire lateral surfaces of the adjacent teeth.
NOTE
▶ Do not use force when using the appliance. If you experience discomfort during one cleaning phase, select the low speed or move on to a different interdental space.
5) Once the interdental space appears to be cleaned, slide the slider switch ⑤ to position 0. The appliance stops.
6) Pull the cleaning attachment ② out of the interdental space and continue cleaning with the next interdental space.
NOTE
▶ Divide your jaw into 4 quadrants. Once you have cleaned all the interdental spaces in one quadrant, rinse the cleaning attachment ② under running water.
7) After completing the cleaning session, rinse the cleaning attachment ② thoroughly under running water. Hold the appliance so that the cleaning attachment ② is pointing downwards and the water flows over the cleaning attachment ②.
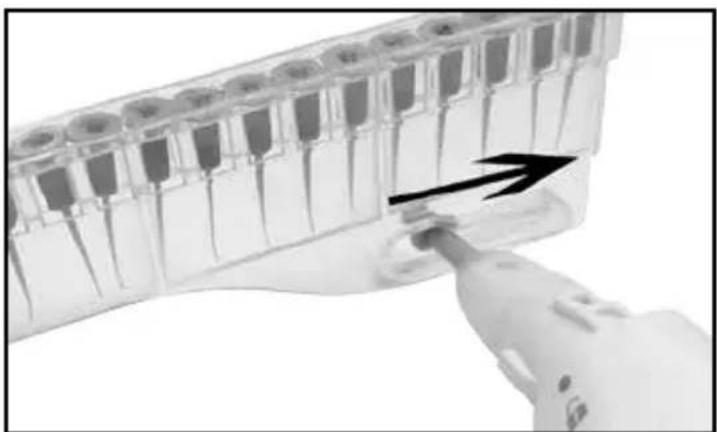
If you want to remove and dispose of the cleaning attachment ②:
1) Remove the appliance head ① by turning it a little so that point on the appliance head ① is aligned with the symbol on the hand set ④. You can then remove the appliance head ①.
2) Pull the cleaning attachment ② off the attachment fitting ③. If it is attached too firmly, use the removal tool on the storage box ⑧.
3) To do this, push the cleaning attachment ② all the way through the opening in the storage box ⑧ and move the hand set ④ together with the appliance head ① in the direction of the arrow:
natural_image
Close-up of a hand inserting a plug into a test tube array (no text or symbols visible)This will remove the cleaning attachment ② from the attachment fitting ③ and it will fall off.
NOTE
To reorder cleaning attachments ②, please contact our service department (see section Ordering replacement parts).
Cleaning
CAUTION
Damage to the appliance!
▶ To avoid irreparable damage to the appliance, ensure that no moisture can penetrate the appliance during cleaning.
■ Clean the surfaces of the appliance with a damp cloth. Use a normal commercial detergent and a little water to remove stubborn residue. Ensure that no water gets into the appliance.
To clean the appliance head ①, remove it from the hand set ④ and rinse it under running water. Allow the appliance head ① to dry before replacing it on the hand set ④.
Storage/disposal
Storage
If you plan not to use the appliance for an extended period, store it in a clean, dry place out of direct sunlight.
Disposal of the appliance

pose of the appliance in your normal domestic waste. This product is subject to the provisions of European Directive 2012/19/EU.
Dispose of the appliance via an approved waste disposal company or your municipal waste disposal facility. Please comply with all applicable regulations. Please contact your waste disposal centre if you are in any doubt.

Your local community or municipal authorities can provide information on how to dispose of the worn-out product.
Disposal of (rechargeable) batteries
Used batteries must not be disposed of in the household waste.
Consumers are legally obliged to dispose of (rechargeable) batteries at a collection point in their community/city district or at a retail store.
The purpose of this requirement is to ensure that batteries are disposed of in an environmentally friendly manner. Only dispose of batteries when they are fully discharged.
Disposal of packaging

The packaging is made of environmentally friendly materials which you can dispose of at your local recycling centre.
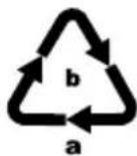
Dispose of the packaging in an environmentally friendly manner. Note the labelling on the packaging and separate the packaging material components for disposal if necessary. The packaging material is labelled with abbreviations (a) and numbers (b) with the following meanings:
1-7:plastics, 20-22: paper and cardboard, 80-98: composites.
Appendix
Technical details
| Voltage supply | 1.5 V battery, size AA, LR6, DC === |
| Protection class | IPX4 (protected against water splashes) |
This appliance has a 3-year warranty valid from the date of purchase. If this product has any faults, you, the buyer, have certain statutory rights. Your statutory rights are not restricted in any way by the warranty described below.
Warranty conditions
The warranty period starts on the date of purchase. Please keep your receipt in a safe place. This will be required as proof of purchase.
If any material or manufacturing fault occurs within three years of the date of purchase of the product, we will either repair or replace the product for you or refund the purchase price (at our discretion). This warranty service requires that you present the defective appliance and the proof of purchase (receipt) within the three-year warranty period, along with a brief written description of the fault and of when it occurred.
If the defect is covered by the warranty, your product will either be repaired or replaced by us. The repair or replacement of a product does not signify the beginning of a new warranty period.
Warranty period and statutory claims for defects
The warranty period is not prolonged by repairs effected under the warranty. This also applies to replaced and repaired components. Any damage and defects present at the time of purchase must be reported immediately after unpacking. Repairs carried out after expiry of the warranty period shall be subject to a fee.
Scope of the warranty
This appliance has been manufactured in accordance with strict quality guidelines and inspected meticulously prior to delivery.
The warranty covers material faults or production faults. The warranty does not extend to product parts subject to normal wear and tear or to fragile parts which could be considered as consumable parts such as switches, batteries or parts made of glass.
The warranty does not apply if the product has been damaged, improperly used or improperly maintained. The directions in the operating instructions for the product regarding proper use of the product are to be strictly followed. Uses and actions that are discouraged in the operating instructions or which are warned against must be avoided.
This product is intended solely for private use and not for commercial purposes. The warranty shall be deemed void in cases of misuse or improper handling, use of force and modifications / repairs which have not been carried out by one of our authorised Service centres.
Warranty claim procedure
To ensure quick processing of your case, please observe the following instructions:
■ Please have the till receipt and the item number (e.g. IAN 12345) available as proof of purchase.
■ You will find the item number on the type plate on the product, an engraving on the product, on the front page of the operating instructions (below left) or on the sticker on the rear or bottom of the product.
If functional or other defects occur, please contact the service department listed either by telephone or by e-mail.
■ You can return a defective product to us free of charge to the service address that will be provided to you. Ensure that you enclose the proof of purchase (till receipt) and information about what the defect is and when it occurred.
You can download these instructions along with many other manuals, product videos and installation software at www.lidl-service.com.
This QR code will take you directly to the Lidl service page (www.lidl-service.com) where you can open your operating instructions by entering the item number (IAN) 123456.
Service

Service Great Britain
Tel.: 0800 404 7657
E-Mail: kompernass@lidl.co.uk

Service Ireland
Tel.: 1890 930 034
(0,08 EUR/Min., (peak))
(0,06 EUR/Min., (off peak))
E-Mail: kompernass@lidl.ie
IAN 324436_1904
Importer
Please note that the following address is not the service address. Please use the service address provided in the operating instructions.
KOMPERNASS HANDELS GMBH
BURGSTRASSE 21
44867 BOCHUM
GERMANY
www.kompernass.com
Ordering replacement parts
You can order the following replacement parts for the product NZR 1.5 B3:
natural_image
Close-up of a metallic mechanical component with multiple pins (no visible text or symbols)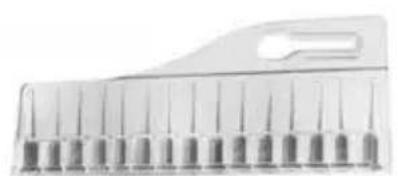
natural_image
Close-up of a metallic mechanical component with multiple pins and a handle (no visible text or symbols)▶ Set: 30 cleaning attachments
Order the replacement parts via the Service Hotline (see Service section) or simply visit our website at www.kompernass.com.

NOTE
▶ Have the IAN number of the appliance ready (can be found on the cover of these operating instructions) when you place your order.
Table des matières
Introduction....32
natural_image
Illustration of dental crowns with a toothbrush touching them (no text or symbols)natural_image
Close-up of a hand inserting a plug into a test tube array (no text or symbols visible)KOMPERNASS HANDELS GMBH
BURGSTRASSE 21
44867 BOCHUM
ALLEMAGNE
www.kompernass.com
natural_image
Close-up of a metallic electronic component with multiple pins and a handle (no visible text or symbols)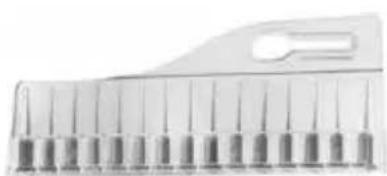
natural_image
Close-up of a metallic mechanical component with multiple pins and a handle (no visible text or symbols)▶ Set : 30 embouts de nettoyage
REMARQUE
natural_image
Illustration of dental crowns with a toothbrush touching them (no text or symbols)natural_image
Close-up of a hand inserting a plug into a test tube array (no visible text or symbols)KOMPERNASS HANDELS GMBH
BURGSTRASSE 21
44867 BOCHUM
DUITSLAND
www.kompernass.com
natural_image
Close-up of a metallic mechanical component with multiple cylindrical pins and a slot (no visible text or symbols)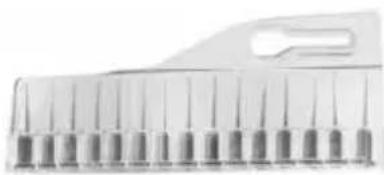
natural_image
Close-up of a metallic electronic component with multiple pins and a handle (no visible text or symbols)▶ Set: 30 reinigingsopzetstukken
OPMERKING
natural_image
Illustration of dental crowns with a toothbrush touching them (no text or symbols)natural_image
Close-up of a hand inserting a plug into a test tube array (no text or symbols visible)KOMPERNASS HANDELS GMBH
BURGSTRASSE 21
44867 BOCHUM
NIEMCY
www.kompernass.com
natural_image
Close-up of a metallic tool holder with multiple screw holes and a handle (no visible text or symbols)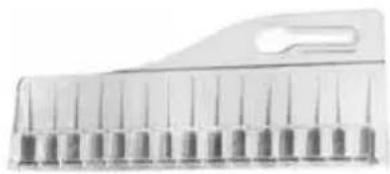
natural_image
Close-up of a metallic tool holder with multiple pins and a handle (no visible text or symbols)HINWEIS
natural_image
Illustration of dental crowns with a toothbrush touching them (no text or symbols)natural_image
Close-up of a hand inserting a plug into a device with a black arrow indicating the insertion direction (no text or symbols visible)KOMPERNASS HANDELS GMBH
BURGSTRASSE 21
44867 BOCHUM
NĚMECKO
www.kompernass.com
natural_image
Close-up of a metallic tool holder with multiple pins (no visible text or symbols)
natural_image
Close-up of a metallic mechanical component with multiple cylindrical pins and a slot (no visible text or symbols)UPOZORNĚNÍ
natural_image
Illustration of dental crowns with a toothbrush touching them (no text or symbols)natural_image
Close-up of a hand inserting a plug into a plastic test tube with a black arrow indicating the insertion direction (no text or symbols visible)KOMPERNASS HANDELS GMBH
BURGSTRASSE 21
44867 BOCHUM
NEMECKO
www.kompernass.com
natural_image
Close-up of a mechanical component with evenly spaced pins (no visible text or symbols)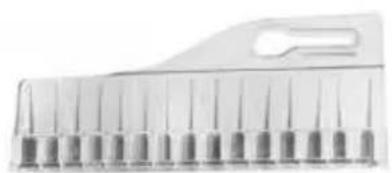
natural_image
Close-up of a metallic mechanical component with multiple pins and a handle (no visible text or symbols)▶ Súprava: 30 čistiacich nadstavcov
UPOZORNENIE
KOMPERNASS HANDELS GMBH
BURGSTRASSE 21
44867 BOCHUM
GERMANY
www.kompernass.com
Stand der Informationen · Last Information Update · Version des informations


- ZAHNZWISCHENRAUMREINIGER POWER FLOSSER NETTOYEUR INTERDENTAIRE NZR 1.5 B3
- ZAHNZWISCHENRAUMREINIGER
- POWER FLOSSER
- NETTOYEAR INTERDENTAIRE
- TANDTUSSENRUIMTEREINIGER
- FR BE
- Inhaltsverzeichnis
- Einführung....2
- HINWEIS
- Safety 19
- Operating components .....22
- Operation 22
- Handling and use 23
- Cleaning....26
- Storage/disposal 26
- Appendix....27
- Ordering replacement parts .... 30
- Introduction
- Information about these operating instructions
- Copyright
- Intended uses
- Warnings
- CAUTION
- A warning notice at this hazard level indicates a risk of property damage.
- NOTE
- Safety
- Basic safety instructions
- Information on using batteries
- Operating components
- (See fold-out page for illustrations)
- Operation
- Package contents and transport inspection
- Power supply
- Handling and use
- Fitting the cleaning attachment
- Cleaning the interdental spaces
- Cleaning
- Damage to the appliance!
- Storage/disposal
- Storage
- Disposal of the appliance
- Disposal of (rechargeable) batteries
- Used batteries must not be disposed of in the household waste.
- Disposal of packaging
- Appendix
- Technical details
- Warranty conditions
- Warranty period and statutory claims for defects
- Scope of the warranty
- Warranty claim procedure
- Service
- Service Great Britain
- Service Ireland
- Importer
- Ordering replacement parts
- Table des matières
- Introduction....32
- REMARQUE
- OPMERKING
- UPOZORNĚNÍ
- UPOZORNENIE
Brand : NEVADENT
Model : NZR 1.5 B3
Category : Interdental cleaner