Susi 48940 - Ice machine UNOLD - Free user manual and instructions
Find the device manual for free Susi 48940 UNOLD in PDF.

User questions about Susi 48940 UNOLD
0 question about this device. Answer the ones you know or ask your own.
Ask a new question about this device
Download the instructions for your Ice machine in PDF format for free! Find your manual Susi 48940 - UNOLD and take your electronic device back in hand. On this page are published all the documents necessary for the use of your device. Susi 48940 by UNOLD.
USER MANUAL Susi 48940 UNOLD
natural_image
Product photo of a red and white UNOLED instant drink maker with clear drink, two glasses, and a straw (no visible text or symbols)Bedienungsanleitung
Instructions for use | Notice d'utilisation Gebruiksaanwijzing | Istruzioni per l'uso Instrucciones de uso | Instrukcja obsługi
Modell 48940
INHALTSVERZEICHNIS
Instructions for use Model 48940
Technical Specifications....24
Explanation of symbols....24
For your safety....24
Before first use....28
General information on making slush......29
Description of control panel 30
Operation....31
Appliance protection features ....32
Cleaning and care....33
Guarantee Conditions....35
Waste Disposal/Environmental Protection ...35
Service 23
text_image
Technical diagram of a mechanical device with numbered parts for identification and assembly reference.DE Ab Seite 8
1 Tap
2 Outlet
3 Cooling cylinder (for cooling)
4 Housing
5 Condensate tray
6 Control panel
7 Drip grid
8 Drip tray
9 Fill opening
10 Mixer
11 Locking lever
NL Pagina 49
text_image
Technical diagram of a multi-step appliance assembly with numbered parts for identificationIT Page 61
natural_image
Line drawings of two industrial machines with a component, labeled Abb. 1 Abb. 2 (no text or symbols on the devices themselves)natural_image
Technical line drawing of a mechanical or industrial device with ventilation grilles and a handle (no text or symbols)
natural_image
Technical line drawing of a mechanical or industrial device with ventilation grilles and a cylindrical component (no text or symbols)Abb. 3 Abb. 4
natural_image
Line drawing of a vintage sewing machine with fan and stand (no text or symbols)Abb. 5
text_image
MAX MINAbb. 6
natural_image
Symbol of a trash bin with crossed lines indicating no waste or restriction, and a solid black rectangle below (no text or labels)classification: N/SN
Dimensions: approx. 42.9 x 17.5 x 44.6 cm (WxDxH)
Weight: approx. 10.4 kg
Cord length: approx. 120 cm
Refrigerant: R290 (23 g propane)
Features: Quiet compressor cooling, 6 portions per cycle, 5 preset programs, container and drip tray dishwasher-safe

Accessories: Operating instructions, recipe booklet
Features, technology, colours, and design are subject to change without notice; errors excepted
EXPLANATION OF SYMBOLS

This symbol denotes a possible hazard which could cause injury or damage to the appliance.
Caution: risk of fire. This symbol indicates a possible fire hazard.
FOR YOUR SAFETY
Please read this instruction manual carefully and keep it for future reference.
Persons in household
- This appliance can be used by children aged 8 or above or by individuals with reduced physical, sensory or mental capabilities or a lack of experience and knowledge, if they are supervised or have been instructed in the safe use of the appliance and understand the hazards involved.
- Children must not be allowed to play with the appliance.
-
Children from the age of 8 may be permitted to clean or maintain the appliance, provided they are supervised.
-
Keep the appliance and its power cable out of the reach of children under the age of 8.
- Only use the appliance indoors.
- Always unplug the appliance after use, before cleaning, or if any faults occur during operation.
- Never immerse the appliance in water or other liquids, and do not expose the power cord to moisture.
- The appliance is designed for household use and similar purposes, e.g.
■ kitchenettes in offices, shops or other workplaces,
- farms,
■ kitchenettes for guests in hotels, motels, hostels,
■ bed and breakfast accommodations or holiday homes.
Electric safety
-
Connect the appliance to an alternating current source as specified on the type plate.
-
Do not connect the appliance to an external timer or remotely controlled power system.
-
Never immerse the appliance or the cable in water or another liquid.
-
For safety reasons, never place or operate the appliance and power cord on or near hot surfaces, open flames or stove tops.
-
Before using the appliance, fully unwind the power cord.
-
Do not attach power strips or portable power supplies to the back of the appliance.
Information on how to handle the appliance safely
- Do not route the power cord over the edge of the worktop.
- Use the appliance only after it has been properly assembled.
- Place the appliance on a clear, level surface. Make sure that the ice maker is at least 8 cm away from other objects, walls, or furniture. This minimum clearance allows for optimal ventilation and prevents the appliance from overheating.
- The ventilation slots must be unobstructed during operation.
- Regularly check the appliance, the power cord and the plug for wear and damage. If the power cord or other parts of the appliance are damaged, return the appliance to our customer service
department for inspection and repair. Unauthorised repairs can result in hazards for the user and will void the warranty.
- Never use the appliance with accessories from other appliances.
- Never store explosive materials, such as aerosol cans with flammable propellants, inside the appliance.
- Use only drinking water in the appliance, never ultrapure or distilled water.
- Do not repeatedly press the ON/OFF button. To prevent damage to the compressor, wait at least five minutes before pressing the button again.
- Never fill the mixing container with hot or frozen ingredients.
Information on the safe handling of foods
- If the lid is opened frequently, this will cause the temperature inside the appliance to rise.
- If the appliance is not used for 48 hours or more, the mixing container must be cleaned thoroughly.
- If the appliance is empty and is not used for an extended period, switch off and defrost the appliance, clean and dry all parts and leave the lid open to prevent mould from forming inside the appliance.
Notes on safe handling of the R290 refrigerant
- While highly compatible with the environment, the natural gas R290 used in the cooling circuit is flammable. When transporting and installing the product, make sure not to damage any components of the cooling circuit.
- The appliance must always be upright during transport and storage.
- Before cleaning or servicing the appliance, switch it off and disconnect the plug from the electrical outlet.
- Use appliances operating with flammable refrigerants in well ventilated rooms only.
- Observe all applicable local regulations on handling gas.
- Personnel performing maintenance or repairs on the cooling circuit should possess a valid certificate for handling refrigerants.
-
If the appliance is defective and beyond repair, dispose of it properly in accordance with the applicable local regulations for appliances with refrigerants.
-
Make sure not to damage any components that are part of the cooling circuit.

Never reach into the appliance while it is in operation – danger of injury!
Do not allow the appliance to tip more than 45^ ; otherwise, damage can occur to the compressor.
After unpacking, please leave the appliance at the final location for at least two hours with the lid open before putting it into operation. The refrigerant in the appliance needs to settle first to keep the compressor from becoming damaged.

Warning: Do not store explosive materials such as aerosol cans with flammable propellants in this appliance.
Make sure that the ventilation slots on the appliance housing and inside the appliance are unobstructed.
Never use mechanical aids or other methods for faster defrosting, unless they are expressly approved by the manufacturer.
Do not damage the refrigeration circuit.
Do not operate any electrical devices inside the food compartment of the appliance, unless recommended by the manufacturer.
The product's cooling circuit contains propane (R290) as a refrigerant, which although highly compatible with the environment, is flammable. When transporting and installing the product, make sure not to damage any components of the cooling circuit.
The refrigerant (R290) is flammable.
In case of damage to the cooling circuit:
■ Avoid open flames and sources of ignition.
■ Thoroughly ventilate the room where the appliance is located.
The manufacturer will not be liable in the event of incorrect assembly, improper or incorrect use or if repairs are carried out by unauthorized third parties.
BEFORE FIRST USE
- Remove all packaging materials and any transport guards (but not the type plate). Keep the packaging material away from children - choking hazard! Dispose of the packaging materials according to the relevant local waste disposal regulations.
- Inspect the appliance for damage. If there is visible damage, do not operate the appliance; instead, contact our Customer Service department.
- Check whether all accessories listed in this manual are present.
- Clean all parts as described in the section "Cleaning and care".
- Place the appliance on a level, dry worktop and make sure there is sufficient clearance to other objects.
- After unpacking, please leave the appliance at the final location for at least two hours with the lid open before putting it into operation. The refrigerant in the appliance needs to settle first to keep the compressor from becoming damaged.
- Attach the tap as shown in Figure 1.
- Place the drip grate in the drip tray and slide in the drip tray at the bottom of the appliance (Fig. 2).
natural_image
Line drawing of a vintage portable air conditioner unit with cooling fan and ventilation grille (no text or symbols)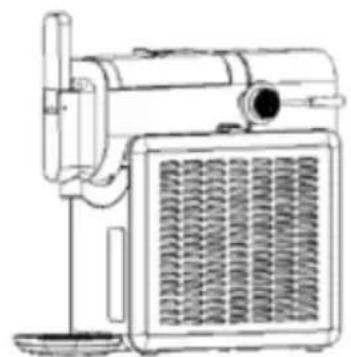
natural_image
Line drawing of a manual washing machine with cooling fan and side-mounted stand (no text or symbols)Fig. 1 Fig.
-
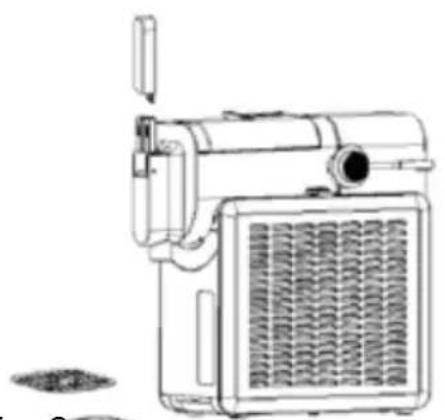
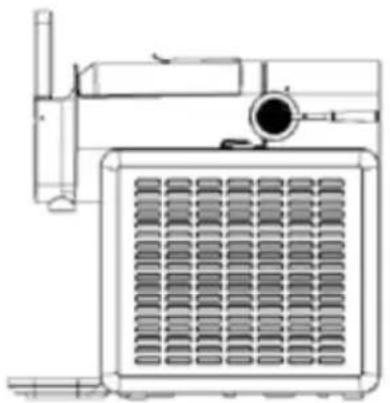
Before putting the appliance into operation, the mixer and mixing container must be securely locked.
-
Push the locking lever back to lock both elements.
■ Figure 3: shows unlocked state.
■ Figure 4: shows locked state.
■ Figure 3: shows unlocked state. ■ Figure 4: shows locked state.

natural_image
Technical line drawing of a mechanical device with ventilation grilles and a mounted component (no text or symbols)
natural_image
Technical line drawing of a mechanical or industrial device with ventilation grilles and a cylindrical component (no text or symbols)Fig. 3 Fig. 4
GENERAL INFORMATION ON MAKING SLUSH
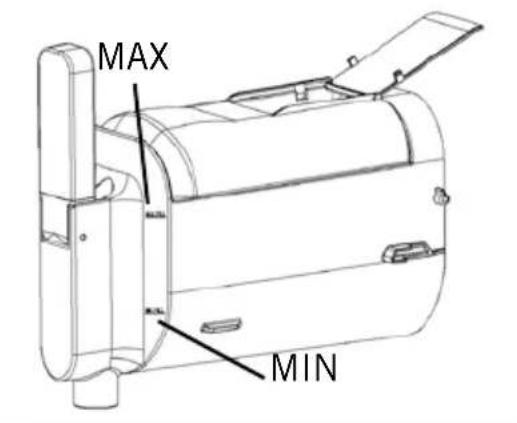
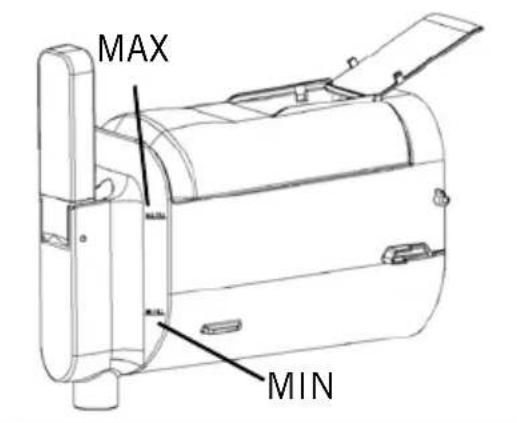
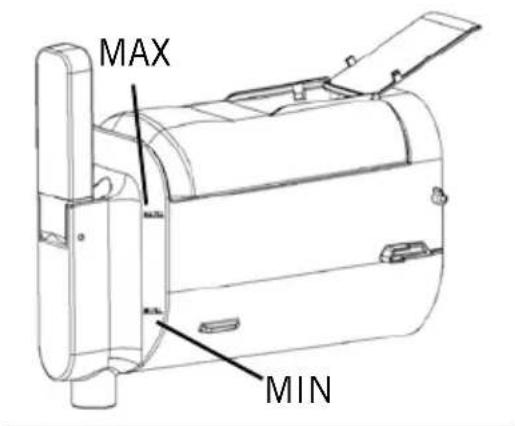
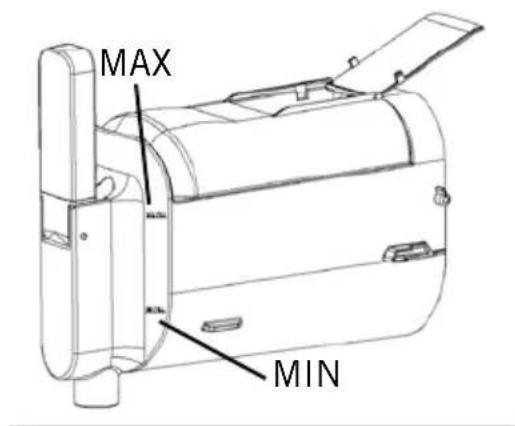
- Always be aware of the maximum capacity of the mixing container, to prevent the ingredients from overflowing. It is also important to fill the container to the minimum capacity, to obtain optimal slush ice. For the best slushies, the container should ideally be completely full. You may need to adapt your recipes to the capacity of the appliance.
- The preparation time will vary depending on several factors, such as the temperature of the ingredients, room temperature, sugar content, and the desired consistency. The use of pre-cooled ingredients can shorten the preparation time.
- However, you should never put frozen ingredients in the container, since this will damage the appliance.
- If you use freshly squeezed juice, any pulp must be removed by straining through a sieve, for example. Solid components can clog the outlet.
- The formation of condensate on the outside of the mixing container is normal, especially at high humidity or in case of long preparation times.
- The recipe booklet included contains additional information and tips.
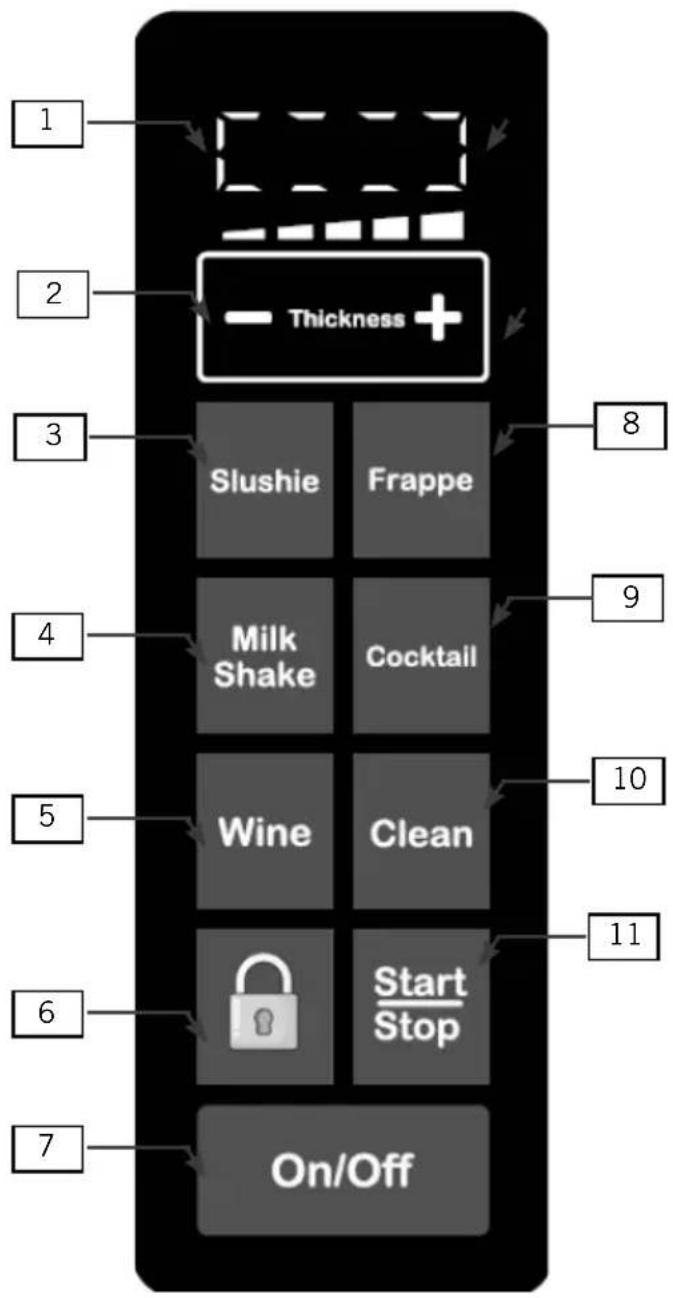
DESCRIPTION OF CONTROL PANEL
text_image
1 2 3 4 5 6 7 Thickness + Slushie Frappe Milk Shake Cocktail Wine Clean Start/Stop On/Off 8 9 10 111 Display
2 Select consistency, + increases the consistency, - decreases the consistency
3 Button for classic slush ice
4 Button for milk shake slush
5 Button for wine slush ice
6 Child protection lock
7 ON/OFF button
8 Button for coffee frappé slush ice
9 Button for cocktail slush ice
10 Cleaning program button
11 Start/Stop button
OPERATION
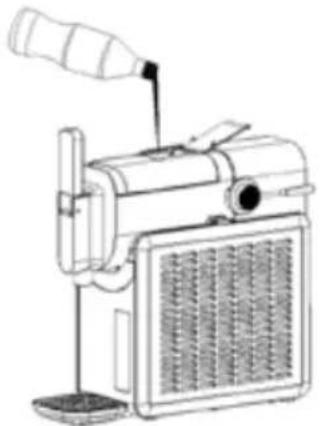
- Get the required ingredients ready.
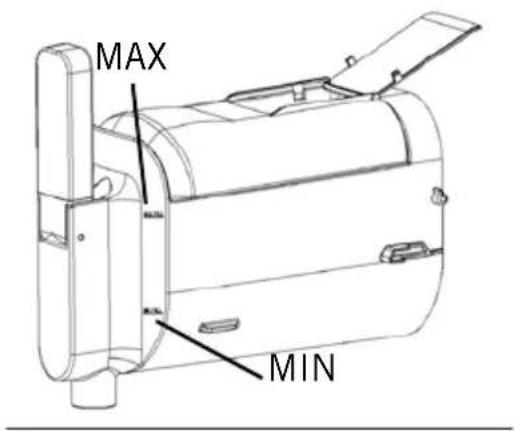
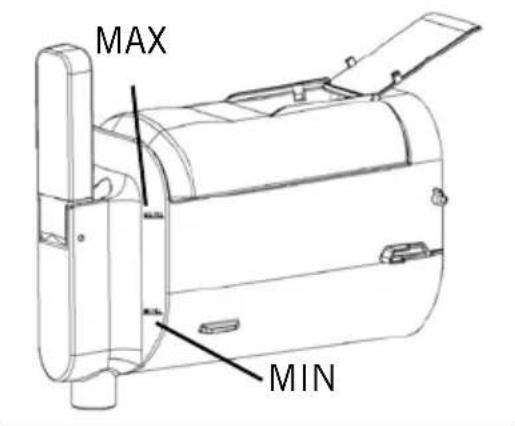
- Open the lid of the mixing container and slowly pour in the required liquid (Fig. 5). Observe the Min and Max markings (Fig. 6). If you do not use enough liquid, it will not be mixed well. If the container is too full of liquid, it can overflow.
- Close the lid of the mixing container.
natural_image
Line drawing of a vintage portable radio or fax device with a mounted antenna and ventilation grille (no text or symbols)Fig. 5
text_image
MAX MINFig. 6
- Plug the appliance into an electrical outlet in accordance with the type plate. Press the ON/OFF button to switch the appliance on.
- Now select the preparation type with the buttons provided. You can choose from among the following programs:
■ Slushie for classic slush ice specialities
■ Milk Shake for slush ice milk shakes
■ Wine for slush ice with wine
■ Frappe for coffee frappé slush ice
■ Cocktail for slush ice cocktails
-
Use the + and – buttons to set the desired consistency of the slush ice. Five levels are available; level 3 is preset at the factory. Once a level is selected, it will be saved for future applications, but can be changed by pressing a different button.
-
Note: If the temperature of the ingredients is 20–25 °C, it takes about 35 minutes on level 3 until the slush ice is finished. If pre-cooled ingredients are used, this time is shortened accordingly.
-
Press the Start/Stop button. The appliance starts mixing and cooling ingredients, the button for the selected preparation type lights up during this time.
- After 10 seconds, the child protection lock is automatically activated; the child protection lock indicator lamp lights up, indicating that the appliance is locked. Now, input via the buttons is disabled. Press and hold the child protection lock button for 3 seconds to deactivate the lock. Input via the buttons is enabled again.
- To pause the current program, press the Start/Stop button.
- When the slush ice is ready, the appliance beeps three times and “Cool” appears on the display. The symbol for the selected program lights up brightly, while the other function symbols light up dimly.
- The appliance is now in cooling mode and keeps the slush ice cool.
- Place a container under the outlet and push the tap forward to remove the slush ice. Once the desired quantity has been dispensed, release the tap.
- The appliance remains in cooling mode until you select another function or switch off the appliance.
- To switch off the appliance, press the ON/OFF button and unplug the appliance from the electrical outlet.
- If you wish to prepare more slush ice right away, you must first clean the appliance in accordance with the interim cleaning instructions in the chapter “Cleaning and care”.
APPLIANCE PROTECTION FEATURES
- Motor protection: The appliance is equipped with a safety feature that automatically stops the mixer if the processed mass is too solid. This prevents damage to the machine.
- Compressor protection: To protect the compressor, avoid starting and stopping the appliance repeatedly. After being switched off, the compressor needs a rest period of 3 minutes before it can be activated again. Unplugging the power cord deactivates the protection feature. To prevent damage to the compressor, we recommend that you do not unplug the appliance.
- Mixing container protection: The appliance automatically switches off if the mixing container is not correctly inserted or if it is removed during operation. This feature prevents injuries, as well as damage to the appliance. In this case, the function symbols on the display light up, the consistency indicator
flashes, and the appliance can only be started again after the mixing container is correctly inserted.
CLEANING AND CARE

Before disassembly, switch off the appliance and disconnect the plug from the electrical outlet.
Do not use abrasive scouring agents, steel wool, metal objects, hot cleaners or disinfectants, since they can cause damage to the appliance.
Interim cleaning
- Fill the mixing container with clean water up to the “Max” marking. The maximum permissible water temperature is 50^ C. Switch on the appliance using the ON/OFF switch and then press the “Clean” button. Let the appliance run only about 4 minutes. Then drain the water via the outlet into a sufficiently large container and discard. If the mixing container is still not clean, repeat the process.
Disassembly
- Before disassembly, carry out interim cleaning for 2–3 minutes as described in the section above. Completely drain the water via the outlet into a sufficiently large container and discard.
- Switch off the appliance using the ON/OFF switch and unplug it from the electrical outlet.
- Open the locking mechanism by pulling the lever forward (see chapter "Before first use").
- Remove the mixing container and the mixer. Clean both components with a moist cloth and dry thoroughly.
- Pull the drip tray out of the appliance, empty the tray, and clean the tray and drip grate in warm water with a little washing-up liquid.
- Pull the condensate tray out of the appliance, empty the tray and clean it, likewise in warm water with a little washing-up liquid.
- Wipe off the cooling cylinder and the seal with a clean cloth. Important. The seal cannot be removed. Never pull on the seal. This can deform the seal, resulting in water leaks and a defective appliance.
-
The outlet, mixer and mixing container are dishwasher-safe and can be cleaned in the upper basket using a gentle rinsing program.
-
To clean these parts by hand, add a mild washing-up liquid to about 8 litres of water and immerse all parts. Use a washing-up brush, for example, to remove any food residue from the parts.
- Afterwards, rinse all parts with clean water.
- Wipe off the housing carefully with a moist cloth.
- All parts must be completely dry before you reassemble the appliance.
- Note: The appliance operates with a compressor. As a result, condensation water can collect inside the appliance. After switching off and cleaning the appliance, it should therefore remain unpacked for at least two days before storing, to allow the condensation water to evaporate.
- If the appliance is not to be used for an extended period, it should preferably be stored in the original box in a protected, dry area that is free of dust.
GUARANTEE CONDITIONS
We grant a warranty of 24 months for this UNOLD brand appliance - 12 months for commercial use - from the date of purchase, covering damage that is demonstrably due to factory defects when used as intended. Within the warranty period, we will remedy material and manufacturing defects at our discretion by repair or exchange. Our warranty services apply exclusively to appliances sold in Germany and Austria. For other countries, please contact the responsible importer. Please send appliances for which you seek removal of defects, together with a copy of the machine-generated proof of purchase that shows the date of purchase along with a description of the fault, to our customer service department using suitable packaging. On our website https://unold.de/pages/rucksendungen, you can print out a return slip (only for return shipments from Germany and Austria). All types of damage attributable to wear and tear, improper handling and non-compliance with the maintenance and care instructions are excluded from the warranty. The warranty claim is void if repairs or interventions on the appliance are carried out by a third party. This manufacturer's warranty does not limit your statutory rights or your claims against the seller or dealer under the purchase contract in accordance with the provisions of the German Civil Code (BGB). Your statutory rights as a consumer, in particular your rights to warranty and the statutory claims for defects in accordance with Sections 437 et seqq. BGB, remain unaffected.
UNOLD AG, Mannheimer Straße 4, D-68766 Hockenheim
WASTE DISPOSAL / ENVIRONMENTAL PROTECTION
Our appliances are produced on a highquality level for a long lifetime. Regular maintenance and expert repairs by our after-sales service can extend the useful life of the appliance. If an appliance is defective and repair is not possible, we ask you to follow the following instructions for disposal. Do not dispose this appliance together with your standard household waste. There is a legal requirement to dispose of waste electrical and electronic equipment (WEEE) as well as batteries and accumulators separately from household waste. You can recognise this waste equipment by the crossed-out wheeled bin symbol (WEEE symbol). Please bring this product to an approved collection point for recycling of electric and electronic products. By separate collection and disposal of waste products you help to protect natural resources and ensure, that the product is disposed in an adequate way to protect health and environment.
natural_image
Symbol of a trash bin with crossed lines indicating no waste or discharge, and a solid black rectangle below (no text or labels)The instruction booklet is also available for download: www.unold.de
The authors have thoroughly considered and tested the recipes included in these operating instructions. Nevertheless, a guarantee cannot be accepted. The authors, respectively UNOLD AG and their assignees shall not be liable for personal injuries, material damages and financial loss.
NOTICE D'UTILISATION MODÈLE 48940
CARACTÉRISTIQUES TECHNIQUES
natural_image
Technical line drawing of a mechanical or industrial device with no visible text, numbers, or symbols.Fig. 3

natural_image
Technical line drawing of a mechanical or industrial component with ventilation grilles and a cylindrical component (no text or symbols)Fig. 4
INFORMATIONS GÉNÉRALES SUR LA PRÉPARATION
natural_image
Line drawing of a portable radio or fax machine with ventilation grille and antenna (no text or symbols)Fig. 5
text_image
MAX MINFig. 6
CONDITIONS DE GARANTIE
natural_image
Symbol of a trash bin with crossed lines indicating no waste or discharge, and a solid black rectangle below (no text or labels)natural_image
Line drawings of two industrial machines with heat sinks and a plate, labeled Fig. 1 and Fig. 2 (no text or symbols on the devices themselves)natural_image
Technical line drawing of two identical industrial HVAC unit designs with ventilation grilles and mounting brackets (no text or symbols)Fig. 3 Fig. 4
ALGEMENE INFORMATIE OVER DE BEREIDING
natural_image
Line drawing of a vintage portable radio with ventilation grilles and a pointer (no text or symbols)Fig. 5
text_image
MAX MINFig 6
„AAN/UIT“-knop.
natural_image
Symbol of a trash bin with crossed lines indicating no waste or discharge, and a solid black rectangle below (no text or labels)natural_image
Technical line drawing of a mechanical or industrial device with ventilation grilles and a handle (no text or symbols)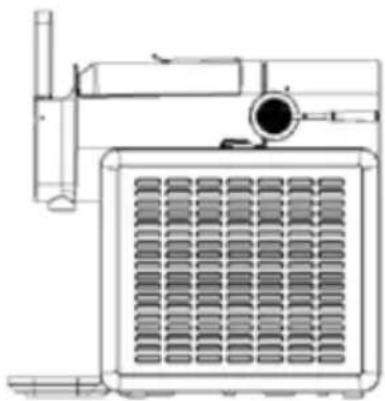
natural_image
Technical line drawing of a mechanical or industrial component with ventilation grilles and a central hub (no text or symbols)Fig. 3 Fig. 4
natural_image
Line drawing of a vintage portable radio with a speaker emitting sound waves (no text or symbols)Fig. 5
text_image
MAX MINFig. 6
natural_image
Symbol of a trash bin crossed with a diagonal line and a horizontal line, representing waste sorting or disposal (no text or labels)natural_image
Line drawing of a manual kitchen tool with a side panel and lid, no text or symbols present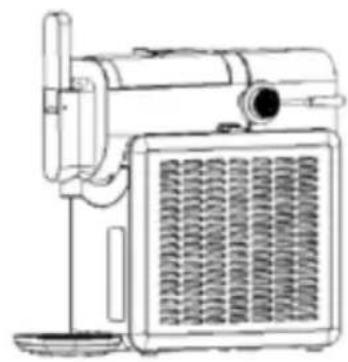
natural_image
Line drawing of a manual kitchen tool with ventilation grilles and a side-mounted fan (no text or symbols)Fig. 2
Fig. 1
natural_image
Technical line drawing of a mechanical or industrial device with ventilation grilles and a handle (no text or symbols)Fig. 3
natural_image
Technical line drawing of a mechanical or industrial device with ventilation grilles and a mounted component (no text or symbols)Fig. 4
natural_image
Line drawing of a vintage portable radio with ventilation grilles and a mounted fan (no text or symbols)Fig. 5
text_image
MAX MINFig. 6
natural_image
Simple line drawing of a trash bin with crossed lines indicating no waste or discharge (no text or symbols)natural_image
Line drawings of two industrial machines labeled III. 1 and III. 2, showing internal components and a small dish (no text or symbols on the devices themselves)natural_image
Technical line drawing of two identical industrial air purifiers with heat sinks and ventilation grilles (no text or symbols)III. 3
III. 4
OGÓLNE INFORMACJE O PRZYGOTOWYWANIU
natural_image
Line drawing of a vintage sewing machine with a stand and fan (no text or symbols)III. 5

text_image
MAX MINIII. 6