
ETV41 - Cooker Essentiel B - Free user manual and instructions
Find the device manual for free ETV41 Essentiel B in PDF.

| Brand | Essentiel B |
| Model | ETV41 |
| Product type | Built-in ceramic hob |
| Number of cooking zones | 4 |
| Heating technology | Ceramic |
| Cooking zone diameters | Zone 1: 20 cm, Zone 2: 16.5 cm, Zone 3: 27 x 16.5 cm (oval), Zone 4: 16.5 cm |
| Power supply | 220-240 V ~ 50/60 Hz |
| Maximum power | Approximately 7.2 kW (32 A) |
| Energy consumption of the hob | 183.6 Wh/kg |
| Control type | Touch controls |
| Main functions | Programmable timer (0-99 min), child lock, automatic shutdown, residual heat indicator |
| Power levels | 9 levels (1 to 9) |
| Safety | Automatic shut-off in case of overheating, control panel lock, end-of-cooking audible signal |
| Installation | Built-in, requires a worktop at least 30 mm thick, safety distance of 760 mm above |
| Cleaning and maintenance | Clean with a damp cloth after cooling, use a scraper for stubborn stains, avoid abrasive products |
| Residual heat indicator | Display 'H' on hot zones |
| Recommended cookware material | Stainless steel, cast iron (flat and smooth bases) |
| Environmental protection | Appliance subject to WEEE regulations, do not dispose of with household waste |
Frequently Asked Questions - ETV41 Essentiel B
User questions about ETV41 Essentiel B
0 question about this device. Answer the ones you know or ask your own.
Ask a new question about this device
Download the instructions for your Cooker in PDF format for free! Find your manual ETV41 - Essentiel B and take your electronic device back in hand. On this page are published all the documents necessary for the use of your device. ETV41 by Essentiel B.
USER MANUAL ETV41 Essentiel B
natural_image
Four white circles arranged in a 2x2 grid on a dark background, with a red numeric input box below (no text or symbols on the circles)Notice d'utilisation / User guide / Instrucciones de uso / Bedienungsanleitung / Gebruiksaanwijzing
FR - Fiche produit
Measurements made according to Regulation No. 66/2014 of the European Commission and standard EN 60350-2:2013:
| Value | Unit | |
| Brand | Essentiel b | |
| Model reference | ETV41 | |
| Type of hob | Built-in | |
| Number of cooking zones | 4 | |
| Heating technology | Vitroceramic | |
| Diameter of the usable surface area for each electric cooking zone, rounded to the nearest 5 mm | Zone 1: 20 ∅Zone 2: 16.5 ∅Zone 3: 27*16.5 ∅Zone 4: 16.5 ∅ | cm |
| Energy consumption per cooking zone or cooking area calculated per kg | Zone 1: 183.3Zone 2: 178.2Zone 3: 194.8Zone 4: 178.1 | Wh/kg |
| Energy consumption of the hob, calculated per kg | 183.6 Wh/kg | |
| L (mm) | W (mm) | H (mm) | D (mm) | A (mm) | B (mm) | X (min) | F (mm) | ||
| 590 | 520 | 51 | 47 | 560 ± | 2 | 480 ± | 2 50 min. | 3 min. |
natural_image
Pure technical diagram of a rectangular plate with labeled corner points (A, B, C, D) and no text or symbols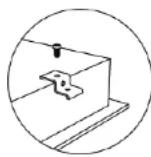
Mise en route
ALLUMER / ÉTEINDRE LA TABLE DE CUISSON
Installation should only be carried out by specialists. The user must comply with the legislation and standards in force in their country of residence.
Fitting the watertight seal
The adhesive seal supplied with the appliance prevents anything from getting inside the unit. Care must be taken when fitting this item.
Stick the seal on the edge of the hob, 3 mm from the outer edge, after removing the protective strip.
Fitting the hob
Cut the worktop according to the dimensions shown in the diagram below.
For fitting and use, there must be a gap of at least 50 mm around the hole.
Make sure the thickness of the worktop is at least 30mm. Select an insulated, heat-resistant worktop material (wood or similar hygroscopic materials should not be used unless it is an impregnated material) to avoid electrical shocks and reduce any warping caused by the heat radiating from the hob.
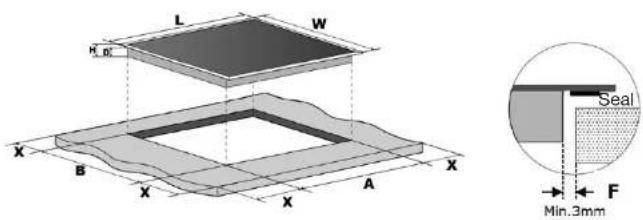
| L (mm) W | (mm) H (mm) D (mm) | A (mm) B | (mm) X (mm) F (mm) | ||||
| 590 520 | 51 | 47 | 560 ± 2 | 480 ± 2 | 50 min.3 min. | ||
The safety distance between the sides of the hob and the interior surfaces of the worktop must be at least 3 mm.
In any case, make sure that the hob is properly ventilated and that the air inlets and outlets are not blocked.
Also make sure the hob is in good working order.
The safety distance between the hob and the units above it must be at least 760 mm.
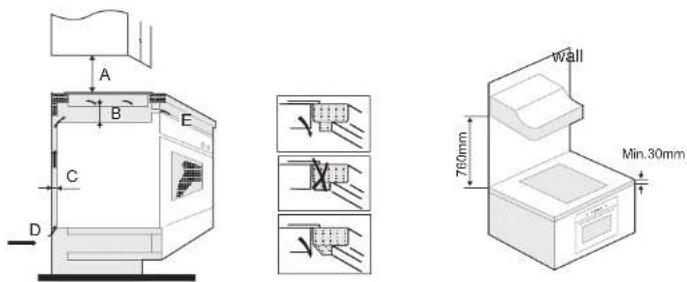
| A (mm) B (mm) C (mm) | D | E | ||
| 760 | 25 min. | 20 min. | air inlet | air outlet 5 mm |
Make sure that there is adequate ventilation
In order to avoid any accidental contact with the base of the hob when it is hot or any unexpected electric shock when it is on, a wooden insert, fixed with screws, must be placed at a minimum distance of 50 mm under the hob.
Follow the dimensions indicated in the diagram below.
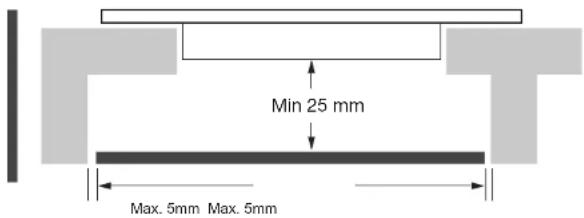
There are vents on the outside of the hob.
Make sure that these openings are not blocked by the worktop when fitting the hob.
Please note that the glue between the plastic or wood material and the unit must withstand a minimum temperature of 150^ C so that the coating does not peel off. The walls to the rear and sides, and the surrounding surfaces, must therefore be able to withstand a temperature of 90^ C.
Before fitting the hob, make sure that:
- The worktop is at right angles and level, and there are no structural elements interfering with the spacing requirements.
- The worktop is made of a heat-resistant and insulated material.
- If the hob is fitted above an oven, the oven must have a built-in cooling fan.
- The installation will comply with all clearance requirements as well as the applicable standards and regulations.
- If the appliance is not fitted with an accessible plug, the fixed installation must include a system for disconnecting it in accordance with applicable regulations.
- The appliance must be connected to the mains power by an all-pole switch (e.g. circuit breakers, fuses, residual current devices and contact switches) with a gap of at least 3 mm between the contacts.
- CAUTION: Only use hob guards designed by the manufacturer of the cooking appliance or recommended by the appliance manufacturer in the operating instructions, or hob guards built into the appliance. The use of unsuitable guards could lead to accidents.
- This appliance is not intended to be operated using an external timer or a remote control system.
- Consult local planning authorities and council regulations if you are unsure about the installation.
- Use heat-resistant, easy-to-clean finishes (e.g. ceramic tiles) for the wall surfaces surrounding the hob.
After fitting the hob, make sure that:
• The power cable is not accessible through the cupboard doors or drawers.
- There is enough cool air flowing from outside the units to the base of the hob.
- If the hob is fitted above a drawer or cupboard, a thermal protection barrier must be fitted under the bottom of the hob.
- The circuit breaker must remain easily accessible to the customer.
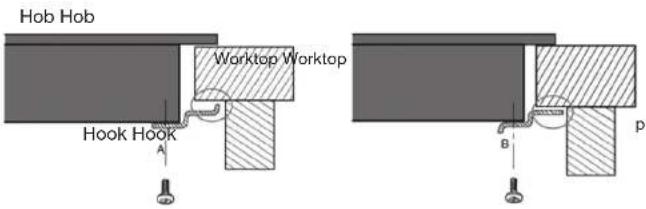
Fitting the mounting hooks
- The appliance must be placed on a stable and smooth surface (use the packaging). Do not force to controls that protrude from the hob.
- Secure the hob to the worktop by screwing the 4 hooks under the hob (see photo) after installation.
- Adjust the position of the hooks according to the thickness of the worktop.

natural_image
Simple line drawing of a rectangular prism with labeled corner points A, B, C, D (no text or symbols on the object itself)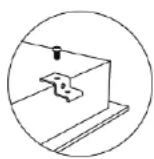
A: Screw
B: Hook
C: Screw hole
D: Base
PRECAUTIONS:
- The hob must be fitted by qualified personnel or technicians.
- The hob should not be fitted directly above a dishwasher, refrigerator, freezer, washing machine or tumble dryer because moisture can damage the hob's electronics.
- Worktop veneers and coatings must be made of heat-resistant materials (100 °C).
- The wall edge strips must be heat-resistant.
- Do not use a steam cleaner
electrical connections
Precautions

The appliance must be connected to the mains electricity by a specialised person who is familiar with the safety standards and legislation in force.
- Before carrying out any operation on the electrical part of the appliance, you must first disconnect it from the mains electricity.
- Technical data and electrical connection conditions can be found on the appliance's rating plate.
- This appliance is designed for a 220 - 240 V- 50/60 Hz power supply.
- Make sure that the voltage indicated on the rating plate corresponds to the supply voltage of your home.
- The appliance must be earthed: Only use an appropriately sized power cable with a yellow/green earth wire.
- This appliance must be connected to the mains via an all-pole switch (e.g. circuit breakers, fuses, earth leakage circuit breakers and contact switches) with a minimum contact spacing of 3 mm.
- Do not use extension cords, multi-way sockets or adapters, as this could lead to overheating of the electrical connections.
- The power cable must not touch any hot part and must be positioned so that its temperature does not exceed 75°C at any point.
- If the cable is damaged or needs to be replaced, this must be carried out by an after-sales service technician with dedicated tools to avoid any accident.
Connecting the hob
- This hob must be connected to the mains supply by an all-pole disconnection switch that complies with the applicable installation rules.
- A disconnection switch must be incorporated into the fixed wiring system.
- Warning: do not use an electric screwdriver to make the connection with the terminal block.
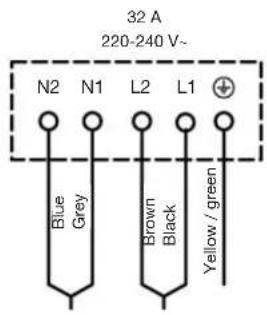
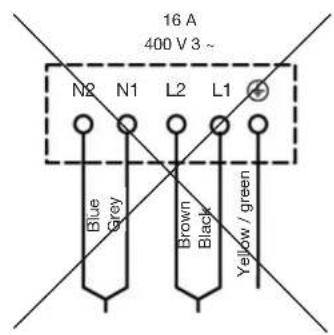
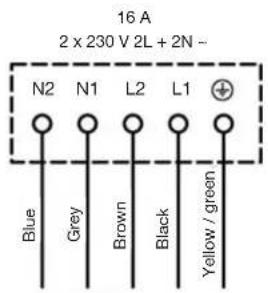
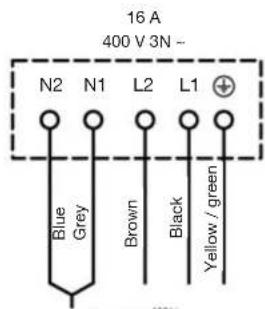
- Warning: Make sure that the wires are properly inserted into the cable connection system on the mains supply.
description of the control panel
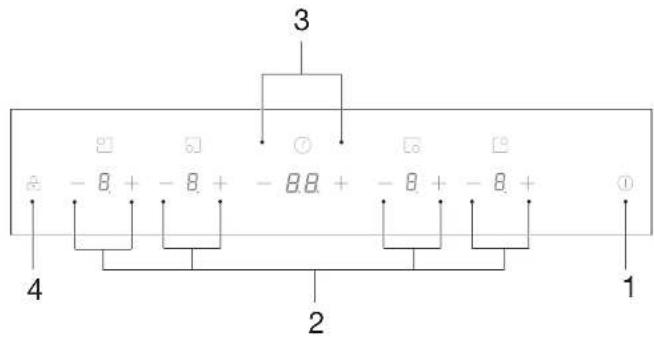
- On/off button
- Cooking zone adjustment buttons (decrease [-] and increase [+] the power level)
- Timer adjustment buttons (decrease [-] and increase [+] the cooking time)
- Locking the control panel (child lock)
before first use
Getting started
Clean the appliance with a damp cloth, then dry it. Do not use any detergent that may cause bluish discolouration on glass surfaces.
basic use
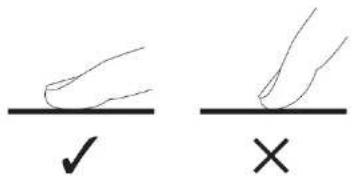
Touch-sensitive buttons
Your machine is equipped with touch-sensitive buttons to control the various functions. It can be activated by lightly touching the button. This activation is confirmed by an indicator lamp, a display and/or an audible signal.

Only press one key at a time.
Getting started
SWITCHING THE HOB ON/OFF
| Action Control panel | Display | |
| Switch on the hob | Press 1 | - |
| Switch off the hub | Press 1 | Nothing displayed or H. |
- When you switch on the hob, it will beep.
- Make sure that the pan you put on the cooking zone is compatible. Make sure the bottom of the container and the hob are clean and dry.
| Action Control panel | Display | |
| Adjust the power | Press the [-] or [+] button to decrease or increase the power of the selected cooking zone.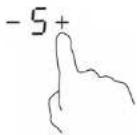 | 1_to9 |
• If you do not make any adjustments for one minute, the ceramic hob will turn
off automatically. You will then need to turn the hob back on.
• You can change the power level at any time during cooking.
- If you press and hold the [-] or [+] button, the power level decreases or increases quickly.
STOP COOKING ON A COOKING ZONE
| Action Control panel | Display | |
| Stop cooking | Press the [-] button of the cooking zone until is displayed.Press the [+] and [-] buttons of the cooking zone at the same time. | or H |
DISPLAY
| Display Description Function | |
| 0 | Zero The cooking zone is activated. |
| 1 to 9 | Power level Choosing the cooking level. |
| E | Error message Electronic circuit fault. |
| H | Residual heat The cooking zone is still hot. |
| LO | Child lock The hob is locked. |
advanced use
Residual heat indicator (display shows H)
When you switch off a cooking zone or fully switch off the hob, the cooking zone, that is still hot, is indicated by the H symbol.

As long as the residual heat indicator is on, do not touch the cooking zone or place any heat-sensitive object on it. Risk of burns and fire!
The H symbol switches off when the cooking zone can be touched without danger.
Timer function L
The timer can be assigned simultaneously to all 4 cooking zones with different time settings (0 to 99 minutes) for each zone.
You can use the timer alone (excluding cooking) or to notify you when cooking has finished.
1) TIMER USED ALONE (EXCLUDING COOKING)
- You can use the timer even if you do not select a cooking zone.
Action Control panel Display
| Switching on the hob | Press 1 | - |
| Select the timer | Press the [-] or [+] button on the timer. | The timer display flashes and then becomes fixed. |
| Setting the timer | Press the [-] or [+] button on the timer. | For example:7-36+ |
| Action Control panel Display | ||
| The time countdown begins | (Display of the time remaining and the indicator flashes for 5 seconds)For example:1- >17+ | |
| The timer has finished | The appliance emits a beep sound for 30 seconds. | -- |
| To stop the sound signal and switch off the hob | Press 1 | (The hob switches off) |
- If you briefly press the [-] and [+] buttons, the timer increases or decreases in 1-minute increments.
- If you press and hold the [-] and [+] buttons, the timer increases or decreases in 10-minute increments.
- If the setting time exceeds 99 minutes, the timer will automatically return to 0 minutes.
2) SET A TIMER FOR THE END OF COOKING
| Action Control panel Display | |||
| Select the zone | Press the [-] or [+] button of a cooking zone to adjust the power level. | For example: |  |
| Setting the timer | Press the [-] or [+] buttons of the timer to set a cooking time. | For example: | 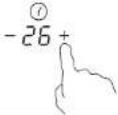 |
Action Control panel Display
| The time countdown begins | (Display of the time remaining and the indicator flashes for 5 seconds)For example:1- >17+ | |
| The timer has finished | The appliance emits a beep sound for 30 seconds. | -- |
| The cooking zone stops automatically. | [XOXO]-- + |
- A red dot next to the power level indicates the cooking zone selected for the timer.
- If you want to change the timer, use the [-] and [+] buttons of the timer.
2) STOP THE TIMER FUNCTION DURING COOKING
Action Control panel Display
| Stop the timer | Press the timer [-] and [+] buttons at the same time. 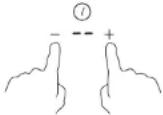 | _orH |
- When multiple timers are activated, simply repeat the operation by selecting each cooking zone for which a timer is activated.
3) AUTOMATIC SHUTDOWN AT THE END OF COOKING
As soon as the cooking time is up, a "-" message flashes on the display, there is a beep sound and the cooking zone switches off automatically. To stop the beep and stop the indicator from flashing, press the button.
Locking the control panel (child lock)
To avoid changing a selection, particularly when cleaning the ceramic surface, the control panel (with the exception of the on/off button) can be locked.
LOCKED
| Action Control panel Display | ||
| Switching on the hob | Press ^[C408] | O or H |
| Lock the hob | Press ^[7220] | LO |
- You can always turn off the hob with the button in case of emergency.
UNLOCKING
| Action Control panel Display | ||
| Switching on the hob | Press 1 | 0 |
| Unlock the hob | Press and hold 2 for a few seconds. | -- |
Default operating time
Auto off is a safety protection function for your hob. It turns off automatically if you forget to turn it off. The default operating times based on the different power levels are shown in the table below:
| Power level | 1 2 | 3 4 5 | 6 7 8 9 | ||||||
| Default operating time (in hours) | 8 8 | 8 4 4 | 4 2 2 2 |
cooking tips
Choice of cooking utensils
WHAT EQUIPMENT TO USE?
Most pans and other cooking utensils are compatible with ceramic glass. Refer to the manufacturer's instructions. However, choose a material that is not likely to scratch the glass-ceramic surface, such as cast iron or stainless-steel pans. Aluminium or copper utensils can leave marks that are difficult to remove.
CHARACTERISTICS OF CONTAINERS
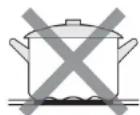
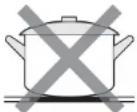
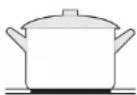
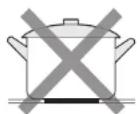

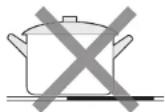

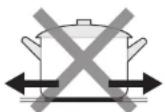
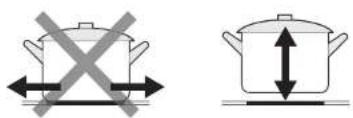
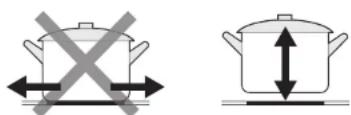
- Cookware should always have a flat, full bottom that fits snugly into the cooking areas. Do not use unstable or deformed pans.
- Place the cookware on the cooking zone before switching it on.
- Make sure the diameter of the pan is suitable for the diameter of the cooking zone and is well positioned in the centre.
- Dry the underside of the pan before placing it on the cooking zone.
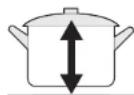
- Do not drag the pan across the glass surface to avoid damaging it. Lift the pan.
• Using a lid will reduce the cooking time and save energy.
OTHER RECOMMENDATIONS
- Keep children away from the hob while it's in use. Make sure container handles are facing inwards. Remember that oil or fat can ignite if brought to an excessive temperature.
- The cooking zones remain hot after use. Do not leave any object on them and do not put your hands on the hob or you will burn yourself, as long as the residual heat indicator is still on.
- Unplug the hob if you notice the glass cracking.
- Do not use the hob as a storage or work surface.
Cooking power guide
| 1 to 2 | Melt,Reheat | Sauces, butter, chocolate, gelatineReady-made meals |
| 2 to 3 | RisingDefrosting | Rice, pudding and ready-made mealsVegetables, fish, frozen products |
| 3 to 4 | Steam Vegetables, fish, meat | |
| 4 to 5 | Water | Boiled potatoes, soups, pasta, fresh vegetables |
| 6 to 7 | Low heat cooking | Meat, liver, eggs, sausagesGoulash, rolls, tripe |
| 7 to 8 | Cook,Frying | Potatoes, doughnuts, pancakes |
| 9 | Fry, Cook,Bring to a boil | Steaks, omelettesWater |
The values shown above are provided as a rough guide only.
cleaning and maintenance
- Daily cleaning and proper maintenance have a crucial impact on the durability of your ceramic hob.
- Clean the ceramic hob following the same rules as for glass. Never use objects that could scratch the glass ceramic such as the tip of a knife, abrasive or aggressive cleaning products, scouring powder, scratching sponges, etc.
• After each use, immediately clean up any liquid spills, especially foods with a high sugar content or sugar splashes, to prevent them from burning on the glass-ceramic surface. - Wipe light, unburned soiling with a damp cloth without cleaning agent. Some cleaning products can cause a blue stain on the plate. Stubborn stains often cannot be removed after the first cleaning, even if you use specific cleaning products.
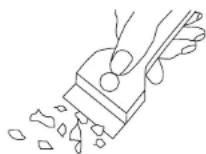
- Remove larger stains stuck to the hob when the hob is still slightly warm using a scraper (not supplied). After removing the largest stains, wipe the surface with a damp cloth when the hob has completely cooled down.
- Calcium residues can be removed using vinegar or special cleaners.
- We recommend you obtain specific cleaning products for the maintenance of glass-ceramic hobs from shops for thorough cleaning.
- Never clean your hob with a pressure or steam cleaner.
• Never apply cleaner to a hot hob.
troubleshooting guide
Some minor issues can be resolved by the user. If the information below doesn't resolve your specific problem, do not attempt to repair the appliance by yourself, but contact your retailer's after-sales service.
The hob doesn't switch on:
• The hob is improperly connected to the mains.
- Check the fuse in your home's electric board and replace it if necessary.
- Check if there is a power cut.
The control buttons do not respond:
- The child lock is activated and the controls are locked. Press and hold for a few seconds.
The touch-sensitive buttons are difficult to use:
- The touch-sensitive buttons are covered with water or grease. Make sure the surface of the touch-sensitive buttons is clean and dry.
The glass of the hob is scratched:
- You are using cooking vessels with rough edges. Use cooking utensils with a flat, smooth base. Check out the "Choice of cooking utensils" section.
- You are using an abrasive sponge or cleaning product. See the "Maintenance and cleaning" section.
A cooking zone stops automatically and the residual heat indicator comes on:
- When an excessive temperature is detected, the hob will automatically stop.
- This is a safety feature in the event of overheating. You can turn the hob back on and continue cooking.
The cooking plate is cracked:
- DANGER! Stop using the hob. Unplug it immediately and contact your dealer's after-sale service centre.
Error codes
If a technical problem is detected, the error codes listed in the table below may be displayed:
| Error codes | Problems Solutions | |
| E0 | Faulty temperature sensor. | Contact your retailer's after-sales department. |
| E1 | ||
| E2 | ||
| E7 | ||
| E3 | ||
| E4 | ||
| C1 | Overheating | Allow the hob to cool down. If the problem recurs, check that the installation is properly ventilated. |
| EL | Supply voltage too low | Get the electrical installation checked by an approved professional. |
| EH | Supply voltage too high | |
| EU | Communication failure | Contact your retailer's after-sales department. |
If any of the error codes persist, contact the after-sales service of your retailer. Do not disassemble or carry out repairs yourself. Repairs carried out by unqualified people are not covered by the warranty.
instalación

| L (mm) A | (mm) | Alt. (mm) | D (mm) A | (mm) B (mm) X (mm) | F (mm) | |
| 590 520 | 51 47 560 | ± 2 480 ± | 2 50 min. | 3 min. |
natural_image
Pure 3D diagram of a rectangular prism with labeled corner points A, B, C, D (no text or symbols beyond labels)
| A (mm) B (mm) C (mm) D | E | |||
| 760 | 25 Min. | 20 Min. | Lufteinlass | Luftauslass 5 mm |
natural_image
Simple line drawing of a rectangular frame with corner markers, no text or symbols present
Inbetriebnahme
| L (mm) | W (mm) | H (mm) | D (mm) | A (mm) | B (mm) | X (min) | F (mm) | ||
| 590 | 520 | 51 | 47 | 560 ± | 2 | 480 ± | 2 50 min. | 3 min. |
natural_image
Pure 3D diagram of a rectangular prism with labeled corner points A, B, C, D (no text or symbols beyond labels)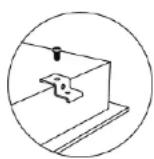
Inschakeling
DE KOOKPLAAT AAN/UITZETTEN
All information, designs, drawings and pictures in this document are the property of SOURCING & CREATION. SOURCING & CREATION reserves all rights to its brands, designs and information. Any copy and reproduction through any means shall be deemed and considered as counterfeiting.
Protection of the environment
This symbol attached to the product means that it is an appliance whose disposal is subject to the directive on waste from electrical and electronic equipment (WEEE). This appliance may not in any way be treated as household waste and must be subject to a specific type of removal for this type of waste. Recycling and
recovery systems are available in your area (waste removal) and by distributors. By taking your appliance at its end of life to a recycling facility, you will contribute to environmental conservation and prevent any harm to your health.

\* Tested in our laboratories
Warranty valid from the date of purchase (receipt as proof of purchase). This warranty does not cover defects or damage caused by improper set up, incorrect use, or normal wear and tear of this product.
Customer Relations Department /