USER MANUAL CT702 Essentiel B
natural_image
Black outdoor headphones and charging case (no text or symbols visible)
Notice d'utilisation / User guide /
Instrucciones de uso / Bedienungsanleitung /
Gebruiksaanwijzing
natural_image
Isometric illustration of a device with a monitor and circular wave signals, no text or symbols present
natural_image
Technical line drawing of a mechanical component with no visible text or symbols
natural_image
Technical line drawing of a mechanical component with an arrow indicating upward motion (no text or symbols)
natural_image
Technical line drawing of a mechanical component with a circular outline and an upward arrow indicator (no text or symbols)
natural_image
Technical line drawing of a mechanical component with a labeled part (no text or symbols present)
Thank you for purchasing an Essentiel b brand product. We take great care in the DESIGN,
RELIABILITY and EASE OF USE of our products.
We hope that you will be fully satisfied with this TV headset.
instructions for use
READ THESE INSTRUCTIONS CAREFULLY BEFORE USING THIS DEVICE AND SAVE THEM TO REFER TO THEM LATER ON.
General instructions
Users should not attempt to repair or replace any part of this device. Repairs must be carried out by qualified personnel. Any disassembly of the device will void the warranty.

WARNING
RISK OF ELECTRIC SHOCK
- DO NOT OPEN

WARNING: TO REDUCE THE RISK OF FIRE OR ELECTRIC SHOCK, DO NOT OPEN THE COVER OR THE BACK PANEL.

A lightning symbol inside an equilateral triangle warns users about the presence of uninsulated high voltages inside the device with a sufficiently high current to present an electrical discharge risk to individuals.

An exclamation mark inside an equilateral triangle informs users of important operational or maintenance safety instructions (routine maintenance) in the instructions for use provided with the device.
- Do not let the device fall, do not bump or shake it.
Keep this device away from water
- Do not allow any liquid to get into the device or its transmitter base, and do not place objects filled with liquids (such as vases) on the device or on the transmitter base.
- Do not expose this device or its transmitter base to rain, humidity or water splashes.
- Never immerse the cable, mains adapter, device, or transmitter base in water or any other liquid.
Warning regarding ventilation
- The transmitter base must be located in a place and position that does not interfere with its ventilation.
- Make sure the air vents are not obstructed by objects such as newspapers, tablecloths, curtains, sheets, etc. This device must not be built into a cabinet unless sufficient ventilation is provided.
- Do not insert objects or pointed items into the air vents.
Recycling the battery

Dispose of the battery according to local regulations:
- Do not dismantle the battery, do not dispose of it in a fire.
- Do not expose it to high temperatures or direct sunlight.
- Do not burn it.
- Do not throw the battery away with household waste. In order to protect the environment, the battery must be disposed of according to current regulations.
Signal transmission
This TV headset transmits and receives radio electric frequencies (HF) in the 2.4 GHz range.
These emissions can interfere with the operation of various electronic devices. To prevent accidents, do not use your headset when you are in the following locations:
- places where flammable gas is present, in hospitals or petrol stations, on trains or aeroplanes, or near automatic doors or fire alarms,
- areas where blasting is carried out.
If you have a pacemaker or other prosthesis, ask your doctor for advice.
Protecting your hearing

- In order to avoid possible hearing damage, do not listen at high volume level for long periods of time.
- It is advisable to regularly stop using your headset and/or keep the output volume at a reasonable level.
- Do not set the volume to a level preventing you from hearing what is happening around you.
This product complies with the order of 8 November 2005 implementing article L.5232-1 of the French public health code.

Sourcing & Création assumes responsibility for the compliance of this product with all the requirements set out in the relevant European Union legislation.
your product
Contents of the box
- 1 wireless headset
- 1 transmitter base
- 1 x 3.5 mm Jack cable
• 1 x 3.5 mm Jack/RCA adapter
- 1 optic cable
• 1 micro USB/USB cable
- 1 user manual
Technical features
- Rechargeable headset
• Power supply voltage for transmitter base: 5 V —— 500 mA
• Functional range: 15 metres (in open field)
- On/Off button
• Volume control buttons
- LED indicator lights
- Charging time: 3 hours
• Battery life: 30 hours (volume at 50%)
• Transmission frequency: 2402 - 2480 MHz
• Frequency band: 3 MHz
• Emitted power: 3.53 mW EIRP
• Frequency response: 20 Hz - 20 kHz
- Impedance: 32 Ohms
• Distortion: < 1.5%
- Headset weight: 234g
• Weight of the base: 145g
• Headset dimensions: 193.3 x 160 x 80.3 mm
- Bluetooth 5.0 version
Description of indicator lights
HEADSET INDICATOR LIGHT
• Steady red: headset is charging
- Flashing red: low battery
• Off: headset charged/headset off
- Flashing blue and red: headset starting up/pairing with base
- Steady blue: headset in operation/successfully paired with base
TRANSMITTER BASE INDICATOR LIGHT
• Steady red: headset battery is charging
• Steady green: charging complete
- Flashing blue for 1 second: connecting with headset
- Flashing blue for 2 seconds: awaiting connection with headset
- Steady blue: in operation/successfully paired with headset
Description of headset
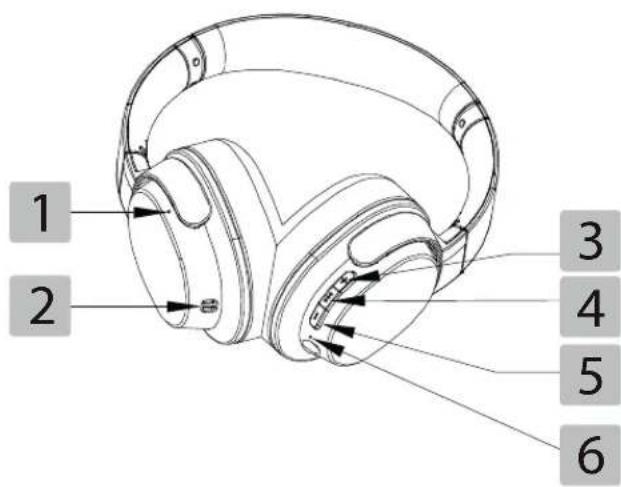
| 1 | Battery charge indicator light (lights up red when the battery is charging, then turns blue when the battery is charged) |
| 2 | Charging points |
| 3 | Volume + button |
| 4 | Multi-function button |
| 5 | Volume - button |
| 6 | Microphone |
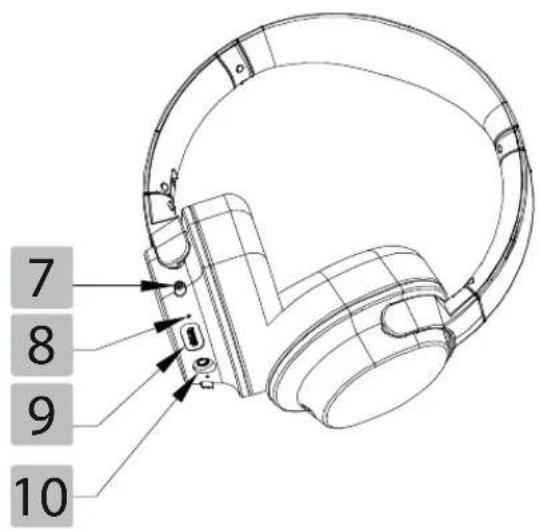
7 On/Off switch
Power on and connection indicator light
- Steady blue: the headset is on and the connection with the base has been established.
- Flashing blue: the headset is on, but is no longer receiving a signal from the transmitter base.
- Flashing blue and red: the headset is in pairing mode, awaiting a connection with the base or with a Bluetooth ^+ device.
- Off: the headset is off (the ON/OFF switch is in the OFF position, or the headset has switched to automatic standby mode after not detecting any signal from the transmitter base for 10 minutes).
9 Micro-USB charging port
10 3.5mm jack socket
Description of the transmitter base

11 On/Off switch
12 Charging pins
13 Headset battery charge indicator light (lights up red when the battery is charging, then turns green when the headset battery is charged)
14 Pairing button
15 3.5mm jack socket
16 Optical input (S/PDIF)
17 5V power connector = (micro USB port)
charging the headset
You can charge the headset battery with or without the charging base.
With the charging base

- Connect one end of the micro USB cable supplied to the USB port of the charging base.
- Plug the other end into a free USB port on your computer. You can also use a USB mains charger (not provided).
- Place the wireless headset on the connector of the charging base. The indicator lights on the headset and the base will light up red.
- When the headset is fully charged, the indicator light on the base will turn green. You can then remove the headset from the base and start using it.
Without the charging base
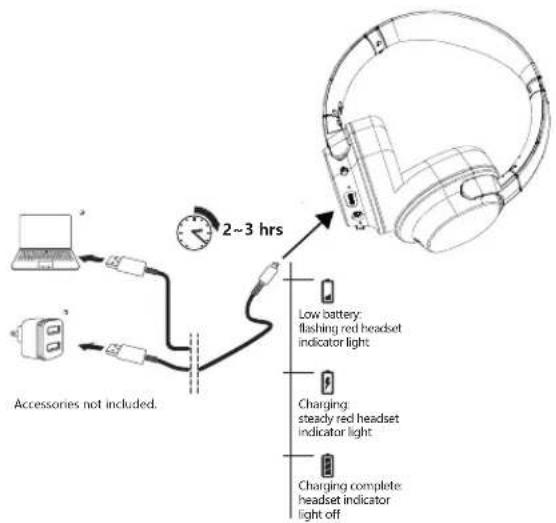
- Turn the ON/OFF switch to the OFF position.
- Connect one end of the micro USB cable supplied to the micro USB port of the headset.
- Plug the other end into a free USB port on your computer. You can also use a USB mains charger (not provided).
- The charging base does not have an integrated battery. Only the headset has an integrated battery.
- Charge the headset fully before using it for the first time. The full charge lasts 3 hours maximum. Battery life is approximately 30 hours.
- A loss of sound quality may indicate that the headset has a low battery.
- The headset will automatically turn off after 5 minutes of inactivity (if the base is also turned off) to conserve battery life.
- Always place the headset in the charging base so that it is charged before each use
- The charging system is designed to never overcharge the battery.
- If the device is not used for a long time, be sure to charge the battery regularly, once every three months.
connections
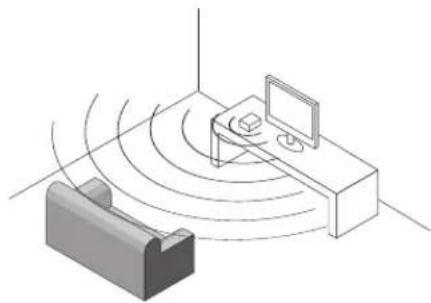
Choosing a position for the base
Before using your headset, you should choose a location near the device you want to listen to, such as your television.
natural_image
Isometric illustration of a device with a monitor and antenna, emitting signal waves from a screen (no text or symbols)
- Do not place the base close to a metal object such as a metal shelf or reinforced concrete wall. The range of the base may be reduced.
- The base and headset do not need to be within visual range of each other. You can move freely around your home within a 30-metre radius (open field).
Connecting the base to a sound source
Once you have decided on the location, you must now connect the headset base to the device you wish to listen to, such as your television.
There are several possibilities, depending on the connection available on the device you wish to listen to with your headset.

Warning! Make sure that the volume of your audio source is high enough. If not, the product may not be able to detect the signal and will go into standby mode. We recommend setting the volume of your audio source to at least 50% to ensure the signal is strong enough.
Note: You can adjust the end volume using the - and + on your headset.
CONNECT THE BASE TO THE OPTICAL SOCKET OF YOUR SOUND SOURCE
This connection provides the most accurate sound transmission via a fibre optic cable (without signal loss).
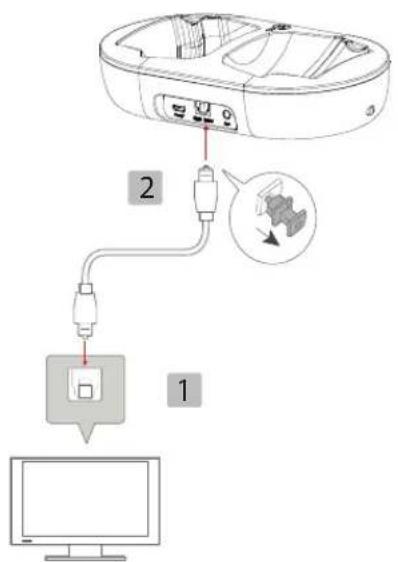
- Connect one end of the optical cable provided to the OPTICAL input socket on your television. This is either on the back or on one side of the television. Refer to your television set's operating instructions to find it easily.
- Connect the other end of the cable to the DIGITAL OPTICAL output on the back of the base.
When using an optical cable, remember to remove the protective cap from the connector. When inserting the connector, you may feel a slight resistance before the connector is fully inserted.
CONNECT THE BASE TO THE 3.5 MM JACK OF YOUR SOUND SOURCE
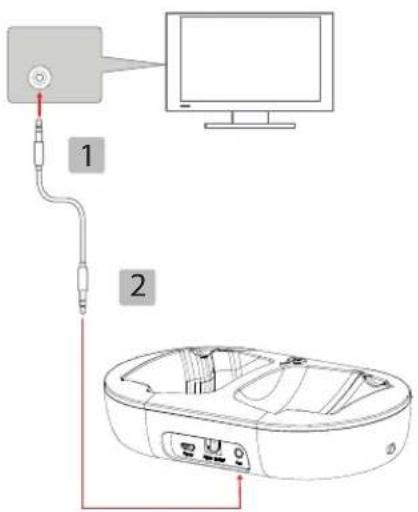
- Connect one end of the 3.5mm jack/jack cable provided to the headset socket on your television. The headset socket is either on the front or on one side of the television. Refer to your television set's operating instructions to find it easily.
- Connect the other end of the cable to the AUX port on the back of the base.
- In most cases, this configuration mutes the sound from your television speakers. The sound is then only available through the headset.
- You can also use a 6.35 mm jack adapter (not provided) on one end of the 3.5 mm jack cable provided if you wish to connect the base to an audio source equipped with a 6.35 mm headset jack (Hi-Fi system, audio amplifier, etc.).
CONNECT THE BASE STATION TO THE RCA JACKS OF YOUR SOUND SOURCE
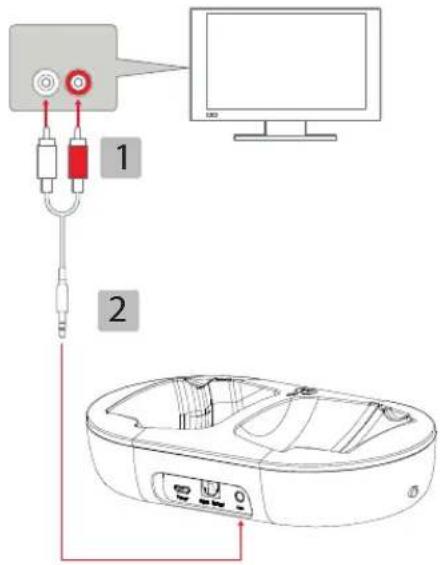
- Connect the red and white RCA jacks of the audio cable provided to the red and white RCA sockets of your television. These are either on the back or on one side of the television. Refer to your television set's operating instructions to find them easily.
- Connect the 3.5 mm jack end of the audio cable provided to the AUX socket on the back of the base.
In most cases, this configuration mutes the sound from your television speakers. The sound is then only available through the headset.
Using the headset in wired mode

- Connect one end of the 3.5 mm jack/jack cable provided to the headset socket on your audio source (MP4 player, phone, portable speaker, etc.)
- Connect the other end to your headset's 3.5 mm jack socket.
The ON/OFF button and touch controls are deactivated in this mode; Volume must be adjusted directly on the audio source.
use
Turning the headset and transmitter base on and off
- To turn on the headset and base, put the ON / OFF switches in the ON position. The base indicator light turns blue then flashes. The headset indicator light turns blue then flashes red and blue.
- To turn off the headset and base, put the ON / OFF switches in the OFF position. The headset and base indicator lights turn flash blue then turn off.
natural_image
Technical line drawing of a mechanical component with no visible text or symbols
- Once the headset is switched on, it automatically connects to the base. This connection takes between 5 and 10 seconds. The LEDs on the base and the headset turn steady blue. A beep will sound in the headset, indicating that the headset and base are properly paired.
- When you place the headset on the base while it is on, it will automatically disconnect. The connection will resume after a few seconds when you put the headset back on your head.
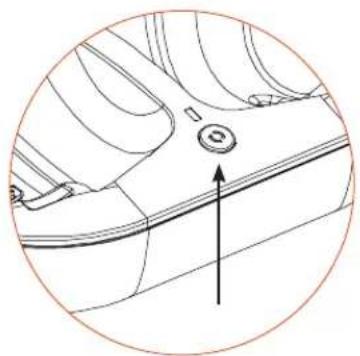
Pairing the headset and base manually
The headset and base have been paired at the factory. However, you can follow the procedure below to pair them again.
Turn on the headset and base.
Press the pairing button located on the base and hold for at least 5 seconds. The base indicator light flashes blue and red.
natural_image
Technical line drawing of a mechanical component with an upward arrow indicating direction (no text or symbols)
Press the --- button on the headset; the indicator light will flash red and blue
After a few seconds, both indicator lights (on the base and on the headset) will stop flashing and remain steady. A beep will sound, indicating that the devices have been successfully paired.
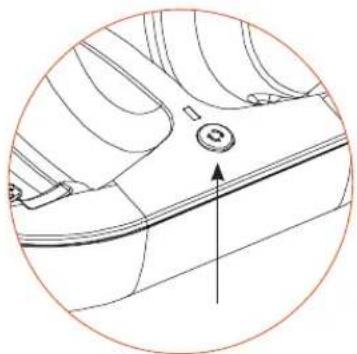
Unpair the base and the headset
To unpair the base and the headset:
natural_image
Technical line drawing of a mechanical component with a circular outline and an upward arrow (no text or symbols)
Press the pairing button located on the base and hold for at least 5 seconds. The base indicator light flashes blue and red.
Then press the same pairing button twice briefly. The indicator light on the base will turn purple for 2 seconds.
On the headset, hold down the +and buttons for 5 seconds until you hear a beep.
The headset indicator light will flash blue and red as well.
Adjusting the volume
Place the headset over your ears

natural_image
Line drawing of a pair of headphones with a cable, enclosed in a circular frame (no text or symbols)
Use the - and + buttons to adjust the volume. Set the volume of your sound source to a medium level to improve the quality of the transmission.
A signal sounds when you have reached the maximum or minimum level.
To protect your hearing, never set the volume to the maximum.
The wireless headset is primarily intended for people with hearing loss and can provide an extremely high sound level. Prolonged listening to this headset at too high a volume level may result in hearing loss.
To avoid hearing loss, do not use the headset at high volume for too long and set the volume to a level that is not harmful. The higher the volume, the more your hearing is at risk.
Remote operation
- Some sound sources automatically switch off the speakers when the headset socket is active. In this case, you can listen to your sound source exclusively through your headset.
- On other sources, such as televisions, you can listen to sound through both your headset and the television speakers. This allows another person to enjoy the programme being viewed.
- If you wish to mute your television speakers, press the MUTE button on the remote control or activate the mute function in the configuration menus of your device. Refer to your television set's operating instructions for more information.
Automatic standby mode
The headset is equipped with an automatic standby feature that activates when music or speech stops playing for several minutes. This feature extends the battery life of the headset.
- The connection indicator light is on continuously when speech or music is being played from the transmitter base.
- The headset will go into standby mode after 10 minutes of complete inactivity, even if the ON/OFF switch is in the ON position.
- To reactivate the headset, turn the switch to the OFF position and then back to the ON position.
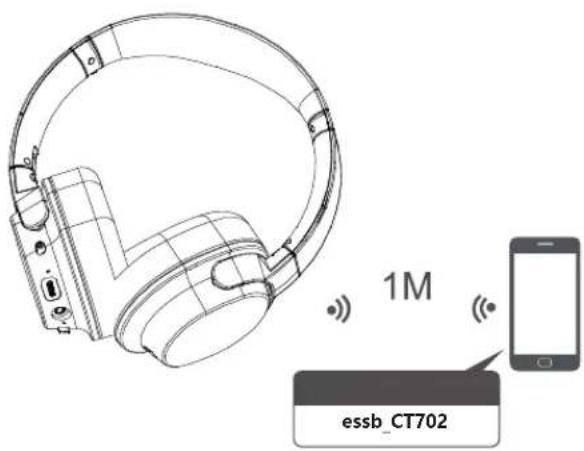
Bluetooth\* connection
If you have an audio device with wireless technology (television, smartphone, tablet, laptop computer, etc.), you can pair it with your headset. The wireless connection allows you to listen to the music playing on your audio device without using a cable.
- Make sure that your wireless device is compatible.
- Put the headset's ON/OFF switch in the ON position. The indicator light flashes blue and red. The headset enters pairing mode.
- On your mobile phone, activate the "search for wireless devices" function. Refer to your mobile phone's manual for more information.
- During pairing, the distance between the audio source and your headset must not exceed 1 metre.
- When the search is complete, connect your device with the audio device essb_CT702.
- After connection, the blue indicator light remains on and flashes.
Pairing takes about 5 minutes. If no device is paired within this time frame, the headset automatically switches to standby mode.
- If the connection fails, turn off the headset and try the connection again. Refer to the manufacturer's manual for more information.
- If your phone has a wireless system older than version 2.1, your headset may require an identification key. If so, type 0000 and confirm.
- After successful pairing, the headset and your mobile phone will connect automatically when they are in proximity to one another. The headset can save up to 8 devices. When there are more than 8 devices, the first will be replaced.
- Each time the headset is turned on, it will pair with the last device connected. If you want to pair another device, turn off the wireless function of the last device connected to the headset.
Listening to music
- Start playback on your wireless audio device.
- To move to the next track, press and hold the+button.
- To return to the previous track, press and hold the button.
- To pause playback, press the --- button.
- To return to playback, press the --- button again.
Adjusting the volume
- To increase the volume, press briefly on the+button.
- To reduce the volume, press briefly on the button.
- A signal sounds when you have reached the maximum or minimum level.
Incoming call detection
When a call is received or dialled, the phone pauses music playback. The transmission of music from your mobile phone to your headset is interrupted.
When the call ends, the phone resumes playback from the point where it was interrupted, and streams music to your headset again.
Take a call
When there is an incoming call, a beep sounds. To take the incoming call, press the --- button.
End a call
To end a call, press the --- button.
Reject a call
To reject an incoming call, press and hold the --- button for approximately 2 seconds.
Make a call
Dial the telephone number on your mobile phone. You can then talk to your caller via the microphone built into the headset.
Redial last call
To redial the last number you called, press the --- button twice, until you hear a beep.
Activate voice command
When you are not on a call, press the + and - buttons briefly to activate voice command.
Deactivate the microphone during a call
While on a call, press twice briefly on the --- button to deactivate the microphone so that the caller cannot hear you. Press twice again briefly on the --- button to activate the microphone.
Cancelling the Bluetooth\* connection
Turn on your headset and hold down the +and _buttons for 5 seconds until you hear a beep.
troubleshooting guide
If you are having trouble with your headset or base, perform the following basic checks. If you cannot resolve the problem by following the instructions below, contact your store's customer service department.
- No sound:
»Make sure that the base is powered via the micro USB port and that the ON/OFF switch is in the ON position.
»Make sure that the headset is turned on (ON/OFF switch is in the ON position).
»Make sure that the sound from your source is loud enough to be detected by the base. Then adjust the desired volume on the headset.
»Make sure that the audio source is turned on, properly connected to the AUX or DIGITAL OPTICAL jack on the transmitter base, and is transmitting sound.
»Make sure the transmitter base is connected to an audio output, usually indicated by OUT or OUTPUT on a television.
»The headset battery might be low. Charge it.
»Check that the headset volume is not set to minimum. Increase it if necessary.
»If you have connected the base to your television using an optical cable for sound transfer to a sound bar or sound system, make sure that the sound output settings are correct and that the cable is securely connected.
- Transmission failure between the headset and the base:
»Your audio source volume is too high or low, which is causing disruption. Adjust the volume on your audio source.
»The headset battery might be low. Charge it.
»The distance between the headset and the transmitter base is too large. The maximum range is 30 metres (in open field).
» The volume of the audio signal is too low. Increase the volume on the audio source.
- The headset and the base do not seem to be paired any more: »Follow the pairing procedure described in the “Use” section.
- I want to connect my headset via Bluetooth\*, but the wireless transmitter (phone, television, mobile speaker) does not search for or find the headset:
»The search can only start if the mobile phone and the headset are both in pairing mode. Make sure this is the case and check that the distance between the two devices does not exceed the maximum permissible distance (10 metres). These two conditions are critical to pairing and connecting your devices.
- None of the pause, play, previous track and next track functions are accessible in music playback mode:
» These functions are only accessible if the audio device supports the AVRCP profile (Audio/Video Remote Control). Make sure the mobile phone or wireless transmitter supports the AVRCP profile.
maintenance and cleaning
- Before cleaning, unplug the base from the power outlet and turn off the base and headset.
- Clean the device with a soft, dry cloth only.
- Do not use liquid cleaners or aerosol cleaners.
- Clean the pads with warm soapy water and rinse thoroughly. Wait until the pads are completely dry before using the headset again.
The undersigned, Sourcing & Création, hereby declares that the essentiel b CT702 TV headset radio electric device complies with directive 2014/53/EU.
The full text of the EU declaration of conformity is available from the following Internet address:
https://www.boulanger.com/info/assistance
natural_image
Isometric illustration of a device with a monitor and circular wave signals, no text or symbols present
natural_image
Technical line drawing of a mechanical component with no visible text or symbols
natural_image
Technical line drawing of a mechanical component with a circular outline and an upward arrow indicator (no text or symbols)
natural_image
Technical line drawing of a car interior with a circular outline and an upward arrow indicating motion or direction (no text or symbols)
natural_image
Technical line drawing of a mechanical component with no visible text or symbols
natural_image
Isometric diagram of a device with a monitor and circular signal waves, no text or symbols present
natural_image
Technical line drawing of a mechanical component with no visible text or symbols
natural_image
Technical line drawing of a mechanical component with an upward arrow indicating motion or force (no text or symbols present)
natural_image
Technical line drawing of a mechanical component with a circular outline and an upward arrow (no text or symbols)
natural_image
Technical line drawing of a mechanical head with a zipper and connector (no text or symbols)
natural_image
Isometric diagram of a device with a monitor and antenna, showing signal waves around it (no text or symbols)
natural_image
Technical line drawing of a mechanical component with no visible text or symbols
natural_image
Technical line drawing of a mechanical component with a circular arrow indicating upward motion (no text or symbols)
natural_image
Technical line drawing of a mechanical component with an upward arrow indicating motion or force (no text or symbols present)
natural_image
Technical line drawing of a mechanical component with labeled parts (no text or symbols)
Protection of the environment
This symbol on the product means that it is a device whose disposal is subject to the directive on waste from electrical and electronic equipment (WEEE). This device may not in any way be treated as household waste and must be subject to a specific type of removal for this type of waste. Recycling and recovery systems are available in your area (waste removal) and provided by distributors. By taking your device to a recycling facility at its end of life, you will contribute to environmental conservation and prevent any harm to your health.

All information, designs, drawings and pictures in this document are the property of SOURCING & CREATION. SOURCING & CREATION reserves all rights to its brands, designs and information. Any copy and reproduction through any means shall be deemed and considered as counterfeiting.
Tested in our laboratories
Warranty valid from the date of purchase (receipt as proof of purchase). This warranty does not cover defects or damage caused by improper set up, incorrect use, or normal wear and tear of this product.