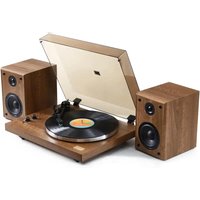
Cassini AR-PH68 - Turntable Arkrocket - Free user manual and instructions
Find the device manual for free Cassini AR-PH68 Arkrocket in PDF.


User questions about Cassini AR-PH68 Arkrocket
0 question about this device. Answer the ones you know or ask your own.
Ask a new question about this device
Download the instructions for your Turntable in PDF format for free! Find your manual Cassini AR-PH68 - Arkrocket and take your electronic device back in hand. On this page are published all the documents necessary for the use of your device. Cassini AR-PH68 by Arkrocket.
USER MANUAL Cassini AR-PH68 Arkrocket
1 Safety Instructions
2 Your Revive Turntable
2.1 Top View
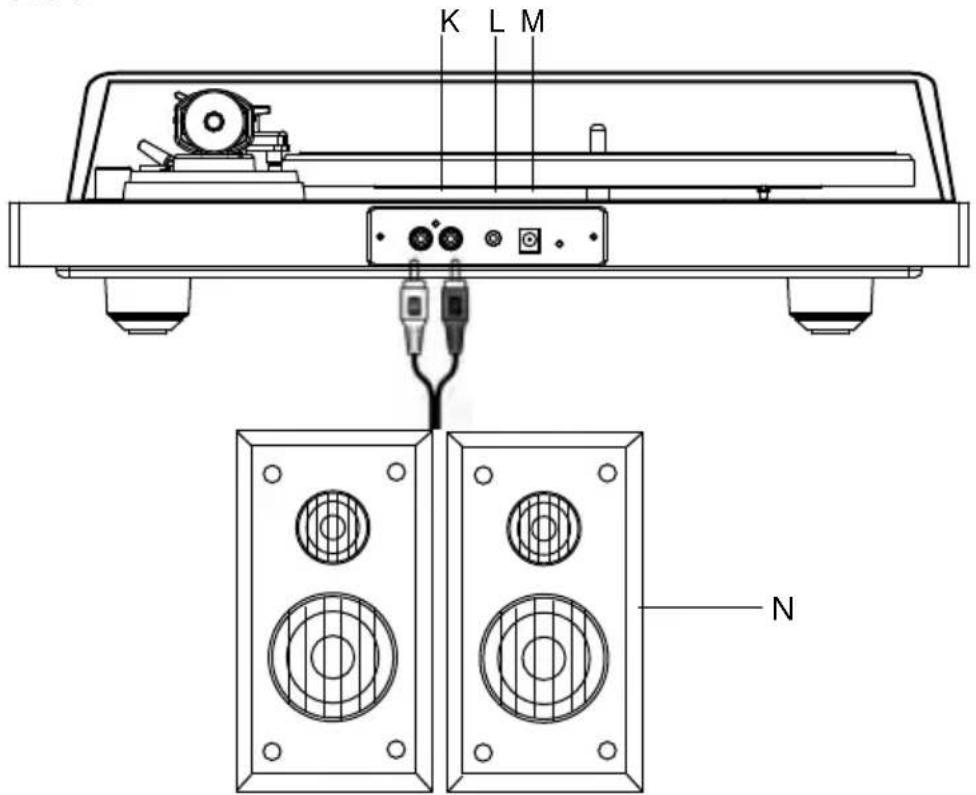
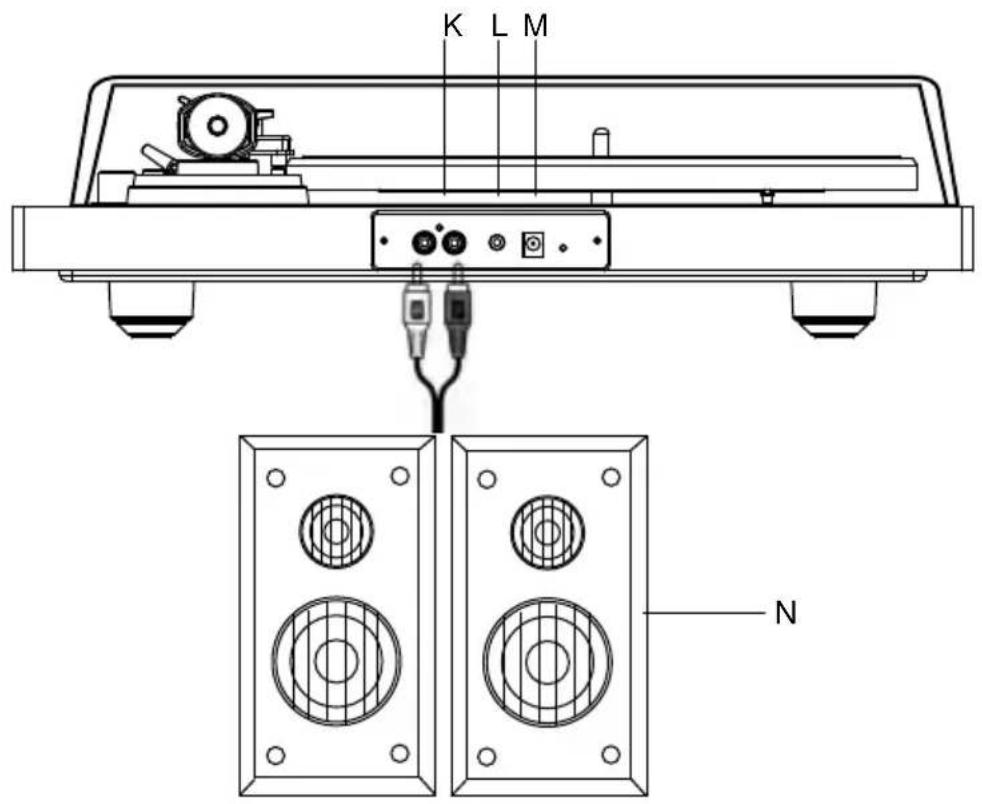
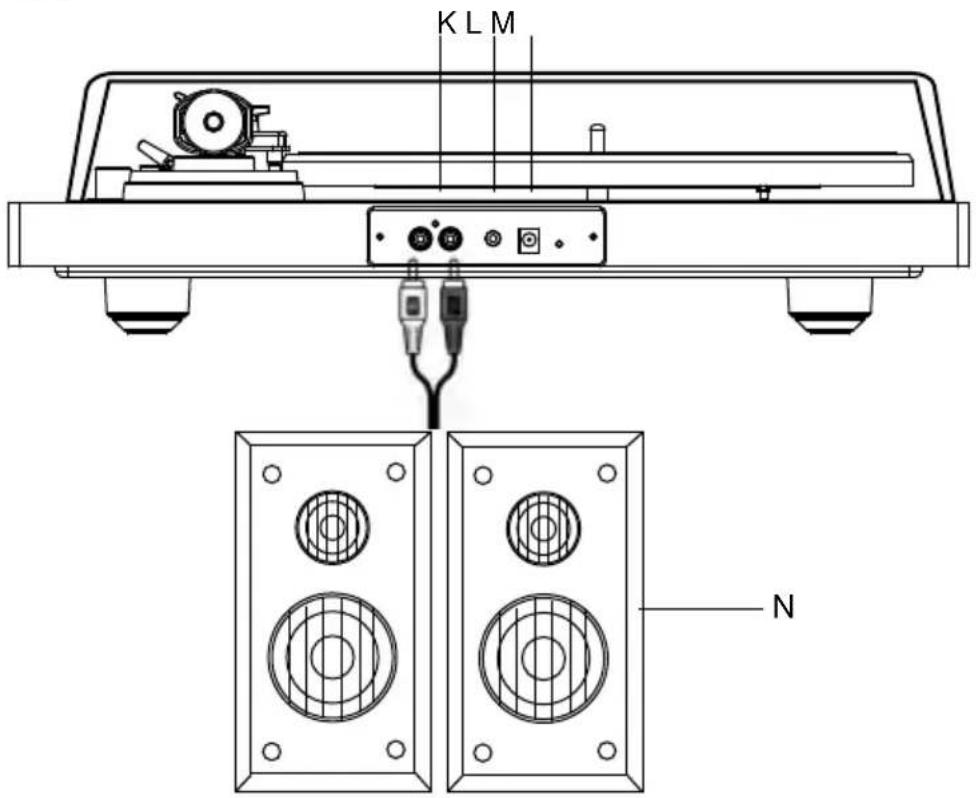
2.2 Back View
3 Setting Up Your Turntable
3.1 Installing The Platter And Turntable Mat
3.2 Install Dust Cover
3.3 Attaching And Adjusting The Counterweight
4 Using Your Turntable
4.1.Before playing a record
4.2. Turntable Operation
4.3 Bluetooth Operation
4.4 Bluetooth Trasmitter Operation
4.5 AUX-IN Operation
5 Needle Replacement
6 Technical Specifications
7 EC Declaration
Read and understand this entire manual before using this product. Keep these instructions for future reference.
- Do not use this product near water.
- This product should be operated only by the type of power source indicated on the marking label or in this instruction manual.
- Do not defeat the safety purpose of the polarized plug. A polarized plug has two blades with one blade wider than the other. This plug will fit into the power outlet only one way. If you are unable to insert the plug fully into the outlet try reversing the plug. If the plug should still fail to fit, contact your electrician.
- Protect the power cord from being walked on or pinched particularly at plugs, convenience receptacles, and the point where they exit from the product.
- Do not overload wall outlets, extension cords, or integral convenience receptacles as this can result in a risk of fire or electric shock.
- Never push objects of any kind into this product through openings as they may touch dangerous voltage points or short-out parts that could result in a fire or electric shock. Never spill liquid of any kind on the product.
- Do not attempt to service this product yourself as opening or removing covers may expose you to dangerous voltage or other hazards. Refer all servicing to qualified service personnel.
- Changes or modifications to this unit not expressly approved by the party responsible for compliance could void the user's authority to operate the equipment.
- Do not use attachments not recommended by the product manufacturer as they may cause hazards.
- A product and cart combination should be moved with care. Quick stops, excessive force, and uneven surfaces may cause the product and cart combination to overturn.
- Slots and openings in the cabinet are provided for ventilation and to ensure reliable operation of the product and to protect it from overheating. Do not block or cover these openings.
- Unplug the product during lightning storm or when unused for long periods of time.
Product overview
2.1 Top view
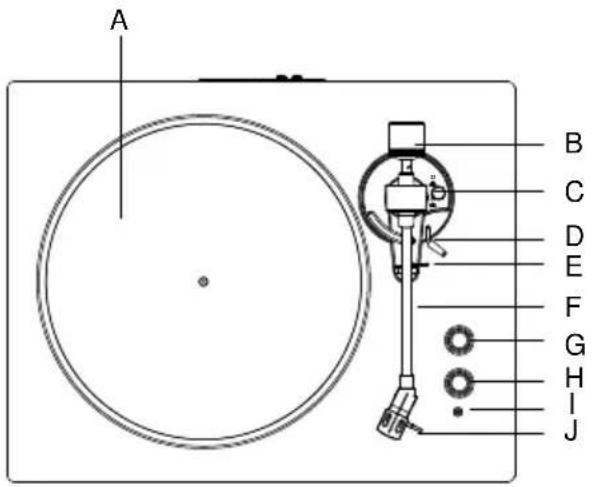
text_image
A B C D E F G H I J2.2 Back View
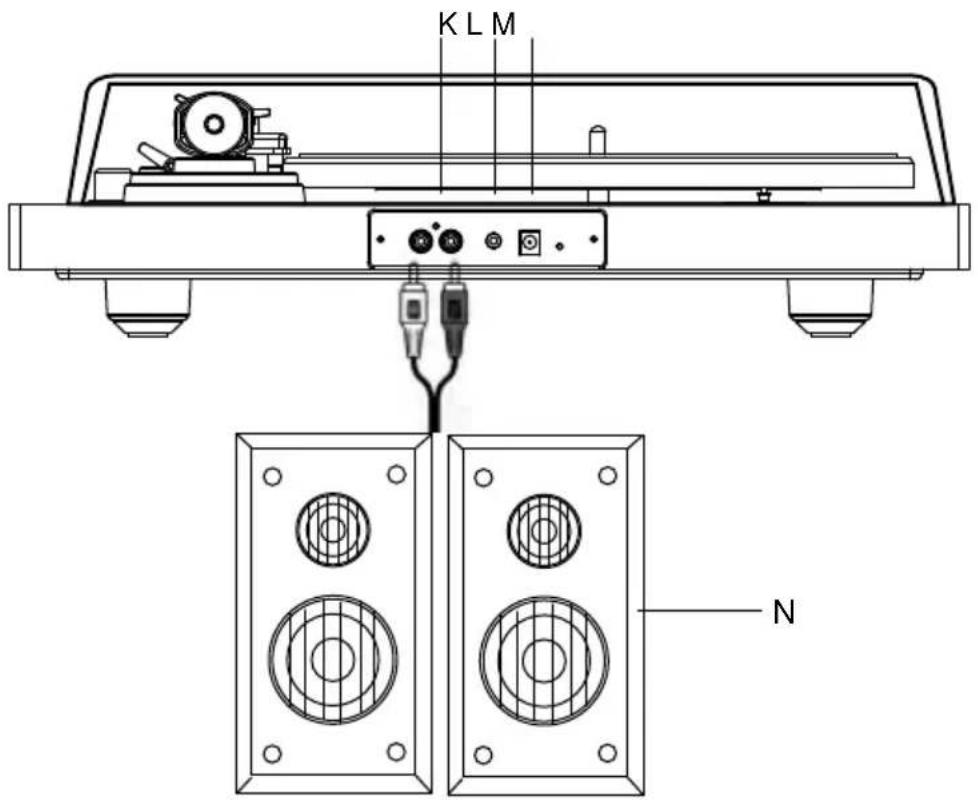
text_image
K L M N| # ITEM DESCRIPTION | ||
| A | Alu | Thuimtab Ael By Tæmtable |
| B | Counter Weight | Turn To Adjust The Needle Pressure |
| C | RPM Selector Switch | Turn To Select The Record Type (33 or45) Speed Of Your Turntable |
| D | Tone Arm Lifter | Push Forward And Pull Back To Raise And Lower Tone Arm |
| E | Tone Arm Rest Holder Place | The Tone Arm On This Holder When Not In Use |
| F Tone Arm Hole The Stylus | That Produces Sound From The Record | |
| G | Function Control Turn The Control To Select BT/Line In/Phone/BT Transmitter | |
| H Power/Volume Control | Turn The Control To Power ON/OFF Unit And Control Dial To Adjust The Volume | |
| I | Indicator Light | Phone Mode: RED Light SolidBluetooth Mode:Blue Light Quickly FlashBluetooth Pairring:Blue Light SolidLine IN Mode: RED And Blue Light SolidBluetooth Transmitting:Blue Light Quickly FlashBluetooth Transmitting Pairring: Red Light Slow Flash |
| J Stylus Generates Sound From A Playing Record | ||
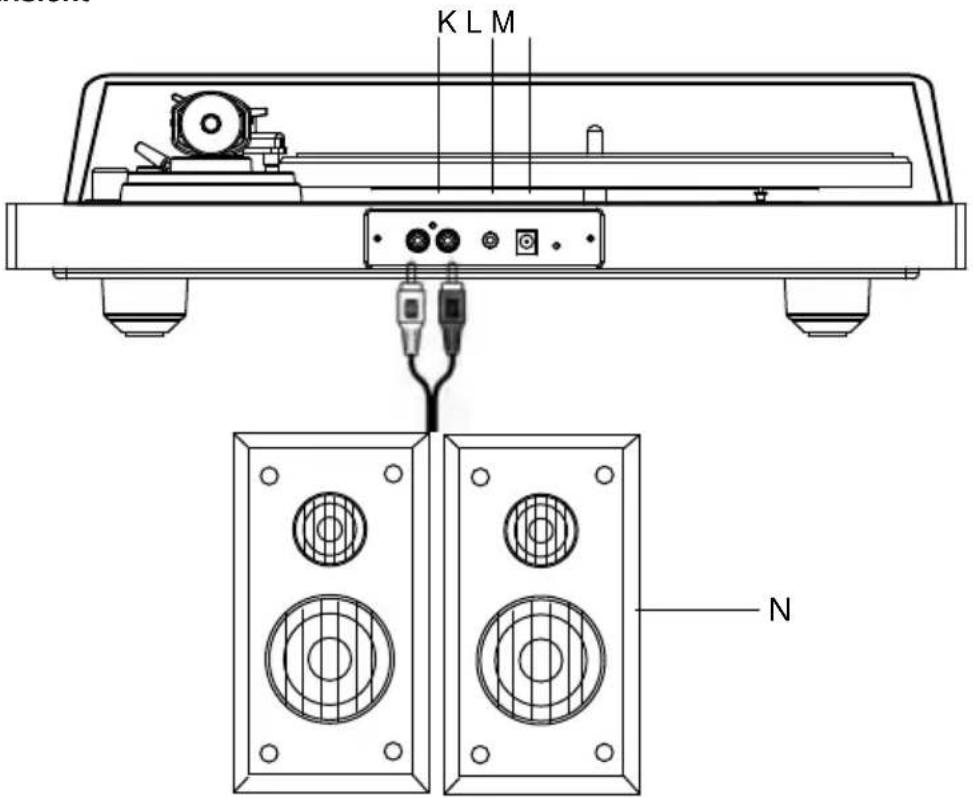
| K Line Out Jack | Plug The Included Speakers RCA Cable Into This Jack | |
| L Line In Jack Connect To An External Audio Device And Play Music | ||
| DC In Power JackM Connect The DC Plug Into DC IN Power Jack | ||
| N | Speakers | An External Amplifier For Music Play |
Setting Up Your Turntable
You need to install the turntable before you can use it.
- Take the accessories out of the packing case and check taht the accessories are in complete and good condition
| # | Accessory Quantity | |
| 1 | Line in cable | 1 pcs |
| 2 | Power adapter | 1 pcs |
| 3 | Counter weight | 1 pcs |
| 4 | 45 RPM adapter | 1 pcs |
| 5 | Turntable mat | 1 pcs |
| 6 | Two belts | 2 pcs (one installed and one spare) |
| 7 | User guide | 1 pcs |
| 8 | Install dust cover | 1 pcs |
- Install the metal platter(the belt is pre-installed on the bottom of the metal platter) and a turntable mat on the metal platter.
- Install dust cover.
- Attach and adjust the counterweight.
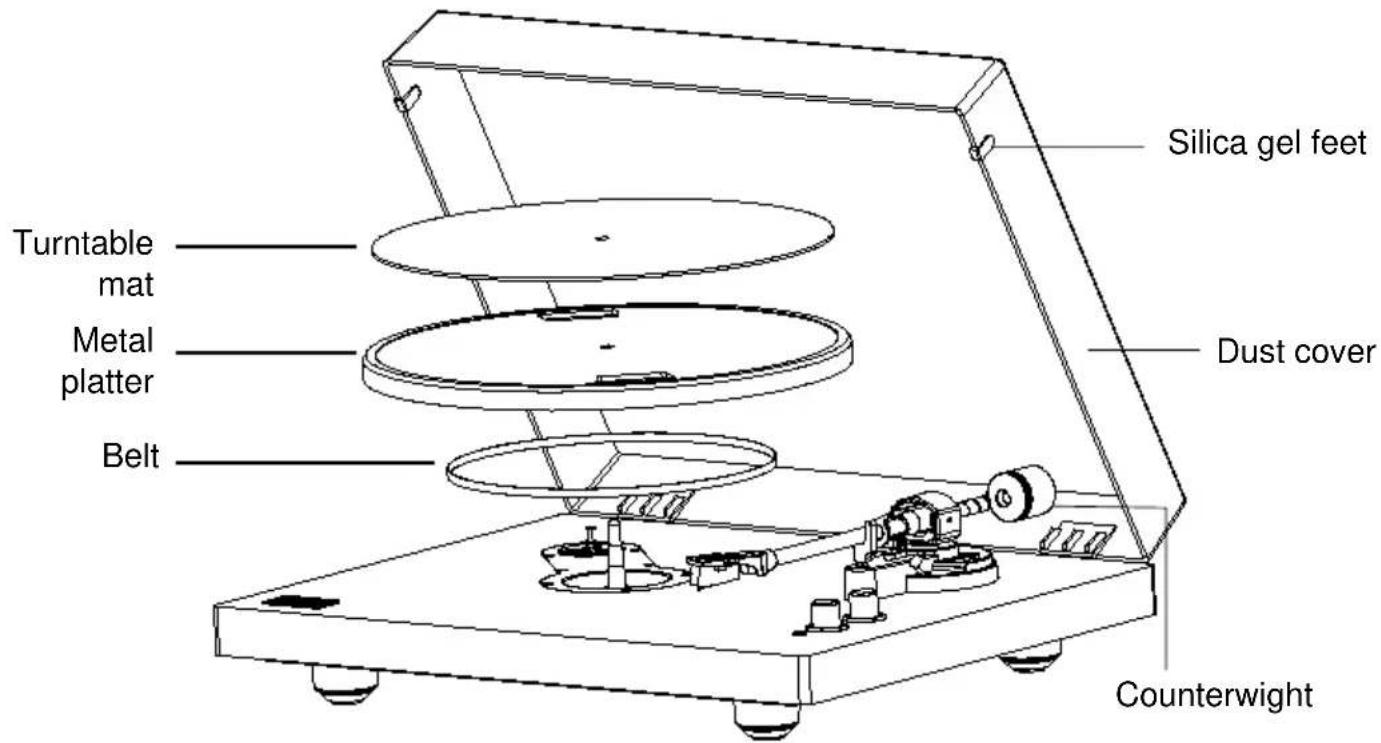
text_image
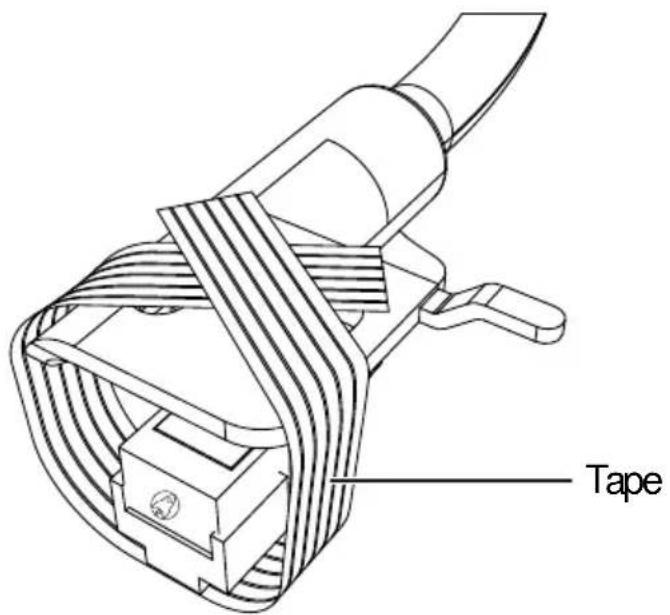
Silica gel feet Turntable mat Metal platter Belt Dust cover Counterweight- Carefully remover the tape. Too much force will damage the cover and stylus.
text_image
TapeInstalling the platter and turntable mat
Note: The belt is pre-installed on the bottom of the metal platter.
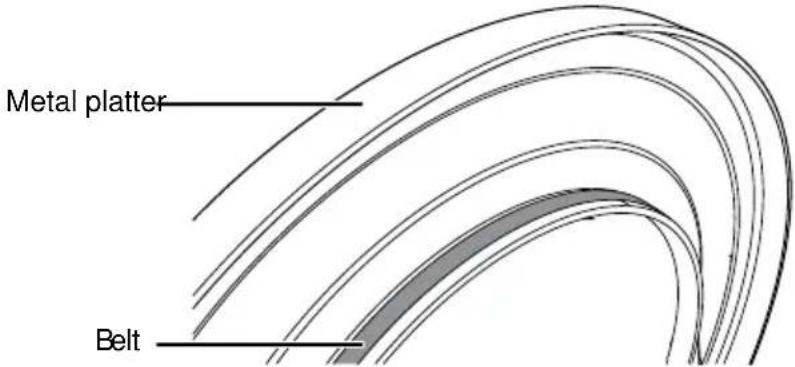
Turn the platter over and check the belt position
Make sure that the drive belt is looped in the middle of the circle. The drive belt located too high or too low in this circle may cause the drive belt to fall off or speed to be unstable.
text_image
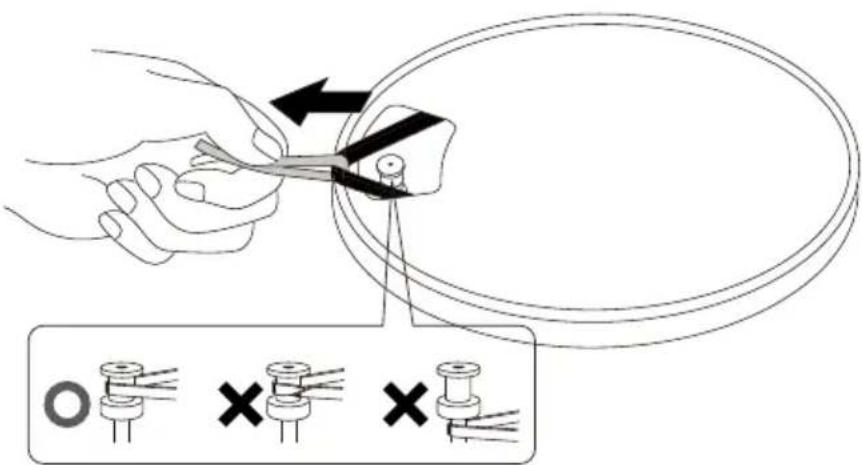
Metal platter Belt- Place the belt on the motor pully.
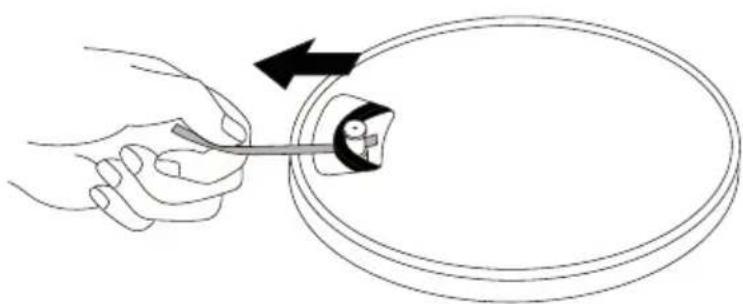
Align one of the platter openings with the motor pulley, and while pulling both ends of the red ribbon that comes attached to the belt, place the belt on the motor pulley, as per the diagram. When doing this, be careful not to twist the belt.
text_image
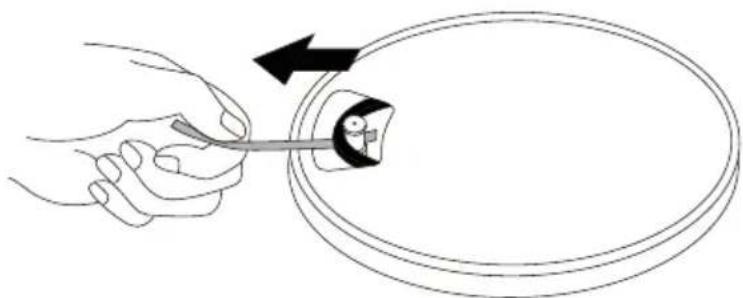
Diagram illustrating a mechanical process with scissors cutting through a circular component, accompanied by three labeled tool icons (circle, cross, X) indicating failure or failure states.Remove the red ribbon from the belt.
natural_image
Illustration of a hand holding a tool inside a circular ring, with an arrow indicating direction (no text or symbols)-
Still holding the belt, flip the platter over, then insert the platter onto the spindle in the center of your turntable.
-
Align the round hole in the platter with the pulley and use your finger to hook the belt onto the pulley.
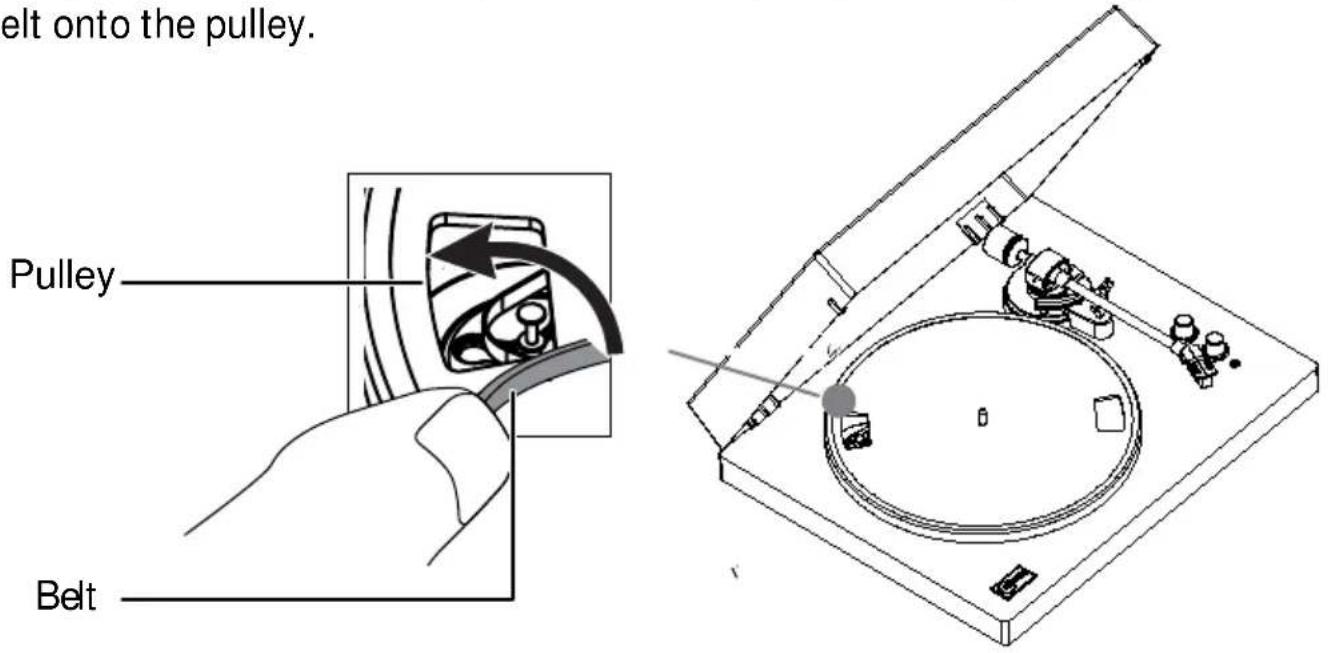
text_image
elt onto the pulley. Pulley Belt- Place the turntable mat on the platter.
EN
Note: When you want to take out the platter from the turntable, remove the mat first, then grasp the platter and pull it upward. This is especially important if you are shipping your turntable to prevent the platter from shaking.
Installing the Lid
Insert the hinge pockets of the lid onto the hinges of the turntable
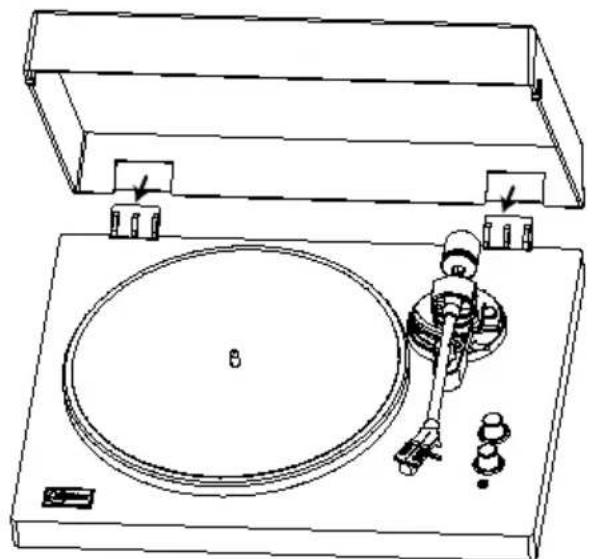
natural_image
Line drawing of a vintage rotary dial with base, top, and bottom views (no text or symbols)EN-7
Cartridge Tracking Force Adjustment
The supplied Counterweight is suitable for cartridges weighing between 3.0-6.0g
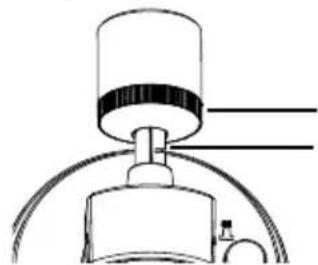
natural_image
Pure mechanical diagram of a pump or valve assembly without any text, numbers, or symbolsTracking Force Dial Center Line
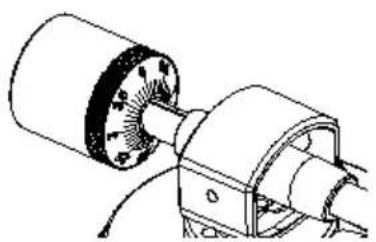
- Gently push and turn the counterweight onto the rear of the tonearm(with the dial facing toward the front of the turntable)
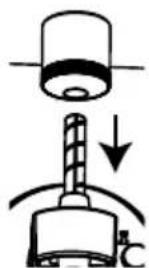
natural_image
Diagram showing a drill bit being inserted into a cylindrical component, with an arrow indicating the process (no text or symbols present)- Hold the counterweight with the black number ring on the counterweight you, and then slightly push the counterweight into the end of tone arm.
natural_image
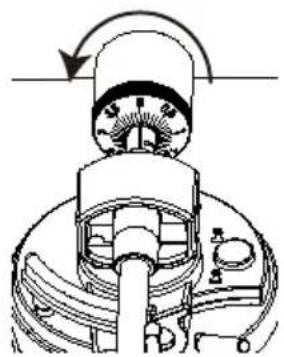
Mechanical component diagram showing a rotating knob with no visible text or symbols- Finally, rotate the counterweigh and tracking force dial together counterclockwise (as seen from the front) to adjust the tracking force according to the cartridge manufacturer's recommendations.
natural_image
Technical line drawing of a mechanical assembly with no visible text or symbols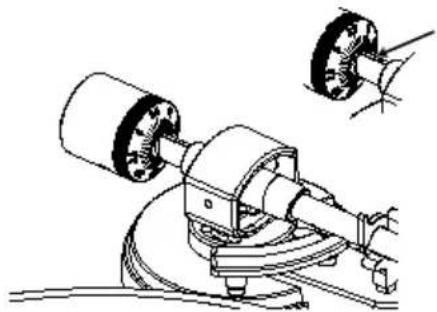
natural_image
Technical line drawing of a mechanical assembly with gears and shafts (no text or symbols)Note: Each mark on the scale represents 0.1g. The recommended tracking force for the factory-installed cartridge is 3.5g 0.5. Carefully rotate the tracking force dial. When "3.5" is centered over the black line on the top of the tonearm please stop.
Playing a Record 4.1.Before playing a record
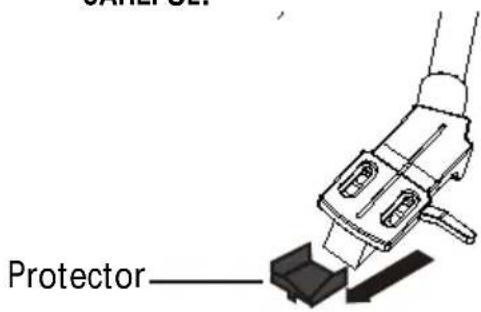
4.1.1 Pull the protector straight forward to remove it.
NOTE: Applying a downward force may cause the stylus to come off the body. Only low volume is output if the stylus has come off, or is about to come off, so refer to "Replacing the stylus" to reattach the stylus correctlu.

text_image
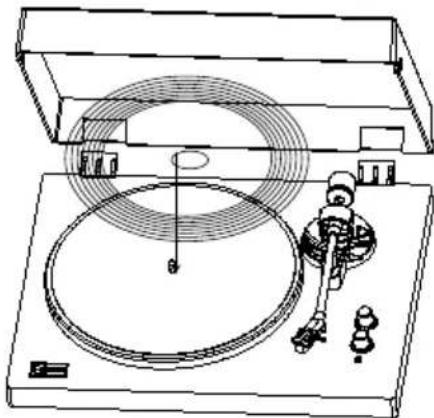
Protector—4.1.2 Place the record on the felt mat so that the center hole aligns with the spindle
natural_image
Line drawing of a vintage typewriter with a circular dial and mechanical components (no text or symbols)4.2. Turntable Operation
Sufficiently lower the volume of the amplifier and speakers first
4.2.1 Connect the include power adapter to the turntable, Turn on the power knob and select Phone mode.
4.2.2 Remove the stylus protector from the stylus
4.2.3 Place the record on the slip mat.
4.2.4 Press the Speed Selector button to switch between 33 and 45 RPM speeds according to the type of record.
4.2.5 Unlock the tonearm clip and set the tonearm lift lever to the up positing.
4.2.6 Position the tonearm over the desired location(groove) on the record.
4.2.7 Carefully lower the tonearm on the record.
4.2.8 Turn up the volume of the turntable as needed.
4.2.9 When you are finished playing the record, raise the tonearm, return it to reston the arm clip and turn volume control knob off the turntable
4.3 Bluetooth Operation
4.3.1. Connect the included power adapter to the turntable and curn on power knob to BT mode the blue indicator light flash quickly.
4.3.2. Turn on the Bluetooth feature of your media device and search for and select"Arkrocker Cassion" to pair the media device and turntable.
4.3.3. Once your media device is successfully paired with the turntable, the turntable will play a short confirmation sound
4.3.4. Play and stream music from your media device to the turntable. The indicator light will become solid.
Note:Bluetooth version:5.0
4.4 Bluetooth Trasmitter Operation
4.4.1. Connect the included power adaptor to the turntable.
4.4.2. Switch the record player on, then set the volume on both devices to low to begin with.
4.4.3. Set the mode selection dial on the record player to PHONO to play
44.4.. Long press the ⚫ button (ON) to begin the pairing process, the operation indicator light flashes in red once the connection has been eatablihed.
4.4.5. Play the music from the turntable to a media derice, If you wish to end playback, long press the ⏻ button again(OFF) to deactivate the transmitter function.
4.5 AUX-IN Operation
This turntable includes an auxiliary audio signal input jack for connecting external audio devices like MP3 players, CD players, and older, nondockable iPods so you can listen to your external source through the turntable's speakers.
4.5.1. Use an audio cable included with one 3.5 mm stereo connection on each end of the cable.
4.5.2. Plug one end into the AUX-IN jack on the turntable and the other end the Line Out jack of the audio device.
4.5.3. Power on the turntable and audio device. The indicator light of turntable is red.
4.5.4. The volume level can be controlled through the turntable. Operate all the functions on the auxiliary device as usual.
NOTE:
- Make sure the tone arm is securely locked to avoid any damage.
- When you are done, don't forge to turn off the power on the turntable and your external device.
5. Needle Replacement
Removing Needle
- Gently pull down the front edge of the needle.
- Pull needle forward.
- Pull out and remove.
Installing Needle
- Position the needle with its tip facing down.
- Line up the back of the needle with the cartridge.
- Insert the needle with its front end at a downward angle and gently lift the front of the needle upward until it snaps into place.
Troubleshooting
Potential Incorrect Use and Fault Conditions:
These turntables are manufactured to the highest standards and undergo strict quality controls before leaving the factory. Faults that may possibly occur are not necessarily due to material or production faults but can sometimes be caused by incorrect use or unfortunate circumstances. Therefore the following list of common fault symptoms is included.
There is no power
• Power adaptor is not connected correctly.
• No power at the power outlet.
Power is on, but the platter does not turn
• Turntable's drive belt is not installed or has slipped off.
Turntable is spinning, but there is no sound, or sound not loud enough
• Stylus protector is still on.
• Tone arm is lift up by the lever.
Record sounds too fast or too slow.
- Wrong speed selected for the record.
Is the belt placed on the motor pulley?
Check that the belt is placed on the motor pulley (brass-colored) correctly
Has the belt been damaged?
Replace it with a new belt.
Strong hum on phono input
• The cable is not grounded correctly.
• Turntable too close to speakers.
6 Technical Specifications
| Model number | PH68-DWT |
| Bluetooth version | JL5.1 |
| Input | AC 100-240V ~50/60Hz |
| Power supply | 12V---2000mA |
| Speaker driver | 4 INCH , |
| Speaker power | 2 X 20W |
| Dimensions | lid closed H119 X W 448 X D351MMlid open H180 X W 448 X D351MM |
| Weight | 9.05kg |
| Stylus Model | AR-N60 |
Information on Waste Disposal for Consumers of Electrical & Electronic Equipment
This mark on a product and/or accompanying documents indicates that when it is to be disposed of, it must be treated as Waste Electrical & Electronic Equipment (WEEE).
Any WEEE marked waste products must not be mixed with general household waste, but kept separate for the treatment, recovery and recycling of the materials used.
For proper treatment, recovery and recycling; please take all WEEE marked waste to your Local Authority Civic waste site, where it will be accepted free of charge. If all consumers dispose of Waste Electrical & Electronic Equipment correctly, they will be helping to save valuable resources and preventing any potential negative effects upon human health and the environment, of any hazardous materials that the waste may contain.
text_image
A B C D E F G H J2.2Vista trasera
text_image
K L M Nnatural_image
Illustration of a hand holding a tool inside a circular frame, with an arrow indicating direction (no text or symbols)natural_image
Line drawing of a vintage typewriter with a circular dial and mechanical components (no text or symbols)natural_image
Simple line drawing of a mechanical device with a cylindrical top and base, no text or symbols present.natural_image
Diagram showing a drill bit being inserted into a cylindrical component, with an arrow indicating the process (no text or symbols present)natural_image
Technical line drawing of a mechanical device with rotating knob and dial (no text or symbols)natural_image
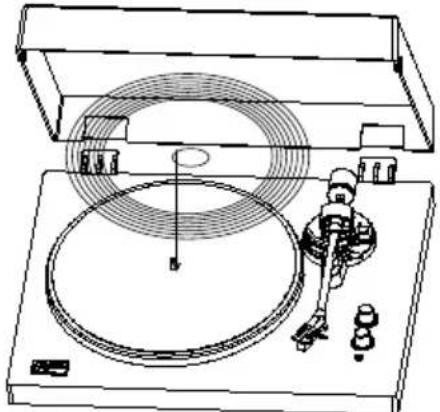
Technical line drawings of mechanical components, showing assembly steps without any text or symbols4.1.2 Place the record on the felt mat so that the center hole aligns with the spindle
natural_image
Technical line drawing of a vintage radio with a speaker and circular components (no text or symbols)text_image
A B C D E F G H J2.2 背面视图
text_image
K L M Ntext_image
Diagram illustrating a mechanical process with tool application and three labeled switch symbols below.CN
从皮带上取下红色丝带。
natural_image
Illustration of a hand holding a tool inside a circular ring, with an arrow indicating direction (no text or symbols)natural_image
Line drawing of a vintage typewriter with a circular dial and mechanical components (no text or symbols)CN-7
唱头跟踪力调整
natural_image
Pure mechanical diagram showing a cylindrical component with a base and pipe, no text or symbols present唱头跟踪力刻度盘中心线
natural_image
Diagram showing a drill bit being inserted into a cylindrical component, with an arrow indicating the process (no text or symbols present)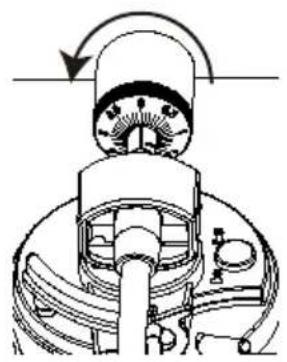
natural_image
Mechanical component diagram showing a rotating shaft and housing mechanism (no text or symbols)natural_image
Technical line drawings of mechanical components, showing two views of a motor assembly (no text or symbols)CN
natural_image
Technical line drawing of a mechanical component with no visible text or symbolsnatural_image
Line drawing of a vintage radio with a circular dial and speaker (no text or symbols)4.2. 唱盘操作
首先要足够降低放大器和音箱的音量。
text_image
A B C D E F G H I J2.2 バックビュー
text_image
K L M Ntext_image
Diagram illustrating a mechanical tool application on a circular component, with labeled states and cross symbols indicating failure or failure.natural_image
Illustration of a hand holding a tool inside a circular device with an arrow indicating rotation (no text or symbols)natural_image
Line drawing of a vintage typewriter with a circular dial and mechanical components (no text or symbols)カートリッジトラッキングフォースの調整
text_image
Diagram showing a drill bit being inserted into a cylindrical component, with an arrow indicating the process.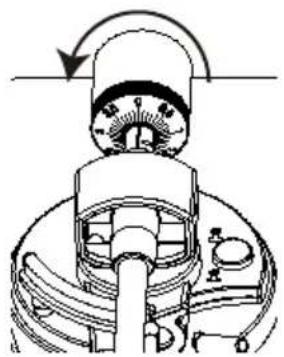
natural_image
Diagram of a mechanical device with rotating dial and adjustment knob (no text or symbols)natural_image
Technical line drawing of a mechanical assembly with a cylindrical component and rotating shaft (no text or symbols)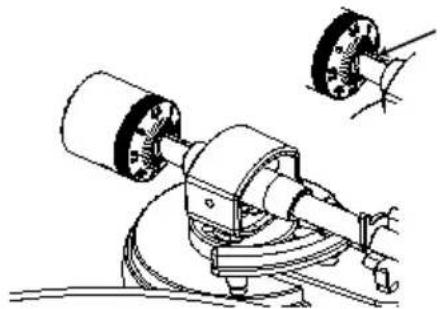
natural_image
Technical line drawing of a mechanical assembly with gears and a base mount (no text or symbols)JP
natural_image
Line drawing of a vintage typewriter with a circular dial and mechanical components (no text or symbols)4.2. ターンテーブル操作
text_image
A B C D E F G H J2.2 Vue arrière
text_image
KLM NFR
text_image
Diagram illustrating a mechanical or electrical procedure with labeled components and directional arrows, accompanied by three diagrammatic icons below.natural_image
Illustration of a hand holding a tool inside a circular ring, with an arrow indicating direction (no text or symbols)natural_image
Line drawing of a vintage typewriter with a circular dial and mechanical components (no text or symbols)FR-7
natural_image
Simple line drawing of a mechanical device with a cylindrical top and connected tubing (no text or symbols)text_image
Diagram showing a drill bit being inserted into a cylindrical component, with an arrow indicating the process and temperature label.natural_image
Technical line drawing of a mechanical device with rotating components and a curved arrow indicating rotation (no text or symbols)natural_image
Technical line drawings of mechanical components, showing two views of a motor assembly (no text or symbols)
natural_image
Line drawing of a vintage radio with a circular dial and base mount (no text or symbols)text_image
A B C D E F G H J2.2 Rückansicht
text_image
K L M Ntext_image
P Olt. KlebebandDE
text_image
Diagram illustrating a mechanical tool application on a circular component, with labeled parts and directional arrows indicating process flow.natural_image
Illustration of hands using a tool to adjust or install a circular component, with an arrow indicating the process (no text or symbols present)natural_image
Line drawing of a vintage radio with a circular dial and mechanical components (no text or symbols)DE-7
natural_image
Simple line drawing of a mechanical device with a cylindrical top and base, no text or symbols present.text_image
Diagram showing a drill bit being inserted into a cylindrical component, with an arrow indicating the direction of movement.natural_image
Mechanical device diagram showing a rotary knob and dial mechanism (no text or labels)natural_image
Technical line drawing of a mechanical assembly with a cylindrical component and rotating shaft (no text or symbols)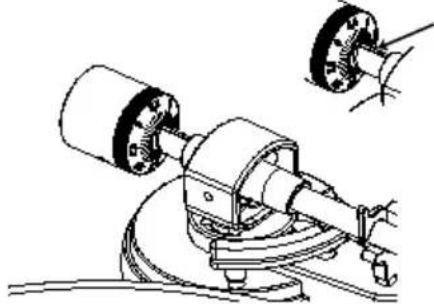
natural_image
Technical line drawing of a mechanical assembly with two components, no visible text or symbolsnatural_image
Technical line drawing of a mechanical clamp or connector (no text or symbols)natural_image
Line drawing of a vintage CD or radio with a circular dial and base mount (no text or symbols)text_image
QR code image containing encoded data, no visible human-readable text1 YEAR WARRANTY
Scan to activate your warranty and downlad the manual

text_image
—ARKROCKETwww.ARKROCKET.com