JTouch INF8655 - Monitor INFOCUS - Free user manual and instructions
Find the device manual for free JTouch INF8655 INFOCUS in PDF.


User questions about JTouch INF8655 INFOCUS
0 question about this device. Answer the ones you know or ask your own.
Ask a new question about this device
Download the instructions for your Monitor in PDF format for free! Find your manual JTouch INF8655 - INFOCUS and take your electronic device back in hand. On this page are published all the documents necessary for the use of your device. JTouch INF8655 by INFOCUS.
USER MANUAL JTouch INF8655 INFOCUS
natural_image
Front view of a Quantum LASER projector with a circular lens and screen (no visible text or symbols beyond branding)1.2 LES CONVENTIONS UTILISÉES DANS CE MANUEL
infocus.com/support/contact
eusupport@infocus.com
infocus.com/support/contact
Asie Pacifique
Lundi – Vendredi
8h – 17h ICT
support@infocus.com
infocus.com/support/contact
Australie
Lundi – Vendredi
8h – 17h AEST
support@infocus.com
infocus.com/support/contact
2. DESCRIPTION DU PRODUIT
text_image
Labeled diagram of a projector with numbered parts for identificationtext_image
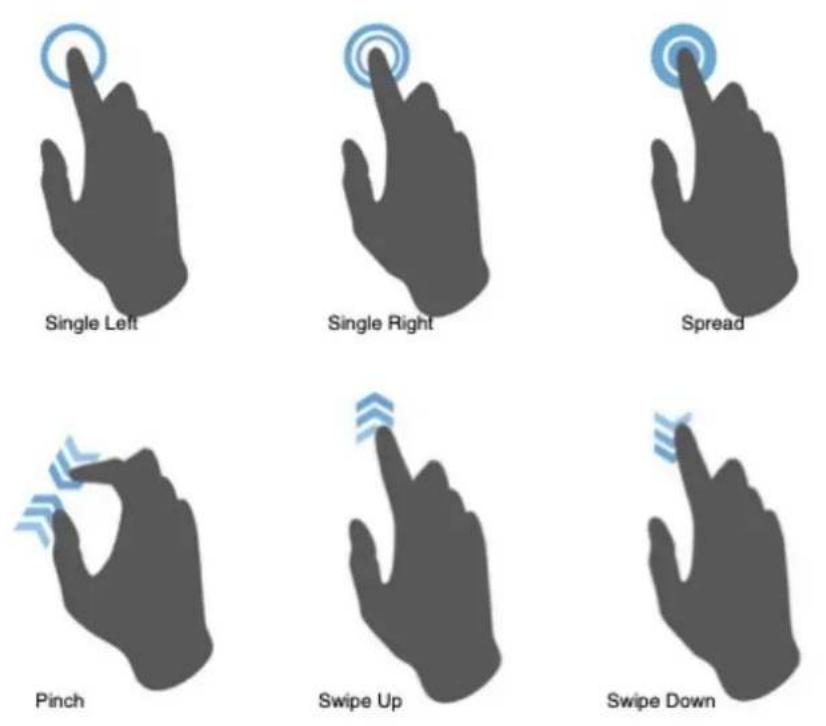
Diagram of a device layout with numbered components and labeled connectorsThe following images detail the touch gestures used on this display.
3. SÉCURITÉ
3.1 COMMENT UTILISER L'APPAREIL DE MANIÈRE SÉCURISÉE

AVERTISSEMENT
natural_image
Symbol of a trash bin with crossed lines indicating no waste, and a solid black rectangle below (no text or labels)text_image
Avoid Electric Shock
text_image
Avoid Strong Magnetic Field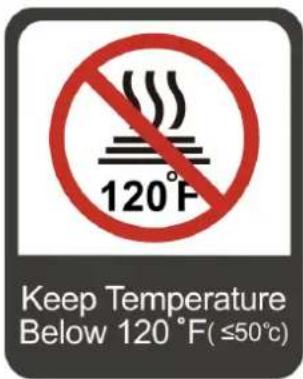
text_image
120°F Keep Temperature Below 120 °F(≤50°C)
text_image
Keep Relative Humidity Under 70%
text_image
Keep Away From Combustible Vapors (gas leaks, etc.)
text_image
Avoid Any Corrosive Liquids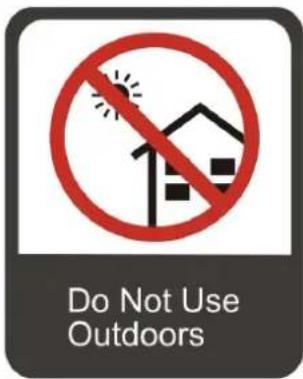
text_image
Do Not Use Outdoors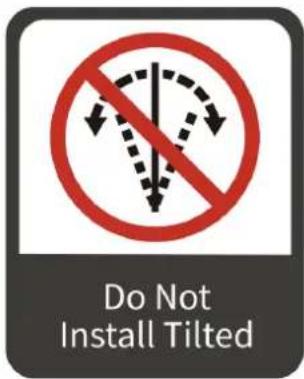
text_image
Do Not Install Tilted4.2 INSTRUCTIONS D'INSTALLATION
"WARNING: MOUNT ABOVE THE HEADS OF CHILDREN."
Additional warning against eye exposure for close exposures less than 1 m.
"AVERTISSEMENT : INSTALLER AU-DESSUS DE LA TÊTE DES ENFANTS."
text_image
Top View Projection distance Screen (Width) Side View Projection distance Screen (Height) Offset4.4 ESPACE LIBRE
text_image
Diagram of a projector with labeled parts and directional arrows indicating motion or flowtext_image
Minimum 30 cm (11.81 inches) Minimum 30 cm (11.81 inches)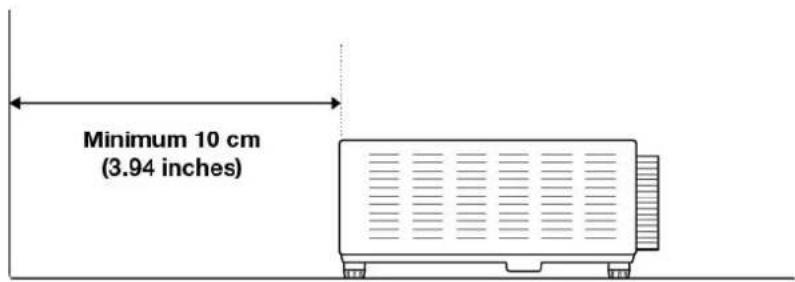
text_image
Minimum 10 cm (3.94 inches)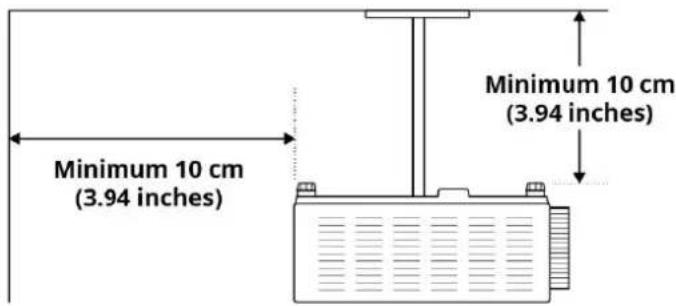
text_image
Minimum 10 cm (3.94 inches) Minimum 10 cm (3.94 inches)natural_image
Technical line drawing of a mechanical device with a threaded component and a rotating knob (no text or symbols)5.1.1 START UP AND SHUT DOWN
Use 100-240V AC as the power supply. and supplied power cable to connect to the power source. The power button on the panel and the remote control can be used to switch between power-on and standby states.
The main power switch on the rear panel has two options, press the "O" to power off the product; press the "I" end to power it on.
5.1.2 SIDEBAR
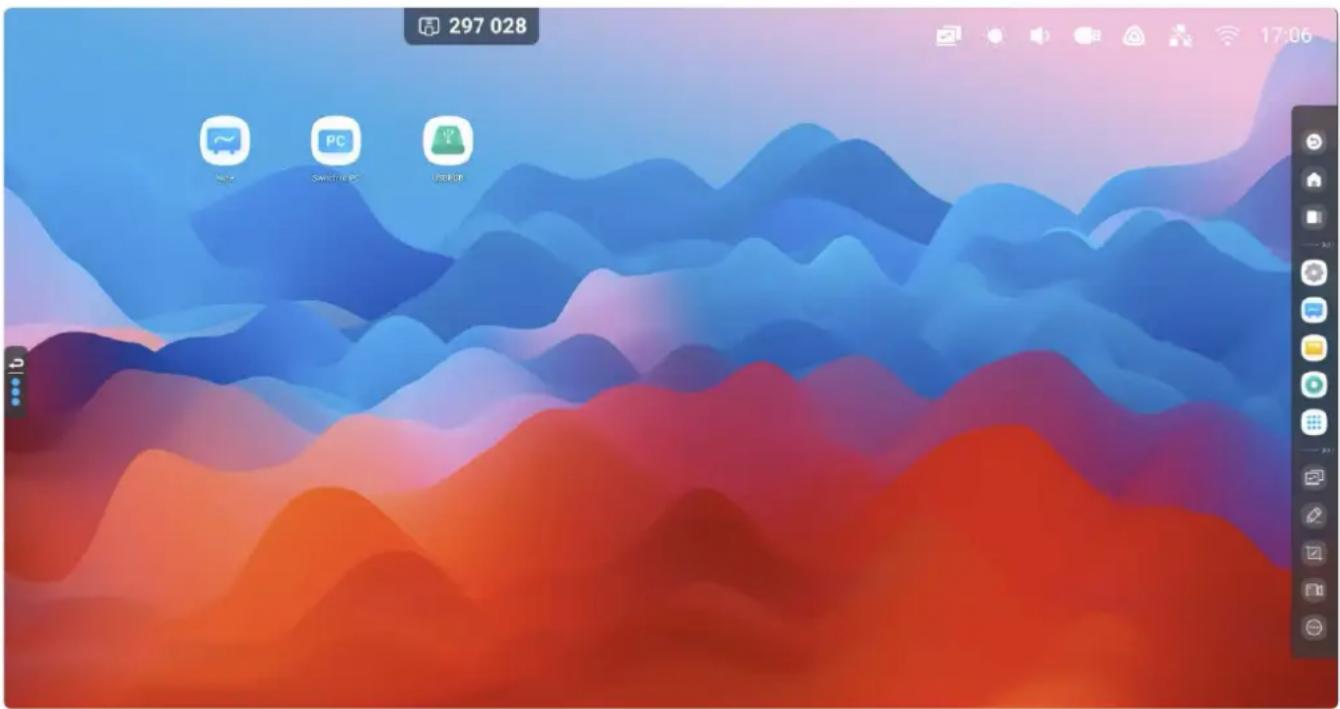
Press the sidebar button on either edge of the screen to open the menu. The sidebar gives access to thesystem settings, applications menu, browser, whiteboard and other applications and tools.
text_image
297 028 None PC iTunes 17:065.1.3 DISPLAY SHORTCUTS
The display has shortcuts for various menu options. These are located on the upper right-hand side of the display. These shortcuts can't be modified or removed.

natural_image
Desktop interface icons including video, audio, camera, Wi-Fi, and a timer (no text or symbols on icons)5.1.4 PC MODULE
If the product is installed with the optional PC module and it is in the "PC" signal source, the PC module will start automatically. If not, start it manually by pressing the power button on the PC Module.
The power key on the panel or remote control can be used to turn off the display, the display will request confirmation to proceed.
Do not directly disconnect the power supply from the display without turning off the PC module as it can damage the PC module.

INFORMATION
The PC module is an optional purchase and does not ship as standard with the display.
5.1.5. SIGNAL SOURCE SWITCHING
You can use the remote control or touch function to switch the source by the following methods:
Method one:
- Press the icon in the upper right side of the screen that looks like a laptop screen with arrows (fig.1)
- Select the signal source and then the product will switch to the input signal source you selected.
Method two:
- Press the "Input" key on the remote controller to open the "Input mode menu"
- Press the cursor keys on the remote control to select a signal source
- Press the "OK" key, and then the product will switch to the input signal source that you selected.
Method three:
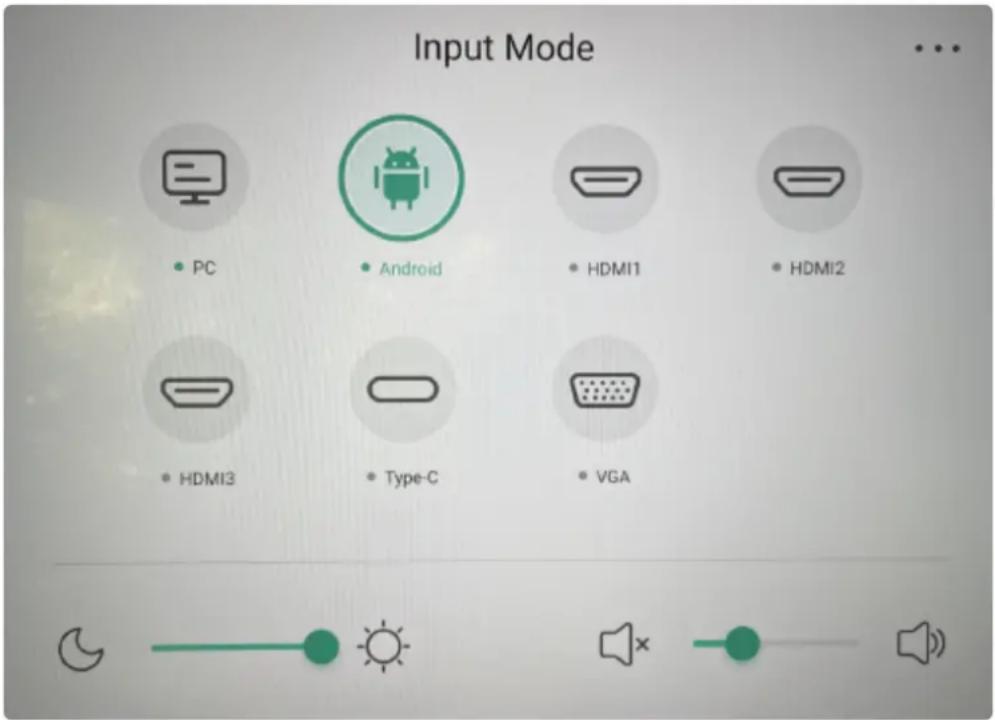
- Swipe up from the bottom of the screen to open the "input" menu (see below image)
- Select the signal source and then the product will switch to the input signal source you selected.
text_image
Input Mode PC Android HDMI1 HDMI2 HDMI3 Type-C VGA5.1.6 AUDIO ADJUSTMENT
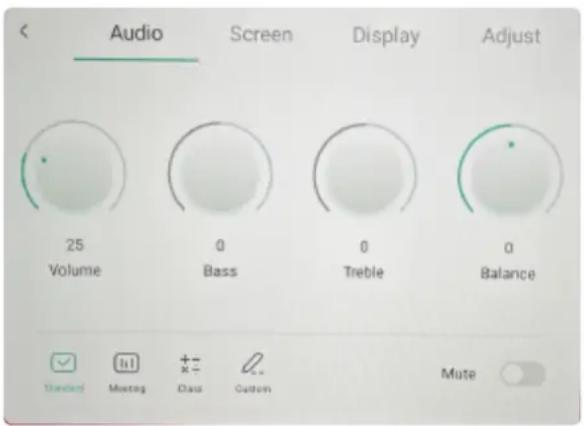
More specific audio adjustments are available using the advanced settings and can be adjusted for all source inputs
text_image
Audio Screen Display Adjust 25 Volume 0 Bass 0 Treble 0 Balance Standard Meeting Class Custom Mute- Open the "input" menu by swiping upwards from the bottom of the screen.
- In the upper right corner of the window, press the icon with 3 dots or swipe from right to left on the window to scroll to the next page
- There are three pre-defined settings for the audio which have default settings. These can be selected at the bottom by pressing “Standard”, “Meeting” or “Class”. It will adjust the Bass, Treble and Balance automatically.
- If a custom option is required press the “custom” and then scroll the icons in a circular motion to adjust the various settings.
- A mute option is also available in this advanced screen
5.1.7 SCREEN ADJUSTMENT
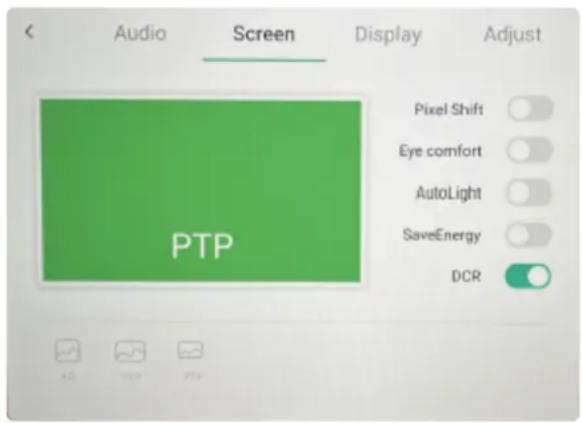
The display provides advanced settings for energy savings, brightness adjustment, dynamic contrast and eye comfort. These settings are designed to reduce energy consumption and provide a greater user experience.
Each option can be manually switched on/off using the toggle switches on the right side of the image.
- Pixel shift is a function when the display is mostly used to display static content. This will adjust the pixels periodically to keep the system running smoothly.
- Eye Comfort will reduce the blue light from the screen
- AutoLight will use the light sensor on the front of the display to automatically adjust the brightness of the screen when the ambient light changes.
- SaveEnergy will use the light sensor and automatically save energy by switching to a black screen when necessary according to the external light situation.
- If the ambient light of the whole machine is lower than 10 for 60 seconds continuously, no matter what the situation, it will change the screen to a black screen and save energy
- When there is no signal channel, it will enter a black screen to save energy after sixty seconds, and then shut down after another two minutes (this is regardless of how the ambient light changes at this time).
- DCR adjust the contrast dynamically based on the content displayed on the screen.
text_image
Audio Screen Display Adjust Pixel Shift Eye comfort AutoLight SaveEnergy DCR PTP5.1.8 DISPLAY ADJUSTMENT
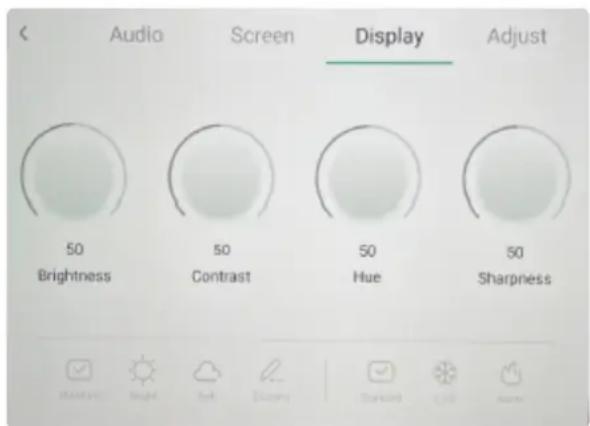
Note: Adjustments are only possible when not in the Android Source mode. Android has default settings that are not adjustable.
- Open the "input" menu by swiping upwards from the bottom of the screen
- In the upper right corner of the window, press the icon with 3 dots and then select "Display" from the headings or swipe from right to left on the window to scroll to the "Display" page
- There are three pre-defined settings for the display image which have default settings. These can be selected at the bottom by pressing “Standard”, “Bright” or “Soft”. It will adjust the Brightness, Contrast, Hue and Sharpness automatically.
- If a custom option is required press the “custom” and then scroll the icons in a circular motion to adjust the various settings.
- The colour gamut can also be set to one of the three options. Standard, Cold or Warm.
text_image
Audio Screen Display Adjust 50 Brightness 50 Contrast 50 Hue 50 Sharpness5.1.9 IMAGE ADJUSTMENTS
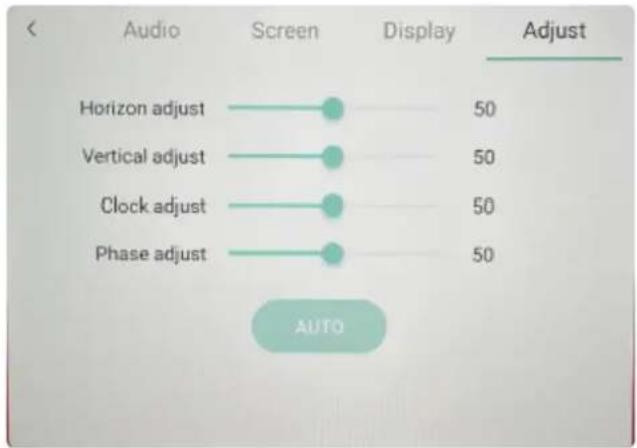
The advanced image adjustment allows for specific picture adjustment when source inputs are not showing correctly. Use the slider bars to adjust each setting and make fine adjustments to the image where required. The AUTO settings are available when not using the “Android OS” input source.
text_image
Audio Screen Display Adjust Horizon adjust 50 Vertical adjust 50 Clock adjust 50 Phase adjust 50 AUTO5.2 ADVANCED SETTINGS
All advanced settings are found in the “settings” application which is opened from the sidebar menu. Some of the settings may be opened using the shortcut icons as previously shown in “basic settings > display shortcuts.

Wireless & Network Wi-Fi, Bluesoft, Diverse

Personal Wallpaper, Multi-Window Media

Input & Output Scored, Input Settings

Application Application management

System Date & Time, Language & Keyboard

About Legal Information, Accredited Venture
Wireless & Network
| Wi-Fi | On > |
| Ethernet | On > |
| Hotspot | Off > |
| Bluetooth | On > |
| VPN | No VPN connected > |
| SAMBA Service | Off > |
5.2.1 WIRELESS
The display can be connected to a wireless and wired network.
WIFI
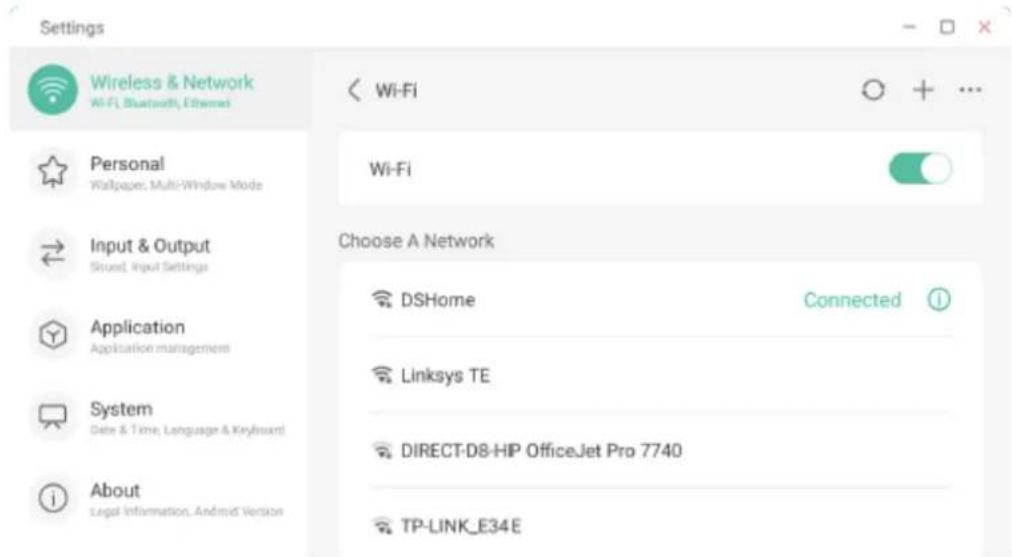
- Enable the connection by selecting the WiFi option to open the sub-menu.
- Change the toggle switch on the right-hand side to switch on the connection. It will change to a green colour, see below image.
- Once the connection is on, the network device will search for local WiFi networks and these will appear below.
- Select the network of choice to open the password and Advanced details window.
- Enter the WiFi network password. See below image.
- If any additional security settings are required, select the “advanced Settings” option and scroll down on the page to display the Proxy and IP Settings options.
- The proxy details can be entered and would be provided by your IT administrator if required.
- If the display is to be assigned a "fixed" IP address, change the option from DHCP and complete the additional settings. These will be provided by your IT administrator.
- Once all settings are complete, press "Connect"
The WiFi will connect to the network and show as connected on the main WiFi page
The WiFi can be switched to another network by following the above steps and can be switched off by changing the toggle switch.
text_image
Settings Wireless & Network Wi-Fi, Bluetooth, Ethernet Wi-Fi Personal Kapalpaer, Multi-Window Mode Input & Output Sound, Input Settings Application Application management System Date & Time, Language & Keyboard About Legal Information, Android Version Choose A Network DSHome Connected Linksys TE DIRECT-D8-HIP OfficeJet Pro 7740 TP-LINK_E34E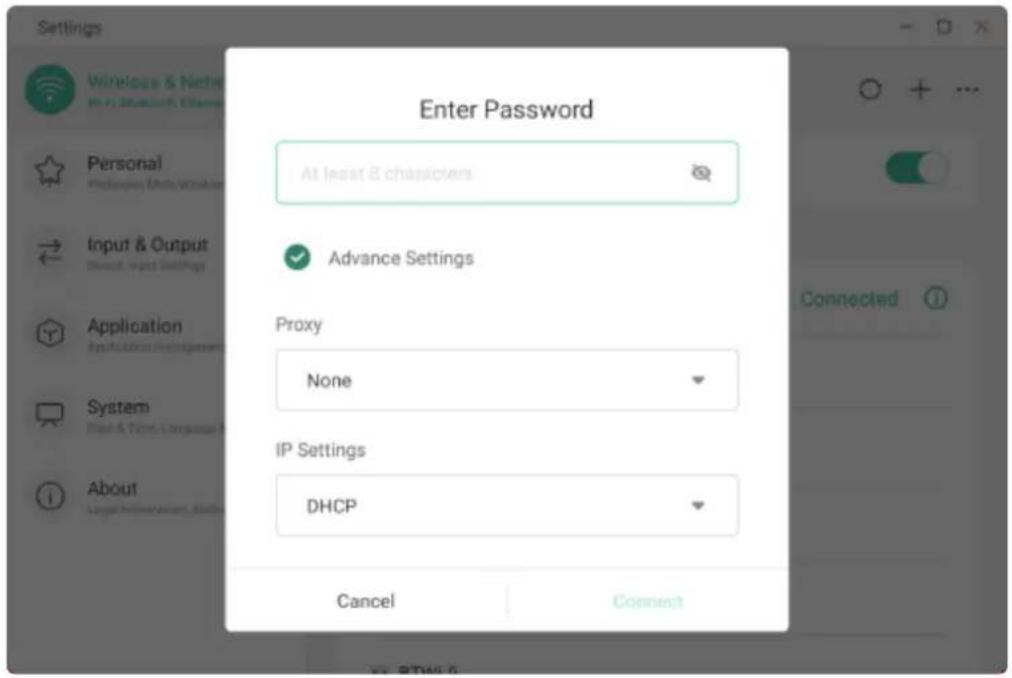
text_image
Enter Password At least 8 characters Advance Settings Proxy None IP Settings DHCP Cancel Connect5.2.2 ETHERNET

INFORMATION
Only available when when a LAN cable(RJ45) is connected to the display.
- Enable the connection by selecting the Ethernet option to open the sub-menu.
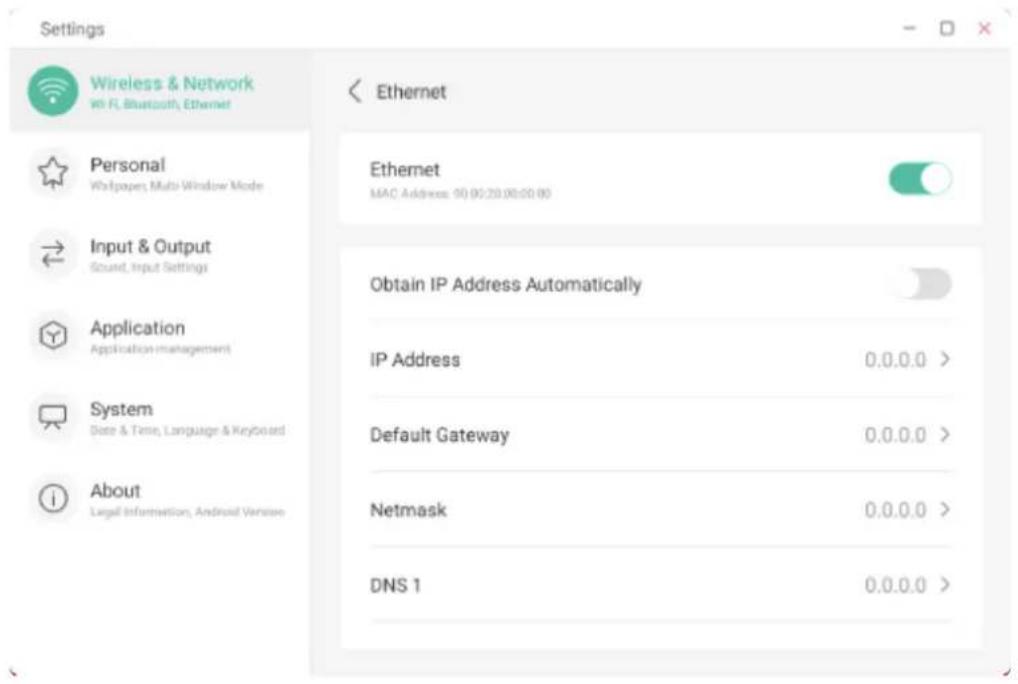
- Change the toggle switch on the right-hand side to switch on the connection. It will change to a green colour. (ethernet fig 1)
- The display will automatically search for a network and provide an IP address to the display.
If the display is to be assigned a "fixed" IP address, disable the option for "Obtaining IP Address Automatically and populate the additional fields. This information should be obtained from your IT administrator.
text_image
Settings Wireless & Network Wi-Fi, Bluetooth, Ethernet Personal Whitpages, Multi Window Mode Input & Output Sound, Input Settings Application Application management System Date & Time, Language & Keyboard About Legal Information, Android Version Ethernet MAC Address: 00:00:20:00:00:00 Obtain IP Address Automatically IP Address 0.0.0.0 > Default Gateway 0.0.0.0 > Netmask 0.0.0.0 > DNS 1 0.0.0.0 >5.2.3 HOTSPOT
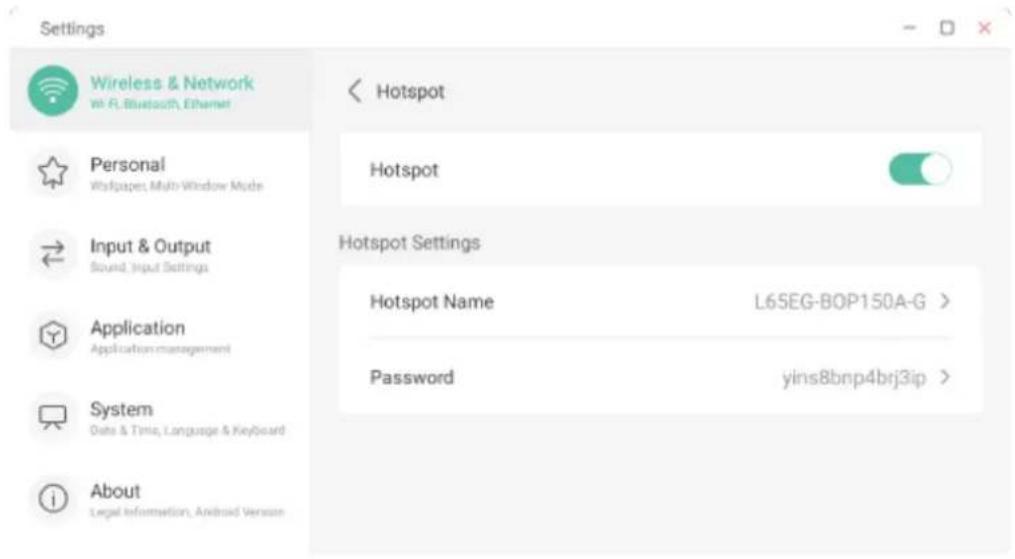
The display can provide a hotspot for devices to connect and share an internet connection. It also allows a secure option for direct casting to the display without the requirement of an active network connection for both devices.
- Enable the connection by selecting the Ethernet option to open the sub-menu.
- Change the toggle switch on the right-hand side to switch on the connection. It will change to a green colour. (hotspot fig 1)
- The name and password can be adjusted in the Hotspot settings
text_image
Settings Wireless & Network W-FL, Bluetooth, Ethernet Personal Wispapers, Multi-Window Mode Input & Output Sound, Input Settings Application Application management System Date & Time, Language & Keyboard About Legal Information, Android Version Hotspot Hotspot Hotspot Settings Hotspot Name L65EG-BOP150A-G > Password yins8bnp4brj3ip >5.2.4 BLUETOOTH
Bluetooth devices such as cameras, keyboards, mice and speakers can be connected to the display for additional functionality.
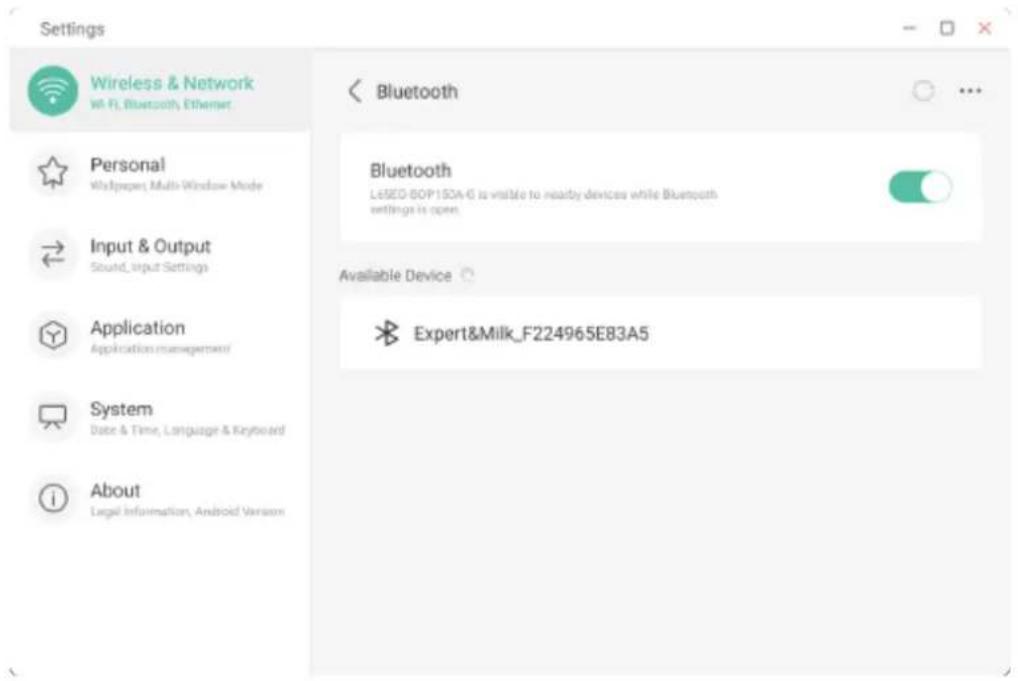
- Enable the connection by selecting the Bluetooth option to open the sub-menu.
- Change the toggle switch on the right-hand side to switch on the connection. It will change to a green colour.
• A list of devices will appear - Select the device to connect and pair with the display
- Once connected it will appear as a connected device in the list
- To unpair, the device, select it from the list and then either forget or disconnect.
text_image
Settings Wireless & Network Wi-Fi, Bluetooth, Ethernet Bluetooth Personal Whipower, Multi-Window Mode Input & Output Sound, Input Settings Application Application management System Date & Time, Language & Keyboard About Legal Information, Android Version Bluetooth LESED-BOP150A-6 is visible to nearby devices while Bluetooth settings is open. Available Device Expert&Milk_F224965E83A55.2.5 VPN
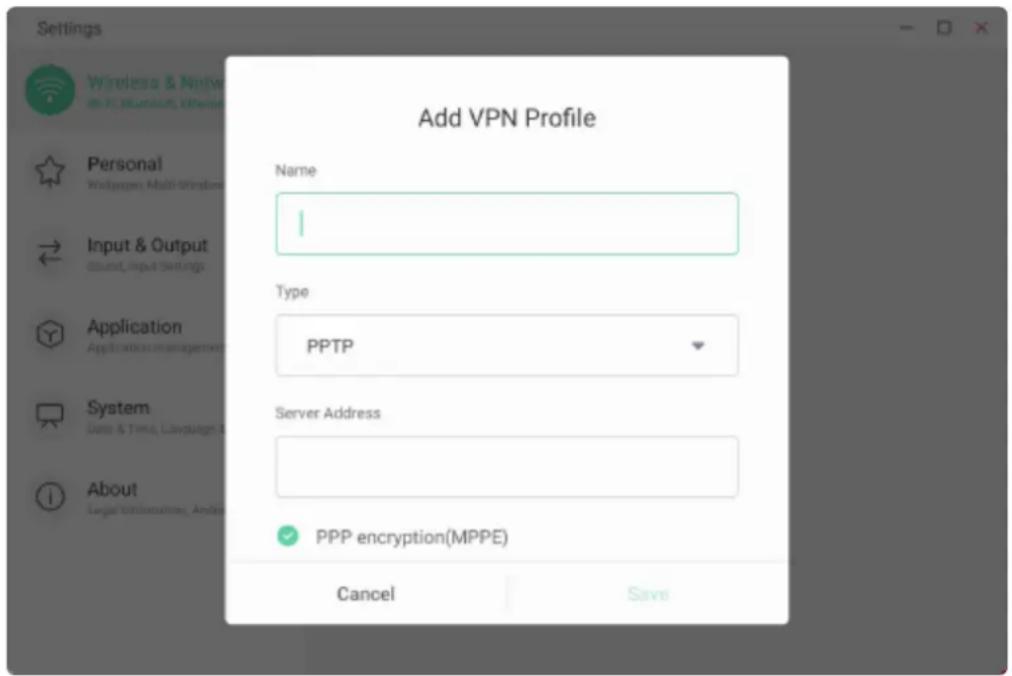
For added security or to connect the display to a remote network, the VPN (Virtual Private Network) setting should be used. All settings for this option should be obtained from your IT administrator.
- Enable the connection by selecting the VPN option to open the sub-menu.
- Select "Add VPN"
- Enter all the details specific to the VPN as provided by your IT Administrator and save to exit.
text_image
Add VPN Profile Name I Type PPTP Server Address PPP encryption(MPPE) Cancel Save5.2.6 SAMBA
The SAMBA connection enables the display to be added to a network directory. This allows remote devices such as laptops or PCs to connect and upload/download files directly to the file manager.

INFORMATION
The username is set as Admin and cannot be changed.
A password is strongly recommended during the setup to protect all content on the display.
5.2.7 WALLPAPER
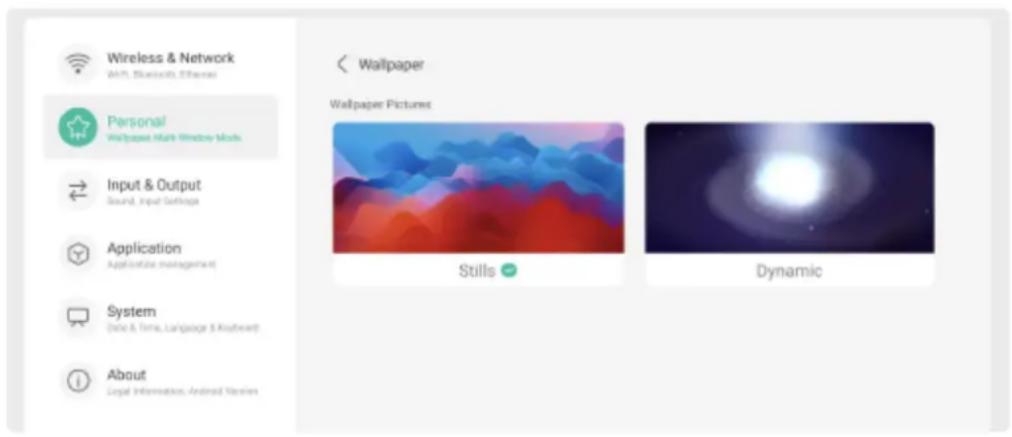
There are a number of the default wallpaper for the home screen to choose from. There are options for either “still” or “dynamic” wallpapers.
- Open the settings menu and select Personal from the side menu and then "wallpaper"
- Choose from the option of "Stills" or "Dynamic" to open and choose from the selection
text_image
Wireless & Network WIFI, Bluetooth, Ethernet Personal Wallpaper Main Window Mode Input & Output Sound, Input Settings Application Application Management System Date & Time, Language & Keyboard About Legal Information, Android VersionThe home screen wallpaper can have a custom wallpaper
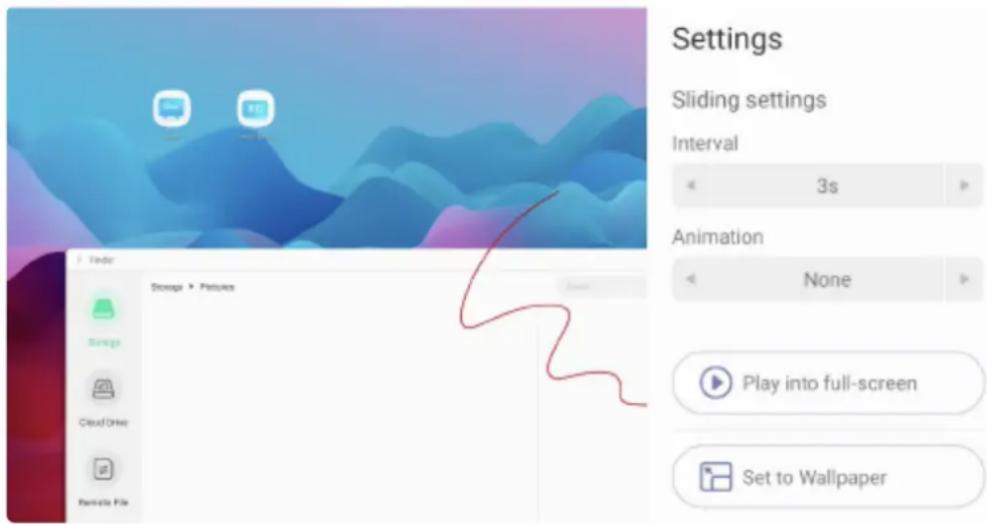
- Download or save an image to the file manager.
- Open the image
- Select "settings" from the picture toolbar at the bottom
- Select "set to wallpaper" on the right side of the menu to activate this as the new wallpaper
text_image
Settings Sliding settings Interval 3s Animation None Play into full-screen Set to WallpaperThe sidebar menu by default is available in all source channels. This allows the sidebar menu to be accessed when using a connected PC, built-in PC Module, the Android interface or even when connected to an external input device such as a DVD player.
There are additional options for security to limit where the sidebar menu is displayed.
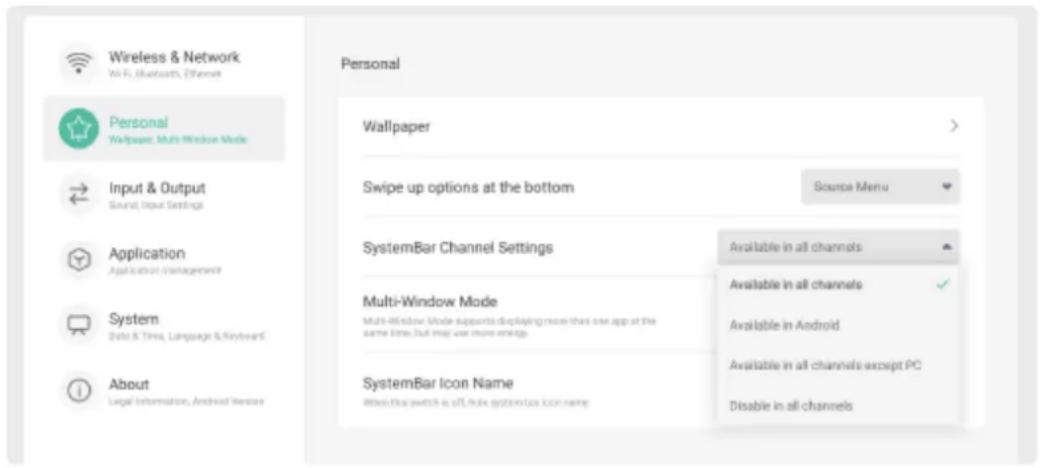
- Open the settings menu and select "Personal"
- On the right side of the menu the option for "SystemBar Channel Settings" will be shown with a drop-down box to the right
- Select the dropdown box to present the options and select the preferred choice
Available in all channels – Default Setting * Available in Android – This will only show the sidebar when using the Android input source
Available in all channels except PC -If a PC module is built into the display, these settings will prevent the menu from showing when using this input source. All other options such as Android, HDMI, and VGA will show the toolbar
Disable in all channels – This will deactivate the sidebar completely for all sources
text_image
Wireless & Network Wi-Fi, Bluetooth, Ethernet Personal Wallpaper, Multi-Window Mode Input & Output Sound, Input Settings Application Application Management System Date & Time, Language & Keyboard About Legal Information, Android Version Personal Wallpaper > Swipe up options at the bottom Source Menu SystemBar Channel Settings Available in all channels Multi-Window Mode Multi-Window Mode supports displaying more than the app at the same time, but may use more setup. SystemBar Icon Name Available in all channels Available in Android Available in all channels except PC Disable in all channels
ATTENTION
"Selecting "Disable in all channels" will result in no access to the apps menu, additional tools and other features available on the display.
To enable the sidebar, use a shortcut icon in upper corner of display to open the settings menu and navigate to the SystembarChannel Settings.
5.2.9 MULTI-WINDOW MODE
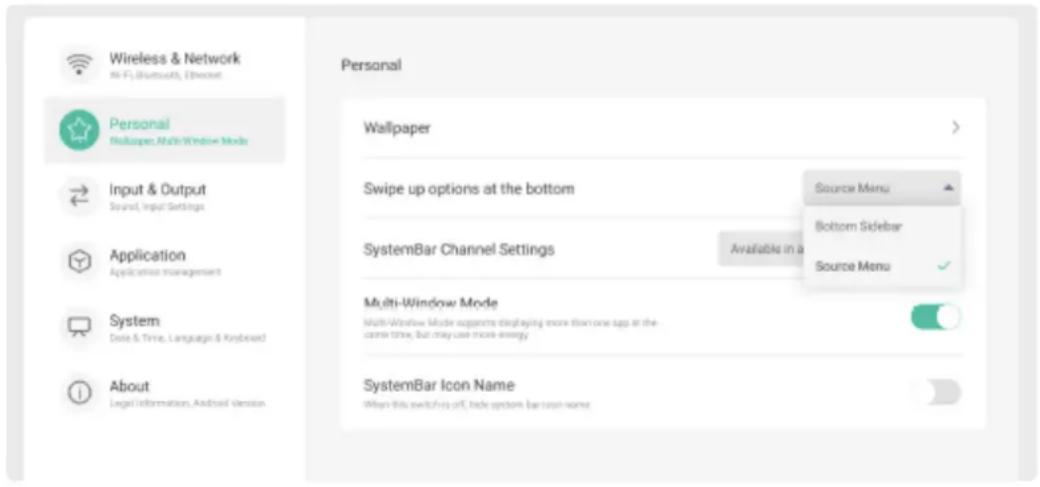
The default setting on the display will open all apps in full screen mode and only one app will be visible on the screen at a time. The Multi-Window Mode allows the display to show multiple apps at the same time. Each window can be adjusted and moved around the screen or locked to a corner, side or covert to full screen.
- Open the settings menu and select "Personal".
- Enable the "Multi-Window Mode" by changing the toggle switch on the right-hand side to switch it on.
- It will change to a green colour when active – see below≥
- The display will need to reboot to activate the mode change.
text_image
Wireless & Network Hi Fi, Bluetooth, Firefox Personal Wallpaper Input & Output Sound, Input Settings Application Application Management System Date & Time, Language & Keyboard About Legal Information, Android Version Swipe up options at the bottom SystemBar Channel Settings Available in a Multi-Window Mode Multi-Window Mode suggests displaying more than one app at the time. But may use more energy SystemBar Icon Name When this switching of C mode system bar icon name5.2.10 SYSTEM BAR ICON NAME
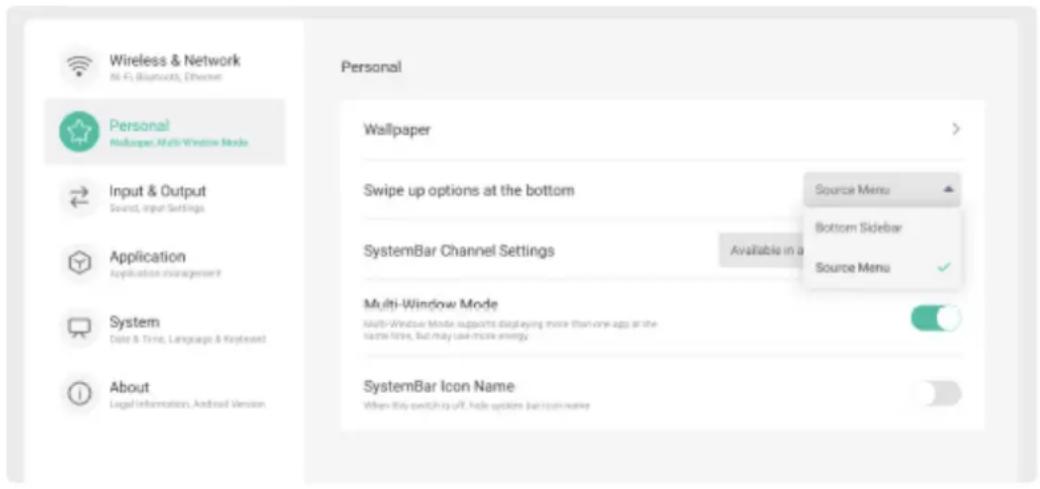
By default, the sidebar menu will show names for all of the icons displayed. This can be switched off by changing the setting to off as shown in the image below when disabled, only the icons will appear in the sidebar menu.
text_image
Wireless & Network MI Fi, Bluetooth, Ethernet Personal Multi-Wirene Mode Input & Output Sound, input Settings Application Application management System Date & Time, Language & Keyboard About Legal Information, Android Version Personal Wallpaper Swipe up options at the bottom SystemBar Channel Settings Available in a Multi-Window Mode Multi-Window Mode supports displaying more than one-app at the file time, but may use more energy SystemBar Icon Name When they switch off, please option your own name5.2.11 MAIN SCREEN SWIPE UP MENU
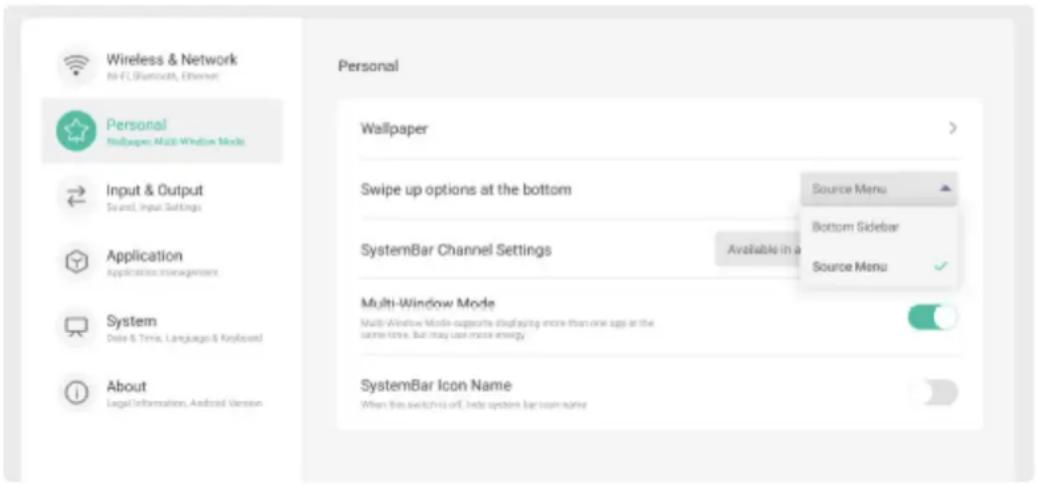
The home screen has the functionality to launch a menu by swiping up with one finger from the bottom of the screen. By default, this action will open the “Source menu” as shown in “Basic Settings” of this user guide.
An alternative option is to have the action open a bottom "Sidebar menu" as shown below.
text_image
Wireless & Network No FCL, Timestamp, Ethernet Personal Wallpaper Input & Output Sound, Input Settings Application Application Managers System Delete & Time, Language & Keyboard About Legal Information, Android Version Personal Swipe up options at the bottom SystemBar Channel Settings Available in a Multi-Window Mode Multi-Window Mode supports displaying more than one app at the same time. But may last more energy SystemBar Icon Name When this switch is off, into system bar town name Source Menu Bottom Sidebar Source Menu5.2.12 INPUT AND OUTPUT
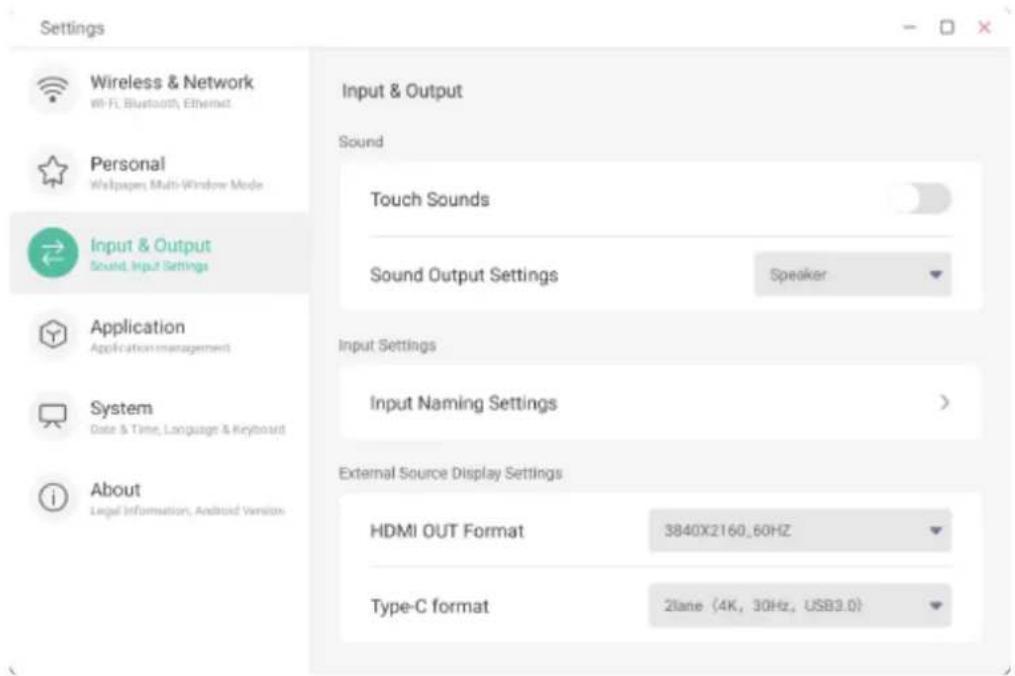
\*Touch Sounds \*
Touch sounds can be switched on/off from this menu. When switched on (default setting), a sound will be heard each time a key is pressed on the on-screen keyboard. This keyboard appears when the requirement to type is needed, in apps.
\*Sound Output \*
The displays are supplied with built-in speakers to provide great audio for most environments. If additional speakers are required and connected to the display through the Audio Out port then the option to switch the audio to either the built-in speakers or external connection is possible. The “mixed” option available will allow audio from both internal and external connections at the same time.
text_image
Settings Wireless & Network Wi-Fi, Bluetooth, Ethernet Personal Wallpaper, Multi-Window Mode Input & Output Sound, Input Settings Application Application management System Date & Time, Language & Keyboard About Legal Information, Android Version Input & Output Sound Touch Sounds Sound Output Settings Speaker Input Settings Input Naming Settings External Source Display Settings HDMI OUT Format 3840X2160, 60HZ Type-C format 2lane (4K, 30Hz, USB3.0)\*Input Naming \*
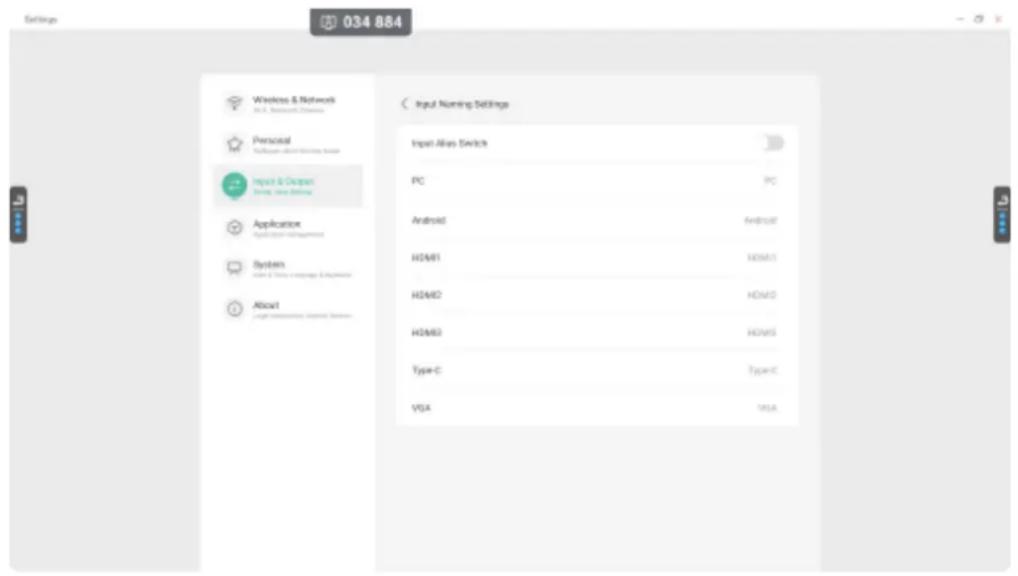
Each of the source input can be set to have a unique name associated to the connection. Open the Input naming setting and switch on the "alias switch" at the tope of the page Each of the source option names can now be changed to a name of the users choice.
If the default naming is required simply turn of the "alias switch"
text_image
Settings 034 884 Wireless & Network PC & Network Devices Personal Application: Windows User Input & Output System: New Settings Application Application Management System System & User's Company & Process About Input Naming Settings Input Alias Switch PC Android H24M1 H24M2 H24M3 Type-C VGA PC Android H24M1 H24M2 H24M3 Type-C VGA*External Source HDMI & USB-C *
The HDMI out resolution can be selected to best suit the device connected to. The default setting is to provide the maximum 4K resolution output.
USB-C output can also be adjusted to either support a higher video frame rate output or a fast data transfer rate. The default setting is to provide a higher data transfer rate of USB-3.0
5.2.13 SYSTEM
Date & Time
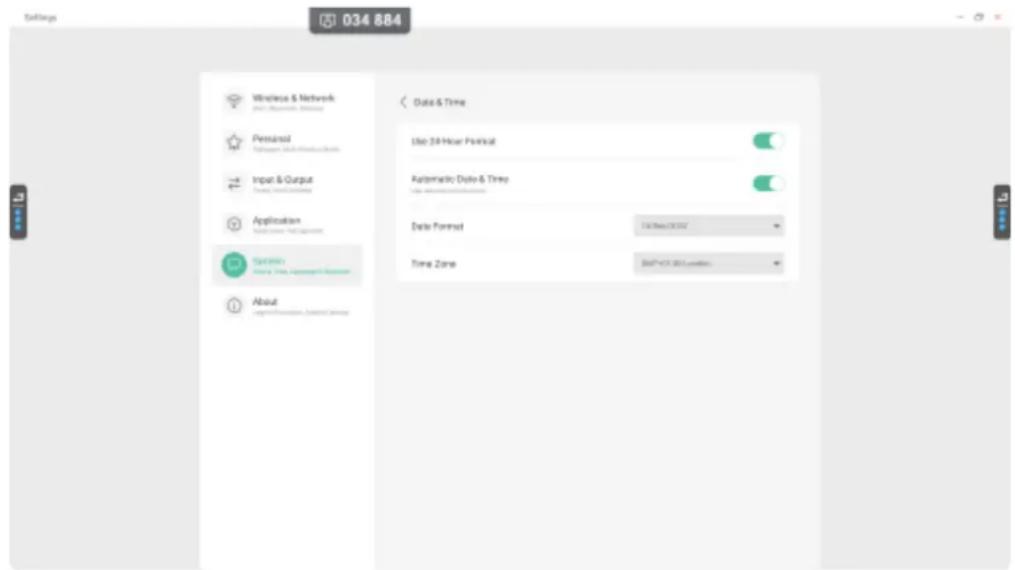
The date and time of the display can be set to either show a 12 hour or 24-hour clock by toggling the switch in the menu
Automatic date and time can be set using a network connection. This will only work when a WiFi or Ethernet connection is being used. If this is not used then manual options will be presented to set both.,
The date format can be selected from the drop menu to provide a user preference
The time zone is not automatically adjusted and will need to be set on the display to represent the current time zone of the display.
text_image
Settings 034 884 Wireless & Network Wireless Network Personal Software, Software, Web Services Input & Output Data & Time Application System Timing, Time, Management & Response Data & Time Use: 24 Hour Period Automatic Data & Time Date Format Time Zone 24*+51.261 Luminics About Copyright Information, Download ServiceLanguage & Keyboard
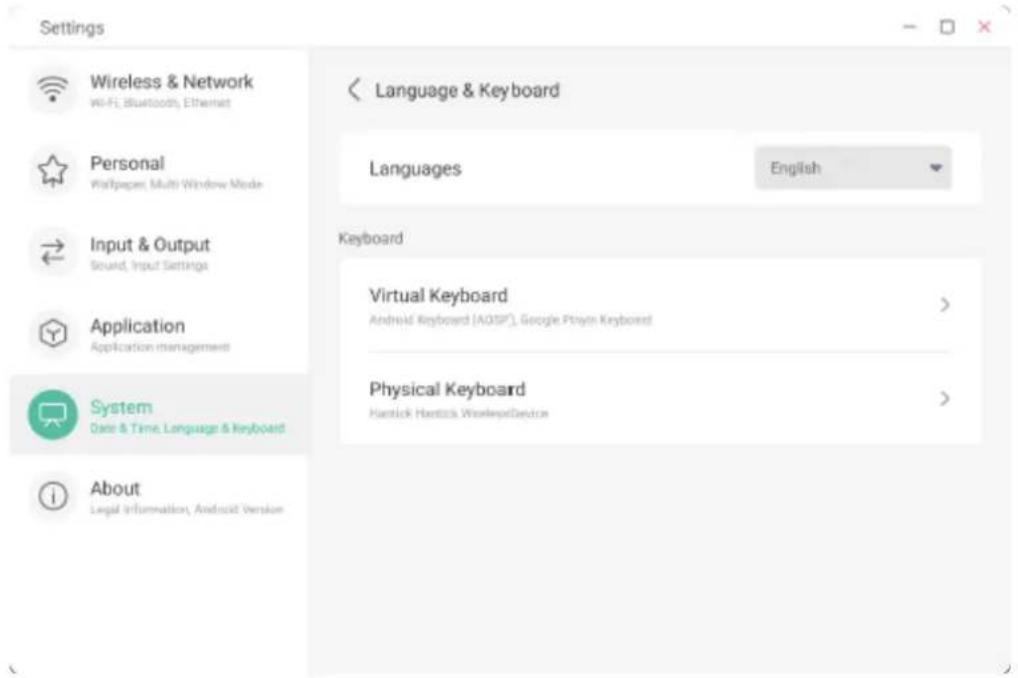
The display language can be changed to one of the 9 languages supported. Open the menu and select from the list to change all menu text to the local language selected.
Keyboards are used throughout the installed applications and by default, the virtual keyboard that appears on the screen is set based on the main display language selected. It can be adjusted by pressing the “Virtual Keyboard” text in the menu screen and then pressing the Android Keyboard option.
Within this menu the option to change the language and also change the layout to a split keyboard is possible.
A physical keyboard can be connected to the display via USB or Bluetooth. These keyboards will be displayed and if required the layout of the keyboard can be adjusted in this menu.
text_image
Settings Wireless & Network Wi-Fi, Bluetooth, Ethernet Personal Wattpaper, Multi Window Mode Input & Output Sound, Input Settings Application Application management System Date & Time, Language & Keyboard About Legal Information, Android Version Language & Keyboard Languages English Keyboard Virtual Keyboard Android Keyboard (AOSP), Google Playn Keyboard > Physical Keyboard Handlick Handlick WirelessDevice >Password Control
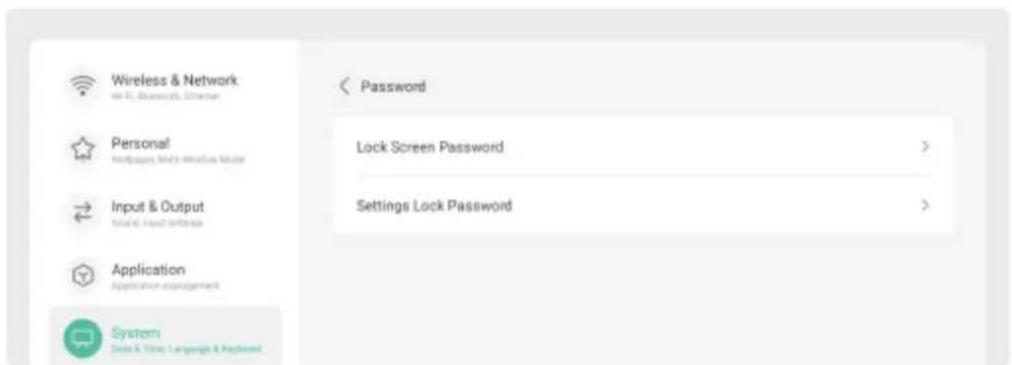
The display has two options for additional security where a password is possible. The settings menu and screen can be independently locked using separate passwords as required.
To set the passwords open the "password" menu under "system" and select the lock option required from either Screen or Settings
text_image
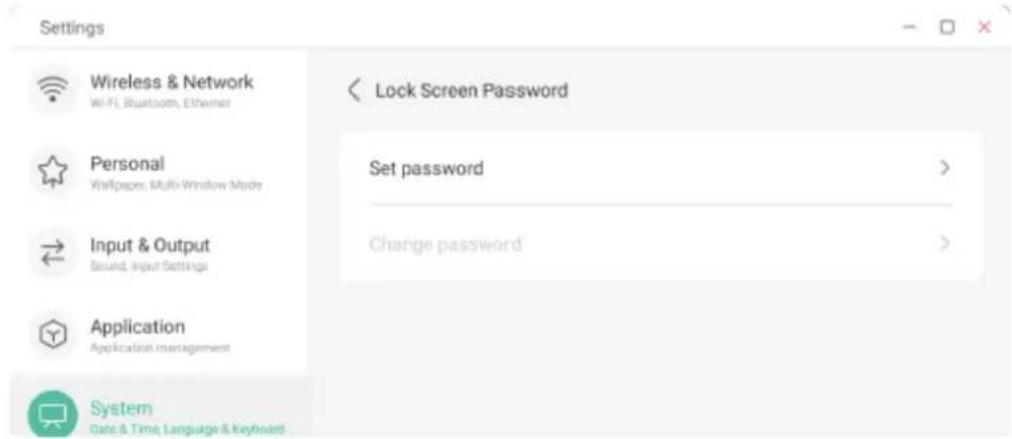
Wireless & Network Hi-Fi, Bluetooth, Other Personal Inscriptions, WiFi Wireless Music Input & Output Sound Impact Settings Application Application Management System Size & Time: Language & Keyboard Password Lock Screen Password > Settings Lock Password >The next screen will show the option to "set password", "clear password" or "change password". This will depend on whether a password has been set previously or not.
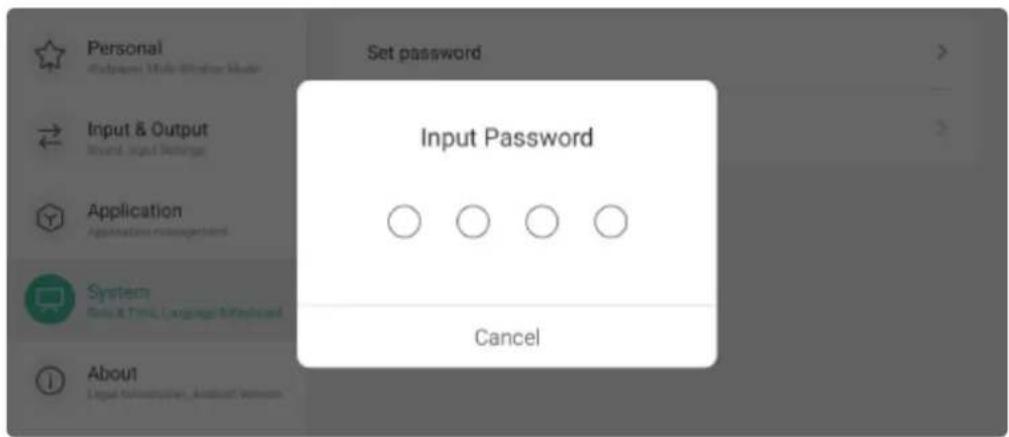
If this is the first time then press "set password" and then enter in a 4 digit code and repeat to confirm the code.
text_image
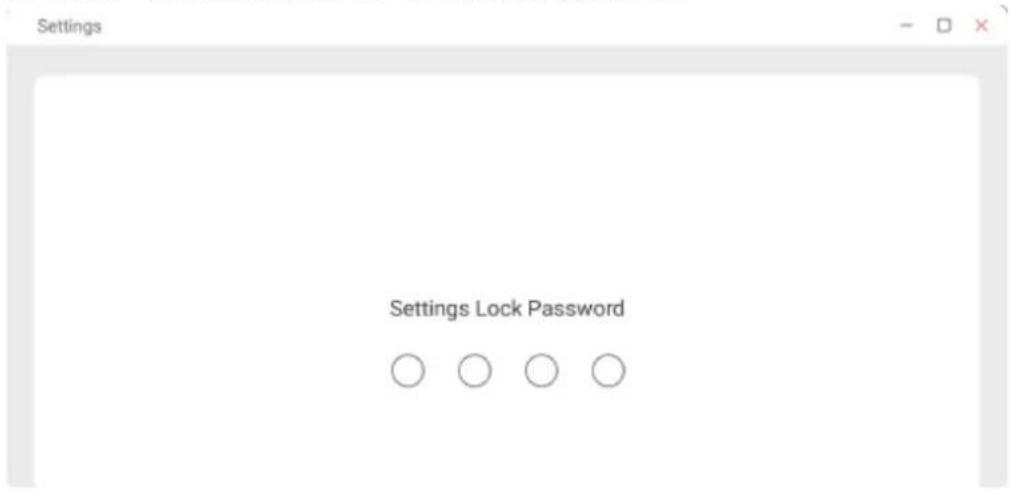
Settings Wireless & Network Wi-Fi, Bluetooth, Ethernet Personal Wallpaper, Multi-Window Mode Input & Output Sound, Input Settings Application Application management System Gate & Time, Language & Keyboard Lock Screen Password Set password > Change password >Once the main settings menu is closed it will be locked for the next time it is opened. To open the menu simply enter the code.
text_image
Personal Outperform Make Window Mode Input & Output Word, Input Settings Application Application management System Help & Print Language Help About Legal Construction, Assistant Session Set password Input Password CancelThe screen lock can be set in the same way and then activated by pressing the "screen lock" icon in the more tools menu from the side bar.
If either of the locks are no longer required or if the code needs to be changed, repeat the first steps to either "clear password" or "change the password"
text_image
Settings Settings Lock PasswordStartup & Shutdown
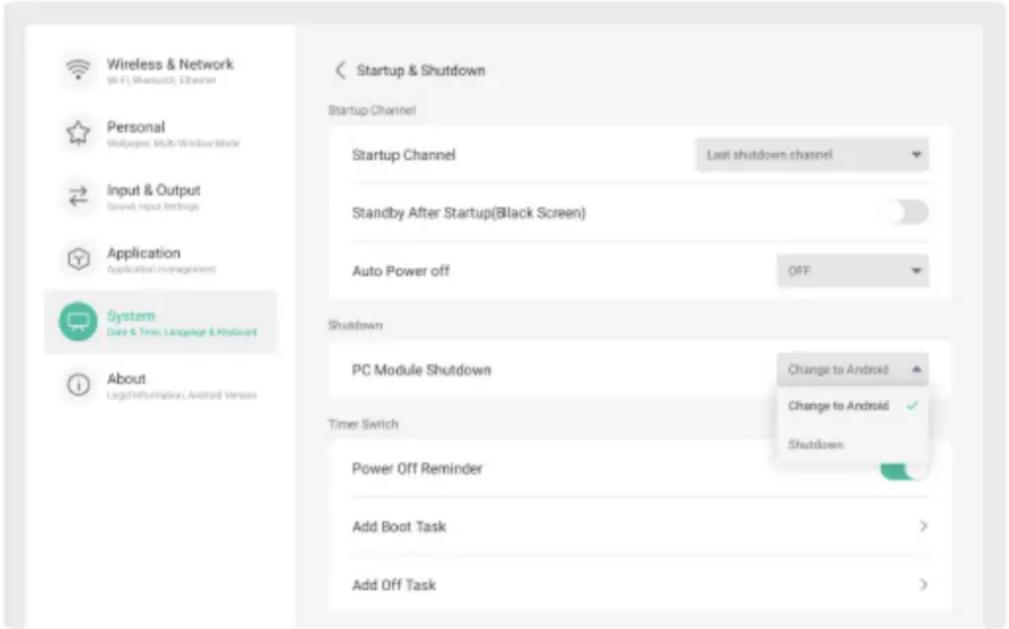
In this menu, the display can have several settings to customise the way the screen reacts to actions and also can also have automation enabled for further environmental benefits
The startup channel allows the user to select which source the display will startup in. It can be a source that is connected, the built in Android OS or the default option of the last source input that was used when last shutdown.
The option to have the screen immediately go into standby mode can be selected. This is a useful tool if you wish to have the screen ready for use and not immediately. It will also reduce energy consumption.
Auto power off can be adjusted to turn the display off after a selected number of minutes. This action will monitor the touch activity and if no touch input is recognised in the period it will trigger the power-off action.
text_image
Wireless & Network (55 F), Bluetooth, Ethernet Personal Multipage, Multi-Window Mode Input & Output Sound, input hostings Application Application Management System Data & Time, Language & Keyboard About Legal Information, Android Versus Startup & Shutdown Startup Channel Last shutdown channel Standby After Startup(Black Screen) Auto Power off OFF Shutdown PC Module Shutdown Change to Android Timer Switch Change to Android ✓ Shutdown Power Off Reminder Add Boot Task > Add Off Task >PC Module Shutdown
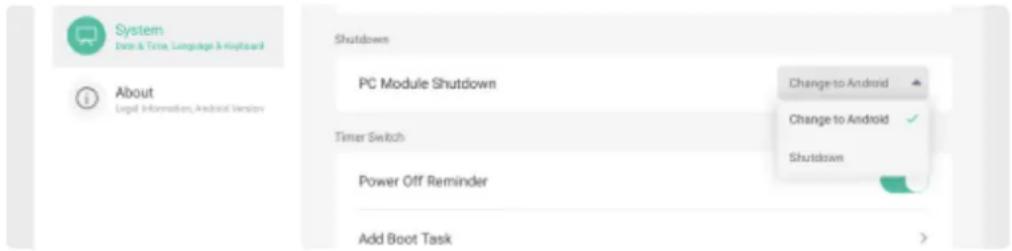
This option is for use with a built-in PC module only.
Users can select either to have the display shut down or switch the source to Android when the PC module is shut down. The setting is made available as users may wish to stop using the built-in PC and move to Android mode and making this setting change can allow the simple sway whilst reducing energy consumption.
text_image
System Date & Time, Language & Keyboard About Legal Information, Android Version Shutdown PC Module Shutdown Timer Switch Power Off Reminder Add Boot Task Change to Android Change to Android ✓ ShutdownStartup & Shutdown Schedules

text_image
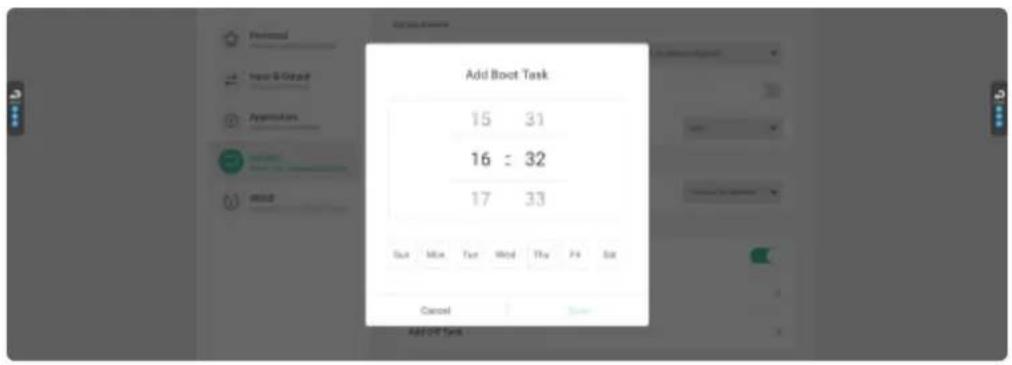
Steam Switch Power Off Remulator Add Back Task > Add Off Task >The display can be automated to turn on and off at selected times and days. A reminder can also be shown on the screen to inform users of the scheduled automation in case the display is still in use. The “add boot task” is selected to create the startup time and day. This could be a single schedule with multiple days or you can create multiple schedules for different days or times.
The "add off task" is created to turn of the display in the same way as the boot task is set.
text_image
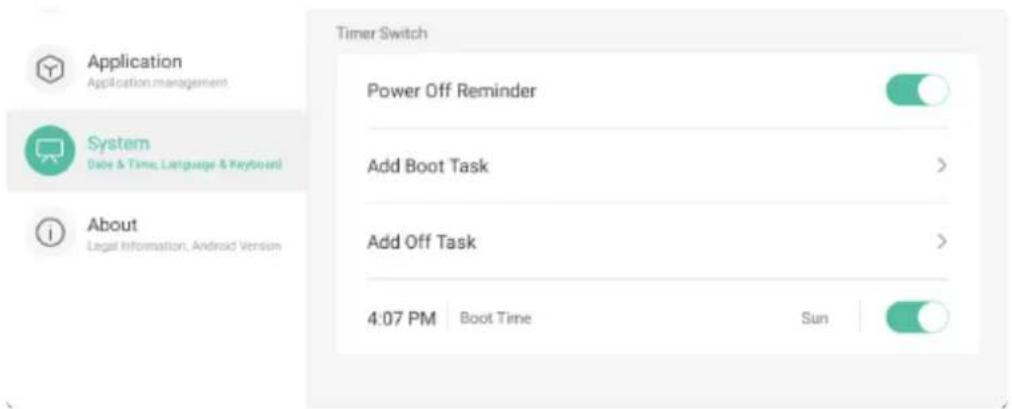
Add Boot Task 15 31 16 = 32 17 33 Out More Tan Wind Try Fri Sat Cancel Add Off TaskAll "Startup & Shutdown" tasks will be displayed at the bottom of the menu and can be activated and deactivated by toggling the switch.
text_image
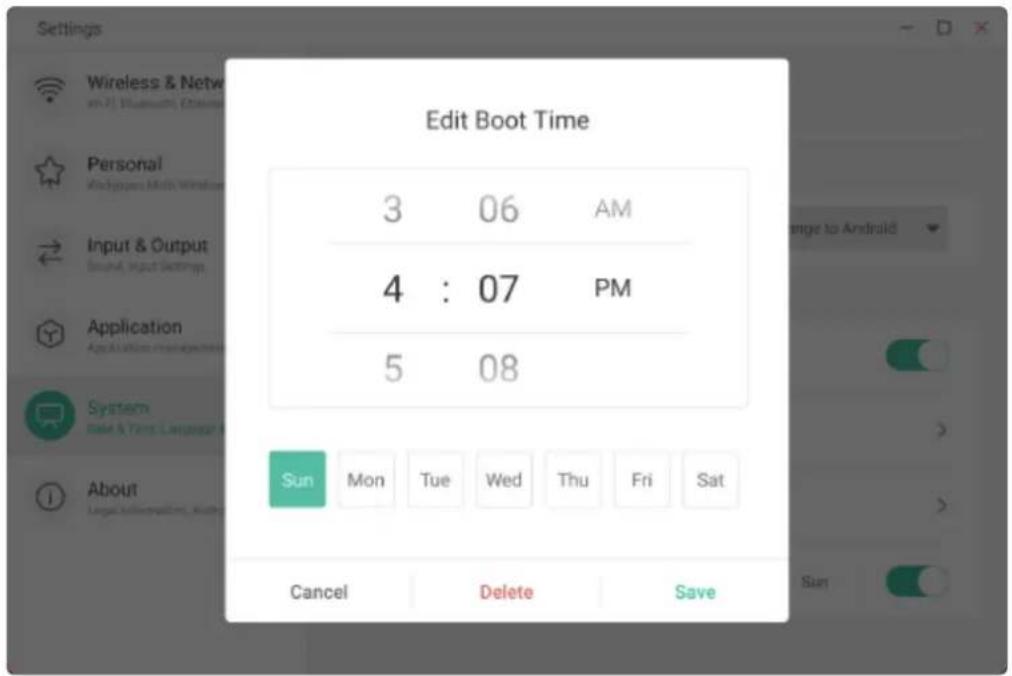
Application Application management System Date & Time, Language & Keyboard About Legal Information, Android Version Timer Switch Power Off Reminder Add Boot Task > Add Off Task > 4:07 PM Boot Time SunTo delete or adjust a schedule, press the task name and either adjust the schedule or select delete.
text_image
Edit Boot Time 3 06 AM 4 : 07 PM 5 08 Sun Mon Tue Wed Thu Fri Sat Cancel Delete Save Wireless & Network @1. Wiannach! Email Personal Macgoges Math Wireless Input & Output Bound, Input Settings Application Application Manager System Item & Parts Language A About Legal Information, StatusPixel Shift
The display can be set to automatically adjust the image by moving pixels for a brief moment and
then resuming the original image. This is to ensure the screen doesn't have burn in issues where users may have a single image displayed for an extremely long period of time.
Email Settings
There are several applications on the display that can send various images, data or documents to a user via email. The email settings option can be configured to use a specific email account for the display so that they can be sent directly.

text_image
Settings 034 884 Wireless & Network and Security Personal (Delaware, Delft, Phone & Email) Input & Output (Dual App/Settings) Applications Applications Management Systems File & View - Access & Window About Mail Settings please open the SMTP or your mail client User Email Password dMFTP server Port Cancel Verify SecurityStorage
The storage option allows users to see how much of the internal storage is being used and to clean app data and any present.
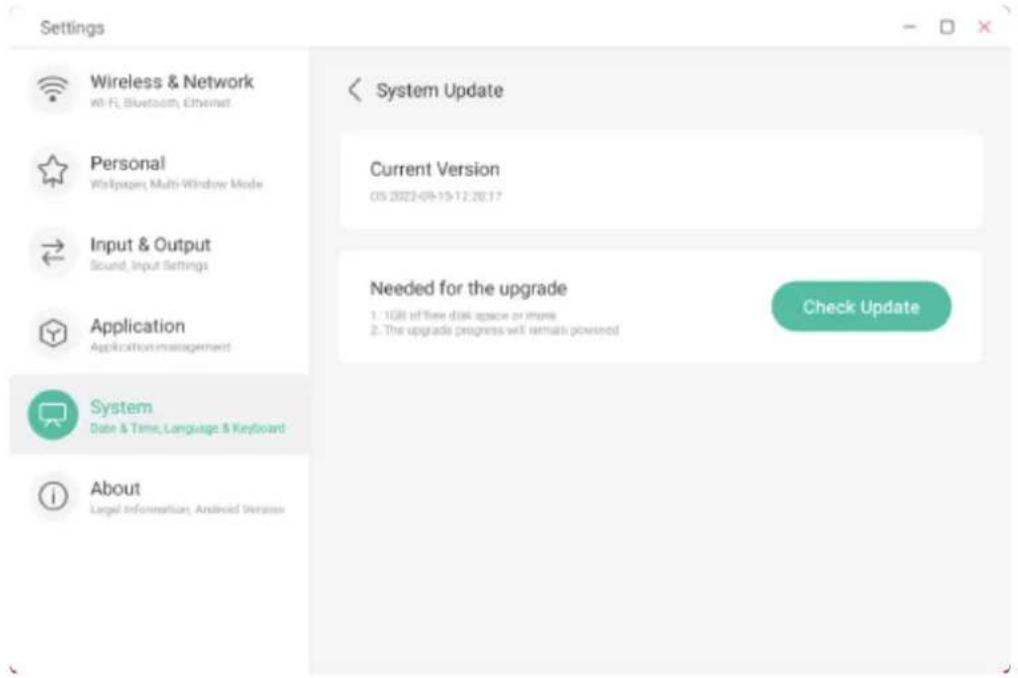
System Update
System updates are periodically made available to users via the OTA (over-the-air) server from InFocus.
Updates are normally only available as a manual activity to prevent releases interfering with user activity on the display at time when in use. To check if any updates are available, press the “check update” button and wait for a few seconds. If an update is available then further details are provided to guide the user for downloading and installed.
If the display is on the latest version then a message will confirm.
text_image
Settings Wireless & Network Wi-Fi, Bluetooth, Ethernet Personal Workpages, Multi-Window Mode Input & Output Sound, Input Settings Application Application management System Date & Time, Language & Keyboard About Legal Information, Android Version System Update Current Version 05 2022-09-15-12:28:17 Needed for the upgrade 1. 1GB of free disk space or more 2. The upgrade progress will remain powered Check UpdateSecurity
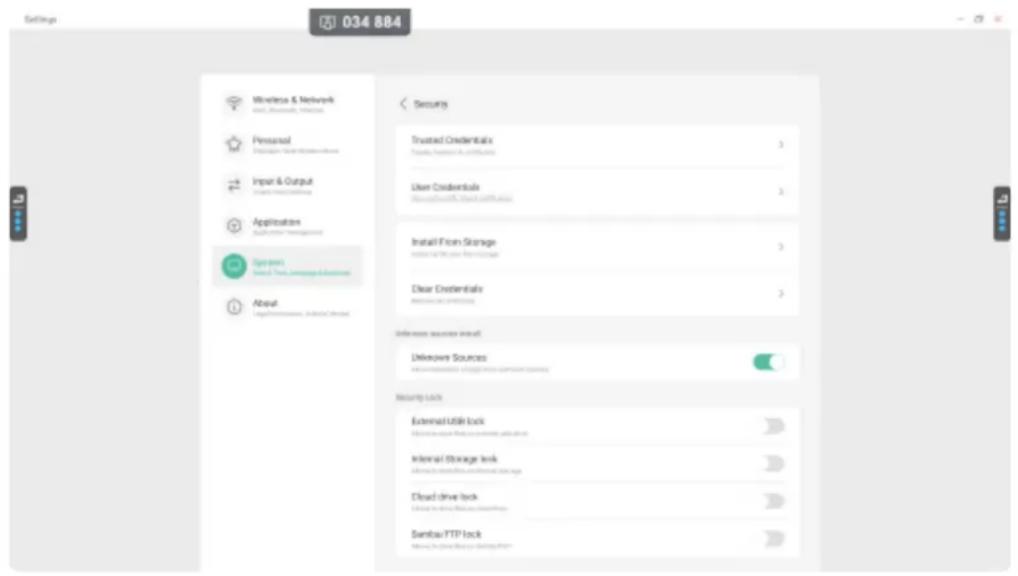
Additional options for USB, Cloud drive and other locks are possible along with allowing manual installation of APK files.
Unknown sources when active will allow users to download APK files and manually install the applications onto the display. By default this is not enabled.
External USB lock when enabled will prevent users from saving files to a USB drive inserted in the display. This prevents files from being copied or other images, documents being saved to a USB device.
Internal Storage Lock when enabled will prevent any files, annotations, drawings being save to the internal storage of the display. This is normally used if the device is to only allow saving to USB devices or if the display is used in confidential locations.
Cloud Drive lock when enabled will prevent any files being saved to the cloud storage accounts that are configured on the display
Samba/FTP lock when enabled will prevent the saving of files from the display to a remote connection storage location on a server.
text_image
Settings 034 884 Wireless & Network Host: Unmonely Wireless Personal Personal Data Security Import & Output Import Security Application Application Management Operators Import/Transfer Services/Continuous About Securities Trusted Credentials Trusts, Injuries & Certifications User Credentials Install From Storage Install To Use Personal Accounts Clear Credentials Information sources insert Deluxe Sources Security Lock External Utility lock Internal Storage link Internal Storage Link Closed drive lock Send to drive Security Checklist Send to drive Security Checklist Send to drive Security ChecklistAbout
The about menu provides details of the display such as the Android version, module number and all legal notices for licenses required on the display.
Some of this information maybe requested if a service case is reported.
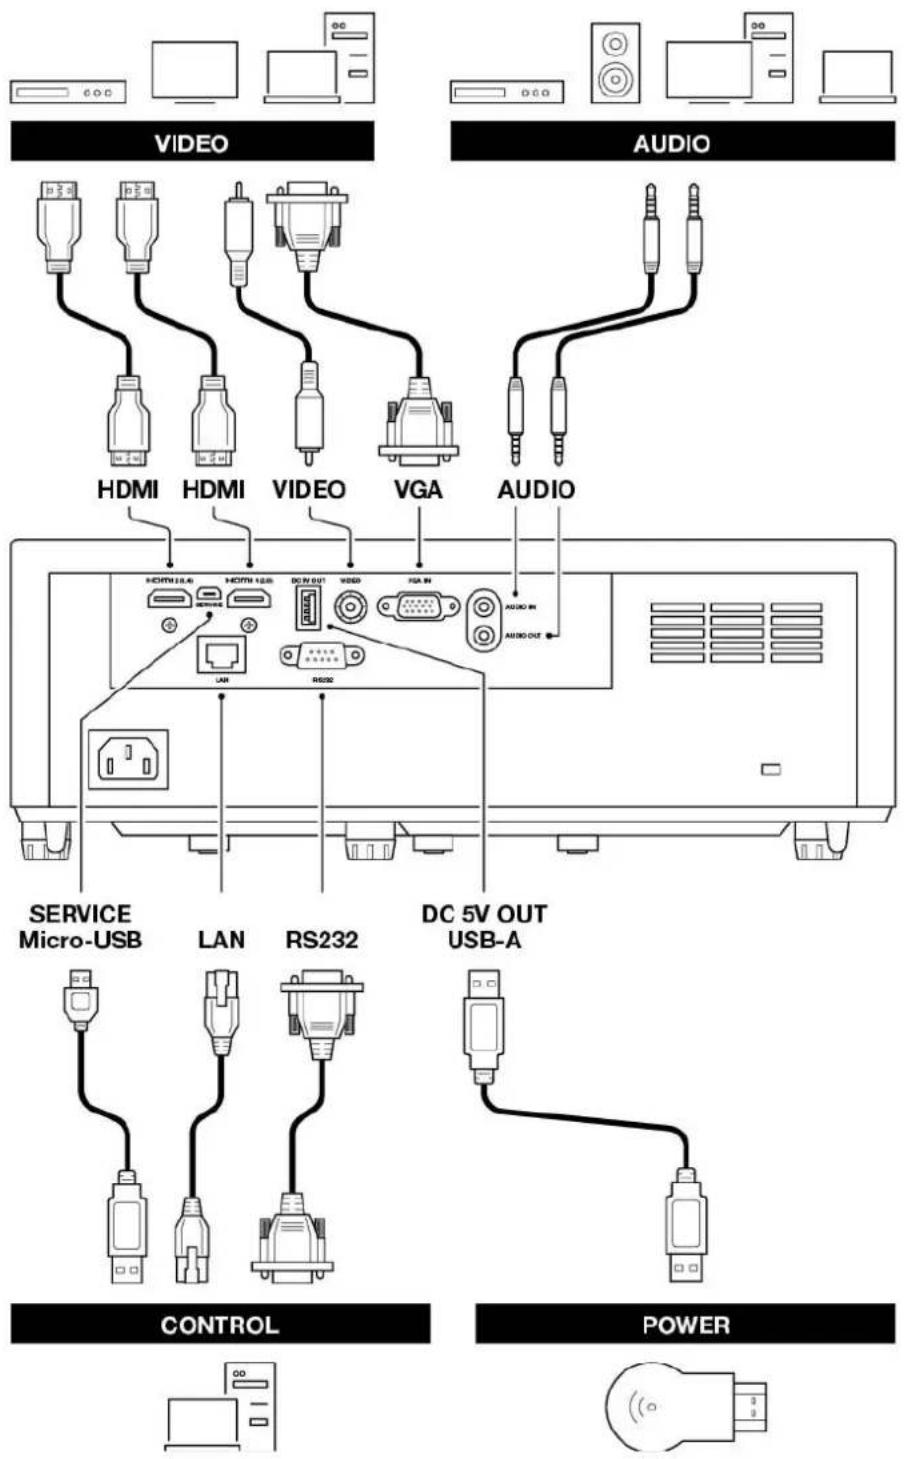
6. BRANCHEMENTS
6.1 SCHÉMA DES BRANCHEMENTS
text_image
VIDEO AUDIO HDMI HDMI VIDEO VGA AUDIO HDMI 18.4 HDMI 12.6 DC 5V OUT VIDEO VGA IN AUDIO IN AUDIO OUT SERVICE Micro-USB LAN RS232 DC 5V OUT USB-A CONTROL POWER
INFORMATION
natural_image
Isometric line drawing of a mechanical component with a base and internal part, showing a curved arrow indicating motion (no text or symbols)text_image
Diagram showing a remote control panel connected to two batteries labeled AA, with an arrow indicating the direction of movement.natural_image
Line drawing of a rectangular object with a curved internal component, no text or symbols present
ATTENTION
natural_image
Symbol of a trash bin crossed out by two diagonal lines (no text or numbers present)
15. CONFORMITÉ DU PRODUIT
DÉCLARATION DE CONFORMITÉ – CLASSE B
DÉCLARATION DE CONFORMITÉ AUX NORMES CE
DÉCLARATION DE CONFORMITÉ UKCA
Maxnerva Technology Services Limited
Room 1001, 10/F, Houston Centre, 63 Mody Road, Tsim Sha Tsui East, Kowloon, Hong Kong.
Grand Field Technology Limited
Room 1001, 10/F, Houston Centre, 63 Mody Road, Tsim Sha Tsui East, Kowloon, Hong Kong.
Independent Quality Solutions Ltd
Enterprise House, Wrest Park, Silsoe, Bedfordshire, MK45 4HR
+44 (0)1462 713322
enquiries@i-q-s.co.uk
www.i-q-s.co.uk
Maxnerva Technology Services USA LLC
13190 SW 68th Parkway, Suite 120
Portland, Oregon 97223,
16. GARANTIE
GARANTIE LIMITÉE D'INFOCUS
Copyright 2022 by Maxnerva Technology Services Limited.