
JTouch IN7513 - Monitor INFOCUS - Free user manual and instructions
Find the device manual for free JTouch IN7513 INFOCUS in PDF.


| Product Type | Interactive Touch Monitor |
| Display Size | 75 inches (diagonal) |
| Resolution | 4K UHD (3840 x 2160) |
| Touch Technology | Infrared (10-point multi-touch) |
| Brightness | 350 cd/m² |
| Contrast Ratio | 4000:1 |
| Viewing Angle | 178° horizontal and vertical |
| Connectivity | HDMI (x3), VGA, USB 2.0 (x4), USB 3.0 (x2), LAN, Audio Out |
| Operating System | Android 8.0 (embedded) |
| Built-in Speakers | 2 x 15W |
| Power Consumption | 300W typical, stand-by <0.5W |
| Dimensions (W x H x D) | 1750 x 1000 x 80 mm |
| Weight | Approx. 50 kg |
| Mounting | VESA 600x400 mm |
| Cleaning Instructions | Use a soft, dry cloth; avoid liquid cleaners |
| Safety Precautions | Ensure proper ventilation; do not expose to moisture |
| Spare Parts | Power cable, touch pen, remote control, batteries |
| Warranty | 3 years standard |
| Included Accessories | Wall mount bracket, screws, quick start guide |
Frequently Asked Questions - JTouch IN7513 INFOCUS
User questions about JTouch IN7513 INFOCUS
0 question about this device. Answer the ones you know or ask your own.
Ask a new question about this device
Download the instructions for your Monitor in PDF format for free! Find your manual JTouch IN7513 - INFOCUS and take your electronic device back in hand. On this page are published all the documents necessary for the use of your device. JTouch IN7513 by INFOCUS.
USER MANUAL JTouch IN7513 INFOCUS
JTouch Series 13 Users Guide
Models
IN6513, IN7513, IN8613
Regulator Models
D011, D012, D013
Please read carefully this manual before operation.
Safety
Read and understand all safety information, operating instructions, and product labels before operating the equipment. Keep this guide in a safe place for future reference.
The lightening flash with arrow-head symbol, within a triangle, is intended to alert the user to the presence of “dangerous voltage” within the products enclosure that may be sufficient to constitute a risk of electric shock to persons.

The exclamation mark within a triangle is intended to alert the user to the presence of important operating and maintenance (servicing) instructions.

To reduce the risk of fire or electric shock, do not expose this product to smoke, rain, dust or moisture!
To reduce the risk of electric shock, do not remove cover (or back). No user-serviceable parts inside. Refer servicing to qualified service personnel.
This product is designed and manufactured to operate within defined design limits, and misuse may result in electric shock or fire.
The installation of this product should be completed by a Trained Installer.
Note
The contents of this document may be updated from time to time due to product version upgrades or other reasons.
Unless otherwise agreed, this document is provided as a guide only, and all statements, information, and recommendations in this document are not warranties of any kind, express or implied.
Contents
| Hardware Details | Hardware Details | 1 |
| HomePage | Homepage | 3 |
| Applications | 4 | |
| White Board | 5 | |
| Side menu | 7 | |
| App List Signal | 9 | |
| source | 10 | |
| Annotation | 11 | |
| All shortcuts | 12 | |
| Floating ball | 13 | |
| Multi Display | 14 | |
| Recent Apps | 15 | |
| Settings | Advanced Features | 16 |
| Environmental sensors switch | 17 | |
| WiFi | 18 | |
| Wired network | 19 | |
| WiFi hotspot | 20 | |
| NFC | 21 | |
| Others | Camera | 24 |
| Remote control | 25 |
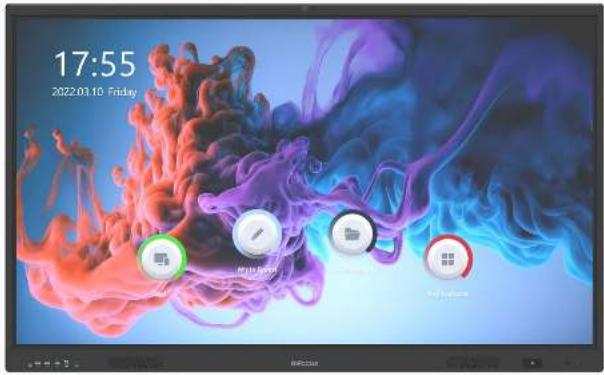
Hardware Details
- Front View 2. Right side View
- TYPE-C IN Port
- Public USB 3.0 Port
- Public USB 3.0 Port
• 4. Public USB 3.0 Port - Touch USB-B Port
- HDMI IN 1 Port
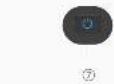
- Power button


①
②
- AC Power Switch
- Power Cable Input

1 / 25

Hardware Details
- Left Side View

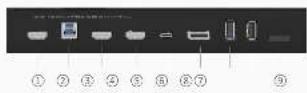
- HDMI IN 4 Port
- Touch USB-B Port
- HDMI IN 3 Port
- HDMI IN 2 Port
- TYPE-C IN Port
- DP IN Port
- Public USB 3.0 Port
-
Public USB 2.0 Port
● 9. Micro-SD (TF) card slot -
Bottom View
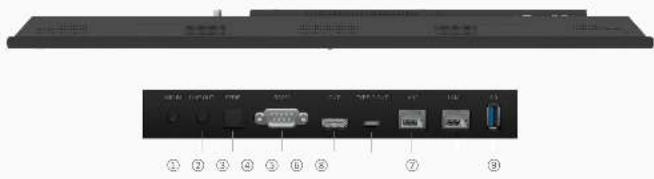
• 1. MIC IN Port
2. LINE OUT Port
3. SPDIF OUT Port
4.RS232 Port
5. HDMI OUT Port
- TYPE-C OUT Port
- LAN2 Port
- LAN1 Port
- Android USB3.0 Port

Homepage
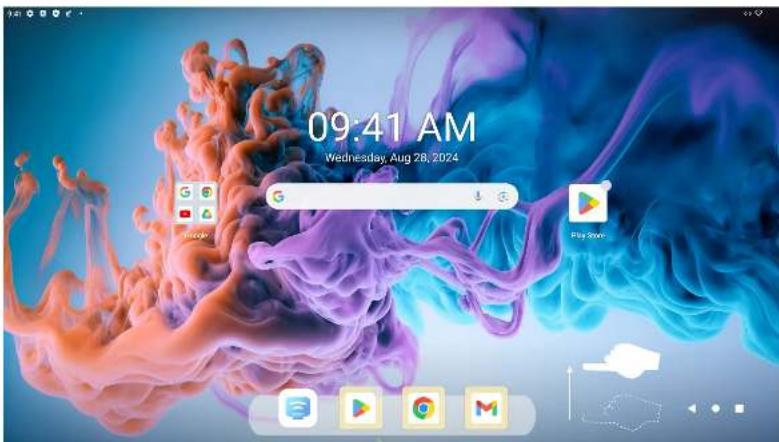
Slide up from the bottom of the screen to bring up the Apps list.

Cast
Tip: the device needs to be connected to the hotspot sent by the Intelligent conference board
Project the content on from mobile decives to touch screen, including mobile phones, tablet and laptops, support Android/IOS/Windows/Mac OS.
Here shows the recently opened applications.

3/25


Applications
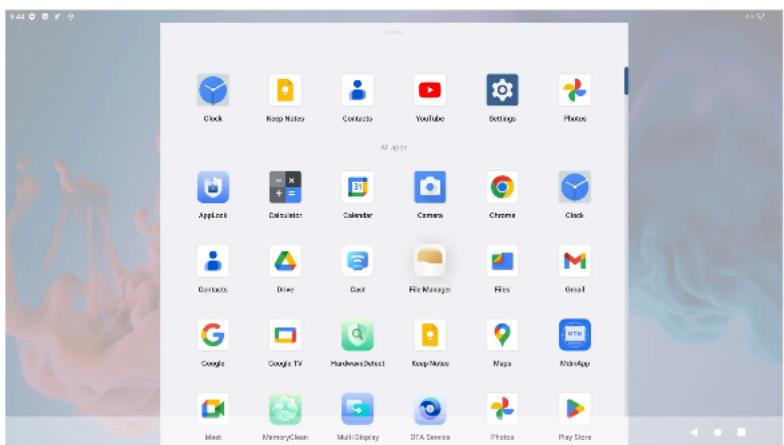
Here are all the APKs of the device.
White Board
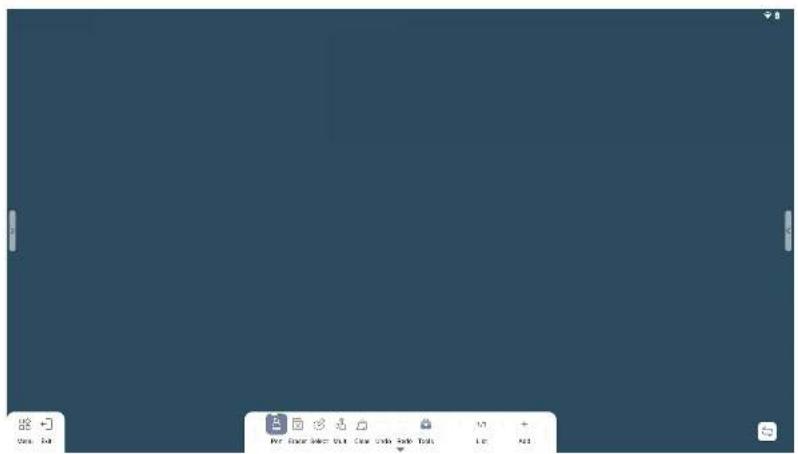
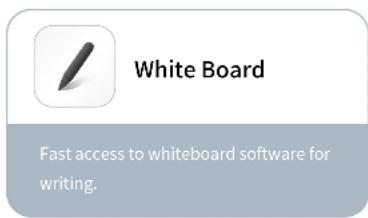
① Open the whiteboard menu
②←] Close the current application
③ Drawing tool
④ Selection of erasure mode and plate erasure
⑤ Zoom in, zoom out, and drag the selected area
⑥ Switch between Multi writing and Single writing
⑦ Click to clear screen
⑧ Return to the previous step
⑨ Return to the next step
Including Shape, Text, Form, Mind, Puzzle, split screen, Split+, Web browser, Web picture, Web video, Spotlight, Timer, Current and Global sticky tools
⑪ + Add page
Bottom left and right menu switching
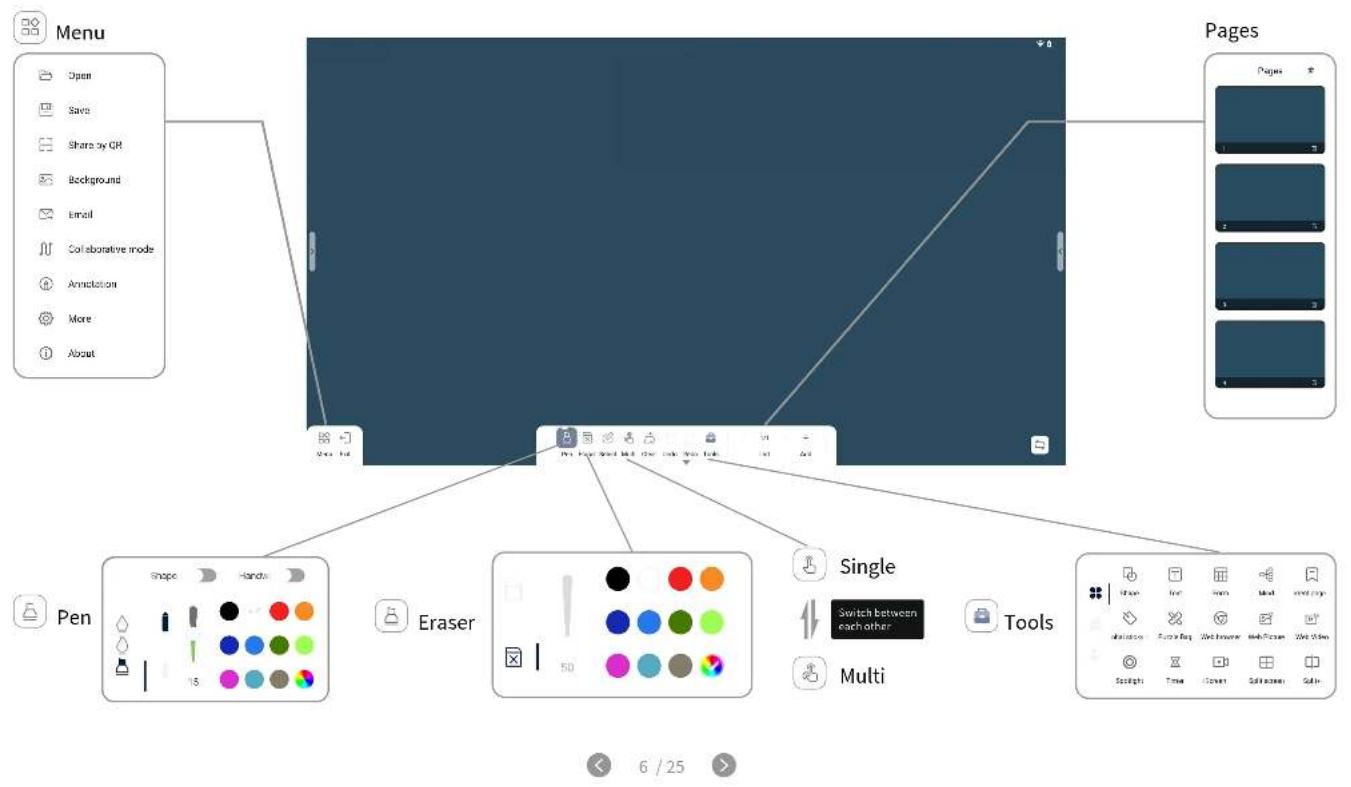
Side menu
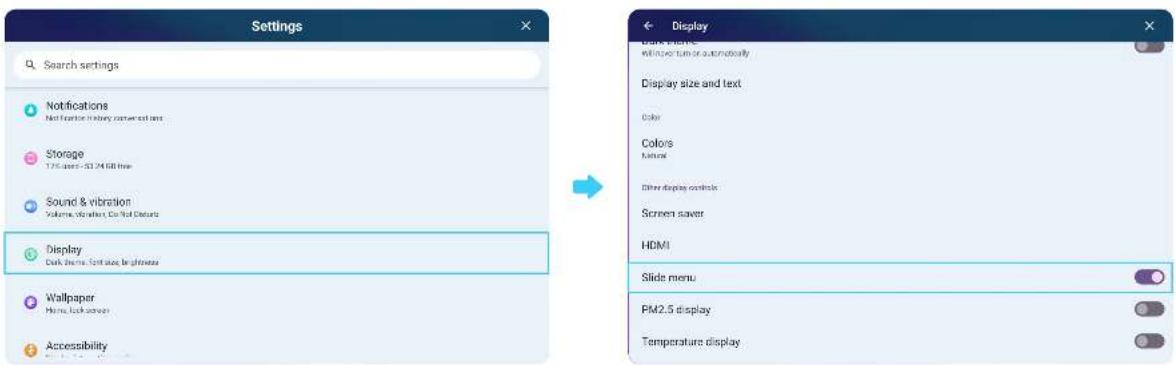
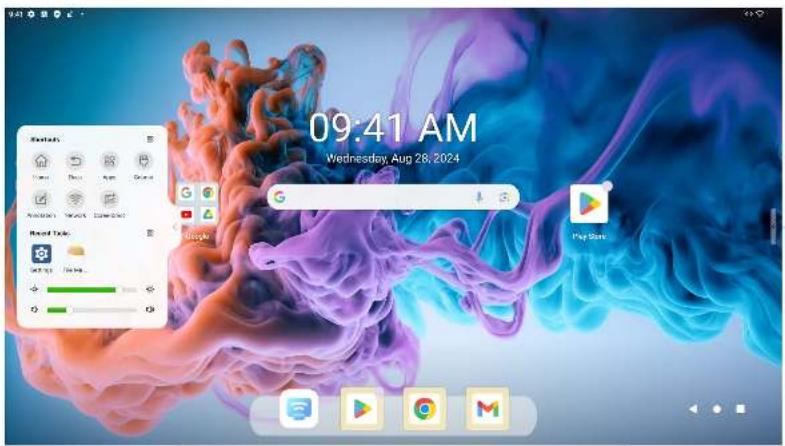
This side menu is hidden by default. Turn on the Side menu switch as below:
"Settings—Display—Turn on the Side menu switch." Side menu can be displayed on the homepage.

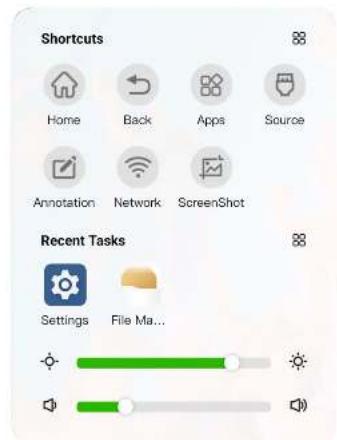
Side menu
Touch the icon on the left or right side of the home page, open Side menu.


8 / 25


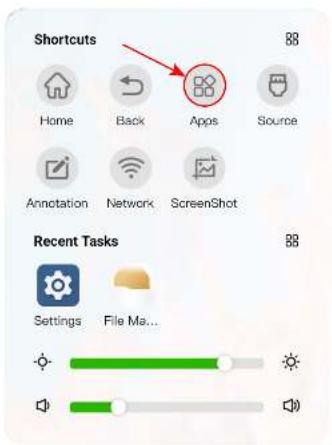
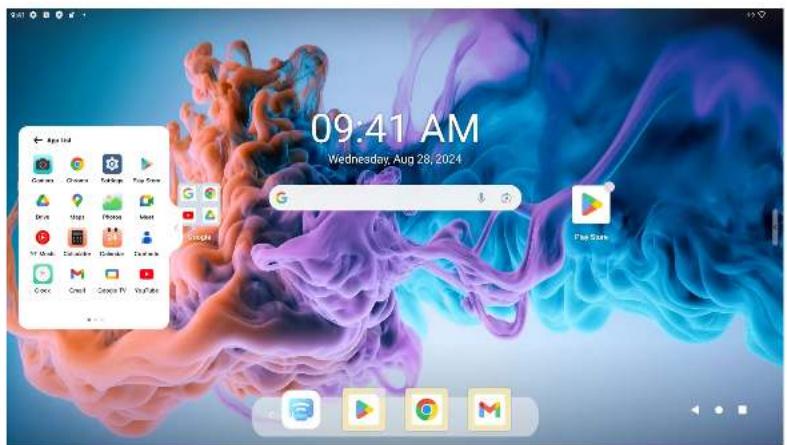
App List
Find more applications quickly.

9 / 25


Signal source
Select the corresponding signal channel.
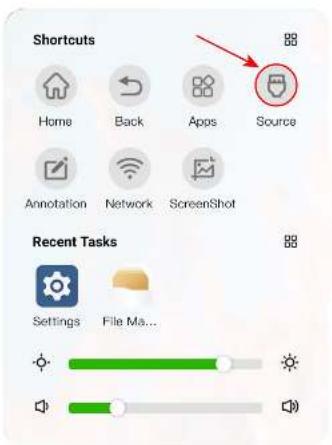
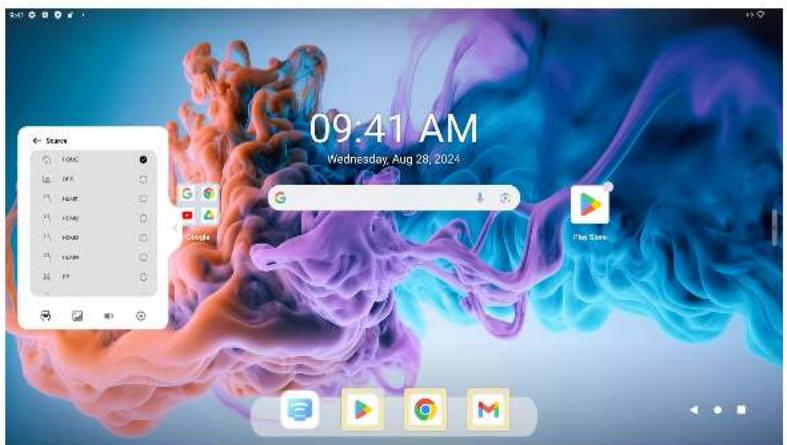

Annotation
You can write freely on the screen.
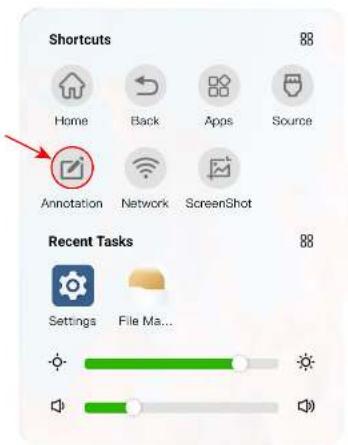
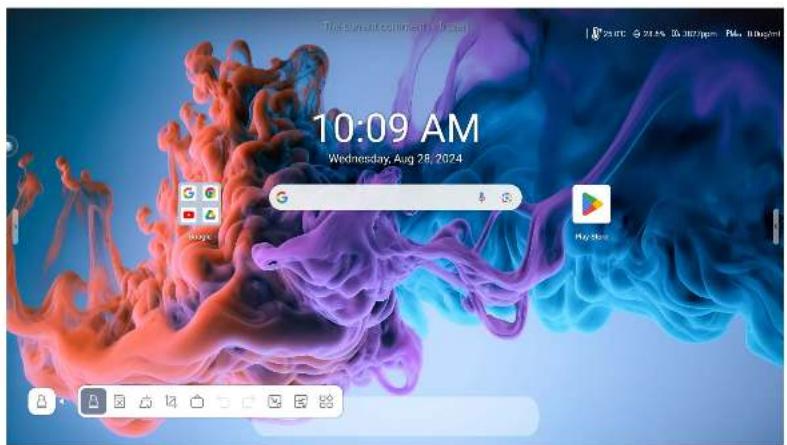

11 / 25


All shortcuts
The collection of tools shortcuts.
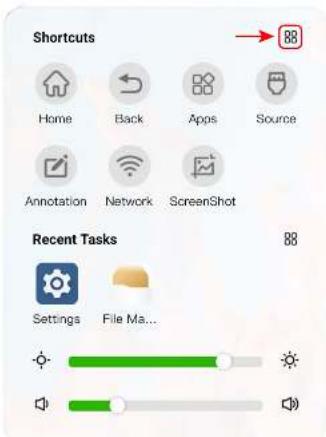
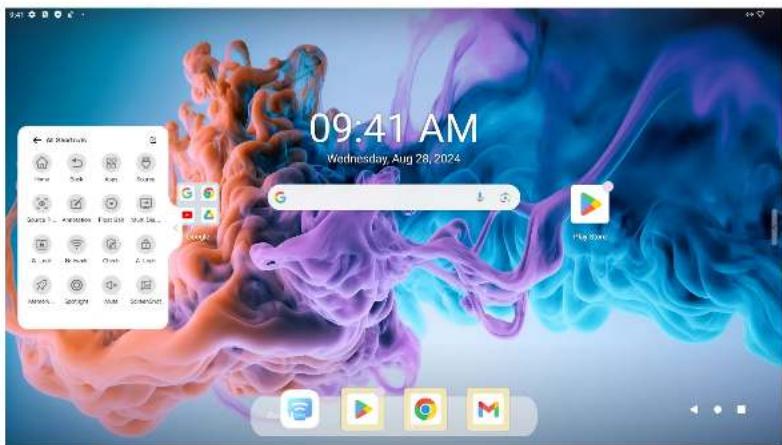

12 / 25


Floating ball
The floating ball can be customized to meet the quick operation needs of users.
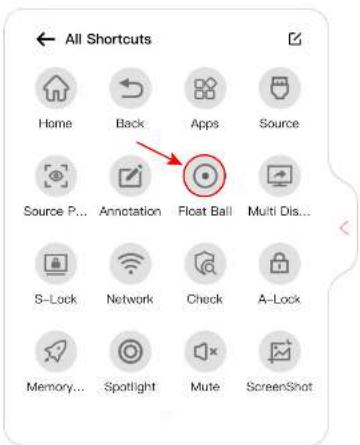
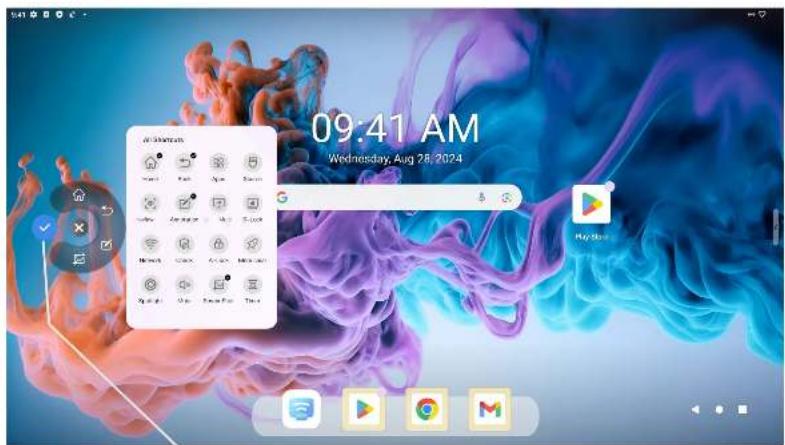
Custom definition

13/25


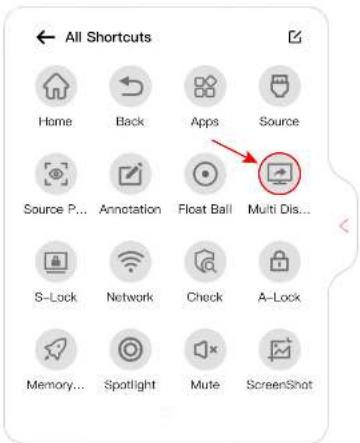
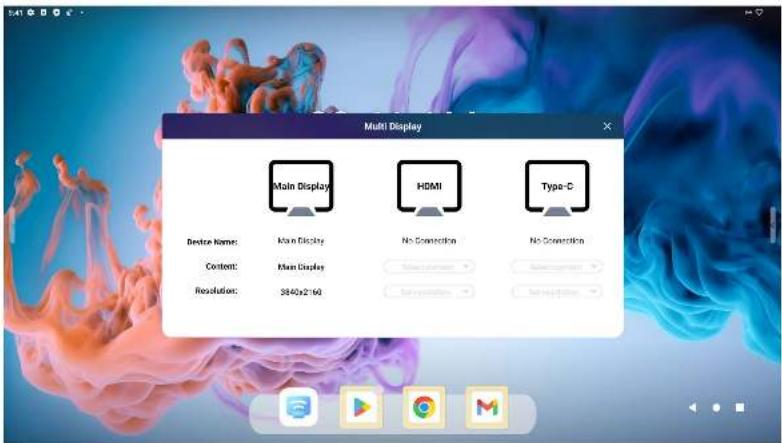
Multi Display
Multi-screen expansion function: You can output the large-screen application screen to other displays through wired projection, and support up to 3 screens to display 3 different applications at the same time.

14 / 25


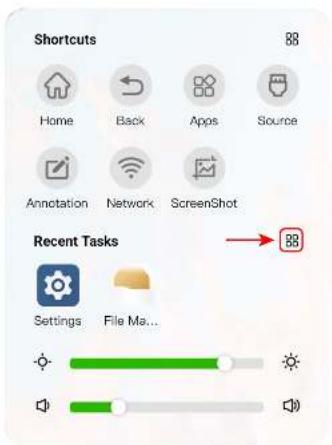
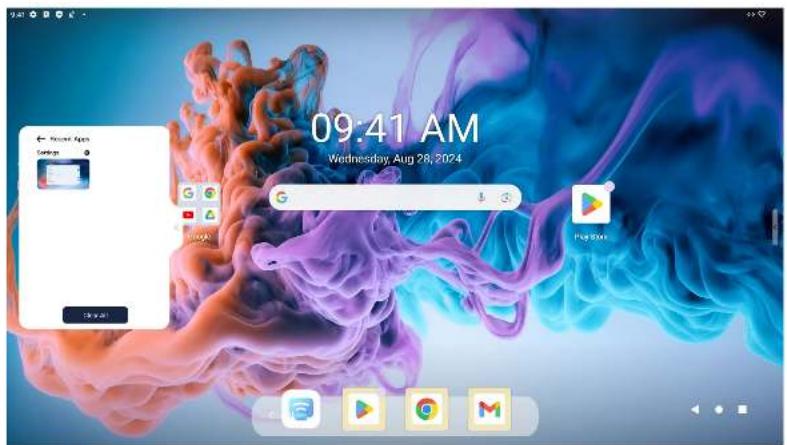
Recent Apps
Manage background applications.

15 / 25


Advanced Features
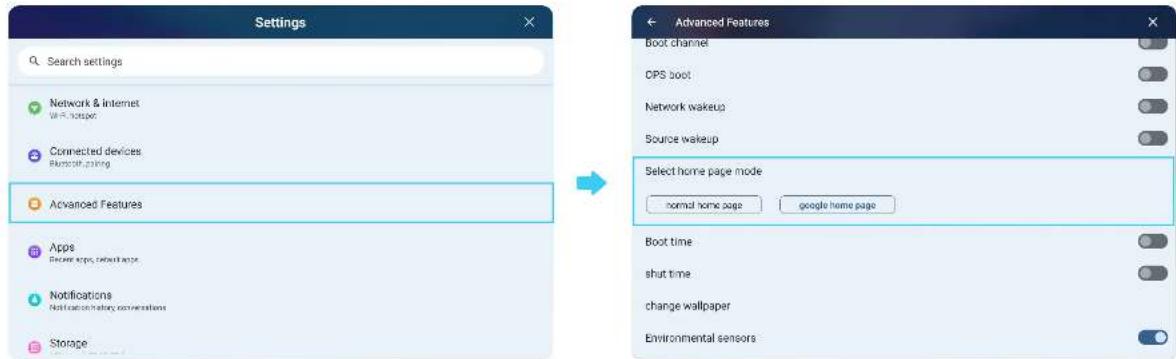
There are two home page modes to select.
"Homepage—Settings—Advanced Features—Select home page mode" normal & google home page can be set.

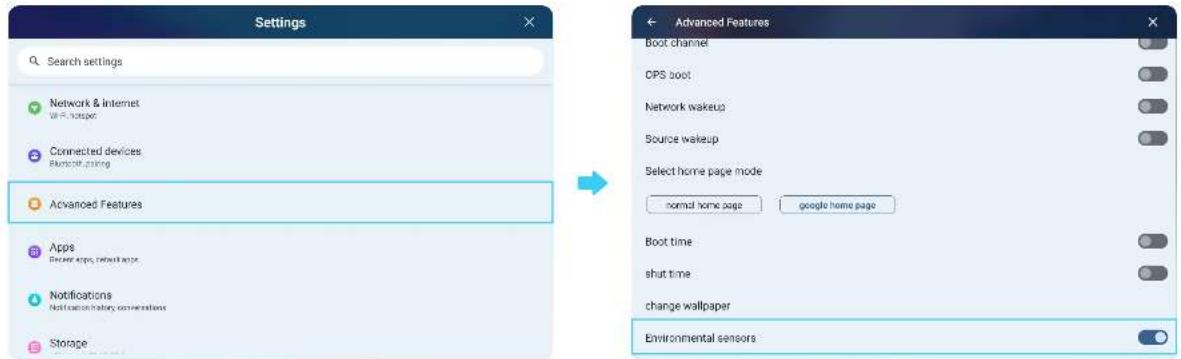
Environmental sensors switch
Environmental sensor(including temperature and humidity sensor, PM2.5 sensor, carbon dioxide sensor): Turn on the environmental sensors switch, the relevant information will be displayed on the upper right corner of the screen.

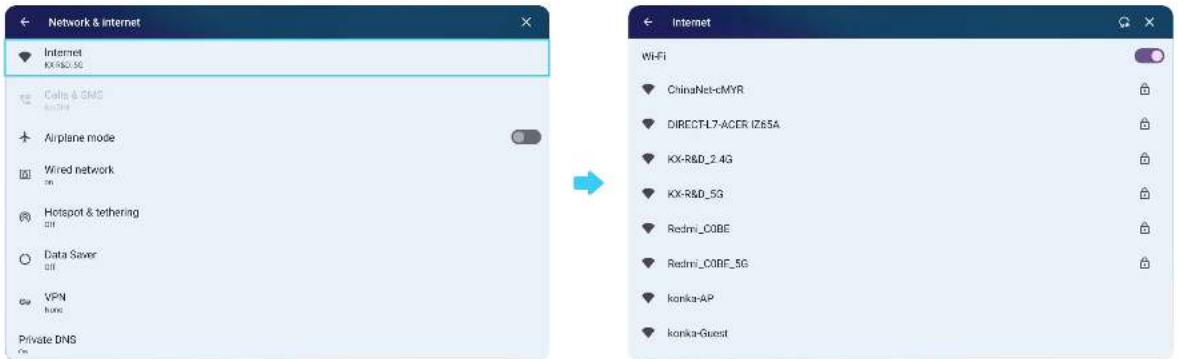
Network settings-WiFi
"Homepage—Settings—Network—Wireless network" WiFi can be set

18 / 25


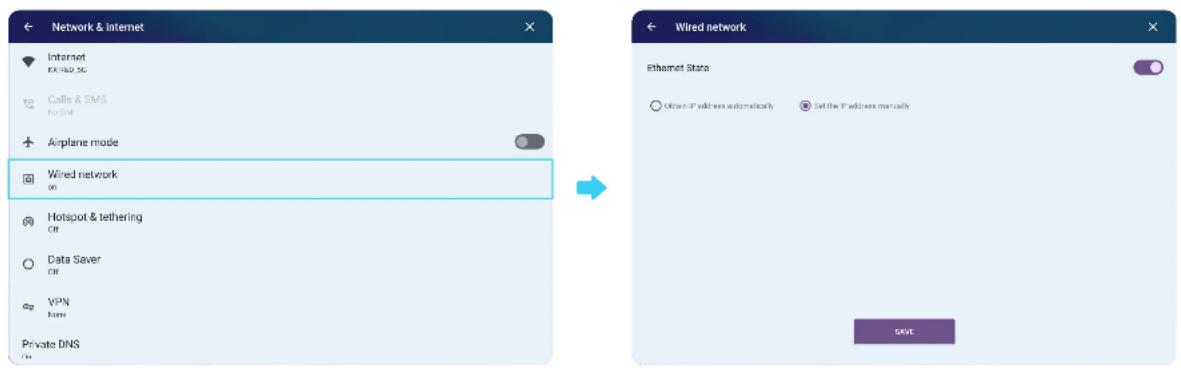
Network settings-Wired network
"Homepage—Settings—Network—Wired network" Wired network can be set

19 / 25


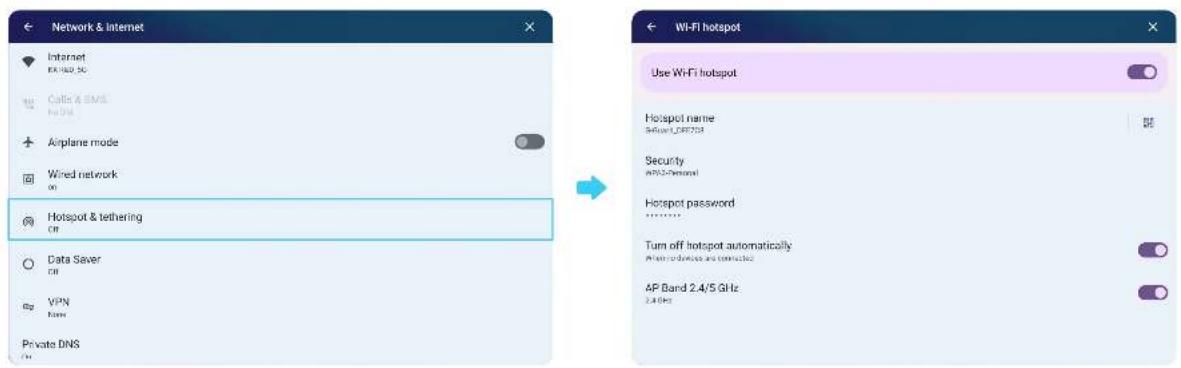
Network settings-WiFi hotspot
"Homepage—Settings—Network—Set hotspot" WiFi hotspot can be set

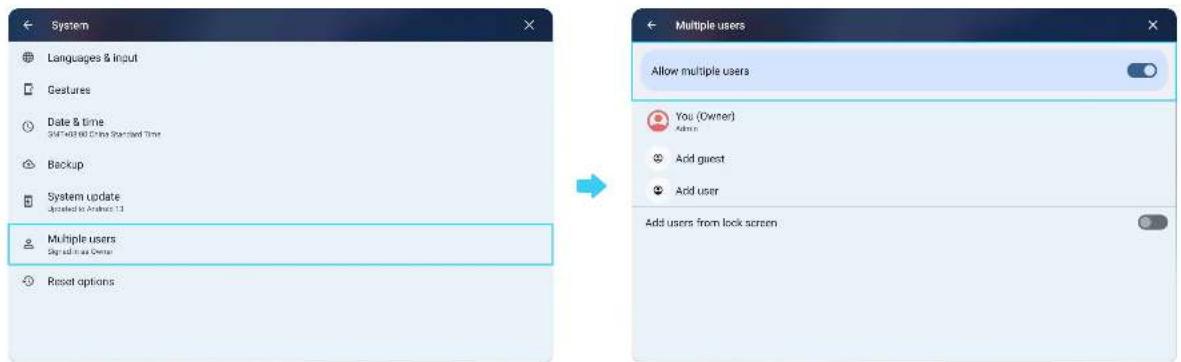
NFC settings-Add user
Before using an NFC card, a new user account must be established first.
"Homepage—Settings—System—Multiple users-Add user" A new user account can be established.

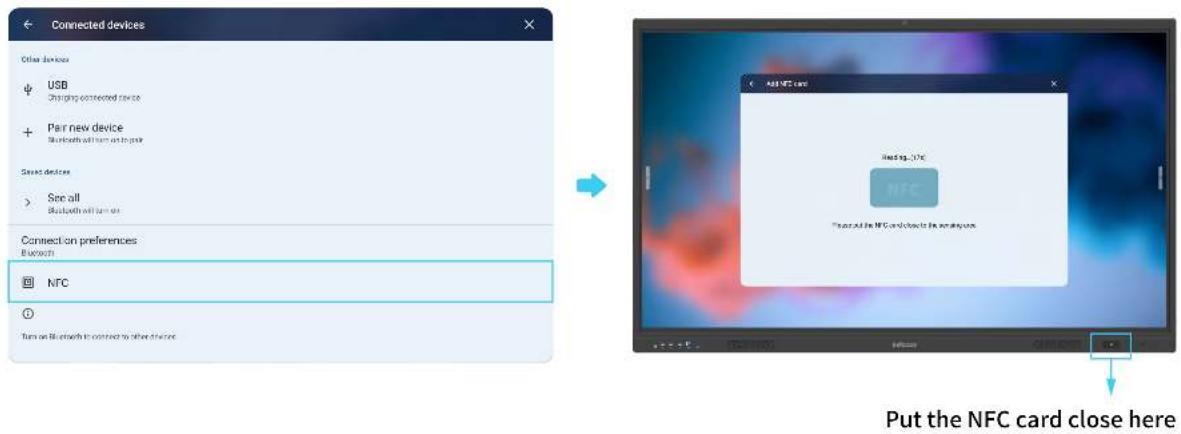
Add NFC card
"Homepage—Settings—Connected devices—NFC" Put the NFC card close to the sensing area.

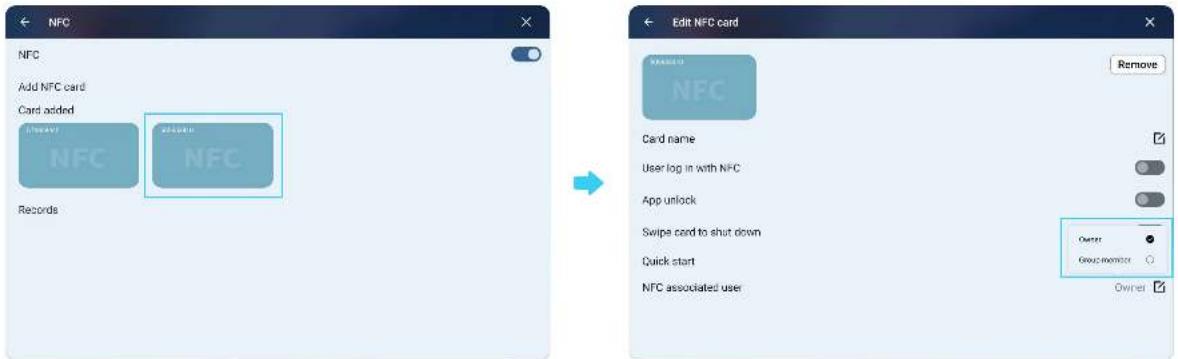
Edit NFC card
After adding two NFC cards, you can see the following interface.
Select any one of the NFC cards, then you can set the identity of this NFC card.
The NFC card can unlock the user account associated with it.

23 / 25


Camera
Different gesture switching modes.

All view mode: without sound source tracing in this mode.

Speaker mode: with sound source tracing in this mode.

Meeting mode: with facial capture in this mode.

24 / 25

Accessories
Remote control
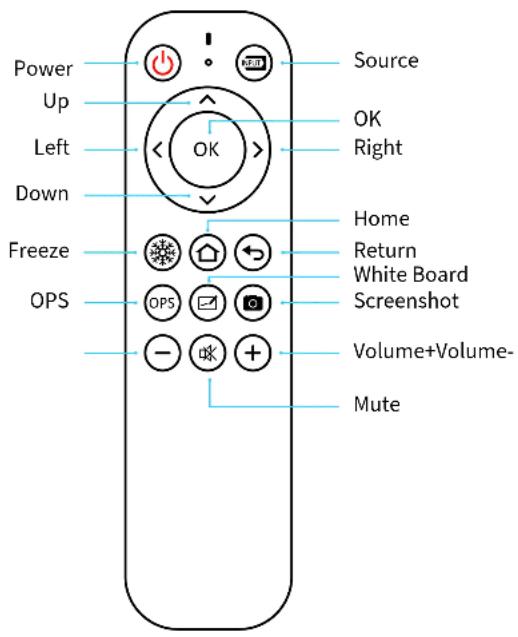

25 / 25

- JTouch Series 13 Users Guide
- Safety
- Note
- Hardware Details
- Homepage
- Cast
- Applications
- White Board
- Side menu
- App List
- Signal source
- Annotation
- All shortcuts
- Floating ball
- Multi Display
- Recent Apps
- Advanced Features
- Environmental sensors switch
- Network settings-WiFi
- Network settings-Wired network
- Network settings-WiFi hotspot
- NFC settings-Add user
- Add NFC card
- Edit NFC card
- Camera
- Accessories
- Remote control
Brand : INFOCUS
Model : JTouch IN7513
Category : Monitor