SHBS 3.7 C2 - Electric mower SILVERCREST - Free user manual and instructions
Find the device manual for free SHBS 3.7 C2 SILVERCREST in PDF.

| Product type | 5-in-1 beard and hair trimmer |
| Brand | SilverCrest |
| Model | SHBS 3.7 C2 |
| Power supply | Li-ion battery 3.7 V, 500 mAh (1.85 Wh) + mains adapter 100-240 V ~50/60 Hz, output 5 V 1000 mA |
| Battery life | Approx. 60 minutes cordless |
| Charging time | Approx. 90 minutes |
| Main functions | Hair cutting, beard trimming, precision trimming, shaving, nose and ear hair trimming |
| Included attachments | 5 interchangeable attachments: hair, beard, precision, nose/ears, shaving |
| Comb attachments | 4 hair combs (3, 6, 9, 12 mm) + 1 adjustable beard comb (3, 4, 5, 6 mm) |
| Precise cutting length adjustment | 3 steps: 0.8 mm / 1.3 mm / 1.8 mm |
| Lock system | Activates/deactivates the device to prevent accidental start |
| Mains operation | Possible even with empty battery |
| LED indicators | Green: operation; flashing green: battery full; flashing red: low battery; flashing blue: lock activated |
| Cleaning and care | Attachments washable with water, regular oiling, cleaning brush included |
| Safety | Moisture protection (IP20), automatic shut-off, lock system |
| Included accessories | Comb, scissors, cleaning brush, cutting oil, storage pouch |
| Spare parts available | Shaving attachment can be ordered separately |
| Warranty | 3 years (subject to warranty conditions) |
| General information | For domestic use, for dry human hair only, do not use on animals or synthetic hair |
Frequently Asked Questions - SHBS 3.7 C2 SILVERCREST
User questions about SHBS 3.7 C2 SILVERCREST
0 question about this device. Answer the ones you know or ask your own.
Ask a new question about this device
Download the instructions for your Electric mower in PDF format for free! Find your manual SHBS 3.7 C2 - SILVERCREST and take your electronic device back in hand. On this page are published all the documents necessary for the use of your device. SHBS 3.7 C2 by SILVERCREST.
USER MANUAL SHBS 3.7 C2 SILVERCREST
natural_image
Product display of a LiDl service brush with multiple circular and radial cutouts (no text or symbols visible on the main image)CORDLESS HAIR & BEARD TRIMMER SHBS 3.7 C2
DK Betjeningsvejledning
HÅR- OG SKÆGTRIMMER MED GEN OPLADELIGT BATTERI
NL BE Gebruiksaanwijzing
HAAR- EN BAARDTRIMMER
MET ACCU
DE Bedienungsanleitung
AKKU HAAR- UND BART-
SCHNEIDER
GB IE NI Operating instructions
CORDLESS HAIR & BEARD
TRIMMER
FR BE Mode d'emploi
TON DEUSE BARBE ET CHEVEUX
AVEC BATTERIE
GR Οδηγία χρήσης
ΚΟΥΡΕΥΤΙΚΗ ΜΗΧΑΝΗ
ΜΠΑΤΑΡΙΑΣ ΓΙΑ ΚΑΙ ΓΕΝΙΑ
natural_image
Black curved arrow pointing left, no text or symbols presentEnglish.... 2
Dansk 28
Français.... 54
Nederlands.... 82
Ελληνικά 110
Deutsch 138
natural_image
Black curved arrow pointing left, no text or symbols presentOverview / Oversigt / Aperçu de l'appareil / Overzicht / Επισκόπηση / Übersicht
natural_image
Illustration of a hand holding a device with an arrow indicating rotation (no text or symbols)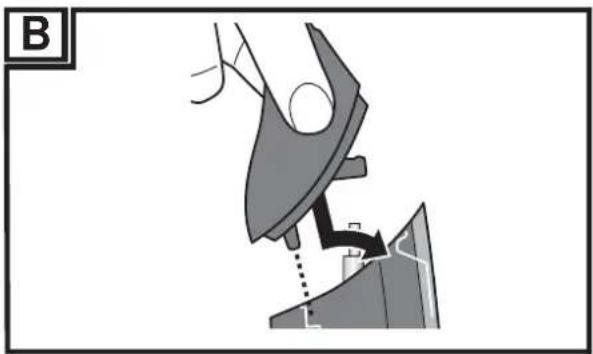
natural_image
Diagram of a mechanical device with a lever and pivot, showing no text or symbols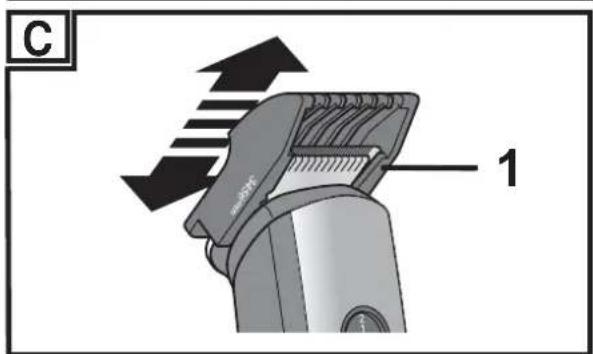
Contents
- Overview ....3
- Intended purpose ....5
- Safety information ....5
- Items supplied ....10
- Charging ....11
- Operation ......12
6.1 Transport safety lock 12
6.2 Changing the cutting attachments 12
6.3 Changing the comb attachments.... 13
6.4 Cutting hair 13
6.5 Trimming a beard.... 14
6.6 Cutting a hairline.... 15
6.7 Shaving.... 15
6.8 Trimming nose and ear hair.... 16
- Cleaning and care ....16
- Storage ....18
- Reordering parts ......19
- Disposal 20
- Troubleshooting ......21
- Technical specifications .....22
- Warranty of the HOYER Handel GmbH ..... 24
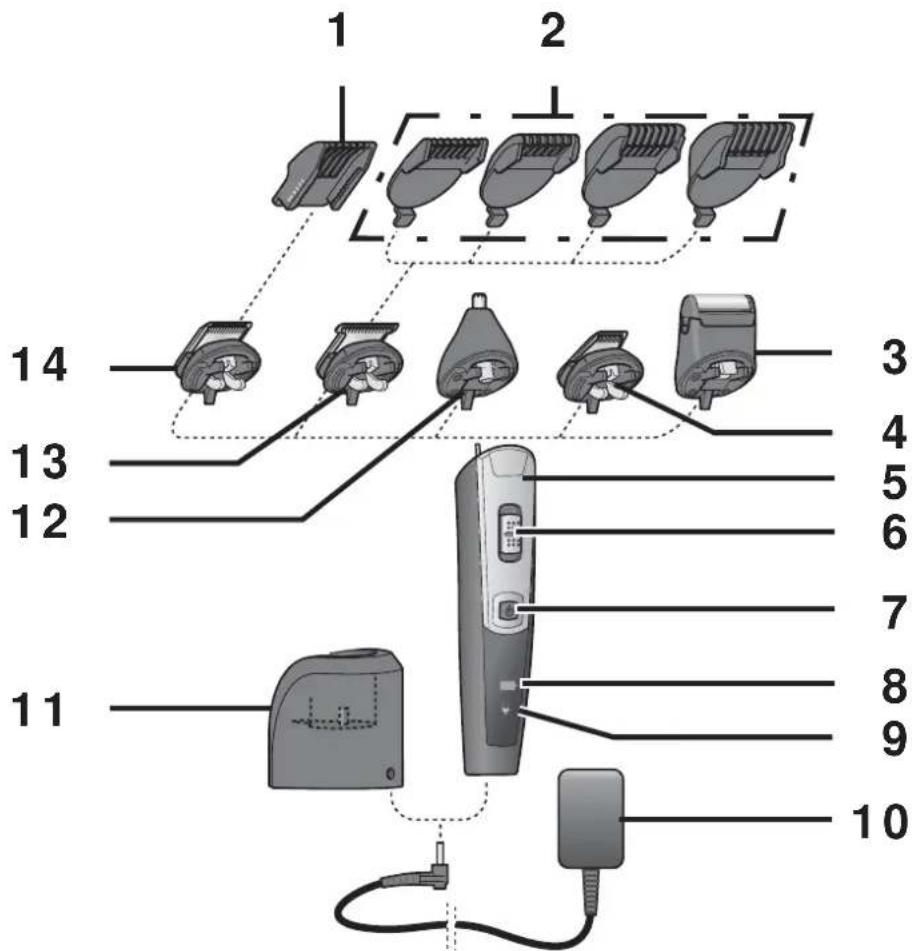
1. Overview
1 Adjustable (3, 4, 5, 6 mm) comb attachment for the beard trimmer attachment
2 Comb attachments for the hair trimmer attachment 3, 6, 9, 12 mm
3 Shaving attachment (only suitable for shaving hairlines)
4 Precision trimmer attachment
5 Hair and beard trimmer with connection for plug-in power unit cable/ battery charger
6 Switch for cutting length fine tuning 1: 0.8 mm / 2: 1.3 mm / 3: 1.8 mm
7 Off switch
8 Battery symbol
is lit green: device in operation
flashing green during charging: battery is fully charged
flashes blue 3 times: transport safety lock activated
9 Plug symbol
Flashing red: battery almost empty
is lit red during charging: the battery is being charged
10 Power unit
11 Battery charger with charge contact
12 Nose/ ear hair trimmer attachment
13 Hair trimmer attachment
14 Beard trimmer attachment
not shown:
15 Scissors
16 Blade oil
17 Cleaning brush
18 Comb
19 Storage bag (for the hair and beard trimmer and its accessories)
Thank you for your trust!
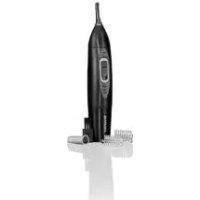
Congratulations on your new 5-in-1 hair and beard trimmer.
For a safe handling of the device and in order to get to know the entire scope of features:
- Thoroughly read these operating instructions prior to initial commissioning.
- Above all, observe the safety instructions!
- The device should only be used as described in these operating instructions.
- Keep these operating instructions for reference.
- If you pass the device on to someone else, please include these operating instructions. The user instructions are a part of the product.
We hope you enjoy your new 5-in-1 hair and beard trimmer!
2. Intended purpose
The 5-in-1 hair and beard trimmer is intended exclusively for trimming human hair. Only use the device for dry hair.
The device is designed for private home use and must not be used for commercial purposes. The device must only be used indoors.
Foreseeable misuse
WARNING! Risk of material damage!
- Do not use the device to cut artificial hair or animal hair.
3. Safety information
Warnings
If necessary, the following warnings will be used in these operating instructions:

DANGER! High risk: failure to observe this warning may result in injury to life and limb.
WARNING! Moderate risk: failure to observe this warning may result in injury or serious material damage.
CAUTION: low risk: failure to observe this warning may result in minor injury or material damage.
NOTE: circumstances and specifics that must be observed when handling the device.
Instructions for safe operation
- This device can be used by children from the age of 8 and people with restricted physical, sensory or intellectual abilities or people without adequate experience and/ or understanding, if they are supervised or instructed on how to use this device safely and if they are aware of the resulting danger. Children must not play with the device. Cleaning and maintenance by the user must not be performed by children without supervision.
- This device may be used by children aged 3 years or above with adult supervision.
- Only use the included original power adaptor for mains operation.
- WARNING! Keep the device dry.

DANGER for children
- Packing materials are not children's toys. Children should not be allowed to play with the plastic bags: There is a risk of suffocation!
- Keep the device out of the reach of children.

DANGER to and from pets and livestock
Electrical devices can represent a hazard to pets and livestock. In addition, animals can also cause damage to the de-
vice. For this reason you should keep animals away from electrical devices at all times.
DANGER! Risk of electric shock due to moisture
- Protect the device from moisture, water drops and water splashes.
- Never touch the device with wet hands.
- The device, the battery charger and the power unit must not fall into water or other liquids and must not be rinsed under running water.
- If the device has fallen into water, pull out the power unit immediately, and only then remove the device from the water. Do not use the device again, but have this checked by a specialist.
- Should liquid enter the device, have it checked before starting the device up again.
- If the device is used in a bathroom, the power unit must be pulled out after use, as the proximity of water represents a hazard, even when the device is switched off.
- Installation of a residual current device (FI/ RCD) with a rated residual operating current of no more than 30 mA is recommended to provide additional protection. Ask your electrician for advice. The installation should only be carried out by a qualified electrician.
DANGER! Risk of electric shock
- Never put the device into operation if there are visible damages to the device, the battery charger or the cable or if the device has been dropped before.
- Connect the cable to the device/ battery charger before plugging the power unit into a wall socket.
- Only connect the power unit to a properly installed, easily accessible wall socket, the voltage of which corresponds to the specifications on the rating plate. The wall socket must continue to be easily accessible after the device is plugged in.
- Ensure that the cable cannot be damaged by sharp edges or hot surfaces.
- Ensure that the cable is not trapped or crushed.
- When removing the power unit from the wall socket, always pull the power unit and never the cable.
- Pull the power unit out of the wall socket, ...
... after every use,
... after each charging process,
... if there is a fault,
... before connecting the device to the cable,
... before you clean the device and
... during thunderstorms.
- To avoid any risk, do not make modifications to the device. Repairs must be carried out by a specialist workshop or the Service Centre.

DANGER from batteries
- Protect the battery against mechanical damages. Fire hazard!
- Do not expose the device to direct sunshine or heat. The ambient temperature should not be lower than -10 °C and higher than +40 °C.
- The charge contacts on the device must not be connected by metallic objects.
-
Thebattery may only be charged with the original accessory (power unit).
-
Should the electrolyte solution leak out of the battery, avoid contact with eyes, mucous membranes and skin. Rinse immediately with plenty of clean water and consult a doctor. The electrolyte solution can cause irritation.
-
The device is provided with a lithium-ion battery.
-
The battery cannot be removed!
- This device must not be opened!
- The device with the installed battery must be disposed of properly.
WARNING! Risk of injury from cutting
- The points of the comb attachments, the hair trimmer attachment, the beard trimmer attachment and the precision trimmer attachment are sharp. Handle with care.
- Do not use the device if the attachment shows damages.
- Switch off the device before pinning up or changing the attachments and each time before cleaning.
WARNING! Risk of injury
- Place the cable in such a way that no one trips over it or steps on it.
- Do not push the nose/ ear hair trimmer attachment too deep into the nostril or the ear canal.
- Do not use the device on open wounds, cuts, sunburn or blisters.
WARNING! Risk of material damage
- The battery charger is fitted with non-slip silicon feet. As furniture is coated with a variety of different varnishes and acrylics and treated with different cleaning agents, we cannot rule out that some of these substances could damage and soften the rubber feet. If necessary, place a non-slip mat under the battery charger.
-
Use the original accessories only.
-
Never place the device on hot surfaces (e.g. hob plates) or near heat sources or open fire.
- Do not cover the power unit to prevent overheating.
- Do not exert too much pressure on the shaving foil of the shaving attachment, to avoid damaging the shaving foil.
- Do not detach the shaving foil from the shaving foil frame, and do not clean it using the brush.
- Do not use any astringent or abrasive cleaning agents.
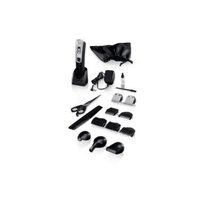
4. Items supplied
1 5-in-1 hair and beard trimmer 5 1 Power unit 10 1 Battery charger 11 5 Interchangeable cutting attachments: hair trimmer attachment 13 beard trimmer attachment 14 precision trimmer attachment 4 nose/ear hair trimmer attachment 12 shaving attachment 3
4 Comb attachments 2 for the hair trimmer attachment 3, 6, 9, 12 mm
1 Adjustable (3, 4, 5, 6 mm) comb attachment 1 for the beard trimmer attachment 14
1 Comb 18
1 Scissors 15
1 Cleaning brush 17
1 Blade oil 16
1 Storage bag (for the hair and beard trimmer and its accessories) 19
1 Operating Instructions
5. Charging
NOTES:
- Before first use (without cable), and for every charging procedure afterwards, charge the hair and beard trimmer 5 for approx. 90 minutes.
-
When the batteries are almost empty, the plug symbol 9 flashes in red. The device can then only be used for a short time without being connected to the electricity supply.
-
Place the battery charger 11 on a level surface.
- Connect the power unit 10 to the battery charger 11.
- Switch off the device with the on/off switch 7 if necessary.
- Insert the power unit 10 into a readily accessible wall socket whose voltage matches the voltage stated on the rating plate.
- Put the hair and beard trimmer 5 into the battery charger 11.
- The plug symbol 9 is lit red and the battery is charged. When the battery is fully charged, the battery symbol 8 flashes in green. When the battery is fully charged, the device can be used for approximately 60 minutes without being connected to the power supply.
6. Operation
Regardless of the charging state of the battery, the 5-in-1 hair and beard trimmer can always be mains-operated.
- For mains operation, ensure that the hair and beard trimmer 5 is switched off.
- Connect the power unit 10 to the connector of the hair and beard trimmer 5.
- Insert the power unit 10 into a readily accessible wall socket whose voltage matches the voltage stated on the rating plate.
- Switch on the device with the on/off switch 7.
6.1 Transport safety lock
When the transport safety lock is activated, the battery symbol 8 flashes blue 3 times.
- Press and hold the on/ off switch 7 for approx. 3 seconds to activate/ deactivate the transport safety lock.
- By connecting the power unit 10, the transport safety lock is deactivated, and also cannot be activated while plugged in to the power supply.
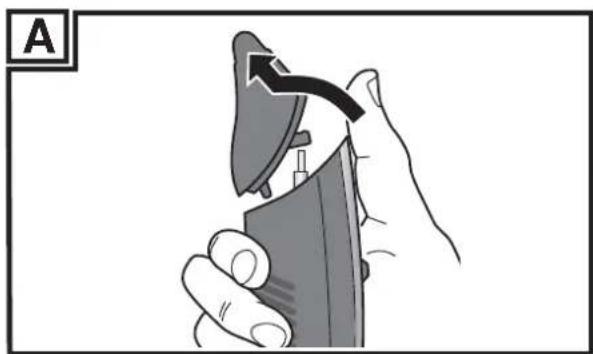
6.2 Changing the cutting attachments
WARNING! Risk of injury!
- Switch off the hair and beard trimmer 5, before you attach or remove the attachments.
• Figure A: to remove the attachments 3, 4, 12, 13, 14 use your thumbs to press the attachment towards the rear of the hair and beard trimmer 5.
- Figure B: to attach the attachments, put the lower flap of the attachment 3, 4, 12, 13, 14 into the slot in the hair and beard trimmer 5 and press the upper part of the attachment against the hair and beard trimmer until it audibly locks into place and sits firmly in position.
6.3 Changing the comb attachments
Pushing on
- To attach the comb attachments 2 + 1 carefully slide the appropriate comb attachment over the hair or beard trimmer attachment 13 / 14. Press the lower part of the comb attachments 2 firmly until they lock into place.
Removing
- To remove the comb attachments 2 loosen the comb attachment at its lower end and pull it off the hair and beard trimmer 5. - Slide the comb attachment 1 for the beard trimmer attachment 14 upwards from the hair and beard trimmer 5.
6.4 Cutting hair
Hair trimmer attachment 13
NOTES:
- The hair to be dressed must be dry.
- The cutting length may deviate depending on the cutting angle.
- Place a sheet or cape around throat and neck to prevent cut-off hair from dropping into the collar.
- Comb the hair well.
- First, start with a comb attachment 2 with a longer cutting length and then, in the course of the cutting process, use shorter cutting lengths step by step.
- Start by cutting the hair in the neck or on the sides and cut towards the centre of the head. Then, cut the front section of the hair towards the centre of the head.
- Hold the hair and beard trimmer 5 in such a way that the comb attachment 2 lies as flat as possible on the head. Move the device evenly through the hair.
- If possible, cut against direction of hair growth.
- In order to catch all the hair, move the hair and beard trimmer 5 several times through each section of the hair.
- Comb the hair repeatedly and well.
- In order to achieve a straight cutting line for cutting lengths over 12 mm, the hair and beard trimmer 5 should be passed through the hair several times from different directions.
6.5 Trimming a beard
Beard trimmer attachment 14
NOTE: please note that the cutting lengths will only be achieved if the switch for cutting length fine tuning 6 is at position 1 and the hair and beard trimmer 5 is held at a right angle to the skin surface.
- Comb the beard in the direction that it grows.
- Trim the beard downwards from ear to chin. First trim one side, then the other.
- Comb attachment 1
Figure C: adjust the cutting length with the slider according to the desired hair length and read off the cutting length us-
ing the marking on the side of the comb attachment 1 (3, 4, 5, 6 mm). Now, shorten your beard step-by-step.
- Use the beard trimmer attachment 14 without a comb attachment 1, to cut the beard very short or to cut a moustache and hairline.
- Using the switch for cutting length fine tuning 6 the cutting length can be slightly varied with three levels (1: 0.8 mm / 2: 1.3 mm / 3: 1.8 mm).
- To trim your moustache, first comb it straight downwards. Then use either the beard trimmer attachment 14 or the precision trimmer attachment 4. Start at the centre above the mouth and trim first one side, then the other.
6.6 Cutting a hairline
Precision trimmer attachment 4
- Use the precision trimmer attachment 4 to shorten and shape moustaches, whiskers, sideburns or eyebrows.
- Put the edge of the attachment at the desired hairline height and move the hair and beard trimmer 5 downwards.
6.7 Shaving
Shaving attachment 3
NOTE: your skin must be clean and dry.
- Hold the hair and beard trimmer 5 at a right angle to the skin surface and gently guide it over your face.
- Shave against the direction of your beard growth.
- Stretch your skin in complicated areas, such as the chin, to achieve better results.
6.8 Trimming nose and ear hair
Nose/ear hair trimmer attachment 12
- Insert only the metal tip slowly into a nostril or an ear.
- Slowly move the hair and beard trimmer 5 with a circular motion to trim the hair.
7. Cleaning and care
DANGER! Risk of electric shock!
- Unplug the power unit 10 from the wall socket before cleaning the hair and beard trimmer 5 and the battery charger 11.
WARNING! Risk of injury!
- Always switch the hair and beard trimmer 5 off before cleaning.
WARNING! Risk of material damage!
- Do not use any astringent or abrasive cleaning agents.
NOTE: clean and oil the device after every use.
Hair and beard trimmer 5 and battery charger 11
- Wipe the casing of the hair and beard trimmer and the battery charger with a damp cloth.
Comb attachments 2, 1
- Remove the comb attachment. Rinse the comb attachment with water and let it dry before using it again.
Hair trimmer, beard trimmer and precision trim-mer attachments 13, 14, 4
- Figure A: remove the attachment from the hair and beard trimmer 5 by pressing it with the thumb towards the rear.
- Remove the hair remnants from the attachment using the cleaning brush 17 included in the delivery.
- Apply a few drops of blade oil 16 to the cutting edge of the attachment. Using a soft cloth, wipe off the surplus oil, if necessary. Only use acid-free oil, such as e.g. sewing machine oil.
Nose/ear hair trimmer attachment 12
- Remove the nose/ ear hair trimmer attachment 12. Rinse it with water and let it dry completely before using it again.
Shaving attachment 3
WARNING!
- Do not detach the shaving foil from the shaving foil frame, and do not clean it using the cleaning brush 17.
NOTE: from time to time, oil the cutting blade with a few drops of acid-free oil (e.g. sewing machine oil). Attach the shaving attachment to the hair and beard trimmer 5 and let it run for a few seconds without using it. Using a soft cloth, wipe off the surplus oil, if necessary.
- Remove the shaving attachment 3.
- Press the button on the side of the shaving attachment and remove the shaving foil frame. While removing the shaving foil frame, only hold it at the side and do not press against the shaving foil.
- Clean the cutting blade using the included cleaning brush 17.
- Clean the shaving foil in the shaving foil frame under running water and allow it to dry completely before putting it back on the shaving attachment 3.
- Put the shaving foil frame back onto the shaving attachment 3. While attaching the frame, make sure that the fastening tabs on the shaving foil frame fit into the appropriate recesses on the shaving attachment, and press the shaving foil frame gently downwards until it audibly locks into place.
8. Storage
- For storage ...
... put the hair and beard trimmer 5 in the battery charger 11 or
... use the included storage bag 19.
9. Reordering parts
You can subsequently order the shaving attachment 3.
Online ordering
shop.hoyerhandel.com

- Scan the QR code with your smartphone/tablet.
- The QR code will take you to a website where you can reorder.
10. Disposal
The battery integrated into this device must not be disposed of in household waste. The device must be disposed of properly with the battery installed. When disposing of this device, the waste disposal facility responsible must be informed that the device contains an integrated battery.

This product is subject to the provisions of European Directive 2012/19/EC. The symbol showing a wheelie bin crossed through indicates that the product requires separate refuse collection in the European Union. This applies to the product and all accessories marked with this symbol. Products identified with this symbol may not be discarded with normal household waste, but must be taken to a collection point for recycling electric and electronic appliances. Recycling helps to reduce the consumption of raw materials and protect the environment.

natural_image
Two identical line diagrams of a trash bin with cross-bracing, no text or symbols present.Packaging
When disposing of the packaging, make sure you comply with the environmental regulations applicable in your country.
11. Troubleshooting
If your device fails to function as required, please try this checklist first. Perhaps there is only a minor problem, and you can solve it yourself.
DANGER! Risk of electric shock!
- Do not attempt to repair the device yourself under any circumstances.
| Fault Possible | causes / Action |
| No function | Has the device been connected to the power supply?Is the battery empty? |
| The cutting attachments 3,4,12,13,14 are not running smoothly | Have the attachments been cleaned, and oiled if necessary? |
12. Technical specifications
| Model: SHBS 3.7 C2 | |
| Hair and beard trimmer: Input: 5 V , , ===⊖⊖⊖1000 mA | |
| Power unit:New Wise InternationalHoldings Limited(Model SW-050100EU/Model SW-050100BS) | Input: 100–240 V ~50/60 Hz, 0.2 A max.Output: 5 V ——⊖⊖⊖1000 mA |
| Protection class of the powerunit: II | |
| Protection type of the powerunit: IP20 | |
| Ambient conditions: only approved for indoor use | |
| Battery: 1x 3.7 V Li-ion, 500 mAh,1,85 Wh | |
| Operating temperature: -10 °C to +40 °C | |
Symbols used
 | Double insulation |
 | Certified Safety. Devices must comply with the generally acknowledged rules of technology and the German Product Safety Act (Produktsicherheitsgesetz - ProdSG). |
 | With the CE marking, HOYER Handel GmbH declares the conformity with EU guidelines. |
 | Devices with this symbol may only be operated indoors (dry environment). |
 | This symbol reminds you to dispose of the packaging in an environmentally friendly manner. |
 | Recyclable materials: cardboard (except corrugated card-board) |
 | Direct current |
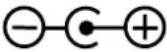 | Symbol for polarity |
 | The power unit has the energy efficiency class 5. |
Subject to technical modifications.
13. Warranty of the HOYER Handel GmbH
Dear Customer,
your device is provided with a 3 year warranty starting with the purchase date. In the event of product defects, you are entitled to statutory rights against the vendor. These statutory rights are not restricted by our warranty presented in the following.
Warranty conditions
The warranty period starts with the purchase date. Please keep the original purchase receipt in a safe place. This document is required to verify the purchase.
If within three years from the purchase date of this product a material or factory defect occurs, the product will be repaired or replaced by us – at our discretion – free of charge to you. This warranty implies that within the period of three years the defective device and the purchase receipt are presented, including a brief written description of the defect and the time it occurred.
If the defect is covered by our warranty, the repaired or a new product will be returned to you. No new warranty period starts with a repair or replacement of the product.
Warranty period and statutory claims for defects
The warranty period is not extended when the warranty has been claimed. This also applies to replaced and repaired parts. Any damages and defects already existing at the time of purchase must be reported immediately upon unpacking. Repairs arising after the expiration of the warranty period are subject to a charge.
Warranty coverage
The device was produced carefully according to strict quality guidelines and tested diligently prior to delivery.
The warranty applies to material or factory defects.
Excluded from the warranty are wear parts subject to normal wear and damages to fragile parts, e.g. switches, batteries, lamps or other parts manufactured from glass.
This warranty expires if the product is damaged, not used as intended or not serviced. For the proper operation of the product, all instructions listed in the operating instructions must be observed carefully. Any form of use and handling that is advised against in the operating instructions or warned against must always be avoided.
The product is only intended for private and not for commercial use. In the case of incorrect and improper treatment, use of force and interventions not performed by our authorised Service Centre, the warranty shall cease.
Handling in case of a warranty claim
In order to ensure prompt processing of your matter, please observe the following notes:
- Please keep the article number IAN: 311427 and the purchase receipt as a purchase verification for all inquiries.
- The article number can be found on the rating plate, an engraving, the title page of your instructions (in the bottom left), or as a label on the rear or underside of the device.
- If faulty operation or other defects occur, first contact the Service Centre listed in the following by telephone or email.
- Then, you are able to send a product reported as defective free of charge to the service address specified to you, including the purchase receipt and the information on the defect and when it occurred.

Please visit www.lidl-service.com to download this and many other manuals, product videos and software.

Service Centre
GB Service Great Britain
Tel.: 0871 5000 720 (£ 0.10/ Min.)
E-Mail: hoyer@lidl.co.uk
IE Service Ireland
Tel.: 1890 930 034
(0,08 EUR/ Min., (peak)) (0,06 EUR/ Min., (off peak))
E-Mail: hoyer@lidl.ie
MT Service Malta
Tel.: 80062230
E-Mail: hoyer@lidl.com.mt
CY Service Cyprus
Tel.: 8009 4409
E-Mail: hoyer@lidl.com.cy
IAN: 311427

Supplier
Please note that the following address is no service address. First contact the aforementioned Service Centre.
HOYER Handel GmbH
Tasköprüstraße 3
DE-22761 Hamburg
GERMANY
Indhold
shop.hoyerhandel.com

natural_image
Two identical line-drawn diagrams of a trash bin with cross-bracing, no text or symbols present.Emballage
shop.hoyerhandel.com

natural_image
Two identical line-drawn diagrams of a trash bin with cross-bracing, no text or symbols present.
natural_image
Symbolic icon of a person walking with arrows indicating rotation or cycle (no text or symbols)Emballage
shop.hoyerhandel.com

natural_image
Two identical line-drawn diagrams of a trash bin with cross-bracing, no text or symbols present.Verpakking
shop.hoyerhandel.com

natural_image
Two identical diagrams of a trash bin with crossed x-bracing, no text or symbols present.Συσκευασία
shop.hoyerhandel.com

natural_image
Symbol of a trash bin crossed out by two diagonal lines (no text or numbers present)Li-Ionen
natural_image
Two identical line diagrams of a trash bin with diagonal cross lines, no text or symbols present.