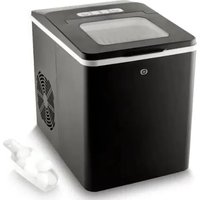
EMG 9-12 - Ice machine Essentiel B - Free user manual and instructions
Find the device manual for free EMG 9-12 Essentiel B in PDF.

| Product type | Ice machine |
| Brand | Essentiel B |
| Model | EMG 9-12 |
| Power supply | 220-240 V~ 50 Hz |
| Maximum power | 150 W |
| Rated current | 0.9 A |
| Electrical protection class | Class I |
| Refrigerant | R600a / 20 g |
| Insulation material | Expanded polystyrene (EPS) |
| Ice cube production capacity | 10 kg in 24 h |
| Water tank capacity | 1.2 litres |
| Dimensions (W × D × H) | 292 × 238 × 282 mm |
| Weight | 6.1 kg |
| Number of production cycles | Large and small ice cube program |
| Indicator lights | Power, empty tank, full basket, size selection |
| Automatic cleaning program | Yes (6 minutes) |
| Automatic stop when basket full | Yes |
| Delay before first use | 2 hours rest, lid open |
| Required ventilation space | 15 cm around the appliance |
| Recommended maintenance | Weekly cleaning, cleaning program, regular draining |
| Climate class | ST/SN/N/T |
| Operating ambient temperature | 10 °C to 32 °C |
Frequently Asked Questions - EMG 9-12 Essentiel B
User questions about EMG 9-12 Essentiel B
0 question about this device. Answer the ones you know or ask your own.
Ask a new question about this device
Download the instructions for your Ice machine in PDF format for free! Find your manual EMG 9-12 - Essentiel B and take your electronic device back in hand. On this page are published all the documents necessary for the use of your device. EMG 9-12 by Essentiel B.
USER MANUAL EMG 9-12 Essentiel B
natural_image
White square ice cream organizer with transparent lid and ventilation grille (no text or symbols visible)Notice d'utilisation / User guide / Instrucciones de uso / Bedienungsanleitung / Gebruiksaanwijzing
| FR EN ES DE NL | |||||
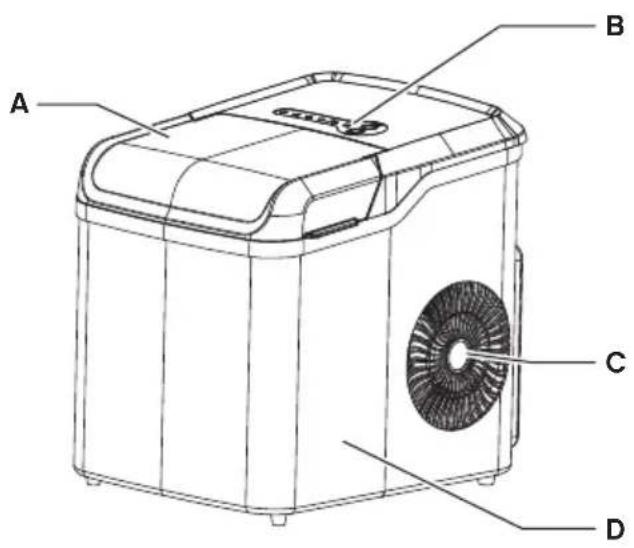
| A | Couvercle avec hublot de contrôle | Lid with viewing window | Tapa con ventana de visualización | Deckel mit Sichtfenster | Deksel met kijkvenster |
| B | Panneau de commande avec voyants | Control panel with indicator lights | Panel de control con indicadores luminosos | Bedienfeld mit Kontrolleuchten | Bedie-ningspaneel met indica-tielampjes |
| C | Ventilation Air vent Salida de aire | Entlüftungs-öffnung | Luchtrooster | ||
| D | Réservoir d'eau | Water tank | Depósito de agua | Wassertank Waterreservoir | |
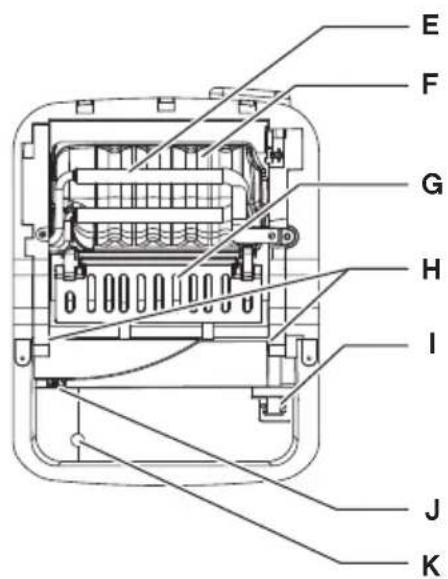
| E | Évaporateur Evaporator Evaporador Verdampfer Verdamper | ||||
| F | Bac à glaçons | Ice tray | Bandeja cubitera | Eiswürfelschale | IJslade |
| G | Volet de récupération des glaçons | Ice cube shovel | Recogecubitos de hielo | Eiswürfel-schaufel | IJsblokjes-schep |
| H | Capteurs infrarouges | Infrared sensors | Sensores infrarrojos | Infrarotsensoren | Infraroodsen-soren |
| I | Filtre | Filter | Filtro | Filter | Filter |
| J | Repère de niveau d'eau MAX | MAX water level mark | Marca de nivel de agua MAX | MAX-Wasser-standsmarkie-rung | MAX waterpeil-markering |
| K | Orifice de vidange avec bouchon | Drain hole with plug | Orificio de desagüe con tapón | Ablauföffnung mit Stopfen | Afvoergat met plug |
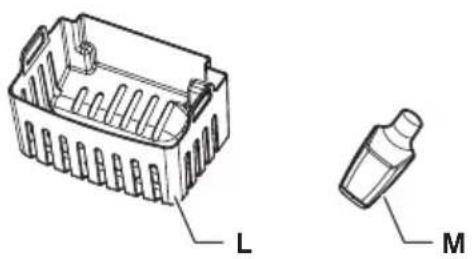
| L | Panier à glaçons | Ice cube basket | Cubitera | Eiswürfelkorb | IJsblokjes-mand |
| M | Pelle à glaçons | Ice scoop | Pala para hielo | Eisschaufel | IJsschep |
flowchart
graph LR
    A["Power"] --> B["Home"]
    B --> C["Home"]
    C --> D["Gift Box"]
    D --> E["Product"]
    F["SELECT"] --> G["ON/OFF"]
    H["7"] --> I["8"]
123456
| FR EN ES DE NL | |||||
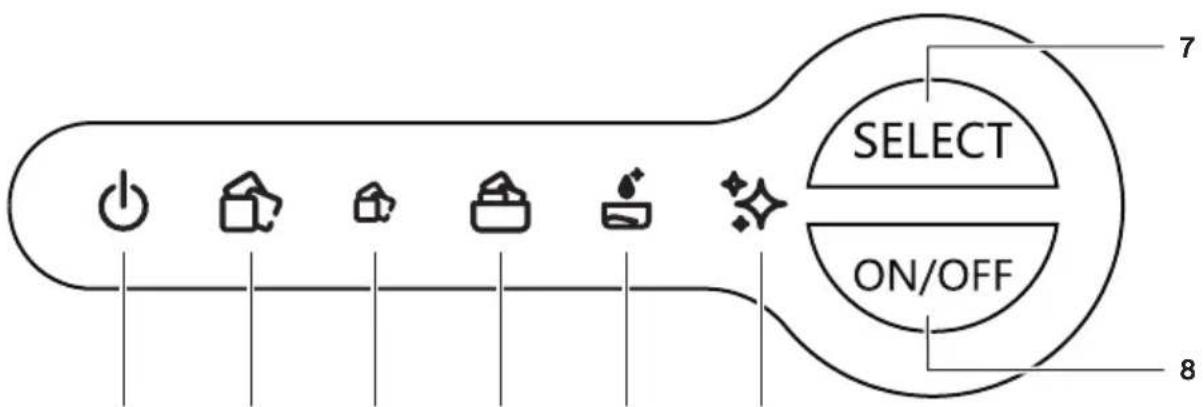
| 1. | Voyant d'alimentation | Power indicator | Indicador de alimentación | Betriebsan-zeige | Aan/uit-indicator |
| 2. | Voyant du programme Gros glaçons | Large cube program indicator | Indicador del programa cubitos grandes | Anzeige des Programms für große Würfel | Grote ijsblokjes programma-indicator |
| 3. | Voyant du programme Petits glaçons | Small cube program indicator | Indicador del programa cubitos pequeños | Anzeige des Programms kleine Würfel | Kleine ijsblokjes programma-indicator |
| 4. | Voyant de panier à glaçons plein | Ice cube basket full indicator | Indicador de cubitera llena | Anzeige für einen vollen Eiswürfelkorb | IJsblokjes-mand vol-indicator |
| 5. | Voyant de réservoir d'eau vide | Empty water tank indicator | Indicador de depósito de agua vacío | Anzeige bei leerem Wassertank: | Leeg water-reservoir-indicator: |
| 6. | Voyant du programme de nettoyage | Cleaning program indicator | Indicador del programa de limpieza | Anzeige des Reinigungs-programms | Reinigingsprogramma-indicator |
| 7. | Bouton de sélection du programme | Select program button | Botón de selección del programa | Programma-auswahl-Taste | Programma selectieknop |
| 8. | Bouton marche/arrêt (Démarrage/ arrêt d'un cycle) | On/off button (start / stop a cycle) | Botón ON/OFF (inicio/ detener un ciclo) | Ein/Aus-Taste (Start/Stopp eines Zyklus) | On/Off-knop (een cyclus starten/ stoppen) |
sommaire
votre produit 6
natural_image
Technical line drawing of a mechanical device with no visible text or symbolsContents of the box 14
Technical characteristics 14
Warnings 15
before first use 15
use 16
Ice cube production 16
The ice-making cycle 17
Indicator lights 17
cleaning and maintenance 18
troubleshooting guide 19
You have just purchased a product from the Essentiel b brand and we thank you. We pay particular attention to the RELIABILITY, EASE OF USE and DESIGN of our products.
We hope that this ice cube maker will give you complete satisfaction.
your product
Contents of the box
- 1 ice cube maker
- 1 ice cube basket
- 1 ice scoop
- 1 user manual
Technical characteristics
• Supply voltage: 220-240 V\~50 Hz
• Maximum power: 150 W
• Rated current: 0.9 A
• Electrical Protection Class: I
• Climate classes: ST/SN/N/T
• Refrigerant type / weight: R600a / 20 g
• Insulation material: Expandable Polystyrene Foam (EPS)
• Ice capacity: 10 kg of ice in 24 h
• Water tank capacity: 1.2 litres
• Water drainage available
• Unit size: L 292 × W 238 × H 282 mm
- Weight: 6.1 kg
Warnings
Do not return the appliance. This could cause compressor and system problems.
Place the appliance on a flat, horizontal surface capable of supporting the weight of the machine (6.1 kg).
For proper ventilation of your appliance, leave a space of at least 15 cm around your ice cube maker.
before first use
- IMPORTANT: Before plugging the appliance into the mains socket for the first time, please allow the appliance to rest with the lid open for 2 hours on a flat, stable surface, to allow the refrigerant gas to descend into the compressor. Failure to wait for 2 hours could damage the compressor.
- This appliance is intended for domestic use only.
- Do not use outdoors.
- Take the appliance out of the box and remove all packaging material. The ice scoop and ice cube basket are stored inside the ice cube maker.
- Before using the machine for the first time (or after a period of inactivity), clean the water tank and ice cube basket. Use the first ice production cycle to flush the system. Discard the water and ice cubes produced in the first cycle.
Ice cube production
- IMPORTANT: Do not open the lid while making ice cubes. You can check production through the viewing window.
-
Before plugging the appliance into the power outlet after moving it, please allow the appliance to rest for 30 minutes.
-
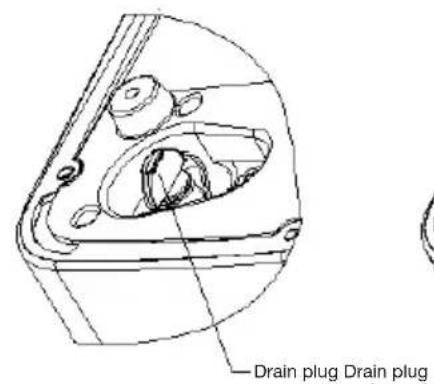
Make sure the drain plug is inserted into the drain hole in the bottom of the water tank.
- Open the lid and take out the ice cube basket.
- Fill the water tank with room temperature water (1.2 L max.). Make sure that the water does not overflow into the ice cube basket and does not exceed the MAX mark indicated on the interior wall of the appliance.
- Replace the ice cube basket and close the lid.
- Plug the power cord into an earthed AC outlet. The power indicator flashes white. The appliance is in standby mode.
- Press the SELECT button to select the large or small ice cube program. The respective indicator lights up solid white when the program is selected.
- Press the ON/OFF button to start making ice. The power indicator lights up solid white and ice production begins.
- When you have obtained the desired amount of ice cubes, turn off the appliance by pressing the ON/OFF button and unplug it from the power supply. It takes about 7-15 minutes to make ice cubes. The time may vary depending on the ambient temperature of the room and the water poured into the tank.
- Place the ice cubes in a container or glasses for immediate use, or place them in the freezer for storage.
- After removing the ice cubes, remove the drain plug located under the appliance and allow the remaining water to drain from the water tank. Replace the drain plug when all the water has been drained.
Notes:
- During the first 3 cycles, the size of the ice cubes may be reduced and irregular.
- You can keep the ice cubes in the appliance for approximately 18 hours, depending on the ambient temperature of the room.
- Do not leave water in the appliance for more than 24 hours.
- Clean the ice cube maker fully at least once a week (refer to the “Cleaning and maintenance” section).
The ice-making cycle
The production of ice cubes takes place as follows:
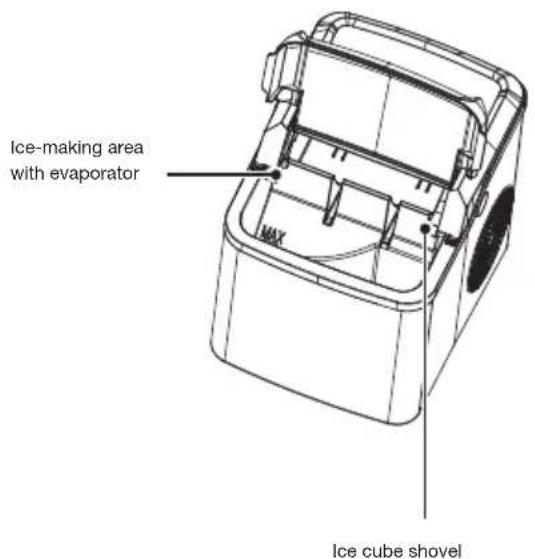
- The water from the water tank is pumped up to the appliance's ice making area at the back of the appliance. Ice begins to form on the "fingers" of the evaporator.
- Once the cycle is complete, the remaining water flows into the water tank and the ice cubes fall from the evaporator's fingers.
- The ice cube shovel pushes the ice into the ice cube basket.
- Once the ice cube shovel is back in the initial position, a new cycle begins again.
Indicator lights
- When the water level in the water tank is insufficient, the empty water tank indicator lights up. You must add water to the water tank, then press the ON/OFF button to restart the appliance. The appliance automatically restarts after 30 minutes if the user does not restart the appliance after it has been refilled.
- When the ice cube basket is full, the appliance automatically turns off and the ice cube basket full indicator turns on. In this case, remove the ice from the ice cube basket with the ice scoop. The appliance automatically restarts ice production after 5 seconds.
• IMPORTANT: Make sure the appliance is not tilted!
cleaning and maintenance
• Clean the ice cube maker at least once a week for fresh tasting ice and to ensure product longevity.
- Before cleaning the appliance, stop the ice-making program, unplug it, remove any ice cubes and allow the appliance to warm up to room temperature.
natural_image
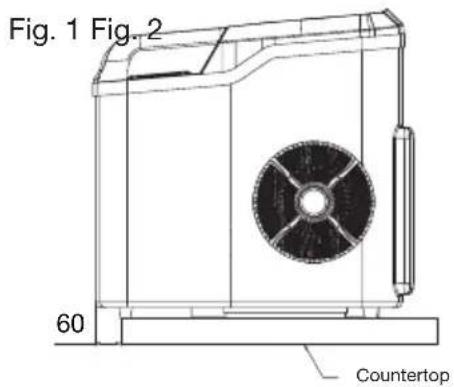
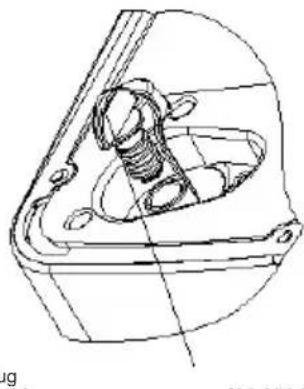
Technical line drawing of a mechanical component with internal spring and housing (no text or symbols)- To drain the appliance (remove the water from the water tank), make sure it is placed on a flat, stable surface. Move it slightly over the edge of the countertop (Fig. 1) approx. 60 ~mm .
Place a container under the drain hole to collect the water. Pull out the drain plug which is located under the appliance (Fig. 2) and drain the water. Tilt the appliance up to 30^ to assist the draining. If there is residual water in the ice tray, gently push the ice tray backwards so that all the water drains into the water tank. After draining, insert the drain plug into the drain plug hole.
• After use, leave the lid open so that mould and bacteria do not grow.
• To clean the internal parts of the ice cube maker and flush through the pipes:
- Fill the water tank to the MAX mark with water.
- Press the SELECT button until the cleaning indicator light turns on.
-
Press the ON/OFF button to start cleaning. The power indicator lights up solid white and the pump starts to pump water around the appliance. The cleaning program takes 6 minutes.
-
When the cleaning program has finished, drain the water from the water tank.
- Clean the ice cube maker, its internal cavity and its components (except the evaporator) regularly with a damp cloth and a mild cleaning solution.
- Do not use abrasive cleaning agents or harsh tools for cleaning. Never use gasoline or solvent-based cleaning products. Rinse thoroughly before resuming use.
- For hygiene reasons, the water in the tank must be changed every 24 hours.
- If the compressor stops due to lack of water, excess ice, power outage, etc., do not operate the ice cube maker immediately. Wait 3 minutes then restart the ice cube maker.
If the appliance is not to be used for a long period of time:
- Remove the drain plug to drain the remaining water. Replace the drain plug once the water has completely drained.
- Leave the lid open so mould and bacteria do not grow.
- Make sure the appliance is completely dry.
troubleshooting guide
| Problem Possible | cause Solution | |
| The empty water tank indicator lights up. | There is not enough water and/or the filter in the water tank is blocked. | Check the filter is not blocked. Clean it with a soft cloth. Then:1. Add water to the maximum level.2. Wait 3 minutes.3. Press the ON/OFF button to restart the ice-making program.If the problem persists, drain the water from the water tank and run the cleaning program to flush through the pipes (refer to the “Cleaning and maintenance” section). |
| There is air or dirt in the water pump. | Contact the after-sales service of your store. | |
| The ice cube basket full indicator lights up. | The ice cube basket is full. | Remove the ice cubes from the tray. |
| The ice cube basket full indicator lights up, but the tray is not full. | The ice cube basket full infrared sensors are iced up or not working properly. | 1. Remove any ice from the infrared sensors.2. Press the ON/OFF button to restart the appliance. If the problem persists, contact the after-sales service of your store. |
| The ice cubes produced are too large or stuck together. | The temperature of the water or the ambient temperature is too low. | Fill the water tank up to the MAX mark with water that has a temperature of at least 8°C and up to 25°C. |
| The ice cubes produced are too small or of poor quality. | There is insufficient ventilation space around the appliance. | Leave a free space of at least 15 cm around the appliance for optimal ventilation. |
| The ambient room temperature is too high. | Make sure the room temperature is between 10°C and 32°C. | |
| The water temperature is too high. | Fill the water tank up to the MAX mark with cool water (from 8°C and up to 28°C). | |
| The operating conditions are good, but the appliance does not produce ice cubes. | The refrigerant system is blocked or leaking. | Contact the after-sales service of your store. |
| The ice cube shovel is blocked. | Ice formed on or around the ice cube shovel. | 1. Turn off and unplug the appliance.2. Push the flap back slightly and remove the pieces of ice.3. Restart the appliance. |
If the problem persists or you cannot resolve it, unplug the appliance from the power outlet and contact the after-sales service of your store. Do not carry out any repairs to the appliance yourself.
índice
su producto 22
natural_image
Technical line drawing of a mechanical device casing with internal components and mounting holes (no text or symbols)natural_image
Technical line drawing of a mechanical device casing with internal components and mounting holes (no text or symbols)IJsblokjesschep
natural_image
Technical line drawing of a mechanical component with internal spring and housing (no text or symbols)All information, designs, drawings and pictures in this document are the property of SOURCING & CREATION. SOURCING & CREATION reserves all rights to its brands, designs and information. Any copy and reproduction through any means shall be deemed and considered as counterfeiting.
Protection of the environment
This symbol attached to the product means that it is an appliance whose disposal is subject to the directive on waste from electrical and electronic
equipment (WEEE). This appliance may not in any way be treated as household
waste and must be subject to a specific type of removal for this type of waste. Recycling and recovery systems are available in your area (waste removal) and by distributors. By taking your appliance at its end of life to a recycling facility, you will contribute to environmental conservation and prevent any harm to your health.

\* Tested in our laboratories
Warranty valid from the date of purchase (receipt as proof of purchase). This warranty does not cover defects or damage caused by improper set up, incorrect use, or normal wear and tear of this product.
Customer Relations Department /