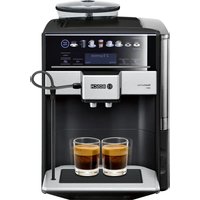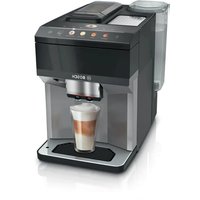
VeroCafe 500 TPU40508 - Coffee machine BOSCH - Free user manual and instructions
Find the device manual for free VeroCafe 500 TPU40508 BOSCH in PDF.


User questions about VeroCafe 500 TPU40508 BOSCH
0 question about this device. Answer the ones you know or ask your own.
Ask a new question about this device
Download the instructions for your Coffee machine in PDF format for free! Find your manual VeroCafe 500 TPU40508 - BOSCH and take your electronic device back in hand. On this page are published all the documents necessary for the use of your device. VeroCafe 500 TPU40508 by BOSCH.
USER MANUAL VeroCafe 500 TPU40508 BOSCH
Register your appliance and join the Bosch family of perks: bosch-home.com/us/mybosch
Fully automatic espresso machine
500 Series
TPU40...
[en-us] Use and Care Manual Fully automatic espresso machine 2
You can find additional information and explanations online. Scan the QR code on the title page.
Table of contents
1 IMPORTANT SAFETY IN-STRUCTIONS .... 4
1.1 Safety definitions 4
1.2 IMPORTANT SAFEGUARDS ..... 4
1.3 General information .... 5
1.4 Intended use 5
1.5 Restrictive Use 5
1.6 Safety instructions .... 5
1.7 State of California Proposition 65 Warnings .... 7
2 Environmental protection and energy-saving .... 8
2.1 Disposal of packaging 8
2.2 Saving energy 8
3 Installation and connection ..... 8
3.1 Contents of package 8
3.2 Installing and connecting the appliance 9
4 Familiarizing yourself with your appliance 9
4.1 Appliance 9
4.2 Control panel 11
4.3 Display 11
5 Overview of beverages ...... 11
6 Accessories 12
7 Before using for the first time .. 12
7.1 Preparing and cleaning the appliance 12
7.2 Checking the water hardness 16
7.3 Overview of water hardness levels 16
7.4 Water filter ^1 17
7.5 Performing initial start-up ..... 18
7.6 General instructions ..... 18
8 Basic Operation 19
8.1 Switching the appliance on or down 19
8.2 Dispensing beverages ..... 19
8.3 Dispensing a coffee drink made from fresh beans ..... 19
8.4 Dispensing a coffee drink made from ground coffee ..... 20
8.5 Dispensing drinks with milk froth 20
8.6 Dispensing a coffee drink with milk froth 20
8.7 Dispensing special beverages 21
8.8 Dispensing milk froth 21
8.9 Dispensing hot water 21
8.10 Beverage settings 22
8.11 Grinder 22
9.1 Activating the child lock ...... 23
9.2 Deactivating the child lock ..... 23
10.1 Activating and deactivating the cup warmer ^1 ..... 23
11.1 Changing the basic set-
tings 24
11.2 Overview of basic settings .... 24
12.1 Dishwasher-safe components 25
12.2 Cleaning agents 25
12.3 Cleaning the appliance ..... 26
9 Child protection 23
10 Cup warmer ^1 23
11 Basic settings 23
12 Cleaning and maintenance .... 25
12.4 Cleaning the drip tray and coffee dregs container ..... 26
12.5 Cleaning the ground coffee compartment 27
12.6 Cleaning the milk system ..... 28
12.7 Cleaning the brewing unit ..... 29
12.8 Machine care cycles 31
13 Troubleshooting 32
14 Transportation, storage and disposal 37
14.1 Activating frost protection ..... 37
14.2 Disposal of your old appli- ance 37
15 Customer Service 38
15.1 Model number (E-Nr.) and production number (FD) ..... 38
16 Technical specifications ..... 38
17 STATEMENT OF LIMITED PRODUCT WARRANTY ...... 38
17.1 What this warranty covers & Who it applies to 38
17.2 Obtaining warranty service ... 39
17.3 How long the warranty lasts 39
17.4 Repair/replace as your exclusive remedy 40
17.5 Out of warranty product ...... 40
17.6 Warranty exclusions 40
17.7 Product information 42
1.1 Safety definitions
Here you can find explanations of the safety signal words used in this manual.

WARNING
This indicates that death or serious injuries may occur as a result of non-observance of this warning.

CAUTION
This indicates that minor or moderate injuries may occur as a result of non-observance of this warning.
NOTICE
This indicates that damage to the appliance or property may occur as a result of non-compliance with this advisory.
Note: This alerts you to important information and/or tips.
1.2 IMPORTANT SAFEGUARDS
WARNING
When using electrical appliances, basic safety precautions should always be followed including the following:
▶ Read all instructions.
▶ Do not touch hot surfaces. Use handles or knobs.
▶ To protect against fire, electric shock and injury to persons do not immerse cord or plugs in water or other liquid.
- Close supervision is necessary when any appliance is used by or near children.
▶ Unplug from outlet when not in use and before cleaning. Allow to cool before putting on or taking off parts, and before cleaning the appliance.
- Do not operate any appliance with a damaged cord or plug or after the appliance malfunctions, or has been damaged in any manner. Return appliance to the nearest authorized service facility for examination, repair or adjustment.
The use of accessory attachments not recommended by the appliance manufacturer may result in fire, electric shock or injury to persons.
▶ Do not use outdoors.
▶ Do not let cord hang over edge of table or counter, or touch hot surfaces.
▶ Do not place on or near a hot gas or electric burner, or in a heated oven.
▶ Always attach plug to appliance first, then plug cord into the wall outlet. To disconnect, turn any control to "off," then remove plug from wall outlet.
▶ Do not use appliance for other than intended use.
▶ Save these instructions.
1.3 General information
■ Read this manual carefully.
- Keep the manual and the product information in a safe place for future reference or for the next owner.
■ Do not connect the appliance if it has been damaged in transit.
1.4 Intended use
Only use this appliance:
■ for preparing hot drinks.
■ for normal household use and in enclosed spaces in a residential environment.
■ up to an altitude of max. 9,840 ft (3000 m) above sea level.
1.5 Restrictive Use
This appliance is not intended for use by persons (including children) with reduced physical, sensory or mental capabilities, or lack of experience and knowledge, unless they have been given supervision or instruction concerning use of the appliance by a person responsible for their safety.
Do not let children play with the appliance.
When children become old enough to use the appliance, it is the responsibility of the parents or legal guardians to ensure that they are instructed in safe practices by qualified persons.
Children should be supervised to ensure that they do not play with the appliance.
1.6 Safety instructions
WARNING
Children may pull packaging material over their heads, or wrap themselves up in it and suffocate.
- Keep packaging material away from children.
▶ Do not allow children to play with packaging material.
Children may breathe in or swallow small parts, causing them to suffocate.
▶ Keep small parts away from children.
▶ Do not allow children to play with small parts.
WARNING
To avoid risk of injury from incorrect repairs, observe the following.
- Connect and operate the appliance only in accordance with the specifications on the rating plate.
- Connect the appliance to a power supply with alternating current only via a correctly installed socket outlet with grounding.
- The protective conductor system of the domestic electrical installation must be properly installed.
To avoid risk of injury from a damaged appliance or power cord, observe the following.
▶ Never operate a damaged appliance.
▶ Never operate an appliance with a cracked or broken surface.
▶ Never pull on the power cord to unplug the appliance. Always unplug the appliance at the power outlet.
▶ If the appliance or the power cord is damaged, immediately unplug the power cord or switch off the breaker in the circuit breaker box.
▶ Call Customer Service. → Page 38
To avoid risk of injury from improper repairs, observe the following.
▶ Only qualified technicians or authorized service providers should perform repairs.
▶ Only genuine spare parts may be used to repair the appliance.
If the power cord of this appliance becomes damaged, it must be replaced by the manufacturer, the manufacturer's Customer Service, or an authorized service provider in order to prevent injury.
An ingress of moisture may cause an electric shock.
▶ Never immerse the appliance or the power cord in water.
▶ Liquids must not be spilled on the appliance plug connection.
▶ Use the appliance in enclosed spaces only.
▶ Never expose the appliance to intense heat or humidity.
- Do not use any steam cleaners or high-pressure cleaners to clean the appliance.
WARNING
The appliance gets hot.
▶ Ventilate the appliance adequately.
▶ Never operate the appliance in a cupboard.
To avoid risk of injury from an extended power cord and non-approved adapters, observe the following.
▶ Do not use extension cords or multiple socket strips.
▶ Only use adapters and power cords approved by the manufacturer.
▶ If the power cord is too short and a longer one is not available, please contact an electrician to have the domestic installation adapted.
WARNING
Some parts of the appliance become very hot.
▶ Never touch hot appliance parts.
- Allow hot appliance parts to cool down before touching.
WARNING
Freshly prepared beverages are very hot.
▶ Let drinks cool down if necessary.
▶ Do not let escaping liquids or steam come into contact with your skin.
WARNING
Improper use of the appliance may endanger the user.
▶ To avoid injuries, only use the appliance for its intended purpose.
Trapped fingers when closing the appliance door.
▶ Be careful of your fingers when closing the appliance door.
The grinder rotates.
▶ Never reach into the grinder.
WARNING
During filtering there may be a slight increase in the potassium level, which is possibly not good for dialysis patients and people with kidney disease.
- Consult a doctor before use if you have kidney disease or follow a special potassium diet.
Soiling on the appliance may be harmful to health.
▶ To ensure hygiene, follow the cleaning instructions for the appliance.
Water from the hot water circuit can be harmful to health.
▶ Only ever use the appliance with fresh, cold, non-carbonated drinking water.
1.7 State of California Proposition 65 Warnings
This product may contain a chemical known to the State of California, which can cause cancer or reproductive harm. Therefore, the packaging of your product may bear the following label as required by California:
STATE OF CALIFORNIA PROPOSITION 65 WARNING:

WARNING
Cancer and Reproductive Harm - www.P65Warnings.ca.gov
2 Environmental protection and energy-saving
2.1 Disposal of packaging
The packaging materials are environmentally compatible and can be recycled.
- Sort the individual components by type and dispose of them separately.
2.2 Saving energy
If you follow these instructions, your appliance will use less energy.
Set the interval for automatic switch-down to the smallest value.
√ If the appliance is not being used, it will switch itself down earlier. → "Basic settings", Page 23
Descale the appliance regularly.
√ Limescale deposits increase the appliance's energy consumption.
3 Installation and connection
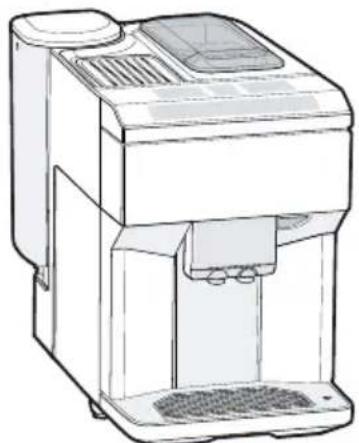
3.1 Contents of package
After unpacking all the parts, check for any damage in transit and for completeness of delivery.
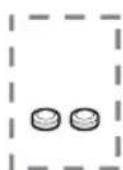
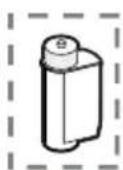
Note: Different accessories are enclosed depending on the appliance model. The accessory is identified by a frame with a dashed line.
natural_image
Line drawing of a modern kitchen appliance with a side panel and ventilation slots (no text or symbols)A

D

F
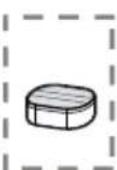
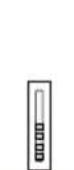
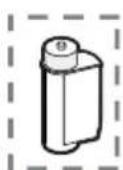
A Fully automatic coffee machine
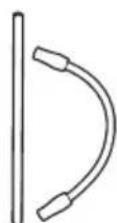
B Milk tube and suction pipe
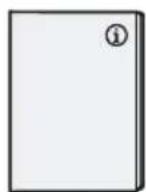
C Instructions for use
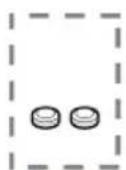
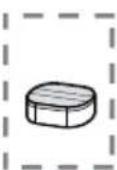
D Cleaning tablet 1
E Descaling tablet 1
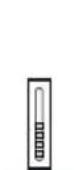
F Water hardness testing strip
G Water filter ^1
3.2 Installing and connecting the appliance
NOTICE
Risk of damage to the appliance. If the appliance is not started up correctly, it may be damaged.
- Only use the appliance in frost-free rooms.
▶ If the appliance has been transported or stored below 32 °F
(0 °C), wait 3 hours at room temperature before starting it up.
▶ After plugging in, always wait approx. 5 seconds.
1. Place the appliance on a level, water-resistant surface that is capable of bearing its weight.
2. Connect the appliance with the electrical plug to a properly grounded wall outlet.
4 Familiarizing yourself with your appliance
4.1 Appliance
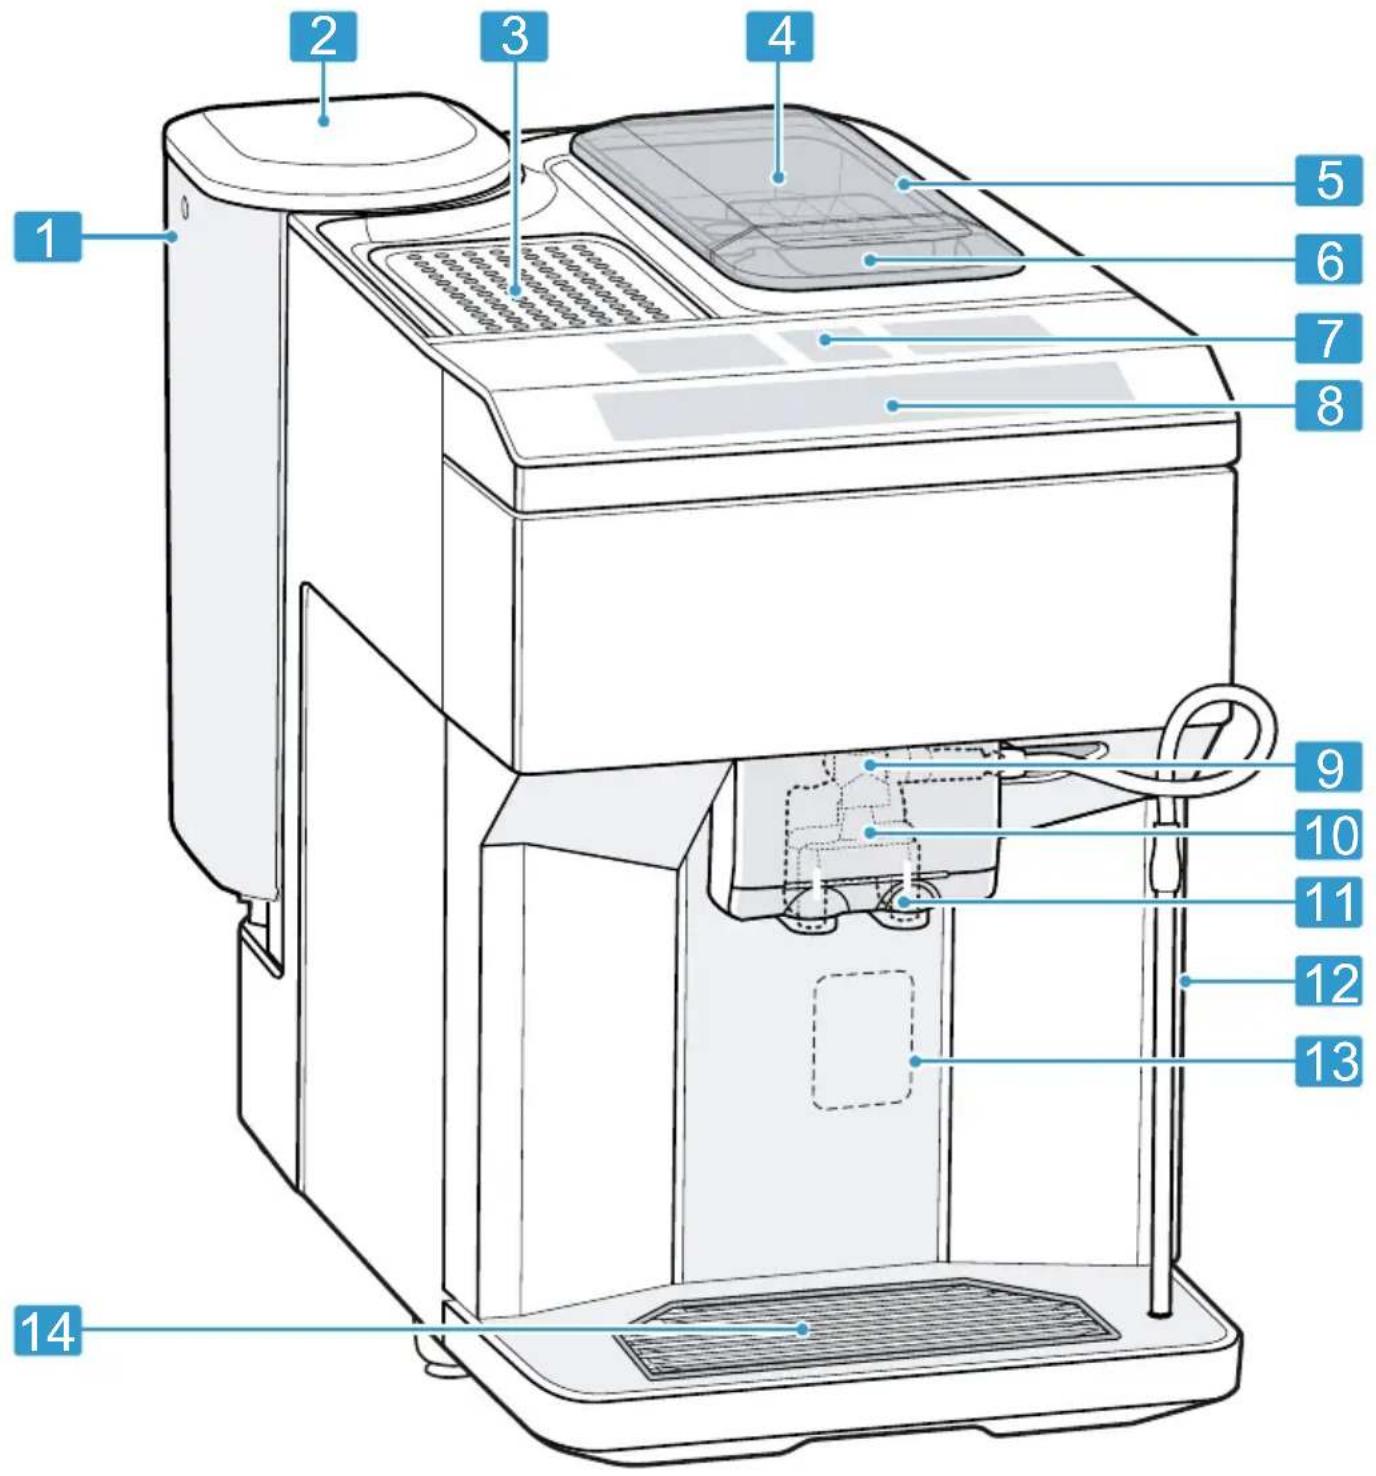
Here you can find an overview of the parts of your appliance.
en-us Familiarizing yourself with your appliance
Note: Individual details and colors may differ, depending on the appliance model.
text_image
Labeled diagram of a 14-inch water heater with numbered parts for identification1 Water tank
2 Lid for water tank
3 Cup warmer ^1
4 Aroma lid
5 Bean container
6 Ground coffee compartment
7 Display
8 Control panel
9 Cover
10 Milk system
4.2 Control panel
You can use the control panel to configure all functions of your appliance and to obtain information about the operating status.
Symbol Explanation
| Switch the appliance on or down. | |
| Open or exit the menuNote: The menu buttons are only visible when the menu is open. | |
| Navigate up in the menu | |
| Navigate down in the menu | |
| ok | Confirm in the menu or save |
| Go back in the menu | |
| Dispense two cups |
11 Outlet system
12 Brewing chamber door
13 Rating plate
14 Drip tray
Symbol Explanation
| 1 | Set coffee strength |
| 2 | Set capacity |
| start stop | Start or stop the process |
4.3 Display
The display shows the selected beverages, settings, and setting options, as well as messages about the appliance's operation status.
The display shows additional information and action steps. The information will be hidden after a short period or by pressing a button. The action steps are hidden once they have been completed.
Note: If no display language is available in your national language, select a display language that is available, e.g. English.
5 Overview of beverages
You can prepare a wide range of different beverages with your appliance.
Quick selection
| Symbol Designation | Explanation Category | ||
 | Espresso | Concentrated coffee. Best served in small, thick-walled cups. Preheat cups with hot water. | → "Dispensing a coffee drink made from fresh beans", Page 19→ "Dispensing a coffee drink made from ground coffee", Page 20 |
 | Coffee Coffee with a crema layer or large cup of coffee prepared using the espresso method. | → "Dispensing a coffee drink made from fresh beans", Page 19→ "Dispensing a coffee drink made from ground coffee", Page 20 | |
 | Cappuccino Espresso with frothed milk. Best served in small cups. | → "Dispensing a coffee drink with milk froth", Page 20 | |
 | LatteMac-chiato | Coffee speciality with three layers: warm milk at the bottom, espresso in the middle, and milk froth on top. Best served in a glass. | → "Dispensing a coffee drink with milk froth", Page 20 |
 | Special beverages | Dispense other drinks. | → "Dispensing special beverages", Page 21 |
6 Accessories
Only use genuine accessories. These are designed especially for your appliance.
Accessories Retail Customer Service
| Accessories small appli-ances | TCZ7003US 12008246 |
| Cleaning tablets TCZ8001 | US 00312423 |
| Descaling tablets TCZ8002 | US 00312422 |
| Care set TCZ8004 | US 00312421 |
7 Before using for the first time
Prepare the appliance for use.
7.1 Preparing and cleaning the appliance
NOTICE
Unsuitable beans can block up the grinder.
- Only use pure, roasted bean mixes that are suitable for use in fully automatic coffee or espresso machines.
-
Do not use coated coffee beans.
-
Do not use caramelized coffee beans.
- Do not use oily coffee beans.
-
Do not use coffee beans that have been treated with additives containing sugar.
▶ Do not add ground coffee. -
Hook in the cover of the beverage dispenser at the bottom and snap it in at the top.
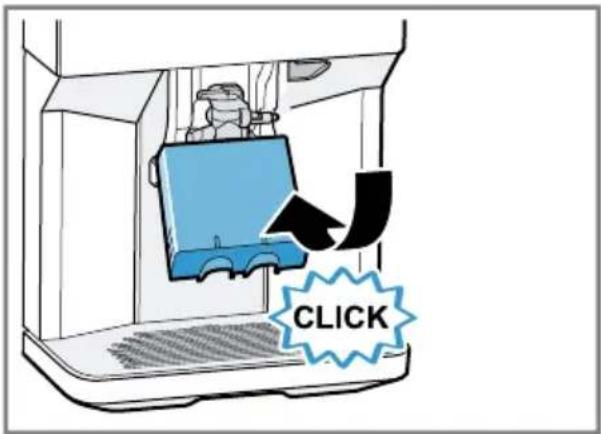
text_image
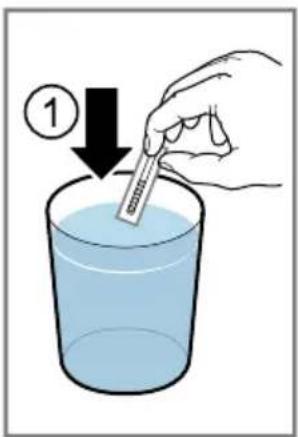
CLICK- Briefly dip the test strip in tap water ① and leave to drain off.
▶ Wait for one minute ②
- Read the water hardness value off the test strip ③
text_image
Diagram showing a hand pouring liquid into a beaker with a thermometer, labeled with step 1 and arrow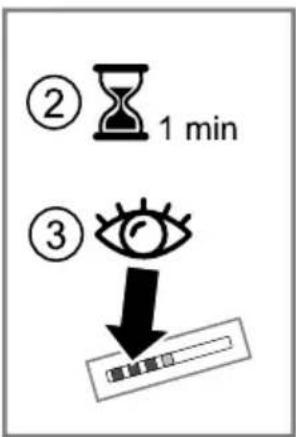
text_image
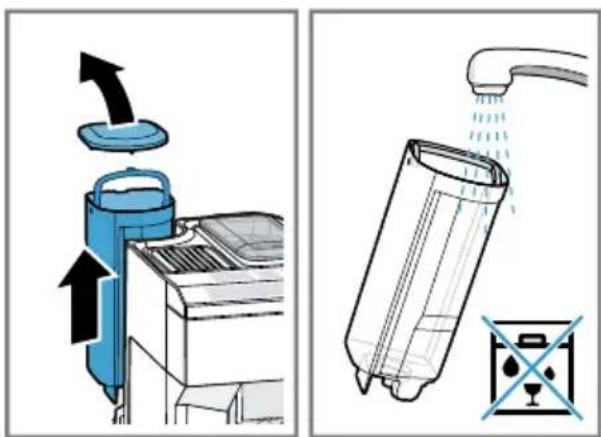
② 1 min ③ ↓- Open the lid and take out the water tank by the handle.
- Clean the water tank and lid.
text_image
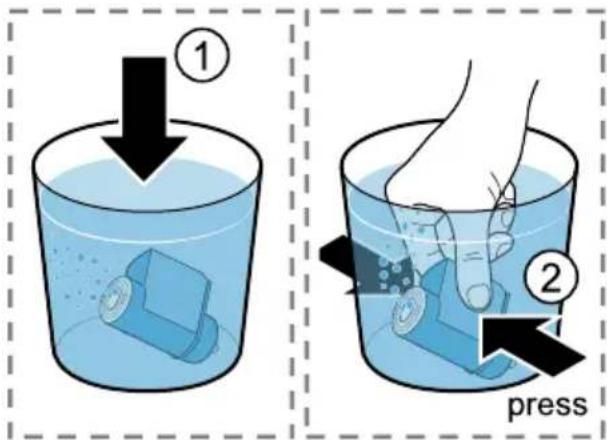
Diagram illustrating a water filter operation with labeled components and water flow indicators- Immerse the water filter in a glass of water with the opening facing up and press the sides together lightly until no more air bubbles rise to the surface.
→ "Water filter", Page 17
text_image
① pressen-us Before using for the first time
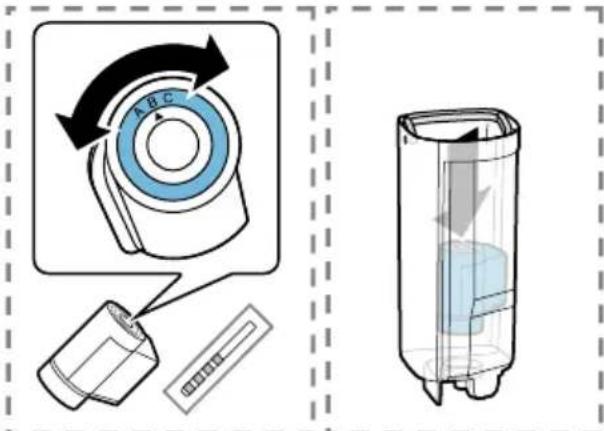
- Set the correct water hardness value on the aroma ring of the water filter.
- Press the water filter firmly into the water tank.
text_image
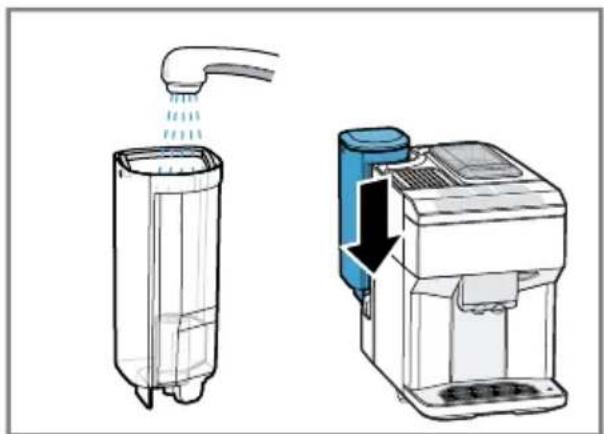
Diagram illustrating a rotary device with labeled components and directional arrows, alongside a 3D rendering of the device's internal structure.- Fill the water tank with water up to the max marking and insert.
natural_image
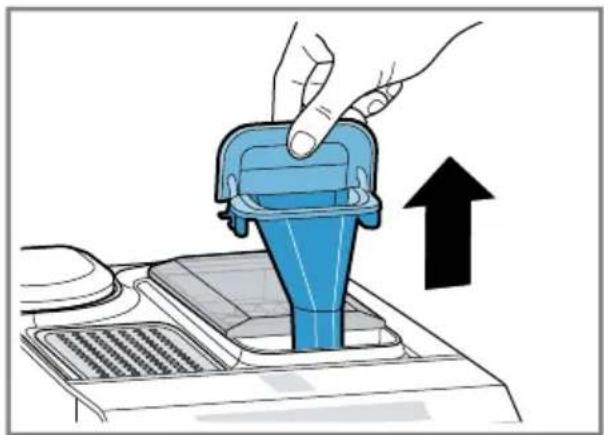
Diagram showing a water dispenser pouring liquid into a digital washing machine with a blue arrow indicating flow direction (no text or symbols present)- Pull out the ground coffee compartment by the open lid.
natural_image
Illustration of a hand pressing a blue plastic container into a car intake manifold, with an upward arrow indicating motion (no text or symbols)- Clean the ground coffee compartment with liquid dish soap.

natural_image
Illustration of a showerhead spraying water with a blue checkmark indicating a water level (no text or symbols present)- Dry the ground coffee compartment and insert it into the appliance.
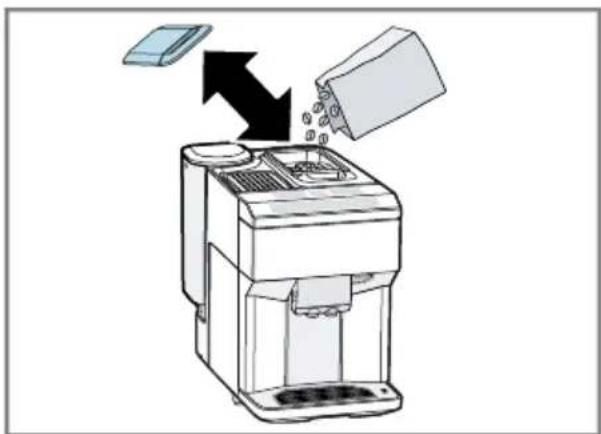
10.Open the aroma lid and add coffee beans.
natural_image
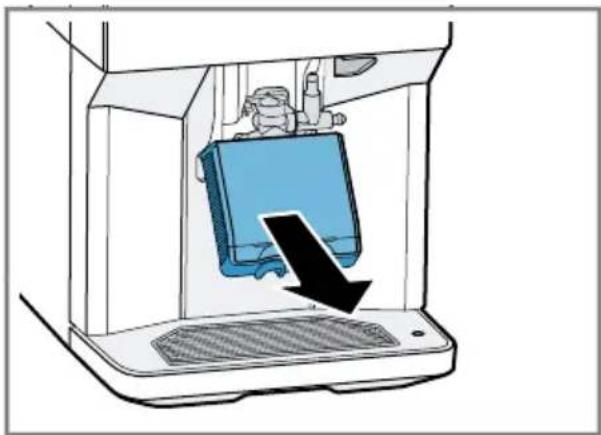
Diagram of a coffee maker with a paper feeding into a container (no text or symbols)11.Slide the outlet system right down.
12.Pull the cover forward.
natural_image
Illustration of a laptop with a device inside, showing a black arrow pointing to the screen (no text or symbols present)- Release and remove the milk system.
text_image
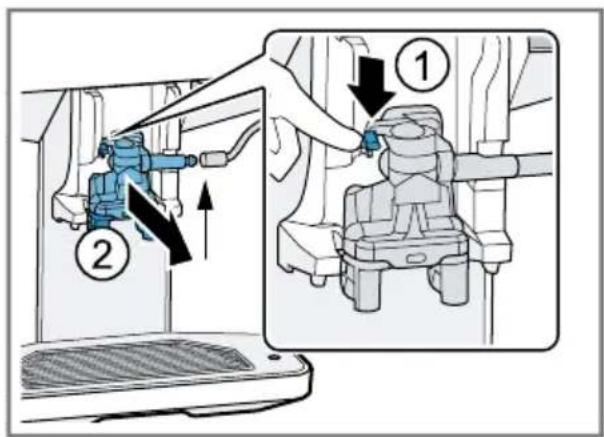
Technical diagram showing mechanical assembly steps with numbered annotations indicating component identification- Dismantle the top and bottom section of the milk system.
natural_image
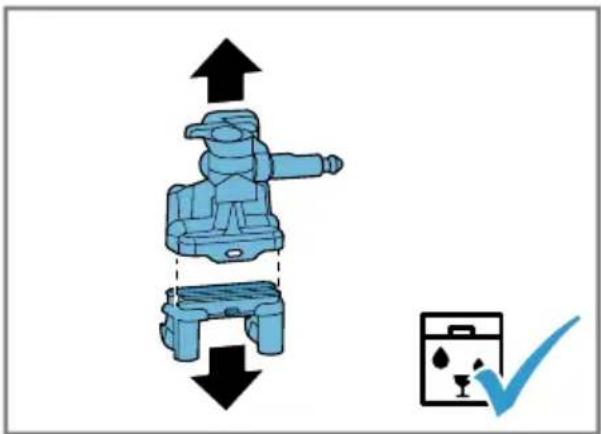
Diagram showing a mechanical device with upward and downward arrows, alongside a checkmark icon (no text or symbols)- Detach the milk tube from the suction pipe.
- Clean the components with dish-washing detergent and a soft cloth.
text_image
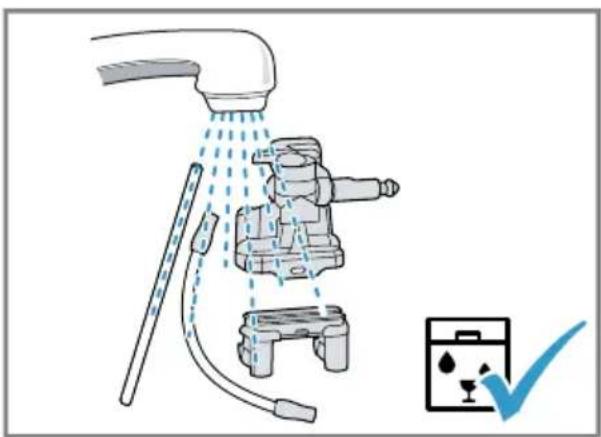
Diagram illustrating a showerhead system with water spray and a cleaning tool, accompanied by a checkmark indicating inspection.- Remove all detergent residues in the milk system after rinsing.
Rinse all components with clean water and dry.
- Assemble all components.
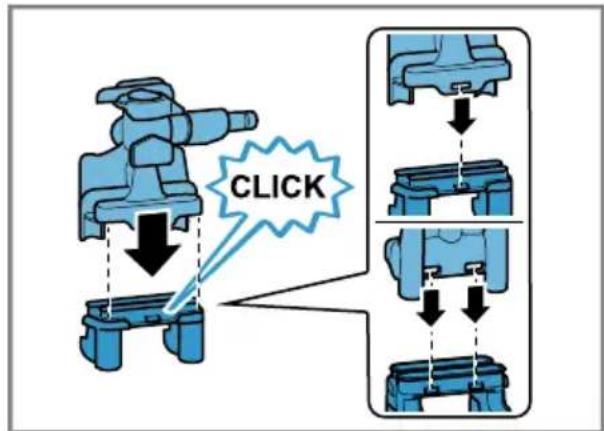
text_image
CLICK- Insert the milk system in the appliance from the front, making sure it is straight.
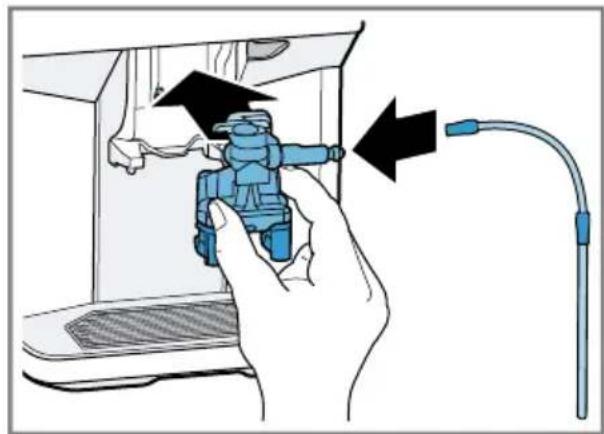
natural_image
Illustration of a hand inserting a blue plastic device into a device with an attached cable (no text or symbols)- Attach the milk tube.
- Rinse the cover and clean with a soft cloth.
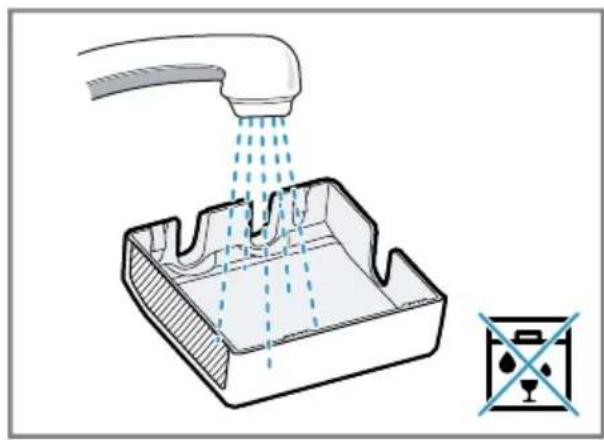
natural_image
Diagram showing a faucet spraying liquid into a container with a cross symbol indicating no text or symbols.en-us Before using for the first time
- Fit the cover.
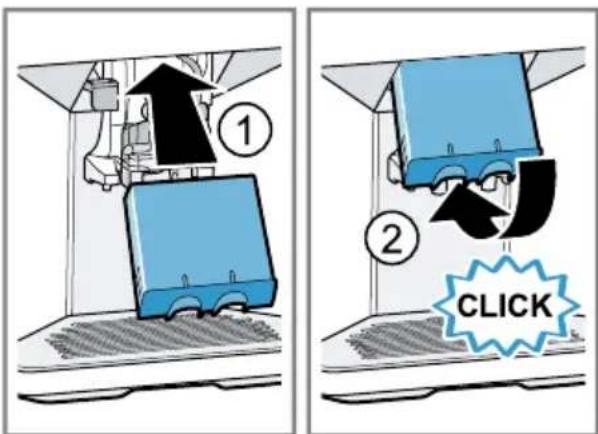
text_image
Diagram illustrating a 3D printer operation with labeled steps and a 'CLICK' button, showing mechanical components and motion arrows.- Slide the outlet system all the way up.
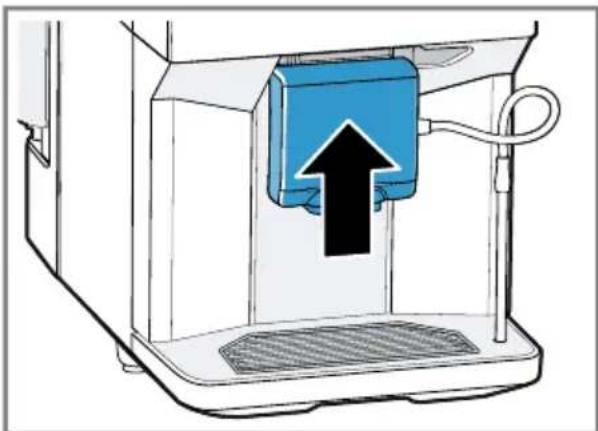
natural_image
Diagram of a blue industrial machine with an upward arrow indicating motion or force, no text or symbols presentNote: Fill the water tank with fresh, cold, non-carbonated drinking water every day.
Tip: To keep the coffee beans at their best, store them in a sealed container in a cool place.
You can keep the coffee beans in the bean container for several days without them losing their aroma.
7.2 Checking the water hardness
It is important to set the right water hardness so your appliance indicates in good time that it needs descaling. You can use the enclosed test strip to check the water hardness or ask your local water company.
- Briefly dip the test strip in fresh tap water.
- Allow the water to drain off the test strip.
- Read the water hardness off the test strip after 1 minute.
→ "Overview of water hardness levels", Page 16
Note: If a water softening system is installed in your house, you can select "Water softener".
Tips
- You can change the settings at any time.
→ "Basic settings", Page 23 - If the water hardness is higher than 21.9 gr/gal (US), you can fill the water tank with prefiltered water to reduce limescale deposits in the water tank.
7.3 Overview of water hardness levels
The table shows allocation of the levels to the different degrees of water hardness.
| Level Ring setting on INTENZA filter | Degree of German hardness in °dH | Water hardness in gr/gal (US) | |
| 1 A 1 - 7 < 7.3 | |||
| 2 A 8 - 14 7.3 - 14.6 | |||
| 3 B 15 - 21 14.6 - 21.9 | |||
| Level Ring setting on INTENZA filter | Degree of German hardness in °dH | Water hardness in gr/gal (US) | |
| 41 | C 22 - 30 > 21.9 | ||
7.4 Water filter ^2
You can use a water filter to minimize limescale deposits and reduce impurities in the water.
The limescale content of the water influences the aroma and crema of coffee. The limescale content of the water influences the aroma and crema of coffee. There is an aroma ring on the underside of the MAVEA® INTENZA water filter. Turn the aroma ring to set the optimum aroma level for your mains water.
Inserting and activating the water filter
NOTICE
Possible damage to the appliance due to limescale build-up.
- Change the water filter at the correct time.
▶ Change the water filter after 2 months at the latest.
▶ Observe the display messages.
Note: If "Please replace or deactivate water filter in menu." is shown on the display, replace the water filter. If you are not inserting a new filter, select "No filter" and follow the instructions on the display.
- Immerse the water filter in a glass of water with the opening facing up and press the sides together lightly
until no more air bubbles rise to the surface.
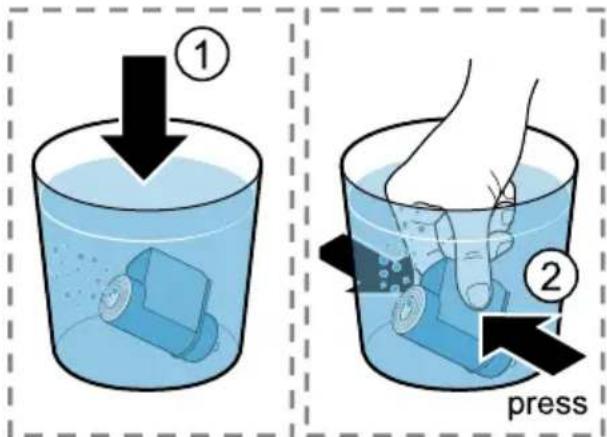
text_image
① ② press- Press ⚙
- Press Vor "Water filter" and . ok
- Use or to select "New filter" or "Replace water filter" and press ok.
- Note: If you are not inserting a new filter, select "No filter" in the menu settings. Press the water filter firmly into the water tank.
- Fill the water tank with water up to the "max" mark and press ok
- Connect the milk tube to the milk system and the suction pipe.
- Insert the end of the suction pipe in the drip plate.
- Place a container with a capacity of 1 liter under the outlet system and press ok
√ The filter will be rinsed and the following message displayed: "Rinsing complete.".
√ The appliance is ready to use.
Tips
■ You should also change your water filter for sanitation reasons.
- With a water filter you need to descale your appliance less frequently.
■ If your appliance has not been used for a long time, for example if you were on vacation, you should rinse the water filter before use by dispensing a cup of hot water.
■ The water filter can be purchased from retailers or the after-sales service.
→ "Accessories", Page 12
7.5 Performing initial start-up
After connecting the appliance to the power supply, configure the settings for initial start-up. Initial start-up appears when switching on for the first time or after resetting to the factory settings.
- Press ⏻to switch the appliance on.
√ The display shows the preset language. - Press /or until the display shows the required language.
- Press ok
- Determine the water hardness.
-
Press ok
-
To set the water hardness, press ∧ or ∨
-
Press o.k
-
Clean and fill the water tank.
-
Press ok
-
To now insert a water filter, press ok.
-
To insert a water filter later, press ↻.
-
Fill the bean container.
-
Press ok
-
Press ok
√ The appliance is rinsing and is ready for operation.
Tip: You can change the settings at any time.
→ "Overview of basic settings", Page 24
7.6 General instructions
Please bear this information in mind so that you can get the best out of your appliance.
Notes
■ The appliance has been programmed at the factory with standard settings for optimum operation.
■ The grinder has been factory-set for optimum operation. If coffee is only dispensed drop by drop or is too thin and with too little crema, you can adjust the grinding level when the grinder is running.
→ "Setting the grinding level", Page 22
■ During operation water droplets may form at the ventilation slits and on the lid of the tablet compartment.
■ If you do not perform any actions on the appliance for a certain period, it will switch down automatically. You can change the duration in the basic settings. → Page 23
■ For technical reasons steam can escape from the appliance.
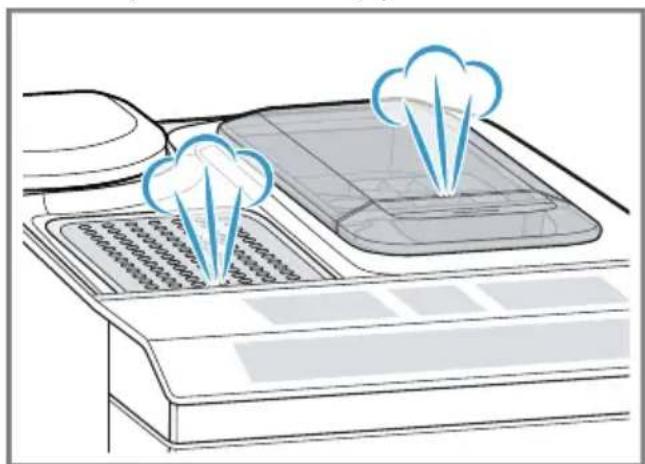
natural_image
Illustration of a printer with cloud icons above its screen (no text or symbols)■ The first beverage will not yet have its full aroma if:
- You are using the appliance for the first time.
- You have run a machine care cycle.
- You have not used the appliance for a long time.
Tip: You will get a stable, fine-pored crema after you have started up your appliance and dispensed a few cups.
8 Basic Operation
8.1 Switching the appliance on or down
- Press ⏻ When the appliance switches on, the display shows the logo. When the appliance is switched on or down, it will rinse automatically. When switched down, the appliance will emit steam into the drip tray for cleaning. The appliance will not rinse itself if it is still warm when switched on, or if no beverage was dispensed before it was switched down.
8.2 Dispensing beverages
Find out how to prepare a drink of your choice.

WARNING
Freshly prepared beverages are very hot.
▶ Let drinks cool down if necessary.
- Do not let escaping liquids or steam come into contact with your skin.
Tips
- You can select the beverage you require directly using the quick selection buttons. The display shows you the beverage and the current settings.
- Your appliance has other beverages besides those available for dispensing via the quick selection buttons.
→ "Dispensing special beverages", Page 21
■ You can adapt your beverage to your personal taste.
→ "Beverage settings", Page 22
Notes
■ If you do not change any settings for approx. 5 seconds, the appliance will exit settings mode. The settings will be automatically saved.
- With a number of settings your coffee is prepared in several steps. Wait until the process has completely finished.
8.3 Dispensing a coffee drink made from fresh beans
- Place the prewarmed cup under the outlet system.
-
Press the beverage symbol for a coffee drink without milk.
√ The display will show the beverage and the current settings.
→ "Beverage settings", Page 22 -
Change the settings if necessary:
▶ To adjust the per-cup quantity, press 📋
→ "Adjusting the per-cup quantity", Page 22
▶ To adjust the coffee strength, press ①
→ "Adjusting the coffee strength", Page 22
- Press start stop
The coffee beans are freshly ground for each brewing operation.
√ The coffee is brewed and then runs into the cup.
Tips
- You can use ^start to stop dispensing prematurely.
- Find out how to make coffee drinks with milk.
→ "Dispensing drinks with milk froth", Page 20
8.4 Dispensing a coffee drink made from ground coffee
NOTICE
The ground coffee compartment can become blocked.
▶ Do not use coffee beans.
▶ Do not use instant coffee.
- Use a soft brush to gently sweep the ground coffee residues into the shaft.
Note
When using ground coffee, the following selections are not available:
■ Two cups at once
- Coffee strength
■ "DoubleShot"
1. Place the prewarmed cup under the outlet system.
2. Press ① repeatedly until the display shows "Gr. Coffee".
3. Open the ground coffee compartment.
4. Add at least 1 and no more than 2 level coffee spoons of ground coffee, max. 0.026 lbs (12 g).
5. Close the ground coffee compartment.
6. Press start stpp
√ The coffee is brewed and then runs into the cup.
Tips
■ You can use start to stop dispensing prematurely.
■ To dispense another beverage with ground coffee, repeat the process.
■ Only ever add ground coffee shortly before beverage preparation.
8.5 Dispensing drinks with milk froth
You can use your appliance to dispense coffee drinks with milk froth.
WARNING
The milk system becomes very hot.
▶ Never touch the milk system when it is hot.
- Allow the hot milk system to cool down before touching it.
NOTICE
Milk residues can dry on and are difficult to remove.
- Clean the milk system after every use.
Note: Do not use creamers.
Tips
■ You can also use plant-based alternatives to milk, e.g. soy milk.
■ The quality of the milk froth depends on the type of milk or plant-based alternative used.
8.6 Dispensing a coffee drink with milk froth
Requirements
■ The milk tube is connected.
■ The suction pipe is connected.
1. Insert the suction pipe in the milk.
2. Place the prewarmed cup under the outlet system.
3. Press the beverage symbol for a coffee drink with milk.
√ The display will show the beverage and the current settings.
→ "Beverage settings", Page 22
4. Change the settings if necessary:
▶ To adjust the per-cup quantity, press 📄
→ "Adjusting the per-cup quantity", Page 22
▶ To adjust the coffee strength, press Ⓞ
→ "Adjusting the coffee strength", Page 22
- Use the ground coffee compartment.
→ "Dispensing a coffee drink made from ground coffee", Page 20
5. Press start stop
√ The beverage is prepared and then runs into the cup.
√ After preparing the beverage, the milk system will automatically clean itself with a short jet of steam.
Tip: If you want to stop dispensing prematurely, press start if you want to stop dispensing completely, press
8.7 Dispensing special beverages
Your appliance has other beverages besides those available via the quick selection buttons.
▶ Press ∅several times.
→ "Overview of beverages", Page 11
8.8 Dispensing milk froth
WARNING
The milk system becomes very hot.
▶ Never touch the milk system when it is hot.
- Allow the hot milk system to cool down before touching it.
Requirements
■ The milk tube is connected.
■ The suction pipe is connected.
1. Insert the suction pipe in the milk, e.g. Tetra Pak carton.
2. Place the prewarmed cup under the outlet system.
- Press ♡repeatedly until the display shows "Milk froth".
- Change the setting if necessary:
▶ To adjust the per-cup quantity, press 📋
→ "Adjusting the per-cup quantity", Page 22
5. Press start stop
√ The milk froth is dispensed from the outlet system.
6. To stop dispensing prematurely, press start stop
8.9 Dispensing hot water
WARNING
The milk system becomes very hot.
▶ Never touch the milk system when it is hot.
- Allow the hot milk system to cool down before touching it.
Note: If the milk system was not cleaned, small amounts of milk may be dispensed with the water.
Requirements
■ The milk system was cleaned.
■ The milk tube was removed.
1. Place the prewarmed cup under the outlet system.
2. Press ♡ repeatedly until the display shows "Hot water".
- Change the setting if necessary:
▶ To adjust the per-cup quantity, press 📄
→ "Adjusting the per-cup quantity", Page 22
4. Press start stop
If the message "Please remove milk tube." appears, remove the milk tube and press start step
√ Hot water runs out of the outlet system.
- To stop dispensing prematurely, press start stop
8.10 Beverage settings
Make a drink according to your taste.
Adjusting the coffee strength
▶ To select the coffee strength, press Ⓞ
You can select the following coffee strengths:
- "mild"
- "regular"
- "strong"
- "very strong"
- "DoubleShot"
Note: The "DoubleShot" setting is not available for every drink and drink quantity.
Tip: For a strong taste of coffee, select a high coffee strength when setting a large per-cup quantity.
Selecting ground coffee
- Press ① repeatedly until the display shows "Gr. Coffee".
→ "Dispensing a coffee drink made from ground coffee", Page 20
AromaDouble Shot
You can make your coffee extra strong by using the "DoubleShot" setting.
The longer the coffee is brewed, the more bitter substances and undesired aromas are released. Bitter substances and undesirable aromas affect the taste and digestibility of coffee. To ensure that only pleasant-tasting and easily digestible aromatic substances are released, coffee beans are freshly ground and brewed when half the quantity has been prepared.
Note: The "DoubleShot" setting is not available for every drink and drink quantity.
Adjusting the per-cup quantity
- Press □ repeatedly until the required per-cup quantity is shown on the display.
Dispensing two cups at once
Depending on the appliance model, you can make two cups at the same time for certain beverages.
Note
The "Dispensing two cups" function is not available for the following selections:
■ "Gr. Coffee"
■ "DoubleShot"
■ Per-cup quantity smaller than 1.2 oz. (35 ml)
-
Press
√ The display shows the setting. -
Place two cups on the right and left under the outlet system.
-
Press start stop
The beverage is prepared in 2 steps. The beans are ground in 2 grinding operations.
√ The drinks are brewed and then run into the cups.
- Wait until the process is complete.
8.11 Grinder
Your appliance has an adjustable grinder, which you can use to customize the right coffee grind size of your coffee beans.
Setting the grinding level
Set the required grinding level while the coffee beans are being ground.
WARNING
The grinder rotates.
▶ Never reach into the grinder.
NOTICE
Risk of damage to the grinder. The grinder may be damaged if the grinding level is not set properly.
▶ Only set the grinding level when the grinder is running.
- Select the grinding level step by step using the rotary selector.
Grinding level Setting
Fine grinding level for light-roasted beans
Turn rotary selector counterclockwise

Coarse grinding level for dark-roasted beans
Turn rotary selector clockwise

The grinding level setting only takes effect after the second cup.
Tip: If the coffee is only dispensed drop by drop, set a coarser grinding level.
If the coffee is dispensed too quickly and with too little crema, set a finer grinding level.
9 Child protection
You can lock the appliance to protect children against scalding and burns.
9.1 Activating the child lock
Requirement: The appliance is switched on.
- Press and hold ☐ for at least 3 seconds.
√ The display shows "Child lock active. To deactivate press for 3 sec."
9.2 Deactivating the child lock
- Press and hold ☐ for at least 3 seconds.
√ This deactivates the child lock.
10 Cup warmer ^1
You can use the cup warmer to pre-heat your cups.
10.1 Activating and deactivating the cup warmer ^1
WARNING
The cup warmer ^1 can become hot.
- Don't touch the cup warmer ^1 while hot.
- Allow the hot cup warmer ^1 to cool down before touching it.
Tip: To optimally warm the cups, place the cups with the cup base on the cup warmer ^1 .
- You can activate or deactivate the cup warmer ^1 in the basic settings.
→ "Overview of basic settings", Page 24
11 Basic settings
You can configure the basic settings for your appliance to meet your needs and call up additional functions.
11.1 Changing the basic settings
- Press
- Use or to select the basic setting required and press ok
√ The display shows the setting options and the navigation symbols
light up. The display indicates the current setting.
- Use or to make the required selection and press ok
√ The setting is saved. - Use to go back.
- To exit the menu, press 🔒
11.2 Overview of basic settings
Here is an overview of the basic settings.
Appliance information License information Display FOSS license text.
| Setting Selection Description | ||
| Cleaning and care Milk system | DescaleCleanCalc'n Clean | Start machine care cycles.→ "Machine care cycles",Page 31 |
| Cup warmer ^1 | Cup warmer off ^2 Cup warmer on | Switch the cup heater on or off.→ "Cup warmer", Page 23 |
| Water filter New filter | No filter | Set use of the water filter. |
| Coffee temp. normal | highmax. | Set the temperature for coffee and hot water drinks.Note: The setting is effective for all preparation types. |
| Languages See selection on the appliance. | Set the menu language. Changes will be immediately displayed. | |
| Autom. switch-off See selection on the appliance. | Set how long the appliance should wait after preparing the last drink before switching off automatically. | |
| Water hardness 1 (soft) | 2 (medium)3 (hard)4 (very hard) ^2 Water softening system | Set the appliance to the local water hardness. |
| Statistics See selection on the appliance. | Display the number of beverages dispensed. | |
| Key tones Key tones on | 1 | Switch the button tones on or off. |
| Key tones off | ||
| Beverage Unit fl.oz | ■ | Adjust the capacity unit. |
| ■ ml | ||
| Start-up rinsing Start-up rinsing off | The cup under the outlet system is not filled with rinsing water when the appliance is switched on. | |
| Factory settings Full reset? Continue: OK Cancel: ← | Restore to the factory settings. Note: All individual settings will be deleted and the factory settings restored. | |
12 Cleaning and maintenance
12.1 Dishwasher-safe components
Find out here which components can be cleaned in the dishwasher.
NOTICE
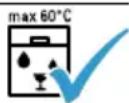
Some components are sensitive to heat and may be damaged if they are cleaned in a dishwasher.
- Follow the operating instructions of the dishwasher.
▶ Only clean dishwasher-safe components in the dishwasher. - Only use programs that do not heat the components above 140 °F (60 °C).
Dishwasher-safe:
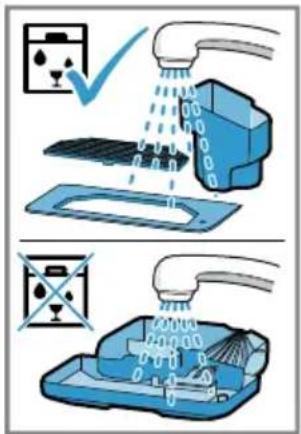
- Drip plate
- Drip grate
■ Coffee dregs container
■ Mechanical fill level indicator
■ Milk system with adapter
■ Ground coffee compartment with hinged lid
Not dishwasher-safe:
■ Drip tray
■ Water tank
- Lid for water tank
■ Brewing unit
■ Beverage dispenser cover

12.2 Cleaning agents
Only use suitable cleaning agents.
NOTICE
Unsuitable cleaning agents may damage the surfaces of the appliance.
- Do not use strong or abrasive cleaning agents.
- Do not use cleaning agents containing alcohol or spirits.
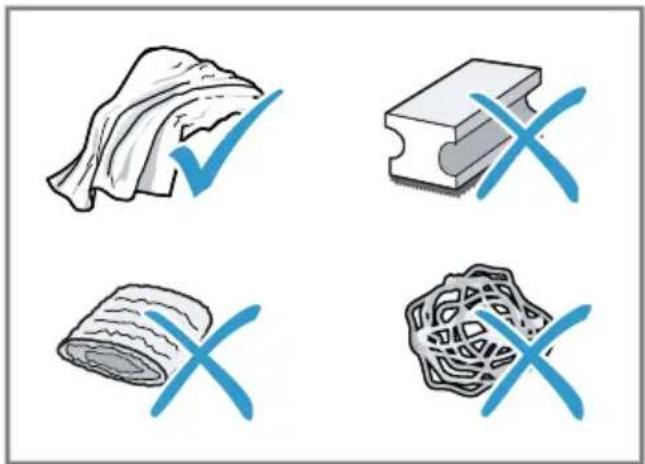
- Do not use hard scouring pads or cleaning sponges.
Unsuitable cleaning and descaling agents may damage the appliance.
- Do not use pure citric acid, vinegar or any vinegar-based agents to descale the appliance.
- Do not use descaling agent with phosphoric acid.
- Only use cleaning tablets and descaling tablets that have been specially developed for the appliance.
→ "Accessories", Page 12
natural_image
Four abstract icons: a rolled document, a rectangular block with X marks, a rolled parchment, and a textured circular object (no text or symbols)Tips
■ Wash new sponge cloths thoroughly to remove any salt adhering to them. Salt can cause rust film to develop on stainless steel surfaces.
■ Always remove any residues of limescale, coffee, milk and cleaning/descaling solutions immediately to prevent corrosion.
12.3 Cleaning the appliance
WARNING
Moisture intrusion may cause an electric shock.
▶ Never immerse the appliance or the power cord in water.
- Liquids must not be spilled on the appliance plug connection.
- Do not use any steam cleaners or high-pressure cleaners to clean the appliance.
WARNING
Some parts of the appliance become very hot.
▶ Never touch hot appliance parts.
- Allow hot appliance parts to cool down before touching.
- Disconnect the appliance from the power supply.
- Clean the housing, the high-gloss surfaces and the control panel with a microfiber cloth.
- Clean the outlet system with a soft, damp cloth after beverages have been dispensed.
- Rinse the water tank with fresh, clean water.
- If the appliance has not been used for a long time, e.g. after a vacation, clean the entire appliance, including moving parts such as the brewing unit or water tank.
Note: The appliance will rinse itself automatically if you switch it on when it is cold or switch it off after it has dispensed coffee. In other words the system cleans itself.
12.4 Cleaning the drip tray and coffee dregs container
Clean and empty the drip tray and coffee dregs container every day to prevent deposits.
- Detach the milk tube from the outlet system.
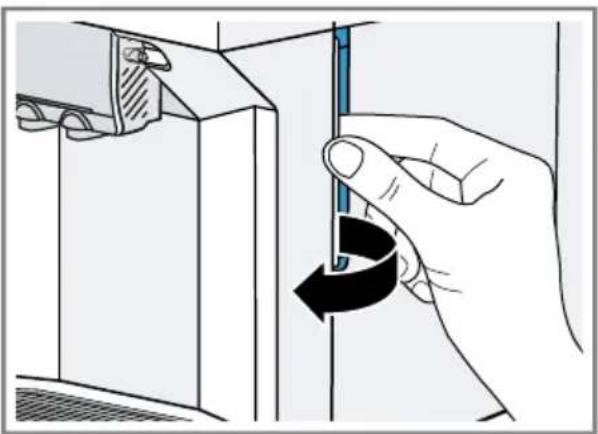
- Open the brewing chamber door.
natural_image
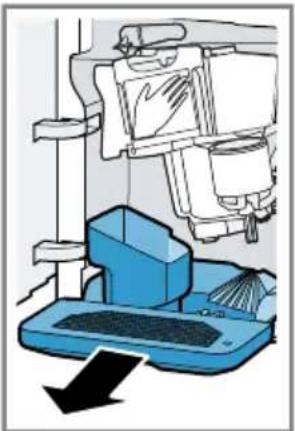
Illustration of a hand using a tool to adjust or install a mechanical component, showing a blue tool inserted into a slot (no text or symbols present)- Pull the drip tray and the coffee dregs container forward and out.
natural_image
Illustration of a robotic arm operating a machine with a blue base and black arrow indicating force (no text or symbols present)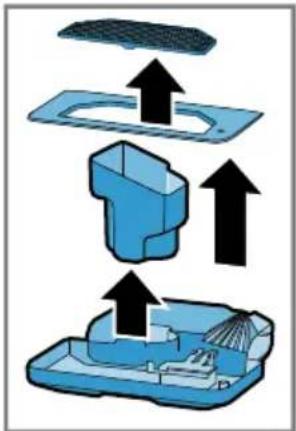
text_image
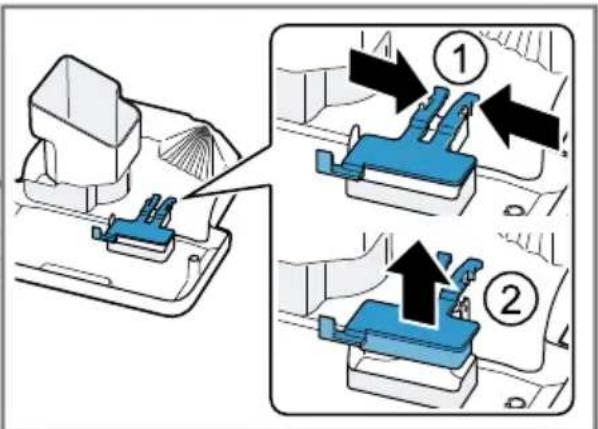
Diagram illustrating three-step assembly or cleaning process with upward arrows indicating progression- Tip: If you press both brackets in, you can then remove the mechanical fill level indicator more easily.
text_image
Diagram illustrating a mechanical assembly process with numbered steps and directional arrows indicating movement or assembly.Remove the mechanical fill level indicator and clean with a damp cloth.
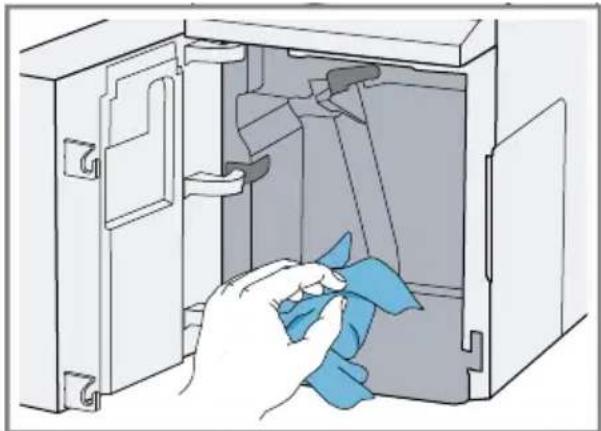
- Clean the appliance interior.
natural_image
Illustration of a hand cleaning a cabinet interior with a blue cloth (no text or symbols)- Clean the drip tray and the coffee dregs container and reinsert in the appliance.
text_image
Diagram illustrating two different cleaning or disinfection methods: one using a showerhead to clean water, the other using a drain drain with a washing machine.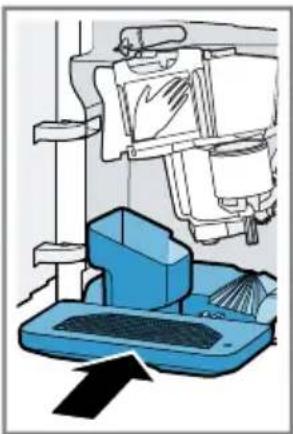
natural_image
Illustration of a robotic arm operating a blue platform with a black arrow indicating motion (no text or symbols present)12.5 Cleaning the ground coffee compartment
Tip: You can clean the ground coffee compartment in the dishwasher.
- Pull out the ground coffee compartment by the open lid.
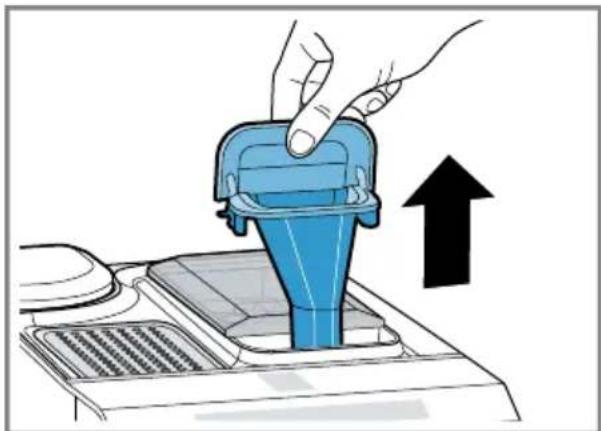
natural_image
Illustration of a hand pressing a blue mechanical component into a car intake manifold, with an upward arrow indicating motion (no text or symbols)en-us Cleaning and maintenance
- Clean the ground coffee compartment with liquid dish soap.
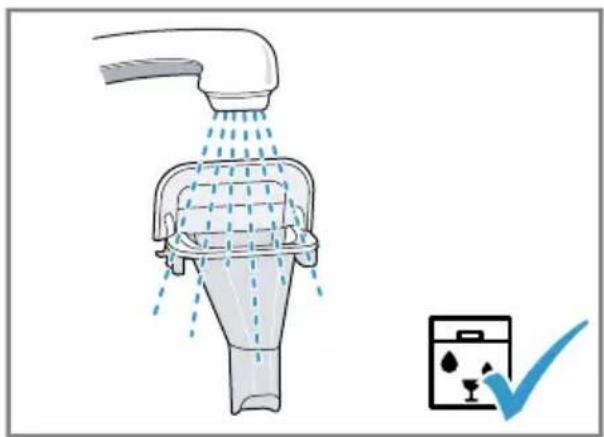
natural_image
Illustration of a showerhead spraying water with a cleaning bag (no text or symbols)- Dry the ground coffee compartment and insert it into the appliance.
12.6 Cleaning the milk system
Clean the milk system regularly.

WARNING
The milk system becomes very hot.
▶ Never touch the milk system when it is hot.
- Allow the hot milk system to cool down before touching it.
NOTICE
The appliance may be damaged by improper cleaning.
- Do not put the cover of the outlet system in the dishwasher.
Tips
- If you want to give the milk system a very thorough clean, you can use the "Clean milk system" machine care cycle.
■ You can clean all components of the milk system in the dishwasher. -
Slide the outlet system right down.
-
Pull the cover forward and remove the milk tube.
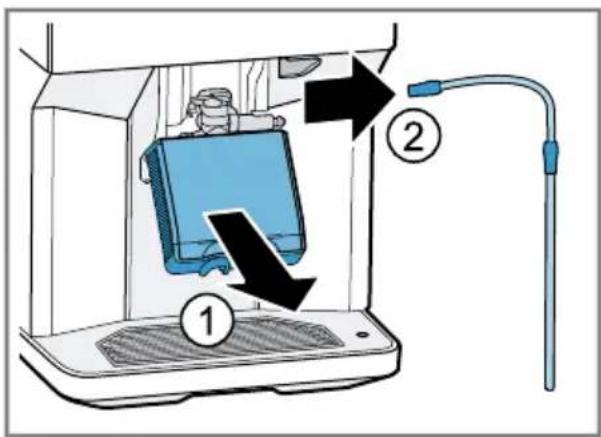
text_image
Diagram of a device with labeled parts, showing a device inside a container and connected to a cable with numbered annotations.- Release and remove the milk system.
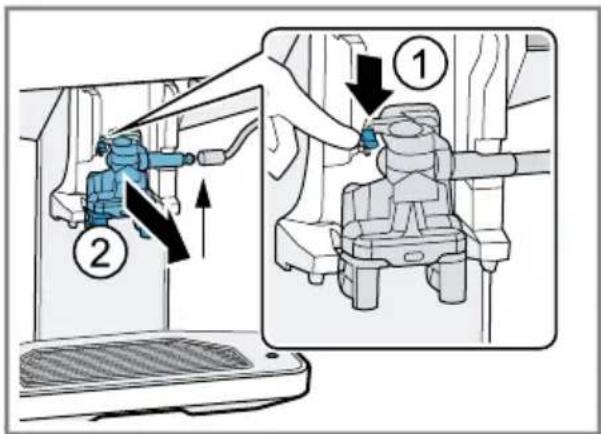
text_image
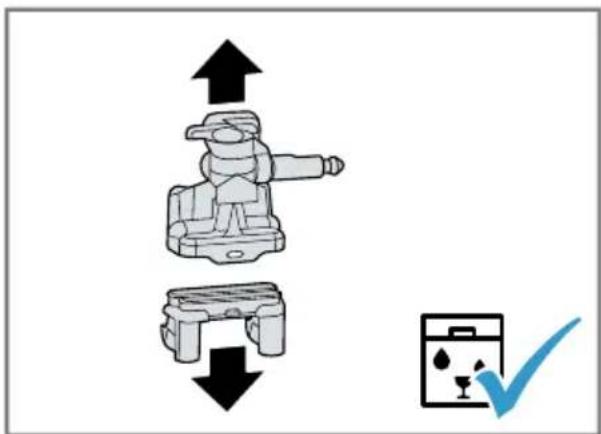
Diagram showing a blue mechanical device being inserted into a vehicle's internal components, with labeled parts ① and ②.- Dismantle the top and bottom section of the milk system.
natural_image
Diagram showing mechanical assembly with bidirectional arrows and a checkmark icon (no text or symbols)-
Detach the milk tube from the suction pipe.
-
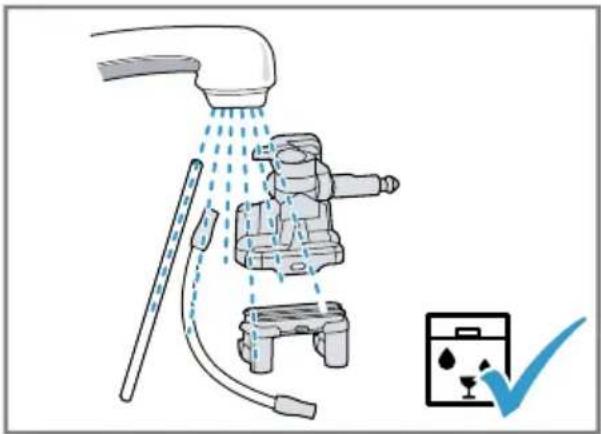
Clean the components with dish-washing detergent and a soft cloth.
text_image
Diagram illustrating a shower system with water spray and a water level indicator, showing components like showerhead, drain, and sink.-
Remove all detergent residues in the milk system after rinsing. Rinse all components with clean water and dry.
-
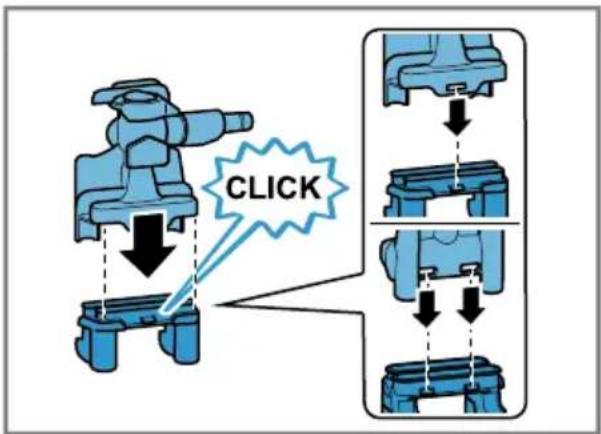
Assemble the top and bottom section of the milk system.
text_image
CLICK-
Fit the milk tube and the suction pipe together.
-
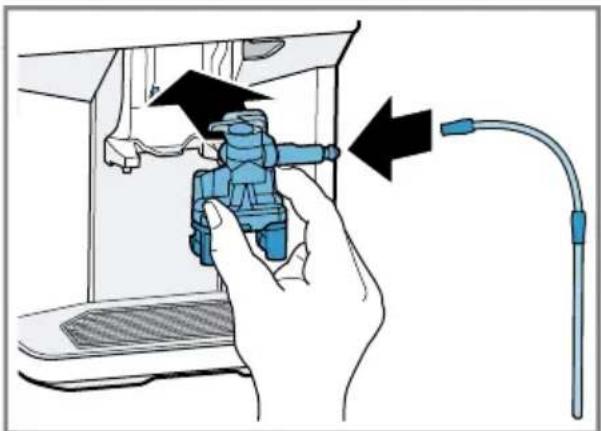
Insert the milk system in the appliance from the front, making sure it is straight.
natural_image
Illustration of a hand inserting a blue mechanical component into a laptop (no text or symbols)- Attach the milk tube.
- Rinse the cover and clean with a soft cloth.
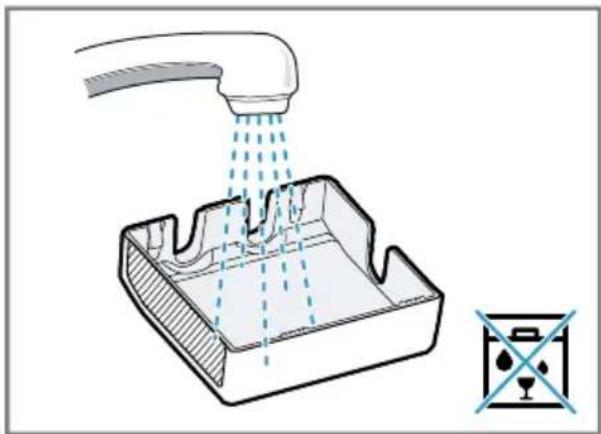
natural_image
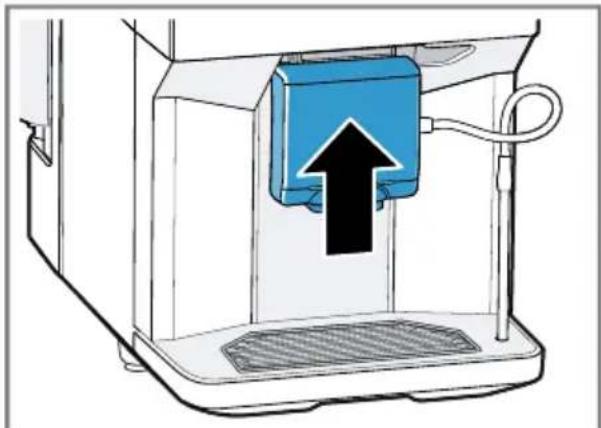
Diagram showing a faucet spraying liquid into a container with a water level indicator (no text or symbols)- Fit the cover.
- Slide the outlet system all the way up.
natural_image
Diagram of a blue industrial machine with an upward arrow indicating motion or force, no text or symbols present12.7 Cleaning the brewing unit
In addition to automatic rinsing, you should also remove and clean the brewing unit regularly.
WARNING
Some parts of the appliance become very hot.
▶ Never touch hot appliance parts.
- Allow hot appliance parts to cool down before touching.
NOTICE
The brewing unit may be damaged by improper cleaning.
▶ Do not use dish detergent.
- Do not use cleaning agents containing vinegar or acids.
en-us Cleaning and maintenance
- Do not clean in the dishwasher.
- Detach the milk tube from the outlet system.
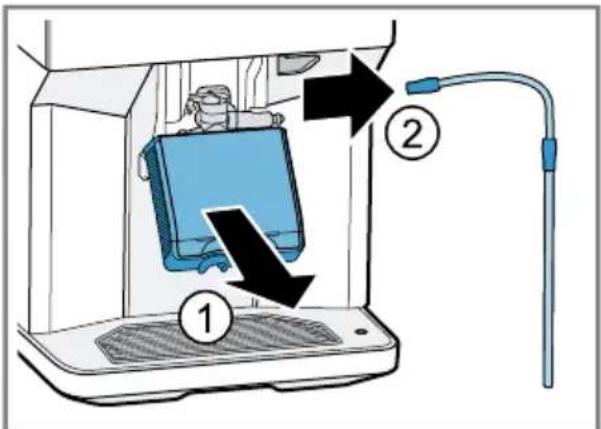
text_image
Diagram showing a device inside a container with labeled parts and directional arrows indicating movement or flow.- Use ⏻to switch the appliance down.
▶ Open the brewing chamber door.
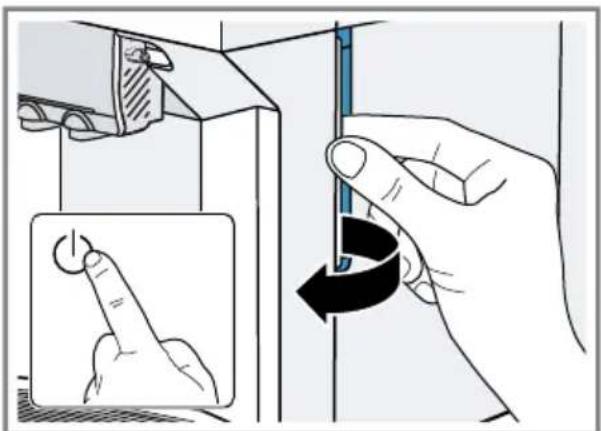
natural_image
Illustration of a hand using a tool to adjust a mechanical component, showing a close-up and rotation view (no text or symbols)- Remove the drip tray with the coffee dregs container.
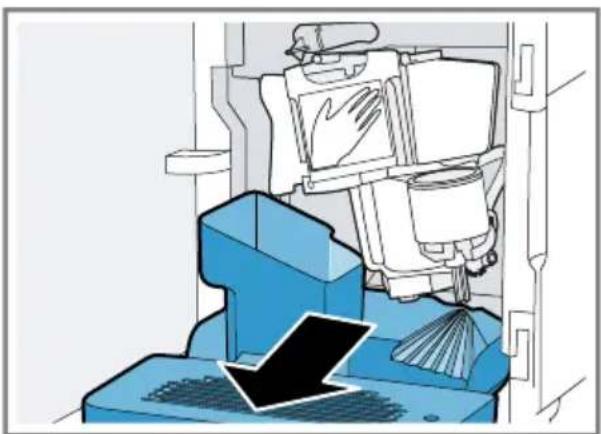
natural_image
Illustration of a cleaning or cleaning machine with a blue box and hand tool, no visible text or symbols- Push the red lever up.
- Hold the brewing unit by the handle and carefully pull forward and out.
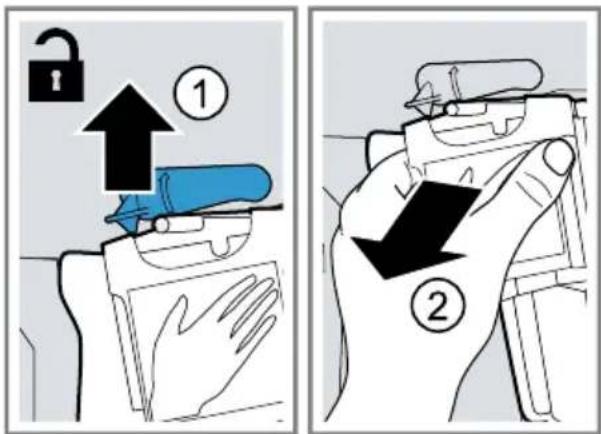
text_image
Diagram illustrating two steps of a medical procedure: step 1 shows a lock and pen being inserted, while step 2 shows a hand holding a device with a magnified view.- Clean the brewing unit thoroughly under warm running water.
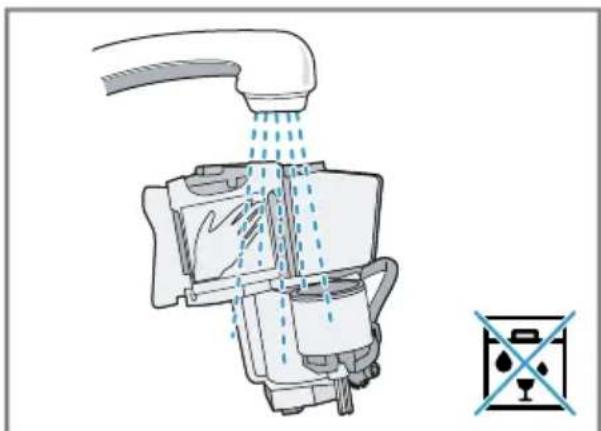
natural_image
Diagram of a kitchen sink with water spray and a water level indicator (no text or symbols)- Clean the appliance interior with a damp cloth and remove any coffee residues.
Leave the brewing unit and the appliance interior to dry.
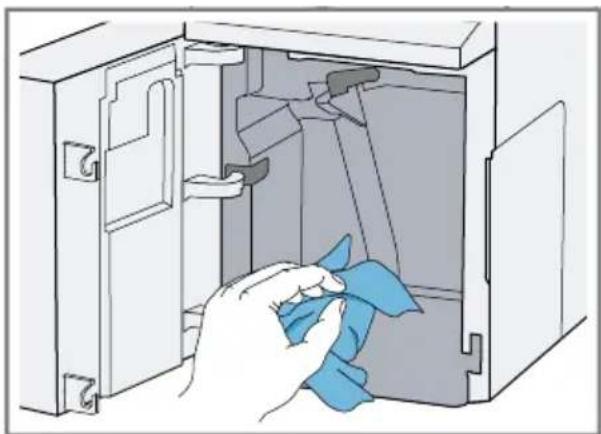
natural_image
Illustration of a hand cleaning a cabinet interior with a blue cloth (no text or symbols)- Hold the brewing unit by the handle.
▶ Push the red lever up.
- Position the brewing unit under the lever and slide it back as far as it will go.
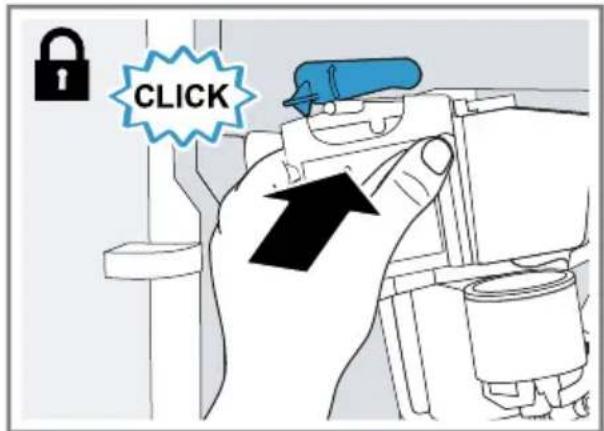
text_image
CLICK√ The lever will click into place.
8. Insert the drip tray with the coffee dregs container.
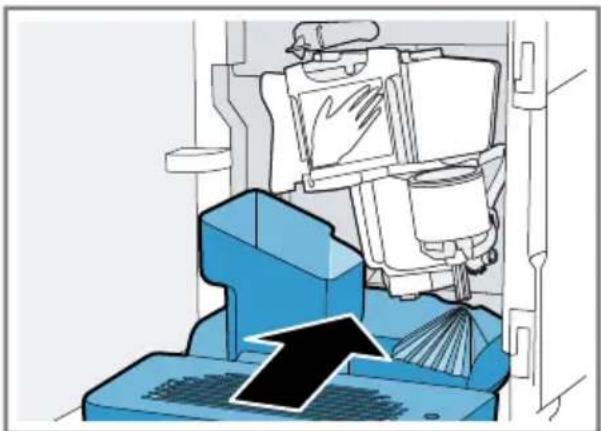
natural_image
Illustration of a robotic arm operating a blue platform with a black upward arrow indicating motion (no text or symbols)- Close the brewing chamber door.
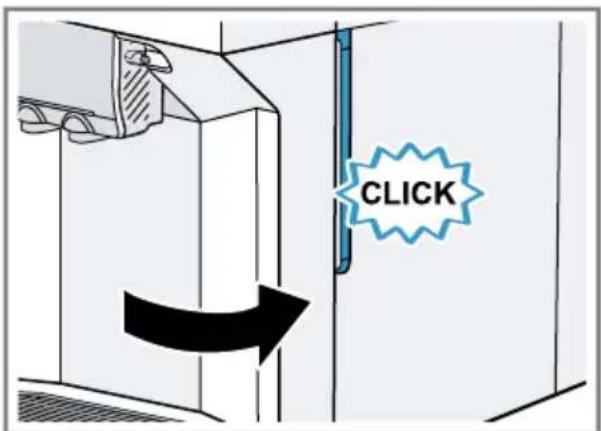
text_image
CLICKNote: The door can only be closed if the brewing unit and drip tray are inserted correctly.
12.8 Machine care cycles
After certain time intervals, your appliance will recommend using the machine care cycles. Use the machine care cycles to clean your appliance thoroughly.
NOTICE
Improper cleaning and descaling or a delay in doing so may damage the appliance.
- Immediately perform the descaling process in accordance with the instructions.
▶ Only put cleaning tablets in the ground coffee compartment. - Do not put descaling tablets or other products in the ground coffee compartment.
Notes
■ The display indicates the progress of the descaling or cleaning process.
- If your appliance is not descaled in good time, the display will show "Descaling overdue. Appliance is locked. Please press menu for 3 sec."
■ If your appliance has been locked, you can only operate it again once the descaling process has been carried out.
- If you accidentally interrupt the machine care cycle, you must reset it. → "Resetting machine care cycles", Page 32
Tips
■ If you use a water filter, this will increase the length of time until you have to run a machine care cycle.
■ You can combine "Descale" and "Clean" with the "Calc'n Clean" machine care cycle.
■ Clean your appliance with a soft, damp cloth immediately after a machine care cycle to remove any
descaling solution residues and to prevent corrosion.
Using machine care cycles
Notes
- If you are using the "Cleaning and care" machine care cycle, clean the brewing unit beforehand.
-
If you are using the "Descale" or "Calc'n Clean" machine care cycles, clean the brewing unit beforehand and prepare the descaling solution.
-
Press
-
Use and to select "Cleaning and care" and press ok
-
Use and to select the required cycle and press oke.g. "Descale".
√ The display will guide you through the cycle.
Preparing descaling solution
- Fill a container with 16,9 oz. (0.5 l) lukewarm water.
- Add a descaling tablet to the water and stir until it is fully dissolved.
Resetting machine care cycles
Perform the following steps if a machine care cycle is interrupted, e.g. due to an outage.
- Empty the container and put the end of the suction pipe in the container.
- Rinse out the water tank.
- Fill the water tank with fresh, non-carbonated water up to the "max" mark.
- Press ak
√ The appliance rinses itself for approx. 2 minutes. - Empty and clean the drip tray.
- Insert the drip tray and close the door.
- Restart the machine care cycle.
13 Troubleshooting

WARNING
To avoid risk of injury from improper repairs, observe the following.
- Only qualified technicians or authorized service providers should perform repairs.
▶ Only genuine spare parts may be used to repair the appliance. - If the power cord of this appliance becomes damaged, it must be replaced by the manufacturer, the manufacturer's Customer Service, or an authorized service provider in order to prevent injury.
Fault Cause and troubleshooting
| Appliance no longer responds. | Appliance has an error.1. Unplug the appliance and wait 60 seconds.2. Plug it back in. |
| Appliance only dispenses water, not coffee. | Empty bean container is not detected by the appliance.▸ Pour in coffee beans. |
| Coffee shaft on brewing unit is blocked.▸ Clean the brewing unit. | |
| Fault Cause and troubleshooting | |
| Appliance only dispenses water, not coffee. | Coffee beans are too oily and do not fall into the grinder.► Gently tap the bean container.► Change the type of coffee.► Do not use oily beans.► Clean the empty bean container with a damp cloth. |
| Appliance is not dispensing milk froth. | Milk system is soiled.► Clean the milk system in the dishwasher. |
| Milk inlet tube not immersed in milk.► Use more milk.► Check whether the milk inlet tube is immersed in the milk. | |
| Heavy build-up of limescale in the appliance.► Descale the appliance. | |
| No milk intake by the milk system. | The milk system is assembled incorrectly.► Assemble the milk system correctly. |
| Milk inlet tube not immersed in milk.► Use more milk.► Check whether the milk inlet tube is immersed in the milk. | |
| Milk froth is too cold. | Milk is too cold.► Warm the milk. |
| Appliance is not dispensing hot water. | Milk system is soiled.► Clean the milk system in the dishwasher. |
| Appliance is not dispensing drinks. | Air in the water filter.1. Immerse the water filter in water with the opening facing upwards until no more air bubbles escape.2. Reinsert the filter.→ "Inserting and activating the water filter", Page 17► Firmly press the water filter straight down into the tank connection. |
| Residues of limescale remover are blocking the water tank.1. Remove the water tank.2. Clean the water tank thoroughly. | |
| Water has dripped inside at the base of the appliance. | Drip tray was removed too soon.► Wait a few seconds after the last drink was dispensed before removing the drip tray. |
| Water in drip tray even when using a cup under the outlet system during the rinsing process. | Appliance carries out an internal rinsing process.► Empty the drip tray. |
| Brewing unit cannot be removed. | Brewing unit is not in the removal position.► Switch the appliance back on. |
| Appliance cannot be operated.Change displays. | Appliance is in demo mode.1. Remove the water tank and fill it with fresh, cold, non-carbonated drinking water.2. Reinsert the water tank. |
| Grinder will not start. | Appliance is too hot.1. Disconnect the appliance from the power supply.2. Wait 1 hour so the appliance can cool down. |
| Grinder is not grinding any coffee beans despite full bean container. | Coffee beans are too oily and do not fall into the grinder.► Gently tap the bean container.► Change the type of coffee.► Do not use oily beans.► Clean the empty bean container with a damp cloth. |
| Display shows "Close" despite the door being closed. | Door is not closed properly.► Press the door firmly shut. |
| Appliance is too hot.1. Disconnect the appliance from the power supply.2. Wait 1 hour so the appliance can cool down. | |
| Display shows "Please empty drip tray and reinsert." despite the drip tray being empty. | Appliance is switched off and does not detect emptying.1. Switch the appliance on and remove the drip tray.2. Reinsert the drip tray. |
| Drip tray is soiled.► Clean the drip tray thoroughly. | |
| Display shows "Please refill water tank" despite the water tank being full. | Water tank is inserted wrong.► Insert the water tank correctly. |
| Float is stuck in the water tank.1. Remove the water tank.2. Clean the water tank thoroughly. | |
| Carbonated water is in the water tank.► Fill the water tank with fresh drinking water. | |
| New water filter was not rinsed as per instructions.1. Rinse the water filter according to the instructions.→ "Inserting and activating the water filter", Page 17 | |
| Display shows "Please refill water tank" despite the water tank being full. | 2. Place the water filter into operation. |
| Air in the water filter.1. Immerse the water filter in water with the opening facing upwards until no more air bubbles escape.2. Reinsert the filter.→ "Inserting and activating the water filter", Page 17 | |
| Water filter is old.► Insert a new water filter. | |
| Limescale deposits in the water tank are blocking the system.1. Clean the water tank thoroughly.2. Start the descaling program. | |
| Display shows "Please clean brewing unit, replace and close door.". | Brewing unit is soiled.► Clean the brewing unit. |
| Mechanism of brewing unit is stiff.► Clean the brewing unit. | |
| Too much ground coffee in the brewing unit.► Use no more than 2 level measuring spoons of ground coffee. | |
| Display shows "Voltage (V) incorrect.". | There are problems with the power supply.► Only operate the appliance at 120 V ~. |
| Display shows "Please restart appliance.". | Brewing unit is heavily soiled or cannot be removed.► Restart the appliance.► Clean the brewing unit. |
| Appliance has an error.1. Unplug the appliance and wait 60 seconds.2. Plug it back in. | |
| Display shows "Calc'n Clean" very frequently. | Decalcified water still contains small amounts of lime.1. Insert a new water filter.→ "Inserting and activating the water filter", Page 172. Set the corresponding water hardness. |
| Incorrect or too little descaling agent used.► When descaling, only use suitable tablets. | |
| Machine care cycle has not been carried out in its entirety.► Reset the machine care cycle.→ "Resetting machine care cycles", Page 32 | |
| Coffee or milk froth quality varies considerably. | Build-up of limescale in the appliance.► Descale the appliance. |
| Milk froth quality varies considerably. | Milk froth quality depends on the type of milk or plant-based alternative used.► Optimize the result through the selection of the milk or plant-based drink type. |
| Coffee is not dispensed or has slowed to a trickle.Set quantity is not reached. | Grinding level is set too fine.► Set a coarser grinding level.→ "Setting the grinding level", Page 22 |
| Heavy build-up of limescale in the appliance.► Descale the appliance. | |
| Air in the water filter.1. Immerse the water filter in water with the opening facing upwards until no more air bubbles escape.2. Reinsert the filter.→ "Inserting and activating the water filter", Page 17 | |
| Appliance is soiled.► Clean the brewing unit.► Descale and clean the appliance. | |
| Coffee strength is set too high.► Reduce the coffee strength to e.g. "regular".→ "Adjusting the coffee strength", Page 22 | |
| Coffee has no crema. | Type of coffee is not optimal.► Use a coffee variety with a higher proportion of Robusta beans. |
| Coffee beans are no longer freshly roasted.► Use fresh coffee beans. | |
| Grinding level is not appropriate for coffee beans.► Adjust the grinder to a finer setting.→ "Setting the grinding level", Page 22 | |
| Coffee is too acidic. | Grinding level is set too coarse.► Adjust the grinder to a finer setting.→ "Setting the grinding level", Page 22 |
| Type of coffee is not optimal.► Use a coffee variety with a higher proportion of Robusta beans. | |
| Coffee is too bitter. | Grinding level is set too fine.► Set a coarser grinding level.→ "Setting the grinding level", Page 22 |
| Type of coffee is not optimal.► Change the type of coffee. | |
Fault Cause and troubleshooting
| Coffee tastes burnt. Grinding level is set too fine. | |
| ► Set a coarser grinding level.→ "Setting the grinding level", Page 22 | |
| Type of coffee is not optimal.► Change the type of coffee. | |
| Brewing temperature is too high.► Set the brewing temperature lower.→ "Overview of basic settings", Page 24 | |
| Coffee grounds are not compact and are too wet. | Grinding level is not set correctly.► Adjust the grinder to a coarser or finer setting.→ "Setting the grinding level", Page 22 |
| Too little ground coffee.► Use 2 level measuring spoons of ground coffee. | |
| Coffee beans are too oily.► Use a different type of bean. | |
14 Transportation, storage and disposal
14.1 Activating frost protection
Protect your appliance from frost during transport and storage.
NOTICE
Residues of liquid in the appliance may damage it during transport or storage.
- Empty the pipe system before transport or storage.
Requirements
■ The appliance is ready for operation.
■ The water tank was filled.
-
Remove the milk container.
-
Clean the brewing unit.
-
Place a large container under the outlet system.
-
Press ♡ repeatedly until the display shows "Milk froth".
-
Press □ repeatedly until the display shows 240 ml.
-
Press start stop
-
Wait until steam escapes from the appliance.
- Remove the water tank.
√ The appliance drains itself automatically.
-
If the message "Please refill water tank" appears, ignore it.
-
Empty and clean the water tank and drip tray.
-
Insert the water tank and drip tray.
-
Switch down the appliance and disconnect it from the mains.
14.2 Disposal of your old appli- ance
Environmentally compatible disposal allows valuable raw materials to be recycled.
- Unplug the appliance from the power supply.
- Cut through the power cord.
- Dispose of the appliance in an environmentally responsible manner. Information about current disposal methods can be obtained from
your specialist dealer or local authority.
15 Customer Service
With any warranty repair, we will make sure your appliance is repaired by an authorized service provider using genuine replacement parts. We use only genuine replacement parts for all repairs.
Detailed information on the warranty period and terms of warranty can be found in the Statement of Limited Product Warranty, from your retailer, or on our website.
If you contact Customer Service, you will need the model number (E-Nr.) and the production number (FD) of your appliance.
USA:
1-800-701-5231
www.bosch-home.com/us/owner-
support/get-support
www.bosch-home.com/us/shop
CA:
1-800-701-5231
www.bosch-home.ca/en/service/get-support
www.bosch-home.ca/en/service/
cleaners-and-accessories
15.1 Model number (E-Nr.) and production number (FD)
You can find the model number (E-Nr.) and the production number (FD) on the appliance's rating plate.
Making a note of your appliance's details and the Customer Service telephone number will enable you to find them again quickly.
16 Technical specifications
| Voltage 120 V ~ | |
| Frequency 60 Hz | |
| Power rating 1600 W | |
| Maximum static pump pressure | 15 bar |
| Maximum capacity of water tank (without filter) | 57.5 fl oz.(1.7 l) |
| Maximum capacity of bean container | 9.5 oz.(≈270 g) |
| Power cord length 39 38 " (1 m) | |
| Appliance height 14.7" | (37.3 cm) |
| Appliance width 10.9" | (27.6 cm) |
| Appliance depth 17.8" | (45.2 cm) |
| Weight, empty 17.6-19.8 lb s (≈8-9 kg) | |
| Type of grinding unit Ceramic | |
17 STATEMENT OF LIMITED PRODUCT WARRANTY
THIS LIMITED WARRANTY GIVES YOU SPECIFIC LEGAL RIGHTS, AND YOU MAY ALSO HAVE OTHER RIGHTS WHICH VARY FROM STATE TO STATE.
17.1 What this warranty covers & Who it applies to
The limited warranty provided by BSH Home Appliances (“Bosch”) in this Statement of Limited Product Warranty applies only to the Bosch appliance (“Product”) sold to you
provided that the Product was purchased:
- For your normal, household (non-commercial) use (i.e., no more than 7,000 cups during the warranty period), and has in fact at all times only been used for normal, non-commercial household purposes.
- New at retail from a BSH authorized dealer or directly from BSH (not a display, floor, “As Is”, or “B” stock appliances), and not for resale, or commercial use.
■ Within the United States or Canada, and has at all times remained within the country of original purchase.
The warranties stated herein apply to the original purchaser of the product warranted herein purchased for ordinary household use during the term of the warranty.
Please make sure to register your product; failure to register will not affect your warranty rights. Registering your product is the best way for Bosch to notify you in the unlikely event of a safety notice or product recall.
Upon purchase or receipt of the product, it is recommended to register it using the QR code on the side of the machine or at https://registerbosch.com/
17.2 Obtaining warranty service
To obtain warranty service for your product, you should contact Bosch Customer Service at (800)701-5231 to arrange a repair.
17.3 How long the warranty lasts
Bosch warrants that the Product is free from defects in materials and workmanship for a period of seven hundred thirty (730) days from the date of the original delivery. The foregoing timeline begins to run upon the date of the original delivery.
The warranty shall only be extended for the time that elapsed between the date of your warranty claim and the date of the completed repair or replacement.
This Product is also warranted to be free from cosmetic defects in material and workmanship (such as scratches of stainless steel, paint/porcelain blemishes, chips, dents, or other damage to the finish) of the Product, for a period of thirty (30) days from the date of delivery. This cosmetic warranty excludes slight color variations due to inherent differences in painted and porcelain parts, as well as differences caused by kitchen lighting, product location, or other similar factors. This cosmetic warranty specifically excludes any display, floor, "As Is", or "B" stock appliances. UNDER THIS SPECIFIC WARRANTY, A PROOF OF PURCHASE (E.G., RECEIPT) IS REQUIRED. If proof of purchase cannot be provided, date of production plus three months will be used as the purchase date. You may be required to provide clear images (e.g., pictures of the Product and/or including the data tag showing model and serial number), but failure to do so will not diminish your warranty rights.
17.4 Repair/replace as your exclusive remedy
During this warranty period, Bosch or one of its authorized service providers will repair your Product without charge to you (subject to certain limitations stated herein) under a valid warranty claim under the terms of the applicable warranty. Bosch will cover the cost of returning the Bosch Product to Bosch via ground shipping, and the original Product (removed parts and components) shall become the property of Bosch. CONSUMERS MUST USE THE SHIPPING TOTE OR SPECIAL PACKAGING INSTRUCTIONS PROVIDED BY BOSCH. This warranty does not cover for shipping damage or loss of product during shipping.
If reasonable attempts to repair the Product have been made without success, then Bosch will replace your Product with a new or factory certified (i.e., refurbished) replacement (upgraded models may be available to you, in Bosch's sole discretion, for an additional charge). Bosch may repair a part of the original Product with a factory certified (i.e., refurbished) part. You have the right to reject a replacement Product that materially differs from the original Product.
Bosch's sole liability and responsibility hereunder is to repair the Product under a valid warranty claim, using a Bosch technician or one of its authorized service providers during normal business hours. For safety and property damage concerns, Bosch highly recommends that you do not attempt to repair the Product yourself, or use a non-authorized service provider;
Bosch will have no responsibility or liability for damage resulting from
repairs or work performed by a non- authorized service provider. Authorized service providers are those per- sons or companies that have been specially trained on Bosch products, and who possess, in Bosch's opin- ion, a superior reputation for cus- tomer service and technical ability (note that they are independent enti- ties and are not agents, partners, af- filiates or representatives of Bosch). Nevertheless, having your roduct ser- viced by a repair shop that is not affil- iated with or an authorized dealer of Bosch will not void this warranty. Also, using third-party parts will not void this warranty.
17.5 Out of warranty product
Bosch is under no obligation, at law or otherwise, to provide you with any concessions, including repairs, pro-rates, or Product replacement, once this warranty has expired.
17.6 Warranty exclusions
This Limited Warranty does not cover any of the following:
■ Products sold outside of the United States of America, USA Territories, and Canada
■ Consumables (e.g., water filter)
■ Repairs made by non-authorized retailer or dealers
■ Products purchased on eBay or auctions
■ Shipping damage or loss of product during shipping
■ Use and care related repairs
■ Use of care products not sold by Bosch (e.g., descalers, cleaners, etc.)
The warranty coverage described herein excludes all defects or dam-
age caused by, including without limitation, one or more of the following:
■ Use of the Product in anything other than its normal, household (non-commercial), and intended manner (including without limitation, any form of commercial use, use or storage of an indoor product outdoors, use of the Product in conjunction with air or water-going vessels).
■ Use of the Product with voltage or frequency outside of the dataplate rating.
■ Use of the product on a generator, solar, inverter, or DC to AC converter.
- Any party's willful misconduct, negligence, misuse, abuse, accidents, neglect, improper operation, failure to maintain according to Use & Care Manual, improper or negligent installation, tampering, failure to follow operating instructions, mishandling, unauthorized service (including self-performed "fixing" or exploration of the appliance's internal workings).
■ Adjustment, alteration or modification of any kind.
- A failure to comply with any applicable state, local, city, or county electrical, plumbing and/or building codes, regulations, or laws, including failure to install the product in strict conformity with local fire and building codes and regulations.
- Ordinary wear and tear, spills of food, liquid, grease accumulations, or other substances that accumulate on, in, or around the Product.
- Any external, elemental and/or environmental forces and factors, including without limitation, rain, wind, sand, floods, fires, mud
slides, freezing temperatures, excessive moisture or extended exposure to humidity, lightning, power surges, structural failures surrounding the appliance, and acts of God.
■ Service calls to correct the installation of your Product, to instruct you how to use your Product, to replace house fuses, or correct house wiring.
■ Damage or defects caused by labor or parts installed by any non-authorized service provider, unless approved by Bosch before service is performed.
In no event shall Bosch have any liability or responsibility whatsoever for damage to surrounding property, including cabinetry, floors, ceilings, and other structures or objects around the Product. Also excluded from this warranty are Products, on which the serial numbers have been altered, defaced, or removed; any type of service to teach you how to use the Product, or servicing where there is nothing wrong with the Product; correction of installation problems (you are solely responsible for any structure and setting for the Product, including all electrical, or other connecting facilities, for proper foundation/flooring, and for any alterations including without limitation cabinetry, walls, floors, shelving, etc.); and resetting of breakers or fuses.
TO THE EXTENT ALLOWED BY LAW, THIS WARRANTY SETS OUT YOUR EXCLUSIVE REMEDIES WITH RESPECT TO PRODUCT, WHETHER THE CLAIM ARISES IN CONTRACT OR TORT (INCLUDING STRICT LIABILITY, OR NEGLIGENCE) OR OTHERWISE. THIS WARRANTY IS IN LIEU OF ALL OTHER WARRANTIES,
WHETHER EXPRESS OR IMPLIED. ANY WARRANTY IMPLIED BY LAW, WHETHER FOR MERCHANTABILITY OR FITNESS FOR A PARTICULAR PURPOSE, OR OTHERWISE, SHALL BE EFFECTIVE ONLY FOR THE PERIOD THAT THIS EXPRESS LIMITED WARRANTY IS EFFECTIVE. IN NO EVENT WILL THE MANUFACTURER BE LIABLE FOR CONSEQUENTIAL, SPECIAL, INCIDENTAL, INDIRECT, "BUSINESS LOSS", AND/OR PUNITIVE DAMAGES, LOSSES, OR EXPENSES, INCLUDING WITHOUT LIMITATION TIME AWAY FROM WORK, HOTELS AND/OR RESTAURANT MEALS, REMODELLING EXPENSES IN EXCESS OF DIRECT DAMAGES WHICH ARE DEFINITIVELY CAUSED EXCLUSIVELY BY BOSCH, OR OTHERWISE. SOME STATES DO NOT ALLOW THE EXCLUSION OR LIMITATION OF INCIDENTAL OR CONSEQUENTIAL DAMAGES, AND SOME STATES DO NOT ALLOW LIMITATIONS ON HOW LONG AN IMPLIED WARRANTY LASTS, SO THE ABOVE EXCLUSIONS OR LIMITATIONS MAY NOT APPLY TO YOU. THIS WARRANTY GIVES YOU SPECIFIC LEGAL RIGHTS, AND YOU MAY ALSO HAVE OTHER RIGHTS WHICH VARY FROM STATE TO STATE.
No attempt to alter, modify or amend this warranty shall be effective unless authorized in writing by an officer of BSH.
17.7 Product information
For handy reference, copy the information below from the rating plate. Keep your invoice and/or delivery documents for warranty validation.
natural_image
Line drawing of a modern kitchen appliance with a side panel and ventilation slots (no text or symbols)A
D
F
The image is too blurry to recognize any text content.
The image is too blurry to recognize any text content.
text_image
Labeled diagram of a 14-inch water heater with numbered parts for identificationtext_image
Diagram illustrating a waste sorting process with labeled components and environmental protection symbolsnatural_image
Diagram showing a water dispenser pouring liquid into a digital washing machine with a blue arrow indicating flow direction (no text or symbols present)natural_image
Illustration of a hand pressing a blue plastic container into a car intake manifold, with an upward arrow indicating motion (no text or symbols)natural_image
Illustration of a showerhead spraying water with a cleaning bag (no text or symbols)natural_image
Line drawing of a coffee maker with an arrow indicating compression or lifting process (no text or symbols)natural_image
Illustration of a laptop inside a transparent enclosure with a black arrow pointing to the screen (no text or symbols)text_image
Diagram showing mechanical assembly steps with numbered instructions and directional arrows indicating movementnatural_image
Diagram showing a mechanical device with upward and downward arrows, alongside a checkmark icon (no text or symbols)text_image
Diagram illustrating a shower system with water spray and a water level indicator, showing components like showerhead, drain, and sink.flowchart
graph TD
    A["Robot"] --> B{Click}
    B --> C["Arrow to left"]
    C --> D["Arrow to right"]
    D --> E["Arrow to right"]
    E --> F["Arrow to right"]
    F --> G["Arrow to right"]
    G --> H["Arrow to right"]
    H --> I["Arrow to right"]
natural_image
Illustration of a hand holding a blue mechanical device inside a container, with an arrow indicating direction (no text or symbols present)natural_image
Diagram showing a faucet spraying liquid into a container with a cross symbol indicating no text or symbols on the diagram itself.text_image
Diagram illustrating a 3D printer operation with labeled steps and a 'CLICK' button, showing mechanical components and motion arrows.natural_image
Diagram of a blue industrial machine with an upward arrow indicating motion or force, no text or symbols presentnatural_image
Illustration of a kitchen appliance with cloud-shaped appliances and a grater (no text or symbols)natural_image
Four hand-drawn icons showing different types of household items: towel, wooden block, rolled towel, and patterned cloth (no text or symbols)Conseils
natural_image
Illustration of a hand using a tool to adjust or install a mechanical component (no text or symbols visible)text_image
Diagram illustrating a robotic device with labeled components and directional arrows indicating movement or assembly.text_image
Diagram illustrating a mechanical assembly process with numbered steps and directional arrows indicating movement or assembly.natural_image
Illustration of a hand cleaning a cabinet interior with a blue cloth (no text or symbols)text_image
Diagram illustrating a kitchen cleaning procedure with labeled steps: washing machine, drain level, and drain outlet.natural_image
Illustration of a hand placing a blue plastic waste bin into a car intake manifold, with an upward arrow indicating motion (no text or symbols)natural_image
Diagram of a showerhead spraying water, with a water filter and checkmark indicating inspection (no text or symbols)text_image
Diagram showing a device inside a container with labeled parts, including numbered arrows indicating assembly or installation steps.text_image
Diagram showing mechanical assembly steps with numbered annotations indicating component positioning and adjustment.natural_image
Diagram showing two mechanical components with bidirectional arrows and a checkmark icon (no text or symbols)text_image
Diagram illustrating a showerhead system with water spray and a cleaning device, including a checkmark indicating inspection.natural_image
Illustration of a hand holding a blue mechanical device inside a laptop, with an arrow indicating direction (no text or symbols present)natural_image
Diagram showing a faucet spraying liquid into a container with a water level indicator (no text or symbols present)natural_image
Diagram of a blue water dispenser with an upward arrow indicating flow or movement (no text or symbols present)text_image
Diagram showing a device with labeled parts, including a numbered component and a tube inserted into it.natural_image
Illustration of a hand holding a tool with a blue blade, showing a rotation arrow and a magnified inset of the finger (no text or symbols)natural_image
Illustration of a cleaning machine with a blue box and hand gesture, showing a downward arrow (no text or symbols)text_image
Diagram illustrating two steps of a lock and hand press, labeled with numbered instructions for lifting or adjusting the lock mechanism.natural_image
Diagram of a kitchen sink with faucet spraying water, showing internal components and a cross symbol (no text or labels)natural_image
Illustration of a hand cleaning a cabinet interior with a blue cloth (no text or symbols)natural_image
Illustration of a robotic arm operating a blue robotic device with a black upward arrow (no text or symbols)www.bosch-home.com/us/owner-support/get-support
www.bosch-home.com/us/shop CA:
1-800-701-5231
www.bosch-home.ca/en/service/get-support
www.bosch-home.ca/en/service/cleaners-and-accessories
text_image
QR code image containing encoded data, no visible human-readable text
BOSCH
natural_image
Line drawing of a modern water dispenser with control panel and side-mounted unit (no text or symbols)A
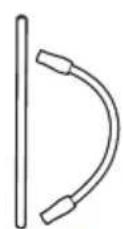
D
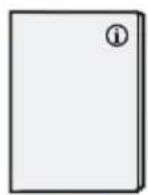
F
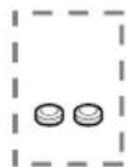
[Non-Text]
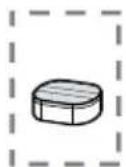
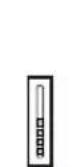

[Non-Text]

Cafetera automática

text_image
Labeled diagram of a 14-inch water heater with numbered parts for identificationtext_image
Illustration showing a hand pouring liquid into a glass with an arrow, accompanied by three steps: 1 minute hour, eye inspection, and a warning label.text_image
Diagram illustrating a water filter system with an upward arrow and a water drop diagram showing liquid flow.text_image
Diagram illustrating a device's rotation and internal structure, showing a rotary knob with ABC and a cylindrical container with directional arrows.natural_image
Illustration of a cleaning machine with a water dispenser and a hand pump, showing internal components (no text or symbols)natural_image
Illustration of a hand pressing a blue plastic container into a car intake manifold, with an upward arrow indicating motion (no text or symbols)natural_image
Illustration of a showerhead spraying water with a cleaning bag (no text or symbols)natural_image
Diagram of a coffee maker with a paper feeding into it, showing mechanical components and a black arrow indicating motion (no text or symbols)natural_image
Diagram of a device inside a transparent enclosure with a blue component and a black arrow pointing to it (no text or symbols)text_image
Diagram showing mechanical assembly steps with numbered instructions and directional arrows indicating movementtext_image
Diagram showing mechanical assembly with upward and downward arrows, plus a checkmark indicating inspection or verification.text_image
Diagram illustrating a shower system with water spray and a water level indicator, showing components like showerhead, drain, and sink.natural_image
Illustration of a hand inserting a blue plastic component into a laptop (no text or symbols)natural_image
Diagram showing a faucet releasing liquid into a container with a cross symbol indicating no text or symbols on the diagram itself.text_image
Diagram illustrating two steps of a robotic device operation, labeled with numbered arrows and a 'CLICK' button.natural_image
Diagram of a blue industrial machine with an upward arrow indicating motion or force, no text or symbols presentnatural_image
Illustration of a kitchen appliance with cloud-shaped appliances and grilles (no text or symbols)natural_image
Four symbolic illustrations: a rolled-up document, a rectangular block with X marks, a rolled-up bread roll, and a patterned plate (no text or symbols)Consejos
natural_image
Illustration of a hand using a tool to adjust or install a mechanical component (no text or symbols visible)text_image
Diagram illustrating a 3D printer's internal structure with labeled components and directional arrows indicating assembly or movement.text_image
Diagram illustrating a mechanical assembly process with numbered steps and directional arrows indicating movement or assembly.natural_image
Illustration of a hand cleaning a cabinet interior with a blue cloth (no text or symbols)text_image
Diagram illustrating a cleaning or disinfection procedure with labeled steps and icons for washing machine components.natural_image
Illustration of a hand pressing a blue plastic container into a car intake manifold, with an upward arrow indicating motion (no text or symbols)natural_image
Illustration of a showerhead spraying water with a water drop filter and a checkmark indicating cleaning (no text or symbols)text_image
Diagram showing a device inside a container with labeled parts, including numbered arrows and numbered labels ① and ②.text_image
Diagram showing a mechanical device being adjusted to a component, with labeled parts and directional arrows.natural_image
Diagram showing mechanical components with bidirectional arrows and a checkmark icon (no text or symbols)text_image
Diagram illustrating a showerhead spraying water onto a mechanical device, with a magnified view showing a droplet and warning symbol.natural_image
Illustration of a hand holding a blue mechanical device inside a device with a cable inserted, showing no text or symbols.natural_image
Diagram showing a faucet spraying water into a rectangular basin with a water level indicator (no text or symbols)natural_image
Diagram of a blue industrial machine with an upward arrow indicating motion or force, no text or symbols presenttext_image
Diagram of a device with labeled parts showing internal components and directional arrowsnatural_image
Illustration of a hand holding a tool with a curved arrow, showing a mechanical component and a magnified inset of the tool (no text or symbols present)natural_image
Illustration of a robotic arm operating in a blue robotic device with a downward arrow indicating motion (no text or symbols present)text_image
Diagram illustrating a lock mechanism with an upward arrow and numbered step 1, showing hand positioning and lock status.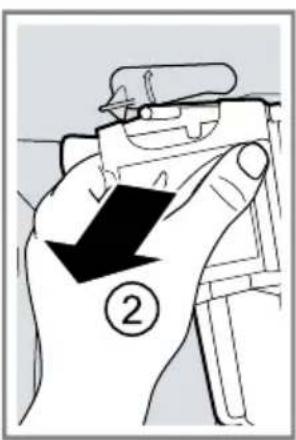
text_image
Diagram showing a hand holding a device with a black arrow and number 2, indicating a step or action.natural_image
Diagram of a kitchen sink with faucet spraying water, showing internal components and a warning symbol (no text or labels)natural_image
Illustration of a hand cleaning a blue cloth inside an open storage cabinet (no text or symbols)natural_image
Illustration of a cleaning machine with blue buckets and a hand placing it, no text or symbols presentwww.bosch-home.com/us/owner-support/get-support
www.bosch-home.com/us/shop CA:
1-800-701-5231
www.bosch-home.ca/en/service/get-support
www.bosch-home.ca/en/service/cleaners-and-accessories
Register your appliance to enjoy customized benefits.
Thank you for being a Bosch customer!
Simply create a MyBosch account, then register your appliance.
You'll find a variety of customized information in MyBosch such as:
- Discount for filters, cleaners, accessories & parts
- Easy access to manuals & appliance specifications
- Easy access to part lists
- Customized offer for the Bosch Appliance Service Plan (sent by mail after appliance registration)
Register here:
www.bosch-home.com/us/owner-support/mybosch
BOSCH HOME APPLIANCES SERVICE
Looking for help? You'll find it here.
No matter what, no matter when: Bosch is here to support you.
We're here to assist with usage instructions, cleaning tips, accessories & parts, troubleshooting, and repairs.
Find online resources such as FAQs, how-to-videos, manuals, warranties and authorized Bosch services at:
www.bosch-home.com/us/owner-support/get-support
Contact us:
Please have your model Number (E-Nr) ready when contacting us.
1-800-944-2904
www.bosch-home.com/us/owner-support/contact-us
BSH Home Appliances Corporation
1901 Main Street, Suite 600
Irvine, CA 92614
USA
www.bosch-home.com
1-800-701-5231
© 2025 BSH Home Appliances Corporation

8001327896 (050915)
en-us, fr-ca, es-mx