
WMC8943VC.S - Washing machine ASKO - Free user manual and instructions
Find the device manual for free WMC8943VC.S ASKO in PDF.

| Brand | Asko |
| Model | WMC8943VC.S |
| Product type | Washing machine |
| Washing capacity | 9 kg |
| Maximum spin speed | 1600 rpm |
| Energy class | A+++ |
| Dimensions (H x W x D) | 85 x 60 x 60 cm |
| Net weight | 85 kg |
| Connectivity | Built-in Wi-Fi, ConnectLife app |
| Smart functions | Remote start, monitoring, remote program selection |
| Washing programs | Cotton, synthetics, delicates, wool, quick, etc. |
| Options | Delayed start, prewash, extra rinse |
| Safety | Child lock, overflow protection |
| Noise level (wash/spin) | 52 dB / 76 dB |
| Water consumption per cycle | 49 L |
| Annual energy consumption | 194 kWh |
| Maintenance and cleaning | Regular cleaning of the filter and door seal |
| Repairability | Spare parts available, repairability index 8.2/10 |
| General information | 93-page manual downloadable as PDF |
Frequently Asked Questions - WMC8943VC.S ASKO
User questions about WMC8943VC.S ASKO
0 question about this device. Answer the ones you know or ask your own.
Ask a new question about this device
Download the instructions for your Washing machine in PDF format for free! Find your manual WMC8943VC.S - ASKO and take your electronic device back in hand. On this page are published all the documents necessary for the use of your device. WMC8943VC.S by ASKO.
USER MANUAL WMC8943VC.S ASKO
natural_image
Pure Wi-Fi symbol icon without any text or labelsWIFI INSTRUCTION
Professional Washing Machine
Professional Tumble Dryer
EN SL DE IT FR PT ES NL CS DA SV NO FI LT LV ET RU UK
For owner/distributor
Contents
Connection Setup Quick Guide 3
Settings 5
WiFi status 5
WiFi (On/Off) 5
Connection setup (Yes/No) 5
End user functions (see separated instructions for an end user) 5
Appliance booking (Enable/Disable) 5
Time limit remote start (5min --> 96h) 5
Add device 6
Remove all devices (connection to WiFi will remain) 6
These instructions are intended solely for the owner/distributor of this machine.
(Instructions for use are supplied separately)
NOTE!
Check the link to application: https://laundry.connectlife.io/
- Download the ConnectLife application.

- Register a ConnectLife account and login.
- Press "Add device" in the application.
- Find and scan the QR code to detect your appliance model (QR code located on the inside of the appliance door).
- Press "Set Up appliance" in the application.
- You should be able to see and follow the instructions below:
a. When machine is off, press and hold the two rightmost buttons, at the same time, turn on the machine.
b. Press "Settings" button to enter Setting menu and toggle the knob to the "WiFi settings" section. Enter the section by pressing the button.
c. Press "WiFi On/Off" button and toggle the knob to the option "On", press "Save" button.
d. Back to "WiFi settings" section, press "Connection setup" button; you have 5 minutes to connect your appliance to the network.
e. In your smart device, connect to the WiFi network named HIS-XXXX (make sure you stay on HIS-XXXX network until step h).
f. Return to the ConnectLife application and press "NEXT".
g. Choose your local WiFi network in the list of all networks and enter password.
h. Press "Connect".
7. When pairing is successful, you will get message "Connection established successfully!" on the appliance UI and check-mark in the application.
8. Name your appliance and assign a room of this appliance.
9. Congratulation! Now you can monitor and control your connected appliance on the website. Start from here: https://laundry.connectlife.io/ (for a better experience, please open it in computer).
Connection Setup Quick Guide
TIP!
More detailed instructions and further help and troubleshooting can be found online: www.connectlife.io
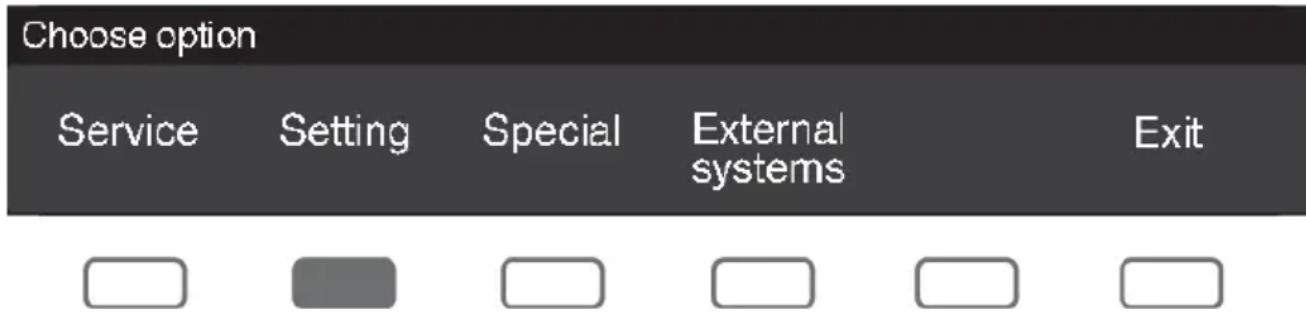
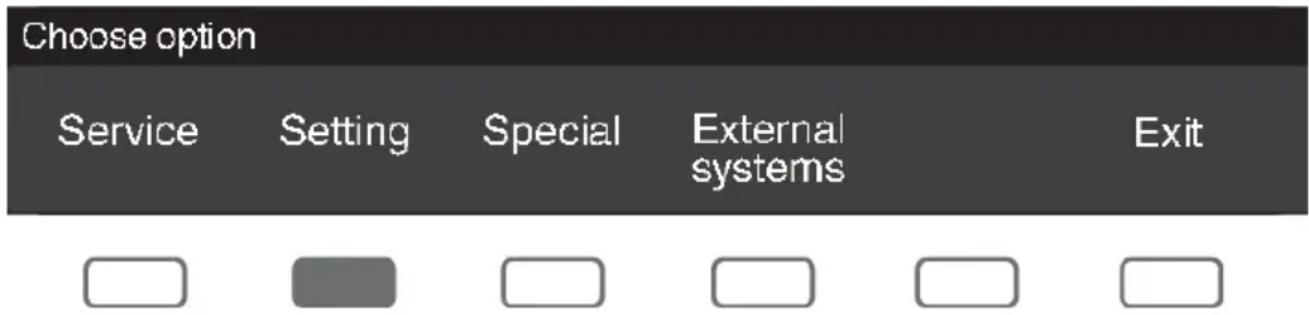
How to get to menu:
Appliance is switched off.
Hold the last two buttons + then short press on button on/off:

natural_image
User interface panel with buttons, a circle, and a play button (no text or symbols)Choose option Settings with program selector knob and confirm with button under selected option.
WiFi settings:
WiFi status
- WiFi (On/Off)
• Connected to router (Yes/No)
• Connected to cloud (Yes/No)
- End-user functions – Remote access level (see instruction below**)
• Control session active (Yes/No)
- Limit remote start (24h)
• HEIDI number (ID number for UI)
WiFi (On/Off)
WiFi module turned Off is factory setting.
(by turning WiFi module On, the energy consumption will increase in standby mode.)
Connection setup (Yes/No)
Connection setup is performed with the ConnectLife application.
Time limit to complete connection setup is 5 minutes.
End user functions (see separated instructions for an end user)
- WiFi setting is not available
- WiFi setting is available, but there is no connection
- WiFi setting is available. Monitoring
- WiFi setting is available. Monitoring + Program selection
- WiFi setting is available. Monitoring + Program selection + Remote start
Appliance booking (Enable/Disable)
Enable: Appliance is able to be reserved by end user in Asko booking system.
Time limit remote start (5min --> 96h)
Limit the duration of remote start session.
Settings
Add device
It allows the owner of appliance to add device, without configuring the connection.
It is necessary to have mobile application.
Remove all devices (connection to WiFi will remain)
It will remove all "paired" devices; this process can take some time depending on your network condition.
natural_image
User interface panel with buttons, a circle, and a play button (no text or symbols)WiFi nastavitve:
WiFi status
natural_image
User interface panel with buttons, a circle, and a play button (no text or symbols)WLAN-Einstellungen:
WLAN-Status
natural_image
User interface panel with buttons, a circle, and a blank input field (no text or symbols)Impostazioni WiFi:
Stato WiFi
natural_image
User interface control panel with buttons, a circle, and a play button (no text or symbols)Réglages Wi-Fi
Statut du Wi-Fi
natural_image
User interface panel with buttons, a circle, and a blank input field (no text or symbols)natural_image
User interface panel with buttons, a circle, and a blank input field (no text or symbols)Ajustes de WiFi:
Estado del WiFi
natural_image
User interface panel with buttons, a circle, and a blank input field (no text or symbols)WiFi-instellingen:
WiFi-status
- WiFi (Aan/uit)
natural_image
User interface control panel with buttons, a circle, and a play button (no text or symbols)Wi-fi-indstillinger:
Wi-fi-status
•Wi-fi (Til/Fra)
natural_image
User interface control panel with buttons, a circle, and a play button (no text or symbols)WiFi-inställningar:
WiFi-status
- WiFi (På/Av)
natural_image
User interface control panel with buttons, a circle, and a play button (no text or symbols)Velg alternativet Innstillinger med programvelgerknappen og bekreft med knappen under det valgte alternativet.
Wi-Fi-innstillinger:
Wi-Fi-status
- WiFi (På/Av)
natural_image
User interface panel with buttons, a circle, and a blank input field (no text or symbols)WiFi-asetukset:
WiFi-tila
„WiFi“ nustatymai:
„WiFi“ büsena
End user functions (see separated instructions for an end
natural_image
User interface panel with buttons, a circle, and a blank input field (no text or symbols)Valige programmi valiku nupuga suvand Seaded ja kinnitage valiku all oleva nupuga.

Wi-Fi seadistused:
WiFi olek
Inspired by Scandinavia
Gorenje, Partizanska 12, 3320 Velenje, Slovenija • www.asko.com

FSC www.fsc.org
MIX
Paper from
responsible sources
FSC® C114278

577778-a4
CE

- WIFI INSTRUCTION
- Contents
- Connection Setup Quick Guide 3
- Settings 5
- NOTE!
- Connection Setup Quick Guide
- TIP!
- WiFi settings:
- WiFi status
- WiFi (On/Off)
- Connection setup (Yes/No)
- End user functions (see separated instructions for an end user)
- Appliance booking (Enable/Disable)
- Time limit remote start (5min --> 96h)
- Settings
- Add device
- Remove all devices (connection to WiFi will remain)
- WLAN-Einstellungen:
- WLAN-Status
- Impostazioni WiFi:
- Stato WiFi
- Réglages Wi-Fi
- Statut du Wi-Fi
- Ajustes de WiFi:
- Estado del WiFi
- WiFi-instellingen:
- WiFi-status
- Wi-fi-indstillinger:
- Wi-fi-status
- WiFi-inställningar:
- Wi-Fi-innstillinger:
- WiFi-asetukset:
- WiFi-tila
- „WiFi“ büsena
- End user functions (see separated instructions for an end
- Wi-Fi seadistused:
- WiFi olek
Brand : ASKO
Model : WMC8943VC.S
Category : Washing machine