
Warp T - Electric guitar HUGHES & KETTNER - Free user manual and instructions
Find the device manual for free Warp T HUGHES & KETTNER in PDF.

| Product Type | Guitar amplifier head + 4x12" speaker cabinet |
| Brand | Hughes & Kettner |
| Model | Warp T |
| Channels | 2 (Warp Hi-Gain and Clean) |
| Output Power | 120 W RMS |
| Power Tubes | 4 x 6L6 Ruby |
| Preamplifier Tubes | 12AX7 (number not specified) |
| Speaker Configuration | 2 x Celestion Vintage 30 (treble) + 2 x Celestion Hot 100 (bass) |
| Speaker Impedance | 8 Ω |
| Speaker Outputs | 1x4 Ω, 1x8 Ω, 2x16 Ω, 1x16 Ω |
| Instrument Input | 6.35 mm jack, impedance 1 MΩ, sensitivity -32 dBV |
| Effects Loop | FX Send/Return, switchable level -10 dB, parallel/series |
| MIDI | Compatible via optional MSM-1 module |
| Special Functions | Lube (dynamic distortion), Sub (bass boost), Presence |
| Head Dimensions (WxHxD) | 655 x 280 x 255 mm |
| Head Weight | 20.5 kg |
| Cabinet Dimensions (WxHxD) | 770 x 820 x 350 mm |
| Cabinet Weight | 46 kg |
| Mains Power | 100/117/230 V, switchable, max consumption 383 VA |
| External Fuses | 1 x T 500 mA (anode voltage) |
| Internal Fuses | 1 x TT 10 A (heating), 2 x T 630 mA (switching) |
| Maintenance | Do not operate without speaker, use Standby, ensure free ventilation |
| Safety | Grounding, do not open when powered, use appropriate cables |
Frequently Asked Questions - Warp T HUGHES & KETTNER
User questions about Warp T HUGHES & KETTNER
0 question about this device. Answer the ones you know or ask your own.
Ask a new question about this device
Download the instructions for your Electric guitar in PDF format for free! Find your manual Warp T - HUGHES & KETTNER and take your electronic device back in hand. On this page are published all the documents necessary for the use of your device. Warp T by HUGHES & KETTNER.
USER MANUAL Warp T HUGHES & KETTNER
Before powering up please read the Important Safety Instructions on page 64 - 66!
WICHTIG:
Though the pamphlet you are holding in your hands explains how to handle your new killer Warp T™ amp, it's far more than merely an owner's manual. You see, it was not the manufacturer who wrote it, but yours truly, Mrs. Hansen (that's my pseudonym!)
As a beta tester, I had the great good fortune of being able to torment my neighbors and surrounding blocks with a Warp T™ half-stack. After spending a furious five minutes unleashing a battery of bodacious staccato salvoes, it was all but impossible to tear myself away from the awesome object of my bench-testing attention. It was way too much fun – certainly more than can be had in any other legal pursuit!
So, there I was a-rocking and a-riffing when the idea came to me that I could offer my services to the folks at Hughes & Kettner®, perhaps capturing my euphoria for this amp in words.
And so it came to pass - you now hold the results in your hands. I hope I managed to explain all the tweaks and knob-twists that made playing so much fun for me and such an unforgettable experience for my neighborhood and outlying areas...
Remember, fear is not your friend, so play it loud and proud!

natural_image
Black-and-white photo of a man in a bandie holding a guitar, with stage lighting and no visible text or symbols.Mrs. Hansen
HERE'S WISHING YOU LOTS OF SUCCESS AND FUN WITH THE WARP T™, D TAKE CARE OF YOR EARS!
THE TONE
21st century metal is all about detuned guitars, ponderous & ominous riffs, and big & bold effected clean sounds. No wonder that yesteryear's amplification can't cut it in this brave new world of sound.
While the postfix "7" in the WARP 7™ model name pointed to the amp's penchant for our beloved electric guitar's seventh bottom string, the "T" in WARP T™ stands for the awesome power of the tubes lurking within the head.
Make no mistake; the WARP T™ is the ultimate tube-driven weapon in your nu metal arsenal. With the WARP T™ half-stack, you have satisfied your wish for more bottom end beef and all but inexhaustible high-gain reserves. Hearing is believing: Simply plug that tube head into your 4 x 12" cabinet and stand back.
THE HEAD
Sporting four 6L6 tubes, the head pumps into the cabinet a heavy helping of oomph, giving you punch unmatched in this class. You'll revel in your newfound ability to cut through the din. Courtesy of mighty 120 watts blasting out of four 12" speakers, your nu metal riffs are sure to come across loud and proud. But even an opus played at warp speed soon becomes boring without a little tension and release to spice things up. The WARP T™ also delivers the kind of crisp, crystal-clear clean tone you need to heighten the musical drama and go from overtures of glassy, glossy arpeggios to infernal finales of paint-peeling fury.
THE CABINET
Somewhat larger and more stable than your ordinary 4x12" cab, this baby is built to deliver scooped mids and bowel-shaking low end. Featuring a special speaker combination of two Celestion Vintage 30s on top for crystal-clear sound and two Celestion Hot 100s on the bottom for pure bass bliss, this cab delivers archetypal nu metal tone. Shimmering with crisp top end and shaking with fat bottom end, this sound is unmatched by any other.
CONTENTS
THINGS TO DO BEFORE OPERATING THE AMP .... 5 POWERING UP .... 5
1.0 THE CHANNELS OF THE WARP T™ .....6
2.0 CONNECTIONS AND CONTROL FEATURES 6
3.0 STANDARD SETUP /
CABLE CONNECTIONS ..... 9
4.0 OPERATING THE WARP T™ 10
5.0 REPLACING TUBES, SERVICE AND PREVENTIVE MAINTENANCE ..... 11
6.0 POSSIBLE ERROR SOURCES/
TROUBLESHOOTING....13
7.0 TECHNICAL SPECIFICATIONS ..... 14
IMPORTANT NOTES ON SAFETY ..... 64
A word of caution before you operate your new amp: It is loud. Exposure to high volume levels may cause hearing damage. Always turn the MASTER VOLUME knob on the front panel all the way down before powering your amp up, and then turn it up gradually to a level that suits the venue and is not harmful to your ears. Always be judicious in the use of your amplifier and its volume controls: Exercise great care to prevent damaging your ears and the ears of the people around you.
Check out the voltage rating displayed next to the WARP T™'s MAINS INPUT and make sure it matches your local mains current before you plug in. Make sure plenty of air can circulate around your amp's ventilation ducts. Place the amp on a sturdy, secure base and avoid exposing it to mechanical shocks and extreme temperatures that could endanger the device or your and others' safety. The manufacturer disclaims any liability or responsibility whatsoever for any damage or defect in this and other devices resulting from misuse.
POWERING UP
First plug the speaker cabinet cord into the appropriate output on the head. On the special WARP T™ cabinet, this is the 8-ohm output. The 4-ohm and two times 16-ohm outputs are available for other cabinet types. To learn more about this, read chapter 2.0, CONTROL CONNECTIONS AND FEATURES. Plug the other end of the cord into the cabinet's input. The life of every all-tube amp depends on you getting this right! If you operate tubes without a connected load such as a speaker cabinet or with the wrong ohm load, they will die an ugly and painful death!
Now plug the head's AC power cord into an outlet and switch the amp on by pressing the MAINS button. Give the tubes some time to warm up before driving them hard. If you get bored with the wait, gaze upon the orange-red glow of the tubes and the red light emanating from the amp's interior. That should put you in the right mood for rude, red-hot riffing.
You like your WARP T™ now, but you'll learn to love it later. And because love means never having to say you're sorry, get into the habit of twisting the MASTER VOLUME knob all the way to the left (counterclockwise) when you've finished riffing. Otherwise, you may be in for a loud surprise next time you power up.
So, you've set the MASTER knob to zero? Okay, then let's get to it. Plug a cord into your guitar, then into the amp. Flick the STANDBY switch to bring those glowing tubes to life. Now you can select between different channels...
1.0 THE CHANNELS OF THE WARP T™
The WARP T™ is equipped with two channels that will serve you well if you like your music hard & heavy:
1.1 WARP CHANNEL
Dive right into the wonderful world of high gain distortion and luxuriate in the jaw-droppingly powerful sound of every riff that rips through speakers. Courtesy of the tube circuitry, this sound leaps right out of the cabinet and goes straight for the throat. The WARP channel delivers it all, from a nasty nu metal thump to post-grunge growl, from alternative snarl to the doomsday thunder so cherished by devotees of death and Goth metal. By varying the WARP channel's preamp gain and the power amp via the MASTER VOLUME knob, you can dial in anything from venomous to spine-chilling scream – and all points in between.
1.2 CLEAN CHANNEL
Even the hardest rocking axe slingers will want to give their head-banging audiences a break now and then. That's what the CLEAN channel is here for – to deliver sweet clean sound for those softer passages that make the next monstrous riff seem even more elephantine. The WARP T™ offers a unique brand of ultra clean sound that remains crisp, clear and sparkly at even very high volumes. This ensures your sound cuts through and ends up where it belongs – in your audience's ears.
2.0 CONNECTIONS AND CONTROL FEATURES
So far, so good! Now you know what your new metal machine can do for you and your music. But you need to learn all about the connections
and control features of the WARP T™ to be able to make the most of its full sonic glory. Let's take a closer look:

2.1 FRONT PANEL
The cockpit of the WARP T™ is divided to three sections. On the left next to the MAINS button, you'll find the MASTER section.
To the right you see the WARP section and finally the CLEAN section. Control features are arrayed from left to right as follows:
MAINS ON/OFF
This button switches the main power supply on and gives the tubes the opportunity to warm up for the challenges that lie ahead.
STANDBY
This switch mutes the amp. After the tubes warm up, flick the STANDBY switch to send the guitar's signal into the WARP T™. Use the following knobs to shape your signal:
MASTER VOL
As the name would indicate, this knob puts the power of 120 tube-driven between your thumb and forefinger. Use it wisely because it can induce everything from bliss to pain to near madness in your band mates. Though twisting this knob can be as much fun as the law allows, don't unleash all this power rashly. Exercise restraint and protect your and your fellow musicians' hearing.
MIDI LEARN
This button serves to program the retrofit Hughes & Kettner ^® MSM-1 ^™ MIDI module. Installing the MSM-1 MIDI module endows the WARP T ^™ with MIDI capability. Once it has been installed, you can press the MIDI LEARN button to save the current channel/FX loop configuration.
FX LEVEL
This knob adjusts the external effect signal's amount or the wet level. For more on this, read section 4.3 HOW TO CONNECT AN EFFECTOR
WARP CHANNEL
MASTER
Controls the level of the WARP channel. Use it to dial in the desired balance between the CLEAN and WARP channels, that is, to determine which side of the WARP T™'s split personality will dominate - Dr. Jekyll or Mr. Hyde.
PRESENCE
Fine-tunes the WARP channel's overtones. You can dial in razor-edge tone to make your musical statements cut through the din.
TREBLE, MID, BASS
Tweak these three knobs according to taste, shaping your personal WARP sound as you see fit.
LUBE
Do you want ultimate response to your touch, a feeling that the strings are an extension of your fingers and slaves to your will? Then press the LUBE button. It "greases" up your strings, making riffs and licks fly off the fret board.
SUB
Press this button to dig deep into the dark underbelly of the WARP channel and draw up bowel-shaking sub bass frequencies.
FX ON
Routes the external effect to the WARP channel. If you want to switch this function via Stageboard or MIDI, set this switch to the OFF position, that is, ensure that it is not pressed. For more on this, read section 4.3 HOW TO CONNECT AN EFFECTOR.
GAIN
Of all the WARP T™'s many features, the GAIN knob is the one that will shape the heart of your tone. Evoking anything from gritty crunch to ferocious fuzz, the GAIN knob lends your riffs and power chords precisely the edge that you want them to have. Twist it to go from merely dirty but tremendously punchy tone at lower settings to a merciless evil roar at higher settings.
WARP CH. ON
Activates the WARP channel and unleashes its unbridled tube power.
CLEAN CHANNEL
PRESENCE
Controls CLEAN channel overtones.
FX ON
Routes the external effect to the CLEAN channel.
TREBLE, MID, BASS
These knobs voice (shape the tone) of the CLEAN channel.
VOLUME
Determines the CLEAN channel's volume and compression levels.
INPUT
Located on the far right, this jack accepts your guitar cord's 6.3 mm (1/4") plug.

2.2 REAR PANEL
You'll find the following components mounted on the black sheet metal panel on the back of the amp:
MAINS
Equipped with a fuse compartment, this Euro mains socket provides power to your amp. Before plugging into the wall outlet, make certain the amp's voltage rating matches your local AC voltage rating. To find out your amp's voltage rating, refer to chapter 7.0 TECHNICAL SPECIFICATIONS.
FOOTSWITCH
This port accepts the two-way Hughes & Kettner® FS-2 Stageboard, which lets you switch CLEAN and WARP channels and FX ON remotely. This feature comes in particularly handy on stage when you need to switch on the fly.
FX SEND
If you want to employ an effect device, connect this jack to the signal processor's input. You can also use this output to send the signal to an outboard power amp or a RED BOX® to patch your signal into a mixer. For more on this, read section 4.3 HOW TO CONNECT AN EFFECTOR.
FX RETURN
Connect this jack to the effect device's output.
FX -10dB
This button reduces the FX SEND jack's output level by 10 dB and increases the FX RETURN jack's input sensitivity by 10 dB to adapt the FX loop to the effect device's input level. Press this button when using effect devices with inputs designed to accept instrument levels.
MIDI MODULE
Channels, FX ON/OFF, and FX PARALLEL/SERIAL can be switched via the optional Hughes & Kettner ^® MSM-1 ^™ . The MIDI module lets you select a MIDI channel number or OMNI mode, in which it responds to commands on all 16 MIDI channels.
SPEAKER OUTS
You can connect cabinets with impedances of 4, 8, 2 x 16 and 16 ohms to the corresponding speaker outputs. Your best bet is to always connect the specially developed cabinet to the WARP T™. It is perfectly matched to the amp, giving you the biggest, boldest bottom end and a veritable eruption of heavy duty tone.
3.0 STANDARD SETUP / CABLE CONNECTIONS
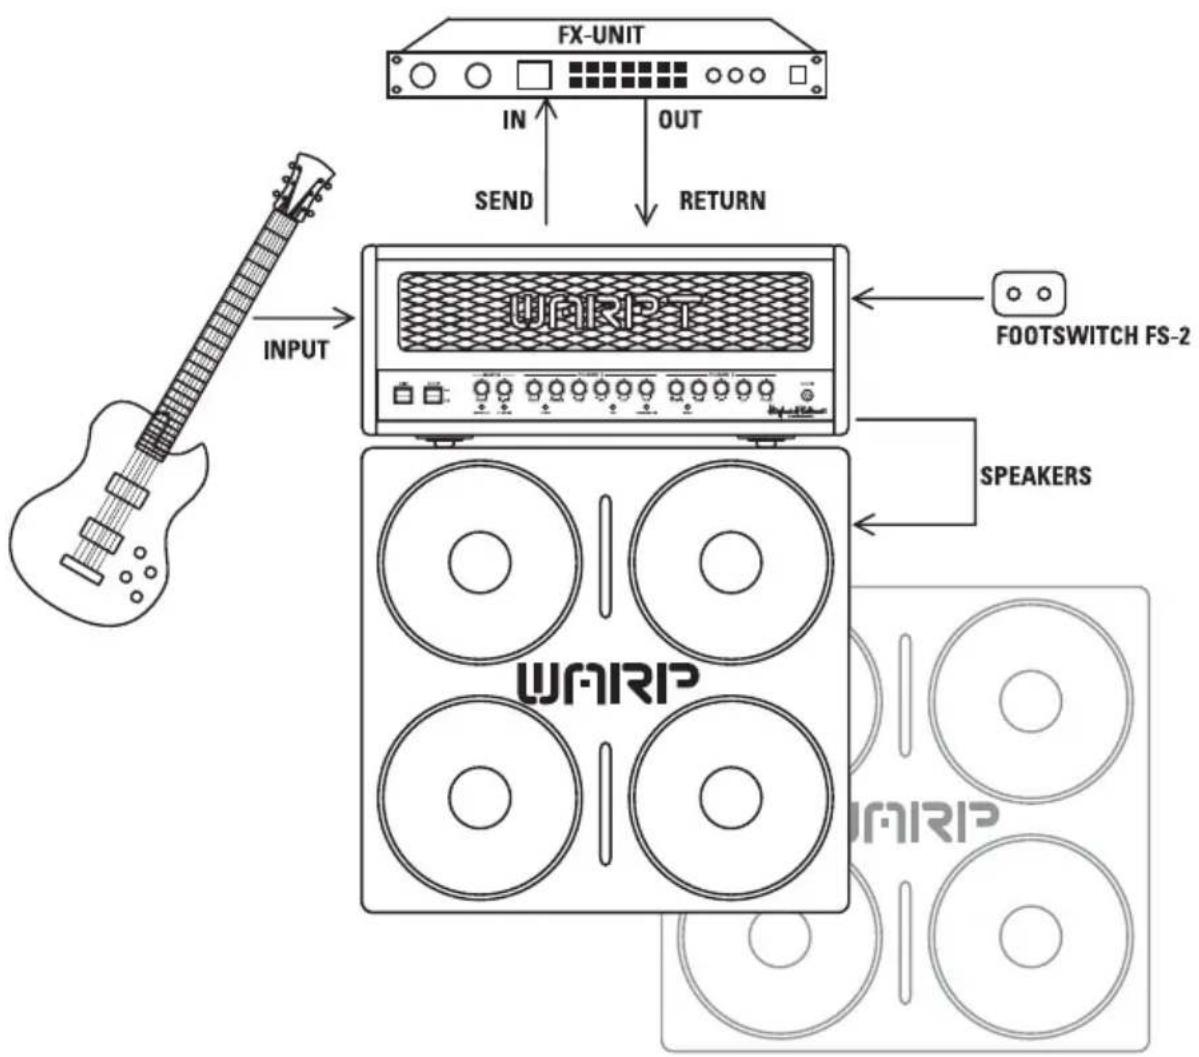
flowchart
graph TD
    A["Input: G chord with guitar"] --> B["WAFIRP"]
    B --> C["FOOTSWITCH FS-2"]
    B --> D["SPEAKERS"]
    B --> E["WAFIRP"]
    B --> F["FX-UNIT"]
    B --> G["IN"]
    B --> H["OUT"]
    B --> I["SEND"]
    B --> J["RETURN"]
Now that you know a bit about the key features of your new amp and probably have discovered how gain the undivided attention of neighbors, fellow musicians, and significant others, let's take a closer look at a couple of tips and suggestions for handling the WARP T™ and connecting other sound-sculpting devices:
4.1 SELECTING CHANNELS
Press the WARP CH. ON button to awaken Beauty or the Beast. When the button lights up to indicate that the amp is in high-gain mode, grab the bull by the horns and hang on for dear life. After a breathtaking ride on the back of the bucking beast, you may want to give yourself and your audience a break. Press the button again to activate the CLEAN channel and revel in the sonic glory of a righteous clean sound.
4.2 FROM GRITTY RIFFS TO HI GAIN SCREAMING LEADS
No one buys this breed of amp to play polka night at the local senior citizens' community center. So, if you want to kick out the jams, you've certainly acquired the right tool for the job: Those red-hot tubes pump out the kind of red-hot tone thought to melt teeth fillings at a hundred paces. Twist the WARP channel's MASTER and GAIN knobs to turn your amp into anything from a gritty grindstone for cranking out meaty chords to a hi-gain scream machine. From subtle menace to a belligerent bellow, it's yours for the taking.
Try this on for size: Set MASTER to 5 and GAIN to 6 or 7 for a pretty ornery growl. Now add a liberal dose of BASS, cut the MIDs, and boost the bottom end by pressing the SUB button to conjure up a truly wicked hi gain roar. Back off the WARP channel's GAIN and crank the MASTER knob to 8 or 9 and try dampening the string with the heel of your hand. This yields rough & ready crunch tone with an enormous low-end kick. Before you do this, you may want to back off the MASTER VOLUME because the sound pressure may be a bit much to handle. Cliché time: An ounce of practice is worth a pound of theory, so experiment to your heart's content!
4.3 HOW TO CONNECT AN EFFECTOR
Located on the back of the amp is an FX loop designed to take any effector you care to connect. To insert a device into the loop, connect its input jack to the WARP T™'s SEND port and the device's output jack to the WARP T™'s RETURN port. Activate the FX loop using the front panel FX ON button or via footswitch. Recall that you can match the FX loop to the effect device's input level. Press the FX SEND LEVEL button for effects devices like stomp boxes that are designed for guitar signals. If the button is not pressed, the signal level remains at standard line level, which is suitable for most rack-mounted multi-effects processors.
When operating the loop in parallel mode, use the LEVEL knob to determine the volume of the effect signal.
NOTE
Some signal processors introduce phase cancellations that are detrimental to the overall sound. In this case, set the effects loop to FX SERIAL. The effects loop now operates like a conventional serial loop—in other words, you'll have to adjust the balance of levels between the original and processed signal at the processor.
TIP
If choose not to connect a signal processor to the FX loop, you can plug in another instrument or audio source.
4.4 THE WARP-T AND MIDI
With the MSM-1 MIDI Module installed, you can switch the FX loop (to include switching between serial and parallel modes) and select WARP-T™ via MIDI. This gives you the very convenient option of switching the WARP-T™ and multi effectors simultaneously.
5.0 REPLACING TUBES, SERVICE AND PREVENTIVE MAINTENANCE
The WARP T™ ships with 6L6 and 12AX7 tubes by RUBY. Once they've been burned in (initial continuous operation under a load), these tubes undergo an in-depth selection process where their electrical values and mechanical status (microphonics) are checked. Then they're installed in a test amp and their sound is auditioned by ear. One of the most important steps is power tube matching, a process whereby tubes with the same characteristics are selected and combined to make matched sets.
When is it a good idea to replace tubes?
The tubes in the WARP T™ are exemplary in terms of quality, workmanship and long service life. If you encounter a problem, please run down the following checklist before you swap your old tubes for new ones:
Was the fault or failure of the power tube caused by the tube itself or a flawed peripheral device or component, perhaps a defective speaker cable? (If you don't get to the bottom of the problem and remedy it, it may crop up again even after you replace the tubes.)
Did the mains voltage fluctuate or spike while the amp was on? In all-tube amps, over-voltage surges in the mains net can certainly blow fuses or even the amps. Over-voltages are often caused by generators or faulty high-current power circuits.
Did a fuse blow even though none of the tubes is actually defective? An old fuse, tube de-ionization or mains voltage power surges could have caused it to blow. In this case, replacing tubes is a waste of money and time.
Tubes definitely show signs of wear when their service life nears its end, including increased microphonics, noise, muddler tone through loss of high-end frequencies, degraded performance, etc. Take these indications seriously and replace old tubes. Not only do these side effects take their toll on sound quality, they are also a sure sign that the tube is about to fail.
NOTE
Though it may be tempting to find out what an amp sounds like with different tubes, please refrain from replacing tubes for experimentation purposes. This can damage the amp and cost a small fortune to repair.
What should you keep in mind when you're replacing tubes?
The golden rule: Replacing tubes is a job best left to qualified professionals. Accordingly, these guidelines are addressed to qualified technicians who earn their living with a screwdriver:
Pull the mains plug of the WARP T™ and allow for a discharge time of at least two minutes before removing the sheet metal panel on the rear of the amp. Once the panel is off, you can cautiously ease the tubes out of their sockets. A single power tube may only be replaced if the replacement tube precisely matches the original, in other words, if it has exactly the same characteristics. If you're replacing power tubes, use matched sets only. If you're installing a new set of power tubes whose characteristics are identical to those of the old set, it is not absolutely necessary to re-bias the amp. On the other hand, if you install a new set with different characteristics, be sure to re-bias the amp. Again, biasing an amp is not a DIY task. It requires experience and an extensive working knowledge of measuring techniques, which is why this job should be carried out only by qualified technicians with tube amp tuning experience.
How do you extend the service life of the WARP T™'s tubes?
- Never operate the WARP T™ without connecting a load (loudspeaker)! Always use high-quality, heavy-duty speaker cables that won't crimp or snap...
- Use the STANDBY switch! Warming tubes up unnecessarily wears them out that much quicker. Make a habit of cutting anode voltage via the STANDBY function and you'll enjoy many more hours of operation.
- Avoid exposing the amp to vibrations, especially when it's powered up. Switch the amp off a good while before moving it, allowing plenty of time for the tubes to cool off completely.
- Ensure plenty of air can circulate around the amp's ventilation slots at all times – your WARP T™'s life depends on it.
- Definitely avoid exposure to extreme heat, dust and particularly moisture.
- Be very careful about the kind of peripheral devices you connect to your amp and always check out their specs before you plug them in. Never connect speaker cabinets with an impedance (ohm) rating lower than the WARP T™ is designed to handle.
- Never connect devices with high output signal levels (e.g. power amps) to the WARP T™'s input.
- Ensure the AC power source delivers the current that your amp is designed to handle before you plug it in. When in doubt about the local rating, ask the venue's sound technician or a stage hand.
- Refrain from performing DIY repairs! To be on the safe side, you should also have a qualified technician replace internal fuses.
6.0 POSSIBLE ERROR SOURCES / TROUBLESHOOTING
The WARP T™ won't power up when you switch it on:
- It's not getting AC power. Check the mains cable to see if it's connected properly.
- The mains fuse is defective. Ensure it is replaced with another fuse of the same rating.
The WARP T ^™ is connected properly, but no sound is audible:
• The amp is set to STANDBY
• One or several GAIN and MASTER controls are turned all the way down
- The anode fuse has tripped. Before replacing the fuse with another fuse of the same rating, have the power tubes checked to learn if they are defective.
- The fuse for the tube heater has tripped (the tubes don't glow). When replacing this fuse, make absolutely certain that it is replaced with a fuse bearing the same rating. Be sure to have a service technician replace the fuse.
The FX LOOP is on when it shouldn't be:
- The FX LOOP is deactivated when the front panel button, the Stageboard button and the MIDI module switching function are off. If any of these three switches is on, the FX LOOP is active.
The sound is thin and muddy when you switch an effects processor on.
- The signal processor provides a wet signal that is blended with the dry or original signal. Depending on the type of effect, the processor may be returning a dry signal back along with wet signal, which causes phase cancellations when mixed to the dry signal in the WARP T™'s parallel loop. To prevent phase cancellations, switch the FX LOOP to SERIAL or turn the dry signal all the way down on the signal processor.
Your amp is producing ringing noises or tends to feedback:
- One or several tubes are microphonic. Replace the defective tube with another of the same type.
After just a few hours of operation, your amp is displaying the typical characteristics of old tubes (increased microphonics and noise, treble loss, weak power output, muddy sound):
- The wrong tubes were installed when old tubes were replaced or the amp was not biased properly. Take the amp to a professional amp technician to correct the problem.
7.0 TECHNICAL SPECIFICATIONS
7.1 HEAD
All level specifications relate to 0 dBV (1V RMS)
INPUTS
INST. INPUT:
Port: 6.3 mm (1/4")
Type: unbalanced
Input impedance: 1 MΩ
Sensitivity: - 32 dB
Max. input level: +8 dB
FX LOOP RETURN L/R:
Port: 6.3 mm (1/4")
Type: unbalanced
Input impedance: 48 kΩ
Max. sensitivity:
• 10dB button pressed -18 dB
• not pressed -8 dB
Max. input level:
• 10dB button pressed + 5 dB
• not pressed +15dB
OUTPUTS
FX LOOP SEND L/R:
Port: 6.3 mm (1/4")
Type of output: unbalanced
Input impedance: 2,2 kΩ
Input level: - 6 dB
Max. output level:
• 10dB button pressed + 2 dB
• not pressed +12 dB
SPEAKER OUTS
Number: 4
Port: 6.3 mm (1/4") jack
Type: unbalanced
Impedance: 1 X 4Ω ; 1 X 8Ω or
2 X 16Ω; 1 X 16Ω
GENERAL ELECTRICAL DATA
Variable AC voltages Protection Class 1
Max. current consumption:
1.35 A @ 230V AC, 4-8-16Ω
2.55 A @ 117V AC, 4-8-16Ω
2.85 A @ 100V AC, 4-8-16Ω
Max. power consumption:
383 VA @ 253 V AC, 4-8-16Ω
Mains voltage tolerance range:
+/- 10%
Ambient temperature range:
- 10 ∞C to + 60 ∞C
External fuses:
1 x T 500 mA (anode)
Internal fuses:
1 x TT 10 A Slo Blo (tube heater and front panel
lighting)
2 x T 630 mA (switching; FX loop)
GENERAL MECHANICAL DATA
DIMENSIONS:
Width: 655 mm (incl. corners)
Height: 280 mm (incl. handles and feet)
Depth: 255 mm (incl. corners)
Weight: 20.5 kg
7.2 4 X 12" CABINET
INPUT
Port: 6.3 mm (1/4")
Type: unbalanced
Input impedance: 8Ω
OUTPUT
Port: 6.3 mm (1/4")
Max. output: 200W
GENERAL ELECTRICAL DATA
Frequency range: 60 Hz to 6 kHz
Load handling capacity: 200W RMS
GENERAL MECHANICAL DATA
DIMENSIONS:
Width: 770 mm (incl. corners)
Height: 820 mm (incl. handles and feet)
Depth: 350 mm (incl. corners)
Weight: 46 kg
ENTER THE DARK ZONE
natural_image
Black-and-white photo of a man in a bandie holding a guitar, with stage lighting and no visible text or symbols.Frau Hansen
VIEL ERFOLG UND SPASS MIT DEINEM WARP T™, ...UND GIB AUF DEINE OHREN ACHT.
DER SOUND
2,85 A @ 100V AC, 4-8-16Ω
natural_image
Black-and-white photo of a man in a bandie holding a guitar, with stage lighting and no visible text or symbols.Mme. Hansen
NOUS VOUS SOUHAITONS BEAUCOUP DE SUCCÈS ET DE PLAISIR MUSICAL AVEC VOTRE WARP T™!
LE SON
2.2 FACE ARRIÈRE
RACCORDEMENT AU SECTEUR
natural_image
Black-and-white photo of a man in a bandie holding a guitar, with stage lighting and no visible text or symbols.Signora Hansen
TI AUGURO BUON DIVERTIMENTO E MOLTO SUCCESSO CON ILTUO NUOVO WARP T™ E TI CONSIGLIO DI BEN PROTEGGERE LE TUE ORECCHIE!
IL SOUND
2,85 A @ 100V AC, 4-8-16Ω
natural_image
Black-and-white photo of a man in a bandie holding a guitar, with stage lighting and no visible text or symbols.La Sra. Hansen
MUCHO ÉXITO Y QUE DISFRUTES CON TU WARP T™ Y CUIDADO CON TUS OÍDOS
EL SONIDO
2.2 PARTE TRASERA
3.0 STANDARD SETUP / CABLE CONNECTIONS
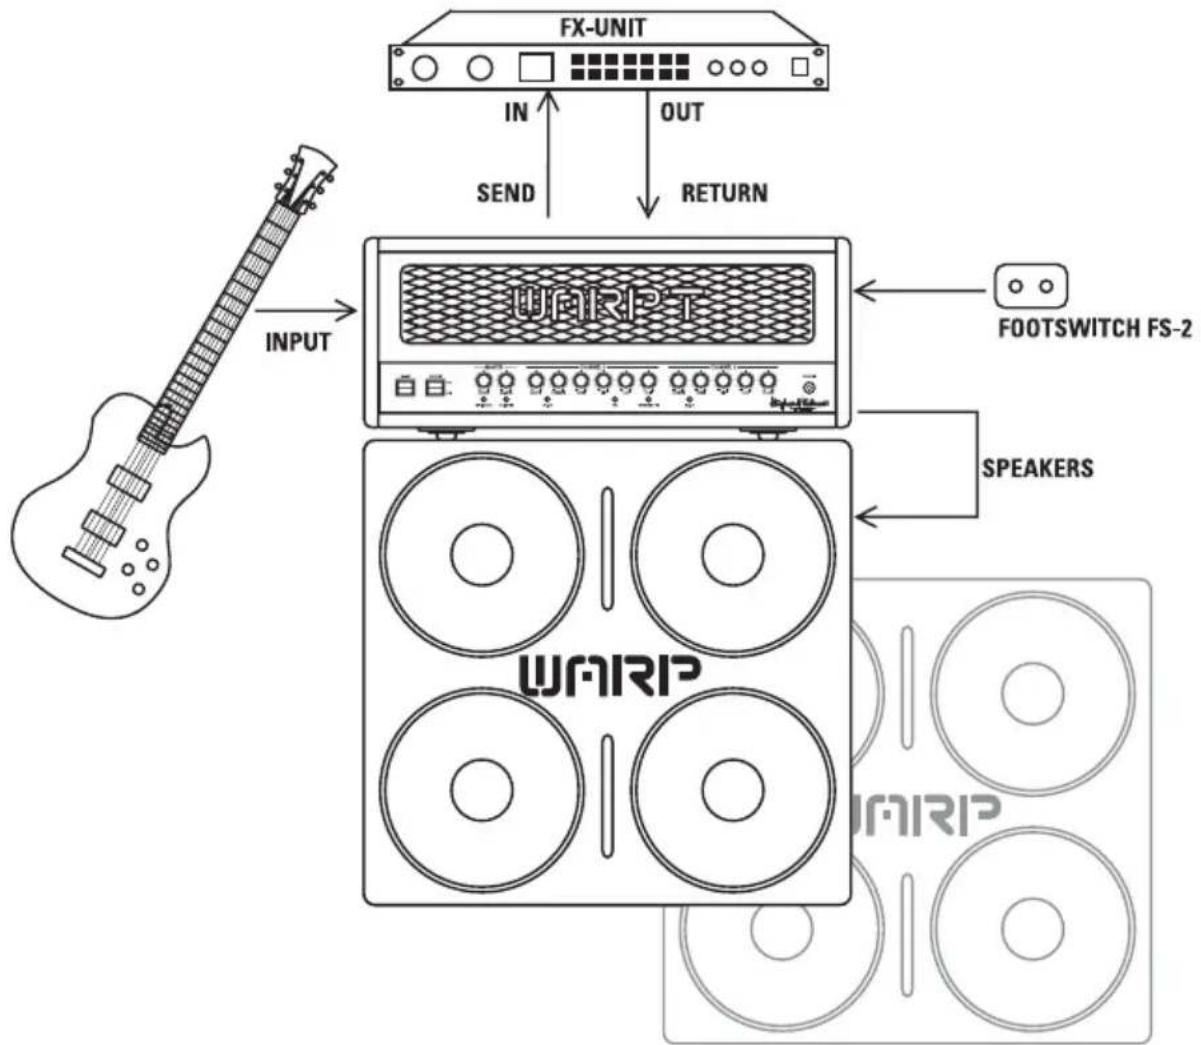
flowchart
graph TD
    A["Input: Gastrophone"] --> B["WAFRIP"]
    B --> C["FOOTSWITCH FS-2"]
    B --> D["SPEAKERS"]
    B --> E["FX-UNIT"]
    E --> F["IN"]
    E --> G["OUT"]
    E --> H["RETURN"]
    B --> I["DAIRIP Display"]
4.0 MANEJO DEL WARP T™
2,85 A @ 100V AC, 4-8-16Ω
This is to certify that
HUGHES & KETTNER® WARP T™
complies with the provisions of the Directive of the Council of the European Communities on the approximation of the laws of the Member States relating to electromagnetic compatibility (EMC Directive 89/336/EEC) and the low voltage Directive (73/23/EEC). This declaration of conformity of the European Communities is the result of an examination carried out by the Quality Assurance Department of STAMER GmbH in accordance with European Standards EN 50081-1, EN 50082-1 and EN 60065 for low voltage, as laid down in Article 10 of the EMC Directive.
SteinR
HUGHES & KETTNER® WARP T™
- Read all of these instructions!
- Save these instructions for later use!
- Follow all warnings and instructions marked on the product!
- Do not use this product near water, i.e. bathtub, sink, swimming pool, wet basement, etc.
- Do not place this product on an unstable cart, stand or table. The product may fall, causing serious damage to the product or to persons!
- Slots and openings in the cabinet and the back or bottom are provided for ventilation; to ensure reliable operation of the product and to protect it from overheating, these openings must not be blocked or covered. This product should not be placed in a built-in installation unless proper ventilation is provided.
- This product should not be placed near a source of heat such as a stove, radiator, or another heat producing amplifier.
- Use only the supplied power supply or power cord. If you are not sure of the type of power available, consult your dealer or local power company.
- Do not allow anything to rest on the power cord. Do not locate this product where persons will walk on the cord.
- Never break off the ground pin on the power supply cord.
- Power supply cords should always be handled carefully. Periodically check cords for cuts or sign of stress, especially at the plug and the point where the cord exits the unit.
- The power supply cord should be unplugged when the unit is to be unused for long periods of time.
- If this product is to be mounted in an equipment rack, rear support should be provided.
- This product should be used only with a cart or stand that is recommended by Hughes & Kettner.
- Never push objects of any kind into this product through cabinet slots as they may touch dangerous voltage points or short out parts that could result in risk of fire or electric shock. Never spill liquid of any kind on the product.
- Do not attempt to service this product yourself, as opening or removing covers may expose you to dangerous voltage points or other risks. Refer all servicing to qualified service personnel.
- Unplug this product from the wall outlet and refer servicing to qualified service personnel under the following conditions:
- When the power cord or plug is damaged or frayed.
- If liquid has been spilled into the product.
- If the product has been exposed to rain or water.
- If the product does not operate normally when the operating instructions are followed.
- If the product has been dropped or the cabinet has been damaged.
- If the product exhibits a distinct change in performance, indicating a need of service!
- Adjust only these controls that are covered by the operating instructions since improper adjustment of other controls may result in damage and will often require extensive work by a qualified technician to restore the product to normal operation.
- Exposure to extremely high noise levels may cause a permanent hearing loss
- Individuals vary considerably in susceptibility to noise induced hearing loss, but nearly everyone will lose some hearing if exposed to sufficiently Intense noise for a sufficient time. The U.S. Government's Occupational Safety and Health Administration (OSHA) has specified the following permissible noise level exposures:
| Duration Per Day In Hours | Sound LeveldBA, Slow Response |
| 8 | 90 |
| 6 | 92 |
| 4 | 95 |
| 3 | 97 |
| 2 100 | |
| 1^1/_2 | 102 |
| 1 105 | |
| 18 | 110 |
| ^1/_4 or less 115 |
- According to OSHA, any exposure in excess of the above permissible limits could result in some hearing loss.
- Ear plug protectors In the ear canals or over the ears must be worn when operating this amplification system in order to prevent a permanent hearing loss if exposure is in excess of the limits as set forth above. To ensure against potentially dangerous exposure to high sound pressure levels, it is recommended that all persons exposed to equipment capable of producing high sound pressure levels such as this amplification system be protected by hearing protectors while this unit is in operation.
- Fuses: For continued protection against risk of fire, replace fuses only with the same type and ratings.
TO PREVENT THE RISK OF FIRE AND SHOCK HAZARD, DO NOT EXPOSE THIS APPLIANCE TO MOISTURE OR RAIN. DO NOT OPEN CASE; NO USER SERVICE-ABLE PARTS INSIDE. REFER SERVICING TO QUALIFIED SERVICE PERSONNEL.
PLEASE READ BEFORE USE AND KEEP FOR LATER USE!
- The unit has been built by Hughes & Kettner in accordance with IEC 60065 and left the factory in safe working order. To maintain this condition and ensure non-risk operation, the user must follow the advice and warning comments found in the operating instructions. The unit conforms to Protection Class 1 (protectively earthed).
- HUGHES & KETTNER ONLY GUARANTEE THE SAFETY, RELIABILITY AND EFFICIENCY OF THE UNIT IF:
- Assembly, extension, re-adjustment, modifications or repairs are carried out by Hughes & Kettner or by persons authorized to do so.
- The electrical installation of the relevant area complies with the requirements of IEC (ANSI) specifications.
- The unit is used in accordance with the operating instructions.
- The unit is regularly checked and tested for electrical safety by a competent technician.
WARNING:
- If covers are opened or sections of casing are removed, except where this can be done manually, live parts can become exposed.
- If it is necessary to open the unit this must be isolated from all power sources. Please take this into account before carrying out adjustments, maintenance, repairs and before replacing parts.
- Adjustment, maintenance and repairs carried out when the unit has been opened and is still live may only be performed by specialist personnel who are authorized by the manufacturer (In accordance with VBG 4) and who are aware of the associated hazards.
- Loudspeaker outputs which have the IEC 417/5036 symbol (Diagram 1, below) can carry voltages which are hazardous if they are made contact with. Before the unit is switched on, the loudspeaker should therefore only be connected using the lead recommended by the manufacturer.
- Where possible, all plugs on connection cables must be screwed or locked onto the casing.
- Replace fuses using only those of the specified type and current rating.
- It is not permitted to use repaired fuses or to short-circuit the fuse holder.
- Never interrupt the protective conductor connection.
- Surfaces which are equipped with the "HOT" mark (Diagram 2, below), rear panels or covers with cooling slits, cooling bodies and their covers, as well as tubes and their covers are purposely designed to dissipate high temperatures and should therefore not be touched.
- High loudspeaker levels can cause permanent hearing damage. You should therefore avoid the direct vicinity of loudspeakers operating at high levels. Wear hearing protection if continuously exposed to high levels.
MAINS CONNECTION:
- The unit is designed for continuous operation.
- The set operating voltage must match the local mains supply voltage.
- Caution: The unit mains switch must be in position OFF before the mains cable is connected.
- The unit is connected to the mains via the supplied power unit or power cable.
- Power unit: Never use a damaged connection lead. Any damage must be rectified by a competent technician.
- Avoid connection to the mains supply in distributor boxes together with several other power consumers.
- The plug socket for the power supply must be positioned near the unit and must be easily accessible.
PLACE OF INSTALLATION:
- The unit should stand only on a clean, horizontal working surface
- The unit must not be exposed to vibrations during operation.
- Keep away from moisture and dust where possible.
- Do not place the unit near water, baths, wash basins, kitchen sinks, wet areas, swimming pools or damp rooms. Do not place objects containing liquid on the unit - vases, glasses, bottles etc.
- Ensure that the unit is well ventilated.
- Any ventilation openings must never be blocked or covered. The unit must be positioned at least 20 cm away from walls. The unit may only be fitted in a rack if adequate ventilation is ensured and if the manufacturer's installation instructions are followed.
- Keep away from direct sunlight and the immediate vicinity of heating elements and radiant heaters or similar devices.
- If the unit is suddenly moved from a cold to a warm location, condensation can form inside it. This must be taken into account particularly in the case of tube units. Before switching on, wait until the unit has reached room temperature.
- Accessories: Do not place the unit on an unsteady trolley, stand, tripod, base or table. If the unit falls down, it can cause personal injury and itself become damaged. Use the unit only with the trolley, rack stand, tripod or base recommended by the manufacturer or purchased together with the unit. When setting the unit up, all the manufacturer's instructions must be followed and the setup accessories recommended by the manufacturer must be used. Any combination of unit and stand must be moved carefully. A sudden stop, excessive use of force and uneven floors can cause the combination of unit and stand to tip over.
- Additional equipment: Never use additional equipment which has not been recommended by the manufacturer as this can cause accidents.
- To protect the unit during bad weather or when left unattended for prolonged periods, the mains plug should be disconnected. This prevents the unit being damaged by lightning and power surges in the AC mains supply.
Diagram 1 Diagram 2


CONSEILS DE SECURITE IMPORTANTS!
PRIERE DE LIRE AVANT L'EMPLOI ET A CONSERVER POUR UTILISATION ULTERIEURE!
Allied Music Exports GmbH, Munich/Germany
CANADA
EFKAY MUSIC, Lachine, Quebec H8T 2P1
CROATIA
Allied Music Exports GmbH, Munich/Germany
CZECH REPUBLIC
MUSICDATA, 59401 Velké
DENMARK
Allied Music Exports GmbH, Munich/Germany
MALAYSIA
GUITAR COLLECTION, 60 000 Kuala Lumpur
NEW ZEALAND
MUSIC WORKS, Onehunga, Auckland
NORWAY
BELCO A/S, 3921 Porsgrunn
POLAND
AMTEC, 51-663 Wrocław
PORTUGAL
ALRICA, 1100 Lisboa
RUSSIA
Bayland Music House, 119146 Moscow
SLOVAK REPUBLIC
GB Music spol. s.r.o., 8111 06 Bratislava
SOUTH KOREA
Firtra Trading Co., Ltd., Seoul
SPAIN
ADAGIO, 08110 Montcada | Reixach
SWEDEN
ILT AB, 84100 Ånge
SWITZERLAND
SDS Music Factory AG, 8048 Zürich
TAIWAN
OMEGA MUSIC, Taichung
TURKEY
Lay Lay Lom A.S., Istanbul
UNITED KINGDOM & EIRE
SENNHEISER, Highwycombe, Bucks HP12 3SL
USA
HUGHES & KETTNER Inc., Mt Prospect, IL 60056
YUGOSLAVIA
Allied Music Exports GmbH, Munich/Germany
- WICHTIG:
- THE TONE
- THE HEAD
- THE CABINET
- CONTENTS
- POWERING UP
- THE CHANNELS OF THE WARP T™
- WARP CHANNEL
- CLEAN CHANNEL
- CONNECTIONS AND CONTROL FEATURES
- FRONT PANEL
- MAINS ON/OFF
- STANDBY
- MASTER VOL
- MIDI LEARN
- FX LEVEL
- WARP CHANNEL
- MASTER
- PRESENCE
- TREBLE, MID, BASS
- LUBE
- SUB
- FX ON
- GAIN
- WARP CH. ON
- CLEAN CHANNEL
- VOLUME
- INPUT
- REAR PANEL
- MAINS
- FOOTSWITCH
- FX SEND
- FX RETURN
- FX -10dB
- MIDI MODULE
- SPEAKER OUTS
- STANDARD SETUP / CABLE CONNECTIONS
- SELECTING CHANNELS
- FROM GRITTY RIFFS TO HI GAIN SCREAMING LEADS
- HOW TO CONNECT AN EFFECTOR
- NOTE
- TIP
- THE WARP-T AND MIDI
- REPLACING TUBES, SERVICE AND PREVENTIVE MAINTENANCE
- When is it a good idea to replace tubes?
- What should you keep in mind when you're replacing tubes?
- How do you extend the service life of the WARP T™'s tubes?
- POSSIBLE ERROR SOURCES / TROUBLESHOOTING
- The WARP T™ won't power up when you switch it on:
- The WARP T ™ is connected properly, but no sound is audible:
- The FX LOOP is on when it shouldn't be:
- The sound is thin and muddy when you switch an effects processor on.
- Your amp is producing ringing noises or tends to feedback:
- After just a few hours of operation, your amp is displaying the typical characteristics of old tubes (increased microphonics and noise, treble loss, weak power output, muddy sound):
- TECHNICAL SPECIFICATIONS
- HEAD
- INPUTS
- OUTPUTS
- GENERAL ELECTRICAL DATA
- GENERAL MECHANICAL DATA
- 4 X 12" CABINET
- OUTPUT
- ENTER THE DARK ZONE
- DER SOUND
- LE SON
- FACE ARRIÈRE
- RACCORDEMENT AU SECTEUR
- IL SOUND
- EL SONIDO
- PARTE TRASERA
- MANEJO DEL WARP T™
- HUGHES & KETTNER® WARP T™
- PLEASE READ BEFORE USE AND KEEP FOR LATER USE!
- WARNING:
- MAINS CONNECTION:
- PLACE OF INSTALLATION:
- CONSEILS DE SECURITE IMPORTANTS!
- PRIERE DE LIRE AVANT L'EMPLOI ET A CONSERVER POUR UTILISATION ULTERIEURE!
- CANADA
- CROATIA
- CZECH REPUBLIC
- DENMARK
- MALAYSIA
- NEW ZEALAND
- NORWAY
- POLAND
- PORTUGAL
- RUSSIA
- SLOVAK REPUBLIC
- SOUTH KOREA
- SPAIN
- SWEDEN
- SWITZERLAND
- TAIWAN
- TURKEY
- UNITED KINGDOM & EIRE
- USA
- YUGOSLAVIA
Brand : HUGHES & KETTNER
Model : Warp T
Category : Electric guitar