
Sensor Bp - Vacuum Cleaner Kärcher - Free user manual and instructions
Find the device manual for free Sensor Bp Kärcher in PDF.

| Product Type | Cordless Stick Vacuum |
| Brand | Kärcher |
| Model | Sensor Bp |
| Power Supply | Li-Ion Battery Kärcher Battery Power+ 36 V, 7.5 Ah |
| Bag Capacity | 5.5 liters |
| Weight (with battery) | 7.99 kg |
| Dimensions (L × W × H) | 360 × 310 × 1160 mm |
| Height Adjustment | 4 mechanical positions |
| Brush Speed | 2500 rpm |
| Working Width | 308 mm |
| Brush Type | Removable Brush Roll |
| Usage | Indoor, dry surfaces (commercial use) |
| Protection Class | III (SELV) |
| Charger Included | Fast Charger Kärcher 36/60, 120 V, 60 Hz |
| Battery Included | Kärcher Battery Power+ 36/75 (36 V, 7.5 Ah) |
| Filter Bag Included | Yes (10 bags in optional replacement pack) |
| Spare Parts Available | Filter pack, brush roll, battery, charger |
| Repairability | No user-serviceable parts, contact authorized service |
| Operating Temperature | 0 °C to +40 °C |
| Battery Storage Temperature | -20 °C to +60 °C |
Frequently Asked Questions - Sensor Bp Kärcher
User questions about Sensor Bp Kärcher
0 question about this device. Answer the ones you know or ask your own.
Ask a new question about this device
Download the instructions for your Vacuum Cleaner in PDF format for free! Find your manual Sensor Bp - Kärcher and take your electronic device back in hand. On this page are published all the documents necessary for the use of your device. Sensor Bp by Kärcher.
USER MANUAL Sensor Bp Kärcher
Operating Instructions (English)
MODEL: 9.877-937.0
Sensor Bp Pack *UL
natural_image
Line drawing of a vacuum cleaner with handle and control panel (no text or symbols)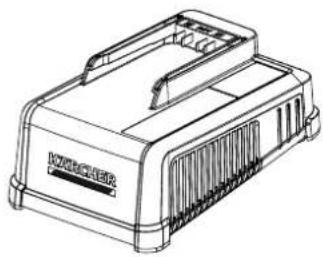
natural_image
Line drawing of a rectangular electronic device with ventilation slots and a top panel (no text or symbols)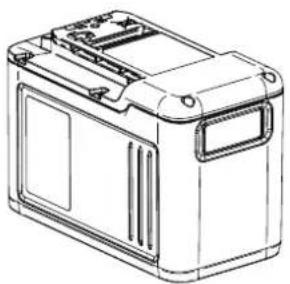
natural_image
Line drawing of a rectangular battery casing with mounting holes and internal compartments (no text or symbols)English 1
Español 15
Français 29
From Serial No. # CC0597289
If Serial Number not listed,
Contact Manufacturer
Intended for Commercial Use

US


8.645-246.0-D 05/23/23
| Model: |
| Date of Purchase: |
| Serial Number: |
| Dealer: |
| Address: |
| Phone Number: |
| Sales Representative: |
Warranty Registration
Thank you for purchasing a Kärcher North America product. Warranty registration is quick and easy. Your registration will allow us to serve you better over the lifetime of the produc
To register your product go to :
http://warranty.karcherna.com
For customer assistance:
1-800-444-7654
KÄRCHER
Machine Data Label 2
Table of Contents 3
Safety
IMPORTANT SAFETY INSTRUCTIONS ..... 4
IMPORTANT SAFEGUARDS 5
Electrical - Charger 6
How to Use this Manual 7
Operation
Scope of Delivery 8
Service Parts....8
Connecting and Operating Elements .....9
Assembly 9
Filter Bag Installation 10
Removing / Changing Filter Bag. 10
Working with SENSOR Bp 11
Height Adjustment of Brush 11
Kärcher Battery Power+ Units Mounting and Removal 12
Maintenance
Maintenance and Care 13
Removing Blockages 13
Trouble Shooting and Support 14
Technical Data 14
Parts
Filter Bag Housing 16
Power Head - Sensor Bp 18
Power Head - Sensor Bp - continued ..... 20
Wiring Diagram 21
IMPORTANT SAFETY INSTRUCTIONS
When using this machine, basic precaution must always be followed, including the following:
READ ALL INSTRUCTIONS BEFORE USING THIS MACHINE.
WARNING:
To reduce the risk of injury, user must read instruction manual, all safety warnings and instructions. Failure to follow the warnings and instructions may result in electric shock, fire and / or serious injury.
- Prevent unintentional starting. Ensure the switch is in the off-position before connecting to battery pack, picking up or carrying the appliance. Carrying the appliance with your finger on the switch, or energizing appliance that have the switch on, invites accidents.
- Disconnect the battery pack from the appliance before making any adjustments, changing accessories, or storing appliance. Such preventive safety measures reduce the risk of starting the appliance accidentally.
- Recharge only with the charger specified by the manufacturer. A charger that is suitable for one type of battery pack may create a risk of fire when used with another battery pack.
- Use appliances only with specifically designated battery packs. Use of any other battery packs may create a risk of injury and fire.
- When battery pack is not in use, keep it away from other metal objects, like paper clips, coins, keys, nails, screws or other small metal objects that can make a connection from one terminal to another. Shorting the battery terminals together may cause burns or a fire.
- Under abusive conditions, liquid may be ejected from the battery; avoid contact. If contact accidentally occurs, flush with water. If liquid contacts eyes, additionally seek medical help. Liquid ejected from the battery may cause irritation or burns.
- Do not use a battery pack or appliance that is damaged or modified. Damaged or modified batteries may exhibit unpredictable behavior resulting in fire, explosion or risk of injury.
- Do not expose a battery pack or appliance to fire or excessive temperature. Exposure to fire or temperature above 130^ C may cause explosion.
- Follow all charging instructions and do not charge the battery pack or appliance outside of the temperature range specified in the instructions. Charging improperly or at temperatures outside of the specified range may damage the battery and increase the risk of fire.
- Maintenance and repairs must be done by qualified personnel. Use only identical replacement parts. This will ensure that the safety of the product is maintained.
- Do not modify or attempt to repair the appliance or the battery pack (as applicable) except as indicated in the instructions for use and care.
- Place the cords from other appliances out of the area to be cleaned.
- Do not operate the vacuum in an area where there are lit candles or fragile objects on the floor to be cleaned. Do not operate the vacuum in a room that has lit candles on furniture that the vacuum may accidentally hit or bump into.
- Do not leave charger when plugged in. Unplug from outlet when not in use and before servicing.
- Do not use outdoors or on wet surfaces.
- Do not use near small or sleeping children. Do not allow to be used as a toy. Close attention is necessary when used by or near children. Do not allow children to sit on the vacuum.
- Use only as described in this manual. Use only manufacturer's recommended attachments.
- Do not use with damaged battery, cord or plug. If appliance is not working as it should, has been dropped, damaged, left outdoors, or dropped into water, return it to a service center.
- Do not pick up anything that is burning or smoking, such as cigarettes, matches, or hot ashes.
- Do not use without dust bag and/or filters in place. Do not wash filters.
- Do not put any object into openings. Do not use with any opening blocked; keep free of dust, lint, hair, and anything that may reduce air flow.
- Keep hair, loose clothing, fingers, and all parts of body away from openings and moving parts. Do not place fingers or other body parts under vacuum unless battery pack has been removed.
- Use extra care when cleaning on stairs.
- Brush may unexpectedly restart. To reduce the risk of injury from moving parts – Remove battery pack before servicing.
- Check the vacuum for air blockages or mechanical failures before switching on.
- Store the vacuum in a dry place at room temperature. When the vacuum is not in use, you should remove battery pack.
SAVE THESE INSTRUCTIONS
IMPORTANT SAFEGUARDS
This appliance is designed for commercial use only!
Accidents due to misuse can only be prevented by those using the machine.
To guard against injury, basic safety precautions should be observed, including the following:
Read and follow all safety instructions.
WARNING:
Electric shock could occur if used outdoors or on wet surfaces.
The vacuum cleaner is designed to be safe when used to perform cleaning functions. Should damage occur to electrical or mechanical parts, cleaner should be repaired by a competent service center before using in order to avoid further damage to machine or physical injury to user.
Observe the following precautions:
Do not run cleaner over power cord of other appliances.
Do not drop battery
Batteries with damaged housing are suspicious and may not be used any longer. Replace them ASAP.
Your vacuum cleaner creates suction and contains a revolving brush. To avoid bodily injury from suction or moving parts, vacuum cleaner brush should not be placed against, or in close proximity of loose clothing, jewelry, hair or body surfaces while using the vacuum cleaner. The cleaner should not be used to vacuum clothing while it is being worn. Keep children away from machine when in operation.
If used on plush carpet or carpet with thick padding, turn off unit when handle is in upright position.
Do not use your vacuum cleaner in areas where flammable and/or explosive vapor or dust is present to avoid possibility of fire or explosion. Some cleaning fluids can produce such vapors. Areas on which cleaning fluids have been used should be completely dry and thoroughly aired before being vacuumed.
To avoid fire hazard, do not pick up matches, fireplace ashes, or smoking material with cleaner.
Keep your work area well lighted to avoid picking up harmful materials (such as liquids, sharp objects, or burning substances) and avoid tripping accidents.
Use care when operating the cleaner on irregular surfaces such as stairs, as falling cleaner could cause bodily injury and/or mechanical damage. Proper storage of machine in an out-of-way area immediately after use will also prevent accidents caused by tripping over cleaner.
Store your vacuum indoors in a cool, dry area not exposed to the weather to avoid electrical shock and/or cleaner damage.
Exercise strict supervision to prevent injury when using vacuum cleaner near children or when a child is allowed to operate vacuum cleaner. Do not allow children to play with vacuum cleaner and never leave cleaner unattended with battery installed.
SAVE THESE INSTRUCTIONS
Electrical - Charger
In the USA, the charger related to this machine operates on a standard 15 amp 115 volt A.C. power circuit. The amp, hertz, and voltage are listed on the data label found on each charger. Using voltages above or below those indicated on the data label will cause serious damage to the charger.
This manual contains the following sections:
- Safety
• How to Use This Manual - Operation
- Maintenance
- Parts List
The HOW TO USE THIS MANUAL section will tell you how to find important information for ordering correct repair parts.
Parts may be ordered from authorized dealers. When placing an order for parts, the machine model and machine serial number are important. Refer to the MACHINE DATA box which is filled out during the installation of your machine. The MACHINE DATA box is located on the inside of the front cover of this manual.
| Model: |
| Date of Purchase: |
| Serial Number: |
| Dealer: |
| Address: |
| Phone Number: |
| Sales Representative: |
The model and serial number of your machine are located on the bottom-back of the machine.
Symbols used in this manual:
1,2,3,...Item numbers with reference in text and listings
A,B,C,...Additional markings with reference in Text
1, 2,...Order of operating steps
The SAFETY section contains important information regarding hazardous or unsafe practices of the machine. Levels of hazards are identified that could result in product damage, personal injury, or severe injury resulting in death.
The OPERATIONS section is to familiarize the operator with the operation and function of the machine.
The MAINTENANCE section contains preventive maintenance to keep the machine and its components in good working condition. They are listed in this general order:
- Maintenance and Care
- Removal of brush roller
- Removing Blockage
- Troubleshooting
The PARTS LIST section contains assembled parts illustrations and corresponding parts list. The parts lists include a number of columns of information:
- ITEM – column refers to the reference number on the parts illustration.
- PART NO. – column lists the part number for the part.
- REF NO. – reference number.
- DESCRIPTION – column is a brief description of the part.
- NOTES – column for information not noted by the other columns.
NOTE: If a service or option kit is installed on your machine, be sure to keep the KIT INSTRUCTIONS which came with the kit. It contains replacement parts numbers needed for ordering future parts.
The manual part number is located on the lower right corner of the front cover.
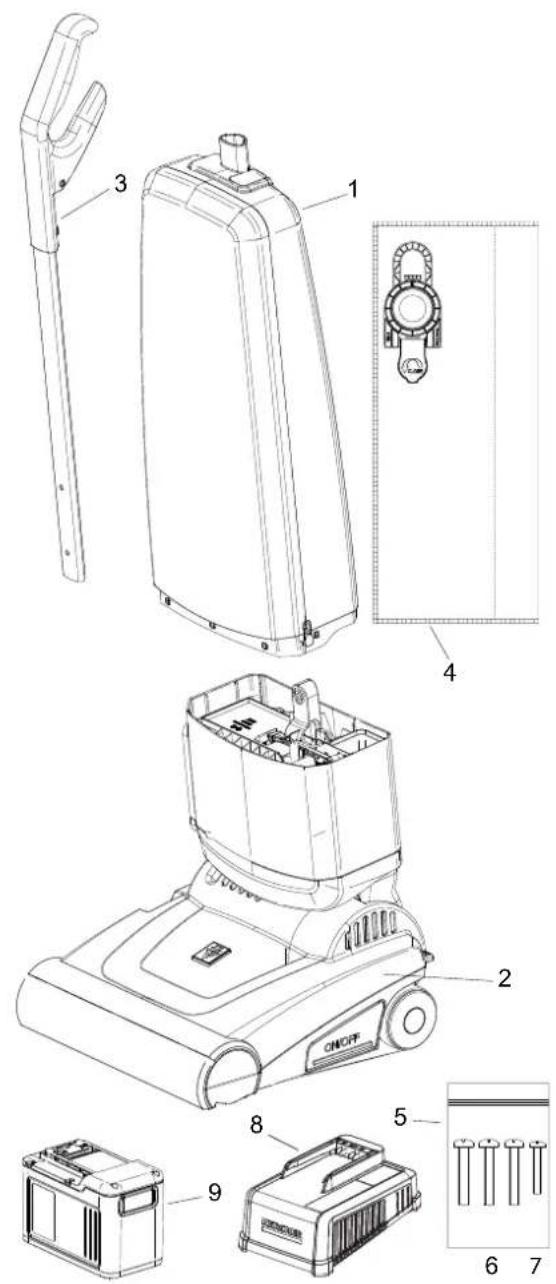

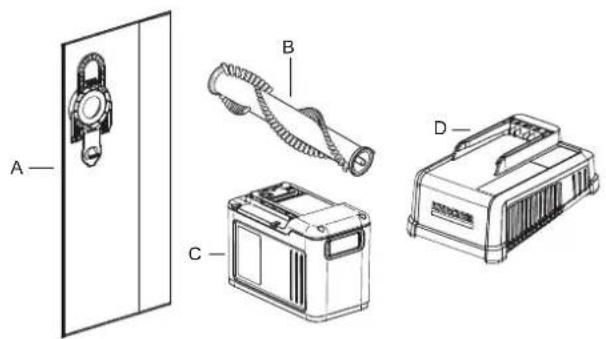
Scope of Delivery
Box Contents:
- Filter compartment
- Power Head
- Grip & Handle Assembly
- Filter bag 1x
-
Screw kit with:
-
Panhead screw 3x M5x30, Phillips drive
-
Panhead screw 1x M4x10, Phillips drive "Spare"
Always packed separately:
- Karcher Fast Charger 36/60 120 V, 60 Hz
- Kärcher Battery Power+ 36/75, 36 V, 7.5Ah
Please check if all listed parts are present. If something is missing, please check the packing material and the poly bag with the documents.
For assembly and some maintenance tasks, you will need a Phillips drive screw driver size PH2.
This tool is not contained in the set delivered:

Service Parts
A. 8.645-209.0 Filter pack 10x bags
B. 8.600-495.0 Brush Roller 31 cm
C. 2.445-075.0 Kärcher Battery Power+36/75, 36 V, 7.5Ah
D. 2.445-053.0 KÄRCHER Fast Charger
36/60, 120 V, 60 Hz
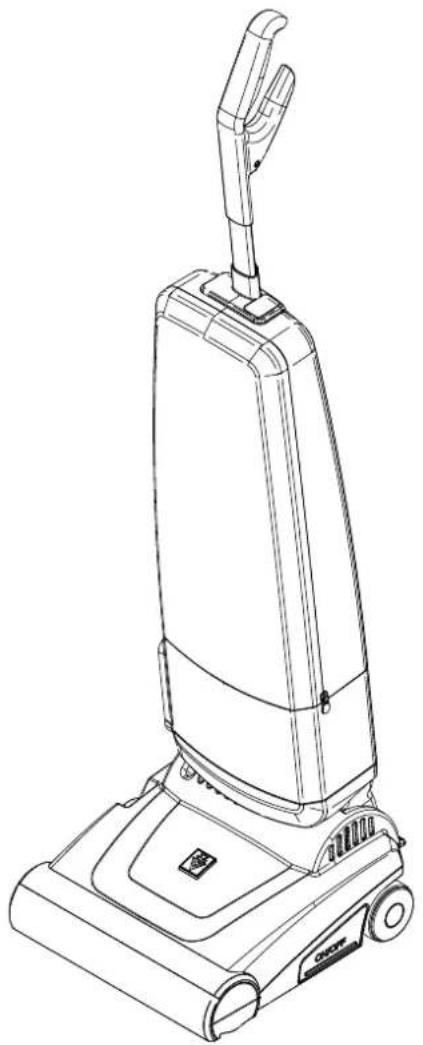
Connecting and Operating Elements
- Brush roller
- Zipper
- Sliders
- Connecting device
- Handle & Handle tube assembly
- Handle guide
- Battery release lever
- On / Off-Switch
- Height adjustment Brush
- Brush cover right hand
- Release button bearing block
- Foot pedal
- Filter bag connection
- Sealing Adapter
Assembly
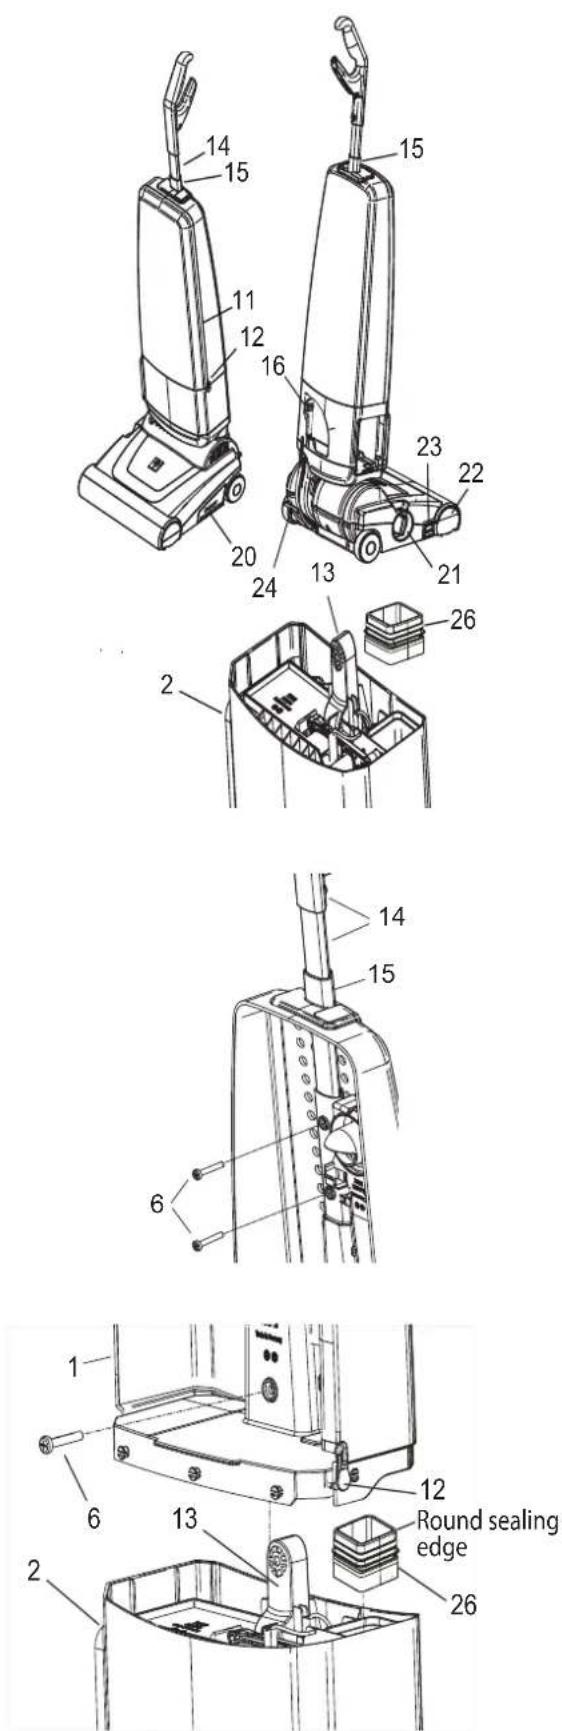
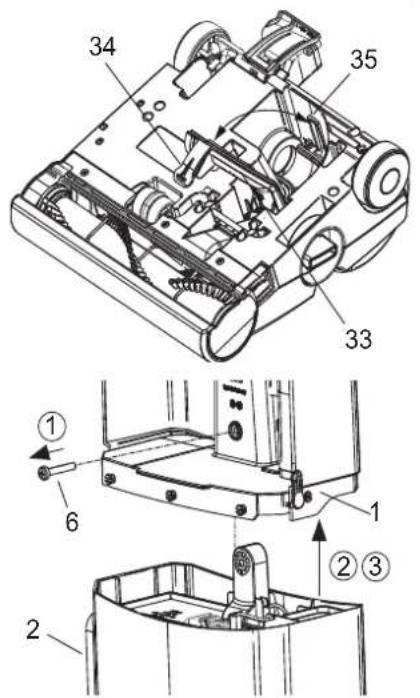
The handle assembly (14) has to be inserted into the guide (15) of the filter bag housing and will be secured with the two remaining M5x30 screws (6).
Please Note: The dust bag housing cover cannot be removed completely! It has not been shown in the illustrations only to improve clarity!
If not already installed in the power head, first insert bottom side with wide sealing of 86455340 (75147) sealing adapter (26) into power head as shown. Make sure that the wide rubber does not roll up during insertion.
Place the filter compartment (1) on the power head (2) so that the connecting piece (13) reaches into the corresponding opening while inserting round sealing edge of sealing adapter into the air channel of filter compartment (1). Open the zipper (11) of the filter compartment by moving the two sliders (12) all the way down to the right and to the left. Make sure that both ends of the zipper reach straight into the plastic part. They may not be folded or protrude. Then press the bottom plate of the filter housing with the flat of your hand and shake it lightly or move the pre-installed handle to simplify assembling.
For the final connection of the main assemblies one of the M5x30 screws (6) from the screw bag (5) is used. It should now be easy to push it a few millimeters into the hole and then engage with the thread inserted from the back.
natural_image
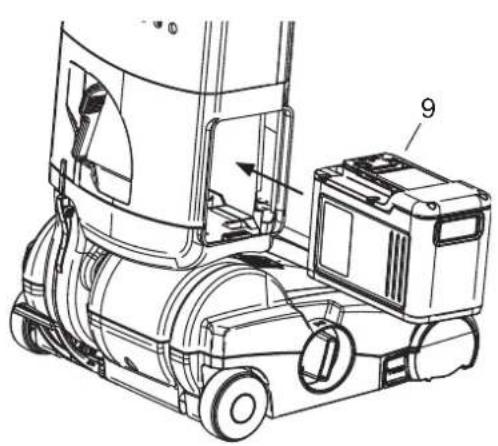
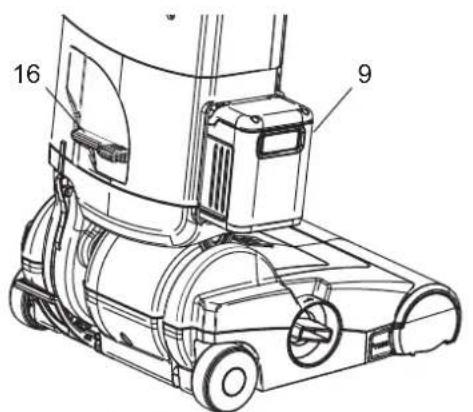
Technical line drawing of a mechanical device with labeled components (no text or symbols present)Afterwards, insert the power unit (9) from the right hand side into the machine. Push until you feel and hear clearly that it engages. The battery pack now will be connected mechanically and electrically to the device. For more detailed description of installation and removing, please refer to section "Kärcher Battery Power+ Units Mounting and Removal".
natural_image
Technical line drawing of a vacuum cleaner with labeled components (no text or symbols)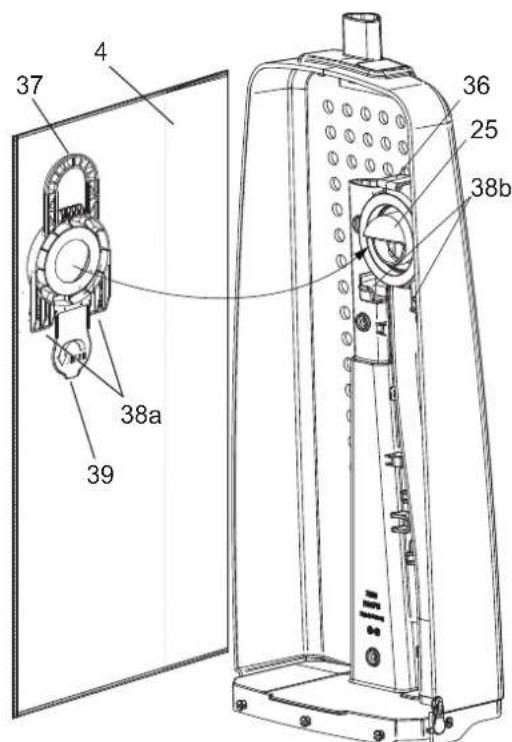
Filter bag cover not shown
Filter Bag Installation
First insert the guides (38a) of the included filter bag (4) into the receptacles (38b). Then tilt it upwards until it locks to latch (36). The filter bag will be plugged onto the connector (25) of the air guide automatically.
Please make sure that the filter bag hangs smoothly and straight in the unit to ensure maximum suction power and dust collection.
Then move both sliders (12) of the zipper to the top of the filter bag housing.
Removing / Changing Filter Bag
Lift latch (36) slightly with your thumb and pull handle (37) simultaneously.

Working with SENSOR Bp
SENSOR Bp is also equipped with many of the well known features of Kärcher upright vacuums.
The On / Off-Switch (20) is located on the left hand side of the power head and is designed to be operated by foot. A slight push will be sufficient for starting the motor, another push will stop it again.
Before bringing the vacuum in working position, please hold the handle firmly. Otherwise the upper part may fall backwards! Push down the foot pedal (23) first.
Afterwards, the upper part of the machine can be tilted into a comfortable working position. For cleaning under furniture or upholstery, the top part can be tilted far back (up to 180°). Working space will only be limited by the height of the power head.
In breaks or after finishing work, it is mandatory to push the filter bag housing upwards until the foot pedal snaps in tactilely and audibly.
Only then the device can be safely placed on a solid surface.
After finishing your work, the Power Pack should be removed from the machine and recharged in order to keep your SENSOR Bp always ready to use.
Height Adjustment of Brush
In order to get an optimal cleaning result, the brush of your SENSOR Bp can be height adjusted in four steps. The large adjustment wheel (21) on the right hand side of the power head is intended for this purpose. These settings are possible:
1 Largest engagement in the carpet, also carpets with low pile height.
2 High sweeping performance, but perhaps faster wear of the brush roller. Also for carpets with middle pile height.
3 Lower sweeping performance. Also for carpets with more pile height.
4 Lowest engagement in the carpet, also for long pile carpets.
The numbers listed above will also be shown on top of the adjuster (21a) according to the setting of the height adjustment.
With these setting options, the optimal balance between material protection, required pushing force, brush roller wear as well as battery running time can be achieved. If the cleaning performance is not sufficient, even in position 1, the brush roller is worn and needs to be replaced.
Please refer to section "Maintenance and Care" for details. It has been proven that it makes sense to start in position 2" and change to diverting settings depending on personal feeling or conditions on site.
natural_image
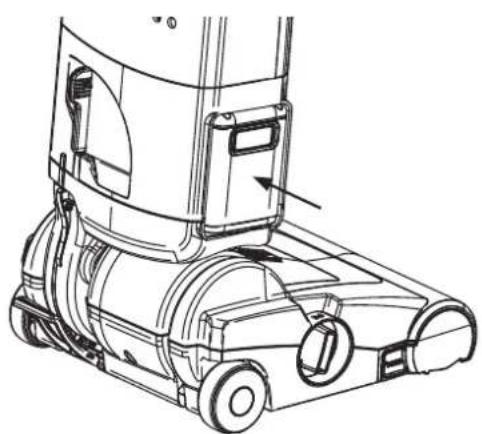
Technical line drawing of a vacuum cleaner with labeled component (16), no text or symbols presentKärcher Battery Power+ Units Mounting and Removal
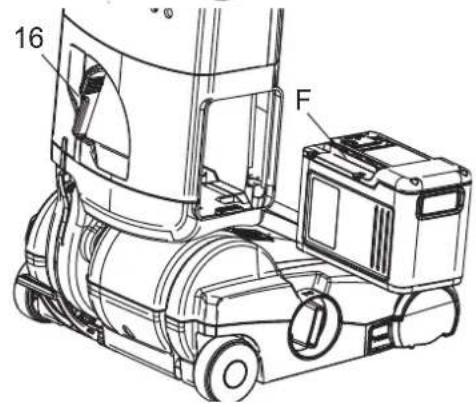
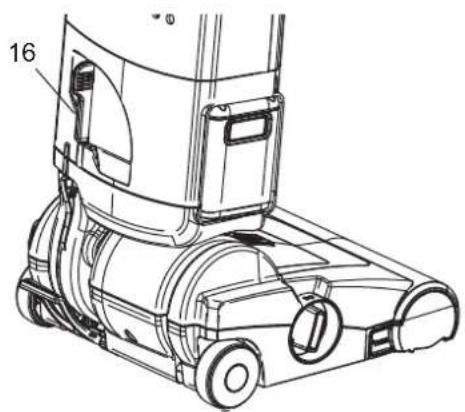
With the big release lever (16) on the backside of the vacuum, the Battery Power+ Unit (9) will be unlocked and pushed a small way out of its fixture.
It returns to working position after a Battery Power+ Unit has been installed correctly. Please observe the relatively large weight of the Battery Power+ Units when removing them! There is a risk of injury or fatal, irreparable damage to the unit when falling down.
The Battery Power+ Unit should be removed from the device with both hands and then be placed on a safe, stable surface (e.g. table, workbench, etc.).
If work has been finished or battery is empty it can directly be re-charged.
Replacing the Battery Power+ Unit works in reverse order and should for your safety always be carried out with both hands.
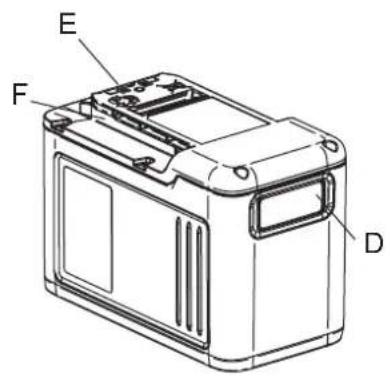
Please note that the Battery Power+ Unit has to be inserted into your SENSOR Bp with contact side (E) first. Otherwise it will not lock correctly into the fixture and the device will not work.
If battery pack cannot be pushed-in correctly, check that the internal guides are lined-up with guides (F) on top of the battery.
The display panel (D, Display) of the Battery Power+ Unit always has to stay visible. After Unit has been inserted so far that tipping out is safely prevented, push it further in with your flat hand on the front side until the end position is indicated by a clearly audible "Click".
Now the Battery Power+ Unit is positioned safely in the device and as well the electrical contacts are connected correctly.
At the same time, the release lever (16) automatically returns to its operating position.

Maintenance and Care
Before performing any maintenance or cleaning, switch off unit and remove battery.
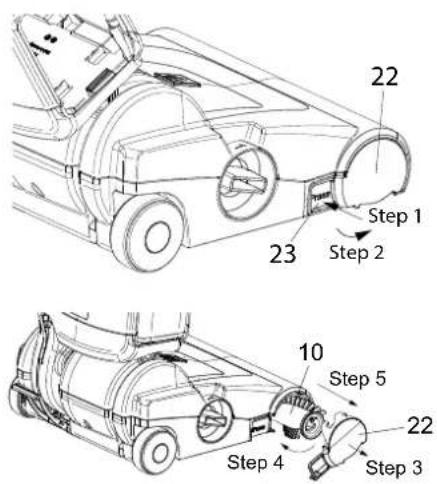
Removal of brush roller
In order to remove the brush roller of the power head firmly press the button marked "PRESS" (23). Now you can swing the bearing block (22) downwards and remove it. Turn the brush roller (10) a bit clockwise and pull it out. It has been proven good practice to check the brush roller regularly for coiled yarn or hair and remove them.
Removing Blockages
If only a slight suction effect is noticeable or if the brush has been blocked, there may be a clog in the air passage. On bottom of the power head, the cover (33) of the air duct can be opened by releasing latch (34) in order to remove clog from the air channel. Make sure that there is no clog beneath this cover or in the transitions to brush channel and turbine.
When everything has been cleared, swing back cover until the latch snaps into its counterpart (35).
If you suspect a blockage in the filter compartment (please refer to page 9), remove battery, remove screw (6) and separate power head (2) and filter compartment (1). The air channel in the filter compartment can be checked easily from bottom.
Do not try to open air channel in filter compartment! If latches break, machine will not work correctly any longer.
Under no circumstances blockages or clog may be cleaned by means of sticks or other hard or solid tools. Damages would be very likely.
Filter bag cover not shown
Trouble Shooting and Support
There are no user-serviceable parts inside the unit.
If a malfunction cannot be solved by the notes below, ask your dealer or other authorized service personnel.
| Machine does not start | Check Battery Power+ Unit for correct placement. If necessary take it out and place it back into the machine. |
| Check charging status of Battery Power+ Unit | |
| Suction power decreases | Check for blockages or clog |
| Check charging status of Battery Power+ Unit | |
| No or poor suction detected | Check for blockages or clog |
| Check charging status of Battery Power+ Unit | |
| Machine switches off during operation | Check charging status of Battery Power+ Unit |
| Check for blockages or clog |
Technical Data
| SENSOR Bp | ||
| Electrical connection Units | ||
| Nominal voltageKärcher Battery Power+ | V DC 36 | |
| Battery Ambient Storage Temperature | °C°F | -20 - 60-4 - 140 |
| Protection class III. SELV | ||
| Technical data | ||
| Filter bag volume I/gal 5.5 I, 1.45 US liq. Gal. | ||
| Engine V 36V | ||
| Measures and Weights | ||
| Typical working weight incl. battery kg / lbs 7.99 / 10.2 with 2.445-075.0 | ||
| Length mm / inches 360mm, 14.2" | ||
| Width mm / inches 310mm, 12.2" | ||
| Height mm / inches 1160mm, 45.6" | ||
| Floor Adjustment | Mechanical | |
| Brush Drive | Toothed Belt | |
| Brush Speed | rpm | 2500 |
| Working width | mm / inches 308mm / 12" | |
| Surrounding Conditions | ||
| Ambient temperature | °C°F | 0 - 4031 - 104 |
| Technical changes reserved | ||
Sensor Bp
KAVLWB3
KÄRCHER
makes a difference
La Aspiradora
natural_image
Line drawing of a vacuum cleaner with handle and control panel (no text or symbols)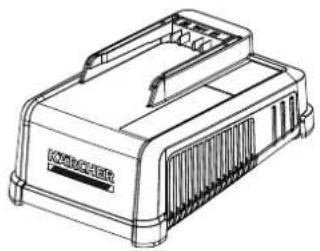
natural_image
Line drawing of a portable electronic device with ventilation slots and a front panel (no text or symbols)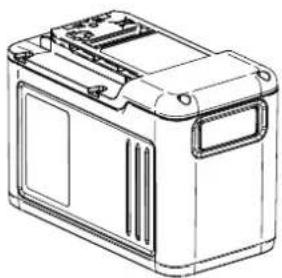
natural_image
Line drawing of a rectangular battery housing with mounting tabs and internal compartments (no text or symbols)8.645-246.0-D 05/23/23
Modelo:
natural_image
Technical line drawing of a mechanical device with labeled parts (no text or symbols present)
natural_image
Technical line drawing of a vacuum cleaner with labeled components (no text or symbols)
natural_image
Technical line drawing of a vacuum cleaner with labeled component (no text or symbols beyond part number)natural_image
Line drawing of a vacuum cleaner with handle and base (no text or symbols)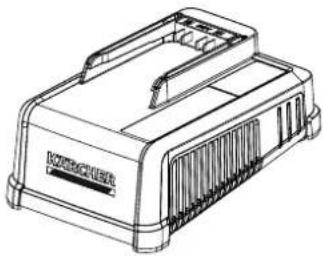
natural_image
Line drawing of a mechanical component with no visible text or symbols
natural_image
Line drawing of a rectangular battery casing with lid and side panels (no text or symbols)
Champ d'application
natural_image
Technical line drawing of a mechanical device with labeled components (no text or symbols present)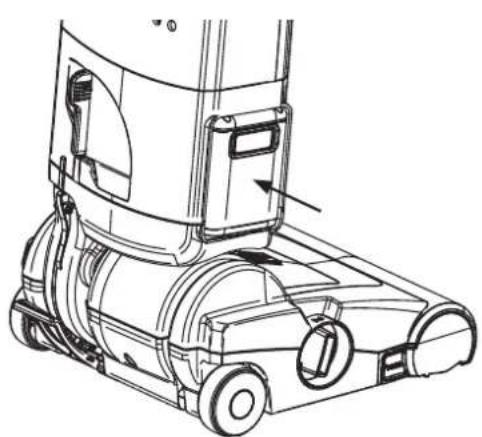
natural_image
Technical line drawing of a vacuum cleaner with labeled components (no text or symbols)


