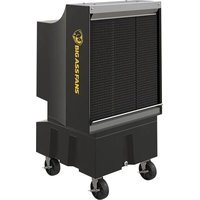
Cool-Space 300 - Fan Big Ass Fans - Free user manual and instructions
Find the device manual for free Cool-Space 300 Big Ass Fans in PDF.


| Product Type | Evaporative cooler (fan) |
| Brand | Big Ass Fans |
| Model | Cool-Space 300 |
| Power supply (120 V) | 120 V ±10%, 60 Hz, 4.1 A |
| Power supply (220/230 V) | 220/230 V ±10%, 50/60 Hz, 1.8 A |
| Minimum circuit ampacity (120 V) | 15 A |
| Minimum circuit ampacity (220/230 V) | 10 A |
| Maximum water pressure | 120 PSI (8 bar / 827 kPa) |
| Number of treatment tablets | 1 tablet every 3 months |
| Cooling pad type | Evaporative cooling pad |
| Pad maintenance | Weekly cleaning with a garden hose |
| Included accessories | 4 casters with bolts |
| Remote control options | Cool-Space 500 model only (remote control included) |
| Safety | Disconnect power before maintenance; Risk of electric shock |
| Repairability | Spare parts available: pump, motor, cooling pad, tablets |
Frequently Asked Questions - Cool-Space 300 Big Ass Fans
User questions about Cool-Space 300 Big Ass Fans
0 question about this device. Answer the ones you know or ask your own.
Ask a new question about this device
Download the instructions for your Fan in PDF format for free! Find your manual Cool-Space 300 - Big Ass Fans and take your electronic device back in hand. On this page are published all the documents necessary for the use of your device. Cool-Space 300 by Big Ass Fans.
USER MANUAL Cool-Space 300 Big Ass Fans
Operation and Maintenance Manual
natural_image
Line drawing of a portable air conditioner unit with fan and wheels (no text or symbols)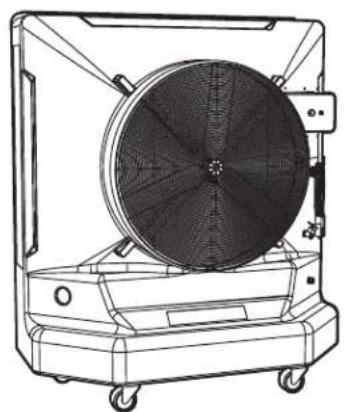
natural_image
Technical line drawing of a portable air conditioner unit with fan and wheels (no text or symbols)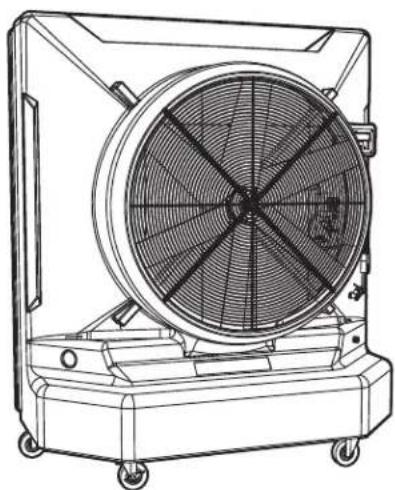
natural_image
Technical line drawing of a large air fan or evaporator unit with visible blades and mounting base (no text or symbols)F-EV1-1801
F-EV1-1802
F-EV1-3601
F-EV1-3602
F-EV1-5001
F-EV1-5002
READ AND SAVE THESE INSTRUCTIONS

WARNING: ELECTRICAL SHOCK HAZARD. Disconnect the power supply before performing service or maintenance. Failure to do so may result in serious injury or death.
CAUTION: Use caution when troubleshooting or repairing electrical components. Ensure power is disconnected from the cooler before the pads or fan guard are removed to gain access to the fan.
CAUTION: Repairs should be performed by a qualified technician.
CAUTION: Prolonged use of hard water without proper water treatment will create mineral deposit buildup. This will cause the pump to fail and is NOT COVERED BY WARRANTY.
DANGER: Hazard to humans and domestic animals. Keep water treatment tablets out of reach of children. Causes severe eye and skin damage. Keep away from eyes, skin, and clothing. Harmful if swallowed.
DANGER: Wear face shield or goggles and rubber gloves when handling water treatment tablets. In case of contact, flush with water and seek medical attention.
WARNING: To avoid contamination, do not store water treatment tablets near drinking water, food, or feed. Do not reuse the empty container. Dispose of contents/container in accordance with local/regional/national/international regulations.
The appliance is not to be used by children or persons with reduced physical, sensory, or mental capabilities, or lack of experience and knowledge, unless they have been given supervision or instruction.
Children being supervised should be instructed not to play with the appliance.
Maximum altitude: < 1000 m

Installation Guide
Rev. G
04/06/2022

Original English Instructions www.bigassfans.com/support
Improper installation, delivery, or maintenance, including, but not limited to, any of the following actions by the customer or agent of the customer will constitute a breach of and will void all warranties:
- Failure to follow the required installation procedures specified in this Installation Guide and in all other documentation supplied with the fans and related equipment including documentation provided by the manufacturers of the individual fan and control components;
- Failure to follow all relevant codes and ordinances, including, but not limited to, the National Electrical Code (United States), applicable national and local electrical codes, and state and local building codes;
- Failure to follow electrical engineering industry standards regarding the approved method of installing solid-state electrical equipment having the characteristics of the fans, the fan controls, and their related components, even if such standards are not specifically referenced in any instructions or literature supplied by Big Ass Fans or provided by manufacturers.
All trademarks used herein are the properties of their respective owners. No part of this document may be reproduced or translated into a different language without the prior written consent of Big Ass Fans. The information contained in this document is subject to change without notice. For the most up-to-date information, see the online printable installation guide at www.bigassfans.com
OPERATION CHECKLIST
☑ Check all hose connections.
Use a 12 gauge cord if the cord is shorter than 50 ft (15 m) or a 10 gauge cord if the cord is longer than 50 ft (15 m).
☑ Provide fresh air intake for the cooler and maintain a minimum clearance of 3 ft (0.9 m) behind the cooler. Do not operate the cooler in an enclosed space.
☑ Make sure the the water source does not exceed 120 PSI (8 bar/827 kPa) of water pressure.
Make sure the cooler's reservoir is filled with water before turning on the pump. The pump automatically shuts off if the water level is too low.
√ Flush new cooling media.
- Fill the cooler with water.
- Turn on the pump.
- Run the cooler without the fan running for 5 hours.
☑ Make sure the cooling media is evenly saturated by using the control valve to adjust the water flow. Do not completely open the control valve. This may flood the cooling media.
☑ Dry out the cooling media before shutting down the cooler. Turn off the pump and leave the fan running for 10 to 15 minutes.
√ Drain and clean the cooler weekly. Remove the cooling media and rinse with a garden hose.
To avoid scale and mineral buildup, use water treatment tablets periodically. Tablets are provided in the cooler's reservoir according to the table below. Every 3 months, add the specified number of tablets to the reservoir after cleaning. Additional tablets are available by calling 877-244-3267.
| Model Number of tablets | |
| Cool-Space® 300 1 | |
| Cool-Space 400 2 | |
| Cool-Space 500 3 | |
ASSEMBLY AND SETUP
CAUTION: Do not connect to a water source where water pressure exceeds 120 PSI (8 bar/827 kPa). This will cause permanent damage to the cooler.
CAUTION: If using an extension cord, do not exceed the cord's amperage ratings. Undersized extension cords create excessive drops in voltage, causing the electric motor to generate excess heat. This results in inefficient motor operation and premature motor failure and will void the warranty.
Installing the casters (Cool-Space® 300 only)
- Locate the package of four (4) casters and sixteen (16) bolts and remove from box.
- Lay box on its side and carefully open bottom of box. Do not stand box upside down.
- Install the four casters using the bolts.
- Stand cooler up on casters and remove box.
The cooler has been factory tested and is ready to use. Place the cooler on level ground with the casters locked to prevent inadvertent movement.
Connecting the water supply
The cooler comes equipped with a garden hose water source connection. Use a standard garden hose (not provided) to connect the water supply to the cooler.
Connecting the electrical supply
Plug the cooler into a fused or breaker-protected circuit. Refer to the tables below for circuit size and extension cord requirements. Cool-Space 500 models cannot be connected to a GFCI outlet.
Amperage and Circuit Requirements
| Model Volts +/- 10% Frequency Min. Circuit Size Running Amps | ||||
| Cool-Space 300 | 120 V 60 Hz | 15 A 4.1 A | ||
| 220/230 V 50/60 | Hz 10 A 1.8 A | |||
| Cool-Space 400 | 120 V 60 Hz | 15 A 8.0 A | ||
| 220/230 V 50/60 | Hz 10 A 5.0 A | |||
| Cool-Space 500 | 120 V 60 Hz | 25 A | 16.5 A | |
| 220/230 V 50/60 | Hz 15 A 8.6 A | |||
Three-Conductor Heavy Duty Extension Cord Requirements (120 V)
| Cord Length | Cord Size | |||
| 16 GA | 14 GA | 12 GA | 10 GA | |
| 0–50 ft (0–15 m) | 13 A | 18 A | 25 A 30 A | |
| 50–100 ft (15–30 m) | 10 A | 13 A | 18 A | 25 A |
Three-Conductor Heavy Duty Extension Cord Requirements (220/230 V)
| Cord Length | Cord Size | |||
| 1.5 mm^2 | 2.5 mm^2 | 4 mm^2 | 5 mm^2 | |
| 6 m 13 A 15 A | 15 A 15 A | |||
| 16 m 13 A 14 A | 15 A 15 A | |||
| 32 m 10 A 12 A | 13 A 15 A | |||
HANDLE [OPTIONAL]
The handle accessory is available for Cool-Space® 400 and Cool-Space 500.
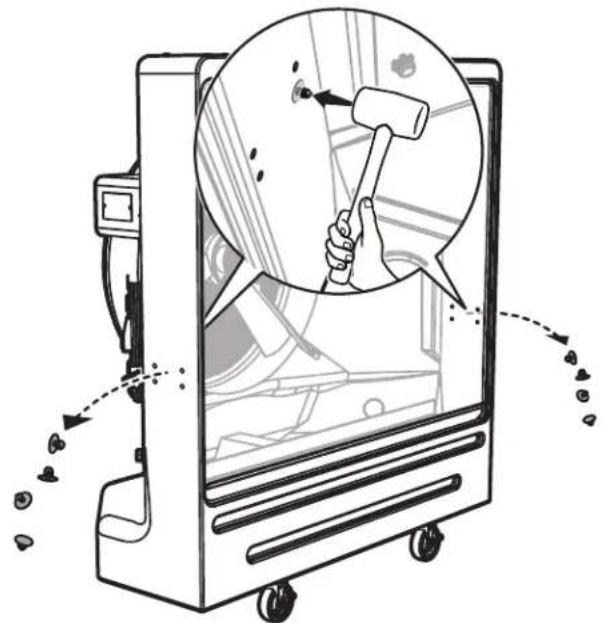
1. Remove media and knockouts
Remove the cooling media according to the Cooling Media Replacement instructions. Use a rubber mallet to remove the eight knockouts from the holes on the sides of the cooler.
natural_image
Illustration of a hand hammer inside a vehicle's door, with motion arrows indicating movement (no text or symbols)
Cooling Media Replacement Instructions
www.bigassfans.com/docs/evap-coolers/cool-space-media-replacement.pdf
2. Install handle brackets and plates
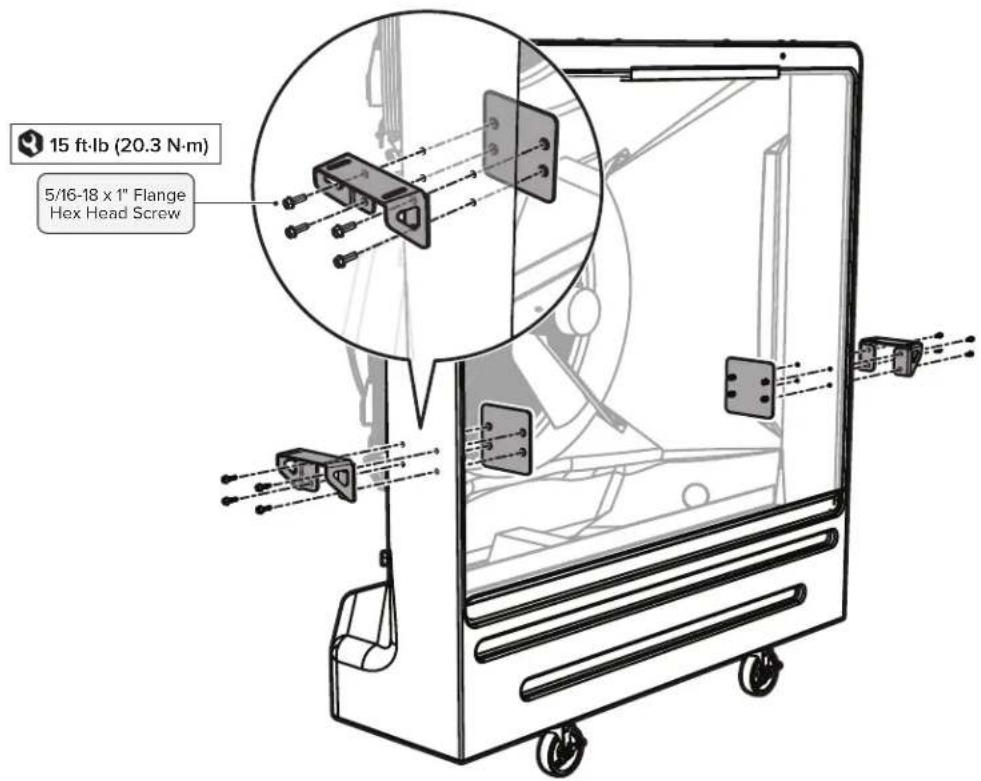
Attach the two handle brackets and support plates to the sides of the cooler.
3. Install media and handle
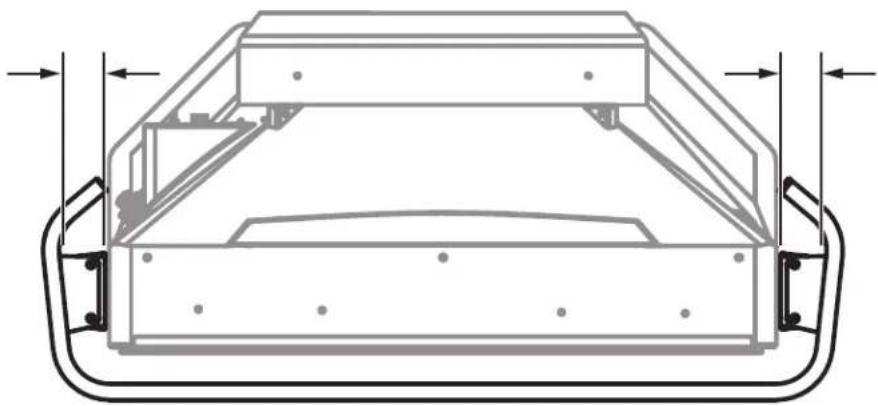
Reinstall the cooling media according to the replacement instructions on the previous page. Attach the handle to the handle brackets. Before tightening the handle hardware, make sure the space between the cooler and the handle is even on both sides of the cooler.
Top View
natural_image
Technical line drawing of a mechanical component with no visible text or symbols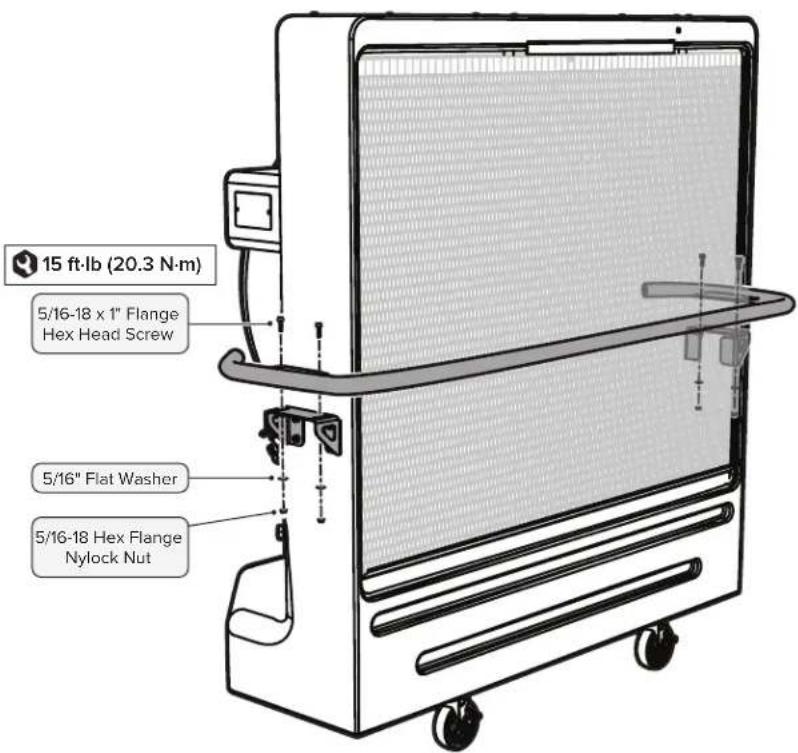
OPERATION
The cooler must be placed on level ground to operate correctly. Evaporative coolers create an oval-shaped air pattern. Obstacles such as racks and workbenches may interfere with airflow. Position the cooler so that interruption of the air pattern is minimized. Multiple coolers may be required to cover larger areas.
There are three major factors to consider when determining where to place the cooler.
- Fresh Air Supply. The inlet side of the cooler (pad side) requires a constant, uninterrupted supply of fresh air for maximum performance. A distance of 3 ft (0.9 m) of clear space to any obstructions at the rear or inlet side of the cooler is recommended.
- Discharge Airflow. The cool air discharged from the cooler should be free from obstruction to promote air circulation in order to maximize the cooling zone.
- Ventilation. Adequate ventilation is needed ensure the cooler does not recirculate air that has already been through the evaporative cooling process.
Operating the cooler
1. Fill the reservoir
After connecting the cooler to a water source, turn the water supply valve on to fill the cooler with water. The float valve will shut off the water flow when the sump is full.
2. Turn on the pump
When starting the cooler for the first time or after installing new cooling media, turn on the pump and flush the cooling media for 5 hours without the fan running and with the flow control valve fully opened. On initial startup, the cooling media will take a few hours to become fully saturated. During this time, the media may produce an odor. This odor will dissipate over time. For best results, change the water in the reservoir a few times.
3. Turn on the fan and adjust the water flow
Set the fan switch to the ON position and adjust the speed to your preferred setting. Adjust the water flow with the flow control valve until water streams over the pads. Do not flood the pads with water. You should see several 1" to 2" (25 to 51 mm) wide dry streaks on the face of the pads. If dry streaks grow wider, adjust flow to allow more water.
The pump automatically shuts off if the water level is too low. If the pump will not start or stops running, refill the cooler with water. The pump may take up to five (5) minutes to reset after the cooler is refilled.
Operation (Cool-Space® 500)
Power Indicator
Red light: Power connected
Green light: Power on
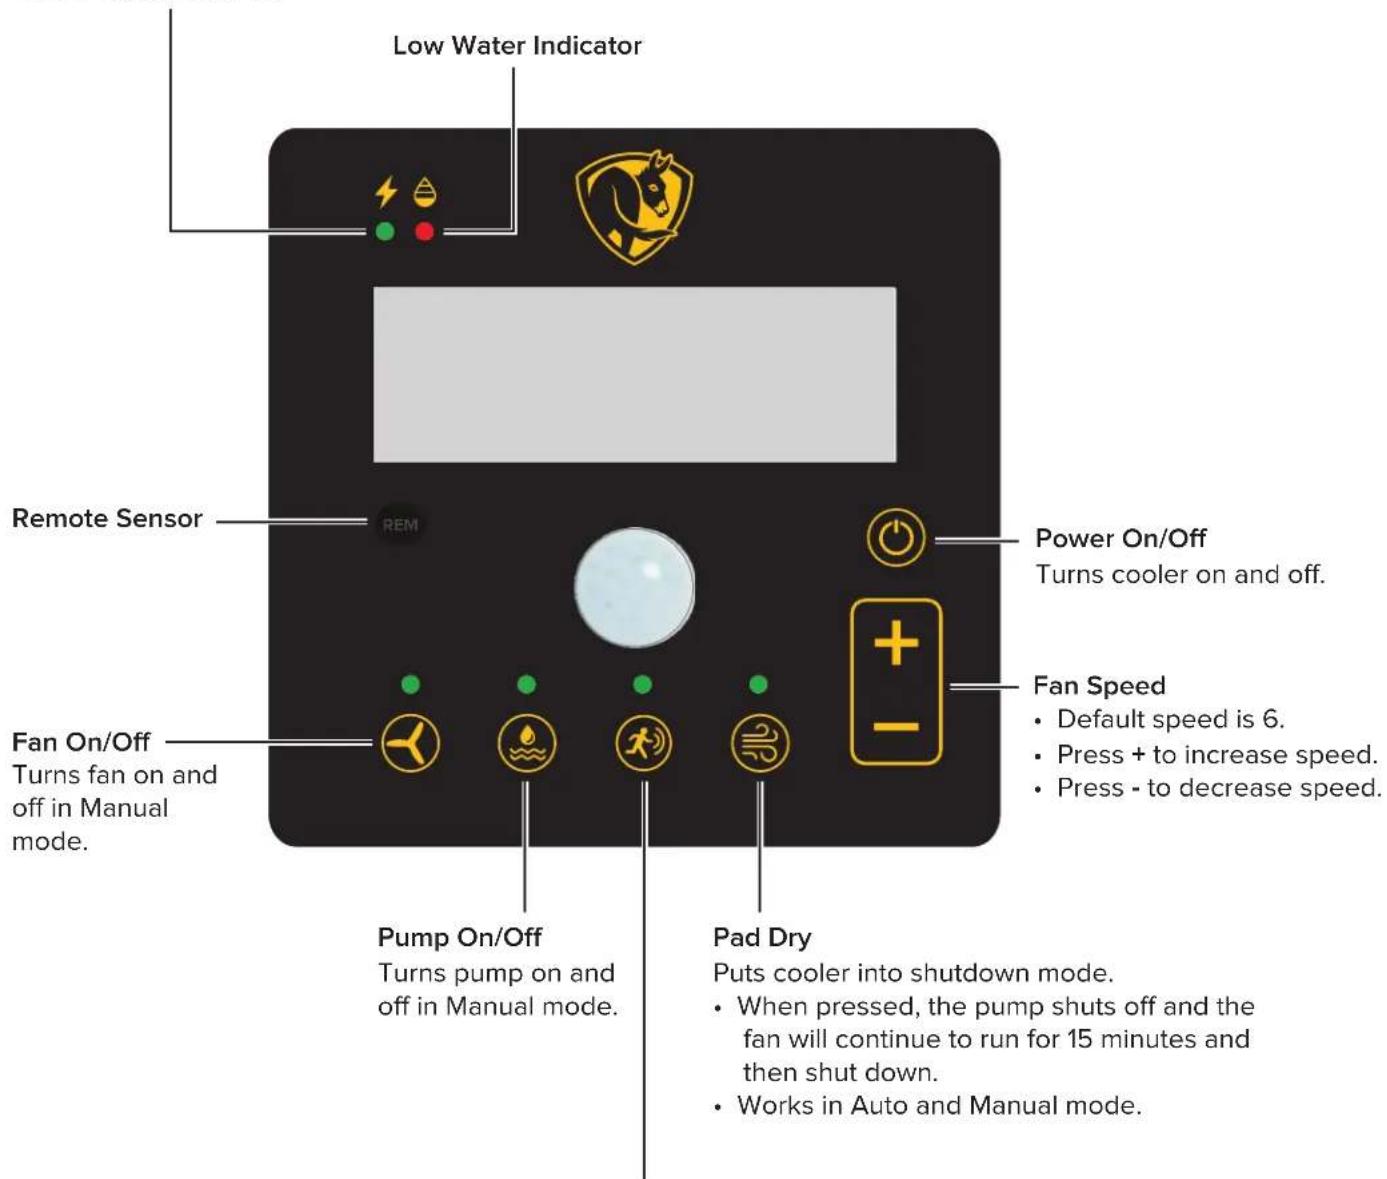
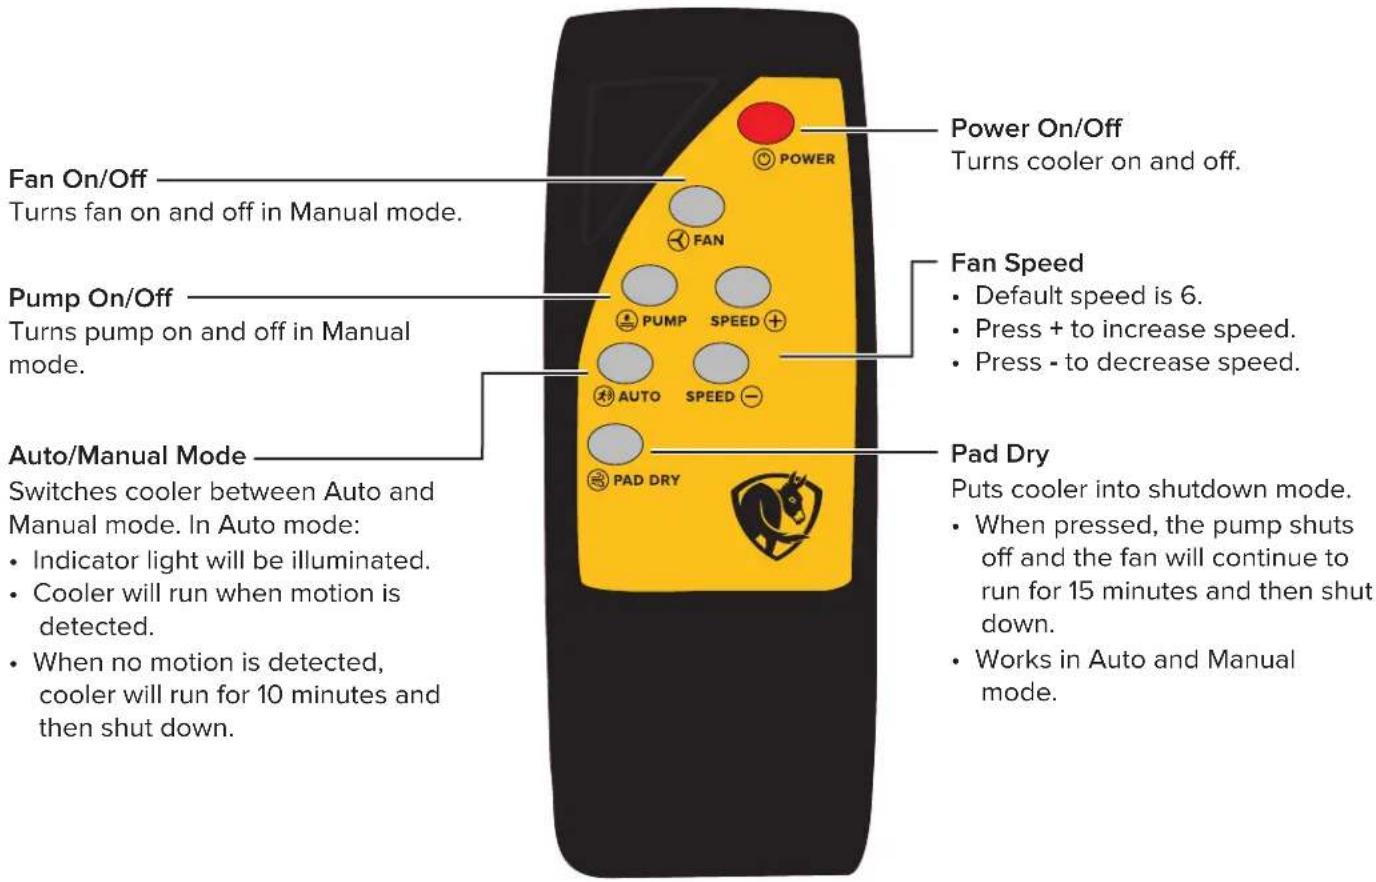
Auto/Manual Mode
Switches cooler between Auto and Manual mode.
In Auto mode:
- Indicator light will be on.
- Cooler will run when motion is detected.
- When no motion is detected, cooler will run for 10 minutes and then shut down.
Remote control operation (Cool-Space® 500)
MAINTENANCE AND STORAGE

WARNING: ELECTRICAL SHOCK HAZARD. Disconnect the power supply before performing service or maintenance. Failure to do so may result in serious injury or death.
Removing the cooling media
Remove the cooling pads to access the inside of the cooler.
-
Remove the bolts connecting the pad retainer bar (pad side) from the housing.
-
Cool-Space ^® 400 and 500 models: Remove top pads.
-
Starting with the center pad(s), tilt pads from the top and lift out of the cooler.
NOTE: Reinstall pads correctly according to the markings on the pads.
Daily maintenance
After each use, turn off the pump about 15 minutes before turning the fan off to allow the pads to drain and dry out. This controls mildew and bacteria growth for a long and efficient pad life. Drain the water from the cooler if it will be unused for a prolonged period of time.
Periodic maintenance
The cooling pads act as a filter to remove dust and other particles from the incoming air stream. The collected particles and any water impurities will flow into the sump and collect there. To keep the cooler operating at peak efficiency, keep the cooling media and sump clear of debris.
Draining the water sump
Depending on how often you operate the cooler, drain the sump anywhere from every week for heavy use to monthly for light use.
- Close water flow valve and open drain valve or remove drain plug located at bottom of reservoir.
- Run pump until sump is dry, and then immediately shut off pump.
- Turn cooler off and disconnect power supply.
- Remove cooling pads.
- Clean out reservoir with either a towel or wet/dry vacuum.
- Remove the water spray bar and its plug. Ensure holes are free of debris.
- Reinstall pads and pad retainer.
Using water treatment tablets
To avoid scale and mineral buildup, use water treatment tablets periodically. Tablets are provided in the cooler's reservoir according to the table below. Every 3 months, add the specified number of tablets to the reservoir after cleaning. Additional tablets are available by calling 877-244-3267.
| Model Number of tablets | |
| Cool-Space 300 1 | |
| Cool-Space 400 2 | |
| Cool-Space 500 3 | |
Cleaning the cooling media
Ensure the cooling pads are kept clean and dust-free. Dust and other particles have an adverse effect on the pads' ability to introduce water into the air stream. If the pad surface is dirty, clean with a soft brush and water. Never use bleach.
Storage
- Remove cooling pads and clean with a soft brush and water to remove dust and debris.
- Drain sump and wipe dry.
- Store cooler in a dry area and cover to prevent dust buildup.
MAINTENANCE CHECKLIST
Spring cleaning
√ Remove the cooling media and clean out any debris in the water pan at the bottom of the cooler.
☑ Remove the distribution tube from the mounting clips. Remove the plug at the end of the tube and flush out. Clean the distribution holes with a small brush and flush with water to verify all holes are clear.
☑ If the cooling media is heavily stained with minerals or is damaged, replace the media. Replacement cooling media is available at bigassfans.com. Verify the media is installed correctly with the arrows on the side.
☑ Connect the water line and turn on the water supply. Check the float valve and make sure it is operating properly. Verify that the float valve is shutting the water off before walking away.
☑ Switch on the fan motor and pump. Make sure the cooling media is evenly saturated with water by using the flow control valve to adjust the water flow. Small dry streaks are acceptable.
Mid-summer checkup
☑ Make sure the float valve is working properly. If the valve sticks, the water will run continuously and flood the reservoir. If this occurs, install a new float valve or contact Customer Service.
☑ Check all other working parts for cracks or damage, including the pump, fan motor, and fan belt.
☑ Check the condition of the cooling media. The cooler runs most efficiently when the media is clean. If the media has a heavy accumulation of mineral deposits, replace it.
Use the drain valve to empty the reservoir. Remove any debris.
Winterize
☑ Clean the minerals from the reservoir. Vinegar can be used to dissolve buildup. Flush out the reservoir through the drain plug.
☑ Inspect the water distribution tube for clogged holes. Clean as necessary.
To prevent freezing in the cooler's water line, disconnect the water supply, and then open both valves on the side of the cooler to dry out the reservoir.
Use a storage cover to protect your cooler and keep it clean.
TROUBLESHOOTING
WARNING: ELECTRICAL SHOCK HAZARD. Disconnect the power supply before performing service or maintenance. Failure to do so may result in serious injury or death.
CAUTION: Use caution when troubleshooting or repairing electrical components. Ensure power is disconnected from the cooler before the pads or fan guard are removed to gain access to the fan.
Contact Customer Service for assistance with troubleshooting and replacement.
Tools needed
- Screwdrivers
- Pliers
- Adjustable wrenches
• Volt/Ohm meter (electrical troubleshooting)
Additional tools may be required.
Pump troubleshooting
| Issue Solution(s) | |
| Pump motor will not run when switch is turned on. | Turn fan on to check for power.If fan does not start, check breaker and make sure cord is plugged in.If fan starts, check for power to and through pump switch (when turned on).Make sure cooler is filled with water. Pump automatically shuts off if water level is too low.Fill water reservoir. |
| Pump motor hums when switch is turned on but does not pump water. | Obstruction in impeller.Remove object(s).Pump motor failure.Replace pump. |
| Breaker trips or fuse blows when switch is turned on. | Check power cord length and breaker rating.Refer page 2 for cooler amperage draw and to determine required cord gauge and circuit size.Check for locked up pump.Replace pump. |
| Pump runs but does not pump water. | Air lock in outlet side of pump.Turn off and on to bleed.Ensure the impeller is turning in pump.If not, replace pump. |
Water distribution system troubleshooting
| Issue Solution(s) | |
| Floor at side of cooler is wet. | Water inlet hose is loose at supply hose or inlet hose is loose at bulkhead fitting.Tighten connections and/or replace hose washers. |
| Water overflows from reservoir or is spitting through fan. | Float valve hose is loose at bulkhead fitting or at float valve.Tighten connections and/or replace hose washers.Water pressure is too high to allow float valve to shut off (120 PSI/8 bar/827 kPa max).Reduce water pressure by adding an inline reducer.Float valve is not properly seated.Check all hoses for leaks. |
| Water is spitting from the cooler. | Check the hose and valve assembly.Reduce flow control setting.Replace cracked hose and valve assembly.Tighten hose connections.Adjust spray bar.Ensure pads are installed correctly. |
| Water is leaking from the drain valve. | Check for worn washer or stem or open drain valve.Replace washer.Replace drain valve. |
| There are too many dry streaks on the pads. | Check for blocked holes in the spray bar or adjust water flow.Remove spray bar and plug and clean the tube and holes.Open water flow control valve. |
| Scale and mineral buildup on cooling media. | Drain and clean the cooler and cooling media.Add water treatment tablets to the reservoir. Refer to the table on page 7 for the number of tablets to add for your cooler model. |
Fan system troubleshooting
| Issue Solution(s) | |
| Fan will not run and makes no sound. | Check power cord, extension cord, switches, and circuit breaker.• Reconnect power or extension cord.• Reset breaker. |
| Fan will not run and makes humming sound. | Blade is in contact with shroud.Re-center blade hub.Motor stall (will not turn by hand).Replace motor. |
| Breaker trips or fuse blows when fan starts. | Motor stall.Replace motor.Check power source. Refer to page 2 for electrical requirements. Upgrade power supply.Extension cord gauge is too small.Replace with heavier cord. |
| Motor overheats, shuts off, and restarts several minutes later. | Extension cord gauge is too small.Replace with heavier cord.Inlet air is obstructed or too close to wall.Provide minimum 3 ft (0.9 m) inlet clearance.Faulty motor.Replace motor. |
| Fan motor will not run and switch makes soft clicking sound. | Ensure switch is making good contact.Replace switch if needed. |
| Fan blade does not turn and cooler makes squealing sound. | Motor stall (will not turn by hand).Replace motor. |
| Fan will not reach speed but turns and makes humming sound. | Check capacitor (where visible) and motor electrical connections.Replace capacitor or motor.Extension cord gauge is too small.Replace with heavier cord. |
Error codes (Cool-Space® 500 only)
| Error Solution(s) | |
| E1 - Voltage Self-Inspection Error | Try a different circuit.Replace the panel. |
| E2 - Overcurrent Protection | Current draw is too high.Check extension cord size.Check that motor spins freely.Check that airflow is not obstructed. |
| E3 - Under Voltage Protection | Supply voltage is too low (< 100 V).Try a different circuit.Install a voltage regulator. |
| E4 - Over Voltage Protection | Supply voltage is too high (> 130 V).Try a different circuit.Install a voltage regulator. |
| E5 - Overload Protection | Motor is running too hot.Check that airflow is not obstructed.Check extension cord size. |
| E6 - Overheat Protection | Check that airflow is not obstructed.Check for mineral buildup on the motor.Check extension cord size. |
| E7 - Panel with Motor Communication Error | Check for a broken or loose wire. |
| E8 - Panel Internal Error • Replace the panel. | |
| E9 - Motor No Response | Check for a broken or loose wire.Replace the motor. |
| F6 - Panel Communication Error • Check for | a broken or loose wire. |
CONTACT US
Customer Service
2348 Innovation Drive
Lexington, KY 40511
USA
877-244-3267
bigassfans.com
Accessories and Replacement Parts
www.bigassfans.com

www.bigassfans.com/support
FRANÇAIS
LISEZ ET CONSERVEZ CES INSTRUCTIONS

natural_image
Illustration of a hand using a hammer inside a device, with motion lines indicating movement or spray (no text or symbols present)natural_image
Technical line drawing of a mechanical component with no visible text or symbols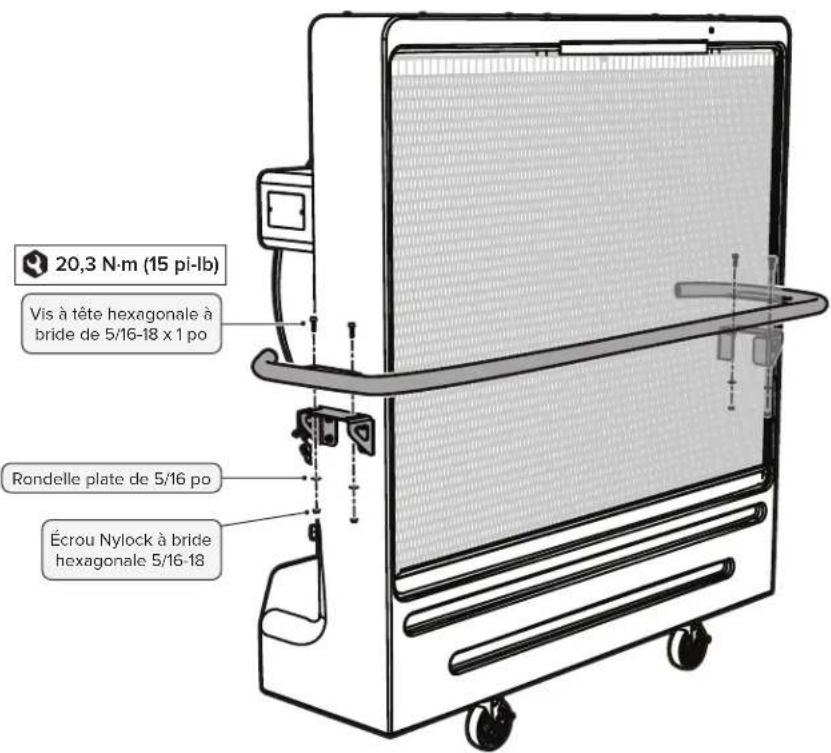
2348 Innovation Drive
Lexington, KY 40511
ÉTATS-UNIS
1877 244-3267
bigassfans.com
www.bigassfans.com/support
ESPAÑOL
LEA Y GUARDE ESTAS INSTRUCCIONES

Patente: www.blgassfans.com/patents • www.blgassfans.com/product-warranties
natural_image
Illustration of a hand using a hammer inside a device, with motion arrows indicating movement (no text or symbols)natural_image
Technical line drawing of a mechanical component with no visible text or symbols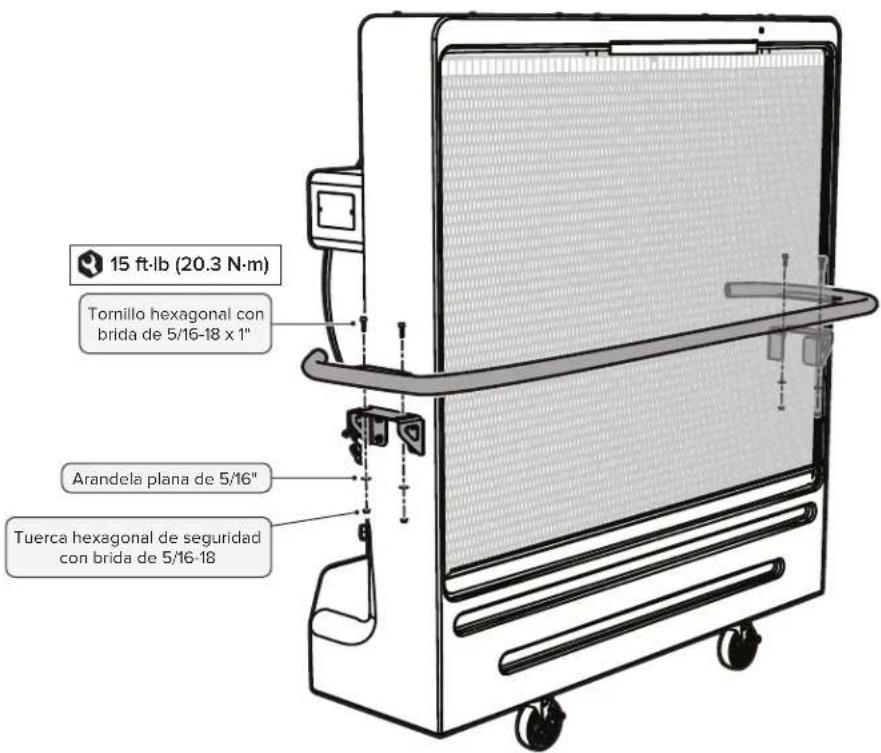
2348 Innovation Drive
Lexington, KY 40511
Estados Unidos
877-244-3267
bigassfans.com
www.bigassfans.com/support
EVA-INST-318-ENG-01
Rev. G
04/06/2022

2348 Innovation Drive, Lexington, KY 40511
1 (877) BIG-FANS | WWW.BIGASSFANS.COM
- READ AND SAVE THESE INSTRUCTIONS
- OPERATION CHECKLIST
- ASSEMBLY AND SETUP
- Installing the casters (Cool-Space® 300 only)
- Connecting the water supply
- Connecting the electrical supply
- HANDLE [OPTIONAL]
- Remove media and knockouts
- Install handle brackets and plates
- Install media and handle
- OPERATION
- Operating the cooler
- Fill the reservoir
- Turn on the pump
- Turn on the fan and adjust the water flow
- Operation (Cool-Space® 500)
- Auto/Manual Mode
- Remote control operation (Cool-Space® 500)
- MAINTENANCE AND STORAGE
- Removing the cooling media
- Daily maintenance
- Periodic maintenance
- Draining the water sump
- Using water treatment tablets
- Cleaning the cooling media
- Storage
- MAINTENANCE CHECKLIST
- Spring cleaning
- Mid-summer checkup
- Winterize
- TROUBLESHOOTING
- Tools needed
- CONTACT US
- FRANÇAIS
- LISEZ ET CONSERVEZ CES INSTRUCTIONS
- ESPAÑOL
- LEA Y GUARDE ESTAS INSTRUCCIONES
Brand : Big Ass Fans
Model : Cool-Space 300
Category : Fan