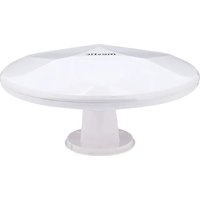
MTVA-40 - TV Antenna Mestic - Free user manual and instructions
Find the device manual for free MTVA-40 Mestic in PDF.


| Product type | Active outdoor DVB-T/T2 TV antenna |
| Brand | Mestic |
| Model | MTVA-40 |
| Frequency bands | VHF 174-230 MHz (channels 5-12), UHF 470-698 MHz (channels 21-49) |
| Polarization | Horizontal |
| Impedance | 75 Ω |
| Coaxial cable length | 5 m |
| Power supply | 230 V mains adapter or 12 V DC cigarette lighter adapter, 0.2 A |
| Protection rating | IPX3 |
| Ambient temperature | -20 to +40 °C |
| Dimensions (H x W x D) | 16 x 33 x 33 cm |
| Weight | 1.2 kg |
| Package contents | Active antenna, base plate, sealing ring, 5 m cable, screws, mains adapter, power inserter, cigarette lighter adapter, manual |
| Main functions | Reception of DTT/T2 signals in VHF and UHF, built-in amplifier, weather protection |
| Installation | Roof mounting with base plate, cable routing through opening, connection via power inserter |
| Intended use | Reception of terrestrial digital television and radio for outdoor use |
| Maintenance and cleaning | Clean with a slightly damp cloth, no aggressive products, disconnect before cleaning |
| Safety | Proper fixation, keep out of reach of children, interior parts only, repairs by specialist |
| Spare parts and repairability | Contact dealer or manufacturer for parts and repairs |
| Warranty | Statutory warranty, proof of purchase required |
| General information | CE marking, declaration of conformity available at www.mestic.de |
Frequently Asked Questions - MTVA-40 Mestic
User questions about MTVA-40 Mestic
0 question about this device. Answer the ones you know or ask your own.
Ask a new question about this device
Download the instructions for your TV Antenna in PDF format for free! Find your manual MTVA-40 - Mestic and take your electronic device back in hand. On this page are published all the documents necessary for the use of your device. MTVA-40 by Mestic.
USER MANUAL MTVA-40 Mestic
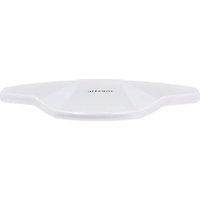
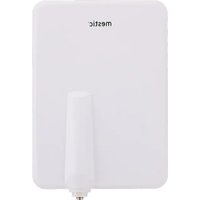
DVB-T antenna MTVA-40 roof
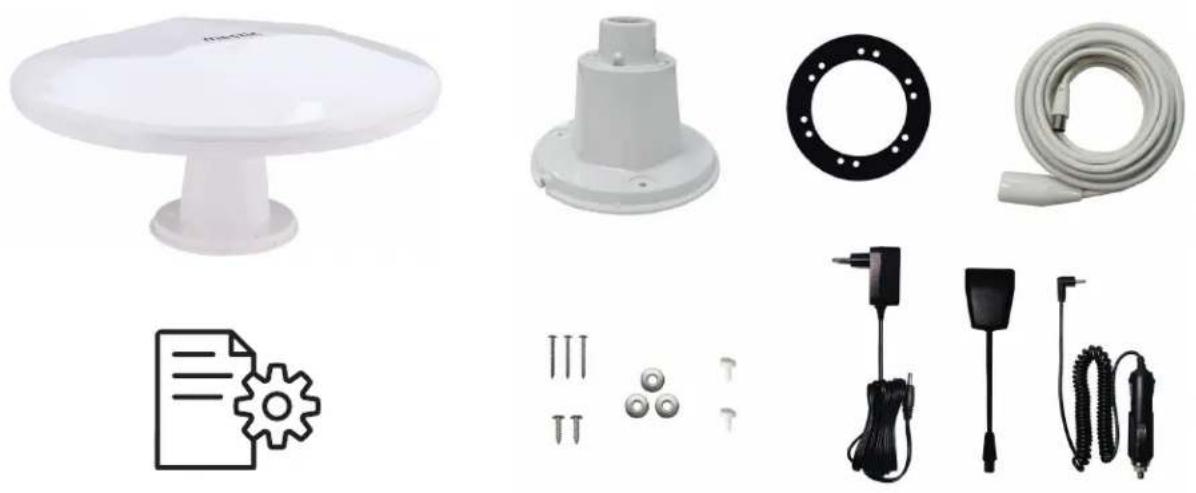
PACKAGE CONTENT
P1(1)
BASE ASSEMBLY
P2(1) P2(2) P2(3) P2(4)
P2(5)
natural_image
Diagram of a vehicle or vehicle with directional arrows indicating movement or force (no text or symbols present)CONNECTION EXAMPLES
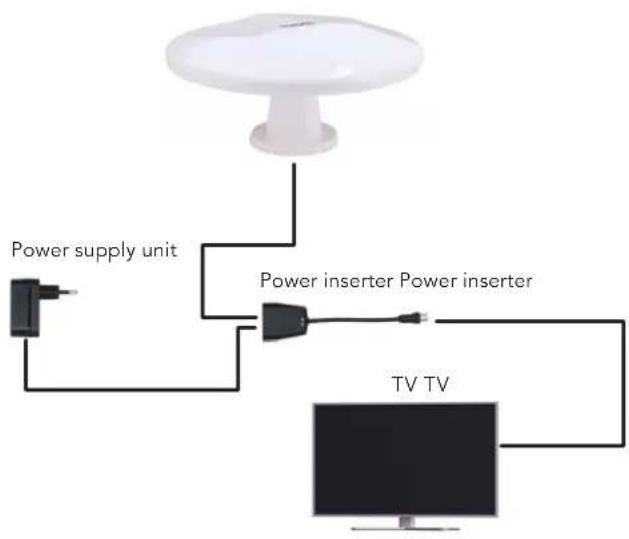
Connection Example 1
flowchart
graph TD
    A["TV TV"] --> B["Power inserter"]
    B --> C["Power supply unit"]
    C --> D["Power inverter"]
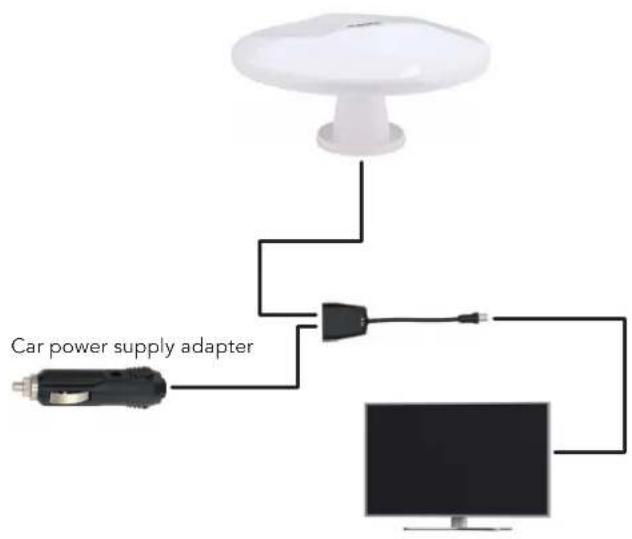
Connection Example 2
flowchart
graph TD
    A["Car power supply adapter"] --> B["Switch"]
    B --> C["Computer"]
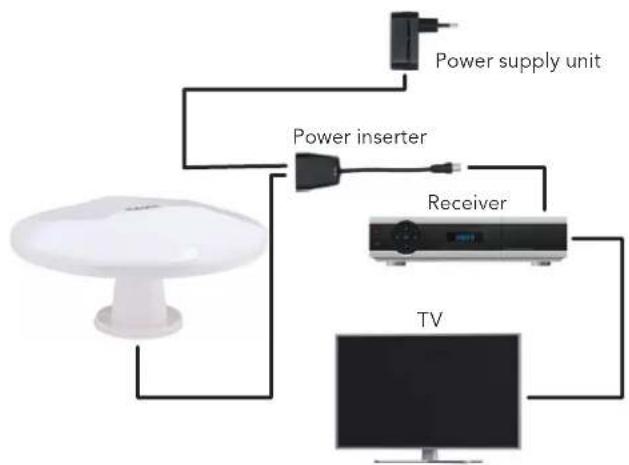
Connection Example 3
flowchart
graph TD
    A["Power supply unit"] --> B["Power inserter"]
    B --> C["Receiver"]
    C --> D["TV"]
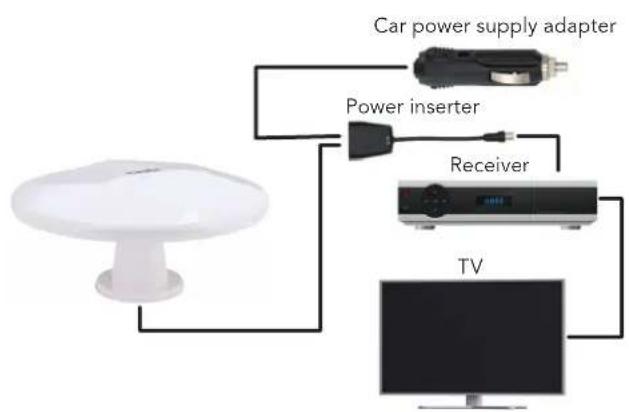
Connection Example 4
flowchart
graph TD
    A["Car power supply adapter"] --> B["Power inserter"]
    B --> C["Receiver"]
    C --> D["TV"]
Beoogd gebruik
The outdoor antenna DVB-T antenna MTVA-40 roof is an active antenna for the reception of digital terrestrial television and radio signals in the VHF and UHF range. The manufacturer accepts no liability for damage caused by improper use!
Safety instructions
- Before using the antenna, please read the operating instructions and safety instructions carefully. This is the only way to use all functions safely and reliably. Keep the instructions for use for the entire service life of the product.
- Also observe the safety instructions and operating instructions for the other devices that are connected to the product.
- Ensure that the antenna is properly secured.
- Position the antenna so that children cannot reach it.
- The infeed switch (voltage feeder), plug-in power supply unit and vehicle plug are only intended for indoor use.
- The mains socket must easily accessible at all times.
- Only use the appropriate plug-in power supply unit (see technical data). Pay attention to the polarity!
• Repairs may only be carried out by specialists. - Remove the plug-in power supply unit from the socket before cleaning.
- Only clean the antenna with a slightly damp cloth and do not use any aggressive or abrasive cleaning agents, as these can damage the surface of the housing.
• Liquid/moisture must not get into the product.
Technical Data
| Frequency / reception range VH | HF 174-230 MHz; UHF 470-698 MHz |
| Channels 5-12, 21-49 | |
| Polarisation horizontal | |
| Impedance 75 Ω | |
| Coaxial cable 5 m | |
| Power supply Plug-in power supply | 230 V or car plug ("Car Power Adapter"), 12 V DC / 0.2 A |
| Protection class IPX3 | |
| Ambient temperature -20 to +40°C | |
| Dimensions Height x width x depth: 16 x 33 x 33 cm | |
| Weight | 1.2 kg |
Package contents
• Active outdoor antenna (VHF and UHF) with integrated amplifier
- Antenna base
- Sealing ring
- Antenna cable with waterproof cover cap (5 m)
- Screws for fastening the antenna base (3x)
- Screws for attaching the antenna to the antenna base (2x)
- Washer (3x)
- Sealing plugs (2x)
• Plug-in power supply 12 V / 0.2 A
- Power inserter
- Car plug ("Car Power Adapter")
- Operating instructions and safety instructions
Installation instructions
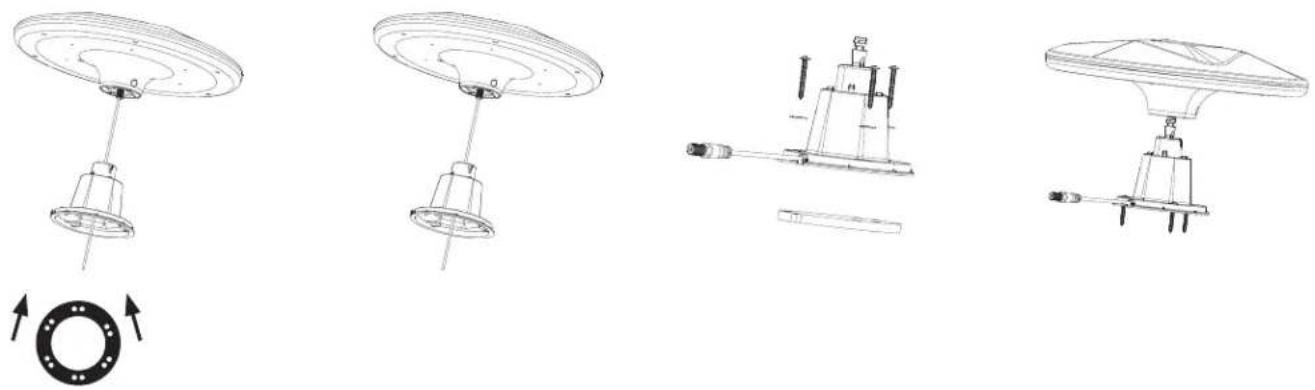
P2(1)
Fit the sealing ring under the antenna base.
P2(2)
Guide the coaxial cable through the opening in the roof and pull the cable into the antenna base. Connect the coaxial cable to the antenna cable. Attach the waterproof cap so that the connection is covered and no water can penetrate.
P2(3)
Insert the screws through the washers. Insert the screws into the holes in the antenna base and screw them to the surface. Tighten the screws.
P2(4)
Attach the main antenna to the base and turn it until you hear a click.
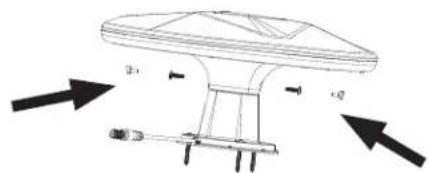
P2(5)
Insert the 2 screws into the holes and tighten them firmly. Close the holes with the 2 pins.
External aerial for TV sets with integrated DVB-T(2) receiver
Connection example 1
Power supply via the external mains plug supplied
- Switch off the TV set.
- Connect the coaxial cable of the external aerial to the aerial connection of the power inserter.
- Plug the cable of the plug-in power supply unit into the socket of the feed-in switch and the plug-in power supply unit into a 230 V AC socket.
- Connect the coaxial cable of the feed-in diverter to the aerial input of your TV set.
- With this connection variant, it does not matter if the 5 V power supply of the TV set is activated.
- Switch on the TV set and search for receivable programmes. If necessary, please refer to the operating instructions for the TV set.
Connection example 2
Power supply via the supplied external car plug ("Car Power Adapter")
- Switch off the TV set.
- Connect the coaxial cable of the external aerial to the aerial connection of the power inserter.
- Plug the cable of the car plug ("Car Power Adapter") into the 12 V socket of the feed-in switch and the car plug into a 12 V car socket.
- Connect the short coaxial cable of the feed-in switch to the aerial input of your TV set.
- With this connection variant, it does not matter if the 5 V power supply of the TV set is activated.
- Switch on the TV set and search for receivable programmes. If necessary, please refer to the operating instructions for the TV set.
External aerial for TV sets without integrated DVB-T(2) receiver
Connection example 3
Power supply via the supplied external plug-in power supply unit
- Switch off the TV set and the DVB-T(2) receiver.
- Connect the coaxial cable of the external aerial to the aerial connection of the power inserter.
- Plug the cable of the plug-in power supply unit into the socket of the feed-in switch and the plug-in power supply unit into a 230 V AC socket.
- Connect the coaxial cable of the feed-in switch to the antenna input of your DVB-T(2) receiver.
- With this connection variant, it does not matter if the 5 V power supply of the TV set is activated.
- Switch on the TV set and the DVB-T(2) receiver.
- You can now search for receivable channels.
If necessary, please refer to the operating instructions of the DVB-T(2) receiver.
Connection example 4
Power supply via the supplied external car plug
- Switch off the TV set and the DVB-T(2) receiver.
- Connect the coaxial cable of the external aerial to the aerial connection of the power inserter.
- Plug the cable of the car plug ("Car Power Adapter") into the 12 V socket of the transfer switch and the car charger into a 12 V car socket.
- Connect the coaxial cable of the feed-in switch to the antenna input of your DVB-T(2) receiver.
- With this connection variant, it does not matter if the 5 V power supply of the tv set is activated.
- Switch on the TV set and the DVB-T(2) receiver
- You can now search for receivable channels.
If necessary, please refer to the operating instructions of the DVB-T(2) receiver.

Disposal instructions – Note on environmental protection:
From the date of transposition of European Directives 2012/19/EU and 2008/98/EU into national law, the following applies: Electrical and electronic equipment and batteries may not be disposed of with household waste. The consumer is legally obliged to return electrical and electronic devices and batteries at the end of their service life to the public collection points set up for this purpose or to the point of sale. Details on this are regulated by the respective state law. The symbol on the product, the instructions for use or the packaging these regulations. By recycling, material recovery or other forms of utilisation of old appliances/batteries, you are making an important contribution to protecting our environment.
Disclaimer
CAMPING-PROFI GmbH accepts no liability or warranty for damage resulting from improper installation, assembly and improper use of the product or failure to observe the operating instructions and/or safety instructions
Guarantee
Every CAMPING-PROFI GmbH product is thoroughly checked and tested before it leaves the factory. The warranty begins with the purchase of the device. Please provide proof of purchase (receipt, invoice, delivery note, etc.). Please keep these documents in a safe place. In the event of repair, take the appliance to your specialist dealer or send it to them.
EU Declaration of Conformity
This product labelled in accordance with the applicable directives. With the CE mark, CAMPING-PROFI GmbH declares that the product fulfils the basic requirements and directives of the European regulations. The declaration of conformity can be found at the following addresses: www.camping-profi.de or www.mestic.de.
Imported in EU by: CAMPING-PROFI GmbH
Mühlweg 13-15, 92361 Berngau
Germany
www.camping-profi.de
- DVB-T antenna MTVA-40 roof
- PACKAGE CONTENT
- BASE ASSEMBLY
- CONNECTION EXAMPLES
- Beoogd gebruik
- Safety instructions
- Package contents
- Installation instructions
- P2(1)
- P2(2)
- P2(3)
- P2(4)
- P2(5)
- External aerial for TV sets with integrated DVB-T(2) receiver
- Connection example 1
- Power supply via the external mains plug supplied
- Connection example 2
- Power supply via the supplied external car plug ("Car Power Adapter")
- External aerial for TV sets without integrated DVB-T(2) receiver
- Connection example 3
- Power supply via the supplied external plug-in power supply unit
- Connection example 4
- Power supply via the supplied external car plug
- Disposal instructions – Note on environmental protection:
- Disclaimer
- Guarantee
- EU Declaration of Conformity
Brand : Mestic
Model : MTVA-40
Category : TV Antenna