USER MANUAL CDS 210 CANDY
natural_image
Illustration of a chemical experiment setup with a funnel and beaker (no text or symbols)
text_image
Technical diagram showing a mechanical device with labeled component A and directional arrow indicating motion or force.
natural_image
Mechanical diagram showing a lever mechanism with rotating components and directional arrows (no text or symbols)
CHARGER LA VAISSELLE
B = assiettes plates
B = assiettes plates
text_image
3 D F A G
B E C
natural_image
Two white plastic basket-like structures with handles and compartments, no text or symbols visible
natural_image
Close-up of a mechanical component with geometric lines and grid overlay (no visible text or symbols)
text_image
6
Q
N
M
P
M
O
N = 11 + 1 assiettes plates
O = 12 assiettes à dessert
P = plat
Q = couverts
natural_image
3D rendered diagram of a plastic container with internal structures and labeled point 'R' (no text or symbols beyond label)
natural_image
Technical line drawing of a mechanical device with labeled component A (no text or symbols beyond label)
natural_image
Diagram of a device with a funnel and labeled component B, showing internal components and flow direction (no text or symbols)
text_image
Diagram of a device with labeled parts and directional arrow, showing components like '1' and '2'
natural_image
Technical line drawing of a mechanical device with labeled component C (no text or symbols beyond label)
natural_image
Line drawing of a device tray with internal compartments and a handle, no text or symbols present
text_image
1 2 3 4 5
D
NETTOYAGE DES FILTRES
natural_image
Illustration of a hand using a tool to lift a cylindrical object on a base, with an arrow indicating motion (no text or symbols)
natural_image
Illustration of a hand holding a mechanical device with arrows indicating motion or force (no text or symbols)
3

natural_image
Diagram of a medical or laboratory procedure showing a tool interacting with a tray-like device (no text or symbols present)
CONSEILS PRATIQUES
natural_image
Mechanical assembly diagram showing a lever pressing a workpiece with a numbered label (2), no text or symbols present.
APRES L'UTILISATION
| | ● | | | | ○ | | | | | 5 | N/A |
| ● | ● | ● | ● | ● | ○ | | 75°C | ○ | ○ | ○ | 120 | OUI |
| ● | ● | ● | ● | | ○ | 65°C | ○ | | ○ | 95 | OUI |
| ● | ● | ● | ● | ● | ○ | | 70°C | | | ○ | 60 | OUI |
| ● | ● | ● | ● | ● | | ○ | 45°C | | | ○ | 160 | OUI |
| ● | ● | ● | ● | | ○ | 45°C | ○ | | ○ | 80 | OUI |
| ● | ● | ● | ● | | | 50°C | | | ○ | 32 | N/A |
N/A = OPTION NON DISPONIBLE
IDENTIFICATION D'ANOMALIES MINEURES
Thank you for choosing a Candy appliance; quality dishwashers which guarantee high performance and reliability.
Candy manufacture a vast range of domestic appliances: washing machines, washer/dryers, cookers, microwave ovens, ovens and hobs, refrigerators and freezers.
Ask your dealer for the catalogue with the complete range of Candy products. Please read this booklet carefully as it provides important information regarding the safe installation, use, and maintenance of the machine, together with some useful advice on how to achieve the best results from your dishwasher.
For future reference please keep this instruction booklet in a safe place.
CUSTOMER SERVICE AND GUARANTEE
Your new appliance is fully guaranteed by the manufacturer for 12 months against electrical/mechanical breakdown excluding:
A. Any faults which occur due to bad installation or misuse of the machine.
B. Any faults which occur due to repair of, or interference with, the machine by any person not authorised by the manufacturer to carry out service.
C. Any faults which occur due to any parts which are fitted to the machine which are not the original manufacturers parts.
D. Any faults arising from non-domestic use or unusual or abnormal use of the machine.
E. Any faults arising from operation at incorrect voltage.
F. Any faults arising from incorrect operation of the machine.
The guarantee applies to Gt Britain and Northern Ireland only, and is an addition to your statutory rights.
AFTER SALES SERVICE
For service and repairs call your local engineer on our national telephone number:
GIAS Service
Tel: 08705 400 600
Support Service
(Eire 018301 666)
CONTENTS
| Safety advice | pag. | 31 |
| Setting up, installation | pag. | 32 |
| Water softener unit | pag. | 35 |
| Loading the salt | pag. | 36 |
| Adjusting the upper basket | pag. | 37 |
| Loading the dishes | pag. | 38 |
| Information for test laboratories | pag. | 40 |
| Loading the detergent | pag. | 41 |
| Types of detergent | pag. | 42 |
| Loading the rinse aid | pag. | 43 |
| Cleaning the filters | pag. | 44 |
| Some practical hints | pag. | 45 |
| Routine cleaning and maintenance | pag. | 46 |
| Description of the control panel | pag. | 47 |
| Technical data | pag. | 47 |
| Programme selection and special functions | pag. | 48 |
| Programme guide | pag. | 50 |
| Identifying minor faults | pag. | 52 |
text_image
Fig. A
1
2
3
4
5
Please read the instructions in this booklet carefully because they contain important information on how to install, use and maintain your dishwasher safely as well as containing useful tips on how to make the most of it.
Keep this booklet safe for future reference.
SAFETY INSTRUCTIONS
There are certain basic safety rules which are valid for any domestic appliance.
Installation
■ Make sure that the plug fitted to the machine is compatible with the power supply socket. If it is not, get a suitably qualified person to fit the correct type, and to make sure that the cables to the mains socket are able to cope with the power rating of the appliance.
■ Ensure that the dishwasher does not crush power cables.
In general it is not advisable to use adaptors, multiple plugs and/or extension cables.
■ Should it be necessary to replace the supply cord, call the After Sales Service Centre.
Safety
■ Never touch the appliance when your hands or feet are wet or damp.
■ Do not use when your feet are bare.
■ Do not remove the plug from the mains supply socket by pulling the mains cable or the machine itself.
■ Do not leave the appliance exposed to the elements (rain, sun etc).
■ Do not let children (or others incapable of operating it) use the machine without supervision.
■ Water left in the machine or on the dishes at the end of the wash programme should not be swallowed.
■ The door should not be left in the open position since this could present a potential hazard (es. tripping).
■ Leaning or sitting on the open door of the dishwasher could cause it to tip over.

WARNING!
Knives and other utensils with sharp points must be loaded in the basket with their points down or placed in a horizontal position.
Daily use
■ This appliance is be designed for domestic use only.
■ The dishwasher is designed for normal kitchen utensils.
Objects that have been contaminated by petrol, paint, traces of steel or iron, corrosive chemicals, acids or alkalis must not be washed in the dishwasher.
If there is a water softening device installed in the home there is no need to add salt to the water softener fitted in the dishwasher.
- Cutlery is washed best if it is placed in the basket with the handles downwards.
If the appliance breaks down or stops working properly, switch it off, turn off the water supply and do not tamper with it. Repair work should only be carried out by an approved service agent and only genuine spare parts should be fitted. Any failure to follow the above advice may have serious consequences for the safety of the appliance.
Disposal
■ The dishwasher has been made from materials which can be recycled so that it can be disposed of in an environmentally friendly way.
If you wish to dispose of an old dishwasher be careful to remove the door to eliminate the risk of children becoming trapped inside it.
INSTALLATION
(Technical notes)
IMPORTANT
When the appliance is located on a carpet floor, attention must be paid to ensure that there is no obstruction to the bottom vents.
Make sure that the plug on the appliance remains accessible after installation.
Electrical connection
This appliance complies with international safety standards, and is fitted with a 3 pin plug with earth connection to ensure complete earthing of the product.
Before connecting the appliance to the mains supply it is important to ensure:
- that the supply socket is properly earthed;
- that your electricity supply is capable of meeting the consumption requirements listed on the rating plate of your appliance.

WARNING!
Ensure that your product is properly earthed.
In the absence of adequate earthing you will notice that when touching the metal parts of your appliance an electrical dispersion can be felt, due to the presence of a radio interference suppressor.
Manufacturer declines all responsibility for any damage due to non-earthing of the machine.

Appliance complies with European Directives 73/23/EEC and 89/336/EEC, replaced by 2006/95/EC and 2004/108/EC, and subsequent amendments.
Electrical connection (for U.K. only)
Plug your dishwasher into the power socket.
If the plug we supply does not fit :
■ CUT IT OFF AND DESTROY IT!
You can't use it on other appliances, and the exposed wires could be dangerous if anyone plugged it in.
■ Fit a suitable plug, as follows:
| Connect to the terminal in the plug |
| Green and yellow wire | Marked with the letter E,OR marked with the Earth symbol, OR coloured green,OR coloured green and yellow. |
| Blue wire | Marked N,OR coloured black. |
| Brown wire | Marked L,OR coloured red. |

WARNING!
THIS APPLIANCE MUST BE EARTHED.
Fuses and plugs
This appliance should be used only on a socket with a minimum rating of 13 Amp.
Our ready-fitted plug is already equipped with a 13 amp fuse which is BS 1362 ASTA approved.
Any replacement should be exactly the same.
If the fuse cover is lost, do not use the plug until it is replaced.
A correct replacement fuse cover (obtainable from your dealer or Electricity board) must be the same colour as shown or named on the insert on the base of the plug.
Water connection
IMPORTANT
The appliance must be connected to the water mains using new hose-sets. The old hose-sets should not be reused.
■ The inlet and drain hoses can be directed to left or right.
IMPORTANT
The dishwasher can be connected to either cold or hot water, as long as it is no hotter than 60 °C.
■ Water pressure must be between 0,08 MPa and 0,8 MPa. If the pressure is below the minimum consult our service department for advice.
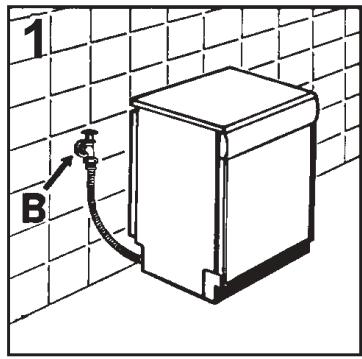
■ The inlet hose must be connected to a tap so that the water supply can be cut off when the machine is not in use (fig. 1 B).
■ The dishwasher is fitted with 3/4" threaded connector (fig. 2).
■ Connect inlet hose “A” to water tap “B” with a 3/4" attachment making sure that it has been properly tightened.
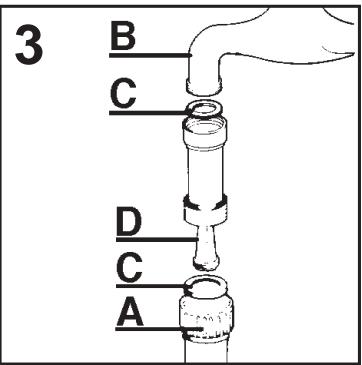
If it is necessary, the inlet pipe can be lengthened up to 2,5 m. The extension pipe is available from the After Sales Service Centre.
If limescale deposits or sand are present in the water, it is advisable to obtain the appropriate filter, art. 9226085, from the After Sales Service Centre (fig. 3). The filter “D” must be inserted between the tap “B” and the inlet hose “A”, remembering to fit the washer “C”.
If the dishwasher is connected to new pipes or to pipes which have not been in use for a long time run water through for a few minutes before connecting the inlet hose. In this way no deposits of sand or rust will clog up the water inflow filter.
text_image
1
B

text_image
2
B
A
text_image
3
B
C
D
C
A
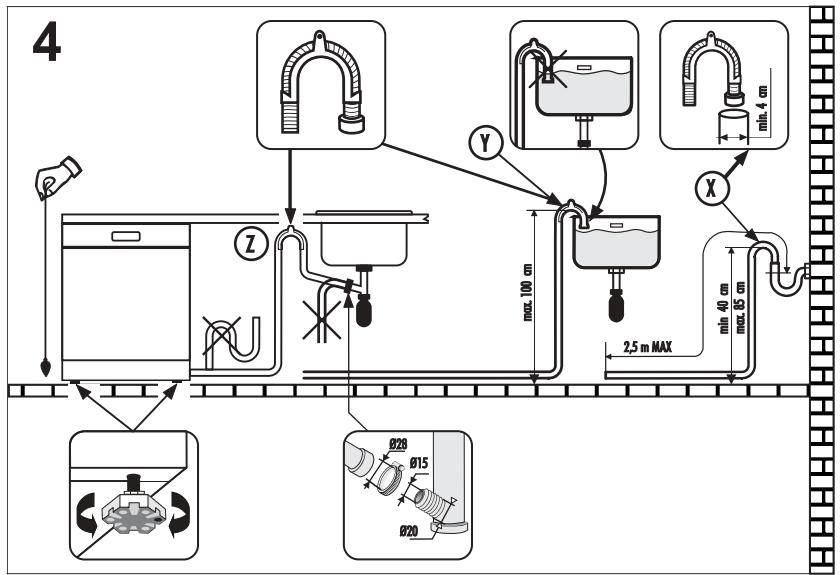
Connecting the outlet hose
■ The outlet hose should discharge into a standpipe, making sure that there are no kinks (fig. 4).
■ The standpipe must be at least 40 cm above floor level and it must have an internal diameter of at least 4 cm.
■ It is advisable to fit an anti-odour air trap (fig. 4X).
If necessary the outlet hose can be extended up to 2,5 m, provided that it is kept at a maximum height of 85 cm above floor level. The extension pipe is available from the After Sales Service Centre.
flowchart
graph TD
    A["Water Machine"] --> B["Refrigerator"]
    B --> C["Pump"]
    C --> D["Drain Tank"]
    D --> E["Main Water Outlet"]
    style A fill:#f9f,stroke:#333
    style B fill:#ccf,stroke:#333
    style C fill:#cfc,stroke:#333
    style D fill:#fcc,stroke:#333
    style E fill:#ffc,stroke:#333
Opening the door
Put your hand into the recess and pull. If the machine comes open while it is working, an electrical safety device automatically switches everything off.
IMPORTANT
For the machine to work properly, the door should not be opened while it is in operation.
Closing the door
Place the baskets in the machine.
Make sure that both the spray arms are free to rotate and are not obstructed by cutlery, crockery or pans. Close the door, pressing on it to make sure it is firmly shut.
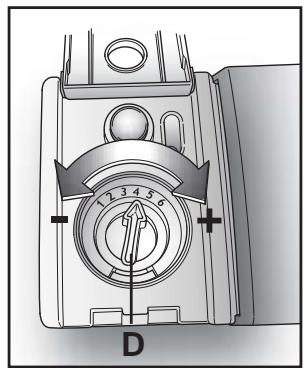
WATER SOFTENER UNIT
Depending on the source of the supply, water contains varying amounts of limestone and minerals which are deposited on the dishes leaving whitish stains and marks.
The higher the level of these minerals present in the water, the harder the water is. The dishwasher is fitted with a water softener unit which, through the use of special regenerating salt, supplies softened water for washing the dishes.
The degree of hardness of your water can be obtained from your water supply company.
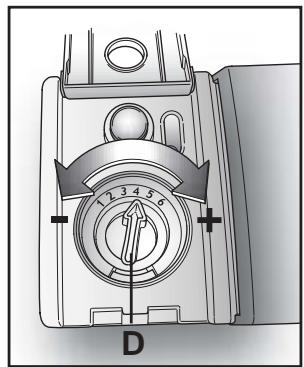
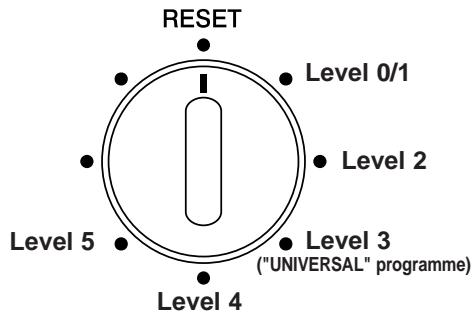
Regulating the water softener
The softener unit can treat water with a hardness of up to 90^ fH (French grading) or 50^ dH (German grading) through 6 different settings.
The table below lists different degrees of water hardness with the corresponding setting for the softener unit.
| Level | Water hardness | Use of regenerating salt | Water softener setting |
| ^0 fH (French grading) | ^0 dH (German grading) |
| 0 | 0-5 | 0-3 | NO | Position 1 |
| 1 | 6-15 | 4-9 | YES | Position1 |
| 2 | 16-30 | 10-16 | YES | Position 2 |
| *3 | 31-45 | 17-25 | YES | Position 3 |
| 4 | 46-60 | 26-33 | YES | Position 4 |
| 5 | 61-90 | 34-50 | YES | Position 5 |
* The water softener unit is set in the factory at level 3, as this is suitable for the majority of users.
According to the degree of hardness of your water, regulate the softener unit in the following way:
IMPORTANT
The dishwasher must be ALWAYS off before start this procedure.
- When the dishwasher is off, OPEN the door.
- Turn the programme selector to the "UNIVERSAL" programme position.
- Press the "ON/OFF" button.
- WITHIN 15 seconds, turn the dial (in a anti-clockwise direction) to the "RESET" position then go to the "UNIVERSAL" programme position again, doing this 4 times (finishing with the programme selector on the "UNIVERSAL" programme position).
- The indicator light "WASHING" will flash 3 times and the alarm will sound 3 times, to indicate the factory water softener setting (LEVEL 3).
- Turn the programme selector to one of the inclusive positions among 1 and 5 to choose the required water softener level.
- The indicator light "WASHING" will flash and the alarm will sound some times, according to the select level (for example, 5 times for the LEVEL 5).
- Turn off the dishwasher pressing the "ON/OFF" button to confirm the new setting.

WARNING!
If any problem occurs, turn the dishwasher off by pressing the "ON/OFF" button and start the procedure again from the beginning (STEP 1).
text_image
RESET
Level 0/1
Level 2
Level 5
Level 3
("UNIVERSAL" programme)
Level 4
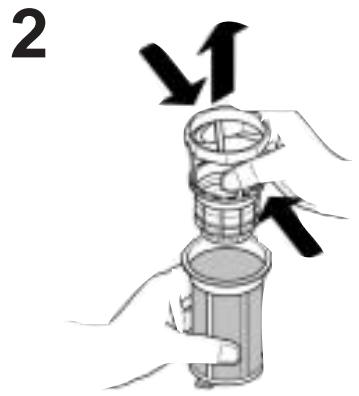
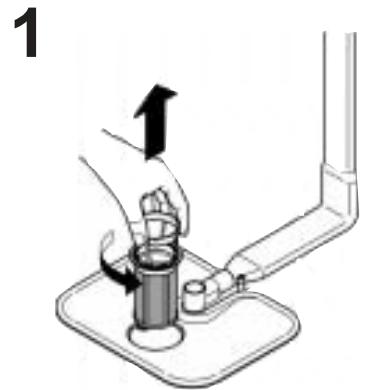
LOADING THE SALT
■ On the bottom of the machine there is a container for the salt for regenerating the softener.
It is important to use only a salt that is specifically designed for dishwasher. Other types of salt contain small quantities of insoluble particles which over a long period of time may affect and deteriorate the softener performance.
■ To add salt, unscrew the cap of the container on the bottom and then refill the container.
■ During this operation a little water will overflow; but keep adding salt until the container is full. When the container is full, clean the thread of salt residue and retighten the tap.
■ After loading the salt, it is recommended running a complete washing cycle, or COLD RINSE programme. The salt dispenser has a capacity of between 1.5 and 1.8 kg and, for efficient use of the appliance, it should be refilled from time to time according to the regulation of the water softener unit.
IMPORTANT
(Only for first start up)
When the appliance is used for the first time, after completely filling the salt container, it is necessary to add water until the container overflows.

natural_image
Illustration of a kitchen utensil with a bowl of food being poured into it (no text or symbols)
Salt loading indicator
This model is provided with an indicator light on the control panel which will light up when it is necessary to reload the salt container.
IMPORTANT
The appearance of white stains on dishes is generally an important sign that the salt container needs filling.
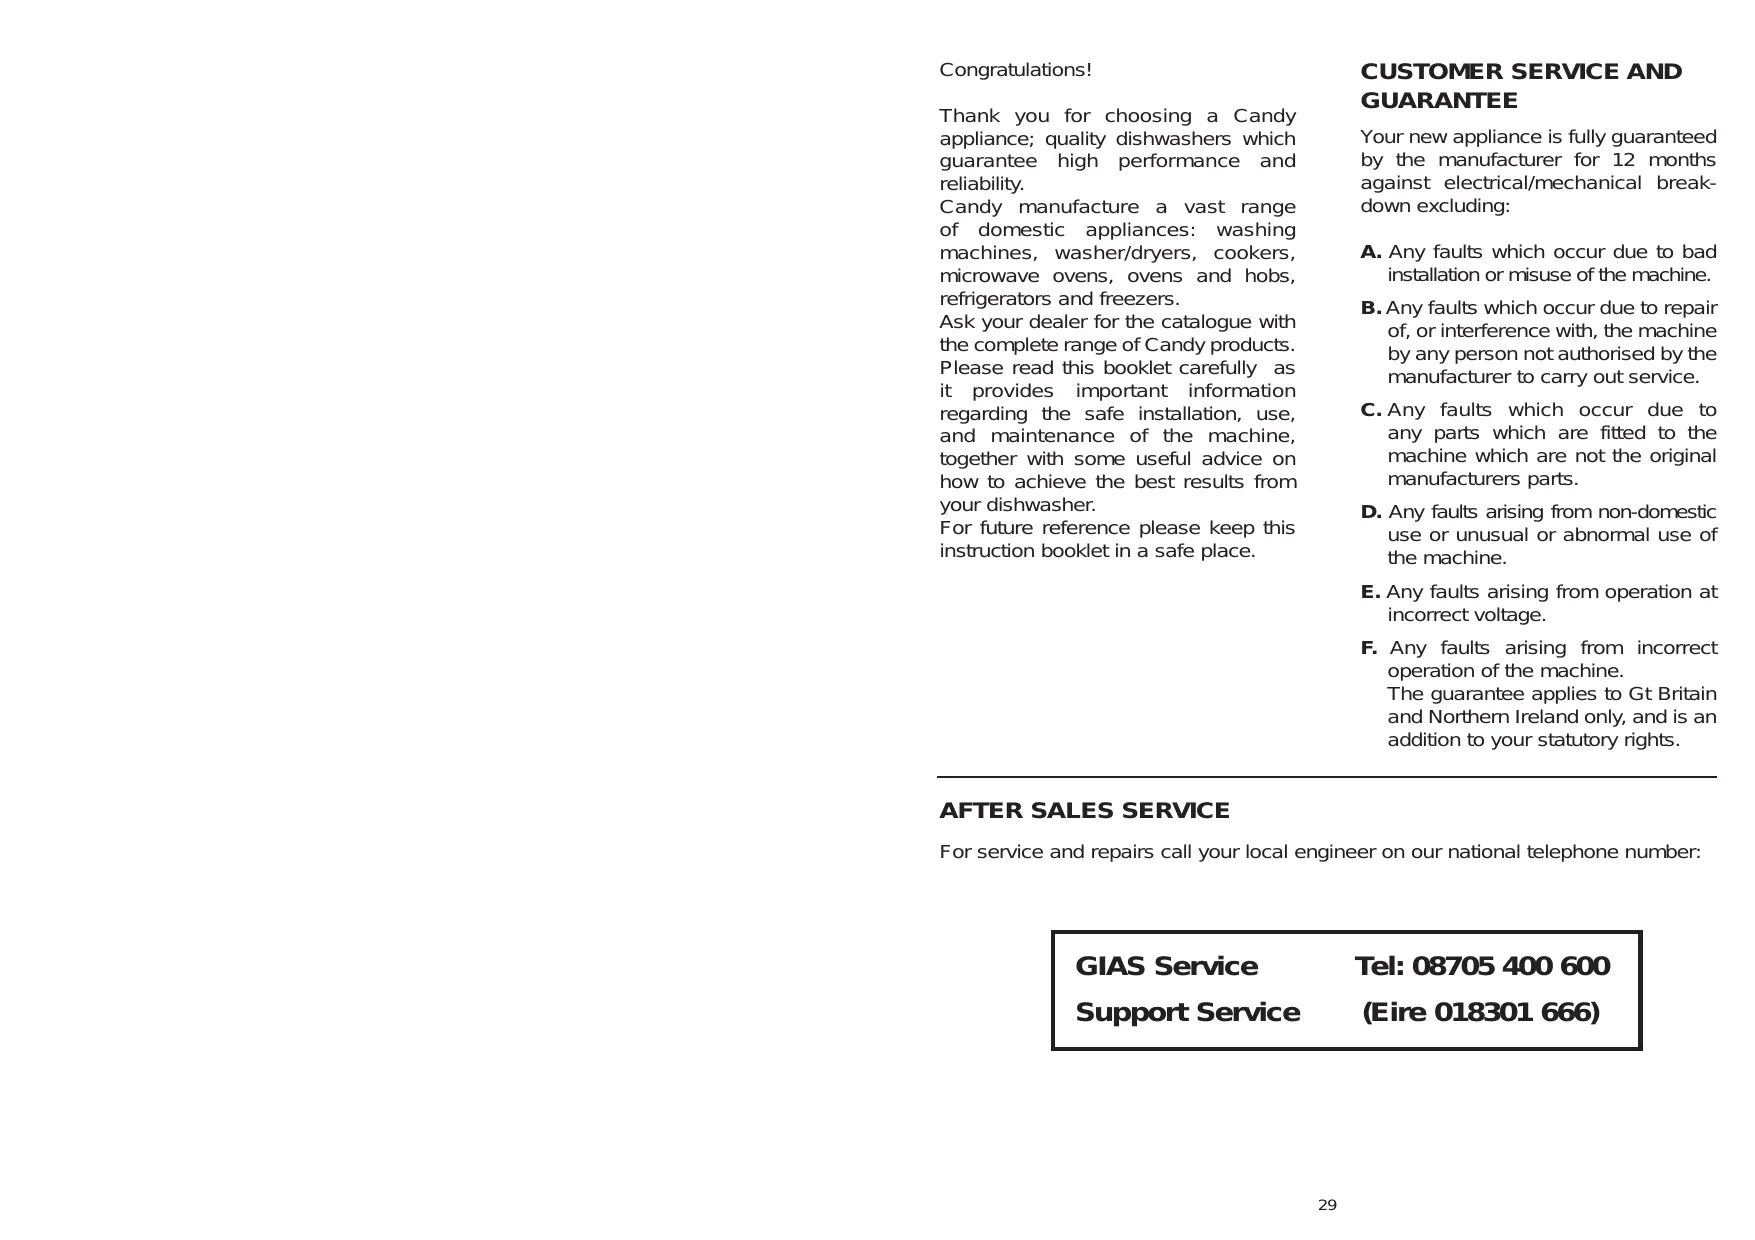
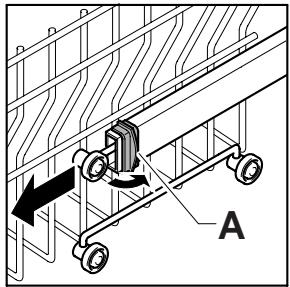
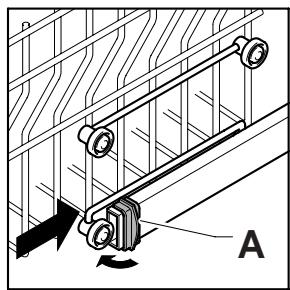
ADJUSTMENT OF THE UPPER BASKET
If 27 cm to 31 cm plates are normally used, load them onto the lower basket after the upper basket has been placed in its upper position and proceed as detailed below:
- Turn the front stops "A" outwards;
- Take out the basket and remount it in the upper position;
- Replace the blocks "A" in their original position.
Dishes that are bigger than 20 cm in diameter can no longer be loaded onto the upper basket and the mobile supports cannot be used when the basket is in the upper position.
text_image
Diagram of a mechanical device with labeled components and directional arrows, marked as 'A'
natural_image
Mechanical linkage diagram showing a lever system with rotating components (no text or labels)
LOADING DISHES
Using the upper basket
The upper basket is provided with mobile racks hooked to the sides of the basket which can be regulated in two positions: upright and lowered. In the lowered position the racks may be used for tea and coffee cups, kitchen knives and ladles. Glasses with stems may be safely hung on the ends of the racks. Glasses, cups, saucers and dessert plates may be loaded under the racks.
■ Soup plates and ordinary plates may be loaded with the rack in the upright position. Plates should be loaded vertically with the underside of the plate towards the back of the dishwasher with a space between each plate to allow water to pass freely.
It is advisable to load plates of the same size together in order to utilize maximum basket capacity.
■ Plates may be loaded in a single row (fig. 1) or on both rows (fig. 2).
It is advisable to load large plates (approx. 27 or more cm) slightly tilted towards the rear to facilitate introduction of the basket into the machine.
■ Salad bowls and plastic bowls may also be loaded on the upper basket. It is advisable to block these in place so that the jets of water do not make them overturn.
The upper basket has been designed to offer maximum flexibility in use and can be loaded with up to 24 plates on two rows, up to 30 glasses on five rows or a mixed load.
Using the lower basket
■ Saucepans, oven dishes, tureens, salad bowls, lids, serving dishes, dinner plates, soup plates and ladles can be loaded on the lower basket.
■ Place the cutlery in the plastic cutlery holder with the handles pointing upwards.
■ Place the cutlery holder on the lower basket (fig. 3), making sure that the cutlery does not get in the way of the rotating arms.
IMPORTANT
The lower basket has a safety-stop device, for its safe extraction, also especially useful with a full load. For loading salt, cleaning filter and for ordinary maintenance, the complete extraction of the basket is necessary.
text_image
1
A C E
B D
F
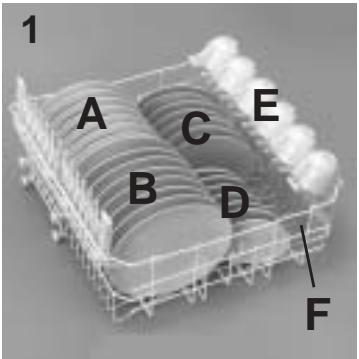
A standard daily load is represented in figs. 1, 2 and 3.
Upper basket (fig. 1)
A = soup plates
B = dinner plates
C = dessert plates
D = saucers
E = cups
F = glasses
text_image
2
A B
G C
D
H / F E F
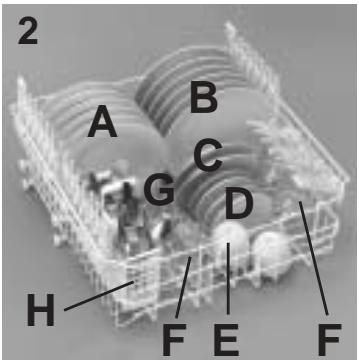
Upper basket (fig. 2)
A = soup plates
B = dinner plates
C = dessert plates
D = saucers
E = cups
F = glasses with stems
G = glasses
H = single section cutlery basket
text_image
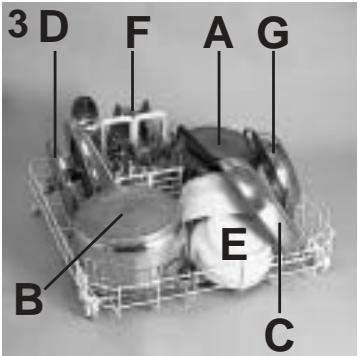
3 D F A G
B E C
Lower basket (fig. 3)
A = medium-sized saucepan
B = large saucepan
C = frying pan
D = lids
E = tureens, serving dishes
F = cutlery
G = oven dishes
Please load the dishwasher sensibly to ensure the best wash results.
natural_image
3D rendered white plastic basket-like structure with side handles and compartments (no text or symbols)
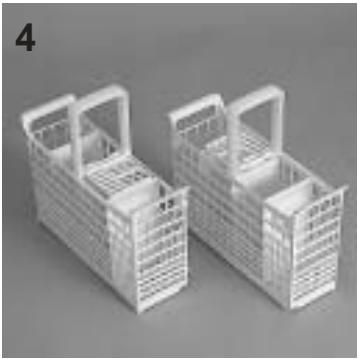
Cutlery basket (fig. 4)
The cutlery basket is made with two detachable parts which will enable various loading options. The two parts can be detached by sliding the left section away from the right section.
General programme comparison (Ref. EN 50242 Standards)
(see programmes selection)
- Upper basket position: low
- Normal load
-
Shine setting: 6
-
Amount of detergent:
-
8 g for pre-wash;
- 22 g for wash.
12 international place load (Ref. EN 50242)
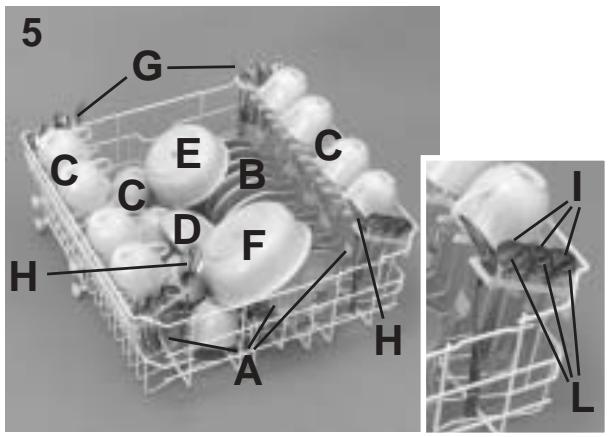
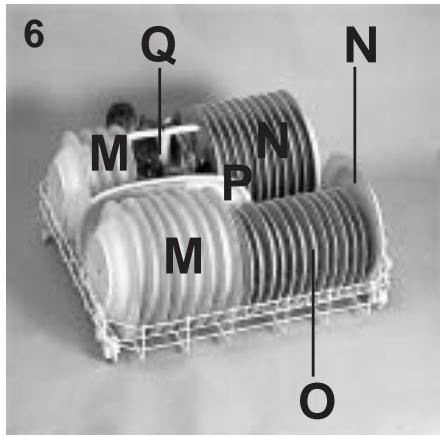
Correct loading is indicated, in fig. 5 for the upper basket, in fig. 6 for the lower basket and in fig. 7 for the cutlery basket.
text_image
5
G
C E B C
C C D F
H A H I L
Upper basket (fig. 5)
A = 5 + 5 + 2 glasses
B = 12 saucers
C = 4 + 4 + 4 cups
D = small bowl
E = medium bowl
F = large bowl
G = 1 + 1 forks
H = 1 + 1 serving spoons
I = 3 + 3 + 3 + 3 dessert spoons
L = 3 + 3 + 3 + 3 teaspoons
text_image
6
Q
N
M
P
M
O
Lower basket (fig. 6)
M = 8 + 4 soup plates
N = 11 + 1 dinner plates
O = 12 dessert plates
P = serving dish
Q = cutlery
natural_image
3D rendered diagram of a plastic container with internal structures and labeled point 'R' (no text or symbols beyond label)
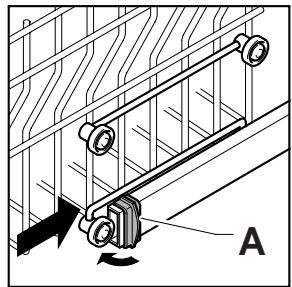
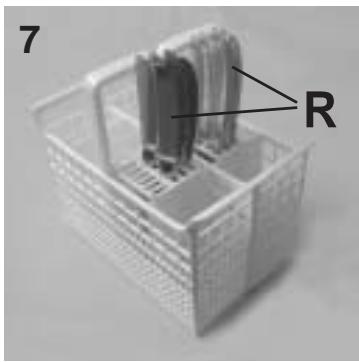
Cutlery basket (fig. 7)
Place the side racks in the lower position and fill with 6 + 6 knives(R); in the spaces left insert cutlery with the handles down.
Take care not to load more than two different types of cutlery in the same compartment.
LOADING THE DETERGENT
The detergent
IMPORTANT
It is essential to use a detergent that is specifically designed for dishwashers either in powder, liquid or tablet form.
“FINISH” gives very good results and can be easily obtained.
Unsuitable detergents (like those for washing up by hand) do not contain the proper ingredients for use in a dishwasher, and stop the dishwasher from working correctly.
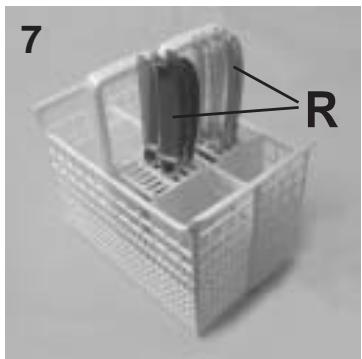
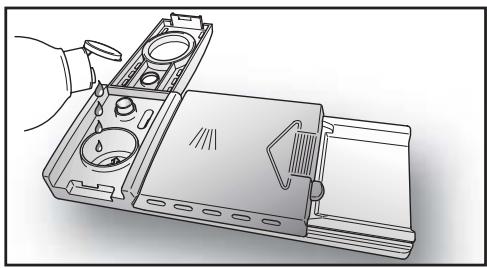
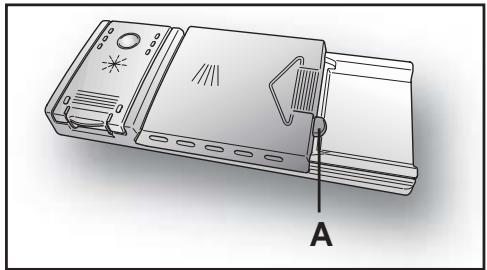
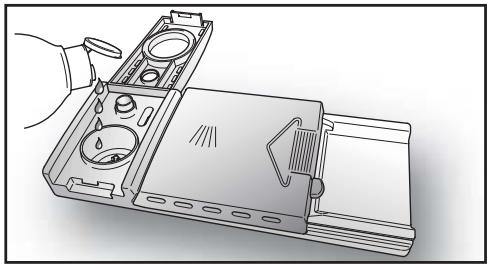
Filling the detergent container
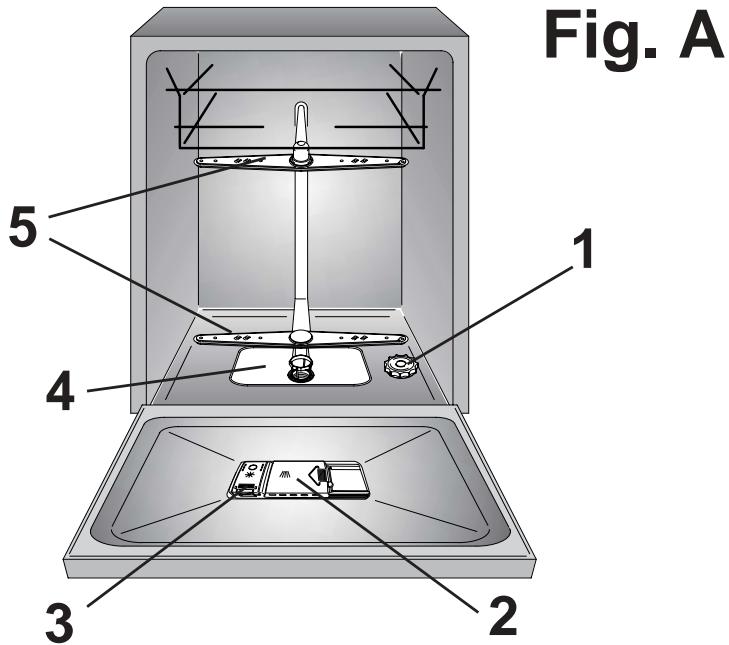
The detergent container is inside the door (fig. A "2"). If the lid of the container is closed, press the button (A) to open.
At the end of every wash cycle the lid is always open and ready for the next time the dishwasher is used.

WARNING!
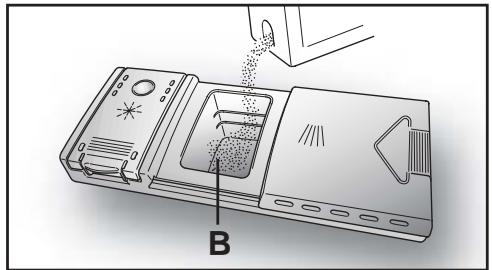
When loading the lower basket, please ensure that the plates or others do not obstruct the detergent dispenser.
The amount of detergent to be used varies according to how dirty the dishes are and on the type of dishes to be washed.
We advise using 20÷30 g of detergent in the wash section of detergent compartment (B).
natural_image
Technical line drawing of a mechanical device with labeled component A (no text or symbols beyond label)
text_image
B
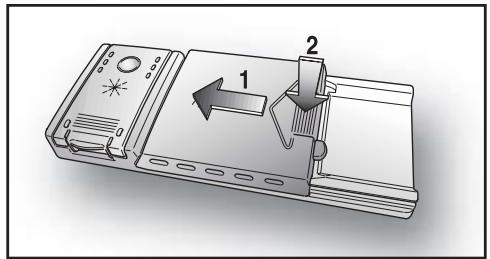
After pouring the detergent into the container, close the lid, firstly pushing (1) and then pressing on it (2) until you hear the click.
natural_image
Diagram of a device with labeled parts and directional arrow (no text or symbols)
Since not all detergents are the same the instructions on the boxes of detergent can vary. We should just like to remind users that too little detergent does not clean the dishes properly whilst too much detergent will not produce better results and is also a waste.
IMPORTANT
Do not use an excessive amount of detergent and help limit damage to the environment at the same time.
TYPES OF DETERGENT
Detergent tablets
Detergent tablets of different manufacturers dissolve at different speeds, for this reason, during short programmes, some detergent tablets may be not fully effective, because they are not completely dissolved. If these products are used, is recommended to choose longer programmes to guarantee the complete use of the detergent.
IMPORTANT
To get satisfactory washing results, the tablets MUST be placed in the wash section of the detergent container and NOT directly in the tub.
Concentrated detergents
The concentrated detergents, with reduced alkalinity and with natural enzymes, in conjunction with 50^ C wash programmes, have a smaller impact on the environment and they protect the dishes and the dishwasher.
The 50^ C wash programmes purposely exploit the dirt-dissolving properties of the enzymes, allowing therefore, with the use of the concentrated detergents, to achieve the same results of the 65^ C programmes but at a lower temperature.
Combined detergents
The detergents that also contain the rinse aid must be placed in the wash section of the detergent container. The rinse aid container must be empty (if it is not empty, set the rinse aid regulator to lowest position before using combined detergents).
"3 in 1"/"4 in 1"/"5 in 1" combined detergents
If you are planning to use combined detergents i.e. those with built in salt and/or rinse agent, we would advise the following:
- read carefully and follow the manufacturer's instructions given on the packaging;
■ the effectiveness of detergents containing the built in water softener/salt depends on the hardness of your water supply. Check that the hardness of your water supply is within the effective range given on the detergent packaging.
If when using this type of product, you don't get satisfactory washing results, please contact the detergent manufacturer.
In certain circumstances use of combined detergents can cause:
■ limescale deposits on dishes or in the dishwasher;
■ a reduction in washing and drying performance.
IMPORTANT
Any problems which arise as a direct result of the use of these products are not covered by our warranty.
Please note that using the "3 in 1"/"4 in 1"/"5 in 1" combined detergents, the rinse aid and salt indicator lights (only used on selected models) are superfluous, so you must ignore the lights.
If washing and/or drying problems occur, we recommend you return to use traditional separate products (salt, detergent and rinse agent). This will ensure that the water softener in the dishwasher operates correctly.
In this case, we recommends that you:
■ refill both the salt and rinse aid container;
■ run one normal washing cycle without a load.
Please note that on return to the use of conventional salt, a number of cycles will be required before the system becomes fully efficient again.
LOADING THE RINSE AID
The rinse aid
The rinse aid, which is automatically released during the last rinsing cycle, helps the dishes to dry quickly and prevents spots and stains forming.
Filling the rinse aid container
The rinse aid container can be found to the left of the detergent container (fig. A "3").
To open the lid, push the reference mark and, in the same time, pull the tab of opening.
It is always advisable to use rinse aid that is specifically designed for dishwasher.
Check the rinse aid level through the indicator eye (C) which is located on the dispenser.
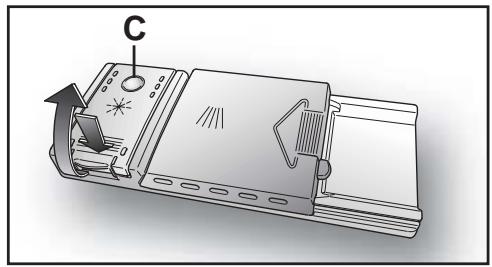
natural_image
Technical line drawing of a mechanical device with labeled component C (no text or symbols beyond label)
FULL

dark
EMPTY

light
natural_image
Line drawing of a mechanical device with ports and a handle, no text or symbols present
Regulating the rinse aid from 1 to 6
The regulator (D) is placed under the lid and can be turned using a coin.
The recommended position is 4.
The limestone content of the water considerably affects the formation of limescale and the drying performance.
It is therefore important to regulate the quantity of rinse aid to achieve good washing results.
If, after the wash, streaks occur on the dishes, decrease the amount by one position. If whitish spots occur, increase the amount by one position.
text_image
12 3 4 5
D
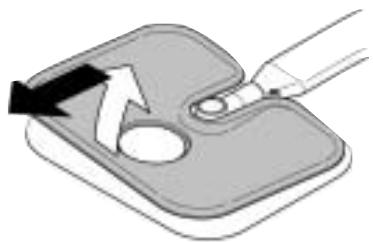
CLEANING THE FILTERS
The filter system (fig.A "4") consists of:
a central container that traps the larger particles;
a flat gauze that continuously filters the wash water;
a micro filter, located beneath the gauze, that traps the tiniest particles ensuring a perfect rinse.
■ To achieve excellent results every time, the filters should be checked and cleaned after each wash.
■ To remove the filter unit, simply turn the handle anticlockwise (fig. 1).
■ For ease of cleaning, the central container is removable (fig. 2).
■ Remove the gauze filter (fig.3) and wash the whole unit under a jet of water. If necessary a small brush can be used.
■ With the Self-cleaning Micro filter, maintenance is reduced and the filter unit need only be checked every two weeks. Nevertheless, after each wash it is advisable to check that the central container and the gauze filter are not clogged.

WARNING!
After cleaning the filters, make sure that they are correctly reassembled and that the gauze filter is properly positioned at the bottom of the dishwasher.
Make sure that the filter is screwed back, clockwise, into the gauze, as poor seating of the filter unit could have an adverse effect on the efficiency of the appliance.
IMPORTANT
Never use the dishwasher without the filters.
natural_image
Illustration of a hand using a tool to lift a cylindrical object on a base, with an arrow indicating motion (no text or symbols)

natural_image
Illustration of a hand holding a mechanical device with arrows indicating motion or force (no text or symbols)
3
natural_image
Diagram of a medical or laboratory procedure showing a tool interacting with a tray-like device containing a circular component (no text or symbols present)
PRATICAL HINTS
How to get really good wash results
■ Before placing the dishes in the dishwasher, remove any remaining food (bones, shells, pieces of meat or vegetables, coffee grounds, skin of fruit, cigarette ash, tooth picks etc. to avoid blocking the filters, water outlet and washing arm nozzles.
■ Try not to rinse the dishes before loading them into the dishwasher.
If saucepans and oven dishes are encrusted with the remains of burnt or roast food, it is advisable to leave them to soak before washing.
■ Place the dishes face downwards.
■ Try to place the dishes in such a way that they are not touching one another. If they are loaded properly you will get better results.
■ After loading the dishes check that the washing arms can rotate freely.
■ Pans and other dishes that have particularly stubborn food particles or remnants of burnt food should be left to soak in water with dishwasher detergent.
■ To wash silver properly:
a) rinse the silver immediately after use, especially if it has been used for mayonnaise, eggs, fish etc.;
b) do not sprinkle detergent onto it;
c) keep it separate from other metals.
How to make savings
If you want the dishwasher to give a complete wash, place the dishes in the dishwasher at the end of each meal and if necessary turn on the COLD RINSE cycle to soften the food remains and remove bigger particles of food from the new load of dishes.
When the dishwasher is full start the complete wash cycle programme.
If the dishes are not very dirty or if the baskets are not very full select an ECONOMY programme, following the instructions in the program list.
What not to wash
It should be remembered that not all dishes are suitable for washing in a dishwasher. We advise against using the dishwasher to wash items in thermoplastic, cutlery with wooden or plastic handles, saucepans with wooden handles, items in aluminium, crystal, leaded glass unless otherwise stated.
■ Certain decorations may fade. It is therefore a good idea before loading the whole batch to wash just one of the items first so as to be sure that others like it will not fade.
It is a good idea not to put silver cutlery with non-stainless steel handles into the dishwasher as there could be a chemical reaction between them.
IMPORTANT
When buying new crockery or cutlery always make sure that they are suitable for washing in a dishwasher.
Useful hints
In order to avoid any dripping from the top rack, remove the lower rack first.
If the dishes are to be left in the machine for some time, leave the door ajar, to let some air circulate and to improve the drying performance.
CLEANING AND MAINTENANCE
■ To clean the dishwasher outside, do not use solvents (degreasing action) neither abrasives, but only a cloth soaked with water.
■ The dishwasher does not require special maintenance, because the tank is self-cleaning.
■ Regularly wipe the door gasket with a damp cloth to remove any food remains or rinse aid.
It is advisable to remove limestone deposits or dirt periodically, by doing an empty wash; pour a glass of vinegar on the bottom of the tank and select the light wash.
If, in spite of the routine cleaning of the filters, you notice that the dishes or pans are not properly washed or rinsed, check that all the spray heads on the rotor arms (fig. A "5") are clear.
If they are blocked, clean them in the following way:
- to remove the upper rotor arm, turn it until it lines up with the stop marked by the arrow (fig. 1). Push it upwards (fig. 1b) and, keeping it pushed in, unscrew it in a clockwise direction (to reassemble it repeat the same operation, but turn it anticlockwise). The lower rotor arm can be removed simply by pulling it upwards (fig. 2);
- wash the rotor arms under a jet of water to clear any blockage in the spray heads;
- when you have finished, refit the rotor arms in the same position, remembering to re-align the arrow and screw into position.
■ Both the door lining and the tank lining are in stainless steel; however, should spots caused by oxidation occur, this is probably due to a high level of iron salts presents in the water.
■ The spots can be removed with a mild abrasive agent; never use chlorine based materials, steel wool, etc.
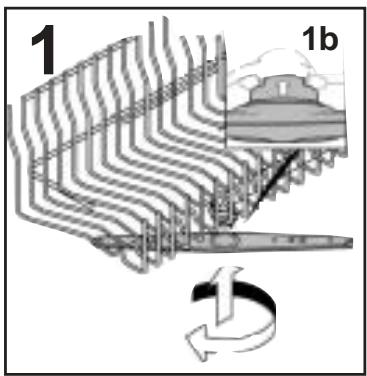
text_image
1
1b
natural_image
Mechanical assembly diagram showing a lever mechanism with a fulcrum and base (no text or symbols)
WHEN CYCLE IS FINISHED
After every wash it is essential to turn off water supply and to switch off the machine by pressing the On/Off button to the off position.
If the machine is not going to be used for some time, it is advisable to follow these rules:
- do an empty wash with detergent in order to clean the machine of any deposits;
- pull out the electric plug;
- turn off the water tap;
- fill the rinse aid container;
- leave the door ajar;
- keep the inside of the machine clean;
- If the machine is left in places where the temperature is below 0^ C any water left inside the pipes may freeze. Wait until the temperature rises above zero and then wait for about 24 hours before starting up the dishwasher.
DESCRIPTION OF THE CONTROL PANEL
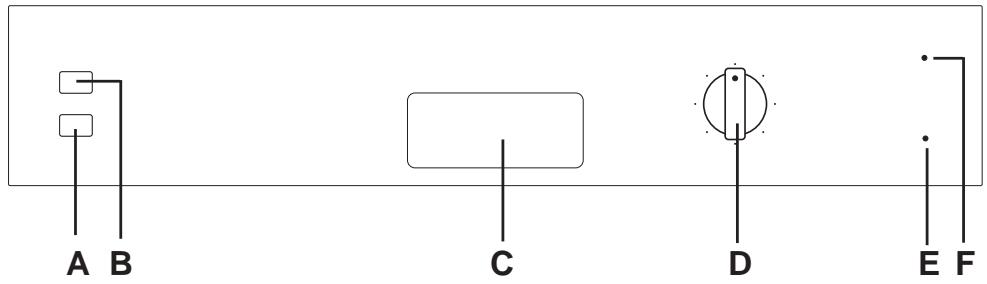
text_image
A B
C
D
E F
A "HALF LOAD" option button
B "ON/OFF" button
C Door handle
D Programme selector
E “SALT EMPTY” light
F Indicator light "WASHING"
DIMENSIONS:
Height cm 82÷88,5
Depth cm 57
Width cm 59,8
Depth with door open cm 117
TECHNICAL DATA:
| EN 50242 place load | 12 |
| Capacity with pans and dishes | 8 persons |
| Water supply pressure | Min. 0,08 - Max 0,8 MPa |
| Fuse | (see rating plate) |
| Power input | (see rating plate) |
| Supply voltage | (see rating plate) |
PROGRAMME SELECTION AND SPECIAL FUNCTIONS
(Use in conjunction with programme guide)
Setting a programme

WARNING!
Before setting any programme, the programme selector must be in the "RESET" position and the indicator light "WASHING"(▶) must be off. Make sure that the "ON/OFF" (①) button is pressed in.
To set the programme, press the "ON/OFF" button: then turn the dial (in a clockwise or anti-clockwise direction) until the pointer (●) is in line with the symbol of the required programme.
After about 4 seconds, the indicator light "WASHING" will come on.
After an audible signal has sounded, the programme will start automatically.
WITHIN 2 minutes of the programme commencing another programme can be selected, simply turning the programme selector to the required position.
IMPORTANT
While a programme is running, the programme selector will remain in the selected position, and will NOT MOVE.
In response to your everyday washing requirement in addition to the normal wash functions this dishwasher is equipped with the "HALF LOAD" function. This function enables the uses to wash a reduced number of dishes yet retaining the freedom of loading them both on the top and bottom basket. When this function is activated the dishwasher will automatically reduce the water and energy consumption and the wash time. When selecting the "HALF LOAD" ensure a reduced amount of detergent is used.
The option button can be selected or deselected WITHIN 2 minutes of the programme commencing.
Interrupting a programme
Opening the door is not recommended while a programme is running, especially during the main washing phase and final drying.
However, the dishwasher will stop automatically when the door is opened.
If the door is opened during a programme, the indicator light "WASHING" will start flashing, up to when you re-close the door. At this point, the programme will restart from where it had been interrupted.

WARNING!
If you open the door during the drying cycle, an audible audio signal advises you that the drying cycle has not yet finished.
If you wish to change or cancel the programme that is running, carry out the following:
turn the programme selector to "RESET" position. After a few seconds the indicator light "WASHING" will go off.
A new wash setting can now be made.

WARNING!
Before starting a new programme, you should check that there is still detergent in the dispenser. If necessary, top up the dispenser.
If there is any break in the power supply while the dishwasher is operating, a special memory stores the selected programme and, when the power is restored, it continues where it left off.
End of programme
A 5 second alarm will sound (if not muted) 3 times at 30 second intervals to signal that the programme has ended. The indicator light "WASHING" will start to flash.
Turn the programme selector to "RESET" position, wait until the indicator light "WASHING" goes off and press the "ON/OFF" button.
Alarm mute for the PROGRAMME END
The alarm for the programme end may be muted as follows:
IMPORTANT
The dishwasher must be ALWAYS off before start this procedure.
- When the dishwasher is off, OPEN the door.
-
Turn the programme selector to the "RAPID" programme position.
-
Press the "ON/OFF" button.
-
WITHIN around 15 seconds, turn the dial (in a clockwise direction) to the "RESET" position and then go back to the "RAPID" programme position again, doing this 4 times (finishing with programme selector on the "RAPID" programme position).
-
The indicator light "WASHING" will come on.
-
Turn the programme selector (in a clockwise direction) to the "RESET" position (the indicator light "WASHING" will start to flash to indicate that the alarm has been deactivated).
-
Turn off the dishwasher pressing the "ON/OFF" button to confirm the new setting.
To turn the alarm on again, follow the same procedure from step 1 to 4 and when the indicator light "WASHING" will come on, turn the dishwasher off by pressing the "ON/OFF" button to confirm the new setting.

WARNING!
If any problem occurs, turn the dishwasher off by pressing the "ON/OFF" button and start the procedure again from the beginning (STEP 1).
Setting of new programme
Whenever you want to set a new programme, you MUST turn the programme selector to "RESET" position and wait for the "WASHING" indicator light to go off.
Troubleshooting
While you are setting a programme, the indicator light "WASHING" will start flashing very quickly (and the alarm will sound) if the electronics detect some incorrect programming function.
In this event, turn the programme selector to the "RESET" position, wait for the "WASHING" indicator light to go off and turn off the dishwasher pressing the "ON/OFF" button.
After checking to make sure the water inlet hose tap is open, that the drain hose is not bent and that the siphon or filters are not clogged, set the selected programme again.
If the anomaly persists, contact Customer Service Department.
IMPORTANT
This dishwasher is equipped with an anti-overflow safety device which will automatically discharge any excess water should a problem occur.

WARNING!
To ensure the correct operation of the anti-overflow safety device, we recommend that the dishwasher is not moved or tilted during operation. If however it is necessary to tilt or move the dishwasher, please ensure that the washing cycle is complete and that there is no remaining water inside the dishwasher.
PROGRAMME GUIDE
| COLD RINSE | Short cold pre-wash for items that are stored in the dishwasher until you are ready to wash a full load. |
| HYGIENIC 75°C | Once a day - for heavily soiled pans and any other items that have been left all day for washing. |
| UNIVERSAL 65°C | Once a day - for normal soiled pans and any other items that have been left all day for washing. |
| ACLASS 1h | A CLASS 1h 70°C | Suitable for heavily soiled items that are to be washed straight after a meal. (Max 8 place load) |
| ECO | ECO 45°C | Energy Saving Programme suitable for normal soiled items. Using detergents with enzyme. Programme standardised to EN 50242. |
| DELICATE 45°C | Suitable for delicate crockery and glassware. Also for less soiled items excluding pans. |
| RAPID 32' 50°C | Quick wash for dishes which are to be washed immediately after the meal. Wash load of 4/6 persons. |
Wash with soaking cycle (Prewash)
If setting the HYGIENIC programme, a second dose of about 20 g of detergent (1table-spoon) must be added directly in the dishwasher. For A CLASS 1h programme add 5 g.
| Check list | Programme contents | Avarage duration in minutes | Special function buttons available |
| Detergent for soaking (Prewash) | Detergent for washing | Clean filter | Check rinse aid dispenser | Check salt container | Hot pre-wash | Cold pre-wash | Main wash | First cold rinse | Second cold rinse | Hot rinse with rinse aid | With cold water (15°C) (Tolerance ± 10%) | “HALF LOAD” button |
| | ● | | | | ○ | | | | | 5 | N/A |
| ● | ● | ● | ● | ● | ○ | | 75°C | ○ | ○ | ○ | 120 | YES |
| ● | ● | ● | ● | | ○ | 65°C | ○ | | ○ | 95 | YES |
| ● | ● | ● | ● | ● | ○ | | 70°C | | | ○ | 60 | YES |
| ● | ● | ● | ● | ● | | ○ | 45°C | | | ○ | 160 | YES |
| ● | ● | ● | ● | | ○ | 45°C | ○ | | ○ | 80 | YES |
| ● | ● | ● | ● | | | 50°C | | | ○ | 32 | N/A |
N/A = OPTION NOT AVAILABLE
IDENTIFYING MINOR FAULTS
Should the dishwasher fail to operate, before contacting the Service Centre, make the following checks:
| FAULT | CAUSE | REMEDY |
| 1 - Machine completely dead | Plug is not connected to wall socket | Connect electric plug |
| O/I button has not been pressed | Press button |
| Door is open | Close door |
| No electricity | Check the fuse in the plug and the electricity supply |
| 2 - Machine does not draw water | See causes for no. 1 | Check |
| Water tap is turned off | Turn water tap on |
| Programme selector is not at correct position | Turn programme selector to correct position |
| The inlet hose is bent | Eliminate the bends in the hose |
| The inlet hose filter is not correctly connected | Clean the filter at the end of the hose |
| 3 - Machine does not discharge water | Filter is dirty | Clean filter |
| Outlet hose is kinked | Straighten outlet hose |
| The outlet hose extension is not correctly connected | Follow the instructions for connecting the outlet hose carefully |
| The outlet connection on the wall is pointing downwards not upwards | Call a qualified technician |
| 4 - Machine discharges water continuously | Position of outlet hose is too low | Lift outlet hose to at least 40 cm above floor level |
| 5 - Spray arms are not heard to rotate | Excessive amount of detergent | Reduce amount of detergent Use suitable detergent |
| Item prevents arms from rotating | Check |
| Plate and cup filter very dirty | Clean plate and cup filter |
| 6 - On electronic appliances without a display: one or more indicator lights flashing quickly. | Water inlet tap turned off | Switch off the appliance. Turn on the tap. Re-set the cycle. |
| FAULT | CAUSE | REMEDY |
| 7 - Load of dishes is only partially washed | See causes for no. 5 | Check |
| Bottom of saucepans have not been washed well | Burnt on food remains must be soaked before putting pans in dishwasher |
| Edge of saucepans have not been washed well | Reposition saucepans |
| Spray arms are partially blocked | Remove spray arms by unscrewing ring nuts clockwise and wash under running water |
| The dishes have not been properly loaded | Do not place the dishes too closely together |
| The end of the outlet hose is in the water | The end of the outlet hose must not come into contact with the outflow water |
| The incorrect amount of detergent has been measured out; the detergent is old and hard | Increase the measure according to how dirty the dishes are and change detergent |
| The wash programme is not thorough enough | Choose a more vigorous programme |
| The lower basket dishes have not been washed | Depress half load button |
| 8 - Detergent not dispensed or partially dispensed | Cutlery, dishes, pans, etc... stop the detergent dispenser opening | Position dishes not to obstruct the dispenser |
| 9 - Presence of white spots on dishes | Water is too hard | Check salt and rinse aid level and regulate amount.Should the fault persist, Contact Service Centre |
| 10 - Noise during wash | The dishes knock against one another | Re-check loading of dishes in the basket |
| The revolving arms knock against the dishes | Again re-check loading |
| 11 - The dishes are not completely dry | Inadequate air flow | Leave the dishwasher door ajar at the end of the wash program to allow the dishes to dry naturally |
| Rinse aid missing | Fill the rinse aid dispenser |
N.B.: Should any of the situations occur and should the machine give a bad wash performance, it is necessary to remove the deposits from the dishes by hand since the final drying cycle hardens the deposits which a second wash in the machine would not be able to remove.
If the malfunction continues contact a Service Centre quoting the serial number of the dishwasher. This is found on the plaque on the inside of the dishwasher door at the top or on the guarantee. This information will make it possible to take more effective action more quickly.
The manufacturers decline any responsibility for any printing mistakes in this instruction booklet. They also reserve the right to modify their own appliances as necessary without altering the essential characteristics.
The manufacturer declines all responsibility in the event of any printing mistakes in this booklet. The manufacturer also reserves the right to make appropriate modifications to its products without changing the essential characteristics.
This appliance is marked according to the European directive 2002/96/EC on Waste Electrical and Electronic Equipment (WEEE).
By ensuring this product is disposed of correctly, you will help prevent potential negative consequences for the environment and human health, which could otherwise be caused by inappropriate waste handling of this product.
The symbol on the product indicates that this product may not be treated as household waste. Instead it shall be handed over to the applicable collection point for the recycling of electrical and electronic equipment
Disposal must be carried out in accordance with local environmental regulations for waste disposal.
For more detailed information about treatment, recovery and recycling of this product, please contact your local city office, your household waste disposal service or the shop where you purchased the product.


 |  |  |  |
 0903 99.109 0903 99.109 |  0900 99.99.109 0900 99.99.109 |  0820.220.224 0820.220.224 |  801.11.505050 801.11.505050 |  0848 780.780 0848 780.780 |