
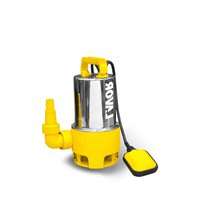
EG-P 3600 - Water pump Lavor - Free user manual and instructions
Find the device manual for free EG-P 3600 Lavor in PDF.

| Product type | Water pump |
| Brand | Lavor |
| Model | EG-P 3600 |
| Power supply | 230 V / 50 Hz |
| Rated power | 1000 W |
| Maximum flow rate | 3600 l/h |
| Maximum head | 45 m |
| Maximum suction depth | 8 m |
| Maximum water temperature | 35 °C |
| Weight | 6.3 kg |
| Thermal protection | Automatic shutdown in case of overload |
| Recommended electrical protection | Residual-current circuit breaker 30 mA |
| Warranty | 2 years (parts and labor) |
| Use | Clean water and wastewater (except salt water) |
| Continuous use | Not suitable |
Frequently Asked Questions - EG-P 3600 Lavor
User questions about EG-P 3600 Lavor
0 question about this device. Answer the ones you know or ask your own.
Ask a new question about this device
Download the instructions for your Water pump in PDF format for free! Find your manual EG-P 3600 - Lavor and take your electronic device back in hand. On this page are published all the documents necessary for the use of your device. EG-P 3600 by Lavor.
USER MANUAL EG-P 3600 Lavor
natural_image
Abstract geometric logo with green and yellow shapes forming a star-like pattern (no text or symbols)LWOR

natural_image
Icon of a person reading a book inside a circle (no text or symbols)NL Gebruiksaanwijzing
F Mode d'emploi
D Gebrauchsanleitung
E Manual de instrucciones
P Manual de instruções
I Istruzioni per l'uso
GB Instruction manual
N Bruksanvisning
s Bruksanvisning
DK Brugsanvisning
SF Käyttöohje
GR Καθαριστη υψηλησ πιεσησ
RUS Руководство по эксплуатации
PL Instrukcja obsługi
cz Návod k použití
RO Manual de instructiuni
TR Kullanma kilavuzu
Nederlands 4
Français 8
Deutsch 12
Español 17
Português 22
Italiano 26
English 31
Norsk 35
Svenska 39
Dansk 43
Suomi 47
Ελληνικα 51
Русский язык ....55
Polski 60
Česky 65
Român 69
Türkçe 73
A

WATERPOMP EG-P 3600
VEILIGHEIDSVOORSCHRIFTEN

WAARSCHUWING
BESCHRIJVING (FIG. A)
2004/108/CE, 2006/95/CE
Pegognaga, 02-2010

Giancarlo Lanfredi
Director
Lavorwash S.p.A., via J. F. Kennedy, 12 Italy 46020 Pegognaga (MN)
2004/108/CE, 2006/95/CE
Pegognaga, 02-2010
Giancarlo Lanfredi
Direttore
Lavorwash S.p.A., via J. F. Kennedy, 12 Italy 46020 Pegognaga (MN)
Read all safety warnings and all instructions.
Failure to follow the warnings and instructions may result in electric shock, fire and/or serious injury.
Save all warnings and instructions for future reference.
Safety warnings
1) Work area safety
a) Keep work area clean and well lit.
Cluttered or dark areas invite accidents.
b) Do not operate power tools in explosive atmospheres, such as in the presence of flammable liquids, gases or dust. Power tools create sparks which may ignite the dust or fumes.
c) Keep children and bystanders away while operating a power tool. Distractions can cause you to lose control.
2) Electrical safety
a) Power tool plugs must match the outlet. Never modify the plug in any way. Do not use any adapter plugs with earthed (grounded) power tools. Unmodified plugs and matching outlets will reduce risk of electric shock.
b) Avoid body contact with earthed or grounded surfaces, such as pipes, radiators, ranges and refrigerators. There is an increased risk of electric shock if your body is earthed or grounded.
c) Do not expose power tools to rain or wet conditions. Water entering a power tool will increase the risk of electric shock.
d) Do not abuse the cord. Never use the cord for carrying, pulling or unplugging the power tool. Keep cord away from heat, oil, sharp edges or moving parts.
Damaged or entangled cords increase the risk of electric shock.
e) When operating a power tool outdoors, use an extension cord suitable for outdoor use. Use of a cord suitable for outdoor use reduces the risk of electric shock.
f) If operating a power tool in a damp location is unavoidable, use a residual current device (RCD) protected supply. Use of an RCD reduces the risk of electric shock.
3) Personal safety
a) Stay alert, watch what you are doing and use common sense when operating a power tool. Do not use a power tool while you are tired or under the influence of drugs, alcohol or medication. A moment of inattention while operating power tools may result in serious personal injury.
b) Use personal protective equipment. Always wear eye protection. Protective equipment such as dust mask, non-skid safety shoes, hard hat, or hearing protection used for appropriate conditions will reduce personal injuries.
c) Prevent unintentional starting. Ensure the switch is in the off-position before connecting to power source and/or battery pack, picking up or carrying the tool. Carrying power tools with your finger on the switch or energising power tools that have the switch on invites accidents.
d) Remove any adjusting key or wrench before turning the power tool on. A wrench or a key left attached to a rotating part of the power tool may result in personal injury.
e) Do not overreach. Keep proper footing and balance at all times. This enables better control of the power tool in unexpected situations.
f) Dress properly. Do not wear loose clothing or jewellery. Keep your hair, clothing and gloves away from moving parts. Loose clothes, jewellery or long hair can be caught in moving parts.
g) If devices are provided for the connection of dust extraction and collection facilities, ensure these are connected and properly used. Use of dust collection can reduce dust-related hazards.
GB
4) Power tool use and care
a) Do not force the power tool. Use the correct power tool for your application.
The correct power tool will do the job better and safer at the rate for which it was designed.
b) Do not use the power tool if the switch does not turn it on and off. Any power tool that cannot be controlled with the switch is dangerous and must be repaired.
c) Disconnect the plug from the power source and/or the battery pack from the power tool before making any adjustments, changing accessories, or storing power tools. Such preventive safety measures reduce the risk of starting the power tool accidentally.
d) Store idle power tools out of the reach of children and do not allow persons unfamiliar with the power tool or these instructions to operate the power tool. Power tools are dangerous in the hands of untrained users.
e) Maintain power tools. Check for misalignment or binding of moving parts, breakage of parts and any other condition that may affect the power tool's operation. If damaged, have the power tool repaired before use. Many accidents are caused by poorly maintained power tools.
f) Keep cutting tools sharp and clean.
Properly maintained cutting tools with sharp cutting edges are less likely to bind and are easier to control.
g) Use the power tool, accessories and tool bits etc. in accordance with these instructions, taking into account the working conditions and the work to be performed. Use of the power tool for operations different from those intended could result in a hazardous situation.
h) If the supply cord is damaged, it must be replaced by a special cord or assembly available from the manufacturer or its service agent.
5) Service
a) Have your power tool serviced by a qualified repair person using only identical replacement parts. This will ensure that the safety of the power tool is maintained.
6) Battery tool use and care
a) Recharge only with the charger specified by the manufacturer. A charger that is suitable for one type of battery pack may create a risk of fire when used with another battery pack.
b) Use power tools only with specifically designated battery packs. Use of any other battery packs may create a risk of injury and fire.
c) When battery pack is not in use, keep it away from other metal objects, like paper clips, coins, keys, nails, screws or other small metal objects, that can make a connection from one terminal to another. Shorting the battery terminals together may cause burns or a fire.
d) Under abusive conditions, liquid may be ejected from the battery; avoid contact. If contact accidentally occurs, flush with water. If liquid contacts eyes, additionally seek medical help. Liquid ejected from the battery may cause irritation or burns.
When using the pump, always observe the following safety instructions.
■ Before use check the pump for damage. Should the pump be damaged, it must not be used.
■ Only connect the pump to an electric group which is protected with an earth leakage switch (30 mA).
- Do not use the pump in swimming pools or other places where persons could find themselves in the vicinity of the pump in the water.
- Do not use the pump in fish ponds or fountains.
■ Never use the pump if no outlet pipe of min. 20 cm has been fitted.
If the pump is used for pumping drinking water, the installation must be rinsed thoroughly.
■ Never let the pump run dry.
■ Always remove the mains plug from the wall socket before moving or servicing the pump.
■ Only move the machine by lifting the handle. Never pull an attached water hose to move the machine.
The following symbols are used throughout this manual:

Denotes risk of personal injury or damage to the machine.
ELECTRICAL SAFETY

Always check that the power supply corresponds to the voltage on the rating plate.
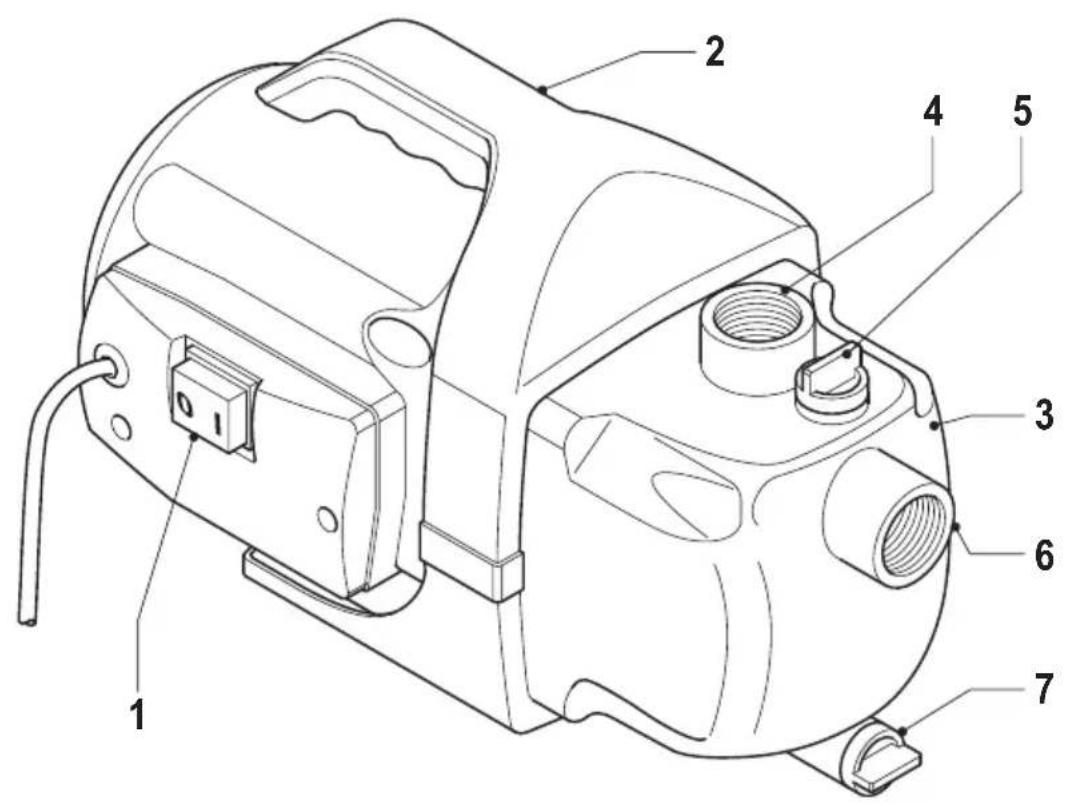
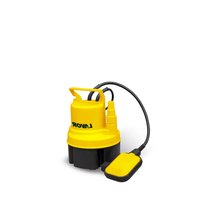
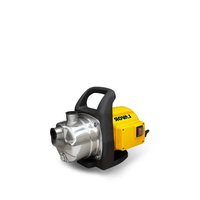
DESCRIPTION (FIG. A)
Your water pump has been designed to pump clean water and waste water. The machine is not suitable for pumping salt water. The machine is not intended for permanent use.
1 On/off switch
2 Handle
3 Pump housing
4 Drain hose connection
5 Filling point
6 Supply hose connection
7 Bleeding point
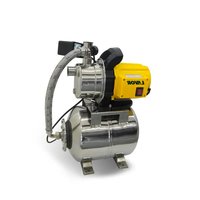
Positioning the pump (fig. A)
- Place the machine on a flat, stable underground. Make sure that the machine is not positioned 4 m higher than the level of the liquid to be pumped.
- Place the machine on a rubber mat (or a comparable vibration-absorbing material) when using the machine in a permanent set-up.
■ Connect the supply and drain hoses. Mount the supply hose to connection (6) and the drain hose to connection (4). - Place a suction valve with filter on the end of the supply hose to prevent the supply from clogging up.
- Place a check valve directly on the drain hose to prevent the pump from being damaged by water hammer.
- Place a shut-off valve downstream from the check valve to facilitate servicing.

Before installing or moving the pump always remove the mains plug from the wall socket.
Connecting the water hose (fig. A)
- Screw a water hose directly or via a reducing nipple to the connection.
- Check whether the hose is connected properly.

Before connecting a water hose, always unplug the tool.
Filling the pump housing (fig. A)
Before each use the pump housing must be filled with water.
■ Remove the screw from the filling point (5).
- Fill the pump housing with water until the level is equal to the edge of the filling point.
■ Re-insert the screw and tighten it securely.
Instructions for use
- Check whether the hoses are connected properly.
■ Make sure that the supply hose is approximately 0.5 m below liquid level.
■ Fill the pump housing with water.
Switching on and off (fig. A)
- To switch the machine on, set the on/off switch (1) to 'I'.
- To switch the machine off, set the on/off switch (1) to '0'.

The pump has been fitted with a thermal protection. In case of overload the motor is switched off. After the motor has cooled down the pump automatically switches on again.
CLEANING AND MAINTENANCE
The machine does not require any special maintenance.
■ Regularly clean the ventilation slots.
■ Defects must only be repaired by an authorised service station.

The pump must not be opened by the user.

GB
Filling the pump housing (fig. A)
After each use the pump housing must be drained.
■ Remove the water hoses present.
■ Remove the screw from the bleeding point (7).
■ Tilt the machine forward and empty the pump housing.
■ Re-insert the screw and tighten it securely.

Never fully close the bleeding point if you leave the machine in an area colder than 0 °C.
TECHNICAL DATA
EG-P 3600
Mains voltage V 230
Mains frequency Hz 50
Power input W 1,000
Max. pump capacity l/h 3,600
Max. pumping depth m 8
Max. pumping height m 45
Max. water temperature °C 35
Weight kg 6.3
Level of sound pressure measured according to ISO 3744:
EG-P 3600
L_dA (sound pressure) dB(A) < 70
GUARANTEE
This product has been thoroughly checked in the factory. After purchase date a full 2 year's guarantee applies to material and production defects. A guarantee of 6 months applies to rechargeable batteries/battery packs and chargers.
Guarantee conditions
If the product shows defects as a result of material and production defects during the period of guarantee, we guarantee free repair on condition that:
- the product has been used properly and for the purpose for which it has been intended.
- repairs are professionally carried out by a person appointed by the supplier.
- the proof of purchase will be submitted.
Accessories and parts showing normal wear are not covered by any guarantee. If, during the period of guarantee, a defect emerges that cannot be repaired, free replacement of the product takes place.

ENVIRONMENT
Should your product need replacement after extended use, do not put it in the domestic waste but dispose of it in an environmentally safe way.
DECLARATION OF CONFORMITY

Lavorwash S.p.A. declares that the machines: Water pump EG-P 3600
have been designed in compliance with the following standards:
EN 50366, EN 55014-1, EN 55014-2,
EN 60335-1, EN 60335-2-41, EN 61000-3-2, EN 61000-3-3
and in accordance with the following directives: 2004/108/EC, 2006/95/EC
Pegognaga, 02-2010

Giancarlo Lanfredi Director
Lavorwash S.p.A., via J. F. Kennedy, 12 Italy 46020 Pegognaga (MN)
IMPORTANT (FOR UK ONLY)
If the moulded 3 pin plug attached to this unit is damaged and needs replacing, it is important that it is correctly destroyed and replaced by an approved BS 1363/5A fused plug and that the following wiring instructions are followed.
The wires in this mains lead are coloured in accordance with the following code:
blue neutral
brown live
green and yellow earth
As the colours of the wires in the mains lead of this unit may not correspond to the coloured markings identifying the terminals in your plug, proceed as follows:
The wire which is coloured blue must be connected to the terminal which is marked with the letter N or coloured black.
The wire which is coloured brown must be connected to the terminal which is marked with the letter L or coloured red.
The wire which is coloured green and yellow must be connected to the terminal which is marked with the letter E or coloured green.
Subject to change; specifications can be changed without further notice.
VANNPUMPE EG-P 3600
SIKKERHETSADVARSLER

ADVARSEL
2004/108/EY, 2006/95/EY
2004/108/EK, 2006/95/EK
Pegognaga, 02-2010

Giancarlo Lanfredi Director
Lavorwash S.p.A., via J. F. Kennedy, 12 Italy 46020 Pegognaga (MN)
2004/108/WE, 2006/95/WE
Pegognaga, 02-2010
Giancarlo Lanfredi
Kierownik
Lavorwash S.p.A., via J. F. Kennedy, 12 Italy 46020 Pegognaga (MN)
2004/108/ES, 2006/95/ES
Pegognaga, 02-2010

Giancarlo Lanfredi
Šreditel
Lavorwash S.p.A., via J. F. Kennedy, 12 Italy 46020 Pegognaga (MN)
natural_image
Abstract geometric logo with green and yellow shapes forming a star-like pattern (no text or symbols)LAVOR
Via J.F. Kennedy, 12 46020 Pegognaga-MN Italia

- LWOR
- WATERPOMP EG-P 3600
- VEILIGHEIDSVOORSCHRIFTEN
- WAARSCHUWING
- BESCHRIJVING (FIG. A)
- Safety warnings
- GB
- ELECTRICAL SAFETY
- DESCRIPTION (FIG. A)
- Positioning the pump (fig. A)
- Connecting the water hose (fig. A)
- Filling the pump housing (fig. A)
- Instructions for use
- Switching on and off (fig. A)
- CLEANING AND MAINTENANCE
- TECHNICAL DATA
- EG-P 3600
- GUARANTEE
- Guarantee conditions
- ENVIRONMENT
- DECLARATION OF CONFORMITY
- IMPORTANT (FOR UK ONLY)
- VANNPUMPE EG-P 3600
- SIKKERHETSADVARSLER
- ADVARSEL
- LAVOR
Brand : Lavor
Model : EG-P 3600
Category : Water pump