USER MANUAL PVS 606 CANDY
GB INSTRUCTIONS FOR USE AND INSTALLATION
Glass Ceramic Hob
ES MANUAL DE USO Y DE INSTALLACION
. Safety instructions 14
. Electrical connectio 14
Built-in from 15 to 17
USER INSTRUCTIONS
. Recommendations 18
. Technical information 19
. The high light zone 20
. Hob cookware tips 20
. How to operate the glass ceramic hob 21
. Cleaning and maintenance 22
Problems and solutions 23
INSTALLATION : safety instructions
Installing a domestic appliance can be a complicated operation which, if not carried out correctly, can seriously affect consumer safety.
It is for this reason that the task should be undertaken by a professionally qualified person who will carry it out in accordance with the technical regulations in force.
In the event that this advice is ignored and the installation is carried out by an unqualified person, CANDY declines all responsibility for any technical failure of the product whether or not it results in damage to goods or injury to individuals.
INSTALLATION - ELECTRICAL CONNECTION
A qualified technician or a person with a similar qualification is required to carry out installation or electrical connection.
"Installation must conform to the standard directives".
Candy declines all responsibility for any damage that may be caused by unsuitable or unreasonable use.
Connection to the electrical circuit, on an oven or glass ceramic hob, should be made via the oven.
For this reason, it is important that the instructions given in the oven instructions booklet are followed carefully.
In all cases, installation must conform to standard directives, in force in the country of installation.
Attention :
. Always check the continuity of the connection to earth to the installation before any electrical operation.
. Candy cannot be held responsible for any accidents resulting from the use of an appliance which is not connected to earth, or with a faulty earth connection continuity.
INSTALLATION - BUILT-IN
The cabinet in which your hob will be installed and all adjacent furniture, should be made of materials which can withstand high temperatures. In addition, all decorative laminates should be fixed using the heat-resistant glue.
Installation:
- Leave a gap of at least 5cm between the appliance and the sides of the adjacent furniture.
- A watertight seal is supplied with the hob.
. Before fitting, turn the hob upside down, with the glass surface facing downwards.
NB Make sure that the glass is protected.
. Fit the seal round the hob.
. Make sure it is correctly fitted so as to prevent any leakage into the supporting cabinet.

INSTALLATION - BUILT-IN
Built-in :
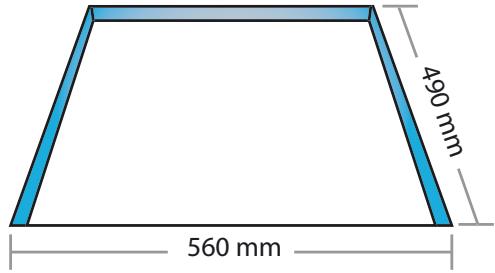
Worktop cut-out dimensions
Length
560 mm
490 mm

CONNECTION BETWEEN THE HOB AND THE OVEN
The built-under ovens (Model "FPC..."), are equipped with a control panel that ensures vitroceramic hobs operate.
| Ovens | | Hobs without control knobs |
| FPC 612 | ℉ | PVS 604 HL / PVS 605 HL / PVS 606 HL |
| FPC 815 | ℉ | PVS 604 HL / PVS 605 HL / PVS 606 HL |
The oven is fitted with electrical wiring plus connectors which allow the connection with one of the vitroceramic hobs shown in the diagram above.
CONNECTION BETWEEN THE HOB AND THE CONTROL PANEL
The connection is the same as that mentioned above.
CCUNIV

INSTALLATION - BUILT-IN
To proceed with the connection, it is necessary to joint male connectors ① and ② of the hob with the "female" connectors ③ of the oven or of the control panel.
1 - INSTALLATION WITH OVEN
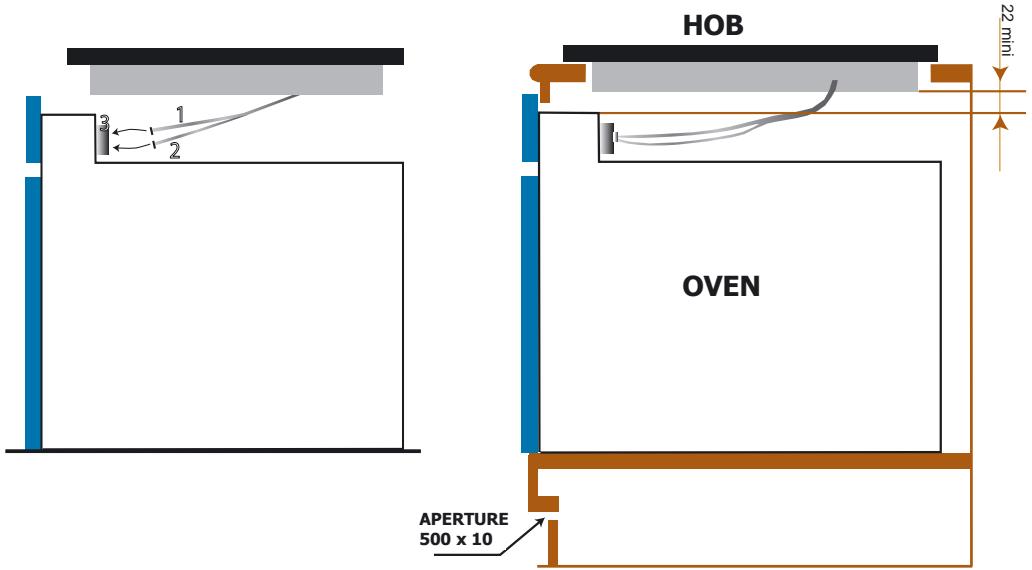
Built-in oven "apertures": Refer to the instruction booklet concerned (serie FPC).
This connection can be made before or after the oven is screwed into place.

2 - INSTALLATION WITH CONTROL PANEL
RECOMMENDATIONS
- The hob is hot when in use. Surface temperatures are high so always be careful when touching the hob. Keep children away.
- Never cook food directly on the glass ceramic hob. Always use the appropriate cookware.
Always place the pan in the centre of the heat zone that you are cooking on.
- Do not use the surface as a cutting board.
- Do not slide saucepans across the hob.
- Do not store heavy items above the hob. If they should fall onto the hob, they may cause damage.
- Do not use the hob as a working surface.
- Do not use the hob for storage of any items.
Aluminium foil and plastic pans must not be placed on heating zones.
- When cooking with fats or oils, never leave the hob unattended. Overheated fats or oils can quickly catch fire.
- In the unlikely event of a surface crack appearing, do not use the hob. Immediately disconnect the hob from the electrical power supply and call the After Sales Service Agent.
At Candy we are constantly striving to improve product quality and as such may modify appliances to incorporate the latest technical improvements.

Glass Ceramic Hobs conform to directives 73/23/CEE and
89/336/CEE.
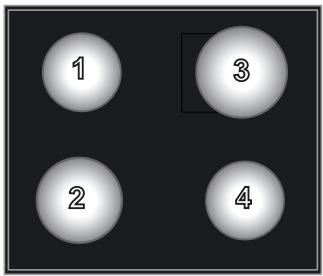
PVS 604 HL

PVS 605 HL

PVS 606 HL
| PVS 604HL | PVS 605HL | PVS 606HL |
| OVERALL DIMENSIONS |
| Width | 58 cm | 58 cm | 58 cm |
| Depth | 51 cm | 51 cm | 51 cm |
| THE HEAT ZONES |
| ① Rear Left | Highlight | Highlight | Highlight |
| 1200 W-Ø140 | 1200 W-Ø140 | 1200 W-Ø140 |
| ② Front left | Highlight | Highlight | Highlight |
| 1800 W - Ø180 | 1800 W - Ø180 | concentric
1000 + 1200 W
Ø140+Ø210 |
| ③ Rear right | Highlight | Highlight | Highlight ex-
tensible oval |
| 2300 W - Ø210 | concentric
1000 + 1200 W
Ø140+Ø210 | 1500 + 900 W
Ø265X170 |
| ④ Front right | Highlight | Highlight | Highlight |
| 1200 W - Ø140 | 1200 W - Ø140 | 1200 W - Ø140 |
| Total power input | 6500 W | 6400 W | 7000 W |
| Supply voltage | 220 - 240V ~ | 220 - 240 V ~ | 220 - 240 V ~ |
THE HIGH LIGHT ZONE
- High light zone : it is regulated by a control knob with 12 heat positions. A metallic conductor strip is uniformly spread over the whole surface of the unit. It is operational within 3 seconds and is suitable for steady, homogeneous and sustained cooking.
HOB COOKWARE ADVICE
Using good quality cookware is critical for getting the best performance from your hob.
- Always use good quality cookware with perfectly flat bases : using this type of cookware will prevent hot spots that may cause foods to stick. Thick metal pots and pans will provide an even distribution of heat.
- Ensure that the base of the pot or pan is dry : when filling pans with liquid or using a pot that has been stored in the refrigerator, ensure that the base of the pan is completely dry before placing it onto the hob. This will help to avoid staining the hob.
- Use pans with a diameter wide enough to completely cover the heat surface : The size of the pan should not be smaller than the heating area. If it is slightly wider the energy will be used at maximum efficiency.
COOKWARE CHOICE
The following information will help you to choose cookware which will give you good performance.
Stainless Steel : highly recommended.
Especially good with a sandwich clad base. This type of saucepan combines the benefits of stainless steel (appearance, durability and stability) with the advantages of aluminium or copper (heat conduction, even heat distribution).
Aluminium : heavy weight recommended.
Good conductivity. Aluminium residues sometimes appear as scratches on the hob, but can be removed if cleaned immediately. Because of its low melting point, thin aluminium should not be used.
Cast Iron : usable, but not recommended. Poor performance. May scratch the surface.
Copper Bottom : heavy weight recommended.
Good performance, but copper may leave residues which can appear as scratches. The residues can be removed, as long as the hob is cleaned immediately. However, do not let these saucepans boil dry. Overheated metal can bond to glass hobs. An overheated copper saucepan will leave a residue that will permanently stain the hob.
Porcelain/enamel : good performance. Only applies to saucepans with a thin smooth flat base.
Glass-ceramic : not recommended. Poor performance. May scratch the surface.
HOW TO OPERATE THE HOB
- Locate the sign corresponding to the cooking zone that you need.
- Turn the control knob to the required cooking setting.
Initially we recommend that the heat zone be set at the highest position until such times as the contents of the saucepan have reached the required temperature, the heat can then be reduced to the required cooking setting.
- The residual heat indicator light is illuminated when the hob surface temperature reaches 60 degrees or above. It will remain on even if the hob is switched off and will only go out when the hob surface has cooled down.
- To switch off the hob, turn the knob to "0".
Warning : The extra large highlight zone, will depending upon the dimensions of the cookware and/or the quantity of food being cooked provide even higher levels of performance. This is largely due to the oval concentric shape of the heat zone.
- The oval heating zone consists of two heating areas, a circular area with a complementary oval shaped section.
Turn the control knob from 1 to 12 to regulate the circular area.
To operate the oval section, simply turn the control knob to position 12 and then select a position from 1 to 12.
- The heating area consists of two concentric zones.
The inner circle is activated when the knob is turned to any of the positions from 1 to 12. The outer ring will only be activated when the control is turned beyond 12 up to a power of 2200 W.
| Positions | Some tips...... |
| 1 - 2 | Very low | To keep a dish hot, melt butter and chocolate... |
| 3 - 4 | Low | Slow cooking, sauscs, stews, rice pudding, poached eggs... |
| 5 - 6 | Moderate | Beans, frozen foods, fruit, boiling water... |
| 7 - 8 | Medium | Steamed apples, fresh vegetables, pasta, crepes, fish... |
| 9 - 10 | High | More intense cooking, omelettes, steaks.... |
| 11 - 12 | Very high | Steaks, chops, frying... |
CLEANING AND MAINTENANCE
- Before cleaning the glass ceramic surface of the hob, make sure it has cooled down.
- Only products, (creams and scrapers) specifically designed for glass ceramic surfaces should be used. They are obtainable from hardware stores.
- Avoid spillages, as anything which falls on to the hob surface will quickly burn and will make cleaning more difficult.
- It is advisable to keep away from the hob all substances which are liable to melt, such as plastic items, sugar, or sugar-based products.
MAINTENANCE :
. Place a few drops of a specialist cleaning product on the hob surface.
. Rub any stubborn stains with a soft cloth or with slightly damp kitchen paper.
. Wipe with a soft cloth or dry kitchen paper until the surface is clean.
Stubborn stains:
. Place a few more drops of specialist cleaning fluid on the hob surface.
. Scrape with a scraper, holding it at an angle of 30^ to the hob, until the stains disappear.
. Wipe with a soft cloth or dry kitchen paper until the surface is clean.
. Repeat the operation if necessary.

A FEW HINTS:
Frequent cleaning leaves a protective layer which is essential for preventing scratches and wear. Make sure that the surface is clean before using the hob again.
To remove marks left by water, use a few drops of white vinegar or lemon juice. Then wipe with absorbent paper and a few drops of specialist cleaning fluid.
The glass ceramic surface will withstand scraping from flat-bottomed cooking vessels, however, it is always better to lift them when moving from one zone to another.
NB:
- do not use a sponge that is too wet.
- never use a knife or a screwdriver.
- a scraper with a razor blade will not damage the surface, as long as it is kept at an angle of 30^ .
- never leave a scraper with a razor blade within reach of children.
- never use abrasive products or scouring powders.
- The trim :
To safely clean the metal trim around the hob wash with soap and water, rinse, then dry with a soft cloth.
PROBLEM SOLVING
Cooking zones that do not maintain a rolling boil or a fast enough frying rate.
-
You must use pans which are absolutely flat. If light is visible between the pan base and a straight edge, the surface unit will not transfer heat properly.
-
Pan bases should closely match the diameter of the heat zone selected.
Foods cooking too slowly.
- Improper cookware being used. Pan bases should be flat, fairly heavy-weight and the same diameter as the heat zone selected.
Tiny scratches (may appear as cracks or abrasions) on the glass surface of the hob.
- Incorrect cleaning methods, cookware with rough bases, or coarse particles (salt or sand) trapped between the cookware and the surface of the hob. Use recommended cleaning procedures, be sure cookware bases are clean before use and use cookware with smooth bases. Tiny scratches are not removable but will become less visible in time as a result of cleaning.
Metal markings (may appear as scratches).
-
Do not slide aluminium cookware across the surface. Use a recommended cleaning procedure to remove marks.
-
If incorrect cleaning materials have been used or spillage or grease stains remain on the surface use a scraper and recommended cleaning product.
Dark streaks or specks.
- Use a scraper and recommended cleaning product.
Areas of discoloration on hob.
- Marks from aluminium and copper pans as well as mineral deposits from water or food can be removed with a cleaning cream.
Hot sugar mixtures / plastic melted to the surface.
See the Glass Hob Cleaning section.
INDICE
PARTE PARA LA INSTALACION
Hay pequeñas rayaduras (queSEOSEOSEOSEOSEOSEOSEOSEOSEOSEOSEOSEOSEOSEOSEOSEOSEOSEOSEOSEOSEOSEOSEOSEOSEOSEOSEOSEOSEOSEOSEOSEOSEOSEOSEOSEOSEOSEOSEOSEOSEOSEOSEOSEOSEOSEOSEOSEOSEOSEOSEOSEOSEOSEOSEOSEOSEOSEOSEOSEOSEOSEOSEOSEOSEOSEOSEOSEOSEOSEOSEOSEOSEOSEOSEOSEOSEOSEOSEOSEOSEOSEOSEOSEOSEOSEOSEOSEOSEOSEOSEOSEOSEOSEOSEOSEOSEOSEOSEOSEO SEOV.