Iridea D2DFA03IRVE - Deep fryer Tognana - Free user manual and instructions
Find the device manual for free Iridea D2DFA03IRVE Tognana in PDF.

| Product type | Oil-free fryer |
| Brand | Tognana |
| Model | Iridea D2DFA03IRVE |
| Capacity | 7 L |
| Power | 1600-1800 W |
| Supply voltage | 220-240 V~, 50-60 Hz, 16 A |
| Dimensions (L x W x H) | 28 x 38 x 31.8 cm |
| Net weight | 5200 g |
| Temperature range | 50 to 200 °C (adjustable in 10 °C increments) |
| Timer | 1 to 60 minutes (adjustable in 1 minute increments) |
| Preset programs | 11 (Fries, Meat, Chicken thighs, Steaks, Pies, Shrimp, Fish, Chicken, Vegetables, Preheat, Cakes) |
| Interior light | Yes (dedicated button) |
| Basket and grid material | Non-stick coating |
| Cleaning of basket and grid | Dishwasher safe (max 55 °C) or with hot water and a non-abrasive sponge |
| Exterior cleaning | Slightly damp soft cloth |
| Safety | Automatic shut-off when basket is removed, overheat protection |
| Included accessories | Cooking grid, cooking basket, user manual |
| Warranty | 2 years (Tognana standard warranty) |
| Use | Household only |
Frequently Asked Questions - Iridea D2DFA03IRVE Tognana
User questions about Iridea D2DFA03IRVE Tognana
0 question about this device. Answer the ones you know or ask your own.
Ask a new question about this device
Download the instructions for your Deep fryer in PDF format for free! Find your manual Iridea D2DFA03IRVE - Tognana and take your electronic device back in hand. On this page are published all the documents necessary for the use of your device. Iridea D2DFA03IRVE by Tognana.
USER MANUAL Iridea D2DFA03IRVE Tognana
natural_image
Red square air fryer with digital display and side door handle (no visible text or symbols)Cod. D2DFA03IRRO - D2DFA03IRRA

natural_image
Exterior view of a modern electric air fryer with digital display (no visible text or symbols)Cod. D2DFA03IRVE - D2DFA03IRVA
natural_image
Plate of shredded yellow food items (no text or symbols visible)Ingredienti
- Patate
500 gr
• Olio
2 cucchiaini
- Sale
a piacere
- Pepe
a piacere
natural_image
Close-up of a golden-brown fried food item with a cut open, placed on parchment paper (no text or symbols visible)Ingredienti
- Alette di pollo
- Aglio
• Olio
- Sale
- Pepe
350 gr
2 spicchi
2 cucchiaini
1 cucchiaino
1 cucchiaino
natural_image
Close-up of a forked steak on a plate with a colorful garnish in the background (no text or symbols visible)Ingredienti
natural_image
Close-up of a plated dish featuring sausages, broccoli, and tomato slices (no text or symbols visible)Ingredienti
• Salsiccia fresca
250 gr
• Olio
1 cucchiaino
natural_image
Close-up of golden fried shrimp on a dark plate, garnished with greenery (no text or symbols visible)Ingredienti
- Gamberi freschi
300 gr
• Olio
1 cucchiaino
- Farina di semola
q.b.
- Sale
q.b.
Thank you for choosing our air fryer designed to cook and heat food for domestic consumption. Tognana Porcellane S.p.A. shall not be held liable for any damage that may be caused directly or indirectly to persons, property or pets as a result of failure to observe all the instructions set out in the operating Manual regarding installation, operation and maintenance of the appliance.
SYMBOLS USED THE MANUAL/ITEM AND THEIR MEANINGS
 | This symbol indicates that the manual must be read carefully before use. Pay special attention to the safety precautions. Keep this manual in a safe place as it is an integral part of the product itself. |
 | HAZARD: this indicates a potential imminent hazard with a high level of risk which, if not prevented, is highly likely to result in severe injury or even loss of life |
 | WARNING: this indicates a potential hazard with a medium level of risk which, if not prevented, is highly likely to result in severe injury or loss of life |
 | CAUTION: this indicates a potential hazard with a low level of risk which, if not prevented, may result in minor or moderate injury. |
 | Class I: this symbol indicates that protection against electric shock does not rely on basic insulation alone but requires additional safety measures. |
 | CAUTION - HOT SURFACE!: This symbol indicates that the surface temperature of the area where the symbol is applied may reach dangerously high values. Therefore, direct contact of the surface with the skin and with heat-sensitive fabrics/materials must be avoided. |
 | IMPORTANT NOTE: this indicates useful information for the correct use of the item. |
 | This symbol on the item or on the packaging indicates that the appliance must be disposed of separately from other waste at the end of its life for proper treatment and recycling purposes. |
 | This symbol indicates that the device complies with the essential safety requirements of European Community regulations/directives. |
 | This symbol indicates that the MOCA (materials and objects intended for contact with food) are suitable for contact with food. |

IMPORTANT NOTES ON CORRECT USE
- This appliance is intended exclusively to heat and cook food for domestic consumption.
- This appliance is intended for domestic use and similar applications, such as:
*staff kitchens of shops, offices, and other work environments;
*agritourisms;
*guests of hotels, pensions, and other residential type environments;
*bed and breakfast type environments.
- This product is not a toy.
- Do not leave parts of the packaging (plastic bags, polystyrene foam, etc.) within reach of children or non-self-sufficient persons, as these objects are potential sources of danger (e.g. risk of suffocation).
- Use the product for the sole purpose for which it has been designed. The manufacturer is not liable for damage or injury caused by improper use.
- Unauthorised repairs or changes shall void the warranty.
- Do not use outdoors.
- Never leave the appliance on unattended.
- Do not position it above or near hot gas or electric burners, or in a heated oven.
- Before use, place the appliance on a solid, flat, horizontal and non-flammable surface.
- To manually turn the appliance off, press the off button.
- Never put the appliance in the dishwasher.
- Do not immerse the appliance in water or rinse it under running water as it contains electronic components and heating elements.
- Use only original accessories and spare parts, or those recommended by the manufacturer.

HAZARD
ITEM
- Before connecting the fryer to the power, check that the voltage shown on the appliance corresponds to your household voltage.
- Connect the appliance to an earthed power socket. The manufacturer shall not be held liable for any accidents resulting from the electrical
installation not being earthed.
-
The appliance can be used by children at least 8 years of age and by persons with reduced physical, sensory or mental capabilities, or lacking experience or the necessary knowledge, provided they are supervised or have received instructions on how to safely use the appliance and understand the inherent dangers. Children must not play with the appliance. Cleaning and maintenance tasks intended to be carried out by the user must not be carried out by unsupervised children.
-
Supervise children in order that they do not play with the appliance.
-
Do not insert metal objects into the slots of the appliance.
-
Do not cover the air intake and vent when the product is being used or is connected to the power socket.
-
Do not position the product against the wall or other objects: the clearance from the rear, middle and upper sides of the product must be at least 10 cm. Do not lay objects on top of the product.
-
Do not add oil to the fryer as this may cause a fire hazard.
-
To avoid short circuits, do not insert bulky foods that might touch the heating elements or are wrapped in aluminium, or metal utensils.
-
Disconnect the appliance from the power socket when it is moved and not in use.
-
Leave the appliance to cool for about 30 minutes before cleaning.
-
Remove any burnt food residue.
-
Improper use of the product may cause damage or injury.
-
To avoid electric shocks, do not submerge the body of the product in water or other liquids.
-
This appliance does not contain repairable parts. Do not try to repair it by yourself. Arrange for maintenance to be performed by a qualified service centre using only identical spare parts. This will ensure the continued safety of the product.
-
Do not use the appliance in very hot, humid or wet environments, or near inflammable materials (curtains, tablecloths, etc.).
-
Do not use if the appliance has been dropped or damaged in any way. Do not attempt to repair it yourself. Contact the retailer for repair/replacement, if under warranty, or call customer support.
-
If the product gives off black smoke, disconnect the power supply immediately. Wait for the product to stop giving off smoke before removing the basket from the fryer.
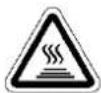
BURN HAZARD!
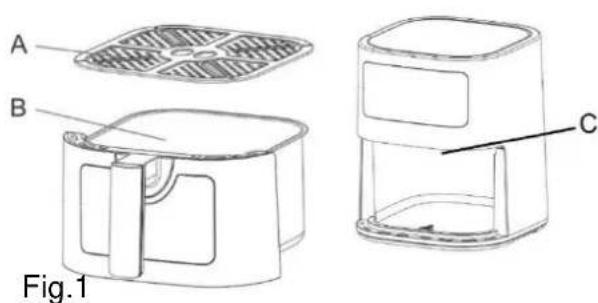
- Do not touch the hot parts of the appliance to avoid burns (see A, B and C of Fig.1). Use handles, tongs or suitable protective devices to remove food from the basket.
-
This appliance can release heat, steam, or condensate during and after operation. The hands and face must be kept at a safe distance from the steam and air vents. Beware of hot steam and heat when removing the basket from the product to prevent the risk of burns, scalds or other injuries and damage to property.
-
When the appliance is in use and for a few minutes after the end of cooking, the temperature of the outer surface and air vent may be very high. Do not touch and do not move the appliance to avoid the risk of burns.
-
Appropriately sized baking paper or aluminium/tin foil can be used for the air fryer. Do not use excessively large sheets that touch the heating elements when in use.
PLUG AND CORD
-
The power cord must be connected to an AC power outlet (standard household current). Do not use other power outlets.
-
In case of incompatibility between the socket and plug of the appliance, have the socket replaced with a suitable type by qualified personnel. The use of adapters, power strips and/or extension cords is not recommended. Should their use become necessary, use only simple or multiple adaptors and extension cords that comply with current safety standards, taking care not to exceed the power limit marked on the adapter and/or extension cord.
-
Do not use the power cord if damaged.
-
Use only the power cord included in the packaging.
-
To avoid electric shocks, do not submerge the power cord complete with the base in water or other liquids.
-
The power cord must be used in a dry and clean place. Use of the appliance in wet or dirty environments may give rise to the risk of fire,
electric shocks or electrocution.
- Do not touch the power cord or plug with wet hands.
- Do not let the cord hang over the counter.
- Be careful not to pull or trip on the power cord. Keep the cord far from sources of heat, hot objects and open flames.
- Disconnect the cord from the mains before cleaning and when it is not in use. To disconnect the appliance, turn it off and then remove the plug from the wall socket. Do not pull on the cord, but rather grab the plug.
- Always connect the plug to the appliance first, then connect the cord to the wall socket. Check that the cord is fully unwound.
- The cord must not be twisted or wrapped around the appliance.
- Do not use the appliance if the power cord is damaged. Do not attempt to repair it yourself. Contact the retailer for repair/replacement, if under warranty, or call customer support.
- Do not use extension cords, power strips or timer devices.
PRODUCT CONFORMITY
The manufacturer Tognana Porcellane S.p.A. declares that the product Air Fryer 7L Mod. Iridea complies with Directive 2014/30/EU of the European Parliament and of the Council, of 26th February 2014, on the harmonisation of the laws of the Member States relating to electromagnetic compatibility.
The manufacturer Tognana Porcellane S.p.A. declares that the product Air Fryer 7L Mod. Iridea complies with Directive 2014/35/EU of the European Parliament and of the Council, of 26th February 2014, on the harmonisation of the laws of the Member States relating to the making available on the market of electrical equipment designed for use within certain voltage limits.
The manufacturer Tognana Porcellane S.p.A. declares that the product Air Fryer 7L Mod. Iridea Directive 2009/125/EC of the European Parliament and of the Council, of 21st October 2009, on establishing a framework for the setting of ecodesign requirements for energy related products
The manufacturer Tognana Porcellane S.p.A. declares that the product Air Fryer 7L Mod. Iridea complies with Directive 2011/65/EU of the Parliament and of the Council, of 8th June 2011 and subsequent Commission Delegated Directive 2015/863, on the restriction of the use of certain hazardous substances in electrical and electronic equipment.
TECHNICAL DATA
• Power: 1600-1800W
- Capacity: 7L
- Input voltage: 220-240Vac \~ 50-60Hz; 16A
• Dimensions: 28 x 38 x 31.8 cm
- Net weight: 5200 g
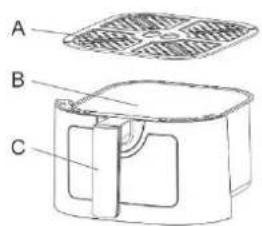
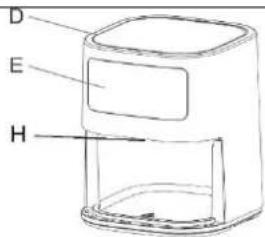
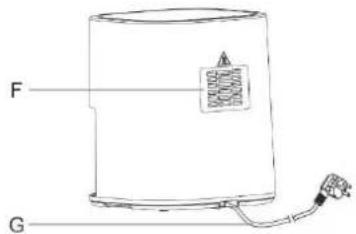
A: Cooking grate
B: Cooking basket
C: Basket handle
D: Air intake
E: Control panel
F: Air vent
G: Power cord
H: Heating element
BEFORE FIRST USE
-
Extract the various components from the packaging, check that they are intact and complete, gently remove any protections and labels. The packaging includes:
-
No. 1 Air fryer
• No. 1 Cooking grate
• No. 1 User Manual -
Check that all the parts are properly assembled and in position before use.
-
If the air fryer is being used for the first time, it is recommended to wash all removable parts that will come into contact with foodstuffs, following the instructions in the section, "CLEANING AND MAINTENANCE".
-
Operate the appliance at 200 °C without food for 10 - 15 minutes. The appliance may give off smoke and odours due to residue from the manufacturing process. This is normal and is not an indication of a defect or hazard.
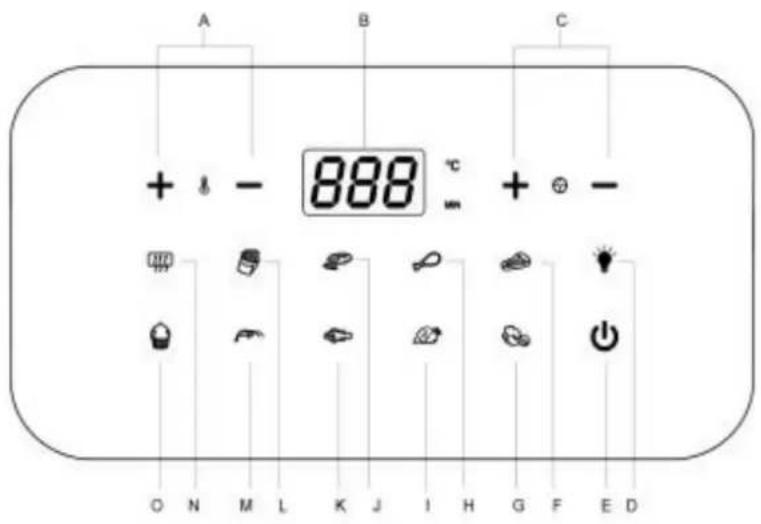
DESCRIPTION OF DISPLAY KEYS

A. Temperature adjustment (+/-)
B. Time/Temperature display
C. Time adjustment (+/-)
D. Internal light key
E. On/Off/Start/Stop key
F. "Steaks" program
G. "Vegetables" program
H. "Chicken legs" program
I. "Chicken" program
J. "Meat" program
K. "Fish" program
L. "Fries" program
M. "Prawns" program
N. Pre-heating
O. "Cakes" program
INSTRUCTIONS FOR USE
- Place the appliance on a flat, stable, heat-resistant and dry surface.
- Insert the power plug in an earthed wall socket, an acoustic signal will be heard, the display will light up for 1 second then return to STANDBY mode: all the lights will turn off except the "ON/OFF KEY"
- Remove the basket and insert the ingredients in the cooking grate.
- Fit the basket properly in its compartment.
- Press the ON key Ⓐ, the display will show the temperature and time of the pre-set program, which are respectively 180°C and 15 min.
- The time and temperature can now be manually adjusted using the Time adjustment +/- (C) and Temperature adjustment +/- (A) keys, or by selecting one of the menu functions.
- Press the START key to start cooking.
- During cooking, the "Internal light key" can be pressed for internal lighting. Pressing the key again will turn the light off.
- At the end of cooking. The appliance will turn off.
NOTES:
- Each function has its own pre-set time and temperature (as indicated in the “pre-set menu” table). The time and temperature can be freely adjusted using the “Time Adjustment +/-” (C) and “Temperature Adjustment +/-” (A) keys respectively.
- The temperature adjustment range is between 50 and 200°C inclusive. Pressing the “Temperature Adjustment +/-” key increases or decreases the temperature by 10°C. Once 200°C is reached, pressing the “+” key once will set the temperature back to 50°C, pressing the “-” key again will set the temperature back to 200°C. During temperature adjustment, the temperature blinks on the display (it does not blink during operation) and after 3 blinks, the temperature is confirmed.
- The time adjustment range is between 1 and 60 minutes inclusive. Pressing the "Time Adjustment +/-" key increases or decreases the time by 1 minute. Once 60 minutes is reached, pressing the "+" will set the time back to 1 minute, pressing the "-" key again will set the time back to 60 minutes. During time adjustment, the time blinks on the display (it does not blink during operation) and after 3 blinks, the time is confirmed.
- If cooking needs to be interrupted during operation, press the ⏻ key; an acoustic signal will be heard, the appliance will stop working and the ⏻ icon will stop blinking.
- If the appliance needs to be turned off during operation, press the ⏻ key; an acoustic signal will be heard, the appliance will stop working and return to standby mode.
- The appliance automatically turns off when the cooking basket is removed from the main unit. Once the basket is placed back in the main unit, the appliance turns on again and continues cooking.
- While in use, the appliance may produce steam. This is normal and is not an indication of a defect or hazard.
- At the end of cooking, the motor continues to run for 1 more minute, then the appliance starts cooling and enters standby mode.
HELPFUL TIPS:
• Always heat the appliance for 3-5 minutes before starting the cooking process.
- The cooking time and temperature can be adjusted at any time during use: in this case, the cooking cycle will restart from the beginning.
- It may be necessary to check and shake certain foods halfway through the cooking time. Shaking small-sized foods improves the end result and avoids uneven cooking. Remove the basket from the main unit and shake it slightly. Place the basket back in the main unit to continue cooking.

CAUTION: The basket may be very hot. Always hold the basket ts handle.
- Cooking times in the air fryer are different to those of a normal oven.
- Smaller and smaller quantities of food require only slightly less preparation time compared to larger foods.
- For best results, we recommend using pre-cooked fries (the ideal quantity is 500 g). To prepare homemade fries, follow the instructions in the recipe book.
- Do not prepare very fatty foods in the appliance.
• To bake a cake/quiche or fry delicate or filled foods, place a baking tray or baking dish in the container. - If the ingredients are not cooked, simply place the basket back in the appliance and cook for another minute
- The appliance can also be used to heat food. Set the appliance to 150^ C for no longer than 10 minutes and regularly check to make sure the food does not burn.
PRE-SET MENU TABLE
| Menu | Set time (min) | Set temperature (°C) | ||
| Functions |  | Pre-heating | 3 | 180 |
 | Fries | 18 | 200 | |
 | Meat | 12 | 200 | |
 | Chicken legs | 20 | 200 | |
 | Steaks | 12 | 180 | |
 | Cakes | 25 | 160 | |
 | Prawns | 8 | 180 | |
 | Fish | 10 | 180 | |
 | Chicken | 30 | 200 | |
 | Vegetables | 10 | 160 | |
The “pre-set menu” table is indicative; the cooking time and temperature depend on the type of food and its consistency. Therefore, the pre-set values are for reference only.
COOKING TIPS
| Food | Cooking time (min) | Temperature °C | Shake | Notes |
| Potatoes and fried food | ||||
| Thin frozen fries | 12-16 | 200 | Shake every 6 minutes | |
| Thick frozen fries | 12-20 | 200 | Shake every 6 minutes | |
| Homemade fries (8x8 mm) | 18-25 | 180 | Shake every 6 minutes | Add 12 tablespoon of oil |
| Homemade potato wedges | 18-22 | 180 | Shake every 6 minutes | Add 12 tablespoon of oil |
| Homemade diced potatoesPotatoes au gratin | 12-1818-22 | 200180 | Shake every 6 minutes | Add 12 tablespoon of oil |
| Meat and poultry | ||||
| Steak | 8-12 | 180 | ||
| Pork chops | 10-14 | 180 | ||
| Hamburgers | 7-14 | 180 | ||
| Sticks | 18-22 | 180 | ||
| Chicken breast | 10-15 | 180 | ||
| Snacks | ||||
| Spring rolls | 8-10 | 200 | Shake every 6 minutes | Oven pre-heated |
| Frozen chicken nuggets | 6-10 | 200 | Shake every 6 minutes | Oven pre-heated |
| Frozen fish fingers | 6-10 | 200 | Oven pre-heated | |
| Frozen cheese snacks | 10 | 200 | Oven pre-heated | |
| Stuffed vegetables | 20 | 160 | Oven pre-heated | |
| Cakes | ||||
| Cakes | 20-25 | 160 | ||
Notes:
- Add 3 minutes of preparation time before starting to fry if the appliance is cold.
- Add maximum 12 tablespoon of oil. Larger quantities may compromise the integrity of the appliance.
CLEANING AND MAINTENANCE
Before cleaning, always disconnect the air fryer from the power socket and leave it to completely cool.
Remove the cooking basket to allow more rapid cooling of the appliance.
The appliance must be cleaned after each use.
1. CLEANING
Cleaning the outside of the fryer
Clean the outside of the fryer with a soft cloth or slightly dampened sponge and dry with a cloth.

HAZARD! DO NOT PLACE IN THE DISHWASHER OR IMMERSE IN JIDS.
Cleaning the basket and cooking grate
Clean the inside of the basket and the grate with warm water and a non-abrasive sponge. Otherwise, the non-stick coating will be damaged.
The grate and basket are dishwasher-safe at a temperature of maximum 55°C.
Cleaning the heating element
Clean with a brush to remove any food residue.
2. STORAGE
Leave the appliance to fully cool before stowing it or winding the power cord.
Check that all food residue has been removed from inside the appliance.
Check that all the parts are clean and dry before putting them away.
Never stow the appliance while it is still wet.
It is recommended to store the appliance in a dry, clean place far from moisture and dust.
| Problem | Possible cause | Solution |
| The appliance is not working. | The plug is not inserted | Insert the plug in the power socket |
| The cooking basket is not inserted | Insert the cooking basket correctly | |
| The cooking time and temperature have not been selected | Set the desired cooking time and temperature | |
| The overheating protection has tripped | Turn the appliance off and wait for it to fully cool before turning it on again. | |
| The food is not well cooked. | There is an excessive amount of food. | Reduce the amount of food. |
| The set temperature is too low. | Set a higher temperature. | |
| The set cooking time is too short. | Set a longer cooking time. | |
| The food is not evenly cooked. | The food needs to be shaken halfway through cooking. | Shake the food and check the doneness. |
| The snacks are not crispy. | Snacks intended for cooking in an oil fryer have been used. | Use oven snacks or brush some oil over the snacks. |
| The cooking basket does not fit properly in the main unit. | Too much food in the basket. | Do not overfill the container. |
| White smoke is emitted and the outside of the appliance is hotter than usual. | Fatty food is being cooked. | This is a normal phenomenon that does not affect the appliance or the cooking result. |
| The cooking basket contains fat residue from previous cooking. | Clean the basket after each use. | |
| The fresh potatoes are unevenly cooked or are not crispy. | The potato sticks were not properly rinsed and dried before cooking. | Rinse the potato sticks well to remove any starch and dry them well. |
| The potato sticks are too big. | Cut the sticks into smaller pieces. | |
| Not enough oil. | Add some oil. | |
| The problem is not solved. | Contact your retailer or customer support. |
RECIPE BOOK
1. Fries with fresh potatoes

natural_image
Plate of shredded yellow food items (no text or symbols visible)Ingredients
- Potatoes 500 g
- Oil 2 teaspoons
- Salt as desired
- Pepper as desired
a. Peel the potatoes and cut them into sticks.
b. Immerse the potato sticks in salted water for at least 20 minutes and boil for 2 minutes, then dry the strips with paper towel.
c. Pour 1/2 tablespoon of olive oil into a bowl, insert the sticks and mix until they are covered in oil.
d. Pre-heat the fryer to 200^ C for 3 minutes.
e. Take the sticks out of the bowl with your fingers or a kitchen utensil so that the excess oil remains in the bowl.
f. Evenly arrange the potato sticks on the grate inside the basket, insert the basket in the appliance and set the "fries" program or set the time and temperature depending on the size and number of potato sticks, or until they turn golden brown.
g. At the end of cooking, place the potato sticks in a bowl, season with salt and pepper as desired and serve.
TIP: for better results, shake the basket with the potato sticks halfway through cooking.
2. Fried chicken wings
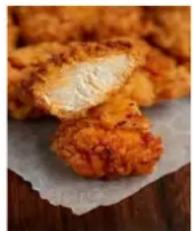
natural_image
Close-up of a fried food item with a cut open, placed on parchment paper (no visible text or symbols)Ingredients
- Chicken wings 350 g
- Garlic 2 cloves
- Oil 2 teaspoons
- Salt 1 teaspoon
- Pepper 1 teaspoon
a. Pre-heat the fryer to 200^ C for 3 minutes.
b. Mix the chicken wings with the oil, garlic, salt and pepper and leave to marinate for 20 minutes.
c. Evenly arrange the chicken wings on the grate inside the cooking basket, insert the basket in the appliance and set the “Chicken legs” program or set the time and temperature depending on the size and number of chicken wings, or until they turn golden brown.
d. At the end of cooking, place the chicken wings in a bowl and serve.
TIP: for better results, shake the basket with the chicken wings halfway through cooking.
3. Beef steak

natural_image
Steamed steak being cut with fork, garnished with fresh fruit (no text or symbols visible)Ingredients
- Beef steak 350 g
• Garlic powder 1 teaspoon - Oil 2 teaspoons
- Salt 1/2 teaspoon
- Pepper 1 teaspoon
- Soy sauce As desired
a. Pre-heat the fryer to 200^ C for 5 minutes.
b. Mix the steak with the oil, garlic, soy sauce, salt and pepper and leave to marinate for 20 minutes.
c. Place the steak on the grate inside the basket, insert the basket in the appliance and set the "Meat" program or set the time and temperature depending on the size and number of steaks, or until they turn golden brown.
d. Halfway through cooking, turn the steak, reduce the temperature to 150 °C and cook for another 10 minutes or until golden brown.
TIP: for better results, turn the steak halfway through cooking.
4. Grilled sausage

natural_image
Close-up of a plated dish featuring sausages with garnishes including broccoli, tomato, and lettuce (no visible text or symbols)Ingredients
- Fresh sausage
250 g
• Oil
1 teaspoon
a. Pre-heat the fryer to 200°C for 3 minutes.
b. Mix the sausages with the oil.
c. Evenly arrange the sausages on the grate inside the basket, insert the basket in the appliance and set the "Meat" program or set the time and temperature depending on the size and number of sausages, or until they turn golden brown.
d. At the end of cooking, place the sausages in a bowl and serve.
TIP: for better results, shake the basket with the sausages halfway through cooking.
5. Fried prawns

natural_image
Close-up of golden fried shrimp on a black plate, garnished with blurred greenery (no text or symbols visible)Ingredients
- Fresh prawns
300 g
• Oil
1 teaspoon
- Semolina flour
t.t.
- Salt
t.t.
a. Clean the prawns, wash and dry them well with paper towel.
b. Take a bowl and place the prawns inside.
c. Season with a little oil and bread them with the semolina flour.
d. Pre-heat the fryer to 200°C for 3 minutes.
e. Spray some oil on the prawns.
f. Evenly arrange the prawns on the grate inside the basket, insert the basket in the appliance and set the "Prawns" program or set the time and temperature depending on the size and number of prawns, or until they turn golden brown.
g. At the end of cooking, place the prawns in a bowl and serve.
TIP: for better results, shake the basket with the prawns halfway through cooking.
PRODUCT DISPOSAL INFORMATION

Pursuant to Art. 26 of Legislative Decree No. 49 of 14 March 2014 “Implementation of Directive 2012/19/EU on waste electrical and electronic equipment (WEEE)”, the crossed-out bin symbol indicates that this appliance is not to be considered municipal waste. Disposing of it must therefore be carried out by separate waste collection. Failure to dispose of the appliance as separate waste may constitute a potential hazard to the environment and human health. Said
product can be returned to the distributor upon purchase of new appliance. Improper disposal of the appliance constitutes fraudulent conduct and is subject to sanctions by the Police Authority. For further information, contact the local administration responsible for environmental management.
PACKAGING
For information on how to correctly dispose of the packaging used to protect this product and its parts and/or accessories, follow the instructions in the packaging.
"TOGNANA" SMALL APPLIANCES WARRANTY
The Company Tognana Porcellane S.p.A. thanks its Customers for their choice and guarantees that its appliances are the result of the latest technologies and research.
This warranty applies only to small appliances marked with the "Tognana" brand and is valid as a conventional warranty pursuant to Article 135-quinquies of the Italian Consumer Code (Legislative Decree 206 of 6 September 2005). This warranty does not in any way affect the rights expressly provided for in favour of the consumer by the regulations on the sale of consumer movable goods, whether Italian or of the consumer's country of residence: the consumer can therefore always assert his rights against the retailer from which he purchased the appliance, under the conditions and within the terms provided for by these regulations.
Under this warranty, the appliance is covered by the conventional warranty for a period of two years from the date of purchase by the first user.
It is up to the consumer - through a delivery document issued by the retailer (or by Tognana Porcellane S.p.A. itself, in the case of a purchase made by the consumer directly in the online shop of the latter) or by another evidentiary document (for example, tax receipt, cash receipt or similar, purchase order, etc.), which shows the name of the retailer and the date on which the sale was made - to demonstrate that this warranty is still valid at the time of filing the complaint of defect of the appliance.
In the event of a defect in the appliance, pursuant to this warranty, the consumer may highlight this defect by contacting the appliance dealer or by contacting Tognana Porcellane S.p.A. directly at the e-mail address support@tognana.com, or at the telephone number +39 0422 6721.
Tognana Porcellane S.p.A. guarantees the free repair or replacement of the appliance and/or its components that have defects due to ascertained causes of manufacture and/or malfunctions, directly or through affiliated service centres (check any contacts on the Tognana Porcellane S.p.A. website: www.tognana.com). Tognana Porcellane S.p.A. reserves the right to completely replace the appliance, if repairability is impossible or too expensive, with another identical or similar appliance (or one that has functional and aesthetic characteristics similar to those of the purchased appliance), without the consumer being able, in this second hypothesis, to contest the choice made by Tognana Porcellane S.p.A.
The consumer, in the presentation of the complaint, in addition to specifying the defect found, also providing photographic documentation, if indispensable for the purpose of ascertaining the defect of the appliance, must communicate their personal data - name and surname, residence address, email and telephone number - for each subsequent contact. For the successful replacement or repair of the appliance, the consumer will in any case be required to follow the instructions provided in this regard by the employees of Tognana Porcellane S.p.A. or the service centre in charge.
All costs of repair and delivery of the replacement appliance or defect-free components will be entirely borne by Tognana Porcellane S.p.A., which will also bear the costs of returning the defective appliance or component, if expressly requested by the consumer.
It should be noted that, following the replacement or repair of the appliance, the effective date of this warranty remains that of the first purchase: therefore, the service performed under the warranty does not extend the period of its validity.
For the purposes of the effectiveness of this warranty, it is specified that: the appliance has been designed and built for exclusively domestic use, consequently terminating this warranty for any other different use. In addition, the appliance can never be considered defective if it has to be adapted or modified to comply with national or local safety and/or technical standards, in force in the consumer's country, if outside the European Union.
In any case, this warranty does not cover:
- parts subject to wear and tear, nor those that require periodic replacement and/or maintenance;
- negligence or carelessness in the use of the appliance (e.g. failure to comply with the operating instructions of the appliance);
- professional use of the appliance;
- defects due to incorrect installation, configuration, updating of software/BIOS/firmware not performed by authorized personnel Tognana Porcellane S.p.A;
- repairs or interventions carried out by personnel not authorised by Tognana Porcellane S.p.A.;
- manipulations of components of the appliance or, where applicable, of the software;
- other circumstances that, in any case, cannot be traced back to manufacturing defects in the appliance.
Tognana Porcellane S.p.A. declines all responsibility for any damage that may, directly or indirectly, result to people, property and pets as a result of failure to comply with all the requirements indicated in the specific instruction booklet and concerning especially the warnings regarding installation, use and maintenance of the device.
Further claims, in particular if they relate to claims, are excluded, unless the liability arises from express provision of law. At the end of the period of validity of this warranty, or for goods that are not covered by it, Tognana
Porcellane S.p.A. remains available to the customer for any questions or information. Further information is available on the website: www.tognana.com.
Cher Client,
CONFORMITÉ DU PRODUIT
natural_image
Plate of shredded yellow food items (no text or symbols visible)Ingrédients
natural_image
Close-up of golden-brown fried food items on a white parchment paper (no text or symbols visible)Ingrédients
natural_image
Close-up of a forked steak on a plate with a fork and garnish in the background (no visible text or symbols)Ingrédients
natural_image
Close-up of a plated dish featuring fried meat garnished with broccoli and lettuce (no text or symbols visible)Ingrédients
- Saucisse fraîche
250 gr
- Huile
1 cuillère à café
natural_image
Close-up of golden fried shrimp on a black plate, garnished with blurred greenery (no text or symbols visible)Ingrédients
CONFORMIDAD DEL PRODUCTO
natural_image
Plate of shredded yellow food items (no text or symbols visible)Ingredientes
- Patatas
500 gr
- Aceite
2 cucharaditas
- Sal
al gusto
- Pimienta
al gusto
natural_image
Close-up of a golden-brown fried food item with a cut section, placed on parchment paper (no text or symbols visible)Ingredientes
natural_image
Steamed pork dish on a white plate with fork and colorful toppings in the background (no visible text or symbols)Ingredientes
natural_image
Close-up of a plated dish featuring fried meatballs garnished with broccoli and lettuce (no text or symbols visible)Ingredientes
- Salchicha fresca
250 gr
- Aceite
1 cucharadita
a. Precalentar la freidora a 200°C durante 3 minutos.
natural_image
Close-up of golden fried shrimp on a black plate, garnished with greenery (no text or symbols visible)Ingredientes
- Gambas frescas
300 gr
- Aceite
1 cucharadita
- Harina de sémola
al gusto
• Sal
al gusto
natural_image
Close-up of shredded yellow food items on a white plate (no text or symbols visible)Zutaten
natural_image
Close-up of a fried food item with a cut open, placed on parchment paper (no visible text or symbols)Zutaten
natural_image
Steamed pork cut on a plate with fork and colorful toppings in background (no text or symbols visible)Zutaten
natural_image
Close-up of a plated dish featuring fried meatballs garnished with broccoli and lettuce (no text or symbols visible)Zutaten
natural_image
Close-up of golden fried shrimp on a black plate, garnished with blurred greenery (no text or symbols visible)Zutaten
A. Podešavanje temperature (+/-)
B. Prikaz vremena/temperature
C. Podešavanje vremena (+/-)
D. Tipka za unutarnje svjetlo
E. Tipka za uključivanje/isključivanje/ Tipka Start/Stop
F. Program "Odresci"
G. Program "Povrće"
H. Program "Pileći bataci"
I. Program "Piletina"
J. Program "Meso"
K. Program "Riba"
L. Program "Pomfrit"
M. Program "Škampi"
N. Predgrijavanje
O. Program "Kolači"
natural_image
Close-up of shredded yellow food items on a white plate (no text or symbols visible)Sastojci
• Krumpir 500 gr
• Ulje 2 žličice
• Sol po želji
• Papar po želji
a. Krumpir ogulite i narežite na štapiće.
b. Krumpirove štapiće namačite u slanoj vodi najmanje 20 minuta i kuhajte 2 minute, a zatim trakice osušite kuhinjskim papirom.
c. Ulijte 1/2 žlice maslinovog ulja u zdjelu, ulijte štapiće i miješajte dok se ne prekriju uljem.
d. Zagrijte fritezu na 200 °C 3 minute.
natural_image
Close-up of a golden-brown fried food item with a cut section, possibly a pastry or pastry (no visible text or symbols)Sastojci
• Pileća krilca 350 gr
- Češnjak 2 češnja
• Ulije 2 žličice
• Sol 1 žličica
• Papar 1 žličica
a. Zagrijte fritezu na 200 °C 3 minute.
b. Krilca pomiješajte s uljem, češnjakom, soli i paprom i ostavite da se mariniraju 20 minuta.
natural_image
Close-up of a fork lifting a golden-brown fried dish, with a red sauce bowl and green vegetables in the background (no text or symbols visible)Sastojci
• Govedi odrezak 350 gr
- Češnjak u prahu 1 žličica
• Ulje 2 žličice
• Sol 1/2 žličice
• Papar 1 zlicica
• Umak od soje Po želji
a. Zagrijte fritezu na 200 °C 5 minute.
b. Odrezak pomiješajte s uljem, češnjakom, soja umakom, soli i paprom i ostavite da se marinira 20 minuta.
c. Odrezak stavite na rešetku u košaricu, ubacite košaricu u uređaj i postavite program "Meso" ili postavite vrijeme i temperaturu prema veličini i količini odrezaka ili dok ne porumene.
d. Na pola pečenja biftek okrenite, smanjite temperaturu na 150 °C i pecite još 10 minuta ili dok ne porumeni.
SAVJET: Za najbolje rezultate okrenite odrezak na pola vremena pečenja.
4. Kobasica na žaru

natural_image
Close-up of a plated dish featuring braised meatballs garnished with broccoli and lettuce (no text or symbols visible)Sastojci
- Svježa kobasica
250 gr
• Ulje
1 žličica
a. Zagrijte fritezu na 200 °C 3 minute.
natural_image
Close-up of golden fried shrimp on a black plate, garnished with blurred greenery (no text or symbols visible)Sastojci
- Svježi škampi
300 gr
• Ulje
1 žličica
- Brašno od krupice
po želji
- Sol
po želji
a. Škampe očistite, operite i dobro osušite papirnatim ručnicima.
b. Uzmite posudu i u nju uspite kozice.
c. Začinite s malo ulja i obložite ih brašnom od krupice.
d. Zagrijte fritezu na 200 °C 3 minute.
POMEMBNA OBVESTILA ZA PRAVILNO UPORABO
natural_image
Plate of shredded yellow food items (no text or symbols visible)Sestavine
• Krompir 500 g
• Olje 2 žlički
• Sol po želji
- Poper po želji
natural_image
Close-up of a golden-brown fried food item with a cut section, placed on parchment paper (no text or symbols visible)Sestavine
- Piščančje 350 g perutničke 2 česna
- Česen 2 žlički
- Olje 1 žlička
• Sol 1 žlička - Poper
a. Cvrtnik 3 minute segrevajte na 200 °C.
b. Perutničke pomešajte z oljem, česnom, soljo in poprom ter pustite, da se marinirajo 20 minut.
c. V košari za peko piščančje perutničke enakomerno razporedite na rešetko znotraj košare, postavite košaro v aparat in nastavite program "Piščančja bedra" ali nastavite čas i temperaturo glede na velikost in količino perutničk. Perutničke morajo biti zlatorjave barve.
d. Po koncu peke perutničke prestavite v skledo in postrezite.
NASVET: Za najboljše rezultate na polovici kuhanja pretresite košaro s perutničkami.
3. Goveji zrezek

natural_image
Close-up of a gr� with fork lifting one piece, garnished with fresh fruit (no text or symbols visible)Sestavine
• Goveji zrezek 350 g
- Česen v prahu 1 žlička
- Olje 2 žlički
• Sol 1/2 žličke
- Poper 1 žlička
- Sojina omaka po želji
a. Cvrtnik 5 minute segrevajte na 200 °C.
b. Zrezek pomešajte z oljem, česnom, sojino omako, soljo in poprom ter pustite, da se marinira 20 minut.
c. Zrezek postavite na rešetko v košaro, vstavite košaro v aparat in nastavite program "Meso" ali nastavite čas in temperaturo glede na velikost in količino zrezkov ali dokler ne dobijo zlatorjave barve.
d. Na polovici pečenja obrnemo zrezek, znižamo temperaturo na 150 °C in pečemo še 10 minut ali dokler zrezek ne dobi zlatorjave barve.
natural_image
Close-up of a plated dish featuring fried meat garnished with broccoli and lettuce (no visible text or symbols)Sestavine
- Sveža klobasa
250 g
• Olje
1 žlička
a. Cvrtnik 3 minute segrevajte na 200 °C.
b. Klobase pomešajte z oljem.
c. Klobase enakomerno razporedite na rešetko v košari, postavite košaro v aparat in nastavite program "Meso" ali nastavite čas in temperaturo glede na velikost in količino klobas ali dokler klobase ne dobijo zlatorjave barve.
d. Po koncu peke klobase prestavite v skledo in postrezite.
NASVET: Za najboljše rezultate na polovici kuhanja pretresite košaro s perutničkami.
5. Ocvrte kozice

natural_image
Close-up of golden fried shrimp on a black plate, garnished with greenery (no text or symbols visible)Sestavine
- Sveže kozice
300 g
• Olje
1 žlička
- Zdrob
po želji
- Sol
po želji
a. Kozice očistite, operite in jih dobro posušite s papirnatimi brisačami.
b. Vzemite posodo in vanjo razporedite kozice.
A. Podešavanje temperature (+/-)
B. Prikaz vremena/temperature
C. Podešavanje vremena (+/-)
D. Dugme za unutrašnje svjetlo
E. Dugme za uključivanje/isključivanje/ Dugme Start/Stop
F. Program "Odresci"
G. Program "Povrće"
H. Program "Pileći bataci"
I. Program "Piletina"
J. Program "Meso"
K. Program "Riba"
L. Program "Pomfrit"
M. Program "Škampi"
N. Predgrijavanje
O. Program "Kolači"
UPUTSTVA ZA UPOTREBU
natural_image
Close-up of shredded yellow food items on a white plate (no text or symbols visible)Sastojci
• Krompir 500 gr
• Ulje 2 kašike
• Sol po želji
• Papar po želji
a. Krompir ogulite i narežite na štapiće.
natural_image
Close-up of a golden-brown fried food item with a cut section, possibly a pastry or pastry (no visible text or symbols)Sastojci
• Pileća krilca 350 gr
- Češnjak 2 češnja
• Ulje 2 kašike
• Sol 1 kašika
• Papar 1 kašika
a. Zagrijte fritezu na 200 °C 3 minuta.
b. Krilca pomiješajte s uljem, češnjakom, soli i paprom i ostavite da se mariniraju 20 minuta.
natural_image
Steamed steak on a plate with fork and fruit cup in background (no text or symbols)Sastojci
• Goveđi odrezak 350 gr
- Češnjak u prahu 1 kašika
• Ulje 2 kašike
• Sol 1/2 kašike
• Papar 1 kašika
- Soja sos po želji
a. Zagrijte fritezu na 200 °C 5 minuta.
b. Odrezak pomiješajte s uljem, češnjakom, soja sosom, soli i paprom i ostavite da se marinira 20 minuta.
c. Odrezak stavite na rešetku u košaricu, ubacite košaricu u uređaj i postavite program "Meso" ili postavite vrijeme i temperaturu prema veličini i količini odrezaka ili dok ne porumene.
d. Na pola pečenja biftek okrenite, smanjite temperaturu na 150 °C i pecite još 10 minuta ili dok ne porumeni.
SAVJET: Za najbolje rezultate okrenite odrezak na pola vremena pečenja.
4. Kobasica na žaru

natural_image
Close-up of a plated dish featuring braised meatballs garnished with broccoli and lettuce (no text or symbols visible)Sastojci
- Svježa kobasica
250 gr
• Ulje
1 kašika
a. Zagrijte fritezu na 200 °C 3 minuta.
natural_image
Close-up of golden fried shrimp on a black plate, garnished with blurred greenery (no text or symbols visible)Sastojci
- Svježi škampi
300 gr
• Ulje
1 kašika
- Brašno od griza
po želji
- Sol
po želji
a. Škampe očistite, operite i dobro osušite papirnatim ručnicima.
b. Uzmite posudu i u nju stavite kozice.
c. Začinite s malo ulja i obložite ih brašnom od griza.
d. Zagrijte fritezu na 200 °C 3 minuta.
OPIS TASTERA NA DISPLEJU
 | P. Podešavanje temperature (+/-)Q. Prikaz vremena/temperatureR. Podešavanje vremena (+/-)S. Taster za unutrašnje svetloT. Taster zauključivanje/isključivanje/ Taster Start/StopU. Program „Odrezak“V. Program „Povrće“W. Program „Pileći batak“X. Program „Piletina“Y. Program „Meso“Z. Program „Riba“AA. Program „Pomfrit“BB. Program „Škampi“CC. ZagrevanjeDD. Program „Kolači“ |
natural_image
Close-up of shredded yellow food items on a white plate (no text or symbols visible)Sastojci
• Krompir 500 gr
• Ulije 2 kašičice
• So po želji
• Biber po želji
natural_image
Close-up of a golden-brown fried food item with a cut section, possibly a pastry or pastry (no visible text or symbols)Sastojci
• Pileća krilca 350 gr
• Beli luk 2 češnja
• Ulje 2 kašičice
• So 1 kašičica
• Biber 1 kašićica
a. Zagrejte fritezu na 200 °C 3 minuta.
b. Krilca pomešajte s uljem, belim lukom, solju i biberom i ostavite da se mariniraju 20 minuta.
c. Pileća krilca u korpi za pečenje ravnomerno rasporedite na rešetku unutar korpe, stavite korpu u uređaj i postavite program „Pileći batak“, a možete i da podesite vreme i temperaturu zavisnosti od veličine i količine krilaca, kao i da ih pečete dok ne porumene.
d. Na kraju kuvanja složite krilca u posudu i poslužite.
SAVET: Za najbolje rezultate protresite korpu s krilcima na pola kuvanja.
3. Govedi odrezak

natural_image
Steamed steak on a plate with fork and fruit cup in background (no text or symbols)Sastojci
• Govedi odrezak 350 gr
• Beli luk u prahu 1 kašičica
• Ulje 2 kašičice
• So 1/2 kašičice
• Biber 1 kašičica
• Umak od soje Po želji
a. Zagrejte fritezu na 200 °C 5 minuta.
b. Odrezak pomešajte s uljem, belim lukom, soja umakom, solju i biberom i ostavite da se marinira 20 minuta.
c. Odrezak stavite na rešetku u korpu, ubacite korpu u uređaj i postavite program „Meso“, a možete i da podesite vreme i temperaturu prema veličini i količini odrezaka, kao i da ih pečete dok ne porumene.
d. Na pola pečenja biftek okrenite, smanjite temperaturu na 150 °C i pecite još 10 minuta ili dok ne porumeni.
SAVET: Za najbolje rezultate okrenite odrezak na pola vremena pečenja.
4. Kobasica na žaru

natural_image
Close-up of a plated dish featuring braised meatballs garnished with broccoli and lettuce (no text or symbols visible)Sastojci
- Sveža kobasica
250 gr
• Ulje
1 kašičica
a. Zagrejte fritezu na 200 °C 3 minuta.
b. Pomešajte kobasice s uljem.
c. Kobasice ravnomerno rasporedite na rešetku u korpi, stavite korpu u uređaj i postavite program „Meso“, a možete i da podesite vreme i temperaturu u zavisnosti od veličine i količine kobasica, kao i da ih pečete dok ne porumene.
natural_image
Close-up of golden fried shrimp on a black plate, garnished with blurred greenery (no text or symbols visible)Sastojci
- Sveži škampi
300 gr
• Ulje
1 kašičica
• Kukuruzno brašno
po želji
So
po želji
a. Škampe očistite, operite i dobro osušite papirnim ubrusima.
b. Uzmite posudu i u nju ubacite škampe.
c. Začinite s malo ulja i obložite ih kukuruznim brašnom.
d. Zagreite fritezu na 200 °C 3 minuta.
A TERMÉK MEGFELELŐSÉGE
A: Sütőrács
B: Sütőkosár
C: Kosárfogantyú
K: Levegőbemenet
E: Vezérlöpult
natural_image
Plate of shredded yellow food items (no text or symbols visible)Összetevők
- Burgonya
500 gr
- Olaj
2 teáskanál
- Só
ízlés szerint
- Bors
ízlés szerint
natural_image
Close-up of golden-brown fried food pieces with a cut section, placed on parchment paper (no text or symbols visible)Összetevők
- CsiRke
350 gr
szárnyak
2 gerezd
- Fokhagyma
2 teáskanál
- Olaj
1 teáskanál
- Só
1 teáskanál
- Bors