
DigitRadio mobil 2 - Radio TECHNISAT - Free user manual and instructions
Find the device manual for free DigitRadio mobil 2 TECHNISAT in PDF.

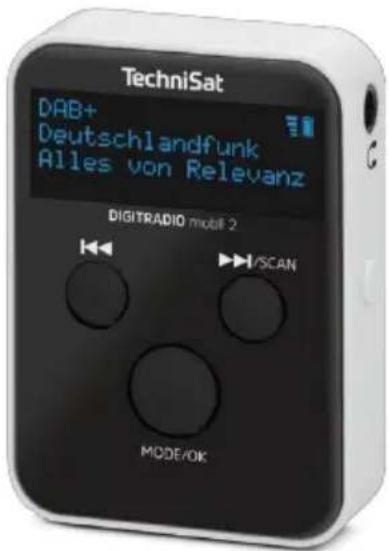
| Product type | Portable DAB+/FM radio |
| Brand | TechniSat |
| Model | DigitRadio mobil 2 |
| Dimensions (W x D x H) | 35 mm x 15 mm x 50 mm |
| Weight | 28.5 g (without cable) |
| Power supply | USB-C 5 V / 0.5 A |
| Battery | Li-Ion, battery life 6 to 8 hours (moderate volume) |
| Display | 0.91 inch OLED |
| Frequency ranges | DAB+: 174.928 – 239.200 MHz; FM: 87.5 – 108 MHz |
| Headphone output power | 0.1 W RMS, 32 ohms |
| Connectors | 3.5 mm headphone jack, USB-C port |
| Main features | DAB+ and FM reception, 10 presets, auto scan, key lock, standby mode |
| Included accessories | Stereo earphones (serve as antenna), USB-C cable, user manual |
| Operating conditions | Temperature 0 °C to 25 °C, humidity 0% to 60% (non-condensing) |
| Power consumption | Operating max. 0.37 W, standby 0.33 W, off 0 W |
| Cleaning | Clean the housing with a soft cloth slightly dampened (water). Do not use solvents. |
| Safety | Indoor use only, do not expose to water, do not open the device, keep out of reach of children (choking hazard) |
| General information | Compliant with Directive 2014/53/EU, 2-year legal warranty, technical support available |
Frequently Asked Questions - DigitRadio mobil 2 TECHNISAT
User questions about DigitRadio mobil 2 TECHNISAT
0 question about this device. Answer the ones you know or ask your own.
Ask a new question about this device
Download the instructions for your Radio in PDF format for free! Find your manual DigitRadio mobil 2 - TECHNISAT and take your electronic device back in hand. On this page are published all the documents necessary for the use of your device. DigitRadio mobil 2 by TECHNISAT.
USER MANUAL DigitRadio mobil 2 TECHNISAT
Operating instructions
DIGITRADIO mobile 2 Portable DAB+/UKW radio
1 Table of contents....2
2 Safety instructions ....4
2.1 Intended use....6
2.2 The target group of these operating instructions....6
2.3 Safe handling of the device 6
3 Legal information....10
3.1 Service instructions....11
4 Description of the device....13
4.1 Control elements....14
5 Prepare for operation....15
5.1 Charge battery....15
5.2 Using earphones....16
5.3 Switch on/off 17
5.4 Switching on for the first time....17
5.5 Setting the volume 19
5.6 Select DAB+ and FM mode....19
5.7 Activating the key lock ....19
5.8 Display Ads....20
6 DAB+ operation....21
6.1 Select transmitter....21
6.2 Saving stations in the favourites memory....21
6.3 Play favourite stations....22
6.4 Perform station search 23
7 VHF operation....24
7.1 Set transmitter....24
72 Manual station search ....25
8 System settings....25
8.1 Open system settings....26
8.2 Language....26
8.3 Time settings....27
8.4 Factory setting 27
8.5 Sokware version 28
9 Troubleshooting 28
10 Cleaning....29
11 Technical data*....30
12 Disposal instructions ....32
13 Notes....34
2 Safety instructions
Signs and symbols

Indicates a safety instruction that can lead to serious injury or death if ignored. Observe the following signal words:
DANGER - Serious injuries with fatal consequences
WARNING - Serious injuries, possibly fatal
ATTENTION - Injuries

Indicates a note that you must observe in order to use the device as intended, to avoid device defects, data loss/misuse or unintentional operation. It also describes additional functions for your device.

Indoor use - Appliances with this symbol are only suitable for indoor use.

Protection class II - Electrical appliances in protection class II are electrical appliances that have continuous double and/or reinforced insulation and no connection options for
have a protective conductor. The housing of an insulated electrical appliance of protection class II can partially or completely form the additional or reinforced insulation.

Your appliance bears the CE mark and fulfils all required EU standards.

Electronic devices/equipment do not belong in household waste, but must be disposed of properly in accordance with Directive 2012/19/EU of the European Parliament and of the Council of 4 July 2012 on waste electrical and electronic equipment (WEEE). At the end of its life, please take this device to the designated public collection points for disposal. BaGeries must be removed before disposing of the device and disposed of separately from the device.

Observe all notes and safety instructions in these operating instructions. Keep the operating instructions in a safe place for future reference. Pass the operating instructions on to the buyer when selling the product.

Direct current symbol. This device is operated with direct current and/or converts alternating current into direct current.
21 Intended use
The DIGITRADIO mobil 2 is intended for portable reception and playback of radio programmes. The device may only be operated with the accessories supplied. Any other use of these accessories is not permitted. Any other use is considered improper use. The device is only authorised for private use.
22 The target group of these operating instructions
The operating instructions are intended for any person who sets up, operates, cleans or disposes of the appliance. Please read the operating instructions and all safety instructions carefully and keep them in a safe place for future reference. Always follow all warnings and instructions in these operating instructions and on the back of the appliance.
23 Safe handling of the device
Please observe the following instructions to minimise safety risks, avoid damage to the appliance and contribute to environmental protection.
Please read all safety instructions carefully and keep them for future reference.

WARNING!
Never open the device or the power supply unit!
Touching live parts is life-threatening!

Observe all the following instructions for the intended use of the appliance and to prevent appliance defects and personal injury.
- Do not repair the appliance yourself. Repairs may only be carried out by trained specialists. Please contact our customer service centres.
- The device may only be operated in the specified ambient conditions.
- Do not expose the appliance to dripping or splashing water. If water gets into the appliance, disconnect it from the power supply and contact the service centre
- Do not expose the appliance to heat sources that heat the appliance in addition to normal use.
- In the event of a conspicuous appliance defect, odour or smoke development, significant malfunctions or damage to the housing, contact Service immediately.
- The appliance may only be operated with the mains voltage printed on the rating plate. Never attempt to operate the appliance with a different voltage.
- If the appliance damaged, it must not be put into operation.
- Do not operate the appliance near bathtubs, showers, swimming pools or running/splashing water. There is a risk of
electric shock and/or device defects.
- This appliance is not intended for use by persons (including children) with reduced physical, sensory or mental capabilities, or lack of experience and/or knowledge, unless they have been given supervision or instruction concerning use of the appliance by a person responsible for their safety.
Instructions on how to use the appliance. Never allow children to use this appliance unsupervised.
- Keep films and small parts away from children. Choking hazard!
- Modifications to the appliance are prohibited.
Safety instructions in connection with rechargeable batteries

WARNING!
The device is equipped with a modern, high-performance and all
The device is equipped with a rechargeable battery that fulfils the safety requirements.
Due to the higher hazard potential of modern rechargeable batteries, please ensure that you handle the device and the rechargeable battery with care and observe the following safety instructions.
- If possible, charge your device in a place with a smoke or fire alarm.
- Ensure that there are no flammable materials or objects in the immediate vicinity when charging.
- Do not operate the appliance outdoors, in damp rooms or in places where very high temperatures are to be expected.
- Do not expose the appliance to heat sources that heat the appliance in addition to normal use. The appliance may only be operated in the ambient conditions specified.
3 Legal information

Hereby, TechniSat declares that the radio equipment type DIGITRADIO mobil 2 is compliance with Directive 2014/53/EU. The full text of the EU Declaration of Conformity is available at the following internet address:
TechniSat is not liable for product damage due to external influences, wear and tear or improper handling, unauthorised repairs, modifications or accidents.

Subject to changes and printing errors. Status 06/24. Copying and reproduction only with the authorisation of the publisher. You can obtain the latest version of the instructions in PDF format from the Download area of the TechniSat homepage at www.technisat.de.

DIGITRADIO mobil 2 and TechniSat are registered trademarks of:
The names of the companies, institutions or brands mentioned are trademarks or registered trademarks of their respective owners.

Images shown are for illustrative purposes only and may differ from the actual product.
3.1 Service instructions

This product is quality-tested and comes with a statutory warranty period of 24 months from the date of purchase. Please keep the invoice as proof of purchase. In the event of warranty claims, please contact the dealer of the product.

Please note!
For questions and information or if there is a problem with this device, please contact our technical hotline:
Mon. - Fri. 8:00 - 17:00 under Tel.:
03925/9220 1800.

Repair orders can also be ordered directly online
If you need to return the device, please use only the following address:
4 Description of the device
Please ensure that the scope of delivery is complete:
- DIGITRADIO mobile 2,
- Stereo earphones (also serves as an antenna),
- USB-C charging cable
- these operating instructions.
The special features of the device
- Digital DAB+ radio is a new digital format that allows to listen to crystal-clear sound without hissing or crackling.
- The radio receives on the frequencies FM 87.5-108 MHz (analogue) and DAB 174-240 MHz (digital).
- The device has a headphone connection
- With a fully charged battery, you can listen to the radio for up to 8 hours at half volume, independent of the mains.
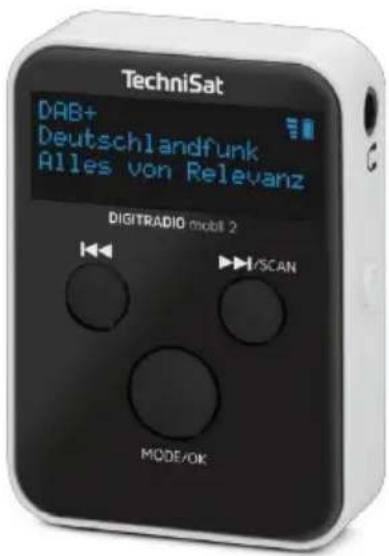
4.1 Control elements
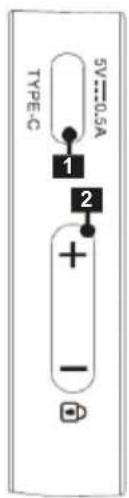
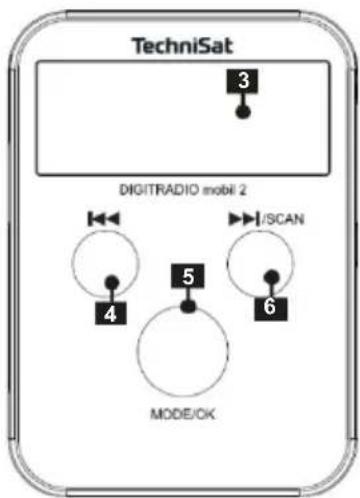

1 USB-C charging port 6 /SCAN
2 Volume +/- 7 Earphone connection 3.5 mm
3 OLED display 8 On/Off
4
5 MODE/OK
5 Prepare for operation
5.1 Charge battery
Connect the DIGITRADIO mobil 2 to a commercially available USB power adapter (not included) or the USB socket of a PC (5 V) using the USB-C cable supplied.
The integrated battery is now being charged.
The charge status is signalled on the display with a battery icon. When the icon is completely full, the battery is fully charged and the DIGITRADIO mobil 2 can be disconnected.

If the device is switched on during the charging cycle, the charging time is extended. The integrated charge management system prevents overcharging.
5.2 Use earphones

ATTENTION!
Hearing damage! Do not listen to music at high volume through headphones. This can lead to permanent hearing damage. Before using headphones, adjust the device volume to the minimum level.

The device can only play radio stations when the earphones are connected. The earphone cable also serves as a receiving aerial!
Only use earphones with a 3.5 millimetre stereo jack plug.
Insert the earphone plug into the earphone socket (7) on the device.

The number and quality of the stations to be received depends on the reception conditions at the place of use. Excellent reception can be achieved with the earphones supplied. The full length of the earphone cable must be aligned for the most favourable reception.
5.3 Switch on/off
Press the On/Off button (8) to switch the appliance on.
TECHNISAT DIGITALRADIO] appears briefly on the display.
Switch to standby: Briefly press the ⏻ On/Off button (8). The display shows [STANDBY].
To switch off, press and hold the button On/Off (8). The display shows [GOODBYE].
5.4 First time switching on
First connect the earphones to the earphone socket (7) and pull out the earphone cables to their full length.
Press the On/Off button (8) to switch the appliance on.
TECHNISAT DIGITALRADIO] appears briefly on the display.
The language selection then appears.The OSD language can be changed with the buttons/ and with MODE/OK (5) can be selected.
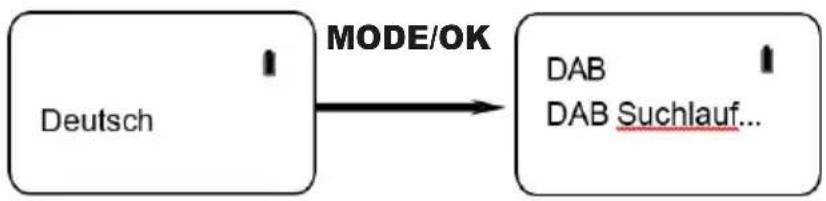
The device then automatically performs a station search in DAB+ mode.
"DAB+ search" appears on the display. Once the station search is complete, the device shows the number of stations found,
then a station is played. Note: If no stations are found, "No DAB" appears in the display: Change the location of the device and perform the station search again. Check whether
the earphone plug is fully inserted. Check that you have fully unplugged the earphone cables. Check the signal strength. Check whether digital radio stations are broadcasting in your area.
5.5 Setting the volume
Briefly press the VOLUME+/- buttons (2) several times.
5.6 Select DAB+ and FM mode
Briefly press the MODE/OK button (5) to switch between DAB+ radio and FM radio.
5.7 Activate the key lock
To unintentional entries, you can switch on the key lock.
Press the VOLUME button - and hold it down for approx. 2 seconds. [Locked] appears on the display.
To switch off the key lock, press and hold the VOLUME - button again for approx. 2 seconds until [Unlocked] appears on the display.
5.8 Display indicators
In DAB+ mode.
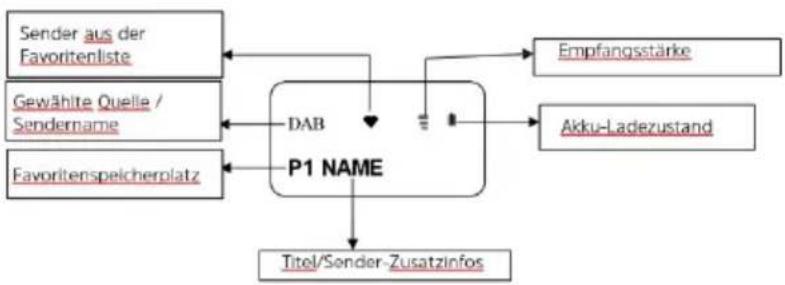
Switch on the DIGITRADIO mobil 2.
Press the MODE/OK button (5) until DAB+ appears on the display.
6.1 Select transmitter
After switching on for the first time, a complete station search has already been carried out (see chapter 5.4) and the stations that can be received at your location have been saved in the station list. If you would like to start a new channel scan, hold the ▶SCAN button until the scan starts. After the scan, the first station from the station list is played.
Press the or button to select a station from the station list. The station name appears on the display and the station is played shortly afterwards.
6.2 Saving stations in the favourites memory
The favourite memory has 10 favourite memory locations P0...P9. To store a station in a favourite memory location, proceed as follows:
First select the desired channel from the channel list and play it (see chapter 6.1).
Now press and hold the MODE/OK button until [Save favourite] appears on the display. Then briefly press the MODE/OK button again.
While [Save in P0] is shown on the display, use the buttons[◀ to▶] select a favourite memory location P0...P9.
Confirm by pressing the MODE/OK button again. The following appears [Saved] in the display.


Repeat the process to save additional transmitters.
If the favourite memory location is already occupied, it will be overwritten when you select it again.
6.3 Play favourite stations
Press and hold the MODE/OK button until [Save favourites] appears on the display. Use the buttons|◀ or▶▶ to select the [Favourites] option and press MODE/OK.
You are now in favourites playback mode.
Use the buttons on to select a favourite memory location P0...
P9. The name of the saved favourite station is also displayed next to the favourite memory location and then played back.

The DIGITRADIO mobil 2 is now permanently in favourites playback mode. You can recognise this by the heart symbol in the display next to the reception strength. To switch back to normal mode, press and hold the MODE/OK button until [Normal mode] appears on the display. Press the MODE/OK button. You are back in normal mode (heart symbol goes out).
6.4 Perform station search
After a change of location, for example, individual channels may no longer receivable. In this case, carry out a new channel search.
In normal DAB+ mode, press and hold the SCAN button for approx. 2 seconds until the automatic search starts. After the scan, the total number of stations found is briefly displayed and the first station from the station list is played.
Alternative:
Press and hold the MODE/OK button until [Save favourite] appears on the display. Use the buttons to select the [Search] option and press MODE/OK. The search starts. After the search, the total number of stations found is briefly displayed and the first station from the station list is played.
7 VHF operation
Switch on the DIGITRADIO mobil 2.
Press the MODE/OK button until FM appears on the display.
[Start FM] appears, followed by the memory location P0 and the frequency 87.50Mhz.
72 Set transmitter
Use the buttons or to select a channel position P0...P9.
Press and hold the button to start the search. The search is stopped at the next receivable station and the station is played back. The station name is displayed for RDS stations.

In this way, a station can be stored in the respective programme positions P0...P9 and an individual favourite station list can be created. You can then select a channel using the buttons on .
7.3 Manual station search
Press and hold the MODE/OK button until [Set manually] appears on the display and press MODE/OK.
Now you can enter a transmitter frequency in 0.5Mhz increments using the buttons or .
To exit manual frequency entry, press the MODE/OK button and select the [Exit] option using ◀◀ or ▶▶. Press MODE/OK again to return to the normal view.
8 System settings
Various basic settings can be made in the system settings. These are, for example: Change the operating language, adjust time settings, SW version and call up the factory settings.
8.1 Open system settings
First switch the DIGITRADIO mobil 2 to standby mode by briefly pressing the On/Off button. The date and time are shown on the display.
Press and hold the MODE/OK button until [Select language] appears on the display.
Using the buttons of and confirming with MODE/OK, you can now select one of the available options, which are explained below.

To exit the system settings (e.g. after a setting), either wait approx. 10 seconds until the display shows the date and time again, or select [Exit] and confirm with MODE/OK.
8.2 Language
Open the system settings as described in chapter 8.1.
Use the buttons or to select the [Select language] option and confirm with MODE/OK.Use the buttons of to select one of the languages and confirm with MODE/OK.
8.3 Set time/date
The time and date are always synchronised and updated via the DAB+ reception. In some cases, however, it may still be necessary to enter them manually. To do this, proceed as follows:
Open the system settings as described in chapter 8.1.
Use the buttons on to select the [Set time/date] option and confirm with MODE/OK.
Using the buttons OK, you can now first enter the hour (flashing) and, after confirming with MODE/OK, the minute of the current time. The date is then entered as before.
84 Factory setting
Open the system settings as described in chapter 8.1.
Use the buttons on to select the [Factory settings] option and confirm with MODE/OK.The DIGITRADIO mobil 2 restarts in the factory settings.
8.5 Software version
Open the system settings as described in chapter 8.1.
Use the buttons on to select the [SW version] option and confirm with MODE/OK.
The currently installed Sokware version is displayed.
9 Troubleshooting
| No DAB+ / FM reception | Change the location |
| Make sure that the earphones are plugged in correctly and that the cable runs the correct length. | |
| DAB+ / FM reception poor / dropouts | If the OLED display is switched on during playback, reception interference may occur. Wait until the display switches off automatically. |
| Battery does not charge | Use a different USB power supply unit with a higher output. |
| Device does not respond to input | Switch it off and then on again. |
10 Cleaning
To avoid damage, do not clean the appliance with a wet cloth or under running water. Do not use scouring pads, scouring powder or solvents such as alcohol or petrol.
Clean the housing with a soft cloth moistened with water.
11 Technical data*
| Reception paths | DAB+, FM |
| Frequencies | DAB+: 174.928 MHz~ 239.200 MHzFM: 87.5~ 108 MHz |
| Kopffiörer | 0.1 W RMS, stereo100 Hz - 15 KHz32ohm |
| Display | 0.91" OLED |
| Power supply | USB-C 5 V/0.5 A |
| Battery | Li-ion |
| Runtime | 6 - 8 hours (with lower volume) |
| Power consumption | Operation max.: 0.37W Standby: 0.33 WOff: 0 W |
| Operating conditions | Temperature: 0°C - 25° CHatch humidity: 0% - 60% (non-condensing) |
| Dimensions (WxDxH) | 35 mm x 15 mm** x 50 mm |
| Weight | 28,5g*** |
*Technical changes and errors excepted.
**Without brackets.
***Without cable.
12 Disposal instructions
The packaging of your appliance consists exclusively of recyclable materials. Please sort them accordingly and return them to the "Dual System". This product is labelled in accordance with Directive 2012/19/EU on waste electrical and electronic equipment (WEEE) and must not be disposed of at the end of its service life via the normal recycling system.
The waste must not be disposed of as household waste, but must be handed in at a collection point for the recycling of electrical and electronic equipment.

The symbol on the product, the instructions for use or the packaging indicates this.
The materials are recyclable according to their labelling. By reusing, material recycling or other forms of recycling old appliances, you are making an important contribution to protecting our environment.

Please ask your local authority for the responsible disposal centre. Ensure that empty batteries and electronic scrap are not disposed of with household waste, but disposed of properly (take back by specialist retailers, hazardous waste).

Important note on the disposal of batteries/rechargeable batteries:
Batteries/rechargeable batteries must be disposed of separately from the device and may contain toxic substances that are harmful to the environment. For the chemical composition, please refer to the technical data or the imprint on the battery.
It is therefore essential that you dispose of BaGeria/rechargeable batteries in accordance with the applicable legal regulations. Never dispose of batteries in normal household waste. You can dispose of used batteries free of charge at your specialist dealer or at special disposal centres.
For products with a battery compartment, you can remove the battery directly. If batteries are permanently installed, do not under any circumstances attempt to remove them yourself. In this case, contact the appropriate specialist personnel, e.g. a waste disposal company.
We hereby advise you to delete all personal data stored on the device on your own responsibility before disposing of the device.

FR
Everything about your TechniSat product in an app.
natural_image
Abstract geometric design with blue and yellow triangular color blocks (no text or symbols)TechniSat
20240628ORV1
Mode d'emploi
DIGITRADIO mobil 2
Radio portable DAB+/OMC

natural_image
Abstract geometric shape with blue and yellow triangular color blocks (no text or symbols)

TechniSat
20240628ORV1
natural_image
Abstract geometric shape with blue and yellow triangular color blocks (no text or symbols)


TechniSat
20240628ORV1
Gebruiksaanwijzing
DIGITRADIO mobiel 2 Draagbare DAB+/UKW radio
5.8 Advertenties....20
6 DAB+ bediening....21
6.1 Selecteer zender 21
natural_image
Abstract geometric shape with blue and yellow triangular color blocks (no text or symbols)

TechniSat
20240628ORV1
- Operating instructions
- Table of contents....2
- Safety instructions ....4
- Legal information....10
- Description of the device....13
- Prepare for operation....15
- DAB+ operation....21
- VHF operation....24
- System settings....25
- Troubleshooting 28
- Safety instructions
- Signs and symbols
- Intended use
- The target group of these operating instructions
- Safe handling of the device
- WARNING!
- Safety instructions in connection with rechargeable batteries
- Legal information
- Service instructions
- Description of the device
- Control elements
- Prepare for operation
- Charge battery
- Use earphones
- ATTENTION!
- Switch on/off
- First time switching on
- Setting the volume
- Select DAB+ and FM mode
- Activate the key lock
- Display indicators
- Select transmitter
- Saving stations in the favourites memory
- Play favourite stations
- Perform station search
- Alternative:
- VHF operation
- Set transmitter
- Manual station search
- System settings
- Open system settings
- Language
- Set time/date
- Factory setting
- Software version
- Troubleshooting
- Cleaning
- Disposal instructions
- FR
- Everything about your TechniSat product in an app.
- Mode d'emploi
- TechniSat
- Gebruiksaanwijzing
- DAB+ bediening....21
Brand : TECHNISAT
Model : DigitRadio mobil 2
Category : Radio