PT809AA - Reception tent Vonroc - Free user manual and instructions
Find the device manual for free PT809AA Vonroc in PDF.

| Product type | Reception tent |
| Brand | Vonroc |
| Model | PT809AA |
| Frame material | Steel |
| Cover material | 100% Oxford 420 denier |
| Cover coating | PVC |
| Water resistance | 3000 PA |
| Dimensions (unfolded) | 295 x 295 x 345 cm |
| Weight | Approximately 25 kg (estimated) |
| Included accessories | 1 wheeled storage bag, 8 stakes, 4 ropes |
| Side panels | Available as optional (mosquito net, window, door) |
| Intended use | Outdoor, festive occasions (garden, birthday, gatherings) |
| Number of people for assembly | 2 people minimum |
| Adjustable height | Yes (adjustment buttons) |
| Maintenance | Clean with warm water and a soft cloth; dry completely before storage |
| Storage | In a cool, dry place away from sunlight |
| Safety instructions | Do not use in bad weather; keep away from flames; do not leave unattended |
| Warranty | Legal warranty against defects in materials and workmanship |
| Repairability | Original spare parts available; repair by approved centers |
Frequently Asked Questions - PT809AA Vonroc
User questions about PT809AA Vonroc
0 question about this device. Answer the ones you know or ask your own.
Ask a new question about this device
Download the instructions for your Reception tent in PDF format for free! Find your manual PT809AA - Vonroc and take your electronic device back in hand. On this page are published all the documents necessary for the use of your device. PT809AA by Vonroc.
USER MANUAL PT809AA Vonroc
natural_image
Abstract geometric shape resembling a stylized letter 'V' on black background (no text or symbols)VONROC®
BUILD YOUR FUTURE
PARTY TENT 300X300CM
PT501XX / BEIGE / BLACK / GREY / WHITE S_PT501XX / BEIGE / BLACK / GREY / WHITE S2_PT501XX / BEIGE / BLACK / GREY / WHITE S3_PT501XX / BEIGE / BLACK / GREY / WHITE

natural_image
Simple line drawing of a triangular roof structure with three legs (no text or symbols)EN Original Instructions 14
natural_image
Illustration of two athletes performing a physical exercise with downward arrows indicating movement (no text or symbols)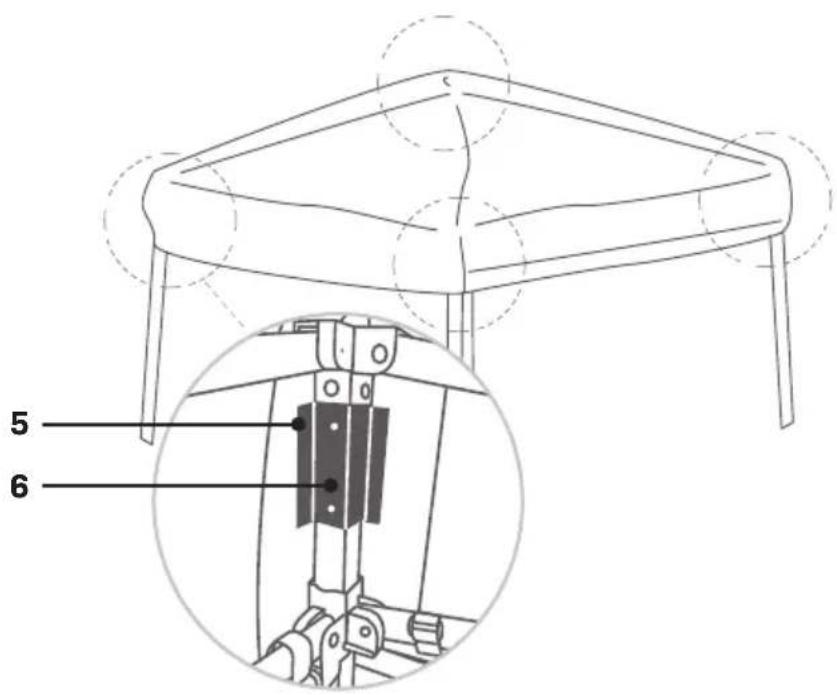
G
natural_image
Illustration of two athletes performing a physical exercise with arms extended, showing motion direction (no text or symbols)H
natural_image
Pure technical line drawing of a mechanical bracket or mounting detail (no text or symbols)|
natural_image
Line drawing of two people carrying a large structure with upward arrows indicating movement (no text or symbols)J
K
L
M
N
natural_image
Illustration of two people pushing a large fabric or material on a platform, with directional arrows indicating movement (no text or symbols)0
natural_image
Diagram of a warehouse with a window and a close-up inset showing a rope knot (no text or symbols)P
natural_image
Simple line drawing of a house roof structure with a vertical door and triangular roof (no text or symbols)Q
123
natural_image
Simple line drawing of a triangular structure with vertical supports (no text or symbols)
EN - SAFETY NOTE
- Close the party tent in case of upcoming winds or wind gusts.
- Do not leave an erected party tent unattended.
- Check screws, bolts, and connections monthly. Tighten if necessary.
NL - VEILIGHEIDSWAARSCHUWING
1. SAFETY INSTRUCTIONS
Read the enclosed safety warnings, the additional safety warnings and the instructions. Failure to follow the safety warnings and the instructions may result in electric shock, fire and/or serious injury. Save the safety warnings and the instructions for future reference.
The following symbols are used in the user manual or on the product:

Read the user manual.
ADDITIONAL SAFETY WARNINGS FOR PARTY TENTS
a) If the party tent is not working properly or has been damaged, do not use it.
b) Before each use, inspect the parts and accessories for damage or wear (cracks/breaks) that could impair function. If any damage is found, replace them with original parts and accessories. The party tent may only be maintained or repaired by persons older than 8 years and under supervision.
c) Do not use accessories not offered by the supplier. They may pose a danger to the user and damage the party tent.
d) Use the party tent only for the purposes indicated in this manual.
e) Be aware of the risks and consequences associated with incorrect use of the party tent. Improper use of the tent can lead to personal injury and damage to the product.
f) Keep the party tent away from open flames, lit cigarettes, and all other heat sources and/or hot surfaces.
g) The party tent is only suitable for outdoor use. Do not use the tent indoors.
h) If the party tent is left outside for an extended period of time, condensation may form. This condensation can pool at the seams and form droplets, making it appear that the tent is not waterproof. This is not the case. We recommend storing the party tent when not in use.
i) Make sure the party tent is dry before putting it in the carrying case. Storing the tent wet may cause mold. Let the tent dry, covered and open, in a dry place for 24 hours before storing.
j) The fabric of the party tent cannot be machine
washed. This may cause damage to the fabric.
k) Fold and store the party tent when not in use.
I) The fabric of this party tent is not fire-retardant/fireproof treated. Keep the tent away from open flames, lit cigarettes, and other heat sources and/or hot surfaces.
m) The party tent should not be used by children. Use of the tent is permitted only when a supervisor is present and responsible for the safety of the user.
n) The party tent must not be used by people with physical or mental disabilities. Use of the tent is allowed only when a supervisor is present who is responsible for the safety of the user.
o) Do not let children play with the party tent. Use and store the tent out of reach of children.
p) To avoid personal injury and damage to the tent, do not allow anyone to climb, sit, stand, or climb on the tent.
q) Always place the party tent on a horizontal, even, stable, and non-flammable surface.
r) It takes at least two people to set up and fold the tent.
s) Always check that the party tent stands firmly and all parts are securely fastened.
t) Be sure to open the tent carefully and gradually to avoid damage to the tent and personal injury.
u) Do not leave the party tent permanently set up. Store the tent when not in use to prevent damage and extend its life.
v) Do not use the party tent in high winds, storms, thunderstorms, heavy rain, snow, freezing temperatures, or severe weather conditions. This may damage the tent.
w) Do not place heat sources such as cooking equipment and barbecues in or near the tent; this may cause fire and damage.
x) Do not hang objects from the frame of the party tent. This may cause the tent to topple or bend
2. MACHINE INFORMATION
Intended use
This consumer party tent is designed for temporary use during various festive occasions, such as garden parties, birthdays and family gatherings. This tent provides effective protection from sun and rain, so that you and your guests can enjoy the event in comfort. The party tent is easy to set up and take down, and is ideal for use on flat and stable surfaces in your garden or other private location
INCLUDED ACCESSORIES:
PT501XX / BEIGE / BLACK / GREY / WHITE
1x Storage bag with wheels
8x Pegs
4x Ropes
S\_PT501XX / BEIGE / BLACK / GREY / WHITE
1x Storage bag with wheels
8x Pegs
4x Ropes
4x mosquito net side panels
S2\_PT501XX / BEIGE / BLACK / GREY / WHITE
1x Storage bag with wheels
8x Pegs
4x Ropes
2x "window" side panels
2x "Door/wall" side panels
S3\_PT501XX / BEIGE / BLACK / GREY / WHITE
2x Storage bag with wheels
16x Pegs
8x Ropes
1x Rain gutter
2x sidewall spacers
1x Tent connection spacers
TECHNICAL SPECIFICATIONS
| Model No. | PT501XX / S_PT501XX / S2_PT501XX / S3_PT501XX |
| Frame material Steel | |
| Frame size 2900 x 2900 mm | |
| Top cover material 100% Oxford | |
| Top cover thickness 420 Denier | |
| Top cover coating PVC coating | |
| Top cover seam finish Reinforced PVC seams | |
| Water proofness 3000PA | |
| Sidewall connection | Hook-and-loop tape in topcover edge |
| Peg material Steel | |
| Rope material Polyester | |
| Tent storage material 100% Oxford | |
| Tent storage bag thickness | 600 Denier |
| Tent size (Max unfolded) | 295 x 295 x 345 cm |
DESCRIPTION
The numbers in the text refer to the diagrams on pages 2-12.
- Storage bag
- Frame
- Roof
- Roof hook-and-loop tape
- Corner hook-and-loop tape
-
Frame corner hook-and-loop tape
-
Corner locks
-
Feet
-
Buckle
-
Buckle tensioner
- Frame cross section
- Mosquito net side panels
-
Mosquito net side panel zipper
-
Side panels
-
Corner zippers
-
Tent connection spacers
-
Rain gutter
-
Sidewall spacers
-
Height adjustment knobs
-
Height setting hole
-
Rope and spanner
-
Pegs
-
Rope and peg storage bag
-
Sandbags
-
Rope connection point
3. ASSEMBLY AND DISASSEMBLY

WARNING Do not set up the party tent in bad weather conditions due to safety risks. Winds can tear the tent loose, which can cause injury or damage.

WARNING It always takes 2 people to set up the tent.
Unfolding the tent (Fig. A, B, C, D, E, F, G, H, I, J, K, L, M)
- Take out the frame (2) out of the storage bag (1).
- Position the frame (2) with the feet (8) towards the ground in the middle of the desired area.
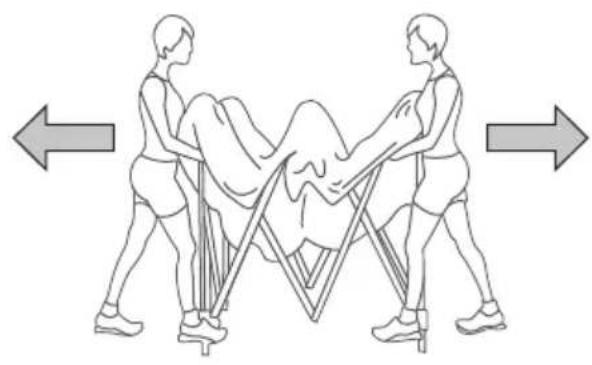
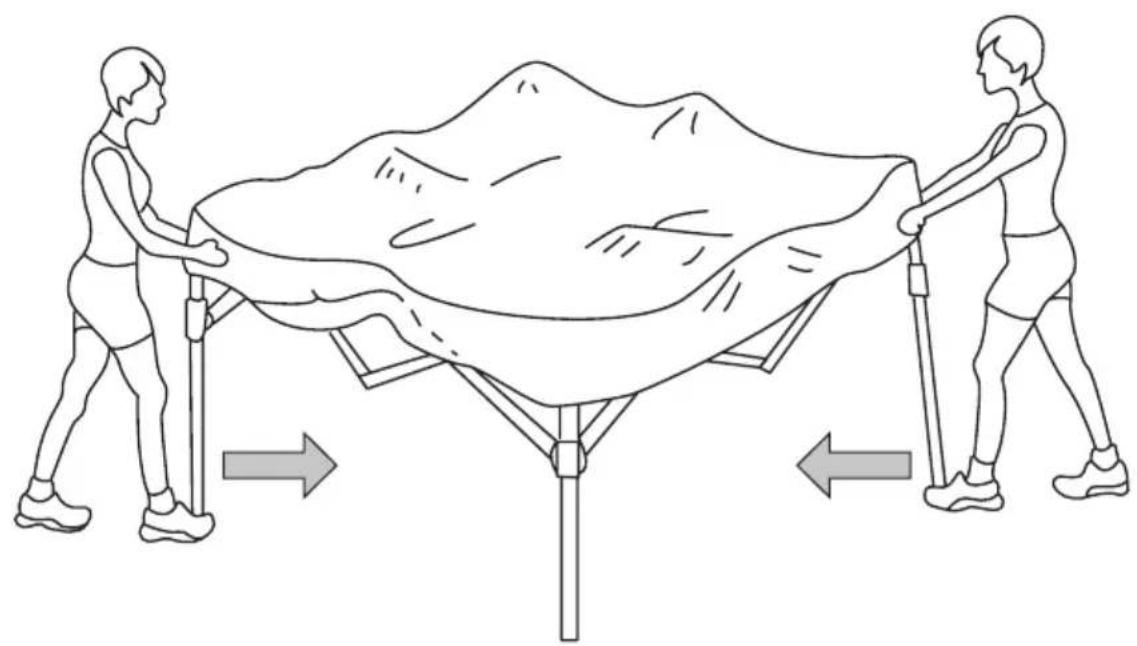
- Take 2 opposite corners of the frame (2) and lift the frame (2) up, pull the frame (2) backwards until it half unfolded.
- Take the roof (3) out of the tent storage bag (1). Unfold the roof (3). Then put it over the frame.
Make sure the roof hook-and-loop tape (4) sticks to the frame corner hook-and-loop tape (6)
- Then take two opposite corners and pull them backwards to unfold the frame (2) into the maximum extended position.
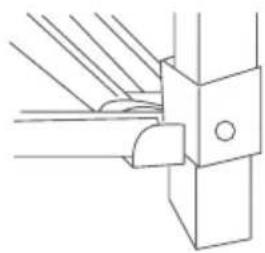
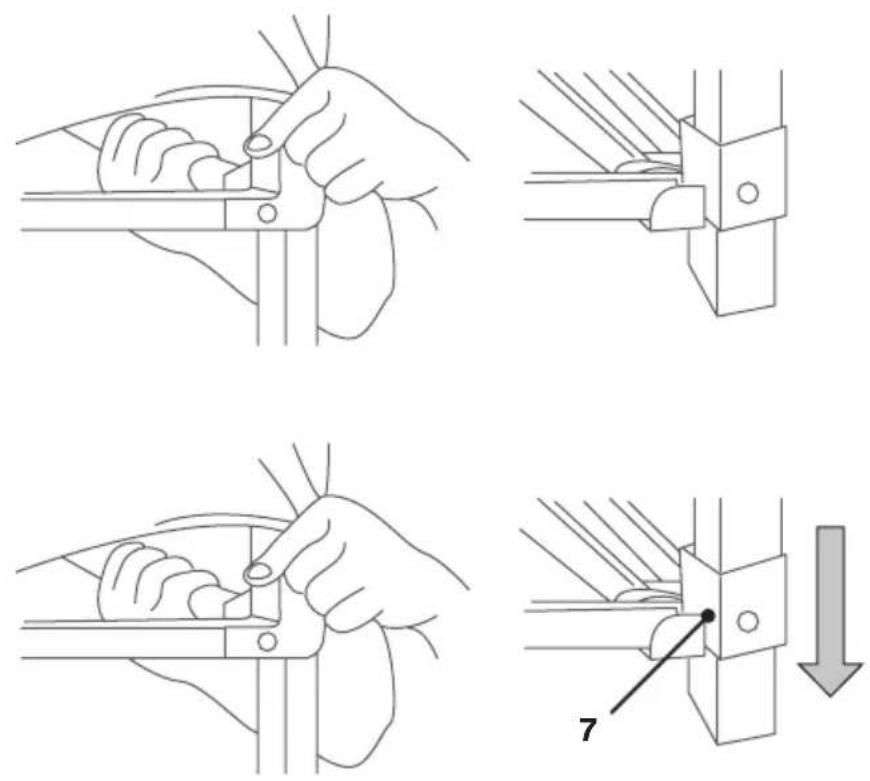
- Click all the corner locks (7) in to their locked position.
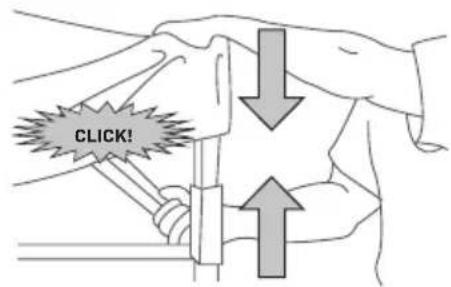
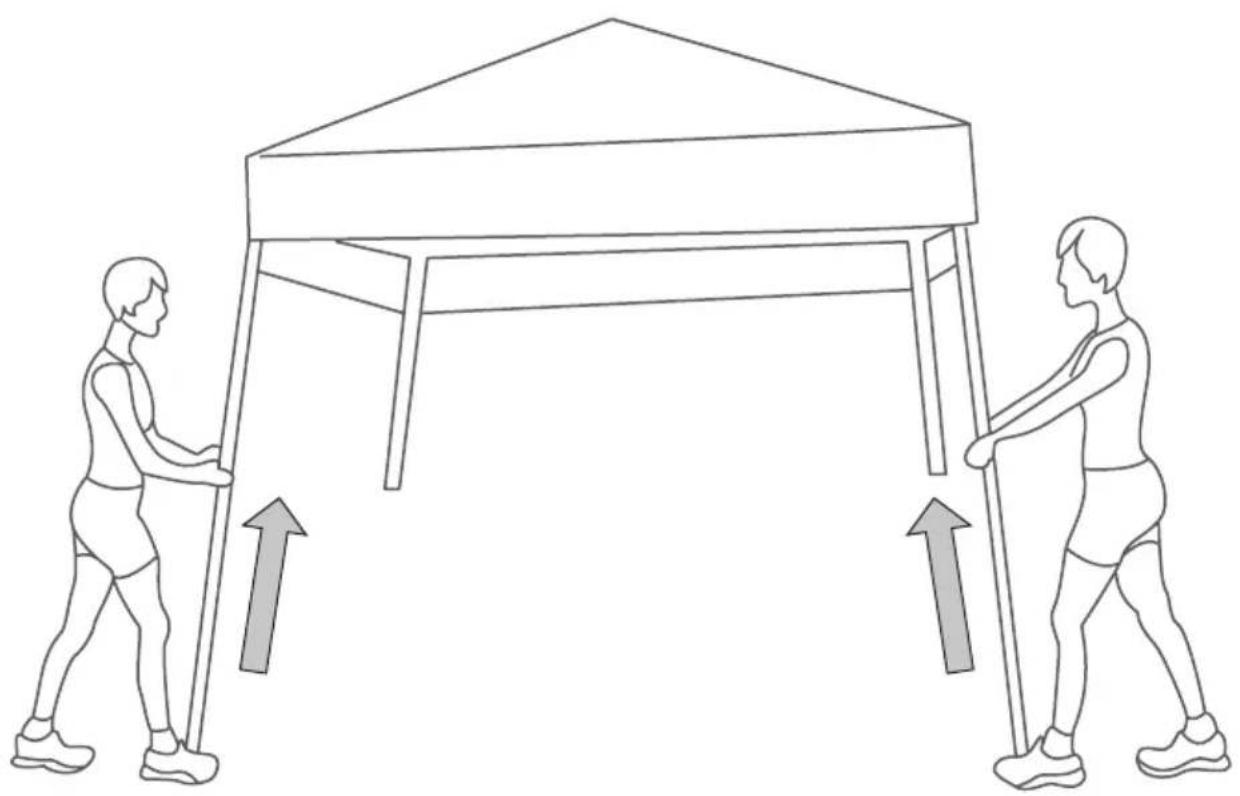
- Then take two parallel feet, hold them to the ground by applying a little pressure to the feet (8). Press the frame (2) up until it clicks into the first height position.
- Move to the other two not extended feet (8) and repeat the previous step.
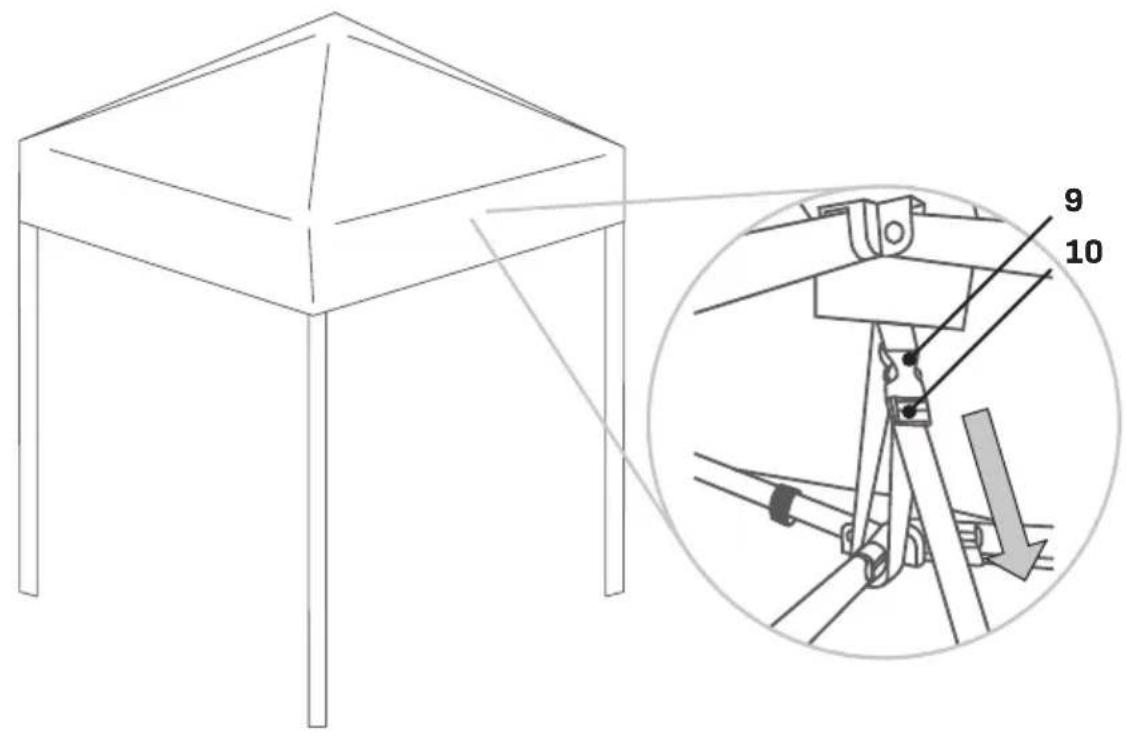
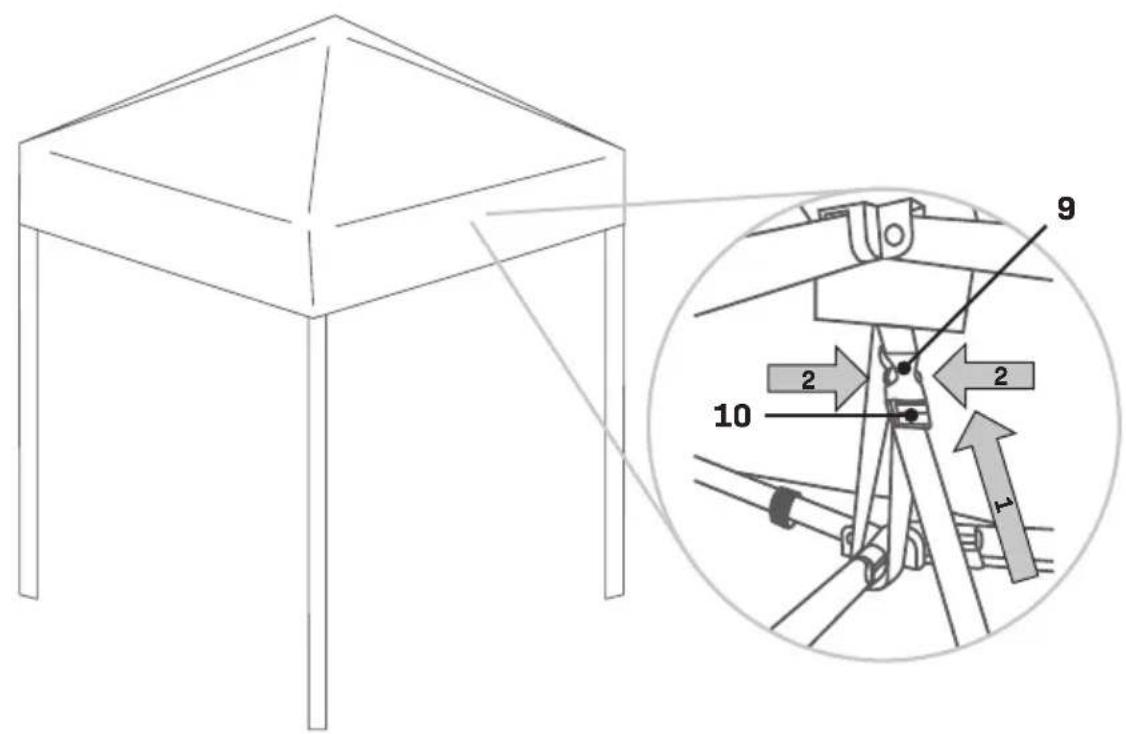
- Now make sure the tent feet poles are not bend and assemble the feet (8) as shown in figure J and K. Connect the buckle (9) and pull the buckle tensioner (10) till the roof (3) moves over the frame cross section (11). Do not over tighten the buckle. This may damage the roof (3) or frame (2)
Mounting the mosquito net side panels (Fig. B, P) Only for S\_PT501XX or if you bought the accessory ART.NO PT801AA
- To install the mosquito net side panels (12) first stick the mosquito net side panels (12) to roof hook-and-loop tape (4).
- Make sure the zipper will be placed in the middle between 2 legs, this will be your entrance and exit.
- Repeat this proces for the other mosquito net side panels (12) you want to connect.
- Use the mosquito net side panel zipper (13) to fully close of the tent.
Removing the mosquito net side panels (Fig. B, P)
Only for S\_PT501XX or if you bought the accessory ART.NO PT801AA
- Open the tent entrance by unzipping the mosquito net side panel zipper (13) located between the two legs.
- Carefully detach the mosquito net side panels (12) by peeling them away from the roof hook-and-loop tape (4). Take care not to damage the netting or the hook-and-loop tape strips.
-
Fold the mosquito net side panels (12) neatly after removal to prevent wrinkles and make future installation easier.
-
Repeat this process for any other mosquito net side panels (12) you wish to remove.
- Ensure all zippers and hook-and-loop tape are closed or covered to protect them during storage.
- Store the mosquito net side panels in a dry, cool place, preferably in the original storage bag, to maintain their condition for future use.
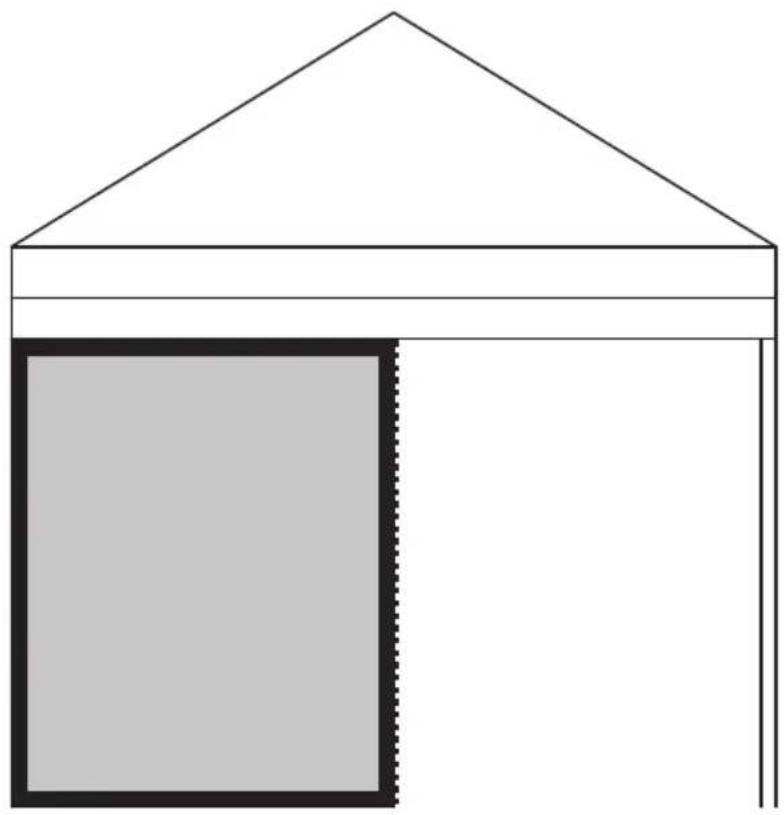
Mounting the side panels (Fig. A, B, C, D, O)
Only for S2\_PT501XX or if you bought the accessory ART.NO PT802AA
- To install the side panels (14) first stick the side panels to the roof hook-and-loop tape (4).
- Make sure the corner zippers (15) are placed against the feet (8).
- Repeat this process for the other side panels (14) you want to connect.
- Feel free to mount the side panels (14) in any desired order to create your desired setup.
Removing the side panels (Fig. A, B, C, D, O)
Only for S2\_PT501XX or if you bought the accessory ART.NO PT802AA
- Unzip the corner zippers (15) that are placed against the feet (8), carefully opening the connections.
- Gently detach the side panels from the roof hook-and-loop tape (4) by peeling them away. Take care not to damage the hook-and-loop tape or the fabric.
- Repeat this process for any other side panels (14) you want to remove.
- Fold each side panel neatly after removal to prevent wrinkles, facilitate easy setup next time and making sure your side panels will fit inside of the storage bag (1).
- Store the side panels in a dry, cool place, preferably in the original storage bag, to keep them in good condition for future use.
Connecting two tents together (Fig. D)
ONLY FOR S3\_PT503XX or if you bought the accessory ART.NO PT807AA
- Unfold two tents as described in the first section
-
Unscrew the provided tent connection spacers (16). Put them around the feet (8) and tighten them around two parallel feet (8).
-
Unroll the rain gutter (17) and stick it to the roof hook-and-loop tape (4) of both tents. So the gap in between gets sealed.
- Use the provided sidewall spacers (18) if you have bought separate sidewalls or mosquito net side panels. Put the rounded side of the side panel spacer up, use the zipper to attach them in between the tents.
Folding the tent (Fig. L, M, N)
- Ensure the tent is clean and dry before folding to prevent mold and mildew during storage.
- Disconnect the buckle (9) and loosen the buckle tensioner (10) as shown in figure J and K, allowing the roof (3) to relax over the frame cross section (11).
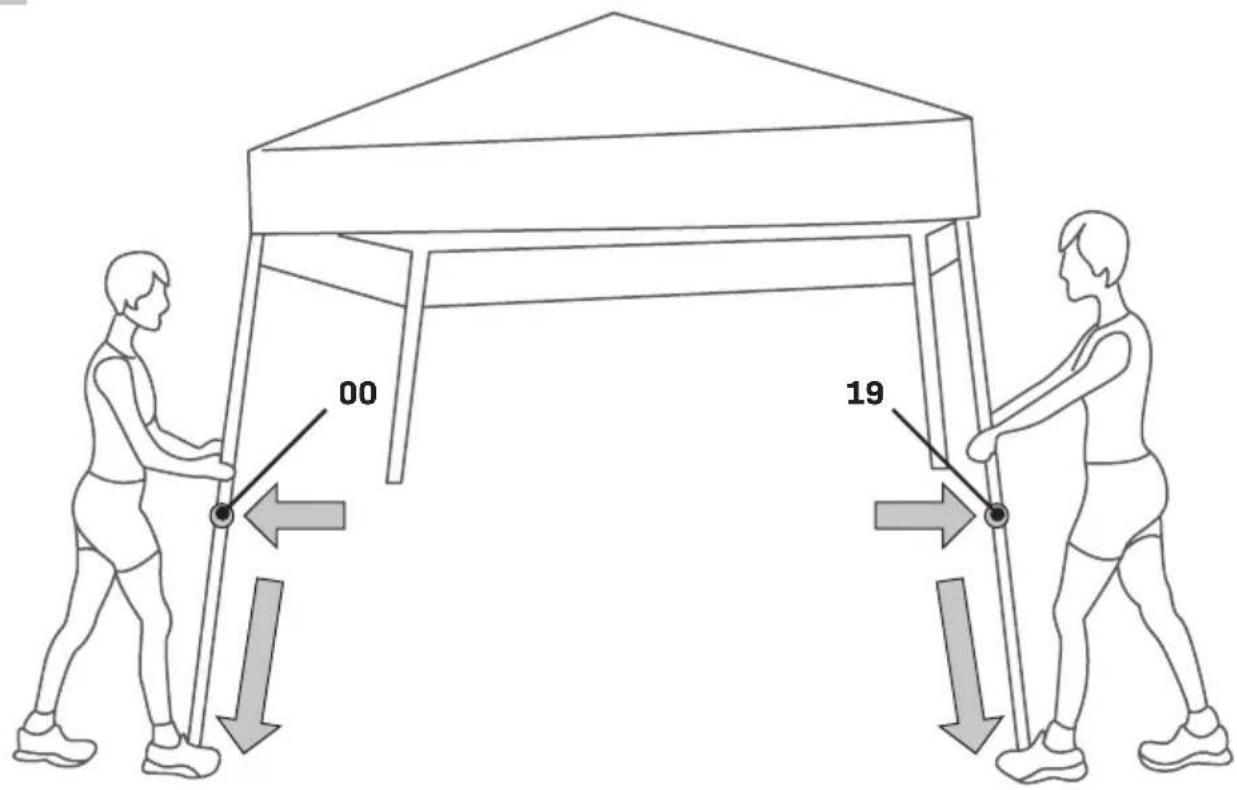
- Press the height adjustment knobs (19) on the feet (8) of the frame (2) to lower it from its extended height. Start by taking two parallel feet (8), applying slight upward pressure to disengage the locks, then gently lower the frame to its lowest position.
- Move to the other two parallel feet (8) and repeat the previous step, ensuring all legs are retracted evenly.
- Unlock all the corner locks (7) to allow the frame (2) to fold smoothly.
- Take two opposite corners of the frame (2) and push them towards each other to partially fold the tent. The frame should start to collapse inward.
- Carefully remove the roof (3) from the frame (2). Gently detach the roof hook-and-loop tape (4) from the frame corner hook-and-loop tape (6). Fold the top cover neatly and place it into the storage bag (1).
- Continue pushing the frame (2) inward by taking two opposite corners and moving them towards each other until the frame is fully folded.
- Lift the folded frame (2) and ensure the feet (8) are pointing upwards to prevent damage.
- Place the folded frame (2) into the storage bag (1), ensuring it fits securely.
- Zip up the storage bag (1) and store the tent in a cool, dry place away from direct sunlight to prolong its lifespan.
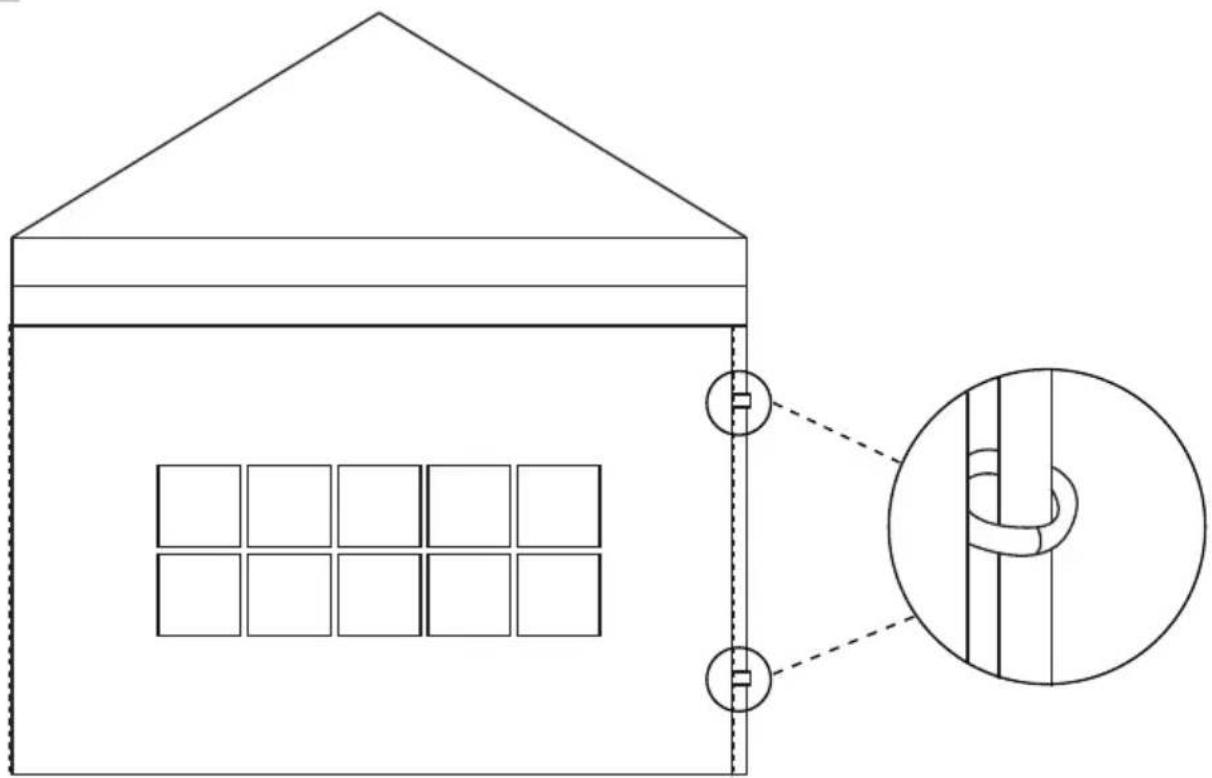
Connecting the ropes and pegs (Fig. A, B, C, D)
- Unroll the rope and spanner (21)
- Tye the unknotted side of the rope to the rope connection point.
- Pull the bottom loop on the spanner out and put
a peg trough the loop.
- Then put the peg with the rope connected into the ground, pull the spanner upwards to add tension to the rope.
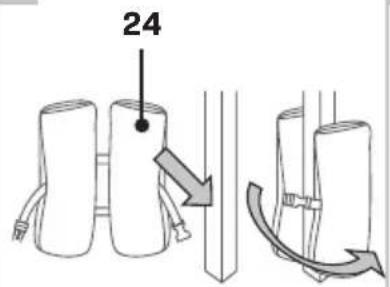
Connecting the sandbags (Fig. Q)
NOT included. Article no. PT807AA
- Fill the sandbags (24), with sand or small stones.
- But the sandbags (24) around the feet (8) just like shown on Fig. Q.
4. OPERATION
Adjusting the height (Fig. L)
Adjust the tent height to the desired position by slightly lifting the frame (2), pressing the height adjustment knobs (19) and placing them into the desired height setting hole (20).
5. MAINTENANCE
Tent maintenance - inspection - storage
To ensure the longevity of your tent, clean it after each use by wiping down the fabric with a soft, damp cloth. Allow the tent to air dry completely before storing to prevent mold and mildew growth. Do not use chemicals or abrasive materials that could damage the fabric or frame.
Regularly inspect all components, including zippers, hook-and-loop tape strips, and poles, for signs of wear or damage.
Store the tent in a cool, dry place away from direct sunlight to prevent fading and material degradation. Proper maintenance will keep your tent in optimal condition for future use.
Before use:
- Inspect for damage: Check all components of the tent, including the fabric, zippers, hook-and-loop tape, and frame (2), for any signs of wear or damage. Repair any minor issues or replace damaged parts as needed.
- Clean if necessary: If the tent was stored for a long period, use a soft cloth or sponge without any chemicals and lukewarm water to clean the tent, side panels, and mosquito nets. Rinse thoroughly and allow all components to dry completely.
During use:
- Monitor weather conditions: Be cautious of
harsh weather. While the tent provides shelter, it may not withstand extreme conditions.
After use:
- Disassemble carefully: Refer to the folding instructions to disassemble the tent without forcing any parts, ensuring the frame (2) and fabric are not damaged.
- Clean the tent: Remove any dirt, leaves, or debris from the tent fabric and accessories before packing.
- Dry completely: Ensure all components are thoroughly dry to prevent mold and mildew during storage.
Storage:
- Use the storage bag (1): Place all tent components into the provided storage bag to protect them from dust and physical damage.
- Store Properly: Keep the tent in a cool, dry place away from direct sunlight and extreme temperatures. Avoid placing heavy objects on top of the stored tent to prevent deformation.
WARRANTY
VONROC products are developed to the highest quality standards and are guaranteed free of defects in both materials and workmanship for the period lawfully stipulated starting from the date of original purchase. Should the product develop any failure during this period due to defective material and/or workmanship then contact VONROC directly.
The following circumstances are excluded from this guarantee:
- Repairs and or alterations have been made or attempted to the machine by unauthorized service centers;
- Normal wear and tear;
- The tool has been abused, misused or improperly maintained;
- Non-original spare parts have been used.
This constitutes the sole warranty made by company either expressed or implied. There are no other warranties expressed or implied which extend beyond the face hereof, herein, including the implied warranties of merchantability and fitness for a particular purpose. In no event shall VONROC be liable for any incidental or consequential damages.
The dealers remedies shall be limited to repair or replacement of nonconforming units or parts.
The product and the user manual are subject to change. Specifications can be changed without further notice.
EXTRA VEILIGHEIDSWAARSCHUWINGEN VOOR
PARTYTENTEN
2. MACHINE-INFORMATIE
Beoogd gebruik
MEEGELEVERDE ACCESSOIRES:
PT501XX / BEIGE / ZWART / GRIJS / WIT
3. MONTÁŽ A DEMONTÁŽ

- VONROC®
- BUILD YOUR FUTURE
- PARTY TENT 300X300CM
- EN - SAFETY NOTE
- NL - VEILIGHEIDSWAARSCHUWING
- SAFETY INSTRUCTIONS
- ADDITIONAL SAFETY WARNINGS FOR PARTY TENTS
- MACHINE INFORMATION
- Intended use
- INCLUDED ACCESSORIES:
- PT501XX / BEIGE / BLACK / GREY / WHITE
- S\_PT501XX / BEIGE / BLACK / GREY / WHITE
- S2\_PT501XX / BEIGE / BLACK / GREY / WHITE
- S3\_PT501XX / BEIGE / BLACK / GREY / WHITE
- TECHNICAL SPECIFICATIONS
- DESCRIPTION
- ASSEMBLY AND DISASSEMBLY
- Unfolding the tent (Fig. A, B, C, D, E, F, G, H, I, J, K, L, M)
- Mounting the mosquito net side panels (Fig. B, P) Only for S\_PT501XX or if you bought the accessory ART.NO PT801AA
- Removing the mosquito net side panels (Fig. B, P)
- Only for S\_PT501XX or if you bought the accessory ART.NO PT801AA
- Mounting the side panels (Fig. A, B, C, D, O)
- Only for S2\_PT501XX or if you bought the accessory ART.NO PT802AA
- Removing the side panels (Fig. A, B, C, D, O)
- Connecting two tents together (Fig. D)
- ONLY FOR S3\_PT503XX or if you bought the accessory ART.NO PT807AA
- Folding the tent (Fig. L, M, N)
- Connecting the ropes and pegs (Fig. A, B, C, D)
- Connecting the sandbags (Fig. Q)
- NOT included. Article no. PT807AA
- OPERATION
- Adjusting the height (Fig. L)
- MAINTENANCE
- Tent maintenance - inspection - storage
- Before use:
- During use:
- After use:
- Storage:
- WARRANTY
- EXTRA VEILIGHEIDSWAARSCHUWINGEN VOOR
- PARTYTENTEN
- MACHINE-INFORMATIE
- Beoogd gebruik
- MEEGELEVERDE ACCESSOIRES:
- MONTÁŽ A DEMONTÁŽ
Brand : Vonroc
Model : PT809AA
Category : Reception tent