
FreshJet 2600 - Air Conditioning DOMETIC - Free user manual and instructions
Find the device manual for free FreshJet 2600 DOMETIC in PDF.

| Product type | Roof air conditioner for motorhome and caravan |
| Brand | Dometic |
| Model | FreshJet 2600 |
| Product number | 9105305660 |
| Cooling capacity (compressor) | 2500 W |
| Cooling capacity (ISO 5151) | 2500 W |
| Heating capacity (heat pump) | 3300 W |
| Power supply | 230 V~ / 50 Hz |
| Current consumption (cooling) | 5.2 A |
| Current consumption (heating) | 5.9 A |
| Operating temperature range | 0 °C to +52 °C |
| Refrigerant | R-407c |
| Fan | 4 speeds + automatic mode |
| Protection type | IPX4 |
| Max. interior volume (insulated walls) | 29 m³ |
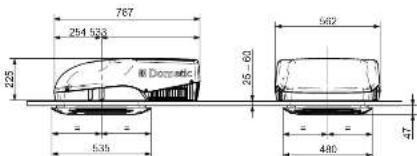
| Dimensions (L x W x H) above roof | 980 x 650 x 248 mm |
| Weight | approx. 39 kg |
| Available air outlet units | Chillout ADB, Design ADB |
| Main functions | Cooling, heating (heat pump), soft start, integrated lighting |
| Routine maintenance | Cleaning of air filters and condensation water drain openings |
| Safety | Automatic shutdown by icing detector, IPX4 water splash protection |
Frequently Asked Questions - FreshJet 2600 DOMETIC
User questions about FreshJet 2600 DOMETIC
0 question about this device. Answer the ones you know or ask your own.
Ask a new question about this device
Download the instructions for your Air Conditioning in PDF format for free! Find your manual FreshJet 2600 - DOMETIC and take your electronic device back in hand. On this page are published all the documents necessary for the use of your device. FreshJet 2600 by DOMETIC.
USER MANUAL FreshJet 2600 DOMETIC
(9102900234, 9102900235)
©
i
natural_image
Diagram showing car interior components with no visible text or symbols[NO TEXT]
4
natural_image
Two diagrams showing a pencil sketching a square and a hand holding a cylindrical object, both without any text or symbols.©
5
A

B

6
7
8
8
9
10

natural_image
Two identical diagrams showing a car on a lift above a vehicle, with arrows indicating motion or movement (no text or symbols)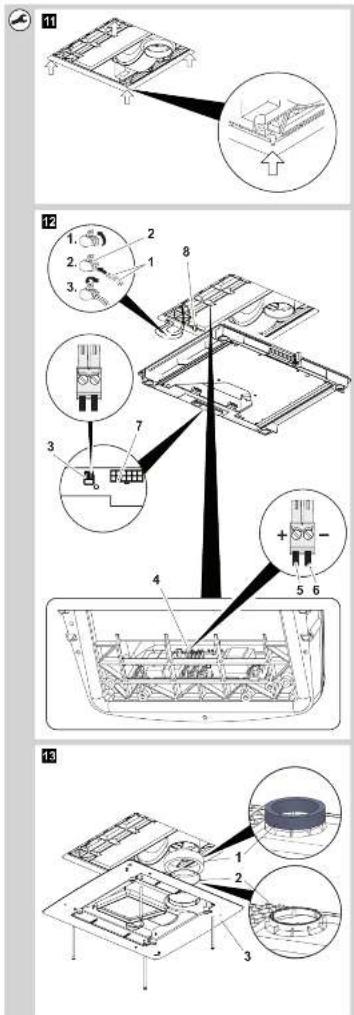
©
i

flowchart
graph TD
    A["输入端"] --> B["1"]
    B --> C["2"]
    C --> D["FJ2200FJ1100, FJ1700"]
    D --> E["输出端"]
    E --> F["1"]
    E --> G["2"]
    G --> H["FJ2600, FJ3200"]
    style A fill:#f9f,stroke:#333
    style E fill:#ccf,stroke:#333
i
20
flowchart
graph TD
    A["Component 1"] --> B["Switch 1"]
    A --> C["Switch 2"]
    D["Component 2"] --> E["Relays 1-2"]
    D --> F["Relays 3-4"]
    D --> G["Relays 5-6"]
    D --> H["Relays 7-8"]
    D --> I["Relays 9-10"]
21
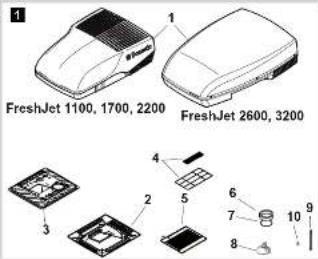
FreshJet 1100, 1700, 2200
FreshJet 2600, 3200

| DE | EN | FR | ES | IT | NL | DA | SV | NO | FI | PT | RU | PL | CS | SK | HU | |
| bl | Bau | Blue | Deu | Aur | Bu | Btau | Ba | Ba | Ba | Shinen | Azul | Cenali | Necleski | Mobla | Mobla | Kek |
| br | Brown | Brown | Marron | Marron | Marcone | Bruh | Bruh | Bruh | Bruh | Ruskes | Casarino | Roos-nerasi | Bezony | Helda | Helda | Banra |
| cy | Cyan | Cyan | Cyan | Cyan | Cyan | Cyan | Cyan | Cyan | Cyan | Syanei | Cune | Fangyah | Cyan | Aurova | Arova | Cicin |
| ge | Solo | Yellow | Jauno | Amantia | Gioia | Goi | GuI | GuI | GuI | Kafitanen | Antarole | Kemual | Zitly | Zitlu | Zitlu | Sanga |
| gn | Gran | Green | Veet | Veet | Veeta | Green | Gran | Gran | Gran | Vitrea | Vece | Senelaki | Zeroy | Zerola | Zerola | Zid |
| gr | Gray | Gray | Gra | Gra | Giglo | Giga | Giga | Giga | Giga | Harmosa | Conzeita | Cocayi | Stary | Seda | Sva | Strana |
| or | Orange | Orange | Orange | Namya | Aromcino | Orange | Orange | Orange | Orange | Drosai | Car da lamja | Opaewatva | Pomatafou | Orcanba | Orcanba | Nomano |
| pk | Pink | Pink | Rose | Rose | Rose | Rice | Lyseride | Rose | Rose | Plinkii | Corde rota | Pleosahi | Rizovny | Rizova | Rizova | Rizosezin |
| r | Red | Red | Rouga | Roya | Rassa | Rod | Red | Red | Red | Pumano | Varmato | Spinosha | Cronsovy | Doncovi | Corvani | Pice |
| sw | Schwarz | Black | Nair | Nagro | Naro | Zuari | Sart | Sart | Sart | Musta | Proto | Nupalvi | Czerny | Domá | Cicina | Faetic |
| vl | Veetl. | Veetl. | Veetl. | Lila | Veetla | Paes | Veetl. | Veetl. | Veetl. | Veetl. | Veletla | Cherotocella | Forkely | Flavola | Flavola | Eurya |
| ws | Veetl. | White | Banco | Banco | Banco | WII | Hid | Wt. | Hvt. | Veikolin | Branco | Benel | Saly | Sila | Beta | Fener |

Dometic
Dometic WAECO International GmbH
Hollefeldstrasse 63
U-48262 Emsdetten
www.dometic-waeco.com
CD
Dometic
FreshJet
Chillout ADB
(9102900232, 9102900233)
©
i
natural_image
Four technical diagrams showing car interior views labeled A, B, and C, with no visible text or symbols.[NO TEXT]
4
natural_image
Two technical diagrams showing a hand holding a pen and a tool, labeled A and B, with no visible text or symbols.©
5
A
B
6

7
8
9

10
natural_image
Two isometric diagrams showing a car on a lift above a vehicle, with arrows indicating motion (no text or symbols)[NO TEXT]
12
13
14
©
16

natural_image
Hand holding a tool interacting with a mechanical component (no visible text or symbols)17
18
natural_image
Technical diagram of a mechanical or electronic component with no visible text, numbers, or symbols.i
flowchart
graph TD
    A["1"] --> B["2"]
    B --> C["FJ2200FJ1100, FJ1700"]
    D["2"] --> E["3"]
    E --> F["FJ2600, FJ3200"]
    G["4"] --> H["5"]
    H --> I["6"]
    I --> J["7"]
    J --> K["8"]
    K --> L["9"]
    L --> M["10"]
    M --> N["11"]
    N --> O["12"]
    O --> P["13"]
    P --> Q["14"]
    Q --> R["15"]
    R --> S["16"]
    S --> T["17"]
    T --> U["18"]
    U --> V["19"]
    V --> W["20"]
    W --> X["21"]
    X --> Y["22"]
    Y --> Z["23"]
EN
Air conditioning roof unit
Installation Manual....3
DE
Dachklimaanlage
Montageanleitung 25
FR
Climatiseur de toit
Instructions de montage ..... 48
ES
Aire acondicionado de techo
Instrucciones de montaje. ..... 73
IT
Climatizzatore a tetto
Indicazioni di montaggio ..... 97
NL
Airconditioning voor
dakinbouw
Montagehandleiding 121
DA
Klimaanlæg til tagmontering
Monteringsvejledning. 144
sv
Takmonterad klimatanläggning
Monteringsanvisning ..... 167
NO
Takmontert klimaanlegg
Monteringsanvisning ..... 189
FI
Kattooilmastointilaitteisto
Asennusohje 211
PT
Ar condicionado para tejadilho
Instruções de montagem ..... 233
RU
Накрышный кондиционер
Инструкция по монтажу.....258
Dometic FreshJet
PL
Please read this instruction manual carefully before installation and start-up, and store it in a safe place. If you pass on the device to another person, hand over this instruction manual along with it.
Table of contents
1 Explanation of symbols 3
2 Safety and installation instructions....4
3 Target group for this instruction manual 7
4 Scope of delivery 7
5 Accessories 8
6 Intended use 8
7 Labels 8
8 Installation 9
9 Troubleshooting....19
10 Disposal 20
11 Technical data 22
1 Explanation of symbols

DANGER!
Safety instruction: Failure to observe this instruction will cause fatal or serious injury.

WARNING!
Safety instruction: Failure to observe this instruction can cause fatal or serious injury.

CAUTION!
Safety instruction: Failure to observe this instruction can lead to injury.

NOTICE!
Failure to observe this instruction can cause material damage and impair the function of the product.

NOTE
Supplementary information for operating the product.
▶ Action: This symbol indicates that action is required on your part. The required action is described step-by-step.
√This symbol describes the result of an action.
Fig. 1 5, page 3: This refers to an element in an illustration. In this case, item 5 in figure 1 on page 3.
2 Safety and installation instructions
Please observe the prescribed safety instructions and stipulations from the vehicle manufacturer and service workshops.
The manufacturer accepts no liability for damage in the following cases:
● Faulty assembly or connection
● Damage to the product resulting from mechanical influences and excess voltage
- Alterations to the product without express permission from the manufacturer
● Use for purposes other than those described in the operating manual
Note the following basic safety information when using electrical devices to protect against:
- Electric shock
- Fire hazards
- Injury
2.1 Handling the device

WARNING!
- Installation and repair of the roof air conditioner may only be carried out by qualified personnel who are familiar with the risks involved and the relevant regulations. Inadequate repairs may cause serious hazards. For repair service, please contact the service centre in your country (addresses on the back page).
● Electrical devices are not toys.
Keep electrical devices out of reach of children or infirm persons. Do not allow them to use electrical devices without supervision.
- Persons whose physical, sensory or mental capabilities or whose lack of experience and knowledge prevent them from using the device safely should not use it without supervision or instruction by a responsible person.
- Do not undo the upper cover of the roof air conditioner in the event of a fire. Use approved extinguishing agents instead. Do not use water to extinguish fires.

CAUTION!
- The roof air conditioner must be installed securely so that it cannot fall down.
- Only operate the roof air conditioner if you are certain that the housing and the cables are not damaged.
- Do not use the roof air conditioner near flammable fluids or in closed rooms.
● Make sure no combustible objects are stored or installed near the air outlet. A distance of at least 50 cm must be kept. - Do not reach into air outlets or insert any foreign objects in the device.

NOTICE!
- Only use the device as intended.
- The roof air conditioner is not suitable for use in agricultural or construction vehicles.
- Do not make any alterations or conversions to the device.
- Never drive through automatic car washes when the roof air conditioner is mounted.
- If faults occur in the refrigerator circuit, the system must be checked by a specialist company and repaired properly. The refrigerant must never be released into the air.

NOTE
- Please ask your vehicle manufacturer if a technical inspection is required after fitting an air conditioner and whether the height entered in the vehicle documents needs to be altered:
– FreshJet 1100, 1700, 2200: increased height 225 mm
– FreshJet 2600, 3200: increased height 248 mm
2.2 Handling electrical cables

WARNING!
- The electrical power supply may only be connected by a qualified electrician (e.g. VDE 0100, Part 721 in Germany).

CAUTION!
- Fit a fuse of at least 10 amps to the connection with the vehicle's power supply.
- Attach and lay the cables so that they cannot be tripped over or damaged.

NOTICE!
- Use cable ducts to lay cables through walls with sharp edges.
- Do not lay loose or bent cables next to electrically conductive materials (metal).
- Do not pull on the cables.
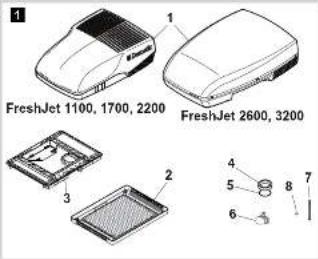
3 Target group for this instruction manual
The instructions in this manual are intended for qualified personnel at workshops who are familiar with the guidelines and safety precautions to be applied.
4 Scope of delivery
4.1 With air diffuser box Chillout ADB (9102900232, 9102900233)
| No. in fig. 1 Number Description | ||||
| 1 1 Roof air conditioner | ||||
| 2 1 Air outlet unit | ||||
| 3 1 Fastening frame | ||||
| 4 | 1 | A | i | r |
| 5 1 Filter covers | ||||
| 6 1 Seal thick | ||||
| 7 1 Seal thin | ||||
| 8 3 Cable connectors | ||||
| 9 4 Long fastening screws | ||||
| 10 4 Short fastening screws | ||||
4.2 With air diffuser box Design ADB (9102900234, 9102900235)
| No. in fig. 1 Number Description |
| 1 1 Roof air conditioner |
| 2 1 Air outlet unit |
| 3 1 Fastening frame |
| 4 1 Seal thick |
| 5 1 Seal thin |
| 6 3 Cable connectors |
| 7 4 Long fastening screws |
| 8 4 Short fastening screws |
5 Accessories
Available as accessories (not included in the scope of delivery):
Designation Item number
| WAECO DC extension kit DC-Kit1 (FJ1100 only) 9100300003 | |
| WAECO DC extension kit DC-Kit2(FreshJet 1100, 1700, 2200 only) | 9100300001 |
| WAECO DC extension kit DC-Kit3(FreshJet 1100, 1700, 2200 only) | 9100300002 |
| WAECO DC extension kit DC-Kit4(FreshJet 1100, 1700, 2200, 2600, 3200) | 9100300044 |
| WAECO DC extension kit DC-Kit5(FreshJet 1100, 1700, 2200 only) | 9100300073 |
| WAECO DC extension kit DC-Kit6(FreshJet 1100, 1700, 2200, 2600, 3200) | 9100300074 |

NOTE
The WAECO DC extension kit (accessory) allows the Dometic FreshJet roof air conditioner to be used while in motion.
6 Intended use
The Dometic FreshJet roof air conditioner can condition the interior of campers and caravans with cool air.
The roof air conditioner is not suitable for installation in construction machines, agricultural machines or similar equipment. It will not work properly if exposed to strong vibrations.
Do not operate the roof air conditioner if the ambient temperature is above 52^ C.

NOTE
You can find additional information on roof air conditioners in the operating manual, such as the technical description or the controls.
7 Labels
Labels are attached to the Dometic FreshJet roof air conditioners. These labels provide the user and fitter with information on specifications of the device.
8 Installation

CAUTION! Beware of injury
The roof air conditioner may only be installed by qualified personnel from a specialist company. The following information is intended for technicians who are familiar with the guidelines and safety precautions to be applied.
8.1 Note on installation
Read this installation manual completely before installing the roof air conditioner.
The following tips and instructions must be observed while installing the roof air conditioner:

DANGER! Danger of electrocution
Disconnect all power supplies when working on the roof air conditioner.

CAUTION! Beware of injury
- Improper installation of the roof air conditioner can result in irreparable damage to the device and put the safety of the user at risk.
- The manufacturer assumes no liability for malfunctions and for the safety of the roof air conditioner, especially for injury and/or damage to property, if the roof air conditioner is not fitted in accordance with these installation instructions.
● Always wear the recommended protective clothing (e.g. protective goggles, gloves).

NOTICE! Beware of damage
- Observe the structural engineering of the vehicle and seal of all openings made when installing the roof air conditioner.
- Check whether the roof of the vehicle is able to support the weight of a person before climbing onto it. Ask the vehicle manufacturer about the permissible roof loads.
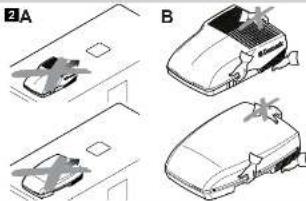
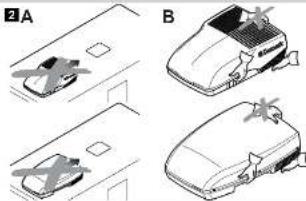
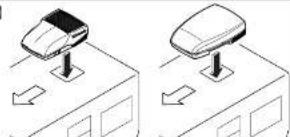
Note on transport
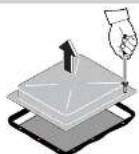
● Always have someone help you carry the roof air conditioner.
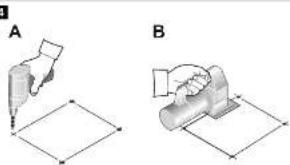
● Always lift the roof air conditioner to move it and never drag it over the roof (fig. 2A).
- Do not use the rear ventilation slots to lift it (fig. 2 B).
Note on installation location
- Before installing the roof air conditioner, check whether any vehicle components could be damaged by the installation of the roof air conditioner (such as lamps, cupboards, doors).
- Before installation, find out (by consulting the manufacturer of the vehicle) whether the construction is designed for the static weight and the loads of the air conditioner when the vehicle is in motion. The manufacturer of the roof air conditioner assumes no liability whatsoever.
- The vehicle manufacturer may have already provided points where the opening for the installation of the roof air conditioner can be made without any risk of weakening the construction or cutting power cables.
- Select a flat and sufficiently level area at the centre of the vehicle roof between two longitudinal sections for installation.
● The roof inclination of the installation surface may not exceed 10^ .
● Make sure no combustible objects are stored or installed near the air outlet. A distance of at least 50 cm should be kept.
● Make sure that there are no objects within the vehicle which could obstruct the attachment of the air outlet unit or the cooled air from flowing through the swivelling air distribution nozzles. - For safety reasons, note the location of existing wiring harnesses, wires and other components within the installation area, in particular those which are not visible, when installing the roof air conditioner (when drilling or screwing etc.).
Note on electrical system
- Only a qualified electrician should connect the roof air conditioner to the electrical power.
- Check that the voltage specification on the type plate is the same as that of the power supply.
- If the lighting should also be switched on without a 230 V voltage supply, make sure that there is a 12 V--- power supply line from the battery to the roof air conditioner.
- Do not lay the 230 V mains cable and the 12/24 V== cable together in the same cable duct.
- Do not lay cables which are loose or bent next to electrically conductive material (metal).
- Install an all-pole switch with a contact opening width of at least 3 mm on the installation side.
There are two ways of installing the roof air conditioner:
- Making a new opening (chapter "Making a new opening" on page 11). In this case the opening must be reinforced by an appropriate frame.
- Using the existing roof hatch openings (ventilation hatch) in the vehicle (chapter “Installing in a roof hatch opening already provided” on page 12).
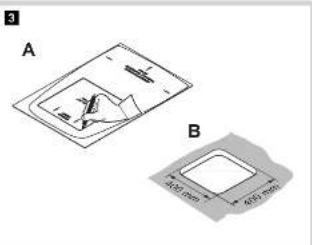
8.2 Making a new opening
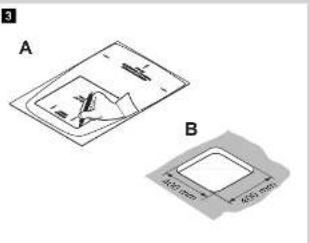
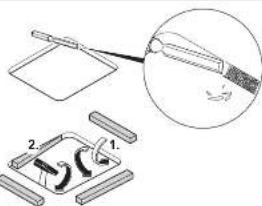
See fig. 3
▶ Select an area at the centre on the roof between two longitudinal supports.
▶ Mark the position and size of the opening using the template included in the packaging (A and B).
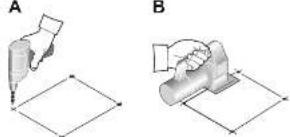
See fig. 4
▶Drill out the corners (A).
▶ Carefully cut out the opening on the roof using a keyhole saw or a similar tool (B).
Make sure no electrical power cables are damaged.
See fig. 5
▶Before installation, check whether the roof hole needs reinforcing.
Remove the foam according to the width of your reinforcing rails (not in scope of delivery) (A).
▶ Fit the reinforcing rails (B).
8.3 Installing in a roof hatch opening already provided

NOTE
- Existing roof hatch openings in accordance with fig. 3 are suitable for installing the roof air conditioner.
- Dispose of all waste material, glue, silicone and seals separately. Observe the disposal guidelines.
- The manufacturer only assumes liability for parts included in the scope of delivery. The validity of the warranty expires if the device is installed together with third-party parts.
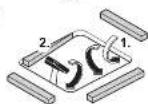
See fig. 6
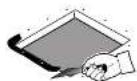
▶Remove all screws and fixtures of the existing roof hatch.
▶Take out the roof hatch.
See fig. 7
▶Remove the sealant around the opening using a scraper or similar tool.
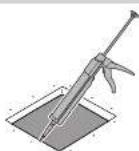
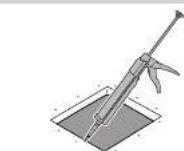
See fig. 8

NOTICE!
Observe the sealant manufacturer's instructions.
Seal the screw holes and recesses with a flexible non-hardening butyl sealing compound (e.g. SikaLastomer-710).
8.4 Laying the connecting cables

DANGER! Danger of electrocution
Make sure there is no voltage at electrically operated components before carrying out work on them!
The roof air conditioner must be connected to an electric circuit which is able to supply the required current (see chapter “Technical data” on page 22).
▶Select the cross-section of the cable corresponding to the length:
- Length < 7.5m : 1.5mm^2
- Length > 7.5 m: 2.5 mm ^2
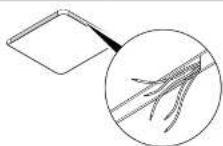
See fig. 9
▶Make an opening on one side in order to feed through the electrical power supply cable.
▶ Feed the 230 V\~ cable through the opening into the vehicle interior.
If the lighting should be switched on without the use of a 230 V\~ voltage supply:
▶ Connect the cable with the positive terminal and the negative terminal of the vehicle battery.
▶ Feed the 12 V== cable through the opening into the vehicle interior.
8.5 Installing the roof air conditioner with Chillout ADB (9102900232, 9102900233)

NOTICE! Risk of damage
Observe the structural strength of the roof of the vehicle. The roof of the vehicle must be able to bear the weight of the roof air conditioner. The roof must not be indented or deformed by the weight of the unit, even over a longer period of time.
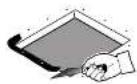
See fig. 10
▶Lift the roof air conditioner onto the roof of the vehicle.
▶Position the roof air conditioner over the installation opening.
Observe the direction of travel.
Attaching the roof air conditioner
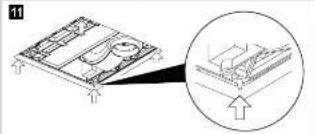
See fig. 11
▶ Position the roof air conditioner into the mounting opening using the conical noses.
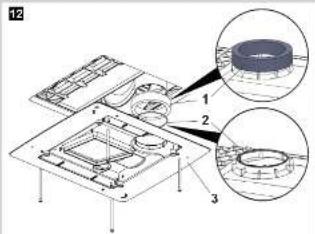
See fig. 12
▶ Choose the suitable seal in accordance with the following table:
Roof thickness Seal type
30 - 45 mm thin (2)
45 - 60 mm thick (1)
▶Position the seal on the mounting frame.
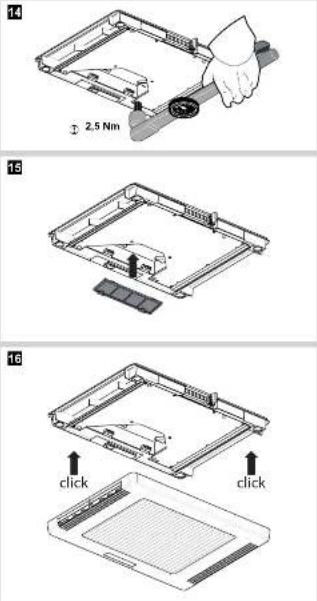
▶ Fasten the mounting frame (3) on the underside of the roof air conditioner with the 4 screws supplied.
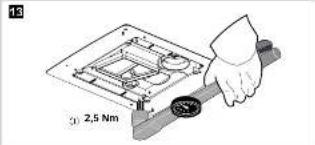
See fig. 13

NOTICE! Risk of damage
Tighten to the specified torque.
▶Tighten the screws using a torque spanner and a fastening torque of 2.5 Nm.
Electrical connection
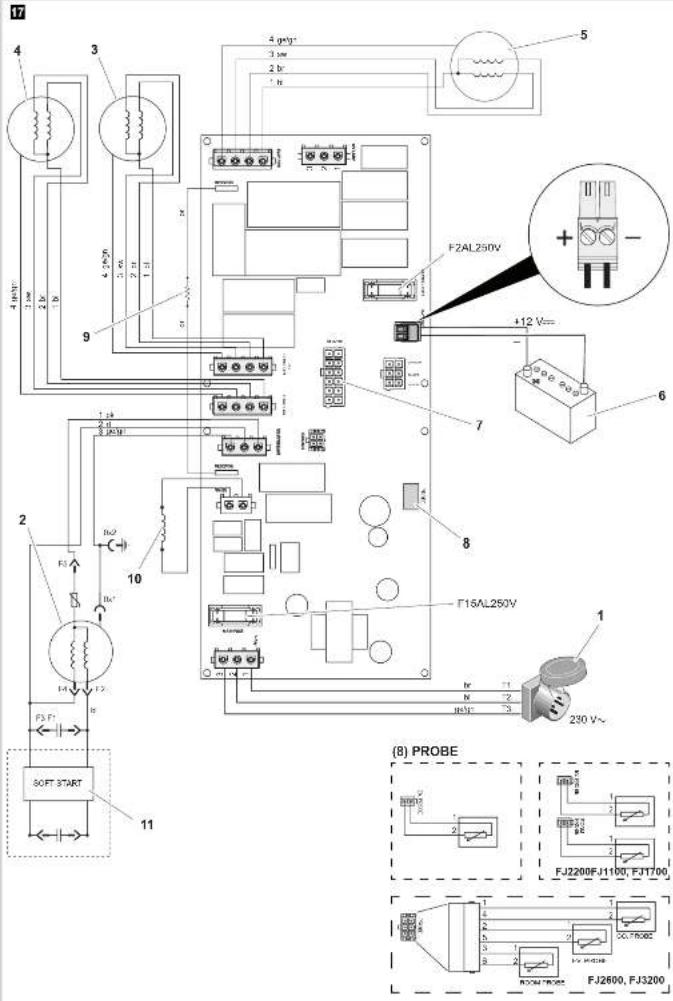
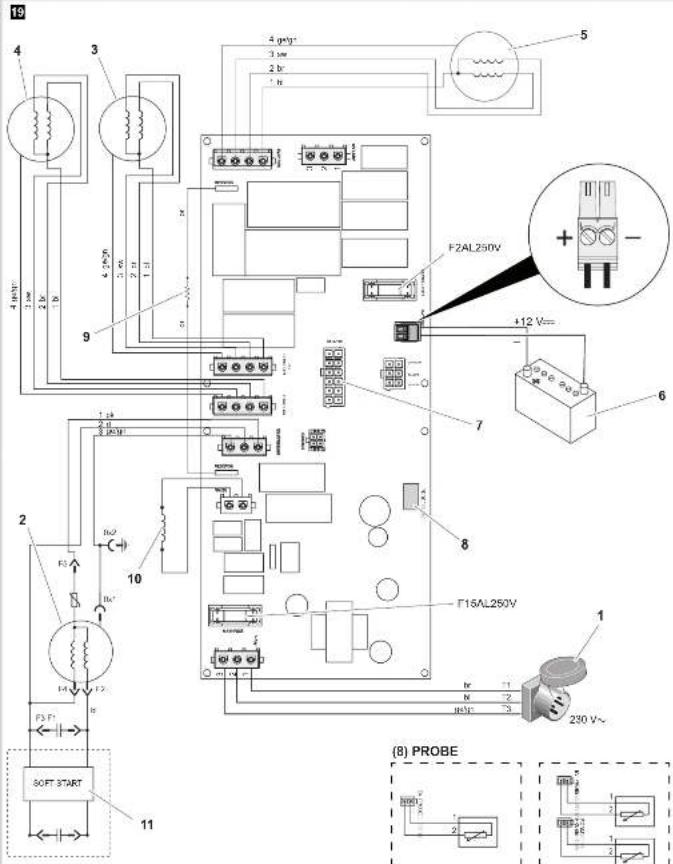
The complete circuit diagram can be found in fig. 19:
| Item Description |
| 1 230 V~ mains |
| 2 Compressor |
| 3 Fan condenser |
| 4 Fan condenser (FreshJet 2600, FreshJet 3200 only) |
| 5 Fan evaporator |
| 6 B a t t e r y |
| 7 Remote socket |
| 8 Temperature sensor |
| 9 Heating (FreshJet 1700, item no. 9105305736 and FreshJet 2200, item no. 9105305738, 9105305740 only) |
| 10 Heat Pump (FreshJet 2600, FreshJet 3200 only) |
| 11 Soft Start (FreshJet 2200, item no. 9105305738, FreshJet 2600, FreshJet 3200 only) |
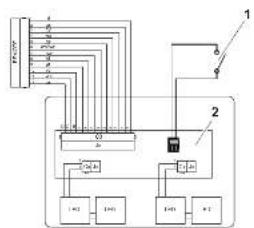
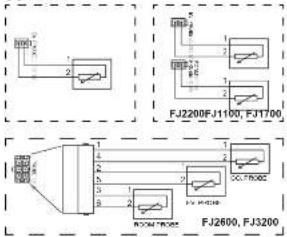
Keys for fig. 20:
| Item Description |
| 1 Remote light switch |
| 2 Air diffuser |
See fig. 14
230 V\~ cable
▶ Connect the roof air conditioner with the 230 V\~ voltage supply. Connect the cables (1) to a cable connector (2).
Remote light switch (not included in the scope of delivery)
You can connect the lighting to a remote light switch. This enables you to switch on the lighting remotely.
To do this, proceed as follows:
▶ Disconnect the 2-pin plug (3) from the socket on the circuit board of the air outlet unit.
▶ Connect the two cables of the remote light switch to the 2-pin plug (3).
▶ Insert the 2-pin plug (3) into socket on the circuit board.
12 V--- cable
You can connect the lighting to the battery. This enables you to switch on the lighting even if the 230 V\~ voltage supply is not connected.
To do this, proceed as follows:
▶ Disconnect the 2-pin plug (4) from the socket on the main board.
▶ Connect the positive cable (5) with the plug.
▶ Connect the negative cable (6) with the plug.
Connecting the circuit board
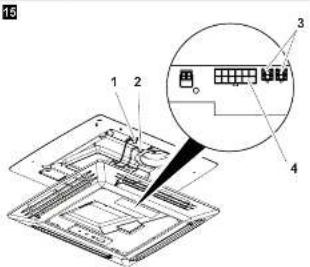
See fig. 15
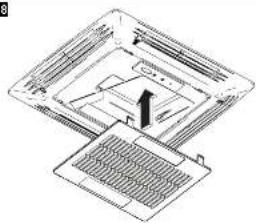
▶ Insert the 12-pin plug (1) in the socket (4) on the circuit board of the air outlet unit.
▶ Insert the two 2-pin plugs (2) in the sockets (3) on the circuit board.
8.6 Installing the air outlet unit Chillout ADB
See fig. 16
▶ Attach the air outlet unit to the (1) fastening brackets using the short fastening screws.
See fig. 17
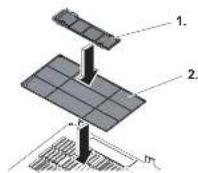
▶Install the air filter in the specified sequence.
See fig. 18
▶Fit the filter covers.
▶ Enter the new vehicle height and weight in the vehicle documents.
8.7 Installing the roof air conditioner with Design ADB (9102900234, 9102900235)

NOTICE! Risk of damage
Observe the structural strength of the roof of the vehicle. The roof of the vehicle must be able to bear the weight of the roof air conditioner. The roof must not be indented or deformed by the weight of the unit, even over a longer period of time.
See fig. 10
▶Lift the roof air conditioner onto the roof of the vehicle.
▶Position the roof air conditioner over the installation opening.
Observe the direction of travel.
Attaching the roof air conditioner
See fig. 11
▶ Position the roof air conditioner into the mounting opening using the conical noses.
Electrical connection
The complete circuit diagram can be found in fig. 17:
| Item Description |
| 1 230 V~ mains |
| 2 Compressor |
| 3 Fan condenser |
| 4 Fan condenser (FreshJet 2600, FreshJet 3200 only) |
| 5 Fan evaporator |
| 6 B a t t e r y |
| 7 Remote socket |
| 8 Temperature sensor |
| 9 Heating (FreshJet 1700, item no. 9105305736 and FreshJet 2200, item no. 9105305738, 9105305740 only) |
| 10 Heat Pump (FreshJet 2600, FreshJet 3200 only) |
| 11 Soft Start (FreshJet 2200, item no. 9105305738, FreshJet 2600, FreshJet 3200 only) |
Keys for fig. 18:
Item Description
1 Remote light switch
2 Air diffuser
See fig. 12
230 V\~cable
▶ Connect the roof air conditioner with the 230 V\~ voltage supply. Connect the cables (1) to a cable connector (2).
Remote light switch (not included in the scope of delivery)
You can connect the lighting to a remote light switch. This enables you to switch on the lighting remotely.
To do this, proceed as follows:
▶ Disconnect the 2-pin plug (3) from the socket on the circuit board of the air outlet unit.
▶ Connect the two cables of the remote light switch to the 2-pin plug (3).
▶ Insert the 2-pin plug (3) into socket on the circuit board.
12 V== cable
You can connect the lighting to the battery. This enables you to switch on the lighting even if the 230 V\~ voltage supply is not connected.
To do this, proceed as follows:
▶ Disconnect the 2-pin plug (4) from the socket on the main board.
▶ Connect the positive cable (5) with the plug.
▶ Connect the negative cable (6) with the plug.
Connecting the circuit board
▶ Insert the 12-pin plug (8) in the socket (7) on the circuit board of the air outlet unit.
See fig. 13
▶ Choose the suitable seal in accordance with the following table:
Roof thickness Seal type
| 30 – 45 mm thin (2) |
| 45 – 60 mm thick (1) |
▶Position the seal on the mounting frame.
▶ Fasten the mounting frame (3) on the underside of the roof air conditioner with the 4 screws supplied.
See fig. 14

NOTICE! Risk of damage
Tighten to the specified torque.
▶Tighten the screws using a torque spanner and a fastening torque of 2.5 Nm.
8.8 Installing the air outlet unit Design ADB
See fig. 15
▶Install the air filter in the specified sequence.
See fig. 16
▶Attach the air outlet unit magnetically to the mounting frame.
9 Troubleshooting
Problem Cause Remedy
| Roof air conditioner constantly switches itself off. | Icing sensor has tripped. Outer temperature is too low or all air nozzles are closed. | |
| No cooling capacity | The roof air conditioner is not set to cooling. | ▶Set the roof air conditioner to cooling. |
| The ambient temperature is above 52 °C. | The roof air conditioner is only designed for ambient temperatures of up to 52 °C. | |
| The temperature set is higher that the room temperature. | ▶Select a lower temperature. | |
| The ambient temperature is below 16 °C. | ▶The roof air conditioner is only designed for ambient temperature above 16 °C. | |
| One of the temperature sensors is defective. | ▶Contact an authorised workshop. | |
| The vaporiser fan is damaged. | ||
| The condenser fan is damaged. | ||
| Low air output | The air intake section is clogged up. | ▶Remove any leaves and other dirt from the ventilation grilles of the roof air conditioner. |
| The blower is defective. ▶Contact an authorised workshop. | ||
| Water enters the vehicle | The condensation water drainage openings are clogged up. | ▶Clean the drainage openings for condensation water. |
| The seals are damaged. ▶Contact an authorised workshop. | ||
| Roof air conditioner does not switch on. | No supply voltage (230 V~) connected. | ▶Check the power supply. |
| The voltage is too low (under 200 V). The voltage converter is defective. | ▶Contact an authorised workshop. | |
| One of the temperature sensors is defective. | ||
| The electrical fuse of the power supply is too low. | ▶Check the electrical fuse of the power supply. | |
| Roof air conditioner does not switch off. | One of the temperature sensors is defective. | ▶Contact an authorised workshop. |
| The electrical fuse of the power supply is too low. | ▶Check the electrical fuse of the power supply. | |
10 Disposal
Regulations for environmental safety and correct disposal
All organisations must apply a set of procedures to identify, evaluate and control the influence that their activities (manufacturing, products, services, etc.) have on the environment.
The procedures to be followed to identify significant environmental impact must take the following factors into account:
● use of raw materials and natural resources
● atmospheric emissions
● discharge of liquids
- waste management and recycling
● contamination of the soil
In order to minimise environmental impact, the manufacturer provides a series of indications here below that should be taken into account by all those who, for whatever reason, interact with the appliance during its working life.
- All packing components must be disposed of (preferably recycled) in compliance with statutory legislation in the country in which disposal takes place.
- All product components must be disposed of (preferably recycled) in compliance with statutory legislation in the country in which disposal takes place.
- For correct disposal, the appliance must be consigned to an authorised waste disposal company to ensure that all recyclable components are reused and the remaining materials are processed properly.
- During installation ensure the room has adequate ventilation to prevent the build-up of stale air that might be harmful to the health of the operators.
- During operation and maintenance ensure that any waste pollutant products (oil, grease, etc.) are disposed of correctly.
- Keep noise levels down to reduce noise pollution.
For more information on correct dismantling of our products please refer to the recycling handbooks at www.dometic.com.
▶Place the packaging material in the appropriate recycling waste bins wherever possible.
When in operation or undergoing repairs and maintenance work, make sure that the refrigerant circuit is not damaged and refrigerant cannot escape. It acts as a greenhouse gas and should not be allowed into the environment.
If you wish to finally dispose of the product, ask your local recycling centre or specialist dealer for details about how to do this in accordance with the applicable disposal regulations.
▶ Dispose of the product at an official waste disposal facility in accordance with the applicable recycling or disposal guidelines.

Protect the environment!
Do not dispose of any batteries with general household waste. Return defective or used batteries to your retailer or dispose of them at collection points.
11 Technical data
| Dometic FreshJet 1100 | Dometic FreshJet 1700 | ||
| Item no.: 9105305735 910530 | 5737 9105305736 | ||
| Compressor cooling capacity: | 1000 W 1700 W | ||
| Cooling capacity based on ISO 5151: | 850 W 1600 W | ||
| Heating capacity: -- 800 W | |||
| Rated input voltage: | 230 V~/ 50 Hz | ||
| Power consumption in cooling mode: | 2.0 A 2.7 A | ||
| Power consumption in heating mode: | -- | 3.5 A | |
| Operating temperature range: | 0 °C to + 52 °C | ||
| Refrigerant: | R-134a | R-407c | |
| Blower: | 4 blower levels1 Automatic mode | ||
| Protection class: | IPX4 | ||
| Max. volume of space in the vehicle (with insulated walls): | 16 m3 | 20 m3 | |
| Dimensions L x W x H (mm): | Chillout ADB: fig. 21Design ADB: fig. 19 | ||
| Weight: | approx. 22.5 kg | approx. 29 kg | |
| Inspection/certification: |   10R-030842 10R-030842  10R-053211 10R-053211 |   10R-053210 10R-053210 | |
| DometicFreshJet 2200 | ||
| Item no.: 9105305739 910530 | 5738 | 9105305740 |
| Compressor cooling capacity: | 2200 W | |
| Cooling capacity based on ISO 5151: | 2050 W | |
| Heating capacity: - 1200 W | ||
| Rated input voltage: 230 V~ / 50 Hz | ||
| Power consumption in cooling mode: | 4.1 A | |
| Power consumption in heating mode: | -5.2 A | |
| Operating temperature range: | 0 °C to +52 °C | |
| Refrigerant: R-407c | ||
| Blower: 4 blower levels | 1 Automatic mode | |
| Protection class: IPX4 | ||
| Max. volume of space in the vehicle (with insulated walls): | 25 m3 | |
| Dimensions L x W x H (mm): Chillout ADB: fig. 21 Design ADB: fig. 19 | ||
| Weight: approx. 32 kg | ||
| Inspection/certification: |      10 03 10 09 10 03 10 09 | |
| Dometic FreshJet 2600 | Dometic FreshJet 3200 | |
| Item no.: 9105305660 910530 | 5661 | |
| Compressor cooling capacity: | 2500 W 2800 W | |
| Cooling capacity based on ISO 5151: | 2500 W 2800 W | |
| Heating capacity: 3300 W | ||
| Rated input voltage: | 230 V~ / 50 Hz | |
| Power consumption in cooling mode: | 5.2 A 5.7 A | |
| Power consumption in heating mode: | 5.9 A 5.9 A | |
| Operating temperature range: | 0 °C to + 52 °C | |
| Refrigerant: R-407c R-410a | ||
| Blower: 4 blower levels | 1 Automatic mode | |
| Protection class: IPX4 | ||
| Max. volume of space in the vehicle (with insulated walls): | 29 m3 32 m3 | |
| Dimensions L x W x H (mm): | 980 x 650 x 248 mm (height above vehicle roof) | |
| Weight: | approx. 39 kg | approx. 36 kg |
| Inspection/certification: | 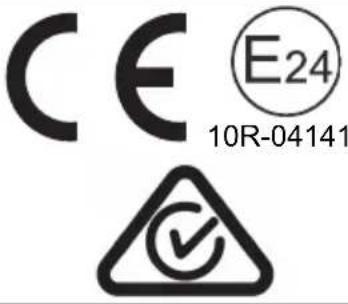 1 1 | CE E2410R-041412 |
Consignes relatives au transport
45 – 60 mm hrubé (1)
▶Tesnenie umiestnite na montážny rám.
| 30 – 45 mm tenké (2) |
| 45 – 60 mm hrubé (1) |
| Dometic FreshJet 1100 | Dometic FreshJet 1700 | |||
| Č. výrobku: 9105305735 9105 | 305737 91053057 | 36 | ||
| Chladiaci výkon kompresora: | 1000 W 1700 W | |||
| Chladiaci výkon v nadväznosti na ISO 5151: | 850 W 1600 | W | ||
| Ohrievací výkon: -- 800 W | ||||
| Vstupné menovité napätie: | 230 V~ / 50 Hz | |||
| Spotreba prúdu pri chladiacej prevádzke: | 2,0 A | 2,7 A | ||
| Spotreba prúdu pri ohrievacej prevádzke: | -- | 3,5 A | ||
| Rozsah prevádzkovej teploty: | 0 °C až +52 °C | |||
| Chladiaci prostriedok: | R-134a | R-407c | ||
| Ventilátor: | 4 stupne ventilácie 1 automatický režim | |||
| Trieda ochrany: | IPX4 | |||
| Max. objem priestoru vozidla (s izolovanými stenami): | 16 m 20 m^3 | |||
| Rozmery D x Š x V (mm): | Chillout ADB: obr. Design ADB: obr. Design ADB: obr. Design ADB: obr. Design ADB: obr. Design ADB: obr. Design ADB: obr. Design ADB: obr. Design ADB: obr. Design ADB: obr. Design ADB: obr. Design ADB: obr. Design ADB: obr. Design ADB: obr. Design ADB: obr. Design ADB: obr. Design ADB: obr. Design ADB: br. Design ADB: obr. Design ADB: br. Design ADB: br. Design ADB: br. Design ADB: br. Design ADB: br. Design ADB: br. Design ADB: br. Design ADB: br. Design ADB: br. Design ADB: br. Design ADB: br. Design ADB: br. Design ADB: br. Design ADB: br. Design ADB: br. Design ADB: br. Design ADB: br. Design ADR: Design ADB: br. Design ADB: br. Design ADB: br. Design ADB: br. Design ADB: br. Design ADB: br. Design ADB: br. Design ADB: br. Design ADB: br. Design ADB: br. Design ADB: br. Design ADB: br. Design ADB: br. Design ADB: br. Design ADB: br. Design ADB: br. Design ADB; Design ADB: br. Design ADB: br. Design ADB: br. Design ADB: br. Design ADB: br. Design ADB: br. Design ADB: br. Design ADB: br. Design ADB: br. Design ADB: br. Design ADB: br. Design ADB: br. Design ADB: br. Design ADB: br. Design ADB: br. Design ADB: br. Design ADB, br. Design ADB: br. Design ADB: br. Design ADB: br. Design ADB: br. Design ADB: br. Design ADB: br. Design ADB: br. Design ADB: br. Design ADB: br. Design ADB: br. Design ADB: br. Design ADB: br. Design ADB: br. Design ADB: br. Design ADB: br. Design ADB: br. DesignADB: Design ADB: br. Design ADB: br. Design ADB: br. Design ADB: br. Design ADB: br. Design ADB: br. Design ADB: br. Design ADB: br. Design ADB: br. Design ADB: br. Design ADB: br. Design ADB: br. Design ADB: br. Design ADB: br. Design ADB: br. Design ADB: br. Design ADR, br. Design ADR, br. Design ADR, br. Design ADR, br. Design ADR, br. Design ADR, br. Design ADR, br. Design ADR, br. Design ADR, br. Design ADR, br. Design ADR, br. Design ADR, br. Design ADR, br. Design ADR, br. Design ADR, br. Design ADR, br. Design ADR, br. DesignADB: Design ADB: br. Design ADB: br. Design ADB: br. Design ADB: br. Design ADB: br. Design ADB: br. Design ADB: br. Design ADB: br. Design ADB: br. Design ADB: br. Design ADB: br. Design ADB: br. Design ADB: br. Design ADB: br. Design ADB: br. Design ADB; Design ADB: br.a. Design ADB: br.a. Design ADB: br.a. Design ADB: br.a. Design ADB: br.a. Design ADB: br.a. Design ADB: br.a. Design ADB: br.a. Design ADB: br.a. Design ADB: br.a. Design ADB: br.a. Design ADB: br.a. Design ADB: br.a. Design ADB: br.a. Design ADB: br.a. DesignADB: DesignADB: br.a. DesignADB: br.a. DesignADB: br.a. DesignADB: br.a. DesignADB: br.a. DesignADB: br.a. DesignADB: br.a. DesignADB: br.a. DesignADB: br.a. DesignADB: br.a. DesignADB: br.a. DesignADB: br.a. DesignADB: br.a. DesignADB: br.a. DesignADB: br.a. Design ADB: br.a. DesignADB: br.a. DesignADB: br.a. DesignADB: br.a. DesignADB: br.a. DesignADB: br.a. DesignADB: br.a. DesignADB: br.a. DesignADB: br.a. DesignADB: br.a. DesignADB: br.a. DesignADB: br.a. DesignADB: br.a. DesignADB: br.a. DesignADB; DesignADB; br.a. DesignADB; br.a. DesignADB; br.a. DesignADB; br.a. DesignADB; br.a. DesignADB; br.a. DesignADB; br.a. DesignADB; br.a. DesignADB; br.a. DesignADB; br.a. DesignADB; br.a. DesignADB; br.a. DesignADB; br.a. DesignADB; br.a. DesignADB; br.a. Design ADB; br.a. DesignADB; br.a. DesignADB; br.a. DesignADB; br.a. DesignADB; br.a. DesignADB; br.a. DesignADB; br.a. DesignADB; br.a. DesignADB; br.a. DesignADB; br.a. DesignADB; br.a. DesignADB; br.a. DesignADB; br.a. DesignADB; br.a. DesignADB, br.a. DesignADB; br.a. DesignADB; br.a. DesignADB; br.a. DesignADB; br.a. DesignADB; br.a. DesignADB; br.a. DesignADB; br.a. DesignADB; br.a. DesignADB; br.a. DesignADB; br.a. DesignADB; br.a. DesignADB; br.a. DesignADB; br.a. DesignADB; br.b. DesignADB; br.a. DesignADB; br.a. DesignADB; br.a. DesignADB; br.a. DesignADB; br.a. DesignADB; br.a. DesignADB; br.a. DesignADB; br.a. DesignADB; br.a. DesignADB; br.a. DesignADB; br.a. DesignADB; br.a. DesignADB; br.a. DesignADB; br.a.DesignADB; br.a. DesignADB; br.a. DesignADB; br.a. DesignADB; br.a. DesignADB; br.a. DesignADB; br.a. DesignADB; br.a. DesignADB; br.a. DesignADB; br.a. DesignADB; br.a. DesignADB; br.a. DesignADB; br.a. DesignADB; br.a. DesignADB; br.a. DesignAGB; br.a. DesignADB; br.a. DesignADB; br.a. DesignADB; br.a. DesignADB; br.a. DesignADB; br.a. DesignADB; br.a. DesignADB; br.a. DesignADB; br.a. DesignADB; br.a. DesignADB; br.a. DesignADB; br.a. DesignADB; br.a. DesignADB; br.a. DesignADB;br.a. DesignADB; br.a. DesignADB; br.a. DesignADB; br.a. DesignADB; br.a. DesignADB; br.a. DesignADB; br.a. DesignADB; br.a. DesignADB; br.a. DesignADB; br.a. DesignADB; br.a. DesignADB; br.a. DesignADB; br.a. DesignADB; br.a. DesignADB; br.a, DesignADB; br.a. DesignADB; br.a. DesignADB; br.a. DesignADB; br.a. DesignADB; br.a. DesignADB; br.a. DesignADB; br.a. DesignADB; br.a. DesignADB; br.a. DesignADB; br.a. DesignADB; br.a. DesignADB; br.a. DesignADB; br.a. DesignADB; br.a. DesignBGB; br.a. DesignADB; br.a. DesignADB; br.a. DesignADB; br.a. DesignADB; br.a. DesignADB; br.a. DesignADB; br.a. DesignADB; br.a. DesignADB; br.a. DesignADB; br.a. DesignADB; br.a. DesignADB; br.a. DesignADB; br.a. DesignADB; br.a. DesignADB,br.a. DesignADB; br.a. DesignADB; br.a. DesignADB; br.a. DesignADB; br.a. DesignADB; br.a. DesignADB; br.a. DesignADB; br.a. DesignADB; br.a. DesignADB; br.a. DesignADB; br.a. DesignADB; br.a. DesignADB; br.a. DesignADB; br.a. DesignADB; br.b.AHD2;br.b.AHD2;br.b.AHD2;br.b.AHD2;br.b.AHD2;br.b.AHD2;br.b.AHD2;br.b.AHD2;br.b.AHD2;br.b.AHD2;br.b.AHD2;br.b.AHD2;br.b.AHD2;br.b.AHD2;br.b.AHD2;br.b.AHD2;br.b.AHD2;br.b.AHD1;br.b.AHD1;br.b.AHD1;br.b.AHD1;br.b.AHD1;br.b.AHD1;br.b.AHD1;br.b.AHD1;br.b.AHD1;br.b.AHD1;br.b.AHD1;br.b.AHD1;br.b.AHD1;br.b.AHD1;br.b.AHD1;br.b.AHD1;br.b.AHD1;br.b-AHD1;br.b.AHD1;br.b.AHD1;br.b.AHD1;br.b.AHD1;br.b.AHD1;br.b.AHD1;br.b.AHD1;br.b.AHD1;br.b.AHD1;br.b.AHD1;br.b.AHD1;br.b.AHD1;br.b.AHD1;br.b.AHD1;br.b.AHD1;br.b.AHD1; | |||
Dometic Australia Pty. Ltd.
1 John Duncan Court
Varsity Lakes QLD 4227
+61 7 55076000
+61 7 55076001
Mail: sales@dometic-waeco.com.au
AUSTRIA
Dometic Austria GmbH
The Gateway · 25 Canton Road,
Tsim Sha Tsui · Kowloon
+852 24611386
+852 24665553
Mail: info@dometic-waeco.com.hk
HUNGARY
Dometic Plc. Sales Office
Kerékgyártó u. 5.
H-1147 Budapest
+36 1 468 4400
昌 +36 1 468 4401
Dometic Italy S.r.l.
Via Virgilio, 3
I-47100 Forli
+39 0543 754901
+39 0543 756631
Mail: info@dometic.it
NORWAY
Dometic Norway AS
Skolmar 24
N-3232 Sandefjord
+47 33428450
吕 +47 33428459
Mail: firmapost@waeco.no
POLAND
Dometic Poland Sp. z o.o.
Ul. Puławska 435A
02-801 Warszawa
+48 22 414 32 00
+48 22 414 32 01
Mail: info@dometic.pl
RUSSIA
Dometic RUS LLC
Komsomolskaya square 6-1
107140 Moscow
+7 495 780 79 39
+7 495 916 56 53
Mail: info@dometic.ru
SLOVAKIA
Dometic Slovakia Sales Office Bratislava
Nádražná 34/A
SK-900 28 Ivanka pri Dunaji
+421 2 45 529 680
Mail: bratislava@dometic.com
SPAIN
Dometic Spain S.L.
Avda. Sierra del Guadarrama, 16
E-28691 Villanueva de la Cañada
Madrid
+34 902 111 042
+34 900 100 245
Mail: info@dometic.es
SWEDEN
Dometic Scandinavia AB
Gustaf Melins gata 7
Dometic Switzerland AG
Riedackerstrasse 7a
CH-8153 Rümlang (Zürich)
+41 44 8187171
吕 +41 44 8187191
Mail: info@dometic-waeco.ch
TAIWAN
WAECO Impex Ltd.
Taipei Office
9F.-10, No. 1180, Zhongzheng Rd.,
Zhonghe Dist., New Taipei City 23586
+886 2 22237225
昌 +886 2 81926742
Mail: marketing@waeco.com.tw
UNITED KINGDOM
Dometic UK Ltd.
Dometic House · The Brewery
Blandford St. Mary
Dorset DT11 9LS
+44 844 626 0133
昌 +44 844 626 0143
Mail: sales@dometic.co.uk
UNITED ARAB EMIRATES
Dometic Middle East FZCO
P. O. Box 17860
S-D 6, Jebel Ali Freezone
Dubai
+971 4 883 3858
+971 4 883 3868
Mail: info@dometic.ae
UNITED STATES OF AMERICA
Dometic Marine Division
2000 N. Andrews Ave. Extension
Pompano Beach, FL 33069 USA
+1 954 973 2477
+1 954 979 4414
Mail: marinesales@dometicusa.com

- Dometic
- Dometic FreshJet
- Table of contents
- Explanation of symbols
- DANGER!
- WARNING!
- CAUTION!
- NOTICE!
- NOTE
- Safety and installation instructions
- Handling the device
- Handling electrical cables
- Target group for this instruction manual
- Scope of delivery
- With air diffuser box Chillout ADB (9102900232, 9102900233)
- With air diffuser box Design ADB (9102900234, 9102900235)
- Accessories
- Intended use
- Labels
- Installation
- CAUTION! Beware of injury
- Note on installation
- DANGER! Danger of electrocution
- NOTICE! Beware of damage
- Note on transport
- Note on installation location
- Note on electrical system
- Making a new opening
- See fig. 3
- See fig. 4
- See fig. 5
- Installing in a roof hatch opening already provided
- See fig. 6
- See fig. 7
- See fig. 8
- Laying the connecting cables
- See fig. 9
- Installing the roof air conditioner with Chillout ADB (9102900232, 9102900233)
- NOTICE! Risk of damage
- See fig. 10
- Attaching the roof air conditioner
- See fig. 11
- See fig. 12
- Roof thickness Seal type
- See fig. 13
- Electrical connection
- See fig. 14
- V\~ cable
- Remote light switch (not included in the scope of delivery)
- V--- cable
- Connecting the circuit board
- See fig. 15
- Installing the air outlet unit Chillout ADB
- See fig. 16
- See fig. 17
- See fig. 18
- Installing the roof air conditioner with Design ADB (9102900234, 9102900235)
- Item Description
- V\~cable
- V== cable
- Installing the air outlet unit Design ADB
- Troubleshooting
- Disposal
- Regulations for environmental safety and correct disposal
- Protect the environment!
- Technical data
- Consignes relatives au transport
- Dometic Australia Pty. Ltd.
- AUSTRIA
- Dometic Austria GmbH
- HUNGARY
- Dometic Plc. Sales Office
- Dometic Italy S.r.l.
- NORWAY
- Dometic Norway AS
- POLAND
- Dometic Poland Sp. z o.o.
- RUSSIA
- Dometic RUS LLC
- SLOVAKIA
- Dometic Slovakia Sales Office Bratislava
- SPAIN
- Dometic Spain S.L.
- SWEDEN
- Dometic Scandinavia AB
- Dometic Switzerland AG
- TAIWAN
- WAECO Impex Ltd.
- UNITED KINGDOM
- Dometic UK Ltd.
- UNITED ARAB EMIRATES
- Dometic Middle East FZCO
- UNITED STATES OF AMERICA
- Dometic Marine Division
Brand : DOMETIC
Model : FreshJet 2600
Category : Air Conditioning