
E-393 - Range hood Pando - Free user manual and instructions
Find the device manual for free E-393 Pando in PDF.

| Product type | Extractor hood with integrated induction hob |
| Brand | Pando |
| Model | E-393 |
| Dimensions (glass) | 780 x 524 mm (approx.) |
| Cut-out dimensions (flush) | 750 x 490 mm |
| Total power | 7400 W |
| Power supply | 230 V~ 50/60 Hz single-phase or 400 V~ two-phase |
| Number of induction zones | 2 zones (can be combined in bridge) |
| Cooking functions | Booster, double booster, timer, keep warm, automatic cooking, bridge, chef, grill, stop&go, recall |
| Hood functions | Booster (10 min), timer (15 min), automatic mode, filter cleaning indicator |
| Grease filters | Dishwasher safe (max 60°C) |
| Residual heat indicator | Yes (symbol H) |
| Pan detection | Yes (symbol U if absent or unsuitable) |
| Control lock | Yes (key L) |
| Automatic safety shut-off | Yes (in case of overheating, forgotten, etc.) |
| Ventilation | Automatic, two speeds |
| Control type | Touch keys and slider |
| Display | LED for power, timer, status messages |
| Maintenance | Clean glass with mild product, cleanable grease filters |
| Warranty | 3 years (according to conditions) |
| Environmental standards | WEEE recycling, Green Dot |
Frequently Asked Questions - E-393 Pando
User questions about E-393 Pando
0 question about this device. Answer the ones you know or ask your own.
Ask a new question about this device
Download the instructions for your Range hood in PDF format for free! Find your manual E-393 - Pando and take your electronic device back in hand. On this page are published all the documents necessary for the use of your device. E-393 by Pando.
USER MANUAL E-393 Pando
natural_image
Modern kitchen stove with a large cooking pot and steam rising from the top (no text or symbols visible)Pando
integralcooking
E-392 / E-393
Instructions for Use
+ info
EN- The manufacturer will not be held liable for any possible inaccuracies due to printing or transcription errors in this manual. The manufacturer reserves the right to incorporate modifications considered useful or necessary into the products, which will not alter their essential functional and safety characteristics.
First of all we wish to thank you for the trust shown on our Company by purchasing one of our products. We are sure you have made the right choice.
In Pando, not only we offer first quality products, but also we make available a large professional team to serve and assist you on any query you may have regarding installation and/or performance.
We also suggest you to pay a visit to our web site (www.pando.es/en) to get to know us better and where you will find all product range containing all necessary commercial and technical information.
A wide selection of extractor hoods can be found there; Wall Hoods, Ceiling, Island or Canopy Hoods. Four types of installation making possible to adapt ourselves to any type of kitchen based on different needs.
At the same time, we take the opportunity to introduce you our collection of in house essential appliances, such our new high performance Ovens and Microwaves, Induction and Gas Hobs to make real your best recipes. Wine Coolers and Aging Wine Coolers to maintain and keep your wines in best of conditions and built-in Dishwashers with latest technology.
All that under a brand with over 40 year history in the market, making products like a real craftsman, and gathering in them the best of our experience to please all your needs.
We sincerely look forward you to have fun, experience and enjoy with the comfort and capacity of what already became your new kitchen ally.
Many Thanks
The PANDO Team

The symbol on the product or its packaging indicates that this product cannot be disposed of like normal domestic waste. The product must be handed over at a collection point for recycling electrical and electronic equipment. If you ensure that this product is correctly disposed of, you will help to avoid the possible negative environmental and public health effects that could arise from incorrect disposal. For more detailed information about recycling this product, please contact your city authorities, the domestic waste service or the establishment where you purchased it. This electrical appliance is marked in compliance with European Directive 2002/96/EC on electrical and electronic appliance waste (WEEE).

ENVIRONMENTAL PROTECTION AND WASTE TREATMENT
DISPOSAL OF THE PACKAGING. The packaging is marked with in Green Dot.
In its commitment to the protection of the environment and in compliance with the provisions of the European Directive 94/62 / EC on packaging and packaging waste and the derived Law 22/2011 on Contaminated Residues and Soils, Pando entrusts entities of social economy an Integrated Management System, responsible for the periodic collection at the consumer's home or in its vicinity of used packaging and packaging waste for subsequent treatment.
To remove all packaging materials such as cardboard, expanded polyurethane, and film, use the appropriate containers.
This ensures the correct treatment and reuse of packaging materials.
EN - INTRODUCTION
Firstly, we would like to thank you for your confidence in our firm when you chose a Pando extractor hood.
EN - SAFETY INSTRUCTIONS
Read carefully the safety instructions indicated in the use and installation manual enclosed in the accessories and product documentation bag.
Installation should only be carried out by qualified professionals, professional installers or the official technical service.
VERY IMPORTANT!
When opening the packaging, check that all the components are in perfect state and all the accessories are present. If this is not the case, contact the dealer and do not install. Once installed, any damage to the exterior such as scratches, dents, stains, etc. will not be covered by the guarantee.
DO NOT REMOVE THE PROTECTIVE PLASTIC FROM THE HOOD UNTIL IT IS COMPLETELY INSTALLED, IF THIS PLASTIC IS NOT PRESENT IN AREAS THAT COULD HAVE A RISK OF DAMAGE DURING INSTALLATION, IT IS RECOMMENDED TO APPLY PROTECTIVE MATERIALS AGAINST IMPACT, SCRATCHES AND CONTACT WITH CORROSIVE AGENTS.
TAKE ESPECIAL CARE DURING THE INSTALLATION IF OTHER WORK IS ALSO IN PROGRESS, BECAUSE PAINT, SILICON, PLASTER AND OTHER MATERIALS COULD CONTAIN CORROSIVE CHEMICALS THAT MAY DAMAGE THE PRODUCT, IN THESE CASES IT IS RECOMMENDED TO ADEQUATELY PROTECT THE HOOD, BY FOR EXAMPLE, HERMETICALLY COVERING AREAS THAT COULD BE AFFECTED WITH PLASTIC.
THIS WILL AVOID DAMAGE TO THE OUTSIDE OF THE APPLIANCE, SOMETHING THAT WILL NOT BE COVERED BY THE GUARANTEE.
It must be taken into account and provide that the hood and peripherals must have easy and safe access for possible maintenance or repair tasks of the official Pando technical service (SAT). The guarantee will NOT cover the costs and means necessary for access to a product that does not meet these conditions. In the event that the product is not easily accessible or safe, a criterion that will be issued by SAT in its initial inspection, it will be the responsibility of the client to place the means and assume the necessary costs so that the SAT can perform the intervention adequately.
EN - INSTALLATION INSTRUCTIONS
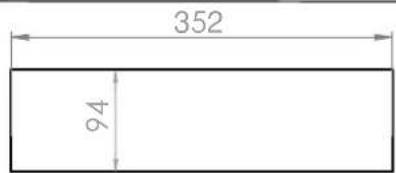
- Ensure that there is a distance of 50 ~mm between the hob and the wall or sides.
- The hobs are classified as "Y" class for heat protection. Ideally the hob should be installed with plenty of space on either side. There may be a wall at the rear and tall units or a wall at one side. On the other side, however, no unit or divider must stand higher than the hob.
- The piece of furniture or the support in which the hob is to be fitted, as well as the edges of furniture, the laminate coatings and the glue used to fix them, must be able to resist temperatures of up to 100 °C.
- Do not install the hob at the top of a non ventilated oven or a dishwasher.
- Ensure under the bottom of the hob casing a space of 20 mm to ensure good air circulation of the electronic device.
- If a drawer is placed under the hob, avoid putting into this drawer flammable objects (for example: sprays) or non heat-resistant objects.
- Materials which are often used to make worktops expand on contact with water. To protect the cut out edge, apply a coat of varnish or special sealant. Particular care must be taken when applying the adhesive joint supplied with the hob to prevent any leakage into the supporting furniture. This gasket ensures a good seal when used in conjunction with smooth work top surfaces.
- The safety gap between the hob and the cooker hood placed above must comply with the
- Recommendations of the hood manufacturer. In the case of no instructions, a distance of 500mm minimum should apply.
- The connection cord should not be subjected to any mechanical constraint.
- Do not use inappropriate child safety shields or hob guards. These can cause accidents.
- WARNING: Use only hob guards designed by the manufacturer of the cooking appliance or indicated by the manufacturer of the appliance in the instructions for use as suitable or hob guards incorporated in the appliance. The use of inappropriate guards can cause accidents.
HERRAMIENTAS NECESARIAS / FERRAMENTAS NECESSÁRIAS / LES OUTILS NÉCESSAIRES / TOOLS NEEDLE

natural_image
Three technical illustrations of electronic components: a rectangular base with circular holes, a pen-like tool, and a screwdriver (no text or symbols present)CONTENIDO / CONTEÚDO / CONTENU / CONTENT

natural_image
Technical line drawings of an electronic device with a box, fan, and cable assembly (no text or symbols)COTAS / DIMENSÕES / REPÈRES / DIMENSIONS
VISTA SUPERIOR / VUE DE DESSUS / TOP VIEW
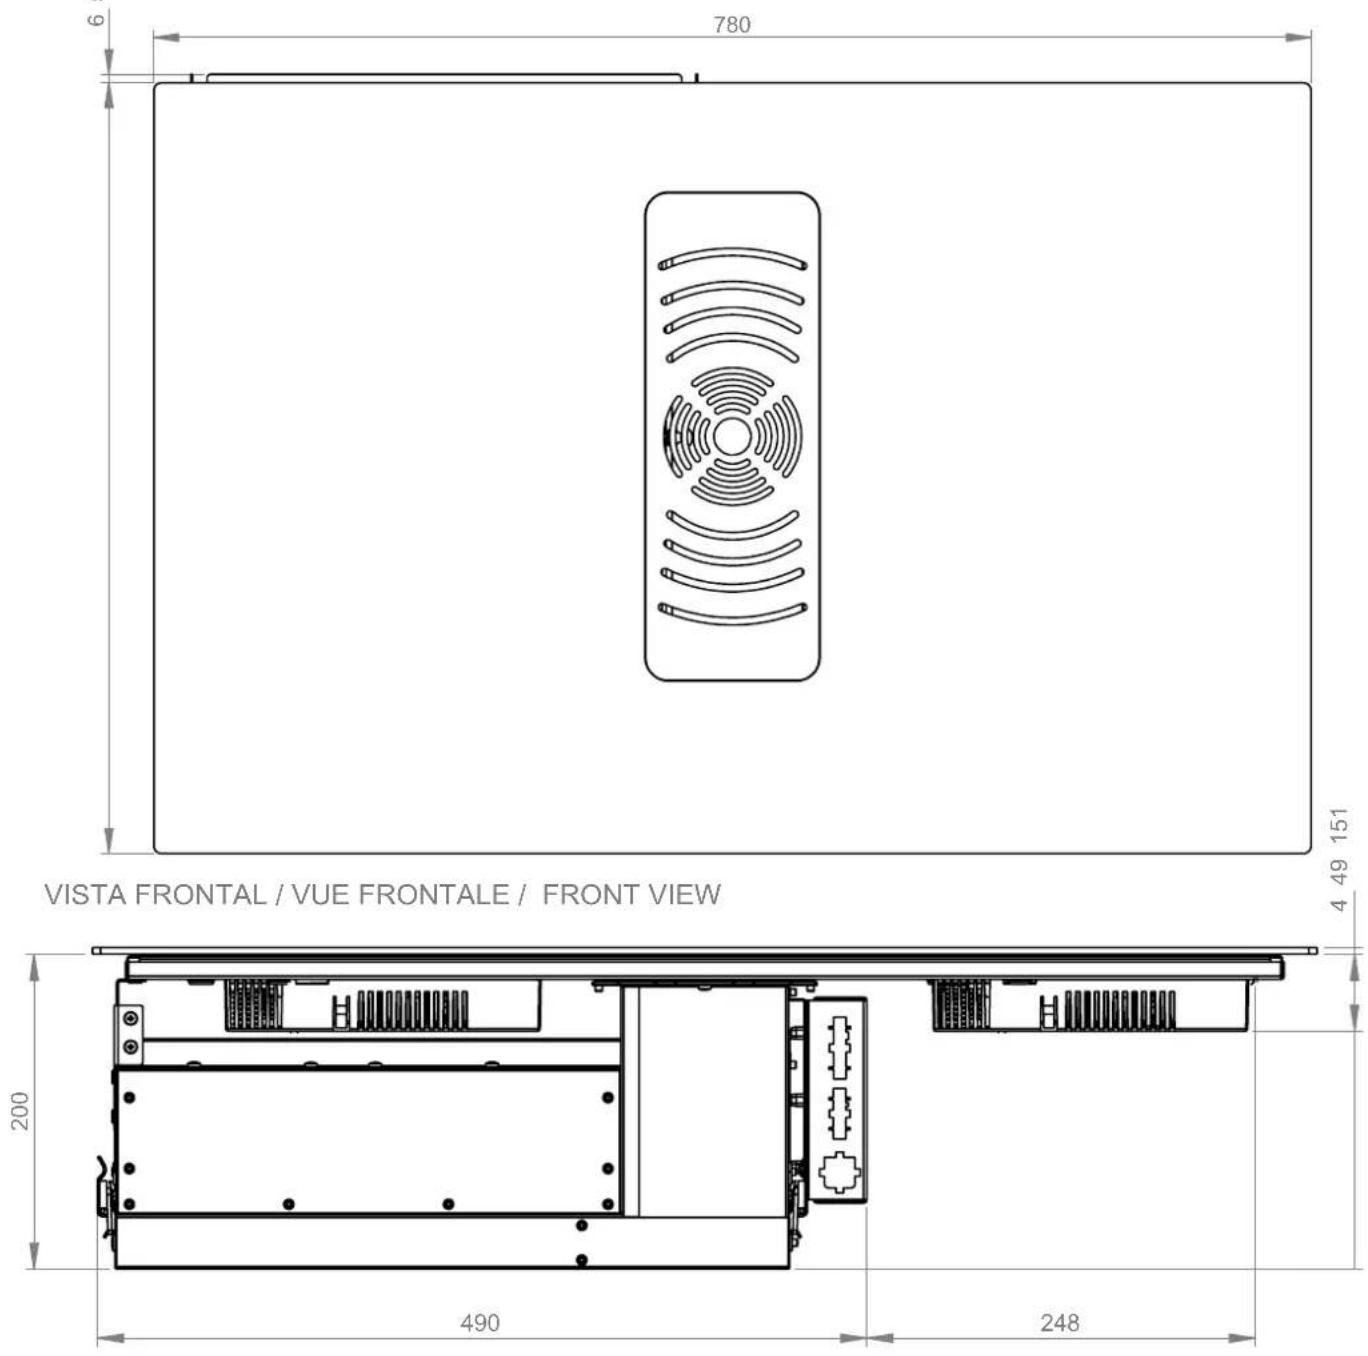
VISTA LATERAL / VUE LATÉRALE / SIDE VIEW

COTAS / DIMENSÕES / REPÈRES / DIMENSIONS
ENCASTRE / INSIRA / ENCASTREMENT / BUILT IN SIZES
Superposed glass installation
Installation for flush glass

ES
ENCASTRE TRASERO
INSIRA TRASEIRO
ENCASTREMENT ARRIERE
REAR BUILT IN SIZE
COTAS / DIMENSÕES / REPÈRES / DIMENSIONS
ENCASTRE / INSIRA / ENCASTREMENT / BUILT IN SIZES

EN Improper installation and non-observance of the vents may cause malfunction or breakdown of the appliance which would not be covered by the manufacturer's warranty.
COTAS / DIMENSÕES / REPÈRES / DIMENSIONS
ENCASTRE / INSIRA / ENCASTREMENT / BUILT IN SIZES
VISTA LATERAL / VUE LATÉRALE / SIDE VIEW
COTAS / DIMENSÕES / REPÈRES / DIMENSIONS
ENCASTRE / INSIRA / ENCASTREMENT / BUILT IN SIZES
VISTA TRASERA / VISTA TRASEIRA / VUE ARRIERE / REAR VIEW


*EN - 43,5mm dimension is for 19mm thick countertops. This dimension will change depending on the countertop thickness.
INSTALACIÓN / INSTALAÇÃO / INSTALLATION / INSTALLATION

EN- Stick the gasket (2) two millimetres from the external edge of the glass, after removing the protection tape (3).
EN The joint between the hob and the worktop must not be made with sealants or silicone. The use of such products in the installation may damage the product and make it difficult for service access or removal. Damage or expenses resulting from non-compliance will not be covered by the product warranty.

natural_image
Illustration of a hand using a screwdriver to mark a cross symbol on a computer monitor (no text or symbols present)3
2
ES FIG. 4 - Solo para modelo con cristal sin biselado y para la opción de instalación enrasado en la encimera. Colocar la placa en el hueco de encastre, y luego rellenar (no pegar) el pequeño hueco entre el borde del perímetro delcristal y el borde del encastre de la encimera, con un sellador elástico y resistente a temperatura elevada≥100°C, de color negro. Aplicar sellador tras instalar la placa en el hueco, solo rellenar, bajo ningúnconcepto, nunca poner sellador bajo el cristal. Una inadecuada instalación puede provocar daños en el producto y dificultar el acceso al servicio técnico, en este caso los daños y gastos no estarían cubiertos porla garantía.
PT FIG. 4 - Apenas para modelo com vidro não biselado e para a opção de instalação embutida no tampo de trabalho. Colocar a placa no recesso, e depois preencher (não colar) o pequeno espaço entre o bordo do perímetro dovidro e o bordo do recesso do tampo de trabalho, com um selante elástico resistente a altas temperaturas≥100°C, de cor preta. Aplicar selante após a instalação do painel na fenda, apenas preencher, em nenhumacircunstância, nunca colocar selante sob o vidro. Uma instalação inadequada pode causar danos no produtoe dificultar o acesso ao serviço técnico, neste caso os danos e despesas não estariam cobertos pelagarantia.
FR FIG. 4 - Uniquement pour le modèle avec verre non biseauté et pour l'option d'encastrement dans le plan de travail. Placer la plaque dans la niche, puis remplir (sans coller) le petit espace entre le bord du périmètre du verre etle bord de la niche du plan de travail, avec un mastic élastique résistant à des températures élevées ≥100°C,de couleur noire. Appliquer le mastic après avoir installé le panneau dans l'interstice, uniquement pourremplir, en aucun cas, ne jamais mettre de mastic sous le verre. Une installation inadéquate peutendommager le produit et rendre difficile l'accès au service technique, dans ce cas les dommages et les fraisne seraient pas couverts par la garantie.
EN FIG.4 - Only for model with non-bevelled glass and for the flush installation option in the worktop. Place the plate inthe recess, and then fill (not glue) the small gap between the edge of the glass perimeter and the edge of theworktop recess, with an elastic sealant resistant to high temperatures ≥100^ , black in colour. Apply sealantafter installing the panel in the gap, only fill, under no circumstances, never put sealant under the glass. Aninadequate installation can cause damage to the product and make it difficult to access the technical service,in this case the damages and expenses would not be covered by the warranty.
CONEXIÓN ELÉCTRICA / LIGAÇÃO ELÉCTRICA CONNEXION ÉLECTRIQUE / ELECTRICAL CONNECTION
ES- Conecte siempre los 2 MÓDULOS.① CAMPANA ② PLACA DE COCCIÓN
PT- Sempre conecte os 2 MÓDULOS.①EXAUSTOR ② PLACA
FR- Connectez toujours les 2 MODULES.① HOTTE ② TABLE DE CUISSON
EN- Always connect the 2 MODULES.① HOOD ② COOKING PLATE

230 V\~ 50/60 Hz
FASE PHASE

TIERRA
GROUND
NEUTRO NEUTRAL
- The installation of this appliance and the connection to the electrical network should be entrusted only to an electrician perfectly to the fact of the normative regulations and which respects them scrupulously.
- Protection against the parts under tension must be ensured after the building-in.
- The data of connection necessary are on the stickers place on the hob casing near the connection box.
- The connection to the main must be made using an earthed plug or via an omnipolar circuit breaking device with a contact opening of at least 3 mm.
- The electrical circuit must be separated from the network by adapted devices, for example: circuit breakers, fuses or contactors.
- If the appliance is not fitted with an accessible plug, disconnecting means must be incorporated in the fixed installation, in accordance with the installation regulations.
- The inlet hose must be positioned so that it does not touch any of the hot parts of the hob or oven.
Caution!
This appliance must only be connected to a network 230 V\~ 50/60 Hz.
Always connect the earth wire.
Respect the connection diagram.
The connection box is located underneath at the back of the hob casing. To open the cover use a medium screwdriver. Place it in the slits and open the cover.
| Mains | Connection | Cable diameter | Cable | Protection calibre |
| 3 x 2.5 mm ^2 1 Phase + N230V~H 05 RR - F | H 05 VV - F | 50/60H25 A * | ||
| 4 x 1.5 mm ^2 2 Phases + N400V~H 05 RR - F | H 05 VV - F | 50/60H16 A * |
* calculated with the simultaneous factor following the standard EN 60 335-2-6

For the various kinds of connection, use the brass bridges which are in the box next the terminal
Monophase 230V\~1P+N
Put the 1^st bridge between terminal L1 and L2, the 2^nd between N1 and N2.
Attach the earth to the terminal “earth”, the neutral N to terminal N1 or N2, the Phase L to one of the terminals L1 or L2.
Biphase 400V\~2P+N
Put a bridge between terminal 4 and 5.
Attach the earth to the terminal “earth”, the neutral N to terminal N1 or N2, the Phase L1 to the terminals L1 and the Phase L2 to the terminal L2.
Frequent loosening and screwing of the screws on the connection box risks damaging the efficiency of the tightness once screwed. It is therefore advisable to keep screwing and unscrewing to a minimum.
Ensure that the cables are correctly inserted and tightly screwed down.
4 weeks after installation, be sure to tighten again the screws in the terminal block.
We cannot be held responsible for any incident resulting from incorrect connection or which could arise from the use of an appliance which has not been earthed or has been equipped with a faulty earth connection.
MANTENIMIENTO / MANUTENÇÃO / MAINTENANCE / MAINTENANCE
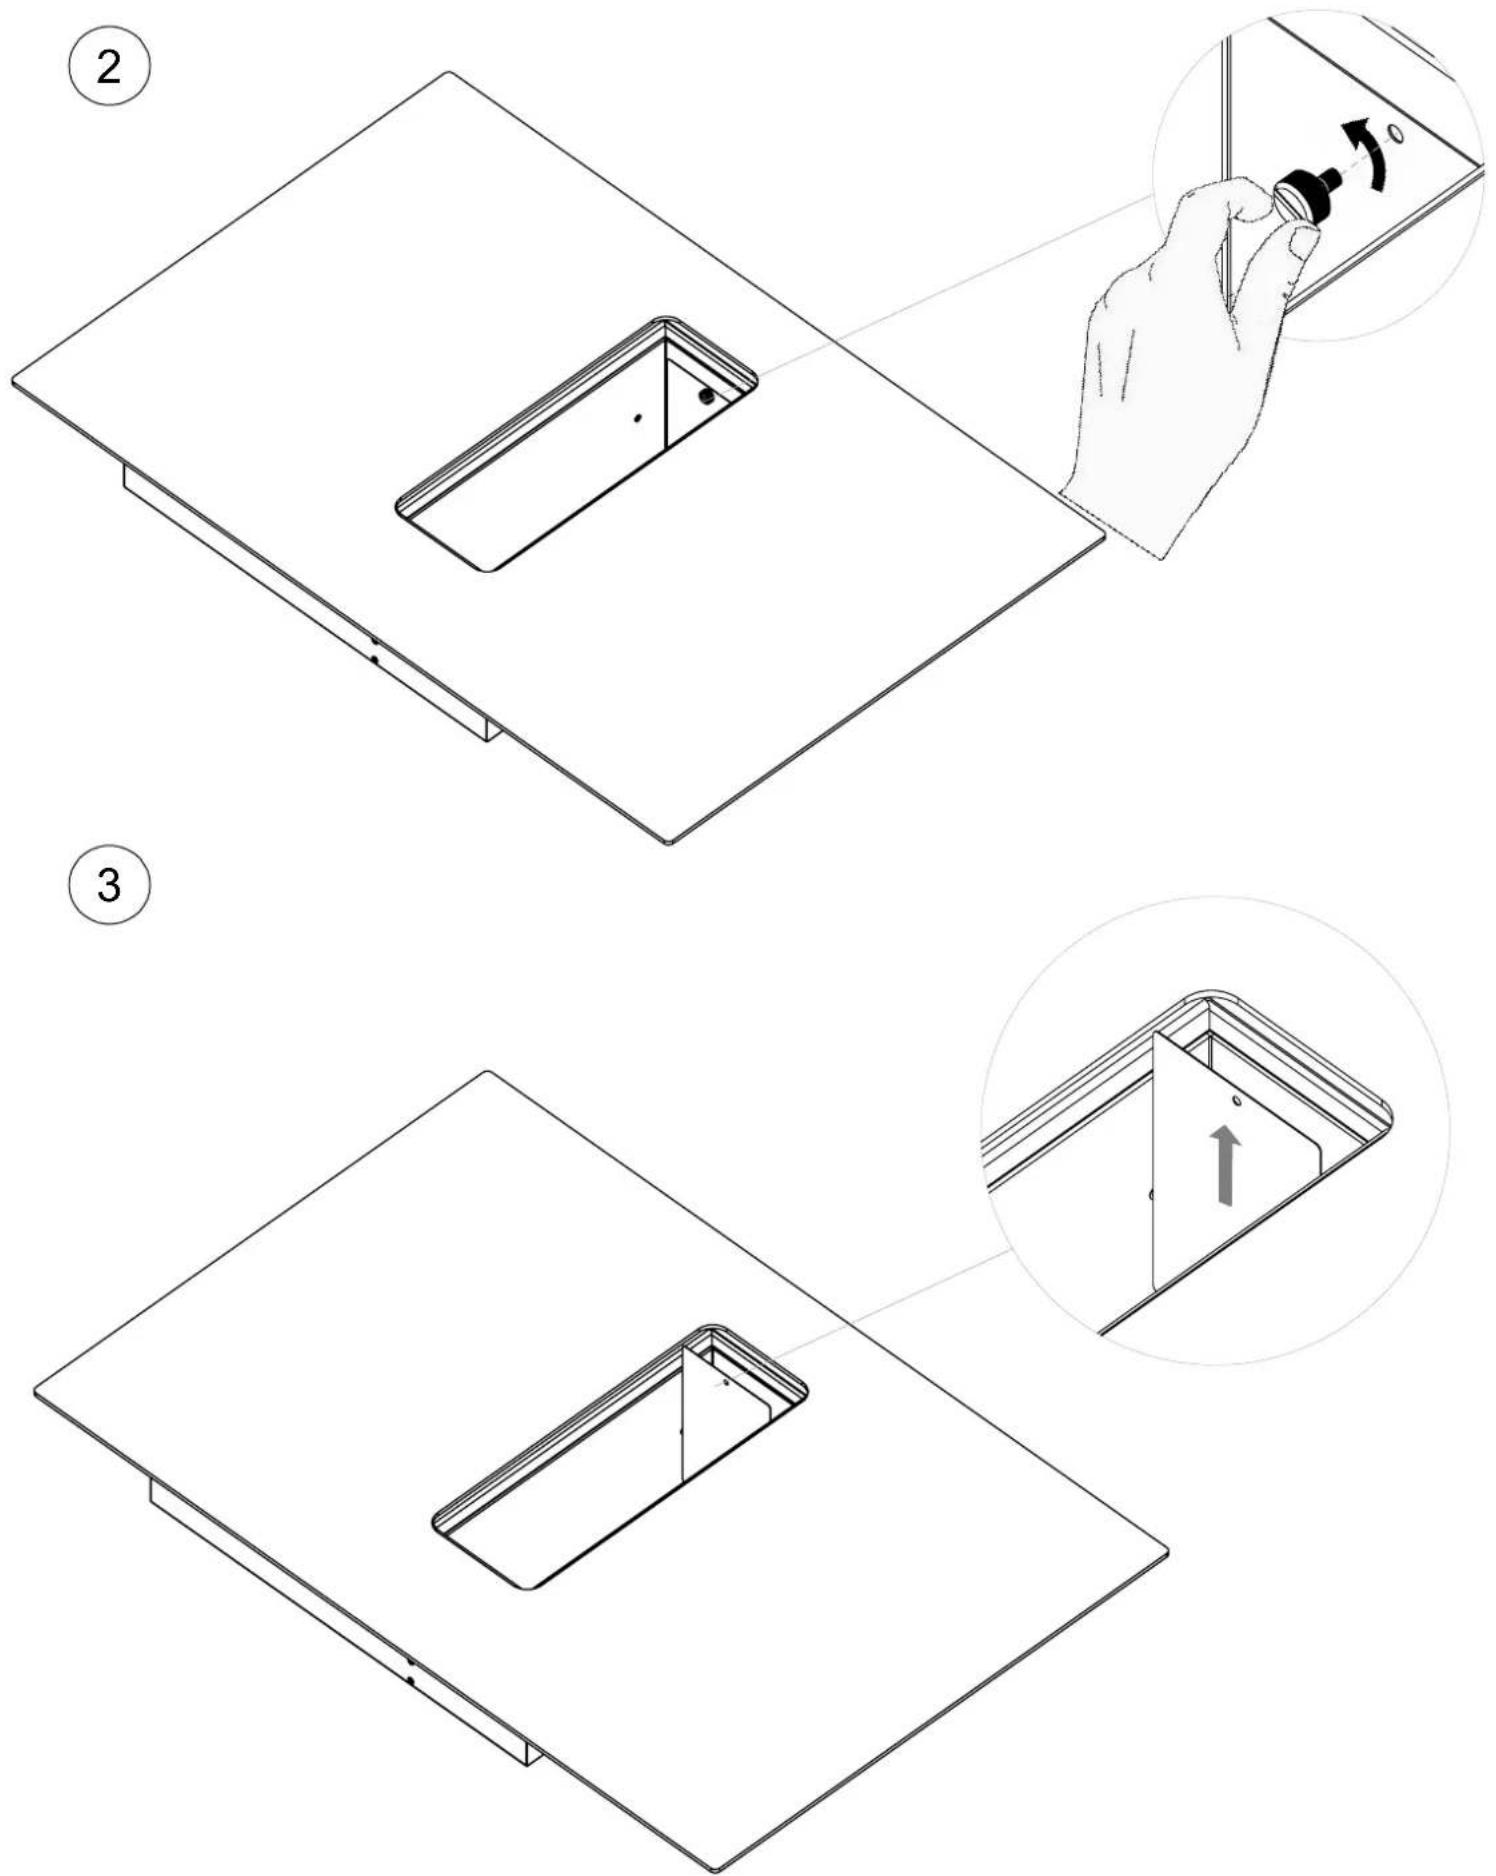
BANDEJA RECOJEACEITES / BANDEJA DE GRAXA / PLATEAU DE GRAISSE / GREASE TRAY
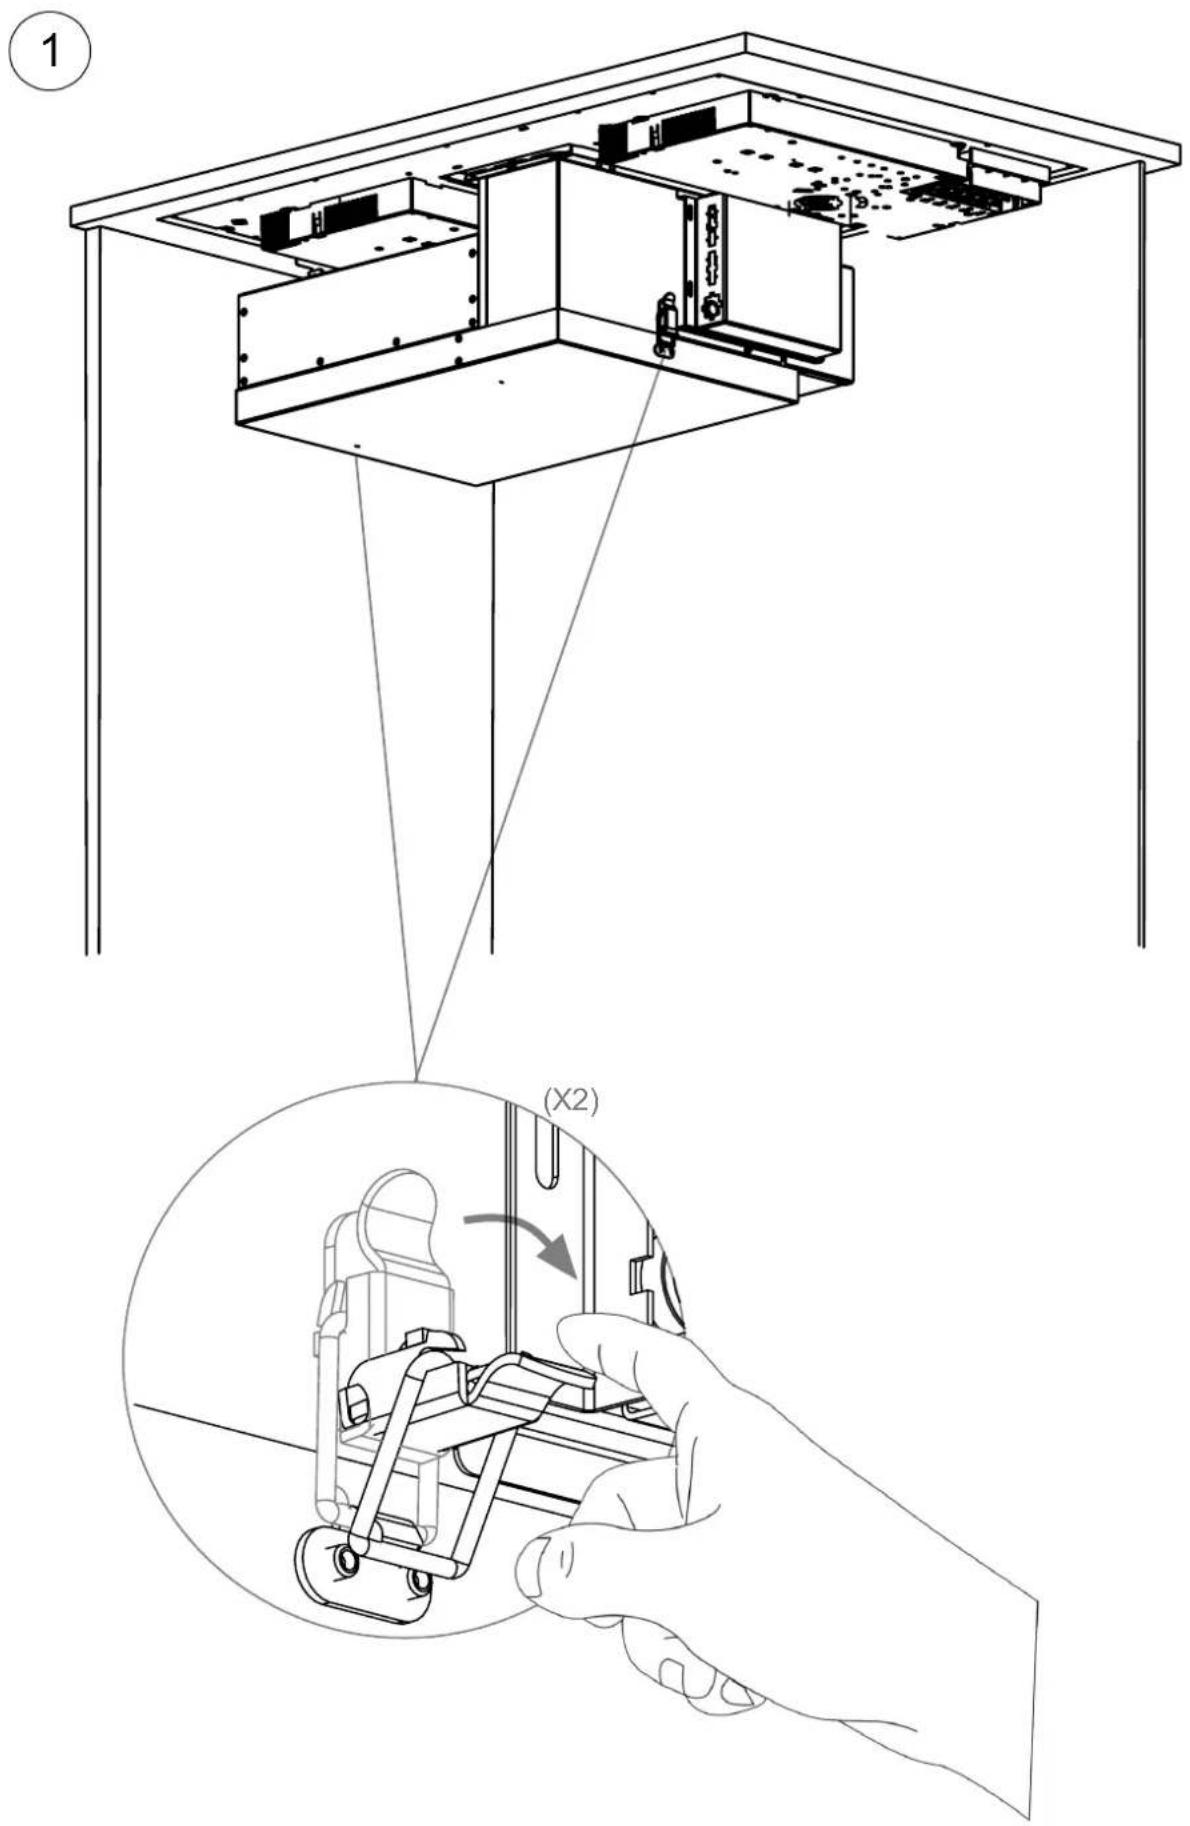
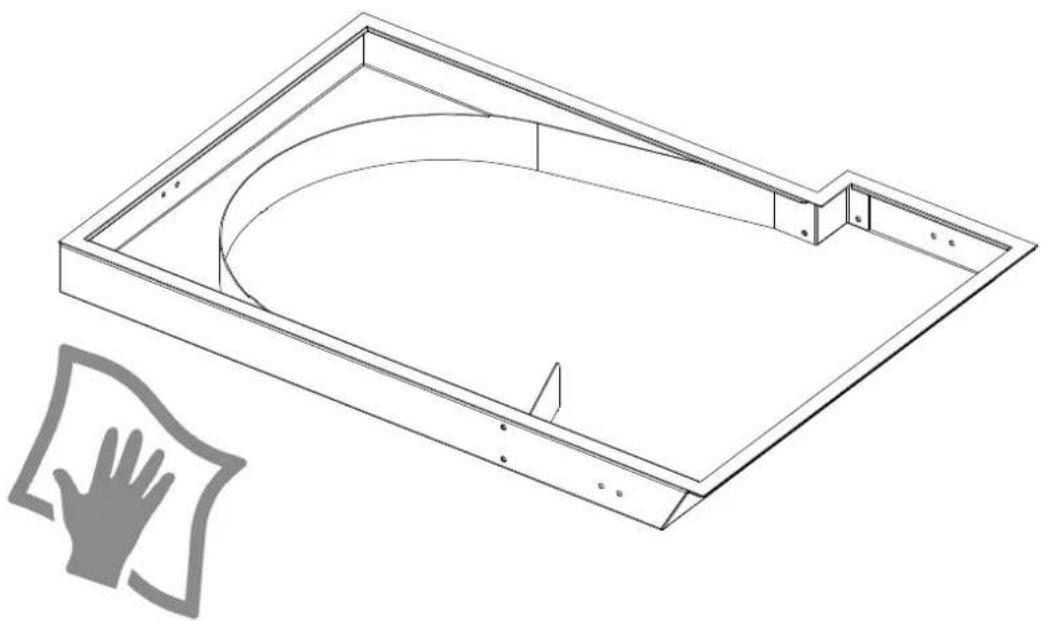
MANTENIMIENTO / MANUTENÇÃO / MAINTENANCE / MAINTENANCE
BANDEJA RECOJEACEITES / BANDEJA DE GRAXA / PLATEAU DE GRAISSE / GREASE TRAY
2

natural_image
Technical line drawing of an internal mechanical assembly with a central fan and mounting base (no text or symbols)3
natural_image
Isometric line drawing of a rectangular frame with an arc and internal structure, accompanied by a hand icon (no text or symbols)MANTENIMIENTO / MANUTENÇÃO / MAINTENANCE / MAINTENANCE
FILTRO ALUMINIO / FILTRO ALUMÍNIO FILTRE D'ALUMINIUM / ALUMINIUM FILTER

natural_image
Illustration of a hand using a device to cut a screen onto a flat surface, showing step-by-step assembly (no text or symbols)MANTENIMIENTO / MANUTENÇÃO / MAINTENANCE / MAINTENANCE
FILTRO HEPA / FILTRO HEPA / FILTRE HEPA / HEPA FILTER
1

MANTENIMIENTO / MANUTENÇÃO / MAINTENANCE / MAINTENANCE
FILTRO HEPA / FILTRO HEPA / FILTRE HEPA / HEPA FILTER
MANTENIMIENTO / MANUTENÇÃO / MAINTENANCE / MAINTENANCE
FILTRO HEPA / FILTRO HEPA / FILTRE HEPA / HEPA FILTER

natural_image
Isometric line drawing of a rectangular frame with internal components, showing a close-up inset of the interior (no text or symbols)NOTAS/NOTAS/REMARQUES/NOTES:
ES
ESPRODUCTO EXCLUSIVO
LIMPIADOR,
ABRILLANTADOR Y
PROTECTOR DE ACERO INOXIDABLE
INOX PANDO, Referencia 1059.
PROPIEDADES:
Degreaser especially recommended for polishing stainless steel surfaces, with its complex formula based on paraffin it leaves an invisible film that acts as a protector and makes it shine.
APPLICATIONS:
Cleans, polishes and evens out stainless steel surfaces of extractor hoods and stainless steel kitchen furniture.
Pando
MANUAL DE USO
MANUAL DE USO
NOTICE D'UTILISATION
INSTRUCTIONS FOR USE
E-392
E-393
SERIAL NUMBER LABEL
Pando
www.pando.es

SERVICIO POST VENTA España, Portugal y Andorra
natural_image
Line drawing of a portable stove with a fan and a cylindrical container, no text or symbols presentnatural_image
Circular metallic object with a star-like pattern and concentric dotted texture (no text or symbols)
natural_image
Close-up of a black cylindrical showerhead with metallic and reflective surfaces (no text or symbols visible)
natural_image
Simple line drawing of a magnifying glass with a shaded ring and a sad face emoji (no text or symbols)natural_image
Simple line drawing of a computer monitor with a sad face emoji, no text or symbols present
∅120
natural_image
Three identical 3D-rendered kitchen utensils with circular and square cutouts, shown in a row (no text or symbols)¡ATENCIÓN!
natural_image
Line drawing of a portable stove with a fan and cylindrical container (no text or symbols)Qualidade da panela
natural_image
Circular metallic object with a star-like pattern on its surface, no visible text or symbols.
natural_image
Close-up of a black showerhead with metallic spherical filter (no text or symbols visible)
natural_image
Simple line drawing of a magnifying glass with a shaded ring and a sad face emoji (no text or symbols)
natural_image
Three identical 3D-rendered kitchen utensils with crossed panes and a smoke, shown in two rows (no text or symbols)ATENÇÃO!
Enclencher appuyer 2 sec. sur [ ] [0]
①
natural_image
Line drawing of a portable stove with a cylindrical container and fan-shaped vent, mounted on a base (no text or symbols)natural_image
Illustration of three identical 3D-rendered kitchen utensils with crossed handles, shown in a grid and a magnified view (no text or symbols)USING THE APPLIANCE 115
PRECAUTIONS NOT TO DAMAGE THE APPLIANCE....116
PRECAUTIONS IN CASE OF APPLIANCE FAILURE 117
OTHER PROTECTIONS 117
DESCRIPTION OF THE APPLIANCE....118
TECHNICAL CHARACTERISTICS....118
CONTROL PANEL 118
USE OF THE APPLIANCE ....119
DISPLAY....119
VENTILATION....119
STARTING-UP AND APPLIANCE MANAGEMENT ....119
BEFORE THE FIRST USE....119
INDUCTION PRINCIPLE 119
SENSITIVE TOUCH 119
POWER SELECTION ZONE "SLIDER" AND TIMER SETTING ZONE 120
STARTING-UP 120
PAN DETECTION....120
RESIDUAL HEAT INDICATION 121
BOOSTER AND DOUBLE BOOSTER FUNCTION....121
TIMER 121
AUTOMATIC COOKING....122
STOP&GO FUNCTION 122
RECALL FUNCTION....123
"KEEP WARM" FUNCTION 123
BRIDGE OR AUTOMATIC BRIDGE FUNCTION....123
CONTROL PANEL LOCKING 124
"CHEF" FUNCTION 124
GRILL FUNCTION....124
COOKING PLATE CLEANING AND MAINTENANCE....126
HOOD MAINTENANCE AND CLEANING ....126
COOKING ADVICES....128
PAN QUALITY 128
PAN DIMENSION 129
EXAMPLES OF COOKING POWER SETTING....129
WHAT TO DO IN CASE OF A PROBLEM....130
ENVIRONMENT PRESERVATION....131
INSTALLATION INSTRUCTIONS....131
ELECTRICAL CONNECTION....133
AFTER-SALES SERVICE (SAT) AND WARRANTY....135
Precautions before using
- Unpack all the materials.
- The installation and connecting of the appliance have to be done by approved specialists. The manufacturer can not be responsible for damage caused by building-in or connecting errors.
- To be used, the appliance must be well-equipped and installed in a kitchen unit and an adapted and approved work surface.
- This domestic appliance is exclusively for the cooking of food, to the exclusion of any other domestic, commercial or industrial use.
- Remove all labels and self-adhesives from the ceramic glass.
- Do not change or alter the appliance.
- The cooking plate can not be used as freestanding or as working surface.
- The appliance must be grounded and connected conforming to local standards.
- Do not use any extension cable to connect it.
- The appliance can not be used above a dishwasher or a tumble-dryer: steam may damage the electronic appliances.
-
The appliance is not intended to be operated by means of external timer or separate remote control system.
-
Switch the heating zones off after using.
- Keep an eye on the cooking using grease or oils: that may quickly ignite.
- Be careful not to burn yourself while or after using the appliance.
- Make sure no cable of any fixed or moving appliance contacts with the glass or the hot saucepan.
- Magnetically objects (credit cards, floppy disks, calculators) should not be placed near to the engaged appliance.
- Metallic objects such as knives, forks, spoons and lids should not be placed on the hob surface since they can get hot.
- In general do not place any metallic object except heating containers on the glass surface. In case of untimely engaging or residual heat, this one may heat, melt or even burn.
- Never cover the appliance with a cloth or a protection sheet. This is supposed to become very hot and catch fire.
- This appliance can be used by children aged from 8 years and above and persons with reduced physical, sensory or mental capabilities or lack of experience and knowledge if they have been given supervision or instruction concerning use of the appliance in a safe way and understand the hazards involved.
• Children shall not play with the appliance. - Cleaning and user maintenance shall not be made by children without supervision.
Precautions not to damage the appliance
- Raw pan bottoms or damaged saucepans (not enamelled cast iron pots,) may damage the ceramic glass.
- Sand or other abrasive materials may damage ceramic glass.
- Avoid dropping objects, even little ones, on the vitroceramic.
- Do not hit the edges of the glass with saucepans.
- Make sure that the ventilation of the appliance works according to the manufacturer's instructions.
- Do not put or leave empty saucepans on the vitroceramic hobs.
- Sugar, synthetic materials or aluminium sheets must not contact with the heating zones. These may cause breaks or other alterations of the vitroceramic glass by cooling: switch on the appliance and take them immediately out of the hot heating zone (be careful: do not burn yourself).
- WARNING: Unattended cooking on a hob with fat or oil can be dangerous and may result in fire.
- CAUTION: The cooking process has to be supervised. A short term cooking process has to be supervised continuously
- WARNING: Danger of fire: do not store items on the cooking surface.
- Never place any hot container over the control panel.
- If a drawer is situated under the embedded appliance, make sure the space between the content of the drawer and the inferior part of the appliance is large enough (2 cm). This is essential to guaranty a correct ventilation.
- Never put any inflammable object (ex. sprays) into the drawer situated under the vitroceramic hob. The eventual cutlery drawers must be resistant to heat.
Precautions in case of appliance failure
- If a defect is noticed, switch on the appliance and turn off the electrical supplying.
- If the ceramic glass is cracked or fissured, you must unplug the appliance and contact the after sales service.
- Repairing has to be done by specialists. Do not open the appliance by yourself.
- WARNING: If the surface is cracked, switch off the appliance to avoid the possibility of electric shock.
Other protections
- Note sure that the container pan is always centred on the cooking zone. The bottom of the pan must have to cover as much as possible the cooking zone.
- For the users of pacemaker, the magnetic field could influence its operating. We recommend getting information to the retailer or of the doctor.
- Do not to use aluminium or synthetic material containers: they could melt on still hot cooking zones.
- NEVER try to extinguish a fire with water, but switch off the appliance and then cover flame e.g. with a lid or a fire blanket.
THE USE OF EITHER POOR QUALITY POT OR ANY INDUCTION ADAPTOR PLATE FOR NON-MAGNETIC COOKWARE RESULTS IN A WARRANTY BREACH. IN THIS CASE, THE MANUFACTURER CANNOT BE HELD RESPONSIBLE FOR ANY DAMAGE CAUSED TO THE HOB AND/OR ITS ENVIRONMENT.
Technical characteristics
| Type | E392E393 |
| Total powerEnergy consumption for the hob EC _hob ** | 7400 W180.5 Wh/kg |
| Heating zonesMinimum detectionNominal level*Booster level* | 210 x 190 mm∅ 110 mm2100 W2500 / 3000 W |
| Standardised cookware category**Energy consumption EC _cw **Standardised cookware category**Energy consumption EC _cw **Standardised cookware category**Energy consumption EC _cw ** | A186.4 Wh/kgB (x2)188 Wh/kgC159.5 Wh/kg |
* The given power may change according to the dimensions and material of the pan. **Calculated according to the method of measuring performance (EN 60350-2).
Control panel
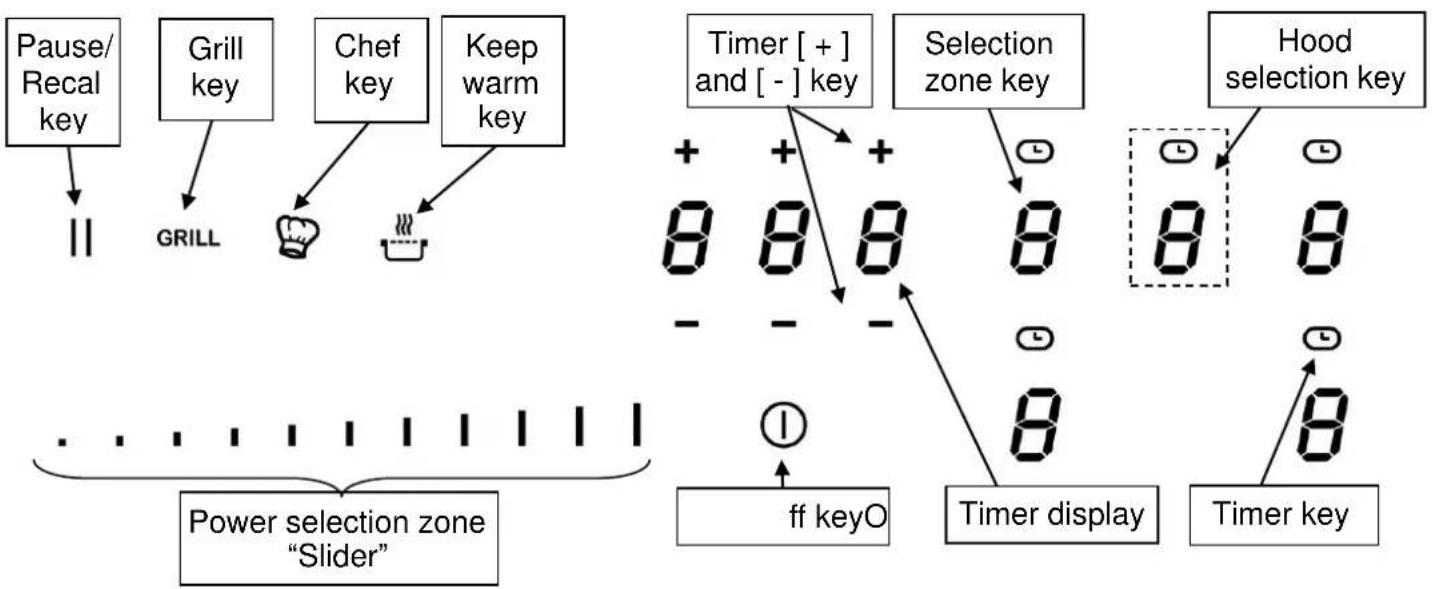
flowchart
graph TD
    A["Pause/Recal key"] --> B["||"]
    C["Grill key"] --> D["GRILL"]
    E["Chef key"] --> F["Starter icon"]
    G["Keep warm key"] --> H["Starter icon with steam"]
    I["Timer [+"] and["-"] key] --> J["+ 8 8 8"]
    K["Selection zone key"] --> L["Time 8"]
    M["Hood selection key"] --> N["Time 8 8"]
    O["ff keyO"] --> P["Timer display"]
    Q["Timer key"] --> R["Time 8"]
    S["Power selection zone "Slider""] --> T["Icon 1"]
Display
Display Designation Description
0 Zero The heating zone is activated.
1...9 Booster level Selection of the cooking level.
U No pan detection No pan or inadequate pan.
A Heat accelerator Automatic cooking.
E Error message Electronic failure.
H Residual heat The heating zone is hot.
P Booster The Power is activated.
“” Double Booster The Super power is activated.
u Keep warm Maintain automatically of 70^ C.
II Stop&Go The hob is in pause.
Bridge 2 cooking zones are combined. Grill Function The Grill Function is activated.
Ventilation
The cooling system is fully automatic. The cooling fan starts with a low speed when the calories brought out by the electronic system reach a certain level. The ventilation starts his high speed when the hob is intensively used. The cooling fan reduces his speed and stops automatically when the electronic circuit is cooled enough.
STARTING-UP AND APPLIANCE MANAGEMENT
Before the first use
Clean your hob with a damp cloth, and then dry the surface thoroughly. Do not use detergent which risks causing blue-tinted colour on the glass surface.
Induction principle
An induction coil is located under each heating zone. When it is engaged, it produces a variable electromagnetic field which produces inductive currents in the ferromagnetic bottom plate of the pan. The result is a heating-up of the pan located on the heating zone.
Of course the pan has to be adapted:
- All ferromagnetic pans are recommended (please verify it thanks a little magnet): cast iron and steel pans, enamelled pans, stainless-steel pans with ferromagnetic bottoms...
- Are excluded: copper, pure stainless-steel, aluminium, glass, wood, ceramic, stoneware,...
The induction heating zone adapts automatically the size of the pan. With a too small diameter the pan doesn't work. This diameter is varying in function of the heating zone diameter.
If the pan is not adapted to the induction hob the display will show [U].
Sensitive touch
Your ceramic hob is equipped with electronic controls with sensitive touch keys. When your finger presses the key, the corresponding command is activated. This activation is validated by a control light, a letter or a number in the display and/or a “beep” sound.
In the case of a general use press only one key at the same time.
Power selection zone "SLIDER" and timer setting zone
To select the power with the slider, slide your finger on the "SLIDER" zone. You can already have a direct access if you put your finger directly on the chosen level.

flowchart
graph TD
    A["Power selection zone "SLIDER" and timer setting zone"] --> B["SLIDER"]
    A --> C["Direct access"]
    B <--> D["SLIDER"]
    C <--> E["Direct access"]
Starting-up
- Start up / switch off the hob:
Action Control panel Display
To start press key [ ] for 2 sec [0]
①
To stop press key [ ] for 2 sec nothing or [
H]
- Start up / switch off a heating zone:
Action Control panel Display
To set slide on the "SLIDER" [1] to [P]
(adjust the power) to the right or to the left
To stop slide to [0] on "SLIDER" [0] or [H]
If no action is made within 20 seconds the electronics returns in waiting position.
Pan detection
The pan detection ensures a perfect safety. The induction doesn't work:
- If there is no pan on the heating zone or if this pan is not adapted to the induction. In this case it is impossible to increase the power and the display shows [U]. This symbol disappears when a pan is put on the heating zone.
- If the pan is removed from the heating zone the operation is stopped. The display shows [U]. The symbol [U] disappears when the pan is put back to the heating zone. The cooking continues with the power level set before.
After use, switch the heat element off: don't let the pan detection [U] active.
Residual heat indication
EN
After the switch off of a heating zone or the complete stop of the hob, the heating zones are still hot and indicates [H] on the display.
The symbol [ H ] disappears when the heating zones may be touched without danger.
As far as the residual heat indicators are on light, don't touch the heating zones and don't put any heat sensitive object on them. There are risks of burn and fire.
Booster and double booster function
Booster [P] and Double Booster [11] grant a boost of Power to the selected heating zone. If this function is activated the heating zones work during 10 minutes with an ultra high Power. This is foreseen for example to heat up rapidly big quantities of water, like nuddles
• Start up / Stop the booster:
Action Control panel Display
Start up the booster Slide to the end of the "SLIDER" [P] Or press directly on the end of the "SLIDER"
Stop the booster Slide on the "SLIDER" [9] to [0]
• Start up / Stop double booster
Action Control panel Display
Start up the booster Slide to the end of the "SLIDER" [P] Or press directly on the end of the "SLIDER" Start up double booster Re-press on the end of the "SLIDER" [.. 11 and P] Stop the double booster Slide on the "SLIDER" [P] to [0] Stop booster Slide on the "SLIDER" [9] to [0]
• Power management:
The total cooking hob is equipped with an overall maximum of Booster power. When the Booster function is activated, the electronic system automatically regulates all “Boosters” selected to equalise the available power to each element selected for booster. The display is blinking on [9] for a few seconds and then shows the maximum of Booster allowed :
Heating zone selected
[ P ] is displayed
The other heating zone: (example: power level 9)
[9] goes to [8] and blinks
Timer
The timer is able to be used simultaneous with all heating zones and this with different time settings (from 0 to 1H59 minutes) for each heating zone.
- Setting and modification of the cooking time:
Action Control panel Display
| Select a zone | Press a zone | [0] |
| Select the power level | slide on the “SLIDER” | [1] to [P] |
| Select theTimer | Press key [ ] | Timer display on |
| Decrease the time | Press key [-] from the timer | [60] to 59, 58... |
| Increase the time | Press key [+] from the timer | Time increase |
After a few seconds, the [ ] display stops with blinking.
The time is confirmed and the timer starts.
• To stop the cooking time:
Action
Control panel
Display
Select the Timer
Press key [ ]
Timer display on
Stop the time
Press key [-] from the timer [000]
If several timers are activated, repeat the process.
- Egg timer function:
Egg timer is an independent function. It stops as soon as a heating zone starts up.
If the egg timer is on and the hob is switched off, the timer continues until time runs out.
Action
Control panel
Display
Activate the hob
Press key [ ] for 2 sec. Ⓘ[0]
Select the Timer
Press [000] [000]
Decrease the time
Press key [- ] from the timer [60] to 59, 58...
Increase the time
Press key [ + ] from the timer Time increase
After a few seconds, the [min] display stops with blinking.
The time is confirmed and the timer starts.
• Automatic stop at the end of the cooking time:
As soon as the selected cooking time is finished the timer displays blinking [000] and a sound rings.
To stop the sound and the blinking, press the key [-] and [ + ].
Automatic cooking
All the cooking zones are equipped with an automatic cooking device. The cooking zone starts at full power during a certain time, and then reduces automatically its power on the pre-selected level.
- Start-up:
Action
Control panel
Display
Power level selection
slide on the "SLIDER" to [7]
(for example « 7 »)
and stay 3s
[7] is blinking with [A]
- Switching off the automatic cooking:
Action
Control panel
Display
Power level selection
slide on the "SLIDER"
[0] to [9]
Stop&Go function
This function brakes all the hob's cooking activity temporarily and allows restarting with the same settings.
- Start up/stop the pause function:
Action
Control panel
Display
Engage pause
press [ II ] 2s
[ II ] and control light on
Stop the pause
press [ II ] 2s
previous settings
Recall Function
After switching off the hob ( Ⓞ, it is possible to recall the last settings.
• cooking stages of all cooking zones (Booster)
- minutes and seconds of programmed cooking zone-related timers
- Keep warm function
• Automatic cooking
The recall procedure is following:
- Press the key [ ] for 2 sec.
- Then press [ II ] before the light stops blinking.
The previous settings are again active.
"Keep warm" Function
This function allows the reach and automatically maintains at the temperature of 70^ C. This will avoid liquids overflowing and fast burning at the bottom of the pan.
Action Control panel Display
Activate the Keep warm Press on key [ ] [ U ]
To stop Press on key [ ] [0]


The maximum duration of keeping warm is 2 hours.
Bridge or Automatic Bridge Function
This function allows the use of 2 cooking zones at the same time with the same features as a single cooking zone. With this function the Booster function is allowed on the left and center zones.
Action Control panel Display
| Activate the hob | Press key [ 1] for 2 sec. | [0] |
| Activate the bridge Place a pan on one of the two zones that will be bridged and press simultaneously the corresponding selection keys [0] and [ ] or Automatically: put a great pan on the 2 zones and press on the 2 “SLIDER” | [ ] blink | |
| Increase bridge | Slide on the “SLIDER” witch indicates the power | [1] to [9] |
| Stop the bridge | Press simultaneously of the 2 cooking zones | [0] |
Control panel locking

To avoid modification of the setting of the cooking zones, in particular during cleaning, the control panel can be locked (with exception to the On/Off key [ ☐]).
Action Control panel Display
Activate the hob Press key [ ] for 2 sec. [0]
Locking the hob Hold for 3s the key of an area then [L]
press the "Slider" which scrolls and
swipe from left to right
Unlock the hob Hold for 3s the key of an area then [0] ou [H]
press the "Slider" which scrolls and
swipe from left to right
"Chef" function
The Chef function (Professional Kitchen Inspiration) automatically creates 2 bridge zones by activating the 4 inductors, it will offer different powers between the two zones that can be adjusted manually. With this we can move our recipient from one area to another with different powers without having to manually adjust or operate the controls.
• Start up/stop the chef function:
Action Control panel Display \_\_\_\_
Engage the chef function press [ ] [3] et [ ], [9] et [ ]
Stop the chef function press [ ] [ 0 ]
π π
Grill function
This function allows the optimal use of the grill plate with combining two areas and using appropriate powers.
• Start up/stop the grill function:
Action Control panel Display
Engage the grill function
Stop the grill function
press [ GRILL ]
press [ GRILL ]
[8]
[0]
OPERATING THE HOOD
Starting the hood
• Start up/stop the hood:
Action
Activate the hood
Select the power level
Stop the hood
Control panel
press on the hood selection key
slide on the "SLIDER"
slide on the "SLIDER" towards the left
Display
[0]
[1] à [9]
[0]
Booster function

When the function is activated, the hood operates at its maximum power level for 10 minutes.
• Start up/stop the booster function:
| Action | Control panel | Display |
| Select the power level | slide on the “SLIDER” | [1] à [9] |
| Activate the booster | slide until the end of the “SLIDER” or press directly at the end of the “SLIDER” | [0] |
| Stop the booster | slide on the “SLIDER” | [1] à [9] |
Timer function
This function allows to operate the hood for 15 minutes after the switch off of the hob.
- Start the timer:
| Action | Control panel | Display |
| Activate the hood | press on the hood selection key | [0] |
| Select the power level | slide on the “SLIDER” | [1] à [P] |
| Start the timer | press [ ☐above the hood selection key | [☐of the hood is on,[015] on the timer display |
| • Stop the timer: | ||
| Action | Control panel | Display |
| Stop the timer | press [ ☐above the hood selection key | Nothing |
Automatic function
This function adjusts automatically the power level of the hood depending on the power level of the cooking zones.
- Activate / deactivate the automatic function:
| Action | Control panel | Display |
| Activate the automatic function | press 3 seconds on the hood selection key | [ A ] |
| deactivate the automatic function | press 3 seconds on the hood selection key | [ 0 ] |
Note: it is possible to quickly change the power of the hood when the automatic function is activated, by sliding your finger on the "SLIDER".
This temporarily stops the automatic function.
The automatic function is reactivated the next time the hob is started.
Switch-off the appliance before cleaning.
Do not clean the hob if the glass is too hot because they are risk of burn.
- Remove light marks with a damp cloth with washing up liquid diluted in a little water. Then rinse with cold water and dry the surface thoroughly.
- Highly corrosive or abrasive detergents and cleaning equipment likely to cause scratches must be absolutely avoided.
- Do not ever use any steam-cleaner or pressure washer.
- Do not use any object that may scratch the ceramic glass.
- Ensure that the pan is dry and clean. Ensure that there are no grains of dust on your ceramic hob or on the pan. Sliding rough saucepans will scratch the surface.
- Spillages of sugar, jam, jelly, etc. must be removed immediately. You will thus prevent the surface being damaged.
- Do not use a steam cleaner to clean this appliance.
- Ensure the cooking pan bases are clean and in good condition prior to using them to prevent any damage to the surface of the device.
HOOD CLEANING AND MAINTENANCE
Regular cleaning of the hood guarantees correct and error-free operation and extends the life of the hood. Be sure to clean the grease filters according to the manufacturer's recommendations.
Filter cleaning indicator
When the hood is on and the suction power is set to [0], the time remaining before cleaning the filter is displayed on the timer display.
The default setting is 30 hours, but you can change this setting if you want.
• Show the remaining time:
Action
Activate the hood
Control panel
press on the hood selection key
Display
[remaining time] on the timer display
• Grease filter cleaning indicator:
When the grease filters are to be cleaned, the timer display shows [00h] and a dot flashes on the hood selection key.
- Reset the time remaining before cleaning the hood filter
Action
Activate the hob
Control panel
press key [ ] for 2 sec
Display
[0] and a dot flashes on the hood selection key [0] and [00h] on the timer display
Select the hood
press on the hood selection key
The last user-specified setting is activated
Reset the counter
press on the timer key for 3 secondes
Confirm the setting
press on the timer key again
- Change the time remaining before cleaning the hood filter
EN
| Action | Control panel | Display |
| Activate the hob | press key [ Ⓤfor 2 sec | [0] and a dot flashes on the hood selection key |
| Select the hood | press on the hood selection key | [remaining time] on the timer display |
| Change the counter time | press on the timer key for 3 secondes adjust to press on the key [ + ] or [ - ] | [remaining time] on the timer display |
| Confirm the setting | press on the timer key again | - |
Manual cleaning of grease filters
The grease filters must be cleaned with a brush, lukewarm water and a mild detergent, when cleaning by hand. Avoid using concentrated detergent.
To avoid
- Lime cleaners, scouring powders, liquid scouring agents or harsh universal cleaners and oven sprays
Cleaning the grease filters in the dishwasher
The grease filters are to be placed vertically in the lower basket and washed at 60^ C maximum with a mild deter gent.
When cleaning the grease filters in the dishwasher, they may become discolored depending on the detergent used. However, this does not affect the proper functioning of the filters.
After cleaning, replace the grease filters in the hood.
When the grease filters are removed, the other removable parts must also be cleaned. This avoids the risk of fire.
For more details consult p.33.
In order to obtain an optimal performance of capturing fumes and vapors, it is recommended to use lids on the pots in a semi-open position with the openingfacingtowards the center of the suction plate.

natural_image
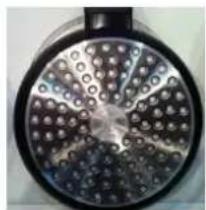
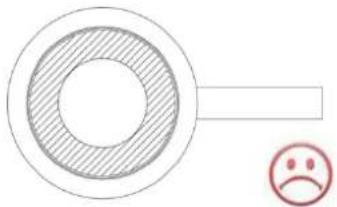
Line drawing of a cooking pot on a stovetop with a circular fan inside, no text or symbols presentPan quality
Adapted materials: steel, enamelled steel, cast iron, ferromagnetic stainless-steel, aluminium with ferromagnetic bottom.
Not adapted materials: aluminium and stainless-steel without ferromagnetic bottom, cupper, brass, glass, ceramic, porcelain.
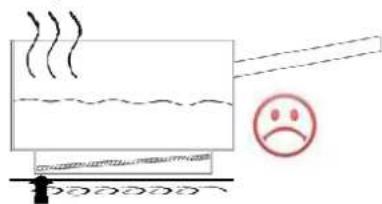
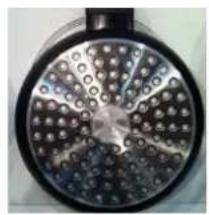
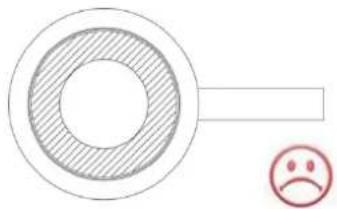
Ferromagnetic base Aluminium base Ferromagnetic ring

natural_image
Four-panel image showing a circular filter with dot patterns, a smiling face, a perforated fan, and a ring-shaped object with a handle (no text or symbols)Base smalToo great a distance Ferromagnetic elementler than tFerromagnetic element not parallel to the inductorhe pot

The manufacturers specify if their products are compatible induction.
To check if pans are compatibles:
- Put a little water in a pan placed on an induction heating zone set at level [9]. This water must heat in a few seconds.
• A magnet stucks on the bottom of the pan.
Certain pans can make noise when they are placed on an induction cooking zone. This noise doesn't mean any failure on the appliance and doesn't influence the cooking operating.
NOTE: Overheating of an empty pot with a curved base or a logo or embossed hollow in the centre could damage the inductor.
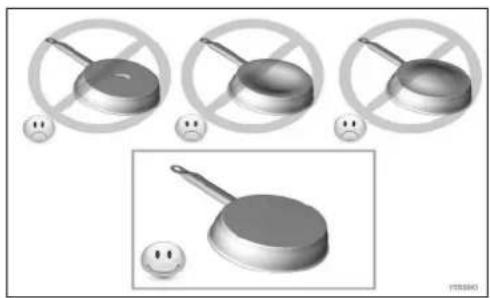
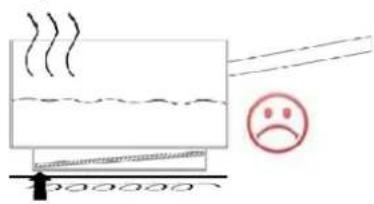
natural_image
Illustration of three frying pan designs with no text or symbols, showing different expressions of surprise or fear (no text or symbols present)CAUTION! The use of unsuitable pans may lead to malfunction or breakdown of the device that is not covered by the manufacturer's warranty.
SOUNDS DURING USE:
- Noises during cooking. Some kitchen utensils, depending on the quality of the ferritic base of the container, may be more intense if the composition of the base is poor or poor.
- A slight "click click" sound is heard. This sound is normal. It is a safety indicator to detect presence of the container on the inductor. It activates automatically when you turn on the hob and during cooking.
- A slight hum is heard. It is a normal sound that comes from the transmission of energy from the inductor to the base of the container (electromagnetic waves).
Pan dimension and material types
The cooking zones are, within a certain limit, automatically adapted to the diameter of the pan base. However the bottom of the pan must have a minimum diameter according to the corresponding cooking zone.
To obtain the best efficiency of your hob, please place the pan in the centre of the cooking zone. Caution! Certain pans made of special materials such as cast iron, i.e. grill plates, have low temperature dissipation property, accumulate significant amounts of heat that is conducted by direct contact of the pan to the ceramic glass, causing overheating inside the appliance, which could lead to damages. Therefore, we recommend not using very high power and using average ranges with this type of pan. This model has a special “GRILL” function for these types of pans that automatically regulates the temperature in order to obtain optimum efficiency and protect the device. Please see the instructions of use on pg. 14. Never use the bridge function for these types of pans.
Examples of cooking power setting
(the values below are indicative)
| Melting1 to 2Reheating | Sauces, butter, chocolate, gelatineDishes prepared beforehand | |
| Simmering2 to 3Defrosting | Rice, pudding, sugar syrupDried vegetables, fish, frozen products | |
| Vegetables, fish, meatSteam3 to 4 | ||
| Steamed potatoes, soups, pasta,Water4 to 5fresh vegetables | ||
| 6 to 7 | Medium cookingSimmering | Meat, lever, eggs, sausagesGoulash, roulade, tripe |
| 7 to 8 | Cooking | Potatoes, fritters, wafers |
| 9 | Frying, roostingBoiling water | Steaks, omelettes, fried dishesWater |
| P and ,, ,, | Frying, roostingBoiling water | scallops, steaksBoiling significant quantities of water |
The hob or the cooking zone doesn't start-up:
• Th e hob is badly connected on the electrical network.
• The protection fuse cut-off.
• The looking function is activated.
- The sensitive keys are covered of grease or water.
• An object is put on a key.
The control panel displays [U]:
• There is no pan on the cooking zone.
• The pan is not compatible with induction.
• The bottom diameter of the pan is too small.
The control panel displays [E]:
• The electronic system is defective.
- Disconnect and replug the hob.
- Call after sales
One or all cooking zone cut-off:
• The safety system functioned.
- You forgot to cut-off the cooking zone for a long time.
• One or more sensitive keys are covered.
• The pan is empty and its bottom overheated.
- The hob also has an automatic reduction of Booster level and breaking Automatic overheating
Continuous ventilation after cutting off the hob:
• This is not a failure, the fan continuous to protect the electronic device.
• The fan cooling stops automatically.
The automatic cooking system doesn't start-up:
• The cooking zone is still hot [H].
• The highest Booster level is set [9].
The control panel displays [U]:
• Refer to the chapter "Keep warm".
The control panel displays [ II ]:
• Refer to the chapter "Stop&Go"
The control panel displays [ ] or [ Er03 ] :
- An object or liquid covers the control keys. The symbol disappear as soon as the key is released or cleaned.
The control panel displays [E2]:
• The hob is overheated, let it cool and then turn it on again.
The control panel displays [E8]:
• The air inlet of the ventilator is obstructed, release it.
The control panel displays [U400]:
• The hob is not connected to the network. Check the connection and reconnect the hob.
- The hob is not connected to the network. Check the connection and reconnect the hob.
A slight "click click" sound is heard when placing a container on a stove:
- This sound is normal. It is a safety indicator to detect the presence of the container on the inductor. It is automatically activated when the hob is turned on and during cooking.
If one of the symbols above persists, call the Customer Service.
ENVIRONMENT PRESERVATION
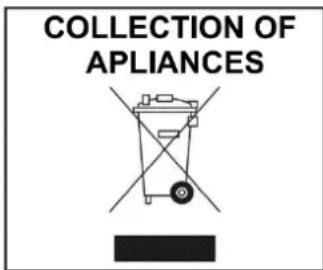
The symbol 1 on the product or its packaging indicates that this product cannot be disposed of like normal domestic waste. The product must be handed over at a collection point for recycling electrical and electronic equipment. If you ensure that this product is correctly disposed of, you will help to avoid the possible negative environmental and public health effects that could arise from incorrect disposal. For more detailed information about recycling this product, please contact your city authorities, the domestic waste service or the establishment where you purchased it. This electrical appliance is marked in compliance with European Directive 2012/19/EU on electrical and electronic appliance waste (WEEE).

ENVIRONMENTAL PROTECTION AND WASTE TREATMENT
DISPOSAL OF THE PACKAGING. The packaging is marked with in Green Dot.
In its commitment to the protection of the environment t and i n compliance with the provisions of the European Directive 94/62 / EC on packaging and packaging waste and the derived Law 22/2011 on Contaminated Residues and d Soils, Pando entrusts entities of social economy an Integrated Management System, responsible for the periodic collection at the consumer's home or in its vicinity of used packaging and packaging waste for subsequent treatment.
To remove all packaging materials such as cardboard, expanded polyurethane, and film, use the appropriate container s.
This ensures the correct treatment and reuse of packaging materials.
INSTALLATION INSTRUCTIONS
The installation must be performed by a qualified electrical contractor.
How to stick the gasket:
The gasket supplied with the hob prevents the intrusion of liquids into the cabinet below. It's installation has to be done carefully, in conformity with the following drawing.

Stick the gasket (2) two millimetres from the external edge of the glass, after removing the protection tape (3).
Fitting - installing:
Installation superposed glass
EN
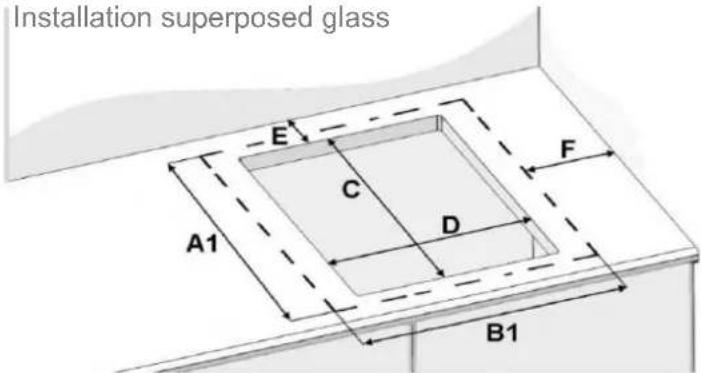
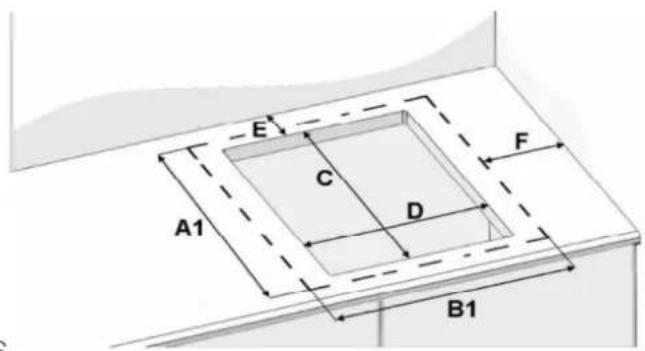
Installation for flush glass

| Cut-out sizeGlas size Rear RadiusSide | Cut sizeE-393 | |||||||
| A1 EDCB1 | (min) | F(min) | B2A2H (Deep) | |||||
| 490520 750 | 50 | 40 | 8 | 524 | 784 | |||

- Ensure that there is a distance of 50 mm between the hob and the wall or sides.
- The hobs are classified as "Y" class for heat protection. Ideally the hob should be installed with plenty of space on either side. There may be a wall at the rear and tall units or a wall at one side. On the other side, however, no unit or divider must stand higher than the hob.
- The piece of furniture or the support in which the hob is to be fitted, as well as the edges of furniture, the laminate coatings and the glue used to fix them, must be able to resist temperatures of up to 100 °C.
- Do not install the hob at the top of a non ventilated oven or a dishwasher.
- Ensure under the bottom of the hob casing a space of 20 mm to ensure good air circulation of the electronic device.
- If a drawer is placed under the hob, avoid putting into this drawer flammable objects (for example: sprays) or non heat-resistant objects.
- Materials which are often used to make worktops expand on contact with water. To protect the cut out edge, apply a coat of varnish or special sealant. Particular care must be taken when applying the adhesive joint supplied with the hob to prevent any leakage into the supporting furniture. This gasket ensures a good seal when used in conjunction with smooth work top surfaces.
- The safety gap between the hob and the cooker hood placed above must comply with the recommendations of the hood manufacturer. In the case of no instructions, a distance of 500 mm minimum should apply.
- The connection cord should not be subjected to any mechanical constraint.
- Do not use inappropriate child safety shields or hob guards. These can cause accidents.
- WARNING: Use only hob guards designed by the manufacturer of the cooking appliance or indicated by the manufacturer of the appliance in the instructions for use as suitable or hob guards incorporated in the appliance. The use of inappropriate guards can cause accidents.
ELECTRICAL CONNECTION
- The installation of this appliance and the connection to the electrical network should be entrusted only to an electrician perfectly to the fact of the normative regulations and which respects them scrupulously.
- Protection against the parts under tension must be ensured after the building -in.
- The data of connection necessary are on the stickers place on the hob casing near the connection box.
- The connection to the main must be made using an earthed plug or via an omnipolar circuit breaking device with a contact opening of at least 3 mm.
- The electrical circuit must be separated from the network by adapted devices, for example: circuit breakers, fuses or contactors.
- If the appliance is not fitted with an accessible plug, disconnecting means must be incorporated in the fixed installation, in accordance with the installation regulations.
- The inlet hose must be positioned so that it does not touch any of the hot parts of the hob or oven.
Caution!
This appliance must only be connected to a network 230 V\~ 50/60 Hz.
Always connect the earth wire.
Respect the connection diagram.
The connection box is located underneath at the back of the hob casing. To open the cover use a medium screwdriver. Place it in the slits and open the cover.
| Mains | Connection | Cable diameter | Cable | Protection calibre |
| 230V~ 50/60Hz | 1 Phase + N | 3 x 2.5 mm ^2 | H 05 VV - FH 05 RR - F | 25 A * |
| 400V~ 50/60Hz | 2 Phases + N | 4 x 1.5 mm ^2 | H 05 VV - FH 05 RR - F | 16 A * |
* calculated with the simultaneous factor following the standard EN 60 335-2-6

Connection of the hob
For the various kinds of connection, use the brass bridges which are in the box next the terminal
Monophase 230V\~1P+N
Put the 1^st bridge between terminal L1 and L2, the 2^nd between N1 and N2.
Attach the earth to the terminal “earth”, the neutral N to terminal N1 or N2, the Phase L to one of the terminals L1 or L2.
Biphase 400V\~2P+N
Put a bridge between terminal 4 and 5.
Attach the earth to the terminal “earth”, the neutral N to terminal N1 or N2, the Phase L1 to the terminals L1 and the Phase L2 to the terminal L2.
Frequent loosening and screwing of the screws on the connection box risks damaging the efficiency of the tightness once screwed. It is therefore advisable to keep screwing and unscrewing to a minimum.
Ensure that the cables are correctly inserted and tightly screwed down.
4 weeks after installation, be sure to tighten again the screws in the terminal block.
We cannot be held responsible for any incident resulting from incorrect connection or which could arise from the use of an appliance which has not been earthed or has been equipped with a faulty earth connection.
PANDO GUARANTEE CERTIFICATE INOXPAN S.L.
INOXPAN S.L., thank you for choosing our brand and for trusting a Pando product, standard of Quality, Design & Innovation, a brand honoring his origins and commitments.
TERMS OF THIS WARRANTY:
This product comes with a warranty of 3 year as from the date of purchase covering all product defect affecting its performance. To validate the same is mandatory to apply the purchasing invoice or buying ticket before the official Customer Service engineer.
During the above-mentioned period, the Company pledge to repair or replace at no cost any defective part whose cause is due to vice or manufacturing product flaw to make it work fine again, as well as the necessary labour cost and expenses involved in said repairing or replacement.
PANDO WARRANTY EXEMPTIONS:
It shall not be covered by the warranty or may be cause of cancelation of such, any of the following case scenarios, thus being the user the one taking charge of any material cost, labour and customer service travel expenses:
- Installation or performing reviews, extractor hood or ducting cleaning or maintenance.
- Failures or defects caused by not respecting or following the safety instructions, product use and maintenance manual recommendations.
- Whenever the product is orientated to commercial or non-residential use, to which it is not made for.
- Product malfunction caused by not following the instructions, recommendations and/or norms shown in the appliance manuals.
- Issues arising from any unappropriated product or smoke ducting installation
- Issues and faults produced by carriage or moves, and/or product handling by non-authorised personnel to this company or the brand Pando.
- Bumps, dents, scratches, or broken glasses
- Other alien bodies present in the interior or exterior of the product
- The product or any peripheral associated device, like in-line motors- might not be accessible, either due to elements impeding easy and safe access. All necessary means to access by the Pando authorised engineer shall be on account and responsibility of the user.
- Wiring inadequate handling and internal motor connections, remote or roof, and extractor hood.
- Wear and tear aesthetical parts, like lighting screens, filters and lamps.
- Rust, stains, tone changes produced by the use of inadequate non recommended corrosive cleaning products without the right protection, as those containing chemical corrosive agents, and /or exposure to the sea breeze (saltpetre).
- Issues or malfunction produced by variations of main supply, or natural and random causes from weather or geological origin, as storms, lightning, earthquakes, floods, etc
- Products whose origin is resale, used appliance, or displays with more than two years since their date of manufacturing.
INOXPAN, S.L., remains expressly excluded from any liability over any eventual damage any direct or indirect to persons or materials produced by inadequate product handling and use.
Official Pando Customer Service Contact Details
| SPAIN, PORTUGAL Y ANDORRA: | OTHER COUNTRIES / AUTRES PAYS | ||
| https://www.pando.es/asistencia-tecnica/ |  | ENhttps://www.pando.es/en/after-sales-services/FRhttps://www.pando.es/fr/service-apres-vente/ |  |
INOXPAN S.L.
Pol. Ind. El Cros
Av. El Moli de les Mateves,11
Apdo. Correos n° 21
08310 ARGENTONA
(Barcelona - Spain)
Tel. +34 93 757 94 11
Fax +34 93 757 96 53
www.pando.es
com.pando@pando.es
Export:
export@pando.es
Tel. 902 41 55 11

Pando
www.pando.es

SERVICIO POST VENTA
Environmental Management System Certification
UNE-EN ISO 14001:2015
ES20/208675


Quality Management System
UNE-EN ISO 9001:2015
ES19/86566


- Pando
- integralcooking
- E-392 / E-393
- ENVIRONMENTAL PROTECTION AND WASTE TREATMENT
- EN - INTRODUCTION
- EN - SAFETY INSTRUCTIONS
- VERY IMPORTANT!
- EN - INSTALLATION INSTRUCTIONS
- HERRAMIENTAS NECESARIAS / FERRAMENTAS NECESSÁRIAS / LES OUTILS NÉCESSAIRES / TOOLS NEEDLE
- CONTENIDO / CONTEÚDO / CONTENU / CONTENT
- COTAS / DIMENSÕES / REPÈRES / DIMENSIONS
- ENCASTRE / INSIRA / ENCASTREMENT / BUILT IN SIZES
- INSTALACIÓN / INSTALAÇÃO / INSTALLATION / INSTALLATION
- 3
- CONEXIÓN ELÉCTRICA / LIGAÇÃO ELÉCTRICA CONNEXION ÉLECTRIQUE / ELECTRICAL CONNECTION
- Caution!
- Monophase 230V\~1P+N
- MANTENIMIENTO / MANUTENÇÃO / MAINTENANCE / MAINTENANCE
- BANDEJA RECOJEACEITES / BANDEJA DE GRAXA / PLATEAU DE GRAISSE / GREASE TRAY
- PROPIEDADES:
- APPLICATIONS:
- ¡ATENCIÓN!
- Qualidade da panela
- ATENÇÃO!
- DESCRIPTION OF THE APPLIANCE....118
- USE OF THE APPLIANCE ....119
- STARTING-UP AND APPLIANCE MANAGEMENT ....119
- COOKING PLATE CLEANING AND MAINTENANCE....126
- HOOD MAINTENANCE AND CLEANING ....126
- COOKING ADVICES....128
- WHAT TO DO IN CASE OF A PROBLEM....130
- ENVIRONMENT PRESERVATION....131
- INSTALLATION INSTRUCTIONS....131
- ELECTRICAL CONNECTION....133
- AFTER-SALES SERVICE (SAT) AND WARRANTY....135
- Precautions before using
- Precautions not to damage the appliance
- Precautions in case of appliance failure
- Other protections
- Technical characteristics
- Control panel
- Display
- Ventilation
- STARTING-UP AND APPLIANCE MANAGEMENT
- Before the first use
- Induction principle
- Sensitive touch
- Power selection zone "SLIDER" and timer setting zone
- Starting-up
- Pan detection
- Residual heat indication
- Booster and double booster function
- • Start up / Stop the booster:
- Action Control panel Display
- • Start up / Stop double booster
- • Power management:
- Heating zone selected
- The other heating zone: (example: power level 9)
- Timer
- - Setting and modification of the cooking time:
- • To stop the cooking time:
- Action
- - Egg timer function:
- • Automatic stop at the end of the cooking time:
- Automatic cooking
- - Start-up:
- - Switching off the automatic cooking:
- Stop&Go function
- - Start up/stop the pause function:
- Recall Function
- "Keep warm" Function
- Bridge or Automatic Bridge Function
- Control panel locking
- "Chef" function
- • Start up/stop the chef function:
- Action Control panel Display \_\_\_\_
- Grill function
- • Start up/stop the grill function:
- OPERATING THE HOOD
- Starting the hood
- • Start up/stop the hood:
- Booster function
- Timer function
- Automatic function
- Switch-off the appliance before cleaning.
- HOOD CLEANING AND MAINTENANCE
- Filter cleaning indicator
- • Show the remaining time:
- • Grease filter cleaning indicator:
- - Reset the time remaining before cleaning the hood filter
- Manual cleaning of grease filters
- To avoid
- Cleaning the grease filters in the dishwasher
- Pan quality
- SOUNDS DURING USE:
- Pan dimension and material types
- Examples of cooking power setting
- The hob or the cooking zone doesn't start-up:
- The control panel displays [U]:
- The control panel displays [E]:
- One or all cooking zone cut-off:
- Continuous ventilation after cutting off the hob:
- The automatic cooking system doesn't start-up:
- The control panel displays [ II ]:
- The control panel displays [ ] or [ Er03 ] :
- The control panel displays [E2]:
- The control panel displays [E8]:
- The control panel displays [U400]:
- A slight "click click" sound is heard when placing a container on a stove:
- ENVIRONMENT PRESERVATION
- INSTALLATION INSTRUCTIONS
- How to stick the gasket:
- ELECTRICAL CONNECTION
- Connection of the hob
- PANDO GUARANTEE CERTIFICATE INOXPAN S.L.
- TERMS OF THIS WARRANTY:
- PANDO WARRANTY EXEMPTIONS:
- INOXPAN S.L.
Brand : Pando
Model : E-393
Category : Range hood