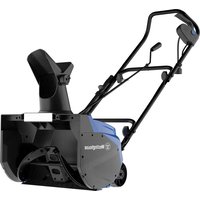
WSnow18D - Effect machine WESTINGHOUSE - Free user manual and instructions
Find the device manual for free WSnow18D WESTINGHOUSE in PDF.


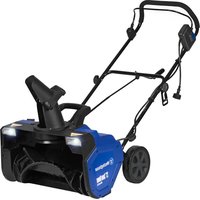
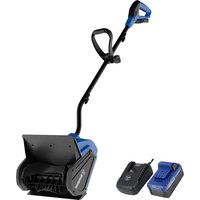
| Product Type | Double-insulated Electric Snow Thrower |
| Brand | Westinghouse |
| Model | WSnow18D |
| Clearing Width | 46 cm (18 in) |
| Snow Intake Height | 25.4 cm (10 in) |
| Maximum Throw Distance | 7.6 m (25 ft) |
| Weight | 15.3 kg (33.7 lb) |
| Power Supply | 120 V AC, 60 Hz |
| Double Insulation | Yes, grounding not required |
| Motor Type | Electric, Brushed |
| Power Cord Length | Not specified (use with extension cord) |
| Cord Retention Device | Yes, built-in |
| Chute Orientation | Manual rotation (left/right) + tilt (distance) |
| Headlights | Yes, integrated |
| Clearing Tool | Included |
| Auger Width | 18 in (46 cm) |
| Auger Material | Reinforced plastic (estimated) |
| Wheels | Yes (diameter not specified) |
| Folding Handle | Yes, for compact storage |
| Safety | Safety switch, double insulation, discharge protection |
| Maintenance | Permanent lubrication, exterior cleaning, screw inspection |
| Warranty | 2-year limited |
| Spare Parts Available | Auger, belt, scraper, pulley |
| Intended Use | Domestic, snow removal on hard surfaces |
Frequently Asked Questions - WSnow18D WESTINGHOUSE
User questions about WSnow18D WESTINGHOUSE
0 question about this device. Answer the ones you know or ask your own.
Ask a new question about this device
Download the instructions for your Effect machine in PDF format for free! Find your manual WSnow18D - WESTINGHOUSE and take your electronic device back in hand. On this page are published all the documents necessary for the use of your device. WSnow18D by WESTINGHOUSE.
USER MANUAL WSnow18D WESTINGHOUSE
natural_image
Blue circular icon with a white crown symbol (no text or numbers)User Manual
WSnow18D
18 in. Snow Blower
GTU5838-15L
natural_image
Technical line drawing of a snowman blade assembly (no text or symbols)Introduction....2-3
Safety 4-6
Electrical Safety....6-7
Components 8
Assembly 9-10
Operation....11-12
Maintenance....13
Troubleshooting....14
Service Hot Line/Company Address...... Back Page
INTRODUCTION

WARNING
Operating, servicing, and maintaining this equipment may expose you to chemicals which are known to the State of California to cause cancer and birth defects or other reproductive harm. To minimize exposure, wear gloves or wash your hands frequently when servicing this equipment. For more information go to www.P65warnings.ca.gov.
DISCLAIMERS
All information, illustrations, and specifications in this manual were in effect at the time of publishing. The illustrations used in this manual are intended as representative reference views only. We reserve the right to make any specification or design change without notice.
ALL RIGHTS RESERVED
All rights reserved. No reproduction allowed in any form without written permission from Westinghouse Outdoor Power Equipment.


DANGER
Read this manual before using or performing maintenance on this product. Failure to follow the instructions and safety precautions in this manual can result in serious injury or death.
UPDATES
The latest User Manual for your Westinghouse products can be found under our support tab. wpowereq.com/pages/manuals
Or scan the following QR code with your smartphone camera to be directed to the link.

PRODUCT REGISTRATION
For trouble-free warranty coverage, it is important to register your Westing-house product.
You can register by:
z Completing and mailing the product registration card included in the carton.

z Registering your product on-line at: wpowereq.com/pages/warranty-registration
z Scanning the above QR code with your smartphone camera to be directed to the mobile registration link.
For Your Records
Date of Purchase: ____
Model Number: ____
Serial Number:
Place of Purchase: ____
z Sending the following product information to:
Westinghouse Outdoor Power
Warranty registration
777 Manor Park Drive
Columbus, OH 43228
IMPORTANT: Keep your purchase receipt for trouble-free warranty coverage.
SPECIFICATIONS
AC Voltage....120V//60Hz, 15 Amps
Maximum Clearing Width ....18 in. (46 cm)
Maximum Throwing Distance 25 ft. (7.6 m)
Maximum Snow Intake Height.....10 in. (25.4 cm)
Machine Weight....33.7 lbs. (15.3 kg)
NOTICE
This product is designed and rated for continuous operation at ambient temperatures above 23^ F ( -5^ C). If needed, this product can be operated in extremely cold temperatures for short periods. If the product is exposed to extreme temperatures during storage, it should be brought back within the optimal temperature range before operation.
NOTICE
Thank you for choosing Westinghouse! PLEASE READ BEFORE RETURNING THIS PRODUCT FOR ANY REASON.
If you have a question or experience a problem with your Westinghouse purchase, call us at 1-855-944-3571 to speak with an agent.
SAVE THIS MANUAL FOR FUTURE REFERENCE.
HAVE QUESTIONS?
Email us at service@wpowereq.com or call 1-855-944-3571
SAFETY DEFINITIONS
The words DANGER, WARNING, CAUTION, and NOTICE are used throughout this manual to highlight important information. Make sure that the meanings of this safety information is known to all who operate, perform maintenance on, or are near the generator.

This safety alert symbol appears with most safety statements. It means attention, become alert, your safety is involved! Please read and abide by the message that follows the safety alerts symbol.

DANGER
which, if not avoided, will result in death or serious injury.

WARNING
which, if not avoided, could result in death or serious injury.

CAUTION
which, if not avoided, could result in minor or moderate injury.
NOTICE
Indicates a situation which can cause
damage to the generator, personal property, and/or the environment, or cause the equipment to operate improperly.
NOTE: Indicates a procedure, practice or condition that should be followed for the generator to function in the manner intended.
SAFETY SYMBOLS
Follow all safety information contained in this user's manual as well as the information on the product labeling.
| SYMBOL | DESCRIPTION |
| Safety Alert Symbol. Indicates a potential personal injury hazard. | |
| Read Operator's Manual. To reduce the risk of injury, user must read and understand operator's manual before using this product. | |
| Beware of stones and other objects that could be thrown from the appliance. Keep all bystanders and domestic animals a safe distance away from the work area. |
| SYMBOL | DESCRIPTION |
 | Wet Conditions Alert. To reduce the risk of electric shock, do not expose to rain and store indoors. |
 | Wear safety gloves during use to protect hands. |
  | Keep hands and feet away. Keep hands and feet away from rotating parts. |
 | Keep feet away from the moving parts of the snow thrower. The rotating parts can cause severe bodily injury. |
  | Disconnect the plug before conducting maintenance or when it is damaged or tangled. |
 | Wear eye and ear protection. |
  | Keep the flexible power supply cord away from the cutting blades. |
 | Always keep the power cable away from heat sources, oils, or sharp edges. Immediately remove plug from the mains if the cable is damaged or entangled. |
 | Wear safety footwear at all times to provide protection against objects that may accidentally fall on feet. |
 | Keep hands away from the moving parts of the snow thrower. The rotating parts can cause severe bodily injury. |
 STOP STOP | Allow all moving parts to come to a complete stop and disconnect from the power source before attempting to clear a clog or service the unit. |
 | Double Insulation. |

WARNING
INSTRUCTIONS. Failure to follow all instructions listed below and on the machine may result in electric shock, fire, and/or serious personal injury.
- Know your snow blower. Read operator's manual carefully. Learn its applications and limitations, as well as the specific potential hazards related to this snow blower. Following this rule will reduce the risk of electric shock, fire, or serious injury.
- Do not permit children to use snow blower. It is not a toy.
- Use only accessories that are recommended by the manufacturer for your model described in this manual. Accessories that may be suitable for one snow blower may create a risk of injury when used on another snow blower. Use only as described in this manual.
- Do not put any object into openings. Do not use with any opening blocked; keep free of dust, lint, hair, and anything that may reduce air flow.
- Keep hair, loose clothing, fingers, and all parts of body away from openings and moving parts.
- Make sure your extension cord is in good condition. When using an extension cord, be sure to use one heavy enough to carry the current your product will draw. A wire gauge size (A.W.G.) of at least 14 is recommended for an extension cord 50 feet or less in length. If in doubt, use the next heavier gauge. The smaller the gauge number, the heavier the cord. An undersized cord will cause a drop in line voltage resulting in loss of power and overheating.
● WARNING: Use outdoor extension cords marked SW-A, SOW-A, STW-A, STOW-A, SJW-A, SJTW-A, or SJTOW-A. These cords are rated for outdoor use and reduce the risk of electric shock.
● Ground Fault Circuit Interrupter (GFCI) protection should be provided on the circuit(s) or outlet(s) to be used for the product. Receptacles are available having built-in GFCI protection and may be used for this measure of safety.
● This product is designed with a cord retainer that prevents the extension cord from being pulled loose while using.
- If cord is damaged in any manner while plugged in, pull extension cord from wall receptacle.
- Don't Abuse Cord — Never carry snow blower by cord or yank it to disconnect from receptacle. Keep cord from heat, oil, and sharp edges.
- Keep hands away from moving parts.
- Avoid Unintentional Starting – Do not carry plugged in appliance with finger on trigger. Be sure the switch trigger is not engaged before plugging in.
- Do not use tool if switch trigger does not turn it on or off. Any tool that cannot be controlled with the switch trigger is dangerous and must be repaired.
- Do not operate snow blowers in explosive atmospheres, such as in the presence of flammable liquids, gases, or dust. Snow blowers create sparks which may ignite the dust or fumes.
- Keep bystanders, children, and visitors at least 100 ft. away while operating a snow blower. Distractions can cause you to lose control.
- If appliance is not working as it should, has been dropped, damaged, left outdoors, or dropped into water, return it to a service center.
- Stay alert, watch what you are doing and use common sense when operating a power snow blower. Do not use snow blower while tired, upset, or under the influence of drugs, alcohol, or medication. A moment of inattention while operating snow blowers may result in serious personal injury.
- Use safety equipment. Always wear eye protection. Dust mask, non-skid safety shoes, hard hat, or hearing protection must be used for appropriate conditions.
- Dress properly — Do not wear loose clothing, scarves, or jewelry. They can be caught in moving parts.
- Check for misalignment or binding of moving parts, breakage of parts, and any other condition that may affect the snow blower's operation. If damaged, have the snow blower serviced before using. Many accidents are caused by poorly maintained snow blowers.
- Keep the snow blower and its handle dry, clean and free from oil and grease. Always use a clean cloth when cleaning. Never use brake fluids, gasoline, petroleum-based products, or any strong solvents to clean your snow blower. Following this rule will reduce the risk of loss of control and deterioration of the enclosure plastic.
● Always wear safety glasses with side shields. Everyday glasses have only impact resistant lenses. They are NOT safety glasses. Following this rule will reduce the risk of eye injury.
● Always wear eye protection with side shields marked to comply with ANSI Z87.1 along with hearing protection when operating this equipment.
- Protect your hearing. Wear hearing protection during extended periods of operation. Following this rule will reduce the risk of serious personal injury.
- Don't expose snow blowers to rain. Water entering a snow blower will increase the risk of electric shock.
- Wear heavy long pants, long sleeves, boots, and gloves. Avoid loose garments or jewelry that could get caught in moving parts of the machine or its motor.
- Wear rubber boots when operating the snow blower. Protective footwear will protect your feet and improve your footing on slippery surfaces. Do not go barefoot or wear sandals.
- Keep firm footing and balance. Do not overreach. Overreaching can result in loss of balance.
- Do not operate the snow blower in a direction that will cause snow to be thrown on people or pets. Thrown snow or other objects can cause serious personal injuries.
- Store Idle Snow Blowers Indoors — When not in use, snow blower should be stored indoors in a dry, locked up place — unplugged and out of the reach of children.
- Keep all bystanders, children, and pets at least 100 ft. away.
- Snow blower service must be performed only by qua repair personnel. Service or maintenance performed by unqualified personnel may result in a risk of injury.
- When servicing a snow blower, use only identical replacement parts. Replace or repair damaged cords. Follow instructions in the Maintenance section of this manual. Use of unauthorized parts or failure to follow Maintenance Instructions may create a risk of shock or injury.
- Never use snow blower near fires, fireplaces, hot ashes barbecue pits, etc. Use near fires or ashes can spread fires and result in serious injury and/or property damage.
- Never use snow blower to spread chemicals, fertilizers, or any other toxic substances. Spreading these substances could result in serious injury to the operator or bystanders.
- Never place snow blower on any surface, except a hard, clean surface when motor is running. Gravel, sand, and other debris can be picked up by the air inlet and thrown at the operator or bystanders, causing possible serious injuries.
- Check the work area before each use. Remove all objects such as rocks, broken glass, nails, wire, or string which can be thrown or become entangled in the machine.
- Do not use snow blower on ice, which can cause the operator to slip and fall, resulting in possible serious personal injury.
- Never use snow blower on frozen lakes, rivers, or similar surfaces. Serious injury or death could occur if the ice breaks.
● Never use the snow blower on a rooftop or other unstable surface, which can result in death or serious personal injury.
● For household use only.
- Use the right appliance — Do not use the snow blower for any job except that for which it is intended.
- Do not force the snow blower - It will do the job better and safer at the rate for which it was designed.
- Never direct discharged material toward anyone. Avoid discharging material against a wall or obstruction. Material may ricochet back toward the operator. Stop the snow blower when crossing gravel or rocky surfaces.
- If the snow blower strikes a foreign object, follow these steps:
- Release the switch trigger and wait until the unit comes to a complete stop.
- Disconnect the snow blower from the power supply.
• Thoroughly inspect the snow blower for any damage.
• Repair any damage before restarting and continuing to operate the snow blower.
- Do not lift up or hold the snow blower above the ground when operating, which can result in loss of control and possible serious personal injury. Only operate the snow blower in accordance with the operating instructions provided in this operator's manual.
- Keep guards in place and in working order.
- Disconnect the plug from power source when not in use, before servicing, and when changing accessories.
- Maintain Snow Blowers With Care — Follow instructions for lubricating and changing accessories.
- Save these instructions. Refer to them frequently and the use them to instruct others who may use this tool. If you loan someone this tool, loan them these instructions also.
ELECTRICAL SAFETY
DOUBLE-INSULATED APPLIANCES
In a double-insulated appliance, two systems of insulation are provided instead of grounding. No grounding means is provided on a double-insulated appliance, nor should a means for grounding be added to the appliance. Servicing a double-insulated appliance requires extreme care and knowledge of the system, and should be performed only by qualified service personnel at an authorized dealer.
Replacement parts for a double-insulated appliance must be identical to the parts they replace. A double-insulated appliance is marked with the words "Double Insulation" or "Double Insulated." The symbol (square within a square) may also be marked on the appliance.
This electric snow shovel is double-insulated, eliminating the need for a separate grounding system. Use only identical replacement parts. Read the instructions before servicing double-insulated appliances. Use this snow shovel only as described in this manual.
EXTENSION CORDS
See Figure 1.
When using a power tool at a considerable distance from a power source, be sure to use an extension cord that has the capacity to handle the current the product will draw. An undersized cord will cause a drop in line voltage, resulting in overheating and loss of power. Use the chart to determine the minimum wire size required in an extension cord. Only round jacketed cords listed by Underwriter's Laboratories (UL) should be used.
When working outdoors with a product, use an extension cord that is designed for outside use. This type of cord is designated with "WA" or "W" on the cord's jacket. Be sure to use a heavy guage (A.W.G.) wire for your product based on the chart below. If in doubt, use the next heavier gauge. (smaller gauge numbers equal heavier cords). Using an undersized cord will cause a drop in line voltage and result in loss of power and overheating.
**Ampere rating (on product data plate)
0-2.0 2.1-3.4 3.5-5.0 5.1-7.0 7.1-12.0 12.1-16.0
| Cord Length | Wire Size (A.W.G.) |
| 25' 16 16 16 16 14 14 | |
| 50' 16 16 16 14 14 12 | |
| **Used on 12 gauge – 20 amp circuit. NOTE: AWG = American Wire Gauge | |
Before using any extension cord, inspect it for loose or exposed wires and cut or worn insulation.
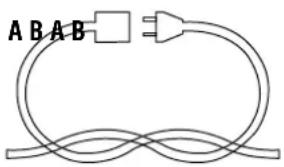
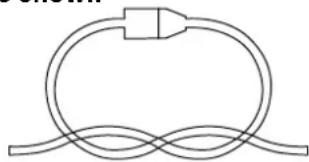
It is possible to tie the extension cord and power cord in a knot to prevent them from becoming disconnected during use. Make the knot as shown in figure 1, then connect the plug end of the power cord into the receptacle end of the extension cord. This method can also be used to tie two extension cords together.

WARNING
Keep the extension cord clear Position the cord so that it will nber, tools, or other obstructions g with a power tool. Failure to do us personal injury.

WARNING
Check extension cords before each use. If damaged replace immediately. Never use the product with a damaged cord since touching the damaged area could cause electrical shock resulting in serious injury.
ELECTRICAL CONNECTION
This product has a precision-built electric motor. It should be connected to a power supply that is nominal 120V/60Hz AC (typical U.S. household circuit). Do not operate this product on direct current (DC). A substantial voltage drop will cause a loss of power and the motor will overheat. If the product does not operate when plugged into an outlet, double-check the power supply.
FIG. 1
TIE CORDS AS SHOWN
natural_image
Pure electrical circuit lines without any symbolsA - Extension cord
B - Appliance cord
FIG. 2
natural_image
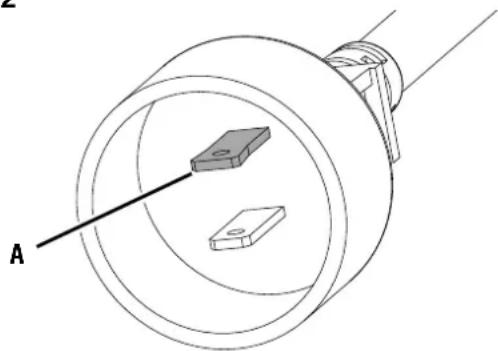
Technical diagram of a mechanical component with two circular parts and a labeled section A (no text or symbols beyond label)A - Polarized blade
SPEED AND WIRING
The speed is not constant and decreases under a load or with lower voltage. For voltage, the wiring in a shop is as important as the motor's horsepower rating. A line intended only for lights cannot properly carry a power tool motor. Wire that is heavy enough for a short distance will be too light for a greater distance. A line that can support one power tool may not be able to support two or three tools.
POLARIZED PLUG
See Figure 2.
To reduce the risk of electric shock, this product has a polarized plug featuring one blade that is wider than the other. Do not modify the plug provided. The plug will fit into a polarized extension cord only one way. Use only a polarized UL-, CSA-, or ETL-listed extension cord when using this snow shovel. If the plug does not fully fit into the extension cord, reverse the plug. If the plug still does not fit, obtain a correct polarized extension cord. A polarized extension cord will require the use of a polarized wall outlet.

WARNING
Improper installation of a nonpolarized extension cord increases the risk of electric shock.
Repair or replace a damaged or worn cord immediately.
This product is for use on a nominal 120 V circuit and has a polarized plug similar to the plug illustrated in figure 2. Only connect the product to an extension cord having the same configuration as the plug. Do not use an adapter with this product.
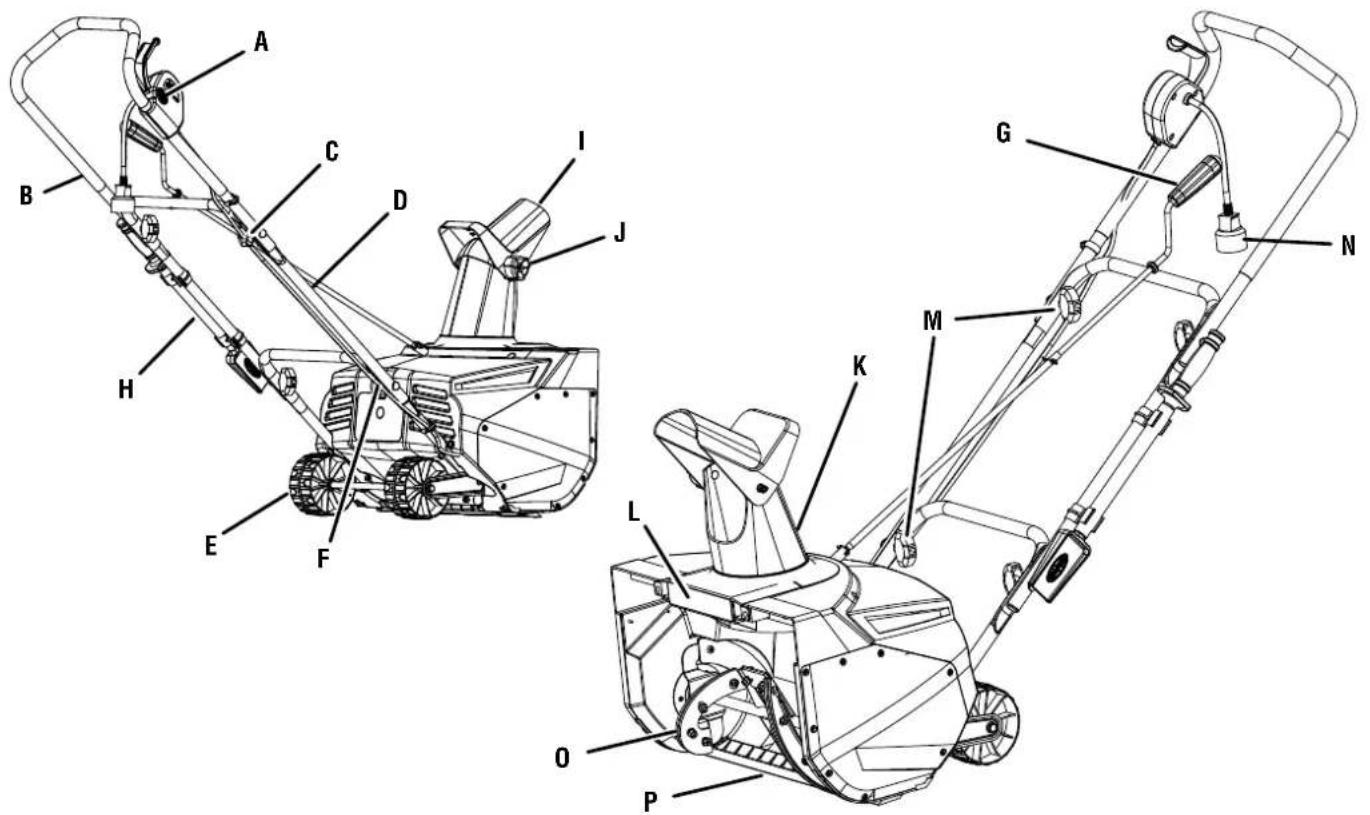
FIG. 3
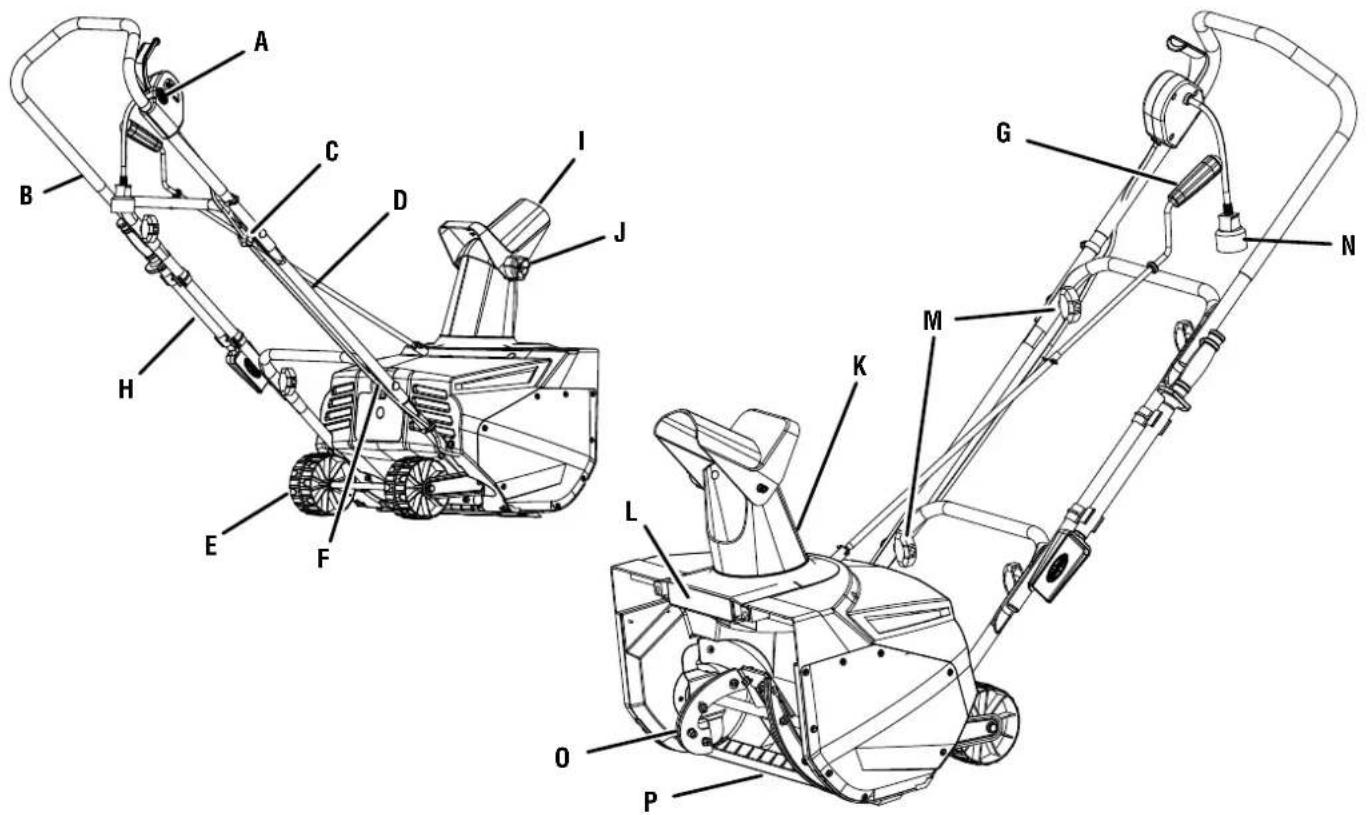
A - Start button
B - Upper handle assembly
C - Power cord retainer
D - Lower handle
E - Wheel
F - Power cable
G - Chute rotation handle
H - Unclogging Tool
I - Chute deflector
J - Chute deflector adjustment knob
K - Discharge chute
L - Headlight
M - Handle locking knobs
N - AC plug
0 - Auger
P - Scraper
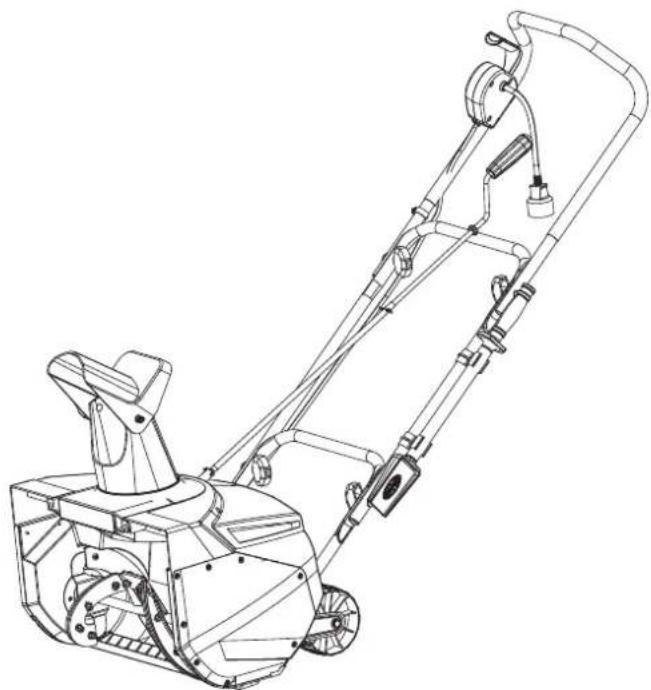
UNDERSTANDING YOUR SNOW BLOWER
See Figure 3.
To reduce the risk of personal injury and product failure, read and understand the information in this user's manual as well as the information on the product labeling.
AUGER
The large auger on this product allows it to take a big bite of snow up to 10 inches in depth. It also features an 18-inch clearing width.
CHUTE ROTATION HANDLE
The chute rotation handle allows for the easy adjustment of the discharge chute for directing the discharge of the snow.
POWER CORD RETAINER
The power cord retainer helps control the safe positioning of the attached power cord. It may also help prevent the accidental disconnection of the attached power cord.
UNCLOGGING TOOL
Designed to reach into the discharge chute to unclog snow buildup.
WARNING
ALWAYS stop the snow blower and disconnect it from the power source before unclogging snow. NEVER place hands inside the discharge chute. Failure to follow this rule could result in serious personal injury.
REMOVING CARTON CONTENTS

WARNING
This product requires assembly.
Do not attempt to operate this product if any items in the INCLUDED LIST are already assembled when you remove the carton contents. These items are not assembled by the manufacturer and should require customer assembly. Using an improperly assembled product can be hazardous and could result in serious personal injury.
- Carefully open the carton.
- Remove and inspect the carton contents. Verify that all the items in the INCLUDED LIST are present and undamaged.
● Recycle or dispose of the packaging materials properly.
INCLUDED LIST
See Figure 4.
Snow blower, chute connecting rods and cotter pins (2 ea.), unclogging tool (1), quick start guide, and user manual.
If any parts are missing, contact our service team at service@wpowereq.com or call 1-855-944-3571.
TOOLS NEEDED (not included)
Needle-nose pliers.

WARNING
Do not alter or modify this prod-
uct unless instructed otherwise in this manual or by the manufacturer. Do not use attachments or accessories that are not recommended for use with this product. Making unauthorized modifications and using incompatible accessories can damage the unit and may void your warranty.

WARNING
Do not connect to power supply
until assembly is complete. Failure to comply could result in accidental starting and possible serious personal injury.
RAISING THE HANDLE ASSEMBLY
See Figures 5 - 6.
This unit ships with its handle fully assembled and in a folded position. The following steps explain how to raise the handle into a secure and locked position.
- Raise the upper handle in the direction as shown by the arrow until the tubes align and slide into the indent of the lower tube.
● Tighten the upper handle locking knobs. Do not overtighten.
FIG. 4
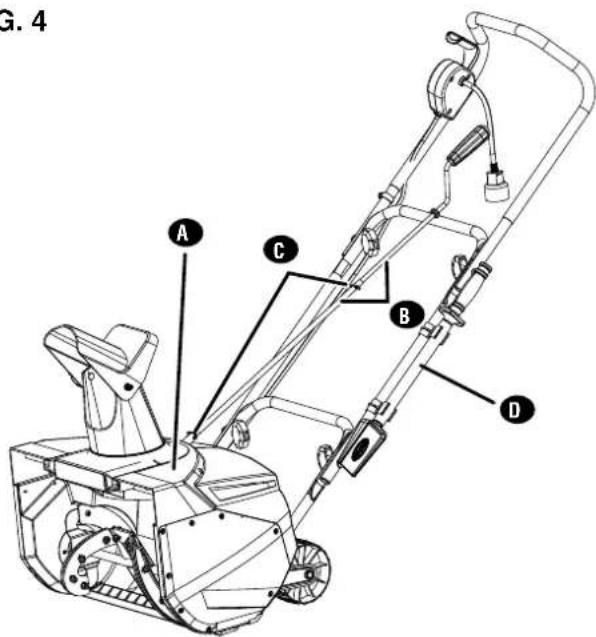
A - Snow blower
B - Upper and lower connecting rods
C - Cotter pins
D - Unclogging tool (1)
NOT SHOWN
User manual
FIG. 5
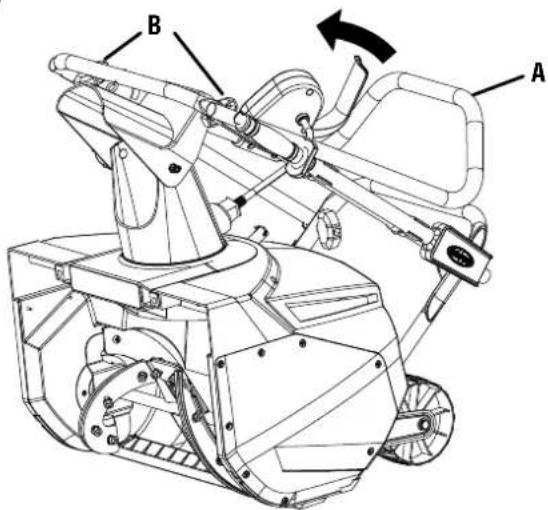
A - Upper handle
B - Upper handle lock knobs
- Raise the handle assembly in the direction as shown by the arrow until the tubes align and slide into the indent of the frame on the snow blower.
● Tighten the lower handle locking knobs. Do not overtighten.
INSTALLING THE DISCHARGE CHUTE CONNECTING ROD
See Figure 7.
The discharge chute connecting rods are attached to the upper handle with plastic ties. Carefully cut the ties and follow the steps to install the discharge chute connecting rod.
● With needle nosed pliers, remove the cotter pin from the chute rod connector on the snow blower.
- Insert the tapered end of the lower chute adjustment rod into the connector on the snow blower and align the holes.
● Reinstall the cotter pin.
- Remove the cotter pin from the top of the lower chute connector rod.
- Insert the upper chute adjustment rod through the eyelet at the top center of the lower handle.
- Insert the upper chute connector rod into the lower chute connector rod and align the holes the lower rod.
● Reinstall the cotter pin.
FIG. 6
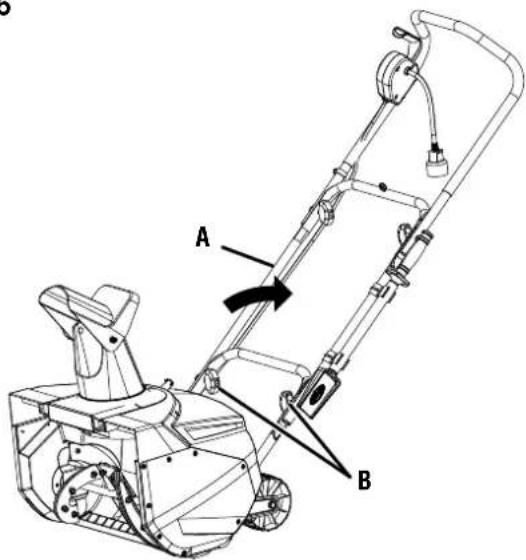
A - Lower handle
B - Lower handle lock knobs
FIG. 7
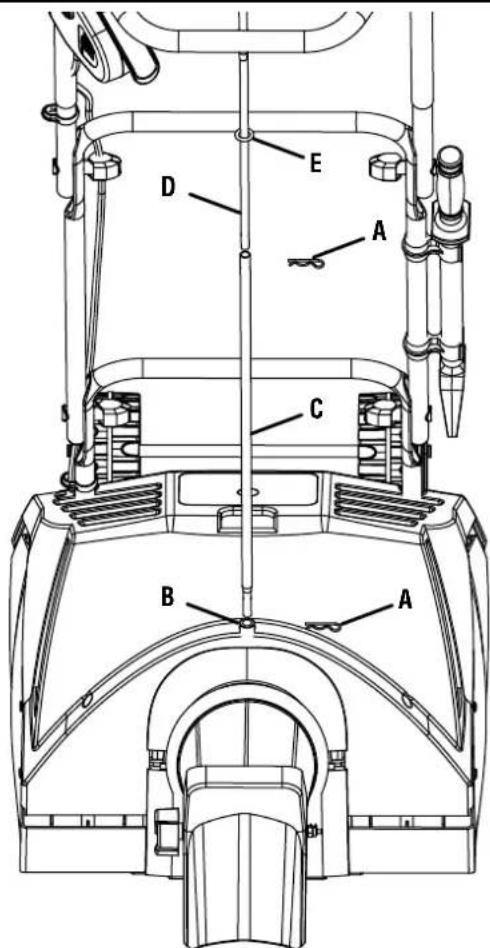
A - Cotter pins
B - Chute rod connector
C - Lower chute adjustment rod
D - Upper chute adjustment rod
E - Eyelet

WARNING
Do not allow familiarity with products to make you careless. Remember that a careless fraction of a second is sufficient to inflict serious injury.

WARNING
Always wear eye protection with side shields marked to comply with ANSI Z87.1. Failure to do so could result in objects being thrown into your eyes resulting in possible serious injury.

WARNING
Do not use any attachments or accessories not recommended by the manufacturer of this product. The use of attachments or accessories not recommended can result in serious personal injury.
NOTICE
Before each use, inspect the entire product for damaged, missing, or loose parts such as screws, nuts, bolts, caps, etc. Tighten securely all fasteners and caps and do not operate this product until all missing or damaged parts are replaced. Please contact customer service or a qualified service center for assistance.

WARNING
Always disconnect the snow blower from the power supply when you are assembling parts, making adjustments, cleaning, or when not in use. This will prevent accidental starting that could cause serious personal injury.
CONNECTING TO POWER SUPPLY
See Figure 8.
This product is designed with a cord retainer that prevents the extension cord from coming loose while in use.
- Form a loop at the end of the extension cord.
- Insert the loop of the extension cord through the bottom opening of the power cord retainer.
- Place the loop over the hook. Lightly pull on the cord to reduce the slack and secure it over the hook.
● Plug the snow blower into the extension cord.
NOTE: Removing all excess cord slack will prevent the plug from loosening from the extension cord.
STARTING AND STOPPING THE SNOW BLOWER
See Figure 9.
To start the motor:
- Connect the snow blower to power supply.
NOTICE
Always secure extension cord to the unit by using the power cord retainer. Failure to use the power cord retainer may result in damage to the snow blower and/or extension cord.
FIG. 8
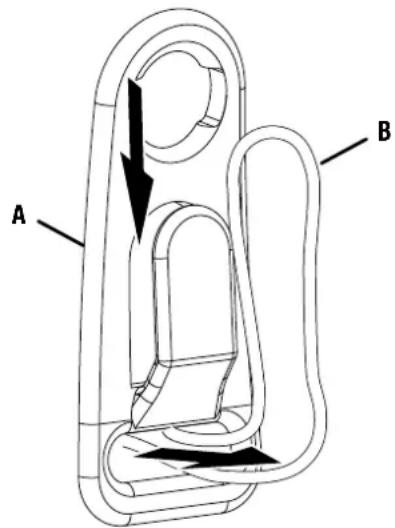
A - Power cord retainer
B - Extension cord
FIG. 9
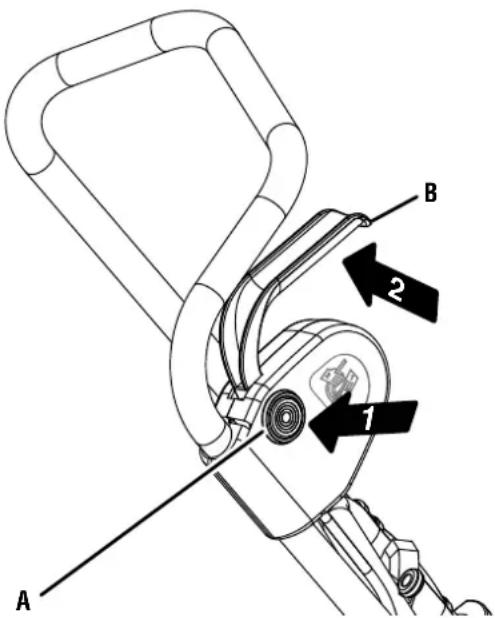
A - Start button
B - On/off switch lever
- Press and hold the start button.
- Pull and hold the on/off switch lever against the handle to start the unit. Release the button but continue holding the on/off switch lever to the handle.
To stop the motor:
● Release the on/off switch lever.
ADJUSTING THE DISCHARGE CHUTE
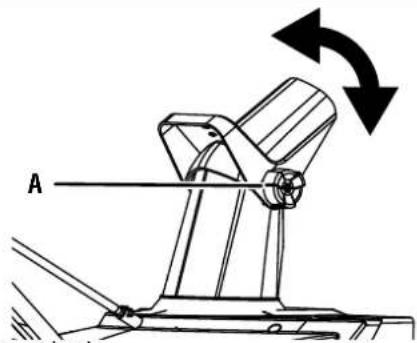
See Figures 10 - 11.
The chute can be adjusted from left to right to change the direction the snow is thrown. It can also be adjusted up and down to change the distance the snow is thrown.
To adjust the direction of the snow:
- Rotate the chute adjustment handle counterclockwise to direct the snow to the left of the unit.
- Rotate the chute adjustment handle clockwise to direct the snow to the right of the unit.
To adjust the distance of the snow:
- Loosen but do not remove the adjustment knob counterclockwise.
- Raising the discharge chute will extend the distance of the thrown snow. Lowering the discharge chute will reduce the distance of the thrown snow.
● Tighten the adjustment knob by turning clockwise. Do not overtighten.
OPERATING TIPS

WARNING
Never use snow blower on fro- similar surfaces. Death or serious the ice breaks.

WARNING
Never use the snow blower on a able surface, which can result in sonal injury

WARNING
Do not use snow blower on ice, operator to slip and fall, resulting personal injury.

WARNING
Do not wear loose clothing, They can be caught in moving or serious personal injury.

WARNING
Keep all snow discharge pointed cal devices to reduce the risk of ric shock.

WARNING
Never point the snow blower or the direction of people or pets. Other objects can cause serious per-

WARNING
Make sure the area to be cleared
is free of stones, sticks, wires, gravel, and other objects that could be accidentally thrown by the snow blower in any direction and cause serious personal injury to the operator and others.
FIG. 10
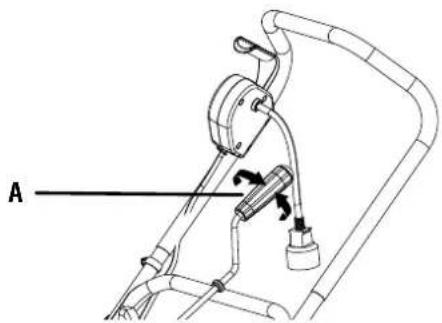
A - Chute adjustment handle
FIG. 11
natural_image
Mechanical assembly diagram showing a rotating component with labeled point A and directional arrows (no text or symbols beyond labels)A - Chute adjustment knob
● Take notice of the direction of the wind before beginning. When possible, discharge snow in the same direction as the wind to prevent snow from being thrown back into your face.
- If the unit comes in contact with any type of obstruction or debris during use, stop the snow blower, disconnect from the power supply, remove the obstruction, and inspect the unit carefully for damage before proceeding.

WARNING
Never reach into the impeller or
place any body part in front of the snow blower when the unit is operating or when the unit is plugged in. Always ensure all moving parts have stopped and the snow blower has been unplugged before clearing any obstructions. Failure to follow these instructions can result in serious personal injury.
- Some parts of the snow blower can freeze under extreme weather conditions. Do not attempt to operate the unit with frozen parts.
- When finished, allow the motor to run for an additional few minutes, then turn the chute rotation lever back and forth several times to remove any remaining snow from the chute.

WARNING
Before inspecting, cleaning or servicing the unit, stop the motor, wait for all moving parts to stop, and disconnect from power supply. Failure to follow these instructions can result in serious personal injury or property damage.

WARNING
Always wear eye protection with side shields marked to comply with ANSI Z87.1. Failure to do so could result in objects being thrown into your eyes resulting in possible serious injury.

WARNING
When servicing, use only authorized replacement parts. Use of any other parts can create a hazard or cause product damage.
NOTICE
Periodically inspect the entire product for damaged, missing, or loose parts such as screws, nuts, bolts, caps, etc. Tighten securely all fasteners and caps and do not operate this product until all missing or damaged parts are replaced. Please contact customer service or a qualified service center for assistance.
GENERAL MAINTENANCE
Avoid using solvents when cleaning plastic parts. Most plastics are susceptible to damage from various types of commercial solvents and may be damaged by their use. Use clean cloths to remove dirt, dust, oil, grease, etc.

WARNING
Do not at any time let brake fluids, gasoline, petroleum-based products, penetrating oils, etc., come in contact with plastic parts. Chemicals can damage, weaken, or destroy plastic which can result in serious personal injury.
LUBRICATION
All of the bearings in this product are lubricated with a sufficient amount of high grade lubricant for the life of the unit under normal operating conditions. Therefore, no further bearing lubrication is required.
STORING THE SNOW BLOWER

CAUTION
Make sure all melted snow that may drip from the snow blower is properly wiped up to prevent a slip and fall hazard.
● Wipe the snow blower with a clean dry cloth.
- Check all nuts, bolts, knobs, screws, fasteners, etc., for tightness.
- Inspect moving parts for damage, breakage, and wear. Have repairs made on any damaged or missing parts.
- Loosen the handle knobs and lower the upper handle assembly.
- Store snow blower indoors in a clean, dry place out of the reach of children.
- Do not store near corrosive materials such as fertilizer or rock salt.
REPLACEMENT PARTS
The following replacement parts are available by contacting Westinghouse customer service toll-free at 1 (855) 944-3571.
18-in. Auger 1000380001
18-in. Belt 1400074001
18-in. Scraper....1051045001
Large Pulley....1000383001
| PROBLEM POSSIBLE | CAUSE CORRECTION | |
| Snow blower won’t start | Snow blower is not plugged in. Connect snow | blower to 120V power supply. Be sure the snow blower plug is properly connected to the extension cord. |
| The start button was not depressed. Press and | hold the start button before engaging the bale. | |
| The motor is on but the auger does not turn. | The drive belt may be worn or broken. Replace | the drive belt. |
| A layer of snow remains on the ground after passing over it. | The auger or scraper may be worn. Have the | auger or scraper replaced by an authorized service center. |
This product has a two-year limited warranty. For more information, visit our website:
https://westinghouseoutdoorpower.com/pages/support#warranty
For service or replacement parts assistance, call our service hotline toll-free at 1-855-944-3571
WSnow18D (GTU5838-15L)
Westinghouse Outdoor Power
Warranty registration 777 Manor Park Drive Columbus, OH 43228
natural_image
Pure electrical circuit lines without any symbolsnatural_image
Diagram of a mechanical component with two small components and a labeled section A (no text or symbols beyond label)A - Cuchilla polarizada
This product is for use on a nominal 120 V circuit and has a polarized plug similar to the plug illustrated in figure 2. Only connect the product to an extension cord having the same configuration as the plug. Do not use an adapter with this product.
FIG. 3
A - Mango inferior
A - Chaveta
natural_image
Mechanical assembly diagram showing a rotating component with directional arrows (no text or symbols)https://westinghouseoutdoorpower.com/pages/support#warranty
NE PAS RETOURNER CE PRODUIT AU MAGASIN
Westinghouse Outdoor Power
Warranty registration
777 Manor Park Drive
Columbus, OH 43228
Tension CA....120V//60Hz, 15 A
AVOIR DES QUESTIONS?
NOTE : AWG = American Wire Gauge
natural_image
Simple line drawing of two connected wires labeled A and B, with no text or symbols present.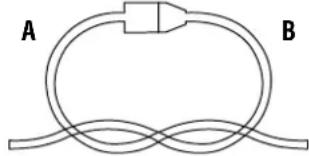
natural_image
Simple line drawing of a coiled cable with labeled points A and B (no text or symbols beyond labels)natural_image
Technical line drawing of a mechanical component with labeled section A (no text or symbols beyond label)A - Fiche polarisée
VITESSE ET CÂBLAGE
https://westinghouseoutdoorpower.com/pages/support#warranty
natural_image
Blue circular icon with a white crown symbol (no text or numbers)www.WestinghouseOutdoorPower.com
Service Hotline (855) 944-3571
777 Manor Park Drive, Columbus, OH 43228
and Westinghouse are trademarks of Westinghouse Electric Corporation.
Used under license by Westinghouse Outdoor Power Equipment.
© 2023 MWE Investments, LLC All Rights Reserved.
- User Manual
- INTRODUCTION
- WARNING
- DISCLAIMERS
- ALL RIGHTS RESERVED
- DANGER
- UPDATES
- PRODUCT REGISTRATION
- For Your Records
- SPECIFICATIONS
- NOTICE
- HAVE QUESTIONS?
- Email us at service@wpowereq.com or call 1-855-944-3571
- SAFETY DEFINITIONS
- CAUTION
- SAFETY SYMBOLS
- ELECTRICAL SAFETY
- DOUBLE-INSULATED APPLIANCES
- EXTENSION CORDS
- See Figure 1.
- ELECTRICAL CONNECTION
- SPEED AND WIRING
- POLARIZED PLUG
- See Figure 2.
- UNDERSTANDING YOUR SNOW BLOWER
- See Figure 3.
- AUGER
- CHUTE ROTATION HANDLE
- POWER CORD RETAINER
- UNCLOGGING TOOL
- REMOVING CARTON CONTENTS
- INCLUDED LIST
- See Figure 4.
- TOOLS NEEDED (not included)
- RAISING THE HANDLE ASSEMBLY
- See Figures 5 - 6.
- NOT SHOWN
- INSTALLING THE DISCHARGE CHUTE CONNECTING ROD
- See Figure 7.
- CONNECTING TO POWER SUPPLY
- See Figure 8.
- STARTING AND STOPPING THE SNOW BLOWER
- See Figure 9.
- To start the motor:
- To stop the motor:
- ADJUSTING THE DISCHARGE CHUTE
- See Figures 10 - 11.
- OPERATING TIPS
- GENERAL MAINTENANCE
- LUBRICATION
- STORING THE SNOW BLOWER
- REPLACEMENT PARTS
- WSnow18D (GTU5838-15L)
- Westinghouse Outdoor Power
- NE PAS RETOURNER CE PRODUIT AU MAGASIN
- AVOIR DES QUESTIONS?
- VITESSE ET CÂBLAGE
Brand : WESTINGHOUSE
Model : WSnow18D
Category : Effect machine