
ULX-DRYER150 - Blower Ulsonix - Free user manual and instructions
Find the device manual for free ULX-DRYER150 Ulsonix in PDF.
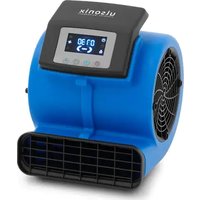


| Product type | Floor blower / Dryer |
| Brand | Ulsonix |
| Model | ULX-DRYER150 |
| Rated voltage | 230 V / 50 Hz |
| Rated power | 135 W |
| Dimensions (W x D x H) | 270 x 240 x 320 mm |
| Weight | 3.8 kg |
| Number of speeds | 3 (low, medium, high) |
| Automatic shut-off timer | Yes, adjustable in 30 min increments up to 8 h |
| Negative ions function | Yes, purifies air and eliminates odors |
| Power supply | Mains with ground connection |
| Usage | Indoor only |
| Maintenance | Clean the exterior with a dry cloth; do not expose to water |
| Safety | Mandatory grounding, overheat protection (not specified), automatic shutdown possible via timer |
| Spare parts | List provided in the manual (exploded view): grids, feet, housings, motor, fan wheel, etc. |
| Repairability | Do not disassemble the motor yourself; contact a qualified professional |
| Control type | LCD panel with buttons (on/off, speed, timer, negative ions) |
| Included accessories | Power cable |
Frequently Asked Questions - ULX-DRYER150 Ulsonix
User questions about ULX-DRYER150 Ulsonix
0 question about this device. Answer the ones you know or ask your own.
Ask a new question about this device
Download the instructions for your Blower in PDF format for free! Find your manual ULX-DRYER150 - Ulsonix and take your electronic device back in hand. On this page are published all the documents necessary for the use of your device. ULX-DRYER150 by Ulsonix.
USER MANUAL ULX-DRYER150 Ulsonix
This User Manual has been translated for your convenience using machine translation. Reasonable efforts have been made to provide an accurate translation; however, no automated translation is perfect nor is it intended to replace human translators. The official User Manual is the English version. Any discrepancies or differences created in the translation are not binding and have no legal effect for compliance or enforcement purposes. If any questions arise related to the accuracy of the information contained in the User Manual, please refer to the English version of those contents which is the official version.
Technical data
| Parameter description | Parameter value |
| Product name | Floor dryer |
| Model | ULX-DRYER150 |
| Rated voltage [V~] / Frequency [Hz] | 230 / 50 |
| Rated power [W] | 135 |
| Dimensions [Width x Depth x Height; mm] | 270 x 240 x 320 |
| Weight [kg] | 3.8 |
This machine has the advantages of convenient operation, safe use and good ventilation effect. Suitable for operation in a home environment. The machine has the function of negative ions, which can purify the air and speed up the elimination of odors.
Precautions
1. Supervision of Use
- This machine is not intended to be used by individuals (including children) who are physically weak, slow to respond, or mentally handicapped unless they are under the guidance or assistance of someone responsible for their safety.
2. Children's Safety
- Children should be supervised to ensure they do not play with the machine. Be aware that the packaging and plastic bags of this product pose a suffocation risk, and children should be kept away from them.
3. Power Precautions
- Always unplug the power plug from the outlet when cleaning or servicing the machine.
4. Damaged Power Cord or Plug
- If the power cord, plug, or socket is damaged or loose, or if the power plug does not match the socket, do not use this machine. Doing so could lead to electric shock, overheating, or fire.
5. Unplug When Not in Use
- Always unplug the power plug immediately after the machine has stopped working.
6. Grounding Requirement
- This product must be grounded to reduce the risk of electric shock in case of a malfunction. The power supply must match the voltage and frequency of the machine and be powered by a grounded socket. If the socket is not grounded, the machine should not be used.
7. Proper Disposal
- If the machine is damaged, do not attempt to dispose of it yourself or throw it in the trash. Contact a professional organization for proper disposal to avoid environmental pollution.
8. Avoid Dusty Environments
- Do not use this machine in dusty environments, such as those containing flour, wood dust, toner, or metal dust. This may pose a risk of packaging errors or machine damage.
9. Power Cord Handling
- Avoid pulling the power cord across sharp edges or corners. Always inspect the power cord for signs of damage or aging before each use. Do not use the machine if the cord is damaged.
10. Unplugging the Machine
- Do not pull the power cord or use the machine body to remove the power plug. Always unplug the machine by holding the plug itself.
11. External Modifications
- Do not install an external governor on this machine.
12. Water Resistance
- This product is not waterproof. It is intended for indoor use only. Do not expose it to rain or use it near water sources such as water tanks, pools, or areas prone to flooding. Avoid getting the machine wet, as this could cause a fire or electric shock due to short-circuiting.
13. Protect from Heat and Damage
- Keep the machine and its power cord away from heat sources, oil, and sharp objects.
14. Air Inlet and Outlet
- Ensure that no accessories such as air inlets or outlets are missing or removed during use. Keep the air inlets and outlets free from blockages.
15. Avoid Personal Injury
- Keep hair, clothing, fingers, and other body parts away from the openings and moving parts of the machine to prevent injury or electric shock.
16. Stable Placement
- Always place the machine on a stable surface to prevent it from falling, which could result in injury or damage to the machine. Do not move or lift the machine during operation.
Operating Instructions:
1. Power Switch (icon)
- Press this button to turn the fan on or off.
2. Wind Speed Adjustment (icon)
- Press this button to adjust the fan speed. The fan has three speed settings:
■ Press once to select the 1st gear (lowest speed). ■ Press again to switch to the 2nd gear (medium speed). ■ Press again to switch to the 3rd gear (highest speed). ■ Press once more to return to the 1st gear.
3. Timer Function (icon)
- Use this button to set the automatic shut-off timer. ○ Each press increases the timer by 30 minutes.
- The maximum timer setting is 8 hours.
4. Negative Ion Function (icon)
- Press this button to turn the negative ion function on or off.
- When the function is on, the icon on the display will flash.
- Press the button again to turn off the function, and the " " icon will disappear from the display.
Exploded View
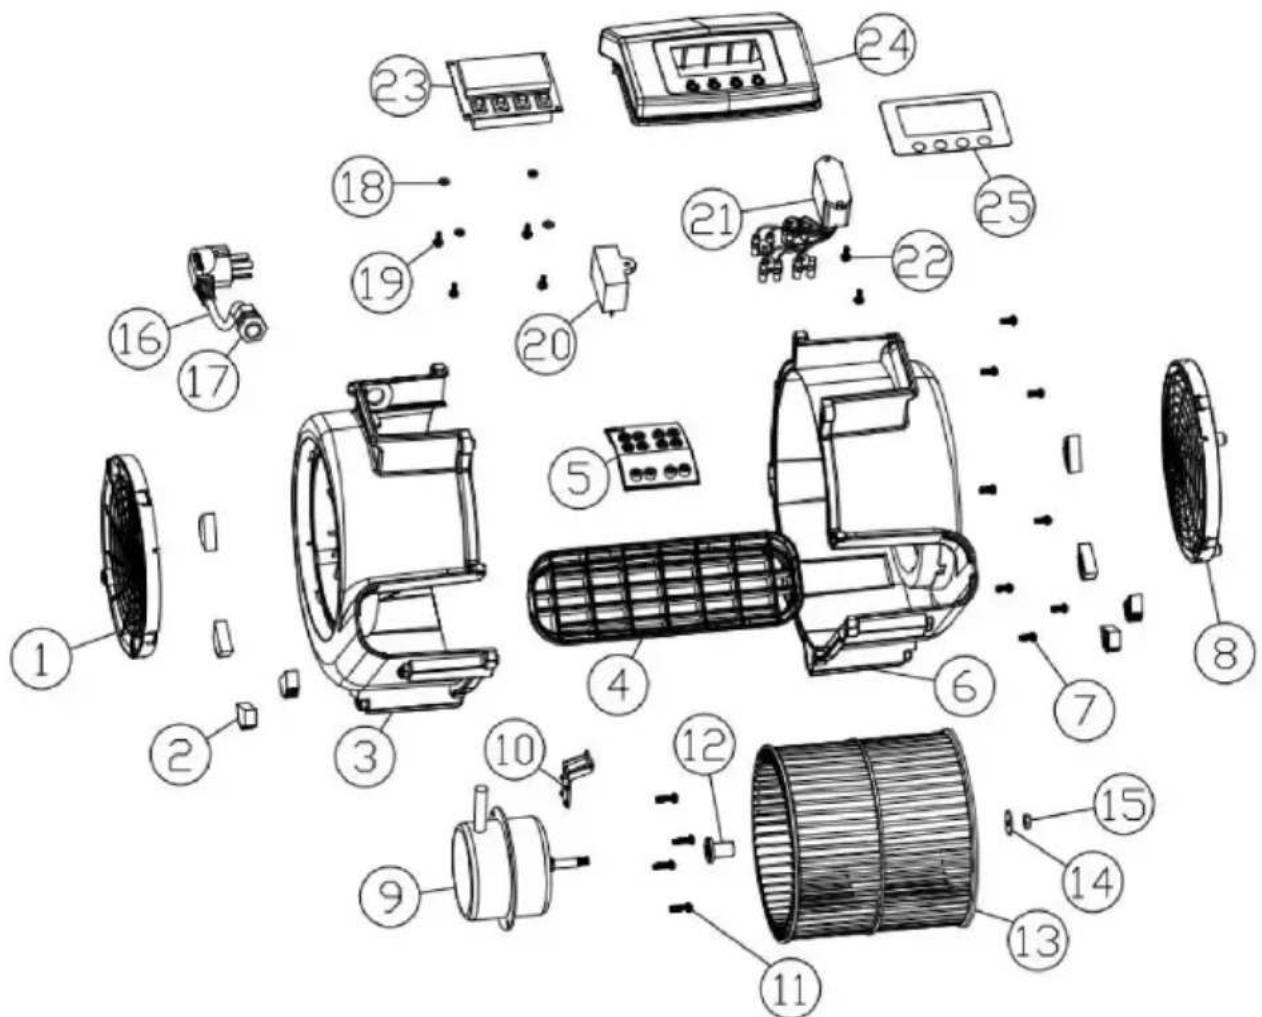
1 Left net 2 Rubber feet 3 Left housing 4 Air outlet 5 Air duct inner panel 6 Right housing 7 TAH4*10 Self-tapping screws 8 Right side net 9 Motor 10 Clamping plate 11 TAH4*10 Self-tapping screw 12 Wind wheel bushing 13 170mm wind wheel
14 6*20*1.5 meson 15 M6 anti-thread nut 16 Power cable 17 Crimping seat 18 Insulating gasket 19 PA3*10 20 Capacitance 21 Negative ion generator 22 TT4*10 Self-tapping screw 23 LCD control panel 24 Handle cover 25 LCD stickers
Maintenance and Care Instructions:
1. Water Protection
- This product is not waterproof. Ensure that water or detergents do not enter the body during use to prevent electric shock.
2. Motor Maintenance
- Do not attempt to disassemble or replace any main parts of the motor yourself. If you encounter any issues or abnormalities, contact the manufacturer or an authorized dealer for professional maintenance.
Troubleshooting
| Fault Phenomenon | Possible Cause of Failure | Approach |
| Motor does not turn | 1. The power cord is not connected properly2. The power switch position is loose3. The motor is burned out4. LCD screen failure | 1. Check the power cord2. Check the switch circuit3. Repair by the manufacturer's service organization or professional |
| Motor starts slowly | Capacitor damage | Have the capacitor repaired and replaced by the manufacturer's service facility or professional |
| The product motor makes abnormal noise | Damage to the rotor during transportation or deformation of the fan casing | Repair and replace the rotor or casing by the manufacturer's service organization or professional |

1 Left net 2 Rubber feet 3 Left housing 4 Air outlet 5 Air duct inner panel 6 Right housing 7 TAH4*10 Self-tapping screws 8 Right side net 9 Motor 10 Clamping plate 11 TAH4*10 Self-tapping screw 12 Wind wheel bushing 13 170mm wind wheel
14 6*20*1.5 meson 15 M6 anti-thread nut 16 Power cable 17 Crimping seat 18 Insulating gasket 19 PA3*10 20 Capacitance 21 Negative ion generator 22 TT4*10 Self-tapping screw 23 LCD control panel 24 Handle cover 25 LCD stickers
1 Left grille 2 Rubber feet 3 Left housing 4 Air outlet 5 Inner air duct panel 6 Right housing 7 TAH4*10 self-tapping screws 8 Right side grille 9 Motor 10 Mounting plate 11 TAH4*10 self-tapping screw 12 Wind wheel bushing 13 170mm wind wheel 14 6*20*1.5 washer 15 M6 anti-rotation nut 16 Power cord 17 Crimping seat 18 Insulating gasket 19 PA3*10 20 Capacitor 21 Negative ion generator 22 TT4*10 self-tapping screw 23 LCD control panel 24 Handle cover 25 LCD stickers
1 Left grille 2 Rubber feet 3 Left housing 4 Air outlet 5 Inner air duct panel 6 Right housing 7 TAH4*10 self-tapping screws 8 Right side grille 9 Motor 10 Mounting plate 11 TAH4*10 self-tapping screw 12 Wind wheel bushing 13 170mm wind wheel
14 6*20*1.5 washer 15 M6 anti-rotation nut 16 Power cord 17 Crimping seat 18 Insulating gasket 19 PA3*10 20 Capacitor 21 Negative ion generator 22 TT4*10 self-tapping screw 23 LCD control panel 24 Handle cover 25 LCD stickers
Maintenance and care instructions:
1. Water protection
For the disposal of the device please consider and act according to the national and local rules and regulations.
CONTACT
expondo Polska sp. z o.o. sp. k.

- PRECAUTIONS
- SUPERVISION OF USE
- CHILDREN'S SAFETY
- POWER PRECAUTIONS
- DAMAGED POWER CORD OR PLUG
- UNPLUG WHEN NOT IN USE
- GROUNDING REQUIREMENT
- PROPER DISPOSAL
- AVOID DUSTY ENVIRONMENTS
- POWER CORD HANDLING
- UNPLUGGING THE MACHINE
- EXTERNAL MODIFICATIONS
- WATER RESISTANCE
- PROTECT FROM HEAT AND DAMAGE
- AIR INLET AND OUTLET
- AVOID PERSONAL INJURY
- STABLE PLACEMENT
- OPERATING INSTRUCTIONS
- POWER SWITCH (ICON)
- WIND SPEED ADJUSTMENT (ICON)
- TIMER FUNCTION (ICON)
- NEGATIVE ION FUNCTION (ICON)
- EXPLODED VIEW
- MAINTENANCE AND CARE INSTRUCTIONS
- WATER PROTECTION
- MOTOR MAINTENANCE
- CONTACT
Brand : Ulsonix
Model : ULX-DRYER150
Category : Blower