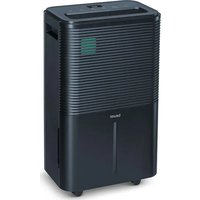
LE 150 - Dehumidifier BEURER - Free user manual and instructions
Find the device manual for free LE 150 BEURER in PDF.

| Product type | Air dehumidifier |
| Brand | Beurer |
| Model | LE 150 |
| Dimensions (L x W x H) | 22.0 x 25.0 x 45.5 cm |
| Weight (empty) | 10.0 kg |
| Power supply | AC 220-240 V, 50 Hz, 200 W (30 °C, 80% RH) |
| Dehumidification capacity | 12 l / 24 h (30 °C, 80% RH) |
| Tank capacity | 2.0 l |
| Refrigerant | R-290 (propane gas), 50 g |
| Recommended room size | Up to 30 m² (floor area) |
| Dehumidification modes | Continuous, target humidity (30-80%), automatic (45-55%), night, laundry drying |
| Fan speed | 2 speeds (low and high) |
| Timer | 1 to 24 hours (delayed on/off) |
| Humidity indicator | Colored: blue (<45%), green (45-65%), red (>65%) |
| Defrost function | Automatic between 5 °C and 16 °C |
| Air filter cleaning | Every 14 days (washable with warm water) |
| Water tank cleaning | Every 2 weeks (clean water) |
| Safety | Automatic shut-off if tank full, low/high temperature protection, child lock not specified |
| Included accessories | Condensate hose, air filter |
| Spare parts | Plastic cover with filter (110.105), water tank (110.101), condensate hose (110.106), tank cover (110.103) |
| Warranty | Refer to the warranty card provided |
Frequently Asked Questions - LE 150 BEURER
User questions about LE 150 BEURER
0 question about this device. Answer the ones you know or ask your own.
Ask a new question about this device
Download the instructions for your Dehumidifier in PDF format for free! Find your manual LE 150 - BEURER and take your electronic device back in hand. On this page are published all the documents necessary for the use of your device. LE 150 by BEURER.
USER MANUAL LE 150 BEURER
natural_image
Black beurer air purifier device with digital display and control buttons (no visible text or symbols on body)natural_image
Illustration of an open book with a geometric window and horizontal lines, no text or symbols presentEN Unfold page 3 before reading the instructions for use.
United Kingdom Conformity Assessed Mark

Importeur
WARNING
natural_image
Diagram showing a device being processed into a container, with no visible text or symbols.natural_image
Technical line drawing of a boat's internal structure with a black arrow pointing to the handle (no text or symbols)Read these instructions for use carefully before initial use. Follow the warnings and safety notes. Keep these instructions for use for future reference.
Make the instructions for use accessible to other users. If the device is passed on, provide the instructions for use to the next user as well.
WARNING
- This device is only intended for domestic/private use, not for commercial use.
- This device may be used by children over the age of 8 and by people with reduced physical, sensory or mental skills or a lack of experience or knowledge, provided that they are supervised or have been instructed on how to use the device safely, and are fully aware of the consequent risks of use.
• Children must not play with the device. - Cleaning and user maintenance must not be performed by children unless supervised.
- If you are not using the device, unplug the mains plug before transporting and/or cleaning it.
- Set up the device on a sturdy, level surface in such a way that provides 50 cm clearance on all sides.
- Clean the device using only the methods specified. Under no circumstances must liquid enter the fan unit.
- Do not use any solvent-based cleaning products.
- If the mains cable is damaged, it must be replaced by the manufacturer, its Customer Service team or similarly qualified individuals to avoid danger.
CONTENTS
- Included in delivery 14
- Signs and symbols....14
- Intended use....14
- Warnings and safety notes.....14
- Device description....16
- Usage 17
6.1 Setting up the air dehumidifier....17
6.2 Switching the air dehumidifier on /off.....17
6.3 Setting the fan speed....17
6.4 Setting the dehumidification mode....17
6.5 Setting a special mode....18
6.6 Setting the timer....18
6.7 Humidity indicator....18
6.8 Defrost function .....18
6.9 Emptying the water tank....18
6.10 Condensate hose....19
- Cleaning, care and maintenance....19
7.1 Cleaning the housing....19
7.2 Cleaning the water tank....19
7.3 Cleaning the air filter....19
-
Accessories and replacement parts....20
-
What if there are problems? 20
-
Disposal....20
-
Technical specifications ....20
-
Guarantee....20
1. INCLUDED IN DELIVERY
Check that the exterior of the cardboard delivery packaging is intact and make sure that all contents are included in the delivery. Before use, ensure that there is no visible damage to the device or accessories and that all packaging material has been removed. If you have any doubts, do not use the device and contact your retailer or the specified Customer Services address.
• 1 air dehumidifier
• 1 condensate hose
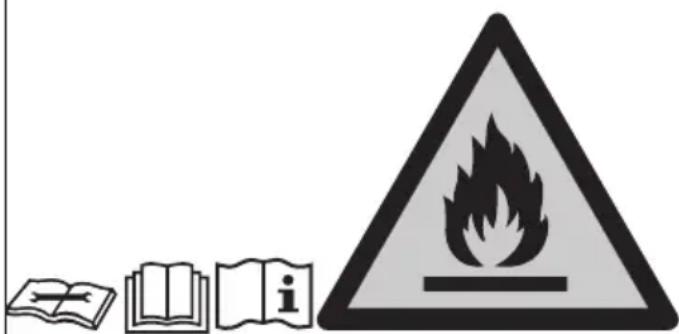
2. SIGNS AND SYMBOLS
The following symbols are used on the device, in these instructions for use, on the packaging and on the type plate for the device:

DANGER
This symbol indicates that this device uses flammable coolant. There is a risk of fire if the coolant leaks and is exposed to an external ignition source.

DANG
Indicates an imminent danger. If it is not avoided, death or serious injury will occur.

WARNING
Indicates a potentially impending danger. If it is not avoided, there is a risk of death or serious injury.

CAUTION
Indicates a potentially imminent hazard. If it is not avoided, slight or minor injuries may result.
NOTICE
Indicates a potentially harmful situation. If it is not avoided, the device or something in its vicinity may be damaged.

Product information
Note on important information

Read the instructions

Consult instructions for use

CE labelling
This product satisfies the requirements of the applicable European and national directives.

Separate the product and packaging elements and dispose of them in accordance with local regulations.

The electronic device must not be disposed of with household waste


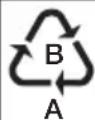
Marking to identify the packaging material.
A = material code,
B = material number:
1-7 = plastics,
20-22 = paper and cardboard

The products demonstrably meet the requirements of the Technical Regulations of the EAEU

United Kingdom Conformity Assessed Mark

Importer

Maintenance indicator; read the technical manual

Store in an upright position

Minimum room floor area
Tested for safety in accordance with the requirements of the "Produktsicherheitsgesetz" (German Product Safety Act)
3. INTENDED USE
The air dehumidifier is intended only for dehumidifying the air indoors in closed rooms, excluding laundry rooms and unventilated cellars. The air dehumidifier is intended for private use only. Do not use the device in the immediate vicinity of bathtubs and showers.

WARNING
If you suffer from a severe respiratory or lung disease, consult your doctor before using the air dehumidifier. The device is only intended for the purpose described in these instructions for use. The manufacturer is not liable for damage resulting from improper or careless use.
4. WARNINGS AND SAFETY NOTES

WARNING
Danger of suffocation! Keep packaging material away from children.
Electric shock

WARNING
As with every electrical device, use this air dehumidifier carefully and cautiously in order to avoid danger due to electric shock.
- Therefore, only operate the device at the mains voltage and frequency indicated on the device (the type plate can be found next to the mains connection cable of the device unit).
- Never operate the device if it or any of its accessories are visibly damaged or have been dropped. If the device is defective, do not operate it again; contact Beurer Customer Services instead.
- The device must only be used on a mains socket with a residual-current protective device (risk of electric shock).
- Pull the mains adapter plug out of the socket in the case of operational faults, before cleaning and when the device is not in use.
- In the event of defects or operational faults, switch the device off immediately and disconnect it from the mains socket. Do not pull on the mains cable or on the device to disconnect the plug from the socket. Never hold or carry the device by the mains cable. Keep the cables away from hot surfaces.
- Always switch off the device before disconnecting the mains plug.
- Never disconnect the mains plug with wet or damp hands.
- Keep the device away from fire and flammable or explosive objects.
- Ensure that the openings of the air dehumidifier and the mains cable do not come into contact with water, steam or other liquids.
- Do not use the device in close proximity to flammable or explosive gas mixtures.
- Never pick up a device that has fallen into water. Disconnect the mains plug immediately.
- Do not drop the device or subject it to any impacts.
- This device must be installed in accordance with the local installation regulations.
- Do not tilt or turn over the device.
- Do not use an extension cable or adapter plug.
- Do not climb or sit on the device.
- Do not insert fingers or other objects into the air outlet 2.
- Do not touch the air inlet 7 or the aluminium fins of the device.
- Do not operate the device if it has been dropped or damaged, or if it shows signs of malfunction.
- Do not clean the device with chemicals.
- Make sure that the device is far away from fire and flammable or explosive objects.
- The device must be stored in a way that prevents mechanical damage.
- The device must not be broken up or incinerated, even after use.
- Please note that refrigerants are odourless.
- The pipes must be protected against physical damage and must not be installed in an unventilated room if it is smaller than 4 m^2 .
- The device must be stored in a well-ventilated room of the same size as that specified for operation.
- Never immerse the device in water or any other liquid. Water must not get onto or inside the device.
- The device must not be connected to the power supply with other household appliances using a multi-outlet power strip.
- Do not use cable extensions.
- The device must not be set up on a wet or flooded surface.
- Do not hang curtains or wet clothing in front of the air outlet 2 as this will overload the device.
- Do not hang wet clothing over the device as water may drip into the device.
Repairs
WARNING
- Only specialist personnel may perform repairs on electrical devices. Improper repairs may put users in significant danger. For repairs, please contact Customer Services or an authorised retailer.
- The device must not be dismantled or opened using tools.
Risk of fire
WARNING
There may be a risk of fire if the device is used improperly or these instructions for use are ignored!
- Therefore, never operate the device underneath a cover, such as a blanket, pillow, etc.
- Never use the device near petrol or other highly flammable substances.
- Never set up the device in a place where it could be exposed to sources of heat.
- Never set up the device near sources of heat such as radiators, heating coils, ovens or other products that generate heat.
- Never set up the device in an area where oil or water could splash on it.
- Never set up the device in a place where it is exposed to direct sunlight.
- Never set up the device in a place where it is exposed to mechanical vibrations, shocks or excessive dust.
- Never set up the device in a place with insufficient ventilation (e.g. in a cupboard or bookcase).
- Never place the device on an uneven surface.
- Avoid direct sunlight when operating and storing the device.

DANGER
Warnings on handling R-290 refrigerant (propane gas)
The device uses R-290 (propane gas) as the refrigerant. R-290 has no harmful effect on the ozone layer (ODP), has a low greenhouse effect (GWP) and is available worldwide. R-290 is an ideal refrigerant for this type of application due to its efficient and energetic properties. Given the high flammability of the refrigerant, the following special precautions must be taken.
WARNING
The device must be set up, operated and stored in a room with a floor area greater than 4 m^2 .
WARNING
A failure to observe the following refrigerant warnings may result in explosions, death, injury or material damage.
- The device is only intended for use with R-290 (propane gas) as the refrigerant. Do not use any other refrigerant.
- The refrigerant circuit is sealed. Maintenance work relating to the refrigerant must only be carried out by a qualified technician.
- Do not release the R-290 (propane gas) refrigerant into the atmosphere.
-
The R-290 (propane gas) refrigerant is flammable and heavier than air. It first accumulates in low areas, but can be recirculated by the fans.
-
If propane gas is present in the room or even just suspected, do not allow untrained personnel to attempt to identify the cause.
- The R-290 (propane gas) refrigerant used in the device is odourless. The absence of an odour does not mean that no gas has escaped.
- If you discover a gas leak on the device, immediately evacuate all persons from the room. Ventilate the room. Do not restart the device; contact Beurer Customer Services instead.
- Do not use naked flames, cigarettes or other possible sources of ignition near the device.
Handling
IMPORTANT
- Always switch off and unplug the device each time after using it and before cleaning it.
- Do not place any objects in device openings or in rotating parts.
- If the temperature is low, the condensate hose 9 must not be routed outside.
- Before transporting the device, empty the water tank 1 to avoid spilling the water.
- Do not tilt the device as escaping water could damage the device.
- Check the device from time to time when it is in operation.
- Unplug the device when it is not in use.
NOTICE
- Do not place any objects on the device.
- Do not expose the device to high temperatures.
- Avoid water damage by handling the device carefully (e.g. water damage from splashing in the vicinity of wooden floors).
- This device is designed to provide optimum performance between 5°C and 30°C.
- Always transport the device in an upright position and not on its side/horizontally.
5. DEVICE DESCRIPTION
The related illustrations are on page 3.
Device
1 Water tank
2 Air outlet
3 Control unit with LED displays
4 Carrying handle
5 Humidity indicator
6 Air filter
7 Air inlet
8 Opening for condensate hose
9 Condensate hose
10 Castors
Display
11 Timer symbol (lights up when the timer is on)
12 Sleep symbol
(lights up when sleep mode is on)
14 Automatic symbol
(lights up when automatic mode is on)
13 Laundry drying symbol (lights up when laundry drying mode is on)
15 Continuous operation symbol (lights up when continuous dehumidification is on)
16 Target humidity symbol (lights up when a target humidity can be set)
17 ON/OFF symbol (lights up as soon as the device is in standby mode)
18 Low fan speed (lights up when the low fan speed has been set)
19 High fan speed (lights up when the high fan speed has been set)
20 Water level symbol (lights up when the water tank is full and needs to be emptied or has not been inserted)
Buttons
21 ON/OFF button (switches the device on /off)
22 Humidity button (set a target humidity)
23 Fan speed button (set the low and high fan speed)
24 Automatic button (set automatic mode)
25 Sleep/laundry drying button (set sleep mode/laundry drying mode)
26 Timer button (set the timer duration)
6. USAGE
Overview of usage
| STEP 1Set up the air dehumidifier (Section 6.1) |  | |
| STEP 2Switch on the air dehumidifier (Section 6.2) |  | |
| STEP 3Select the fan speed (Section 6.3) |  | Low |
 | High | |
| STEP 4Select the dehumidification mode (Section 6.4) |  | Continuous dehumidifi-cation |
 | Dehumidifica-tion with target humidity | |
| STEP 5 (optional)Set a special mode (Section 6.5) |  | Laundry drying mode |
 | Sleep mode | |
 | Automatic mode | |
| STEP 6 (optional)Set the timer (Section 6.6) |  | 1 - 24 hours |
6.1 Setting up the air dehumidifier
- Remove the device from the top of the box without opening the film bag.
-
Now remove all plastic films. Unwind the mains cable fully in order to avoid overheating.
-
Check the device, mains plug and cable for damage each time before using them.
- Place the device on a firm, level and water-resistant surface to prevent vibrations and noise.
- Set up the air dehumidifier in such a way that provides 50 cm clearance on all sides. Do not use naked flames, cigarettes or other possible sources of ignition near the device.
- Make sure that the air outlet 2 and air inlet 7 of the device are never blocked.
- Insert the mains plug into a suitable socket. Ensure that the cable does not pose a trip hazard.
- Before initial use, leave the device to rest in an upright position for at least 24 hours. If the device has been tilted more than 45^ , leave it in an upright position for at least 24 hours before initial use.

If the device has fallen over or if you have relocated the device, leave it to rest in an upright position for at least 24 hours. Do not set up the device in a place where flammable gases can escape. The device must be operated in a room with a floor area greater than 4 m^2 .
6.2 Switching the air dehumidifier on /off
- Press the ON/OFF button 21 to switch on the air dehumidifier.
→ The low fan speed 18 and target humidity symbol 16 light up. - Press the ON/OFF button 21 again to switch off the air de-humidifier.
→ All LEDs except the ON/OFF symbol 17 go out.
6.3 Setting the fan speed
The air dehumidifier has two fan speeds: One low 18 and one high 19 fan speed.

Cannot be selected when the air dehumidifier is in sleep mode or laundry drying mode.
- To switch between the low 18 and high 19 fan speed, press the fan speed button 23 when the air dehumidifier is on.
→ The current fan speed setting lights up on the display (18 or 19).
6.4 Setting the dehumidification mode
The device has two different dehumidification modes.
• Continuous dehumidification
• Dehumidification with target humidity
Continuous dehumidification
In continuous dehumidification mode, the room is dehumidified without interruption.
- To switch on continuous dehumidification mode, press the humidity button 22 repeatedly until “--” appears on the display. The continuous operation symbol 15 lights up.
Dehumidification with target humidity
In dehumidification with target humidity mode, the room is dehumidified only up to a preset target value (e.g. 50% humidity). The device stops dehumidifying the air once the preset target value has been reached.

It is only possible to dehumidify the air with a target humidity in this mode or in sleep mode.
- If no modes have been selected, you can freely choose the target humidity and fan speed.
- Select a target humidity using the humidity button 22 (you can select a level of between 30-80% in increments of 5%). The target humidity symbol 16 lights up. If “--” appears on the display after passing 80% when making your selection, the device will run in continuous dehumidification mode again.
- In addition, you can use the fan speed button 23 to choose between the low and high fan speed. The fan speed symbol 18 or 19 lights up.
6.5 Setting a special mode
The device has three optional special modes that you can select if desired.
- Sleep mode
• Laundry drying mode for clothes
• Automatic mode
Sleep mode
Sleep mode automatically sets the low fan speed 18 and switches off all LEDs and button tones to ensure a restful night's sleep with no disturbances. The target humidity can always be set in sleep mode.
- To switch on sleep mode, press the sleep/laundry drying button 25.
→ The sleep symbol 12 lights up for 3 seconds and then dims. All other LEDs and button tones are off.
Laundry drying mode for clothes
The device has a special laundry drying mode for when you want to dry clothes indoors and counteract the resulting humidity. It also enables the clothes to dry faster.
This laundry drying mode automatically sets the high fan speed 19 and continuous dehumidification. You cannot set a target humidity here.
WARNING
Risk of electric shock! Do not place any laundry directly on the device. Do not hang laundry over the device as water may flow into the device and cause a short circuit.
Position the device so that there is a clearance of at least 50 cm on all sides. Keep the room closed (incl. doors and windows).
- To switch on laundry drying mode, press the sleep/laundry drying button 25 twice.
→ The laundry drying symbol 13 lights up on the display.
- To switch off laundry drying mode again, press the sleep/laundry drying button 25 once.
→ The laundry drying symbol 13 goes out on the display. The device switches to the “Dehumidification with target humidity” setting.
Automatic mode
In automatic mode, the air in the room is automatically dehumidified so that the humidity is always between 45-55%.
-
To switch on automatic mode, press the automatic button 24. The automatic symbol 14 lights up.
-
To switch between the low 18 and high 19 fan speed, press the fan speed button 23 when the air dehumidifier is on.
-
To switch off automatic mode, press the automatic button 24 again. The automatic symbol 14 goes out.
6.6 Setting the timer
The air dehumidifier features a timer function that you can use to determine after how many hours the device should switch itself off (when in operation) or on.
- Use the timer button 26 to select your desired timer duration (you can select a duration between 1-24 hours in increments of 1 hour). The timer duration that is currently set is shown on the display. Once the set timer duration has flashed five times on the display, this means the timer duration is confirmed and the timer symbol 11 lights up. After confirming the timer duration, the display shows the current humidity level again.
- To view the remaining timer duration whilst the device is running, press the timer button 26. The display briefly shows the remaining timer duration (in hours) after which the air dehumidifier will switch itself off.
- To switch off the timer, press the timer button 26 repeatedly until the display shows "00".
Switch-off time:
Press the timer button 26 while the device is running to set the switch-off time. The device will switch off after the selected time period.
Switch-on time:
Press the timer button 26 while the device is switched off to set the switch-on time. The device will switch on after the selected time period.
6.7 Humidity indicator
The humidity indicator 5 shows the current ambient humidity level on the device.
Low humidity of < 45% = humidity indicator is blue
Optimum humidity of 45-65% = humidity indicator is green
High humidity of >65% = humidity indicator is red
6.8 Defrost function
If the device is operated in an environment with low temperatures, frost may form inside the device. To ensure perfect operation, the air dehumidifier features a defrost function.
If the temperature is between 5°C and 16°C, the device automatically starts with the defrost function for 10 minutes.
→ The ON/OFF symbol 17 flashes on the display whilst the defrost function is running.
Once the 10 minutes have elapsed, the device continues running normally for 60 minutes.
Do not switch off the device whilst the defrost function is running or attempt to accelerate the defrost process.
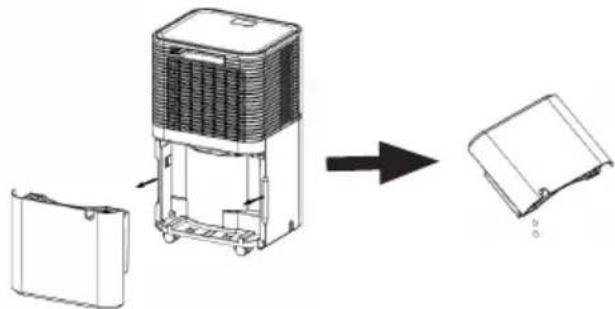
6.9 Emptying the water tank
If the water tank 1 is full, the water level symbol 20 will light up red and the device will automatically stop running. An acoustic signal will sound (except in sleep mode) and the message "FL" will appear on the display.
To empty he water tank 1, proceed as follows:
-
Press the ON/OFF button 21 to switch off the air dehumidifier.
→ All LEDs except the ON/OFF symbol 17 go out. -
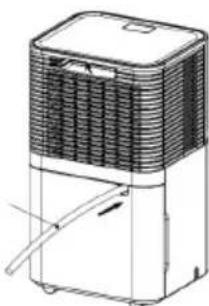
Carefully pull the water tank 1 backwards using the recessed handles at the sides.
-
Empty the water tank 1 via the tank outlet.
natural_image
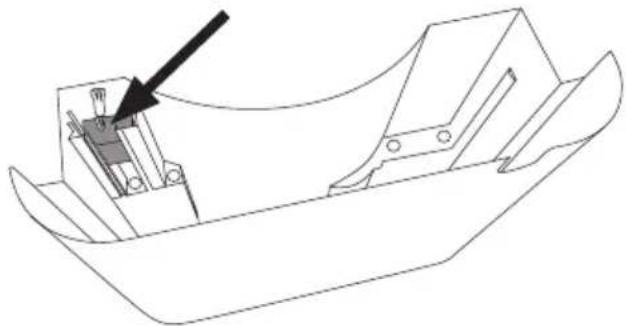
Diagram showing a device being processed into a housing, with no visible text or symbols.- Check that the float can move freely before reinserting the tank. The float must not be blocked. If the float is blocked, this can cause an incorrect water level to be shown on the display ("FL" for a full water tank).
natural_image
Technical line drawing of a boat's internal structure with a black arrow pointing to the handle (no text or symbols)- Reinsert the water tank 1 into the device.
6.10 Condensate hose
If you want the device to run continuously, connect the supplied condensate hose 9 to the device. The condensate can automatically drain into a sufficiently sized collection container or a suitable drain.
CAUTION
- Never block the outlet of the condensate hose, otherwise condensate will flow back into the water tank 1.
- Do not bend the condensate hose 9.
- Ensure that there is a sufficient gradient between the opening for the condensate hose 8 and the drain to allow the accumulating condensate to flow away. Ensure that the end of the condensate hose is positioned flat against the ground.
- The condensate hose 9 must be correctly connected to the opening 8 on the device.
- Do not kink the condensate hose 9.
-
The opening for the condensate hose 8 must always be tightly sealed with the silicone plug when the condensate hose is not connected.
-
Pull the condensate hose 9 straight.
-
Insert one end of the condensate hose through the round opening 8 on the rear of the device, above the water tank.
-
Press the tube firmly onto the water outlet.
-
Direct the other end of the condensate hose into a drain.
-
If you want to collect the condensate in the water tank 1 again, pull out the condensate hose.
natural_image
Line drawing of a portable air conditioner unit with ventilation grille and cooling fan (no text or symbols)7. CLEANING, CARE AND MAINTENANCE
WARNING
- Before performing any cleaning or maintenance work, always ensure that the mains plug of the device has been properly disconnected!
- Always store the device in its original packaging. Only store the device in an upright position. Do not place any objects on the device.
- Store the device in a well-ventilated room that measures at least 4 m ^2 .
- Store the device in dry conditions and protected from frost and heat.
- Clean the device and allow it to dry fully before putting it into storage.
- The device must be stored in a room where there are no permanent sources of heat (e.g. naked flames, a running gas device or a running electric heater).
This device contains R-290 refrigerant. However, the quantity of refrigerant is less than 1 kg and it is kept in a sealed cooling circuit. Maintenance may only be carried out by trained technicians or Beurer service personnel. The device does not need to be refilled with refrigerant provided that it is used correctly and the coolant circuit is undamaged.
Regular cleaning is a prerequisite for hygienic and fault-free operation. Always fully empty and thoroughly clean the water tank of the air dehumidifier if the device has not been used for more than 3 days. A lack of cleaning and hygiene can cause bacteria, algae and fungi to form in the water.
7.1 Cleaning the housing
Clean the air dehumidifier with a slightly damp cloth. Do not use any solvents or other aggressive or abrasive cleaning products, as the surface may become damaged. Make sure that no moisture gets inside the device.
7.2 Cleaning the water tank
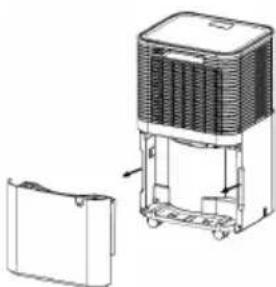
- Carefully pull the water tank out backwards as shown.
- Rinse out the water tank with clean water every 2 weeks. If the device is used very intensively, clean the water tank more frequently. If necessary, remove any deposits in the water tank using a plastic brush.
natural_image
Technical line drawing of a portable air conditioner unit with a separate housing (no text or symbols)7.3 Cleaning the air filter
NOTICE
We recommend cleaning the air filter 6 every 14 days as dust can collect there and restrict the air flow. Do not operate the device without the air filter 6 installed.
- Pull out the water tank 1.
- Remove the air filter 6.
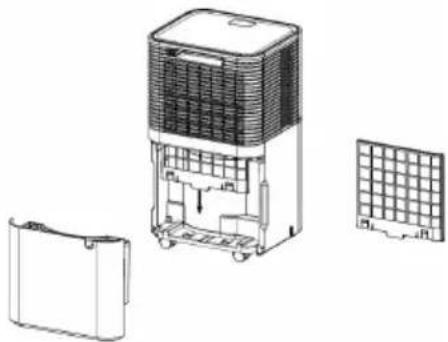
natural_image
Exploded view diagram of a portable air purifier with internal components and grid layout (no text or labels)- If it is slightly dirty, use the brush of a vacuum cleaner to carefully remove the dust residue from the screen.
- If it is very dirty, soak the air filter 6 in warm water at a temperature of approx. 40°C. Then rinse it carefully with a neutral cleaning product.
- Leave the air filter 6 to dry completely before reinserting it into the device. Never insert the air filter 6 if it is damp or wet.
- Reinsert the air filter 6 and the water tank 1 into the device.
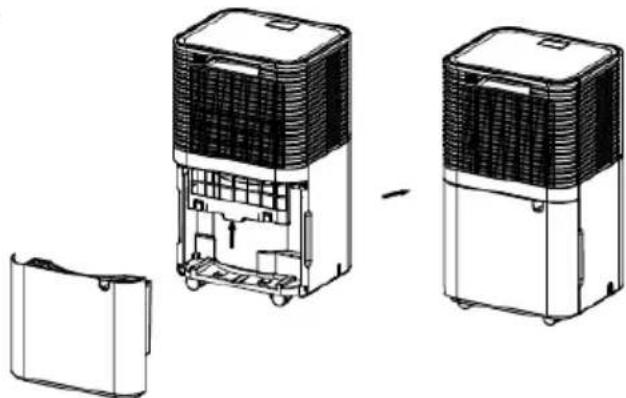
natural_image
Technical line drawing of a portable air conditioner unit with open lid and internal components (no text or symbols)8. ACCESSORIES AND REPLACEMENT PARTS
To purchase accessories and replacement parts, please visit www.beurer.com or contact the corresponding service address (according to the service address list) in your country. Accessories and replacement parts are also available from retailers.
| Designation Item number and/or order number |
| Plastic cover with filter 110.105 |
| Water tank 110.101 |
| Condensate hose 110.106 |
| Water tank lid 110.103 |
9. WHAT IF THERE ARE PROBLEMS?
The device is not working:
- The device is not connected to the mains power supply. Connect the mains plug and switch on the device.
- The device has switched itself off for safety reasons. Clean and refill the device before next use. Then switch it on again.
The device automatically stops dehumidifying the air:
- The water tank is full. Empty the water tank, then start up the device again.
- The water tank was not reinserted correctly. Put the water tank in the correct position.
• The air filter is clogged. Clean the air filter 6. - The device may perform an automatic defrost. It will not dehumidify the air whilst the defrost function is running.
The device is not performing as well as it should:
- The room is too big. The device is recommended for use in rooms measuring up to 60 m ^2 .
• The air filter is clogged. Clean the air filter 6. -
The air inlet 7 or air outlet 2 is blocked. Make sure that the air inlet 7 and air outlet 2 are not blocked.
-
Too much air is being exchanged in the room. Close the windows and doors.
- The device continues to run even though the target humidity has been reached. To protect the device components, the device continues to dehumidify the air for approx. 3 minutes even after the target humidity has been reached.
An error message appears on the display:
| Display | Problem Solution | |
| E2 | Humidity sensor is faulty | Contact Customer Services |
| LO | Ambient humidity is < 20% | The air dehumidifier switches itself off as a safety measure |
| HI | Ambient humidity is >90% | |
| CL | Protection against low temperatures: Ambient temperature is < 5°C | Do not operate the device in rooms with a temperature below 5°C. |
| CH | Protection against high temperatures: Ambient temperature is >38°C | Do not operate the device in rooms with a temperature above 38°C. |
| FL | Water tank is full, not inserted or not inserted correctly | Empty the water tank or insert it correctly |
10. DISPOSAL
For environmental reasons, do not dispose of the device in household waste at the end of its service life. Dispose of the device at a suitable local collection or recycling point in your country. Observe the local regulations for material disposal. Dispose of the device in accordance with EC Directive Waste Electrical and Electronic Equipment (WEEE). If you have any questions, please contact the local authorities responsible for waste disposal. You can obtain
the location of collection points for old devices from the local or municipal authorities, local waste disposal companies or your retailer, for example.
11. TECHNICAL SPECIFICATIONS
| Model LE 150 | |
| Mains voltage/power AC 220-2 | 40 V, 50 Hz / 200 W(30°C, 80% rH) |
| Dimensions (L x W x H) 22,0 x | 25,0 x 45,5 cm |
| Deadweight 10.0 kg | |
| Recommended room size | up to 30 m2 |
| Tank capacity 2.0 l | |
| Dehumidifying capacity | 12 l / 24 h (30°C, 80% rH) |
| Refrigerant | R-290 (propane gas), 50 g |
| Wiring diagram | See last page of theseinstructions for use |
12. GUARANTEE
More information on the guarantee and guarantee conditions can be found in the guarantee leaflet supplied.
FRANÇAIS

AVERTISSEMENT
natural_image
Diagram showing a device being processed into a container, with no visible text or symbols.natural_image
Technical line drawing of a mechanical component with an arrow pointing to a section (no text or symbols present)natural_image
Line drawing of a portable air conditioner unit with cooling fins and ventilation slots (no text or symbols)7. NETTOYAGE, ENTRETIEN ET MAINTENANCE
AVERTISSEMENT
natural_image
Diagram of a portable air conditioner unit with a side panel and housing (no text or symbols)natural_image
Technical line drawing of a portable air conditioner unit with internal components and mounting base (no text or symbols)natural_image
Technical line drawing of three different air purifiers with internal compartments and housing (no text or symbols)8. ACCESSOIRES ET PIÈCES DE RECHANGE
ADVERTENCIA
natural_image
Diagram showing a device being processed into a housing, with no visible text or symbols.natural_image
Technical line drawing of a mechanical component with an arrow indicating direction (no text or symbols)natural_image
Line drawing of a portable air conditioner unit with ventilation slots and cooling pipes (no text or symbols)7. LIMPIEZA, CUIDADO Y MANTENIMIENTO
ADVERTENCIA
natural_image
Technical line drawing of a portable air conditioner unit with a separate housing (no text or symbols)natural_image
Exploded view diagram of a refrigerant air purifier with internal components and mounting base (no text or labels)natural_image
Technical line drawing of three different electronic devices with internal components, shown from exploded and assembled views (no text or symbols)8. ACCESORIOS Y PIEZAS DE REPUESTO
AVVERTENZA
natural_image
Diagram showing a device being processed into a housing, with no visible text or symbols.natural_image
Technical line drawing of a mechanical component with an arrow pointing to a specific part (no text or symbols present)natural_image
Line drawing of a portable air purifier with ventilation slots and cooling fins (no text or symbols)7. PULIZIA, CURA E MANUTENZIONE
AVVERTENZA
natural_image
Line drawing of a portable air conditioner unit with a separate housing (no text or symbols)natural_image
Exploded view diagram of a portable air conditioner unit showing internal components and mounting base (no text or labels)natural_image
Technical line drawing of three different household air purifiers with internal components, shown from exploded to assembled views (no text or labels)8. ACCESSORI E PARTI DI RICAMBIO
▲ UYARI
natural_image
Diagram showing a device with internal components being processed into a final housing (no text or symbols present)natural_image
Technical line drawing of a boat's internal structure with an arrow pointing to the center (no text or symbols)natural_image
Line drawing of a portable air conditioner unit with ventilation slots and cooling pipes (no text or symbols)7. TEMİZLİK, BAKIM VE ONARIM
⚠️ UYARI
natural_image
Technical line drawing of a portable air conditioner unit with a separate housing and side panel (no text or symbols)natural_image
Technical line drawing of a portable air conditioner unit with internal components and mounting base (no text or symbols)natural_image
Technical line drawing of three different air purifiers with internal compartments and housing (no text or symbols)8. AKSESUARLAR VE YEDEK PARÇALAR
ПРЕДУПРЕЖДЕНИЕ
natural_image
Diagram showing a device being processed into a container, with no visible text or symbols.natural_image
Technical line drawing of a boat hull with a highlighted section showing a handle (no text or symbols)natural_image
Illustration of a portable air purifier with cooling fins and ventilation ducts (no text or symbols)natural_image
Diagram of a portable air conditioner unit with a separate housing and cooling unit (no text or symbols)7.3 Очистка фильтра
УВЕДОМЛЕНИЕ
natural_image
Exploded view diagram of a portable air purifier with internal components and mounting base (no text or labels)natural_image
Technical line drawing of a portable air conditioner unit with internal components and housing (no text or symbols)OSTRZEŻENIE
natural_image
Diagram showing a device being processed into a housing, with no visible text or symbols.natural_image
Technical line drawing of a boat hull with a highlighted section showing a handle (no text or symbols)natural_image
Line drawing of a portable air purifier with ventilation slots and cooling pipes (no text or symbols)7. CZYSZCZENIE, PIELEGNACJA I KONSERWACJA
OSTRZEŻENIE
natural_image
Diagram of a portable air conditioner unit with a side panel and housing, showing internal airflow paths (no text or symbols)natural_image
Technical line drawing of a portable air purifier with internal components and mounting base (no text or symbols)natural_image
Technical line drawing of a portable air conditioner unit with internal components and housing (no text or symbols)8. AKCESORIA I CZEŚCI ZAMIENNE
UKCA-markering (UK Conformity Assessed)

Importeursymbool
WAARSCHUWING
5. BESCHRIJVING VAN HET APPARAAT
natural_image
Diagram showing a device being processed into a final container, with no visible text or symbols.natural_image
Technical line drawing of a boat hull with a highlighted section showing a handle (no text or symbols)natural_image
Line drawing of a portable air conditioner unit with ventilation slots and cooling pipes (no text or symbols)7. REINIGING EN ONDERHOUD
WAARSCHUWING
natural_image
Technical line drawing of a portable air conditioner unit with a side panel and wheels (no text or symbols)7.3 Luchtfilter reinigen
LET OP
natural_image
Technical line drawing of a portable air conditioner unit with internal components and mounting base (no text or symbols)natural_image
Technical line drawing of a portable air conditioner unit with open lid and internal components (no text or symbols)8. TOEBEHOREN EN RESERVE-ONDERDELEN
ADVARSEL
Manglende overholdelse af nedenstående advarsler om kølemiddel kan medføre eksplosion, dødsfald, personskade eller tingsskade.
natural_image
Diagram showing a device being processed into a container, with no visible text or symbols.natural_image
Technical line drawing of a boat's internal structure with an arrow pointing to the hull (no text or symbols present)natural_image
Line drawing of a portable air conditioner unit with ventilation grilles and cooling fins (no text or symbols)7. RENGÖRING, SKÖTSEL OCH UNDERHÅLL
▲ WARNING
natural_image
Technical line drawing of a portable air conditioner unit with a separate housing (no text or symbols)natural_image
Technical line drawing of a portable air purifier with internal components and mounting base (no text or symbols)natural_image
Technical line drawing of a portable air conditioner unit with internal components and housing (no text or symbols)8. TILLBEHÖR OCH RESERVDELAR
ADVARSEL
natural_image
Diagram showing a device being processed into a container, with no visible text or symbols.natural_image
Technical line drawing of a boat's internal structure with a black arrow pointing to the center (no text or symbols)natural_image
Illustration of a portable air purifier with cooling fins and ventilation duct (no text or symbols)7. RENGJ∅RING OG VEDLIKEHOLD
ADVARSEL
natural_image
Technical line drawing of a portable air conditioner unit with a separate housing (no text or symbols)natural_image
Exploded view diagram of a portable air purifier with internal components and mounting base (no text or labels)natural_image
Diagram showing three views of a portable air conditioner unit with internal components, no text or symbols presentVAROITUS
natural_image
Diagram showing a device being processed into a housing, with no visible text or symbols.natural_image
Technical line drawing of a boat's internal structure with a black arrow pointing to the handle (no text or symbols)natural_image
Line drawing of a portable air conditioner unit with cooling fins and ventilation slots (no text or symbols)7. PUHDISTUS, HOITO JA HUOLTO

VAROITUS
natural_image
Technical line drawing of a portable air conditioner unit with a side view showing internal components (no text or symbols)natural_image
Technical line drawing of a portable air purifier with internal components and mounting base (no text or symbols)natural_image
Technical line drawing of a portable air conditioner unit with open and closed sections (no text or symbols)8. LISÄVARUSTEET JA VARAOSAT
Suite 16, Stonecross Place, Stonecross Lane North,
WA3 2SH
Lowton,
United Kingdom