
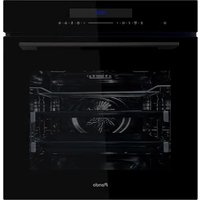
PHM-850 - Plate warmer Pando - Free user manual and instructions
Find the device manual for free PHM-850 Pando in PDF.

| Product type | Combined microwave and plate warmer |
| Model | PHM-850 |
| Brand | Pando |
| Capacity | Approximately 25 L (estimate) |
| Turntable diameter | 345 mm |
| Maximum microwave power | 900 W (estimate) |
| Grill power | Not specified (built-in grill) |
| Power supply | 230 V ~ 50 Hz, earthed plug |
| Main functions | Microwave, grill, combination, weight/timer defrost, quick cook, auto menu, timer, clock |
| Compatible materials | Glass, ceramic, microwave-safe plastic, paper, plastic wrap |
| Materials to avoid | Metal, aluminum, utensils with metal trim, paper ties |
| Care and cleaning | Clean the cavity with a damp cloth; do not use abrasive cleaners or metal scrapers; steam clean with lemon |
| Safety | Child lock, auto shut-off, door with safety locks, mandatory earthing |
| Installation | Built into a 60 cm cabinet; do not install behind a decorative door; ensure ventilation |
| Warranty | 3 years (subject to conditions) |
| Country of origin | Spain (brand) |
Frequently Asked Questions - PHM-850 Pando
User questions about PHM-850 Pando
0 question about this device. Answer the ones you know or ask your own.
Ask a new question about this device
Download the instructions for your Plate warmer in PDF format for free! Find your manual PHM-850 - Pando and take your electronic device back in hand. On this page are published all the documents necessary for the use of your device. PHM-850 by Pando.
USER MANUAL PHM-850 Pando
Pando
integralcooking
PHM-850
ES
EN Operating manual Certificate of Guarantee
natural_image
Simple line drawing of a circular object with four small oval features at the center (no text or symbols)Plato de cristal

natural_image
Simple line drawing of a circular object with a central knob and two side handles (no text or symbols)natural_image
Blank rectangular book with no visible text or symbols on pagesnatural_image
Circular mechanical component with diagonal hatching and hanging weights (no text or symbols)natural_image
Two abstract line drawings: a wavy, spiral-like shape and a curved arrow pointing to a hexagonal base (no text or symbols)Eje giratorio
natural_image
Line drawing of a kitchen oven with a circular vent and side-mounted dish (no text or symbols)
Nota:
natural_image
Technical line drawing of a microwave oven with open door and tray (no text or symbols)
Microondas

Función
| C-1 | Micro 55% (495W) | Grill 45% (405W) |
| C-2 | Micro 36% (324W) | Grill 64% (576W) |
natural_image
Line drawing of a laboratory oven with a circular chamber and control panel (no text or symbols)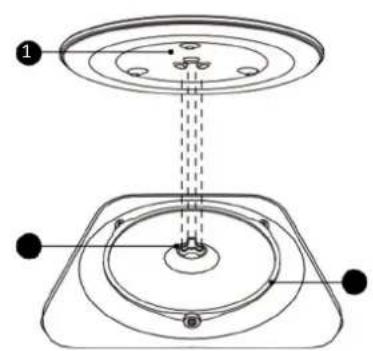
Nota:
INSTRUÇÕES DE MONTAGEM PARA O FORNO DE MICROONDAS EMOTRADO
ABERTURAS DE MOBILIÁRIO NECESSÁRIAS *

Dimensões em mm
Embutido
natural_image
Technical line drawing of a microwave oven with mounting base and control panel (no text or symbols)| C-1 Micro 55% (495W) Grelhador 45% (405W) | |
| C-2 Micro 36% (324W) Grill 64% (576W) |
https://www.pando.es/en/after-sales-services/
FR
IMPORTANT SAFETY INSTRUCTIONS ATTENTION....7
POUR RÉDUIRE LES RISQUES DE BLESSURES AUX PERSONNES INSTALLATION DE MISE À LA TERRE ....10
NETTOYAGE....11
UTENSILS....11
INSTALLATION AND CONNECTION....16
INSTRUCTIONS DE MONTAGE POUR LE FOUR À MICRO-ONDES EMOTRADO ....17
Embarqué....18
IMPORTANT SAFETY INSTRUCTIONS ATTENTION
natural_image
Simple line drawing of a circular object with four small oval features at the center (no text or symbols)Plaque de
natural_image
Simple line drawing of a circular object with two small protrusions and a central circular feature (no text or symbols)Support de table
natural_image
Blank white book or document with no visible text, symbols, or markingsnatural_image
Circular metal grate with diagonal stripes and hanging weights at both ends (no text or symbols)natural_image
Two abstract line drawings: a spiral-shaped figure and a curved arrow pointing to a hexagonal base (no text or symbols)Arbre rotatif
natural_image
Line drawing of an open oven with a circular vent and side-mounted dish (no text or symbols)
Note :
INSTALLATION AND CONNECTION
INSTRUCTIONS DE MONTAGE POUR LE FOUR À MICRO-ONDES EMOTRADO
ÉVENTS POUR MEUBLES REQUIS *

Dimensions en mm
Embarqué
natural_image
Technical line drawing of a microwave oven with internal compartments and mounting base (no text or symbols)| C-1 | Micro 55% (495W) | Grille 45% (405W) |
| C-2 | Micro 36% (324W) | Grill 64% (576W) |
First of all, we would like to thank you for the trust you have placed in our company by purchasing one of our products. We are sure that you have made the right decision.
At Pando, not only do we offer top quality products, but we also have a large team of professionals who will assist and advise you on any queries you may have when it comes to installation or operation.
We also invite you to visit our website (www.pando.es) to get to know us better and where you can see our full range of products with the necessary commercial and technical information.
Here you will find a wide selection of decorative hoods. Wall-mounted, ceiling-mounted, island and built-in. Four types of installation that allow us to adapt to any type of kitchen according to the needs that arise.
We also show you our collection of essential appliances in any home. Appliances such as our collection of high-performance Ovens and Microwaves, Induction and Gas Hobs that will help you make the best recipes, Wine cellars and ageing cellars to keep and preserve your wines in the best conditions and integrated dishwashers with the latest technology.
All this under a brand with a very long history of more than 40 years in the market, which manufactures its products as a true craftsman. Our products reflect the best of our experience in order to satisfy all your needs.
We sincerely hope that you will have fun, experience and enjoy the comfort and capabilities of what is already your new kitchen ally.
Thank you very much
The Pando team
INDEX
ENVIRONMENTAL PROTECTION....5
PRECAUTIONS TO AVOID POSSIBLE EXPOSURE TO EXCESS MICROWAVE ENERGY....6
IMPORTANT SAFETY INSTRUCTIONS ATTENTION....6
TO REDUCE THE RISK OF INJURY TO PERSONS GROUNDING INSTALLATION....9
CLEANING....9
UTENSILS....10
Materials you can use in the microwave oven....11
Materials to avoid in the microwave oven 12
NAMES OF FURNACE PARTS AND ACCESSORIES....13
TURNTABLE INSTALLATION....14
How to position the turntable:....14
INSTALLATION AND CONNECTION....15
FITTING INSTRUCTIONS FOR THE EMOTRADO MICROWAVE OVEN....16
Embedded....17
Electrical connections....18
CONTROL PANEL 18
OPERATION 19
Setting the clock....19
Kitchen timer....19
Microwave 19
Grill....19
Combination....20
Defrosting by weight....20
Time-based defrosting....20
Multi-stage firing....21
Fast cooking 21
Lock function....21
Query function....22
Automatic menu 22
AUTOMATIC MENU TABLE....23
PROBLEM SOLVING....24
PANDO WARRANTY CONDITIONS: 27
EXCLUSIONS FROM THE PANDO WARRANTY: 27
ENVIRONMENTAL PROTECTION
RECOGIDA DE LOS ELECTRODOMÉSTICOS

The symbol on the product or on its packaging indicates that this product cannot be treated as normal household waste. This product must be handed over to the collection point for the recycling of electrical and electronic equipment. By ensuring this product is disposed of correctly, you will help prevent potential negative consequences for the environment and public health, which could otherwise be caused by inappropriate waste handling of this product. For more detailed information about recycling of this product, please contact your local city office, your household waste disposal service or the shop where you purchased the product. This appliance is marked according to the European Directive 2012/19/EU on waste electrical and electronic equipment (WEEE).

ENVIRONMENT AND WASTE TREATMENT
DISPOSAL OF THE PACKAGING. The packaging is marked with the Green Dot.
In its commitment to environmental protection and in compliance with the provisions of European Directive 94/62/EC on packaging and packaging waste and the derived Law 22/2011 on Waste and Contaminated Soil, Pando entrusts social economy entities with an Integrated Management System, responsible for the regular collection of used packaging and packaging waste at the consumer's home or in the vicinity for subsequent treatment.
For disposal of all packaging materials such as cardboard, expanded polyurethane and films, use appropriate containers.
This ensures the correct treatment and re-use of packaging materials.
PRECAUTIONS TO AVOID POSSIBLE EXPOSURE TO EXCESS MICROWAVE ENERGY
a) Do not attempt to operate this oven with the door open, as this may result in harmful exposure to microwave energy. It is important not to break or tamper with the safety interlocks.
b) Do not place any objects between the front face of the oven and the door and do not allow dirt or cleaning residues to accumulate on the sealing surfaces.
c) CAUTION: If the door or door seals are damaged, the oven must not be put into operation until it has been repaired by a competent person.
Attention
If the oven is not kept in a good state of cleanliness, its surface may degrade, which could affect the life of the appliance and lead to a dangerous situation.
IMPORTANT SAFETY INSTRUCTIONS ATTENTION
To reduce the risk of fire, electric shock, personal injury or exposure to excess power from the microwave oven, follow basic precautions when using your appliance, including the following:
- Read and follow the "PRECAUTIONS TO AVOID POSSIBLE EXPOSURE TO EXCESS MICROWAVE ENERGY".
- This oven can be used by children aged from 8 years and above and persons with reduced physical, sensory or mental capabilities or lack of experience and knowledge if they have been given supervision or instruction concerning use of the oven in a safe way and understand the hazards involved. Children must not play with the oven. Cleaning and maintenance must not be carried out by unsupervised children.
- Keep the oven and its cord out of the reach of children under 8 years of age.
-
If the power cord is damaged, it must be replaced by the manufacturer, its service agent or similarly qualified persons in order to avoid a hazardous situation.
-
CAUTION: Make sure that the oven is switched off before changing the lamp to avoid the possibility of electric shock.
- CAUTION: It is dangerous for any person other than a competent person to perform any service or repair operation involving the removal of a cover that provides protection against exposure to microwave energy.
- CAUTION: Liquids and food must not be heated in closed containers as they may explode.
- When heating food in plastic or paper containers, keep an eye on the oven because of the possibility of ignition.
-
Use only utensils suitable for use in microwave ovens.
-
If smoke escapes, turn off or unplug the oven and keep the door closed to smother the flames.
-
Heating beverages in microwave ovens can cause delayed eruptive boiling, so care should be taken when handling the container.
-
The contents of baby bottles and jars of baby food should be stirred or shaken and the temperature should be checked before consumption to avoid burns.
-
Eggs in the shell and whole hard-boiled eggs should not be heated in microwave ovens as they may explode, even after microwave heating has been completed.
-
Details for cleaning door seals, cavities and adjacent parts.
-
The oven must be cleaned regularly and food deposits must be removed.
-
Failure to keep the oven clean may result in surface deterioration which could adversely affect the life of the appliance and possibly lead to hazardous situations.
-
Use only the temperature probe recommended for this oven (for ovens equipped with the possibility of using a temperature sensor probe).
-
The microwave oven must be operated with the decorative door open (for ovens with decorative door).
-
This microwave is intended for use in household and similar applications such as:
a. Staff kitchen areas in shops, offices and other working environments.
b. By clients in hotels, motels and other residential-type settings.
c. Farm kitchens.
d. Pension-type environments
-
The microwave oven is intended for heating food and beverages. Drying of food or clothing and heating of heating pads, slippers, sponges, wet cloths and the like may cause risk of injury, ignition or fire.
-
The use of metal food and beverage containers is not permitted during microwave cooking.
- The oven must not be cleaned with a steamer.
- The oven must not be installed behind a decorative door to avoid overheating (this does not apply to ovens with a decorative door).
- The microwave oven is intended for built-in use.
- The oven must operate with any cabinet door open.
- Take care not to displace the turntable when removing containers from the oven (For stationary and built-in appliances which are used at a height of 900 mm or more above the floor and which have a removable turntable. However, this does not apply to ovens with a horizontal bottom hinged door).
- The surface of a storage drawer can become hot.
- Do not use abrasive cleaning products or sharp metal scrapers.
- to clean the oven door glass, as they may scratch the surface and break the glass.
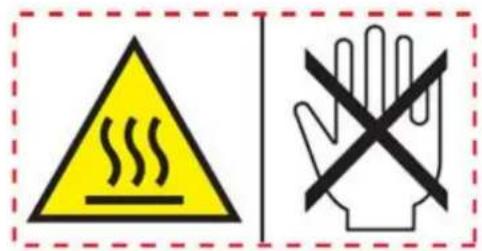
- ATTENTION: The apparatus and its accessible parts
- They become hot during use. Care should be taken to avoid touching the heating elements. Children under 8 years of age should be kept away unless under continuous supervision.
- During and after use, the oven becomes hot. Avoid touching the heating elements inside the oven.
- CAUTION: Accessible parts may become hot during and after use. Keep children away.
- WARNING: When the oven is operating in combination mode, children should only use the oven under adult supervision due to the temperatures generated.
TO REDUCE THE RISK OF INJURY TO PERSONS GROUNDING INSTALLATION
DANGER
Danger of electric shock
Touching any of the internal components may result in serious personal injury or death. Do not disassemble this oven.
ATTENTION:
Danger of electric shock
Improper grounding may result in electric shock. Do not plug the oven into an outlet until it is properly installed and grounded.
This oven must be grounded. In the event of an electrical short circuit, grounding reduces the risk of electric shock by providing an escape wire for the electric current.
This oven is equipped with a cord having a grounding wire with a grounding plug. The plug must be plugged into an outlet that is properly installed and grounded.
Consult a qualified electrician or serviceman if you do not fully understand the grounding instructions or if you are in doubt as to whether the oven is properly grounded.
If an extension cord is required, use only a 3-wire extension elbow.
- A short power cord is provided to reduce the risk of entanglement or tripping over a longer cord.
- If you use a set of long cords or an extension cord:
a. The marked electrical rating of the cord set or extension cord must be at least equal to the electrical rating of the oven.
b. The extension cord must be a 3-wire cord with earth connection.
c. The long cord should be positioned so that it does not lie flat on the worktop or table where it can be pulled on by children or tripped over unintentionally.
CLEANING
Be sure to unplug the oven from the mains.
- Clean the oven cavity after use with a slightly damp cloth.
-
Clean the accessories in the usual way with soapy water.
-
The frame, door seal and adjacent parts should be carefully cleaned with a damp cloth when dirty.
- Do not use harsh abrasive cleaners or sharp metal scrapers to clean the oven door glass, as they may scratch the surface, which may cause the glass to break.
- Cleaning tip---For easier cleaning of the cavity walls that cooked food can touch: place half a lemon in a bowl, add 300 ml of water (1/2 pint) and heat at 100% power in the microwave for 10 minutes. Wipe the oven with a soft, dry cloth.
UTENSILS
CAUTION - DANGER OF PERSONAL INJURY!
It is dangerous for any person other than a competent person to carry out any service or repair operation involving the removal of a cover which provides protection against exposure to microwave energy.
Refer to the instructions on "Materials that can be used in the microwave oven or should be avoided in the microwave oven". There may be certain non-metallic utensils that are not safe to use in the microwave oven. If in doubt, you can test the utensil in question by following the procedure below.
TESTING OF UTENSILS:
- Fill a microwave-safe container with 1 cup of cold water (250 ml) together with the utensil in question.
- Cook at maximum power for 1 minute.
- Carefully feel the utensil. If the empty utensil is hot, do not use it for microwave cooking.
- Do not exceed the cooking time of 1 minute.
Materials you can use in the microwave oven
| Utensils Remarks | |
| Browning dish | Follow the manufacturer's instructions. The bottom of the browning pan must be at least 5mm (3/16 inch) above the turntable. Incorrect use may cause the turntable to break. |
| Tableware | Microwave safe only. Follow manufacturer's instructions. Do not use cracked or chipped dishes. |
| Glass jars | Always remove the lid. use them only to heat food until it is just hot. Most glass jars are not heat resistant and may break. |
| Glassware | Use only heat-resistant ovenproof glassware. Make sure it is free of metal decorations. Do not use cracked or chipped dishes. |
| Oven cooking bags | Follow the manufacturer's instructions. Do not close with metal ties. Make openings to allow steam to escape. |
| Paper plates and cups | use only for short-term cooking/heating. Do not leave the oven unattended during cooking. |
| Absorbent paper | Use to coat food for reheating and to absorb fat. Use under supervision for short-term cooking only. |
| Butter paper Use as a lid to prevent splashing or as a wrapper for steaming. | |
| Plastic | Microwave safe only. Follow the manufacturer's instructions. They must be labelled "Microwave Safe". Some plastic containers soften from heating the food they contain. Boil-in bags" and tightly closed plastic bags should be torn/perforated or vented according to package directions. |
| Plastic wrapping | Only suitable for microwave use. Use to cover food during cooking to retain moisture. Do not allow plastic wrap to touch food. |
| Thermometers | Microwaveable only (meat thermometers and candy thermometers) |
| Waxed paper Use as a cover to prevent splashing and retain moisture. | |
Materials to avoid in the microwave oven
| Utensils Remarks | |
| Aluminium tray | They may cause electric arcing. Transfer food to a microwave-safe dish. |
| Food packaging with metal handle | It may cause electric arcing. Transfer food to a microwave-safe dish. |
| Metal or metal trimmed utensils | Metal protects food from microwave energy. Metal trim may cause arcing. |
| Paper ties They can cause an electric arc and cause a fire in the furnace. | |
| Plastic foams They may cause a fire in the oven. | |
| Wood | Plastic foam may melt or contaminate the liquid inside when exposed to high temperatures. |
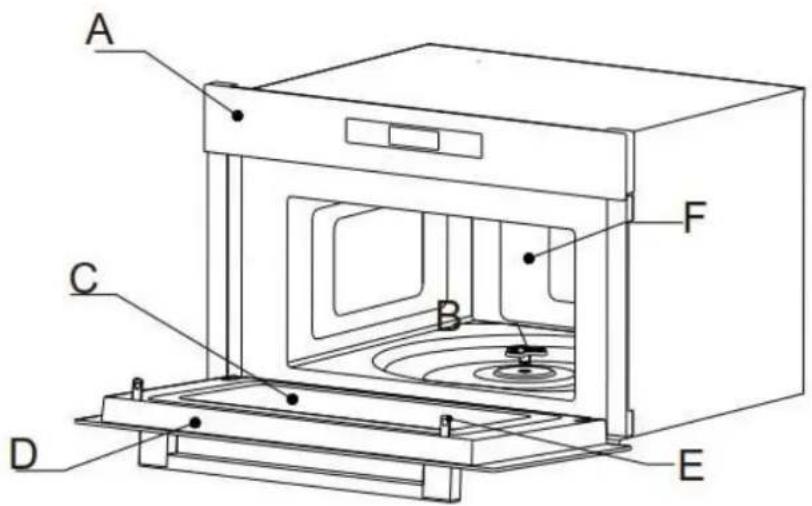
NAMES OF FURNACE PARTS AND
ACCESSORIES
Remove the oven and all materials from the carton and oven cavity. Your oven comes with the following accessories:

natural_image
Simple line drawing of concentric ovals with small oval objects at center (no text or symbols)Glass plate

natural_image
Simple line drawing of a circular object with two side handles and a central circular element (no text or symbols)Turntable support

natural_image
Blank rectangular book with no visible text or symbols on pagesInstruction manual

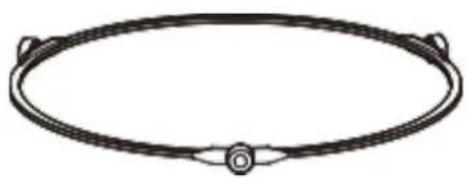
natural_image
Circular metal grate with diagonal stripes and hanging weights at both ends (no text or symbols)Grill (for grilling e.g. steaks, sausages and for toasting bread. As a support for flat plates.
natural_image
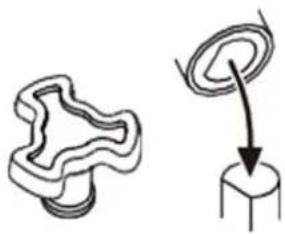
Two abstract line drawings: a spiral-shaped figure and a cube with an arrow pointing to it (no text or symbols)Rotating
a. Control panel
b. Door unit
c. Rotating shaft
d. Safety interlocking system
e. Observation window
f. Oven cavity
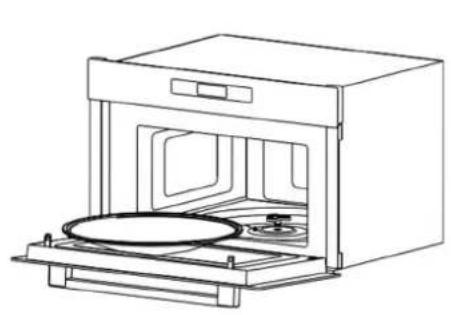
TURNTABLE INSTALLATION
Cleaning the cooking compartment and positioning the turntable. For new installations, ensure that all packaging and the transport belt have been removed from the turntable shaft. Before using the oven to prepare food for the first time, the turntable must be correctly positioned. The cooking compartment and accessories must be cleaned.
How to position the turntable:
- Place the turntable holder (1) in the recess in the oven compartment.
- Place the glass plate (1) on the turntable support (3). Fit the curved raised lines in the centre of the bottom of the glass plate between the three spokes of the shaft.
- Make sure that the glass plate (1) fits into the turntable shaft (2) in the centre of the oven floor. The rollers of the shaft must fit inside the lower flange of the turntable.
natural_image
Line drawing of an open oven with a circular vent and lid (no text or symbols)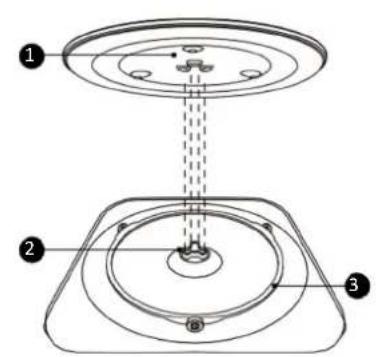
Note:
- Never use the oven without the turntable. Make sure that it is properly attached. The turntable can rotate clockwise or counterclockwise.
- Never place the glass dish upside down. The glass dish must never be restricted.
- Both the glass dish and the turntable stand must always be used during cooking.
- Some foods and food containers are always placed on the glass cooking plate.
- Never restrict the movement of the turntable.
- If the glass platen or turntable support cracks or breaks, contact the nearest authorised service centre.
INSTALLATION AND CONNECTION
- This oven is intended for domestic use only.
- This oven is intended for built-in use only. It is not designed for use on a countertop or in a cabinet.
- Please note the special installation instructions.
- The oven can be installed in a 60 cm wide wall cabinet.
- The oven is fitted with a plug and must only be connected to a properly installed earthed socket.
- The mains voltage must correspond to the voltage indicated on the rating plate.
- Installation of the socket and replacement of the connection cable must only be carried out by a qualified electrician. If the socket is no longer accessible after installation, there must be an all-pole disconnection device on the installation side with a contact distance of at least 3 mm.
- Do not use adapters, multi-pole power strips or extension cables. Overloading can cause a fire hazard.
THE ACCESSIBLE SURFACE MAY BE HOT DURING AND AFTER OPERATION.
FITTING INSTRUCTIONS FOR THE EMOTRADO MICROWAVE OVEN
REQUIRED FURNITURE VENTS *

Dimensions in mm
Embedded
Do not hold or carry the oven by the door handle. The door handle cannot support the weight of the oven and could break.
Carefully push the microwave into place, making sure that it is in the centre.
Open the door and secure the microwave with the screws provided.

natural_image
Technical line drawing of a microwave oven with mounting base and control panel (no text or symbols)- Insert the oven completely and centre it.
- Do not bend the connection cable.
- Screw the oven in place.
Electrical connections
The oven is fitted with a plug and must only be connected to a properly installed earthed socket. Only a qualified electrician who is aware of the applicable regulations may install the socket or change the connection cable. If the socket is no longer accessible after installation, an omnipolar switch must be provided.
with a contact gap of at least 3 mm. Protection against contact must be ensured by the installation.
Fuse protection: see operating instructions, technical data.
CONTROL PANEL


Microwave

Function Selection of functions

Clock / timer Time and time selection

Slider Determine +/-

Automatic menu Automatic function selection

Block / cancel Lock and pause

Start / + 30sec. / Confirm
OPERATION
Setting the clock
Press "Clock / Kitchen timer" once, then "00:00" is displayed.
Move the slider or press "+" or "-" to adjust the hour figures. The time should be between 0-23.
Press "Clock / Kitchen timer" to confirm.
Move the slider or press "+" or "-" to adjust the minutes. The time range is 0:05-95:00.
Press "Clock / Kitchen timer" to confirm.
Kitchen timer
Press "Clock/Cooking timer" twice, then "00:00" will be displayed.
Move the slider or press "+" or "-" to adjust the time. The time range is 0:05-95:00.
Press "Start / + 30 sec / Confirm" to confirm.
Microwave
| Power (W) | 900 | 720 4 | 50 270 | 90 | |
| Power level | 100 % | 80 % | 50 % | 30 % | 10 % |
| Visualisation | P10 | P8 P5 | P3 P1 |
-
In standby, press "Microwave" and then "P10" will be displayed.
-
Press "Microwave" repeatedly to adjust the power level, 5 power levels are available.
-
Move the slider or press "+" or "-" to adjust the cooking time.
-
Press "Start / + 30 sec. / Confirm" to start cooking.
Grill
Press "Function" once, then "G-1" appears.
Move the slider or press "+" or "-" to adjust the cooking time.
Press "Start / + 30 sec. / Confirm" to start cooking.
Note: When half the time has elapsed, the buzzer will sound to remind you to turn the food. If no operation is performed, the oven will continue to operate.
Combination
- Press "Function" once, and then "G-1" appears. Press "Function" repeatedly to choose the desired combination mode, and "C-1", "C-2" will be available.
- Move the slider or press "+" or "-" to adjust the cooking time.
- Press "Start / + 30 sec. / Confirm" to start cooking.
Note: Combination instructions
POWER BOARD
| C-1 Micro 55% (495W) Grill 45% (405W) | |
| C-2 Micro 36% (324W) Grill 64% (576W) |
Defrosting by weight
To enter the defrost by weight function:
- Press "Function" repeatedly until "0.1kg" is displayed.
- Move the slider or press "+" or "-" to adjust the weight. The weight range is 100-2000 g.
- Press "Start / + 30 sec / Confirm" to start defrosting.
Time-based defrosting
To access the defrost by time function:
- Press "Function" repeatedly until "1:00" is displayed.
- Move the slider or press "+" or "-" to adjust the time. The time range is 0:05-95:00.
- Press "Start / + 30 sec / Confirm" to start defrosting.
Note: When the buzzer sounds, turn the food over. If no operation is performed, the oven will continue to operate.
Fast cooking
In standby mode, press "Start / + 30 sec. / Confirm" to cook food at 100 % power level for 30 seconds. Each press of the same button can increase 30 seconds and the maximum time value is 95 minutes.
Note: Fast cooking cannot be set in defrost by weight, multi-stage and automatic menu.
Lock function
You can use this function to prevent the microwave from being switched on accidentally. To activate the lock:
In the standby state, press and hold "Lock / Cancel" for three seconds. A long beep will sound and the lock icon will be displayed.
To deactivate the lock:
In locked state, press and hold "Lock / Cancel" for three seconds. A long beep will sound.
Query function
If the clock has been set, the current time will be displayed for three seconds by pressing "Clock / Cooking timer" in the cooking state.
Automatic menu
- In standby state, press "Auto Menu", the display will show "A-1".
- Press "Auto Menu" repeatedly to choose the menu you need. There are 8 automatic menus available.
- Move the slider or press "+" or "-" to adjust the weight of the food.
- Press "Start / + 30 sec. / Confirm" to start cooking.
AUTOMATIC MENU TABLE
| MENU WEIGHT(S) VISUALISATION | POWER | ||
| A-1 POTATO | 1 (about 230 g) 1 | P100 | |
| 2 (about 460 g) 2 | |||
| 3 (about 690 g) 3 | |||
| A-2 MEAT | 150 g 150 g | P100 | |
| 300 g 300 g | |||
| 450 g 450 g | |||
| 600 g 600 g | |||
| A-3 FISH | 150 g 150 g | P80 | |
| 250 g 250 g | |||
| 350 g 350 g | |||
| 450 g 450 g | |||
| 650 g 650 g | |||
| A-4 GREEN | 150 g 150 g | P100 | |
| 350 g 350 g | |||
| 500 g 500 g | |||
| A-5 DRINK | 1 glass (240 g) 1 | P100 | |
| 2 glasses (480 g) 2 | |||
| 3 glasses (720 g) 3 | |||
| A-6 PASTA | 50 g (cold water 450 g) 50 g | P80 | |
| 100 g (cold water 800 g) 100 g | |||
| 150 g (cold water 1200 g) 150 g | |||
| A-7 POPCORN | 100 g 100 g | P100 | |
| A-8 PIZZA | 200 g 200 g | P100 / G-1 | |
| 400 g 400 g | |||
PROBLEM SOLVING
| NORMAL | |
| The microwave oven interferes with TV reception. | Radio and TV r eception may be interfered with when the microwave oven is operating. This is similar to interference from small household appliances such as a mixer, hoover and electric fan.This is normal. |
| Dim oven light | When cooking with low power microwaves, the oven light may dim. This is normal. |
| Steam build-up on the door, hot air escaping through the vents | As food cooks, steam may escape from the food. Most of it will escape through the vents. But some of it may collect in a cold place such as the oven door. This is normal. |
| The oven has been accidentally switched on without food in it | It is forbidden to operate the oven wit hout food inside.It is very dangerous. |
| PROBLEM POSSIBLE | CAUSE REMEDY | |
| The oven cannot be started. | (1) The power cable is not properly plugged in. | Unplug it. Plug it in again after 10 seconds. |
| (2) Fuse is blown or circuit breaker is tripped. | Replace the fuse or reset the circuit breaker (repaired by our professional staff). | |
| (3) Problems with the socket. | Check the socket outlet with other electrical appliances. | |
| The oven does not heat up. | (4) The door is not properly closed. | Close the door tightly. |
| SPECIFICATION - EN | SPECIFICATIONS - EN | PHM-850 |
| TRANSPORT / STORAGE LOGISTICS / WAREHOUSING | ||
| Net Weight [Kg] Net Weight [Kg] Net Weight [Kg] Net Weight [Kg] Net Weight [Kg] Net Weight [Kg] Net Weight [Kg] Net Weight [Kg] Net Weight [Kg] Net Weight [Kg] Net Weight [Kg] Net Weight [Kg] Net Weight [Kg] Net Weight [Kg] Net Weight [Kg] Net Weight [Kg] Net Weight [Kg] Net Weight [K g] Net Weight [Kg] Net Weight [Kg] Net Weight [Kg] Net Weight [Kg] Net Weight [Kg] Net Weight [Kg] Net Weight [Kg] Net Weight [Kg] Net Weight [Kg] Net Weight [Kg] Net Weight [Kg] Net Weight [Kg] Net Weight [Kg] Net Weight [Kg] Net Weight [Kg] Net Weight [Kg] Net Weight[ Kg] Net Weight [Kg] Net Weight [Kg] Net Weight [Kg] Net Weight [Kg] Net Weight [Kg] Net Weight [Kg] Net Weight [Kg] Net Weight [Kg] Net Weight [Kg] Net Weight [Kg] Net Weight [Kg] Net Weight [Kg] Net Weight [Kg] Net Weight [Kg] Net Weight [Kg] Net Weight [Kg] NetWeight [Kg] Net Weight [Kg] Net Weight [Kg] Net Weight [Kg] Net Weight [Kg] Net Weight [Kg] Net Weight [Kg] Net Weight [Kg] Net Weight [Kg] Net Weight [Kg] Net Weight [Kg] Net Weight [Kg] Net Weight [Kg] Net Weight [Kg] Net Weight [Kg] Net Weight [Kg] Net Weight [Kg ] Net Weight [Kg] Net Weight [Kg] Net Weight [Kg] Net Weight [Kg] Net Weight [Kg] Net Weight [Kg] Net Weight [Kg] Net Weight [Kg] Net Weight [Kg] Net Weight [Kg] Net Weight [Kg] Net Weight [Kg] Net Weight [Kg] Net Weight [Kg] Net Weight [Kg] Net Weight [Kg] Net Weight [Ck] Net Weight [Kg] Net Weight [Kg] Net Weight [Kg] Net Weight [Kg] Net Weight [Kg] Net Weight [Kg] Net Weight [Kg] Net Weight [Kg] Net Weight [Kg] Net Weight [Kg] Net Weight [Kg] Net Weight [Kg] Net Weight [Kg] Net Weight [Kg] Net Weight [Kg] Net Weight [Kg] Net Weight (Kg) Net Weight [Kg] Net Weight [Kg] Net Weight [Kg] Net Weight [Kg] Net Weight [Kg] Net Weight [Kg] Net Weight [Kg] Net Weight [Kg] Net Weight [Kg] Net Weight [Kg] Net Weight [Kg] Net Weight [Kg] Net Weight [Kg] Net Weight [Kg] Net Weight [Kg] Net Weight [Kg] Net Weight [L] Net Weight [Kg] Net Weight [Kg] Net Weight [Kg] Net Weight [Kg] Net Weight [Kg] Net Weight [Kg] Net Weight [Kg] Net Weight [Kg] Net Weight [Kg] Net Weight [Kg] Net Weight [Kg] Net Weight [Kg] Net Weight [Kg] Net Weight [Kg] Net Weight [Kg] Net Weight [Kg] Net Weight[Kg] Net Weight[Kg] Net Weight[Kg] Net Weight[Kg] Net Weight[Kg] Net Weight[Kg] Net Weight[Kg] Net Weight[Kg] Net Weight[Kg] Net Weight[Kg] Net Weight[Kg] Net Weight[Kg] Net Weight[Kg] Net Weight[Kg] Net Weight[Kg] Net Weight[Kg] Net Weight[Kg] Net Weight[Kg] Net Weight[Kg] Net Weight[Kg] Net Weight[ Kg] Net Weight[Kg] Net Weight[Kg] Net Weight[Kg] Net Weight[Kg] Net Weight[Kg] Net Weight[Kg] Net Weight[Kg] Net Weight[Kg] Net Weight[Kg] Net Weight[Kg] Net Weight[Kg] Net Weight[Kg] Net Weight[Kg] Net Weight[Kg] Net Weight[Kg] Net Weight[Kg] Net Weight[Kg] Net Weight[Kg] Net Weight[Kg] Net Weight[kg] Net Weight[kg] Net Weight[kg] Net Weight[kg] Net Weight[kg] Net Weight[kg] Net Weight[kg] Net Weight[kg] Net Weight[kg] Net Weight[kg] Net Weight[kg] Net Weight[kg] Net Weight[kg] Net Weight[kg] Net Weight[kg] Net Weight[kg] Net Weight[kg] Net Weight[kg] Net Weight[kg] Net Weight[kg] Net Weight[ Kg] Net Weight[kg] Net Weight[kg] Net Weight[kg] Net Weight[kg] Net Weight[kg] Net Weight[kg] Net Weight[kg] Net Weight[kg] Net Weight[kg] Net Weight[kg] Net Weight[kg] Net Weight[kg] Net Weight[kg] Net Weight[kg] Net Weight[kg] Net Weight[kg] Net Weight[kg] Net Weight[kg] Net Weight[kg] Net Weight[ Kg ] Net Weight[ Kg ] Net Weight[ Kg ] Net Weight[ Kg ] Net Weight[ Kg ] Net Weight[ Kg ] Net Weight[ Kg ] Net Weight[ Kg ] Net Weight[ Kg ] Net Weight[\ Kg ] Net Weight[ Kg ] Net Weight[ Kg ] Net Weight[ Kg ] Net Weight[ Kg ] Net Weight[ Kg ] Net Weight[ Kg ] Net Weight[ Kg ] Net Weight[ W ] Net Weight[ W ] Net Weight[ W ] Net Weight[ W ] Net Weight[ W ] Net Weight[ W ] Net Weight[ W ] Net Weight[ W ] Net Weight[ W ] Net Weight[ W ] Net Weight[ W ] Net Weight[ W ] Net Weight[ W ] Net Weight[ W ] Net Weight[ W ] Net Weight[ W ] Net Weight[ W ] Net Weight[ W ] Net Weight[ W ] Net Weight[ W ] Net Weight[ W ] Net Weight[ W ] Net Weight[ W ] Net Weight[ W ] Net Weight[ W ] Net Weight[ W ] Net Weight[ W ] Net Weight[ W ] Net Weight[ Kg ] Net Weight[ Kg ] Net Weight[ Kg ] Net Weight[ Kg ] Net Weight[ Kg ] Net Weight[ Kg ] Net Weight[ Kg ] Net Weight[ Kg ] Net Weight [\ Kg\ Kg\ Kg\ Kg\ Kg\ Kg\ Kg\ Kg\ Kg\ Kg\ Kg\ Kg\ Kg\ Kg\ Kg\ Kg\ K g\ K g\ K g\ K g\ K g\ K g\ K g\ K g\ K g\ K g\ K g\ K g\ K g\ K g\ K g\ K g\ K g\ ] | 23 | |
| Packaging Size [WxDxH mm][WxDxH mm][WxDxH mm][WxDxH mm] | Packing Dimensions [WxDxH mm][WxDxH mm]. | 660 x 582 x 466 |
| INSTALLATION INSTALLATION | ||
| Voltage [V - VAC] Voltage [V - VAC] | Voltage [V - VAC] Voltage [V - VAC 220 - 240 | |
| Frequency [Hz] Frequency [Hz] Frequency [Hz] Frequency [Hz] Frequency [Hz] Frequency [Hz] Frequency [Hz] Frequency [Hz] Frequency [Hz] Frequency [Hz] Frequency [Hz] Frequency [Hz] Frequency [Hz] Frequency [Hz] Frequency [Hz] Frequency [Hz] Frequency [Hz] Frequency [Hz] Frequency [Hz] Frequency [Hz] Frequency [Hz] Frequency [Hz] Frequency [Hz] Frequency [Hz] Frequency [Hz] Frequency [Hz] | ||
| Power cord [m] [m Power cable] [m] [m 1 | ||
| TECHNICAL SPECIFICATIONS & AESTHETICS | TECHNICAL and AESTHETICAL CHARACTERISTICS | |
| Nominal maximum power [W] Rated maximum power [W] 1450 | ||
| Maximum power Microwave + Grill [W] [W] Maximum power Micro + Grill [W] 1450 | ||
| Grill upper power [W] Upper grill power [W] 1100 | ||
| Microwave Output Power [W] Output power Micro [W] 900 | ||
| Power Lamp [watt] Halogen | Illumination Power [W] | 4 x 1 |
| ACCESSORIES | ACCESSORIES | |
| Grill upper type | Top grill | Metallic |
| Grill Rack | Grill Grid | √ |
| FEATURES | BENEFITS | |
| Usable Volume [L] | Useful volume [L] | 34 |
| COOKING FUNCTIONS | COOKING FUNCTIONS | |
| Total functions | Total number of functions | 8 |
| Automatic programs | Automatic programmes | 5 |
| Power levels: | Power levels: | 5 |
| - P1 power is the 10% from the total power (W) | - P1 is equivalent to a power in W compared to the total of 10%. | 90 |
| - P3 power is the 30% from the total power (W) | - P3 is equivalent to a power in W compared to the total of 30%. | 270 |
| - P5 power is the 50% from the total power (W) | - P5 is equivalent to a power in W compared to the total of 50%. | 450 |
| - P8 power is the 80% from the total power (W) | - P8 is equivalent to a power in W compared to the total of 80%. | 720 |
| - P10 power is the 100% from the total power (W) | - P10 equals a power in W compared to the total of 100%. | 900 |
| Digital clock Digital clock | √ | |
| Digital timer Digital timer | √ | |
| Defrost Defrost | √ | |
| Express Cooking Express cooking | √ | |
| Preset function Predefined functions | √ | |
| Plate diameter [∅ mm] Plate diameter [∅ mm] | Plate diameter [∅ mm] 345 | |
| End Cooking signal End of cooking signal | √ |
13. PANDO GUARANTEE CERTIFICATE
INOXPAN S.L., thanks you for choosing and placing your trust in a product of our brand Pando, which is distinguished by its Quality, Design and Innovation, being faithful to its origins and commitments.
PANDO WARRANTY CONDITIONS:
This appliance is guaranteed for 3 years from the date of purchase and covers it against all manufacturing defects that affect its proper operation. In order for this warranty to be valid, it is essential to present the invoice or purchase receipt to the Pando Authorised Service technician.
During this period, the Company undertakes to replace or repair free of charge any defective part due to a defect or manufacturing defect in the appliance, until it is in proper working order, as well as the necessary labour and expenses incurred as a result of such repair or replacement.
EXCLUSIONS FROM THE PANDO WARRANTY:
It will not be covered by the product warranty and could be cause for cancellation of this, and in these cases the user will be responsible for the costs of materials, labour and travel of the technical service, in the following cases:
- The installation, servicing, cleaning or maintenance of the furnace.
- If the installation of the oven has not been carried out by Authorised Professional Specialists or Official Pando Technical Service personnel, who comply with the requirements of safety standards and electrical power regulations.
- Any breakdown, malfunction or malfunction caused by incorrect installation or use.
- Breakdowns or damage caused by failure to observe or follow the safety instructions, recommendations for use and maintenance in the appliance manuals.
- When the appliance is intended for commercial or non-domestic use, for which it is not intended.
- Malfunctioning of the product due to non-compliance with the standards, instructions and recommendations indicated in the appliance manuals.
- Breakdowns or problems caused by an inadequate installation, or by not having the required free spaces in the furniture and indicated in the installation manual, for adequate ventilation of the product.
- Breakdowns or damage caused by transport or transfer, and manipulation of the device by unauthorised personnel not authorised by this company or the Pando brand.
- Bumps, dents, scratches or scrapes, broken glass.
- Presence of foreign bodies foreign to the device, inside or outside the product.
- The technician does not have easy access to the product, because there are elements that prevent easy and safe access. The means required for the authorised Pando technician to access the device are the responsibility of the user.
- Improper handling of the wiring and connections of the oven.
- Aesthetic, wear and tear components, such as light screens, lamps, trays, grills, racks, guides.
- Rust, burns, stains or discoloration of the body, door, fittings or interior cavity resulting from improper maintenance or use, or from improper application or unprotected exposure to corrosive elements such as cleaning agents not recommended by the manufacturer and unsuitable cleaning agents.
- Breakdowns or damage caused by variations in the electricity supply or fortuitous and natural causes of atmospheric or geological origin such as storms, lightning, earthquakes, floods, etc.
- Appliances from resale, second hand, trade-in or exhibitions that are more than two years old from the date of manufacture.
INOXPAN, S.L., is expressly excluded from any liability for any direct or indirect damage to persons or materials caused by improper handling of the device.
Contact details Official Authorised Pando Technical Service:
| SPAIN, PORTUGAL AND ANDORRA: | OTHER COUNTRIES: | ||
| https://www.pando.es/asistencia-tecnica/ |  | ENhttps://www.pando.es/en/after-sales-services/FRhttps://www.pando.es/fr/service-apres-vente/ |  |
INOXPAN S.L.
Pol. Ind. El Cros
SERVICIO POST VENTA

- Pando
- integralcooking
- PHM-850
- Nota:
- INSTRUÇÕES DE MONTAGEM PARA O FORNO DE MICROONDAS EMOTRADO
- Embutido
- IMPORTANT SAFETY INSTRUCTIONS ATTENTION
- Note :
- INSTALLATION AND CONNECTION
- INSTRUCTIONS DE MONTAGE POUR LE FOUR À MICRO-ONDES EMOTRADO
- Embarqué
- INDEX
- ENVIRONMENTAL PROTECTION
- RECOGIDA DE LOS ELECTRODOMÉSTICOS
- ENVIRONMENT AND WASTE TREATMENT
- PRECAUTIONS TO AVOID POSSIBLE EXPOSURE TO EXCESS MICROWAVE ENERGY
- Attention
- TO REDUCE THE RISK OF INJURY TO PERSONS GROUNDING INSTALLATION
- DANGER
- ATTENTION:
- CLEANING
- UTENSILS
- CAUTION - DANGER OF PERSONAL INJURY!
- TESTING OF UTENSILS:
- Materials to avoid in the microwave oven
- NAMES OF FURNACE PARTS AND
- ACCESSORIES
- TURNTABLE INSTALLATION
- How to position the turntable:
- Note:
- THE ACCESSIBLE SURFACE MAY BE HOT DURING AND AFTER OPERATION.
- FITTING INSTRUCTIONS FOR THE EMOTRADO MICROWAVE OVEN
- Embedded
- Electrical connections
- CONTROL PANEL
- OPERATION
- Setting the clock
- Kitchen timer
- Microwave
- Grill
- Combination
- Defrosting by weight
- Time-based defrosting
- Fast cooking
- Lock function
- To deactivate the lock:
- Query function
- Automatic menu
- PROBLEM SOLVING
- PANDO GUARANTEE CERTIFICATE
- PANDO WARRANTY CONDITIONS:
- EXCLUSIONS FROM THE PANDO WARRANTY:
- INOXPAN S.L.
Brand : Pando
Model : PHM-850
Category : Plate warmer