
PHM851 - Plate warmer Pando - Free user manual and instructions
Find the device manual for free PHM851 Pando in PDF.
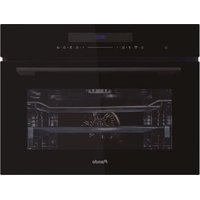
| Product type | Plate warmer / Built-in microwave oven |
| Brand | Pando |
| Model | PHM851 |
| Dimensions without front panel (HxWxD) | 360 x 553 x 376.5 mm |
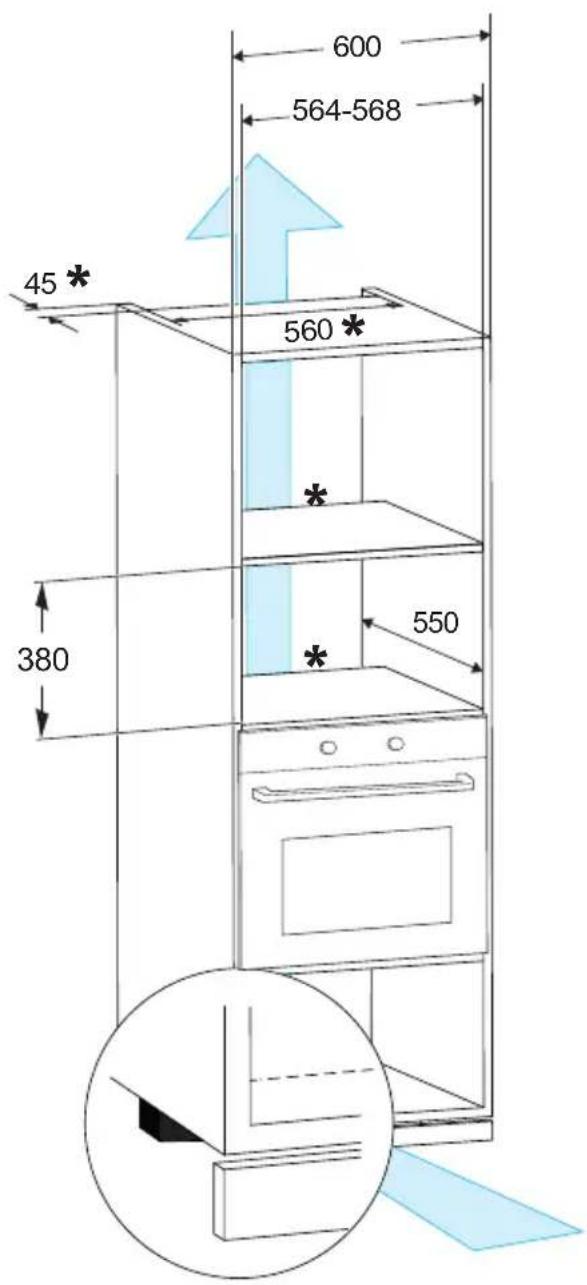
| Overall dimensions (HxWxD) | 380 x 564-568 x 550 mm |
| Net weight | 17.6 kg |
| Power supply | 230 V / 50 Hz |
| Power cord length | 1 m |
| Usable volume | 25 L |
| Microwave output power | 900 W |
| Microwave input power | 1450 W |
| Grill input power | 1000 W |
| Digital clock | Yes (24 h) |
| Interior lighting | Halogen |
| Key lock (child safety) | Yes |
| Automatic stop when door opens | Yes |
| Standby power consumption | 0.8 W |
| Main functions | Quick cook, microwave, grill, combination (C-1, C-2), defrost by weight and by time, auto menu (8 programs), timer, multi-function (2 stages) |
| Accessories included | Glass turntable, rotating ring, grill |
| Cleaning | Clean the cavity with a damp cloth after use; do not use abrasive cleaners; loosen residues with half a lemon and 300 ml of water heated for 10 minutes at 100% |
| Safety | Child lock, mandatory grounding, automatic stop when door opens, do not operate empty, use only suitable utensils |
| Warranty | 3 years (conditions according to manual) |
Frequently Asked Questions - PHM851 Pando
User questions about PHM851 Pando
0 question about this device. Answer the ones you know or ask your own.
Ask a new question about this device
Download the instructions for your Plate warmer in PDF format for free! Find your manual PHM851 - Pando and take your electronic device back in hand. On this page are published all the documents necessary for the use of your device. PHM851 by Pando.
USER MANUAL PHM851 Pando
natural_image
Modern kitchen appliance with wooden cutting board and Pando microwave oven, no visible text or symbols on main objectsPando
integralcooking
PHM - 851
ES - PT - FR - EN

Certificate of Guarantee

The Global Kitchen Partner
Images and content in this handbook is of exclusive property of Pando - INOXPAN S.L, for which it is completely forbidden the use of images as well as total or partial reproduction without previous authorisation in written.
LAS IMÁGENES MOSTRADAS EN ESTE MANUAL NO SON CONTRACTUALES.
THE IMAGES SHOWN IN THIS HANDBOOK ARE NOT CONTRACTUAL
natural_image
Symbol of a waste bin with crossed lines indicating no waste, and a solid rectangle below (no text or labels)DEL MEDIOAMBIENTE Y TRATAMIENTO DEL RESIDUO
natural_image
Simple line drawing of a circular object with internal components and dots, no text or symbols present.natural_image
Simple line drawing of a four-legged metal grate with vertical supports (no text or symbols)

ventosa
Start+30Sec./Confirm.

natural_image
Line drawing of a microwave oven with front panel and door (no text or symbols)
INSTALACIÓN
NOTA:


natural_image
Symbol of a trash bin crossed out by two crossed lines, with a solid black rectangle below (no text or labels)natural_image
Simple line drawing of a circular tray with four small objects on each side (no text or symbols)natural_image
Simple line drawing of a round metal table with four legs and a horizontal panel (no text or symbols)
Start+30Sec./Confirm.
natural_image
Line drawing of a microwave oven with front panel and door (no text or symbols)
INSTALACIÓN A


NOTA:
natural_image
Diagram of a box with a checkmark and wavy lines inside, mounted on a stand (no text or symbols)
natural_image
Diagram of a device with a black X mark on its side panel, connected to wires and a base (no text or symbols)

natural_image
Diagram of a cabinet interior with an open door, showing structural components and a directional arrow (no text or symbols)
natural_image
Symbol of a trash bin crossed out by two diagonal lines, with no text or labels present.PROTECTION DE L'ENVIRONNEMENT ET TRAITEMENT DES DÉCHETS
Start+30Sec./Confirm.

natural_image
Line drawing of a microwave oven with lid and front panel (no text or symbols)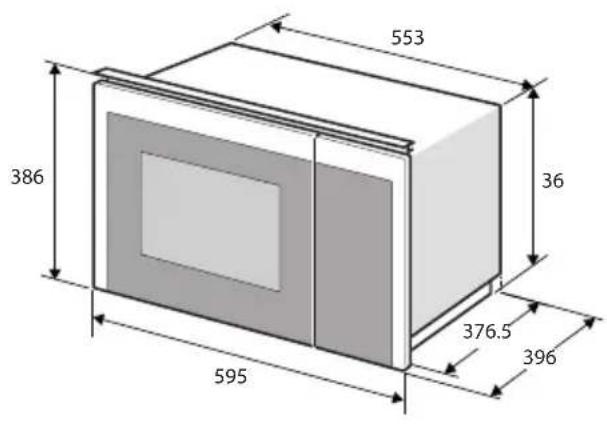
INSTALLATION A

REMARQUE :
natural_image
Illustration of a box with a checkmark and airflow indicators, no text or symbols present
natural_image
Diagram of a device with a cross symbol on its side panel, connected to wires and a base (no text or labels)


flowchart
graph LR
    A[" "] --> B[" "]
    B --> C[" "]
    C --> D[" "]
GARANTIE DES PRODUITS
First of all, we would like to thank you for the trust you have placed in our company by purchasing one of our products.
For purchasing one of our products. We are sure that you have made the right decision.
At Pando, not only do we offer top quality products, but we also have a large team of professionals who will help you and advise you on any queries you may have during installation or operation.
To get to know us better, we invite you to visit our website (www.pando.es) where you can see our full range of products with the most up to date commercial and technical information.
Here you will find a wide selection of Decorative Hoods; wall-mounted, ceiling-mounted, island, integrated into furniture and integrated into the hob.
This variety allows us to adapt to any style of kitchen.
We also show you our collection of essential appliances in any home.
Appliances such as our collection of high-performance Ovens and Microwaves with high performance, Induction and Gas Hobs that will help you to make the best recipes, Wine Cellars and Ageing Cellars to maintain and preserve your wines in the best conditions, Dishwashers with the most modern technology and our with the most up-to-date technology and our range of Refrigerators and Freezers with Freezers and Refrigerators for panel integration together with those for free installation.
All this under a brand with a very long trajectory of more than 40 years in the sector, which manufactures its products as a sector, which manufactures its products like a true craftsman. Bringing the best of our experience to everything we do.
We sincerely hope you have fun, experience and enjoy the comfort and capabilities of what is already your new capabilities of what is already your new kitchen ally.
Muchas gracias
El equipo de Pando
Pando reserves the right to change or cancel any measures of the articles in the manual without prior notice, without affecting the essential characteristics of functionality and safety, and is not responsible for any errors or omissions that may occur in the manual.
Technical specifications valid except for typographical errors, omission, or printing.
The images and content of this manual are the exclusive property of Pando - INOXPAN S.L., and any appropriation of images and total or partial reproduction without prior written authorization is strictly prohibited.
THE IMAGES SHOWN IN THIS MANUAL ARE NOT CONTRACTUAL.
Pando's Technical Management reserves the right to modify, alter, or improve the technical drawings displayed in this manual without prior notice.
The paper version of this manual cannot be updated in real-time, to ensure the latest version of your product's instructions, we recommend consulting the digital version at www.pando.es
ENVIRONMENTAL PROTECTION
The symbol on the product or its packaging indicates that this product cannot be disposed of like normal domestic waste. The product must be handed over at a collection point for recycling electrical and electronic equipment. If you ensure that this product is correctly disposed of, you will help to avoid the possible negative environmental and public health effects that could arise from incorrect disposal. For more detailed information about recycling this product, please contact your city authorities, the domestic waste service or the establishment where you purchased it. This electrical appliance is marked in compliance with European Directive 2012/19/EU on electrical and electronic appliance waste (WEEE).
COLLECTION OF
HOUSEHOLD APPLIANCES
natural_image
Symbol of a trash bin with crossed lines indicating no waste or restriction, and a solid black rectangle below (no text or labels)ENVIRONMENTAL PROTECTION AND WASTE TREATMENT
DISPOSAL OF THE PACKAGING. The packaging is marked with in Green Dot.
In its commitment to the protection of the environment and in compliance with the provisions of the European Directive 94/62 / EC on packaging and packaging waste and the derived Law 22/2011 on Contaminated Residues and Soils, Pando entrusts entities of social economy an Integrated Management System, responsible for the periodic collection at the consumer's home or in its vicinity of used packaging and packaging waste for subsequent treatment.
To remove all packaging materials such as cardboard, expanded polyurethane, and film, use the appropriate containers.
This ensures the correct treatment and reuse of packaging materials.
INDEX
SAFETY 80
CLEANING....83
SUITABLE AND NOT SUITABLE UTENSILS....83
INSTALLATION....85
DESCRIPTION OF APPLIANCES....86
DISPLAY 87
Installation Instructions 88
Installing the turntable 91
OPERATION 91
- Setting the clock....91
- Cooking with microwave....92
- Fast cooking....92
- Child lock function ......92
- Grill or Combi. Cooking ....93
- Investigator function ......93
- Defrost by weight....93
- Time Defrost....93
- Multifunction ...... 94
- Timer 94
- Open the oven door....94
- Auto Menu....95
TROUBLESHOOTING....96
DATA SHEET 97
WARRANTY....98
SAFETY
To reduce the risk of fire, electric shock or possible personal injury, read the basic safety precautions carefully:
- Liquids and other foods should not be heated in closed containers as they may explode.
- It is dangerous for any unqualified person to perform any service or repair operation involving the removal of a protective cover from exposure to microwave energy.
- Children should not play with the appliance. Cleaning and maintenance shall not be performed by children unless they are at least 8 years old and under supervision.
- This appliance can be used by children aged from 8 years and above.
- Persons with reduced physical, sensory or mental capabilities or lack of experience and knowledge in the use of this appliance may only use the microwave if they have been given supervision and instruction in its use.
- Keep the appliance and its cord out of the reach of children under 8 years of age.
Only use utensils suitable for use in microwave ovens.
- The oven must be cleaned regularly and food residues must be removed.
- Do not use the oven cavity for storing objects. Do not store objects such as bread, biscuits, etc. inside the oven.
Precautions to avoid harmful microwave exposure:
a. Do not attempt to operate this oven with the door open, as this may result in harmful exposure to microwave energy. It is important not to break or tamper with the safety interlocks.
b. Do not place any objects between the front face of the oven and the door or allow dirt or cleaner residue to accumulate on the sealing surfaces.
c. WARNING: If the door or door seals are damaged, the oven should not be operated until it has been repaired by a competent person.
9. When heating food in plastic or paper containers, watch the oven because of the possibility of ignition.
10. Do not use steam cleaners.
- If smoke escapes, turn off or unplug the appliance and keep the door closed to smother the flames.
- Do not overcook food at one time.
- Remove wire ties and paper or plastic metal handles before placing any container in the microwave oven.
- Install or locate this oven only in accordance with the installation instructions provided.
- Shelled eggs and whole hard boiled eggs must not be heated in microwave ovens as they may explode, even after microwave heating has been completed.
- If the power cord is damaged, it must be replaced by the manufacturer, its service agent or similarly qualified persons in order to avoid an accident.
- During operation, the appliance may become hot and adjacent surfaces may become hot. Keep the cord away from any of these surfaces, and do not cover any ventilation grilles. Avoid touching the heating elements inside the microwave oven.
-
Do not store or use this appliance outdoors.
-
This appliance is intended for use in domestic or similar applications such as:
-
Staff cooking areas in shops, offices and other work environments.
• Hotels, motels and other residential type environments.
• Cottages, Bed&Brekfast, etc. -
Do not use this oven near water, in a wet basement or near a swimming pool.
- Do not let the cord hang over the edge of the table or worktop.
- Failure to keep the oven in a clean condition may result in surface deterioration which could adversely affect the life of the appliance and possibly lead to a hazardous situation.
- Heating beverages with microwave ovens can cause delayed eruptive boiling, so care must be taken when handling the container.
- The appliances are not designed to be operated by an external timer or separate remote control system.
-
Metal food and beverage containers are not permitted during microwave operation.
-
The microwave oven is designed to heat food and beverages. Heating slippers, sponges, wet cloths and the like may cause risk of injury or fire.
- Care must be taken not to displace the turntable when removing containers from the appliance, so as not to damage the cavity.
- The appliance must not be installed behind a door so that the door does not heat up and is not damaged.
- If metal touches the wall of the cooking compartment, sparks are generated which can damage the appliance or shatter the inner glass of the door.
- Metal, e.g. a spoon in a glass, must be at least 2 cm away from the oven walls and the inside of the oven door. Aluminium trays can generate sparks in the appliance. The appliance is damaged due to the sparks that form.
Reduce the danger: Installation of earthing.
Electric Shock Hazard.
Touching some of the internal components can cause serious personal injury or death. Do not disassemble the appliance.
Electric Shock Hazard:
Improper grounding may result in electric shock.
Do not plug the appliance into an outlet until it is properly installed and grounded.
This appliance must be grounded. In the event of a short circuit, grounding reduces the risk of electric shock by providing an escape wire for the electric current.
This appliance is equipped with an earthed cord having an earthed plug. The plug must be plugged into an outlet that is properly installed and grounded.
Consult a qualified electrician or serviceman if the grounding instructions are not completely understood, or if there is any doubt as to whether the appliance is properly grounded.
-
A short power supply cord is provided to reduce the risk of becoming entangled in or tripping over a longer cord.
-
If a long cord set or extension cord is used:
a. The electrical rating marked on the cord set or extension cord must be at least as great as the electrical rating of the appliance.
b. The extension cord must be a grounded 3-wire cord.
c. The long cord must be routed so that it will not drape over the countertop or tabletop where it can be pulled or tripped over unintentionally.
CLEANING
Before starting cleaning, be sure to unplug the appliance from the mains.
- Clean the oven cavity after use with a slightly damp cloth.
- Clean the accessories in the usual way with soapy water.
- The door frame, door gasket and adjacent parts should be carefully cleaned with a damp cloth when dirty.
- Do not use harsh abrasive cleaners or sharp metal scrapers to clean the oven
door glass as they may scratch the surface, which may cause the glass to break.
- To facilitate cleaning of the cavity walls that cooked food may touch: Place half a lemon in a bowl, add 300 ml of water and heat at 100% power in the microwave for 10 minutes. Clean the oven with a soft, dry cloth.
SUITABLE AND NOT SUITABLE UTENSILS
Test to check whether or not a utensil is suitable for use in your microwave oven:
- Fill a microwave-safe container with 250 ml of water and place it inside the microwave oven.
- Place the utensil to be tested to verify whether or not it is suitable for microwave use, next to the container with water that you have introduced in the previous step.
- Turn on your appliance for 1 minute. (Do not exceed the time).
- At the end of the time, carefully feel the empty test utensil (be careful, risk of burning) and observe:
- If it is hot, it is NOT suitable for microwave ovens
- If it is cold, it is suitable for microwave ovens
Materials to avoid in your microwave oven
| Utensils Description | |
| Aluminium trays | May cause electrical arcing. Transfer food to a microwave-safe dish. |
| Metal handled food cartons with metal trim | May cause arcing. Place food on a microwave-safe dish. |
| Metal or metal trim | Metal protects food from microwave energy. Metal trim may cause arcing. |
| Metal flanges May arc and could cause a fire in the oven. | |
| Paper bags May catch fire. | |
| Plastic foam | Plastic foam may melt or contaminate the liquid inside if exposed to high temperatures. |
| Wood Wood dries out when used in the microwave oven and may split or crack. | |
Materials that can be used in the microwave oven
| Utensils Description | |
| Browning dish Follow | the manufacturer's instructions. The bottom of the browning plate must be at least 3/16 inch (5mm) above the turntable. Incorrect use may result in breakage of the turntable. |
| Crockery Microwave | safe only. Follow manufacturer's instructions. Do not use cracked or chipped dishes |
| Glass Jars Always | remove the lid. Use only for heating food. Most glass jars are not heat resistant and may break. |
| Glassware Only heat | resistant oven glassware. Make sure it has no metal decorations. Do not use cracked or chipped glassware |
| Oven cooking bags | Follow manufacturer's instructions. Do not seal with metal flange. Make slits to allow steam to escape. |
| Paper plates and cups | Use only for short-term cooking/heating. Do not leave oven unattended while cooking |
| Cooking paper Use | to cover food for reheating and to absorb grease. Use under supervision for short-term cooking only. |
| Baking paper Use as | as a cover to prevent splashing or as a wrap for steaming |
| Plastic Microwave safe only. Follow manufacturer's instructions. Must be labelled "microwave safe". Some plastic containers soften when the food in them is heated. Boil-in bags" and tightly closed plastic bags should be slit, punctured or vented according to package instructions. | |
| Plastic wrap Microwave safe only. Use to cover food during cooking to retain moisture. Do not allow plastic wrap to touch food. | |
| Thermometers Microwave safe only (meat and candy thermometers). | |
| Waxed paper Use as | as a cover to prevent splashing and retain moisture. |
INSTALLATION
Remove all packaging and protective plastics and clean the cooking compartment and accessories.
All recommendations regarding the danger of electric shock and the installation of earthing defined under the initial safety section must be observed.
The appliance is fitted with a plug and must only be connected to a properly installed earthed socket. Only a qualified technician or electrician who is familiar with the relevant regulations may install the socket or replace the connecting cable.
If the socket is no longer accessible after installation, there must be an all-pole isolating switch on the installation side with a contact separation of at least 3 mm.
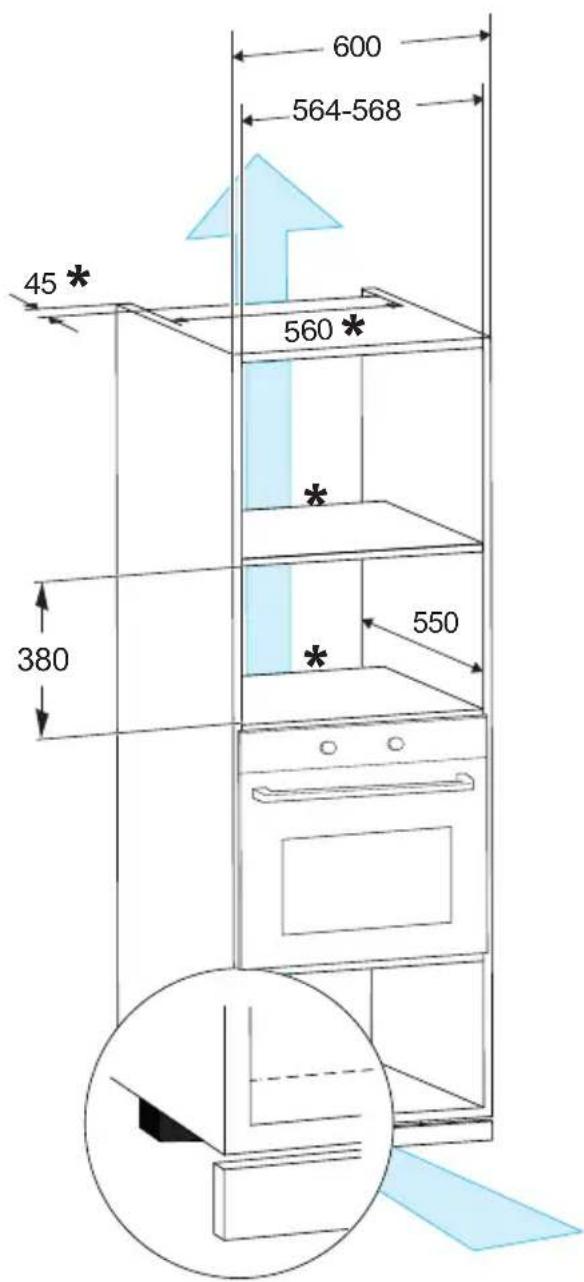
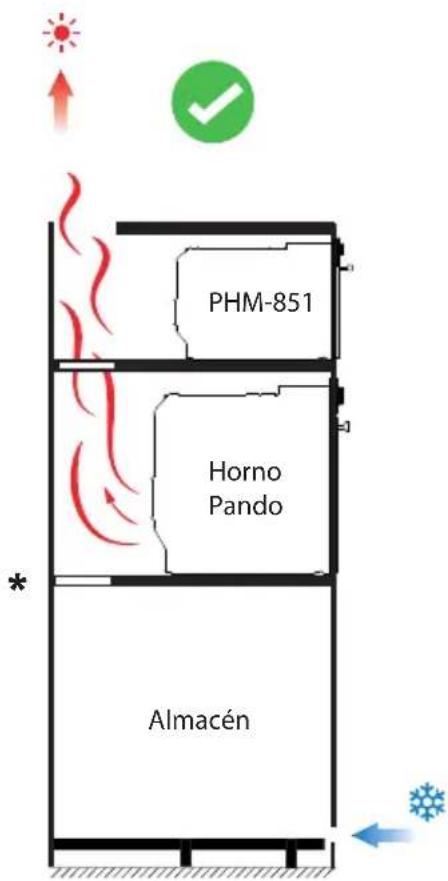
The installation cabinet must not have a rear panel behind the device. Minimum installation height: 850 mm.
DESCRIPTION OF APPLIANCES
(In case of differences between the appliance and the pictures of this product, the product shall prevail).
Remove the oven and all materials from the carton and oven cavity. Your oven comes with the following accessories:
Glass Tray

natural_image
Simple line drawing of a circular tray with four small objects at the center (no text or symbols)Rotating ring assembly


Instruction manual

natural_image
Simple line drawing of a circular metal grate with three legs and a central handle (no text or symbols)Rotating shaft

Sucker
Grill Rack( Can not be used in microwave function and must be placed on the glass tray )
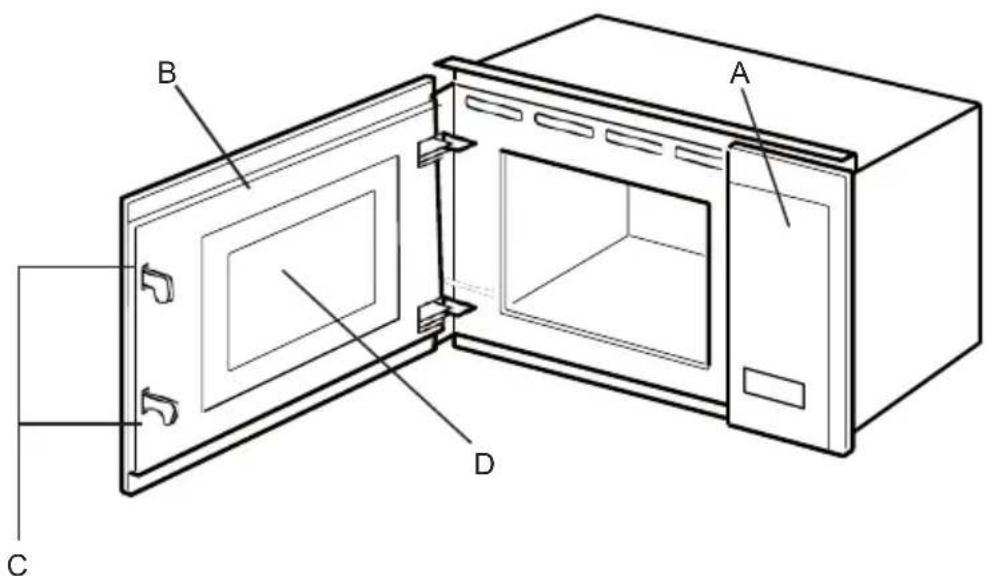
a. Control panel
b. Door mounting
c. Safety interlock system
d. Viewing window
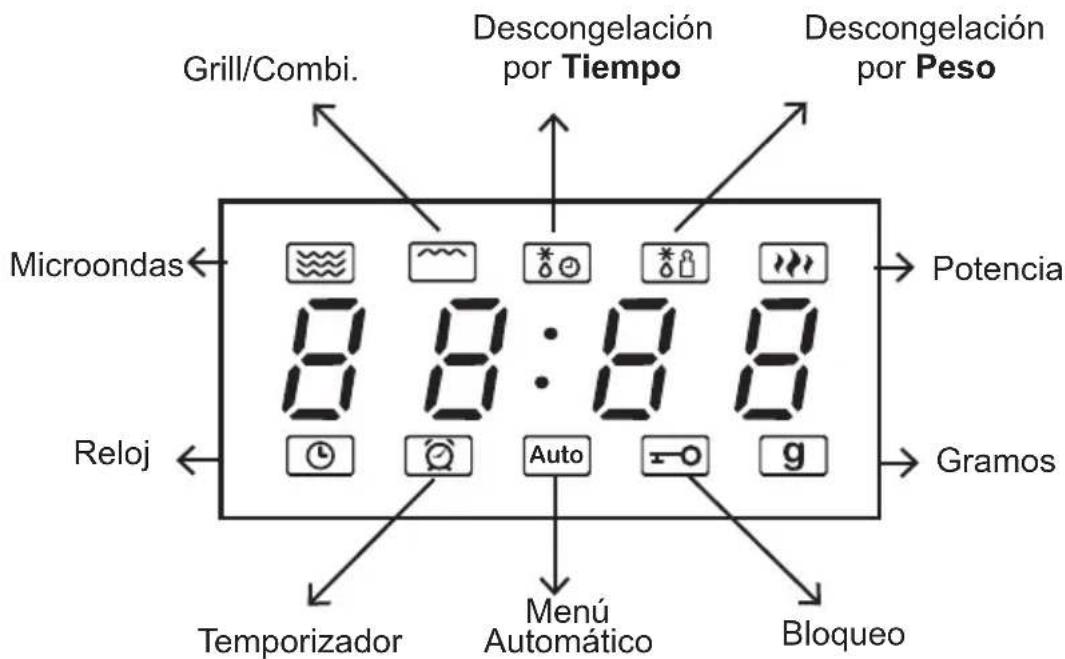
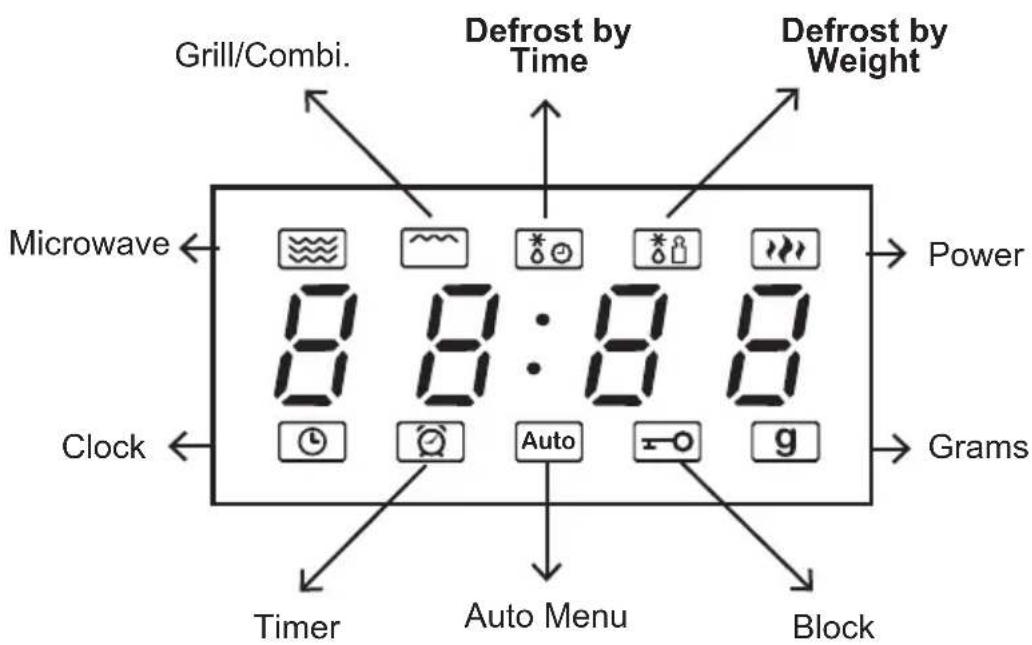
DISPLAY

Microwave

Kitchen Timer/Clock

Grill/Combi.


Weight Defrost

Stop/Clear

Time Defrost

Start+30Sec./Confirm.
Ventilation slots and air intakes must not be covered.
- This oven is designed for built-in use only. It is not designed for use on a worktop or inside a closed cabinet.
- The mains voltage must correspond to the voltage indicated on the rating plate.
- The appliance may be installed in a high wall cabinet with an open width of 60 cm.
- Adaptors, multidirectional power strips and extension leads must not be used. Overloading may cause a fire hazard.
Installation Instructions
Components:

natural_image
Line drawing of a microwave oven with lid and front panel (no text or symbols)
INSTALLATION A


NOTE:
• Do not cover or obstruct the rear grilles of your microwave oven.
• Do not press on or twist the power cord.

natural_image
Illustration of a box with a checkmark and airflow lines, no text or symbols present
natural_image
Diagram of a device with a warning sign inside, showing electrical connections and wiring (no text or symbols present)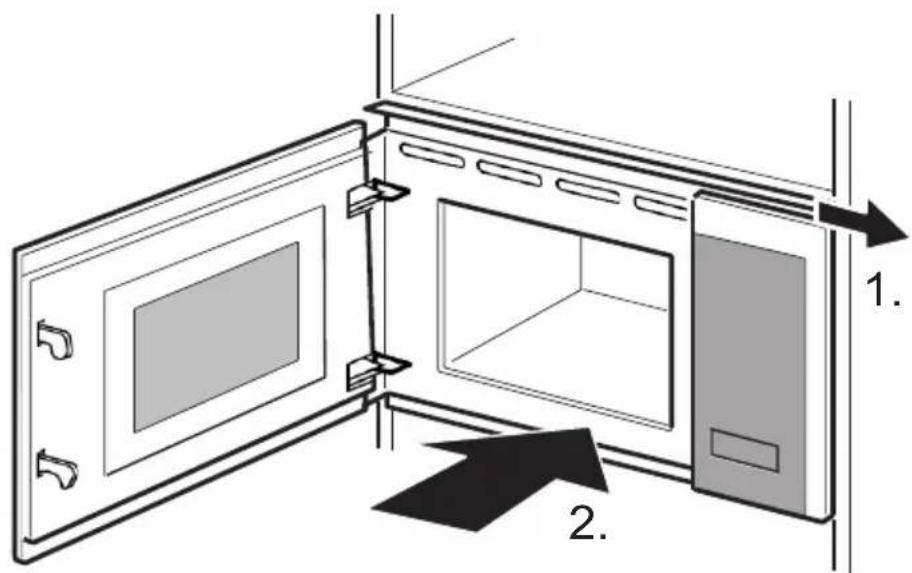


Installing the turntable
In the case of new installations, make sure that all packaging and transport tape has been removed from the rotating shaft. Fit the turntable as follows:
-
Place the rotating ring (3) in the recess in the oven compartment.
-
Place the glass tray (1) on the rotating ring assembly (3).
-
Make sure that the glass tray (1) fits on the rotating shaft (2) in the centre of the oven compartment.

- Never use the appliance without the turntable.
• Make sure that it is correctly attached.
- The turntable can rotate clockwise or counterclockwise.
- Never place the glass tray upside down. The glass tray must never be obstructed.
- All food and food containers are always placed on the glass tray.
- If the glass tray or the turntable ring cracks or breaks, contact the nearest authorised service centre.
OPERATION
This microwave oven uses a modern electronic control to adjust the cooking parameters to better suit your cooking needs.
1. Setting the clock
When the appliance is switched on, the microwave oven will show "0:00" on the display, and a buzzer will sound. The microwave oven will enter standby mode.
-
Press the "Kitchen Timer/Clock" icon twice, and the hour digits will flash.
-
Press " A or " " to set the hour digits, the entered time must be between 0-23.
-
Press "Kitchen Timer/Clock" icon again to confirm, the minute digits will flash.
-
Turn " or " to set the minute digits, the entered hour must be between 0-59.
-
Press "Kitchen Timer/Clock" to finish setting the clock. " : " will flash. The current time will be displayed.
2. Cooking with microwave
- Press "Microwave" key once to display "P100".
- Press "Microwave" repeatedly or press "^" or "▼" to select the microwave power. "P100", P80", "P50", "P30", "P10" will be displayed in order.
- Press "Start / +30Sec. / Confirm" to confirm the setting.
- Press "or" to set the cooking time. (The maximum cooking time is 95 minutes).
- Press "Start / +30Sec. / Confirm" to start cooking.
Microwave power diagram:
| Microwave Powers: On Screen: | |
| High P100 | |
| Medium-High | P80 |
| Medium P50 | |
| Medium-Low P30 | |
| Low P10 | |
Use Specification:
- If the door is opened during coo-king, close the door and press "Start/+30Sec./Confirm" to continue coo-king.
- After setting the cooking program, if "Start/+30Sec./Confirm" is not pressed within 1 minute. The current time will be displayed. The setting will be cancelled.
3. Fast cooking
- In standby mode, press the "Start/+30Sec./Confirm" button to cook at 100% power level for 30 seconds. Each press of the same button can increase the cooking time by 30 seconds. The maximum cooking time is 95 minutes.
- During microwave, grill, combined cooking and defrost by time, press "Start/+30Sec./Confirm" to increase the cooking time.
- In the automatic menu and defrost by weight states, you cannot increase the cooking time by pressing "Start/+30Sec./Confirm".
- In standby state, press "to choose the cooking time. After setting the cooking time, press "Start/+30Sec./Confirm" to start microwave cooking with the lever at 100% power.
4. Child lock function
Lock: In standby status, press "STOP/Clear" for 3 seconds to enter the child lock status and the current time will be displayed if the time has been set, otherwise the display will show " [二]".
Unlock: In locked status, press "STOP/Clear" for 3 seconds, the lock is released.
5. Grill or Combi. Cooking
- Press "Grill / Combi." once and the display will show "G".
- Keep pressing "Grill / Combi." until the display shows "C-1".
- Press "Start / +30Sec. / Confirm" to confirm.
- Press " ^" or " √ to adjust the cooking time until the oven displays "10:00".
- Press "Start / +30Sec./ Confirm" to start cooking.
Combi feed instructions:
| Prog. | Microwave Power | Grill Power | |
| Grill G | 0% 100% | ||
| Combi.1 | C-1 55% 45% | ||
| Combi.2 | C-2 36% 64% |
Note: When half of the grilling time has elapsed, the oven will beep twice. This signal is warning you that you should turn the food over to ensure proper cooking, once you have done so close the door and press "Start/+30Sec./Confirm" to continue cooking. If no operation is performed, the oven will continue to operate.
6. Investigator function
- In microwave or grill and combined cooking states. Press "Miorowave " Grill/Combi" the current power will be displayed for 3 seconds.
- If the clock has been set, during the cooking state, press "Kitchen Timer/ Clock" to check the current time. It will be displayed for 3 seconds.
7. Defrost by weight
- Press "Weight Defrost" once, the display will show "dEF1".
- Press " nor " to select the weight of the food. (The weight range is 100-2000g).
- Press "start/+30Sec./Confirm" To start defrosting.
Note: after half the time has elapsed, the oven will beep twice, warning you to turn the food over. This ensures that defrosting has a better effect. Close the door and then press "Start/+30 Sec./Confirm" to continue cooking. If no operation is performed, the oven will continue to operate.
8. Time Defrost
- Press "Time Defrost" once. The display will show "dEF2".
- Press " A or " The maximum cooking time is 95 minutes.
- Press the "Start/+30Sec./Confirm" key to start defrosting.
Note: after half the time has elapsed, the oven will beep twice, warning you to turn the food over. This ensures that defrosting has a better effect. Close the door and then press "Start/+30 Sec./Confirm" to continue cooking. If no operation is performed, the oven will continue to operate.
9. Multifunction
A maximum of 2 fucnions can be set at the same time. If one of the stages is defrosting, it must be programmed in the first place. The buzzer will sound once after each stage and the next stage will start.
Note: Automatic menu and fast cooking cannot be set as one of the multiple stages.
Example: If you want to defrost the food for 5 minutes, then cook at 80% microwave power for 7 minutes. The steps are as follows:
- Press "Time Defrost" once; the display will show "dEF2"
- Press " /or" " to set the defrosting time of 5 minutes;
- Press "Microwave" once, the display will show "P100".
- Press "Microwave" repeatedly to select the microwave power until "P80" appears;
- Press "Start / +30Sec / Confirm" to confirm.
- Press "or" to set the cooking time of 7 minutes;
- Press "Start / +30Sec / Confirm" to start cooking.
10. Timer
This function is only for using your appliance as an auxiliary timer for a task you are performing. During this function your microwave will not perform any action other than a countdown.
- Press " Kitchen Timer/Clock once; the display will show "00:00"
- Press "or" to enter the time you wish to time. (The maximum time is 95 minutes).
- Press "Start / +30Sec. / Confirm" to confirm the setting.
- When the countdown reaches 0, the buzzer will sound 5 times.
If the clock (24-hour system) has been set, the display will show the current time.
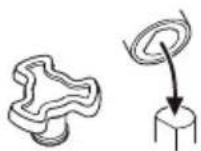
Press "AUTO" button, the oven door will open. Note: If the electric door is broken, open the oven door with the sucker as shown below.

flowchart
graph TD
    A["Device 1"] --> B["Device 2"]
    B --> C["Device 3"]
    C --> D["Device 4"]
    D --> E["Device 5"]
    E --> F["Device 6"]
    style A fill:#f9f,stroke:#333
    style B fill:#f9f,stroke:#333
    style C fill:#f9f,stroke:#333
    style D fill:#f9f,stroke:#333
    style E fill:#f9f,stroke:#333
    style F fill:#f9f,stroke:#333
12. Auto Menu
- In standby, press " ^repeatedly to select the menu.
- Press "Start/+30Sec./Confirm" to confirm the selected menu.
- Press "or" to select the weight of the food.
- Press "Start/+30Sec./Confirm" to start cooking.
| Menu Weight Power | |||
| A1 | Pizza | 200g | C-2 |
| 400g | |||
| A2 | Meat | 250g | 100% (Mic.) |
| 350g | |||
| 450g | |||
| A3 | Vegetables | 200g | 100% (Mic.) |
| 300g | |||
| 400g | |||
| A4 | pasta | 50g (with 450g cold water) | 80% (Mic.) |
| 100g (with 800g cold water) | |||
| A5 | Potato | 200g | 100% (Mic.) |
| 400g | |||
| 600g | |||
| A6 | Fish | 250g | 80% (Mic.) |
| 350g | |||
| 450g | |||
| A7 | Drink | 1 cup (about 120 ml) | 100% (Mic.) |
| 2 cup (about 240 ml) | |||
| 3 cup (about 360 ml) | |||
| A8 | Popcorn | 50g | 100% (Mic.) |
| 100g | |||
TROUBLESHOOTING
| Normal | |
| Microwave oven interferes with TV reception | Radio and TV reception may be affected by microwave oven operation. This is similar to interference from small household appliances such as blender, hoover and electric fan. This is normal. |
| Dim oven light | During low power microwave cooking, the oven light may become dim. This is normal. |
| Steam builds up in the door, hot air escapes through the vents | When cooking, steam may escape from the food. But some of it may accumulate in a cool place, such as the oven door. This is normal. |
| The oven was accidentally turned on without food inside. | It is forbidden to operate the unit without food inside. It is very dangerous. |
| Problem Possible cause Solution | ||
| The oven cannot be started. | (1) The power cord is not plugged in properly. | Unplug it. Plug it in again after 10 seconds. |
| (2) The fuse is blown or the circuit breaker is working. | Replace the fuse or reset the circuit breaker (repaired by our professional staff). | |
| (3) Problems with the socket. | Test the socket with other electrical appliances. | |
| The oven does not heat up. | (4) The door is not closed properly. | Close the door properly. |
DATA SHEET
MODEL
| INSTALLATION | PHM-851 |
| Product dimensions without front panel (H x W x D) mm) | 360 x 553 x 376.5 |
| Built-in dimensions (H x W x D) (mm) | 380 x 564-568 x 550 |
| Voltage (V) | 230 |
| Frequency (Hz) | 50 |
| Power cable (m) | 1 |
| Net Weight (kg) | 17.6 |
| BENEFITS | |
| Useful Volume 1) (L) | 25 |
| Rated output Power (Microwave) | 900W |
| CHARACTERISTICS | |
| Rated Input Power (Microwave) | 1450W |
| Rated Input Power (Grill) | 1000W |
| Digital clock | Yes |
| Interior light | Halogen |
| Keyboard Lock | Yes |
| Automatic switch-off when the door is opened | - |
| Standby mode | 0.8W |
| The maximum time needed for the microwave oven to automatically reach the applicable low power mode or condition. | 20 minutes |
PRODUCT WARRANTY
INOXPAN S.L., thanks you for choosing and placing your trust in a product of our brand Pand o, which is distinguished by its Quality, Design and Innovation, being faithful to its origins and commitments.
CONDITIONS OF GUARANTEE PANDO:
This appliance is guaranteed for 3 years from the date of purchase. This warranty exclusively covers the Pando product against any manufacturing defect that affects its proper functioning. In order for the warranty to be valid, it is essential to present the invoice or purchase receipt together with a photo of the label or registration number of the product to the Pando Authorised Service technician.
During this period, the Company undertakes to replace or repair free of charge any defective part due to a defect or manufacturing defect in the appliance, until it is working properly, as well as the necessary labour and expenses incurred as a result of such repair or replacement.
EXCLUSIONS FROM THE WARRANTY PANDO:
It will not be covered by the guarantee of the product or ind uc tion, and could be cause for cancellation of the same, and in these cases the user will be responsible for the costs of materials, labour and travel of the technical service, in the following cases:
- The installation, servicing, cleaning or maintenance of the furnace.
- If the installation of the oven has not been carried out by Authorised Professional Specialists or Official Pando
- Technical Service personnel, who comply with the requirements of safety standards and electrical power regulations.
- Any breakdown, malfunction or malfunction caused by incorrect installation or use.
- Breakdowns or damage caused by failure to observe or follow the safety instructions, recommendations for use and
- maintenance in the appliance's manuals.
- When the appliance is intended for commercial or non-domestic use, for which it is not intended.
- Malfunctioning of the product due to non-compliance with the standards, instructions and recommendations indicated in the appliance manuals.
- Breakdowns or problems caused by an inadequate installation, or by not having the required free spaces in the furniture and indicated in the installation manual, for adequate ventilation of the product.
- Breakdowns or damage caused by transport or transfer, and handling of the appliance by unauthorised personnel not authorised by this company or the Pando brand.
- Bumps, dents, scratches or scrapes, broken glass.
- Presence of foreign bodies foreign to the device, inside or outside the product.
- The technician does not have easy access to the product, because there are elements that prevent easy and safe access. The means required for the authorised Pando technician to access the device are the responsibility of the user.
- Improper handling of the wiring and connections of the oven.
- Aesthetic components, wear and tear, such as light screens, lamps, trays, grills, guides.
- Rust, burns, stains or discoloration of the body, door, fittings or interior cavity resulting from improper maintenance or use, or from improper application or unprotected exposure to corrosive elements such as cleaning agents not recommended by the manufacturer and unsuitable cleaning agents.
- Breakdowns or damage caused by variations in the electricity supply or fortuitous and natural causes of atmospheric or geological origin such as storms, lightning, earthquakes, floods, etc.
- Appliances from resale, second hand, trade-in or exhibitions that are more than three years old from the date of manufacture.
INOXPAN, S.L., is expressly excluded from any liability for any direct or indirect damage to persons or things caused by a product improperly installed, handled, used and/or maintained.
Official Autorizado Pando Technical Service Contact Data:
| ESPAÑA, PORTUGAL AND ANDORRA OTHER COUNTRIES: | |||
| www.pando.es/asistencia-tecnica/ |  | https://www.pando.es/en/after-sales-services/ |  |
Pol. Ind. El Cros
SERVICIO POST VENTA España, Portugal y Andorra

Environmental Management System Certification
UNE-EN ISO 14001:2015
ES20/208675


- Pando
- integralcooking
- PHM - 851
- The Global Kitchen Partner
- DEL MEDIOAMBIENTE Y TRATAMIENTO DEL RESIDUO
- NOTA:
- PROTECTION DE L'ENVIRONNEMENT ET TRAITEMENT DES DÉCHETS
- REMARQUE :
- GARANTIE DES PRODUITS
- ENVIRONMENTAL PROTECTION
- ENVIRONMENTAL PROTECTION AND WASTE TREATMENT
- INDEX
- SAFETY
- Precautions to avoid harmful microwave exposure:
- Reduce the danger: Installation of earthing.
- Electric Shock Hazard:
- CLEANING
- SUITABLE AND NOT SUITABLE UTENSILS
- INSTALLATION
- DESCRIPTION OF APPLIANCES
- DISPLAY
- Installation Instructions
- NOTE:
- Installing the turntable
- OPERATION
- Setting the clock
- Cooking with microwave
- Use Specification:
- Fast cooking
- Child lock function
- Grill or Combi. Cooking
- Investigator function
- Defrost by weight
- Time Defrost
- Multifunction
- Timer
- Auto Menu
- TROUBLESHOOTING
- PRODUCT WARRANTY
- CONDITIONS OF GUARANTEE PANDO:
- EXCLUSIONS FROM THE WARRANTY PANDO:
Brand : Pando
Model : PHM851
Category : Plate warmer