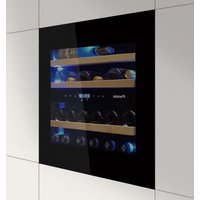
PVMAV 60-25 - Wine cellar Pando - Free user manual and instructions
Find the device manual for free PVMAV 60-25 Pando in PDF.


| Product type | Built-in wine cellar |
| Brand | Pando |
| Model | PVMAV 60-25 |
| Bottle capacity | 25 bottles (0.75 L) |
| Temperature zones | 2 independent zones |
| Temperature range | 5 °C to 20 °C |
| Dimensions (H × W × D) without handle | 595 × 592 × 559 mm |
| Dimensions with handle | 595 × 592 × 599 mm |
| Recessed dimensions | 589 × 555 × 545 mm |
| Net volume | 63 L |
| Energy class | A (G according to new 2021 standard) |
| Annual consumption | 131 kWh/year |
| Noise level | 39 dB(A) |
| Supply voltage | 220-240 V ~ 50 Hz |
| Total power | 100 W |
| Refrigerant type | R600a |
| Inverter compressor | No |
| Interior lighting | Blue LED, 12 light points (0.6 W) |
| Door | UV-filtering triple tempered glass, not reversible |
| Shelves | 3 sliding beech wood shelves + 1 fixed shelf |
| Defrost | Automatic |
| Humidity control | Water tank (optional manual adjustment) |
| Heating | Yes, for low temperature maintenance |
| Alarms | Open door and temperature exceeding |
| Special functions | Dynamic climate mode, silent mode, Display OFF mode, Eco Demo mode |
| Installation | Column built-in / integrated, integrated front ventilation |
| Warranty | 3 years (according to conditions) |
Frequently Asked Questions - PVMAV 60-25 Pando
User questions about PVMAV 60-25 Pando
0 question about this device. Answer the ones you know or ask your own.
Ask a new question about this device
Download the instructions for your Wine cellar in PDF format for free! Find your manual PVMAV 60-25 - Pando and take your electronic device back in hand. On this page are published all the documents necessary for the use of your device. PVMAV 60-25 by Pando.
USER MANUAL PVMAV 60-25 Pando
integral WineCellar
Pando
integralcooking
WINE CAVINETS
PVMAV 45-18
PVMAVP 45-18
PVMAV 60-25
PVMAVP 60-25
PVMAV 88-49
PVMAVP 88-49
PVMAV 124-70
PVMAVP 124-70
PVMAV 178-112
PVMAVP 178-112
PBE182-190
PBE 89-66
PVMB15-7
PVMB 30-16
PVMB 40 -28
PVMBP-HD 40-28
PVMB 60 -53
PVMBP 60-45
PVMBP-HD 60-45
ES
User and installation manual Guarantee certificate
+ info
IT
natural_image
Interior view of a dual-chamber refrigerator with shelves stocked with wine bottles, showing open doors and wiring (no visible text or labels)VISTA FRONTAL
VISTA LATERAL

AVISO
natural_image
Technical line drawing of a mechanical assembly with screws and fasteners (no text or symbols)• PVMB 15-7
• PVMB 30-16
• PVMB 40-28
• PVMBP-HD 40-28
• PVMB 60-53
• PVMBP 60-45
• PVMBP-HD 60-45
• PBE 182-190
• PBE 89-66
natural_image
Diagram of a cabinet with open door and internal shelves, showing structural components (no text or symbols)- PVMAV 45-18
• PVMAVP 45-18 - PVMAV 60-25
- PVMAVP 60-25
• PVMAV 88-49
• PVMAVP 88-49 - PVMAV 124-70
• PVMAVP 124-70
• PVMAV 178-112
• PVMAVP 178-112
natural_image
Two black double-chamber refrigerator units with horizontal shelves and circular vented seating (no visible text or labels)ESQUEMA – BISAGRA PROFESIONAL INTEGRADA CON CIERRE "SOFT"
ATENCIÓN
natural_image
Display shelf with glass dominoes and a dark control panel labeled 'Pando' (no readable text on domino or background)natural_image
Technical line drawing showing two views of a mechanical assembly with rollers and a moving component (no text or symbols)3.11. ANGULOS LATERALES EMBELLECEDORES (OPCIONAL)

1
natural_image
Simple line drawing of a Y-shaped structure with a folded paper clip and a circular frame (no text or symbols)2
natural_image
Isometric line drawing of a 3D cube with two vertical supports and directional arrows indicating movement (no text or symbols)natural_image
Simple line drawing of a rectangular block with an arrow indicating clockwise motion and a circular symbol inside (no text or labels)5.3. ESTANTERIAS
natural_image
Technical line drawing of two mechanical components with ribbed bases and mounting holes (no text or symbols)natural_image
Line drawing of a rectangular box placed on a grid base (no text or symbols)natural_image
Diagram of a circular grid pattern with bidirectional arrows on both sides (no text or symbols)6.4. CORTES DE ENERGÍA ELÉCTRICA
natural_image
Interior view of a black refrigerator with multiple wine bottles on shelves and open door (no visible text or labels)VISTA FRONTAL
VISTA LATERAL
natural_image
Simple line drawing of a vehicle with a cross symbol, enclosed in a circle (no text or labels)
AVISO
natural_image
Technical line drawing of a mechanical bracket with screws and arrows indicating assembly or movement (no text or symbols)- PVMB 15-7
- PVMB 30-16
- PVMB 40-28
- PVMBP-HD 40-28
- PVMB 60-53
- PVMBP 60-45
- PVMBP-HD 60-45
• PBE 182-190 - PBE 89-66
natural_image
Diagram of a cabinet with open door and shelf, showing internal components and arrows indicating movement (no text or symbols)- PVMAV 45-18
- PVMAVP 45-18
- PVMAV 60-25
- PVMAVP 60-25
- PVMAV 88-49
• PVMAVP 88-49 - PVMAV 124-70
• PVMAVP 124-70
• PVMAV 178-112
• PVMAVP 178-112
natural_image
Two black wine cabinets with white and beige shelves, no visible text or labelsATENÇÃO
natural_image
Display shelf with dark glass beads and a label 'Plano' at the bottom (no other text or symbols visible)
natural_image
Display shelf with dark glass objects and a digital display showing 'Pensau' (no readable text or symbols on objects)3.9. BASE DE VIDRO
SOMENTE PARA MODEOS:
PBE 182-190CRR
PBE 89-66CRR
natural_image
Technical line drawing showing two views of a mechanical assembly with rollers and a directional arrow (no text or symbols)3.11. ÂNGULO LATERAIS DE TRIM (OPCIONAL)

natural_image
Simple line drawing of a horizontal bar with label '2X' (no other text or symbols)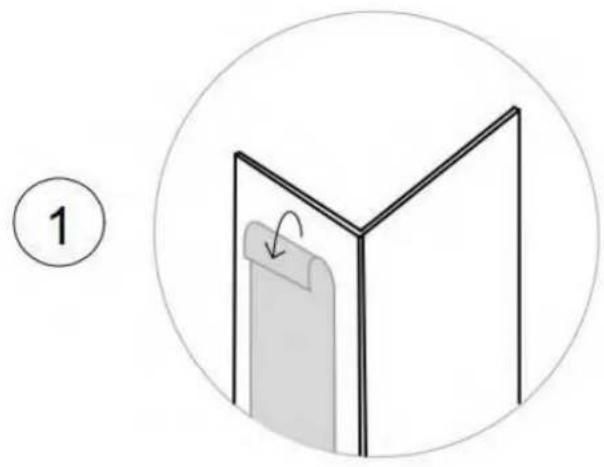
natural_image
Diagram of a 3D object with a curved arrow indicating rotation, enclosed in a circle (no text or symbols)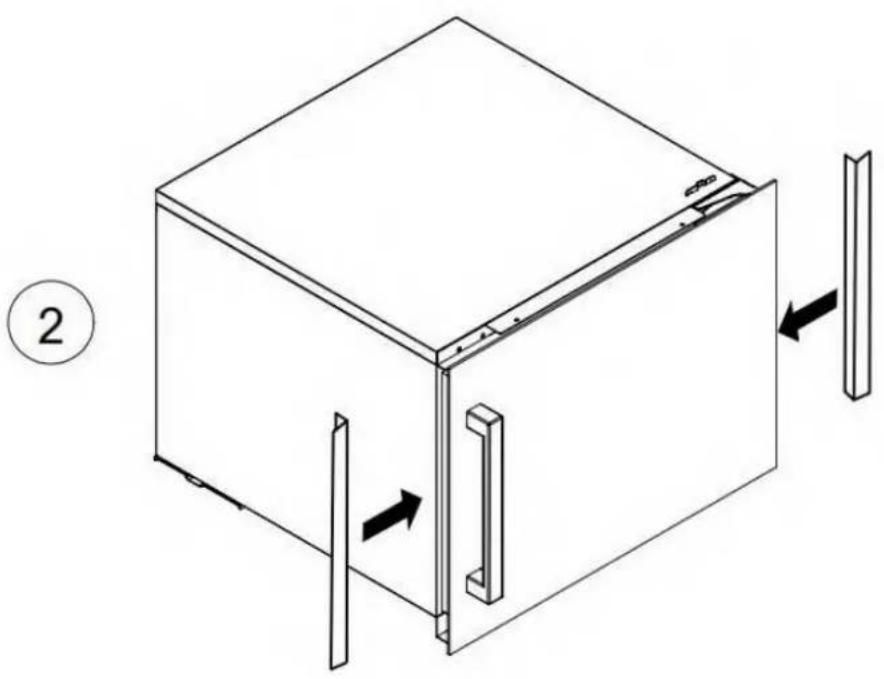
natural_image
Isometric line drawing of a 3D cabinet with two vertical supports and directional arrows indicating movement (no text or symbols)PAINEL INDICADOR LUMINOSO (DISPLAY)
natural_image
Simple line drawing of a rectangular frame with an arrow indicating clockwise motion (no text or symbols)5.3. PRATELEIRAS
natural_image
Technical line drawing of two rectangular metal profiles with mounting holes (no text or symbols)natural_image
Line drawing of a rectangular box placed on a wooden platform (no text or symbols)natural_image
Diagram of a circular grid pattern with bidirectional arrows on both sides, no text or symbols present.6.4. CORTES DE ENERGIA ELÉTRICA
2. CARACTERISTIQUES DU PRODUIT
natural_image
Interior view of a server rack unit with multiple circular components and a close-up of the door (no visible text or labels)VUE DE CÔTÉ
VUE DE FACE

REMARQUER
natural_image
Technical line drawing of a mechanical bracket with multiple screw fasteners and directional arrows indicating movement (no text or symbols)natural_image
Diagram of a cabinet with open door and internal shelves, showing structural components (no text or symbols)• PVMAV 45-18
• PVMAVP 45-18
- PVMAV 60-25
• PVMAVP 60-25
- PVMAV 88-49
• PVMAVP 88-49
• PVMAV 124-70
• PVMAVP 124-70
• PVMAV 178-112
• PVMAVP 178-112
natural_image
Two identical black beverage cabinets with white and beige panels, no visible text or symbols.DIAGRAM – CHARNIÈRE PROFESSIONNELLE INTEGRÉE AVEC LA FERMETURE "SOFT"
ATENTION
3.9. SOCLE DE VERRE (OPTIONNEL)
SEULEMENT POUR LES MODÈLES :
• PBE 182-190CRR
- PBE 89-66CRR
natural_image
Technical line drawing showing two views of a mechanical assembly with circular components and directional arrows (no text or symbols)3.11. ANGLES DE GARNITURE LATÉRALE (EN OPTION)
4. INSTRUCTIONS DE FONCTIONNEMENT

natural_image
Hand interacting with a multi-tiered refrigerator labeled 'Pando' (no other text or symbols visible)natural_image
Simple line drawing of a rectangular block with an arrow indicating clockwise motion (no text or symbols)5.3. PLATEAUX
natural_image
Technical line drawing of two rectangular metal profiles with slats and mounting holes (no text or symbols)5.4. BRUITS DE FONCTIONNEMENT
natural_image
Line drawing of a rectangular box placed on a wooden platform (no text or symbols)6.2. NETTOYAGE DE L'APPAREIL
natural_image
Diagram of a circular grid pattern with directional arrows, no text or symbols present6.4. COUPURES ÉLECTRIQUES
First of all we wish to thank you for the trust shown on our Company by purchasing one of our products. We are sure you have made the right choice.
In Pando, not only we offer first quality products, but also we make available a large professional team to serve and assist you on any query you may have regarding installation and/or performance.
We also suggest you to pay a visit to our web site (www.pando.es/en) to get to know us better and where you will find all product range containing all necessary commercial and technical information.
A wide selection of extractor hoods can be found there; Wall Hoods, Ceiling, Island or Canopy Hoods. Four types of installation making possible to adapt ourselves to any type of kitchen based on different needs.
At the same time, we take the opportunity to introduce you our collection of in house essential appliances, such our new high performance Ovens and Microwaves, Induction and Gas Hobs to make real your best recipes. Wine Coolers and Aging Wine Coolers to maintain and keep your wines in best of conditions and built-in Dishwashers with latest technology.
All that under a brand with over 40 year history in the market, making products like a real craftsman, and gathering in them the best of our experience to please all your needs.
We sincerely look forward you to have fun, experience and enjoy with the comfort and capacity of what already became your new kitchen ally.
Many Thanks
The PANDO Team
- SAFETY ....131
- PRODUCT CHARACTERISTICS....135
- INSTALLATION ....136
3.1. Before using the appliance....136
3.2.Installation....136
3.3. Instructions for fitting under a worktop....138
3.4. Assembly instructions in column / integrated 139
3.5. Electrical connection 140
3.6. Fitting the handle....140
3.7. Set and secure the unit to the furniture....141
3.8. Reversible optional door....142
3.9. Glass plinth (optional)....144
3.10. Bordeaux bottle holder (optional)....144
3.11. Side trim angles (optional)....145
-
OPERATING INSTRUCTIONS....146
-
USE AND OPERATION ....147
5.1. Use and operation....147
5.1.1. Control panel 147
5.1.2. Shelves and storage 152
5.1.3. Dynamic climate mode / silent mode ( energy saving) .....153
5.1.4. Display off mode....153
5.1.5.Eco demo mode....154
5.2. Push automatic opening function .....155
5.3. Shelves 156
5.4. Noise in operation 156
5.5. Defrosting / humidity/ ventilation....157
5.6. Table with wine serving temperatures ..... 158
- CARE AND MAINTENANCE....159
6.1. Humidity control 159
6.2. Cleaning the unit.... 159
6.3. Activated charcoal odor filter 160
6.4. Power cuts 160
6.5. During holidays/ long absence....161
6.6.Moving the unit / changing location 161
6.7. Advices for saving energy 161
- TROUBLESHOOTING ....162
- FAQ's (Frequently Asked Questions)......164
- TECHNICAL SPECIFICATIONS ......166
- AFTER SALES TECHNICAL SERVICE AND GUARANTEE....170
- INSTALLATION DIAGRAMS AND DIMENSIONS ....297
- BOTTLES DISTRIBUTION....322
1. SAFETY
When using an electrical appliance, certain precautions must be taken to reduce the risk of fire, electric shock and injury, including the following:
FOR YOUR SAFETY
Please read the instructions carefully, even if you are very familiarized with the device.
- This appliance is designed to be used for wine storage. Please use it only as described in this manual. Other non-recommended uses could cause fires, electrical shock or injuries.
- This appliance can be used by children aged 8 or over and people with physical, sensorial or mental disablement or with a lack of experience and knowledge, if they have been instructed on the safe use of the appliance and understand the risks, or they are supervised. Children must not play with the appliance. Cleaning and maintenance must not be done by unsupervised children.
- In compliance with IEC standards: This appliance is not designed to be used by people (including children) with reduced physical, sensorial or mental capacity or with a lack of experience and knowledge, unless they are supervised or instructed on the use of the appliance by a person responsible for their safety. Ensure that children do not play with the appliance.
- Electrical appliances are not toys. Always keep the appliance out of the reach of children. Keep the electric power cable out of the reach of children. Do not let the mains cable hang over the edge of a table or worktop where the appliance has been located.
- Children aged from 3 to 8 years are allowed to load and unload refrigerating appliances.
- To avoid electrical shocks, DO NOT SUBMERGE the unit, the cable or the plug in water or spray any liquid onto it.
- Unplug the appliance from the mains socket when not in use, when it is moved from one place to another and before cleaning it.
- To disconnect the appliance, hold the plug and pull it out of the mains socket. Never pull the cable.

WARNING: Please keep the appliance distant from inflammable substances. Do not connect the appliance in the presence of explosive and/or inflammable gases.

- Do not place this appliance or any of its parts close to an open flame, cooker or a heating device.
- Do not use the appliance if the electric cable or plug is damaged, if it does not work or if it has fallen or suffered any other type of damage. If the power cable is damaged, it must be replaced by the manufacturer, an after-sales service, or qualified personnel, to avoid hazards.
- The use of accessories not recommended by the manufacturer could be dangerous.
- Place the unit on a dry and level surface.
- Do not start the appliance if the casing is removed or damaged.
- A bad connection between the mains AC socket (in the wall) and the plug could cause overheating and deform it. Contact a qualified electrician to replace the wall socket if it is loose or damaged.
- Place the unit out of direct sunlight and sources of heat (stove, heater, radiator, etc.)
- WARNING: This appliance is free from CFC and HFC gases and contains small amounts of isobutane (R600a), which is respectful with the environment, but it is inflammable. It does not damage the ozone layer, nor does it add to the greenhouse effect. During transport and start up, make sure no parts of the refrigeration system are damaged. Leaks of coolant are inflammable and could harm eyes.
In case of damage:
- Avoid open flames and anything that could cause sparks
- Disconnect from the mains
- Ventilate the room where the appliance is located for some minutes and contact the Technical Assistance Service for advice.
In case of a coolant leak, if the appliance is in a small room, there is a risk that the gases could spread around the room. For each 8g of coolant, at least 1 cubic meter of space is required. The amount of coolant contained in the appliance is indicated on a specifications plate placed inside the appliance. It is dangerous for anyone who is not an authorized technician to carry out maintenance or repairs on this appliance.
WARNING: Keep the ventilation openings in the appliance or the integrated structure unobstructed. The manufacturer will not accept liability for damage caused by misuse or as a result of repairs made by unauthorized personnel. This will also void the guarantee and any other claim for liability.
WARNING: Do not use mechanical means or utensils to accelerate the process of defrosting except those recommended by the manufacturer.
WARNING: Do not damage the cooling circuit. Never use the appliance if the cooling circuit has been damaged.
WARNING: Do not use any electrical appliance inside the food compartment of the unit unless it is recommended by the manufacturer.
WARNING: To avoid danger caused by instability, the unit must be secured as indicated in the instructions.
WARNING: Please keep the unit away from fire or corrosive substances when installing.
WARNING: DO NOT store explosive substances such as aerosol cans with inflammable propellant in this unit.
WARNING: When position the appliance, ensure the supply cord is not trapped or damaged.
WARNING: Do not locate multiple portable socket-outlets or portable power supplies at the rear of the appliance.
To avoid contamination of food, please respect the following instructions:
- Opening the door for long periods can cause a significant increase of the temperature in the compartments of the appliance.
- Clean regularly surfaces that can come in contact with accidental spills of liquids.
- If the refrigerating appliance is left empty for long periods, switch off, defrost, clean, dry, and leave the door open to prevent mould developing with the appliance.
-
The wine cellar is not intended for food preservation. The recommended use is for the conservation of bottled liquids.
-
This appliance is designed for DOMESTIC use, IT IS NOT recommended for INDUSTRIAL use.
- Do not try to repair or replace any component of the unit unless specifically recommended in this manual. Any other servicing must be carried out by authorized technicians.
- Replace all the panels after servicing and before starting up the unit.
- The unit should be moved by two or more people. Trying to move it with one person could cause back and/or other lesions.
- Never clean the parts of this appliance with inflammable liquids. Vapours could cause a fire or an explosion. Do not store petrol or any other inflammable liquid in the proximity of the unit. Vapours could cause a fire or explosion.
- Do not plug in or unplug the appliance with wet hands.
- A separate circuit supplying this appliance is recommended. Use an unswitched mains socket.
- If you use a lock, do not keep the keys close to the appliance or within the reach of children.
WARNING: To reduce the risk of fires, electrical shocks or injuries, unplug or disconnect the mains supply before carrying out any maintenance work.
PLEASE KEEP THESE INSTRUCTIONS AT HAND
In case of any problem, refer to the Troubleshooting guide at the end of this manual. It contains minor operation problems that can be corrected.
PACKAGING AND END OF LIFE
Packaging must be disposed of correctly. Make sure that the plastic wrapping, bags, etc. a disposed of safely and keep them out of the reach of children. Danger of suffocation!
Refrigeration equipment must be disposed of properly and professionally at the end of its life, according to local regulations and environmental legislation.
This applies to discarded appliances as well as to this unit when it has reached the end
WARNING: Make sure that old appliances cannot be used after disposal, by removing the cap, cutting the electric cable and destroying or removing any catch with springs or so. This will avoid children playing and getting trapped inside the appliance (danger of suffocat endangering their lives in any other way. DO NOT dispose of this appliance in waste dust the insulation (cyclopentane) and the coolant gas (R600a) still in the device, as they are inflammable.
Instructions for disposal:
• This appliance must not be disposed of as domesticwaste.
- The cooling circuit, especially the heat exchanger at the rear/ bottom of the unit should damaged.
The symbol on the product or its packaging indicates that this product cannot be disposed of like normal domestic waste. The product must be handed over at a collection point for recycling electrical and electronic equipment. If you ensure that this product is correctly disposed of, you will help to avoid the possible negative environmental and public health effects that could arise from incorrect disposal. For more detailed information about recycling this product, please contact your city authorities, the domestic waste service or the establishment where you purchased it. This electrical appliance is marked in compliance with European Directive 2012/19/EU on electrical and electronic appliance waste (WEEE).

ENVIRONMENTAL PROTECTION AND WASTE TREATMENT
DISPOSAL OF THE PACKAGING. The packaging is marked with in Green Dot.
In its commitment to the protection of the environment and in compliance with the provisions of the European Directive 94/62 / EC on packaging and packaging waste and the derived Law 22/2011 on Contaminated Residues and Soils, Pando entrusts entities of social economy an Integrated Management System, responsible for the periodic collection at the consumer's home or in its vicinity of used packaging and packaging waste for subsequent treatment.
To remove all packaging materials such as cardboard, expanded polyurethane, and film, use the appropriate containers.
This ensures the correct treatment and reuse of packaging materials.
2. PRODUCT CHARACTERISTICS
- Equipped with independent shelves with one, two or three temperature areas, depending on the model.
- Variable electronic temperature control with a digital screen and tactile operation.
- Temperature can be adjusted from 5^ to 20^ (41°F to 68°F) in any of the compartments and can be displayed in degrees Fahrenheit or Centigrade.
- It can be configured for long-term storage temperature or specific serving temperature for red /white/ sparkling wines.
•Cooling and heating (depending on model) for perfect storage and/or serving conditions. - A dynamic cooling compressor to guarantee air circulation inside with a uniform distribution of temperature and humidity.
- Blue LED light inside with an ON/OFF switch. Operation mode and display mode.
- Alarm system warning of malfunctioning due to open door.
- The standby mode “DISPLAY OFF” will disconnect the display lights, interior light and audible alarms. Pre-existing cooling operations will continue functioning normally.
- Temperature memory function-If the power supply is cut off (voltage surge, circuit breaker, etc.) and then reconnected, the unit will continue operating at the last selected temperature.
•Automatic defrosting with evaporation of water from defrosting. - Reversible tempered glass door, with a double/triple panel, smoked glass to protect the wine from UV light and offer an attractive presentation with little condensation and a low noise level.
- Steel external and internal body in a mat black finish with interior coating also finished in black, offering good performance, long life and stability. This mat finish avoids excessive light damaging the maturing process.
- Glass door or glass door with stainless steel frame, and with or without stainless steel handle.
- Shelves made of solid beech wood sliding out and adjustable to offer maximum convenience and flexibility to adapt to different sized bottles.
- Coolant respectful with the environment with insulating foam.
• Humidity control system (Water tank)
NOTE: Characteristics and specifications may be subject to modifications without prior notice.
3. INSTALLATION
3.1. BEFORE USING THE APPLIANCE
- Remove all the external and internal packaging. Clean the internal surfaces with a soft cloth and warm water. The unit may contain residual smells at first, these will disappear as the unit begins to cool.
- Before connecting the appliance to the mains, leave it to rest in vertical position for at least 24 hours. This will reduce the possibility of malfunctioning in the cooling system caused by transportation. During this time, it is recommended to leave the door open to dispel any residual smells.
- The door can be opened either from the left or from the right. The unit is delivered with the door opening on the left-hand side. If you wish to open the door on the right, follow the instructions in "changing the door hinges".
- Change the door handle round if necessary.
3.2. INSTALLATION
PLANS AND DIMENSIONS FOR INSTALLATION: SEE PAGES AT THE END OF THIS MANUAL.
- This appliance is designed to be installed either fitted or free-standing.
- WARNING: Do not store or install the unit in the open. This unit is designed for indoor use only.
- WARNING: Do not install the unit in a washroom area. Avoid placing the unit in damp locations.
- Place the unit on a floor with sufficient strength to bear the weight of the unit when full. To level the unit, adjust the front levelling foot at the bottom of the unit.
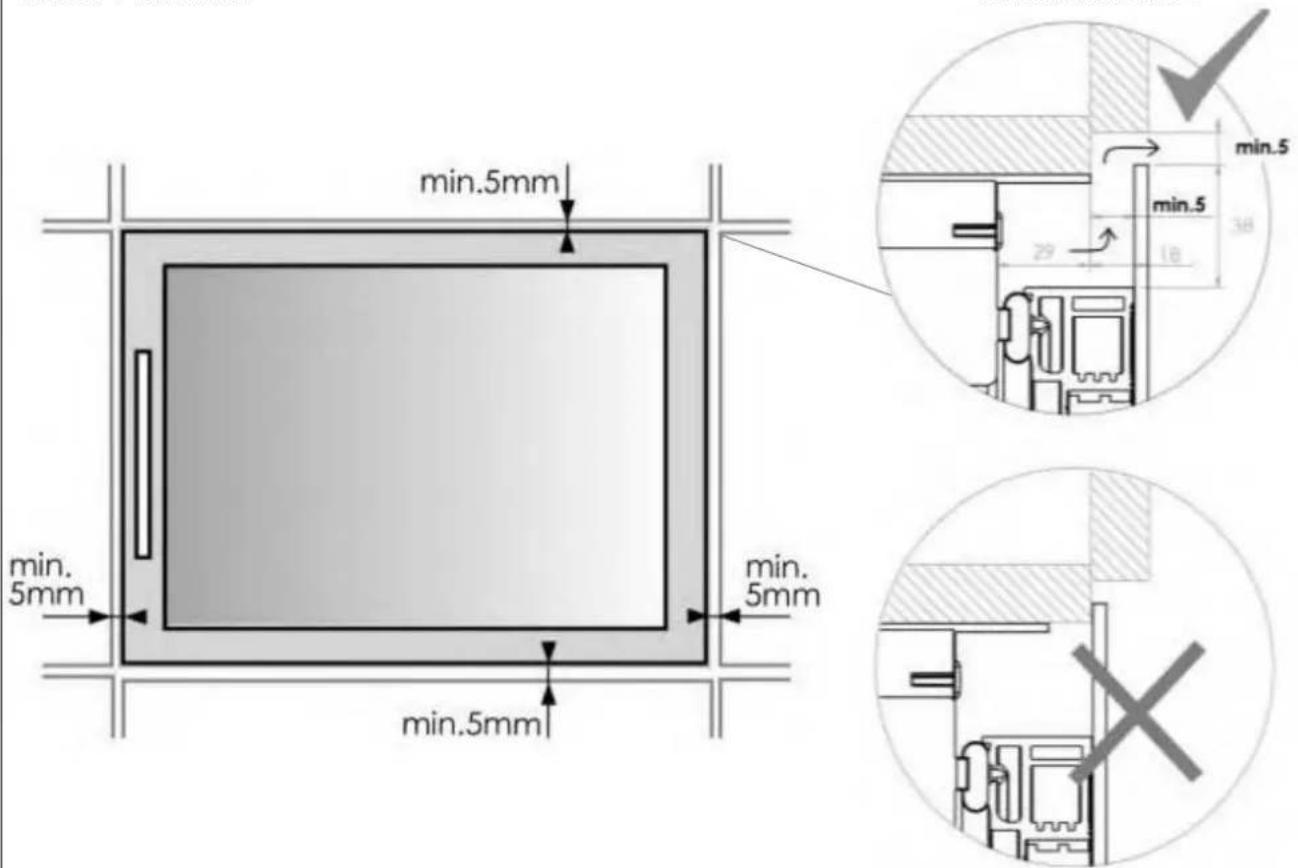
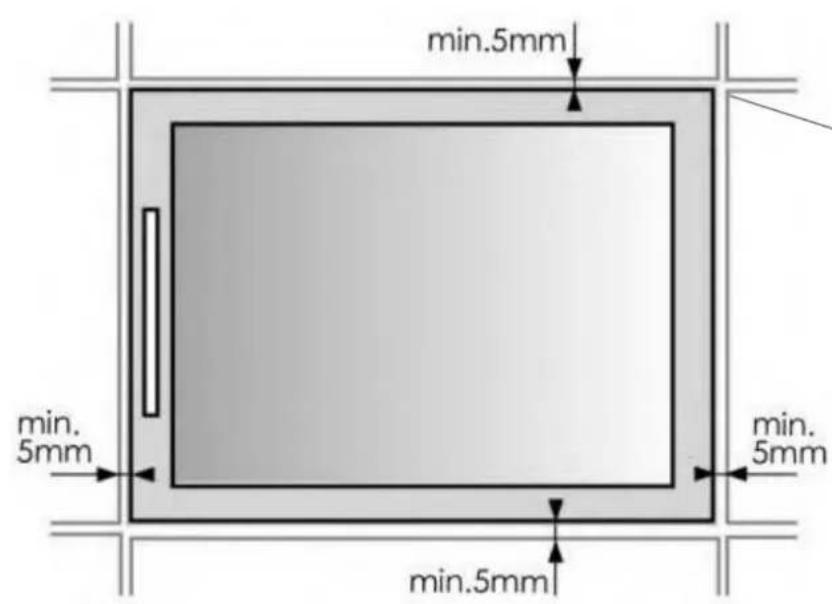
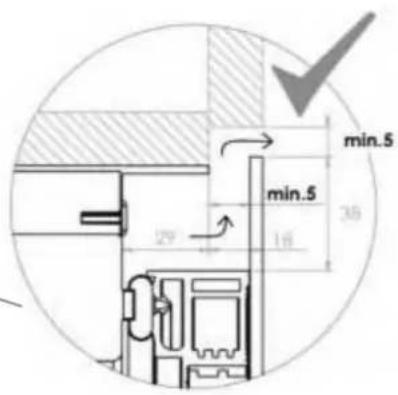
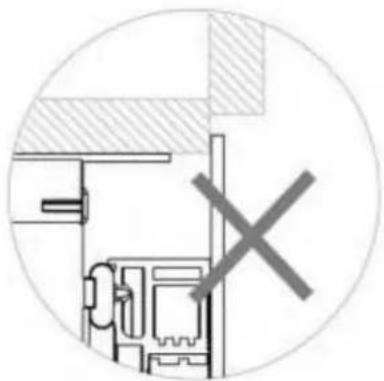
- When installing free-standing, it is necessary to leave 100 ~mm of space between the rear and sides of the unit to allow for air circulation to cool the compressor and condenser, which will save energy. When installed built-in, it is also necessary to leave 5 ~mm on each side and at the top, to guarantee adequate ventilation. Make sure that the air outlet at the front of the unit is not covered or obstructed.
- Place the unit out of direct sunlight and sources of heat (stove, heater, radiator, etc.) Direct sunlight can affect the acrylic coating and the heat of the sun can increase energy consumption. Extremely cold ambient temperatures could also cause the unit to malfunction.
- Connect the unit to an exclusive and easily accessible mains socket. Any query about power and/or ground connection should be directed to a qualified electrician or an authorised service centre.
- This device must be installed with all its electrical, plumbing and drainage connections in compliance with national and local regulations.
IMPORTANT: HIGH HUMIDITY ENVIRONMENTS
At times of high humidity, there may be some condensation on the external surfaces of the glass door. This condensation will disappear when the levels of humidity decrease. To prevent this from happening, it is recommended to install the unit in a location with sufficient ventilation, in a place with dry air or air conditioning.
NOTE: The mains plug of the unit should be accessible.
3.2.1. SEVERAL APPLIANCES INSTALLATION
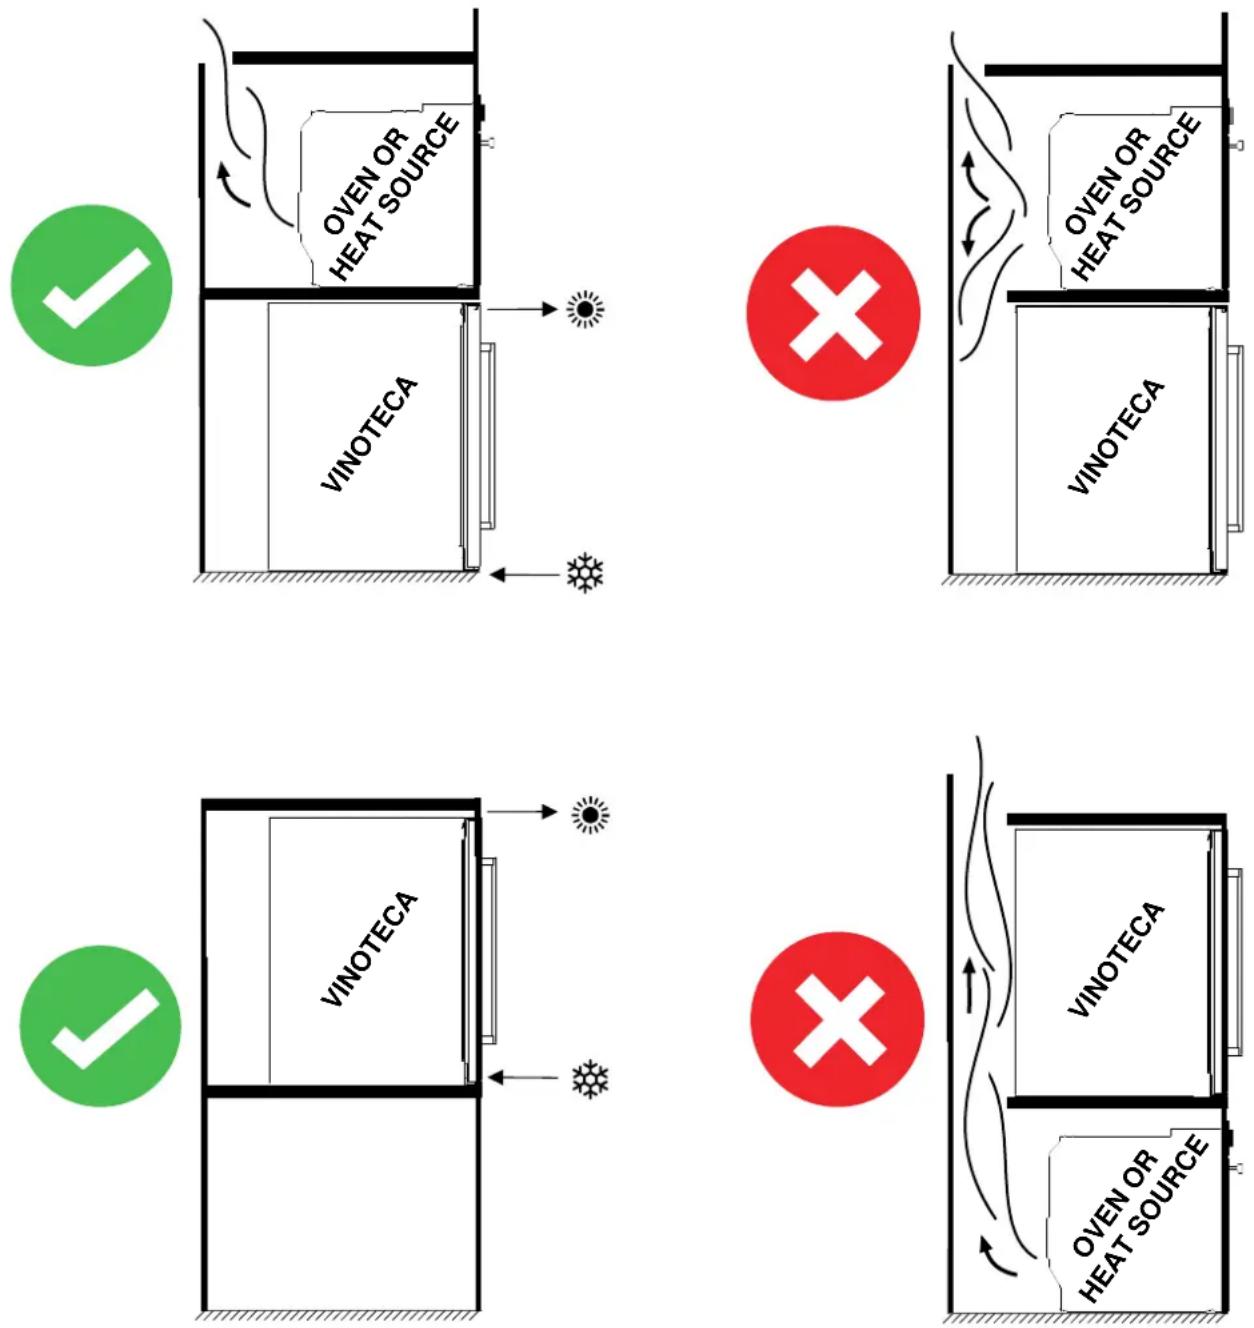
ATTENTION!: WHEN INSTALLING SEVERAL APPLIANCES SHARING SAME VENTILATION SPACE:
It is advisory that before the installation of any Pando wine cooler in a cabinet where other heat-emission appliances may also be found, all isolation and ventilation additional measurements must be taken, so that those product heating may not affect any part of the wine cooler. An inappropriate installation or isolation may trigger a wine cooler error or malfunctioning , or else side damages in the cabinet furniture, which is not covered by the manufacturer guarantee
3.3. INSTRUCTIONS FOR FITTING UNDER A WORKTOP
Only for models:
- PVMB 15-7
- PVMB 30-16
- PVMB 40-28
• PVMBP-HD 40-28 - PVMB 60-53
- PVMBP 60-45
• PVMBP-HD 60-45
• PBE 182-190
• PBE 89-66
Make sure that the installation does not obstruct the front ventilation grille. This unit is designed to fit under worktops of 820-890 mm height, using the adjustable ventilation grille to guarantee that the feet are hidden from view at the front. Remove the screws from the adjustable ventilation grille and slide it to the required height. Tighten the screws to secure the grille in its position.
If the unit is completely built-in, when fitting the kitchen skirting board, make sure that the ventilation grilles in this skirting board can dissipate at least 300 square centimetres, so the hot air can be dispersed without any obstruction. Otherwise, the unit will have to work more, increasing electricity consumption.
Also make sure that the door can open and close freely in the chosen location.
NOTE: When pushing the unit into its space, make sure that the power cable is not trapped.
3.4. ASSEMBLY INSTRUCTIONS IN COLUMN / INTEGRATED
Only for models:
• PVMAV 45-18
- PVMAVP 45-18
- PVMAV 60-25
- PVMAVP 60-25
- PVMAV 88-49
- PVMAVP 88-49
- PVMAV 124-70
• PVMAVP 124-70
• PVMAV 178-112
• PVMAVP 178-112
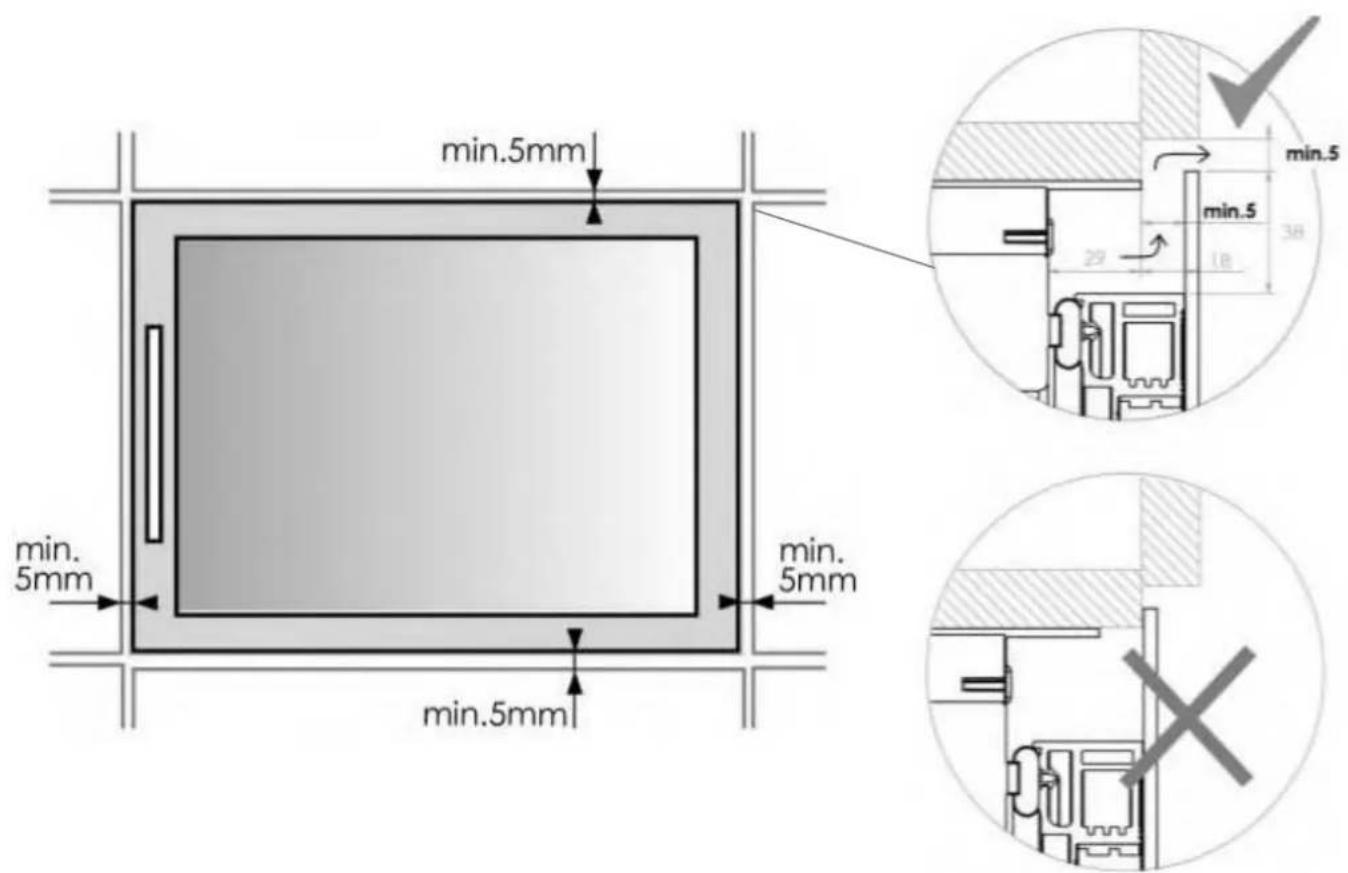
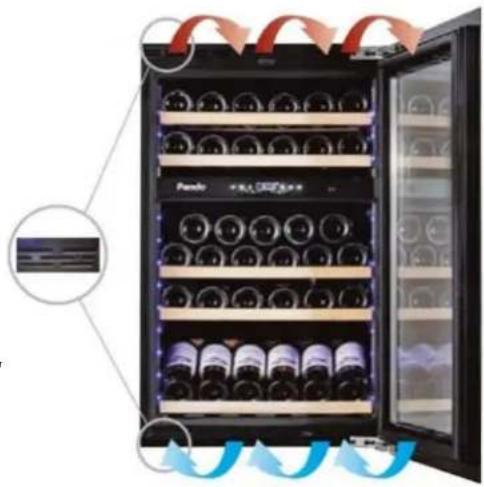
These models have incorporated an exclusive Pando integrated ventilation system, see image.
They incorporate a ventilation system in the upper and lower front, invisible with the door of the unit closed.
Do not cover or hinder the grids, keep them clean for free air circulation.
They can be mounted in the niche of the furniture / column directly, without the need for ventilation in the furniture.
natural_image
Interior view of a fully stocked wine refrigerator with shelves and glass doors, showing internal components and blue airflow arrows (no text or symbols)FRONT VIEW
SIDE VIEW
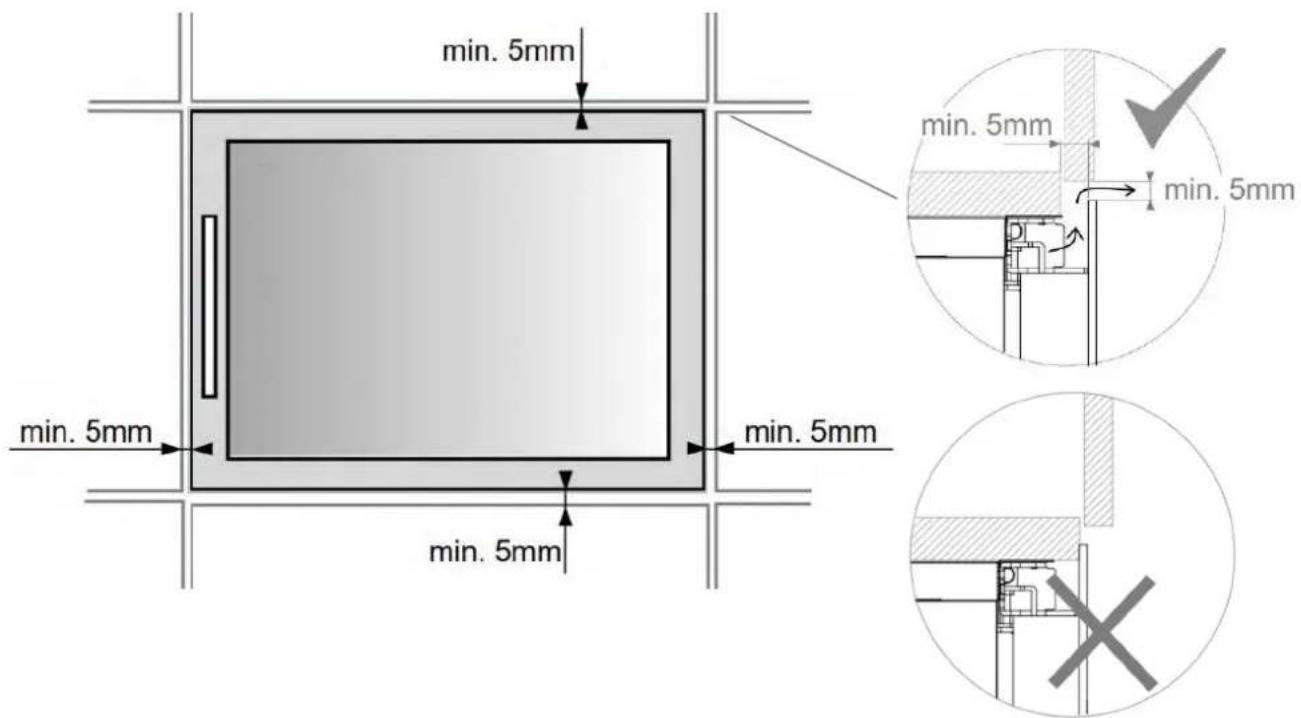
Respect the minimum front ventilation perimeter and interior (5 mm), to avoid malfunctions or product breakdowns that would NOT be covered by the warranty.
ATENTION
FOR INSTALLATION YOU CAN FIND A DETAILED DIAGRAM IN THE PAGES AT THE END OF THIS MAANUAL
3.5. ELECTRICAL CONNECTION
WARNING: Incorrect grounding of the unit may pose an electrical shock hazard. If the mains cable is damaged, it must be replaced by a qualified electrician or an authorized service center.
All electrical work must be carried out by qualified professionals, in compliance with national and local safety regulations.
Check that the voltage indicated on the unit corresponds to the voltage supplied by the mains.
Connect the unit separately to a mains socket with 13A capacity
Connection must be made to an adequate power socket that is easily accessible. For greater safety, it is recommendable to install a residual current device (RCD) with a triggering current of 30 mA.
Have a qualified electrician check the device and the circuit to ensure that the power socket is correctly connected to earth.
Note: In locations where lightning is frequent, it is recommended to use voltage surge protectors.
Do not connect the unit to the mains through an extension lead. Extension leads do not offer the necessary safety for the appliance (e.g. danger of overheating).
The unit should not be connected to an inverter and should not be used with a multiple connection socket adaptor, as this could damage the electronic unit.
The cable should be securely behind the appliance avoiding it getting entangled or hanging in an unprotected manner.
WARNING: THIS APPLIANCE MUST BE GROUNDED.
3.6. FITTING THE HANDLE
IMPORTANT: Do not tighten the screws excessively and do not use electric tools to install the handle.
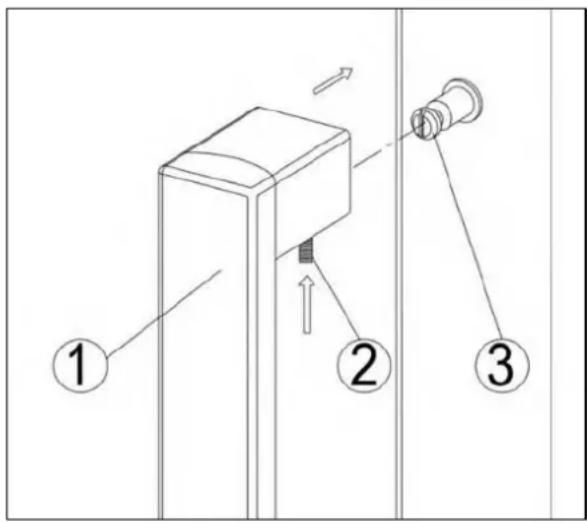
- Place the handle (1) onto the securing studs (3) of the door and tighten the grub screws (2) with an Allen key to secure the handle.
Note:
All the parts removed should be stored, in case it is required to change the door back to its original configuration.
3.7. SET AND SECURE THE UNIT TO THE FURNITURE
3.7.1 Only for models UNDER A WORKTOP:
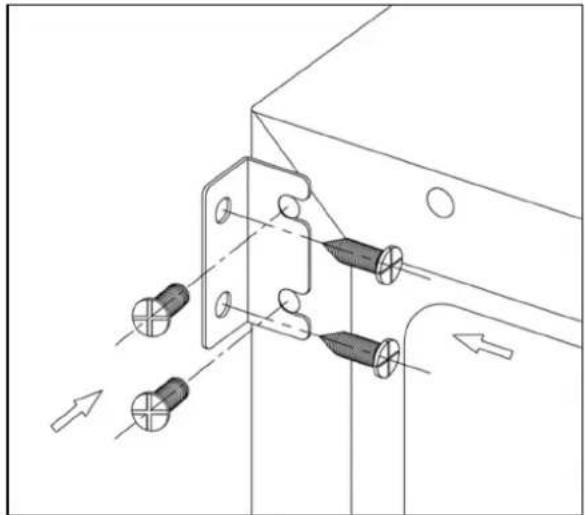
natural_image
Technical line drawing of a mechanical bracket with multiple bolted components and directional arrows indicating movement (no text or symbols)- PVMB 15-7
- PVMB 30-16
• PVMB 40-28
• PVMBP-HD 40-28
• PVMB 60-53
• PVMBP 60-45
• PVMBP-HD 60-45
• PBE 182-190
• PBE 89-66
Open the two caps of the body of the appliance on the opposite side of the hinge and secure the appliance in the niche by tightening the screws through the mounting bracket.
3.7.2 Only for models UNDER A WORKTOP:
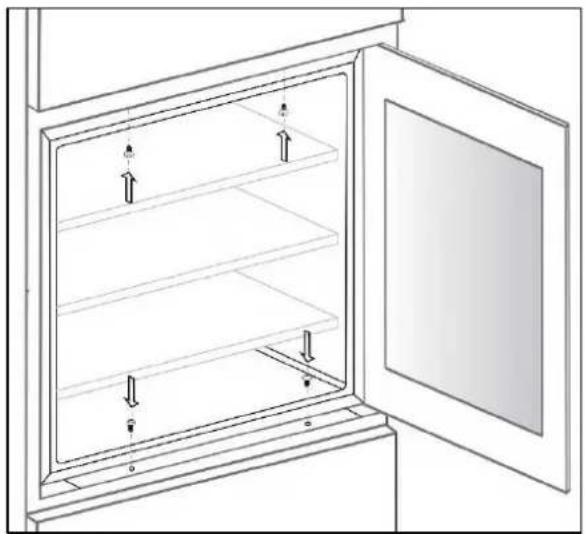
natural_image
Diagram of a cabinet with open door and shelves, showing internal components and directional arrows (no text or symbols)PVMAV 45-18
PVMAVP 45-18
PVMAV 60-25
PVMAVP 60-25
PVMAV 88-49
PVMAVP 88-49
PVMAV 124-70
PVMAVP 124-70
PVMAV 178-112
PVMAVP 178-112
Open the two caps of the body of the appliance on the opposite side of the hinge and secure the appliance in the niche by tightening the screws through the mounting bracket.
3.8. REVERSIBLE OPTIONAL DOOR
WARNING: The side on which the door opens should be indicated at the moment of purchasing the unit, as this must be done by specialized personnel. It can be modified in the future, please consult with our After-sales Service.
DIAGRAM – MODELS FITTED UNDER A WORKTOP
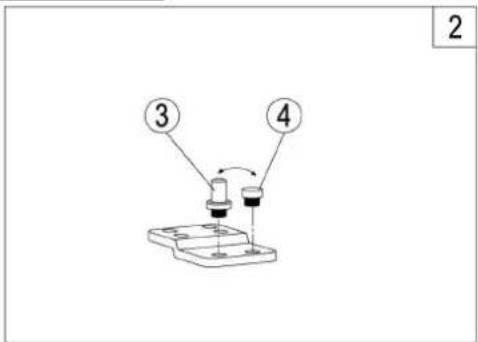
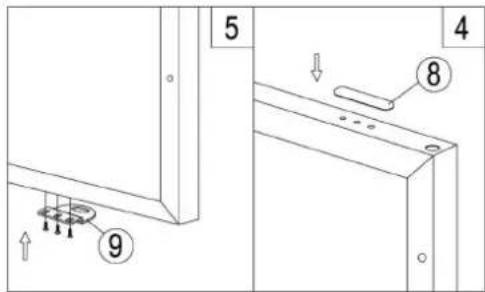
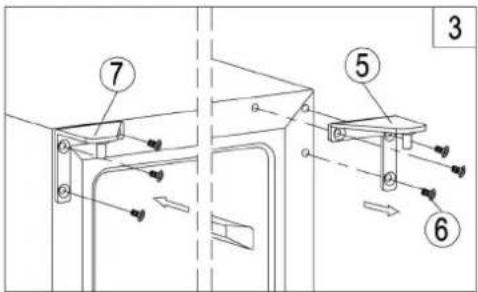
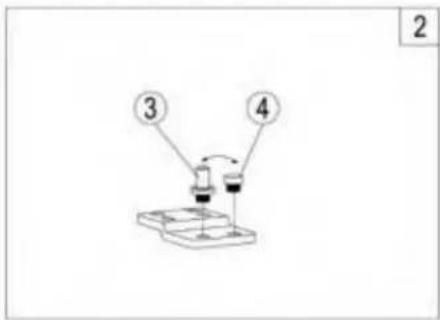
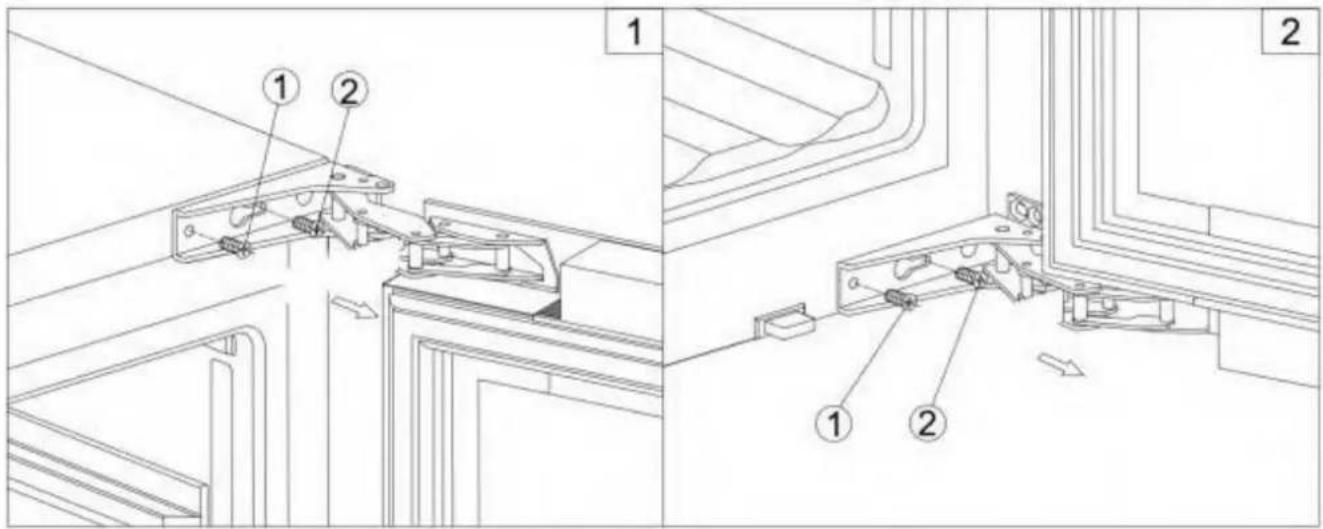
- Remove the lower hinge (1) by unscrewing the four locking screws (2). Be careful to hold the glass door firmly after removing the screws. (Figure 1)
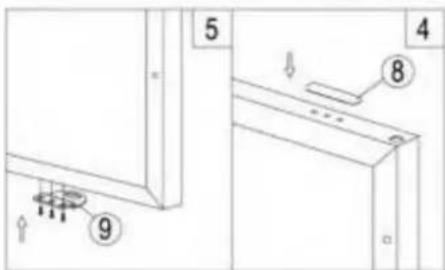
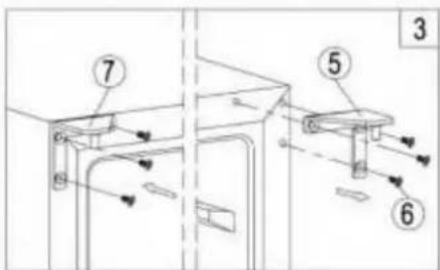
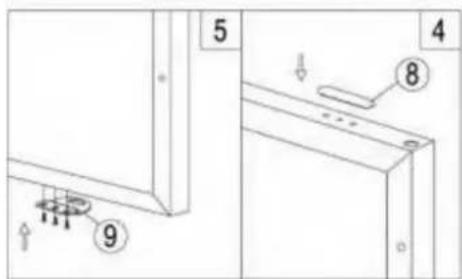
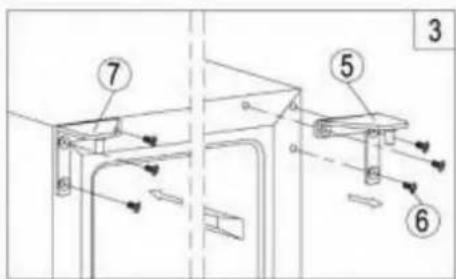
- Gently pull down to remove the glass door from the upper right hinge and place it on a padded surface to avoid the risk of damage. Then remove the upper right hinge (5). (Fig. 3) Unscrew and transfer the hinge (7) and / or door plug (8) from the lower hinge to the opposite side.(Fig. 3)
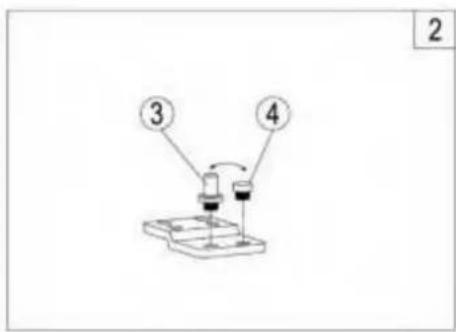
- Unscrew and transfer the hinge pin (3) and / or the door stop (4) from the lower hinge to the opposite side. (Figure 2).
- Open the cover caps on the left side of the cabinet and use them to cover the screw holes on the right side.
- Screw the alternative upper left hinge (7) to the left side of the cabinet. (Fig. 3)
- Turn the door 180° and reposition the door in the designated position. Then, screw the lower hinge assembly in the designated position to the left and tighten it once the door is levelled.
- Transfer the handle and plugs to the opposite positions and then reassemble the ventilation grills if necessary.
natural_image
Front view of a black double-chamber wine refrigerator with multiple side channels (no visible text or labels)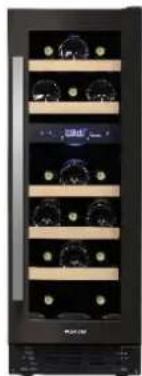
natural_image
Front view of a black wine refrigerator with multiple side shelves and decorative vials (no visible text or labels)DIAGRAM – PROFESSIONAL ARTICULATED HINGE WITH CLOSURE "SOFT"
ATTENTION
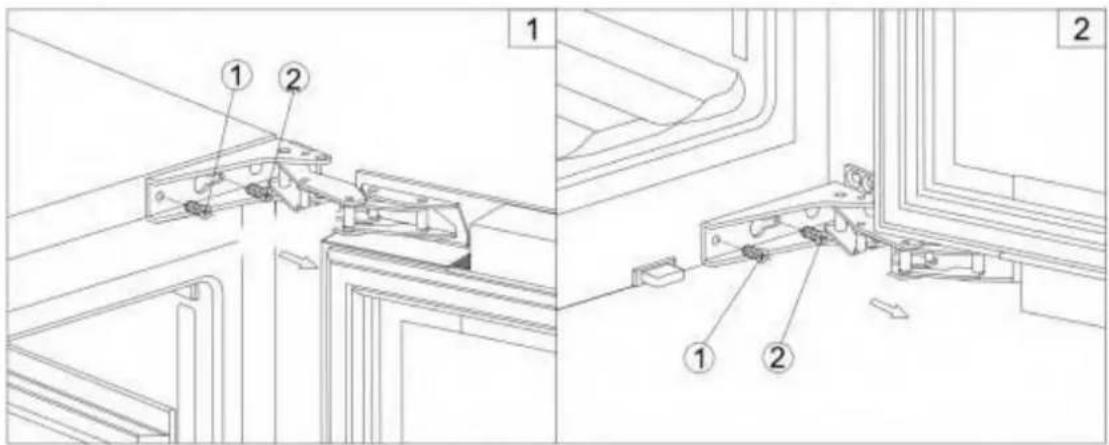
Be very careful with articulated hinges. The hinge closes automatically and there are many pine points before / during installation
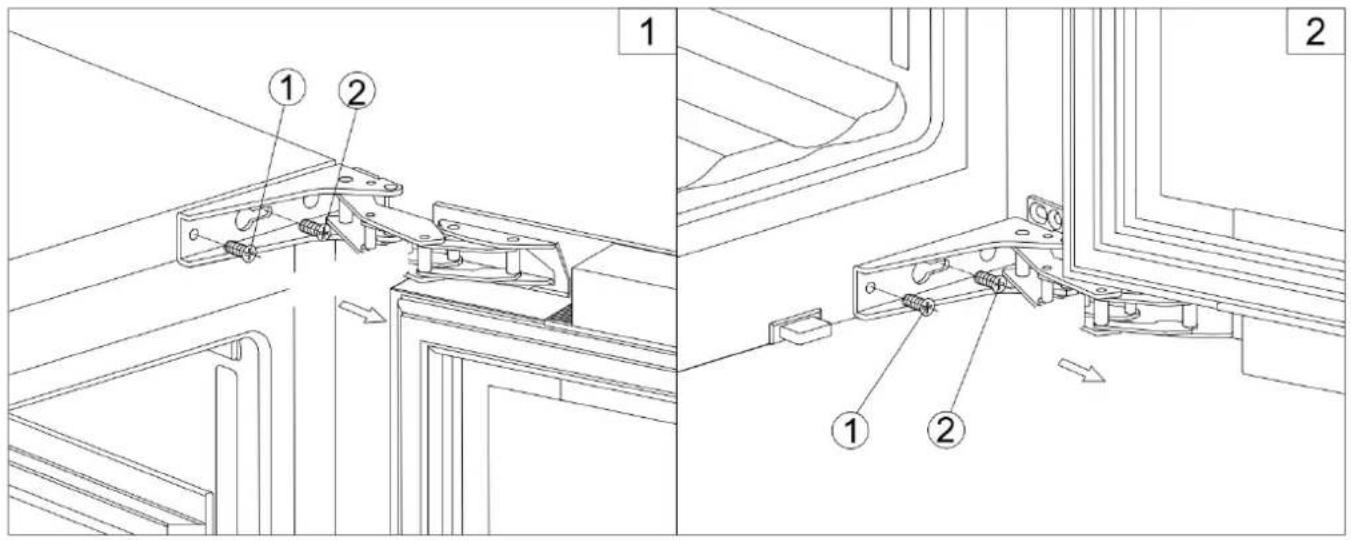
- Unscrew and remove the two screws (1) and loosen the two screws (2). Move the door through the hole and remove it. Be careful to hold the door securely and place it on a padded surface to prevent damage.
- Remove the screws (2). Remove the covers on the opposite side of the cabinet and use them to cover the holes in these screws.
- On the opposite side, screw the screws (2) half way.
- Place the new door on the opposite side, moving the hinge hole by the screws (2). Level and tighten both screws firmly.
- Finally, screw the screws firmly (1)
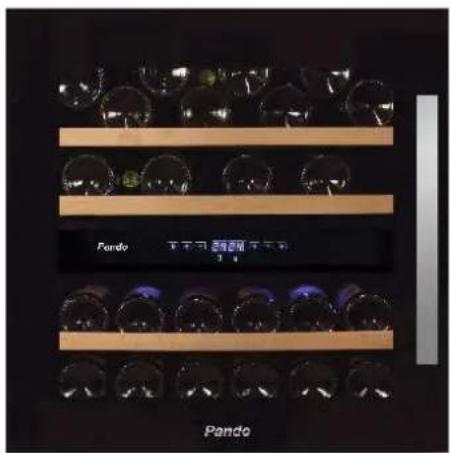
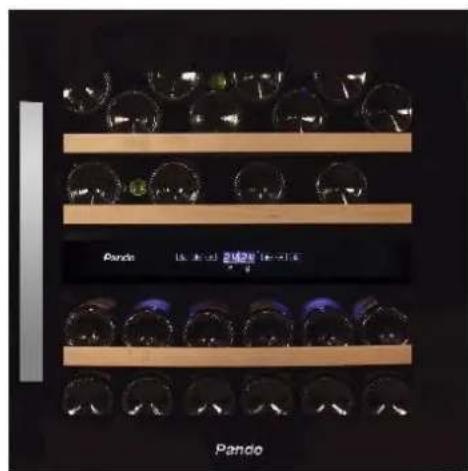
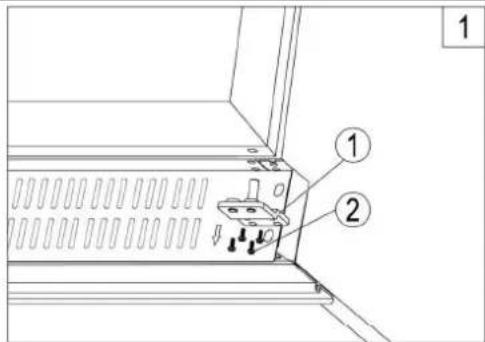
3.9. GLASS PLINTH (OPTIONAL)
Only for models:
• PBE 182-190CRR
- PBE 89-66CRR
1
1
2
2
1
3
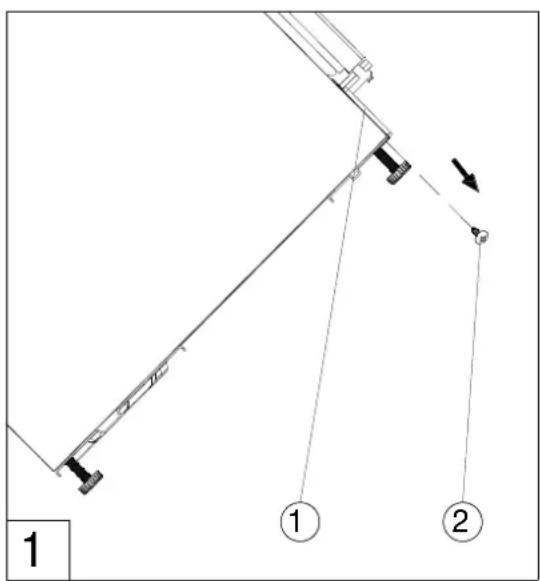
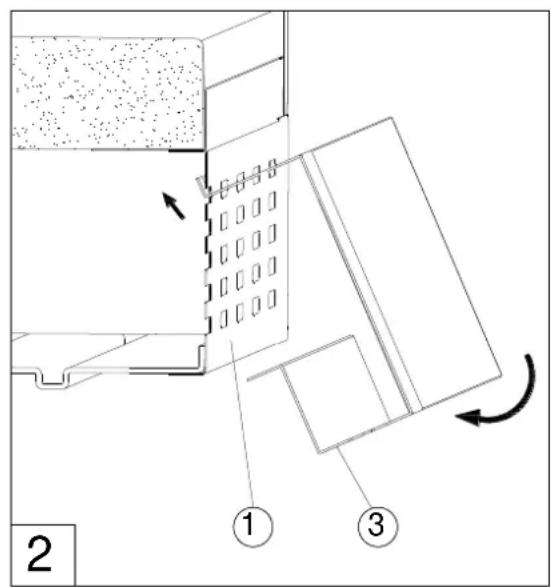
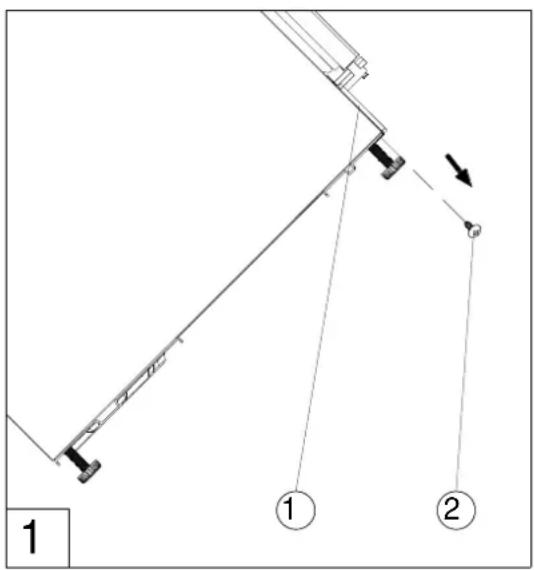
- Unscrew and remove the four screws (2) that are used to fix the metal ventilation plinth (1) and the bottom bracket. (Fig. 1)
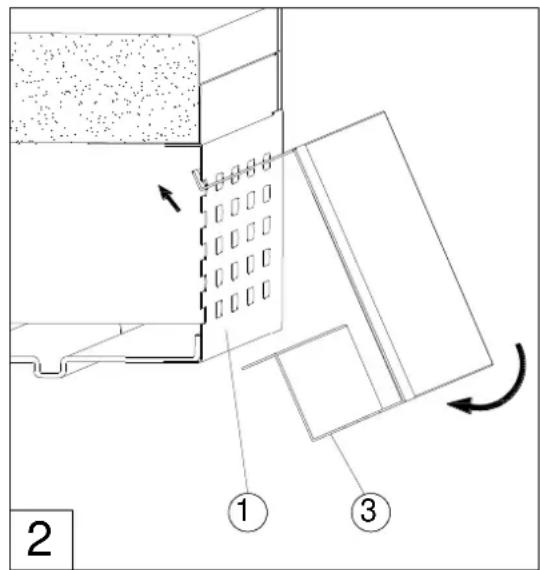
- Insert the tabs on the glass fronted plinth section into the top slots of the metal plinth. Manoeuvre the plinth so that the holes in the inner lip of the glass fronted plinth section are level with the holes in the metal plinth. Re-fit the screws (2). (Fig. 2)
NOTE: Do not tilt the appliance further than 90^ during this process. Allow the appliance to settle for at least 8 hours before switching on after tilting.
3.10. BORDEAUX BOTTLE HOLDER
Only for models:
- PBE 182-190CRR
The wine cabinet is designed to load either Bordeaux bottles or Burgundy bottles. In order to keep the bottle stability when loading the Bordeaux bottles, pls follow up below instruction to install the plastic Bordeaux bottle holders (if they are provided) on the side pilasters. When loading the Burgundy bottles, pls remove them.
1
2
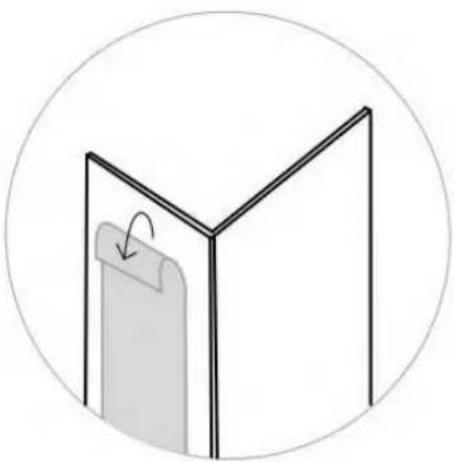
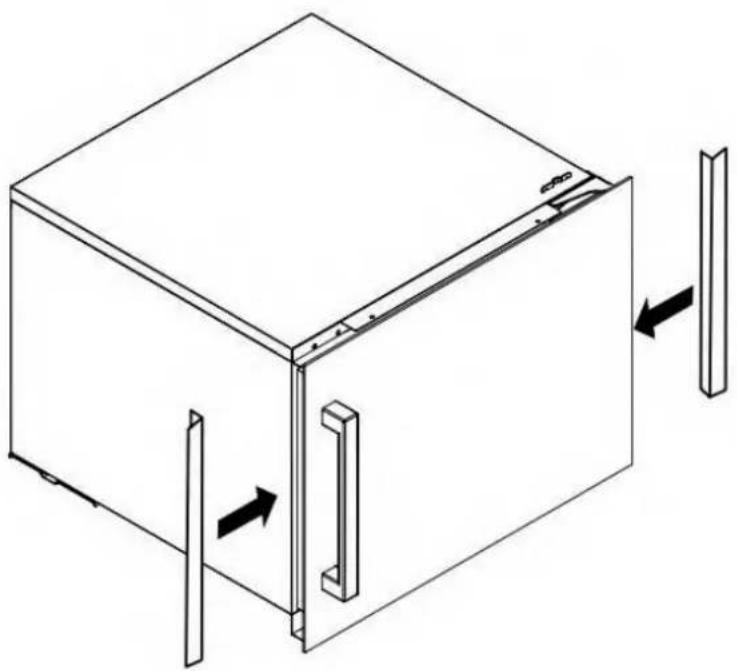
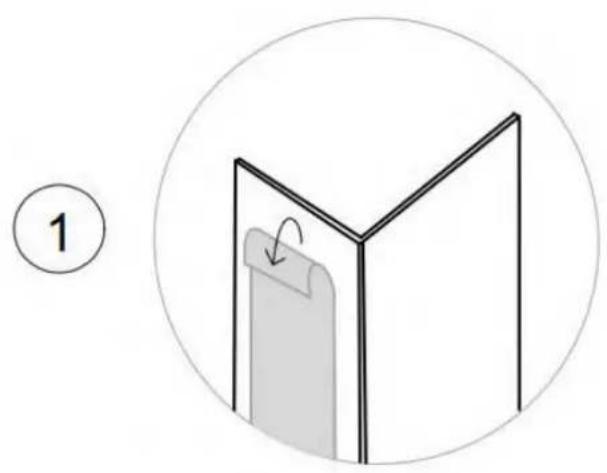
3.11. SIDE TRIM ANGLES (OPTIONAL)

natural_image
Diagram showing a 3D object with a folded paper or sheet, enclosed in a circular boundary, labeled with number 1 (no text or symbols on the diagram itself)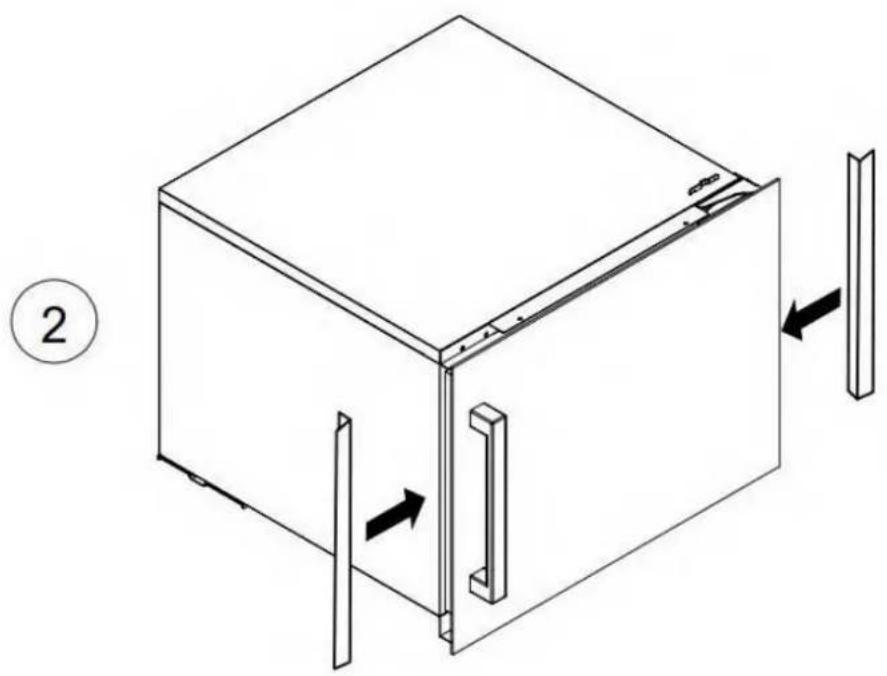
natural_image
Isometric line drawing of a 3D cabinet with directional arrows indicating movement or force (no text or symbols)4. OPERATING INSTRUCTIONS
This device is designed to work within certain ambient temperatures. The climate class is specified on the specifications plate.
The appliance may malfunction if it is left working for a long period of time outside the specified temperature range. For example, placing the unit in extreme heat or cold conditions could cause fluctuations in the internal temperature. The range of 5^ C and 20^ C ( 41^ F and 68^ F) will not be achieved.
| Climate class Ambient temperature | |
| SN | +10°C to +32°C |
| N +16°C | to +32°C |
| ST +16°C | to +38°C |
| T | +16°C to +43°C |
NOTE: Units without a heater will not raise the internal temperature if ambient the temperature is lower than the pre-set level.
ATTENTION:
- When using the appliance for the first time, or after restarting after a long period of inactivity, the selected temperature may vary a few degrees from the temperature indicated on the LED panel. This is normal and is due to the activation time. Once the unit has been in operation for a few hours, everything will return to normal.
- If the unit is disconnected, there is a power cut or it is switched off, you will have to wait for 3 to 5 minutes before restarting the unit. If you try to start the unit before, it will not turn on.
5. USE AND OPERATION
5.1. USE AND OPERATION
5.1.1. CONTROL PANEL
FOR A SINGLE ZONE

POWER To turn the appliance off, lightly touch and hold the key for 5 seconds until temperature display goes out. To turn the appliance on, lightly touch and hold the key for 1 second until temperature display lights up.
NOTE: Pressing the button once will disconnect the audible alarm if it is on.

LIGHT Used to turn the internal light on/off.
△ UP Used to increase the temperature in 1^ C steps.
▽ DOWN Used to lower the temperature in 1°C steps.
ILLUMINATED DISPLAY
Shows the temperature and other services.
INDICATOR LIGHT
The indicator light is the dot on the lower right-hand side of the screen. The indicator light turns on when you select the multi-key function. To carry out this function, keep the first key pressed and then press the pause key for at least 5 seconds and then release all keys.
Select the temperature display in degrees Fahrenheit or Centigrade. To change the option, keep the LIGHT key pressed for 5 seconds.
TEMPERATURE CONTROL ADJUSTMENT
- The unit has a single temperature zone. Temperature can be adjusted from 5^ to 20^ (41°F and 68°F), ideal for storing red, white or sparkling wine.
- When the unit is plugged in for the first time, it will start with the factory pre-set values. Predefined temperature is 12^ (54°F).
- You can adjust the temperature as needed by pressing the UP or DOWN keys. If both keys are pressed at once, the screen will display the last predetermined temperature. The temperature will increase by 1^ C / 1^ F when the UP key is pressed once, or will decrease by 1^ C / 1^ F when the DOWN key is pressed once. The screen will blink while the adjustment is being made.
- When the temperature has been set, the screen will display the current interior temperature.
- To see the system temperature at any time, press the UP or DOWN key, the established temperature will be displayed temporarily for 5 seconds. Then the screen will display the current interior temperature again.
FOR DOUBLE ZONE
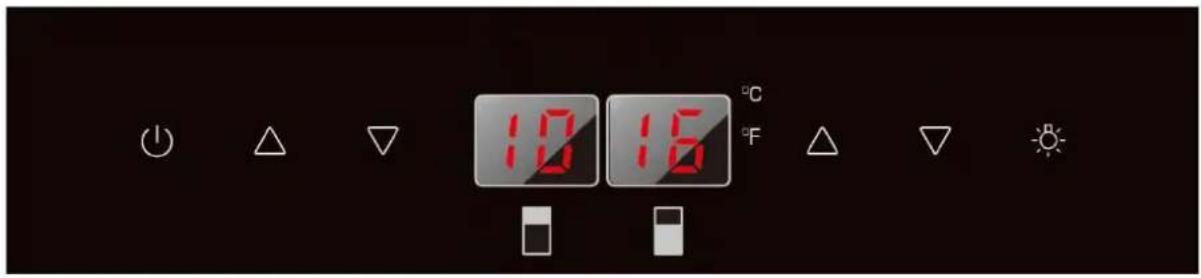
POWER To turn the appliance off, lightly touch and hold the key for 5 seconds until temperature display goes out. To turn the appliance on, lightly touch and hold the key for 1 second until temperature display lights up.
NOTE: Pressing the button once will disconnect the audible alarm if it is on.

LIGHT Used to turn the internal light on/off.

UP Used to increase the temperature in 1°C steps.

DOWN Used to lower the temperature in 1°C steps.
ILLUMINATED DISPLAY Shows the temperature and other services.

The upper refrigeration zone.

The lower refrigeration zone.
INDICATOR LIGHT
The indicator light is the dot on the lower right-hand side of the screen. The indicator light turns on when you select the multi-key function. To carry out this function, keep the first key pressed, press the pause key for at least 5 seconds and then release all keys.
Select the temperature display in degrees Fahrenheit or Centigrade. To change the option, keep the LIGHT key pressed for 5 seconds.
TEMPERATURE CONTROL ADJUSTMENT
The unit has two independent temperature zones. The temperature of both zones can be adjusted from 5^ C to 20^ C ( 41^ F to 68^ F). The LOWER temperature zone is ideal for storing white and red wine from 13^ C to 20^ C ( 55^ F to 68^ F). The UPPER temperature zone is ok for white wine from 5^ C to 13^ C ( 41^ F to 55^ F).
- When the unit is plugged in for the first time it will start with the factory pre-set values. The temperature programmed in the factory for the upper temperature area is 8^ (46°F) and for the lower temperature zone is 12^ (54°F).
- Press the keys on the left UP and DOWN to control the internal temperature of the upper temperature zone and press the keys on the right up and down to control the internal temperature of the lower zone. If both keys are pressed at once the screen will display the last predetermined temperature.
- IMPORTANT: The temperatures of the two zones can be equalized, obtaining the same temperature throughout the wine cellar.
In the case that unequal areas are desired, the temperature of the upper zone must always be the colder one and the lower zone the less cold.
TO EQUAL THE TEMPERATURES, press the △up or ▽down keys until the desired temperature value is achieved.
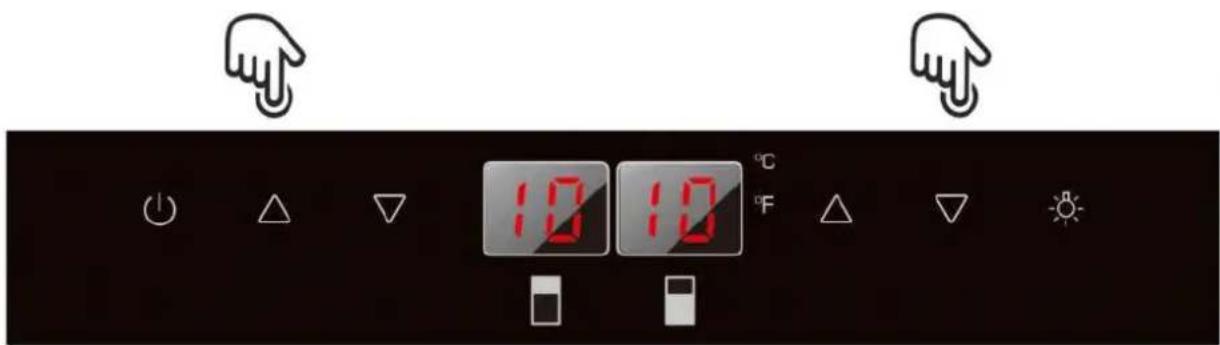
TO UNEQUAL THE TEMPERATURES, press the central keys up or down until the desired temperature value is achieved.
NOTE: The temperature of the upper zone always has to be lowest, than the temperature of lower zone.
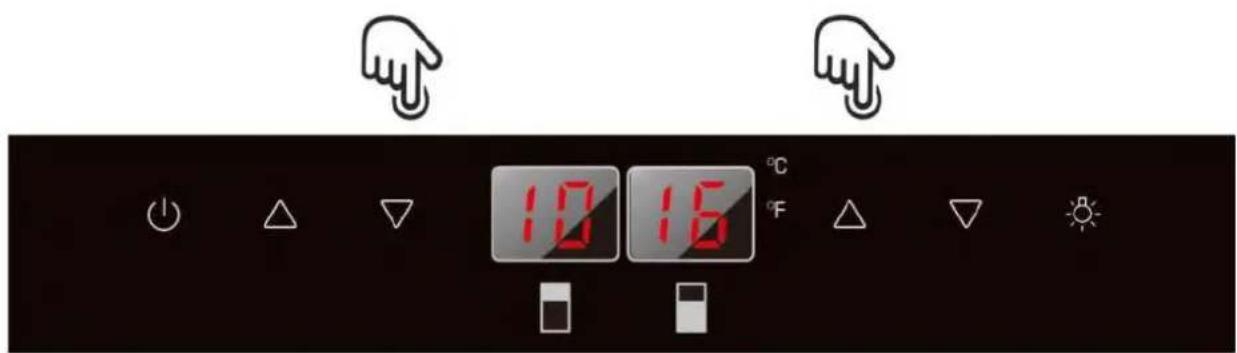
- The temperature to be set will increase in 1^ or 1^ steps when pressing the UP sign once, and will decrease by 1^ or 1^ when pressing the DOWN sign once. The screen will blink while the adjustment is being made.
- When the temperature has been set, the screen with display the actual interior temperature on the particular zone.
• To see the system temperature at any time, press the UP or DOWN keys. The temperature setting will blink temporarily in the screen for 5 seconds. Then the screen will display the current interior temperature again.
FOR SINGLE ZONE WITH LCD DISPLAY (PBE MODELS)
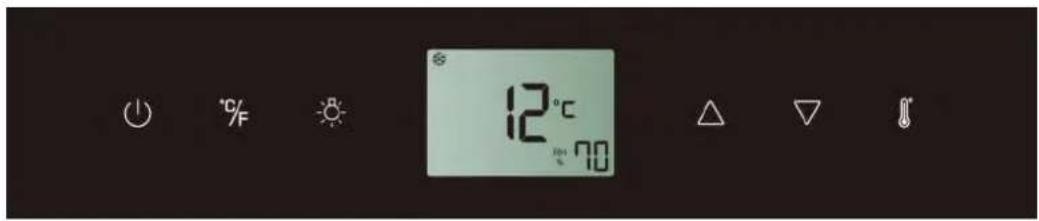
POWER To turn the appliance ON, lightly touch and hold the ⏻ key for 1 second until temperature display goes on. To turn the appliance OFF, lightly touch and hold the ⏻ key for 5 seconds until temperature display goes off.
NOTE: Touching the ⏻ key once can switch off the audible alarm when the alarm is on.
^/_F °F/°C Selector Set the temperature to be displayed in °Fahrenheit or °Celsius.
LIGHT Used to turn the inner light on/off.
UP Used to increase (warm) the set temperature by 1^ / 1^ .
▽ DOWN Used to decrease (cool) the set temperature by 1^ C/ 1^ F.
Setting Selector Select the temperature and humidity you want to set.
ICONS ON THE DISPLAY:
- The following symbols will be automatically displayed on the screen as appropriate, being managed by the unit itself.
| 18 | Temperature or Error code display for the upper zone |
| 08 | Temperature or Error code display for the middle zone |
| 2 | Temperature or Error code display for the lower zone |
| * | Compressor is ON |
| ○ | Heater is ON |
| ▲ | Defrosting mode |
| ! | Warning |
| ♥ | Alarm |
- The following symbols will be shown on the screen according to user selection.
| Dynamic Climate mode | |
| DEMO | Eco Demo mode |
| The interior light is in Showcase mode | |
| Relative humidity display |
SETTING THE TEMPERATURE CONTROL
- The unit has a single adjustable temperature zone. The temperature can be set between 5°C and 20°C (41°F and 68°F). It can be used as a wine maturing cabinet or a wine serving cabinet. The recommended temperature setting range for maturing wine is between 11°C and 14°C (52°F and 57°F). The recommended temperature setting range for serving white wine is between 5°C and 10°C (41°F and 50°F) and the recommended temperature setting range for serving red wine is between 15°C and 20°C (58°F and 68°F).
- When the unit is plugged in for the first time, the unit will power up automatically to the preset defaults. The temperature preset at the factory is 12^ (54°F) (ideal maturing temperature).
- Touch the Setting Selector ⚫ until the temperature you want to set is flashing. Then you can use the UP and DOWN keys to set the internal temperature as required. When you touch either key at the first time, the display will show the last temperature set previously.
- The temperature will increase 1^ / 1^ if you touch the UP key once, or the temperature will decrease 1^ / 1^ if you touch the DOWN key once. The display flashes while you make the setting.
- The set temperature will temporarily flash in the display for 5 seconds after the temperature has been set. Then the display shows the current inner temperature again.
- To view the set temperature at any time, touch the Setting Selector ⚠ key, the set temperature will temporarily flash in the display for 5 seconds. Then the display shows the current inner temperature again.
SETTING THE HUMIDITY CONTROL
- Humidity level can be kept automatically for models with humidity pump.
- Touch the Setting Selector ∥ until the humidity display % is flashing. Now you can use the UP and DOWN key to choose the relative humidity setting from 50% to 80% and 00%. The set humidity will temporarily flash in the display for 5 seconds. Then the display shows the current inner humidity again. The humidity preset at the factory is 70% (ideal wine storage humidity).
- When 00% is selected, the humidity pump will be switched off. The humidity pump increases the energy consumption of the unit. If the function is not necessary, please switch it off. The rated energy consumption is based on the function is switched off.
5.1.2. SHELVES AND STORAGE
WARNING: Do not pull out more than one full shelf at once, as this could cause the unit tip forwards. Some shelves are designed to store more than one layer of bottles. These shelves should not be slid out if there is more than 1 layer of bottles on them.
WARNING: Do not attempt to slide the shelves out further than the stop position, to avoid bottles falling.
WARNING: To avoid damage to the door seal, make sure that the door is completely open when you pull a shelf out of the compartment.
All the wine shelves slide, for easy access, except the bottom shelf. To access the bottles easily, pull the shelf out gently until it stops. The shelves are designed with an emergency stop to prevent them coming out too much while the bottles are being loaded.
WARNING: The bottles may vary in size and dimensions. Different formats in size and diameter can be found in the market. For that reason, the actual number of bottles to store could vary. The maximum capacity of the wine rack is produced with traditional Bordeaux bottles of 750 ml. with a bottle height of up to 30cm.
- You can store your bottles of wine in a single row or stacked, taking the following into account: If you do not have enough bottles to fill the cabinet, it is better to distribute them, so as to avoid them being all at the top or all at the bottom.
- Do not remove or change the wooden shelves to make room for larger bottles or to increase the capacity by piling them all up. (See removing shelves)
- Maintain a small space between the walls of the cabinet and the bottles to allow for air circulation. Like in an underground cellar, air circulation is important to avoid mould and maintain a more homogenous temperature.
- Do not overload the cabinet, to facilitate air circulation.
- Place the bottles flat.
- Avoid obstructing the internal fans (located inside the rear panel of the unit)
- Do not place any contaminants inside. Only store wine in your unit, to guarantee an environment free from smells.
- Only store unopened wine bottles. Storing opened bottles could give rise to spills.
5.1.3. DYNAMIC CLIMATE MODE / SILENT MODE (ENERGY SAVING)
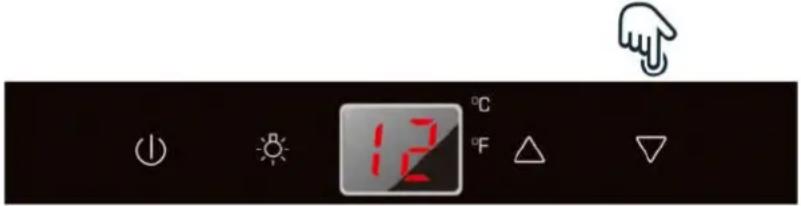
The wine cellar is supplied originally with the Silent Energy Saving mode activated. Dynamic Climate mode is recommended for storing wines for long term in excellent conditions. In this mode the indoor fan distributes the air evenly and keeps the relative humidity and temperature stable throughout the cavity, even when the set temperature has been reached. Due to the continuous use of the fan, small noises may occur and the energy consumption is higher.
- To turn on Dynamic Climate mode, press and hold down the “▼” key for about 5 seconds until it beeps 5 times.
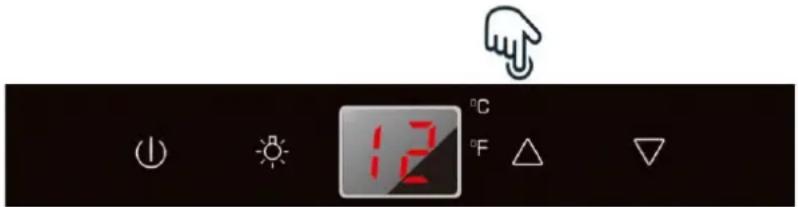
- To turn off Dynamic Climate mode or turn on Silent Energy Saving mode, press and hold the “▲” key for about 5 seconds until 3 beeps are emitted.
5.1.4. DISPLAY OFF MODE
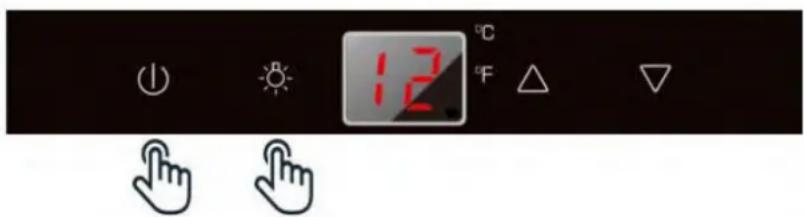
This mode will turn off the illumination of the displays, the interior light and the audible alarms, which will not be heard. Pre-existing cooling operations will continue functioning normally.
To enter "DISPLAY OFF" mode, press the ON and LIGHT keys at the same time for at least 5 seconds. The display will blink four times to confirm the mode is ACTIVE.
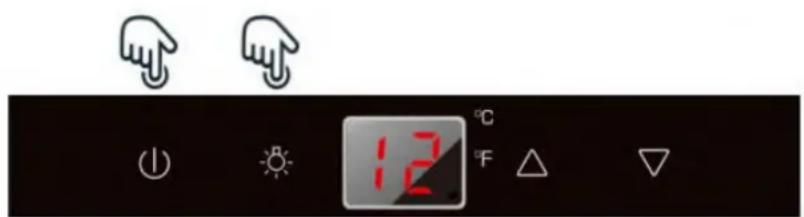
The “DISPLAY OFF” mode can be cancelled by repeating the same procedure. This mode will turn off automatically after 48 or 96 hours.
5.1.5. ECO DEMO MODE
Eco Demo mode can be activated on presenting the unit in exhibitions or sales outlets. In Eco Demo mode, the compressor and all the fans are off.
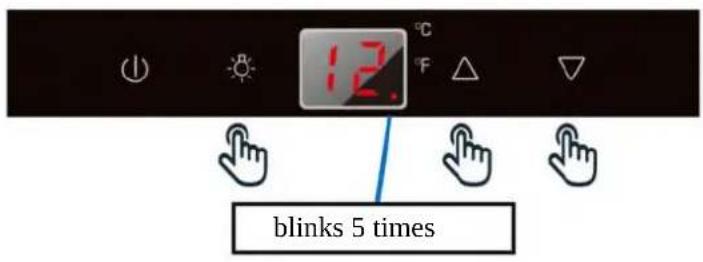
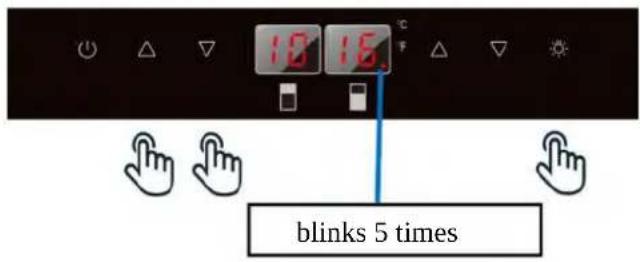
For models PVMB
ACTIVATE:
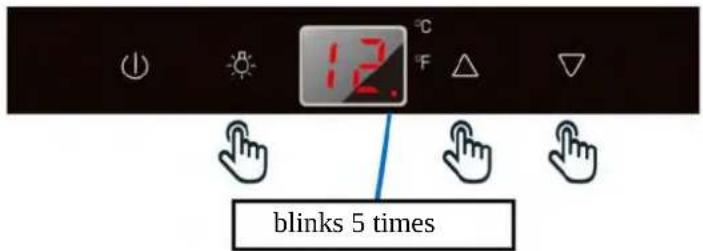
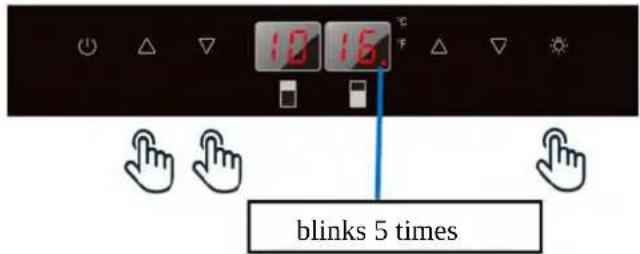
Press the UP and DOWN keys (Upper zone controls in models with two zones) and the LIGHT key together for at least 5 seconds, the indicator light will blink five times to confirm the order and the unit will operate in Eco Mode (demo).
DEACTIVATE:
Deactivate by using the same procedure above.
For models PVMAV
ACTIVATE:
Press the UP and DOWN keys (Upper zone controls in models with two zones) and the LIGHT key together for at least 5 seconds, the indicator light will blink five times to confirm the order and the unit will operate in Eco Mode (demo).
DEACTIVATE:
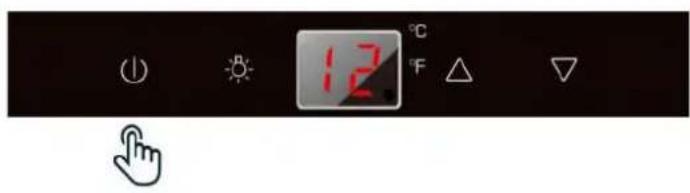
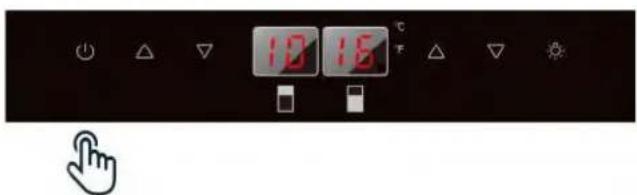
- Press the START / STOP button for at least 5 seconds, until the unit display turns off completely.
- Then, reconnect the unit by pressing the START / STOP button for 1 second until the display lights again and the unit starts up again. The unit will NO longer work in Eco mode (demo)
5.2.PUSH AUTOMATIC OPENING FUNCTION
Only for models:
- PVMAVP 45-18
- PVMAVP 60-25
- PVMBP-HD 40-28
• PVMBP 60-45 & PVMBP-HD 60-45 - PVMAVP 88-49
- PVMAVP 124-70
• PVMAVP 178-112
The PUSH function of opening and closing the door is activated when the unit is switched on. To open the door, press firmly on the upper front centre and release again. The door will open approx. 2 \~ 7 cm. by the push piston housed in the frame. Then the door can be opened completely manually.
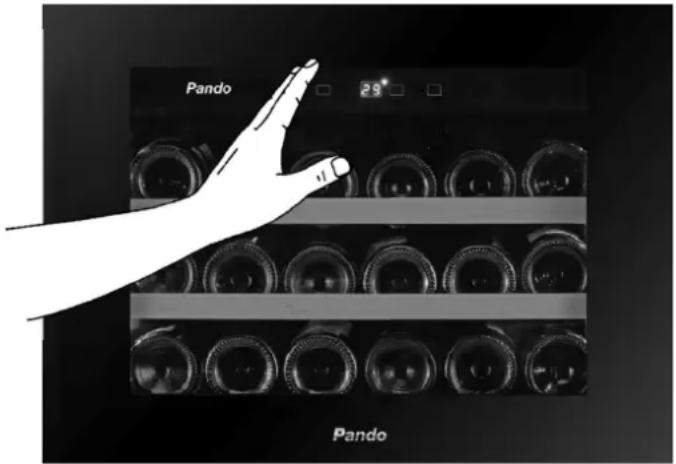
NOTE: Do not block the door or hold it while it is opening. If the door is locked or held during opening, the door opening mechanism - push piston - and the door will be damaged, potentially causing serious damage not covered by the warranty.
Do not push the opening piston or hold it during closing. If the piston is blocked during closing or is inserted inside its base, it can no longer reach its initial position.
In the initial position, the opening piston is aligned with the front of the control panel. To return the opening piston to its initial position, disconnect the appliance from the mains, wait approx. 10 seconds and plug it back. The piston will return to its initial position.
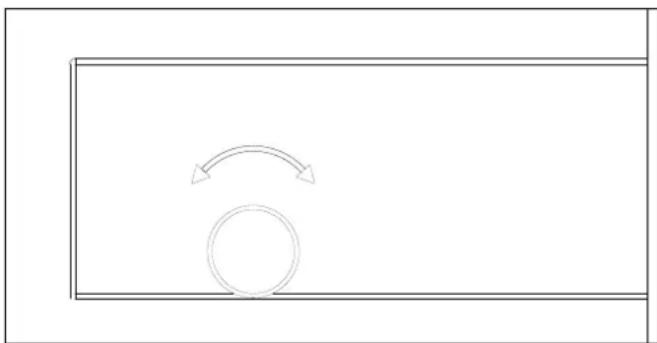
The door on the unit is sensitive to pressure. The pressure to open the door is possible to adjust as following steps:
- Open the door.
- Rotate the screw on the top middle of door counterclockwise to increase the sensitivity and clockwise to decrease the sensitivity.
- Close the door and check if it is correctly adjusted. Rotating the screw counterclockwise too much can cause the door to open automatically even without pushing. In reverse rotating the screw clockwise too much can cause the door not to open even with heavy pushing.
natural_image
Simple line drawing of a rectangular frame with a circular hole and curved arrow indicating rotation (no text or symbols)5.3 SHELVES
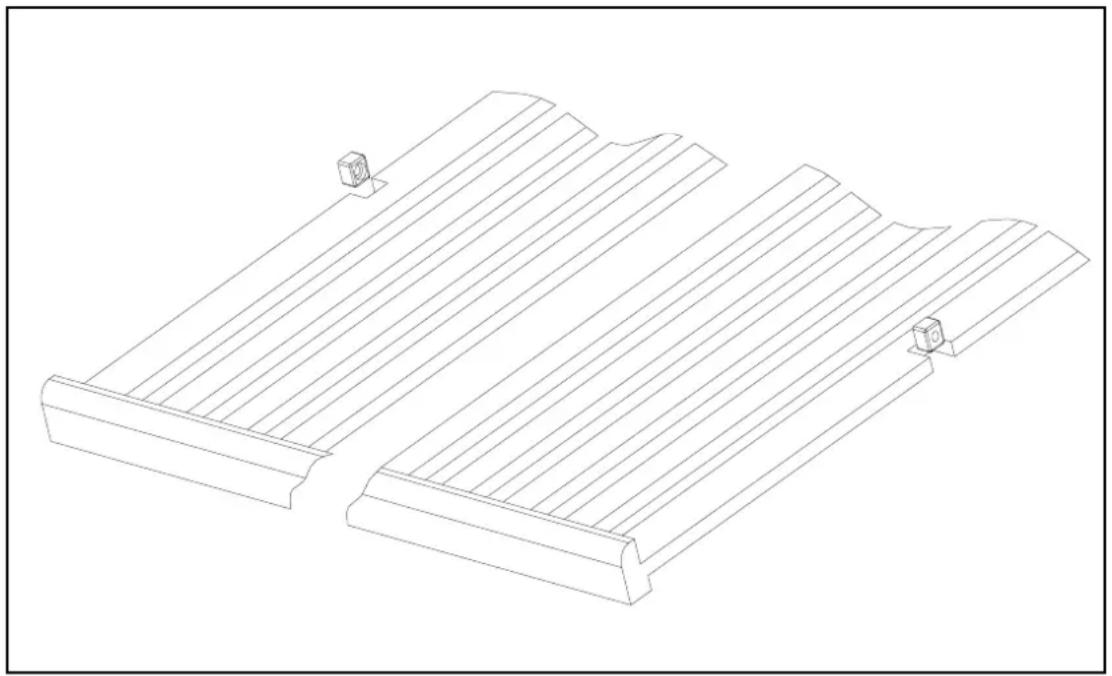
To remove any of the shelves from the rail compartment, move the shelf to the position where the notch of wooden shelf is exactly under the plastic post and then lift it up and out.
In order to replace the shelf, repeat steps described above in reverse. And make sure to engage the shelves with the small pegs of the extended rails when the model is equipped with roller system.
natural_image
Technical line drawing of a mechanical component with two parallel grooves and mounting holes (no text or symbols)5.4 NOISE DURING OPERATION
This unit uses a compressor for cooling. The compressor pumps coolant through the cooling system, which produces some operating noise. Even when the compressor stops, noises caused by temperature and pressure changes are unavoidable. The operating noises will be more audible just after switching off. The unit will be quieter when it has been working continuously for a time.
The following noises are normal and occur now and then:
- “Bubbling” noise caused by the coolant flowing through the coils of the appliance.
- Buzzing produced by the motor / compressor. This noise may be louder for brief periods when the motor starts up.
- Clicks/ soft noises, resulting from contraction and expansion of the materials cause by temperature differences.
- Fan noise, while circulating air inside the wine cabinet.
- Unusual noises are normally the result of incorrect installation. Under no circumstances should the radiator tubes touch a wall, furniture or other tubes.
- If the unit is installed in an open-plan kitchen or in partition walls, operating noises could be more audible. This, however will be due to the surrounding architecture and not the unit itself.
- Noise perception is directly linked to the surroundings of the unit, as well as the specific model. Our appliances are in line with international standards and the latest technologies. But please remember that noises produced by the compressor and the coolant are inevitable.
5.5 DEFROSTING / HIGROMETRY / VENTILATION
The unit has an automatic defrosting system. During the "switching off cycle" the evaporator at the rear of the unit will automatically defrost.
Condensation is accumulated in the drainage tray at the rear of the unit and some of it flows through the drainage hole in the drip tray above the compressor.
Heat is transferred from the discharge tube or the compressor, evaporating any condensation accumulated in the tray. Part of the remaining water is collected inside the unit for humidity purposes.
This system keeps correct humidity inside the unit, something that natural cork, needs to maintain its sealing properties and long life.
The unit is not completely sealed from the outside: Fresh air can enter through the drainage tube. Air circulates through the unit, moved by a fan/fans through the gaps between the shelves.
NOTE: Frost may accumulate on the evaporator if the unit is opened frequently and it is very hot or the unit is located in a very humid place. If the frost does not disappear within 24 hours, the unit will require manual defrosting.
IMPORTANT:
Do not locate the wine cabinet, especially integrated models, with sources of heat under it, such as freezers, ovens, stoves, etc.
This may result in the compressor working all the time and the unit will produce an excessive amount of ice, affecting correct operation of the internal fans and the compressor itself.
5.6. TABLE WITH WINE SERVING TEMPERATURES
All wines mature at the same temperature, which is a constant temperature set between 11^ C and 14^ C. The table below indicates the best temperature for drinking wines:
| RECOMMENDED TEMPERATURES FOR SERVING WINE | ||
| SPARKLING WINES Cava, | Cremat, Champagne, Saumur, Sekt. 4-7 °C | |
| SPECIAL SPARKLING WINES | Milesimé champagne. 9-8 °C | |
| LIGHT WHITE AND DRY WINES | Penedes, Alvariño, Sauvignon from Alsace. 6-8 °C | |
| WHITE SEMI-DRY AND COMPLEX WINES | Burgundy, Chardonnay Navarre and Catalan, Gravés, Rioja, Aulese. | 9-12 °C |
| WHITE FORTIFIED Sauterne, late harvesting. 11-13 °C | ||
| ROSÉ Can be served very cold 5-8 °C | ||
| YOUNG RED WINES Loire, Rioja alavesa, Côtes-du-Rhone 10-12 °C | ||
| PINOT NOIR RED WINES Burgundy 16-17 °C | ||
| ORDINARY RED WINES Bordeaux, Burgundy, Rioja 14-15 °C | ||
| GRANS CRUS | Ribera del Duero, Cruz classé Bourdeaux, Côte-Rotie. 17-18 °C | |
| SPECIAL WINES | Jerez fino (Sherry). | 9-11 °C |
| SPECIAL WINES | Amontillado Sherry, Oloroso Sherry, Madeira, Port wines. | 15-16 °C |
| SPECIAL WINES | Vintage Port. | 16-18 °C |
| SPECIAL WINES | Natural sweet wines | 8-10 °C |
IMPORTANT INFORMATION ABOUT TEMPERATURE
Your unit has been designed to guarantee optimum storage conditions and/or serving temperature for your wines.
Quality wines require longer and milder maturing and need specific conditions to reach their full potential.
Only the "tasting" temperature varies according to the type of wine (See "Table with temperatures for serving wine" above). The same as in natural cellars used by wineries for long-term storage, more than the exact temperature, what is important is temperature "consistency". In other words, as long as the temperature in your cellar is constant (11°C - 14°C) your wines will be stored in perfect condition. Not all wines improve with aging. Some must be consumed young (2 - 3 years), while others have an enormous capacity for aging (50 years or more). All wines have an optimum state of maturation. Consult with your wine provider to obtain this information.
WARNING: If you do not disconnect the unit before maintenance or cleaning, there is the risk of an electric shock or harm.
6.1. HUMIDITY CONTROL
The unit has a system to maintain the correct level of humidity. In extremely dry conditions, it may be necessary to add a little water to the humidity box supplied with your wine cabinet.
Fill the small plastic tank (humidity box) to 34 capacity with water, and insert it in the guides in the top shelf of the appliance. Check the level of water regularly and refill as necessary.
Make sure that the tank is correctly located on the guides of the top shelf to avoid water spillage.
6.2. CLEANING THE UNIT
Disconnect the power, unplug the appliance and remove everything inside, including the shelves.
Wash the interior surfaces with warm water and sodium bicarbonate (Baking soda) The solution should be approximately 2 spoons of sodium bicarbonate to a liter of water.
Wash the shelves with a mild detergent solution.
Dry any excess water with a sponge and a cloth to clean the control area Displays / front buttons.
Wash the exterior with hot water and mild liquid detergent. Rinse well and dry with a soft clean cloth.
Do not clean stainless steel parts with metal scouring pads or abrasive sponges. It is recommended to use an all-in-one stainless steel cleaner and always wiping in the direction of the grain.
6.3. ACTIVED CHARCOAL ODOR FILTER
Only for models:
- PVMAVP 45-18
- PVMAVP 60-25
• PVMB 40-28 & PVMBP-HD 40-28
• PVMAVP 178-112
• PBE 180-190 - PBE 89-66
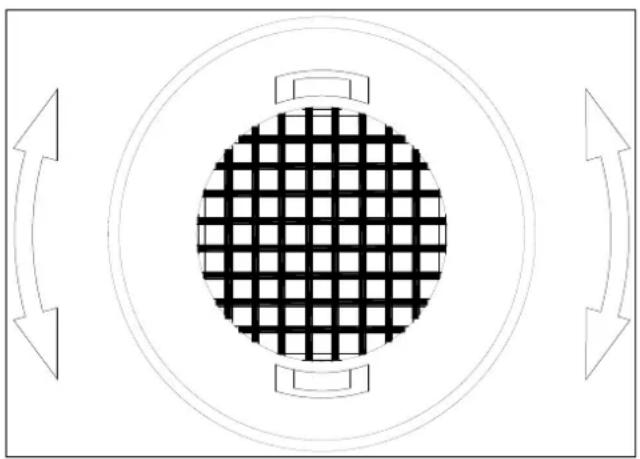
The active charcoal air filter is located in the back of compartment. Replace it with a new one once a year.
1 Remove the shelf in front of the filter.
2 Grip the filter and turn it 90°clockwise or anti-clockwise to remove.
3 Insert the new filter in the vertical position and turn it 90^ clockwise or anti-clockwise until it clicks into position.
natural_image
Symmetrical diagram with a central grid pattern surrounded by four rectangular elements, each with bidirectional arrows on the sides (no text or symbols)6.4. POWER CUTS
In case of a power cut, all the temperature settings will be memorized automatically. If there is a power cut (Voltage surge, circuit breaker, etc.) and it is later switched on, the unit will restart at the last temperature setting.
Most power cuts last a few hours and should not affect the temperature of the unit if you minimize the number of times the door is opened. If power is going to be cut for a longer period, it will be necessary to take measures to protect the contents.
NOTE: Regardless of the cause, if you notice an abnormal temperature or variations in the level of humidity inside the unit, only long and frequent exposure to these abnormal conditions can have adverse effect on your wine.
6.5. DURING HOLIDAYS/ LONG ABSENCE
Short holidays: Leave the unit working during holidays lasting less than three weeks.
Long absence: If you are not going to use the unit for several months, empty it, switch it off and unplug it. Clean the inside and dry well. To avoid mould growing and bad smells, leave the door ajar, blocking it is necessary.
6.6. MOVING THE UNIT / CHANGING LOCATION
Unplug the unit.
Remove the contents of the trays and all removable parte from the inside. Raise the adjustable feet to the base to avoid damage.
Seal the door closed and make sure it is locked.
Only transport the unit in vertical position. In addition, protect the exterior of the unit with a blanket or similar element.
6.7. ADVICES FOR SAVING ENERGY
- If the unit is left empty for long periods of time, it is recommended that it is disconnected and after careful cleaning, leave the door ajar for the air to circulate in the cabinet and avoid condensation, mould or smells.
- The unit should be installed in the coldest area of the room, away from appliances that generate heat, and out of direct sunlight.
- Make sure that the unit is properly ventilated. Never obstruct the air outlets. Clean dust and dirt off the condenser regularly.
- Open the door only when necessary, keeping it open as short a time as possible. Store the wine tidily.
- Do not overfill the unit so that air can circulate properly.
7. TROUBLESHOOTING
Many common problems are easy to solve, avoiding a call to the technical service.
Try the following suggestions to solve the problem before calling the customer/after sales service.
| PROBLEM | POSSIBLE CAUSE | SOLUTION |
| The unit does not work. | Connect the unit.Switch on the unit.Reset the circuit breaker / ICP or change the burnt-out fuse. | |
| The unit does not cool enough. | The temperature has not been correctly set.Ambient temperature requires a higher temperature setting.The door is opened very frequently.The door is not completely closed.The door does not close hermetically.The condenser is too dirty.The ventilation opening is obstructed or contains too much dust. | Check the temperature settingSelect a higher temperature.Do not open the door unless strictly necessary.Close the door with care.Check the door seal and clean or replace it.Clean the condenser when necessary.Remove obstructions and clean out the dust. |
| The unit turns on and off frequently. | Ambient temperature is higher than average.Many bottles have just been added to the unit.The door is opened very frequently.The door is not completely closed.The door does not close hermetically. | Place the appliance in a cooler location. Let the appliance work for a time until it has reached the selected temperature.Do not open the door unless strictly necessary.Close the door with care.Check the door seal and clean or replace it. |
| The light does not come on. | The unit is not connected to the mains.Circuit breaker triggered / ICP or fuse burnt out.The light was switched off from the front panel. | Connect the unit.Reset the circuit breaker / ICP or change the burnt-out fuse.Switch on the light using the front panel. |
| Vibrations. | The unit is not exactly level. | Level the unit using the adjustable feet. |
| The appliance makes noises. | The rattling noise may come from the flow of the coolant, this is normal. At the end of each cycle, you may hear gurgling noises made by the flow of coolant in the appliance. If there are temperature fluctuations, contraction and expansion of internal walls may make cracking noises. | |
| The unit is not exactly level | Level the unit using the adjustable feet. | |
| The door does not close correctly. | The door opening side was changed and it has not been correctly fitted.The seal is dirty.The shelves are incorrectly positioned.The appliance is not properly levelled. | Check the door seal and refit correctly.Clean the door seal.Check the shelves and refit correctly.Level the appliance with the adjustable feet. |
| PROBLEM POSSIBLE CAUSE SOLUTION | ||
| Front panel displays - "E0", "E1", "E2", "E3", "E4", "E5", "E6". | ·Error codes | ·Try to restore the controls with a "Reset". (Disconnect from the mains for 5 minutes)·If the problem persists, call Technical Service. |
| Front panel displays - "E7". | ·Indicates the door switch failure | ·Check that the door closes properly and that the sensor is not dirty or obstructed. |
| The alarm sounds and the display is flashing | ·Has the door been open for more than 60 seconds? | ·If this is the case, close the door. |
| If not, the temperature has risen or has fallen below the temperature established. This may have been due to:·The door is opened very often.·The ventilation opening is obstructed or contains too much dust.·A long power cut.·Many of bottles have just been added to the unit. | ·Do not open the door more than necessary.·Remove the obstructions and clean out the dust.·Let the device work for some time until it has reached the selected temperature. | |
| The alarm sounds and the display panel DOES NOT blink. (door alarm) | ·Has the door been open for more than 60 seconds? | ·Close the door or press the POWER button to turn off the alarm. The alarm will stop when the door is closed |
| The icon "-" is lit up and blinking on the display | ·The temperature on the Display is out of range. | ·The appliance only shows temperatures within a range of 0 ~ 99 °F /-9 ~ 37 °C. If the temperature is not within this range, the icon "-" with be displayed instead. |
| Condensation on the outside of the door glass | ·High Humidity in the environment | ·During periods of high humidity, it may appear drops of water on the outside of the door glass. These will disappear when the humidity level drops. It is advisable to install the unit in a place with sufficient ventilation, in a dry place and / or with air conditioning. |
| The display temperature does not correspond to the real one | ·Differential temperature relationship between both zones is out of range. Greater than 10 °C | ·Lower temperature difference between zones. |
8. FAQ's (Frequently Asked Questions)
- What are the storage conditions that concern collectors and consumers of good wine?
Light, humidity, temperature and vibration.
- What is the ideal temperature for wine?
The ideal temperature to store wine is 11^ C - 14^ C ( 52^ F\~ 57^ F). Nevertheless, any temperature between 5^ C\~ 20^ C ( 41^ F\~ 68^ F) will be ok, as long as it is a constant.
- What is the ideal humidity for wine?
Humidity between 60%-70% is an excellent range to store wine. High levels of humidity maintain humidity inside the bottle, thus avoiding evaporation through the cork. Excessively high levels of humidity are often the cause of development of microorganisms that can prematurely age the wine and even spoil it.
- Storage temperature often seems to vary 3 or 4 degrees.
This is normal: Small differences in temperature are necessary for the appliance to work correctly. When the unit begins the defrosting cycle, the temperature may increase slightly. When the refrigeration system comes back into action, temperature falls again.
These changes occur in a short period of time and their effect is minimum on the preservation of the wine. Liquid tends to maintain an average temperature with a margin of +/- 2°C. For example, if the temperature of a swimming pool is 25°C and during the night the external temperature drops to 18°C, the temperature of the water will not vary so much. In early morning, it will only be 22°C
- Water has accumulated on the floor or at the rear of the unit.
Make sure that the drainage hose inside the appliance is correctly fitted to the water collection tray at the rear. If it is Ok, when there is a lot of humidity you will have to mop up the excess water with a sponge.
- There is water on the interior wall of the unit.
At time of maximum humidity this can happen if the door is opened too frequently.
- The unit seems never to switch off: it is always working.
Make sure the door is closed correctly. Place a thermometer inside the cabinet to see if the unit is displaying the same temperature.
- Vapor / condensation on the glass door.
This may happen in very humid times, especially in the summer.
Make sure the unit is installed according to the instructions in the manual, more specifically regarding ventilation, which is highly important for optimum operation and to avoid breakdowns. Regarding condensation on the outside of the glass door, this is normal and natural in certain circumstances when there is a high exterior temperature, high relative humidity, a room or kitchen without proper ventilation, a room the has been closed for a long time and the cold door of the cabinet will produce condensation.
8. FAQ's (Frequently Asked Questions)
9. The interior fan motors turn on and off even when the set temperature is reached.
To circulate air and maintain the set temperature inside the cabinet, the interior fans will turn ON and OFF when the compressor is on in Dynamic Climate mode. The fan will turn on and off every 20 seconds, approximately. Thus, is normal and serves to circulate air as well as to ensure the operating status of the fans. If the fan is completely off and does not complete the cycle, it is not working. The Dynamic climate mode is factory pre-set. If the user finds it noisy, the SILENT mode can be selected by pressing the UP key for at least 5 seconds until hearing "B B B" three sounds the confirm that silent mode is active.
10. It is not possible to set the high and low temperatures separately – both are adjusted at the same time (Raising one, raises the other as well, etc.).
This is normal: The temperature setting for the LOWER ZONE should always be the same or higher than the UPPER ZONE. So, when the user adjusts the temperature of one of the zones, if the above condition is not met, the temperature setting of the second zone will change automatically to conform to the conditions.
11. It seems that the control panel is not working.
The control panel of this appliance has auto-locking, to avoid undesired manipulation of the settings. This is automatically activated 2 minutes after the control panel is left untouched. To unlock the control panel, press UP and DOWN keys together for 5 seconds.
12. The fans are constantly working. Is this is normal?
To circulate air and maintain the set temperature inside the cabinet, the interior fans will turn ON and OFF when the compressor is on in Dynamic Climate mode. The fan will turn on and off every 20 seconds, approximately. This is normal and serves to circulate air as well as to ensure the operating status of the fans. Fans working continuously. If the fan stops compete, and does not complete the cycle, the fan is not working.
13. The digital screen works. But the unit is not cooling.
Check to see if the unit is in “Demo Eco mode”. Simultaneously press “UP”, “DOWN” and “LIGHT” at the same time for at least 5 seconds to exit Demo Eco mode.
14. The digital screen, the light and the sound do not work, but the unit is cooling well.
Perhaps the unit is in "display OFF" mode
15. Ice is building up at the bottom rear (compressor area) obstructing the farand causing the unit to malfunction.
Check that the lower part or in the vicinity, especially in built-in models, there is another appliance producing heat, such as a freezer, oven, etc., THE WINE CABINET SHOULD NOT BE PLACED IN THESE LOCATIONS.
- TECHNICAL SPECIFICATIONS
| SPECIFICATION | PVMAV45-18/PVMAVP45-18 | PVMAV60-25/PVMAVP60-25 | PVMAV88-49/PVMAVP88-49 | PVMAV124-70/PVMAVP124-70 | PVMAV178-112/PVMAVP178-112 | PBE89-66 | PBE182-190 |
| Number of Sections 1 2 | 2 2 2 1 1 | ||||||
| Cold sections insulation | Yes | Yes Yes Yes | Yes Yes | - | |||
| Wine Storage Bottles with Full Sliding Shelves - Total | 18 | 25 | 49 | 70 | 112 | 66 | 190 |
| Bottle height (mm) | 300 | 300 | 300 | 300 | 300 | 300 | 300 |
| No. Trays removable wood Haya | 2 | 3 5 9 | 15 2 4 | ||||
| No. Trays fixed department | 1 | 1 | - | - | - | - | - |
| Light | Yes | Yes Yes Yes | Yes Yes | Yes | |||
| Temp. Control (Electronic - Digital/Mechanical) | Electronic-Digital | Electronic-Digital | Electronic-Digital | Electronic-Digital | Electronic-Digital | Electronic-Digital | Electronic-Digital |
| Temp. Range (°C/°F) | 5~20°C | 5~20°C | 5~20°C | 5~20°C | 5~20°C | 5~20°C | 5~20°C |
| Temp. Range - Zone One (Upper or Left) (°C/°F) | 5~20°C | 5~20°C | 5~20°C | 5~20°C | 5~20°C | 5~20°C | 5~20°C |
| Temp. Range - Zone Two (Lower or Right) (°C/°F) | N.A | 5~20°C | 5~20°C | 5~20°C | 5~20°C | 5~20°C | N.A |
| Defrosting (Automatic/Semi Automatic/Manual/Frost Free) | Automatic | Automatic | Automatic | Automatic | Automatic | Automatic | Automatic |
| Humidity Control (Humidity Box) | Humidity Box | Humidity Box | Humidity Box | Humidity Box | Humidity Box | Humidity Box | Humidity Box |
| Heating | Yes | Yes Yes Yes | Yes Yes | Yes | |||
| Temperature Alarm System | Yes | Yes Yes Yes | Yes Yes | Yes | |||
| Door Alarm System | Yes | Yes Yes Yes | Yes Yes | Yes | |||
| Deodorizer - Active Charcoal Filter | No | No | No | No | Yes | Yes | Yes |
| Wine Storage Compartment Humidity | Yes | Yes Yes Yes | Yes Yes | Yes | |||
| Control System Humidity Pump for humidity control | NO | NO | NO | NO | NO | Yes | Yes |
| °C/°F Temperature Display | Yes | Yes Yes Yes | Yes Yes | Yes | |||
| Display Color (Blue/Red) | Blue | Blue | Blue | Blue | Blue | Blue | Blue |
| Interior Light Type (LED/Bulb) | LED | LED | LED | LED | LED | LED | LED |
| Interior Light Color (White/Blue) | Blue | Blue | Blue | Blue | Blue | Blue | Blue |
| Flush Back Design | Smooth | Smooth | Smooth | Smooth | Smooth | Smooth | Smooth |
| Light Switch | Yes | Yes | Yes | Yes | Yes | Yes | Yes |
| Professional Fully - integrated HINDGE | Yes | Yes Yes Yes | Yes No | No | |||
| Door reversibility | No | No | No | No | No | Yes | Yes |
| Door Opening Angle | 95-115° | 95-115° | 95-115° | 95-115° | 95-115° | 115° | 115° |
| Anti UV Glass | Yes | Yes | Yes | Yes | Yes | Yes | Yes |
- TECHNICAL SPECIFICATIONS
| SPECIFICATION | PVMAV45-18/PVMAVP45-18 | PVMAV60-25/PVMAVP60-25 | PVMAV88-49/PVMAVP88-49 | PVMAV124-70/PVMAVP124-70 | PVMAV178-112/PVMAVP178-112 | PBE89-66 | PBE182-190 |
| Number of Layers for Glass Door | 3 | 3 3 3 3 3 | |||||
| Tempered Glass Yes | Yes Yes Yes | Yes Yes Yes | Yes | ||||
| Free Standing No | No No No No | Yes Yes | |||||
| Built-in Yes Yes Yes Yes No | No No | ||||||
| Built-under No No | No No No Yes | Yes Yes | |||||
| Power Cord Length (m) - Cabinet to Wall | 1,8 | 1,8 1,8 1,8 | 1,8 1,8 1,8 | ||||
| Integrated ventilation system | Yes | Yes Yes Yes | Yes No No | ||||
| Air Ventilation (Kitchen Unit Ventilation/Front Plinth Ventilation) | Integrated free ventilation | Integrated free ventilation | Integrated free ventilation | Integrated free ventilation | Integrated free ventilation | Front ventilation skirting board | Front ventilation skirting board |
| Height (mm/Inches) | 455 | 595 | 885 | 1234 | 1784 | 820 | 1820 |
| Width (mm/Inches) | 592 | 592 | 592 | 592 | 592 | 595 | 595 |
| Depth without handle (mm/Inches) | 559 | 559 | 559 | 559 | 559 | 575 | 575 |
| Depth with handle (mm/Inches) | 599NO | 599NO | 599NO | 599NO | 599NO | 615 | 615 |
| Body depth without door (mm) | 512 | 512 | 512 | 512 | 512 | 530 | 530 |
| Depth and height base_DxH (mm) | - | - | - | - | - | 72x95 | 72x95 |
| Handle Dimensions_HxWxD (mm) | 285x25x40NO | 285x25x40NO | 285x25x40NO | 285x25x40NO | 285x25x40NO | 510x25x40 | 510x25x40 |
| product size (HxWxD) | 455x592x559 | 595x592x559 | 885x592x559 | 1234x592x559 | 1784x592x559 | 820x595x575 | 1820x595x575 |
| Adjustment measures_HxWxD (mm) | 450x555x545 | 589x555x545 | 874x555x545 | 1223x555x545 | 1773x555x545 | 822x600x≥585 | 1825x600x≥585 |
| Total Storage Volume (l) | 46 | 63 | 116 | 182 | 285 | 128 | 335 |
| Energy Efficiency Class | A | A A | A | A | A+ A+ | ||
| Energy Efficiency Class / 2021 | G | G | G | G | G | E | G |
| Climate Class (Temp. Range) | ST | ST ST ST ST | ST ST | ||||
| Rated Power Supply | 220-240V~/50Hz | 220-240V~/50Hz | 220-240V~/50Hz | 220-240V~/50Hz | 220-240V~/50Hz | 220-240V~/50Hz | 220-240V~/50Hz |
| Interior Light Number Qty | 12 | 12 | 24 | 38 | 60 | 6 | 62 |
| Consumption for indoor led unit (W) | 0,05 | 0,05 | 0,05 | 0,05 | 0,05 | 0,15 | 0,05 |
| Consumption Total indoor led light (W) | 0,6 | 0,6 1,2 1,9 3 | 0,9 | 3,1 | |||
| Power Input (W) | 85 | 100 | 100 | 160 | 160 | 100 | 160 |
| Current (A) | 0,6 | 1,2 | 1,2 | 1,2 | 1,4 | 1,2 | 1,4 |
| Energy Consumption (kWh/y.r) / 2021 | 127 | 131 | 156 | 170 | 185 | 76 | 144 |
| INVERTER (Yes / No) | NO | NO | NO | Yes | Yes | NO | NO |
| Refrigerant Type | R600a | R600a | R600a | R600a | R600a | R600a | R600a |
| Sound LwA (dB(A) re 1 pW) / 2021 | 36 | 39 | 40 | 40 | 40 | 40 | 41 |
- TECHNICAL SPECIFICATIONS
| SPECIFICATION | PVMB 15-7 | PVMB 30-16 | PVMB 40-28 | PVMBP-HD 40-28 | PVMB 60-53 | PVMBP 60-45 | PVMBP-HD 60-45 |
| Number of Sections 1 | 2 | 2 | 2 | 2 | 2 | 2 | |
| Cold sections insulation - | Yes | Yes | Yes | Yes | Yes | Yes | |
| Wine Storage Bottles with Full Sliding Shelves - Total | 7 | 16 | 28 | 28 | 53 | 45 | 45 |
| Bottle height (mm) 300 | 300 | 300 | 300 | 300 | 300 | 300 | |
| No. Trays removable wood Haya | - | 5 | 5 | 5 | 4 | 4 | 4 |
| No. Trays fixed department 7 | 1 | 1 | 1 | 1 | 1 | 1 | |
| Light Yes | Yes | Yes | Yes | Yes | Yes | Yes | |
| Temp. Control (Electronic-Digital/Mechanical) | Electronic-Digital | Electronic-Digital | Electronic-Digital | Electronic-Digital | Electronic-Digital | Electronic-Digital | Electronic-Digital |
| Temp. Range (°C/°F) 5~20°C | 5~20°C | 5~20°C | 5~20°C | 5~20°C | 5~20°C | 5~20°C | |
| Temp. Range - Zone One (Upper or Left) (°C/°F) | 5~20°C | 5~20°C | 5~20°C | 5~20°C | 5~20°C | 5~20°C | 5~20°C |
| Temp. Range - Zone Two (Lower or Right) (°C/°F) | N.A | 5~20°C | 5~20°C | 5~20°C | 5~20°C | 5~20°C | 5~20°C |
| Defrosting (Automatic/Semi Automatic/Manual/Frost Free) | Automatic | Automatic | Automatic | Automatic | Automatic | Automatic | Automatic |
| Humidity Control (Humidity Box) | Humidity Box | Humidity Box | Humidity Box | Humidity Box | Humidity Box | Humidity Box | Humidity Box |
| Heating No | Yes | Yes | Yes | Yes | Yes | Yes | |
| Temperature Alarm System Yes | Yes | Yes | Yes | Yes | Yes | Yes | |
| Door Alarm System Yes | Yes | Yes | Yes | Yes | Yes | Yes | |
| Deodorizer - Active Charcoal Filter | No | No | Yes | Yes | No | No | No |
| Wine Storage Compartment Humidity | Yes | Yes | Yes | Yes | Yes | Yes | Yes |
| Control System Humidity Pump for humidity control | NO | NO | NO | NO | NO | NO | NO |
| °C/°F Temperature Display Yes | Yes | Yes | Yes | Yes | Yes | Yes | |
| Display Color (Blue/Red) Blue | Blue | Blue | Blue | Blue | Blue | Blue | |
| Interior Light Type (LED/Bulb) | LED | LED | LED | LED | LED | LED | LED |
| Interior Light Color (White/Blue) | Blue | Blue | Blue | Blue | Blue | Blue | Blue |
| Flush Back Design Smooth | Smooth | Smooth | Smooth | Smooth | Smooth | Smooth | |
| Light Switch Yes | Yes | Yes | Yes | Yes | Yes | Yes | |
| Professional Fully-integrated HINDGE | No | No | No | No | No | Yes | Yes |
| Door reversibility No | No | No | No | No | No | Not without Logo YES with Logo | |
| Door Opening Angle 115° | 115° | 115° | 115° | 115° | 115° | 115° | |
| Anti UV Glass Yes | Yes | Yes | Yes | Yes | Yes | Yes |
- TECHNICAL SPECIFICATIONS
| SPECIFICATION | PVMB15-7 | PVMB30-16 | PVMB40-28 | PVMBP-HD40-28 | PVMB60-53 | PVMBP60-45 | PVMBP-HD60-45 |
| Number of Layers for Glass Door | 3 | 3 3 3 3 3 | |||||
| Tempered Glass Yes | Yes Yes Yes | Yes Yes Yes | |||||
| Free Standing Yes | Yes Yes Yes | Yes Yes Yes | |||||
| Built-in No No No | No No No No | ||||||
| Built-under Yes Yes | Yes Yes Yes | Yes Yes | |||||
| Power Cord Length (m) - Cabinet to Wall | 1,8 | 1,8 1,8 1,8 | 1,8 1,8 | ||||
| Integrated ventilation system | No | No No No No | No No | ||||
| Air Ventilation (Kitchen Unit Ventilation/Front Plinth Ventilation) | Front ventilation skirting board | Front ventilation skirting board | Front ventilation skirting board | Front ventilation skirting board | Front ventilation skirting board | Front ventilation skirting board | Front ventilation skirting board |
| Height (mm/Inches) | 820 | 820 820 880 | 820 820 880 | ||||
| Width (mm/Inches) | 148 | 295 395 395 | 595 595 595 | ||||
| Depth without handle (mm/Inches) | 530 | 575 575 575 | 575 556 556 | ||||
| Depth with handle (mm/Inches) | 570 | 615 615 | 615 | - | - | - | |
| Body depth without door (mm) | 485 | 530 530 530 | 530 510 510 | ||||
| Depth and height base DxH (mm) | 72x95 | 72x95 | 72x95 | 72x95 | 72x95 | 72x95 | 72x95 |
| Handle Dimensions_HxWxD (mm) | 510x25x40 | 510x25x40 | 510x25x41 | - | 510x25x40 | - | - |
| product size (HxWxD) | 820x148x530 | 820x295x575 | 820x395x575 | 880x395x575 | 820x595x575 | 820x595x556 | 880x595x556 |
| Adjustment measures_HxWxD (mm) | 822x153x≥540 | 822x300x≥585 | 822x400x≥575 | 882x400x≥575 | 822x600x≥585 | 822x600x≥575 | 882x600x≥575 |
| Total Storage Volume (l) | 19 | 52 | 75 | 75 | 125 116 116 | ||
| Energy Efficiency Class | A | A | - | - | A | A | A |
| Energy Efficiency Class / 2021 | G | G | G | G | G | G | G |
| Climate Class (Temp. Range) | ST | ST ST ST ST | ST ST | ||||
| Rated Power Supply | 220-240V~/50Hz | 220-240V~/50Hz | 220-240V~/50Hz | 220-240V~/50Hz | 220-240V~/50Hz | 220-240V~/50Hz | 220-240V~/50Hz |
| Interior Light Number Qty | 3 | 24 | 24 | 24 | 24 | 24 | 24 |
| Consumption for indoor led unit (W) | 0,05 | 0,05 | 0,05 | 0,05 | 0,05 | 0,05 | 0,05 |
| Consumption Total indoor led light (W) | 0,15 | 1,2 | 1,2 | 1,2 | 1,2 | 1,2 | 1,2 |
| Power Input (W) | 60 | 85 | 85 | 85 | 100 | 100 | 100 |
| Current (A) | 0,6 | 0,6 0,6 0,6 1,2 | 1,2 1,2 | ||||
| Energy Consumption (kWh/y.r) / 2021 | 142 | 123 147 147 | 133 133 133 | ||||
| INVERTER (Yes / No) | NO | NO | NO | NO | NO | NO | NO |
| Refrigerant Type | R600a | R600a | R600a | R600a | R600a | R600a | R600a |
| Sound LwA (dB(A) re 1 pW) / 2021 | 40 | 40 | 39 | 39 | 40 | 40 | 40 |
10. AFTER SALES TECHNICAL SERVICE (SAT) AND GUARANTEE:
INOXPAN S.L., thank you for choosing our brand and for trusting a Pando product, standard of Quality, Design & Innovation, a brand honoring his origins and commitments.
TERMS OF THIS WARRANTY:
This product comes with a warranty of 3 year as from the date of purchase covering all product defect affecting its performance. To validate the same is mandatory to apply the purchasing invoice or buying ticket before the Official Customer Service engineer.
During the above mentioned period, the Company pledge to repair or replace at no cost any defective part whose cause is due to vice or manufacturing product flaw to make it work fine again, as well as the necessary labour cost and expenses involved in said repairing or replacement.
PANDO WARRANTY EXEMPTIONS:
It shall not be covered by the warranty or may be cause of cancelation of such, any of the following case scenarios, thus being the user the one taking charge of any material cost, labour and customer service travel expenses:
- Product installation, check-ups, cleaning or maintenance.
- Any failure, defect or product malfunction caused by wrong installation or use.
- Failures or defects caused by not respecting or following the safety instructions, product use and maintenance manual recommendations.
- Whenever the product is orientated to commercial or non-residential use, to which it is not made for.
- Any malfunction or damage suffered by the fridge as a result of failing to comply with the instructions described in the user's manual, and installation manual and ventilation of the device.
- Product malfunction caused by not following the instructions, recommendations and/or norms shown in the appliance manuals.
- Issues and faults produced by carriage or moves, and/or product handling by non-authorised personnel to this company or the brand Pando.
- Bumps, dents, scratches, or broken glasses.
- Other alien bodies present in the interior or exterior of the product.
- The product not be accessible, either due to elements impeding easy and safe access. All necessary means to access by the Pando authorised engineer shall be on account and responsibility of the user.
- Improper manipulation of the wiring and connections of the product.
- Faults or damage caused to the product by incorrect power supply or electrical connection.
- Aesthetic, wear and tear components, such as light screens, filters, (LED) lamps, shelves, drawers, covers, door gasket, etc.
- Rust, stains, tone changes produced by the use of inadequate non recommended corrosive cleaning products without the right protection, as those containing chemical corrosive agents, and /or exposure to the sea breeze (saltpetre).
- Any wine and / or other consumable spoiled due to possible failure or incident with the unit.
- Issues or malfunction produced by variations of main supply, or natural and random causes from weather or geological origin, as storms, lightning, earthquakes, floods, etc.
- Appliances from resale, second hand, change of original owner of the appliance or from exhibitions that are more than two years old from the date of manufacture.
INOXPAN, S.L., remains expressly excluded from any liability over any eventual damage any direct or indirect to persons or materials produced by inadequate product handling and use.
Official Pando Customer Service Contact Details
| SPAIN, PORTUGAL Y ANDORRA: | OTHER COUNTRIES / AUTRES PAYS | ||
| https://www.pando.es/asistencia-tecnica/ |  | ENhttps://www.pando.es/en/after-sales-services/FRhttps://www.pando.es/fr/service-apres-vente/ |  |
natural_image
Interior view of a black server rack with multiple shelves and a door open, showing internal components (no visible text or labels)VISTA FRONTALE
VISTA LATERALE
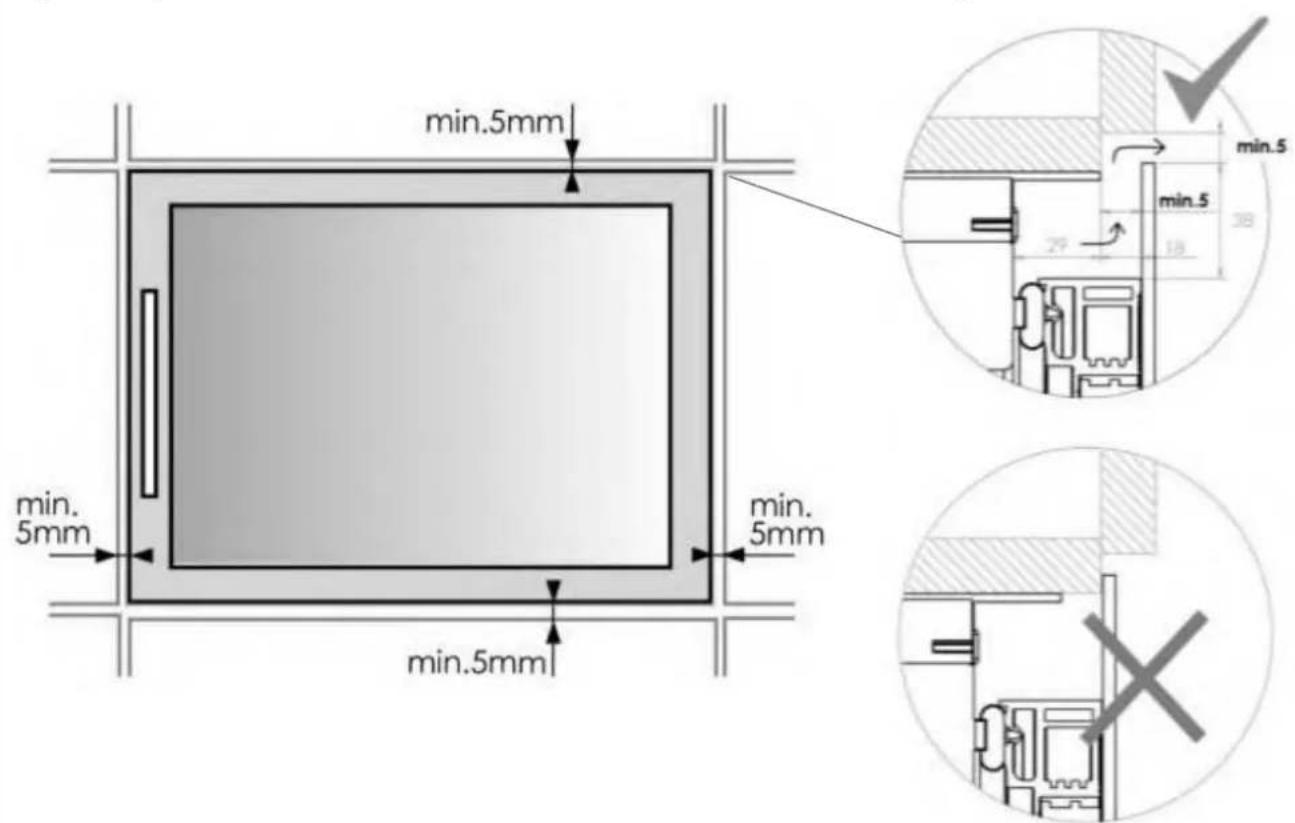

AVVISO
natural_image
Technical line drawing of a mechanical bracket with multiple screw fasteners and directional arrows indicating movement (no text or symbols)• PVMB 15-7
- PVMB 30-16
- PVMB 40-28
• PVMBP-HD 40-28
• PVMB 60-53
- PVMBP 60-45
• PVMBP-HD 60-45
• PBE 182-190
• PBE 89-66
natural_image
Diagram of a cabinet with open door and internal shelves, showing structural components (no text or symbols)- PVMAV 45-18
- PVMAVP 45-18
- PVMAV 60-25
- PVMAVP 60-25
- PVMAV 88-49
- PVMAVP 88-49
- PVMAV 124-70
- PVMAVP 124-70
- PVMAV 178-112
• PVMAVP 178-112
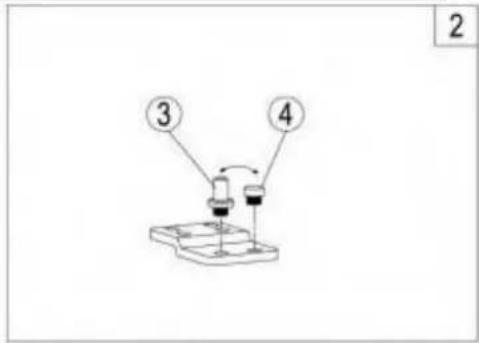
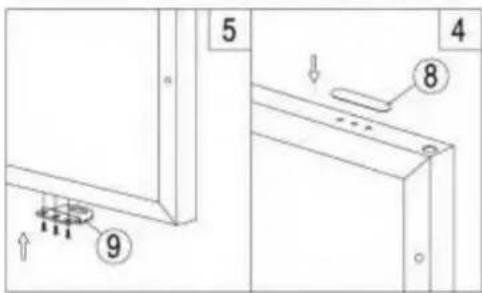

natural_image
Front view of a double-free wine refrigerator with multiple shelves and decorative vials (no visible text or labels)
natural_image
Front view of a black wine refrigerator with multiple shelves and control knobs (no visible text or labels)DIAGRAMMA - CERNIERA ARTICOLATA PROFESSIONALE CON SISTEMA DI CHIUSURA "SOFT"
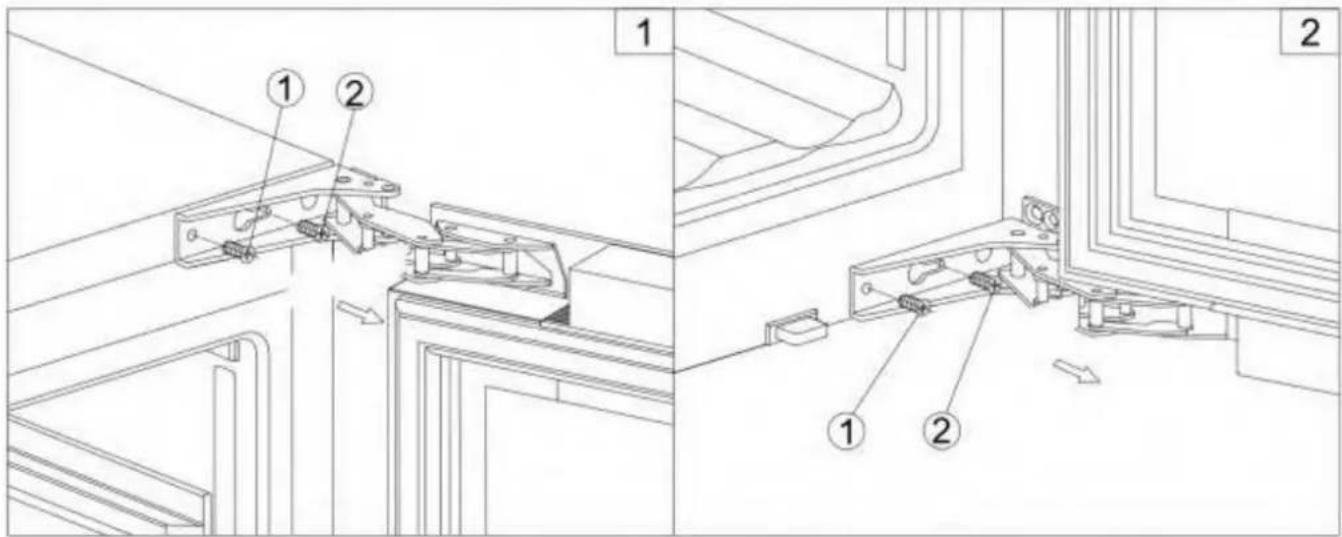
ATTENZIONE

natural_image
Technical line drawing showing two views of a mechanical assembly with rollers and a directional arrow (no text or symbols)3.11. ANGOLI DI FINITURA LATERALE (OPZIONALE)

natural_image
Simple line drawing of a horizontal bar with label '2X' (no other text or symbols)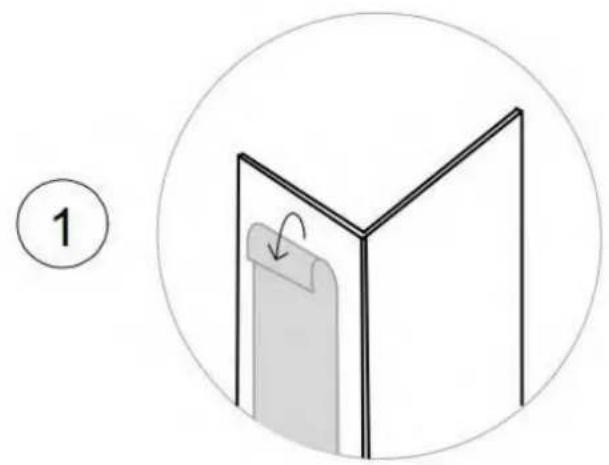
natural_image
Diagram of a Y-shaped structure with a label '1' and an arrow indicating rotation, enclosed in a circle (no text or symbols on the diagram itself)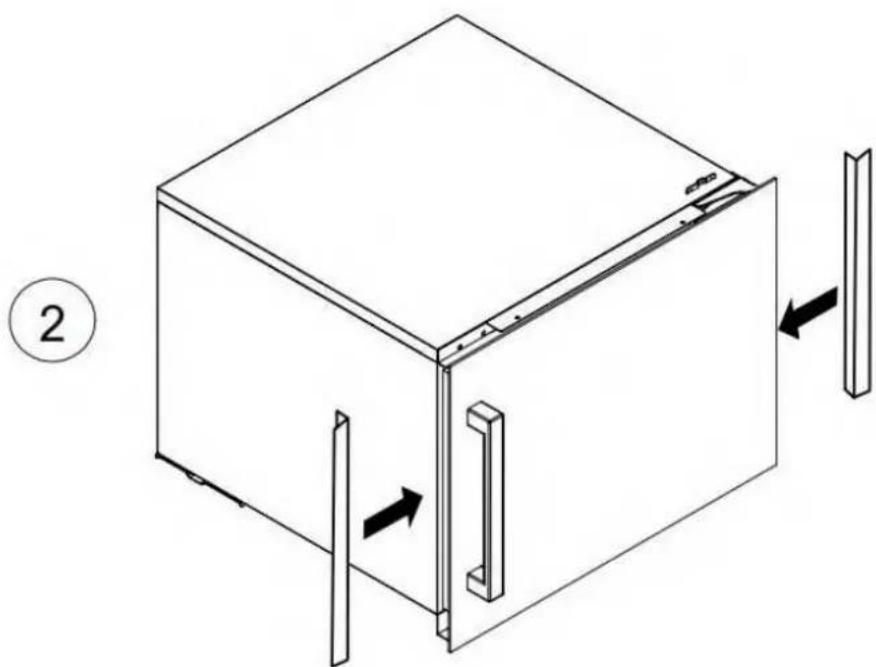
natural_image
Isometric line drawing of a 3D cube with internal components and directional arrows indicating movement (no text or symbols)4. ISTRUZIONI PER L'USO
5.1.5. MODALITÀ DEMO ECO
natural_image
Interior view of a refrigerator with wine rack and open door (no visible text or labels)natural_image
Cross-sectional diagram of a mechanical or electrical component with no visible text or symbols
ПРИМЕЧАНИЕ
natural_image
Technical line drawing of a mechanical bracket with multiple bolted components and directional arrows indicating movement (no text or symbols)natural_image
Diagram of a cabinet with shelves and door, showing internal components and directional arrows (no text or symbols)- PVMB 15-7
- PVMB 30-16
- PVMB 30-16
- PVMB 40-28
- PVMBP-HD 40-28
- PVMB 60-53
- PVMBP 60-45
- PVMBP-HD 60-45
- PBE 182-190
- PBE 89-66
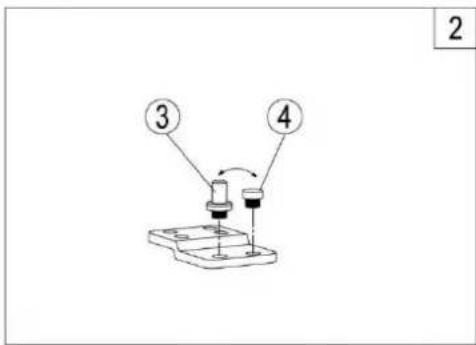
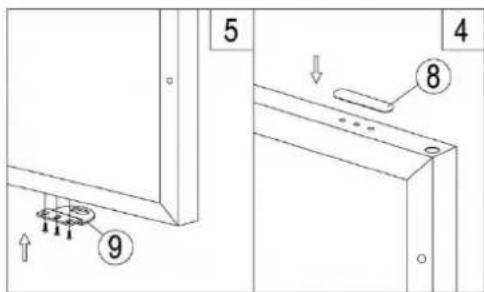
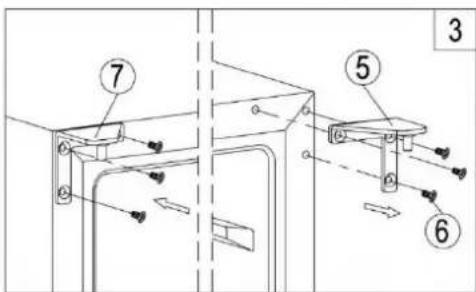
natural_image
Front view of a black double-chamber refrigerator with multiple pendant lights (no visible text or labels)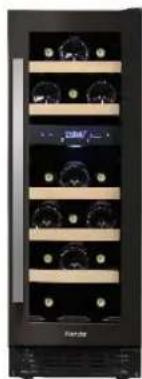
natural_image
Front view of a black double-chamber refrigerator with multiple wall-mounted fans and a central logo (no visible text or symbols on the appliance itself)
ВНИМАНИЕ!
natural_image
Technical line drawing showing a mechanical assembly with rollers and a directional arrow, no text or symbols present.natural_image
Simple line drawing of a Y-shaped structure with an arrow indicating rotation, enclosed in a circle (no text or symbols)2
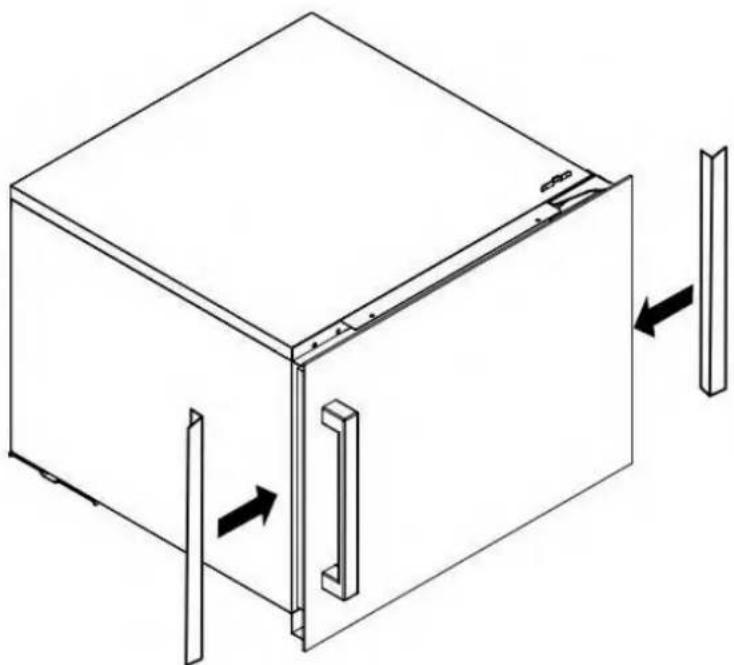
natural_image
Isometric line drawing of a 3D cabinet with two vertical supports and directional arrows indicating movement (no text or symbols)natural_image
Simple line drawing of a rectangular block with an arrow indicating clockwise motion and a circular symbol at the bottom (no text or labels)5.3 ПОЛКИ
natural_image
Technical line drawing of two parallel slatted metal components with mounting holes (no text or symbols)natural_image
Line drawing of a rectangular container placed on a wooden platform with rolled sheets (no text or symbols)6.2. ОЧИСТКА ПРИБОРА
natural_image
Diagram of a circular structure with a grid pattern and bidirectional arrows, no text or symbols present.https://www.pando.es/en/after-sales-services/
FR
- SICHERHEIT ......257
- PRODUKTMERKMALE....261
- INSTALLATION....262
3.1 VOR BENUTZUNG DES GERÄTS ......262
3.2INSTALLATION 262
3.3 ANLEITUNG FÜR DIE MONTAGE UNTER EINER ARBEITSPLATTE....264
3.4 MONTAGEANWEISUNG IN EINER SÄULE / INTEGRIERT 265
3.5 STROMANSCHLUSS....266
3.6 ANBRINGEN DES GRIFFS....266
3.7 INSTALLATION UND BEFESTIGUNG DER EINHEIT AM MÖBELSTÜCK 267
3.8 OPTIONALE TÜR MIT WECHSELBAREM ANSCHLAG 268
3.9 GLASS PLINTH (OPTIONAL) 270
3.10 FLASCHENHALTER TYP BORDEAUX 270
3.11 WINKEL ZUR SEITENVERKLEIDUNG (OPTIONAL)....271
natural_image
Simple line drawing of a trash bin with diagonal lines crossing it, no text or symbols present.natural_image
Interior view of a server rack unit with multiple battery modules and open door (no visible text or labels)natural_image
Technical line drawing of a mechanical bracket with multiple screw fasteners and directional arrows indicating movement (no text or symbols)- PVMB 15-7
• PVMB 30-16
• PVMB 40-28
• PVMBP-HD 40-28
• PVMB 60-53 - PVMBP 60-45
- PVMBP-HD 60-45
• PBE 182-190
• PBE 89-66
natural_image
Diagram of a cabinet with open door and shelf, showing internal components (no text or symbols)'MAV 45-18
'MAVP 45-18
'MAV 60-25
'MAVP 60-25
'MAV 88-49
'MAVP 88-49
'MAV 124-70
'MAVP 124-70
'MAV 178-112
'MAVP 178-112
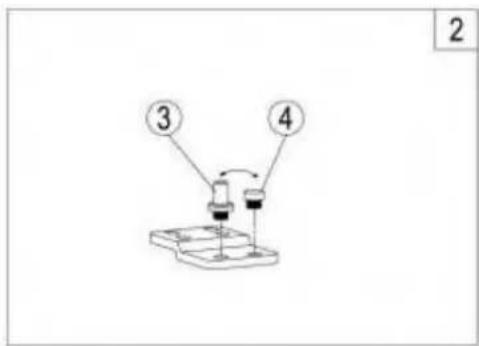
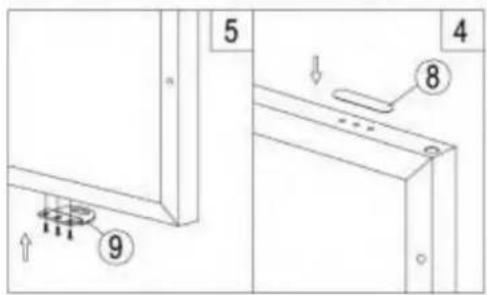
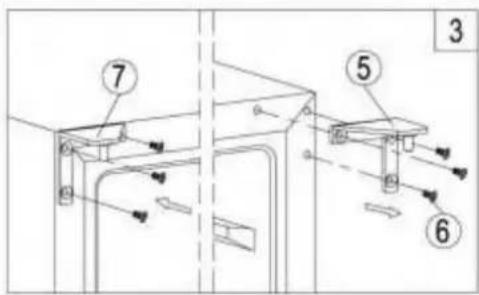
natural_image
Two black wine cabinets with white shelves and circular vials, no visible text or labels▲ACHTUNG!
natural_image
Interior view of a modern refrigerator with glass shelves and a digital display showing 'Panda' branding (no readable text on shelves)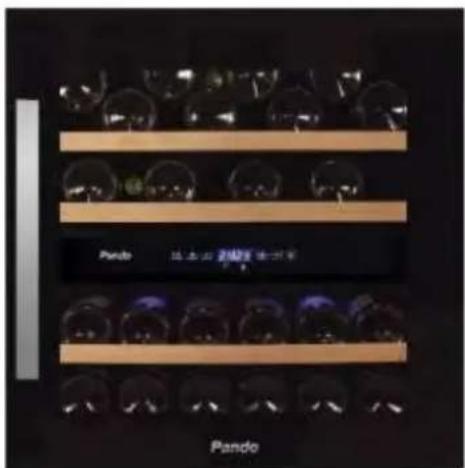
3.9. GLASSOCKEL (OPTIONAL)
natural_image
Technical line drawing showing two views of a mechanical assembly with circular components and directional arrows (no text or symbols)natural_image
Simple line drawing of a horizontal bar with label '2X' (no other text or symbols)1
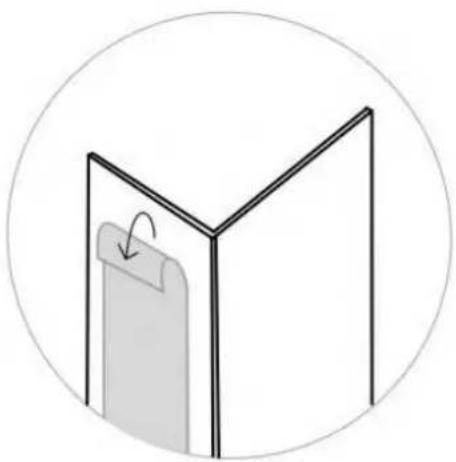
natural_image
Simple line drawing of a Y-shaped structure with a folded paper or sheet, no text or symbols present.2
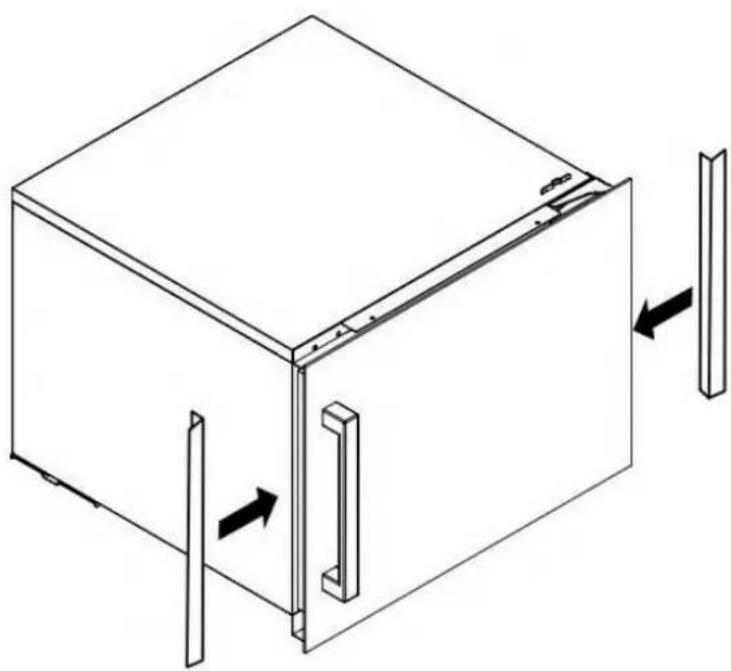
natural_image
Isometric line drawing of a 3D cube with internal components and directional arrows indicating movement (no text or symbols)natural_image
Simple line drawing of a rectangular frame with an arrow indicating clockwise motion (no text or symbols)5.3 EINLEGEBÖDEN
natural_image
Technical line drawing of a mechanical component with two parallel grooves and mounting holes (no text or symbols)5.4 GERÄUSCHE IM BETRIEB
natural_image
Line drawing of a rectangular container placed on a grid base (no text or symbols)5mm perimeter Ventilation. See details on page 136.
5mm perimeter Ventilation. See details on page 136.
5mm perimeter Ventilation. See details on page 136.
natural_image
Line drawing of a wine bottle holder with six bottles arranged in a row (no text or symbols)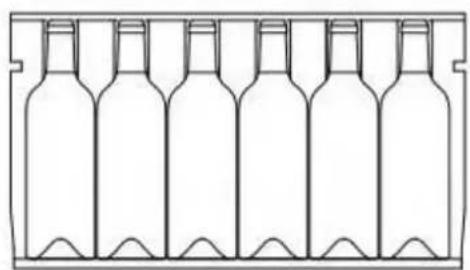
natural_image
Line drawing of seven identical wine bottles arranged in a row, enclosed in a rectangular frame (no text or symbols)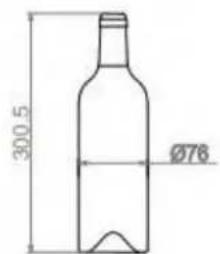
- DISTRIBUCIÓN BOTELLAS / DISTRIBUIÇÃO DE GARRAFAS / DISTRIBUTION DE BOUTEILLES / BOTTLES DISTRIBUTION / DISTRIBUZIONE DELLA BOTTIGLIA / CXEMA YKŁADKI BUTYILOK / FLASCHENAUFTEILUNG
PVMB 15-7 PVMB 30-16
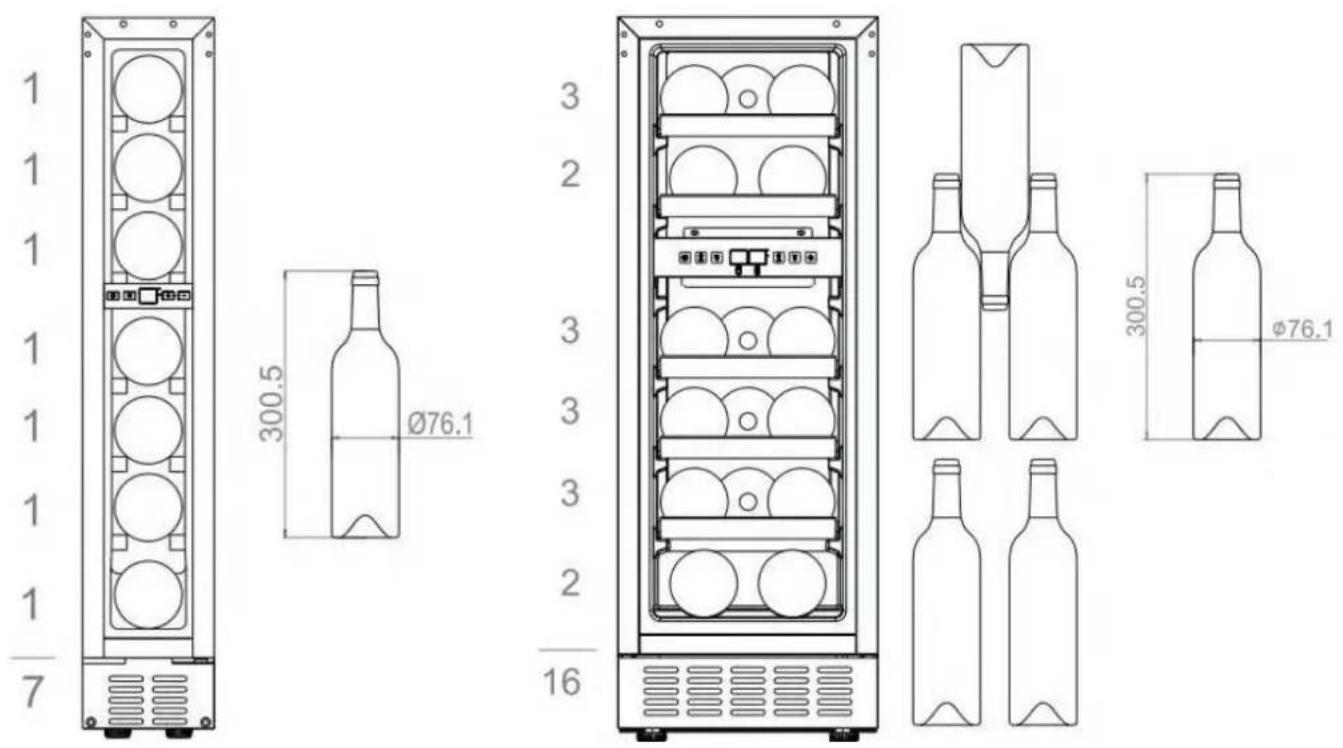
PVMB 40-28 / PVMBP-HD 40-28

- DISTRIBUCIÓN BOTELLAS / DISTRIBUIÇÃO DE GARRAFAS / DISTRIBUTION DE BOUTEILLES / BOTTLES DISTRIBUTION / DISTRIBUZIONE DELLA BOTTIGLIA / CXEMA YKЛАДКИ БУТЫЛОК / FLASCHENAUFTEILUNG
PVMB 60-53
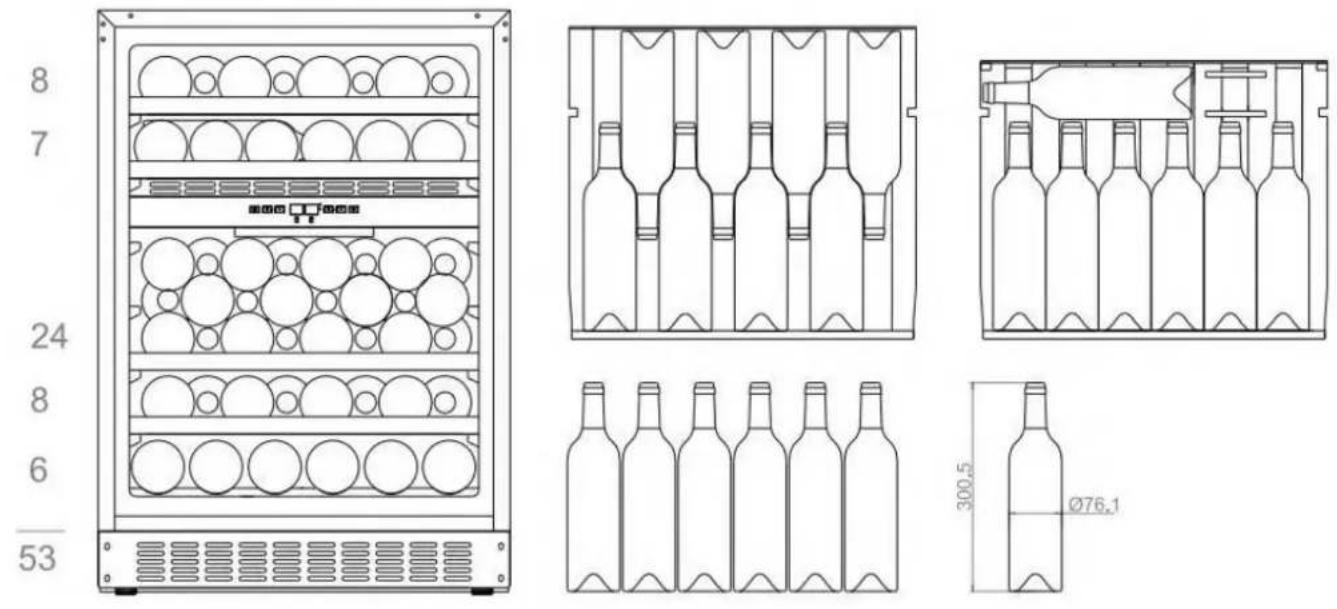
PVMBP 60-45 / PVMBP-HD 60-45
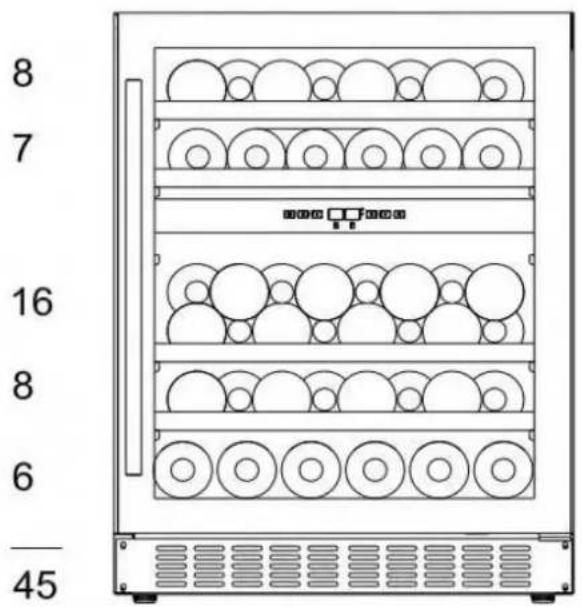
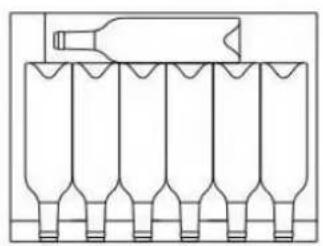
natural_image
Diagram of a multi-stage bottle assembly with multiple bottles arranged in rows (no text or labels)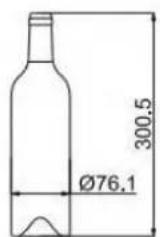
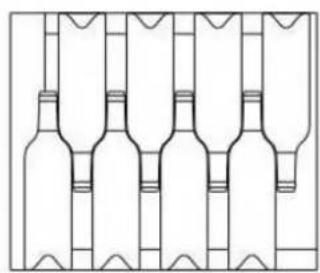
natural_image
Line drawing of six identical bottles arranged in a row, no text or symbols presentINOXPAN S.L.
INOXPAN S.L.
Pol. Ind. El Cros
SERVICIO POST VENTA

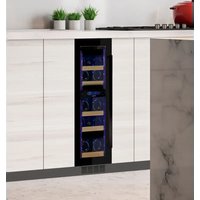

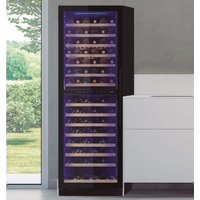
- integral WineCellar
- Pando
- integralcooking
- WINE CAVINETS
- AVISO
- ESQUEMA – BISAGRA PROFESIONAL INTEGRADA CON CIERRE "SOFT"
- ATENCIÓN
- ANGULOS LATERALES EMBELLECEDORES (OPCIONAL)
- ESTANTERIAS
- CORTES DE ENERGÍA ELÉCTRICA
- ATENÇÃO
- BASE DE VIDRO
- SOMENTE PARA MODEOS:
- ÂNGULO LATERAIS DE TRIM (OPCIONAL)
- PAINEL INDICADOR LUMINOSO (DISPLAY)
- PRATELEIRAS
- CORTES DE ENERGIA ELÉTRICA
- CARACTERISTIQUES DU PRODUIT
- REMARQUER
- DIAGRAM – CHARNIÈRE PROFESSIONNELLE INTEGRÉE AVEC LA FERMETURE "SOFT"
- ATENTION
- SOCLE DE VERRE (OPTIONNEL)
- SEULEMENT POUR LES MODÈLES :
- ANGLES DE GARNITURE LATÉRALE (EN OPTION)
- INSTRUCTIONS DE FONCTIONNEMENT
- PLATEAUX
- BRUITS DE FONCTIONNEMENT
- NETTOYAGE DE L'APPAREIL
- COUPURES ÉLECTRIQUES
- SAFETY
- FOR YOUR SAFETY
- In case of damage:
- To avoid contamination of food, please respect the following instructions:
- PLEASE KEEP THESE INSTRUCTIONS AT HAND
- PACKAGING AND END OF LIFE
- Instructions for disposal:
- ENVIRONMENTAL PROTECTION AND WASTE TREATMENT
- PRODUCT CHARACTERISTICS
- INSTALLATION
- BEFORE USING THE APPLIANCE
- INSTALLATION
- IMPORTANT: HIGH HUMIDITY ENVIRONMENTS
- SEVERAL APPLIANCES INSTALLATION
- ATTENTION!: WHEN INSTALLING SEVERAL APPLIANCES SHARING SAME VENTILATION SPACE:
- INSTRUCTIONS FOR FITTING UNDER A WORKTOP
- Only for models:
- ASSEMBLY INSTRUCTIONS IN COLUMN / INTEGRATED
- ELECTRICAL CONNECTION
- FITTING THE HANDLE
- Note:
- SET AND SECURE THE UNIT TO THE FURNITURE
- REVERSIBLE OPTIONAL DOOR
- DIAGRAM – MODELS FITTED UNDER A WORKTOP
- DIAGRAM – PROFESSIONAL ARTICULATED HINGE WITH CLOSURE "SOFT"
- ATTENTION
- GLASS PLINTH (OPTIONAL)
- BORDEAUX BOTTLE HOLDER
- SIDE TRIM ANGLES (OPTIONAL)
- OPERATING INSTRUCTIONS
- ATTENTION:
- USE AND OPERATION
- USE AND OPERATION
- CONTROL PANEL
- FOR A SINGLE ZONE
- ILLUMINATED DISPLAY
- INDICATOR LIGHT
- TEMPERATURE CONTROL ADJUSTMENT
- FOR DOUBLE ZONE
- FOR SINGLE ZONE WITH LCD DISPLAY (PBE MODELS)
- ICONS ON THE DISPLAY:
- SETTING THE TEMPERATURE CONTROL
- SETTING THE HUMIDITY CONTROL
- SHELVES AND STORAGE
- DYNAMIC CLIMATE MODE / SILENT MODE (ENERGY SAVING)
- DISPLAY OFF MODE
- ECO DEMO MODE
- For models PVMB
- ACTIVATE:
- DEACTIVATE:
- For models PVMAV
- 5.2.PUSH AUTOMATIC OPENING FUNCTION
- SHELVES
- NOISE DURING OPERATION
- DEFROSTING / HIGROMETRY / VENTILATION
- IMPORTANT:
- TABLE WITH WINE SERVING TEMPERATURES
- IMPORTANT INFORMATION ABOUT TEMPERATURE
- HUMIDITY CONTROL
- CLEANING THE UNIT
- ACTIVED CHARCOAL ODOR FILTER
- POWER CUTS
- DURING HOLIDAYS/ LONG ABSENCE
- MOVING THE UNIT / CHANGING LOCATION
- ADVICES FOR SAVING ENERGY
- TROUBLESHOOTING
- FAQ's (Frequently Asked Questions)
- The interior fan motors turn on and off even when the set temperature is reached.
- It is not possible to set the high and low temperatures separately – both are adjusted at the same time (Raising one, raises the other as well, etc.).
- It seems that the control panel is not working.
- The fans are constantly working. Is this is normal?
- The digital screen works. But the unit is not cooling.
- The digital screen, the light and the sound do not work, but the unit is cooling well.
- Ice is building up at the bottom rear (compressor area) obstructing the farand causing the unit to malfunction.
- AFTER SALES TECHNICAL SERVICE (SAT) AND GUARANTEE:
- TERMS OF THIS WARRANTY:
- PANDO WARRANTY EXEMPTIONS:
- AVVISO
- DIAGRAMMA - CERNIERA ARTICOLATA PROFESSIONALE CON SISTEMA DI CHIUSURA "SOFT"
- ATTENZIONE
- ANGOLI DI FINITURA LATERALE (OPZIONALE)
- ISTRUZIONI PER L'USO
- MODALITÀ DEMO ECO
- ПРИМЕЧАНИЕ
- ВНИМАНИЕ!
- ПОЛКИ
- ОЧИСТКА ПРИБОРА
- ▲ACHTUNG!
- GLASSOCKEL (OPTIONAL)
- EINLEGEBÖDEN
- GERÄUSCHE IM BETRIEB
- INOXPAN S.L.
Brand : Pando
Model : PVMAV 60-25
Category : Wine cellar