CA6 N5B3LYTX - Oven CANDY - Free user manual and instructions
Find the device manual for free CA6 N5B3LYTX CANDY in PDF.

User questions about CA6 N5B3LYTX CANDY
0 question about this device. Answer the ones you know or ask your own.
Ask a new question about this device
Download the instructions for your Oven in PDF format for free! Find your manual CA6 N5B3LYTX - CANDY and take your electronic device back in hand. On this page are published all the documents necessary for the use of your device. CA6 N5B3LYTX by CANDY.
USER MANUAL CA6 N5B3LYTX CANDY
Thank you for choosing our product. To ensure your safety and get the best results, please read this manual carefully, including the safety instructions, and keep it for future reference.
Before installing the oven note the serial number, which you might need for repairs. Check for any damage during transportation and consult a technician if you're unsure before using it. Keep packaging materials away from children.
NOTE: Please note that the oven's features and accessories may vary depending on the model you purchased.
SUMMARY
1. SAFETY INFORMATION
2. PRODUCT INTRODUCTION
2.1. OVERVIEW OF THE PRODUCT
2.2. ACCESSORIES
2.3. CONTROL PANEL
2.4. CONNECTIVITY
3. BEFORE STARTING
3.1. INFORMATION TO START
3.2. FIRST USAGE
3.3. PRELIMINARY CLEANING
4. OPERATION OF PRODUCT
4.1. HOW THE PRODUCT WORKS
4.2. COOKING FUNCTIONS
4.2.1. STANDARD FUNCTIONS
4.2.2. SPECIAL FUNCTIONS
5. COOKING GUIDELINES
5.1. GENERAL COOKING TABLE
5.2. EVERYDAY COOKING TABLE
6. CARE & CLEANING
6.1. GENERAL RECOMMENDATIONS
6.2. CLEANING THE OVEN
6.2.1. INSIDE THE OVEN: cleaning functions
6.2.1.1. DESCALE
6.2.1.2. DRAINING
6.2.2. OUTSIDE THE OVEN: removal and cleaning the glass door
6.3. CLEANING OF ACCESSORIES
6.4. MAINTENANCE
7. TROUBLESHOOTING
8. ENVIRONMENTAL PROTECTION & DISPOSAL
8.1. APPLIANCE DISPOSAL
8.2. SAVING AND RESPECTING THE ENVIRONMENT
9. INSTALLATION
GENERAL WARNINGS
- Do not use a steam cleaner for cleaning operations.
- CAUTION: in order to avoid a hazard due to inadvertent resetting of the thermal cut-out, this appliance must not be supplied through an external switching device, such as a timer, or connected to a circuit that is regularly switched on and off by the utility
- During use the appliance become hot. Care should be taken to avoid touching heating elements inside the oven.
Use in accordance with attendend use
- Only use the oven for its intended purpose, that is only for the cooking of foods: any other use, for example as a heat source, is considered improper and therefore dangerous. The manufacturer cannot be held responsible for any damage resulting from improper, incorrect or unreasonable usage.
Use limitations
- The appliance can be used by children aged from 8 years and above and persons with reduced physical, sensory or mental capabilities or lack of experience and knowledge if they have been given supervision or instruction concerning use of the appliance in a safe way and understand the hazards involved. Children shall not play with the appliance. Cleaning and maintenance shall not be made by children without supervision.
- This appliance is not intended to be used by persons (including children) with reduced physical, sensory or mental capabilities, or lack of experience and knowledge, unless they have been given supervision or instruction concerning use of the appliance by a person responsible for their safety.
- Children should be supervised to ensure that they do not play with the appliance.
- WARNING: the appliance and its accessible parts become hot during use. Care should be taken to avoid touching heating elements Children less than 8 years of age shall be kept at away unless continuously supervised.
- WARNING: Accessible parts may become hot during use. Young children should be kept away.
INSTALLATION WARNINGS
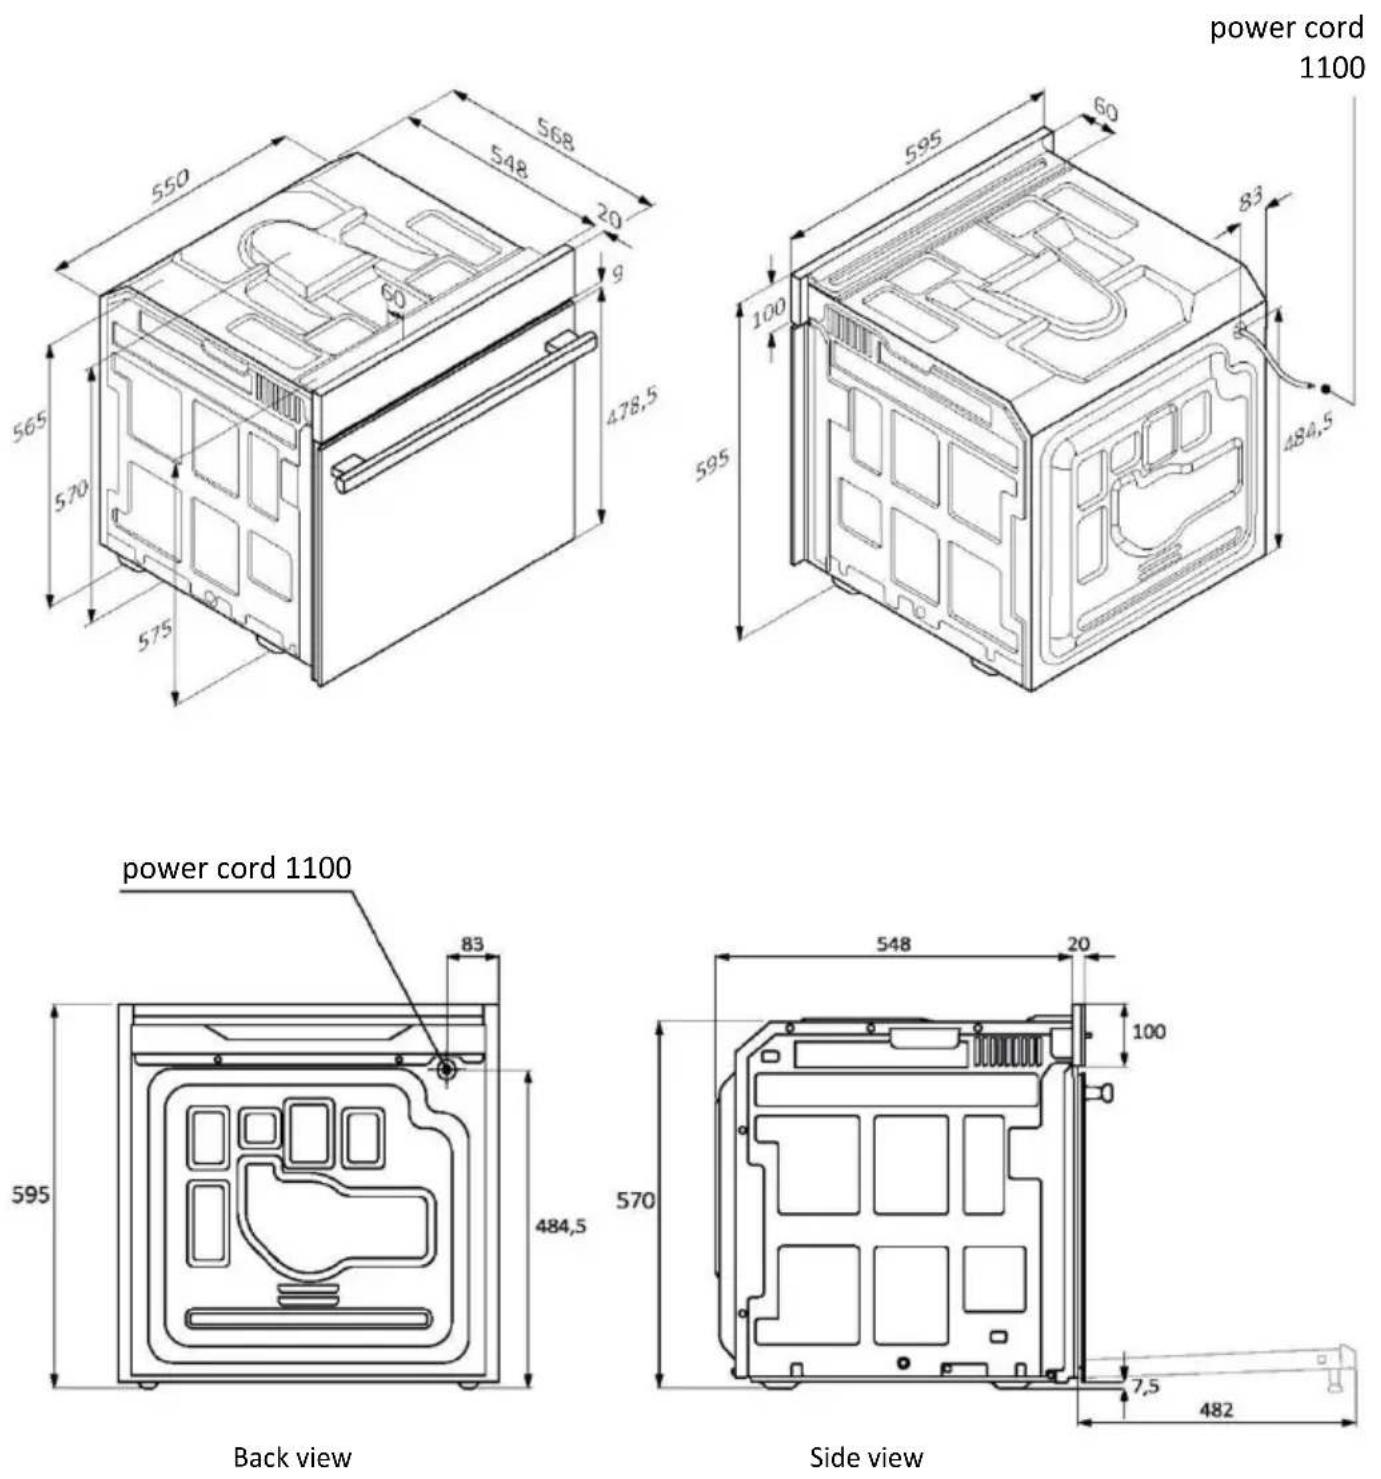
- The oven can be located high in a column or under a worktop.
- Before fixing, you must ensure good ventilation in the oven space to allow proper circulation of the fresh air required for cooling and protecting the internal parts. Make the openings specified on the illustrations according to the type of fitting. Always fix the oven to the furniture with screws provided with the appliance.
- No additional operation/setting is required in order to operate the appliance at the rated frequencies.
- The appliance must not be installed behind a decorative door in order to avoid overheating.
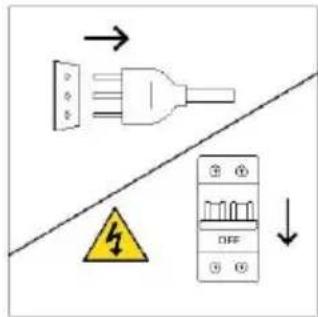
- During installation the oven should be disconnected from the mains electricity supply.
- If the assistance of the manufacturer is required to rectify faults arising from incorrect installation, this assistance is not covered by the guarantee. The installation instructions for professionally qualified personnel must be followed.
- Incorrect installation may cause harm or injury to people, animals or belongings. The manufacturer cannot be held responsible for such harm or injury.
- Installation must be carried on by a qualified technician who must know and respect the laws in force in the country of installation and the manufacturer's instruction.
- After unboxing the appliance, always check it is not damaged, in case of issue contact the customer service before installing and do not connect to the power supply.
- Remove the packaging material before operating the appliance.
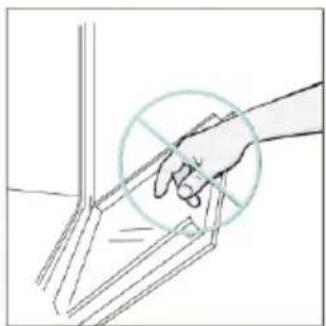
- During installation do not use the oven door's handle to lift and move the oven.
- The installation furniture and the adjacent ones must with stand temperatures of 95°C.
- It is recommended to wear protective gloves during installation to avoid cut injuries.
- Do not install the product in open environments exposed to atmospheric agents.
- This appliance is designed to be used at altitude lower than 2000m.
- To remove protective films and advertisement stickers on front surface of the oven before first usage.
ELECTRICAL WARNINGS
- The socket must be suitable for the load indicated on the tag and must have ground contact connected and in operation. The earth conductor is yellow-green in colour. This operation should be carried out by a suitably qualified professional.
- Connection to the power source can be made by plug or by fixed wiring placing an omnipolar breaker, with contact separation compliant to the requirements for overvoltage category III, between the appliance and the power source that can bear the maximum connected load and that is in line with current legislation.
- In case of incompatibility between the socket and the appliance plug, ask a qualified electrician to substitute the socket with another suitable type. The plug and the socket must be conformed to the current norms of the installation country.
- The yellow-green earth cable should not be interrupted by the breaker. The socket or omnipolar breaker used for the connection should be easily accessible when the appliance is installed.
- If the supply cord is damaged, it must be replaced by the manufacturer, its service agent or similarly qualified persons in order to avoid a hazard.
- For any repairs, refer only to the Customer Care Department and request the use of original spare parts.
- Disconnect the appliance from the mains electricity supply before carrying out any work or maintenance on it.
- WARNING: ensure that the appliance is switched off before replacing the bulb, to avoid the possibility of electric shocks.
- The oven must be switched off before removing the removable parts. After cleaning, reassemble them according the instructions.
-
The use of any electrical appliance implies the observance of some fundamental rules:
-
do not pull on the power cable to disconnect the appliance from the power source;
- do not touch the appliance with wet or damp hands or feet;
- in general the use of adaptors, multiple sockets and extension cables is not recommended;
- in case of malfunction and/or poor operation, switch off the appliance and do not tamper with it.
NOTE: as the oven could require maintenance work, it is advisable to keep another wall socket available so that the oven can be connected to this if it is removed from the space in which it is installed.
- Any repair, installation and maintenance not carried out correctly can seriously endanger the user.
- The manufacturing company hereby states that it does not assume any responsibility for direct or indirect damages caused by incorrect installation, maintenance, or repair work. Furthermore, it is not liable for damages caused by the absence or interruption of the grounding system (e.g., electric shock).
- CAUTION: in order to avoid a hazard due to inadvertent resetting of the thermal cut-out, this appliance must not be supplier through an external switching device, such as a timer, or connected to a circuit that is regularly switched on and off by the utility.
- The appliance is not designed to be activated by an external timer or separate remote control system.
USE & MANTEINANCE
- The dripping pan collects the residues that drip during cooking.
- When you place the Airfry tray or the grid on the side racks, make sure that the shorter section of the side (between the stop and the extremity) is directed towards the interior of the oven. If the grid has a decorative metal bar, pay attention to position it on the exterior of the oven so that the brand logo can be visible and readable. For the correct positioning refer also to the image in the Accessories section of this user manual.
- Do not use harsh abrasive cleaners or sharp metal scrapers to clean the oven door glasses, since they can scratch the surface, which may result in shattering of the glass.
- Only use the temperature probe recommended for this oven.
- During cooking, moisture may condense inside the oven cavity or on the glass of the door. This is a normal condition. To reduce this effect, wait 10-15 minutes after turning on the power before putting food inside the oven. In any case, the condensation disappears when the oven reaches the cooking temperature.
- Cook the vegetables in a container with a lid instead of an open tray.
- Avoid leaving food inside the oven after cooking for more than 15/20 minutes.
- A long power supply failure during an occurring cooking phase may cause a malfunction of the monitor. In this case contact customer service.
- WARNING: Do not line the oven walls with aluminium foil or single-use protection available from stores. Aluminium foil or any other protection, in direct contact with the hot enamel, risk melting and deteriorating the enamel of the insides.
• WARNING: Never remove the oven door seal. - CAUTION: Do not refill the cavity bottom with water during cooking or when the oven is hot.
- Oven trays and grids are not suitable for direct contact with food. Please use suitable cookware or baking paper.
- Wash all accessories before first use with a solution of hot water and washing up liquid.
WARNINGS (\*FOR PYRO OVENS)
-
Excess spillage must be removed before cleaning.
• WARNING: before initiating the automatic cleaning cycle: -
Clean the oven door;
- Remove large or coarse food residues from the inside of the oven using a damp sponge. Do not use detergents;
- Remove all accessories and the sliding rack kit (where present);
- Do not place tea towels.
- During the pyrolytic cleaning process (if available), the surfaces may get hotter than usual and children should be kept away.
- If a hob has been fitted above the oven, never use the hob while the Pyrolizer is working, this will prevent the hob from overheating.
WARNINGS (\*FOR STEAM TOUCH)
- WARNING: Risk of burn and damage to the appliance: using the steam function the released steam can cause burns: Open the door carefully to avoid injury after using a cooking function with steam
- Use only drinking water to fill in the tank.
- When filling in the oven with water use maximum 250ml of water
2. PRODUCT INTRODUCTION
2.1. OVERVIEW OF THE PRODUCT
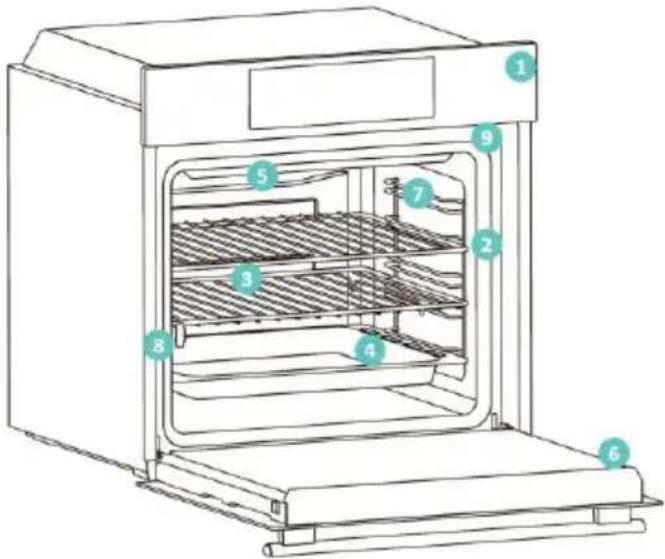
text_image
Technical diagram of an oven with numbered components for identification2.2. ACCESSORIES
- Control panel
- Shelf positions numbers
- Metal grid
- Trays
- Fan cover
- Oven door
- Lateral wire grids (If present: only for flat cavity)
- Serial number & QRcode
- Steam Funnel Insertion
natural_image
Empty white rectangle with black border (no text or symbols)Write here your serial number for future reference.
1 Metal grid
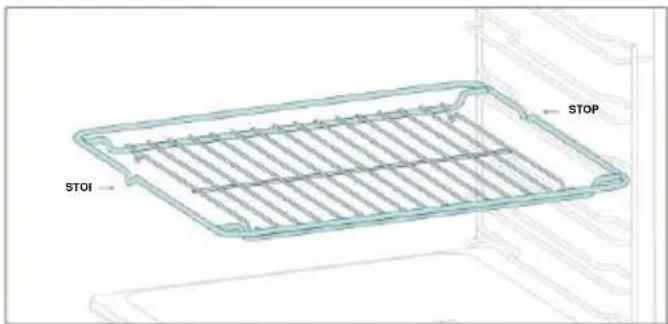
text_image
STOI STOPA metal grid in an oven is a removable, adjustable shelf that supports cookware, ensuring even cooking, and makes cleaning easy. It can be used to hold plates and pans at different heights for various cooking needs.
3 Deeper Tray
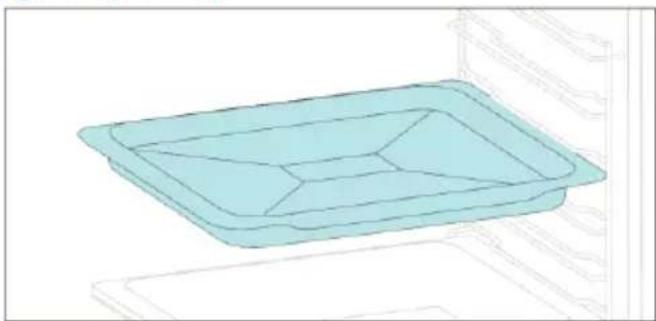
natural_image
Illustration of a rectangular tray with internal compartments, placed on a shelf (no text or symbols)The deeper tray is ideal for recipes with added liquids or layers, such as casseroles or roasts. Its depth is specifically designed to ensure the desired consistency of the food prepared in it.
2 Baking tray (only if present*)
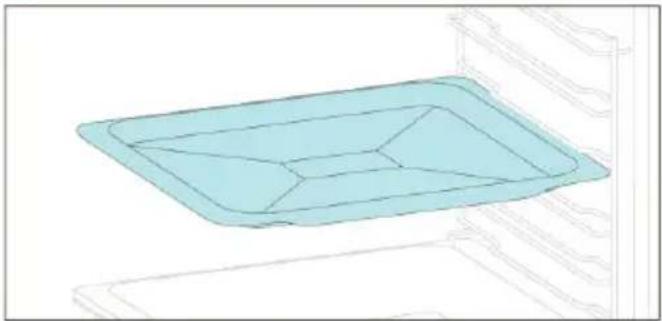
natural_image
3D diagram of a rectangular tray with internal geometric lines, placed on a shelf (no text or symbols)A baking tray is ideal for achieving even bottom browning, making it perfect for cookies and pastries due to its shallow, flat design. Additionally, placing it under a cooking grid can help collect drips and prevent messes in the over
4 Lateral wire grids (only if present*)
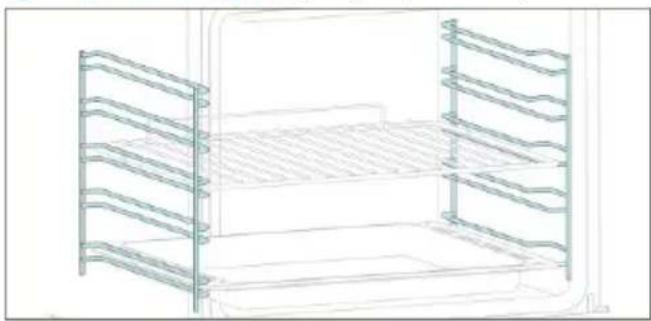
natural_image
Line drawing of a multi-tiered storage unit with horizontal and vertical metal racks (no text or symbols)Located on both sides of the oven cavity, the side racks are designed for placing baking tray and grids during the cooking.
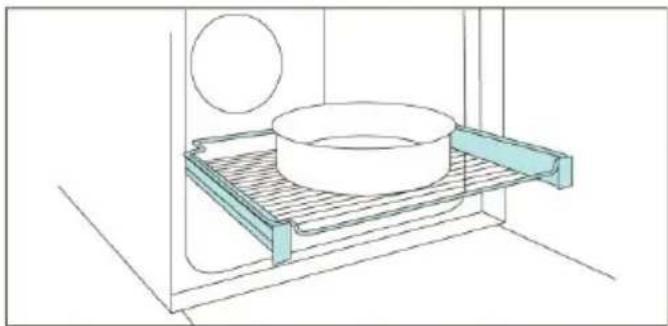
5 Telescopic Guides (only if present*)
natural_image
Line drawing of a kitchen sink with a bowl, tray, and wall (no text or symbols)Telescopic oven rails are shelves that can be extended, making it easier to place or remove items, without the need to reach deep inside a ho oven. They improve safety, stability, and can be adjusted at different level positions.
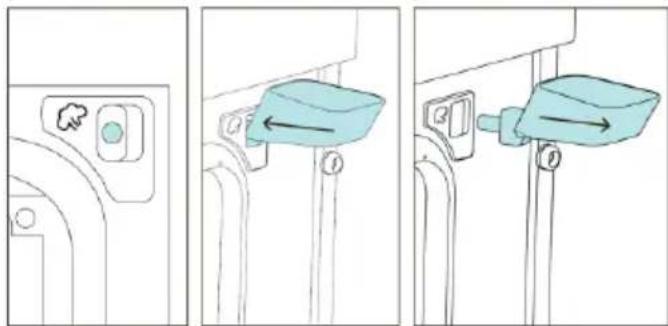
6 Steam Funnel
text_image
Diagram showing three steps of a door switch mechanism with labeled buttons and directional arrowsThe Steam Funnel is a useful accessory to add the necessary water, through the dedicated hole, for steam cooking programs.
2.3. CONTROL PANEL

text_image
1 2 3 4 5 6 7 220°CFunctions and function ranking can be changed depending on the model.
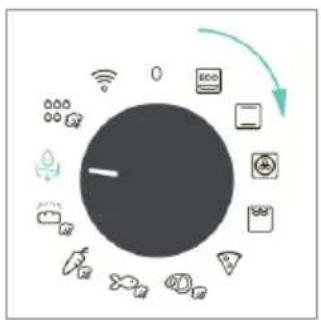
- Function selector knob
- Time
- Temperature
- LED display
- Remote control
- Lamp
- Dial control
MAIN FUNCTIONS
The display has 4 main functions:
| Symbol | Function | Description |
 | Time | Press once for cooking duration, twice for the minute minder (available in standby mode), three times for the time of day, and four times for delay start. In standby mode, only the kitchen timer is accessible. |
 | Temperature | Press once to check the cavity temperature, press and hold for 3 seconds to activate the fast-preheating option (only available during the oven's preheat phase). When the preheat is active, the released icon will be shown on the display. |
 | Remote Control on/off | Press the button to activate remote control, after pairing the oven with the hOn app (through the application). |
 | Light | Press to turn on/off the oven cavity light. |
DISPLAY FUNCTIONS (visible only when active)
| Symbol | Function | Description |
 | Dry Mode | The icon appears when the amount of water added through the Steam Funnel isn't enough to carry out the steam cooking program. The cooking program will proceed in Dry Mode. |
2.4. CONNECTIVITY
Wireless parameters
| Technology | Wi-Fi | Bluetooth |
| Standard | IEEE 802.11 b/g/n | Bluetooth v4.2, BR/EDR, BLE |
| Frequency Band(s) [MHz] | 2401÷2483 | 2402÷2480 |
| Maximum Power [mW] | 100 | 10 |
Product information for networked equipment
Power consumption of the product in networked standby if all wired network ports are connected and all wireless network ports are activated: 2,0 W.
How to activate wireless network port:
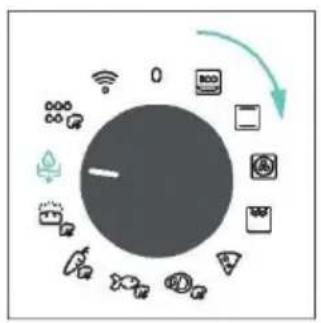
WIFI module switches on as soon as the function knob is set to a position different to zero.
How to deactivate wireless network port:
WIFI module is always off when the function knob is set to zero position.
If the knob is set to different position, go to WIFI menu and select off to deactivate the WIFI.
Hereby, Candy Hoover Group Srl declares that the radio equipment is in compliance with Directive 2014/53/EU and with the relevant statutory requirements for the UK market. The full text of the declaration of conformity is available at the following internet address: www.candy-group.com
HOW TO INTERACT WITH THE APP
Your appliance may be connected to your home wireless network and operated remotely using the app. Connect your appliance to ensure it stays up to date with the latest software and features.
NOTE
- Once the oven is turned on, the WIFI icons blinks for 30 minutes. During this period it's possible to enroll the product.
- Ensure your home Wi-Fi network is turned on.
- You will be given step by step guidance on both your appliance and mobile device.
- It may take up to 10 minutes to connect your oven.
- For further guidance and troubleshooting, please refer to the app.
Download on your smartphone.


text_image
Available on the App Store GET IT ON Google PlayNEW USER REGISTRATION
- Click on "Register"
- You can register through social accounts or sign up with your personal email

text_image
Welcome! Sign in to enter in your home page ENTER REGISTER. Are you now to hOn? Click below to learn about our products © TRY DEMO hOn Do you already have a thousand passwords? Register with your social accounts and log in in the easiest and fastest way. G SIGN UP WITH GOOGLE i SIGN UP WITH APPLE f SIGN UP WITH FACEBOOK No information relating to you will be shared and we will not add anything from you. IT SIGN UP WITH EMAIL Already registered? LOGINQUICK PAIR ENROLLMENT
Step 1
- Select "Add appliance".

text_image
Hello USERNAME YOUR APPLIANCES Add Add Virtual Wine Bank second row 2 better than there is a second row + Add appliance YOUR WIDGETS Long emission differences Back to Core and other Your news What functions do smart appliances have? How to live surtales: home and reduce wiStep 2
- Allow your location permission.

text_image
Allow your location permission To enhance your experience, please allow location permission to hOn app in the next step. CONTINUEStep 3
- Select oven from the appliance category.
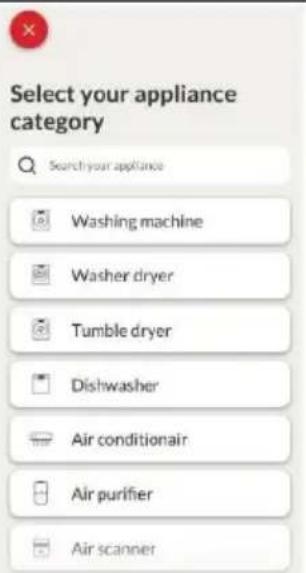
text_image
Select your appliance category Search your appliance Washing machine Washer dryer Tumble dryer Dishwasher Air conditionair Air purifier Air scannerStep 4
- Turn on your appliance; if it is already on, turn it off and on again.

text_image
Turn OFF and then ON your appliance In case you can't switch OFF your appliance, unplug (for at least 10 seconds) and then plug its power supply. OK! DID ITStep 5
- After turning on, the hOn app will start searching for your home appliance.
Step 6.1-6.2
- Select your home appliance, tap on "connect" and wait a few seconds.
Step 7
- Your Oven will be found and you can control it through hOn.

HOW TO CHANGE WIFI SETTINGS
Once the appliance is enrolled, the user can change the WIFI settings between:
- WIFI ON: It is only possible to monitor the oven status by App.
- WIFI OFF: The oven is not connected but still enrolled with network credentials saved.
-
WIFI RESET: The connection is reset and a new enrollment is possible.
-
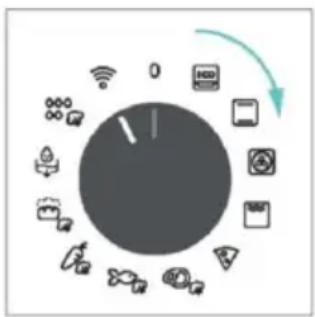
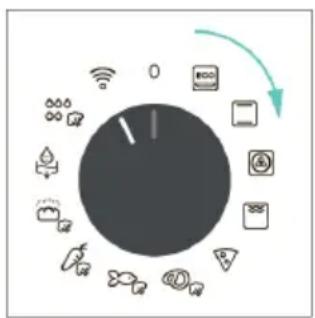
Turn the function knob on WIFI menu.
- On display appears "On".
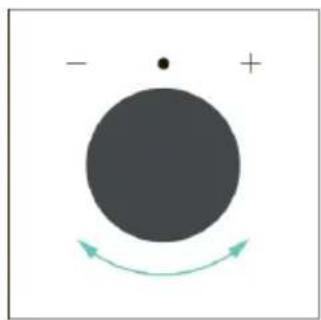
- Rotate the dial control until "Off" or the reset setting "rSt" will be showed.
flowchart
graph TD
    A["Central Device"] --> B["Device 1"]
    A --> C["Device 2"]
    A --> D["Device 3"]
    A --> E["Device 4"]
    A --> F["Device 5"]
    A --> G["Device 6"]
    A --> H["Device 7"]
    A --> I["Device 8"]
    A --> J["Device 9"]
    A --> K["Device 10"]
    A --> L["Device 11"]
    A --> M["Device 12"]
    A --> N["Device 13"]
    A --> O["Device 14"]
    A --> P["Device 15"]
    A --> Q["Device 16"]
    A --> R["Device 17"]
    A --> S["Device 18"]
    A --> T["Device 19"]
    A --> U["Device 20"]

text_image
ON
natural_image
Simple diagram with a large circle, a dot, and a plus sign, with curved arrows indicating rotation or direction (no text or symbols)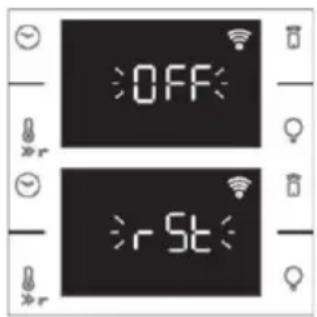
text_image
OFF 5s
REMOTE CONTROL
The Remote Control offers numerous advantages for users, enhancing convenience, efficiency, and the overall cooking experience, by giving the capability to control the product directly from both the appliance and hOn App
This function allows, through your device, to enjoy various features, such as: instant or scheduled start of recipes or cooking programs already available in the app; real-time monitoring of the progress of your recipes; adjustment of the cooking parameters in use; monitoring of the cooking process. Furthermore, it is possible to receive notifications once programs or recipes are completed. The Remote Control can be activated exclusively when the product is enrolled.

NOTE: It is available for all cooking functions on the product, except for Supergrill programs.
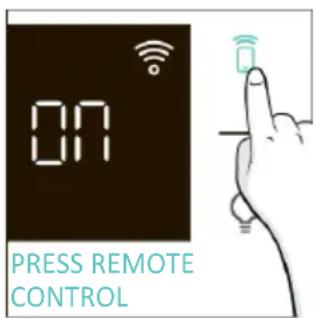
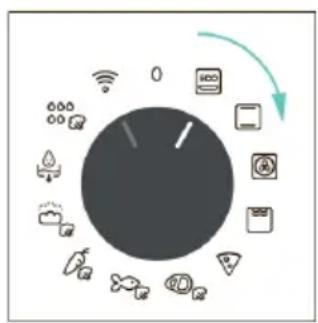
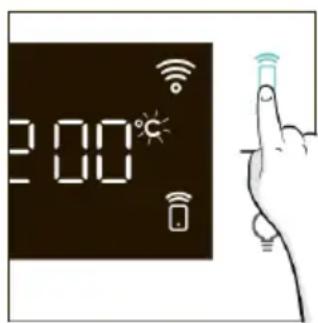
How to activate Remote Control:
- Turn the function knob on WIFI menu.
- Press
- On display appears "hOn". Both WIFI and Remote Control icons will be shown.
- Access to the App, select a program and let the cooking starts. During the process is possible to control and change the program parameters from both product and App.
flowchart
graph TD
    A["Central Unit"] --> B["Device 1"]
    A --> C["Device 2"]
    A --> D["Device 3"]
    A --> E["Device 4"]
    A --> F["Device 5"]
    A --> G["Device 6"]
    A --> H["Device 7"]
    A --> I["Device 8"]
    A --> J["Device 9"]
    A --> K["Device 10"]
    A --> L["Device 11"]
    A --> M["Device 12"]
    A --> N["Device 13"]
    A --> O["Device 14"]
    A --> P["Device 15"]
    A --> Q["Device 16"]
    A --> R["Device 17"]
    A --> S["Device 18"]
    A --> T["Device 19"]
    A --> U["Device 20"]
text_image
ON PRESS REMOTE CONTROL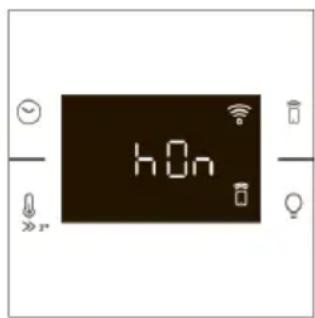
text_image
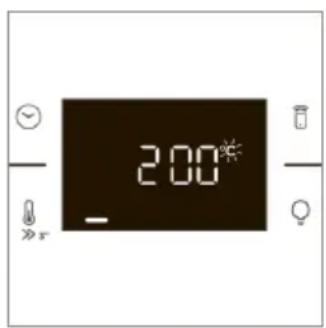
hOnIt's also possible to activate Remote Control during cooking process by pressing related button
text_image
2:00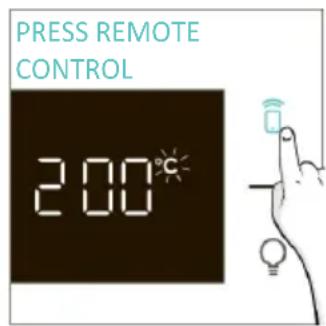
text_image
PRESS REMOTE CONTROL 2.00°C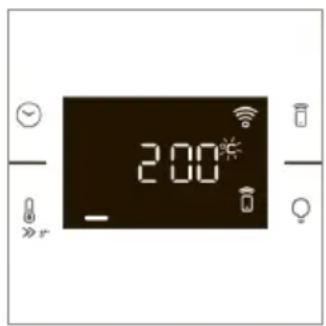
text_image
2:00How to stop Remote Control:
While the cooking program is in progress, it can be stopped directly from the product itself by rotating the function knob to a different position. These actions interrupt the cooking process.
Another way is by pressing the corresponding button of Remote Control that came with your appliance. These actions interrupt the cooking process.
flowchart
graph TD
    A["Central Node"] --> B["Node 1"]
    A --> C["Node 2"]
    A --> D["Node 3"]
    A --> E["Node 4"]
    A --> F["Node 5"]
    A --> G["Node 6"]
    A --> H["Node 7"]
    A --> I["Node 8"]
    A --> J["Node 9"]
    A --> K["Node 10"]
    A --> L["Node 11"]
    A --> M["Node 12"]
    A --> N["Node 13"]
    A --> O["Node 14"]
    A --> P["Node 15"]
    A --> Q["Node 16"]
    A --> R["Node 17"]
    A --> S["Node 18"]
    A --> T["Node 19"]
    A --> U["Node 20"]
text_image
2:00°C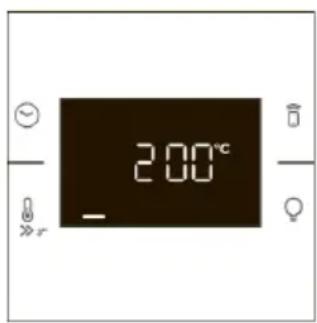
text_image
20.0°C -You can also stop the cooking program remotely using the app by clicking the 'STOP' Button on display device. The oven will automatically stop the cooking.
NOTE: If the user stops the cooking in progress from the oven, simultaneously the stopped cooking will be seen in the App.

text_image
Cooking SH 120k1LEFT ADD 5/MN STOP Current program PROGRAMS Conventional 300°C 50 Pulsed/OPM 60.50m Efficiency Pulsed/OPM EDIT DETAILS -93. BEFORE STARTING
3.1. INFORMATION TO START
When you first turn on the oven, you might notice some smoke. Don't worry, just wait for the smoke to clear before using the oven.
How door works
During the pyrolytic cleaning process, the oven door remains locked at all times. If it's not locked, the oven will display error code 24 and pause the cleaning function.
How illumination works
The oven cavity is illuminated by one or more light bulbs, typically activated each time a cooking function begins.
For ovens equipped with a door switch (see below), the light automatically turns on when the door is opened.
For ovens equipped with lamp button, it can also be used to activate the lighting.
If the oven door remains open for more than 10 minutes, the lights will automatically turn off.
During pyrolytic cleaning process light remains off.*
How cooling fan works
The cooling fan is responsible for dissipating the heat, keeping the oven and its surroundings from getting too hot, as well as protecting kitchen appliances from the effects of high temperatures. For this reason, the cooling fan remains audible for a period of time even after the oven is turned off.
It operates during and after cooking cycle in relation to the internal temperature of the oven.
When the cooling fan is operational, it usually generates a gentle humming or whirring noise. You may also notice a warm airflow emanating from the gap between the oven door and the control panel.
During pyrolytic cleaning and when door is locked, cooling fan is switched on.*
During ECO function the light will remain off.
(*only for pyro ovens)
How status bar works
The status bar, based on the set programs, simplifies monitoring of temperature and time. Specifically, for functions involving preheating, it displays the temperature increase during this phase. In cooking programs and the pyrolytic cleaning function, it shows the countdown of cooking time and the cleaning cycle, respectively.
3.2. FIRST USAGE
When the appliance is switched On for the first time, the initial step is to set time of day, choose between 13 ampere or 16 ampere, select brightness and sound level.
- SET THE TIME: The display will show the blinking preset time '12:00'. To modify it, press 📋 and use the right knob to adjust the current hour. Press again and follow the same procedure to set the minutes. To confirm, press once more.
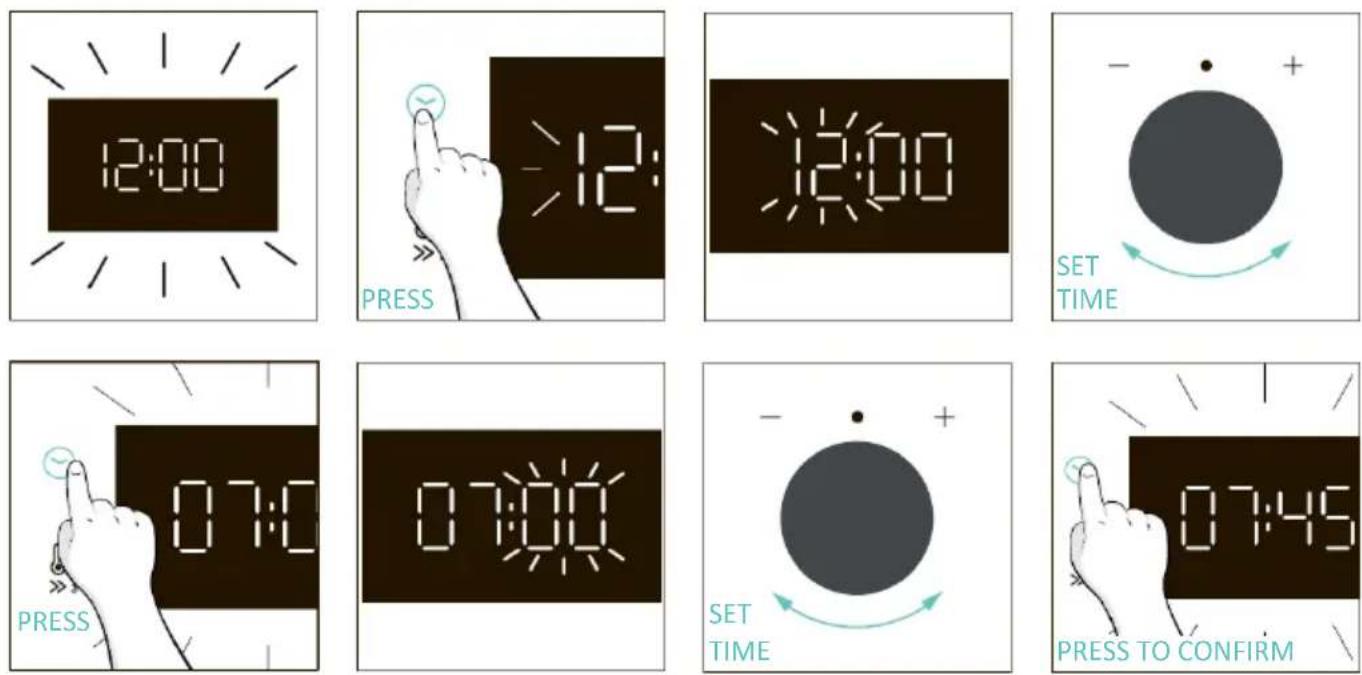
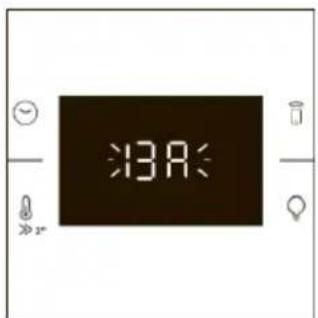
- AMPERAGE: By default, the oven is set to work with higher power suitable for households with more than 3 kW (16 A). If your home has lower power, you can change this setting to 13 A. This setting affects how quickly the oven heats up. Choosing the higher option (16A) means it heats up faster (because the power absorption is increased). On the display, you'll see two choices: 13A and 16A. Just turn the right knob to pick the one you want, then press to confirm.
text_image
3A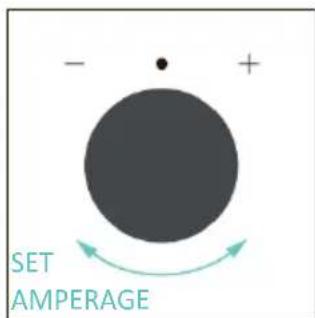
text_image
- + SET AMPERAGE
text_image
6.9
text_image
07: PRESS TO CONFIRMNOTE: The option to set the amperage is only available during the initial installation. To modify the set amperage, please refer to the post-installation instructions.
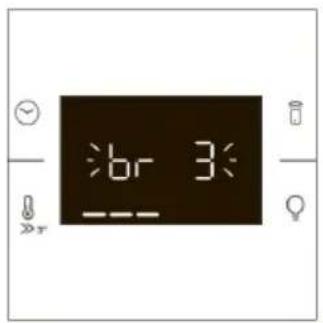
- BRIGHTNESS: The display shows the symbol "br". The numbers represent the level of brightness intensity, editable turning the right knob. To confirm press 😊
text_image
br 3 ---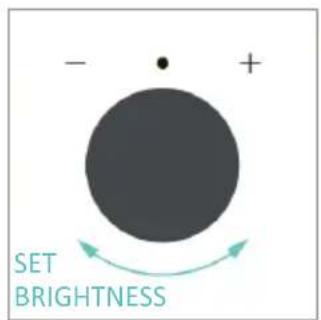
text_image
- + SET BRIGHTNESS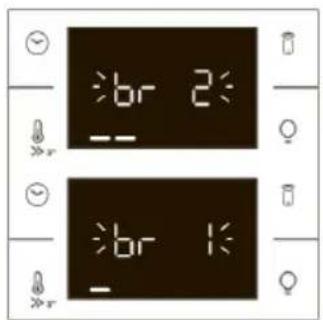
text_image
br 2 -- br 1 -
text_image
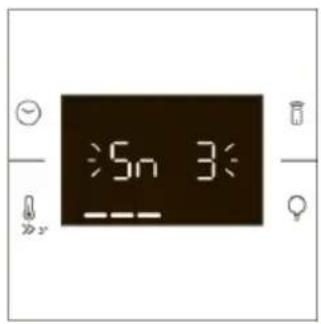
07: PRESS TO CONFIRM- SOUND: The display shows the symbol "Sn". The numbers represent the level of sound intensity, editable turning the right knob. To confirm press ⏻
text_image
5n 3: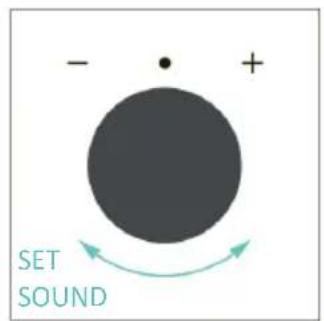
text_image
- • + SET SOUND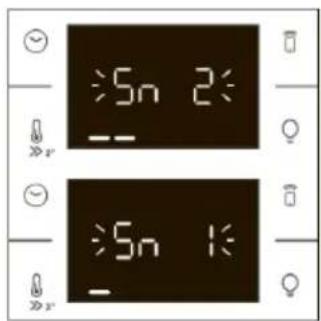
text_image
Sn 2 -- Sn 1 -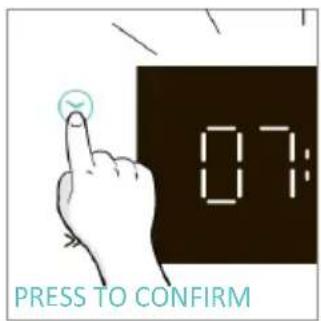
text_image
07: PRESS TO CONFIRM• POST INSTALLATION INSTRUCTIONS
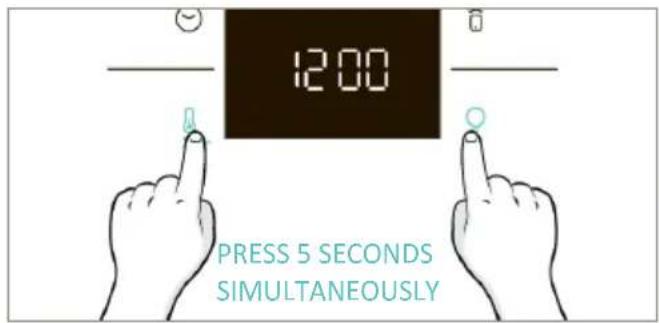
When oven is in stand-by mode, it is possible to go back to initial settings by pressing simultaneously Temperature and Lamp buttons for 5 sec.
text_image
12:00 PRESS 5 SECONDS SIMULTANEOUSLY3.3. PRELIMINARY CLEANING
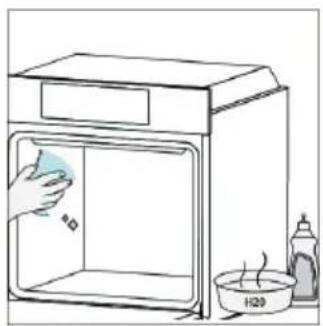
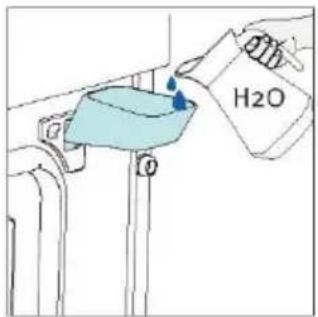
Clean the oven before using for the first time. Wipe over external surfaces with a damp soft cloth. Wash all accessories and wipe inside the oven with a solution of hot water and washing up liquid. Set the empty oven to the maximum temperature and leave on for about 1 hour, this will remove any lingering smells of newness.
natural_image
Line drawing of a kitchen sink with a hand cleaning the interior, next to a water bottle and a bowl labeled H20 (no text or symbols on main elements)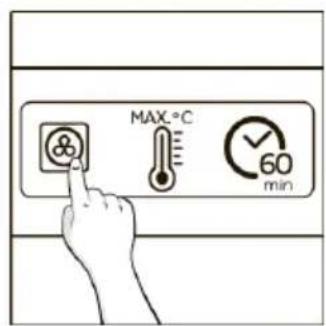
text_image
MAX.°C 60 min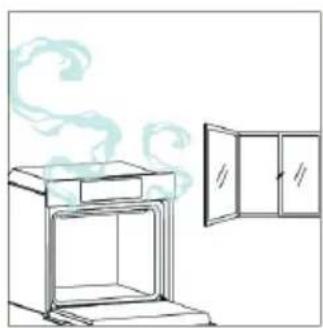
natural_image
Line drawing of a kitchen oven with a cabinet and smokestack (no text or symbols)4. OPERATION OF PRODUCT
4.1. HOW THE PRODUCT WORKS
SWITCHING ON/OFF THE OVEN
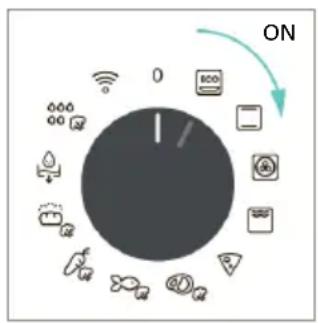
To turn ON the oven rotate the function knob (clockwise/counterclockwise) and select a cooking program. To turn it OFF, set the function knob to the '0' position.
text_image
ON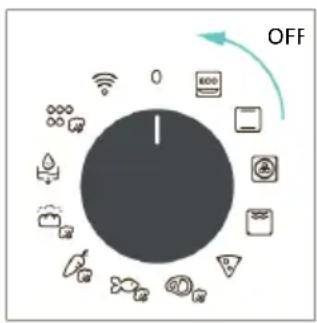
text_image
OFFSET COOKING PROGRAM
Turn the function knob and select the desired program. On display will appear a default temperature that can be edit in every moment turning the right knob (clockwise to increase and counterclockwise to decrease the temperature).
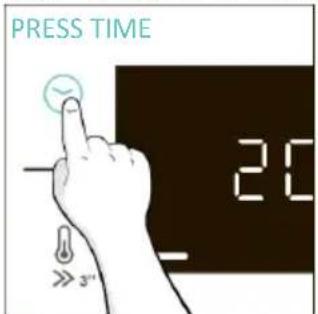
TIME MENU
Access the Time menu by pressing 😊To navigate into tap as many times as is needed to enter in the following settings:
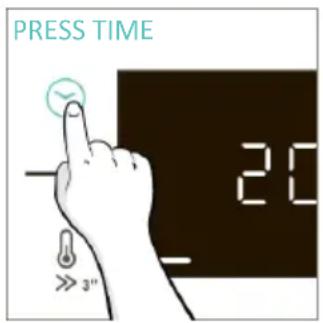
text_image
PRESS TIME 20 3"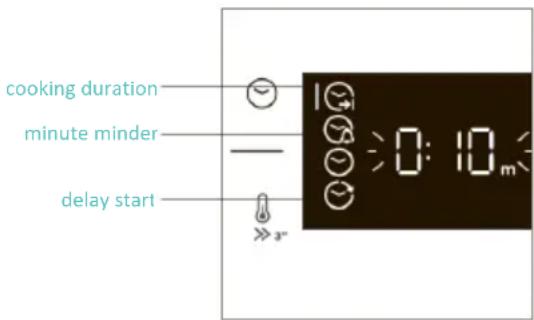
text_image
cooking duration minute minder delay start 0:10m >> 3"NOTE: several parameters cannot be set at the same time, therefore only the last set remains in the memory while the previous one is deleted.

COOKING DURATION
Allows to preset the cooking time required for the recipe chosen.
ACTIVATION: press to enter in the Time menu. Tap as many times as you need to select "Cooking duration" function. Then use the dial control to regulate the value.
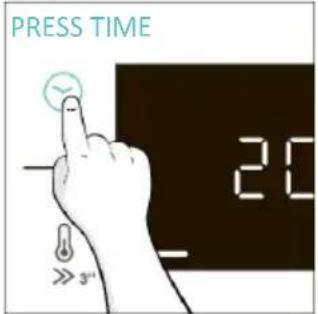
text_image
PRESS TIME 20 3"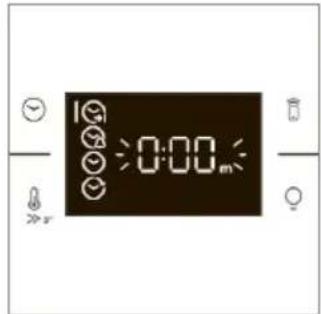
text_image
0:00m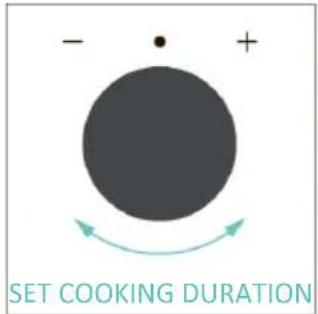
text_image
- • + SET COOKING DURATION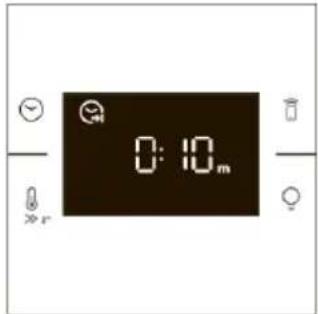
text_image
0:10mThe countdown starts at the end of preheating (if present). During cooking phase is possible to change the duration value by turning the right knob. When duration is elapsed the cooking stops.

MINUTE MINDER
Allows to use the oven as alarm clock.
ACTIVATION: press to enter in the Time menu. Tap as many times as you need to select "Minute minder" function. Then use the dial control to regulate the value.

text_image
PRESS TIME 20 3"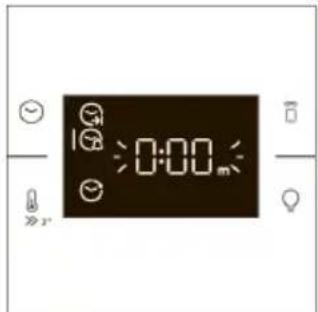
text_image
0:00 24°
text_image
- + SET MINUTE MINDER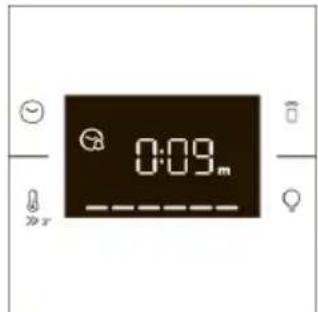
text_image
0:09.m >> rWhen the function is set, the primary information showed on display is always the time. To edit the temperature, press to enter dedicated edit mode. When duration is elapsed, the cooking continues until the left knob is turned in 0 position.
This function can be set also when the oven is in stand by mode by pressing ⚙When activated, the minute minder operates independently of the oven's cooking functions.

DELAY START
Allows to choose the cooking start time.
ACTIVATION: press to enter in the Time menu. Tap as many times as you need to select "Delay start" function. Then use the dial control to set the start time of cooking.
text_image
PRESS TIME 20 30
text_image
10:30m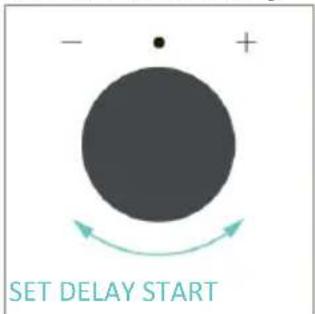
text_image
- + SET DELAY START
text_image
20:00NOTE: Delay start is activable only after setting Cooking Duration and it is not available with grill functions.
ADDITIONAL FUNCTIONS
CHILD LOCK
This function allows you to lock the screen to prevent any unwanted use by minors. To activate it, simultaneously press the Lamp and Remote Control buttons for 3 seconds.
An icon with a key will appear on the user interface. In this condition, the oven user interface is locked, and no changes in settings can be made.
To deactivate the child lock, press the Lamp and Remote Control buttons again for 3 seconds (the icon with the key will disappear)
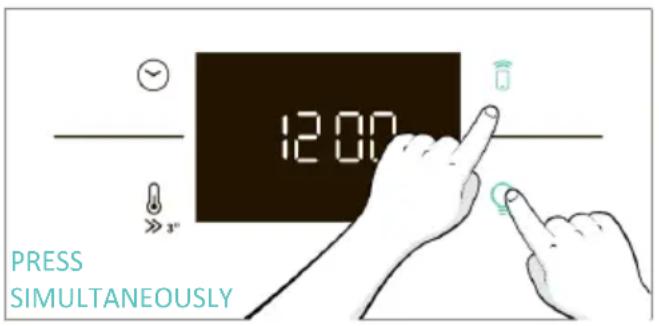
text_image
12:00 PRESS SIMULTANEOUSLY4.2. COOKING FUNCTIONS
FAST PREHEATING OPTION
In order to accelerate preheating phase, the fast-preheating option can be selected by pressing the temperature icon for 3s after having selected cooking program and temperature. This option will activate a combination of fan and heating elements regardless of the chosen cooking function. To save energy, when fast preheating is activated the lamp will be turned OFF until the oven reaches the desired temperature.
4.2.1. STANDARD FUNCTIONS
NOTE: for functions that require preheating, ensure all accessories are removed during this phase. Follow instructions in the table below for what regards preheating.
"YES/FAST PREHEAT" means that preheating is required and fast preheat option is available; "NO" means that preheat is not available and foods must be inserted with cold oven.
| Symbol | Function | T°C default T°C range | Suggested shelf position | Preheat | Suggestions |
 | *ECO | 190°C 150-220°C | L3/L4 | NO | IDEAL FOR: cooking meat, fish or vegetablesThis function allows to save energy during cooking keeping the food moist and tender.Cavity lamp is switched off |
 | *Conventional | 200°C 30-250°C | L2/L3 | YES/FAST PREHEAT | IDEAL FOR: cakes, breads, biscuits, quiches on one level using both upper and lower heating.Can be used with Preci Probe. |
 | Multi-Level | 160°C 50-250°C | L4 (one tray)L2+L5 (two trays)L2+L4+L6 (three trays) | YES/FAST PREHEAT | IDEAL FOR: cakes, biscuits and pizzas on one or more levels.Ideal to cook different foods.Can be used with Preci Probe. |
 | **Supergrill | 05 01-05 | L6 | NO | IDEAL FOR: big quantities of sausages, steaks and toast bread.The entire area below the grill element becomes hot. Use with the door closed. Turn food two thirds of the way through cooking (If necessary). |
*Tested in accordance with the EN 60350-1 for the purpose of energy consumption declaration and energy class.
**Use with the door closed.
4.2.2. SPECIAL FUNCTIONS
| Symbol | Function | T°C default T°C range | Suggested shelf position | Preheat | Suggestions |
 | Pizza | 300°C200-300°C | L2/L3 | NO | IDEAL FOR: all kind of pizzas without preheating the oven. Use lower temperatures for frozen items and 300°C for home-made recipes |
5. COOKING GUIDELINES
5.1. GENERAL COOKING TABLE
| Category | Recipe | N° of levels | Cooking program | T°C | Preheat | Cooking accessory | Shelf position | Cooking time after preheating* (min) |
| Sweet bakery | Small cakes /Muffins | 1 | Conventional Multilevel | 175°C 160°C | Y | Baking tray Baking tray | L3 L4 | 20-30 30-40 |
| 2 | Multilevel | 150°C | Baking + Deeper trays | L2+L5 | 30-40 | |||
| 3 | Multilevel | 140°C | Baking trays | L2+L4+L6 | 40-50 | |||
| Sponge cakes (26 cm ∅) | 1 | Conventional | 170°C | Y | Metal grid + Cake tin | L2 | 30-40 | |
| Multilevel | 150°C | Metal grid + Cake tin | L4 | 40-50 | ||||
| 2 | Multilevel | 150°C | Metal grids + Cake tin | L1+L4 | 50-60 | |||
| Biscuits/ Shortbreads | 1 | Conventional Multilevel | 150°C 150°C | Y | Baking tray Baking tray | L3 L4 | 25-30 30-40 | |
| 2 | Multilevel | 140°C | Baking + Deeper trays | L2+L5 | 30-40 | |||
| 3 | Multilevel | 140°C | Baking trays | L2+L4+L6 | 35-40 | |||
| Choquettes | 1 | Multilevel | 190°C | Y | Baking tray | L3 | 25-35 | |
| 2 | Multilevel | 180°C | Baking tray | L2+L5 | 25-35 | |||
| Yorkshire pudding | 1 | Conventional | 200°C | Y | Baking tray | L3 | 20-30 | |
| Meringues | 1 | Multilevel | 90°C | Y | Baking tray | L4 | 90-160 | |
| Macaron | 1 | Conventional | 150°C | Y | Baking tray | L3 | 15-20 | |
| Apple pie | 1 | Conventional | 185°C | Y | Metal grid + Cake tin | L2 | 60-70 | |
| 1 | Multilevel | 170°C | Y | Metal grid + Cake tin | L4 | 65-75 | ||
| Tarte tatin | 1 | Conventional | 170°C | Y | Metal grid + Cake tin | L2 | 40-60 | |
| Chocolate souffle | 1 | Conventional | 200°C | Y | Baking tray + molds | L3 | 10-15 | |
| Cheesecake | 1 | Conventional | 150°C | Y | Metal grid + Cake tin | L2 | 50-65 | |
| Frozen croissants | 1 | Conventional | 180°C | Y | Baking tray | L3 | 20-25 | |
| 2 | Multilevel | 180°C | Baking trays | L2+L5 | 25-35 | |||
| 3 | Multilevel | 160°C | Baking trays | L2+L4+L6 | 30-40 | |||
| Strudel, frozen | 1 | Conventional | 210°C | Y | Baking tray | L3 | 30-45 | |
| Breads and Flatbread | Toast bread | 1 | Supergrill | 05 | N | Metal grid | L6 | 4-6 |
| Focaccia | 1 | Conventional | 200°C | Y | Baking tray | L2 or L3 | 25-35 | |
| Bread, whole | 1 | Conventional | 200°C | Y | Baking tray | L3 | 35-50 | |
| Savory pies and casseroles | Salty cakes / Quiches (26 cm ∅) | 1 | Conventional | 200°C | Y | Metal grid + Quiche tin | L1 or L2 | 30-50 |
| 2 | Multilevel | 180°C | Y | Metal grid + Quiche tin | L1+L4 | 50-70 | ||
| Cheese souffle | 1 | Conventional | 200°C | Y | Baking tray + molds | L3 | 20-35 | |
| Lasagna, fresh | 1 | Conventional | 200°C | Y | Metal grid + ovenproof dish | L3 | 40-60 | |
| Lasagna, frozen | 1 | Conventional | 180°C | Y | Metal grid + ovenproof dish | L3 | 50-60 | |
| Cannelloni, frozen | 1 | Conventional | 180°C | Y | Metal grid + ovenproof dish | L3 | 45-55 | |
| Baked pasta | 1 | Multilevel | 200°C | Y | Metal grid + ovenproof dish | L4 | 20-30 | |
| Pizza | Pizza, fresh (Tray) | 1 | Conventional | 250°C | Y | Baking tray | L2 or L3 | 15-20 |
| Pizza, fresh (Tray) | 1 | Pizza | 250°C | N | Baking tray | L2 or L3 | 18-25 | |
| 2 | Multilevel | 180°C | Y | Baking + Deeper trays | L2+L5 | 25-35 | ||
| Pizza, fresh (Round) | 1 | Conventional | 250°C | Y | Baking tray | L2 or L3 | 8-10 | |
| Pizza, fresh (Round) | 1 | Pizza | 300°C | N | Baking tray | L2 or L3 | 15-20 | |
| 2 | Multilevel | 180°C | Y | Baking + Deeper trays | L2+L5 | 30-40 | ||
| Pizza, frozen (thin crust) | 1 | Conventional | 220°C | Metal grid | L3 | 10-15 | ||
| 2 | Multilevel | 200°C | Y | Metal grid | L2+L5 | 15-25 | ||
| 3 | Multilevel | 180°C | Metal grid | L2+L4+L6 | 20-30 | |||
| Pizza, frozen (thin crust) | 1 | Pizza | 200°C | N | Metal grid | L2 | 10-15 | |
| Meat & Poultry | Roasted whole chicken (1-1.2kg) | 1 | Multilevel | 220°C | Y | Metal grid/L4 Place Backing tray at L1 with 150ml of water | L4 | 40-60 |
| Chicken thighs | 1 | Multilevel | 220°C | N | Airfry tray** | L4 | 30-50 | |
| Roasted duck | 1 | Multilevel | 200°C | Y | Metal grid + Ovenproof dish | L3 | 50-60 | |
| Meat & Poultry | Rooster | 1 | Multilevel | 220°C | Y | Metal grid Place baking tray at L1 | L4 | 20-40 |
| Roasted Turkey | 1 | Multilevel | 200°C | Y | Metal grid + Ovenproof dish | L3 | 50-60 | |
| Pork ribs (1000-1200g) | 1 | Conventional | 200°C | Y | Metal grid + Ovenproof dish | L3 | 80-100 | |
| Sausages | 1 | Supergrill | 4 | Y | Metal grid | L5 | 40-50 | |
| Roast beef (500g) | 1 | Multilevel | 220°C | Y | Baking tray | L3 | 20-40 | |
| Meatloaf (1000-1500g) | 1 | Conventional | 180°C | Y | Baking tray | L3 | 40-50 | |
| Roasted chicken with potatoes | 1 | Multilevel | 200°C | Y | Deeper tray | L4 | 45-60 | |
| Fish and Seafood | Grilled seafood | 1 | Supergrill | 4 | N | Metal grid | L5 | 15-30 |
| Frozen fish sticks | 1 | Multilevel | 200°C | N | Air fry tray** | L4 | 20-25 | |
| Baked fish | 1 | ECO | 200°C | N | Metal grid Place baking tray at L1 | L3 | 40-60 | |
| Vegetables | Vegetable gratin | 1 | ECO | 200°C | N | Metal grid + Ovenproof dish | L3 | 80-90 |
| Frozen french-fries (300-500g) | 1 | Multilevel | 220°C | N | Air fry tray** | L4 | 18-25 | |
| Potato gratin | 1 | Multilevel | 200°C | Y | Metal grid + Ovenproof dish | L4 | 15-25 | |
| Roasted potatoes | 1 | Conventional | 200°C | Y | Baking tray | L4 | 30-50 |
Cooking times may vary according to consumer's recipe and ingredients.
*if preheating required
NOTE: For cooking cakes, quiches and other recipes that require a mold or a container on 2 levels, place them staggered: the upper tray on the left side and the lower tray on the right side.
5.2. EVERYDAY COOKING TABLE
Food category menu allows to cook a variety of recipes without preheating the oven, thanks to dedicated cooking programs tailored to each category needs.
| Symbol | Description | Preheat | Shelf position | Temperature range (°C) | Time Range (min) | Description |
 | Meat + Steam | NO | L3-L4 | 200-230 | 20-120 | For beef, veal and pork roasts, poultry and cuts of meat. |
 | Fish + Steam | NO | L3-L4 | 150-180 | 15-60 | For whole fish and fillets. |
 | Vegetables + Steam | NO | L3-L4 | 180-220 | 30-90 | For roasted vegetables and potatoes |
 | Bakery all in + Steam | NO | L3-L4 | 200 | 80-130 | For leavening and directly baking breads or bread loaves in container. The total cooking time is comprehensive of 60min of leavening process |
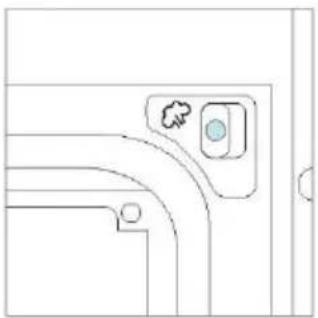
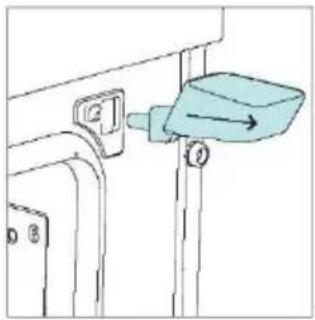
How to use the Steam Funnel for steam cooking programs
After selecting the steam cooking program, the UI will ask to add water through the dedicated accessory (Steam Funnel), proceed as following.
- Insert the Steam Funnel into the proper hole in the top right corner of the cavity
natural_image
Pure electrical circuit lines without any symbols
natural_image
Diagram of a mechanical assembly with a blue bucket and directional arrow (no text or symbols)- Add 250 ml of water to the Steam Funnel
text_image
H2O- Remove the Steam Funnel from the cavity hole and close the oven door.
natural_image
Diagram of a mechanical device with a blue component and directional arrow, no text or symbols present
natural_image
Diagram of a mechanical bracket with an arrow indicating rotational motion (no text or symbols)The default time will be then shown and the cooking program will start automatically after one second. The time can be edited by turning the right knob; cooking temperature can be changed by pressing the dedicated icon. Both parameters can be set within a limited range as shown in the table above.
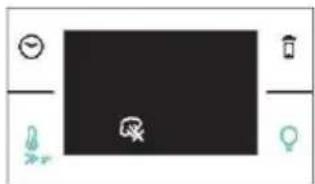
If the water amount added isn't enough or if no water is added at all, the cooking program will proceed regardless in "Dry Mode", a sound will be heard and will be shown on display.
natural_image
Pure electrical circuit lines without any symbolsNOTE: If too much water is loaded, the excess will come out from the draining nozzle.
NOTE: when cooking with steam, some residual water or condensation may be observable on the cavity bottom at the end of cooking.
NOTE: if, after turning off the oven, there is a need to continue cooking, it's recommended avoiding the use of everyday cooking programs and instead opting for standard functions.
| Recipe | Serving size | Cooking program | T°C | Cooking accessory | Shelf position | Cooking time (min) |
| Beef roast | 500-800g | Meat + Steam | 220°C | Metal grid | L3 | 30-40 |
| Beef fillet | 200g | Meat + Steam | 200°C | Metal grid | L3 | 20-25 |
| Meatloaf | 1000-1500g | Meat + Steam | 200°C | Metal grid | L3 | 40-50 |
| Beef Wellington | 500g | Meat + Steam | 200°C | Metal grid | L3 | 50-80 |
| Pot roast | 800-1000g | Meat + Steam | 200°C | Metal grid | L3 | 40-70 |
| Pork ribs | 1000-1200g | Meat + Steam | 200°C | Metal grid | L3 | 80 |
| Lamb rack | 800-1000g | Meat + Steam | 210°C | Metal grid | L3 | 60-80 |
| Lamb leg | 1500-2000g | Meat + Steam | 200°C | Metal grid | L3 | 80 |
| Salmon fillets | 200-600g | Fish + Steam | 170°C | Baking tray | L3 | 20-35 |
| Tuna steaks | 600g (app. 4 pcs) | Fish + Steam | 180°C | Metal grid | L3 | 15-20 |
| Swordfish steaks | 700g (app. 4 pcs) | Fish + Steam | 180°C | Baking tray | L3 | 15-20 |
| Cod fillet | 600g (app. 4 pcs) | Fish + Steam | 160°C | Baking tray | L3 | 15-20 |
| Seabream, Whole | 1 | Fish + Steam | 170°C | Baking tray | L3 | 35-45 |
| Seabream, fillet | 600g (app. 4 pcs) | Fish + Steam | 160°C | Baking tray | L3 | 15-20 |
| Seabass fillet | 600g (app. 4 pcs) | Fish + Steam | 160°C | Baking tray | L3 | 15-20 |
| Salt baked fish | 1 | Fish + Steam | 180°C | Baking tray | L3 | 30-40 |
| Fish skewers | 8 pieces | Fish + Steam | 160°C | Metal grid | L3 | 20-30 |
| Stuffed squid | 4 pieces | Fish + Steam | 180°C | Baking tray | L3 | 25-40 |
| Fennels | 1 tray | Vegetables + Steam | 200°C | Metal grid | L3 | 30-40 |
| Mixed vegetables | 1 tray | Vegetables + Steam | 190°C | Metal grid | L3 | 40-45 |
| Cauliflowers | 1 tray | Vegetables + Steam | 190°C | Metal grid | L3 | 40-50 |
| Pumpkins, cubed | 1 tray | Vegetables + Steam | 200°C | Metal grid | L3 | 30-40 |
| Stuffed peppers | 1 tray | Vegetables + Steam | 180°C | Metal grid | L3 | 70-80 |
| Stuffed zucchini | 1 tray | Vegetables + Steam | 190°C | Metal grid | L3 | 35-45 |
| Carrot sticks | 1 tray | Vegetables + Steam | 180°C | Baking tray | L3 | 35-40 |
| Broccoli | 1 tray | Vegetables + Steam | 190°C | Baking tray | L3 | 30-40 |
| Ratatouille | 1 tray | Vegetables + Steam | 190°C | Metal grid | L3 | 40-45 |
| Vegetable flan | 6 ramekins | Vegetables + Steam | 180°C | Baking tray + molds | L3 | 25-35 |
6. CARE & CLEANING
6.1. GENERAL RECOMMENDATIONS
Regular cleaning can extend the lifecycle of your appliance. Wait for the oven to cool before carrying out manual cleaning.
• After each use of the oven, a minimum of cleaning will help keep the oven perfectly clean.
- Do not line the oven walls with aluminum foil or single-use protection available from stores. Aluminum foil or any other protection, in direct contact with the hot enamel, risks melting and deteriorating the enamel of the insides.
- In order to prevent excessive dirt of your oven and the resulting strong smokey smells, we recommend not using the oven at very high temperature. It is better to extend the cooking time and lower the temperature a little.
- In addition to the accessories supplied with the oven, we advise you only use dishes and baking molds resistant to very high temperatures.
6.2. CLEANING THE OVEN
6.2.1. INSIDE THE OVEN: cleaning functions

Pyrolytic cleaning (*depending on the oven model)
This process relies on the chemical process bearing the same name, which involves the decomposition of complex substances through the application of heat treatment.
Once initiated, it automatically locks the oven door and swiftly elevates the temperature to a searing 410°C.
At the end of the cleaning cycle, food residues will leave a white coating on the enamel surfaces. To remove these particles, wipe with a cloth soaked in hot soapy water and use a brush or steel wool. Suitable cleaning agents are hot soapy water or oven cleaner.
How does it work:
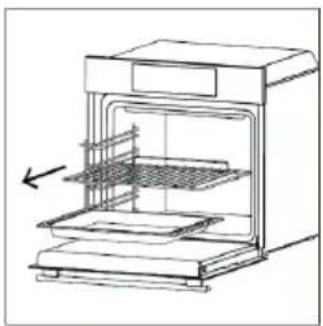
- Remove any accessories from the oven, such as grids, side racks and side racks screw;
-
Turn function knob on ✦. Turn the dial control to set the Pyrolytic program; Allow the function to operate for the preset time. During this process and the following cooling phase, the oven door will remain locked.
-
When the appliance is cool, clean the inner surfaces of the oven with a cloth.
WARNING: Make sure that the appliance is cool before you touch it. Care must be taken with all hot surfaces as there is a risk of burns. Use distilled or drinkable water.
natural_image
Line drawing of an oven with a rack and vent, showing internal structure without any text or symbols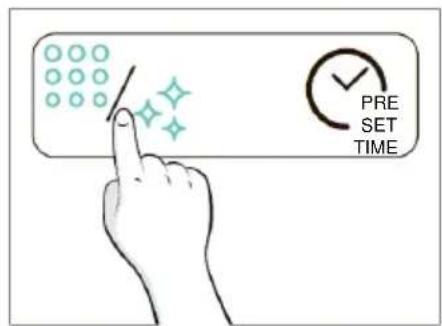
text_image
PRE SET TIME
natural_image
Line drawing of a hand cleaning a kitchen appliance with a cloth (no text or symbols)Aquactiva Steam
The Steam cleaning function is designed to effortlessly tackle light dirt and provide a quick and eco-friendly solution for cleaning your oven cavity using the power of steam.
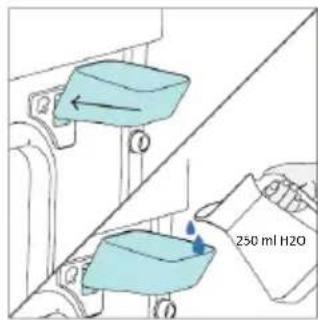
How does it work:
- Pour 250 ml of water through the dedicated steam funnel.
- Turn the knob on ☐. If necessary, turn the dial control to set the Steam clean program. Allow the function to operate for the preset time.
- At the end of the cleaning process, allow the oven to cool down.
- When the appliance is cool, clean the inner surfaces of the oven with a cloth.
- WARNING: Make sure that the appliance is cool before you touch it. Care must be taken with all hot surfaces as there is a risk of burns. Use distilled or drinkable water. Wipe the cooking compartment and allow it to dry completely to avoid possible corrosions.

flowchart
graph TD
    A["Smart Home Control System"] --> B["Data Transfer"]
    B --> C["Smart Home Display"]
    C --> D["Smart Monitor"]
    D --> E["Digital Interface"]
    E --> F["Smart Speaker"]
    F --> G["Smart Computer"]
    G --> H["Smart Board"]
    H --> I["Smart Speaker"]
    I --> J["Smart Monitor"]
    J --> K["Digital Interface"]
    K --> L["Smart Display"]
    L --> M["Smart Monitor"]
text_image
250 ml H2O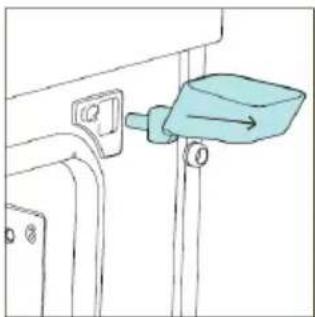
natural_image
Simple line drawing of a door handle with a blue plastic clip attached (no text or symbols)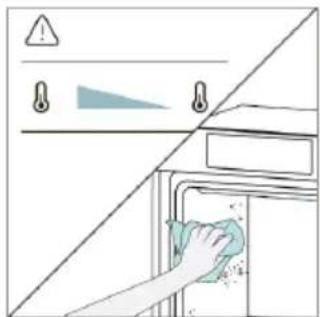
natural_image
Illustration of a hand cleaning a kitchen appliance with a cloth, showing no text or symbols.STEAM SYSTEM CLEANING
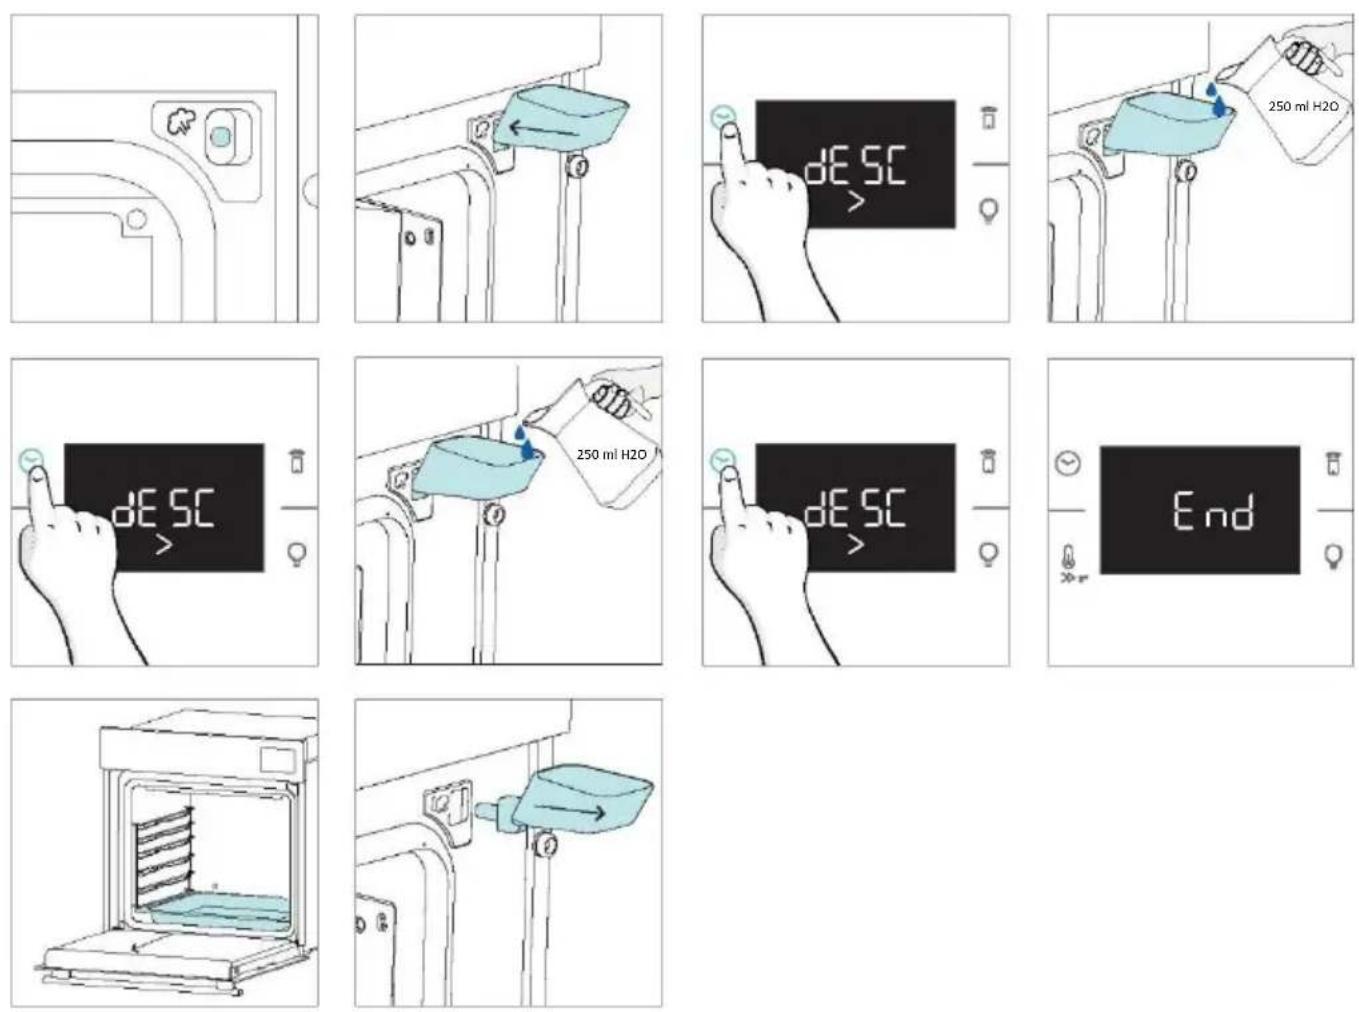
This function is suggested after 25 steam cycles, and it will be mandatory after 40 steam cycles. The oven will show the "descaling icon" at the end of every steam cycle starting from the 25th if users have not performed descale yet. After 40 steam cycles, none of the steam cooking programs will start before users execute the descaling program. It is divided into three steps:
6.2.1.1. DESCALE
Step 1 (Removing residual water from steamer):
i. Select drain-descale mode from left knob and then select the descale function with the right knob and press time button to confirm.
ii. Place tray on cavity bottom and press the time button to start.
iii. After the buzzer beeps to proceed to the second stage, remove the tray and clean it.
flowchart
graph TD
    A["Smart Home Control Unit"] --> B["Smart Device 1"]
    A --> C["Smart Device 2"]
    A --> D["Smart Device 3"]
    A --> E["Smart Device 4"]
    A --> F["Smart Device 5"]
    A --> G["Smart Device 6"]
    A --> H["Smart Device 7"]
    A --> I["Smart Device 8"]
    A --> J["Smart Device 9"]
    A --> K["Smart Device 10"]
    A --> L["Smart Device 11"]
    A --> M["Smart Device 12"]
    A --> N["Smart Device 13"]
    A --> O["Smart Device 14"]
    A --> P["Smart Device 15"]
    A --> Q["Smart Device 16"]
    A --> R["Smart Device 17"]
    A --> S["Smart Device 18"]
    A --> T["Smart Device 19"]
    A --> U["Smart Device 20"]
natural_image
Simple diagram with a large circle, a dot, and a plus sign, with curved arrows indicating rotation or direction (no text or symbols)
text_image
DESC >
natural_image
Line drawing of a kitchen oven with a tiled interior and ventilation duct (no text or symbols)
text_image
dE SC >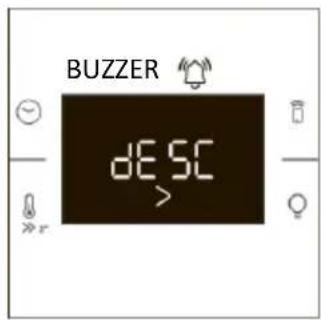
text_image
BUZZER dESC >
natural_image
Line drawing of a kitchen oven with a blue tray inside and a side panel (no text or symbols)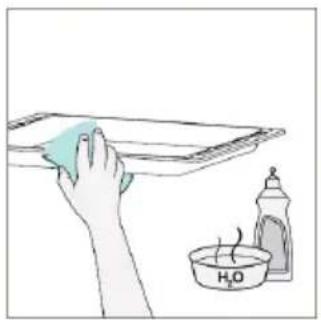
natural_image
Illustration of a hand cleaning a surface with a cloth and a water bottle (no text or symbols)Step 2 (Descaling):
i. Place the water funnel and tray and press the time button to confirm.
ii. Fill 200 ml water and 50 ml descaler into the funnel. Then press the time button to confirm.
iii. Pull out the funnel, close the door and press the time button to confirm.
iv. Descaling process will take for a while, after that to proceed to the third stage, remove the tray and clean It again.

natural_image
Pure technical line drawing of a mechanical component with no text or symbols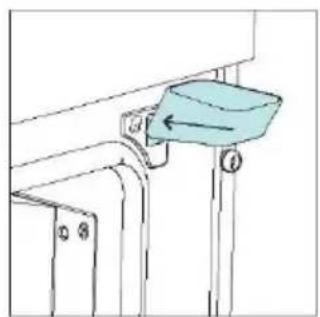
natural_image
Technical line drawing of a mechanical component with a blue component and directional arrow (no text or symbols)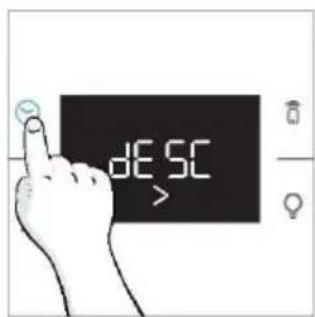
text_image
DESC >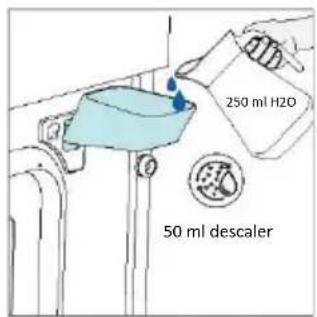
text_image
250 ml H2O 50 ml descaler
text_image
DESC >
natural_image
Simple line drawing of a door handle with a blue plastic clip attached (no text or symbols)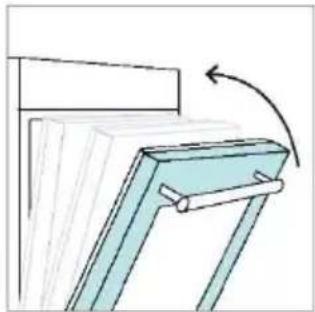
natural_image
Diagram of a mechanical component with a rotating arrow indicating rotation (no text or symbols)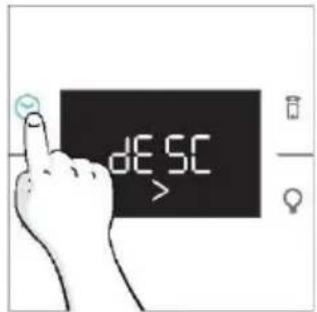
text_image
dESC >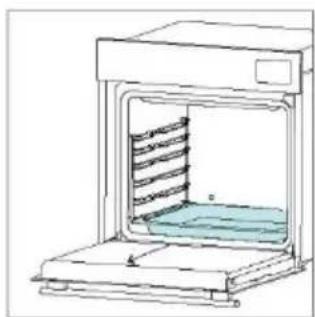
natural_image
Line drawing of a laboratory oven with a rack inside and a blue cushion on the side (no text or symbols)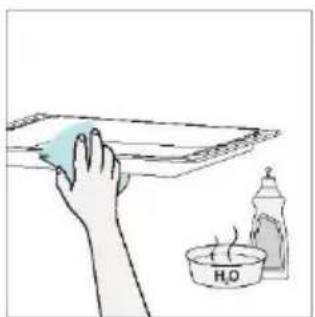
natural_image
Illustration of a hand cleaning a surface with a cloth and a small container labeled H2O (no text or symbols on the main subject)Step 3 (Rinsing):
i. Place the water funnel and tray and press the time button to confirm.
ii. Fill 250 ml water into the funnel. Then press the time button to confirm.
iii. After first draining completed, fill 250 ml water into the funnel. Then press the time button to continue rinsing.
iv. After second draining completed, fill 250 ml water into the funnel. Then press the time button to continue rinsing.
v. When the descaling function ends, remove the tray and funnel.
6.2.1.2. DRAINING
Step 1 (Removing residual water from steamer):
i. Select drain-descale mode and then select the draining function with the right knob.
ii. Place tray on cavity bottom and press the time button to start.
iii. When the draining function ends, remove the tray and clean it.
flowchart
graph TD
    A["Central Device"] --> B["Component 1"]
    A --> C["Component 2"]
    A --> D["Component 3"]
    A --> E["Component 4"]
    A --> F["Component 5"]
    A --> G["Component 6"]
    A --> H["Component 7"]
    A --> I["Component 8"]
    A --> J["Component 9"]
    A --> K["Component 10"]
    A --> L["Component 11"]
    A --> M["Component 12"]
    A --> N["Component 13"]
    A --> O["Component 14"]
    A --> P["Component 15"]
    A --> Q["Component 16"]
    A --> R["Component 17"]
    A --> S["Component 18"]
    A --> T["Component 19"]
    A --> U["Component 20"]
    A --> V["Component 21"]
    A --> W["Component 22"]
    A --> X["Component 23"]
    A --> Y["Component 24"]
    A --> Z["Component 25"]
    A --> AA["Component 26"]
    A --> AB["Component 27"]
    A --> AC["Component 28"]
    A --> AD["Component 29"]
    A --> AE["Component 30"]
    A --> AF["Component 31"]
    A --> AG["Component 32"]
    A --> AH["Component 33"]
    A --> AI["Component 34"]
    A --> AJ["Component 35"]
    A --> AK["Component 36"]
    A --> AL["Component 37"]
    A --> AM["Component 38"]
    A --> AN["Component 39"]
    A --> AO["Component 40"]
    A --> AP["Component 41"]
    A --> AQ["Component 42"]
    A --> AR["Component 43"]
    A --> AS["Component 44"]
    A --> AT["Component 45"]
    A --> AU["Component 46"]
    A --> AV["Component 47"]
    A --> AW["Component 48"]
    A --> AX["Component 49"]
    A --> AY["Component 50"]

natural_image
Simple diagram with a large circle, a dot, and a plus sign, with curved arrows indicating rotation or direction (no text or symbols)
natural_image
Line drawing of a kitchen oven with a tiled interior and ventilation duct (no text or symbols)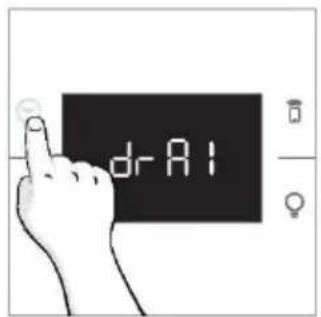
text_image
dr A1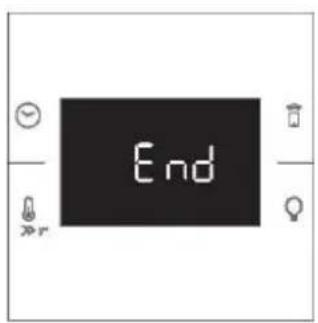
text_image
End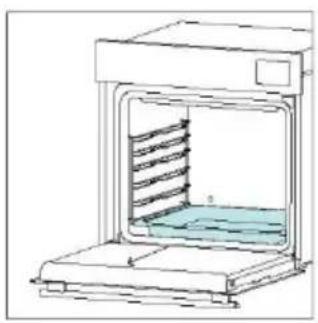
natural_image
Line drawing of a laboratory oven with internal cooling system (no text or symbols)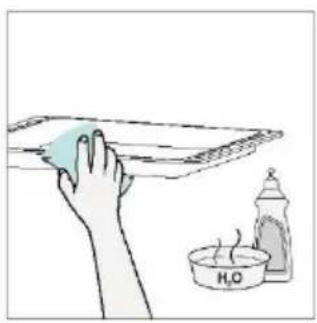
natural_image
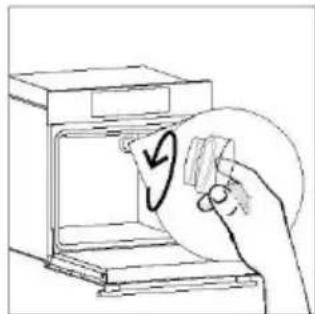
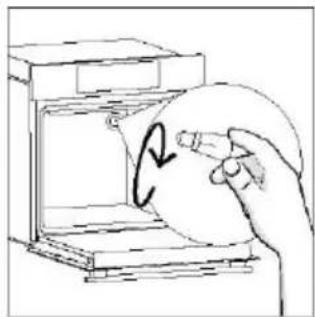
Illustration of a hand cleaning a surface with a cloth and a water bottle labeled H₂O (no text or symbols on the main subject)6.2.2. OUTSIDE THE OVEN: removal and cleaning the glass door
- Position the door at 90^ . Rotate the hinge locking tabs outward from the oven.

natural_image
Line drawing of a door oven with hands operating it (no text or symbols)
natural_image
Diagram showing a mechanical component being inserted into a corner, with an arrow indicating direction (no text or symbols present)- Position the door at 45^ . Simultaneously press the two buttons on both the sides of the door's lateral shoulders and pull towards yourself to remove the upper glasses' door cover.

text_image
1 2 4°- Very carefully remove the oven glass, starting with the inner one. During the procedure, firmly hold the glass with both hands and place them on a cushioned flat surface (e.g., on a fabric).

natural_image
Simple line drawing of a tilted rectangular object with directional arrows indicating movement or force (no text or symbols)- WARNING: The outer glass is not removable.
natural_image
Line drawing of a hand holding a bracket with a circular overlay (no text or symbols)- Clean the glass using a soft cloth and suitable cleaning products.

text_image
Illustration showing a hand cleaning a surface with water droplets, next to a bottle labeled 'H2O' and a bowl of water.-
Insert the glass panels, making sure that the "LOW-E / PYRO" label is correctly readable and positioned on the lower left side of the door, near the left-side hinge. This way, the printed label on the first glass will remain on the inside of the door.
-
Reattach the upper glasses' door cover by pushing it inwards until you hear a click from the two side buttons.
-
Then, bring the door back to 90^ and rotate the hinge locking tabs inward towards the inside of the oven.

text_image
PYRO OR LOW-E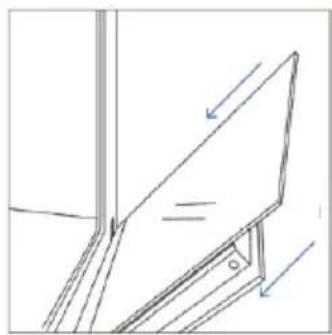
natural_image
Line drawing of a mechanical assembly with no visible text or symbols
natural_image
Line drawing of a double-bowel oven with hands inserting a cable into the opening (no text or symbols)
natural_image
Diagram showing a tool interacting with a mechanical component, no text or symbols present6.3. CLEANING OF ACCESSORIES
Ensure that you clean the accessories thoroughly after every use and dry them using a towel. For persistent residues, consider soaking the accessories in a mixture of water and soap for approximately 30 minutes before giving them a second wash.
CLEANING OF SIDE RACKS:
- Remove the side racks by pulling them in the direction of the arrows.
- To clean the side racks either put them in the dishwasher or use a wet sponge, ensuring that they are dried afterwards.
- After the cleaning process install the side racks in reverse order.
6.4. MAINTENANCE
COMPONENTS REPLACEMENT
Changing the bulb on top:
- Disconnect the oven from mains supply.
- Remove the lamp's glass cover.
- Disassemble the bulb.
- Replace the bulb with a new one of the same type.
- Relocate the lamp's glass cover.
- Reconnect the oven from mains supply.
Step 1
text_image
Safety warning diagram showing a plug on a line with hazard symbol and OFF status panelStep 2
natural_image
Line drawing of a hand holding a circular object next to an open appliance (no text or symbols)Step 3

natural_image
Line drawing of a hand holding a circular object with a curved arrow, next to an open device (no text or symbols)Step 4
natural_image
Hand holding a circular object with a curved arrow inside, inside an open appliance (no text or symbols)Step 5

natural_image
Hand holding a circular object with a curved arrow inside, next to an open appliance (no text or symbols visible)Step 6

text_image
Electrical hazard warning symbol with plug, ON button, and warning sign indicating safety hazardThis product contains one or more light sources of energy efficiency class G (Lamp)
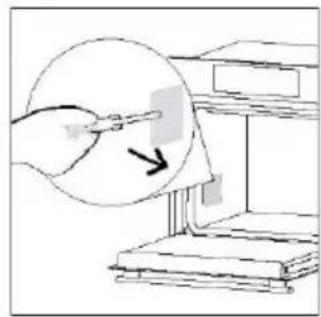
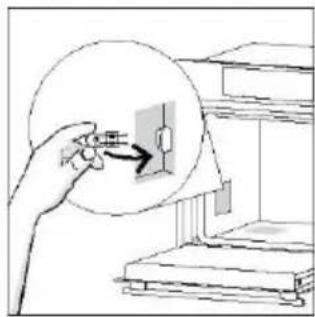
Changing the lateral bulb:
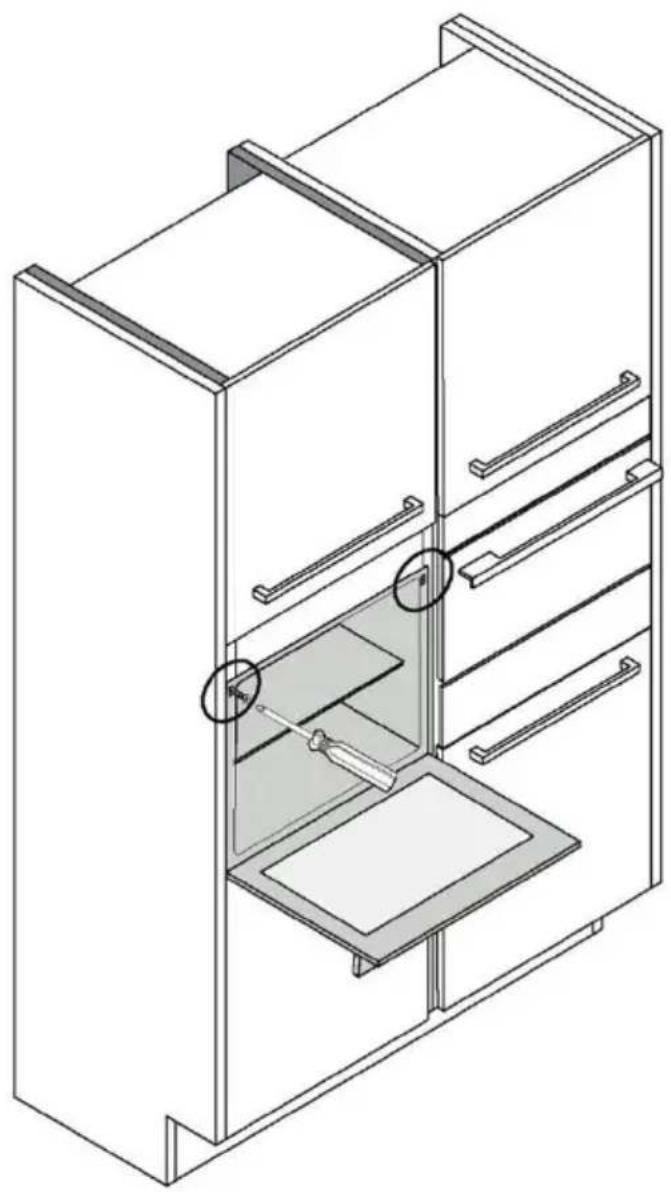
- Disconnect the oven from mains supply.
- Use a flat-head screwdriver by positioning it to the side of the protective glass and gently apply pressure to remove it.
- Carefully grasp the bulb from its base.
- Insert the new one.
- Reinstall the protective glass by pressing it gently until it's locked into position.
- Reconnect the oven from mains supply.
Step 1

text_image
Electrical diagram showing a plug connected to an ON/OFF switch with warning symbol and directional arrowsStep 2

natural_image
Illustration of a hand holding a pen near a stack of books, with an arrow pointing to a square object (no text or symbols present)Step 3

natural_image
Illustration of a hand inserting a small object into a storage unit (no text or symbols visible)Step 4

natural_image
Illustration of a hand holding a small electronic component with an arrow pointing to it, next to a staircase (no text or symbols)Step 5

natural_image
Diagram of a printer with a magnified inset showing a close-up of the printer's internal structure (no text or symbols present)Step 6

text_image
Electrical warning symbol diagram showing a plug, safety warning sign, and ON panel with arrows indicating current directionThis product contains one or more light sources of energy efficiency class G (Lamp)
7. TROUBLESHOOTING
If, during oven use, an error occurs, the display will show the code "ER" followed by two digits, which will identify the error.
Proceed by turn off the oven and un-plug it, wait for a few minutes, and then reconnect it.
If the error disappears, you can resume using the oven. If it doesn't, call customer service and communicate the code (ERXX) you see on the display.
Error
Smoke
8.1. APPLIANCE DISPOSAL

This appliance is labelled in accordance with European Directive 2012/19/EU regarding electric and electronic appliances (WEEE). The WEEE contain both polluting substances (that can have a negative effect on the environment) and base elements (that can be reused). It is important that the WEEE undergo specific treatments to correctly remove and dispose of the pollutants and recover all the materials.
Individuals can play an important role in ensuring that the WEEE do not become an environmental problem; it is essential to follow a few basic rules:
- the WEEE should not be treated as domestic waste;
- the WEEE should be taken to dedicated collection areas managed by the town council or a registered company.
In many countries, domestic collections may be available for large WEEEs. When you buy a new appliance, the old one can be returned to the vendor who must accept it free of charge as a one-off, as long as the appliance is of an equivalent type and has the same functions as the purchased appliance.
8.2. SAVING AND RESPECTING THE ENVIRONMENT
Where possible, avoid pre-heating the oven and always try to fill it.
Open the oven door as infrequently as possible, because heat from the cavity disperses every time it is opened. For a significant energy saving, switch off the oven between 5 and 10 minutes before the planned end of the cooking time, and use the residual heat that the oven continues to generate. Keep the seals clean and in order, to avoid any heat dispersal outside of the cavity. If you have an electric contract with an hourly tariff, the "delayed cooking" programme makes energy saving simpler, moving the cooking process to start at the reduced tariff time slot.
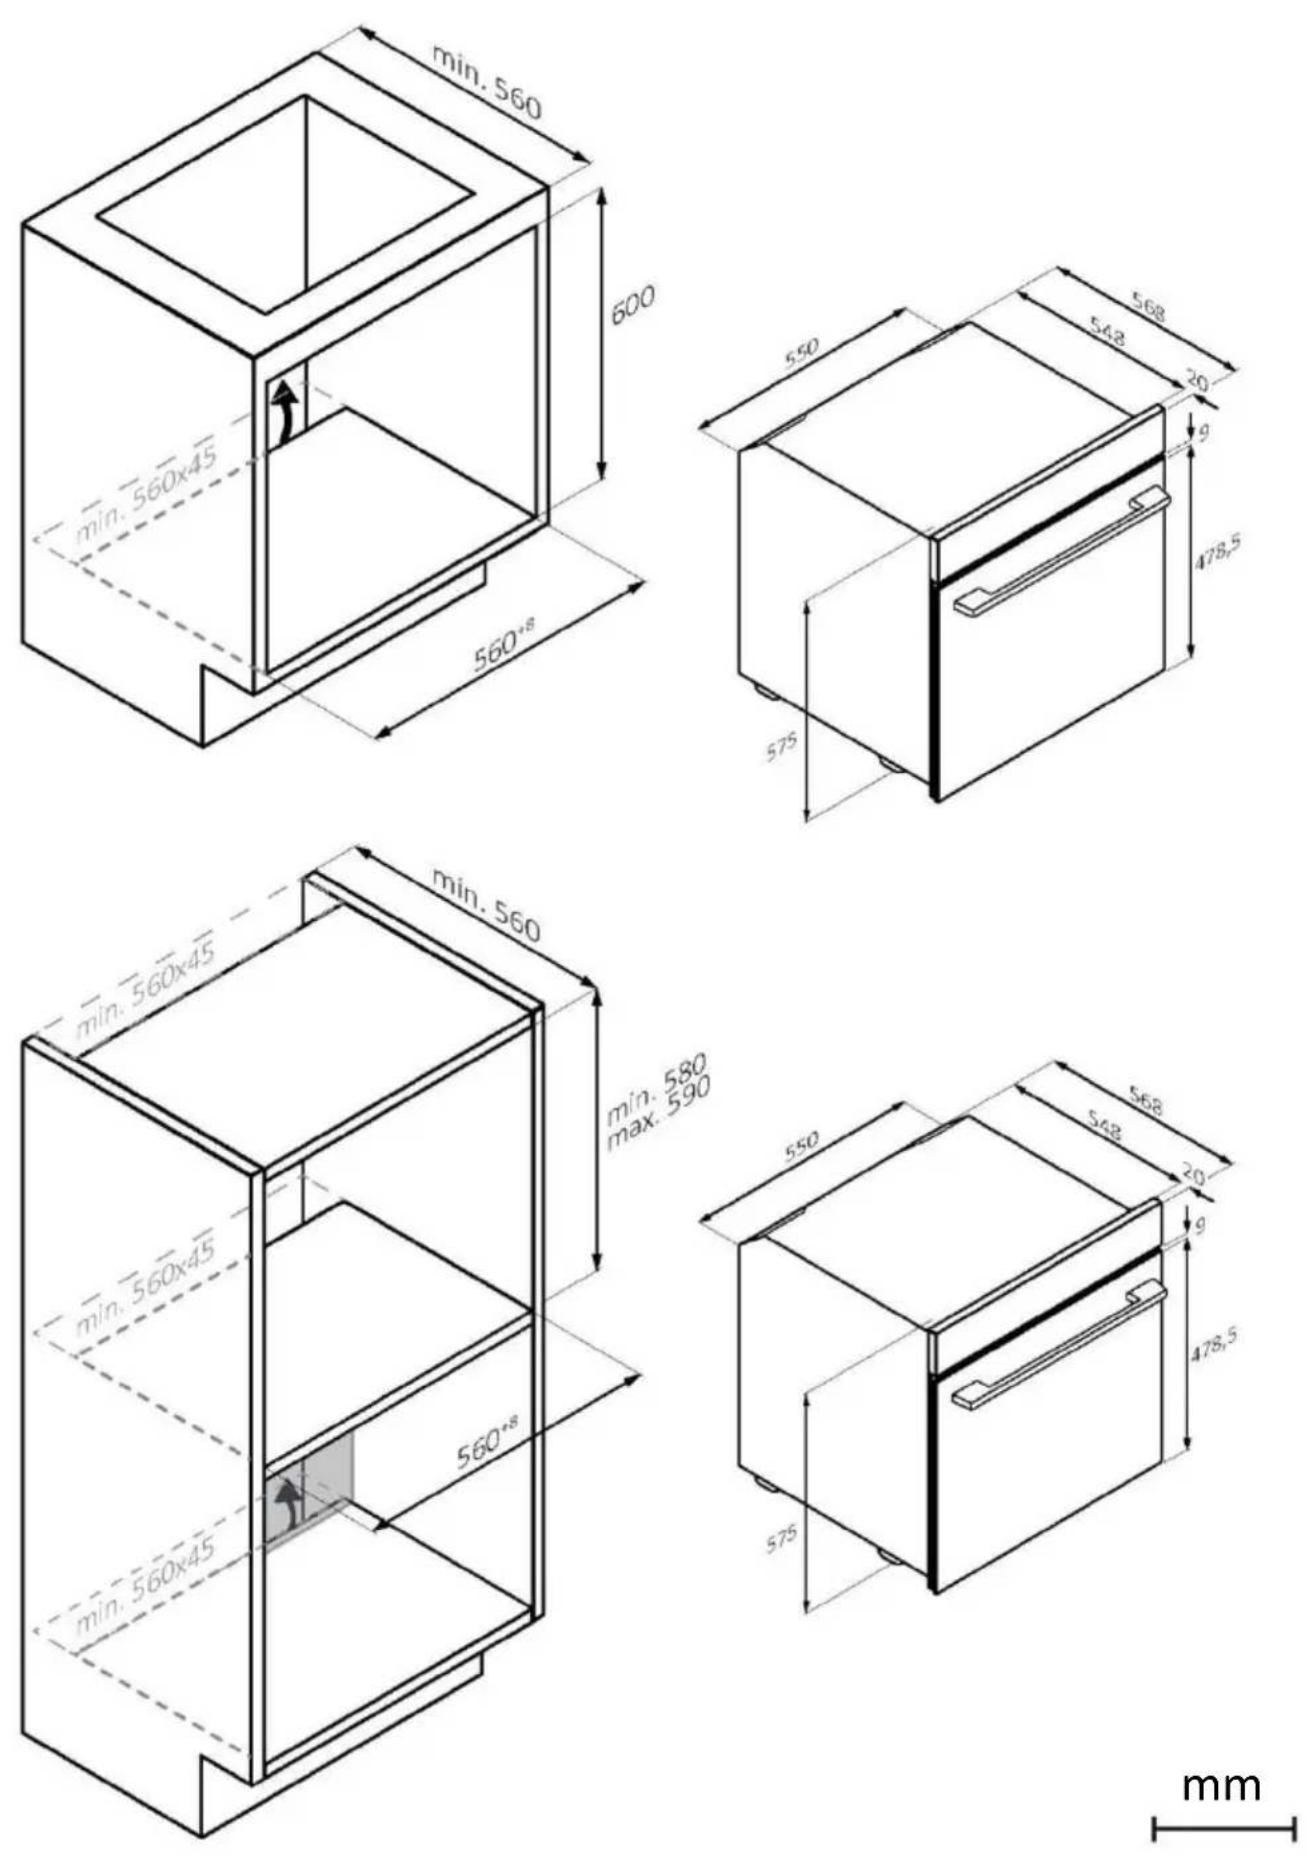
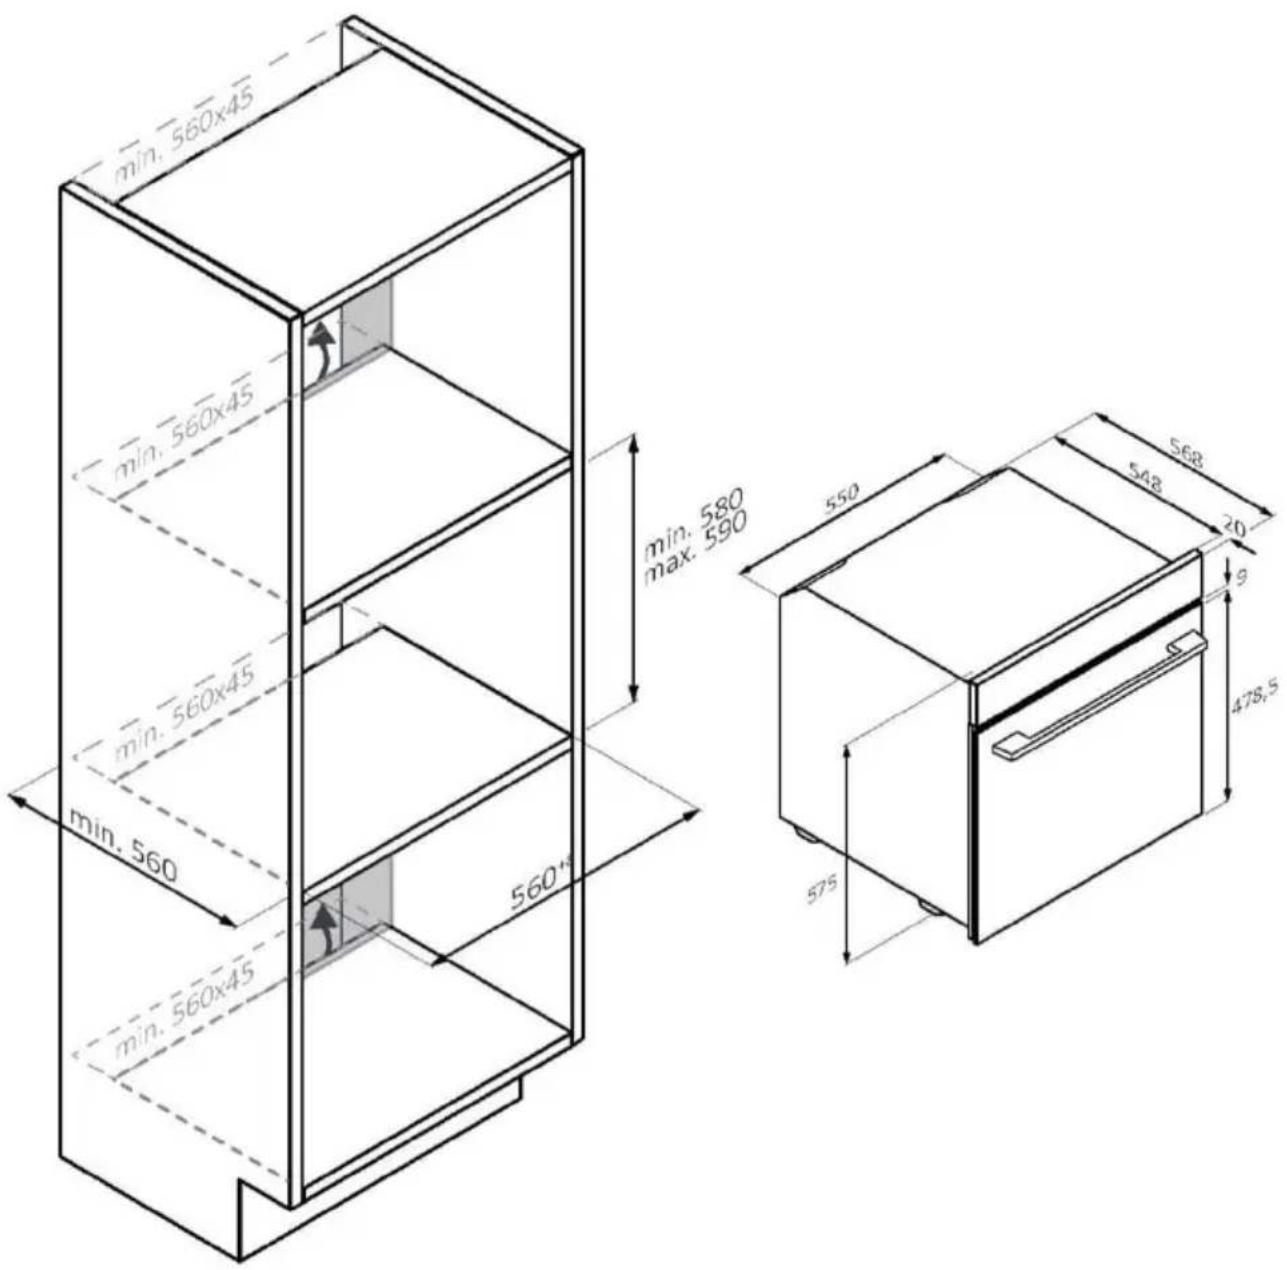
text_image
min. 560x45 min. 560x45 min. 560x45 min. 560 min. 560x45 min. 560 min. 580 max. 590 560" 575 575 548 20 9 478,5 568
natural_image
Isometric line drawing of a multi-level refrigerator with internal compartments and handrails (no text or symbols)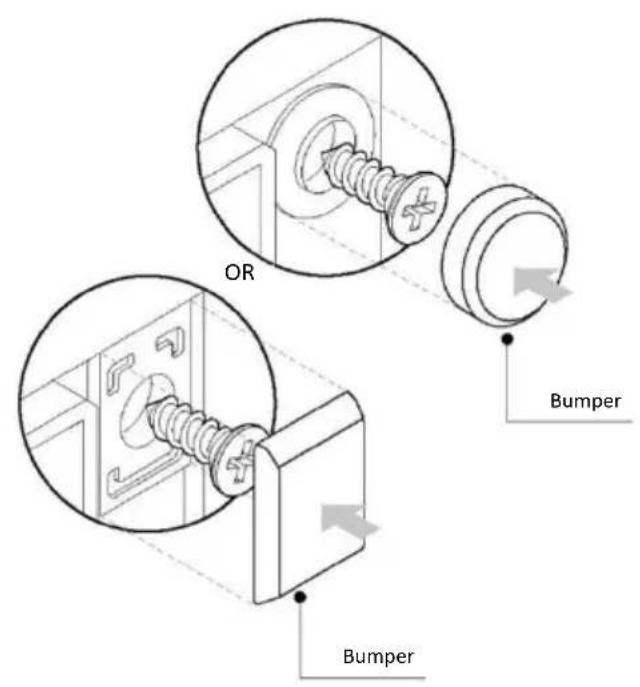
text_image
OR Bumper Bumper
BIENVENUE
natural_image
Illustration of a light blue rectangular tray with internal compartments, placed on a shelf (no text or symbols)natural_image
Line drawing of a kitchen sink with a bowl, tray, and wall-mounted dish (no text or symbols)natural_image
Line drawing of a two-tiered storage unit with horizontal and vertical metal racks (no text or symbols)text_image
Diagram showing three steps of a door lock mechanism with labeled buttons and directional arrows indicating movement.COMMENT INTERAGIR AVEC L'APPLICATION
text_image
Available on the App Store GET IT ON Google PlayINSCRIPTION D'UN NOUVEL UTILISATEUR
text_image
Welcome! Sign in to enter in your home page ENTER REGISTER Are you now to hOn? Click below to learn about our products © TRY DEMG hOn Do you already have a thousand passwords? Register with your social accounts and log in in the easiest and fastest way. SIGN UP WITH GOOGLE SIGN UP WITH APPLE SIGN UP WITH FACEBOOK No information relating to you will be stored and let us not past anything normally. OR SIGN UP WITH EMAIL Already registered? LOGINAPPAIRAGE RAPIDE
Étape 1
text_image
Hello USERNAME YOUR APPLIANCES Add + Add appliance YOUR WIDGETS Long-litreum darker/soft Plan to Care your news What functions do smart appliances have? How to live sustain home and reduce wÉtape 2
text_image
Allow your location permission To enhance your experience, please allow location permission to hOn app in the next step. CONTINUEÉtape 3
text_image
Select your appliance category Search your appliance Washing machine Washer dryer Tumble dryer Dishwasher Air conditionair Air purifier Air scannerÉtape 4
text_image
Appliance connection Turn OFF and then ON your appliance In case you can't switch OFF your appliance, unplug (for at least 10 seconds) and then plug its power supply. OK IT DID ITÉtape 5
text_image
Appliance connection Searching your appliance Don't turn off your Bluetooth. No app is looking for your appliance... 00:00:40 Stay close to your appliance in order to correctly capture the signal.Étape 6.1-6.2
text_image
Appliance connection Searching your appliance Don't turn off your Bluetooth. Oven New appliance Long appliance name to... CONNECT PRODUCT NOT FOUND
text_image
Appliance connection Searching your appliance Don't turn off your Bluetooth. Oven Connecting New appliance Long appliance name to... Stay close to your appliance in order to correctly capture the signal.Étape 7
text_image
Appliance connection Your appliance has been correctly identified! Brand Hoover Model 31008486-7888-1824 Serial number 12345678-1234-1234 Is this your appliance? YES IT'S MY OVEN NO IT'S NOT
COMMENT MODIFIER LES PARAMÈTRES DU WI-FI
natural_image
Simple diagram with a large circle, a dot, and a plus sign, with curved arrows indicating rotation or direction (no text or symbols)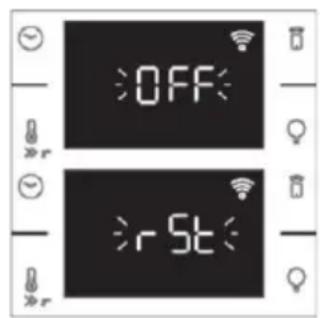
text_image
OFF r5t
CONTRÔLE À DISTANCE
text_image
Cooking SH 12M LEFT ADD 5.1MN STOP Current program PROGRAMS Conventional 200°C 50 Prolactating 30-50Hz Efficiency Prolactating EDIT DETAILS →3. AVANT DE COMMENCER
3.1. INFORMATIONS POUR COMMENCER
text_image
:br 3 ---
text_image
- • + RÉGLEZ LA LUMINOSITÉ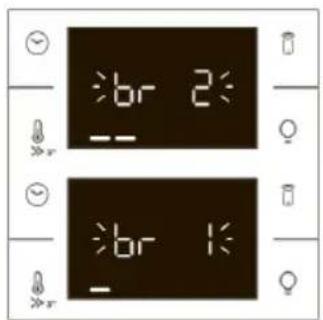
text_image
br 2 -- br 1 -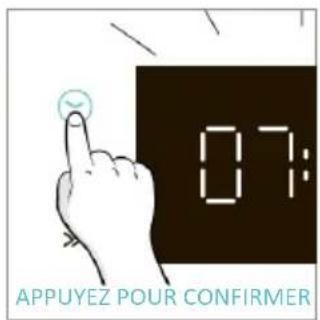
text_image
07: APPUYEZ POUR CONFIRMERnatural_image
Illustration of a kitchen sink with a hand cleaning the interior, next to a water bottle and a bowl labeled H20 (no text or symbols on main objects)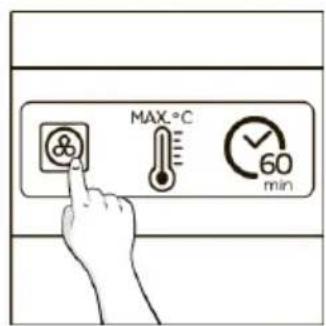
text_image
MAX.°C 60 min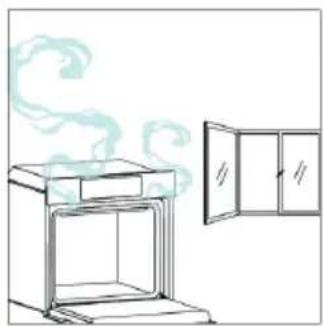
natural_image
Line drawing of an oven with smoke rising, next to a cabinet (no text or symbols)4. FONCTIONNEMENT DU PRODUIT
4.1. FONCTIONNEMENT DU PRODUIT
MISE EN MARCHE/ARRÊT DU FOUR
natural_image
Pure technical line drawing of a mechanical component with no text or symbols
natural_image
Technical diagram of a mechanical assembly with a blue component and mounting brackets (no text or symbols)natural_image
Diagram of a mechanical device with a blue component and directional arrow, no text or symbols present
natural_image
Diagram of a mechanical component with an arrow indicating rotation, no text or symbols presentnatural_image
Pure electrical circuit lines without any symbolsnatural_image
Line drawing of an oven with a rack and vent, showing internal structure without any text or symbols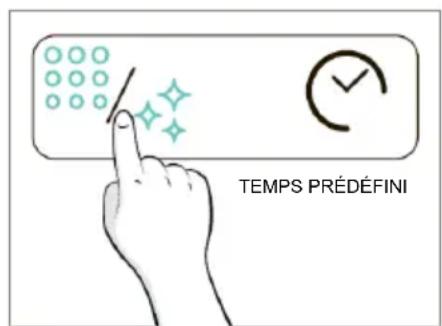
text_image
TEMPS PRÉDÉFINI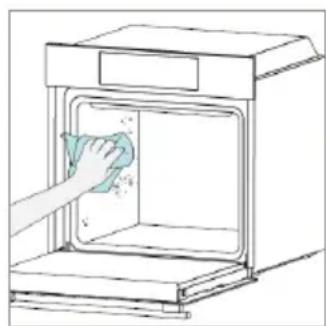
natural_image
Line drawing of a hand cleaning a kitchen appliance with a cloth (no text or symbols)Vapeur Aquactiva
natural_image
Simple line drawing of a mechanical device with a blue lever and mounting bracket (no text or symbols)
text_image
Diagram showing a hand cleaning a kitchen with a cloth, indicating environmental hazard or safety warning.NETTOYAGE DU SYSTÈME À VAPEUR
natural_image
Simple diagram with a large circle, a dot above it, and a curved arrow with plus sign (no text or symbols)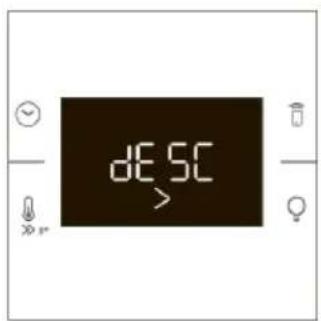
text_image
DESC >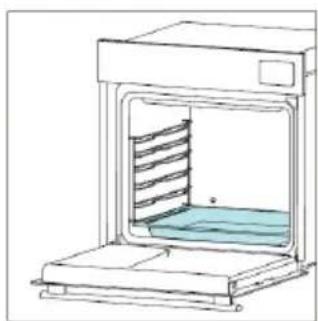
natural_image
Line drawing of a laboratory oven with a blue liquid inside (no text or symbols)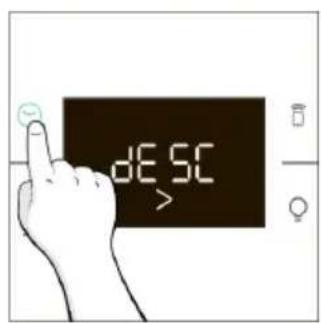
text_image
dESC >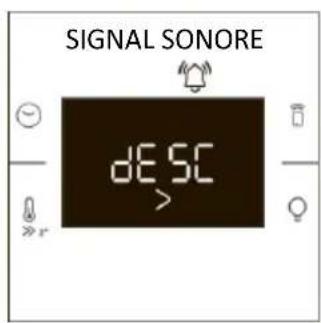
text_image
SIGNAL SONORE DESC >
natural_image
Line drawing of a laboratory oven with a rack inside and a blue tray on the side (no text or symbols)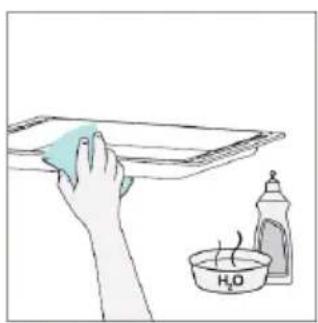
natural_image
Illustration of a hand cleaning a cloth with a water bottle and beaker nearby (no text or symbols)natural_image
Pure technical line drawing of a door or corner component with no text, numbers, or symbols
natural_image
Technical diagram of a mechanical component with a blue component and directional arrow (no text or symbols)
text_image
DESC >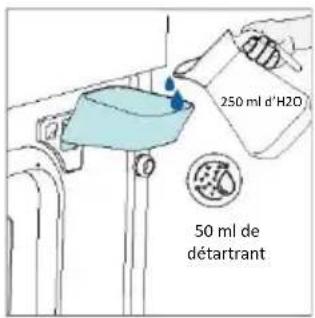
natural_image
Simple line drawing of a door handle with a blue plastic clip attached (no text or symbols)
natural_image
Diagram of a mechanical bracket with an arrow indicating rotation or force direction (no text or symbols present)
text_image
DESC >
natural_image
Line drawing of a kitchen oven with a tray holding a blue dish (no text or symbols)
natural_image
Illustration of a hand cleaning a surface with a cloth and a small container labeled H2O (no text or symbols on the main subject)Étape 3 (Rinçage) :
natural_image
Line drawing of a door oven with hands operating it (no text or symbols)
natural_image
Diagram showing a mechanical component being inserted into a corner, with an arrow indicating direction (no text or symbols present)natural_image
Simple line drawing of a tilted rectangular object with directional arrows indicating movement or force (no text or symbols)natural_image
Line drawing of a hand holding a bracket with a circular overlay (no text or symbols)text_image
Illustration showing a hand cleaning a surface with water droplets, accompanied by a bottle and a labeled dish containing H₂O.text_image
PYRO OU BAS
natural_image
Line drawing of a mechanical assembly with no visible text or symbols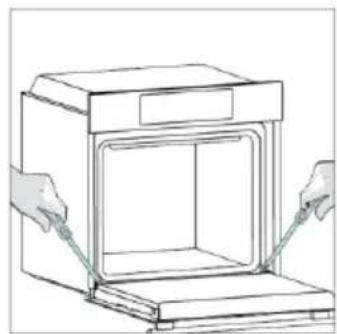
natural_image
Line drawing of a double door with hands inserting a cable into the opening (no text or symbols)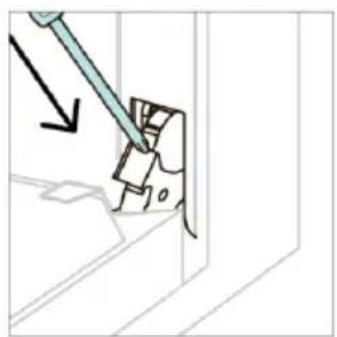
natural_image
Diagram showing a tool interacting with a mechanical component, with an arrow indicating direction (no text or symbols present)6.3. NETTOYAGE DES ACCESSOIRES
natural_image
Line drawing of a laboratory oven with internal circulation and heat exchanger (no text or symbols)
natural_image
Diagram showing two open industrial cabinets with internal heat dissipation arrows, no text or symbols present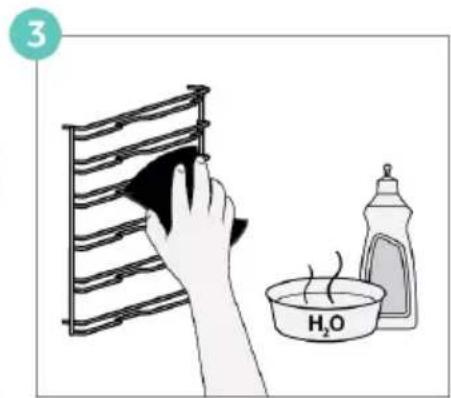
text_image
3 H₂O
natural_image
Diagram of two industrial furnace or oven structures with internal heat transfer arrows, no text or symbols present
natural_image
Line drawing of a simple oven with internal cooling ducts (no text or symbols)6.4. ENTRETIEN
REMPLACEMENT DES COMPOSANTS
text_image
Safety warning diagram showing a plug on a line with hazard symbol and OFF status indicatorsÉtape 2

natural_image
Line drawing of a hand holding a circular object next to an open appliance (no text or symbols)Étape 3

natural_image
Line drawing of a hand holding a circular object with a curved arrow, next to an open device (no text or symbols)Étape 4

natural_image
Hand holding a circular object with a curved arrow inside, inside an open appliance (no text or symbols)Étape 5

natural_image
Hand holding a circular object with a curved arrow inside, next to an open appliance (no text or symbols visible)Étape 6

text_image
Electrical hazard warning symbol with plug, warning sign, and ON/OFF switch symbolstext_image
Safety warning diagram showing a plug and fuse with a hazard symbol and an ON/OFF switchÉtape 2
natural_image
Illustration of a hand holding a pen over a document with an arrow pointing to it, next to stacked books (no text or symbols present)Étape 3

natural_image
Illustration of a hand inserting a small component into a wall-mounted device (no text or symbols visible)Étape 4
natural_image
Illustration of a hand holding a small electronic component with an arrow pointing to it, next to a shelf (no text or symbols)Étape 5

natural_image
Diagram of a staircase with an arrow pointing to a window (no text or symbols present)Étape 6

text_image
Electrical safety warning diagram showing plug, ON panel, and warning symbol with arrowstext_image
Diagram showing a kitchen appliance with exhaust and cleaning process, including a warning triangle and hand cleaning the interior.8.1. ÉLIMINATION DE L'APPAREIL
natural_image
Isometric line drawing of a multi-level refrigerator with internal compartments and handrails (no text or symbols)
text_image
OU Butoir Butoir
BIENVENIDO/A
text_image
Technical diagram of an oven with numbered components for identification2.2. ACCESORIOS
natural_image
Empty white rectangle with black border (no text or symbols)natural_image
Simple line drawing of a rectangular tray with internal compartments, placed on a shelf (no text or symbols)natural_image
3D wireframe diagram of a rectangular tray with internal compartments, placed on an open shelf (no text or symbols)natural_image
Line drawing of a minimalist room interior with a bowl, wall-mounted shelf, and a circular object (no text or symbols)natural_image
Line drawing of a multi-tiered storage unit with horizontal shelves and metal racks (no text or symbols)text_image
Diagram illustrating three steps of a door handle replacement, showing step 1 with a pushpin and step 2 with a bag attached.text_image
Available on the App Store GET IT ON Google Playtext_image
Welcome! Sign in to enter in your home page ENTER REGISTER Are you now to hOn? Click below to learn about our products © TRY DEMG hOn Do you already have a thousand passwords? Register with your social accounts and log in in the easiest and fastest way. SIGN UP WITH GOOGLE SIGN UP WITH APPLE SIGN UP WITH FACEBOOK No information relating to you will be stored and let us not past anything normally. OR SIGN UP WITH EMAIL Already registered? LOGINREGISTRO RÁPIDO PARA EMPAREJAMIENTO
Paso 1
text_image
Hello USERNAME YOUR APPLIANCES Add + Add appliance YOUR WIDGETS Long-term darker's text Your NEWS What functions do smart appliances have? How to live sustain- home and reduce wPaso 2
text_image
Allow your location permission To enhance your experience, please allow location permission to hOn app in the next stop. CONTINUEPaso 3
text_image
Select your appliance category Search your appliance Washing machine Washer dryer Tumble dryer Dishwasher Air conditionair Air purifier Air scannerPaso 4
text_image
Appliance connection Turn OFF and then ON your appliance In case you can't switch OFF your appliance, unplug (for at least 10 seconds) and then plug its power supply. OK IT DID ITPaso 5
text_image
Appliance connection Searching your appliance Don't turn off your Bluetooth. No app is looking for your appliance... 00:00:40 Stay close to your appliance in order to correctly capture the signal.Paso 6.1-6.2
text_image
Appliance connection Searching your appliance Don't turn off your Bluetooth. Oven New appliance Long appliance name to... CONNECT PRODUCT NOT FOUND
text_image
Appliance connection Searching your appliance Don't turn off your Bluetooth. Oven Connecting New appliance Long appliance name to... Stay close to your appliance in order to correctly capture the signal.Paso 7
text_image
Appliance connection Your appliance has been correctly identified! Brand Hoover Model 31008486-7888-1824 Serial number 12345678-1234-1234 Is this your appliance? YES IT'S MY OVEN NO IT'S NOT
natural_image
Simple diagram with a large circle, a dot, and a plus sign, with curved arrows indicating rotation or direction (no text or symbols)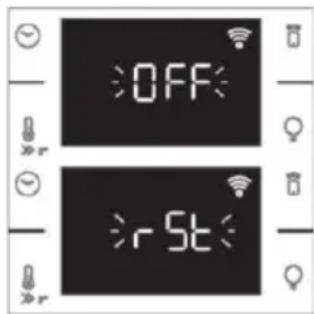
text_image
OFF r5t
CONTROL REMOTO
text_image
Cooking BYDINLEET ADD 510MM STOP Current program PROGRAMS Conventional 200 gm 30.80m Elevated (EVR) Efficiency Predicted (EVR) EDIT DETAILS3. ANTES DE EMPEZAR
natural_image
Illustration of a kitchen sink with a hand cleaning the interior, next to a water bottle and a bowl labeled H2O (no text or symbols on main objects)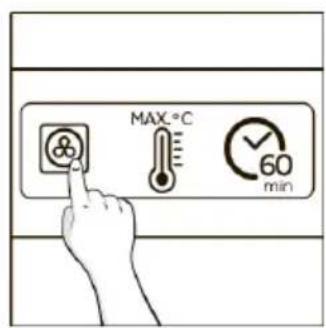
text_image
MAX.°C 60 min
natural_image
Line drawing of a kitchen oven with a chimney and adjacent door (no text or symbols)flowchart
graph TD
    A["Control knob"] --> B["Smart devices"]
    A --> C["Smart devices with wireless signals"]
    A --> D["Smart devices with wireless connectivity"]
    A --> E["Smart devices with wireless connectivity"]
    A --> F["Smart devices with wireless connectivity"]
    A --> G["Smart devices with wireless connectivity"]
    A --> H["Smart devices with wireless connectivity"]
    A --> I["Smart devices with wireless connectivity"]
    A --> J["Smart devices with wireless connectivity"]
    A --> K["Smart devices with wireless connectivity"]
    A --> L["Smart devices with wireless connectivity"]
    A --> M["Smart devices with wireless connectivity"]
    A --> N["Smart devices with wireless connectivity"]
    A --> O["Smart devices with wireless connectivity"]
    A --> P["Smart devices with wireless connectivity"]
    A --> Q["Smart devices with wireless connectivity"]
    A --> R["Smart devices with wireless connectivity"]
    A --> S["Smart devices with wireless connectivity"]
    A --> T["Smart devices with wireless connectivity"]
    A --> U["Smart devices with wireless connectivity"]
    A --> V["Smart devices with wireless connectivity"]
    A --> W["Smart devices with wireless connectivity"]
    A --> X["Smart devices with wireless connectivity"]
    A --> Y["Smart devices with wireless connectivity"]
    A --> Z["Smart devices with wireless connectivity"]
natural_image
Pure electrical circuit lines without any symbols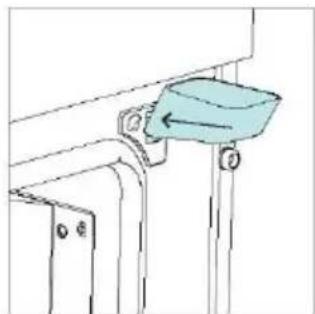
natural_image
Technical line drawing of a mechanical component with a blue bucket and mounting bracket (no text or symbols)natural_image
Diagram of a mechanical device with a blue component and directional arrow, no text or symbols present
natural_image
Diagram of a mechanical component with an arrow indicating rotation, no text or symbols presentnatural_image
Pure electrical circuit lines without any symbolsnatural_image
Line drawing of an oven with a rack and vent, showing internal structure without any text or symbols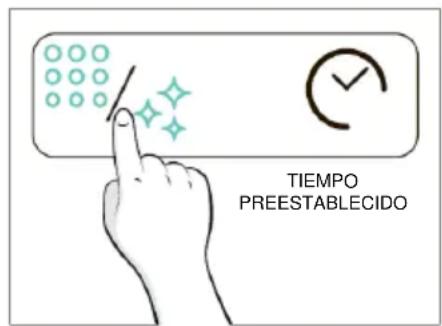
text_image
TIEMPO PREESTABLECIDO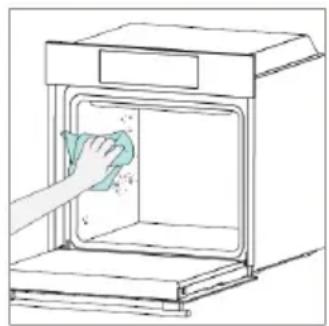
natural_image
Line drawing of a hand cleaning a kitchen appliance with a cloth (no text or symbols)
Vapor Aquactiva
natural_image
Simple line drawing of a mechanical component with a blue handle and mounting bracket (no text or symbols)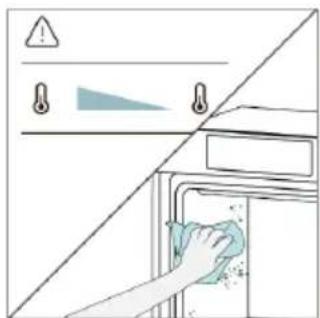
natural_image
Illustration of a hand cleaning a kitchen appliance with a cloth, showing no text or symbols.STEAM SYSTEM CLEANING
natural_image
Simple diagram with a large circle, a dot above it, and curved arrows indicating rotation or direction (no text or symbols)
text_image
DESC >
natural_image
Line drawing of a kitchen oven with a tiled interior and insulation material (no text or symbols)
text_image
dESC >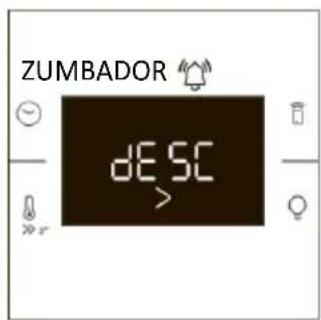
text_image
ZUMBADOR DESC >
natural_image
Line drawing of a kitchen oven with a blue tray inside and a rack inside (no text or symbols)
natural_image
Illustration of a hand cleaning a cloth with a water bottle and a bowl of H2O (no text or symbols)natural_image
Pure technical line drawing of a door or corner component with no text, numbers, or symbols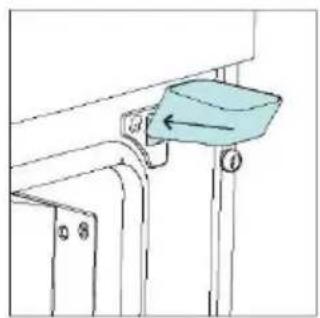
natural_image
Technical diagram of a mechanical assembly with a blue component and directional arrow (no text or symbols)
text_image
DESC >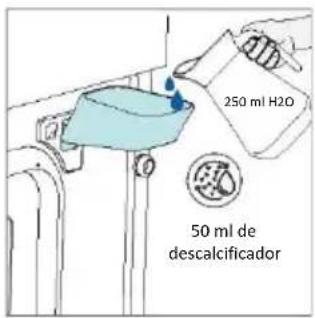
text_image
250 ml H2O 50 ml de descalcificador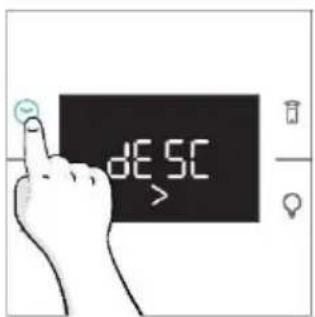
text_image
DESC >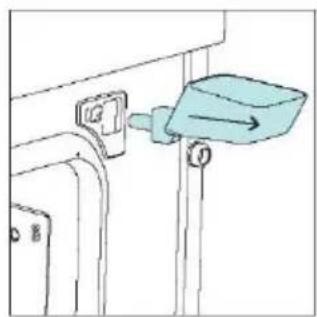
natural_image
Simple line drawing of a door handle with a blue plastic clip attached (no text or symbols)
natural_image
Diagram of a mechanical bracket with an arrow indicating rotation or force direction (no text or symbols present)
text_image
DESC >
natural_image
Line drawing of a kitchen oven with a tray holding a blue dish (no text or symbols)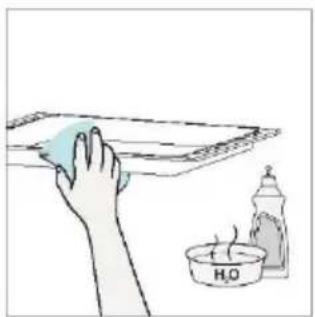
natural_image
Illustration of a hand cleaning a surface with a cloth and a small container labeled H2O (no text or symbols on the main subject)Paso 3 (enjuague):
natural_image
Pure technical line drawing of a mechanical component with no text or symbols
natural_image
Diagram of a mechanical component with a blue component and directional arrow, no text or symbols present
text_image
dESC >
text_image
250 ml H2O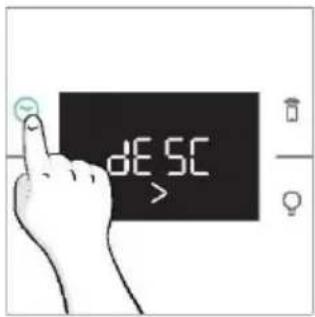
text_image
dE SC >
text_image
250 ml H2O
text_image
dE SC >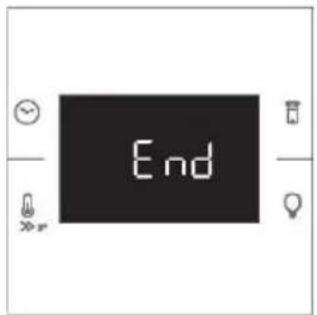
text_image
End
natural_image
Line drawing of an open oven with a rack inside, showing interior space and no text or symbols
natural_image
Simple line drawing of a mechanical component with a blue lever and mounting bracket (no text or symbols)6.2.1.2. DRENAJE
natural_image
Simple diagram with a large circle, a dot, and a plus sign, with curved arrows indicating rotation or direction (no text or symbols)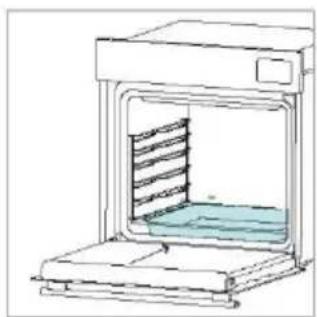
natural_image
Line drawing of a kitchen oven with a tiled interior and insulation material (no text or symbols)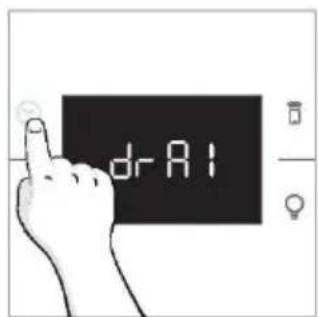
text_image
dr A1
text_image
End
natural_image
Line drawing of a laboratory oven with internal cooling system (no text or labels)
natural_image
Illustration of a hand cleaning a surface with a cloth and a small bottle labeled 'H2O' (no text or symbols on the main subject)natural_image
Line drawing of a door opening with hands operating it (no text or symbols)
natural_image
Simple line drawing of a mechanical component with an arrow indicating downward motion (no text or symbols)natural_image
Simple line drawing of a tilted rectangular object with directional arrows indicating movement or force (no text or symbols)natural_image
Hand holding a tool interacting with a bracket (no text or symbols visible)natural_image
Illustration of a hand cleaning a surface with a water droplet, a bottle, and a beaker labeled H₂O (no text or symbols on the main image)text_image
PYRO O LOW-E
natural_image
Line drawing of a mechanical assembly with no visible text or symbols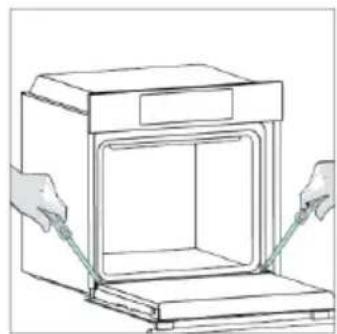
natural_image
Line drawing of a double-bowel oven with hands inserting a cable (no text or symbols)
natural_image
Diagram showing a tool interacting with a mechanical component, with an arrow indicating direction (no text or symbols present)6.3. LIMPIEZA DE ACCESORIOS
text_image
Safety warning diagram showing a plug on a line with hazard symbol and OFF status indicatorsPaso 2

natural_image
Hand holding a paper with a circular arrow inside an oven (no text or symbols)Paso 3

natural_image
Hand holding a circular object inside a device, with an arrow indicating rotation (no text or symbols present)Paso 4

natural_image
Hand holding a circular object with a curved arrow inside, next to an open device (no text or symbols visible)Paso 5

natural_image
Hand holding a circular object with a curved arrow inside, next to an open appliance (no text or symbols visible)Paso 6

text_image
Safety warning diagram showing electrical hazard symbol and ON/OFF switch symbols on a diagonal linetext_image
Safety warning diagram showing a plug and fuse with a hazard symbol and an ON/OFF switch labeled 'OFF'Paso 2
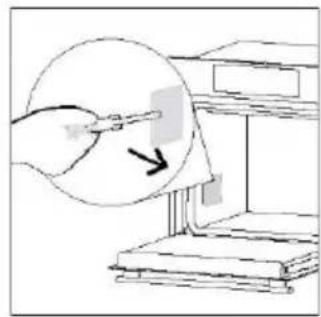
natural_image
Illustration of a hand inserting a pencil into a stack of books, with no visible text or symbols.Paso 3

natural_image
Illustration of a hand inserting a small object into a device, with no visible text or symbolsPaso 4

natural_image
Illustration of a hand holding a small electronic component with an arrow pointing to it, next to a shelf (no text or symbols)Paso 5
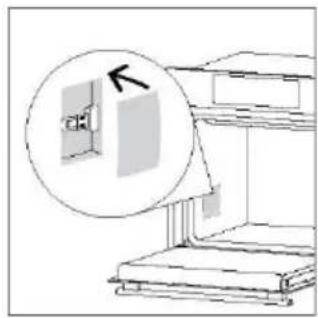
natural_image
Diagram of a printer with an open door and a magnified inset showing the paper's edge detail (no text or symbols)Paso 6

text_image
Electrical hazard warning diagram showing a plug connected to an ON panel with a warning symboltext_image
Diagram illustrating a chemical process with exhaust, showing air purification and cleaning stepsnatural_image
Isometric line drawing of a multi-level refrigerator with internal compartments and handrails (no text or symbols)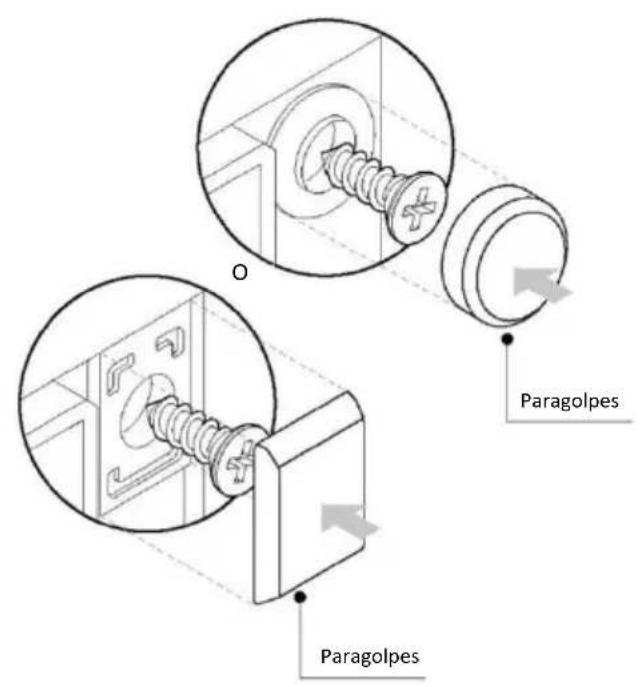
text_image
Paragolpes ParagolpesVÍTEJTE
text_image
Technical diagram of an oven with numbered components for identification2.2. PŘÍSLUŠENSTVÍ
1 Kovový rošt
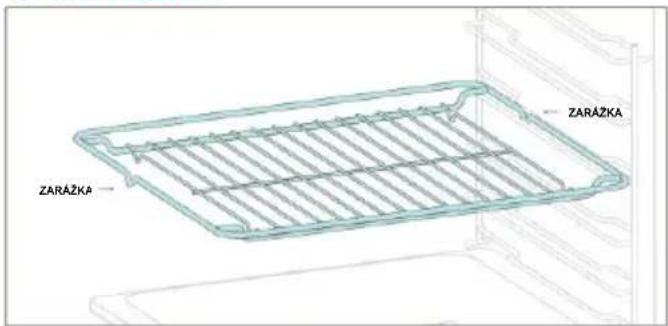
text_image
ZARAZKA ZARAZKAnatural_image
Illustration of a light blue rectangular tray with internal compartments, placed on a shelf (no text or symbols)natural_image
Line drawing of a rectangular tray with internal compartments, placed on an open shelf (no text or symbols)natural_image
Line drawing of a multi-tiered storage unit with horizontal and vertical metal racks (no text or symbols)natural_image
Line drawing of a kitchen sink with a bowl, a round head, and a side shelf (no text or symbols)text_image
Diagram showing three steps of a door lock mechanism with labeled buttons and directional arrowstext_image
Available on the App Store GET IT ON Google PlayREGISTRACE NOVÉHO UŽIVATELE
text_image
Welcome! Sign in to enter in your home page. ENTER REGISTER Are you now to hOn? Click below to learn about our products TRY DEMO hOn Do you already have a thousand passwords? Register with your social accounts and log in in the easiest and fastest way. G SIGN UP WITH GOOGLE i SIGN UP WITH APPLE f SIGN UP WITH FACEBOOK No information relating to you will be shown and we will not add anything from you. IF: SIGN UP WITH EMAIL Already registered? LOGINRYCHLÉ PÁROVÁNÍ S REGISTRACÍ
Krok 1
text_image
Hello USERNAME YOUR APPLIANCES Add Add Virtual Wine Bank second row 2 better than there is a second row + Add appliance YOUR WIDGETS I can't know that you want to care I don't know what you want to care Your news What functions do smart appliances have? How to live untaiers: home and reduce wiKrok 2
text_image
Allow your location permission To enhance your experience, please allow location permission to hOn app in the next step. CONTINUEKrok 3
text_image
Select your appliance category Search your appliance Washing machine Washer dryer Tumble dryer Dishwasher Air conditionair Air purifier Air scannerKrok 4
text_image
Appliance connection Turn OFF and then ON your appliance In case you can't switch OFF your appliance, unplug (for at least 10 seconds) and then plug its power supply. OK! DID ITKrok 5
text_image
Appliance connection Searching your appliance Don't turn off your Bluetooth. No app is looking for your appliance... 00:00:40 Stay close to your appliance in order to correctly capture the signal.Kroky 6.1–6.2
text_image
Appliance connection Searching your appliance Don't turn off your Bluetooth. Oven New appliance Long appliance name to... CONNECT PRODUCT NOT FOUND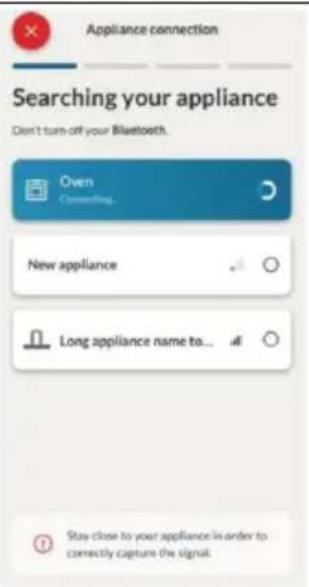
text_image
Appliance connection Searching your appliance Don't turn off your Bluetooth. Oven Connecting... New appliance Long appliance name to... Stay close to your appliance in order to correctly capture the signal.Krok 7
text_image
Appliance connection Your appliance has been correctly identified! Brand Hoover Model 31008486-7888-1824 Serial number 12345678-1234-1234 Is this your appliance? YES IT'S MY OVEN NO IT'S NOT
JAK ZMĚNIT NASTAVENÍ WIFI
flowchart
graph TD
    A["Input Data"] --> B["Processing"]
    B --> C["Output Data"]
    style A fill:#333,stroke:#fff,color:#fff
    style B fill:#999,stroke:#000,color:#fff
    style C fill:#ccc,stroke:#000,color:#fff
    %% Arrow pointing to 'Data' arrow from center to right
    %% Note: Diagram includes Wi-Fi icon, email icon, and app icon at top-right corner
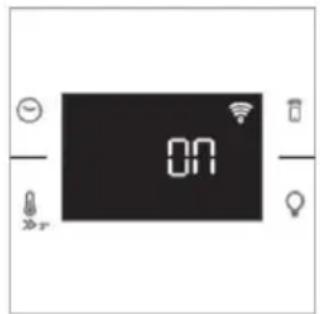
text_image
ON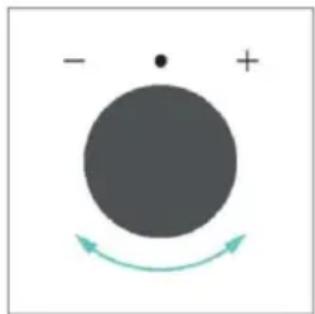
natural_image
Simple diagram with a large circle, a dot, and a plus sign, with curved arrows indicating rotation or direction (no text or symbols)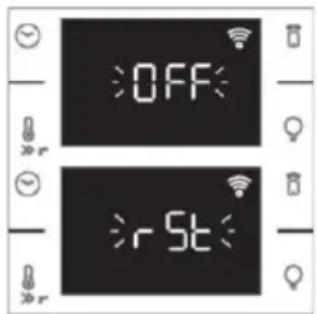
text_image
OFF r St
DÁLKOVÉ OVLÁDÁNÍ
text_image
Cooking SK12041EFT ADD 51MM STOP Current programs PROGRAMS Conventional JGB15 D-30m E1: PobusGPM Efficiency AdeusGPM EDIT DETAILS3. NEŽ ZAČNETE
3.1. INFORMACE KE SPUŠTĚNÍ
natural_image
Illustration of a kitchen appliance with a hand cleaning it, showing a blue cloth and a small bowl labeled H20 (no text or symbols on the main subject)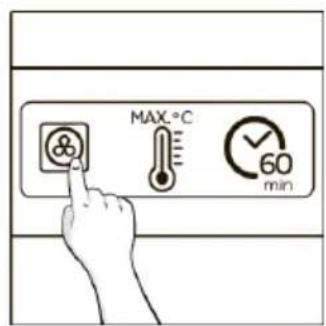
text_image
MAX.°C 60 min
natural_image
Line drawing of an oven with a cabinet and adjacent door, no text or symbols present4. OVLÁDÁNÍ SPOTŘEBIČE
4.1. JAK TENTO VÝROBEK FUNGUJE
natural_image
Pure electrical circuit lines without any symbols
natural_image
Simple line drawing of a mechanical component with a blue bucket and mounting brackets (no text or symbols)natural_image
Line drawing of an oven with a rack and vent, showing internal structure without any text or symbols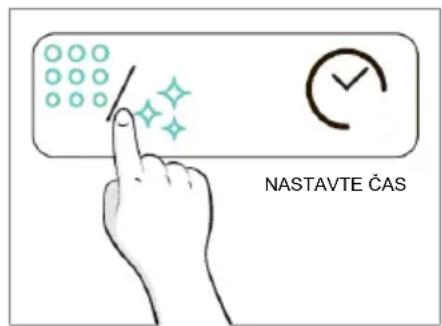
text_image
NASTAVTE ČAS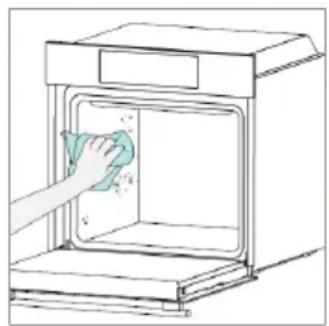
natural_image
Line drawing of a hand cleaning a kitchen appliance with a cloth (no text or symbols)Aquactiva Steam
natural_image
Simple line drawing of a mechanical device with a blue lever and attached bracket (no text or symbols)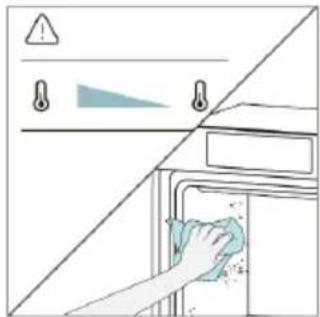
natural_image
Illustration of a hand cleaning a kitchen appliance with a cloth (no text or symbols)ČIŠTĚNÍ PARNÍHO SYSTÉMU
natural_image
Simple diagram with a large circle, a dot above it, and curved arrows indicating rotation or direction (no text or symbols)
text_image
DESC >
natural_image
Line drawing of a kitchen oven with a tiled interior and insulation material (no text or symbols)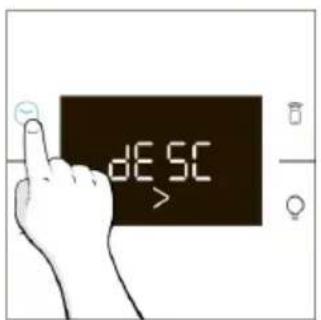
text_image
dESC >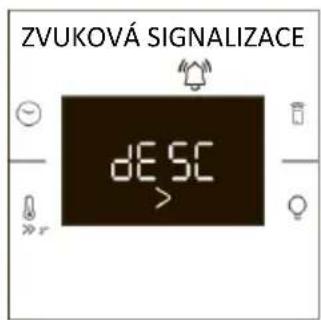
text_image
ZVUKOVÁ SIGNALIZACE DESC >
natural_image
Line drawing of a kitchen oven with a blue tray inside and a rack inside (no text or symbols)
natural_image
Illustration of a hand cleaning a cloth with a water bottle and a bowl of H2O (no text or symbols)natural_image
Pure electrical circuit lines without any symbols
natural_image
Technical diagram of a mechanical component with a blue component and directional arrow (no text or symbols)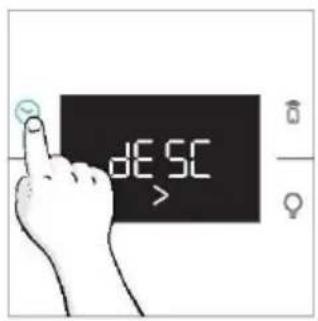
text_image
dESC >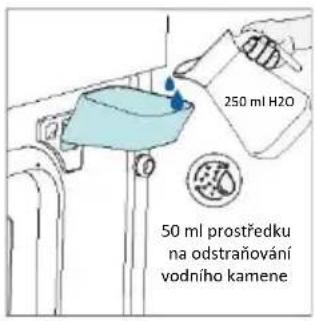
natural_image
Simple line drawing of a door handle with a blue plastic clip attached (no text or symbols)
natural_image
Diagram of a mechanical bracket with an arrow indicating rotation or force direction (no text or symbols)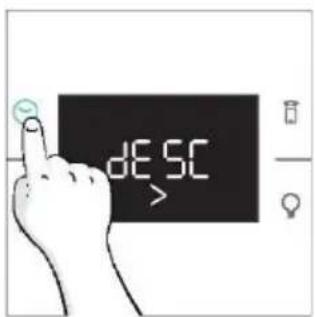
text_image
DESC >
natural_image
Line drawing of a kitchen oven with a tray holding a blue dish (no text or symbols)
natural_image
Illustration of a hand cleaning a surface with a cloth and a small container labeled H2O (no text or symbols on the main subject)natural_image
Pure architectural line drawing of a curved corridor with a circular component and a small icon (no text or symbols)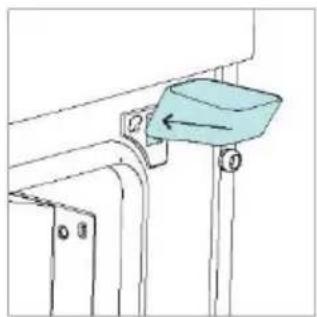
natural_image
Technical line drawing of a mechanical component with a blue component and directional arrow (no text or symbols)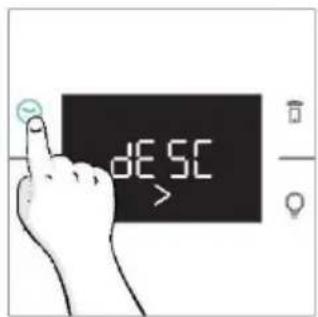
text_image
DESC >
text_image
250 ml H2O
text_image
dESC >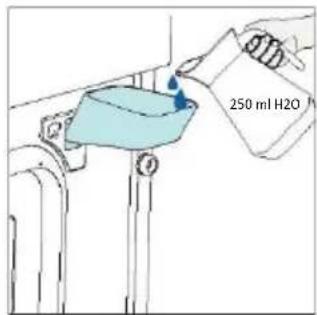
text_image
250 ml H2O
text_image
dE SC >
text_image
End
natural_image
Line drawing of a kitchen oven with a slatted interior and a tiled base (no text or symbols)
natural_image
Simple line drawing of a mechanical device with a blue handle and mounting bracket (no text or symbols)6.2.1.2. VÝPOUŠTĚNÍ
natural_image
Simple diagram with a large circle, a dot above it, and a curved arrow indicating rotation or direction (no text or symbols)
natural_image
Line drawing of a kitchen oven with a tiled interior and base (no text or symbols)
text_image
dr A1
text_image
End
natural_image
Line drawing of a laboratory oven with internal cooling system (no text or symbols)
natural_image
Illustration of a hand cleaning a surface with a cloth and a small bottle labeled 'H2O' (no text or symbols on the main subject)natural_image
Line drawing of a mechanical setup with a flat plate and support frame (no text or symbols)natural_image
Line drawing of a double-bowel oven with hands inserting a cable (no text or symbols)
natural_image
Diagram showing a tool interacting with a mechanical component, no text or symbols presentnatural_image
Line drawing of a laboratory oven with internal cooling ducts and heat exchanger (no text or symbols)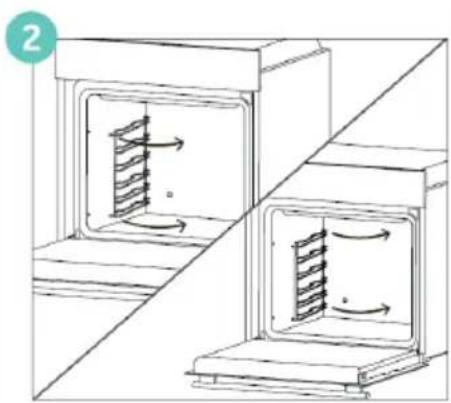
natural_image
Diagram showing two open industrial or storage units with internal flow arrows, no text or symbols present
text_image
3 H₂O
natural_image
Diagram of two industrial furnace units with internal heat dissipation arrows, no text or symbols present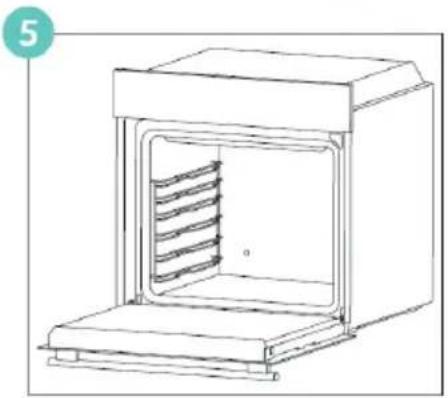
natural_image
Line drawing of a laboratory oven with internal cooling ducts (no text or symbols)6.4. ÚDRŽBA
VÝMĚNA SOUČÁSTÍ
text_image
Safety warning diagram showing a plug on a line with a hazard symbol and an electrical panel labeled 'OFF' indicating disassembly.Krok 2

natural_image
Line drawing of a hand holding a circular object next to an open appliance (no text or symbols)Krok 3
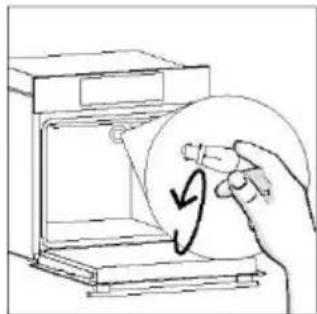
natural_image
Line drawing of a hand holding a circular object with a curved arrow, next to an open device (no text or symbols)Krok 4

natural_image
Hand holding a circular object with a curved arrow inside, inside an open appliance (no text or symbols)Krok 5
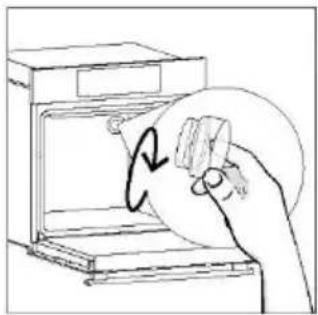
natural_image
Hand holding a circular object with a curved arrow inside, next to an open appliance (no text or symbols visible)Krok 6

text_image
Electrical hazard warning symbol with plug, warning sign, and ON/OFF switch symbolstext_image
Safety warning diagram showing a plug and fuse with a warning symbol and an ON/OFF switchKrok 2
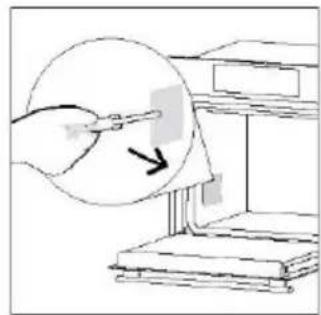
natural_image
Illustration of a hand holding a magnifying glass over a stack of books, with no visible text or symbols.Krok 3

natural_image
Illustration of a hand inserting a small object into a device, with no visible text or symbols.Krok 4
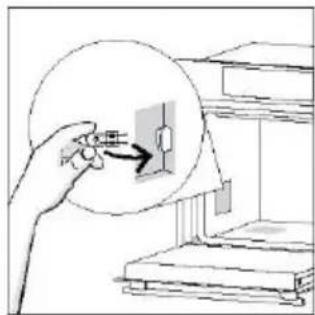
natural_image
Illustration of a hand holding a small electrical component with an arrow pointing to it, next to a shelf (no text or symbols)Krok 5

natural_image
Diagram of a printer with an arrow pointing to its screen (no text or symbols present)Krok 6
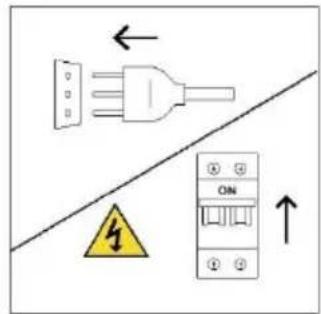
text_image
Electrical warning symbol and circuit diagram showing a plug, ON panel, and warning sign with lightning symboltext_image
Diagram showing a kitchen appliance with exhaust and cleaning process, including a warning triangle and hand cleaning the interior.8.1. LIKVIDACE SPOTŘEBIČE

natural_image
Isometric line drawing of a multi-level refrigerator with internal compartments and handrails (no text or symbols)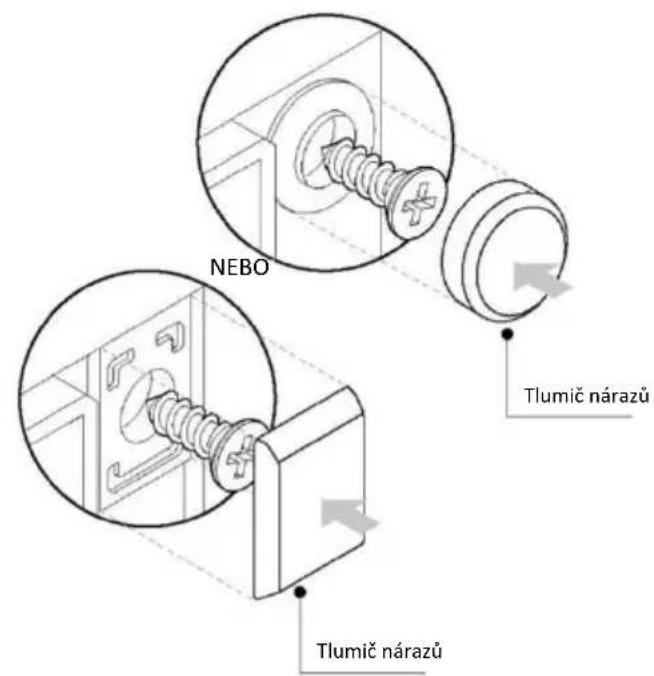
text_image
Technical diagram of an oven with numbered components for identification2.2. ACCESORII
natural_image
Illustration of a rectangular tray with internal compartments, no text or symbols presentnatural_image
Simple line drawing of a rectangular tray or vent with internal compartments, placed on a shelf (no text or symbols)natural_image
Line drawing of a multi-tiered storage unit with horizontal shelves and metal racks (no text or symbols)natural_image
Line drawing of a kitchen sink with a bowl, tray, and wall-mounted shelf (no text or symbols)text_image
Diagram showing three steps of a door lock mechanism with labeled buttons and directional arrows indicating movement.text_image
Available on the App Store GET IT ON Google PlayÎNREGISTRAREA UNUI NOU UTILIZATOR
text_image
Welcome! Sign in to enter in your home page ENTER REGISTER Are you now to hOn? Click below to learn about our products © TRY DEMG hOn Do you already have a thousand passwords? Register with your social accounts and log in in the easiest and fastest way. SIGN UP WITH GOOGLE SIGN UP WITH APPLE SIGN UP WITH FACEBOOK No information relating to you will be stored and let us not past anything normally. OR SIGN UP WITH EMAIL Already registered? LOGINÎNREGISTRAREA RAPIDĂ A ASOCIERILOR
Pasul 1
text_image
Hello USERNAME YOUR APPLIANCES Add + Add appliance YOUR WIDGETS Long-lliptum dolar/soft Plan to Care your news What functions do smart appliances have? How to live sustain home and reduce wPasul 2
text_image
Allow your location permission To enhance your experience, please allow location permission to hOn app in the next step. CONTINUEPasul 3
text_image
Select your appliance category Search your appliance Washing machine Washer dryer Tumble dryer Dishwasher Air conditionair Air purifier Air scannerPasul 4
text_image
Turn OFF and then ON your appliance In case you can't switch OFF your appliance, unplug (for at least 10 seconds) and then plug its power supply. OK IT DID ITPasul 5
text_image
Appliance connection Searching your appliance Don't turn off your Bluetooth. Non app is looking for your appliance... 00:00:40 Stay close to your appliance in order to correctly capture the signal.Pasul 6.1-6.2
text_image
Appliance connection Searching your appliance Don't turn off your Bluetooth. Oven New appliance Long appliance name to... CONNECT PRODUCT NOT FOUND
text_image
Appliance connection Searching your appliance Don't turn off your Bluetooth. Oven Connecting New appliance Long appliance name to... Stay close to your appliance in order to correctly capture the signal.Pasul 7
text_image
Appliance connection Your appliance has been correctly identified! Brand Hoover Model 31008486-7888-1824 Serial number 12345678-1234-1234 Is this your appliance? YES IT'S MY OVEN NO IT'S NOT
CUM SE SCHIMBĂ SETĂRILE WI-FI
natural_image
Simple diagram with a large circle, a dot, and a plus sign, with curved arrows indicating rotation or movement (no text or symbols)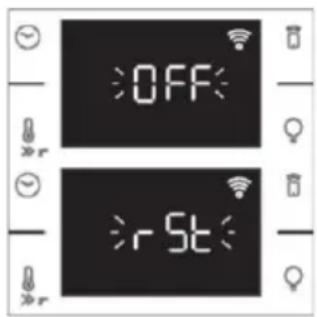
text_image
OFF r5t
CONTROL LA DISTANȚĂ
text_image
Cooking IN: 50% LEFT ADD 5 MIN STOP Current program PROGRAMS Conventional 200°C 30.00m E1: Pheval(50K) E2: Pheval(50K) E3: Pheval(50K) EDIT DETAILSnatural_image
Line drawing of a kitchen sink with a hand cleaning the interior, next to a water bottle and a bowl labeled H20 (no text or symbols on main elements)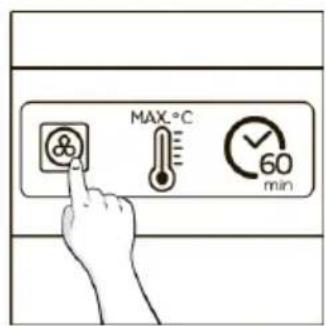
text_image
MAX.°C 60 min
natural_image
Line drawing of a kitchen oven with smoke rising, next to an open door (no text or symbols)4. UTILIZAREA PRODUSULUI
4.1. CUM FUNCȚIONEAZĂ PRODUSUL
PORNIREA/OPRIREA CUPTORULUI
natural_image
Pure electrical circuit lines without any symbols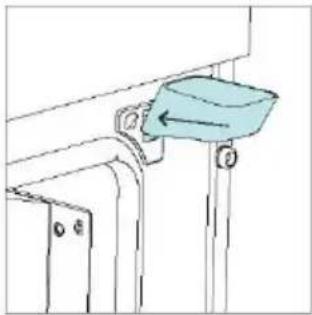
natural_image
Technical line drawing of a mechanical assembly with a blue component and mounting brackets (no text or symbols)natural_image
Diagram of a mechanical device with a blue component and directional arrow, no text or symbols present
natural_image
Diagram of a mechanical bracket with an arrow indicating rotational motion (no text or symbols)natural_image
Pure electrical circuit lines without any symbolsnatural_image
Line drawing of an oven with a rack inside, showing internal structure and airflow direction (no text or symbols)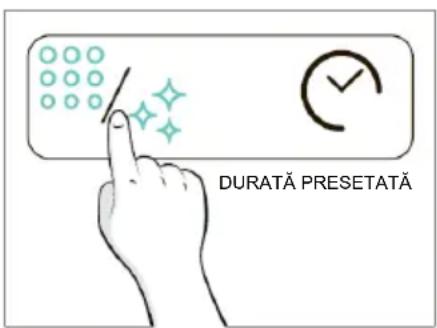
text_image
DURATĂ PRESETATĂ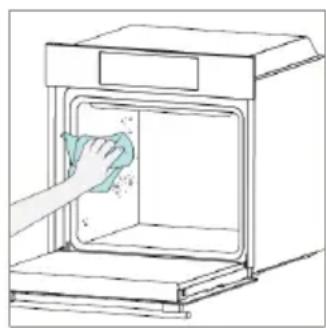
natural_image
Line drawing of a hand cleaning a kitchen appliance with a cloth (no text or symbols)Abur Aquactiva
natural_image
Simple line drawing of a door handle with a blue plastic clip attached (no text or symbols)
natural_image
Illustration of a hand cleaning a kitchen appliance with a cloth, showing no text or symbolsCURĂȚAREA SISTEMULUI CU ABUR
natural_image
Simple diagram with a large circle, a dot above it, and curved arrows indicating rotation or direction (no text or symbols)
text_image
DESC >
natural_image
Line drawing of a kitchen oven with a tiled interior and insulation material (no text or symbols)
text_image
dESC >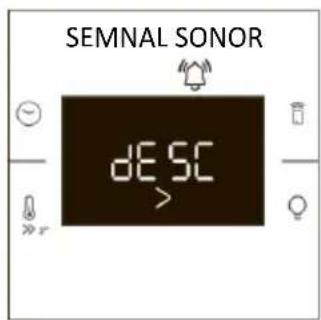
text_image
SEMNAL SONOR DESC >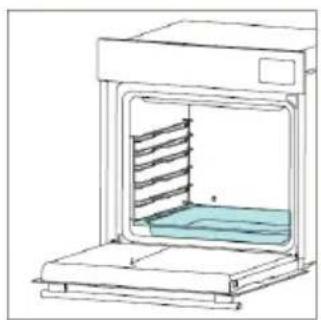
natural_image
Line drawing of a kitchen oven with a blue tray inside and a rack inside (no text or symbols)
natural_image
Illustration of a hand cleaning a cloth with a water bottle and a bowl of H2O (no text or symbols)Pasul 2 (Decalcifiere):
natural_image
Pure technical line drawing of a door or corner component with no text, numbers, or symbols
natural_image
Technical diagram of a mechanical component with a blue component and directional arrow (no text or symbols)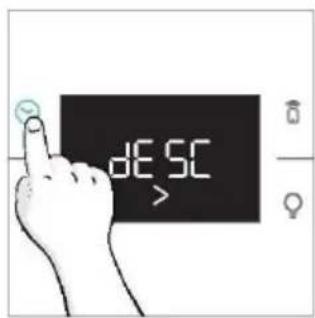
text_image
DESC >
text_image
250 ml apă 50 ml de produs de decalcifiere
text_image
DESC >
natural_image
Simple line drawing of a door handle with a blue plastic clip attached (no text or symbols)
natural_image
Diagram of a mechanical bracket with an arrow indicating rotation or force direction (no text or symbols present)
text_image
DESC >
natural_image
Line drawing of a kitchen oven with a tray holding a blue dish (no text or symbols)
natural_image
Illustration of a hand cleaning a surface with a cloth and a small container labeled H2O (no text or symbols on the main subject)Etapa 3 (Clătire):
natural_image
Simple diagram with a large circle, a dot, and a plus sign, with curved arrows indicating rotation or direction (no text or symbols)
natural_image
Line drawing of a kitchen oven with a tiled interior and base (no text or symbols)
text_image
dr A1
text_image
End
natural_image
Line drawing of a laboratory oven with internal cooling unit and base (no text or symbols)
natural_image
Illustration of a hand cleaning a surface with a cloth and a small bottle labeled 'H2O' (no text or symbols on the main subject)natural_image
Line drawing of a door oven with hands operating it (no text or symbols)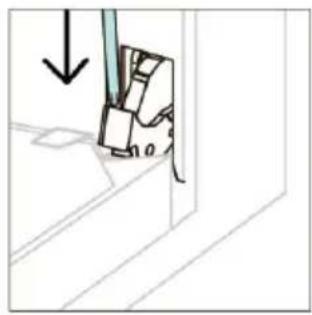
natural_image
Diagram showing a mechanical component with an arrow indicating downward motion (no text or symbols present)text_image
Diagram illustrating a mechanical or electrical component with labeled parts and directional arrows indicating motion or force.natural_image
Simple line drawing of a tilted rectangular object with directional arrows indicating movement or force (no text or symbols)natural_image
Hand holding a hand near a bracket with a circular overlay (no text or symbols)text_image
Illustration showing a hand cleaning a surface with water droplets, next to a bottle labeled 'H2O' and a bowl of water.text_image
PYRO SAU LOW-E
natural_image
Line drawing of a mechanical assembly with no visible text or symbols
natural_image
Line drawing of a double door with hands inserting a cable into the opening (no text or symbols)
natural_image
Diagram showing a tool interacting with a mechanical component, with no visible text or symbols6.3. CURĂȚAREA ACCESORIILOR
natural_image
Line drawing of a laboratory oven with internal circulation and heat exchanger (no text or symbols)
natural_image
Diagram showing two identical electrical or mechanical components with internal wind patterns, separated by a diagonal line (no text or symbols)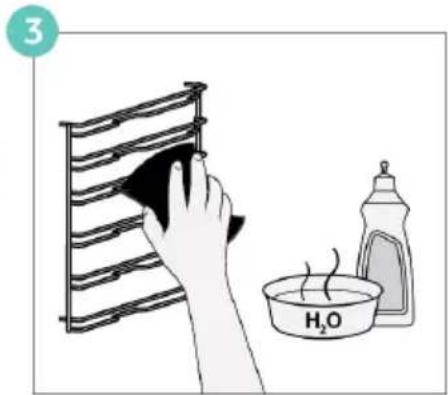
text_image
3 H₂O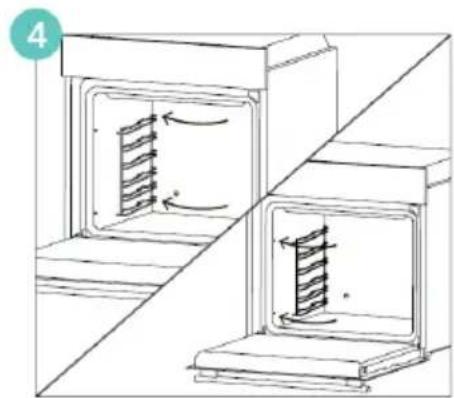
natural_image
Diagram of two industrial furnace or oven structures with internal heat transfer arrows, no text or symbols present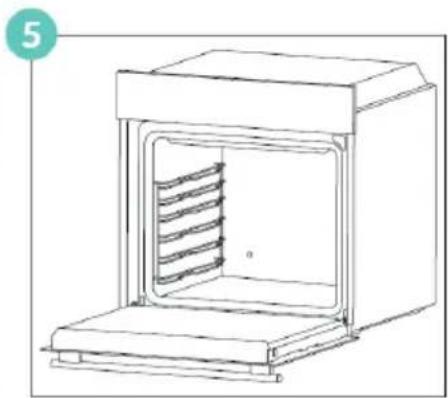
natural_image
Line drawing of a simple oven with internal rack structure (no text or symbols)6.4. ÎNTRETINEREA
ÎNLOCUIREA COMPONENTELOR
text_image
Safety warning diagram showing a plug on a line with hazard symbol and OFF status indicatorsPasul 2

natural_image
Line drawing of a hand holding a circular object next to an open appliance (no text or symbols)Pasul 3

natural_image
Line drawing of a hand holding a circular object with a curved arrow, next to an open device (no text or symbols)Pasul 4

natural_image
Hand holding a circular object with a curved arrow inside, inside an open appliance (no text or symbols)Pasul 5

natural_image
Hand holding a circular object with a curved arrow inside, next to an open appliance (no text or symbols visible)Pasul 6
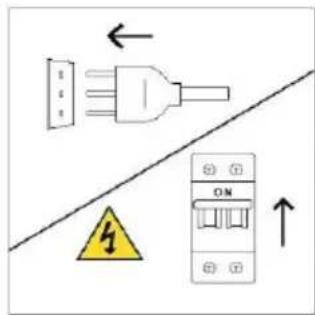
text_image
Electrical hazard warning symbol with fuse, warning sign, and ON/OFF symbols on a diagonal linetext_image
Electrical diagram showing a plug connected to an ON/OFF switch with warning symbol and directional arrowsPasul 2

natural_image
Illustration of a hand holding a pen near a stack of books, with an arrow pointing to a square object (no text or symbols present)Pasul 3

natural_image
Illustration of a hand inserting a small object into a storage unit (no text or symbols visible)Pasul 4

natural_image
Illustration of a hand holding a small electronic component with an arrow pointing to it, next to a staircase (no text or symbols)Pasul 5

natural_image
Diagram of a printer with a magnified view showing internal components (no text or symbols)Pasul 6

text_image
Electrical warning symbol and circuit diagram showing a plug, safety warning sign, and ON panel with arrowstext_image
Diagram illustrating a chemical process with exhaust, heating, and cleaning steps of a kitchen appliance.8.1. ELIMINAREA APARATULUI

natural_image
Isometric line drawing of a multi-level refrigerator with internal compartments and handrails (no text or symbols)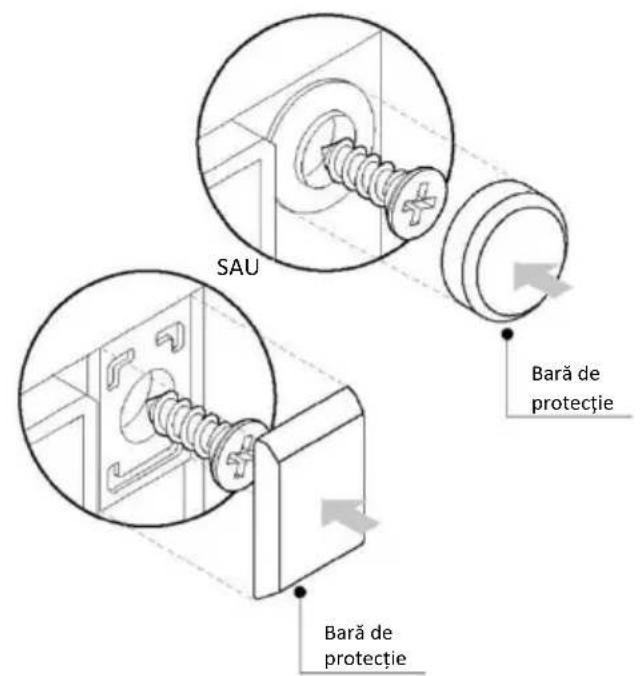
text_image
Technical diagram of an oven with numbered components for identification2.2. TARTOZÉKOK
natural_image
Empty white rectangle with black border (no text or symbols)text_image
LEALLITAS LEALLITASnatural_image
Illustration of a rectangular tray with internal compartments, placed on a shelf (no text or symbols)natural_image
Line drawing of a rectangular tray with internal compartments, placed on a shelf (no text or symbols)natural_image
Line drawing of a multi-tiered storage rack unit with no text or symbolsnatural_image
Line drawing of a kitchen sink with a bowl, tray, and wall-mounted shelf (no text or symbols)text_image
Diagram showing three steps of a door lock mechanism with labeled buttons and directional arrowstext_image
Available on the App Store GET IT ON Google PlayÚJ FELHASZNÁLÓ REGISZTRÁLÁSA
text_image
Welcome! Sign in to enter in your home page ENTER REGISTER Are you now to hOn? Click below to learn about our products © TRY DEMG hOn Do you already have a thousand passwords? Register with your social accounts and log in in the easiest and fastest way. G SIGN UP WITH GOOGLE i SIGN UP WITH APPLE f SIGN UP WITH FACEBOOK No information relating to you will be shared and we will not part anything from you. or ✓ SIGN UP WITH EMAIL Already registered? LOGINGYORS PÁROSÍTÁS
1. lépés
text_image
Hello USERNAME YOUR APPLIANCES Add + Add appliance YOUR WIDGETS Long-term diameter at next Start to Care your news What functions do smart appliances have? How to live sustainable home and reduce us2. lépés
text_image
Allow your location permission To enhance your experience, please allow location permission to hOn app in the next step. CONTINUE3. lépés
text_image
Select your appliance category Search your appliance Washing machine Washer dryer Tumble dryer Dishwasher Air conditionair Air purifier Air scanner4. lépés
text_image
Appliance connection Turn OFF and then ON your appliance In case you can't switch OFF your appliance, unplug (for at least 10 seconds) and then plug its power supply. OK IT DID IT5. lépés
text_image
Appliance connection Searching your appliance Don't turn off your Bluetooth. Non app is looking for your appliance... 00:00:40 Stay close to your appliance in order to correctly capture the signal.6.1-6.2. lépés
text_image
Appliance connection Searching your appliance Don't turn off your Bluetooth. Oven New appliance Long appliance name to... CONNECT PRODUCT NOT FOUND
text_image
Appliance connection Searching your appliance Don't turn off your Bluetooth. Oven Connecting New appliance Long appliance name to... Stay close to your appliance in order to correctly capture the signal.7. lépés
text_image
Appliance connection Your appliance has been correctly identified! Brand Hoover Model 31008486-7888-1824 Serial number 12345678-1234-1234 Is this your appliance? YES IT'S MY OVEN NO IT'S NOT
natural_image
Simple diagram with a large circle, a dot, and a plus sign, with curved arrows indicating rotation or direction (no text or symbols)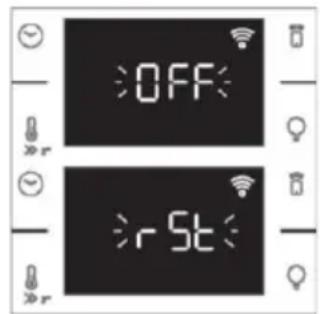
text_image
OFF rST
TÁVVEZÉRLÉS
flowchart
graph TD
    A["Smart Home Control Interface"] --> B["Smart Device Icon"]
    B --> C["Green Arrow pointing to the dial indicator"]
    style A fill:#000,stroke:#fff,color:#fff
    style B fill:#000,stroke:#fff,color:#fff
    style C fill:#000,stroke:#fff,color:#fff
    style_D["Smart Bag Icon"] --> E["Smart Device Icon"]
    E --> F["Green Arrow pointing to the dial indicator"]
    style_G["Smart Dish Icon"] --> H["Smart Device Icon"]
    H --> I["Green Arrow pointing to the dial indicator"]

text_image
ON NYOMJA MEG A TÁVVEZÉRLÉS GOMBOT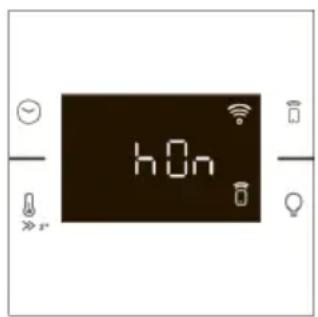
text_image
hOntext_image
NYOMJA MEG A TÁVVEZÉRLÉS GOMBOT 2.00°C
text_image
2:00text_image
Cooking SH 120kLEFT ADD 5/MIN STOP Current program PROGRAMS Conventional 30V/°C 30.50m 10 PulsatGPN Efficiency PulsatGPN EDIT DETAILS -93. MIELÓTT ELKEZDENÉ
3.1. KEZDÉSHEZ SZÜKSÉGES INFORMÁCIÓK
text_image
NYOMJA MEG 12: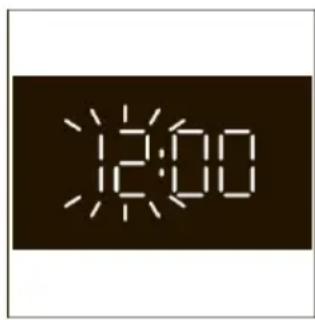
text_image
12:00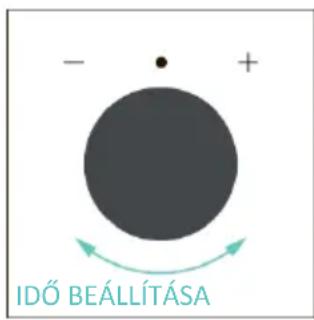
text_image
- + IDŐ BEÁLLÍTÁSA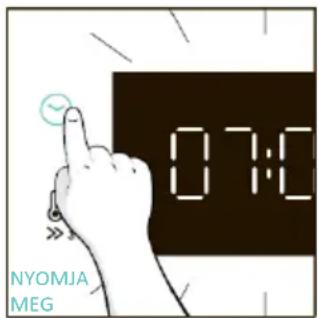
text_image
07:00 NYOMJA MEG
text_image
07:00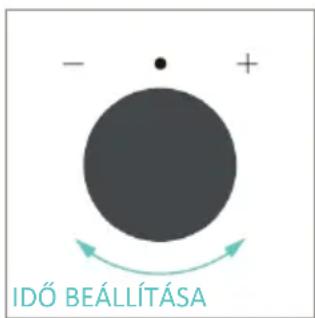
text_image
- + IDŐ BEÁLLÍTÁSA
text_image
07:45 NYOMJA MEG A MEGERÖSÍTÉSHEZnatural_image
Illustration of a hand washing a small blue object from a kitchen appliance, with a water bottle and label H20 nearby (no text or symbols on main subject)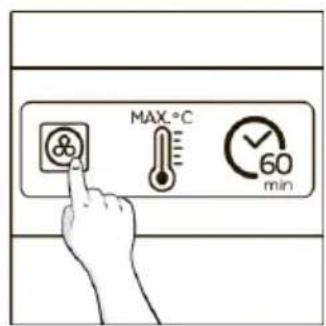
text_image
MAX.°C 60 min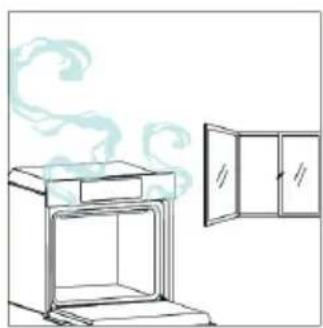
natural_image
Line drawing of an oven and cabinet with smoke, no text or symbols present4. A TERMÉK MÚKÖDÉSE
4.1. A TERMÉK MÚKÖDÉSE
A SÜTŐ BE-/KIKAPCSOLÁSA
natural_image
Pure electrical circuit lines without any symbols
natural_image
Diagram of a mechanical assembly with a blue bucket and directional arrow (no text or symbols)natural_image
Diagram of a mechanical device with a blue component and directional arrow, no text or symbols present
natural_image
Diagram of a mechanical component with an arrow indicating rotation (no text or symbols present)natural_image
Pure electrical circuit lines without any symbolsnatural_image
Line drawing of an oven with a rack and vent, showing internal structure without any text or symbols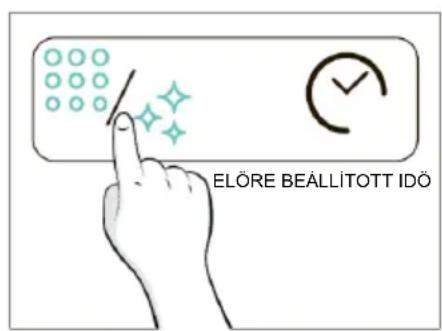
text_image
ELÖRE BEÄLLÍTOTT IDÖ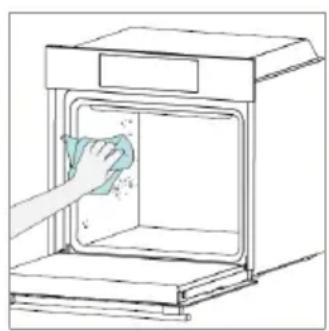
natural_image
Line drawing of a hand cleaning a kitchen oven with a cloth (no text or symbols)Aquactiva góz
natural_image
Simple line drawing of a mechanical component with a blue handle and mounting bracket (no text or symbols)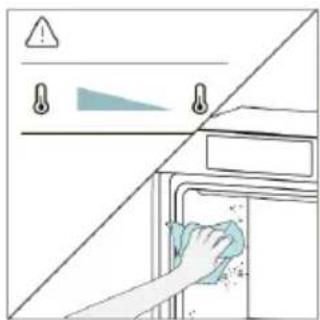
natural_image
Diagram showing a hand cleaning a kitchen appliance with a cloth, no text or symbols presentnatural_image
Simple diagram with a large circle, a dot, and a plus sign, with curved arrows indicating rotation or direction (no text or symbols)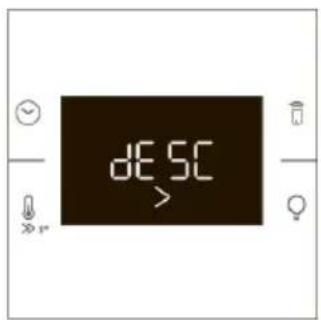
text_image
DESC >
natural_image
Line drawing of a laboratory oven with a blue liquid inside (no text or symbols)
text_image
dE SC >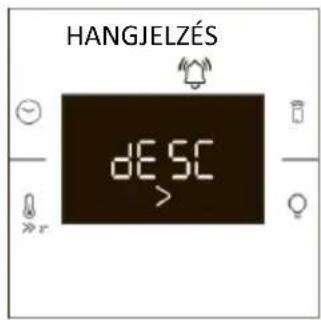
text_image
HANGJELZÉS DESC >
natural_image
Line drawing of a kitchen oven with a blue tray inside and a side panel (no text or symbols)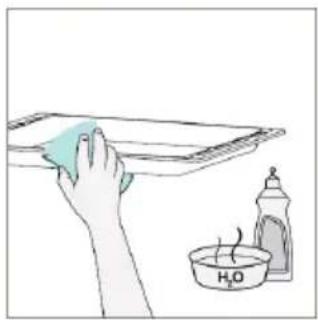
natural_image
Illustration of a hand cleaning a surface with a cloth and a water bottle (no text or symbols)natural_image
Pure technical line drawing of a door or corner component with no text, numbers, or symbols
natural_image
Technical diagram of a mechanical assembly with a blue component and directional arrow (no text or symbols)
text_image
DESC >
natural_image
Simple line drawing of a door handle with a blue plastic clip attached (no text or symbols)
natural_image
Diagram of a mechanical bracket with an arrow indicating rotation or force direction (no text or symbols present)
text_image
DESC >
natural_image
Line drawing of a kitchen oven with a tray holding a tiered rack (no text or symbols)
natural_image
Illustration of a hand cleaning a surface with a cloth and a small container labeled H2O (no text or symbols on the main subject)3. lépés (Öblítés):
natural_image
Pure architectural line drawing of a curved corridor with a circular component and a small icon (no text or symbols)
natural_image
Technical line drawing of a mechanical component with a blue component and directional arrow (no text or symbols)
text_image
DESC >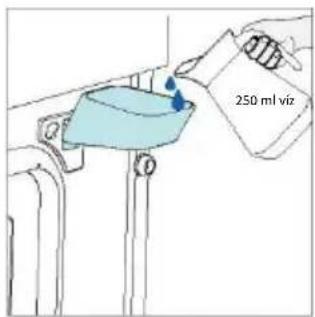
text_image
250 ml viz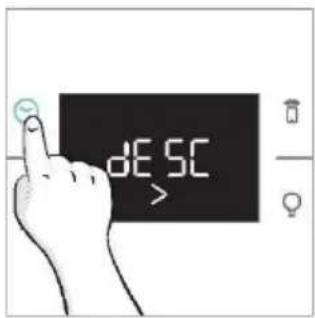
text_image
dESC >
text_image
250 ml víz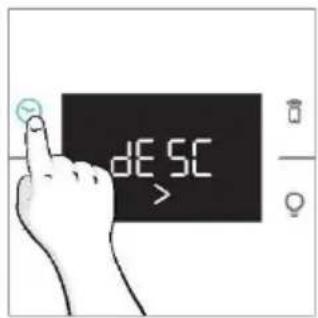
text_image
dE SC >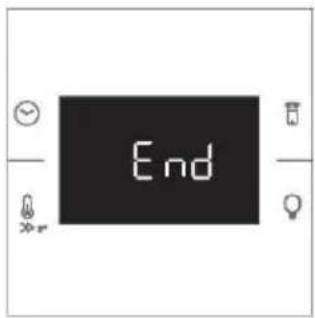
text_image
End
natural_image
Line drawing of a kitchen oven with a slatted interior and a tiled base (no text or symbols)
natural_image
Simple line drawing of a mechanical device with a blue handle and mounting bracket (no text or symbols)6.2.1.2. LEERESZTÉS
natural_image
Simple diagram with a large circle, a dot above it, and a curved arrow indicating rotation or movement (no text or symbols)
natural_image
Line drawing of a kitchen oven with a tiled interior and side supports (no text or symbols)
text_image
dr A1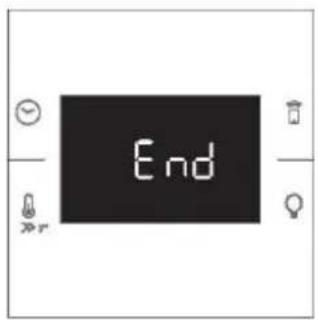
text_image
End
natural_image
Line drawing of a laboratory oven with internal cooling ducts (no text or symbols)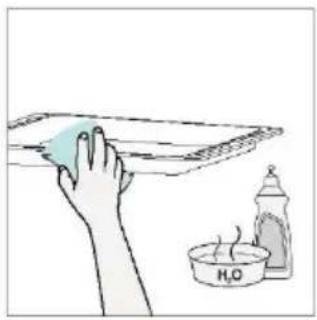
natural_image
Illustration of a hand cleaning a surface with a cloth and a water bottle (no text or symbols)natural_image
Line drawing of hands operating a small oven with a lid (no text or symbols)
natural_image
Simple line drawing of a mechanical component with an arrow indicating downward motion (no text or symbols)text_image
Diagram illustrating a mechanical or electrical device with labeled parts and directional arrows indicating motion or force.natural_image
Simple line drawing of a tilted rectangular object with directional arrows indicating movement (no text or symbols)natural_image
Line drawing of a hand holding a bracket with a circular overlay (no text or symbols)text_image
Illustration showing a hand cleaning a surface with water droplets, next to a bottle labeled 'H2O' and a bowl of liquid.text_image
PYRO VAGY LOW-Enatural_image
Line drawing of a mechanical assembly with no visible text or symbolsnatural_image
Line drawing of a double-bowel oven with hands inserting a cable into the opening (no text or symbols)
natural_image
Diagram showing a tool interacting with a mechanical component, no text or symbols presentnatural_image
Line drawing of a laboratory oven with internal circulation and heat exchanger (no text or symbols)
natural_image
Diagram showing two open industrial cabinets with internal heat dissipation arrows, no text or symbols present
text_image
3 H₂O
natural_image
Diagram of two industrial furnace or oven structures with internal heat dissipation arrows (no text or symbols)
natural_image
Line drawing of a simple oven with internal cooling ducts (no text or symbols)6.4. KARBANTARTÁS
ALKATRÉSZEK CSERÉJE
text_image
Safety warning diagram showing a plug on a line with hazard symbol and OFF status indicators- lépés

natural_image
Line drawing of a hand holding a circular object next to an open appliance (no text or symbols)- lépés

natural_image
Line drawing of a hand holding a circular object with a curved arrow, next to an open device (no text or symbols)- lépés

natural_image
Hand holding a circular object with a curved arrow inside, inside an open appliance (no text or symbols)- lépés

natural_image
Hand holding a circular object with a curved arrow inside, next to an open appliance (no text or symbols visible)- lépés

text_image
Electrical hazard warning symbol with plug, ON button, and warning sign indicating safety hazardtext_image
Electrical diagram showing a plug connected to an ON/OFF switch with warning symbol and directional arrows- lépés
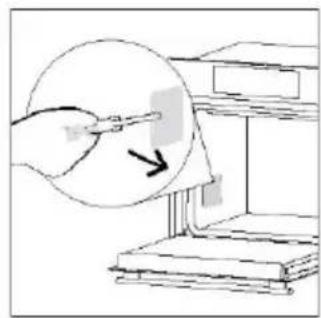
natural_image
Illustration of a hand holding a pen near a stack of books, with an arrow pointing to a square object (no text or symbols present)- lépés

natural_image
Illustration of a hand inserting a small object into a device, with no visible text or symbols.- lépés

natural_image
Illustration of a hand holding a small electronic component with an arrow pointing to it, next to a staircase (no text or symbols)- lépés
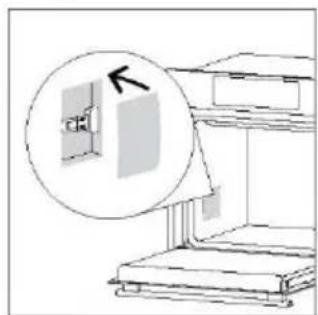
natural_image
Diagram of a printer or printer setup with a magnified view of the printer's internal components (no text or symbols present)- lépés
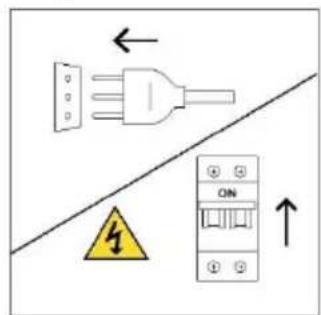
text_image
Electrical warning symbol and circuit diagram showing a plug, safety warning sign, and ON panel with arrowstext_image
Diagram illustrating a chemical process with exhaust, showing air purification and cleaning stepsnatural_image
Isometric line drawing of a multi-level refrigerator with internal compartments and handrails (no text or symbols)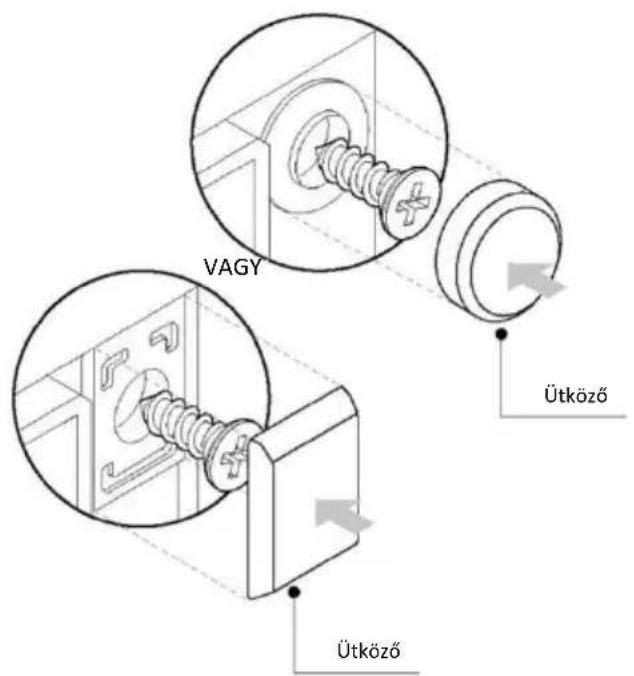
text_image
Technical diagram of an oven with numbered components for identification2.2. DODATNA OPREMA
- Kontrolni panel
- Brojevi pozicija polica
- Metalna rešetka
- Plehovi
- Poklopac ventilatora
- Vrata pećnice
- Bočne žičane rešetke (ako su deo opreme: samo za ravnu šupljinu)
- Serijski broj i QR kod
- Umetanje parnog levka
text_image
STOI STOPnatural_image
Simple line drawing of a rectangular tray placed inside a rack (no text or symbols)Pleh za pečenje je idealan za postizanje ravnc mernog potamnjivanja sa donje strane, što ga čin savršenim za kolače i peciva zbog svog plitkog ravnog dizajna. Pored toga, ako se postavi ispod rešetke za kuvanje može pomoći u sakupljanju curenja i sprečava prljanje pećnice.
3 Dublji pleh
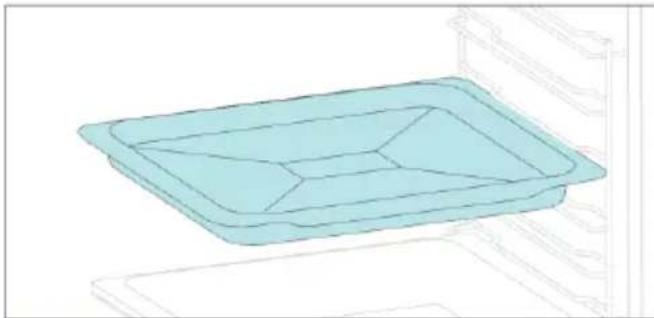
natural_image
Illustration of a rectangular tray with internal compartments, placed on an open shelf (no text or symbols)Dublji pleh je idealan za recepte prema kojima se dodaju tečnosti ili slojevi, kao što su duveč ili peče Njegova dubina je posebno dizajnirana da osig željenu ujednačenost hrane pripremljene u njemu
natural_image
Line drawing of a kitchen sink with a bowl, tray, and wall-mounted shelf (no text or symbols)natural_image
Line drawing of a multi-tiered storage unit with horizontal shelves and top panel (no text or symbols)Postavljene na obe strane unutrašnjosti pećnice, bočne rešetke su dizajnirane za postavljanje pleha za pečenje i rešetki tokom kuvanja.
6 Parni levak
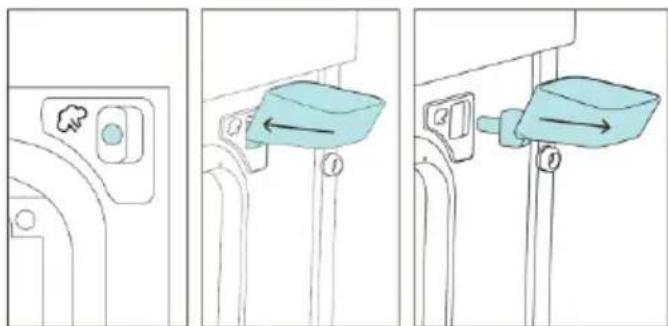
text_image
Diagram showing three steps of a door seatbelt switch mechanism with labeled parts and directional arrowsParni levak je koristan dodatak za dodavanje potrebne vode, kroz namenski otvor, za programu kuvanja na pari.
2.3. KONTROLNI PANEL
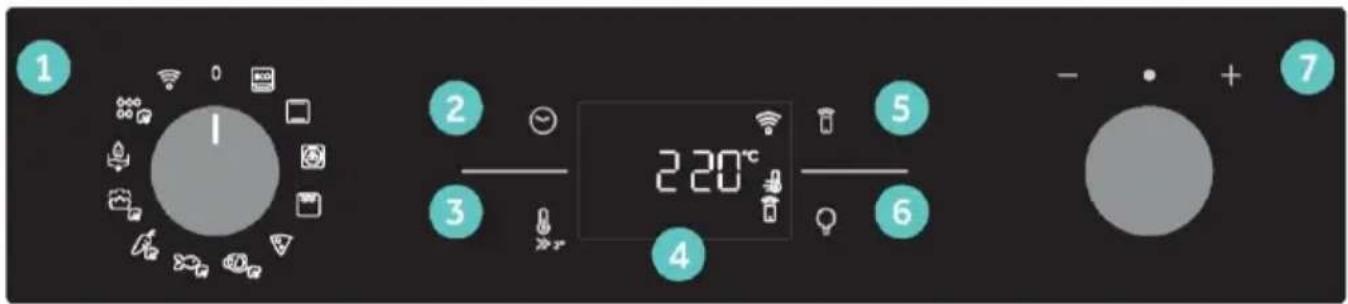
text_image
1 2 3 4 5 6 7 220°Ctext_image
Available on the App Store GET IT ON Google PlayREGISTRACIJA NOVOG KORISNIKA
- Kliknite na „Registrujte se“
- Registrujte se pomoću naloga na društvenim mrežama ili ličnom imejl adresom

text_image
Welcome! Sign in to enter in your home page ENTER REGISTER Are you now to hOn? Click below to learn about our products TRY DEMO Do you already have a thousand passwords? Register with your social accounts and log in in the latest and fastest way. G SIGN UP WITH GOOGLE i SIGN UP WITH APPLE f SIGN UP WITH FACEBOOK No information relating to you will be stored and we will not add anything from you. OR SIGN UP WITH EMAIL Already registered? LOGINPRIJAVLJIVANJE ZA BRZO UPARIVANJE
1. korak
text_image
Hello USERNAME YOUR APPLIANCES Add Add appliance Add Virtual Wine Bank second row 2 better there is a second row YOUR WIDGETS Low emission diameter of web Scan to Care Your news What functions do smart appliances have? How to live suntales: home and reduce w2. korak
text_image
Allow your location permission To enhance your experience, please allow location permission to hOn app in the next stop. CONTINUE3. korak
text_image
Select your appliance category Search your appliance Washing machine Washer dryer Tumble dryer Dishwasher Air conditionair Air purifier Air scanner4. korak
text_image
Turn OFF and then ON your appliance In case you can't switch OFF your appliance, unplug (for at least 10 seconds) and then plug its power supply. OK! DID IT5. korak
- Nakon uključivanja, aplikacija hOn počinje da traži vaš kućni uređaj.
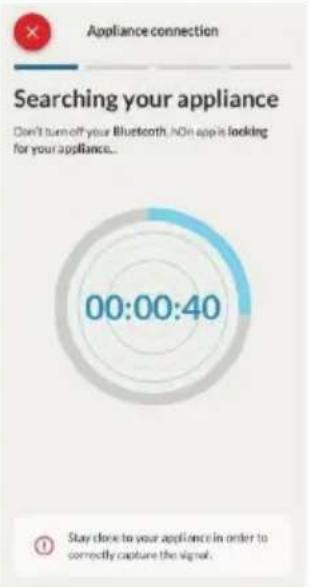
text_image
Appliance connection Searching your appliance Don't turn off your Bluetooth. No app is looking for your appliance... 00:00:40 Stay close to your appliance in order to correctly capture the signal.6.1-6.2. korak
text_image
Appliance connection Searching your appliance Don't turn off your Bluetooth. Oven New appliance Long appliance name to... CONNECT PRODUCT NOT FOUND
text_image
Appliance connection Searching your appliance Don't turn off your Bluetooth. Oven Connecting New appliance Long appliance name to... Stay close to your appliance in order to correctly capture the signal.7. korak
text_image
Appliance connection Your appliance has been correctly identified! Brand Hoover Model 31008486-7888-1824 Serial number 12345678-1234-1234 Is this your appliance? YES IT'S MY OVEN NO IT'S NOT
KAKO DA PROMENITE PODEŠAVANJA WI-FI MREŽE
Kada se uređaj registruje, korisnik može da promeni podešavanja Wi-Fi mreže između:
natural_image
Simple diagram with a large circle, a dot, and a plus sign, with curved arrows indicating rotation or direction (no text or symbols)
text_image
OFF 5T
DALJINSKO UPRAVLJANJE
text_image
Cooking SH 120kLEFT ADD 5/4MM STOP Current program PROGRAMS Conventional 300°C 30-90m 10. PulsedLDPB Efficiency PulsedLDPB EDIT DETAILS -93. PRE POČETKA
3.1. INFORMACIJE VEZANE ZA POČETAK
Kada prvi put uključite pećnicu, možda ćete primetiti dim. Ne brinite, pre upotrebe pećnice samo sačekajte da se dim raščisti.
natural_image
Simple line drawing of a kitchen appliance with a hand cleaning the interior (no text or symbols)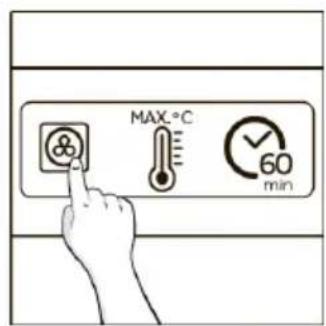
text_image
MAX.°C 60 min
natural_image
Line drawing of an oven with a cabinet and adjacent door (no text or symbols)4. RAD PROIZVODA
4.1. KAKO PROIZVOD RAD
UKLJUČIVANJE/ISKLJUČIVANJE PEĆNICE
Da biste uključili pećnicu, okrenite funkcijsko dugme (u smeru kazaljke na satu/suprotno od kazaljke na satu) i izaberite program pečenja. Da biste je ISKLJUČILI, podesite funkcijsko dugme u položaj „0“.
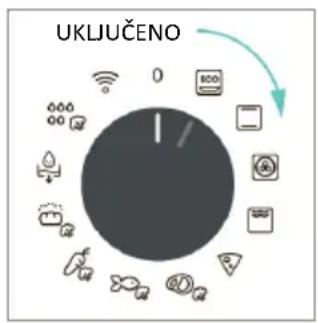
text_image
UKLIJUČENO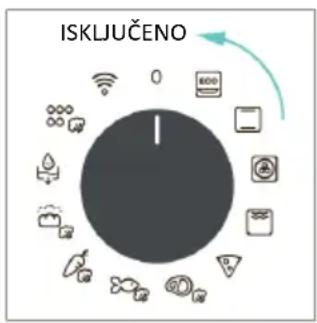
text_image
ISKLJUČENOPODESITE PROGRAM KUVANJA
natural_image
Pure electrical circuit lines without any symbols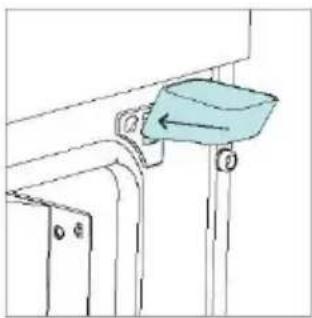
natural_image
Technical line drawing of a mechanical component with a blue component and mounting bracket (no text or symbols)- Dodajte 250 ml vode u parni levak
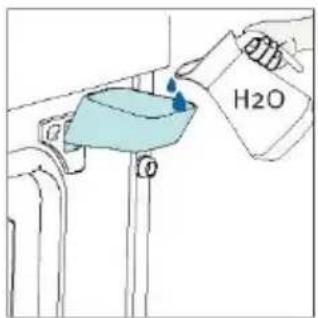
text_image
H2O- Izvadite parni levak iz otvora šupljine i zatvorite vrata pećnice.

natural_image
Diagram of a mechanical device with a blue component and directional arrow, no text or symbols present
natural_image
Diagram of a mechanical bracket with an arrow indicating rotational motion (no text or symbols)Tada će se prikazati podrazumevano vreme i program kuvanja će se automatski pokrenuti nakon jedne sekunde. Vreme se može izmeniti okretanjem desnog dugmeta; temperatura kuvanja se može promeniti pritiskom na odgovarajuću ikonicu. Oba parametra se mogu podesiti u ograničenom opsegu kao što je prikazano u gornjoj tabeli.
natural_image
Pure electrical circuit lines without any symbolsnatural_image
Line drawing of an oven with a rack and vent, showing internal structure without any text or symbols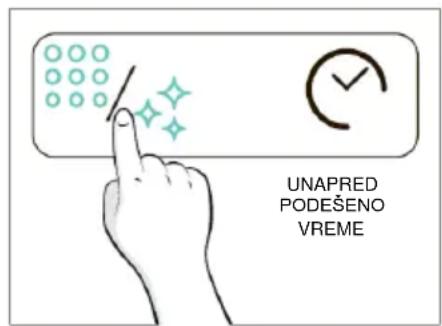
text_image
UNAPRED PODEŠENO VREME
natural_image
Line drawing of a hand cleaning a kitchen oven with a cloth (no text or symbols)Aquactiva Steam
Funkcija čišćenja parom je dizajnirana da se bez napora uhvati u koštac sa laganom zaprljanošću i pruži brzo i ekološki prihvatljivo rešenje za čišćenje unutrašnjosti pećnice pomoću snage pare.
Kako funkcioniše:
- Nalijte 250 ml vode kroz namenski parni levak.
- Uključite dugme. Ako je potrebno, okrenite kontrolu brojčanika da biste podesili program za čišćenje parom. Funkcija će raditi tokom unapred podešenog vremena.
- Na kraju postupka čišćenja, pustite pećnicu da se ohladi.
- Kada se uređaj ohladi, očistite unutrašnje površine pećnice krpom.
- UPOZORENJE: Proverite da li je uređaj ohlađen pre nego što ga dodirnete. Vodite računa o svim vrućim površinama jer postoji rizik od opekotina. Koristite destilovanu ili pijaću vodu. Obrišite odeljak za kuvanje i neka se dobro osuši kako bi se izbegla eventualna korozija.

flowchart
graph TD
    A["Smart Home Control System"] --> B["Device 1"]
    A --> C["Device 2"]
    A --> D["Device 3"]
    A --> E["Device 4"]
    A --> F["Device 5"]
    A --> G["Device 6"]
    A --> H["Device 7"]
    A --> I["Device 8"]
    A --> J["Device 9"]
    A --> K["Device 10"]
    A --> L["Device 11"]
    A --> M["Device 12"]
    A --> N["Device 13"]
    A --> O["Device 14"]
    A --> P["Device 15"]
    A --> Q["Device 16"]
    A --> R["Device 17"]
    A --> S["Device 18"]
    A --> T["Device 19"]
    A --> U["Device 20"]
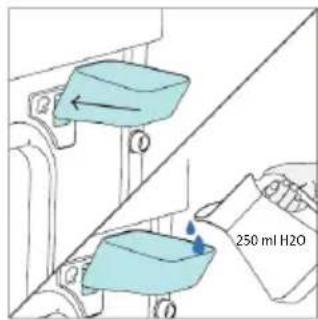
text_image
250 ml H2O
natural_image
Simple line drawing of a mechanical component with a handle and mounting bracket (no text or symbols)
text_image
Diagram showing a hand cleaning a kitchen appliance with a blue triangular warning symbol above the window.ČIŠĆENJE PARNOG SISTEMA
Ova funkcija se predlaže nakon 25 ciklusa pare, a biće obavezna nakon 40 ciklusa pare. Počevši od 25. ciklusa pare, pećnica će prikazati ikonu za uklanjanje kamenca na kraju svakog ciklusa ako korisnici još nisu obavili uklanjanje kamenca. Nakon 40 ciklusa pare, nijedan od programa za kuvanje na pari neće se pokrenuti pre nego što korisnici izvrše program za uklanjanje kamenca. Deli se na tri koraka:
6.2.1.1. UKLANJANJE KAMENCA
1. korak (uklanjanje zaostale vode iz odeljka za paru):
i. Izaberite režim za ispuštanje tečnosti-uklanjanje kamenca pomoću levog dugmeta i zatim izaberite funkciju za uklanjanje kamenca pomoću desnog dugmeta i pritisnite dugme za vreme da biste to potvrdili.
ii. Stavite pleh na dno šupljine pećnice i pritisnite dugme za vreme da biste započeli.
iii. Nakon što se oglasi zvučni signal za prelazak na drugu fazu, uklonite pleh i očistite ga.
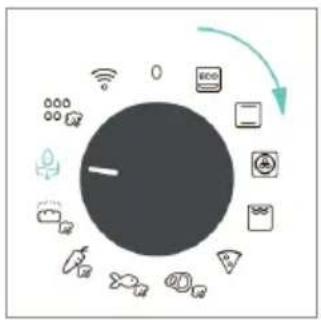
flowchart
graph TD
    A["Smart Home Control Unit"] --> B["Smart Device"]
    A --> C["Smart Computer"]
    A --> D["Smart Speaker"]
    A --> E["Smart Laptop"]
    A --> F["Smart Security System"]
    A --> G["Smart Smart Home"]
    A --> H["Smart Security System"]
    A --> I["Smart Security System"]
    A --> J["Smart Security System"]
    A --> K["Smart Security System"]
    A --> L["Smart Security System"]
    A --> M["Smart Security System"]
    A --> N["Smart Security System"]
    A --> O["Smart Security System"]
    A --> P["Smart Security System"]
    A --> Q["Smart Security System"]
    A --> R["Smart Security System"]
    A --> S["Smart Security System"]
    A --> T["Smart Security System"]
    A --> U["Smart Security System"]
    A --> V["Smart Security System"]
    A --> W["Smart Security System"]
    A --> X["Smart Security System"]
    A --> Y["Smart Security System"]
    A --> Z["Smart Security System"]
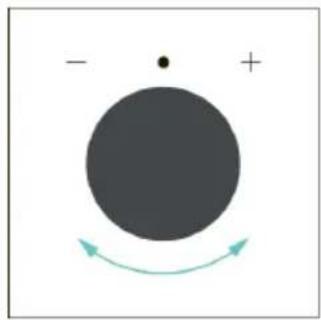
natural_image
Simple diagram with a large black circle, a dot above it, and a curved arrow with plus sign at top (no text or symbols)
text_image
DESC >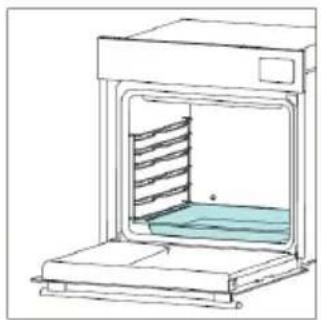
natural_image
Line drawing of a kitchen oven with a side shelf and ventilation slots (no text or symbols)
text_image
dE SC >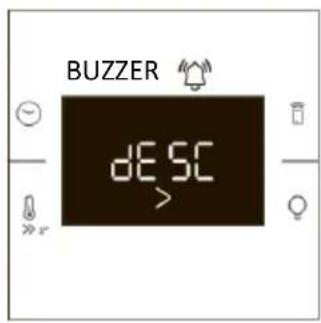
text_image
BUZZER DESC >
natural_image
Line drawing of a laboratory oven with a blue tray inside (no text or symbols)
natural_image
Illustration of a hand cleaning a surface with a cloth and a small bottle labeled H₂O (no text or symbols on the main subject)2. korak (uklanjanje kamenca):
i. Postavite levak za vodu i pleh i pritisnite dugme za vreme da biste potvrdili.
ii. Nalijte 200 ml vode i 50 ml sredstva za uklanjanje kamenca u levak. Zatim pritisnite dugme za vreme da biste potvrdili.
iii. Izvucite levak, zatvorite vrata i pritisnite dugme za vreme da biste potvrdili.
iv. Proces uklanjanja kamenca će potrajati neko vreme, nakon čega prelazite na treću fazu, izvadite pleh i ponovo ga očistite.

natural_image
Pure technical line drawing of a door or corner component with no text, numbers, or symbols
natural_image
Technical diagram of a mechanical component with a blue component and directional arrow (no text or symbols)
text_image
DESC >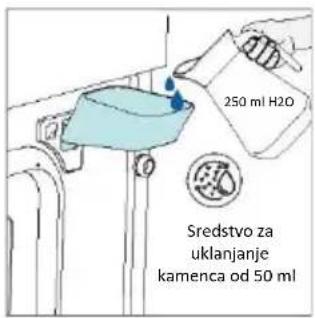
text_image
250 ml H2O Sredstvo za uklanjanje kamenca od 50 ml
text_image
DESC >
natural_image
Simple line drawing of a door handle with a blue plastic clip attached (no text or symbols)
natural_image
Diagram of a mechanical bracket with an arrow indicating rotation or force direction (no text or symbols)
text_image
DESC >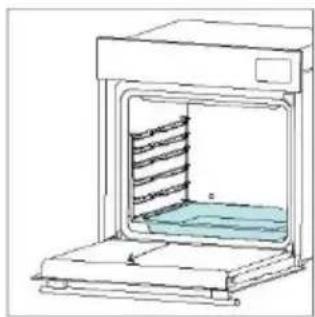
natural_image
Line drawing of a kitchen oven with a tray holding a tiered rack (no text or symbols)
natural_image
Illustration of a hand cleaning a surface with a cloth and a small container labeled H2O (no text or symbols on the main subject)3. korak (ispiranje):
i. Postavite levak za vodu i pleh i pritisnite dugme za vreme da biste potvrdili.
ii. Nalijte 250 ml vode u levak. Zatim pritisnite dugme za vreme da biste potvrdili.
iii. Nakon završetka prvog ispuštanja tečnosti, nalijte 250 ml vode u levak. Zatim pritisnite dugme za vreme da biste nastavili sa ispiranjem.
iv. Nakon završetka drugog ispuštanja tečnosti, nalijte 250 ml vode u levak. Zatim pritisnite dugme za vreme da biste nastavili sa ispiranjem.
v. Kada se funkcija uklanjanja kamenca završi, uklonite pleh i levak.

6.2.1.2. ISPUŠTANJE TEČNOSTI
- korak (uklanjanje zaostale vode iz odeljka za paru):
i. Izaberite režim za ispuštanje tečnosti-uklanjanje kamenca i zatim izaberite funkciju za ispuštanje tečnosti pomoću desnog dugmeta.
ii. Stavite pleh na dno šupljine pećnice i pritisnite dugme za vreme da biste započeli.
iii. Kada se funkcija ispuštanja tečnosti završi, uklonite pleh i očistite ga.
6.2.2. SPOLJAŠNJOST PEĆNICE: uklanjanje i čišćenje staklenih vrata
natural_image
Line drawing of a door oven with hands operating it (no text or symbols)
natural_image
Diagram showing a mechanical component with an arrow indicating downward motion (no text or symbols present)- Postavite vrata na 45°. Istovremeno pritisnite dva dugmeta sa obe strane bočnih strana vrata i povucite prema sebi da biste uklonili poklopac gornjih stakala.
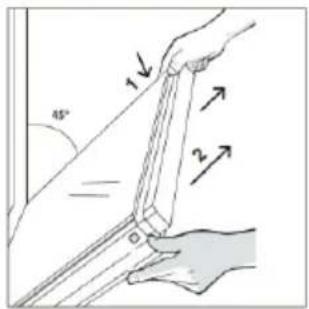
text_image
Diagram illustrating a mechanical or electrical component with labeled parts and directional arrows indicating motion or force.- Veoma pažljivo uklonite staklo pećnice, počevši od unutrašnjeg stakla. Tokom postupka, čvrsto držite staklo obema rukama i stavite ga na mekanu ravnu površinu (npr. na tkaninu).

natural_image
Simple line drawing of a tilted rectangular object with directional arrows indicating movement or force (no text or symbols)natural_image
Hand holding a diagonal line with a circular overlay (no text or symbols)- Očistite staklo mekom krpom i odgovarajućim sredstvima za čišćenje.
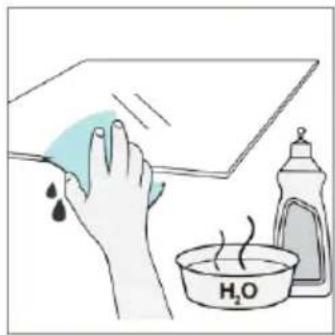
text_image
Illustration showing a hand cleaning a surface with water droplets, next to a bottle labeled 'H2O' and a bowl of water.-
Umetnite staklene ploče, vodeći računa da oznaka „LOW-E/ PYRO“ bude ispravno čitljiva i postavljena na donjoj levoj strani vrata, u blizini leve šarke. Na taj način će štampana etiketa na prvom staklu ostati na unutrašnjoj strani vrata.
-
Ponovo pričvrstite poklopac vrata gornjeg stakla tako što ćete ga gurati prema unutra dok ne čujete klik dva bočna dugmeta.
-
Zatim vratite vrata na 90° i okrenite jezičke za zaključavanje šarki prema unutrašnjosti pećnice.
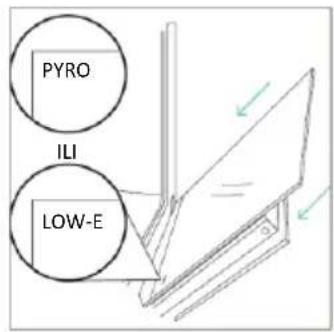
text_image
PYRO ILI LOW-E
natural_image
Line drawing of a mechanical assembly with no visible text or symbols
natural_image
Line drawing of a kitchen appliance with two hands inserting a cable into the opening (no text or symbols)
natural_image
Diagram showing a tool interacting with a mechanical component, with an arrow indicating direction (no text or symbols present)6.3. ČIŠĆENJE DODATNE OPREME
Obavezno temeljno očistite dodatnu opremu nakon svake upotrebe i osušite je peškirom. Za tvrdokorne naslage, natopite dodatnu opremu u mešavini vode i sapuna oko 30 minuta pre nego što je ponovo operete.
ČIŠĆENJE BOČNIH NOSAČA:
- Uklonite bočne nosače povlačenjem u pravcu strelica.
- Da biste očistili žičane nosače, stavite ih u mašinu za pranje sudova ili koristite vlažni suđer i obavezno ih posle osušite.
- Nakon procesa čišćenja, postavite žičane nosače obrnutim redosledom.
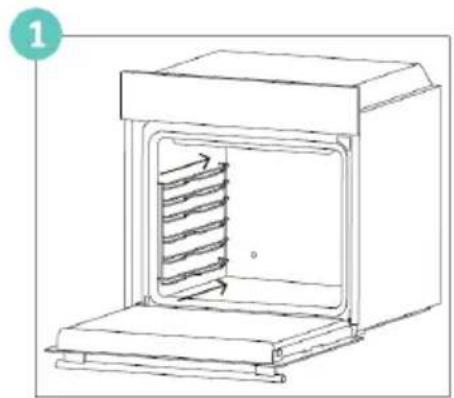
natural_image
Line drawing of a laboratory oven with internal circulation and heat exchanger (no text or symbols)
natural_image
Diagram showing two identical electrical or mechanical components with internal wind patterns, separated by a diagonal line (no text or symbols)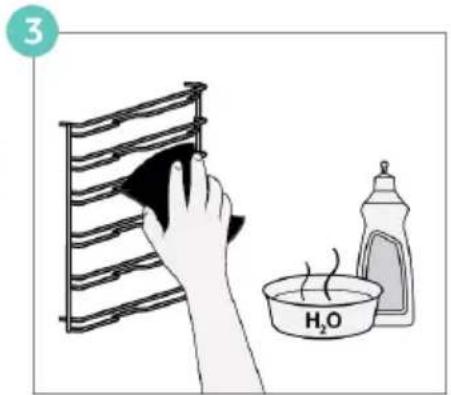
text_image
3 H₂O
natural_image
Diagram of two open industrial storage units with internal flow arrows, no text or symbols present
natural_image
Line drawing of a simple oven with internal cooling ducts (no text or symbols)6.4. ODRŽAVANJE
ZAMENA KOMPONENTI
text_image
Safety warning diagram showing a plug on a line with hazard symbol and OFF status indicators- korak
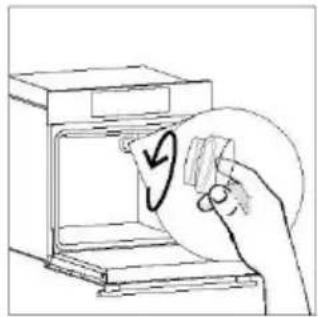
natural_image
Hand holding a paper with a circular arrow inside an oven (no text or symbols)- korak
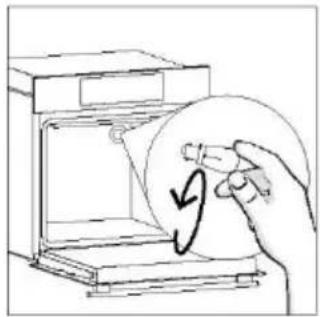
natural_image
Hand holding a circular object inside a device, with an arrow indicating rotation (no text or symbols)- korak

natural_image
Hand holding a circular object with a curved arrow inside, next to an open device (no text or symbols visible)- korak

natural_image
Hand holding a circular object with a curved arrow inside, next to an open appliance (no text or symbols visible)- korak

text_image
Safety warning diagram showing electrical hazard symbol and ON/OFF switch symbols on a diagonal linetext_image
Electrical diagram showing a plug connected to an ON/OFF switch with warning symbol and directional arrows- korak

natural_image
Illustration of a hand holding a pen near a stack of books, with an arrow pointing to a square object (no text or symbols present)- korak

natural_image
Illustration of a hand inserting a small object into a device, with no visible text or symbols.- korak
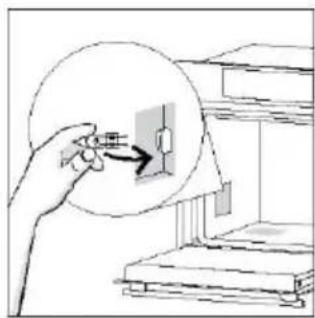
natural_image
Illustration of a hand holding a small electronic component with an arrow pointing to it, next to a staircase (no text or symbols)- korak

natural_image
Diagram of a printer with a magnified view showing internal components (no text or symbols)- korak

text_image
Electrical warning symbol and circuit diagram showing a plug, safety warning sign, and ON panel with arrowstext_image
Diagram showing a kitchen appliance with a hand cleaning it, accompanied by a warning sign and a water bottle labeled 'H20'.8. ZAŠTITA ŽIVOTNE SREDINE I ODLAGANJE NA OTPAD
8.1. ODLAGANJE UREĐAJA NA OTPAD

natural_image
Isometric line drawing of a multi-level refrigerator with internal compartments and handrails (no text or symbols)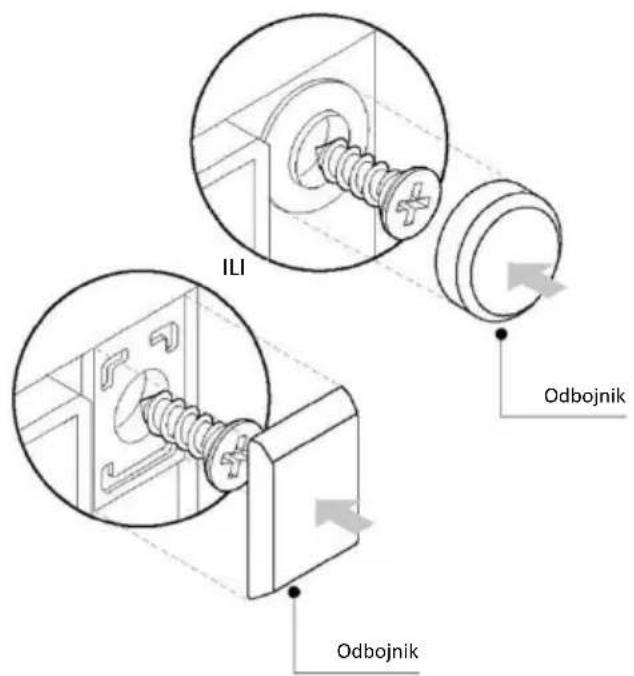
text_image
ILI Odbojnik Odbojnik
ДОБРЕ ДОШЛИ
text_image
Technical diagram of an oven with numbered components for identification2.2. ПРИНАДЛЕЖНОСТИ
natural_image
3D diagram of a rectangular tray with internal compartments, placed on a shelf (no text or symbols)natural_image
Illustration of a rectangular tray with internal compartments, placed on a shelf (no text or symbols)natural_image
Line drawing of a kitchen sink with a bowl, a round pan, and a handle (no text or symbols)natural_image
Line drawing of a multi-tiered storage unit with horizontal racks (no text or symbols)text_image
Diagram illustrating three steps of a door lock mechanism with labeled buttons and directional arrowstext_image
Available on the App Store GET IT ON Google Playtext_image
Welcome! Sign in to enter in your home page ENTER REGISTER Are you now to hOn? Click below to learn about our products © TRY DEMG hOn Do you already have a thousand passwords? Register with your social accounts and log in in the easiest and fastest way. SIGN UP WITH GOOGLE SIGN UP WITH APPLE SIGN UP WITH FACEBOOK No information relating to you will be stored and let us not past anything normally. OR SIGN UP WITH EMAIL Already registered? LOGINtext_image
Hello USERNAME YOUR APPLIANCES Add + Add appliance YOUR WIDGETS Long-litreum darker/soft Plan to Care your news What functions do smart appliances have? How to live sustain home and reduce wСтъпка 2
text_image
Allow your location permission To enhance your experience, please allow location permission to hOn app in the next step. CONTINUEСтъпка 3
text_image
Select your appliance category Search your appliance Washing machine Washer dryer Tumble dryer Dishwasher Air conditionair Air purifier Air scannerСтъпка 4
text_image
Turn OFF and then ON your appliance In case you can't switch OFF your appliance, unplug (for at least 10 seconds) and then, plug its power supply. OK!ID!ITСтъпка 5
text_image
Appliance connection Searching your appliance Don't turn off your Bluetooth. No app is looking for your appliance... 00:00:40 Stay close to your appliance in order to correctly capture the signal.Стъпка 6.1-6.2
text_image
Appliance connection Searching your appliance Don't turn off your Bluetooth. Oven New appliance Long appliance name to... CONNECT PRODUCT NOT FOUND
text_image
Appliance connection Searching your appliance Don't turn off your Bluetooth. Oven Connecting New appliance Long appliance name to... Stay close to your appliance in order to correctly capture the signal.Стъпка 7
text_image
Appliance connection Your appliance has been correctly identified! Brand Hoover Model 31008486-7888-1024 Serial number 12345678-1234-1234 Is this your appliance? YES IT'S MY OVEN NO IT'S NOT
КАК ДА ПРОМЕНЯ НАСТРОЙКИТЕ НА WIFI
natural_image
Simple diagram with a large circle, a dot, and a plus sign, with curved arrows indicating rotation or direction (no text or symbols)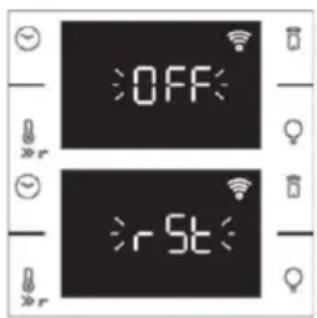
text_image
OFF r5t
text_image
Cooking BH Simon LEFT ADD 5/4MN 1TOP Current program PROGRAMS Conventional 220/10 31. Protein(DPE) DPA (Protein DPE) EDIT DETAILS3. ПРЕДИ ДА ЗАПОЧНЕТЕ
natural_image
Simple line drawing of a kitchen appliance with a hand cleaning the door and a bottle nearby (no text or symbols)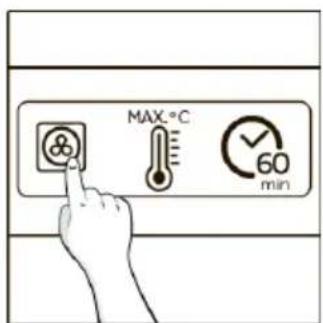
text_image
MAX.°C 60 min
natural_image
Line drawing of an oven with smoke rising, next to a cabinet (no text or symbols)natural_image
Pure technical line drawing of a mechanical component with no text or symbols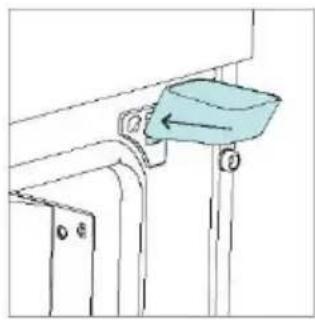
natural_image
Technical line drawing of a mechanical assembly with a blue component and mounting brackets (no text or symbols)natural_image
Diagram of a mechanical component with a blue arrow indicating direction (no text or symbols)
natural_image
Diagram of a mechanical component with an arrow indicating rotation, no text or symbols presentnatural_image
Pure electrical circuit lines without any symbolsnatural_image
Line drawing of an oven with a rack inside, showing internal structure and airflow direction (no text or symbols)
text_image
ПРЕДВАРИТЕЛНО ЗАДАДЕНО ВРЕМЕ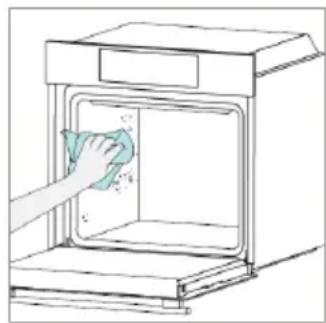
natural_image
Line drawing of a hand cleaning a kitchen appliance with a cloth (no text or symbols)
Aquactiva Steam
natural_image
Simple line drawing of a mechanical component with a handle and mounting bracket (no text or symbols)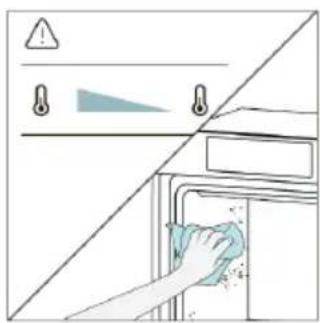
natural_image
Illustration of a hand cleaning a kitchen appliance with a cloth, showing no text or symbols.natural_image
Simple diagram with a large circle, a dot above it, and an upward arrow with a curved arrow below (no text or symbols)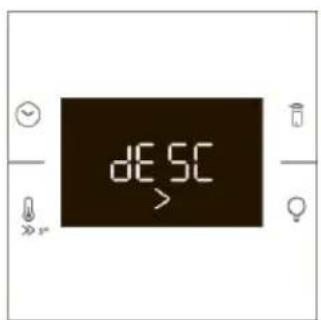
text_image
DESC >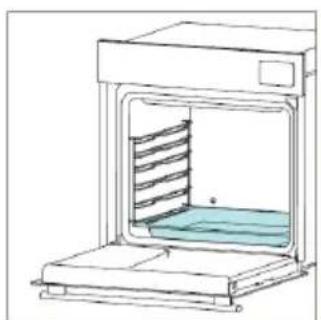
natural_image
Line drawing of a kitchen oven with a tiled interior and ventilation duct (no text or symbols)
text_image
dESC >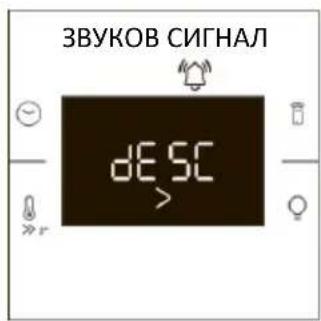
text_image
ЗВУКОВ СИГНАЛ DESC >
natural_image
Line drawing of a kitchen oven with a blue insulation layer inside (no text or symbols)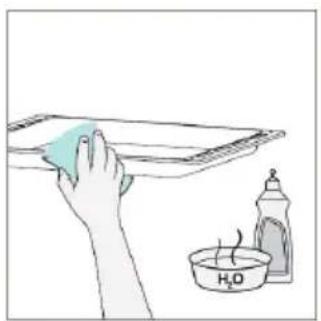
natural_image
Illustration of a hand cleaning a surface with a cloth and a water bottle (no text or symbols)natural_image
Simple diagram with a large circle, a dot above it, and a curved arrow indicating rotation or direction (no text or symbols)
natural_image
Line drawing of a kitchen oven with a tiled interior and base (no text or symbols)
text_image
dr A1
text_image
End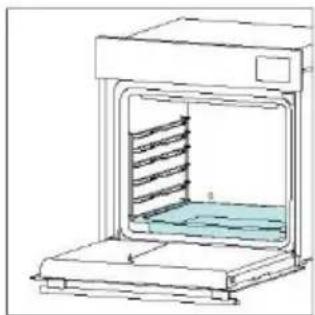
natural_image
Line drawing of a laboratory oven with internal cooling unit and base (no text or symbols)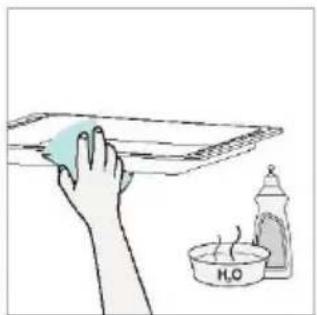
natural_image
Illustration of a hand cleaning a surface with a cloth and a small bottle labeled 'H2O' (no text or symbols on the main subject)natural_image
Line drawing of a door oven with hands operating it (no text or symbols)
natural_image
Diagram showing a mechanical component with an arrow indicating downward motion (no text or symbols present)text_image
Diagram illustrating a mechanical or electrical component with labeled parts and directional arrows indicating motion or force.natural_image
Simple line drawing of a tilted rectangular object with directional arrows indicating movement or force (no text or symbols)natural_image
Hand holding a diagonal line with a circular overlay (no text or symbols)text_image
Illustration showing a hand cleaning a surface with water droplets, accompanied by a bottle and a labeled dish containing H₂O.natural_image
Line drawing of a mechanical assembly with no visible text or symbols
natural_image
Line drawing of a double-bowel oven with hands inserting a cable (no text or symbols)
natural_image
Diagram showing a tool interacting with a mechanical component, with an arrow indicating direction (no text or symbols present)6.3. ПОЧИСТВАНЕ НА ПРИНАДЛЕЖНОСТИ
natural_image
Line drawing of a laboratory oven with internal circulation and heat exchanger (no text or symbols)
natural_image
Diagram showing two identical electrical or mechanical components with internal wind patterns, separated by a diagonal line (no text or symbols)
text_image
3 H₂O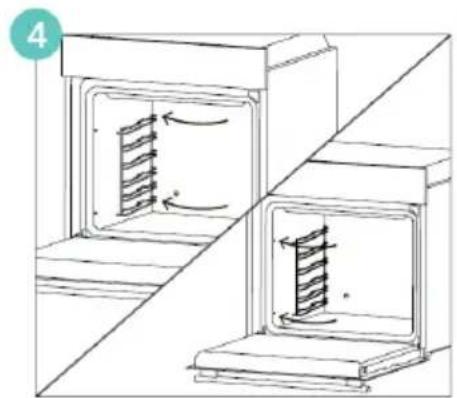
natural_image
Diagram of two open industrial cabinets with internal heat exchangers and heat flux arrows, no text or symbols present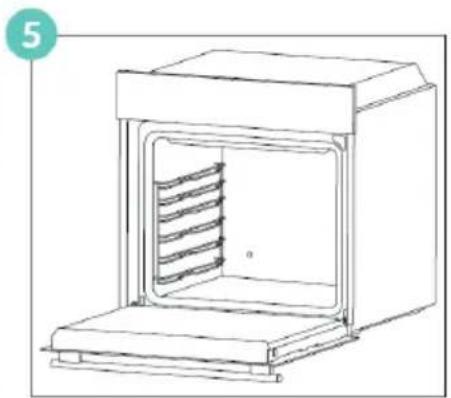
natural_image
Line drawing of a simple oven with internal cooling ducts (no text or symbols)6.4. ПОДДРЪЖКА
ПОДМЯНА НА КОМПОНЕНТИ
text_image
Safety warning diagram showing a plug, hazard symbol, and electrical circuit symbols with Chinese labelsСтъпка 2

natural_image
Hand holding a paper with a circular arrow inside an oven (no text or symbols)Стъпка 3

natural_image
Line drawing of a hand holding a circular object with an arrow, inside an open device (no text or symbols)Стъпка 4

natural_image
Hand holding a circular object inside a device with a curved arrow indicating rotation (no text or symbols)Стъпка 5

natural_image
Hand holding a circular object with a curved arrow inside, next to an open appliance (no text or symbols visible)Стъпка 6

text_image
Safety warning diagram showing electrical hazard symbol and ON/OFF switch symbols on a diagonal linetext_image
Safety warning diagram showing a plug and fuse with a hazard symbol and an ON/OFF switchСтъпка 2

natural_image
Illustration of a hand holding a pen over a document with an arrow pointing to it, next to stacked books (no text or symbols present)Стъпка 3
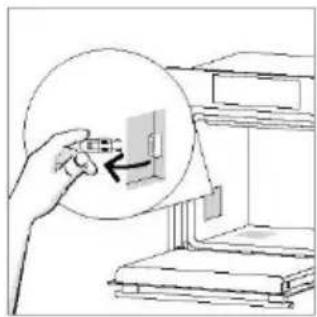
natural_image
Illustration of a hand inserting a small object into a device inside a circular frame (no text or symbols)Стъпка 4

natural_image
Illustration of a hand holding a small electronic component with an arrow pointing to it, next to a shelf (no text or symbols)Стъпка 5

natural_image
Diagram of a staircase with an arrow pointing to a window (no text or symbols present)Стъпка 6
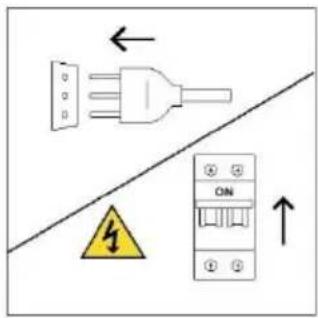
text_image
Electrical safety warning diagram showing plug, ON panel, and warning symbol with arrowstext_image
Diagram showing a kitchen appliance with exhaust and cleaning process, including a warning triangle and hand cleaning the interior.8.1. ИЗХВЪРЛЯНЕ НА УРЕДА
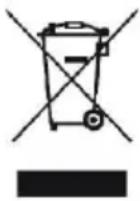
natural_image
Isometric line drawing of a multi-level refrigerator with internal compartments and handrails (no text or symbols)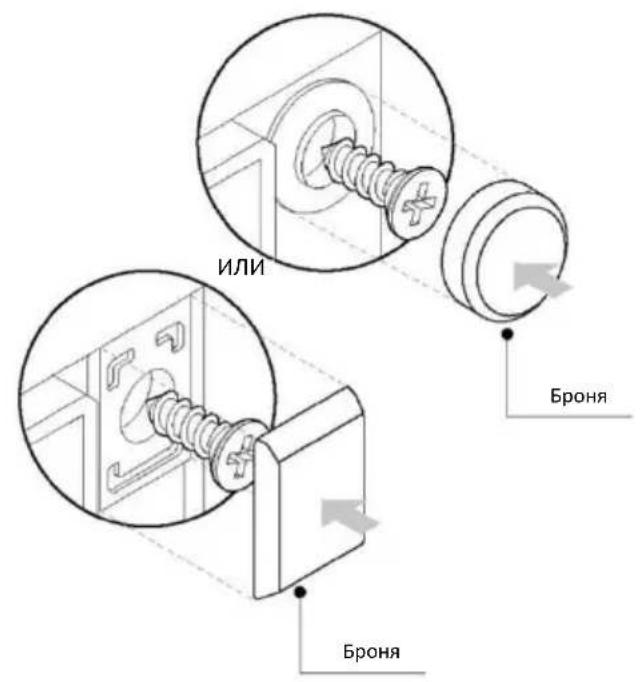
text_image
Technical diagram of an oven with numbered components for identification2.2. PRIBOR
- Upravljačka ploča
- Brojevi položaja polica
- Metalna rešetka
- Plitice
- Poklopac ventilatora
- Vrata pećnice
- Bočne žičane rešetke (ako postoje: samo za ravni prostor za pečenje)
- Serijski broj i QR kôd
- Umetanje parnog lijevka
natural_image
3D wireframe diagram of a rectangular tray with internal compartments, placed on a shelf (no text or symbols)natural_image
3D wireframe diagram of a rectangular tray with internal compartments, placed on an open shelf (no text or symbols)Duboka ladica idealna je za recepte s dodanim tekućinama ili slojevima, kao što su složenci ili pečenja. Njena je dubina posebno dizajnirana kako bi hrana koja se u njenoj priprema imala željenu konzistentnost.
5 Teleskopske vodilice
natural_image
Line drawing of a kitchen sink with a bowl, a sphere, and a tray (no text or symbols)Teleskopske vodilice u pećnici police su koje se mogu produljiti, što olakšava postavljanje i uklanjanje predmeta, bez potrebe za posezanjem duboko u vruću pećnicu. Poboljšavaju sigurnost, stabilnost i mogu se postaviti na različite razine.
natural_image
Line drawing of a multi-tiered storage rack or shelf unit (no text or symbols)text_image
Diagram showing three steps of a door lock mechanism with labeled buttons and directional arrows indicating movement.Lijevak za paru koristan je dodatak za dodavanje potrebne vode kroz namjenski otvor za programe kuhanja na pari.
2.3. UPRAVLJAČKA PLOČA
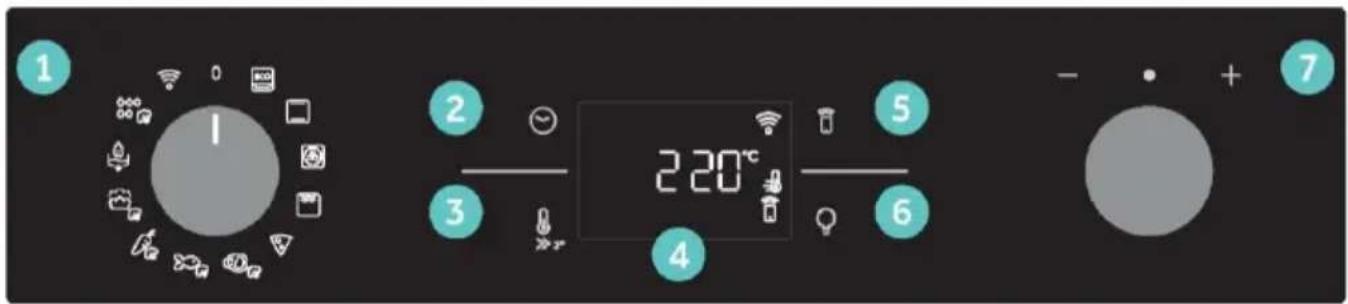
text_image
1 2 3 4 5 6 7 220°CFunkcije i rangiranje funkcija ovise o modelu.
- Ručica izbornika funkcije
- Vrijeme
- Temperatura
- Zaslon LED
- Daljinsko upravljanje
- Lampica
- Birač
GLAVNE FUNKCIJE
Zaslon ima 4 osnovne funkcije:
text_image
Available on the App Store GET IT ON Google PlayREGISTRACIJA NOVOG KORISNIKA
- Kliknite na „Register“ (Registriraj se)
- Možete se registrirati putem računa društvenih mreža ili se registrirati adresom osobne e-pošte

text_image
Welcome! Sign in to enter in your home page ENTER REGISTER Are you now to hOn? Click below to learn about our products TRY DEMO Do you already have a thousand passwords? Register with your social accounts and log in in the easiest and fastest way. SIGN UP WITH GOOGLE SIGN UP WITH APPLE SIGN UP WITH FACEBOOK No information relating to you will be shared and we will not add anything from you. OR: SIGN UP WITH EMAIL Already registered? LOGINBRZA REGISTRACIJA ZA UPARIVANJE
1. korak
- Odaberite „Add appliance" (Dodaj uređaj).
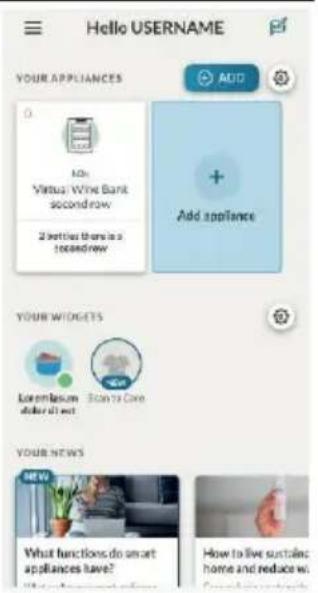
text_image
Hello USERNAME YOUR APPLIANCES Add Add Virtual Wine Bank second row 2 better there is a second row + Add appliance YOUR WIDGETS Low emissions darker effect Plan to Care You're news What functions do smart appliances have? How to live surfaces home and reduce us.2. korak
text_image
Allow your location permission To enhance your experience, please allow location permission to hOn app in the next stop. CONTINUE3. korak
- Odaberite pećnicu iz kategorije uređaja.

text_image
Select your appliance category Search your appliance Washing machine Washer dryer Tumble dryer Dishwasher Air conditionair Air purifier Air scanner4. korak
text_image
Appliance connection Turn OFF and then ON your appliance In case you can't switch OFF your appliance, unplug (for at least 10 seconds) and then plug its power supply. OK! DID IT5. korak
text_image
Appliance connection Searching your appliance Don't turn off your Bluetooth. No app is looking for your appliance... 00:00:40 Stay close to your appliance in order to correctly capture the signal.Korak 6.1 - 6.2
- Odaberite kućanski uređaj, dodirnite „Connect” (Poveži se) i pričekajte nekoliko sekundi.
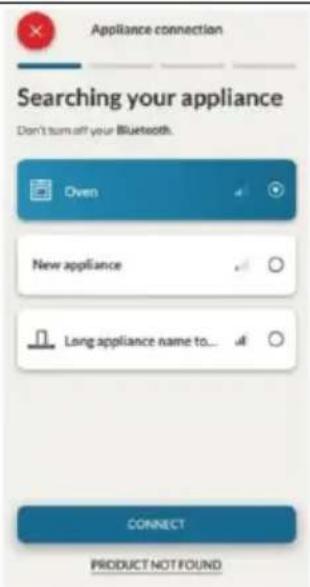
text_image
Appliance connection Searching your appliance Don't turn off your Bluetooth. Oven New appliance Long appliance name to... CONNECT PRODUCT NOT FOUND
text_image
Appliance connection Searching your appliance Don't turn off your Bluetooth. Oven Connecting New appliance Long appliance name to... Stay close to your appliance in order to correctly capture the signal.7. korak
text_image
Appliance connection Your appliance has been correctly identified! Brand Hoover Model 31008486-7888-1824 Serial number 12345678-1234-1234 Is this your appliance? YES IT'S MY OVEN NO IT'S NOTKAKO PROMIJENITI POSTAVKE WI-FI MREŽE
Nakon registracije uređaja, korisnik može odabrati sljedeće postavke Wi-Fi mreže:
- WIFI ON (UKLJUČI Wi-Fi): Stanje pećnice može se pratiti samo putem aplikacije.
- WIFI OFF (ISKLJUČI Wi-Fi): Pećnica nije spojena, ali je i dalje registrirana sa spremljenim mrežnim vjerodajnicama.
-
WIFI RESET (RESETIRAJ WI-FI): Veza je ponovno uspostavljena i moguća je nova registracija.
-
Okrenite birač funkcija u izborniku Wi-Fi mreže.
- Na zaslonu se prikazuje „On” (Uključeno).
- Okrećite birač dok se ne prikaže „Off” (Isključeno) ili postavka za resetiranje „rSt”.
DALJINSKO UPRAVLJANJE
Daljinsko upravljanje nudi brojne prednosti za korisnike, povećava praktičnost, učinkovitost i cjelokupno iskustvo pripreme hrane i pružaj mogućnost upravljanja proizvodom izravno s uređaja i iz aplikacije hOn
Ova funkcija omogućuje da putem uređaja uživate u raznim značajkama, kao što su: trenutno ili planirano pokretanje recepata ili programa kuhanja koji su već dostupni u aplikaciji; praćenje napretka vaših recepata u stvarnom vremenu; podešavanje korištenih parametara kuhanja; praćenje postupka kuhanja. Nadalje, moguće je primati obavijesti nakon završetka programa ili recepata. Daljinsko upravljanje možete aktivirati isključivo kada je proizvod registriran.
NAPOMENA: Dostupan je za sve funkcije kuhanja na proizvodu, osim za program Supergrill.
text_image
Cooking SH 120kLEFT ADD 5/4MM STOP Current program PROGRAMS Conventional 300°C 50. PulsedLDPB 30.50m Efficiency PulsedLDPB EDIT DETAILS →3. PRIJE POKRETANJA
3.1. INFORMACIJE ZA POČETAK
natural_image
Line drawing of a kitchen appliance with a hand cleaning the interior (no text or symbols)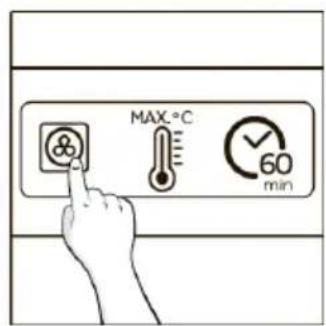
text_image
MAX.°C 60 min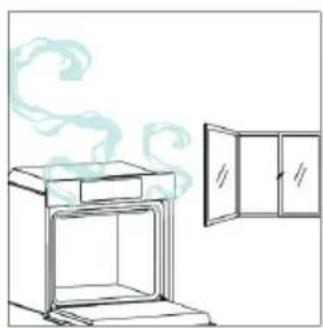
natural_image
Line drawing of a kitchen oven with a cabinet and cloud-shaped smoke in the background (no text or symbols)4. UPOTREBA PROIZVODA
4.1. NAČIN RADA PROIZVODA
UKLJUČIVANJE/ISKLJUČIVANJE PEĆNICE
Za uključivanje pećnice okrenite birač funkcija (udesno/ulijevo) i odaberite program pečenja. Želite li je isključiti, postavite birač funkcija u položaj „0”.

text_image
UKLIJUČENO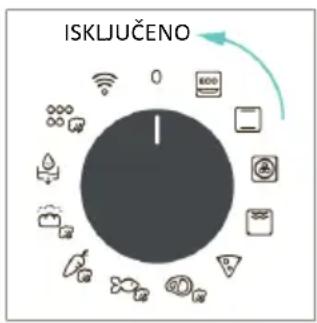
text_image
ISKLJUČENOPODEŠAVANJE PROGRAMA KUHANJA
Okrenite birač funkcija i odaberite željeni program. Na zaslonu će se pojaviti zadana temperatura koja se može urediti u svakom trenutku okretanjem desnog birača (udesno za povećanje i ulijevo za smanjenje temperature).
IZBORNIK VREMENA
Pristupite izborniku vremena pritiskom na ☺. Za navigaciju dodirnite ☺ onoliko puta koliko je potrebno za unos sljedećih postavki:
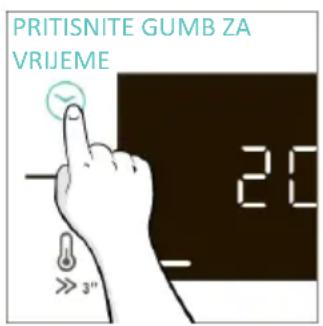
text_image
PRITISNITE GUMB ZA VRIJEME 20 3"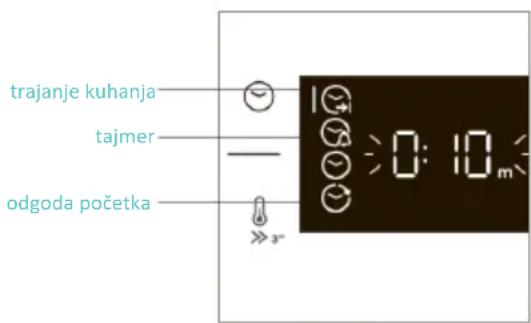
text_image
trajanje kuhanja tajmer odgoda početkaNAPOMENA: nije moguće postaviti nekoliko parametara istovremeno, stoga u memoriji ostaje samo posljednji, a prethodni se briše.
TRAJANJE KUHANJA
Omogućuje se prethodno postavljanje vremena kuhanja za odabrani recept.
AKTIVACIJA: pritisnite za ulazak u izbornik Time (Vrijeme). Dodirnite onoško puta koliko je potrebno za odabir funkcije „Trajanje kuhanja”. Zatim biračem odaberite vrijednost.
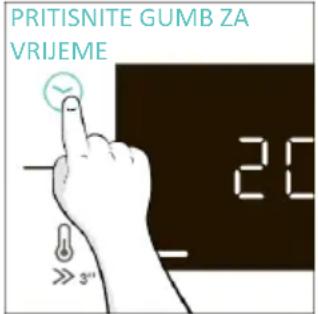
text_image
PRITISNITE GUMB ZA VRIJEME 20 >> 3"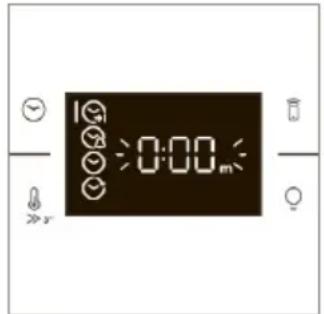
text_image
0:00m
text_image
- • + POSTAVLJANE TRAJANJA KUHANJA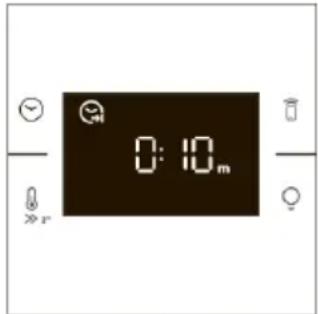
text_image
0:10mOdbrojavanje počinje po završetku zagrijavanja (ako je uređaj opremljen). Tijekom faze kuhanja moguće je promijeniti vrijednost trajanja okretanjem desnog birača. Kad istekne vrijeme trajanja, kuhanje se zaustavlja.
TAJMER
natural_image
Pure electrical circuit lines without any symbols
natural_image
Technical line drawing of a mechanical component with a blue component and directional arrow (no text or symbols)natural_image
Diagram of a mechanical device with a blue component and directional arrow, no text or symbols present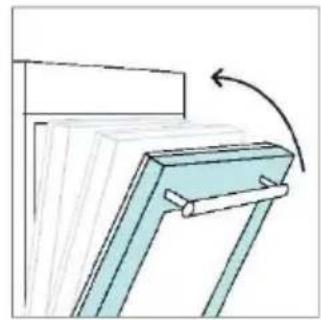
natural_image
Diagram of a mechanical bracket with an arrow indicating rotational motion (no text or symbols)natural_image
Pure electrical circuit lines without any symbolsNAPOMENA: Ako se napuni previše vode, višak će izaći iz ispusne mlaznice.
i NAPOMENA: kada kuhate s parom, na dnu pećnice na kraju kuhanja može biti vidljivo nešto preostale vode ili kondenzacije.
i NAPOMENA: ako nakon isključivanja pećnice postoji potreba za nastavkom kuhanja, preporučuje se izbjegavanje programa everyday cooking i odabir standardnih funkcija.
| Recept | Veličina porcije | Program kuhanja | T °C | Pribor za kuhanje | Položaj police | Vrijeme kuhanja (min) |
| Goveđe pečenje | 500 - 800 g | Meso + para | 220 °C | Metalna rešetka | L3 | 30 - 40 |
| Govedi filet | 200 g | Meso + para | 200 °C | Metalna rešetka | L3 | 20 - 25 |
| Mesna štruca | 1000 - 1500 g | Meso + para | 200 °C | Metalna rešetka | L3 | 40 - 50 |
| Govedina wellington | 500 g | Meso + para | 200 °C | Metalna rešetka | L3 | 50 - 80 |
| Pirjana govedina | 800 - 1000 g | Meso + para | 200 °C | Metalna rešetka | L3 | 40 - 70 |
| Svinjska rebra | 1000 - 1200 g | Meso + para | 200 °C | Metalna rešetka | L3 | 80 |
| Stalak za janjetinu | 800 - 1000 g | Meso + para | 210 °C | Metalna rešetka | L3 | 60 - 80 |
| Janjeći but | 1500 - 2000 g | Meso + para | 200 °C | Metalna rešetka | L3 | 80 |
| Fileti lososa | 200 - 600 g | Riba + para | 170 °C | Ladica za pečenje | L3 | 20 - 35 |
| Odresci tune | 600 g(oko 4 kom) | Riba + para | 180 °C | Metalna rešetka | L3 | 15 - 20 |
| Odresci sabljarke | 700 g(oko 4 kom) | Riba + para | 180 °C | Ladica za pečenje | L3 | 15 - 20 |
| Filet bakalara | 600 g(oko 4 kom) | Riba + para | 160 °C | Ladica za pečenje | L3 | 15 - 20 |
| Okruglica, cijela | 1 | Riba + para | 170 °C | Ladica za pečenje | L3 | 35 - 45 |
| Fileti orade | 600 g(oko 4 kom) | Riba + para | 160 °C | Ladica za pečenje | L3 | 15 - 20 |
| Filet lubina | 600 g(oko 4 kom) | Riba + para | 160 °C | Ladica za pečenje | L3 | 15 - 20 |
| Riba pečena u soli | 1 | Riba + para | 180 °C | Ladica za pečenje | L3 | 30 - 40 |
| Riblji ražnjići | 8 komada | Riba + para | 160 °C | Metalna rešetka | L3 | 20 - 30 |
| Punjene lignje | 4 komada | Riba + para | 180 °C | Ladica za pečenje | L3 | 25 - 40 |
| Komorač | 1 ladica | Povrće + para | 200 °C | Metalna rešetka | L3 | 30 - 40 |
| Miješano povrće | 1 ladica | Povrće + para | 190 °C | Metalna rešetka | L3 | 40 - 45 |
| Cvjetača | 1 ladica | Povrće + para | 190 °C | Metalna rešetka | L3 | 40 - 50 |
| Bundeve, narezane na kockice | 1 ladica | Povrće + para | 200 °C | Metalna rešetka | L3 | 30 - 40 |
| Punjene paprike | 1 ladica | Povrće + para | 180 °C | Metalna rešetka | L3 | 70 - 80 |
| Punjene tikvice | 1 ladica | Povrće + para | 190 °C | Metalna rešetka | L3 | 35 - 45 |
| Štapići mrkve | 1 ladica | Povrće + para | 180 °C | Ladica za pečenje | L3 | 35 - 40 |
| Brokula | 1 ladica | Povrće + para | 190 °C | Ladica za pečenje | L3 | 30 - 40 |
| Ratatouille | 1 ladica | Povrće + para | 190 °C | Metalna rešetka | L3 | 40 - 45 |
| Rožata od povrća | 6 ramekina | Povrće + para | 180 °C | Ladica za pečenje + kalupi | L3 | 25 - 35 |
6. ODRŽAVANJE I ČIŠĆENJE
6.1. OPĆE PREPORUKE
Redovito čišćenje može produljiti životni vijek vašeg uređaja. Pričekajte da se pećnica ohladi prije ručnog čišćenja.
- Minimalno čišćenje nakon svake upotrebe pećnice pripomaže u održavanju savršene čistoće pećnice.
- Ne oblažite stjenke pećnice aluminijskom folijom ili jednokratnom zaštitom koja je dostupna u prodavaonicama. Aluminijska folija ili bilo koja druga zaštita, u izravnom doticaju s vrućim emajlom, pod rizikom je od rastapanja i uništavanja emajla u unutrašnjosti.
- Kako biste spriječili pretjerano prljanje svoje pećnice i nastale snažne dimne mirise, preporučujemo da ne upotrebljavate pećnicu pri veoma visokim temperaturama. Bolje je produžiti vrijeme kuhanja i malo smanjiti temperaturu.
- Uz dodatke koji se isporučuju s pećnicom, savjetujemo vam isključivo upotrebu posuđa i kalupa za pečenje koji su otporni na veoma visoke temperature.
6.2. ČIŠĆENJE PEĆNICE
6.2.1. UNUTRAŠNJOST PEĆNICE: funkcije čišćenja

Pirolitičko čišćenje (*ovisno o modelu pećnice)
Taj se postupak oslanja na istoimeni kemijski proces kojim se razgrađuju složene tvari toplinskom obradom.
Nakon pokretanja, automatski se zaključavaju vrata pećnice i brzo se podiže temperatura na 410 °C. Na kraju ciklusa čišćenja, ostaci hrane ostavit će bijeli sloj na emajliranim površinama. Ako želite ukloniti te čestice, obrišite krpom natopljenom u vrućoj vodi sa sapunom i upotrijebite četku ili čeličnu vunu. Prikladna sredstva za čišćenje su vruća voda sa sapunom ili sredstvo za čišćenje pećnice.
Kako funkcionira:
natural_image
Line drawing of an oven with a rack and vent, showing internal structure without any text or symbols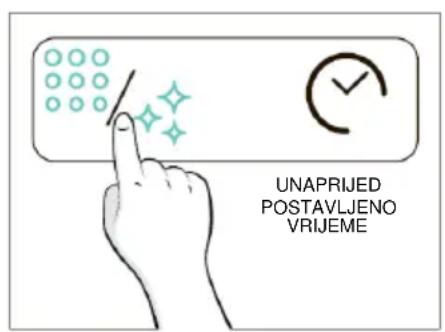
text_image
UNAPRIJED POSTAVLJENO VRIJEME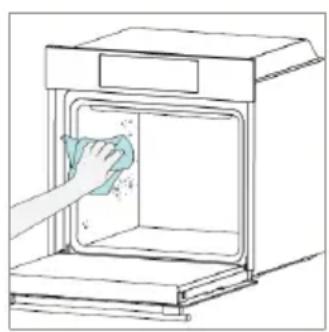
natural_image
Line drawing of a hand cleaning a window with a cloth (no text or symbols)Aquactiva Steam
Funkcija Steam cleaning dizajnirana je za lako uklanjanje lagane prljavštine, brzo je i ekološki prihvatljivo rješenje za čišćenje unutrašnjosti pećnice snagom pare.
Kako funkcionira:
natural_image
Simple line drawing of a door handle with a blue plastic clip attached (no text or symbols)
natural_image
Illustration of a kitchen sink with a hand cleaning the interior (no text or symbols)ČIŠĆENJE PARNOG SUSTAVA
Ova se funkcija predlaže nakon 25 ciklusa čišćenja parom i obvezna je nakon 40 ciklusa čišćenja parom. Pećnica će prikazati ikonu „descale icon” na kraju svakog ciklusa čišćenja parom, počevši od 25., pod uvjetom da korisnici još nisu uklonili kamenac. Nakon 40 ciklusa čišćenja parom, nijedan program kuhanja na pari neće se pokrenuti prije nego korisnici izvrše program uklanjanja kamenca. Podijeljen je u tri koraka:
6.2.1.1. UKLANJANJE KAMENCA
Korak 1 (uklanjanje preostale vode iz generatora pare):
i. Odaberite način uklanjanja kamenca na lijevom regulatoru, a zatim desnim regulatorom odaberite funkciju uklanjanja kamenca i pritisnite gumb za vrijeme kako biste potvrdili odabir.
ii. Postavite ladicu na dno pećnice i pritisnite gumb za vrijeme za pokretanje.
iii. Nakon oglašavanja zvučnog signala koji označava prijelaz u drugu fazu, uklonite ladicu i očistite je.
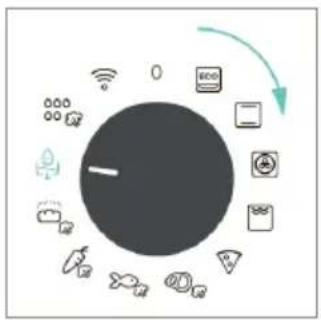
flowchart
graph TD
    A["Smart Home Control System"] --> B["Device 1"]
    A --> C["Device 2"]
    A --> D["Device 3"]
    A --> E["Device 4"]
    A --> F["Device 5"]
    A --> G["Device 6"]
    A --> H["Device 7"]
    A --> I["Device 8"]
    A --> J["Device 9"]
    A --> K["Device 10"]
    A --> L["Device 11"]
    A --> M["Device 12"]
    A --> N["Device 13"]
    A --> O["Device 14"]
    A --> P["Device 15"]
    A --> Q["Device 16"]
    A --> R["Device 17"]
    A --> S["Device 18"]
    A --> T["Device 19"]
    A --> U["Device 20"]

natural_image
Simple diagram with a large circle, a dot above it, and curved arrows indicating rotation or direction (no text or symbols)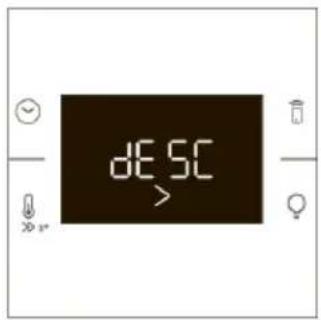
text_image
DESC >
natural_image
Line drawing of a kitchen oven with a tiled interior and insulation material (no text or symbols)
text_image
dESC >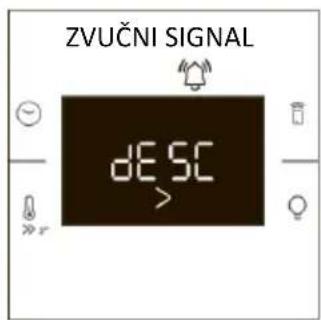
text_image
ZVUČNI SIGNAL DESC >
natural_image
Line drawing of a kitchen oven with a blue tray inside and a rack on the door (no text or symbols)
natural_image
Illustration of a hand cleaning a cloth over a bowl with a water bottle (no text or symbols)Korak 2 (uklanjanje kamenca):
i. Postavite lijevak za vodu i ladicu pa pritisnite gumb za vrijeme da biste potvrdili odabir.
ii. Ulijte 200 ml vode i 50 ml sredstva za uklanjanje kamenca u lijevak. Zatim pritisnite gumb za vrijeme da biste potvrdili odabir.
iii. Izvucite lijevak, zatvorite vrata i pritisnite gumb za vrijeme da biste potvrdili odabir.
iv. Postupak uklanjanja kamenca trajat će neko vrijeme, a nakon toga prijeđite na treću fazu, izvadite posudu i ponovno je očistite.
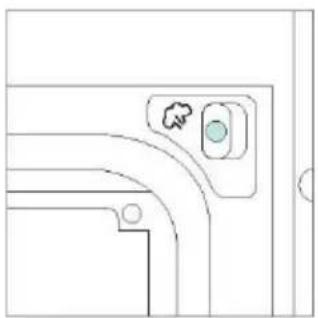
natural_image
Pure technical line drawing of a door or corner component with no text, numbers, or symbols
natural_image
Technical diagram of a mechanical assembly with a blue component and directional arrow (no text or symbols)
text_image
dESC >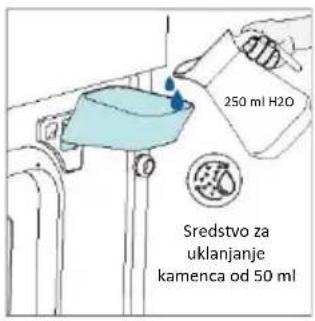
text_image
250 ml H2O Sredstvo za uklanjanje kamenca od 50 ml
text_image
DESC >
natural_image
Simple line drawing of a door handle with a blue plastic clip attached (no text or symbols)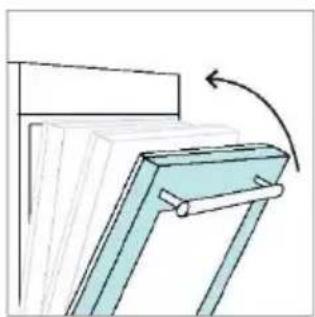
natural_image
Diagram of a mechanical bracket with an arrow indicating rotation or force direction (no text or symbols present)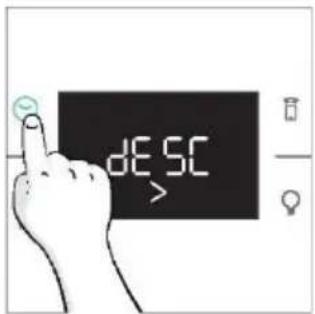
text_image
dESC >
natural_image
Line drawing of a kitchen oven with a tray holding a tiered rack (no text or symbols)
natural_image
Illustration of a hand cleaning a surface with a cloth and a small container labeled H2O (no text or symbols on the main subject)Korak 3 (ispiranje):
i. Postavite lijevak za vodu i ladicu pa pritisnite gumb za vrijeme da biste potvrdili odabir.
ii. Ulijte 250 ml vode u lijevak. Zatim pritisnite gumb za vrijeme da biste potvrdili odabir.
iii. Nakon prvog cijeđenja, ulijte 250 ml vode u lijevak. Zatim pritisnite gumb za vrijeme da biste nastavili s ispiranjem.
iv. Nakon drugog cijedenja, ulijte 250 ml vode u lijevak. Zatim pritisnite gumb za vrijeme da biste nastavili s ispiranjem.
v. Kad funkcija uklanjanja kamenca završi, uklonite ladicu i lijevak.
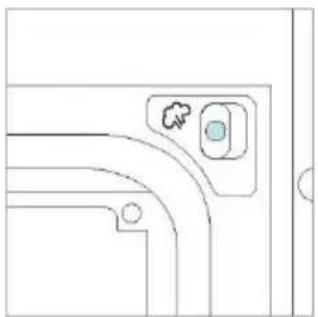
natural_image
Pure architectural line drawing of a curved corridor with a circular component and a small icon (no text or symbols)
natural_image
Diagram of a mechanical component with a blue component and directional arrow, no text or symbols present
text_image
DESC >
text_image
250 ml H2O
text_image
dESC >
text_image
250 ml H2O
text_image
dE SC >
text_image
End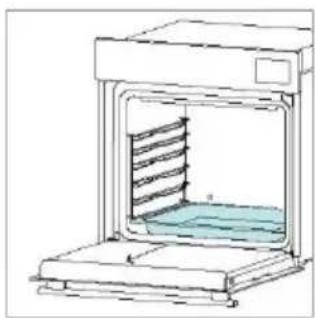
natural_image
Line drawing of a kitchen oven with a slatted interior and a tiled base (no text or symbols)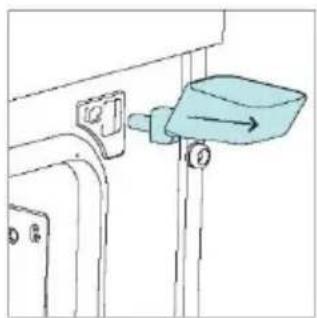
natural_image
Simple line drawing of a mechanical device with a blue handle and mounting bracket (no text or symbols)6.2.1.2. COVODNJA
Korak 1 (uklanjanje preostale vode iz generatora pare):
i. Odaberite način rada za uklanjanje kamenca, a zatim desnim gumbom odaberite funkciju cijedenja.
ii. Postavite ladicu na dno pećnice i pritisnite gumb za vrijeme za pokretanje.
iii. Kada funkcija cijeđenja završi, uklonite ladicu i očistite je.
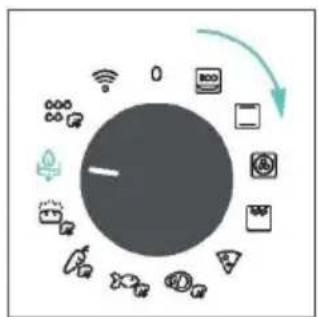
flowchart
graph TD
    A["Smart Devices"] --> B["Wireless Connectivity"]
    B --> C["System Interaction"]
    C --> D["Green Arrow"]
    D --> E["Central Node"]
    style A fill:#999,stroke:#333
    style B fill:#ccc,stroke:#333
    style C fill:#666,stroke:#333
    style D fill:#fff,stroke:#333
    style E fill:#fff,stroke:#333
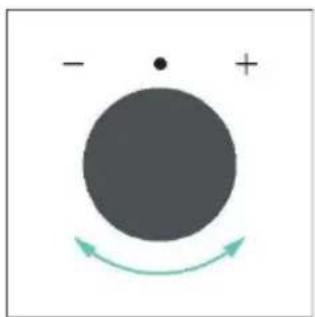
natural_image
Simple diagram with a large circle, a dot, and a plus sign, with curved arrows indicating rotation or direction (no text or symbols)
natural_image
Line drawing of a kitchen oven with a tiled interior and base (no text or symbols)
text_image
dr A1
text_image
End
natural_image
Line drawing of a laboratory oven with internal cooling system (no text or labels)
natural_image
Illustration of a hand cleaning a surface with a cloth and a small bottle labeled 'H2O' (no text or symbols on the main subject)6.2.2. VANJSKE POVRŠINE PEĆNICE: uklanjanje i čišćenje staklenih vrata
- Postavite vrata na 90°. Zakrenite jezičke za zaključavanje šarke tako da su okrenuti od pećnice.
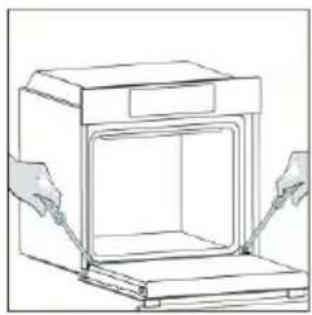
natural_image
Line drawing of a door opening with hands operating it (no text or symbols)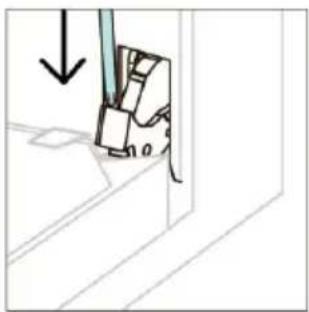
natural_image
Simple line drawing of a mechanical component with an arrow indicating downward motion (no text or symbols)text_image
Diagram illustrating a mechanical or electrical component with labeled parts and directional arrows indicating motion or force.natural_image
Simple line drawing of a tilted rectangular object with directional arrows indicating movement (no text or symbols)- UPOZORENJE: Vanjsko staklo ne može se ukloniti.
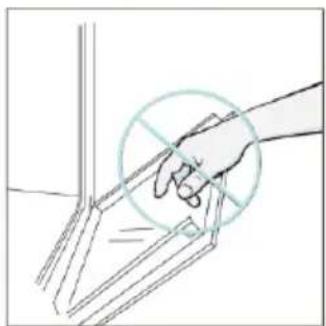
natural_image
Hand holding a tool interacting with a bracket (no text or symbols visible)- Očistite staklo mekom krpom i odgovarajućim sredstvima za čišćenje.

text_image
Illustration showing a hand cleaning a surface with water droplets, accompanied by a bottle and a labeled dish containing H₂O.text_image
PYRO ILI LOW-Enatural_image
Line drawing of a mechanical setup with a flat plate and support frame (no text or symbols)- Zatim vratite vrata na 90° i zakrenite jezičke za zaključavanje šarki tako da gledaju prema unutrašnjosti pećnice.

natural_image
Line drawing of a double-bowel oven with hands inserting a cable (no text or symbols)
natural_image
Diagram showing a tool interacting with a mechanical component, with an arrow indicating direction (no text or symbols present)6.3. ČIŠĆENJE PRIBORA
Nakon svake upotrebe temeljito očistite pribor i osušite ga ručnikom. Tvrdokorne je ostatke na priboru pribora možda najbolje namočiti u mješavini vode i sapuna otprilike 30 minuta prije drugog pranja.
ČIŠĆENJE BOČNIH REŠETKI:
- Uklonite bočne rešetke povlačenjem u smjeru strelica.
- Žičane rešetke prilikom čišćenja stavite u perilicu posuđa ili upotrijebite mokru spužvu, a zatim ih obavezno osušite.
- Nakon čišćenja postavite bočne police obrnutim redoslijedom.
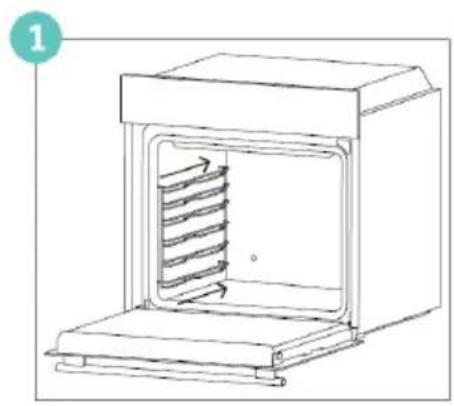
natural_image
Line drawing of a laboratory oven with internal heating element (no text or symbols)
natural_image
Diagram showing two open industrial chambers with internal flow arrows, no text or symbols present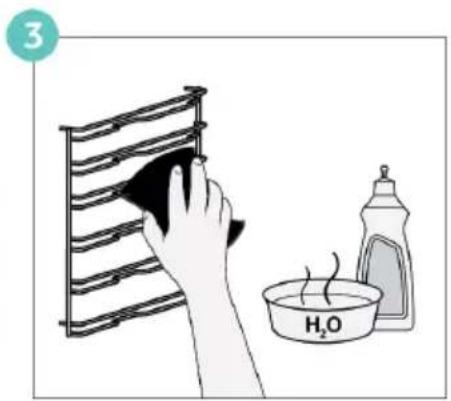
text_image
3 H₂O
natural_image
Diagram of two industrial furnace or oven structures with internal heat transfer arrows, no text or symbols present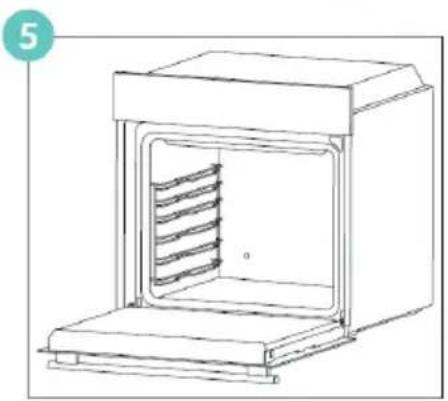
natural_image
Line drawing of a laboratory oven with internal rack structure (no text or symbols)6.4. ODRŽAVANJE
ZAMJENA DIJELOVA
text_image
Safety warning diagram showing a plug on a line with hazard symbol and OFF status indicators- korak

natural_image
Hand holding a paper with a circular arrow inside an oven (no text or symbols)- korak

natural_image
Hand holding a circular object inside a device, with an arrow indicating rotation (no text or symbols present)- korak

natural_image
Hand holding a circular object with a curved arrow inside, next to an open device (no text or symbols visible)- korak

natural_image
Hand holding a circular object with a curved arrow inside, next to an open appliance (no text or symbols visible)- korak
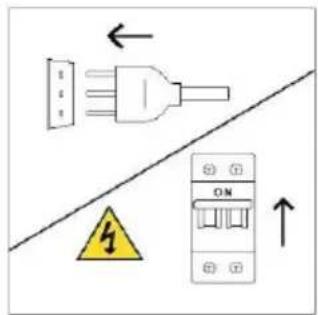
text_image
Safety warning diagram showing electrical hazard symbol and ON/OFF switch symbols on a diagonal linetext_image
Safety warning diagram showing a plug and fuse with a hazard symbol and an ON/OFF switch labeled 'OFF'- korak
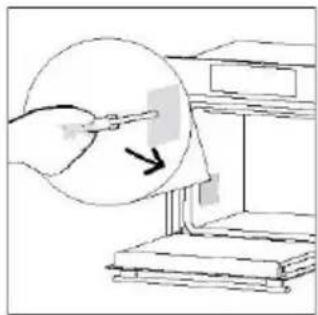
natural_image
Illustration of a hand holding a pen near a document with an arrow pointing to it, next to stacked books (no text or symbols)- korak

natural_image
Illustration of a hand inserting a small electronic component into a device (no text or symbols visible)- korak

natural_image
Illustration of a hand holding a small electrical component with an arrow indicating direction (no text or symbols present)- korak

natural_image
Diagram of a printer with an arrow pointing to its screen (no text or symbols present)- korak
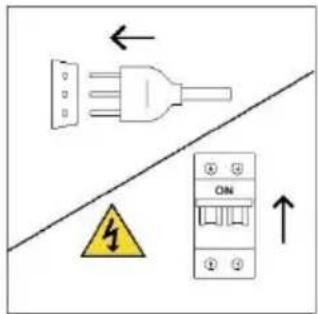
text_image
Electrical warning symbol and circuit diagram showing a plug, safety warning sign, and ON panel with arrowstext_image
Diagram showing a kitchen appliance with exhaust and cleaning process, including a warning triangle and hand cleaning the interior.8.1. ZBRINJAVANJE UREĐAJA

Ovaj uređaj označen je u skladu s Direktivom 2012/19/EZ o otpadnoj električnoj i elektroničkoj opremi (OEEO). Otpadna električna i elektronička oprema sadrži onečišćujući tvari (koje mogu imati negativan učinak na okoliš) i bazne elemente (koji se mogu ponovnu upotrijebiti). Važno je posebno obraditi otpadnu električnu i elektroničku opremu da bi se ispravno uklonili i odložili onečišćivači i vratili svi materijali.
Pojedinci mogu imati važnu ulogu u postizanju cilja da otpadna električna i elektronička oprema ne postane ekološki problem. Treba se pridržavati nekoliko osnovnih pravila:
natural_image
Isometric line drawing of a multi-level refrigerator with internal compartments and handrails (no text or symbols)
text_image
ILI Odbojnik Odbojnik
CANDY
70052517