
5CC284FD0 - Fridge BLAUPUNKT - Free user manual and instructions
Find the device manual for free 5CC284FD0 BLAUPUNKT in PDF.

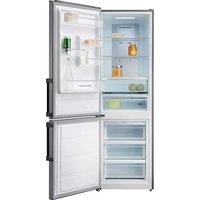
| Product type | Refrigerator with freezer compartment |
| Brand | Blaupunkt |
| Model | 5CC284FD0 |
| Category | Refrigerator |
| Cooling system | Total No Frost |
| Interior lighting | LED, energy efficiency class G |
| Control panel | Electronic with digital display and touch keys |
| Special functions | Fast Freeze, Fast Cool, Vacation mode |
| Open door alarm | Yes, with audible and visual signal |
| Temperature alarm | Yes, in case of power failure or abnormal temperature |
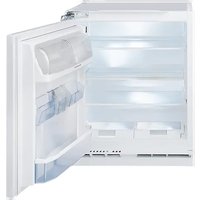
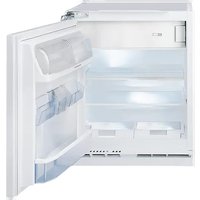
| Door reversibility | Possible, not covered by warranty if performed by user |
| Freezing capacity | Information on the rating plate (not specified in the manual) |
| Refrigerator temperature range | +2°C to +8°C, recommended +4°C |
| Freezer temperature range | -16°C to -24°C, recommended -18°C |
| Defrosting | Automatic (No Frost) in both compartments |
| Fan | Yes, for uniform air distribution, may include an antibacterial filter |
| Removable accessories | Drawers, bottle racks, shelves, ice cube tray |
| Cleaning and maintenance | Unplug before cleaning, use a soft cloth and a neutral cleaner, do not use abrasive products or steam cleaners |
| Energy consumption | Not specified in the manual |
Frequently Asked Questions - 5CC284FD0 BLAUPUNKT
User questions about 5CC284FD0 BLAUPUNKT
0 question about this device. Answer the ones you know or ask your own.
Ask a new question about this device
Download the instructions for your Fridge in PDF format for free! Find your manual 5CC284FD0 - BLAUPUNKT and take your electronic device back in hand. On this page are published all the documents necessary for the use of your device. 5CC284FD0 by BLAUPUNKT.
USER MANUAL 5CC284FD0 BLAUPUNKT
EN USER AND INSTALLATION MANUAL ....19
FR MANUEL D'UTILISATION ET D'INSTALLATION ....27
NL GEBRUIKERS- EN INSTALLATIEHANDLEIDING ....35
IT MANUALE D'USO E INSTALLAZIONE ....43
natural_image
Line drawings of various hand tools including crad and gloves, screwdriver, and tape measure (no text or labels)
natural_image
Diagram of a refrigerator interior showing airflow and wiring, no text or symbols present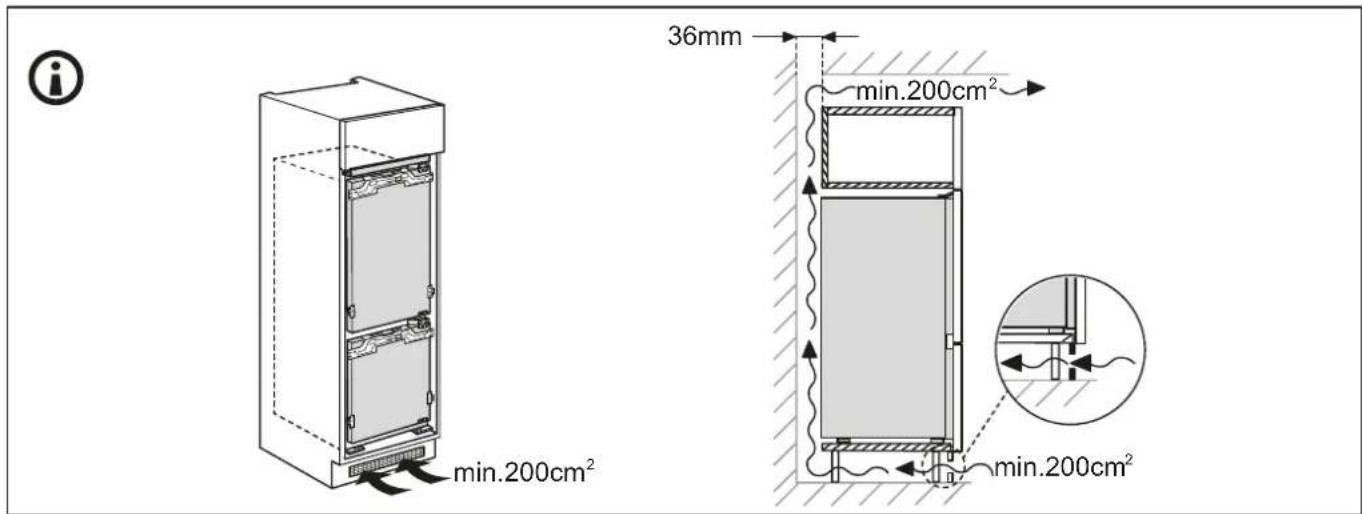
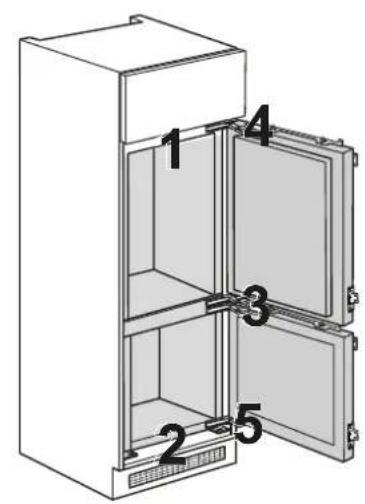
1
2
3
4
5
natural_image
Diagram of an open refrigerator with internal compartments and directional arrows indicating movement (no text or symbols)1
2
3
natural_image
Diagram of a device interior showing a cable inserted into a panel, with no visible text or symbols.4
5
6
7
8

natural_image
Diagram of a door frame with a black cable inserted, showing internal components and a lightning bolt symbol (no text or labels)9
10
11
12
13
14
15
natural_image
Diagram showing two refrigerator units with doors open, one rotated to the other (no text or symbols)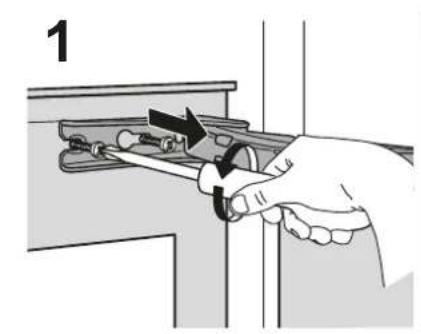
natural_image
Illustration of a hand using a tool to adjust or install a mechanical component, no text or symbols present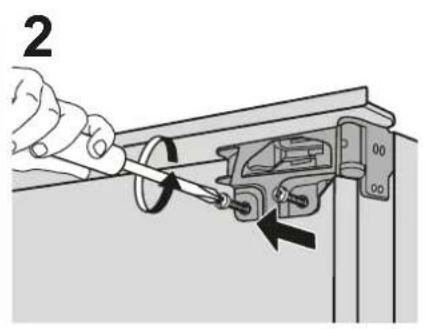
natural_image
Hand holding a door lock with a black arrow indicating the lock mechanism (no text or symbols present)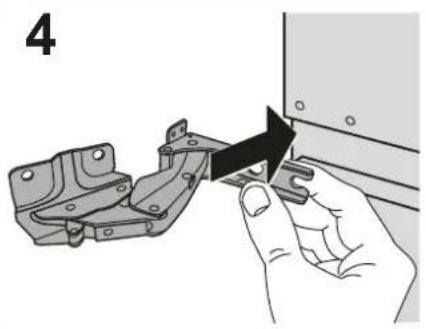
natural_image
Illustration of a hand holding a metal bracket with a black arrow indicating the process (no text or symbols present)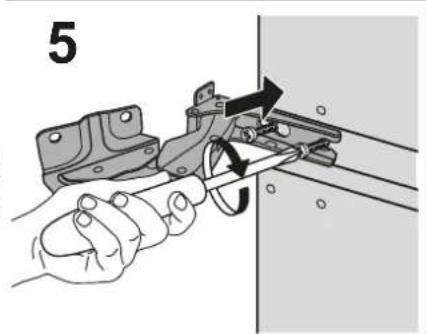
natural_image
Illustration of a hand using a tool to adjust or install a mechanical component, with no visible text or symbols.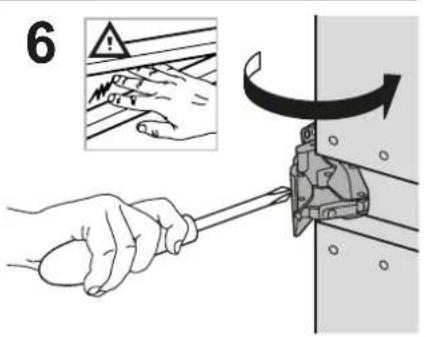

natural_image
Mechanical assembly diagram showing a hand holding a rotating component with arrows indicating motion (no text or symbols)INHALT
ÜBERSICHT....12
Allgemeine Informationen....12
Bedientafel....12
FUNKTIONSWEISE 14
natural_image
Diagram of two server racks with internal compartments and ventilation ducts (no text or symbols)Zeichenerklärung
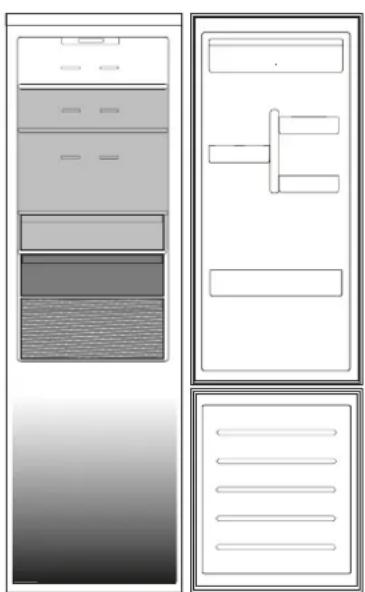
TEMPERATUR BEREICH
natural_image
Two document panels with horizontal lines, one showing a grid layout and the other a blank sheet (no text or symbols)Zeichenerklärung

SCHUBFÄCHER DES GEFRIERRAUMS

GEFRIERBEREICH-FACH
(Max Kühlbereich)
First time use....22
Refrigerator compartment and food storage 22
How to store fresh food and beverages....22
Freezer compartment food storage 23
Freezer compartment 23
Functional sounds....24
Recommendation in case of no use of the appliance....24
CLEANING AND MAINTENANCE....25
Refrigerator light 25
Shelves 25
Door....25
TROUBLESHOOTING 26
SUPPORT 26
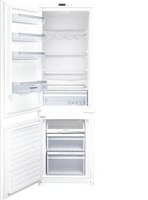
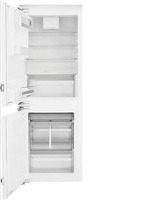
OVERVIEW
GENERAL INFORMATION
The drawers, baskets and shelves should be kept in their current position unless otherwise specified in this quick guide. The light system inside the refrigerator compartment uses LEDs light, allowing a better lighting than traditional light bulbs as well as a very low energy consumption.
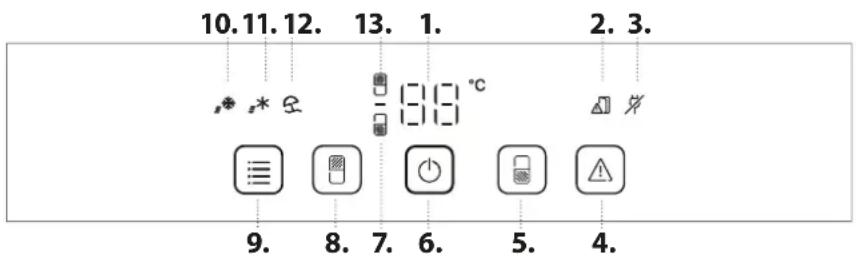
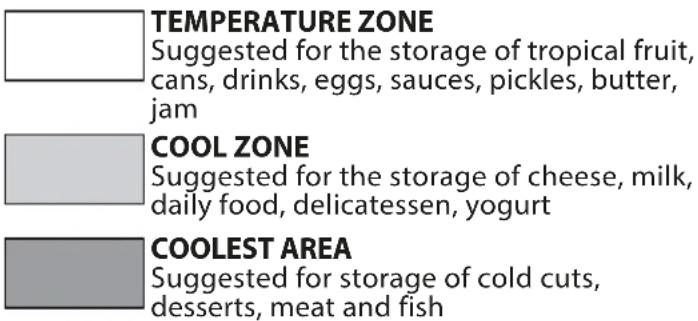
CONTROL PANEL
Doors and lids of the refrigeration appliance should be removed before disposal in the landfill, to avoid children or animals getting trapped inside.
- Temperature Display
- Door open indicator
- Black out alarm indicator
- Turning off the sound alarm
- Freezer Temperature
- On/Stand-by
- Freezer indicator
- Refrigerator temperature
- Function Menu
- Fast freeze indicator
- Fast cool indicator
- Vacation mode indicator
- Refrigerator indicator
ON/STANDBY
To put the product in Stand-by, press and hold the On/ Stand By 📄 button for 3 seconds. All the indicators turn off except On/Standby indicator. In Stand-by mode the light in the refrigerator compartment does not turn on Press again to reactivate the appliance.
FAN
The Fan improves temperature distribution inside the refrigerator compartment, allowing better preservation of stored food. The fan will start/stop working depending on the temperature and/or humidity level inside the fridge. If the appliance has the Fan it can be equipped with the antibacterial filter.
TEMPERATURE DISPLAY
The display may alternately show the refrigerator compartment temperature (between 2^ C and 8^ C) or the temperature of the freezer compartment (between -16^ C and -24^ C).
To avoid an increase of food waste, refer to recommended setting and Storage Time in OPERATION chapter
FRIDGE COMPARTMENT TEMPERATURE
To adjust the Fridge Temperature, press the Fridge button. The Fridge Temperature can be adjusted between +2°C and +8°C, as shown by the Fridge Temperature display. Recommended setting for the refrigerator compartment is +4°C.

TURNING OFF THE SOUND ALARM
To turn off the sound alarm, briefly press the button.

FREEZER COMPARTMENT TEMPERATURE
To adjust the Freezer Temperature, press the Freezer button. The Freezer Temperature can be adjusted between -16°C and -24°C, as shown by the Freezer Temperature display. Recommended setting for the freezer compartment is -18°C.

FUNCTION MENU
Press ☐ FUNCTION MENU button repeatedly to select and activate one or more of the functions available: "Fast Freeze" ☐, "Fast cool" ☐, "Vacation mode" ☐. To disable one or more functions: press ☐ FUNCTION MENU repeatedly until no option is highlighted.

FAST FREEZE
The use of this function is recommended when placing a very high quantity of food to be frozen in the freezer compartment.
24 hours before freezing fresh food, press the Fast Freeze button to activate the Fast Freeze function. When activated, the Fast Freeze indicator turns on. After 24 hours place the food to be frozen in the bottom freezing zone of freezer compartment. The function is automatically disabled after 50 hours, or can be manually disabled by pressing Fast Freeze button again.

FAST COOL
Using Fast Cool function it is possible to increase the cooling capacity in the refrigerator compartment. The use of this function is recommended when placing a very high quantity of food in the refrigerator compartment. Press the Fast Cool button to activate Fast Cool function. When activated, the Fast Cool indicator turns on. The function is automatically disabled after 6 hours, or can be manually disabled by pressing Fast Cool button again.

VACATION
You can use this function in the event of a prolonged absence from home. Press the Vacation button for 3 sec to engage Vacation Mode.
The display will show the temperature of the refrigerator compartment (+12°C) and the Vacation mode icon will light up.
After activating this function, remove the food from the refrigerator compartment and keep both doors closed - the refrigerator will maintain a suitable temperature to prevent odours from forming.
The freezer, however, remains at the temperature originally set. A deep clean (of both refrigeration and freezer compartment) is recommended before activating this function in order to prevent the spread of bacteria. Press again the same button for 3 sec to deactivate Vacation.
Changing the setpoint will automatically deactivate the function.
NOTE: Fast Freeze and Fast Cool deselect after approximately 10 hours.
Vacation mode also deselects if the user modifies the Fridge Temperature button.
OPERATION
FIRST TIME USE
Wait at least two hours, after the installation, before connecting the appliance to the power supply. Connect the appliance to the power supply it starts the operation automatically. The ideal storage temperatures for the food are preset in the factory.
After turning the appliance on, you must wait for 4-6 hours for the correct storage temperature to be reached for a normally filled appliance. If the audible signal sounds, it means that the temperature alarm has intervened: press the button to switch off the acoustic alarms.
REFRIGERATOR COMPARTMENT AND FOOD STORAGE
The refrigerator compartment allows for the storage of fresh food and drink. The refrigerator compartment defrosts completely automatically. The occasional presence of drops of water on the internal back wall of the compartment is a sign of the automatic defrosting phase. The defrosting water is channelled into a drain and then collected in a container, where it evaporates.
Note: the ambient temperature, how often the doors are opened and the position of the appliance may affect the internal temperatures in the two compartments. Set the temperatures depending on these factors. In very humid conditions, condensation may form in the refrigerator compartment, especially on the glass shelves. In this case, it is recommended that you close containers with liquids in (e.g. a pot of stock), wrap up food with a high water content (e.g. vegetables) and turn on the fan, if there is one. All of the drawers, door shelves and shelves can be removed.
MULTIFLOW AIR DISTRIBUTION
The multiflow helps to distribute evenly the cold air in the cavity for a better food preservation. Foods can be placed on any shelf of the appliance. Please pay attention to not obstruct the air distribution vents thus ensuring its free movement.
LIGHT SYSTEM
This product contains a top light source of energy efficiency class G
HOW TO STORE FRESH FOOD AND BEVERAGES
Foods which give off a large amount ethylene gas (apples, apricots, pears, peaches, avocado, figs, prunes, blueberries, mellons, beans) and those that are sensitive to this gas, such as fruit vegetables and salad, should always be separated or wrapped so as not to reduce the storage life; for example do not store tomatoes together with kiwi fruits or cabbage. Do not store food too close together to enable sufficient air circulation. Use recyclable plastic, metal, aluminum and glass containers and cling film to wrap foods. If you have a little quantity of food to store in the refrigerator, we recommend to use the shelves above the crisper for fruits and vegetables since this is the coolest area of the compartment. Always use closed containers for liquids and for food that may give off or be tainted by odor or flavor transfer or cover them. To avoid bottles falling over, you can use the bottle holder (available on selected models).
natural_image
Diagram of server rack and door compartments with no visible text or symbolsLegend

The load limits are determined by the particular construction (baskets, containers, flaps, drawers, shelves, etc.), or the load limits are determined by natural load limits.
FREEZER COMPARTMENT FOOD STORAGE
The freezer compartment - 100 allows long time storage of frozen food and freezing of fresh food. The quantity of fresh food that can be frozen in 24 hours is written on the rating plate. Arrange the fresh food in the freezing area inside the freezer compartment, leaving enough space around the food packages to allow air to circulate freely. It is advisable that you do not re-freeze food that has partially defrosted. It is important to wrap the food in a way that prevents the ingress of water, humidity or condensation.
natural_image
Two document panels: one with a clipboard and one with a blank sheet, both without any text or symbols.Legend

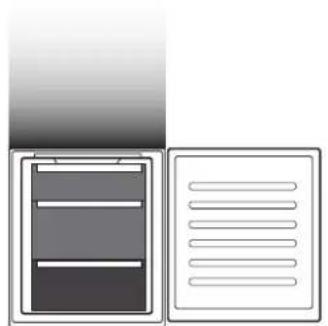
FREEZER DRAWERS

FREEZING ZONE DRAWER
(Max cool zone)
Suggested to freeze fresh/cooked food
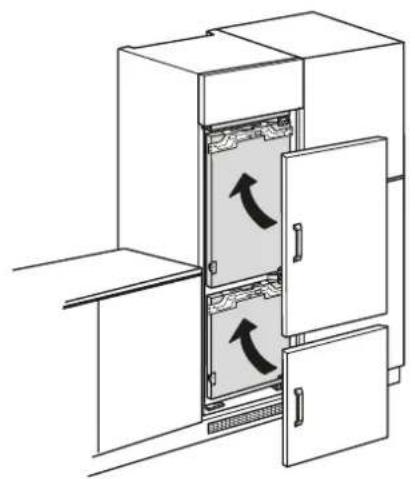
REMOVING THE DRAWERS
Pull the drawers outwards as far as they will go, lift them up and remove them. To get more volume, the freezer compartment can be used without the drawers. Make sure that the door is closed properly after putting the food back on the grilles/shelves.
FREEZER COMPARTMENT
Ice cubes
Fill 2/3 of the ice tray with water and put it back in the freezer compartment. Do not use sharp or pointed objects to remove the ice under any circumstances.
The quantity of fresh food that can be frozen in a specific time period is indicated on the rating plate.
Load limits are determined by baskets, flaps, drawers, shelves etc. Make sure that these components can still close easily after loading.
Easy Take Freezer Tray
Easy access zone in the freezer: easy to find and grab your favorite items.
Total No Frost system
The Total No Frost system effectively prevents ice formation, avoiding the hassle of manual defrosting both in freezer and fridge cavity.
Its ventilation system provides perfect circulation of cold air in both cavities thus avoiding ice builds up.
FUNCTIONAL SOUNDS
- A buzz generated by the compressor is normal while the product is working.
- Gurgling and crackles are generated by the passage of the refrigerant gas inside the cooling circuit, therefore these are normal noises.
- It's possible to "hear" creaks when the compressor is active and inactive: it is a normal sound of the product's structure.
- Check that the balconies on the inside of the refrigerator door, the shelves and the drawers in the refrigerator compartment are attached and positioned properly, to avoid possible vibrations.
- Don't place glass containers (bottles, jars, etc.) in direct contact with each other, to avoid vibrations.
- This device is equipped with a compressor that operates at an optimum speed to minimize energy consumption. So it may happen that in certain situations (in summer or if large quantities of food are introduced) that the compressor increases the speed and therefore it is more noisy than usual.
RECOMMENDATION IN CASE OF NO USE OF THE APPLIANCE
In the event of non-use of the applicance
Disconnect the appliance from the power supply, empty it, defrost it (if necessary) and clean it. Keep the doors slightly ajar to let air circulate inside the compartments. By doing this, you avoid the development of mould and bad odours.
In the event of an interruption to the power supply
Keep the doors closed so the food stays cold for as long as possible. Do not re-freeze food that has partially defrosted. If there is a prolonged power cut, the black out alarm may also activate (in products with electronics).
CLEANING AND MAINTENANCE
Before any cleaning or maintenance operation, unplug the appliance from the mains or disconnect the electrical power supply.
Never use abrasives. Never clean refrigerator parts with flammable fluids.
Do not use steam cleaners.
The buttons and control panel display must not be cleaned with alcohol or alcohol-derived substances, but with a dry cloth.
Clean the appliance occasionally with a cloth and a solution of warm water and neutral cleaning agents specifically for cleaning the inside of the refrigerator.
REFRIGERATOR LIGHT
The light system inside the refrigerator compartment uses LEDs light, allowing a better lighting than traditional light bulbs as well as a very low energy consumption. Contact the Technical Assistance Service if you need a replacement.
Important: The refrigerator compartment light switches on when the refrigerator door is opened.
SHELVES
All of the drawers, door shelves and shelves can be removed.
DOOR
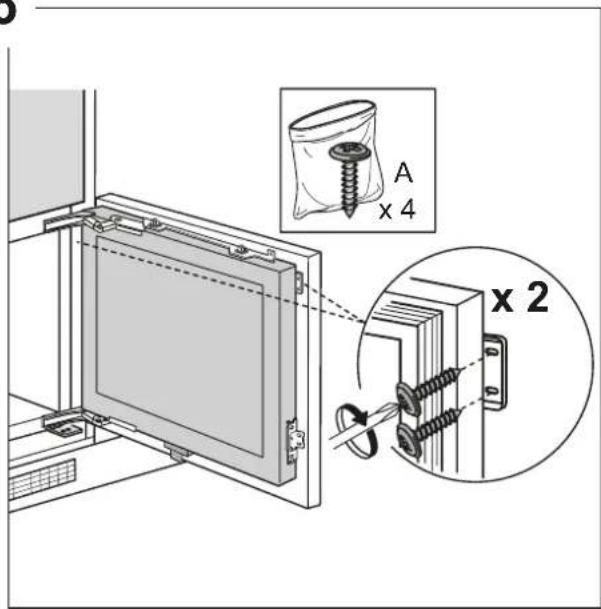
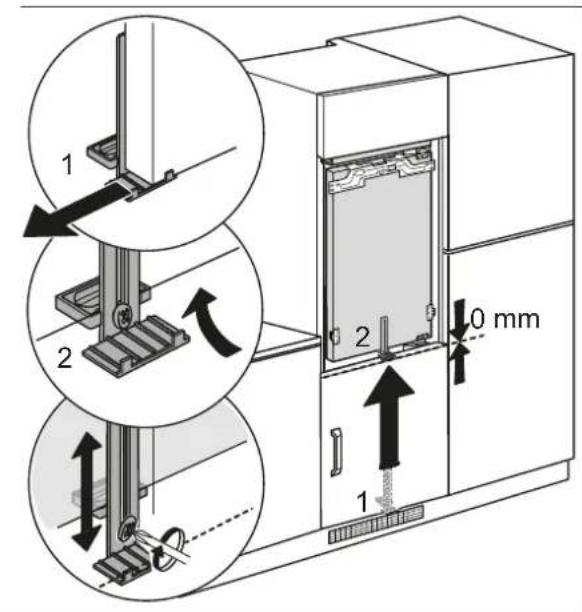
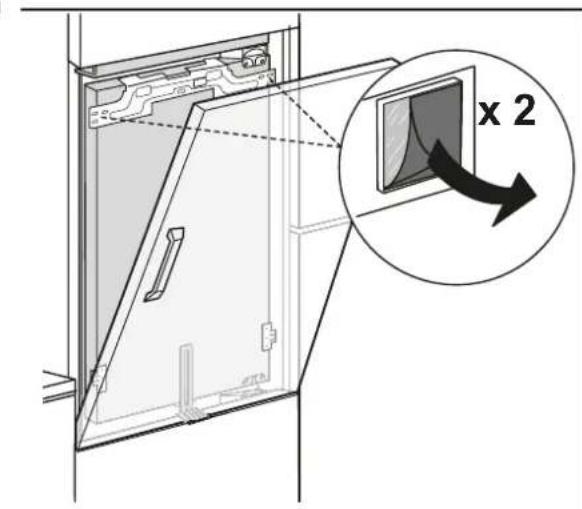
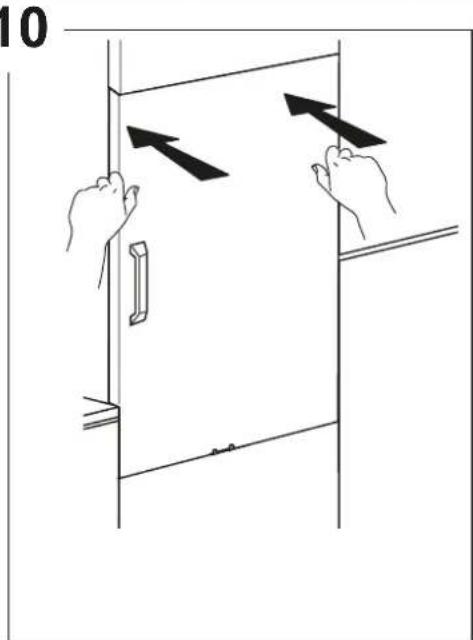
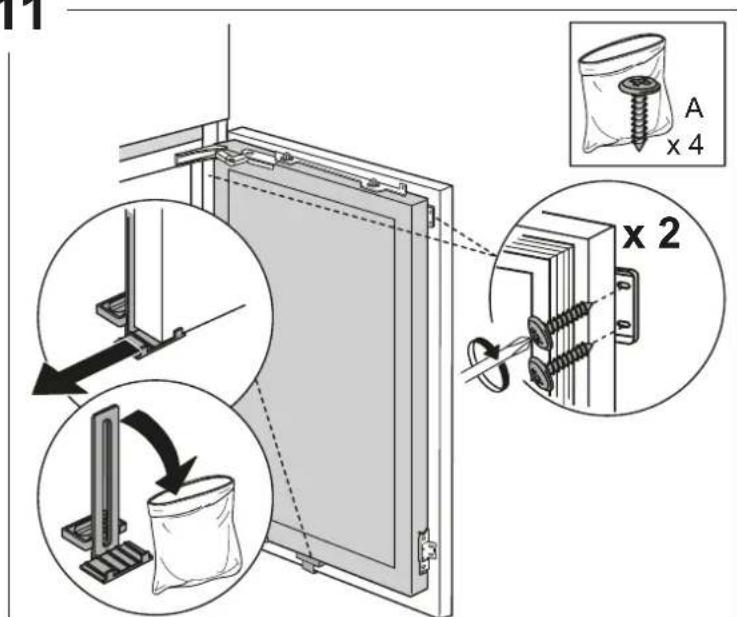
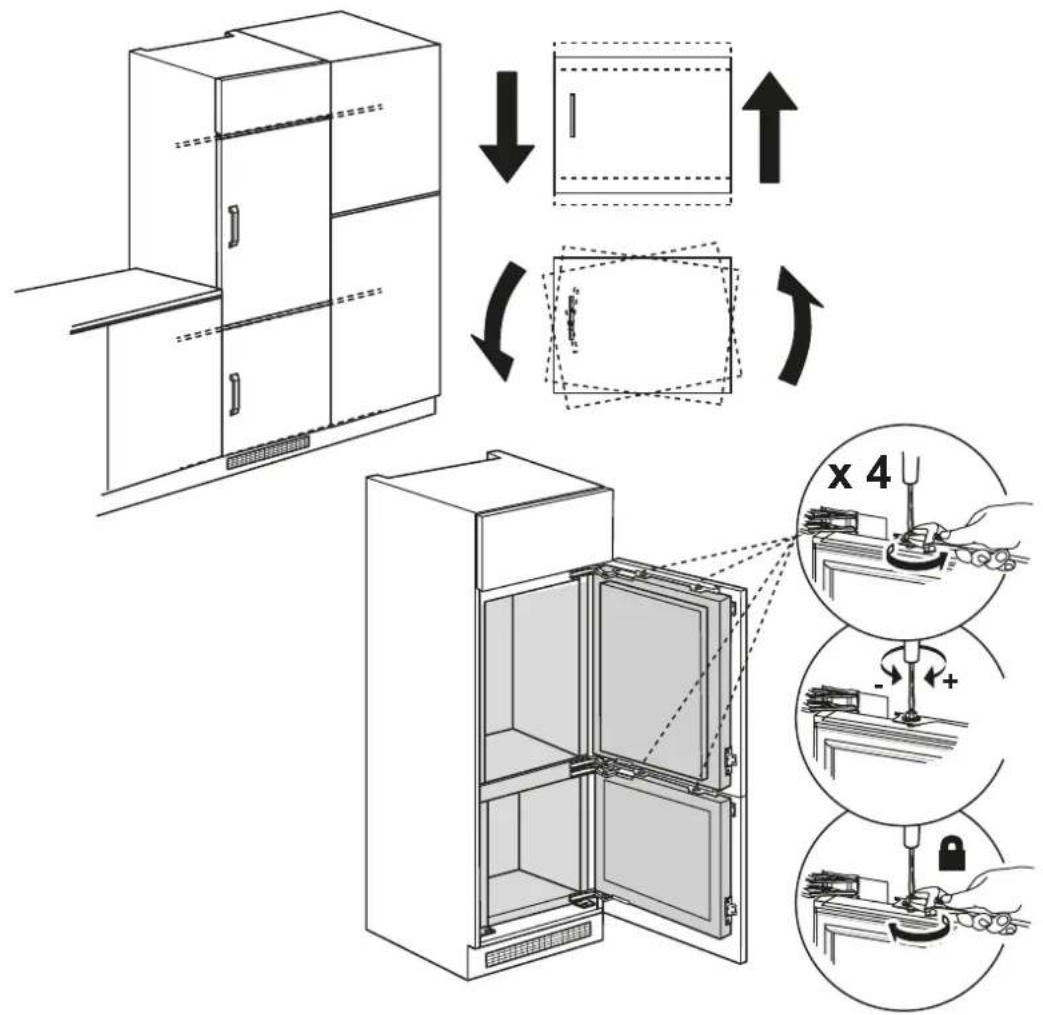
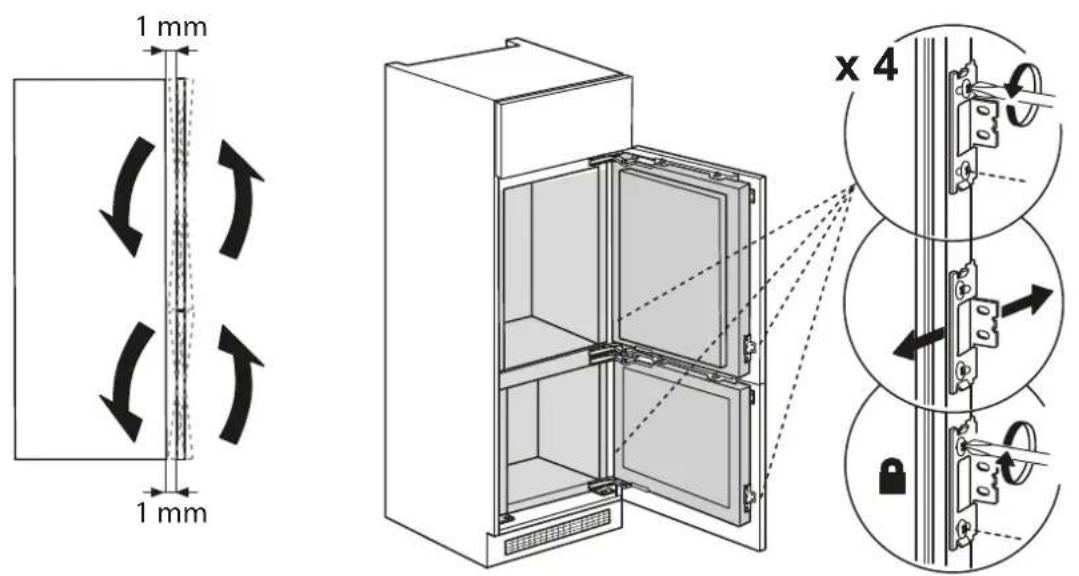
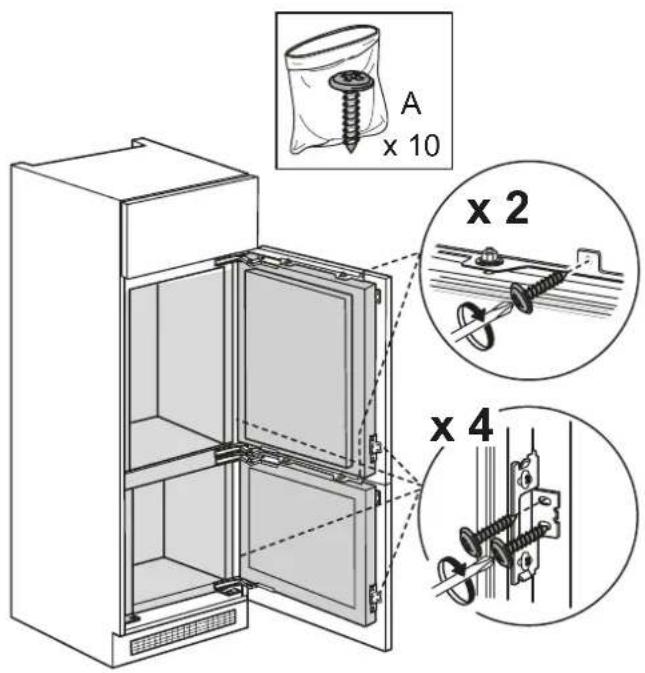
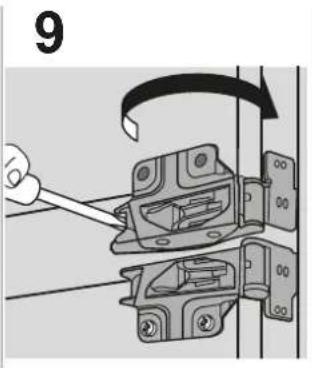
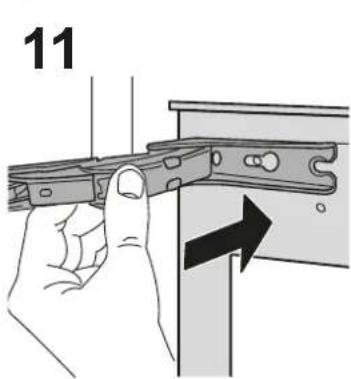
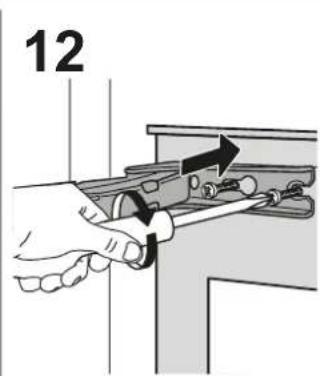
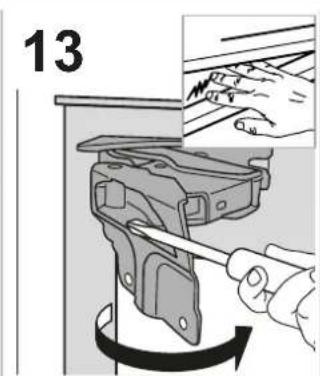
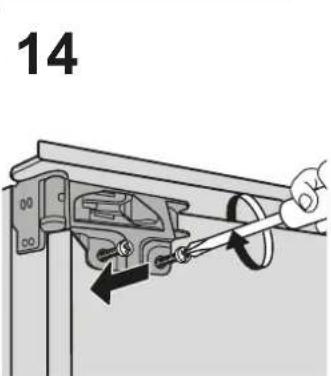
DOOR REVERSIBILITY
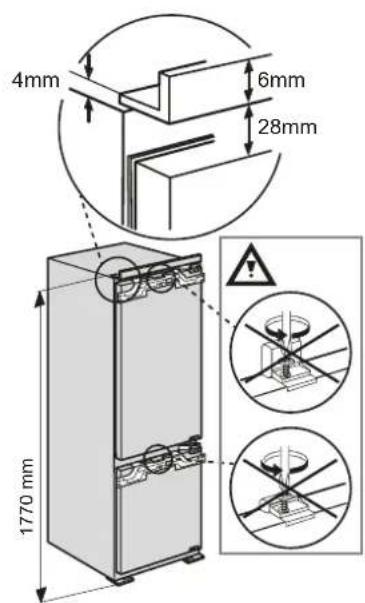
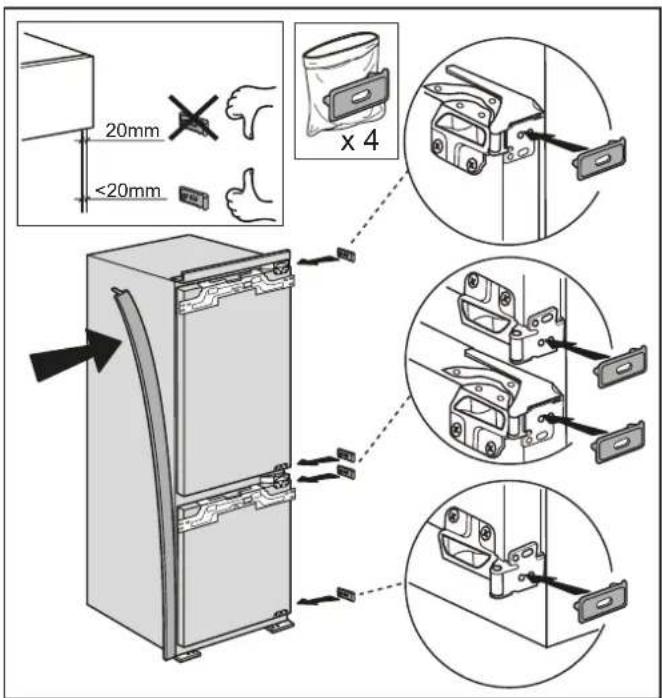
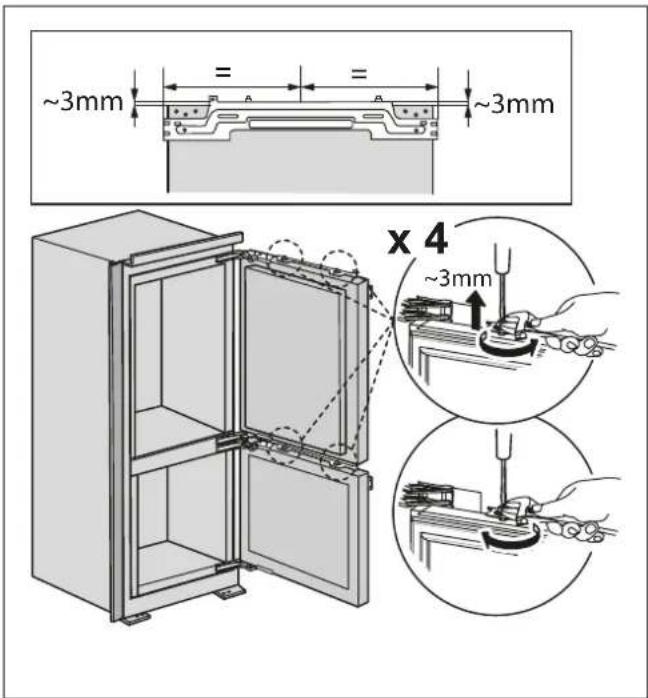
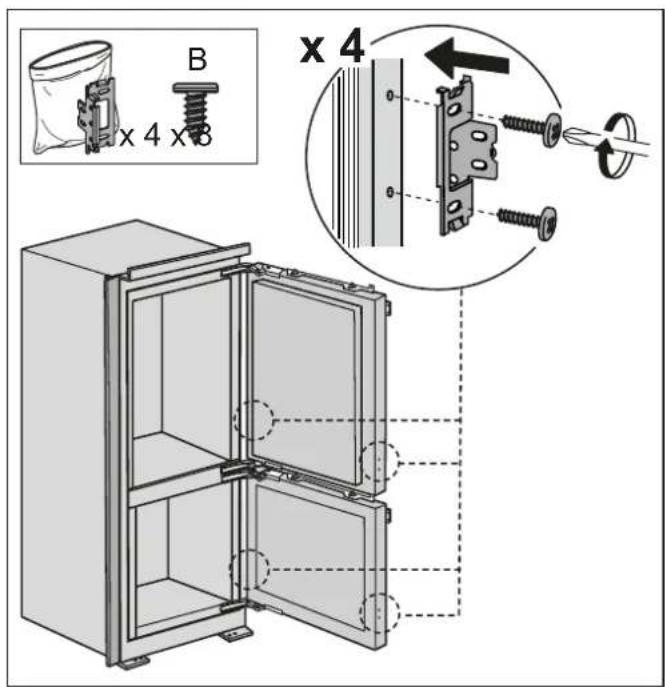
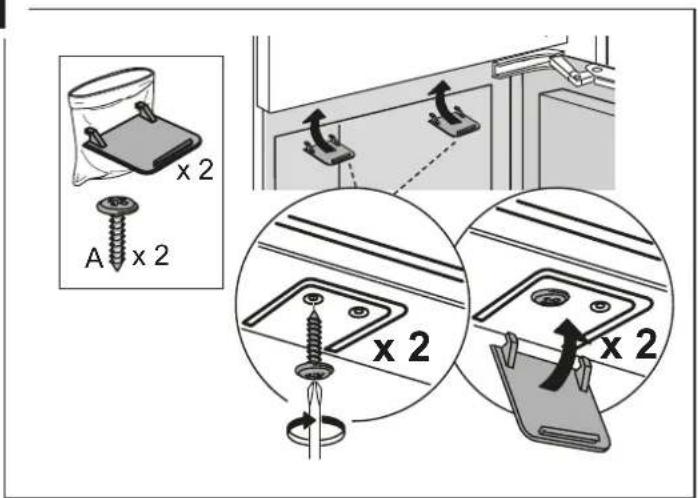
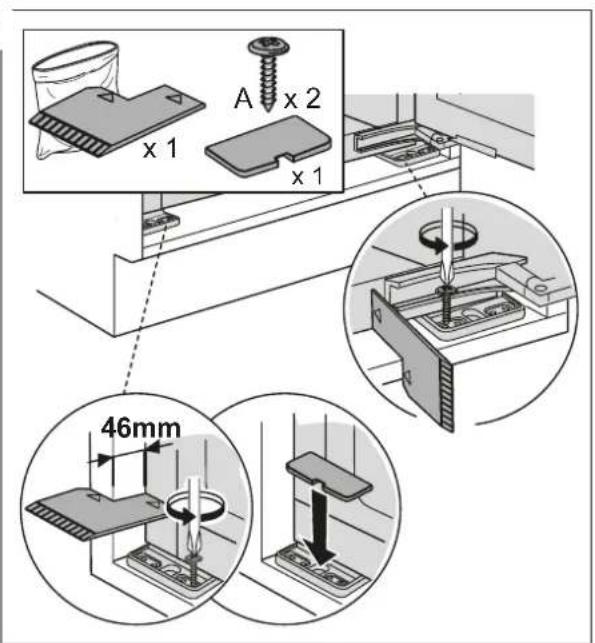
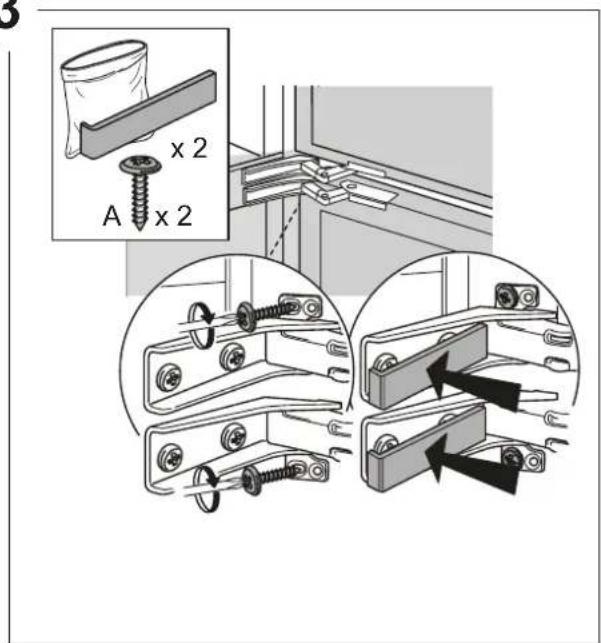
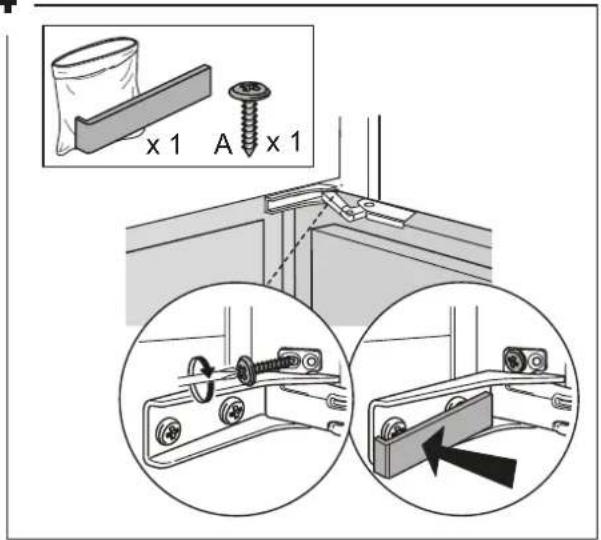
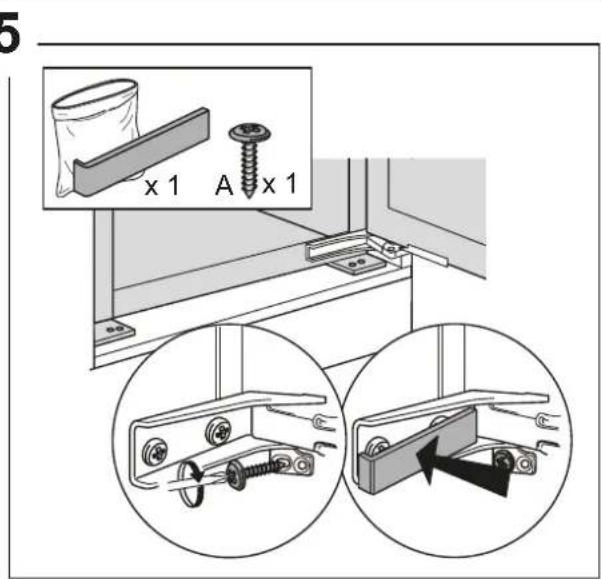
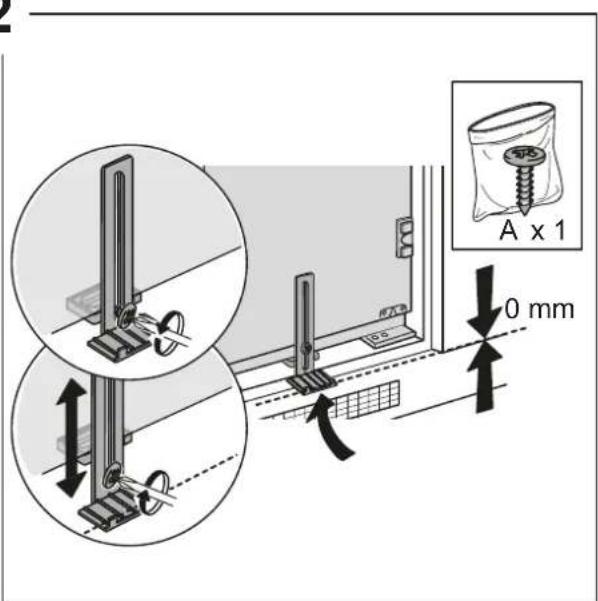
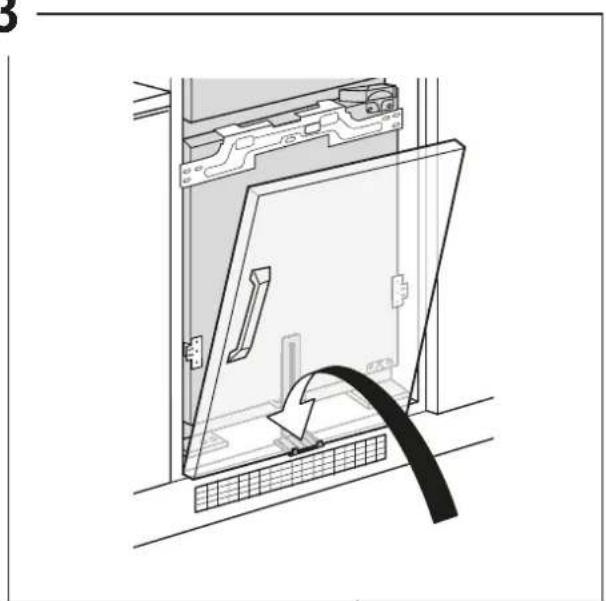
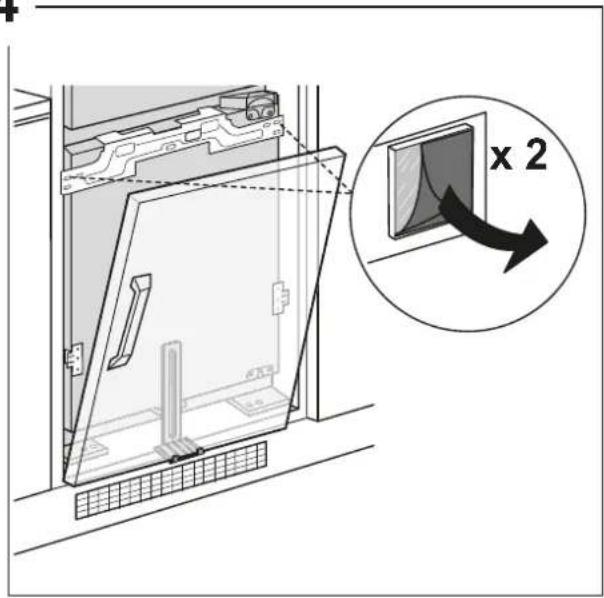
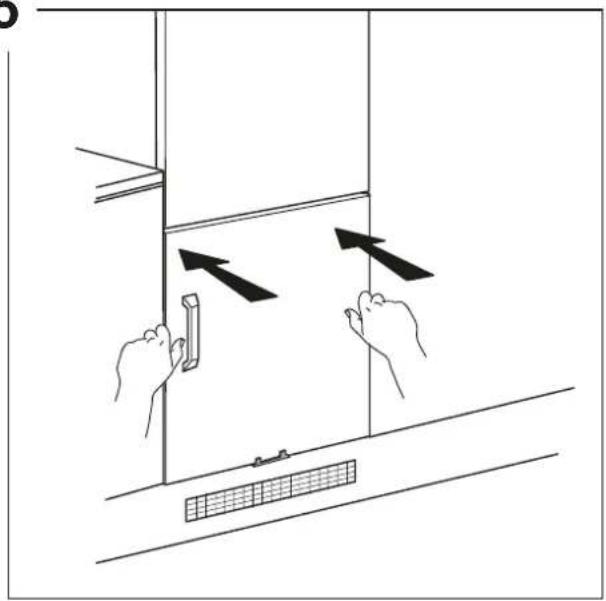
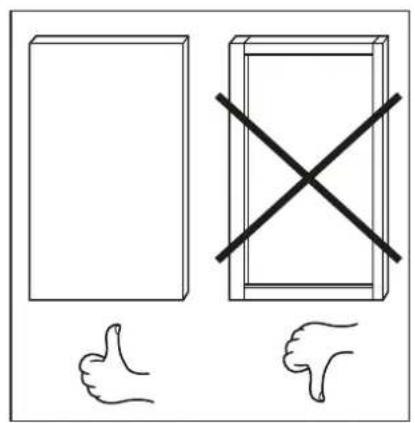
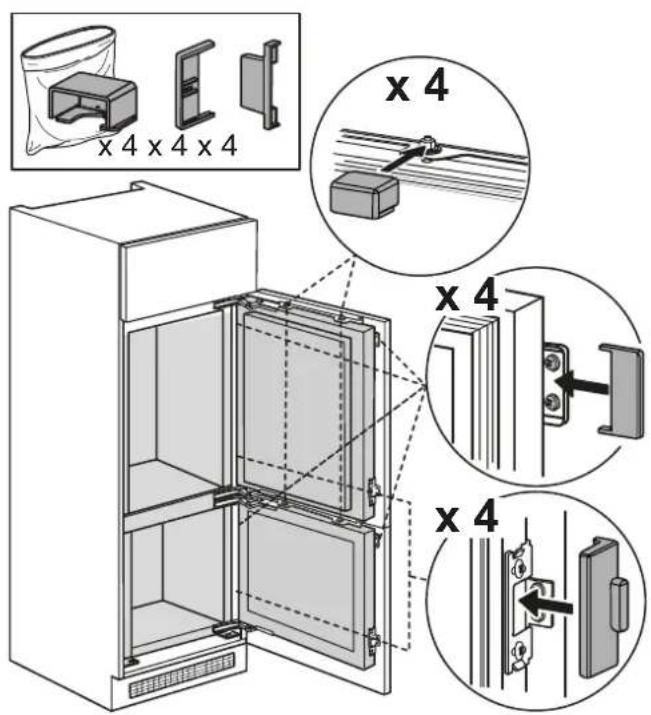
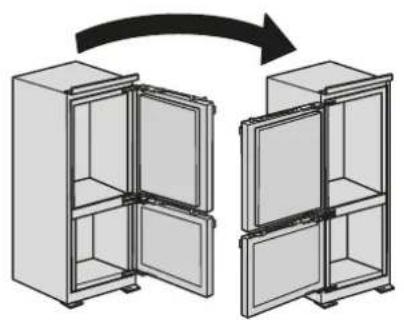
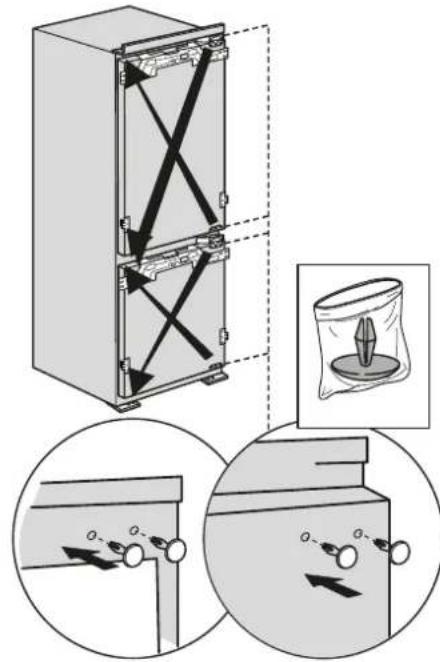
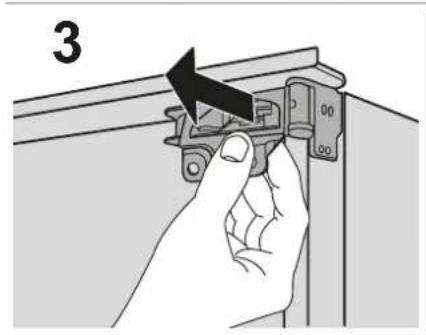
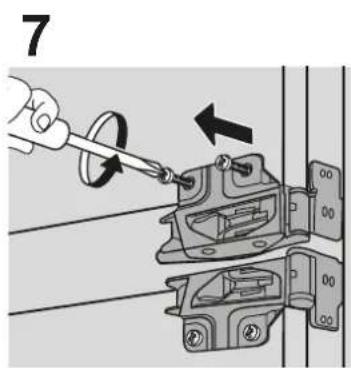
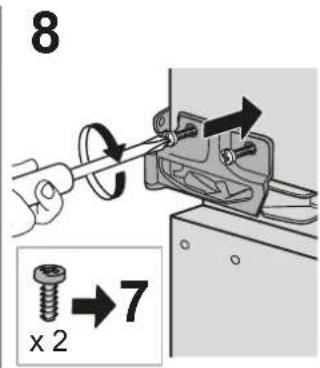
Note: The direction of door opening can be changed. If this operation is not performed by After-sales Service it is not covered by the warranty. Follow instruction in Installation chapter.
TROUBLESHOOTING
What to do if... Possible reasons Solutions
| The control panel is switched off, the appliance does not work. | The appliance may be in On / Stand-by mode.There may be an appliance power supply problem. | Turn the appliance on pressing the On/Stand-by button. Check that:there is not a power outage;the plug is properly inserted in the power socket and the mains double-pole switch (if present) is in the correct position (i.e. allows the appliance to be powered);the household electrical system protection devices are efficient;the power cable is not damaged. |
| The inside light does not work. | The light may need to be replace. Models with LED lights: contact the authorised Technical Assistance Service. | |
| The appliance may be in On / Stand-by mode. | Turn the appliance on by briefly pressing the button (see On/Stand-by function). | |
| The temperature inside the compartments is not low enough. | There could be various causes (see "Solutions"). | Check that:the doors close properly;the appliance is not installed near a heat source;the set temperature is adequate;the circulation of air through the ventilation grilles on the base of the appliance is not obstructed. |
| There is water on the bottom of the refrigerator compartment. | The defrost water drain is blocked. | Clean the defrosting water drain (see section "Cleaning and Maintenance"). |
| The front edge of the appliance, at the door striker seal, is hot. | This is not a defect. It prevents condensation from forming. | No solution is necessary. |
| Door open alarm indicator and Alarm indicators blink, the acoustical alarm is activated. | Door open alarm The Fridge door remained open for more than 2 minutes | Close the door or press the Stop Alarm to mute the acoustical alarm. |
| The freezer temperature display blinks, the acoustical alarm is activated and the Alarm Indicator blinks | Blackout alarmInside the Freezer the temperature is not adequate | Press the Stop Alarm button to stop the acoustical alarm; the freezer temperature display continues blinking and the Alarm Indicator remains on until the adequate temperature in the freezer is restored. |
| The red icon is lit up (without flashing), a sound signal is activated and the freezer temperature display is flashing. | Freezer compartment temperature alarmThe freezer compartment temperature alarm indicates that the compartment is not at the optimum temperature. This may occur: when using for the first time, after defrosting and/or cleaning, when freezing large quantities of food or when the door to the freezer does not close completely. | To turn off the sound signal, briefly press the "Turn off sound alarm" button (the temperature display will stop flashing). When the optimum temperature conditions have been reached, the red icon will automatically turn off. If the freezer compartment temperature alarm continues, contact the Authorised Technical Assistance Service. |
SUPPORT
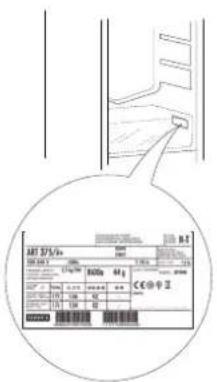
When contacting our Service Centre, please state the codes provided on your product's identification plate.
SOMMAIRE
APERÇU....
natural_image
Diagram of two server racks with internal compartments and ventilation ducts (no text or symbols)Légende

TEMPÉRATURE ZONE
natural_image
Two document sheets: one with a vertical tab and horizontal lines, the other with a blank sheet (no text or symbols)Légende

BACS DU CONGÉLATEUR

natural_image
Illustration of three industrial or commercial objects: a bag with smoke, a dome-shaped structure, and a cabinet with a bag (no text or symbols)PROBLEEMOPLOSSING....42
ONDERSTEUNING 42
GEBRUIKERSHANDLEIDING
OVERZICHT
ALGEMENE INFORMATIE
FAST COOL (SNEL KOELEN)
natural_image
Diagram of two server racks with internal compartments and ventilation grilles (no text or labels)Legenda
natural_image
Two document panels with horizontal lines, one showing a grid layout and the other a blank sheet (no text or symbols)Legenda

LADEN VRIESVAK

natural_image
Diagram of two server racks with internal compartments and ventilation grilles (no text or symbols)Legenda

ZONA TEMPERATA
natural_image
Two document layout diagrams: one with a vertical bar and horizontal lines, the other with a blank sheet (no text or symbols)Legenda

CASSETTI CONGELATORE

CASSETTO ZONA CONGELAMENTO
natural_image
Diagram showing two vertical panels: one with layered rectangular blocks and one with a door-like structure (no text or symbols)Leyenda
ZONA DE TEMPERATURA
natural_image
Two document icons: a gray clipboard with three horizontal lines and a white sheet with horizontal lines, both without any text or symbols.natural_image
Diagram showing two vertical panels with layered rectangular elements and a central door-like structure, no text or symbols present.Forklaring
TEMPERATURZONE
natural_image
Two document panels, one with a blank cover and one with horizontal lines (no text or symbols)Forklaring

FRYSERSKUFFER

FRYSEOMRÅDETS SKUFFE
(Max køleområde)
Total No Frost system
DRIFTSRELATEREDE LYDE
INNEHÅLLSFÖRTECKNING
ÖVERSIKT 68
Allmän information....68
Kontrollpanel....68
FUNKTION....70
natural_image
Diagram showing two vertical panels with internal compartments and a central door, no text or symbols present.Förklaring

TEMPERATURZON
natural_image
Two document panels with horizontal lines, one open and one filled with a grid (no text or symbols)RENGÖRING OCH UNDERHÅLL
- INHALT
- ÜBERSICHT....12
- FUNKTIONSWEISE 14
- Zeichenerklärung
- TEMPERATUR BEREICH
- SCHUBFÄCHER DES GEFRIERRAUMS
- GEFRIERBEREICH-FACH
- CLEANING AND MAINTENANCE....25
- TROUBLESHOOTING 26
- SUPPORT 26
- OVERVIEW
- GENERAL INFORMATION
- ON/STANDBY
- FAN
- TEMPERATURE DISPLAY
- FRIDGE COMPARTMENT TEMPERATURE
- TURNING OFF THE SOUND ALARM
- FREEZER COMPARTMENT TEMPERATURE
- FUNCTION MENU
- FAST FREEZE
- FAST COOL
- VACATION
- OPERATION
- FIRST TIME USE
- REFRIGERATOR COMPARTMENT AND FOOD STORAGE
- MULTIFLOW AIR DISTRIBUTION
- HOW TO STORE FRESH FOOD AND BEVERAGES
- FREEZER COMPARTMENT FOOD STORAGE
- REMOVING THE DRAWERS
- FREEZER COMPARTMENT
- Ice cubes
- Easy Take Freezer Tray
- Total No Frost system
- FUNCTIONAL SOUNDS
- RECOMMENDATION IN CASE OF NO USE OF THE APPLIANCE
- In the event of non-use of the applicance
- In the event of an interruption to the power supply
- CLEANING AND MAINTENANCE
- REFRIGERATOR LIGHT
- SHELVES
- DOOR
- DOOR REVERSIBILITY
- TROUBLESHOOTING
- SUPPORT
- SOMMAIRE
- Légende
- TEMPÉRATURE ZONE
- BACS DU CONGÉLATEUR
- PROBLEEMOPLOSSING....42
- ONDERSTEUNING 42
- GEBRUIKERSHANDLEIDING
- OVERZICHT
- ALGEMENE INFORMATIE
- FAST COOL (SNEL KOELEN)
- Legenda
- ZONA TEMPERATA
- CASSETTI CONGELATORE
- CASSETTO ZONA CONGELAMENTO
- Leyenda
- ZONA DE TEMPERATURA
- Forklaring
- TEMPERATURZONE
- DRIFTSRELATEREDE LYDE
- INNEHÅLLSFÖRTECKNING
- ÖVERSIKT 68
- FUNKTION....70
- Förklaring
- TEMPERATURZON
- RENGÖRING OCH UNDERHÅLL
Brand : BLAUPUNKT
Model : 5CC284FD0
Category : Fridge