
KDD 114 A2 NF - Fridge Koenic - Free user manual and instructions
Find the device manual for free KDD 114 A2 NF Koenic in PDF.

| Product type | Combined refrigerator-freezer with water and ice dispenser |
| Brand | Koenic |
| Model | KDD 114 A2 NF |
| Total net capacity | 490 L |
| Refrigerator capacity | 334 L |
| Freezer capacity | 156 L (4-star compartment 138 L, 2-star compartment 18 L) |
| Energy class | A++ |
| Annual consumption | 322 kWh/year |
| Voltage / Frequency | 220-240 V~ / 50 Hz |
| Rated current | 2.5 A |
| Dimensions (H × W × D) | 1788 × 895 × 745 mm |
| Open door depth | 1142 mm |
| Climate class | N to T (16 °C to 43 °C) |
| Noise level | 43 dB(A) |
| Freezing capacity | 14 kg/24h |
| Storage time during failure | 7 h |
| Defrost | Automatic (No Frost) in all compartments |
| Water and ice dispenser | Integrated, with selection for cold water, ice cubes, crushed ice |
| Display and controls | Electronic control panel with digital display, lock |
| Special functions | Vacation Mode, Fast Freeze, Fast Cool |
| Included accessories | Storage for 6 eggs, ice cube tray, water filter with installation kit, adjustment key |
| Number of shelves (refrigerator) | 4 glass shelves |
| Number of shelves (freezer) | 3 glass shelves |
| Number of door bins (refrigerator) | 5 |
| Number of door bins (freezer) | 3 |
| Number of drawers (freezer) | 2 |
| Vegetable bins | 2 |
| Interior lighting | LED (refrigerator and freezer) |
Frequently Asked Questions - KDD 114 A2 NF Koenic
User questions about KDD 114 A2 NF Koenic
0 question about this device. Answer the ones you know or ask your own.
Ask a new question about this device
Download the instructions for your Fridge in PDF format for free! Find your manual KDD 114 A2 NF - Koenic and take your electronic device back in hand. On this page are published all the documents necessary for the use of your device. KDD 114 A2 NF by Koenic.
USER MANUAL KDD 114 A2 NF Koenic
-
40% [1] = 1
-
2016-12-23
17.30.11 12
(4) 125.1
a)
b)
r
Johne GmbH
^1 ^2 ^3 ^4
150-61-polar
(2)
公司负责人:徐勇、周
(3) 2018年1月1日
HJ00142789115.01

Sicherheitshinweise
- This product can be used by children aged from 8 years and above and persons with reduced physical, sensory or mental capabilities or lack of experience and knowledge if they have are being supervised or have received instructions concerning use of the appliance in a safe way and understand the hazards involved.
- Children aged from 3 to 8 years are allowed to load and unload refrigerating appliances.
• Children shall not play with the product. - Cleaning and user maintenance shall not be carried out by children unless they are supervised.
- A damaged power cord may only be replaced by an authorised service agent in order to avoid hazards.
- The product is designed for the preparation of normal household quantities in the home, or in household-like, non-commercial environments. Household-like environments include staff kitchens in shops, offices, agricultural and other small businesses or for use by guests at bed-and-breakfast establishments, small hotels and similar residential facilities.
- Warning: Keep ventilation openings, in the appliance enclosure or in the built-in structure, clear of obstruction.
Safety Instructions
- Warning: Do not use mechanical devices or other means to accelerate the defrosting process, other than those recommended by the manufacturer.
- Warning: Do not damage the refrigerant circuit.
- Warning: Do not use electrical appliances inside the food storage compartments of the product, unless they are of the type recommended by the manufacturer.
- Do not store explosive substances such as aerosol cans with a flammable propellant in this product.
- The lamp is not replaceable.
- Follow the instructions in the chapter Cleaning and care.
- Warning: The refrigerant and insulation blowing gas are flammable. When disposing of the product, do so only at an authorized waste disposal center or contact the service agent.
- To avoid contamination of food, please respect the following instructions:
-Opening the door for long periods can cause a significant increase of the temperature in the compartments of the appliance.
-Clean surfaces, that can come in contact with food and accessible drainage systems, on a regular basis.
English
Safety Instructions
-Clean the water tanks if they have not been used for 48 h; flush the water system connected to a water supply if water has not been drawn for 5 days.
-Store raw meat and fish in suitable containers in the refrigerator, so that it does not come into contact with or drip onto other food.
-Two-star frozen-food compartments are suitable for storing pre-frozen food, storing or making ice-cream and making ice cubes.
-One-, two- and three-star compartments are not suitable for the freezing of fresh food.
-If the refrigerating appliance is left empty for long periods, switch it off, defrost, clean, dry, and leave the door open to prevent mould developing within the appliance.
Safety Instructions
- Read this manual thoroughly before first use. It contains important information for your safety as well as for the use and maintenance of the equipment.
- Do not place any objects on top of the product.
- Never immerse electrical parts of the product in water or any other fluids during cleaning or operation. Never hold the product under running water.
- Do not under any circumstances attempt to repair the product yourself. For servicing and repairs, please consult an authorised service agent.
- The mains voltage must match the information on the rating label of the product.
- Only unplugging from the power socket can separate the product completely from the mains.
- Avoid damages to the power cord that may be caused by kinks or contact with sharp corners.
- Keep this product including power cord and power plug away from all heat sources such as ovens, hot plates and other heat-producing products/objects.
- Only unplugging from the power socket by the plug itself. Do not pull on the cord.
- Unplug the product ...
- when the product is not being used,
- in case of malfunctions,
- before attaching / detaching accessories and
- before cleaning the product.
- Use this product in dry indoor areas only and never outdoors.
- This product is not intended for commercial use. It is designed for household use only.
-
Make sure that electrical components, live parts and the power cord do not become wet.
-
Use accessories supplied with the device or recommended by the manufacturer only!
- Do not cover the product while in use. Fire hazard!
- WARNING! When positioning the appliance, ensure the supply cord is not trapped or damaged.
- WARNING! Do not locate multiple portable socket-outlets portable power suppliers at the rear of the appliance to avoid possibilities of electrical shock of water leakage.
Caution: Risk of fire!
Flammable materials.
WARNING! During use, service and disposal of the appliance, please pay attention to the symbol which is located on rear of the appliance (rear panel or compressor).
It's risk of fire warning symbol. There are flammable materials in refrigerant pipes and compressor. Please keep clear from it during using, service and disposal.
English
Congratulations!
Thank you for your purchase of a KOENIC product. Please read this manual carefully and keep it for future reference.
Intended use
This product is suitable for refrigerating and freezing food and beverages only. Any other use may damage the device or cause injuries. The product is only intended to be used in private households and shall not be used for commercial purposes.
The Imtron GmbH assumes no liability for damages to the product, for property damages or for personal injuries due to careless or improper usage of the product, or usage of the product which does not meet the manufacturer's specified purpose.
Before first time use
Carefully remove the product and accessories from the original packaging. It is recommended to keep the original packaging for storage. If you wish to dispose of the original packaging, please observe applicable legal provisions. Should you have any questions regarding proper disposal, contact your local waste management center.
Inspect the delivery contents for completeness and damages. Should the delivery contents be incomplete or damaged, contact your sales outlet immediately.
After unpacking, please refer to chapter
Cleaning and care.
Disposal
Do not dispose of this product as unsorted municipal waste. Return it to a designated collection point for the recycling of WEEE. By doing so, you will help to conserve resources and protect the environment. Contact your retailer or local authorities for more information.
Refrigerants must be evacuated and disposed of by a qualified specialist in accordance with federal and local regulations before the appliance is scraped.
Delivery contents
1 x Fridge and freezer combination
1 x Egg holder for 6 eggs
1 x Box for ice cube maker and cold water
1 x User manual
Controls and components
A Control panel with display
A1 Button FRZ.TEMP.
A2 Temperature display, freezer
A3 QUICK FRZ. indicator
A4 QUICK REF. indicator
A5 Temperature display, refrigerator
A6 Button REF.TEMP.
A7 LOCK/UNLOCK button
A8 Key lock/unlock indicator
A9 Dispensing button DISPENSER
A10 Water function indicator
A11 Ice (shredded) function indicator
A12 Ice cube function indicator
A3 Ice and cold water function off indicator
A14 Ice and cold water function on/off button ICE OFF
A15 Filter indicator
A16 Holiday mode indicator
A17 MODE button
B Freezer door
C Freezer door handle
D Discharge opening with cover and seal
Dispenser opening
F Dispenser stop
G Freezer glass shelf (3x)
I Freezer compartment (2x)
Power cord with plug (not shown)
K Adjustable feet, front
L Vegetable compartment (fresh food compartment, 2x)
M Refrigerator door tray (5x)
N Refrigerator glass shelf (4x)
0 Refrigerator door handle
P Refrigerator door
Q Refrigerator interior lighting
R Ice cube maker with ice box
S Freezer interior lighting
Accessories
1 x egg holder for 6 eggs (not shown)
1 x Integrated ice cube maker and water chiller
1 x Wrench
1 x Filter incl. installation kit
2 x Hoses incl. installation kit
Installation
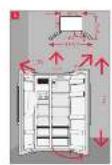
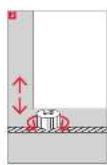
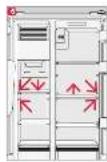
Fig. 1 Place the unit on a level and stable surface. Keep the minimum distances to all sides.
Fig. 2 Unevenness can be compensated with the adjustable front feet.
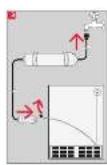
Fig. 3 Familiarize yourself with the connection of the water pipes and possible connectors in the proximity of the device.
Make sure that the water connection is within the accessible range.
Screw the supplied adapter to the water connection (1/2"), but do not open the tap, yet. Make sure the adaptor is properly connected and sealed.
Remove the red protective cap from the hose at the back of the refrigerator.
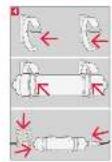
Fig. 4 Attach the water filter to a wall at the desired location.
To do this, install the two retaining clips at the correct distance (approx.
15cm) and at the desired location using the screws and expansion anchors provided. The filter can be placed in a horizontal, vertical as well as tilted position. The direction of the water flow can be either way. In any case, observe the given water pressure.
Plug one end of the blue hose into the previously installed adapter on the water connection.
Remove both rubber plugs from the water filter.
Then push the hose connector, that's attached to the other side of the blue hose, as far as possible into the inlet of the water filter.
Insert the two supplied angled hose connectors onto both ends of the white hose. Connect one of them to the filter outlet and the other one to the hose on the back of the refrigerator.
Now attach the securing clips to all hose connectors.
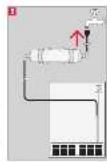
Fig. 5 Make sure that all installations and connections have been carried out correctly and that all are properly sealed. Make sure that the hoses are not and cannot be bend. Turn on the water at the water connection. Once again check all connections for possible leakages and make sure they are properly sealed. Check all connections for proper sealing in periodic intervals, to avoid possible leakages.
Fig. 6 The refrigerator and freezer compartments are equipped with glass shelves and drawers, which, if desired, can be removed by pulling them forward. Some of the shelves can be inserted at different heights.
English

Warning
If the refrigerator has been stored or tipped sideways during transport or installation, it must stand upright for 2 hours before being connected to the mains.
Operation
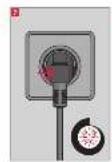
Fig. 7 Plug in the power plug into an appropriate mains socket outlet.
Note:
Allow the product to precool for about 2-3 hours before storing food in it.
Settings
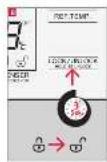
Fig. 8 The control panel is locked in normal operation. Before adjusting the settings described below, press the lock/ unlock key LOCK/UNLOCK for at least 3 seconds, to unlock the display. The symbol LOCK changes to and all keys are unlocked. All settings made are only activated after the automatic locking. After 30 seconds, the display is automatically locked.
Freezer temperature setting
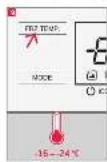
Fig. 9 Press the FRZ.TEMP. button to set the freezer temperature from -16 to -24°C in 1°C temperature steps. After adjusting the setting the display flashes for another 5 seconds, before the setting is automatically saved.
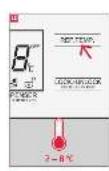
Refrigerator temperature setting
Fig. 10 Press the REF.TEMP. button to set the temperature of the refrigerator from 2 to 8°C in 1°C steps. After adjusting the setting the display flashes for another 5 seconds, before the setting is automatically saved.
Vacation, QUICK FRZ. (quick freeze) and QUICK REF. (quick cooling) functions
Fig. 11 By pressing the MODE button, you can select three different functions as indicated by the respective symbol.
- Vacation mod: In this mode, the refrigerator is switched off and the freezer is set to -18°C. Make sure, that all foods are removed from the refrigerator before activating this setting.
- Freeze mode: QUICK FRZ.: In this mode, the temperature of the freezer, is switched to -24°C for 26 hours. Thereafter, the freezer operates at the preset temperature. The settings of the refrigerator are not affected by this.
- Quick freeze mod* QUICK FRZ. and Quick cooling mode 🔒 QUICK REF.: In this mode, both the freezer and refrigerator set temperatures are switched to -24°C and 2°C respectively for 26 and 2.5 hours. Thereafter, both the freezer and refrigerator operate at the preset temperature.
- Quick cooling mode? QUICK REF.: In this mode, the temperature of the refrigerator, is switched to 2°C for 2.5 hours. Thereafter, the refrigerator operates at the preset temperature. The settings of the freezer are not affected by this.
To turn off the auxiliary functions, unlock the control panel again as described in the
Settings section and press the MODE button repeatedly until none of the additional function icons lights up. As a result, any additional functions are deactivated and the device operates at the preset temperatures.
Cold water and ice cube maker
Warning! Before drawing water and ice for the first time, remove the cover with gasket from the discharge opening on the inside of the freezer door. If the cover is not removed, ice and water will be ejected into the freezer. If necessary, unlock the control panel and press the button ice and cold water on/off ICE OFF to switch the ice and cold water function on or off.
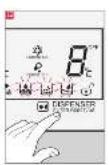
Fig. 12 Press the DISPENSER button until the corresponding symbol indicates the desired function: Ice cube extraction indicator entire ice cubes are dispensed; Ice picking (shredded) indicator crushed ice is being dispensed; Water indicator cold water is dispensed.
Fig. 13 Now press the drinking cup against the dispenser stop to start the preset dispensing. Remove the cup to stop dispensing.
Warning! Never reach into the dispenser opening of the freezer door!
Note:
- During the ice cube or shredded ice dispensing, different mechanical sounds will be audible. This is normal and no reason for complaint.
- The water and ice dispensing only works when the freezer door is closed.
- If you have not taken cold water for several days, pour the first X cups of water away to avoid bacterial infections.

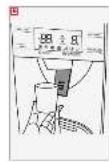
Door height adjustment
① If the doors do not close properly or are not aligned, the height can be adjusted.
2 Use the wrench provided (b) to loosen the counter nut (c) and then adjust the height of each door by turning the adjusting nut (a) with the wrench (b). If the height is correct and both doors are aligned, tighten the counter nut (c) again.
Energy saving tips
- Do not place the product in the vicinity of a heat source (radiator or kitchen stove, etc.).
- Ensure unobstructed air flow around the refrigerator and freezer.
- If an ice layer has built, defrost the unit. A thick ice layer affects the transmission of the cold, thus the energy consumption will be increased.
- When taking out food, only open the door shortly. A shorter door opening time causes less ice to deposit on the freezer walls.
- Select the temperature regulator setting according to the filling amount of the product.
- Use drawers, baskets or shelves to store the food. If the energy of the product is used efficiently, the energy consumption can be minimized.
English
Cleaning and care

Warning
• Unplug the product before cleaning.
- When cleaning, never use solvents or abrasive materials, hard brushes, metallic or sharp objects. Solvents are harmful to human health and can attack plastic parts, while abrasive cleaning materials and tools may scratch the surface(s).
- Never use oil or grease on the door seal. This will make it porous over time.
- Do not use steam cleaning equipment. The steam may come in contact with electrical parts of the product, causing a short circuit.
- Clean the product's exterior surfaces with a slightly damp cloth and then dry them thoroughly.
• Make sure that no water enters the product interior (for example, through the switch). - Wipe the door seal with clean water only, and dry it thoroughly afterwards.
- Removable parts e.g. glass shelves, can be taken out for cleaning.
- Pull out the ice cube maker x times a year and rinse the box inside with detergent and warm water. Install the ice cube maker box when it is dry.
Decommissioning
If a longer break should occur during operation of the refrigerator, the following steps must be carried out:
• Unplug the product.
• Empty the product.
- Clean the interior of both compartments and let them dry.
- Carefully clean all the accessories (vegetable containers, door compartments, glass shelves, etc.)
- Let the doors open to avoid the formation of unpleasant odors and mold.
- Close the water supply.
Technical data
Rated current : 2.5 A
Energy Consumption
kWh/24h : 0.882
kWh/year :322
Ambient temperature : 16°C -43°C
Net capacity of refrigerator : 334 L
Net capacity of freezer : 156 L
Measurement (HxWxD):
1788×895×745mm
Depth with door open : 1142 mm
Four-star compartment
Storage Volume :138 L
Two-star compartment
Storage Volume :18 L
This product is intended to be used in climate classes from N to T.
| Climate class | Ambient temperature |
| N +16 to | +32°C |
| ST +16 to | +38°C |
| T | +16 to +43°C |
Troubleshooting
If there are any problems during operation, please refer to the following table. If problems cannot be solved as indicated under Solution, please contact your manufacturer.
| Problem Possible causes | Solution | |
| Product does not work | • Interrupted power supply | • Check the power supply |
| Temperature in the compartments is not low enough. | • The door is not closed firmly or it is opened to often. | • Rearrange the food so that the door can be closed firmly. |
| • The ambient temperature is lower than 10°C or higher than 43°C | • The product is intended to be operated in an ambient temperature of 10°C to 43°C | |
| Water gathers in the lower part of the compartment | • The food comes in contact with the rear wall of the compartment | • Move away the food or containers from the rear wall |
| The interior lamp doesn’t shine | • Lamp is defect • Contact service center |
Error codes
| Error Code | Fault Description |
| E0 | Mechanical fault of ice maker |
| E1 | Circuit fault of refrigerating temperature sensor |
| E2 | Circuit fault of Freezing temperature sensor |
| E5 | Circuit fault of evaporator heater sensor |
| E6 | Communication fault |
| E7 | Circuit fault of ambient temperature sensor |
| EE | Circuit fault of ice maker sensor |
| EH | Circuit fault of ambient humidity sensor |
Alarm function
This product is equipped with an alarm.
An alarm will sound, wenn an opened door isn't closed within 120s after opening it. To turn off the alarm, close the respective door or push any button on the control panel.
An alarm will also sound, if the temprature of the freezer compartment rises above -8^ . In addition the error code E2 will be displayed.
English
EU Product Data Sheet 1/1
KDD 114 A2 NF
The information in this product data sheet is presented in accordance with Article 3, letter b) in connection with Appendix III of delegated regulation (EU) No. 1050/2010 of the Commission on completing Council Directive 2010/30/EU of the European Union and of the Council with regard to the labelling of household cooling appliances relating to energy consumption.
| a) Supplier's trademarks KOENIC | |
| b) Model identifier KDD 114 A2 NF | |
| c) Household cooling appliance models ^1 category 7 | |
| d) Energy efficiency class ^2 | A++ |
| e) Community eco-label in accordance with Council Regulation (EEC) No. 66/2010 n/a |
| Symbol Value Unit | ||||
| f) Annual energy consumption3 | AE: | 322 kWh/year | ||
| g) | Storage volume and if necessary Starratingeach compartment | |||
| Other Compartment5 | Von | n/a L | ||
| Cellar Compartment V | cm | n/a L | ||
| Wine storage compartment | Vina | n/a L | ||
| Storage area for fresh comestibles | Vi | 334 | L | |
| Chill compartment | Va | n/a L | ||
| Ice cube making compartment and zero-star compartment | xx | L | ||
| One-star compartment | V* | n/a L | ||
| Two-star compartment | V** | n/a L | ||
| Three-star compartment | V*** | 18 | L | |
| Freezer compartment (four-star compartment) V**** 138 | L | |||
| h) Design temperature "other compartments" | n/a | |||
| i) | Information regarding frost-free conditions for each compartment: | |||
| Other Compartment | n/a | |||
| Cellar Compartment | n/a | |||
| Wine storage compartment | n/a | |||
| Storage area for fresh comestibles | ja | |||
| Chill compartment | n/a | |||
| Ice cube making compartment and zero-star compartment | yes | |||
| One-star compartment | n/a | |||
| Two-star compartment | yes | |||
| Three-star compartment | n/a | |||
| Freezer compartment (four-star compartment) | yes | |||
| j) | Storage time in the event of breakdown ("temperature increase time") | 7 | h | |
| k) Freezing capacity | 14 | kg/24h | ||
| l) | Climatic Class6 | N-T | ||
| m) | Airborne acoustical noise | 45 | dB(A) rel pW | |
Fig.7 Plug in the power plug into an appropriate mains socket outlet.
Remarque:
1 x egg holder for 6 eggs (not shown)
Refrigerator temperature setting
Freezer temperature setting
- Sicherheitshinweise
- Safety Instructions
- English
- Caution: Risk of fire!
- Congratulations!
- Intended use
- Before first time use
- Cleaning and care.
- Disposal
- Delivery contents
- Controls and components
- Accessories
- Installation
- Warning
- Operation
- Note:
- Settings
- Freezer temperature setting
- Refrigerator temperature setting
- Vacation, QUICK FRZ. (quick freeze) and QUICK REF. (quick cooling) functions
- Cold water and ice cube maker
- Door height adjustment
- Energy saving tips
- Cleaning and care
- Decommissioning
- Technical data
- Four-star compartment
- Two-star compartment
- Troubleshooting
- Alarm function
- EU Product Data Sheet 1/1
- Remarque:
Brand : Koenic
Model : KDD 114 A2 NF
Category : Fridge