
W11517113 - Ice Maker WHIRLPOOL - Free user manual and instructions
Find the device manual for free W11517113 WHIRLPOOL in PDF.


| Product Type | Automatic ice maker for refrigerator |
| Brand | Whirlpool |
| Model | W11517113 |
| Usage | Built into refrigerator freezer |
| Power supply | 120 V AC, 60 Hz, 3-prong grounded plug |
| Power consumption | Approximately 100 W |
| Water connection | 1/4 in (6.35 mm) outer diameter copper tubing |
| Required water pressure | 20 to 120 psi (1.4 to 8.3 bar) |
| Ice production | First ice in 24 h, full bin in about 72 h, production every 2 to 3 h |
| Ice bin capacity | Approximately 2 kg |
| Dimensions (W x D x H) | Approximately 30 x 15 x 15 cm |
| Weight | Approximately 2.5 kg |
| Materials | Plastic and metal |
| Main functions | Automatic ice production, on/off control arm, removable storage bin |
| Maintenance and cleaning | Periodic cleaning of water inlet valve screens |
| Safety | Unplug before installation, grounding required, do not use extension cord |
| Parts and repairability | Parts available from Whirlpool after-sales service |
| General information | Installation by qualified technician recommended; comply with local plumbing codes |
Frequently Asked Questions - W11517113 WHIRLPOOL
User questions about W11517113 WHIRLPOOL
0 question about this device. Answer the ones you know or ask your own.
Ask a new question about this device
Download the instructions for your Ice Maker in PDF format for free! Find your manual W11517113 - WHIRLPOOL and take your electronic device back in hand. On this page are published all the documents necessary for the use of your device. W11517113 by WHIRLPOOL.
USER MANUAL W11517113 WHIRLPOOL
Requesting Assistance or Service......2
Important Information ....3
Before you Begin....4
Tools 4
Installation notes....4
Components ....4
Component illustrations....4
Installing the Ice Maker....5
Making preparations....5
Mounting the ice maker 5
Connecting the Water Supply 6
Final Installation....8
Forming the copper tubing....8
Connecting the power/ leveling the unit......8
Starting the Ice Maker....9
Troubleshooting 10
Operational notes....10
Troubleshooting chart....10
Table des matières
Page Page
Requesting Assistance or Service
If you need assistance contact your dealer, or call the Whirlpool Customer eXperience Center toll-free, 1-800-253-1301, 24 hours a day.
The following information is used throughout this installation Guide. Read it thoroughly so you are familiar with it.
Your safety and the safety of others are very important.
We have provided many important safety messages in this manual and on your appliance. Always read and obey all safety messages.

This is the safety alert symbol.
This symbol alerts you to potential hazards that can kill or hurt you and others.
All safety messages will follow the safety alert symbol and either the word "DANGER" or "WARNING."
These words mean:
! DANGER
You can be killed or seriously injured if you don't immediately follow instructions.
WARNING
You can be killed or seriously injured if you don't follow instructions.
All safety messages will tell you what the potential hazard is, tell you how to reduce the chance of injury, and tell you what can happen if the instructions are not followed.
- This Installation Guide gives you complete instructions on how to install the Ice Maker Kit in your refrigerator-freezer and connect a water line to it. Please read the guide and follow the instructions exactly as described. Also, make sure that you observe all of the "safety" instructions.
- IMPORTANT: A qualified service technician must install the water line and ice maker.
- Before you start to install your Ice Maker Kit, you will have to purchase a copper tubing kit that contains a "Regular Valve and Clamp Assembly" (for refrigerators with an automatic ice maker, or self-filling trays). The kit contains all of the hardware necessary to connect your ice maker to the water supply. You can purchase one at most hardware or plumbing supply stores.
NOTE: Do not use piercing-type, or 3/16" shut-off valves. They reduce the flow of water to the ice maker, and are easily clogged. Do not use polyethylene tubing to connect the ice maker to the water line. Use only 1/4" (O.D.) copper tubing.
CUSTOMER INSTALLATION IS NOT WARRANTED BY THE REFRIGERATOR OR ICE MAKER MANUFACTURER.
Before You Begin
Tools
Gather required tools and parts before starting installation. Read and follow the instructions provided with any tools listed here.
- Regular screwdriver
- Phillips screwdriver
- 7/16" and 1/2" open-end wrenches (or an adjustable wrench)
- Pliers
- 1/4" nut driver
- Small hand level (optional)
- Ruler
Installation notes
- Follow the instructions thoroughly. Read through the entire step so that you understand it before you perform it.
- The illustrations in this Installation Guide are meant to clarify the installation steps you need to perform. For each set of steps shown, refer to the diagram immediately beside or below the text for clarification. Some illustrations also contain "DETAILS." DETAILS are contained in bubbles alongside the larger illustration. A DETAIL shows a close-up illustration of a certain portion of a diagram or an illustration of a specific step you are to perform. DETAILS are labeled A, B, or C and are clearly referenced in each step.
- When you are instructed to install a part, position the part as shown in the illustration.
Components
Remove the contents from the shipping carton and set them on a table where they can be easily identified and located. Check all of the components in the kit against the following list to help you become familiar with them. When you identify a component, place a check mark (√) after it. The KEY numbers correspond to the "Component Illustrations."
Do not discard any of the packing material until you account for all of the components.
KEY QTY DESCRIPTION
| 1 | 1 | Ice maker |
| 2 | 1 | Ice bucket |
| 3 | 2 | Jumper harness |
Component Illustrations
Installing the Ice Maker
Making preparations
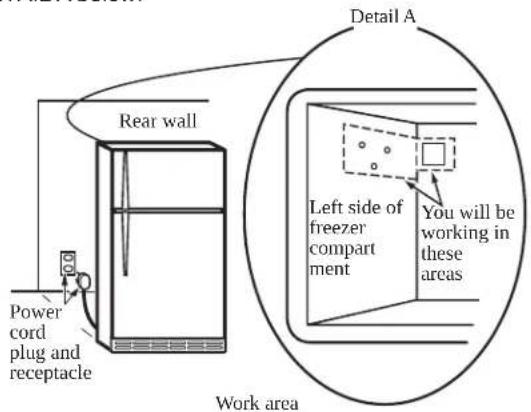
Refer to the illustration below for the following steps.
- Pull the refrigerator away from the wall so that you can easily access the rear panel.
IMPORTANT: Make sure to protect the floor from any damage.
WARNING
Electrical Shock Hazard
Disconnect power before installing ice maker.
Failure to do so can result in death or electrical shock.
- Unplug Refrigerator or disconnect power.
- Open the freezer door and remove all of the food items from inside the freezer compartment.
- On top-mount models without a full-width freezer shelf, remove the ice tray shelf. Place the shelf aside, as you will use it later to support the ice bucket.
NOTE: The work area for refrigerator-freezer is shown in DETAIL A below.
text_image
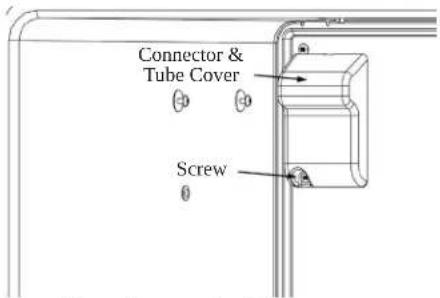
Power cord plug and receptacle Rear wall Detail A Left side of freezer compartment You will be working in these areas Work area- Remove the screw from the ice maker connector & tube cover. Retain this screw for ice maker installation. Remove cover.
text_image
Connector & Tube Cover ScrewRemoving connector & tube cover
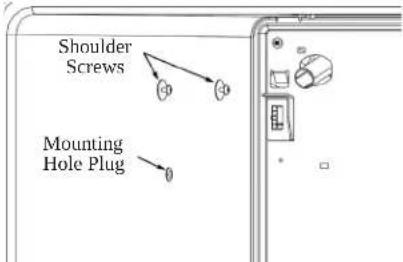
- Insert the end of a small-bladed screwdriver under the edge of the ice maker mounting hole plug in the side of the freezer liner, and pry it out of its hole. You can discard the plug.
NOTE: Verify the shoulder screws are in position.
text_image
Shoulder Screws Mounting Hole PlugRemoving mounting hole plug
- Take the two jumper harnesses included in the kit and determine which one can connect to the connector in the rear wall of the freezer compartment. Discard the other jumper.
Mounting the ice maker
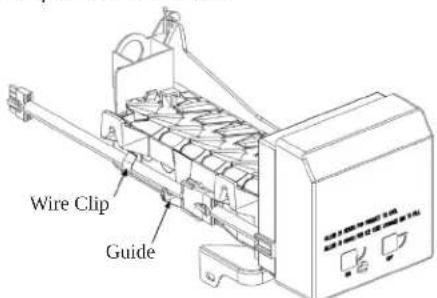
- Connect the compatible jumper harness to the ice maker wiring harness. Route the wires over the guide and through the wire clip on the ice maker.
text_image
Wire Clip GuideConnecting the jumper harness
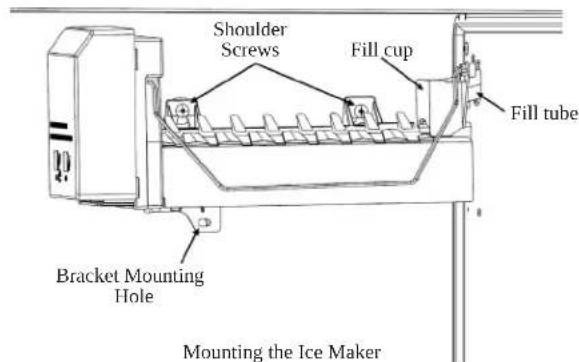
- Position the ice maker inside the freezer compartment and connect its wiring connector to the freezer compartment connector so they lock together (the locking arm will snap over the raised tab). The connectors will fit together only one way.
- Hang the ice maker from the tabs on the shoulder screws. Make sure that the bracket mounting hole is aligned with the mounting hole in the freezer liner. NOTE: Guide fill tube through hole in fill cup.
text_image
Shoulder Screws Fill cup Fill tube Bracket Mounting Hole Mounting the Ice Maker- Mount the ice maker to the freezer liner mounting hole with the 1/2" hex-head sheet-metal screw removed from the ice maker connector & tube cover.
Connecting the Water Supply
Read all directions before you begin.
IMPORTANT:
- Connect to potable water supply only.
Do not use with water that is microbiologically unsafe or of unknown quality without adequate disinfection before or after the system. Systems certified for cyst reduction may be used on disinfected waters that may contain filterable cysts.
- Plumbing must be installed in accordance with the International Plumbing Code and any local codes and ordinances.
- Copper and PEX tubing connections from the household water line to the refrigerator are acceptable and will help avoid off-taste or odor in your ice or water. Check for leaks.
- If PEX tubing is used instead of copper, we recommend the following part numbers: W10505928RP (7 ft [2.14 m] jacketed PEX), 8212547RP (5 ft [1.52 m] PEX), or W10267701RP (25 ft [7.62 m] PEX).
• Install tubing only in areas where temperatures will remain above freezing.
Tools Needed:
Gather the required tools and parts before starting installation.
- Flat-blade screwdriver
- 7/16" and 1/2" open-end wrenches or 2 adjustable wrenches
- 1/4" nut driver
NOTE: Do not use a piercing-type or 3/16" (4.76 mm) saddle valve, which reduces water flow and clogs easier.
Connect to Water Line
IMPORTANT: If you have turned the refrigerator on before the water was connected, turn off the ice maker.
- Unplug refrigerator or disconnect power.
- Turn off main water supply. Turn on nearest faucet long enough to reduce water pressure in the water line.
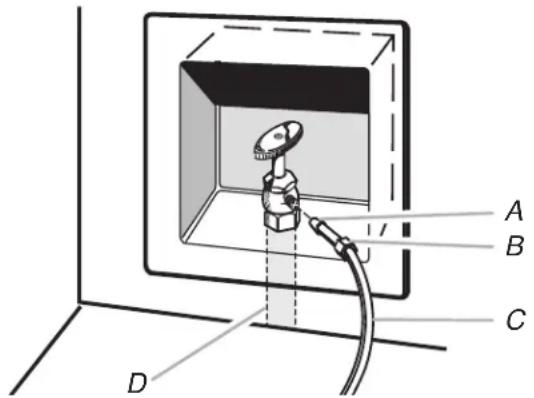
- Use a quarter-turn shut-off valve or the equivalent, served by a 1/2" household supply line.
NOTE: To allow sufficient water flow to the refrigerator, a minimum 1/2" (12.7 mm) size household supply line is recommended.
text_image
A B C DA. Sleeve
C. Copper tubing (to refrigerator)
D. Household supply line (1/2" minimum)
- Now you are ready to connect the copper tubing to the shut-off valve. Use 1/4" (6.35 mm) O.D. (outside diameter) soft copper tubing to connect the shut-off valve and the refrigerator.
- Ensure that you have the proper length needed for the job. Be sure both ends of the copper tubing are cut square.
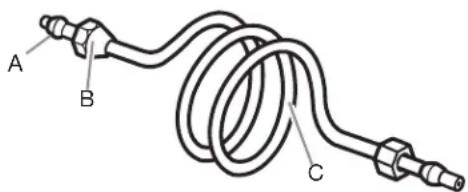
- Slip compression sleeve and compression nut onto copper tubing as shown. Insert end of tubing into outlet end squarely as far as it will go. Screw compression nut onto outlet end with adjustable wrench. Do not overtighten.
text_image
A B CA. Compression sleeve
B. Compression nut
C. Copper tubing
- Place the free end of the tubing into a container or sink and turn on main water supply to flush out tubing until water is clear. Turn off shut-off valve on the water pipe.
Note: Always drain the water line before making the final connection to the inlet of the water valve to avoid possible water valve malfunction.
- Bend the copper tubing to meet the water line inlet, located on the back of the refrigerator cabinet as shown. Leave a coil of copper tubing to allow the refrigerator to be pulled out of the cabinet or away from the wall for service.
Connect to Refrigerator
Follow the connection instructions specific to your model.
-
Remove plastic cap from water valve inlet port. Attach the copper tubing to the valve inlet using a compression nut and sleeve as shown. Tighten the compression nut. Do not overtighten. Confirm copper tubing is secure by pulling on copper tubing.
-
Create a service loop with the copper tubing. Avoid kinks when coiling the copper tubing. Secure copper tubing to the rear panel with a "P" clamp, using the original screw in the panel slot above the valve.
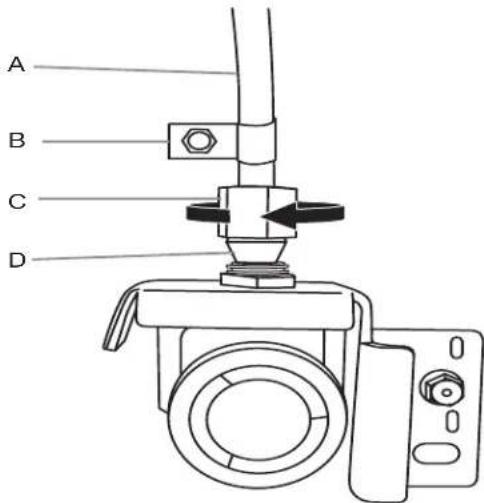
text_image
A B C DA. Copper tubing
C. Compression nut
B. "P" clamp
D. Compression sleeve
- Turn on water supply to refrigerator and check for leaks. Correct any leaks.
Final Installation
Forming the copper tubing
- Loop the copper tubing coming from the water valve as shown. Position the coiled copper tubing near the center of the unit so that it forms an "accordion-fold" (as shown in the diagram below) when it is moved to and from the wall.
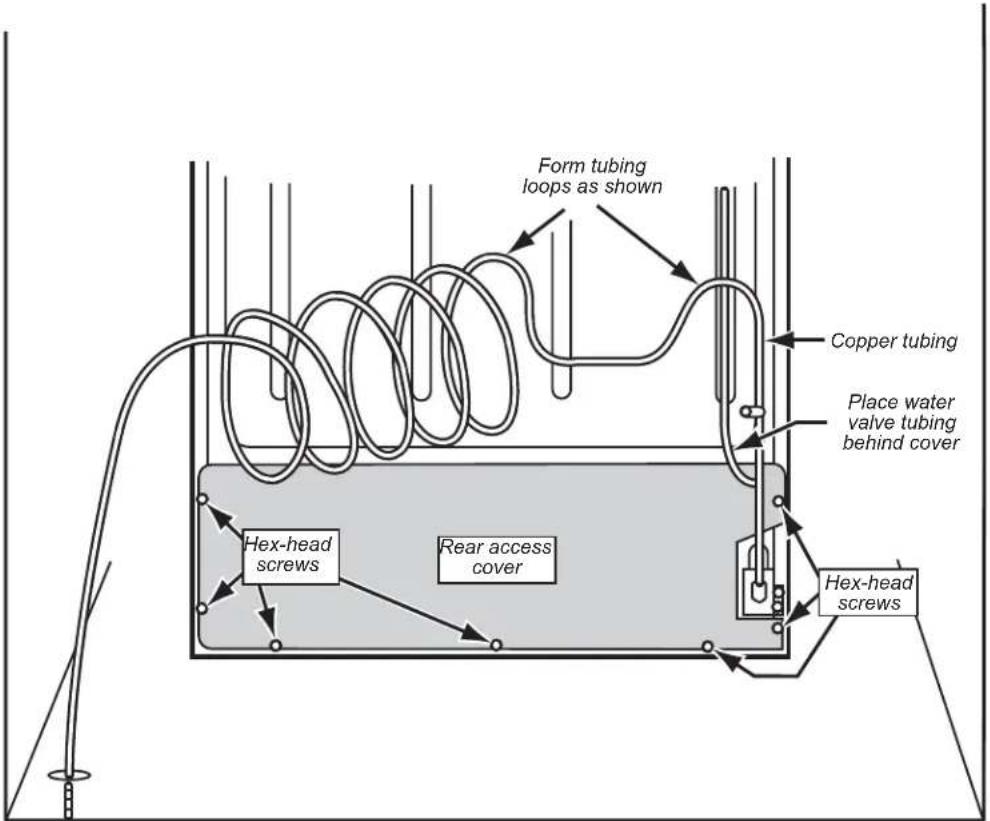
text_image
Form tubing loops as shown Copper tubing Place water valve tubing behind cover Hex-head screws Rear access cover Hex-head screwsForming the copper tubing
Connecting the power/Leveling the unit
WARNING
Electrical Shock Hazard
Plug into a grounded 3 prong outlet.
Do not remove ground prong.
Do not use an adapter.
Do not use an extension cord.
Failure to follow these instructions can result in death, fire, or electrical shock.
-
Plug the power cord into its AC outlet, and gently push the refrigerator back against the wall.
-
Place a level on top of the cabinet. If you need to re-level the refrigerator, follow the procedure to adjust the front casters, as outlined in your refrigerator's "User Guide."
-
Check the position of the ice maker. If it is crooked and needs to be adjusted, loosen the bottom mounting screw and position the ice maker as desired, then tighten the screw.
Starting the Ice Maker
- IMPORTANT: Make sure freezer lights are on and freezer door switch remains open when performing this step. Manually rotate ejector fingers 60 degrees towards a vertical orientation. To avoid damaging ice maker, ejector fingers should only be rotated in a clockwise direction (see illustration).
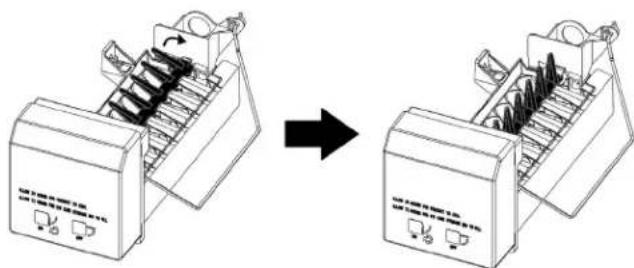
natural_image
Diagram showing a machine before and after processing a rack with blades (no text or symbols present)Before After
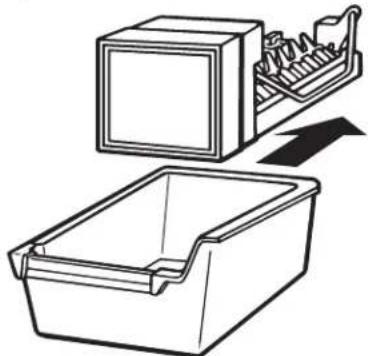
- Wash out the ice bucket, and then slide it under the ice maker (see illustration) as far as it will go. The ice bucket will be sitting on top of the freezer shelf.
natural_image
Diagram showing a refrigerator with an open drawer and a moving rack, no text or symbols presentInstalling the ice bucket
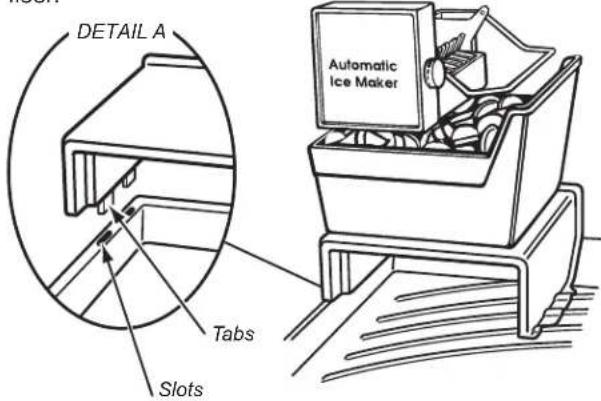
IMPORTANT: On top-mount models without a full-width freezer shelf, you will need to place the ice bucket on top of the inverted ice tray shelf. First, position the ice tray shelf face down so that the shorter side is alongside the freezer wall (see DETAIL A). Then insert the tabs on the shorter side of the shelf into the slots on the edge of the freezer floor. This will hold the shelf in position. Next, place the ice bucket on top of the inverted ice tray shelf and slide it under the ice maker (see illustration). The ice maker will not function properly if the ice bucket is placed directly on the freezer floor.
text_image
DETAIL A Tabs Slots Automatic Ice Maker- Place the items back into the freezer compartment.
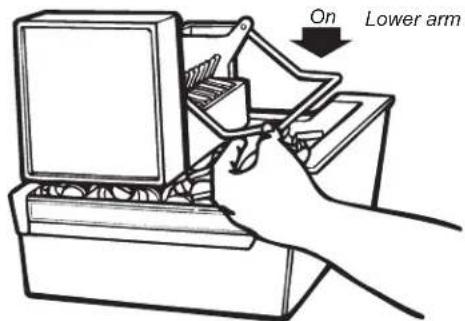
- Lower the arm on the ice maker (see illustration) to its "on" position, and close the freezer door. The ice maker will begin to make ice within 24 hours.

Raise arm to stop ice
text_image
On Lower armTurning the ice maker on
NOTE: It usually takes approximately 24 hours for the ice maker to begin producing ice. Once ice is available, you may notice that it has an "off taste." If this happens, make two or three batches of ice and discard them. After that, the "off-taste" should be gone. If you have any problems, refer to "Troubleshooting" section.
This completes the installation of your Ice Maker.
Troubleshooting
Operational notes
-
The Ice Maker water valve contains a flow washer that acts like a pressure regulator to control the water flow. For the Ice Maker to work properly, the water pressure in your home must be between 20 and 120 pounds per-square-inch (psi). If you encounter problems with your Ice Maker's ability to produce ice, call your water utility company and have the water pressure checked.
-
The Ice Maker's water valve is equipped with two strainers: a plastic basket type and a wire-mesh screen. Both of these can be cleaned by turning off the water and disassembling the water valve (your service center should be able to provide this service). If local water conditions require periodic cleaning, or if you use a well as a water source, you should consider installing a second water strainer in the water line. You can obtain a water strainer from your local appliance dealer.
Troubleshooting chart
The following chart lists several common problems that could occur with your Ice Maker.
| PROBLEM CAUSE | |
| One or more of the following sounds is heard: ■Buzzing ■Trickling water ■Thud (clatter of ice) | The water valve is operating. Water is entering the Ice Maker fill cup. Ice is being dumped into the ice bin. |
| Ice tastes stale. The ice is old. Make a new batch. | |
| Water in Ice Maker overflows. Refrigerator or Ice Maker is not | level. If the Ice Maker still overflows after leveling, turn off the Ice Maker's water supply at the shut-off valve, and raise the Ice Maker's bail arm to the “off” position; then contact your local service center. |
| Not enough ice. It will take 72 hours to fill the ice bucket. The | ice maker will make ice every 2 to 3 hours. For more ice, adjust the freezer control for a colder setting. |
| Ice making has stopped. Be sure that the bail arm is lowered | into the ice bucket. Make sure that the water shut-off valve is on. The water shut-off valve or the water valve screen is clogged (contact your local service center). |
Informations importantes :
text_image
Technical diagram of an electrical device with labeled components including battery, socket, and connector partsD. Bague de compression