S-LS-72 - Welding machine Stamos - Free user manual and instructions
Find the device manual for free S-LS-72 Stamos in PDF.

User questions about S-LS-72 Stamos
0 question about this device. Answer the ones you know or ask your own.
Ask a new question about this device
Download the instructions for your Welding machine in PDF format for free! Find your manual S-LS-72 - Stamos and take your electronic device back in hand. On this page are published all the documents necessary for the use of your device. S-LS-72 by Stamos.
USER MANUAL S-LS-72 Stamos
PRODUKTNAME DIGITALE LOTSTATION
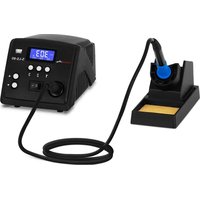
PRODUCT NAME DIGITAL SOLDERING STATION
NAZWA PRODUKTU CYFROWA STACJA LUTOWNICZA
NAZEV VÝROBKU DIGITALNÍ PAJECÍ STANICE
NOM DU PRODUIT STATION DE SOUDAGE NUMERIQUE
NOME DEL PRODOTTO STAZIONE SALDANTE DIGITALE
NOMBRE DEL PRODUCTO ESTACIÓN DE SOLDADURA DIGITAL
| MODELL | |
| PRODUCT MODEL | S-LS-62 |
| MODEL PRODUKTU | S*LS-63 |
| S*LS-64 | |
| MODEL VÝROBKU | S-LS-65 |
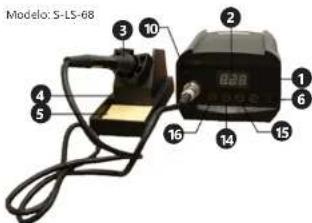
| MODELT | S-LS-68 |
| S-LS-71 | |
| MODELLO | S*LS-72 |
HERSTELLER
MANUFACTURER
PRODUCENT
VYROACE
FABRICANT PRODUTTOR
FABRICANTE
ANSCHRIFT DES HERSTELLERS
MANUFACTURER ADDRESS
ADRES PRODUCENTA
ADRESA VYR
ADRESSE DU FABRICANT
INDIRIZZO DEL PRODUITORE
DIRECCIÓN DEL FABRICANTE
text_image
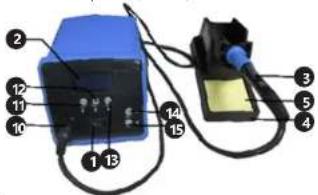
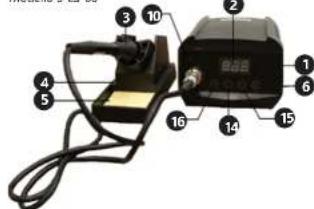
Labeled diagram of a handheld electronic device with numbered components for identificationModell: S LS-63, S LS 64, S LS 65, S LS 72
text_image
Labeled diagram of an electronic device with numbered components for identification20.04.202220.04.2022
5
DE
DE
text_image
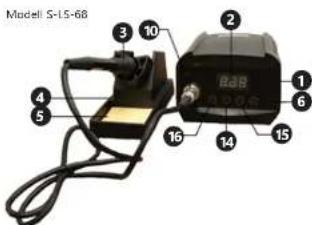
Model S-15-68 1 2 3 4 5 6 7 8 9 10 11 12 13 14 15 16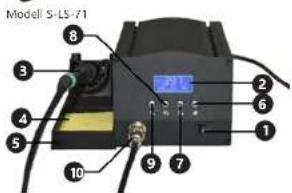
text_image
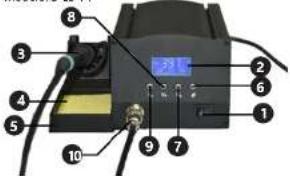
Model S-LS-71 8 3 4 5 10 9 7 6 215 1text_image
E A F SET 888 °C REAL G CAL 888 °F B 888 888 HA. Temperaturwert
F. REAL (Real Mode): reale Temperatur
Model: S-L5-62, S-L5-71
| Parameter description | Parameter value | ||
| Product name DIGITAL SOLDERING STATION 80W | DIGITAL SOLDERING STATION 100W | DIGITAL SOLDERING STATION 80W | |
| Model S-LS-62 S-LS-63 S-LS-64 | |||
| Rated voltage [V~] Frequency [Hz] | 230/50 | ||
| Power [W] 80 100 80 | |||
| Temperature range [°C] | 150-450 | ||
| Temperature stability | +/-2% | ||
| Accuracy of temperature indications [°C] | +/-10 | ||
| Tip resistance [Ω] | <2 | ||
| Rated current [A] | 0.4 0.5 0.4 | ||
| Fuse 3A 1.A | |||
| Ground potential on the tip [mV] | <5 | <2 | |
| Protection class | 1 | ||
| Protection rating IP | IP20 | ||
| Dimensions [mm] | 115x145 x36 | 115x173 x100 | |
| Weight [kg] | 1,73 | 2,48 | |
| Product name | DIGITAL SOLDERING STATION 60W | DIGITAL SOLDERING STATION 75W | |
| Model | S-LS-65 S-LS-68 | ||
| Rated voltage [V~]/Frequency [Hz] | 230/50 | ||
| Power [W] | 60 75 | ||
| Temperature range [°C] | 150-450 | 200-490 | |
| Temperature stability | +/-2% | ||
| Accuracy of temperature indications [°C] | +/-15 | +/-10 | |
| Tip resistance [Ω] | < 2 | |
| Rated current [A] | 0,3 | 0,54 |
| Fuse | 1 A | |
| Ground potential on the tip (mV) | < 2 | |
| Protection class | 1 | |
| Protection rating IP | IP20 | |
| Dimensions (mm) | 115x173x100 | 115x145x96 |
| Weight (kg) | 1,83 | 1,81 |
| Product name | DIGITAL SOLDERING STATION 150W | DIGITAL SOLDERING STATION 90W |
| Model | 5-LS-71 5-LS-72 | |
| Rated voltage (N-/)/ Frequency [Hz] | 250/50 | |
| Power (W) | 150 90 | |
| Temperature range (°C) | 150-450 | 100-500 |
| Temperature stability | +/- 2% | |
| Accuracy of temperature indications (°C) | +/- 10 | |
| Tip resistance [Ω] | < 2 | |
| Rated current [A] | 0,7 | 0,5 |
| Fuse | 2 A | 1 A |
| Ground potential on the tip (mV) | < 2 | |
| Protection class | 1 | |
| Protection rating IP | IP20 | |
| Dimensions (mm) | 125x155x112 | 115x173x100 |
| Weight (kg) | 1,72 | 2,36 |
- GENERAL DESCRIPTION
The user manual is designed to assist in the safe and trouble-free use of the device. The product is designed and manufactured in accordance with strict technical guidelines, using state-of-the-art technologies and components. Additionally, it is produced in compliance with the most stringent quality standards.
DO NOT USE THE DEVICE UNLESS YOU HAVE THOROUGHLY READ AND UNDERSTOOD THIS USER MANUAL.
To increase the product life of the device and to ensure trouble-free operation, use it in accordance with this user manual and regularly perform maintenance tasks. The technical data and specifications in this user manual are up to date. The manufacturer reserves the right to make changes associated with quality improvement.
LEGEND
| CE | The product satisfies the relevant safety standards. |
| Read instructions before use. | |
| The product must be recycled. | |
| WARNING! or CAUTION! or REMEMBER! Applicable to the given situation (general warning sign). | |
| Wear protective goggles. | |
| Wear a dust mask respiratory tract protection. | |
| ATTENTION! Electric shock warning! | |
| ATTENTION! Hot surface, risk of burns! | |
| Only use indoors. | |
| Soldering with lead-free solder wire. |
PLEASE NOTE! Drawings in this manual are for illustration purposes only and in some details may differ from the actual product.
The original operation manual is written in German. Other language versions are translations from the German.
2. USAGE SAFETY
ATTENTION! Read all safety warnings and all instructions. Failure to follow the warnings and instructions may result in electric shock, fire and/or serious injury or even death.
The terms "device" or "product" are used in the warnings and instructions to refer to DIGITAL SOLDERING STATION.
2.1 ELECTRICAL SAFETY
a) The plug must fit the socket. Do not modify the plug in any way. Using original plugs and matching sockets reduces the risk of electric shock.
b) Avoid touching earthed elements such as pipes, heaters, boilers and refrigerators. There is an increased risk of electric shock if the earthed device is exposed to rain, comes into direct contact with a wet surface or is operating in a clamp environment. Water getting into the device increases the risk of damage to the device and of electric shock.
c) Do not touch the device with wet or damp hands.
d) Use the cable only for its designated use. Never use it to carry the device or to pull the plug out of a socket. Keep the cable away from heat sources, oil, sharp edges or moving parts. Damaged or tangled cables increase the risk of electric shock.
c) Do not use the device if the power cord is damaged or shows obvious signs of wear. A damaged power cord should be replaced by a qualified electrician or the manufacturer's service centre.
20.04.202220.04.2022
f) To avoid electric shock, do not immerse the cord, plug or device in water or other liquids. Do not use the device on wet surfaces.
g) ATTENTION! DANGER TO LIFE! While cleaning, never immerse the device in water or other liquids.
h) Do not use in very humid environments or in the direct vicinity of water tanks.
i) Prevent the device from getting wet. Risk of electric shock!
2.2. SAFETY IN THE WORKPLACE
a) Make sure the workplace is clean and well lit. A messy or poorly lit workplace may lead to accidents. Try to think ahead, observe what is going on and use common sense when working with the device.
b) Do not use the device in a potentially explosive environment, for example in the presence of flammable liquids, gases or dust. The device generates sparks which may ignite dust or fumes.
c) If you discover damage or irregular operation, immediately switch the device off and report it to a supervisor without delay.
d) If you are unsure about whether the product is operating correctly or if you find damage, please contact the manufacturer's service centre.
e) Only the manufacturer's service centre may make repairs to the product. Do not attempt to make repairs yourself!
f) In case of fire, use a powder or carbon dioxide (CO _2 ) fire extinguisher (one intended for use on live electrical devices) to put it out.
g) Children or unauthorised persons are forbidden to enter a work station. (A distraction may result in loss of control over the device).
h) Use the device in a well-ventilated space.
i) Regularly inspect the condition of the safety labels. If the labels are illegible, they must be replaced.
j) Please keep this manual available for future reference. If this device is passed on to a third party, the manual must be passed on with it.
k) Keep packaging elements and small assembly parts in a place not available to children.
i) Keep the device away from children and animals. m) If this device is used together with another equipment, the remaining instructions for use shall also be followed.
REMEMBER! When using the device, protect children and other bystanders.
2.3. PERSONAL SAFETY
a) Do not use the device when tired, ill or under the influence of alcohol, narcotics or medication which can significantly impair the ability to operate the device.
b) The device can be handled only by physically fit persons who are capable of handling it, properly trained, familiar with this manual and trained within the scope of occupational health and safety.
c) When working with the device, use common sense and stay alert. Temporary loss of concentration while using the device may lead to serious injuries.
d) Use personal protective equipment as required for working with the device, specified in section 1 (Legend). The use of correct and approved personal protective equipment reduces the risk of injury.
c) To prevent the device from accidentally switching on, make sure the switch is on the OFF position before connecting to a power source.
EN EN
f) Do not overestimate your abilities. When using the device, keep your balance and remain stable at all times. This will ensure better control over the device in unexpected situations.
g) The device is not a toy. Children must be supervised to ensure that they do not play with the device.
h) When working with the device, harmful fumes are generated. The workplace must be well ventilated to protect unauthorized persons from the harmful effects of fumes.
2.4 SAFE DEVICE USE
a) Do not overload the device. Use the appropriate tools for the given task. A correctly-selected device will perform the task for which it was designed better and in a safer manner.
b) Do not use the device if the ON/OFF switch does not function properly (does not switch the device on and off). Devices which cannot be switched on and off using the ON/OFF switch are hazardous, should not be operated and must be repaired.
c) Disconnect the device from the power supply before commencement of adjustment, cleaning and maintenance. Such a preventive measure reduces the risk of accidental activation.
d) When not in use, store in a safe place, away from children and people not familiar with the device who have not read the user manual. The device may pose a hazard in the hands of inexperienced users.
e) Keep the device in perfect technical condition. Before each use check for general damage and especially check for cracked parts or elements and for any other conditions which may impact the safe operation of the device. If damage is discovered, hand over the device for repair before use.
f) Keep the device out of the reach of children. g) Device repair or maintenance should be carried out by qualified persons, only using original spare parts. This will ensure safe use.
h) To ensure the operational integrity of the device, do not remove factory fitted guards and do not loosen any screws.
i) Do not move, adjust or rotate the device in the course of work.
j) Do not leave this appliance unattended while it is in use.
k) Clean the device regularly to prevent stubborn grime from accumulating.
Do not cover the air intake and outlet.
m) The device is not a toy. Cleaning and maintenance may not be carried out by children without supervision by an adult person.
n) It is forbidden to interfere with the structure of the device in order to change its parameters or construction.
a) Keep the device away from sources of fire and heat. b) Always place the soldering iron on the holder if it is not in use.
q) Keep the soldering tip and parts that can get hot away from your body, clothing and flammable objects / substances.
r) The soldering tip remains hot even after the power is turned off. Before cleaning or replacing parts, wait until the device has cooled down completely.
s) Exercise caution and do not inhale solder t) Do not cover the ventilation openings!
ATTENTION! Despite the safe design of the device and its protective features, and despite the use of additional elements protecting the operator, there is still a slight risk of accident or injury when using the device. Stay alert and use common sense when using the device.
- USE GUIDELINES The device is designed for soldering, desoldering or shrinking electronic and electrical connections.
The user is liable for any damage resulting from unintended use of the device.
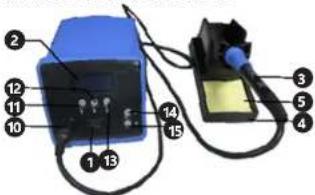
3.1. DEVICE DESCRIPTION Model: S-LS-62
text_image
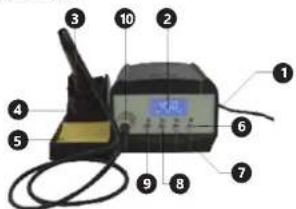
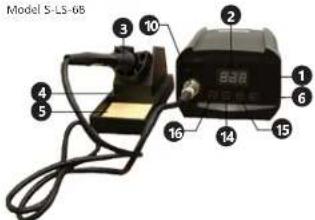
Labeled diagram of a portable electronic device with numbered components for identificationModel: S-LS-63, S-LS-64, S-LS-65, S-LS-72

text_image
Labeled diagram of an electronic testing setup with numbered components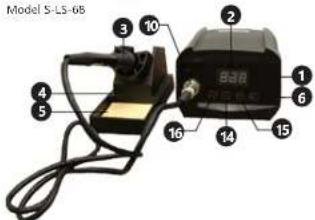
text_image
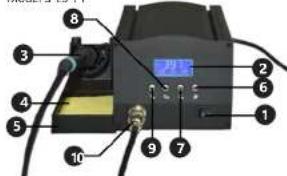
Model S-LS-65 1 2 3 4 5 6 7 8 9 10 11 12 13 14 15 16Model S-LS-71

text_image
Labeled diagram of an electronic device with numbered components and a digital display showing '202'-
Power button
-
Display
-
Soldering iron
-
Stand with handle
-
Tip cleaning sponge
-
* Button
-
'3/' Button
-
"2/▼" Button
-
"1/▲" Button
-
Soldering iron connection socket
-
Quick access button "T"
-
Quick access button "Z"
-
Quick access button "3"
-
"▲" Button
-
▼ Button
Display
Model: S-LS-62, S-LS-63, S-LS-64, S-LS-65, S-LS-71, S-LS-72
text_image
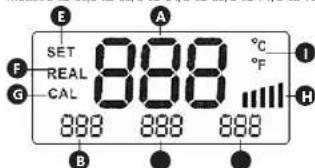
E A F SET 888 °C G REAL 888 °F G CAL 888 H B 888 888A. Temperature value
B. Saved temperature value 1 - access to the temperature value
C. Saved temperature value 2 - access to the temperature value
D. Saved temperature value 3 - access to the temperature value
E. SET (Set Mode): soldering in the SET state
F. REAL (Real Mode): real temperature
G. CAL (Calibration): soldering iron in the temperature calibration mode
H. Current temperature power value
- Temperature unit "F" or "C"
3.2. PREPARING FOR USE
APPLIANCE LOCATION
Ensure good ventilation in the room in which the device is being used. There should be at least 10 cm distance between each side of the device and the wall or other objects. Keep the product away from hot surfaces. The device should always be used when positioned on an even, stable, clean, fireproof and dry surface, and be out of the reach of children and persons with limited mental and sensory functions. Position the device such that you always have access to the power plug. The power cord
connected to the appliance must be properly grounded and correspond to the technical details on the product label.
3.3. DEVICE USE
PLEASE NOTE: During the first heating the heating element "burns out".
-
Place the device on a flat, stable surface and place the soldering iron in the holder.
-
Connect the soldering iron lead to the socket.
-
Connect the device to the power supply.
-
Turn the device on using the power switch.
-
The mode of operation of the device, depending on
the model, is described in section 3.3.1
- After you have finished working, put the soldering iron in the holder and turn off the device.
a) The display will turn on automatically and the last temperature setting will be displayed for 3 seconds, then the display will show the current temperature.
b) Temperature
- Pressing the '2/▼' or '1/▲' buttons enters the temperature change setting.
- Holding the "2/▼" or "1/▲" buttons changes the temperature.
- Pressing the "1/▲" or "2/▼" or "3/"> buttons changes the temperature value to the value which has been saved (memory buttons).
c) Memory buttons
• To change the saved temperature value, set the desired temperature and then press and hold the selected "1/▲" or "2/▼" or "3/∗" button and with the "N" button at the same time. The temperature will be saved.
- In the case of model S-L5-71: it is recommended to set the temperature for the speed dial button '1/▲' up to 200°C, for the speed dial button '2/▼' between 300 and 350°C, for button "3/4" from 380°C upwards.
d) Calibration
- The soldering iron should be calibrated after replacing the heating element, tip or the soldering iron itself.
- An external temperature sensor must be connected for the calibration (not included). Enter the temperature calibration mode hold the "3"* button. The value of the last calibration appears on the display, the value "flashes". Set the calibration values using "▲" or "▼," and confirm with "*" (temperature correction range -50°C \~ -50°C). Compare with the temperature sensor, if necessary, set the temperature difference repeating the steps.
c) Changing the temperature units
• The device must be turned off before changing the units.
- Press and hold the "e" button and turn on the device. The units will be changed
f) Temperature lock function, only in S-LS-71
- Pressing and holding the "4" button will lock the selected temperature. Pressing and holding the "4" button again will unlock the device.
q) Standby mode, only in S-LS-71
The device has an automatic sleep mode that will turn on when the soldering iron is not used for approx. 10 minutes. The soldering iron temperature automatically drops to 100^ C. Picking the soldering iron up or pressing any button deactivates the sleep mode.
EN EN
h) Error message
- "S-E" message on the display means that there is a problem with the sensor in the soldering iron or that the soldering iron is disconnected.
- "H – E" message on the display means that the heating element cable or a part of the circuit is damaged.
Model: S-LS-63, S-LS-64, S-LS-65
a) After turning on the device, depending on the model, the display will show the power value for 3 seconds. Then the last temperature setting will appear followed by the current temperature.
b) Temperature
- Pressing the "▲" or "▼" buttons switches into the temperature control status; the temperature value may be change using these buttons.
- Pressing "1" or "2" or "3" (the memory buttons) you can quickly set the temperature stored in the device.
c) Memory buttons
- To change the value of the previously set temperature, set the desired temperature using the "▲" or "▼" buttons, then press and hold button "1" or "2" or "3". The temperature will be saved.
d) Temperature lock function
- Set the temperature and press "1" and "2" and "3" simultaneously for more than 3 seconds. The set value will be locked.
- To remove the lock, press and hold button "1" and "2" and "3" again for more than 3 seconds. The temperature lock will be unlocked.
e) Menu
- To enter the settings, press the "▲" and "▼" buttons simultaneously for more than 3 seconds. Moving to the next menu window is possible by pressing the "▲" or "▼" buttons. In order to select a parameter, use buttons "1" or "2" or "3"; you can change the parameter value using buttons "▲" or "▼".
- Temperature calibration (CAL): An external temperature sensor (not included in the set) should be connected to calibrate the device. When you enter the parameter using "1" button, the display will show the value of the last correction (the correction range is -50°C\~50°C). Then, select a desired value. Confirm the set value correction by pressing "1" again. Compare temperature values with the sensor readings. Set the appropriate temperature difference, if necessary repeating the steps.
- Resolution of the set temperature (FIN) - Using the FIN mode you can change the resolution of the set temperature in 1 °C or 5 °C increments. Press "2" button and then use the "▲" or "▼" buttons to select the ON value if the temperature is to be changed by 1 °C or the OFF value if it is to be changed by 5 °C.
- Temperature unit selection (C-F) - enter the parameter using "3" button, select the desired unit using the "▲" or "▼" button. Confirm by pressing "3".
- Standby mode (Sib) - use the "▲" or "▼" buttons to move to the next menu window. Select the parameter with "1" button and set the appropriate time. The time setting range is from 1 to 120 minutes. Confirm with "1". The device
will go into standby and, after the selected time has elapsed, the temperature will gradually decrease to approx. 150°C. The device will turn on if you press any button.
- Automatic switch off time (Sdn) - select the parameter using "2" button, and set the appropriate time after which the device will be turned off. The time setting range is from 1 to 120 minutes. Confirm with "2".
- Sound (bL) - select the parameter with the "3" button and set the sound to "OFF" or "ON" using the "▲" or "▼" buttons. Confirm with "3".
- Factory settings (FAC) - use the "▲" or "▼" buttons to move to the next menu window. Select the parameter using "1" button and select "ON" on the display). Confirm with "1", the device will return to factory settings:
a CAL: reset
s FIN: ON
n C-F: C
n STB: OFF
* SDN: OFF
n BL: ON
s Quick access temperature 1: 200°C
* Quick access temperature 2: 300°C
* Quick access temperature 3: 400°C
a ESC exit the menu.
Model S-LS-6B
a) The display will turn on and the temperature will rise to the factory settings. When the temperature reaches a stable value, a red dot will flash on the right hand side, which means that the device is maintaining the temperature. After the temperature has been reached, the display will show its current value.
b) Temperature
- To change the temperature, press the "√" button. Then, the hundreds digit will "flash"; use the "▲" or "▼" button to set the desired temperature.
- Pressing the "*" button again initiates setting the tens and single digits of the temperature value. The value is changed using the "▲" or "▼" buttons
- Confirm the selected value with the "N" button. c) Calibration
- Calibration should be performed when changing the Soldering iron or the heater.
- An external temperature sensor must be connected to complete the calibration (not included).
• The device must be turned off.
- Press and hold the *** button and simultaneously turn on the device. The symbol "-P-" will show for 2 seconds on the display, confirming the calibration mode.
- The device will automatically set the temperature to 400^ C
- Press the "/*" button, the display will show "0",
- Using a temperature meter, read the soldering iron tip temperature. The temperature shown on the device should be about 400°C (the temperature fluctuations may be +/- 5°C).
- Use the "▲" or "▼" button to set the temperature difference, if necessary.
- Confirm with the "#" button. A beep will sound.
d) The standby mode
- The device goes to automatic standby mode which will turn on when it is not used for 30 minutes. The temperature of the soldering iron automatically drops to 200^ , and when the device is not used for approx. 2 hours, it will automatically turn off. To turn the device back on, lift the soldering iron or press the "#" button or switch the device on again. It is not possible to change the sleep time.
e) Beeps
- A single beep means that the device has reached the set temperature.
- A continuous beep may mean the following: a decrease in temperature of approx. 10% from the set value (the beep will stop when the temperature reaches the appropriate temperature), exceeding the maximum temperature of the soldering iron /the soldering iron is not connected (the display will show the message "LE") or damage to the heater or the heater temperature sensor (the display will show "SE").
Model S-L5-72
a) The display will turn on automatically and the last temperature setting will be displayed for 3 seconds, then the display will show the current temperature. b) Temperature
- Pressing the "▲" or "▼" buttons switches into the temperature control status; the temperature value may be change using these buttons.
- Pressing "1" or "2" or "3" (the memory buttons) you can quickly set the temperature stored in the device.
c) Memory buttons
- To change the value of the previously set temperature, set the desired temperature using the "▲" or "▼" buttons, then press and hold button "1" or "2" or "3". The temperature will be saved.
d) Temperature calibration
- Calibration should be performed when changing the Soldering iron or the heater.
- An external temperature sensor must be connected to complete the calibration (not included).
- To enter the programming mode, press and hold the '▲' and '▼' buttons simultaneously. Then select button '1', the display will show "CAL" on the left hand side, and the last correction value will be displayed. To change the calibration value, use the '▲' or '▼' buttons (calibration range between -50°C and +50°C). Select the desired value and confirm by pressing "1" again. Compare the temperature with the sensor reading. Set the appropriate temperature difference, if necessary repeating the steps.
e) Changing the operati
- Pressing the "▲" and "▼" buttons simultaneously, enter the programming mode and then select the '2' button. Use the "▲" or "▼" button to select the mode. When you have set the mode, pressing the '2' button will save your settings.
- Mode 0: continuous operation in high temperature; in this mode, high temperature stability is enhanced.
- Mode 1: suitable for operating at different temperatures over the same time.
• Mode 2: operating within a wide temperature range.
f) Sleep function
- Pressing the "▲" and "▼" buttons simultaneously, enter the programming mode and then select the "2" button. Then, set the operating mode (see subsection above) or press the "2" button three times to proceed to the sleep function settings. The last saved sleep time will appear on the display. You can change the sleep time value using the "▲" or "▼" buttons. Confirm pressing "2".
- In the sleep mode, the temperature goes down to 200°C, if the set working temperature is lower than 200°C then the device will not enter the sleep mode.
• After the device has entered the sleep mode, press any button if you want to turn the device on.
g) Device lock setting
- Pressing the "▲" and "▼" buttons simultaneously, enter the programming mode and then select the "3" button.
+ Use the "▲" or "▼" button to set the selected password, confirm with the '3' button. Then enter the same password again and confirm with '3'.
• The device will be locked after restarting.
- "LOC" will appear on the display. To unlock, press the "▲" and "▼" buttons simultaneously to enter the programming mode, and then select the "3" button. Use the "▲" or "▼" button to enter the password.
• To deactivate the device lock, enter the programming mode and set the password to "0".
i) Changing the temperature units
• The device must be turned off before changing the units.
- Press and hold the "2" button and turn on the device. The units will be changed
h: Sound setting
• The device must be turned off.
• To turn on the sound, press and hold the "▲" and "▼" buttons and simultaneously turn on the device.
i) Error message
- If the "S - E" message appears on the display with a five-second long alarm beep, there is a problem with the sensor in the soldering iron or the soldering iron is disconnected.
- If the "H - E" message appears on the display with a five-second long alarm beep, the heating element cable or part of the circuit is damaged.
3.4. LOCKING FUNCTION
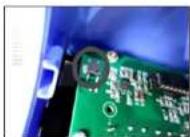
Model S-LS-72
To reset the password, open the device housing, press the PCBA reset button (shown in the figure below) and turn on the device at the same time.
EN
PL
3.5. CLEANING AND MAINTENANCE
a) Unplug the mains plug and allow the device to cool completely before each cleaning, adjustment or replacement of accessories, or if the device is not being used.
b) After cleaning the device, all parts should be dried completely before using it again.
c) Store the unit in a dry, cool place. free from moisture and direct exposure to sunlight.
d) Do not spray the device with a water jet or submerge it in water.
c) Do not allow water to get inside the device through vents in the housing of the device.
1) Clean the vents with a brush and compressed air.
g) The device must be regularly inspected to check its technical efficiency and spot any damage.
h) Do not use sharp and/or metal objects for cleaning (e.g. a wire brush or a metal spatula) because they
may damage the surface material of the appliance. The outer cover of the device can be cleaned with a damp cloth, using a small amount of liquid detergent. Do not use solvents to clean the cover.
j) IMPORTANT: Please remove and clean the soldering tip;
• at least once a day after non-intensive use,
• every time after moderate and intensive use.
IMPORTANT: If a new soldering tip has been installed, remove any accumulations in the fixing part. Otherwise, the tip may melt into the heating element or the fixing part.
k) Remove the loose accumulation on the soldering tip to prevent cold solder.
I) Prolonged operation of the device at high temperatures (above 400°C) may shorten the life span of the soldering tip.
m) Never clean the tip with a file or abrasive material.
DISPOSING OF USED DEVICES
Do not dispose of this device in municipal waste systems. Hand it over to an electric and electrical device recycling and collection point. Check the symbol on the product, instruction manual and packaging. The plastics used to construct the device can be recycled in accordance with their markings. By choosing to recycle you are making a significant contribution to the protection of our environment. Contact local authorities for information on your local recycling facility.
INSTRUKCJA OBSŁUGI
DANE TECHNICZNE
text_image
Labeled diagram of a portable electronic device with numbered componentsModel: S-LS-63, S-LS-64, S-LS-65, S-LS-72

text_image
Labeled diagram of an electronic device with numbered components for identification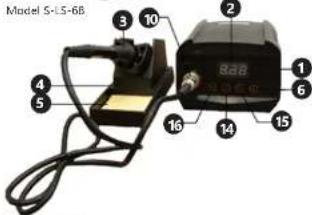
text_image
Model 5-LS-68 1 2 3 4 5 6 7 8 9 10 11 12 13 14 15 16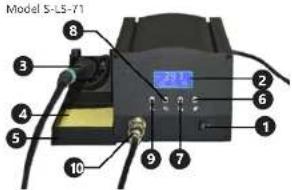
text_image
Model S-L5-71 8 3 4 5 10 9 7 6 2 1text_image
E A F SET 888 °C I G REAL 888 °F G CAL 888 H B C Dtext_image
Labeled diagram of a portable radio device with numbered parts for identificationModel: S-LS-62, S-LS-64, S-LS-65, S-LS-72
text_image
Labeled diagram of an electronic device with numbered components for identificationModel S-L5-6B
text_image
Model S-LS-68 1 2 3 4 5 6 7 8:30 9 10 11 12 13 14 15 16Model S-LS-71
text_image
Labeled diagram of a device with numbered components and a digital display showing '2021'text_image
E A F SET 888 °C G REAL °F CAL 888 888 888 B ● ●A. Hodnota teploty
text_image
Labeled diagram of a handheld device with numbered parts for identificationFR FR
text_image
Labeled diagram of an electronic device with numbered components for identification
text_image
Model: S-LS-68 1 2 3 4 5 6 7 8 9 10 11 12 13 14 15 16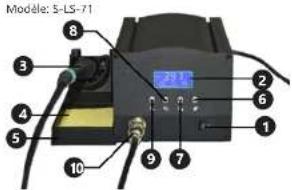
text_image
Modelle: 5-LS-71 8 3 4 5 10 9 7 6 2 1text_image
E A F SET 888 °C REAL 888 °F G CAL 888 H B C Dtext_image
Labeled diagram of a device with numbered components for identificationModella: S-LS-63, S-LS-64, S-LS-65, S-LS-72

text_image
Labeled diagram of an electronic device with numbered components for identificationModello 5-LS-68
text_image
Labeled diagram of a handheld electronic device with numbered components for identificationModello 5-1 S-71

text_image
Modellia 5-21 8 3 4 5 10 9 7 6 2text_image
E A F SET 888 °C G REAL 888 °F CAL 888 H B 888 888E. SET(Sel Model): saldatura in SET
F. REAL (Real Mode): temperatura reale
text_image
Labeled diagram of a handheld electronic device with numbered components for identificationModelo: S-LS-63, S-LS-64, S-LS-65, S-LS-72

text_image
Labeled diagram of an electronic device with numbered components for identification20.04.202220.04.2022
ES ES
text_image
Modelo: S-LS-68 1 2 3 4 5 6 7 8 9 10 11 12 13 14 15 16Modelo: S-LS-71
text_image
Labeled diagram of an electronic device with numbered components and a digital display showing 21V power.text_image
F A SET REAL CAL 888 888 888 °C °F I H BNAMEPLATE TRANSLATIONS
text_image
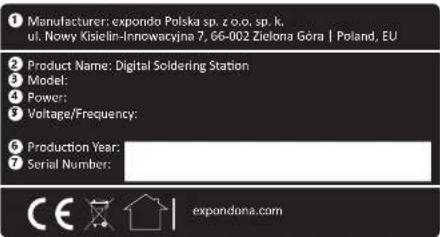
Manufacturer: expondo Polska sp. z o.o. sp. k. ul. Nowy Kiselin-Innowacyjna 7, 66-002 Zielona Góra | Poland, EU Product Name: Digital Soldering Station Model: Power: Voltage/Frequency: Production Year: Serial Number: CE exponduna.com| 1234 | ● | ● | ● | ||
| DE Hersteller Produktname Modell Leistung | |||||
| EN Manufacturer Product Name Model Power | |||||
| PL Producent Nazwa produktu Model Moc | |||||
| CZ | Výrobce | Název výrobku | Model Výkon | ||
| FR | Fabricant | Nom du produit | Modèle | Puissance | |
| IT | Produkture | Name del prodotto | Modello | Potenza | |
| ES | Fabricante | Nombre del producto | Modelo | Potencia | |
| 5 | 6 | 7 | |||
| DE | Spannung/Frequenz | Produktionsjahr | Ordnungsnummer | ||
| EN | Voltage/Frequency | Production year | Serial No. | ||
| PL | Napiecie znamionowe/Czestotliwość | Rok produkcji Numier serii | |||
| CZ | Jmenovité napájeci napétí/Frekivence | Rok výroby | Sénové číslo | ||
| FR | Tension/Fréquence | Année de production | Numéro de serie | ||
| IT | Tensione/Frequenza | Anno di produzione | Numero di serie | ||
| ES | Voltaje/Frecuencia | Año de producción | Número de serie | ||
NOTES/NOTIZEN
NOTES/NOTIZENNOTES/NOTIZEN
STAMOS | soldering
For the disposal of the device please consider and act according to the national and local rules and regulations.
CONTACT
expondo Polska sp. z o.o. sp. k.