Bolero DressCode 940 BI Inverter A - Washing machine CECOTEC - Free user manual and instructions
Find the device manual for free Bolero DressCode 940 BI Inverter A CECOTEC in PDF.

User questions about Bolero DressCode 940 BI Inverter A CECOTEC
0 question about this device. Answer the ones you know or ask your own.
Ask a new question about this device
Download the instructions for your Washing machine in PDF format for free! Find your manual Bolero DressCode 940 BI Inverter A - CECOTEC and take your electronic device back in hand. On this page are published all the documents necessary for the use of your device. Bolero DressCode 940 BI Inverter A by CECOTEC.
USER MANUAL Bolero DressCode 940 BI Inverter A CECOTEC
natural_image
Exterior view of a white and black CooVac washing machine with digital display (no visible text or symbols on the main body)Safety instructions 9
- Parts and components 75
- Before use 75
- Installation 76
- Operating instructions 78
- Cleaning and maintenance 93
- Troubleshooting 95
- Technical specifications 96
- How to build in the washing machine 97
- Disposal of old electrical and
electronic appliances 98 - Technical support and warranty 99
- Copyright 99
SOMMAIRE
Read these instructions thoroughly before using the device. Keep this instruction manual for future reference or new users.
- Ensure that the mains voltage matches the voltage specified on the device rating label and that the plug is earthed.
- The installation of an earthed socket must be carried out by a qualified electrician. Make sure that the electrical installation complies with current regulations.
- If the power cord is damaged, it must be replaced by the official Cecotec Technical Support Service or by a similarly qualified person to prevent hazards.
- If the product is damaged, it must not be used. Contact the official Cecotec Technical Support Service. Risk of electric shock!
- Do not use an extension cord or multiple sockets.
- Do not use external switching devices such as timers.
- This appliance is for indoor use only.
- Keep the device away from heat sources and direct sunlight to prevent the plastic and rubber pieces from getting damaged.
- Make sure the device is installed in places where the temperature is above 5°C. Lower temperatures may cause damage to internal components. If the device should freeze, be sure to drain the water completely to avoid further damage.
- In case of leaks or splashes of water, dry the device as soon as possible.
- The device is not designed for built-in installation.
-
Use the hose set supplied with the appliance. Do not reuse old hoses.
-
Check the hose connections and the tap to avoid problems due to pressure changes. If the connections loosen or leak, turn off the water tap. Do not operate the washer before the hoses have been properly installed.
- Do not remove the filter from the drain pump while there is water left in the machine. Hot water spillage may occur.
- Before carrying out any maintenance in the device, unplug the appliance from the mains.
- As a safety measure, we advise you to unplug the appliance and cut the water supply after every use. Maximum water-inlet pressure: 1 MPa. Minimum water-inlet pressure: 0.05 MPa.
- Use the new hoses supplied with the equipment.
- Never unplug the appliance with wet hands.
- Unplug the power cord before cleaning or repairing the product.
- For safety reasons, the appliance must be properly earthed.
- Water channelling and electrical devices must be connected by a qualified technician in accordance with the local and national safety regulations specified by the manufacturer.
- The glass door may reach high temperatures during operation. Keep children and pets away from the glass door.
- Do not use the device in rooms where water, moisture, explosives, or caustic gases are present.
- If the room where the washing machine is located has any type of device that generates fumes from the burning of fuels, make sure that there is proper ventilation, as the accumulation of these fumes may cause a fire hazard.
- Never use sprays or flammable substances near the device.
- Do not wash items that have been soiled with substances
such as cooking oil, acetone, alcohol, petrol, kerosene, spot removers, turpentine, waxes, and wax removers.
- Items such as foam rubber, shower caps, waterproof textiles, rubber backed articles, and clothes, or pillows fitted with foam rubber pads should not be washed in the machine.
- Fabric softeners or similar products should be used as specified by manufacturer.
- Do not wash articles that have been cleaned in, washed in, soaked in, or stained with flammable or explosive substances, like wax, oil, paint, petrol, degreasers, dry-cleaning solvents, kerosene, etc., which may result in fire or explosion.
- When washing fabrics that contain vegetable or cooking oil or have been contaminated by haircare products, they should first be washed in hot water with extra detergent. This will reduce, but not eliminate, the hazard.
- Do not install the equipment on a carpeted floor.
- The air openings must not be obstructed by a carpet.
- Appliances with a single inlet valve can only be connected to a cold-water supply.
- The plug must be accessible after installation.
- The appliance must not be installed behind a lockable door, a sliding door, or a door with a hinge on the opposite side to that of the device.
- The appliance shall not be installed in a humid place.
- The product is exclusive for household use and is only designed for the textiles suitable for machine washing.
- Do not use it for commercial purposes.
- Do not stand or sit on the appliance.
- Do not lean against appliance door.
- Flammable and explosive or toxic solvents are forbidden.
Do not use detergents containing petrol, alcohol, etc. Use only detergents suitable for machine washing, especially those which are dosed directly in the drum.
- Do not stop the device before ending the washing cycle. In any case, if this should happen, remove the garments with caution, as they may reach high temperatures.
- Once the washing cycle has finished, we recommend removing the laundry as soon as possible to prevent creases.
- This appliance can be used by children aged 8 and above and persons with reduced physical, sensory, or mental capabilities or lack of experience and knowledge, as long as they have been given supervision or instruction concerning the use of the appliance in a safe way and understand the hazards involved. Do not allow children to play with the device. The cleaning and maintenance of the appliance should not be carried out by children without supervision.
- Children should be supervised to make sure that they do not play with the device.
- Children under 3 years old must stay away from the washing machine, unless they are constantly supervised.
- Make sure that children and animals do not climb on the washing machine while it is in operation.
- All cleaning, washing or similar products must be stored in a safe place, out of the reach of children.
- Do not place heavy objects on top of the washer.
- Cautions during the handling of the machine
- If you wish to change the location of the washing machine, make sure you install the transport bolts again in the device, as they will ensure the interior of the product is not damaged during transport.
- Water accumulated inside the appliance must be drained out.
- Handle the machine carefully. Never hold each protruded part on the machine while lifting. Do not use the door of the device as a handle during transport.
- The device is heavy. Transport it with care.
- Secure the drain and water-supply hose correctly.
- Do not close the door with excessive force. If it is found difficult to close the door, please check if the clothes are put in or distributed well.
- Never try to force the door open. The door will unlock shortly after the end of a cycle.
- It is forbidden to wash carpets.
- Never pour water manually during washing.
INSTRUCTIONS DE SÉCURITÉ
- (UE) 2021/340, (UE) 2021/341,
- (UE) 2021/340, (UE) 2021/341,
- Door
- Detergent dispenser tank
- Control panel
- Drain hose
- Power cable
Accessories. Fig. 2
- 4 caps
- 1 cold water supply hose
- Instruction manual
- Acoustic foam (optional)
NOTE:
The graphics in this manual are schematic representations and may not exactly match the device.
2. BEFORE USE
- This device is packaged in a way as to protect it during transport. Take the device out of its box and remove all packaging materials. You can keep the original box and other packaging elements in a safe place. This will help you prevent damage to the device when transporting it in the future. In case the original packaging is disposed of, make sure all packaging materials are recycled accordingly.
- Make sure all parts and components are included and in good conditions. If there is any piece missing or in bad conditions, contact the official Cecotec Technical Support Service immediately.
- Keep all packaging materials away from children.
Note
- Before using the wash machine, the product shall be calibrated.
- Before washing the clothes for the first time, the product shall be operated in one round of the whole procedures without the clothes inside.
- Make sure that all pockets are empty. Sharp and rigid items such as coins, brooches, nails, screws, or stones may cause serious damage to this machine.
ENGLISH
Box content
- Washing machine
- Hose
- Instruction manual
- Caps
3. INSTALLATION
- Place the device on a flat, stable and dry surface. Make sure the product does not stand on the power cord. F
- Be sure to maintain minimum clearances to walls. Fig. 3
- Avoid exposure to direct sunlight and heat sources. Ensure good ventilation.
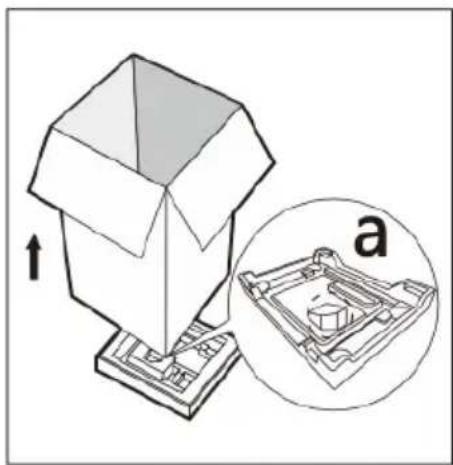
- Remove the cardboard box and Styrofoam packing.
- Lift the washing machine and remove the base packing. Make sure the small triangle foam is removed with the bottom one together. If not, lay the unit down with on the side surface, then remove the small foam from the unit bottom manually. Fig. 4
- Remove the tape securing the power supply cord and drain hose.
- Remove the water supply hose from the drum.
Removing the transport bolts
- The transport bolts must be removed from the backside of the device before using it.
- The transport screws will be necessary again when moving the product, so make sure they are kept in a safe place.
- This appliance is heavy. Transport it with care. Do not hold any protruding parts when lifting. Do not use the door to lift the appliance.
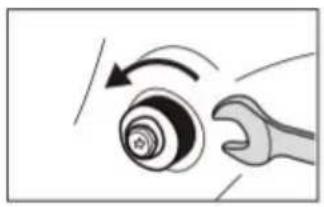
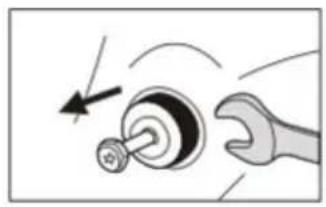
In order to remove the bolts
Fig. 5
- Loosen the 4 bolts with a spanner and then remove them.
- Stop the holes with transport hole plugs.
- Keep the transport screws properly for future use.
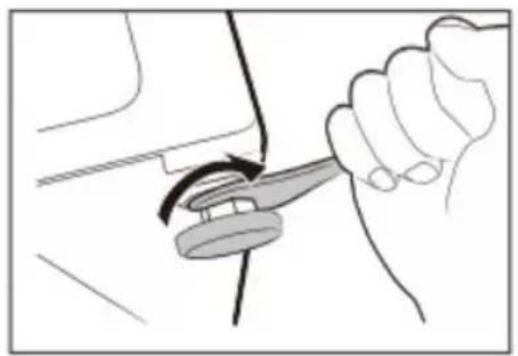
Levelling the washing machine. Fig. 6
Warning
The lock nuts on all four feet must be screwed tightly against the housing.
- Check if the legs are closely attached to the cabinet. If not, please turn them to their original position and tighten the nuts.
- Loosen the lock nut to turn the feet until they are in contact with the floor.
- Adjust the feet and tighten the washers with a spanner. Make sure the machine is steady.
Water supply hose connection
Warning
- Do not kink, crush, modify or repair the water supply hose.
- Make the connection manually, do not use tools. Check the connection is optimal.
Connection between the washing machine connector and the water supply hose.
- Align the curved part of the hose and the washer connector (inlet valve) on the back of the product as shown in figure 7.
- Tighten the compression nut by turning clockwise.
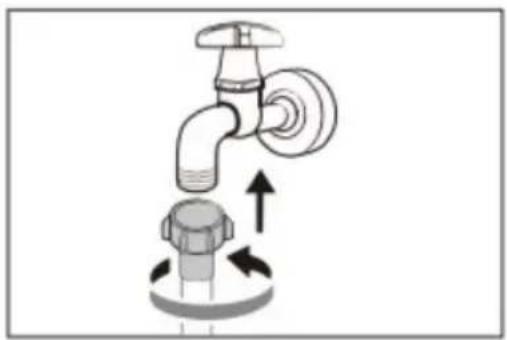
Connection between a screw tap and the water supply hose
Screw tap and water supply hose.
Align the other end of the water supply hose and the threaded tap and tighten the compression nut tightly by turning clockwise. Check figure 8 for reference.
Drain hose
Note
- Do not kink or protract the drain hose.
- Position the drain hose properly, at 60-90 cm from the floor.
There are two ways to place the end of the drain hose:
- In a drainpipe. It is recommended to use a vertical tube. Fig. 9
- In a sink's drainpipe, over the trap. Fig. 10
If the washing machine has a drain hose bracket (depending on the model), it can also be installed on a sink or a tank, as indicated next.
Warning
When installing the drain hose, fix it properly with a rope or a clamp. If drain hose is too long, do not force it into washing machine as it will cause abnormal noises.
Acoustic sponges (depending on model)
Warning
Be sure to assemble the acoustic sponges, as they can reduce the noise caused by the washing machine while it is running.
- Place a soft material, such as foam or towels, between the base of the washing machine and the floor for protection.
ENGLISH
- Gently lift the washing machine on one side and stick the longer sponges on the longer bottom edges of the washing machine on its base. Do the same to adhere the shorter sponges to the shorter bottom edges. Fig. 11
4. OPERATING INSTRUCTIONS
Note
- Please make sure the appliance is properly installed before operation.
- Before washing the clothes for the first time, the product shall be operated in one round of the whole procedures without the clothes inside.
- All washing machines are thoroughly checked before leaving the factory and undergo quality control. There may be a small amount of residual water in the drum. To remove it, as well as to neutralise possible odours, it is recommended to clean the drum before the first use. You can run a Drum Clean programme or use another washing programme at a temperature of 90°C without laundry and detergent.
Calibration
- It is advisable to calibrate the washing machine before its first use in order to get the best performance from it.
- The device is able to detect the amount of laundry in the drum. Calibration optimises product performance by minimising water and energy consumption.
- To perform the calibration, follow the steps below:
- Remove any objects from the drum and close the door.
- Plug the power cord into the outlet.
- Switch on the machine and press the Delay Start and "Speed" buttons simultaneously for about 10 seconds until the control panel displays "t19".
- Next, to start the washing machine, press the Start/Pause button. The drum will start to rotate slowly, and the display will show different numbers, when it shows a steady figure the washing machine is calibrated, you can turn the device off.
Start of washing
Before washing
- Plug the appliance into a power supply.
- Open the water supply tap.
- Load the washing machine with the laundry.
- Close the door.
- Add detergent (and softener if necessary) in the dispenser tank.
Note
- Detergent must be added in "case I" only after selecting pre-washing for machines with this function.
- Make sure that the washing machine is properly installed before use.
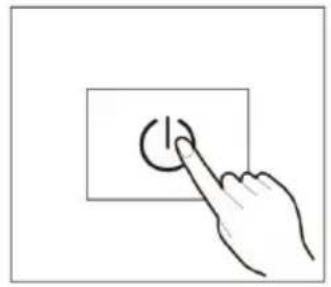
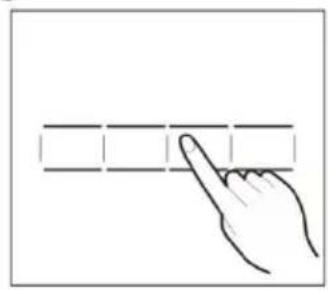
Washing. Fig. 12
- Switch on the device by pressing the On/Off button.
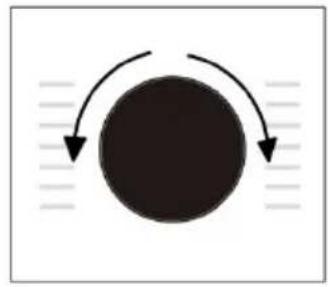
- Turn the knob to select the desired programme.
- Select function or use the default one.
- Press the Start/Pause button.
After washing
When the wash cycle is completed, a beep will sound, and the word "END" will be displayed on the control panel.
Using the washing machine
Before each washing
- The washing machine should be operated within a temperature range of 5-40 °C. If used under 0°C, the inlet valve and draining system may be damaged. If the machine is placed or operated in rooms at 0 °C or below, it should be transferred to normal room temperature to ensure the water supply hose and drain hose are not frozen before use.
- Check the care labels and the product instructions when using detergent before washing. Use non-foaming or less-foaming detergent suitable for machine washing.
- Check the label.
- Empty the pockets of the clothes to be washed.
- Knot the long strips, close zips, or tighten button.
- Place small items in washing bags.
- Turn easy-pilling and long-pile fabrics inside out.
- Separate clothes with different textures.
Note
Washing loose laundry can cause imbalances in the washing machine. It is advisable to add more laundry to ensure optimum performance (maximum 34 parts of the drum).
Detergent dispenser tank Fig. 13
1: pre-wash compartment (detergent)
2: softener compartment
3: washing compartment (detergent)
ENGLISH
- Press and pull the detergent dispenser tank to remove it.
| Programme | I | II |  |
| Quick 15' | ● | ○ | |
| Rapid 45' | ● | ○ | |
| 20°C | ● | ○ | |
| Jeans | ○ | ● | ○ |
| ECO 40-60 | ● | ○ | |
| Steam Wash | ○ | ● | ○ |
| Rinse&Spin | ○ | ||
| Spin Only | |||
| Baby Care | ○ | ● | ○ |
| Wool | ● | ○ | |
| Delicate | ● | ○ | |
| Mixed | ○ | ● | ○ |
| Synthetic | ○ | ● | ○ |
| Sportswear | ○ | ● | ○ |
| Cotton | ○ | ○ |

Necessary

Optional
Note
- When using agglomerated, ropy detergent or additives, before they are poured into the detergent box, it is suggested to use some water for dilution to prevent the inlet of detergent box from being blocked and overflowing while filling water.
- Use a detergent suitable for machine washing at different temperatures for best results and minimum water and energy consumption.
- To obtain the best washing results it is important to use a correct detergent dose.
-
Use a small amount of detergent with a small load of laundry.
-
Always adjust the detergent amount to the water hardness, if tap water is soft, use less detergent.
- Dose detergent according to the degree of soiling of the laundry.
- The highly concentrated compact detergent requires particularly precise dosing.
- Excessive dosing of detergent can lead to foaming and poor washing and rinsing results.
- Insufficient detergent dosage can lead to limescale build-up and discolouration of the laundry.
- Detergent should be added to the compartment only after selecting the prewash function.
| Recommended detergent | Wash cycles Washing temperature (°C) | Type of laundry and textile | |
| Heavy-duty detergent with bleaching agents and optical brighteners | Cotton.ECO 40-60. | 40/60 White laundry made from boil-proof cotton or linen. | |
| Colour detergent without bleaching agents and optical brighteners | Cotton, ECO 40/60,Mixed, 20°C | 20/30/40/60 Coloured | laundry made from cotton or linen. |
| Colour or mild detergent without optical brighteners. | 20°CSynthetic. | Cold/20/30/40 Coloured | Laundry made from easy care fibres or synthetic materials. |
| Mild washing detergent. | Synthetic. 20/30 Delicate textiles, silk, | viscose. | |
| Special wool detergent | Wool 20/30/40 Wool. | ||
Control panel
Fig. 14
Power button (1)
Press to switch the device on and off.
Start/Pause button (2)
Press to start or pause the washing cycle.
ENGLISH
Option (3)
Select an additional function, the light indicator will light when selected.
Programmes (4)
Select the appropriate programme for different types of laundry by turning the selector.
Display (5)
The display shows the settings, estimated time remaining, options, and status messages of the washing machine.
Operating instructions
Fig. 15
A. Display, shows the following data:
- Washing time
- Spin speed
- End of washing cycle (END)
- Delay Start (in H hours)
- Error message (Example: E30)
B. Locked Door icon
C. Extra Rinse icon
D. PreWash icon
E. Child Lock icon
Washing programmes:
02722 DressCode 740 BI Inverter A
| PROGRAMME Load (kg) Default time | (h:min) | |
| 7.0 | ||
| Quick 15' | 2.0 | 0:15 |
| Rapid 45' | 2.0 | 0:45 |
| 20°C 3.5 | 1:01 | |
| Jeans | 7.0 | 1:35 |
| ECO 40-60 | 7.0 | 3:28 |
| Steam Wash 3.5 1:48 | ||
| Rinse&Spin | 7.0 | 0:20 |
| Spin Only | 7.0 | 0:12 |
| Baby Care | 7.0 | 2:01 |
| Wool | 2.0 | 1:07 |
| Delicate 2.5 | 0:50 | |
| Mixed | 7.0 | 1:20 |
| Synthetic 3.5 3:18 | ||
| Sportswear 3.5 | 0:47 | |
| Cotton | 7.0 | 3:39 |
02723 DressCode 840 BI Inverter A
| PROGRAMME Load (kg) Default time | (h:min) | |
| 8.0 | ||
| Quick 15' | 2.0 | 0:15 |
| Rapid 45' | 2.0 | 0:45 |
| 20°C | 4.0 | 1:01 |
| Jeans | 8.0 | 1:35 |
| ECO 40-60 | 8.0 | 3:38 |
| Steam Wash | 4.0 | 1:48 |
| Rinse&Spin | 8.0 0:20 | |
| Spin Only | 8.0 | 0:12 |
| Baby Care | 8.0 | 2:01 |
| Wool | 2.0 | 1:07 |
| Delicate 2.5 | 0:50 | |
| Mixed | 8.0 | 1:20 |
| Synthetic | 4.0 | 3:18 |
| Sportswear | 4.0 | 0:47 |
| Cotton | 8.0 | 3:39 |
02724 DressCode 940 BI Inverter A
| PROGRAMME Load (kg) Default time | (h:min) | |
| 9.0 | ||
| Quick 15' | 2.0 | 0:15 |
| Rapid 45' | 2.0 | 0:45 |
| 20°C | 4.5 | 1:01 |
| Jeans | 9.0 | 1:35 |
| ECO 40-60 | 9.0 | 3:48 |
| Steam Wash | 4.5 | 1:48 |
| Rinse&Spin | 9.0 0:20 | |
| Spin Only | 9.0 | 0:12 |
| Baby Care | 9.0 | 2:01 |
| Wool | 2.0 | 1:07 |
| Delicate 2.5 | 0:50 | |
| Mixed | 9.0 | 1:20 |
| Synthetic | 3,0 | 3:18 |
| Sportswear | 3,0 | 0:47 |
| Cotton | 9.0 | 3:39 |
Note
The parameters on the table are just a reference for the user. Actual parameters may vary from those shown here.
Model: 02722_Bolero DressCode 740 BI Inverter A Washing Machine
| Cycle | Normal capacity in kg | Temperature settings | Cycle duration in hours and minutes | Energy consumption in kWh per operating cycle | Water consumption in litres/cycle | Maximum temperature °C(1) | Remaining moisture content Spin speed /(rpm) |
| Quick 15' | 2.0 | Cold | 0:15 | 0.030 | 31 | Cold | 70%/800 |
| 20°C | 3.5 | 20 | 1:01 | 0.17741 | 20 | 65%/1000 | |
| Steam Wash | 3.5 | 40 | 1:48 | 0,540 | 41 | 40 | 65%/1000 |
| Mixed 7.0 | 40 | 1:20 | 0.69665 | 40 | 65%/1000 | ||
| Cotton | 7.0 | 40 | 3:39 | 1.392 | 65 | 40 | 53%/1400 |
| ECO 40-603) | 7.0 | -- | 3:28 | 0,67557.0 | 34 | 53.9%/1350 | |
| 3.5 | -- | 2:42 | 0,375 | 41,0 | 30 | 53.9%/1350 | |
| 2.0 | -- | 2:42 | 0,188 | 32.0 | 24 | 53.9%/1350 |
- The information above are just references and can change according to the different use conditions.
- The information given for programmes other than the ECO 40-60 programme is indicative only.
- 20°C is capable of washing lightly soiled cotton laundry at a nominal temperature of 20°C, which complies with Regulation (EU) 2019/2023.
- In relation to EN 60456:2016/A11:2020 with (EU) 2019/2014, (EU) 2019/2023,
- (EU) 2021/340, (EU) 2021/341,
- The EU energy efficiency class is A
- Energy test programme: ECO 40-60. Other preset. Half load for 7.0 kg machines: 3.5 kg.
- Quarter load for 7.0 kg machine: 2.0 kg.
Model: 02722_Bolero DressCode 740 BI Inverter A Washing Machine
| Cycle | Normal capacity in kg | Temperature settings | Cycle duration in hours and minutes | Energy consumption in kWh per operating cycle | Water consumption in litres/cycle | Maximum temperature °C1) | Remaining moisture content Spin speed /(rpm) |
| Quick 15' | 2.0 | Cold | 0:15 | 0.030 | 31 | Cold | 70%/800 |
| 20°C | 4.0 | 20 | 1:01 | 0.183 | 44 20 | 65%/1000 | |
| Steam Wash | 4.0 | 40 | 1:48 | 0.569 | 44 | 40 | 65%/1000 |
| Mixed | 8.0 | 40 | 1:20 | 0.754 | 71 | 40 | 65%/1000 |
| Cotton | 8.0 | 40 | 3:39 | 1.498 | 71 | 40 | 53%/1400 |
| ECO 40-603) | 8.0 | -- | 3:38 | 0.759 | 62.0 | 33 53.9%/1350 | |
| 4.0 | -- | 2:48 | 0.425 43,0 | 28 53.9%/1350 | |||
| 2.0 | -- | 2:48 | 0.199 | 36.0 | 25 53.9%/1350 | ||
- The information above are just references and can change according to the different use conditions.
- The information given for programmes other than the ECO 40-60 programme is indicative only.
- 20°C is capable of washing lightly soiled cotton laundry at a nominal temperature of 20°C, which complies with Regulation (EU) 2019/2023.
- In relation to EN 60456:2016/A11:2020 with (EU) 2019/2014, (EU) 2019/2023,
- (EU) 2021/340, (EU) 2021/341,
- The EU energy efficiency class is A
- Energy test programme: ECO 40-60. Other preset. Half load for 8.0 kg machines: 4.0 kg.
- Quarter load for 8.0 kg machine: 2.0 kg.
Model: 02722_Bolero DressCode 740 BI Inverter A Washing Machine
| Cycle | Normal capacity in kg | Temperature settings | Cycle duration in hours and minutes | Energy consumption in kWh per operating cycle | Water consumption in litres/cycle | Maximum temperature °C1) | Remaining moisture content Spin speed /(rpm) |
| Quick 15' | 2.0 | Cold | 0:15 | 0.030 | 31.0 | Cold | 70%/800 |
| 20°C | 4.5 | 20 | 1:01 | 0.189 | 48.0 20 | 65%/1000 | |
| Steam Wash | 4.0 | 40 | 1:48 | 0.599 | 48.0 | 40 | 65%/1000 |
| Mixed | 9.0 | 40 | 1:20 | 0.813 | 78.0 | 40 | 65%/1000 |
| Cotton | 9.0 | 40 | 3:39 | 1.056 | 78.0 | 40 | 70%/800 |
| ECO 40-603) | 9.0 | -- | 3:48 | 0.865 | 63.0 | 43 53%/1350 | |
| 4.5 | -- | 2:54 | 0.452 49.0 | 32 53%/1350 | |||
| 2.5 | -- | 2:54 | 0.205 | 39.0 | 23 53%/1350 | ||
- The information above are just references and can change according to the different use conditions.
- The information given for programmes other than the ECO 40-60 programme is indicative only.
- 20°C is capable of washing lightly soiled cotton laundry at a nominal temperature of 20°C, which complies with Regulation (EU) 2019/2023.
- In relation to EN 60456:2016/A11:2020 with (EU) 2019/2014, (EU) 2019/2023,
- (EU) 2021/340, (EU) 2021/341,
- The EU energy efficiency class is A
- Energy test programme: ECO 40-60. Other preset. Half load for 9.0 kg machine: 4.5 kg.
- Quarter load for 9.0 kg machine: 2.5 kg.
- The highest temperature reached by the laundry in a washing cycle for at least 5 minutes.
- Residual moisture after the wash cycle in percentage of water content and the spin speed at which it was reached.
- The ECO 40-60 programme can normally soiled clean cotton clothes declared as washable at 40°C or 60°C, together in the same cycle. This programme is used to assess compliance with Regulation (EU) 2019/2023.
ENGLISH
The most efficient programmes in terms of energy consumption are generally those that are carried out at lower temperatures and longer duration.
Loading the washing machine up to the recommended capacity for the respective programmes will contribute to saving energy and water.
Noise and residual moisture content are influenced by the spin speed: the higher the spin speed, the higher the noise and the lower the residual moisture content.
Warning
If there is a power failure while the machine is running, the internal memory stores the selected programme. The unit will resume the programme when power supply is restored.
Choose the most suitable washing programme according to the type of laundry:
| PROGRAMME TYPE OF CLOTHING | |
| Quick 15' | Extra-short programme, suitable for lightly soiled washing or for small amounts of laundry.Useful programme for washable and delicate fabrics, such as silk. |
| Rapid 45' | It can be used to wash a few items of laundry or clothes that are not too dirty. |
| 20°C | Capable of washing lightly soiled cotton linen at a nominal temperature of 20°C. |
| Jeans | Specially designed for jeans. |
| ECO 40-60 | The ECO 40-60 programme can normally soiled clean cotton clothes declared as washable at 40°C or 60°C, together in the same cycle. |
| Steam Wash Steam can enter the fiber to the core, effectively killing bacteria and germs, preventing odours, and protecting your health. | |
| Rinse&Spin Rinses, spins | the laundry, and drains the water from the drum. |
| Spin Only Centrifuging the | laundry and draining the water from the drum |
| Baby Care Useful programme for delicate fabrics such as baby clothes. Performs deeper cleansing and better rinsing to protect babies' skin. | |
| Wool | Wool or virgin wool fabrics, hand or machine washable. Delicate washing programme to prevent shrinkage. Longer programme breaks (garments are kept soaking). |
| Delicate | For delicate, washable textiles, e.g., silk, satin, synthetic fibres, or blended fabrics. |
| Mixed | Mixed loads with cotton and synthetic clothes |
| Synthetic Wash synthetic articles, for example shirts, coats, mix. While washing the knitting textiles, detergent quantity shall be reduced as the soft fabric is more prone to bubbles. | |
| Sportswear | For washing sports clothes. |
| Cotton | Wear-resistant and heat-resistant fabrics made of cotton or linen. |
Options
| PROGRAMME TEMPERATURE | UREDEFAULT (°C) | SPIN SPEEDDEFAULT (rpm) | ADDITIONAL FUNCTIONS |
| Cotton 40 800 Delay Start/Prewash/ | Extra Rinse | ||
| Steam Wash 40 1000 Delay Start/Prewash/ | Extra Rinse | ||
| Synthetic 40 800 Delay Start/Prewash/ | Extra Rinse | ||
| Mixed 40 1000 Delayed Start/Prewash/ | Extra Rinse | ||
| Jeans 30 800 Delay Start/Prewash/ | Extra Rinse | ||
| ECO 40-60 - 1400 Delay Start | |||
| 20°C 20 1000 Delay Start / Extra Rinse | |||
| Spin Only - 1000 Delay Start | |||
| Quick 15' Cold 800 Delay Start | |||
| Rapid 45' 20 800 Delay Start / Extra Rinse | |||
| Sportswear 20 800 Delayed Start/Prewash/ | Extra Rinse | ||
| Wool 40 600 Delay Start / Extra Rinse | |||
| Baby Care 60 1000 Delay Start/Prewash/ | Extra Rinse | ||
| Rinse&Spin - 1000 Delay Start / Extra Rinse | |||
| Delicate 30 800 Delay Start / Extra Rinse |
- The table shows the cycles' options and how they can be adjusted.
- It also shows if some settings are not compatible with some cycles.
- To know the maximum spin speed, the programme time and other ECO 40-60 programme details, refer to the contents of the Product Sheet page.
OPTIONS
Delay Start
- To set the Delay Start function:
- Switch on the equipment
- Select a programme
- Press the Delay Start button to choose the time (the delaying time is 0-24 H.).
- Press Start/Pause to activate the delay operation.
- To cancel the "Delay Start" function, press the button before starting the programme until the display shows 0H. If the programme has already started, switch the device off and on again and select a new programme.
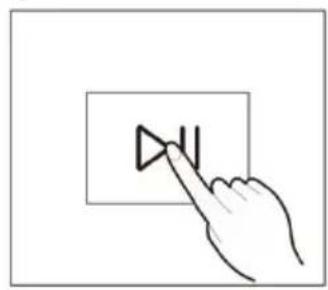
Start/Pause
Switch on the equipment
Press the button ▷◇ to start or pause the washing cycle.
Extra rinse
Switch on the equipment
Select a programme
Press the button — and select Extra Rinse to make the machine perform an extra final rinse (Extra Rinse icon will light up 📊).
Pre-Wash
Switch on the equipment
Select a programme
Press the button and select Prewash to make the appliance perform an additional wash before the main wash cycle starts, to increase the washing performance (Prewash icon will light up)!
Note: detergent must be added to compartment I.
Spin speed
Switch on the equipment
Select a programme
Press this button to select the desired speed.
Temperature
- Switch on the equipment
- When necessary, the wash temperature can be adjusted by pressing the button and following the sequence below: Cold-20°C-30°C-40°C-60°C-90°C.
My Cycle
With this option you can save the configuration of the most frequently used programme.
-
Switch on the equipment
-
Choose the desired programme using the selector and the desired settings if applicable (temperature, spin speed, prewash, extra rinse).
-
Press and hold the Speed button for approx. 3 seconds.

The settings will be saved.
- By selecting the "My Cycle" programme through the selector, the previously saved settings are automatically activated.
Child Lock
- Switch on the equipment
- Press the Temp and Speed buttons at the same time for approximately 3 seconds.
- Note:
- When the child lock is activated and the washing programme starts, the indicator will light up.
- Press and hold both buttons again to unlock the function.
- This function locks all buttons except the On/Off button and the child lock button itself.
- Deactivate the child lock function before selecting a programme and starting washing.
ENGLISH
Mute Mode
- Switch on the equipment
- Select a programme
- Press the Start/Pause button
- Press and hold the Temp button for approx. 3 seconds. No beeps shall be heard.
- To reactivate the sound, press the Temp button again for about 3 seconds.
- Note: the setting will be saved until next restart.
Usage counter
- Unplug the equipment for 10 seconds and plug it in again.
- Switch on the machine and wait for 10 seconds, press and on the control panel simultaneously and continuously for about 5 seconds until the display shows digits. The value indicates the usage times of the machine.
- Repeat step 1 again to resume normal operation.
Tips for use
- After a programme is completed, wait for two minutes before opening the door.
- Check whether the water inside the drum has been drained before opening its door. Do not open the door if there is any water.
- Do not wash only one piece of clothes or garment, as these could cause great unbalance. Always introduce at least 3 or 4 clothes so that draining can be done smoothly.
- The information given for the programmes different to the eco 40-60 programme are just indicative.
- The eco 40-60 programme can clean normally soiled cotton clothes declared as washable at 40°C or 60°C, together in the same cycle. This programme is used to assess compliance with EU eco-design legislation.
- The times indicated for each programme match the length with standard loads and temperatures. Other loads and temperatures will need different programme length.
- The most efficient programmes in terms of energy consumption are generally those that are carried out at lower temperatures and longer length.
- Load the washing machine to the quantity estimated for each programme, this will help you save energy and water.
- The length, and energy and water consumption of each programme may vary according to the weight and type of laundry, the additional functions active, water, and ambient temperature.
- It is recommended the use of liquid detergent for washing programmes at low temperature. You can vary the quantity of detergent according to the quantity of laundry and its soiling level. Follow the detergent manufacturer recommendations for the quantity of detergent you must use.
- You can find more information on this model by scanning the QR code of the reference of your product (you will also find the energy label).
| Product | Bolero DressCode740 BI Inverter A | Bolero DressCode840 BI Inverter A | Bolero DressCode 940BI Inverter A |
| Reference: | 02722 02723 02724 | ||
| QR code |  |  |  |
5. CLEANING AND MAINTENANCE
Warning
- Before cleaning or repair tasks, unplug the appliance from the mains and close the water tap.
- Proper maintenance on the washing machine can extend its working life. The surface can be cleaned with diluted non-abrasive, neutral detergents if necessary. If there is any water overflow, use a cloth to wipe it off immediately.
- Do not use abrasive cleaners or scouring pads to clean the device.
Cleaning the drum
- The rusts left inside the drum by the metal articles shall be removed immediately with chlorine-free detergents.
- Do not use steel wool.
Note
Do not put laundry in the washing machine during the drum cleaning.
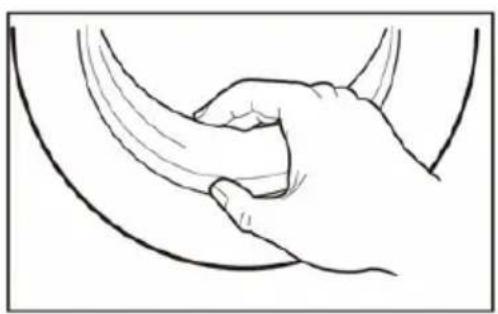
Cleaning the door seals and glass
- Wipe the glass and seal after each wash to remove lint and stains. If lint builds up it can cause leaks. Fig. 16
- Remove any coins, buttons, and other objects from the seal after each wash.
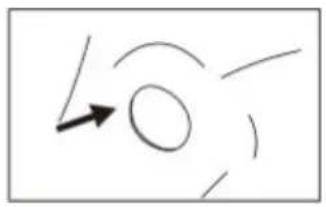
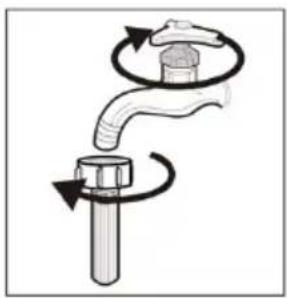
Cleaning the inlet filter. Fig.17
Note
The inlet filter must be cleaned when there is little water.
- Close the water supply tap.
- Remove the water supply hose from the tap.
- Clean the filter with a soft brush.
ENGLISH
- Loosen the water supply hose from the rear part of the washing machine. Remove the filter with a pair of fine-tipped clippers, taking care not to damage it.
- Use a soft brush to clean the filter.
- Return the filter to its original position and connect the hose.
- Clean the filter every 3 months to guarantee optimum functioning.
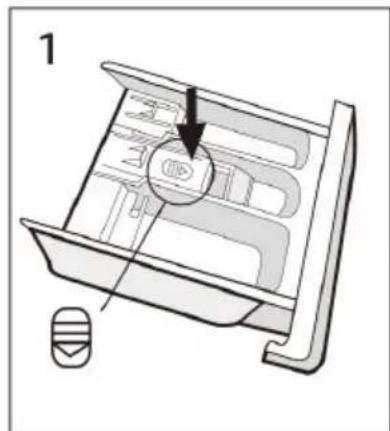
Cleaning the detergent dispenser tank. Fig. 18
- Remove the detergent dispenser tank.
- Press down the arrow on the softener cover inside the dispenser drawer.
- Lift the clip up and take out the softener cover and wash all grooves with water.
- Place the softener cover again and push it gently to introduce it in the detergent dispenser in place.
Warning
- Do not use alcohol, solvents, or chemical products to clean the detergent dispenser.
- Clean the tank about every 3 months.
Cleaning the drain pump filter. Fig. 19
Warning
- Be careful with the hot water!
- Allow any possible water remains to cool down.
- Unplug the machine to avoid electrical shock before washing.
- The drain pump filter can filter the yarns and small foreign matters from the washing.
- Clean the filter periodically to ensure proper operation of the washing machine.
- Open the bottom cover.
- Remove the filter by turning it counterclockwise.
- Be careful, empty the water with a suitable container.
- Remove dust, dirt and other substances or objects.
- Place the filter again in its original position by turning it in the other sense.
- Open the lower cover cap.
Warning
- Make sure that the filter is reinstalled correctly.
- Rotate the lower cover cap (filter) so water runs directly into a suitable container.
- When the appliance is in use and depending on the programme selected there can be hot water in the pump. Do not remove the lower cover during the wash cycle, always wait until the appliance has finished the cycle and is empty.
-
When replacing the cover, ensure it is securely re-tightened.
-
TROUBLESHOOTING
| Problem Cause Solution | ||
| The washing machine does not turn on | The door is not closed properly. It is not connected to a power outlet | Restart after the door is closed.Check if there are clothes stuck.Plug it to a mains socket.Check that the control and protection elements of the electrical installation are activated. |
| The door does not open The safety lock system is activated | Unplug it and restart the product. | |
| Water leakage Bad connection between pipes and water supply hose or drainpipe. | Check and fasten the water pipes and hoses correctly.Clean the hoses ensuring they are not blocked. | |
| Detergent residues in the box Detergent is dampened or agglomerated | Clean and wipe the detergent box | |
| Indicator or display does not light | The PCB is disconnected, or the system connector has connection problems | Check for power supply.If the problem persists, contact the official Technical Support Service of Cecotec. |
| Abnormal noise. Check if the fixing bolts have | been removed.Make sure the appliance is installed on a solid, level floor.Level the washing machine adjusting its feet. | |
If the problem persists:
1. Unplug the appliance.
2. Contact the official Cecotec Technical Support Service. Do not try to repair the appliance on your own.
Errors
| Error Cause Solution | ||
| E30 The door is not closed | properly | Restart after the door is closed.Check if there is laundry or dirt stuck. |
| E10 Water injecting problem | while washing | Check if the water pressure is too low.Stretch the water supply hose.Check if the inlet valve filter is blocked. Clean the filters. |
| E21 Overtime water draining | Check if the drainpipe is | blocked.Remove any type of object or dirt which may block the water outlet. Check there are no blockages in the water supply and/or drain hoses. |
| E12 Water overflow Restart | the appliance. | |
| EXX Other models Contact | the official Technical | Support Service of Cecotec. |
7. TECHNICAL SPECIFICATIONS
You can find more information on this model by scanning the QR code on the energy label.
Technical specifications may change without prior notification to improve product quality.
| Product Bolero | DressCode740 BI Inverter A | Bolero DressCode840 BI Inverter A | Bolero DressCode 940BI Inverter A |
| Reference: 02722 | 02723 02724 | ||
| QR codes |  |  |  |
| Rated capacity | 7.0 kg 8.0 kg 9.0 kg | ||
| Voltage | 220-240 V~ | ||
| Rated power 19 | 50 W (1900 W model 02724) | ||
| Rated frequency | 50 Hz | ||
| Water pressure | 0.05 MPa~1 MPa | ||
| Maximum power | 10 A | ||
| Protection rating | IPX4 | ||
Made in China | Designed in Spain
8. HOW TO BUILD IN THE WASHING MACHINE
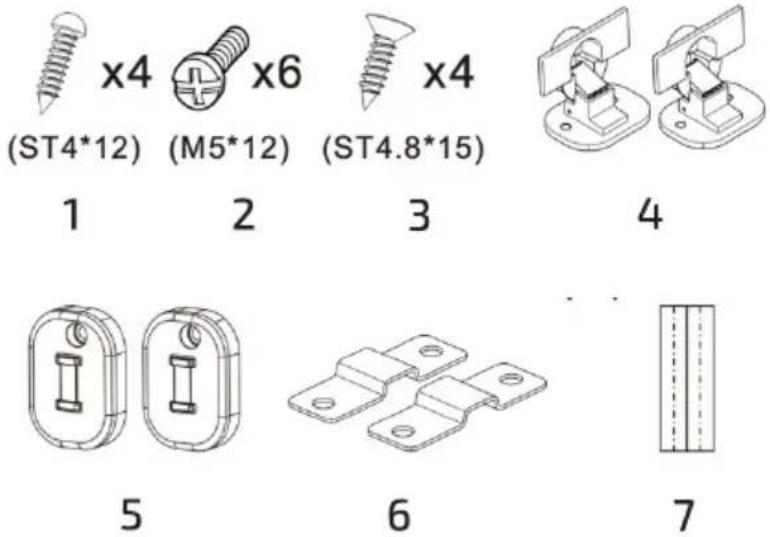
Assembly kit Fig.20
- Self-tapping screws ST4*12 (x4)
- Self-tapping screws M5*12 (x6)
- Self-tapping screws ST4,8*15 (x4)
- Hinges (x2)
- Magnets (x2)
- Dividers (x)
- Positioning sheet (1)
ENGLISH
Assembly tools (not included)
- Screwdriver
- Electric screwdriver
- Ruler
- Pencil
General measures to build-in the washing machine (Fig. 21)
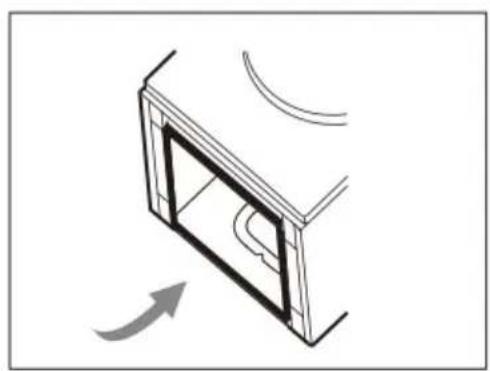
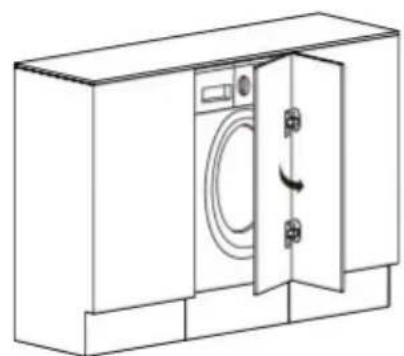
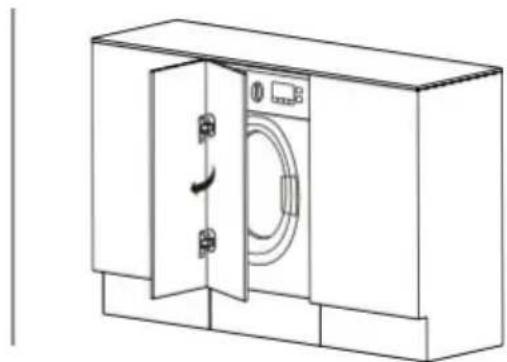
Door preparation and assembly (Fig. 22)
- Door installation with opening direction from left to right.
- Door assembly with opening direction from right to left.
Steps to follow:
- Make a mark on the door using the positioning sheet (Fig. 23).
- Fix the positioning sheet on the door (Fig. 24).
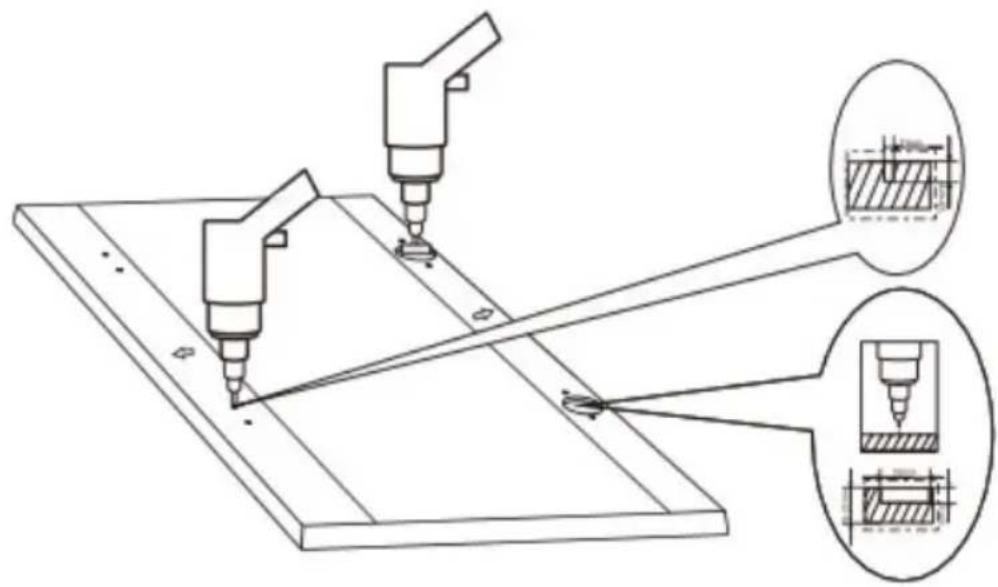
- Drill holes in the door (Fig. 25).
- Install the hinges and spacers using the screws provided (Fig. 26).
-
Install the magnets (Fig. 27).
c. Attach the magnets to the washing machine.
d. Screw the magnets to the washing machine. -
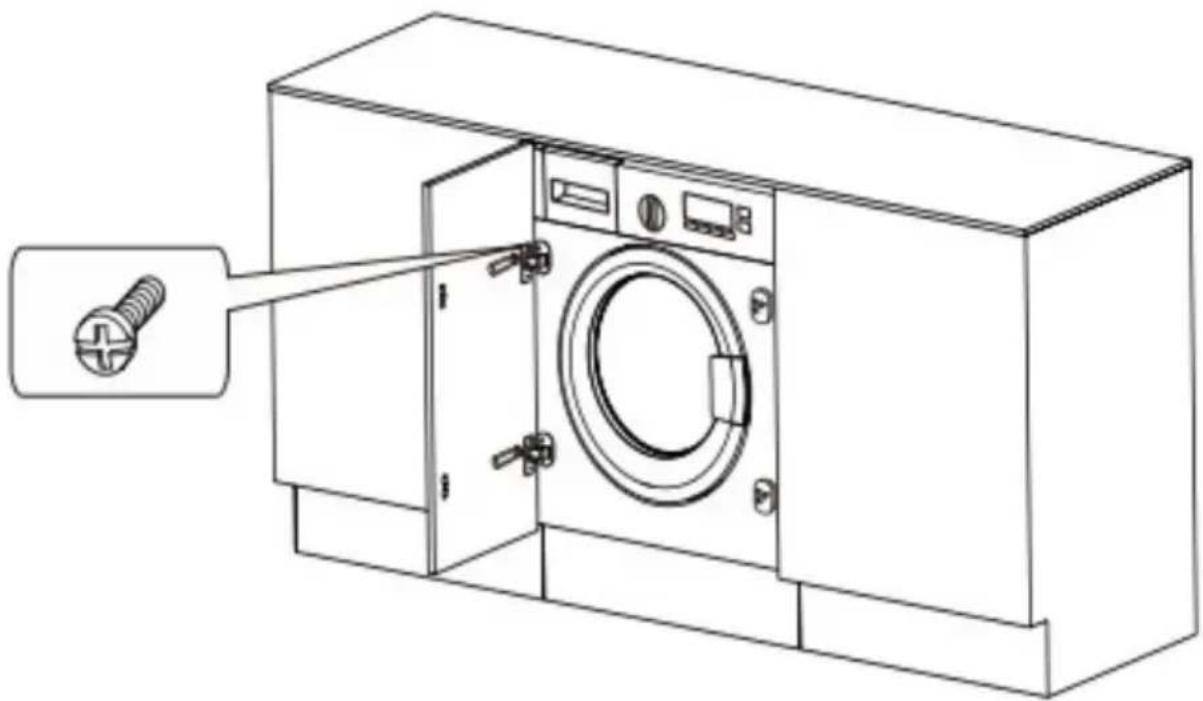
Install the door using the screws provided (Fig. 28).
WARNING
When installing the appliance in the kitchen, make sure that, if possible, the hoses are placed in either of the two recesses at the back of the appliance. This will help prevent the hoses from kinking or getting trapped.
9. DISPOSAL OF OLD ELECTRICAL AND ELECTRONIC APPLIANCES

This symbol indicates that, according to the applicable regulations, the product and/or battery must be disposed of separately from household waste. When this product reaches the end of its shelf life, you should dispose of the cells/batteries/accumulators and take them to a collection point designated by the local authorities.
Consumers must contact their local authorities or retailer for information concerning the correct disposal of old appliances and/or their batteries.
Compliance with the above guidelines will help protecting the environment.
10. TECHNICAL SUPPORT AND WARRANTY
Cecotec shall be liable to the end user or consumer for any lack of conformity that exists at the time of delivery of the product under the terms, conditions, and deadlines established by the applicable regulations.
It is recommended that repairs be carried out by qualified personnel.
If at any moment you detect any problem with your product or have any doubt, do not hesitate to contact the official Cecotec Technical Support Service at +34 963 210 728.
11. COPYRIGHT
The intellectual property rights over the texts in this manual belong to CECOTEC INNOVACIONES, S.L. All rights reserved. The contents of this publication may not, in whole or in part, be reproduced, stored in a retrieval system, transmitted, or distributed by any means (electronic, mechanical, photocopying, recording, or similar) without the prior authorization of CECOTEC INNOVACIONES, S.L.
MEASURES (Fig. 29)
| Model 02722 Bolero DressCode 740 BI Inverter A02723 Bolero DressCode 840 Inverter A | |
| Dimensions | |
| A 595mm | |
| B 825mm | |
| C 495mm | |
| D 915mm | |
| E 135mm | |
| F 555mm | |
| G 545mm | |
| H 975mm | |
| Weight 60kg | |
ENGLISH
| Model 02724 Bolero DressCode 940 BI Inverter A | |
| Dimensions | |
| A 595mm | |
| B 825mm | |
| C 515mm | |
| D 935mm | |
| E 135mm | |
| F 575mm | |
| G 565mm | |
| H 995mm | |
| Weight 60kg | |
*Approximate data may vary depending on improvements made.
1. PIÈCES ET COMPOSANTS
Img. 1
- (UE) 2021/340, (UE) 2021/341,
DIMENSIONS (IMG. 29)
| Modèle 02722 Bolero DressCode 740 BI Inverter A02723 Bolero DressCode 840 Inverter A | |
| Dimensions | |
| A 595 mm | |
| B 825 mm | |
| C 495 mm | |
| D 915 mm | |
| E 135 mm | |
| F 555 mm | |
| G 545 mm | |
| H 975 mm | |
| Poids 60 kg | |
| Modèle 02724 Bolero DressCode 940 BI Inverter A | |
| Dimensions | |
| A 595 mm | |
FRANÇAIS
| B 825 mm | |
| C 515 mm | |
| D 935 mm | |
| E 135 mm | |
| F 575 mm | |
| G 565 mm | |
| H 995 mm | |
| Poids 60 kg |
| Cotton (cotone) | 8,0 | 40 | 3:39 | 1,498 | 71 | 40 | 53 %/1400 |
| ECO 40-60 ^3) | 8,0 | -- | 3:38 | 0,759 | 62,0 | 33 53,9 | %/1350 |
| 4,0 | -- | 2:48 | 0,425 43,0 | 28 53,9 | %/1350 | ||
| 2,0 | -- | 2:48 | 0,199 | 36,0 | 25 53,9 | %/1350 |
- (UE) 2021/340, (UE) 2021/341,
| Jeans | 8,0 | 1:35 |
| ECO 40-60 | 8,0 | 3:38 |
| Limpeza a vapor (Steam Wash) | 4,0 | 1:48 |
| Enxaguamento e centrifugação (Rinse&Spin) | 8,0 0:20 | |
| Centrifugar (SpinOnly) | 8,0 | 0:12 |
| Roupa de bebé (Baby Care) | 8,0 | 2:01 |
| Lã (Wool) | 2.0 | 1:07 |
| Roupa delicada (Delicate) 2,5 | 0:50 | |
| Roupa Mista (Mixed) | 8,0 | 1:20 |
| Sintético (Synthetic) | 4,0 | 3:18 |
| Desporto (Sports) | 4,0 | 0:47 |
| Algodão (Cotton) | 8,0 | 3:39 |
02724 DressCode 940 BI Inverter A
| PROGRAMA Carga (kg) Tempo por defeito | (h:m) | |
| 9,0 | ||
| Rápido 15' (Quick 15') | 2.0 | 0:15 |
| Rápido 45' (Quick 45') | 2.0 | 0:45 |
| 20 °C | 4,5 | 1:01 |
| Jeans | 9,0 | 1:35 |
| ECO 40-60 | 9,0 | 3:48 |
| Limpeza a vapor (Steam Wash) | 4,5 | 1:48 |
| Enxaguamento e centrifugação (Rinse&Spin) | 9,0 0:20 | |
| Centrifugar (SpinOnly) | 9,0 | 0:12 |
| Roupa de bebé (Baby Care) | 9,0 | 2:01 |
| Lã (Wool) | 2.0 | 1:07 |
| Roupa delicada (Delicate) 2,5 | 0:50 | |
| Roupa Mista (Mixed) | 9,0 | 1:20 |
| Sintético (Synthetic) | 3,0 | 3:18 |
| Desporto (Sports) | 3,0 | 0:47 |
| Algodão (Cotton) | 9,0 | 3:39 |
Aviso
- (UE) 2021/340, (UE) 2021/341,
- (UE) 2021/340, (UE) 2021/341,
Kinderslot (Child Lock)
| B 825mm | |
| C 495mm | |
| D 915mm | |
| E 135mm | |
| F 555mm | |
| G 545mm | |
| H 975mm | |
| Waga 60kg | |
| Model 02724 Bolero DressCode 940 BI Inverter A | |
| Wymiary | |
| A 595mm | |
| B 825mm | |
| C 515mm | |
| D 935mm | |
| E 135mm | |
| F 575mm | |
| G 565mm | |
| H 995mm | |
| Waga 60kg | |

natural_image
Simple line drawing of a washing machine with circular vent and diagonal lines (no text or symbols)Fig. / Img. / Rys. / Obr. 3
natural_image
Technical illustration of a mechanical assembly with an inset showing a close-up view of a component labeled 'a' (no text or symbols present)Fig. / Img. / Rys. / Obr. 4
natural_image
Illustration of a snail being adjusted with a wrench, showing rotational motion (no text or symbols)1
natural_image
Illustration of a wrench turning a screw with an arrow indicating motion (no text or symbols)2
natural_image
Simple line drawing with a curved arrow and a circle, no text or symbols present3
Fig. / Img. / Rys. / Obr. 5
natural_image
Illustration of a hand using a tool to adjust or install a mechanical component (no text or symbols visible)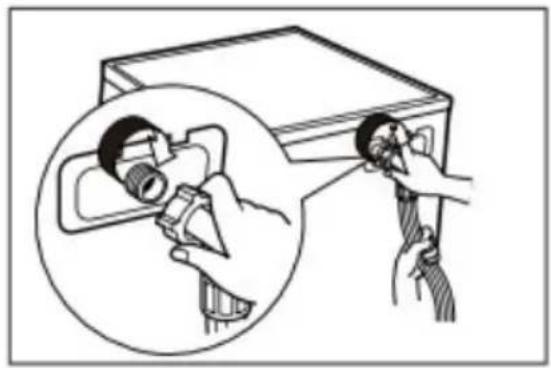
natural_image
Illustration of a person using a device to adjust or install a device, with magnified inset showing the device's handle (no text or symbols present)Fig. / Img. / Rys. / Obr. 6 Fig. / Img. / Rys. / Obr. 7
natural_image
Diagram of a faucet with directional arrows indicating movement or force (no text or symbols)Fig. / Img. / Rys. / Obr. 8

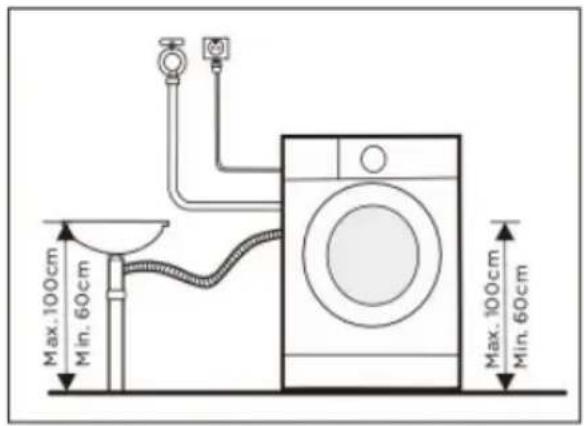
Fig. / Img. / Rys. / Obr. 10Fig. / Img. / Rys. / Ob

natural_image
Diagram of a door frame with an arrow indicating direction (no text or symbols)Fig. / Img. / Rys. / Obr. 11
1
natural_image
Hand pressing a button on a square panel (no text or symbols visible)2
natural_image
Simple diagram with a black circle and two curved arrows pointing outward, surrounded by horizontal lines (no text or symbols)3
natural_image
Hand pointing at a grid of rectangular cells (no text or symbols)4
natural_image
Hand pointing at a button symbol on a square panel (no text or labels)Fig. / Img. / Rys. / Obr. 12
1
2
3
4
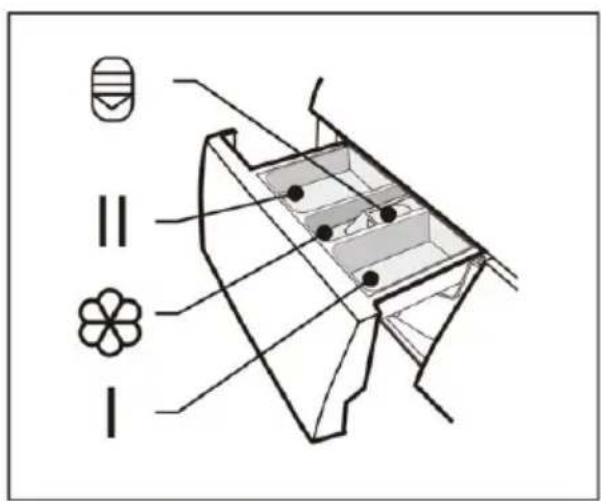
Fig. / Img. / Rys. / Obr. 13

flowchart
graph TD
    A["Circle Node"] --> B["Rectangular Node 1"]
    A --> C["Rectangular Node 2"]
    A --> D["Rectangular Node 3"]
    A --> E["Rectangular Node 4"]
    A --> F["Rectangular Node 5"]
Fig. / Img. / Rys. / Obr. 14
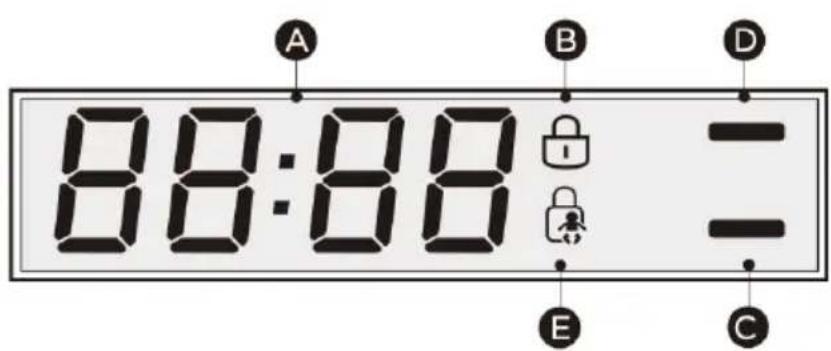
Fig. / Img. / Rys. / Obr. 15
natural_image
Line drawing of a hand gripping a curved object (no text or symbols)Fig. / Img. / Rys. / Obr. 16
natural_image
Diagram of a faucet with rotating arrows indicating flow direction (no text or symbols)
natural_image
Illustration of a hand holding a microphone with a tool inserted (no text or symbols)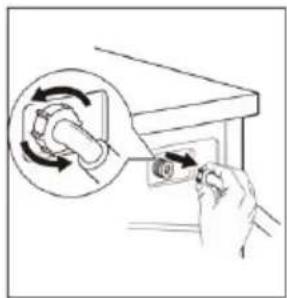
natural_image
Hand holding a small mechanical component with a circular arrow indicating rotation (no text or symbols)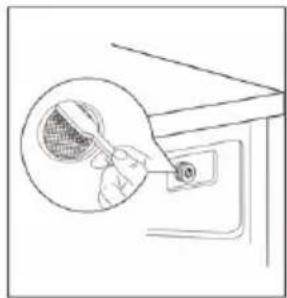
natural_image
Simple line drawing of a hand inserting a small object into a device (no text or symbols)Fig. / Img. / Rys. / Obr. 17
natural_image
Diagram of a mechanical component with an arrow indicating direction, no text or symbols present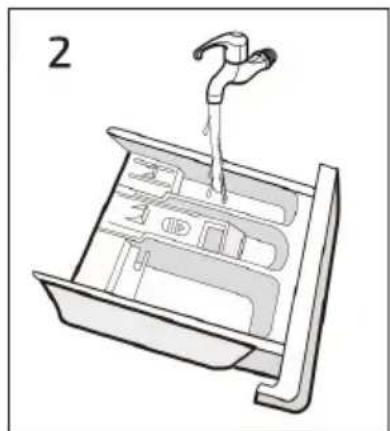
natural_image
Line drawing of a mechanical component with a lever and base plate (no text or symbols)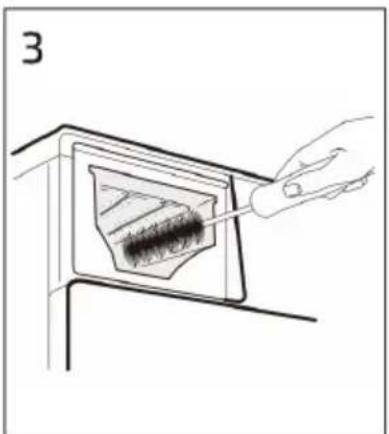
natural_image
Line drawing of a hand using a tool to interact with a screen displaying a textured object (no text or symbols)
natural_image
Diagram of a mechanical drawer with internal compartments and an arrow indicating direction (no text or symbols)Fig. / Img. / Rys. / Obr. 18

natural_image
Hand holding a light bulb above a plate with a circular arrow indicating rotation (no text or symbols)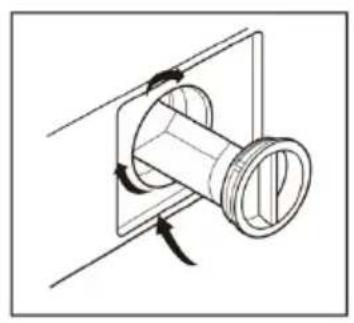
natural_image
Diagram of a pipe connection with directional arrows indicating flow or movement (no text or symbols)Fig. / Img. / Rys. / Obr. 19
1
2
3
4
5
6
7
Fig. / Img. / Rys. / Obr. 20
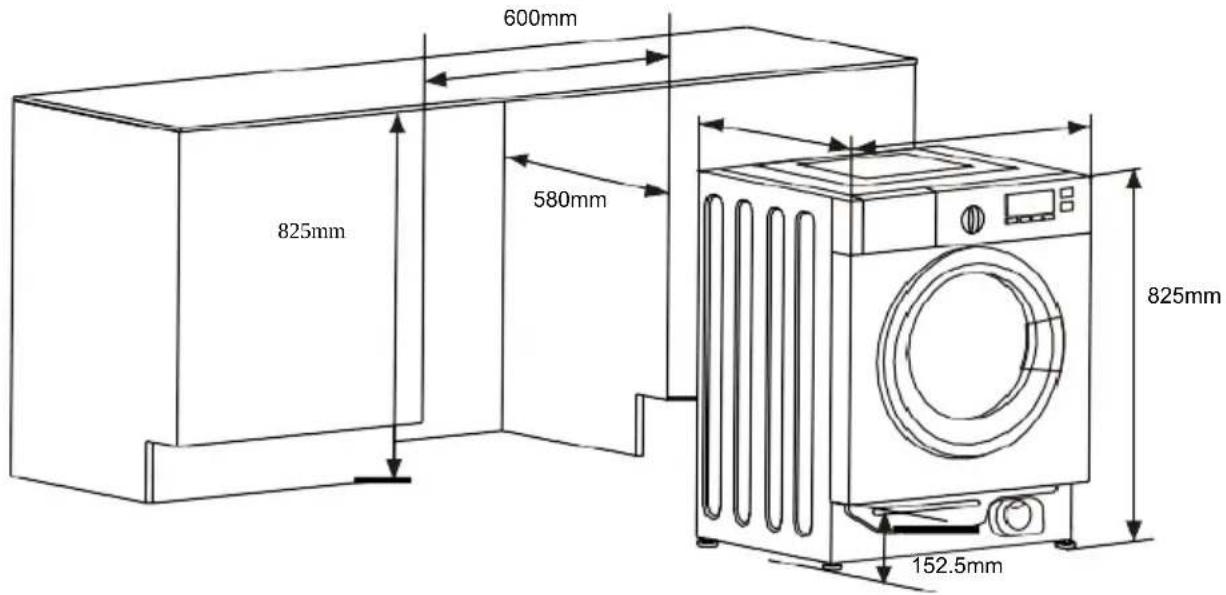
Fig. / Img. / Rys. / Obr. 21
natural_image
Line drawing of a front-loading washing machine with door and side panels (no text or symbols)1
natural_image
Line drawing of a cabinet with an open door and internal air vent (no text or symbols)2
Fig. / Img. / Rys. / Obr. 22

Fig. / Img. / Rys. / Obr. 23

natural_image
Pure electrical circuit lines without any symbols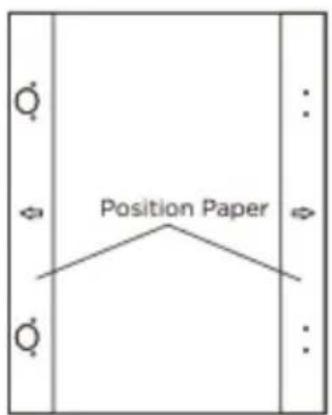
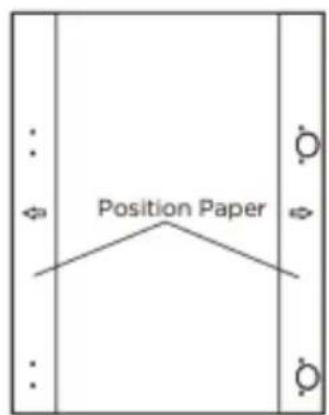
Fig. / Img. / Rys. / Obr. 24
natural_image
Technical line drawing of a cutting machine tool on a workbench, with two inset views showing detailed cross-sections (no text or symbols present)Fig. / Img. / Rys. / Obr. 25
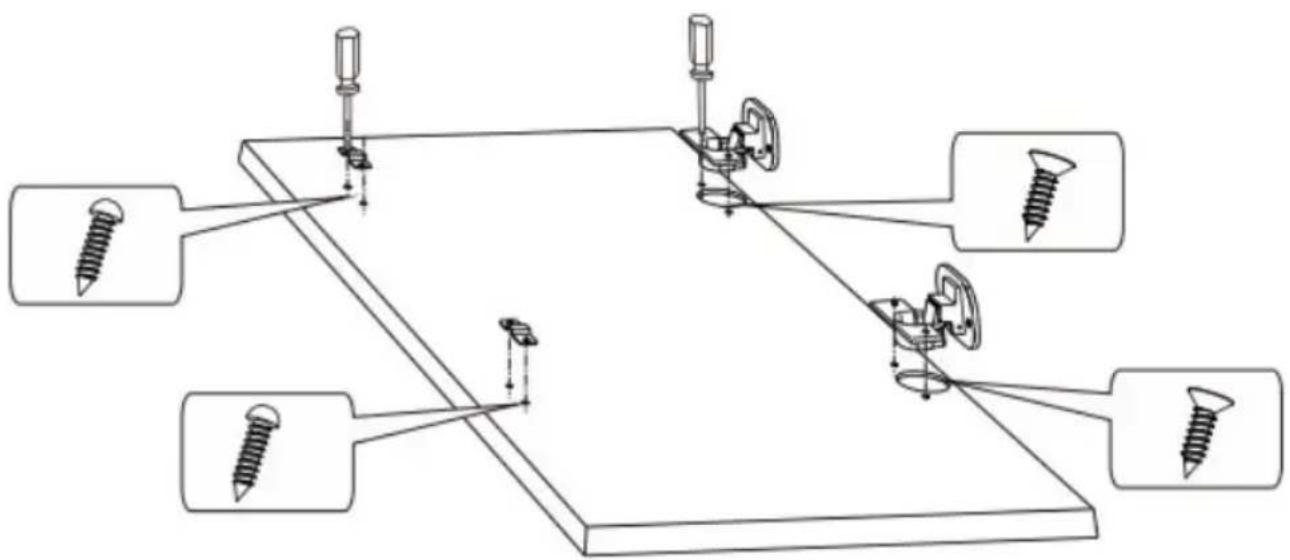
Fig. / Img. / Rys. / Obr. 26
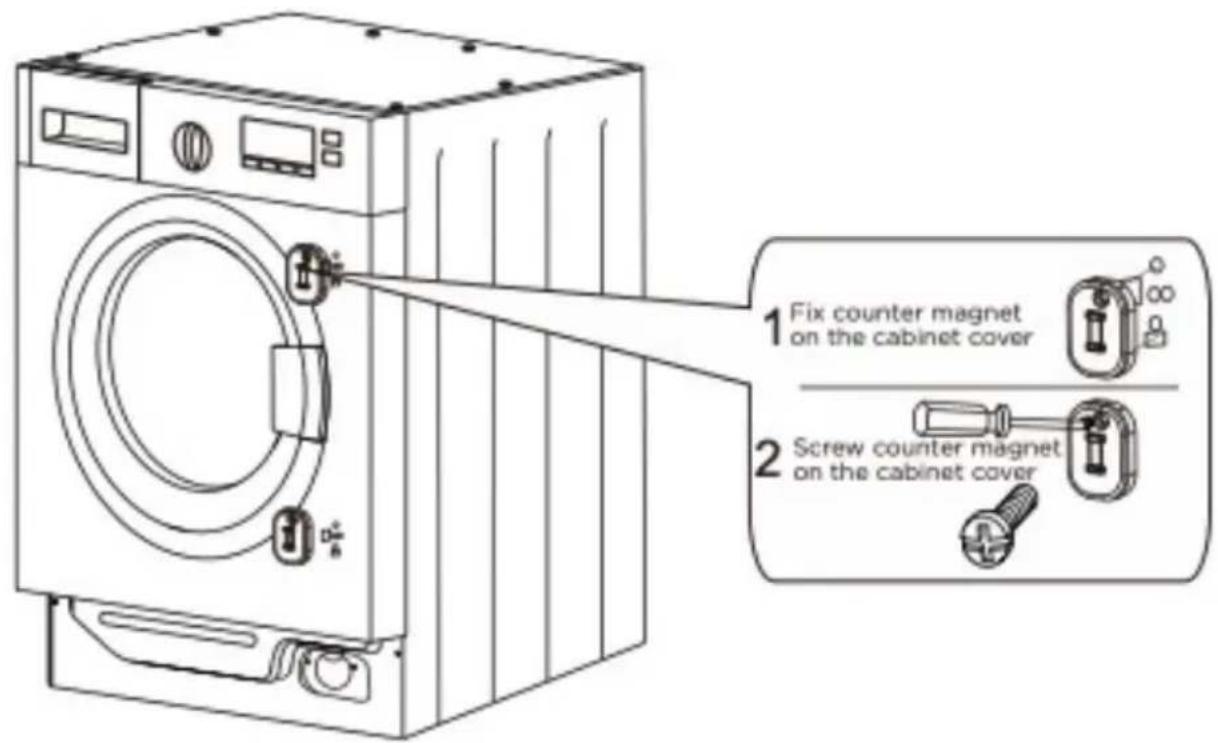
Fig. / Img. / Rys. / Obr. 27
natural_image
Line drawing of a washing machine with a screw inserted, showing internal components and no text or symbolsFig. / Img. / Rys. / Obr. 28
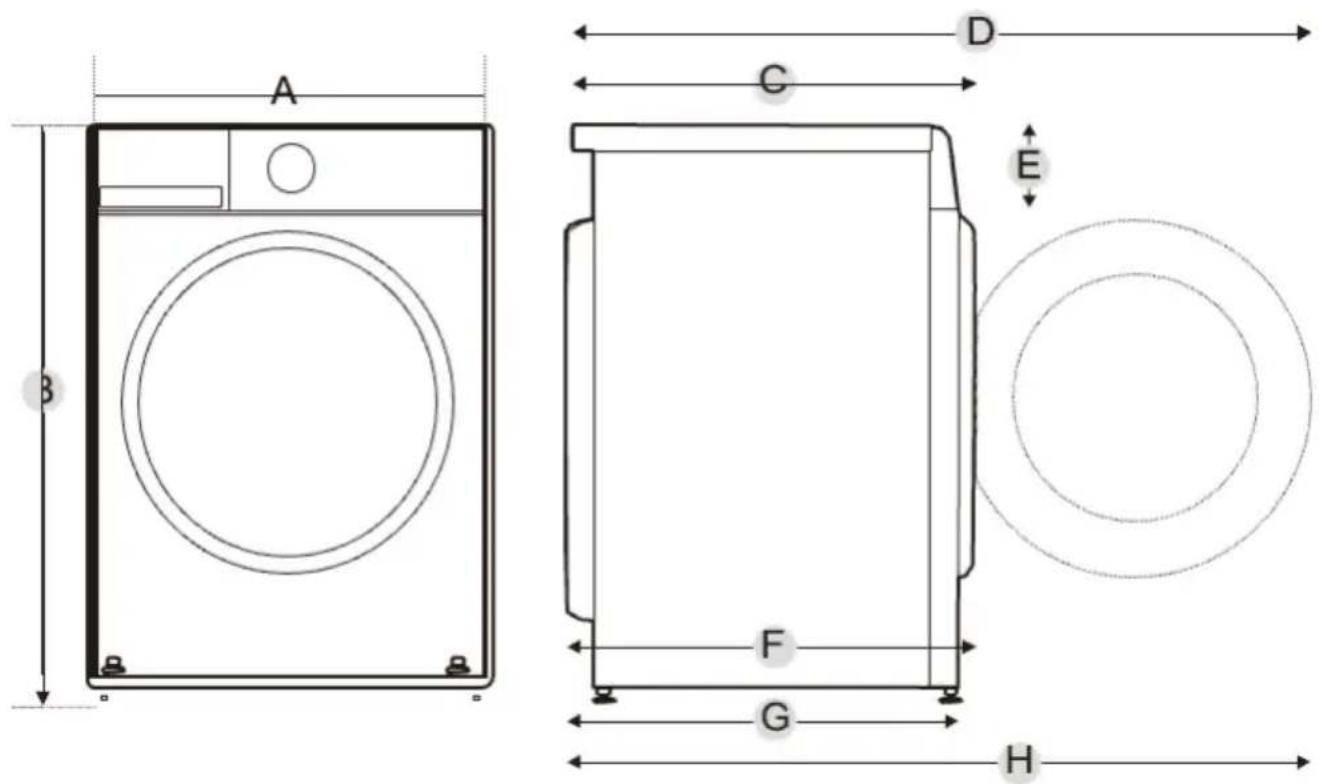
Fig. / Img. / Rys. / Obr. 29
www.cecotec.es