SureFlap Connect Microchip XL - Pets Sure Petcare - Free user manual and instructions
Find the device manual for free SureFlap Connect Microchip XL Sure Petcare in PDF.


User questions about SureFlap Connect Microchip XL Sure Petcare
0 question about this device. Answer the ones you know or ask your own.
Ask a new question about this device
Download the instructions for your Pets in PDF format for free! Find your manual SureFlap Connect Microchip XL - Sure Petcare and take your electronic device back in hand. On this page are published all the documents necessary for the use of your device. SureFlap Connect Microchip XL by Sure Petcare.
USER MANUAL SureFlap Connect Microchip XL Sure Petcare
natural_image
Silhouette illustration of cats and a dog with sound waves, no text or symbols presentThank you for choosing the new Microchip Cat Flap Connect!
The Microchip Cat Flap Connect has been designed to control your cats' access both into and out of the house, keeping intruder animals out and making sure your pets feel safe and happy in their own home. This allows you to restrict some pets to indoors-only (i.e. kittens that are not ready to explore the outside yet), while others are allowed to come and go as they please!
The Microchip Cat Flap Connect is easy to program at the touch of a button. You can store up to 32 pet identities. It is able to recognise either the microchip already implanted in your cat or the Sure Petcare RFID Collar Tag (sold separately).
And, if you are ready to enjoy the advantages of being part of the Sure Petcare family of connected products and would like your Cat Flap to work with the Sure Petcare app, you will need:
The Hub (included in your Cat Flap packaging or can be sold separately*) is the connected element of the system. It connects to your home internet and can talk to both the Cat Flap and your Sure Petcare app. For more information on how to purchase a Hub please visit surepetcare.com/hub

The Sure Petcare app. You'll be able to see when your cats come in and out of the house, even when you're away from home. It also allows you to change your product settings remotely so, for example, you can make sure your cat stays indoors and ready for a cuddle when you get home from work.
Of course, the Microchip Cat Flap Connect is required! But don't worry, this product can still be used without the need to connect it to the Hub and Sure Petcare app. When not connected, you will not be able to control its features remotely.
What's in the box?
Please make sure you have all these parts*
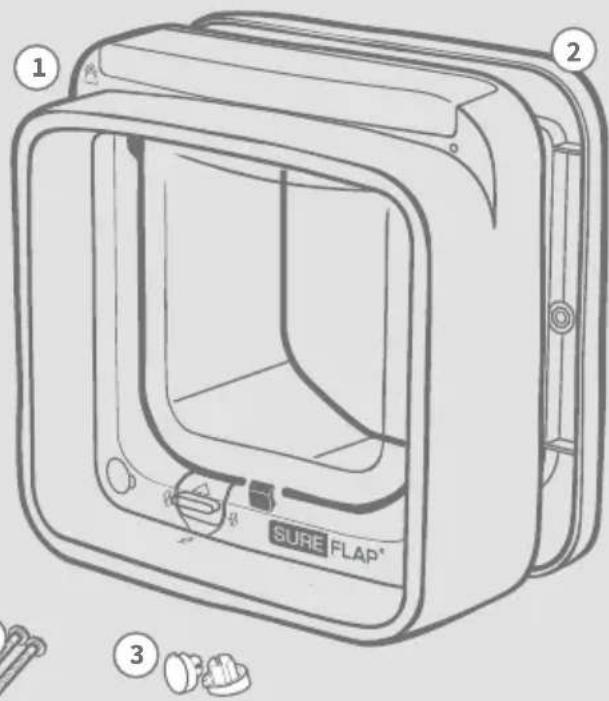
① Microchip Cat Flap Connect
② External frame
3 2 x Screw caps for external frame
④ 2 x 30mm Screws
5 2 x 50mm Screws
6 2 x 75mm Screws
*Hub only included in dedicated/promotional packs. Batteries not included.
text_image
SURE FLAP®Contents
Important information....③
Product overview....⑤
Checklist....⑦
Key features....⑦
Batteries....⑧
Buttons & lights....⑧
Adding your pet - access permissions....⑨
Microchip Cat Flap Connect system....⑪
Set up your system 12
Where to put your Hub.... 13
Hub lights.... 14
Fitting your Microchip Cat Flap Connect....15
Fitting in a door.... 17
Fitting in glass.... 19
Fitting in a metal door 21
Fitting in a wall....23
Locking Modes....27
Product care....28
Help & support.... 29
Warranty & disclaimer.... 31

PLEASE READ THE FOLLOWING INFORMATION CAREFULLY AND RETAIN THIS MANUAL FOR FUTURE REFERENCE.
This product is intended for domestic pets only.
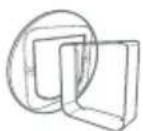
Use only SureFlap accessories to ensure compatibility: surepetcare.com/accessories
Make sure you have all of the parts listed on page 1.
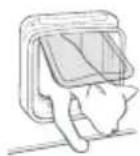
Make sure your cat(s) can pass comfortably through the flap before fitting. See page 16 for details on the flap size.
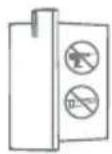
Do not cut or drill the tunnel under any circumstances.
Please ensure the product is installed correctly before use - see pages 15-26.
This Cat Flap requires 4 good quality AA 1.5V alkaline batteries and these should be inserted and replaced with caution. Do not mix different types of batteries or use a combination of new and used batteries. If the Microchip Cat Flap Connect is going to be unused for several months, please remove the batteries.
Risk of fire. Fire hazard if incorrect battery type used. Use alkaline batteries only.
You can find the product code on the back of the Microchip Cat Flap Connect, above the tunnel.

text_image
SLIFE FLAP* Model - XXXXXX _______________________________ _______________________________ _______________________________ _______________________________ _______________________________ _______________________________ _______________________________The serial number label is on the inside of the battery compartment cover.
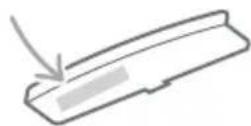
Remember to register this product via the enclosed warranty card.
Safety warnings
- Do not use this product if parts are missing, damaged or worn.
- There are small components used in the construction of this item. Any loose items should be kept away from young children and pets to avoid choking hazards.
- Please take care when using power tools during installation. Ensure you follow all safety instructions provided with the tool and that you use protective equipment, such as eye-wear.
- This product has been tested to mandatory legal requirements for its intended purpose. Unauthorised modifications may result in unintended radio and TV interference.
Other important things to consider
PETS: Sure Petcare recommends that the SureFlap Microchip Cat Flap Connect is used with your cat's implanted microchip, however it may also be operated using the Sure Petcare RFID Collar Tag (sold separately). If using the collar tag, it should be used with a safety collar which incorporates a breakaway buckle. Sure Petcare cannot accept liability for any injury or death caused by a pet's collar.
This Cat Flap is to be used only for cats which can fit through the flap opening dimensions as shown on page 16.

SECURITY: The motorised locks are provided to prevent the entry of unwanted animals and the exit of certain pets. They are not a security device. Sure Petcare cannot accept liability for unintended use, and the owner of this product accepts full responsibility for supervising the access in and out of the home that it provides.

INSTALLATION: Before installing your Microchip Cat Flap Connect you should consider any potential hazards present inside or outside the intended location, as well as the impact that subsequent modifications to your property may have on the use of this product.
If you have any doubts concerning the installation, it is recommended that you consult a professional.
Do not install the SureFlap Microchip Cat Flap Connect in a fire door, as it will render the fire door unfit for purpose.

natural_image
Simple gray line drawing of a smiling baby face with a bow (no text or symbols)CHILDREN: Children should not be permitted to play with the Microchip Cat Flap Connect. It is not a toy and should not be treated as such. However, it can be used by children aged 8 years and above and also by persons with reduced physical, sensory or mental capabilities as long as they are supervised or have been given instructions on how to use the product in a safe way. They should always be made aware of any potential hazards involved. Do not allow children of any age to clean the product without supervision. The Microchip Cat Flap Connect packaging and packing bags are not toys.

natural_image
Simple icon of a smiling baby face inside a shield shape (no text or symbols)CHILD PROOFING: In households with children, it is essential to include the Microchip Cat Flap Connect in any childproofing considerations. Playing with the manual lock may result in cats' access permissions changing and them coming into contact with potential dangers. For this reason, young children should be monitored at all times when in the immediate vicinity of the Microchip Cat Flap Connect.
This product can still be used without the need to connect it to the Hub and Sure Petcare app. When not connected, you will not be able to control its features remotely.
Normal operation whether connected or not

natural_image
Simple line drawing of two cats facing a vertical barrier with noise symbols (no text or labels)The Microchip Cat Flap Connect controls the access of your pets both into and out of the house. This allows you to restrict some pets to indoors only, while others are allowed outside and back in again.
Any intruder animal trying to enter your home will be kept outside.
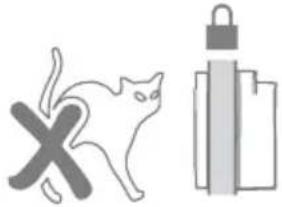
natural_image
Simple line drawings of a cat with a 'X' symbol and a lock on a stack of books (no text or symbols present)For cats with outdoor access
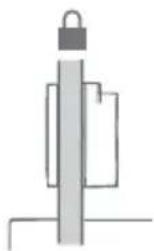
In standard operating mode the Cat Flap is locked in both directions.
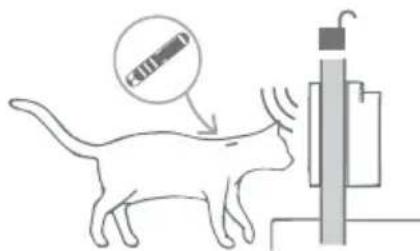
text_image
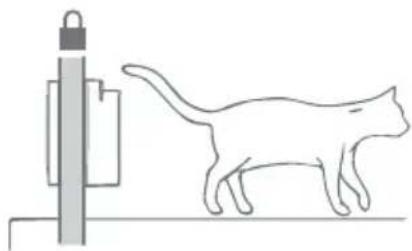
Diagram showing a cat reacting to a wall-mounted device with a magnified circular annotation labeled 'FLU' pointing to the animal.When it detects the authorised cat's microchip or collar tag on either side of the Cat Flap, it unlocks.
natural_image
Simple line drawing of a cat walking near a lock and a vertical structure (no text or symbols)Once your cat has fully entered or left the house, the Cat Flap locks again on both sides.
Additional to the latch noise, as your pet goes through the flap, you will hear some clicking. This is the Cat Flap verifying which side your pet is on.
For indoor only cats

natural_image
Illustration of a cat peeking out of a window with a lock, no text or symbols presentIndoor only pets won't be allowed to go outside through the Microchip Cat Flap Connect. However, if they do manage to go outside (e.g. they escape through the window), don't panic! The Cat Flap will always allow them to come back in.
Please be aware that an indoor only cat who is not microchipped (or is not wearing a Sure Petcare RFID Collar Tag) will not be able to regain access to the house if they accidentally get out.
Microchip Cat Flap Connect system
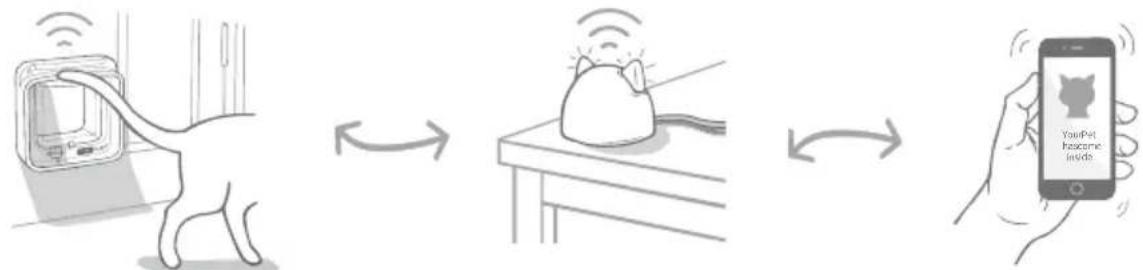
To use your Microchip Cat Flap Connect with the Sure Petcare app, you will need these three elements:
Microchip Cat Flap Connect Hub Sure Petcare app
flowchart
graph LR
    A["User with Wi-Fi device"] --> B["User interacting with cat"]
    B --> C["User holding smartphone with 'YourPet home' inside"]
The Hub is connected to the internet via an Ethernet cable and monitors the activity of your Microchip Cat Flap Connect. It communicates with both the Cat Flap and the Sure Petcare app allowing you to keep track of your cat's movements in and out of the house. So now you can see these updates on the app and keep tabs on your furry friends even when you're away from home!
You're also able to control the different functions remotely from the Sure Petcare app. For example changing locking modes or altering your pet's curfew time can be done at the click of a button.

All the details on how to set up your system can be found in pages 11-14 but first it is essential to go through the initial setup and the adding your pet sections.
Main setup steps
Initial Setup
Checklist of everything you need, how to fit the batteries, buttons & lights and key features.
pages 7-8
Adding your pets - access permissions
This section explains how to set the two different access permissions. Some cats will have outdoor access whilst others will be kept indoors.
pages 9-10
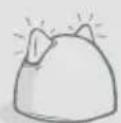
Connect your Microchip Cat Flap Connect
Here you will find the steps to set up your connected system. If you do not wish to use the Microchip Cat Flap Connect with the Hub and Sure Petcare app, please continue to the fitting section.
pages 11-14
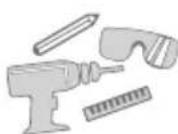
Fit your Microchip Cat Flap Connect
You should only begin fitting your Cat Flap once your cat(s) are successfully added and you have connected your Cat Flap with the Hub and Sure Petcare app.
pages 15-26
Day-to-day use
To help you make the most of your Microchip Cat Flap Connect, here you will find information about the different locking modes and product care.
pages 27-28
Before you start setting up your product or your system, you should make sure you have:

4 x good quality alkaline AA cell batteries.
E.g. Energizer or Duracell. See page 8.

Accessories for fitting.
If you're fitting your Cat Flap in a door containing metal, through glass or in a wall, you'll require some SureFlap accessories.
Visit: surepetcare.com/accessories

Tools and supplies for fitting.
A checklist of the tools you'll require for each fitting location can be found on its specific page. See pages 15-26.

Time!
Make sure you allow enough time to set up your Microchip Cat Flap Connect system and to fit it in its desired location.

When using the Microchip Cat Flap Connect system you will also need:

A Hub
If not already provided within your Cat Flap packaging, you will need to purchase a Hub. For more details see page 11.

An internet router with a spare Ethernet port.
So you can plug your Hub into your router and obtain a reliable internet connection. See page 12.

A compatible smart device to download the Sure Petcare app.
A smart phone or tablet running either iOS9 or above on Apple or 4.4 or above on Android is required for the mobile app.
Alternatively if you want to use the Sure Petcare web app on your computer, please go to surepetcare.io

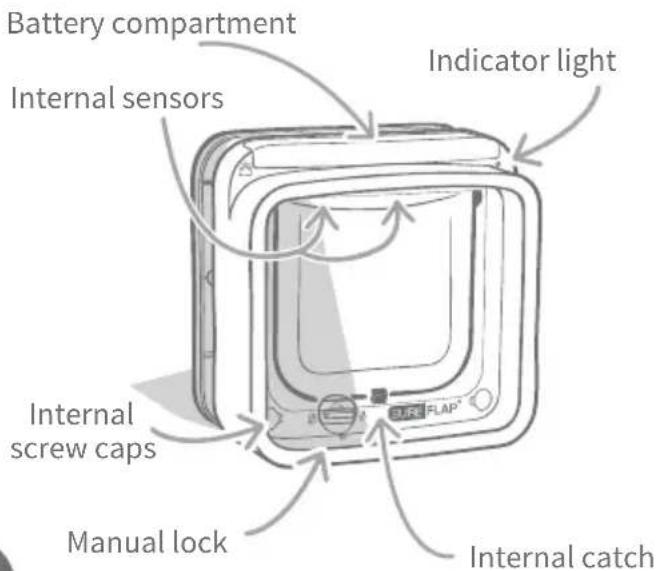
Key Features
text_image
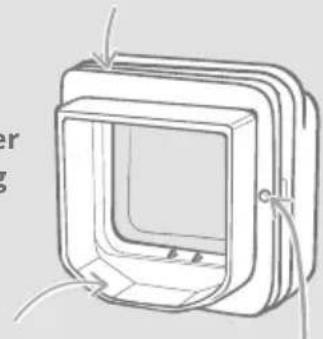
Battery compartment Internal sensors Indicator light Internal screw caps Manual lock Internal catch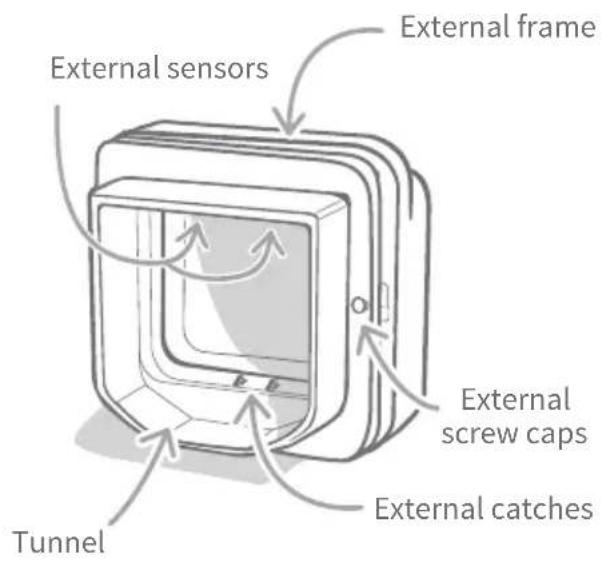
text_image
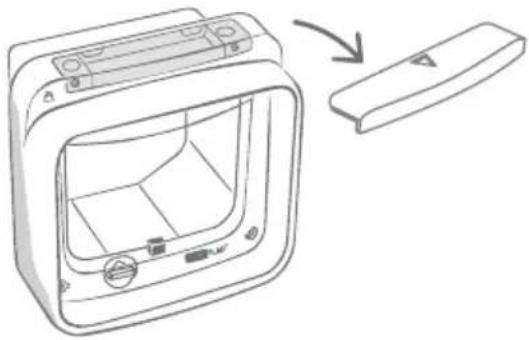
External frame External sensors External screw caps External catches TunnelAlways use 4 good quality AA 1.5V alkaline batteries to ensure the best performance of your product. This product is NOT designed for use with rechargeable batteries. To insert or change the batteries please follow the steps below:
natural_image
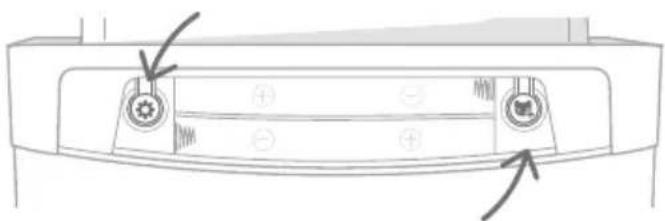
Line drawing of a device with a door panel and a separate rectangular component, showing no text or symbols.Remove the compartment cover from the front of the Microchip Cat Flap Connect.
natural_image
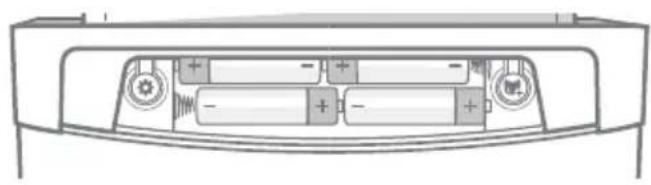
Diagram of a device rear panel with battery and switch components (no text or labels)Insert the batteries into the compartment as shown, with the + and - in the correct orientation. Then replace the compartment cover.
After inserting the batteries, the indicator light will initially light up for 2 seconds. Leave the unit for about 10 seconds before allowing a cat into the tunnel - this allows the electronic sensors to settle properly.

When the batteries start to run low, the indicator light will flash red once every 5 secs. Note that this indicator is different from the fast flashing (every second) when you add a pet.
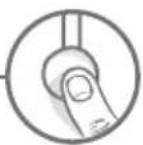
Buttons & Lights

'Settings' button
Used to connect your Microchip Cat Flap Connect to your Hub.
natural_image
Front view of a car dashboard with three buttons and directional arrows indicating navigation (no text or symbols)
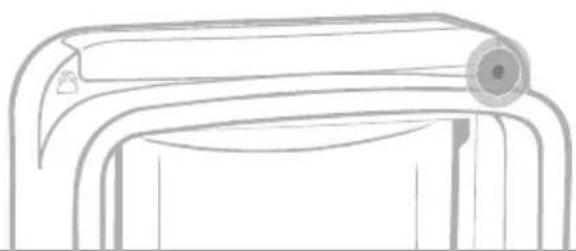
'Add a Pet' button
Used to add your cat's microchip ID or collar tag into the Microchip Cat Flap Connect (see pages 9-10).
natural_image
Line drawing of a roof-mounted air conditioner unit (no text or symbols)
Indicator light
The light will illuminate when:
- you add a cat (see pages 9-10).
- the batteries are running low (see section above).
- connecting to Hub.
Adding your pet - access permissions
Before fitting your Microchip Cat Flap Connect, you need to add your cat's microchip ID to it. You'll need to get them to put their head inside the tunnel so their microchip ID can be read and memorised. This product gives you the flexibility of giving outdoor access to some of your cats whilst others are kept indoors.

If you are using your Microchip Cat Flap Connect system for multiple cats, avoid mixing up microchip IDs by adding each cat separately and making a note of the order you added them. This will be useful when you create their pet profiles in the Sure Petcare app.
Adding a cat with outdoor access
natural_image
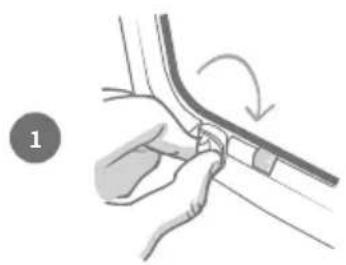
Illustration of a hand adjusting a car's seatbelt with an arrow indicating rotation (no text or symbols present)Make sure the manual lock is set to Position 1 before you begin. See page 27 for more information.


text_image
1x 2Remove the battery compartment cover to reveal the 'Add a Pet' button 📋, press it once and then release it.
natural_image
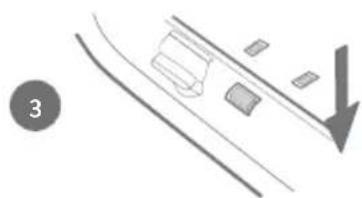
Diagram showing a mechanical component moving along an inclined plane with a downward arrow indicating motion (no text or symbols)When the Cat Flap is in 'Add a cat with outdoor access' mode, the catches will drop (you will hear a click) and the indicator light will flash GREEN once every second.
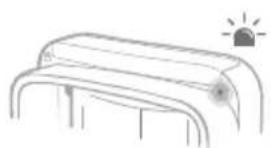
natural_image
Simple line drawing of a roof or bench with a sun icon above (no text or symbols)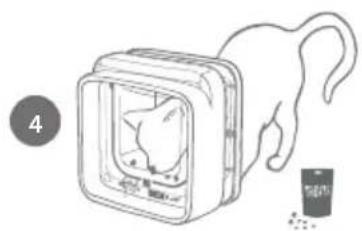
natural_image
Illustration of a cat emerging from a device with a magnified view showing its internal structure (no text or symbols)Place some dry food or a treat inside the tunnel as close to the clear plastic door as possible. The aim is to encourage your cat to put its head inside the tunnel or to pass through the flap in either direction. When your cat enters the tunnel to eat the food, the sensors inside the product activate and the Cat Flap saves the cat's microchip ID in its memory.
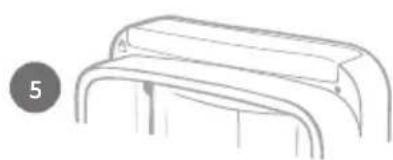
natural_image
Simple line drawing of a folded garment or cushion (no text or symbols)Once your cat's microchip ID has been successfully added, the indicator light will stop flashing and the catches will move up (lock) when the cat has moved away from the Cat Flap.
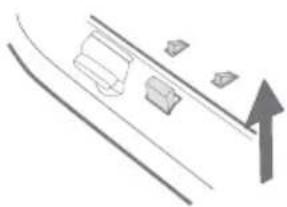
natural_image
Diagram showing a vehicle on a curved track with an upward arrow indicating motion (no text or symbols)Adding an indoor only cat
This mode is designed for those cats that need to be kept inside.
text_image
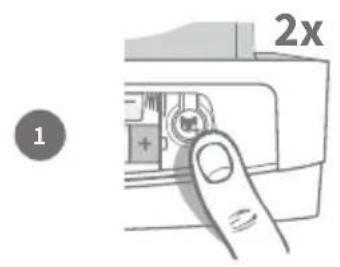
1 2xAfter making sure that the manual lock is set to Postion 1 (see step 1 in 'Adding a cat with outdoor access'), remove the battery compartment cover and press the 'Add a Pet' button once, wait for the lock to stop moving and then press it again.
natural_image
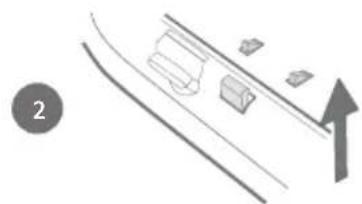
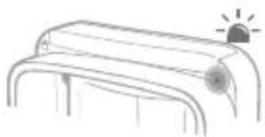
Diagram showing a curved track with a box and blocks, an upward arrow, and a numbered circle (no text or symbols)When the Cat Flap is in 'Add an indoor only cat' mode, the catches will move up (lock) and the indicator light will flash RED once every second.
natural_image
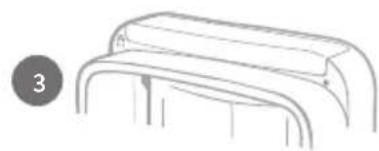
Simple line drawing of a folded garment or towel rack with no text or symbolsThen follow step 4 in 'Adding a cat with outdoor access' mode to save your cat's microchip ID in the product's memory.
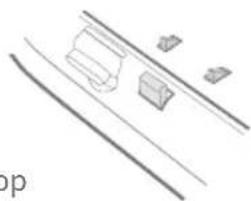
natural_image
Simple line drawing of a mechanical component with no text or symbolsOnce your cat's microchip ID has been successfully saved, the indicator light will stop flashing and the catches will stay up (locked).

You should avoid adding pets when the batteries are low - change the old batteries before adding a new cat.
Changing the entry/exit permissions for your cat
You can change the permissions for any of your cats at any time if their circumstances change (i.e. a cat who is allowed to go outside now needs to be kept in due to illness or injury, or a kitten who was kept inside is now allowed out). To do this simply change the entry/exit permissions in the product settings section of the Sure Petcare app. If you are using it as not connected, please add your cat again using the new desired mode.

To perform the adding process with the Sure Petcare RFID Collar Tag simply follow the steps above and hold the collar tag inside the tunnel, making sure it touches the clear plastic door. Make sure you are not wearing any metal jewellery as this can cause interference.

If you want to use the Microchip Cat Flap Connect for more than one cat, you are able to store up to 32 cats in its memory by repeating the process.

In the unlikely circumstance that you need to wipe the memory press and hold the 'Add a Pet' button for around 10 seconds. Then, the catches will open and close once. At this point the memory of your Microchip Cat Flap Connect is clear.
Download the free Sure Petcare app now
Download the Sure Petcare mobile app and create an account. Then you’ll be asked to make a ‘household’ (a connected network that will contain all of your Sure Petcare connected products and all of your pets). You can even invite other members of your family to join your household, so they don’t have to repeat the setup process.
A smartphone or tablet running either iOS9 (or above) on Apple, or 4.4 (or above) on Android is required to download the mobile app.

If you'd rather control the different features from your computer, you can use the Sure Petcare web app. To do this, please go to surepetcare.io
You will need the latest version of Safari, Chrome, Firefox or Internet Explorer running on either Mac OS X v10.9 (or above) or Windows 7 (or above).

Download on the App Store

GETITON Google Play

AVAILABLE ONLINE surepetcare.io
Receive notifications when your cat, with outdoor access, enters or leaves the house.

Monitor your cat's activity and notice changes in behaviour.

Create a curfew for locking the Cat Flap or take control at any time.

Share access to your household with family and friends.
Purchase a SurePetcare Hub
If not already provided within your Cat Flap packaging, you will need to purchase a Hub. For more information please visit surepetcare.com/hub
Set up your system
Once you have successfully downloaded the Sure Petcare app, you will need to plug in your Hub and set it up. Once your Hub is set up you will be asked to connect it to both the Cat Flap and the app. Please follow the steps below:
natural_image
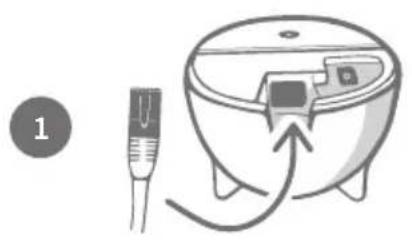
Illustration of a medical device with a catheter inserted into a container, connected to a cable (no text or symbols present)Plug one end of the Ethernet cable into the base of your Hub and the other end into a spare Ethernet port on your router.
natural_image
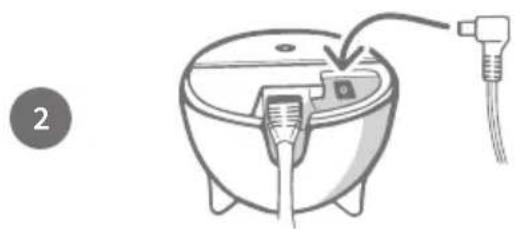
Diagram of a medical device with tubing and connector, no text or symbols presentAssemble the power supply and plug it into your power outlet. Plug the other end of the cable into the base of your Hub.
natural_image
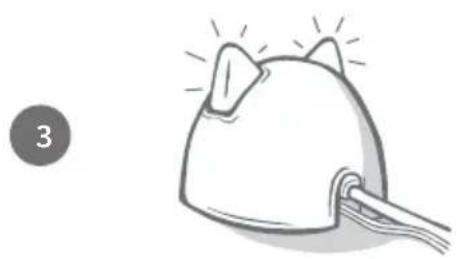
Simple line drawing of a cat-shaped object with a string attached to its head (no text or symbols)Your Hub's 'ears' will start alternating red and then green. When both ears remain solid green your Hub is ready. If the ears fail to do this sequence please see page 14 for more information.
text_image
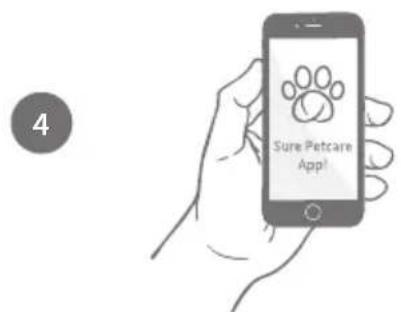
Sure Petcare ApplIn order to complete the setup of your Microchip Cat Flap Connect system you will need to follow the remaining steps on the Sure Petcare app. Once all the elements of your system are connected you can start controlling your Cat Flap's features remotely!

Your Hub may receive a software update. If you see solid red lights during setup, don't panic, your Hub is updating its software. Once complete the Hub will reboot and you'll see the light sequence detailed in step 3.
Where to put your Hub
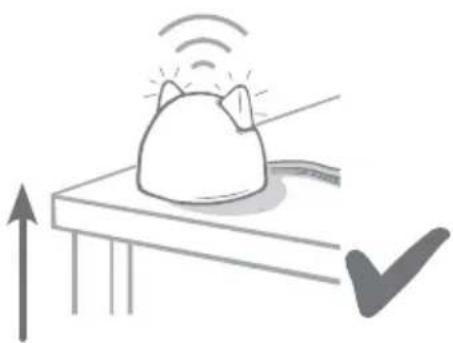
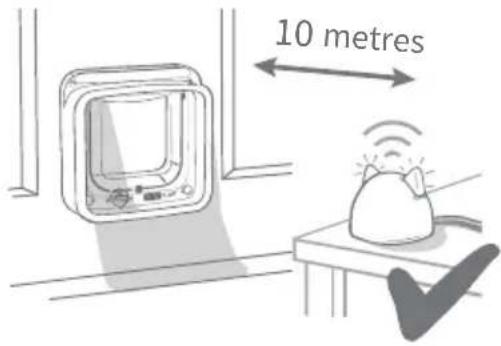
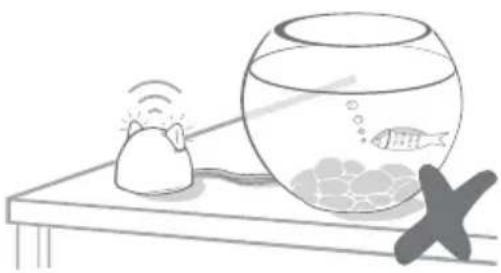
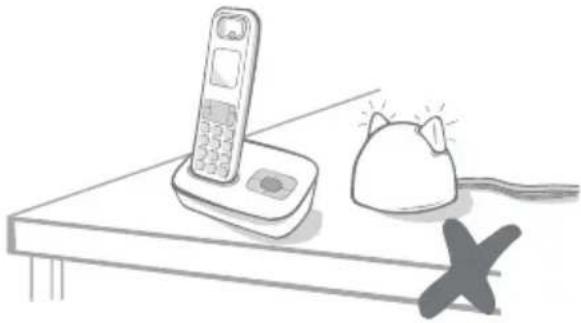
Because your Microchip Cat Flap Connect system communicates wirelessly, the location of your Hub can affect its performance.
natural_image
Illustration of a cat on a surface with a checkmark and upward arrow, no text or symbols present.Place the Hub at least 1 metre off the ground (i.e. on a table that is as clear of obstructions as possible).
text_image
10 metresTry to position your Hub so that it is in line-of-sight of your Cat Flap and within 10 metres distance.
natural_image
Illustration of a mouse interacting with a fishbowl and a small fish, with a cross symbol on the table (no text or symbols present)Avoid positioning your Hub near or in line of sight of any large amounts of water (i.e. fish tanks).
natural_image
Illustration of a desk with a remote control unit, a cat-shaped object, and a cross symbol (no text or labels)Keep your Hub as far away as possible from any potential sources of interference (i.e. digital cordless phones, baby monitors, etc).
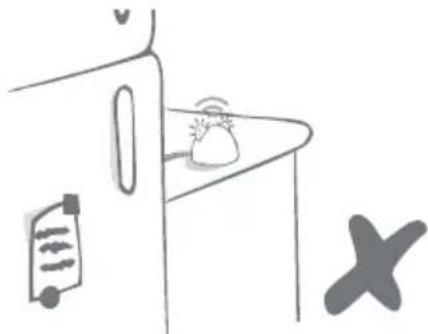
natural_image
Simple line drawing of a kitchen counter with a hanging bag and a cross symbol (no text or labels)Make sure the Hub isn't positioned next to any large metal objects (i.e. fridges).
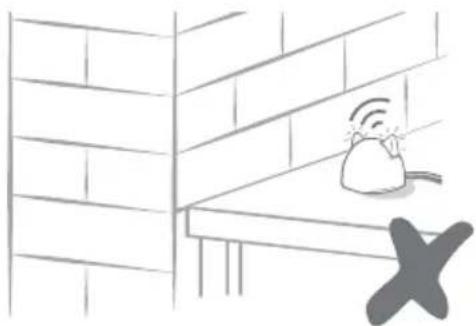
natural_image
Simple line drawing of a cat on a brick wall with a Wi-Fi signal icon and a cross symbol (no text or labels)Avoid thick walls between the Hub and the Cat Flap.

Occasionally your Hub may experience connection issues despite following these tips. For further advice on how to move your Hub closer to your Cat Flap whilst still being able to connect it to the internet, go to: surepetcare.com/hub-connectivity

If your Hub loses internet connection for any reason, your Microchip Cat Flap Connect will still function as normal and retain its settings.
Your Hub indicates its current state using the lights in its ears. Different coloured light sequences mean different things.
Setup lights
Every time the Hub powers up or is trying to connect to other elements of the system, you'll see the setup lights:
1 The ears will alternate red for a while,
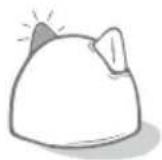

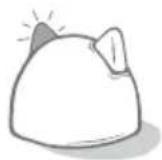
2 then they will alternate green,



3 once you see a flash of orange and the ears go solid green the Hub is connected.


Green ears
Green ears mean the Hub is working correctly. See below for the details of what each light sequence means.
Both ears are solid green – Your Hub is turned on, connected and working correctly.
Both ears flash twice – A cat has gone through the Microchip Cat Flap Connect.
Alternating green ears – Your Hub is re-connecting to our servers.
Red ears
Both ears are solid red – Your Hub is doing a Firmware update. Be patient, your Hub will reboot and continue as normal shortly.
Both ears flashing red – Your Hub has lost connection with your Microchip Cat Flap Connect and is trying to reconnect.
Alternating red ears – Your Hub is having difficulty connecting to the internet and/or our servers.
For more information on diagnosing these issues, see page 29.
Fitting your Microchip Cat Flap Connect
Where to fit your Cat Flap
The Cat Flap can be fitted in any of the following locations. Please see the specified pages for more information on the tools and supplies you'll need and step-by-step fitting instructions.
· Wooden/plastic doors, see page 17
- Doors containing metal, see page 21
· Glass (glazier required), see page 19
- Walls (consult a builder), see page 23
Inside vs outside
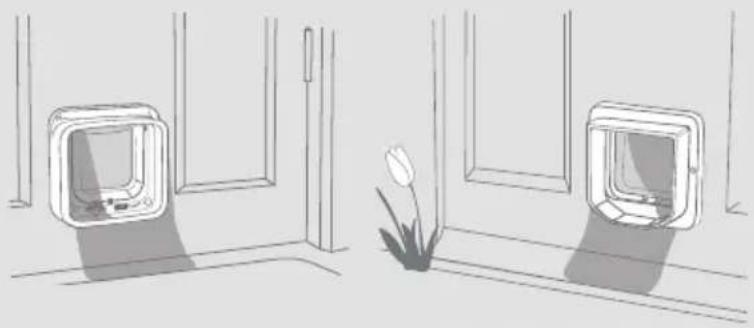
It's important to know which side of your Cat Flap is fitted to the inside of the house and which goes outside.
The side of the Cat Flap with the SureFlap logo and the battery compartment must be inside your house.
Outside the house Inside th
natural_image
Line drawing of two wall-mounted home appliances with a small flower nearby (no text or symbols)Cat behaviour expert's advice
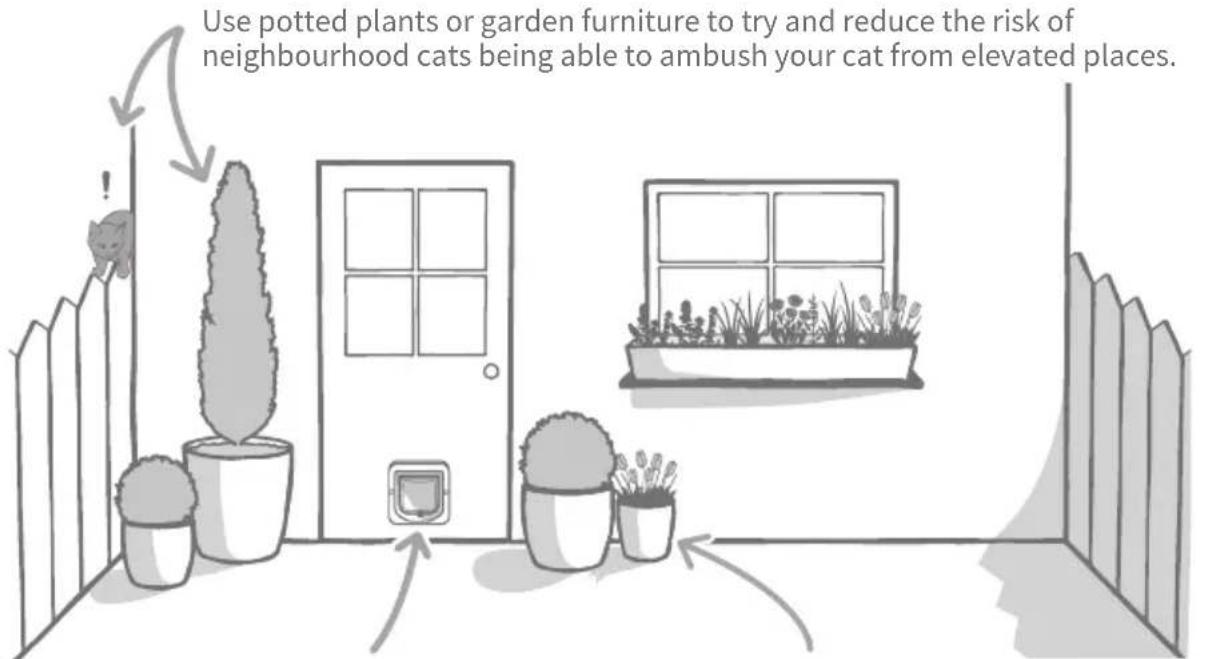
We have provided a few tips to help you find the best place to fit your Cat Flap. Whilst the back door might be the obvious place to fit a Cat Flap, you need to consider how the layout of your garden might affect your cat.
text_image
Use potted plants or garden furniture to try and reduce the risk of neighbourhood cats being able to ambush your cat from elevated places.Make sure your Cat Flap is fitted at the right height for your pets so it's easy for them to get in and out.
Conceal the Cat Flap with potted plants as entering onto a large open space can be stressful for some pets.
Things to bear in mind

We strongly advise contacting a glazier for glass fitting and a builder for wall fitting.

We recommend adding your cat(s) to the Cat Flap prior to fitting (see page 9).
natural_image
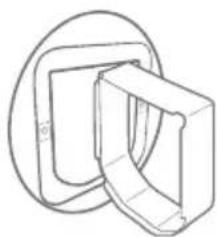
Pure technical line drawing of two interlocking mechanical components (no text or symbols)SureFlap accessories are required for wall, glass and metal installations. Visit surepetcare.com/accessories
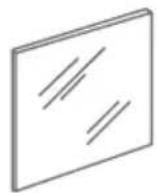
For glass installation you may need to buy a new pane of glass. Details for this can be found on page 19.
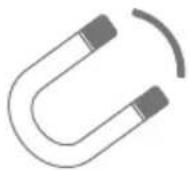
It's important to check if your door has metal within it, as this can interfere with the the flap's performance. See page 21 for more details.
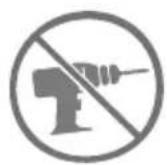

Do not under any circumstances drill or cut the tunnel of your Cat Flap.

Installation video tutorials (English speaking) can be found at surepetcare.com/support
Key fitting features
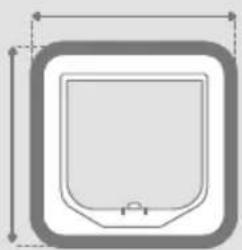
natural_image
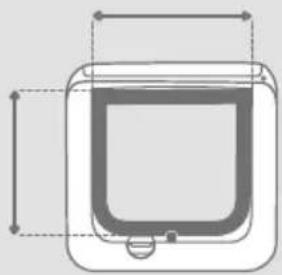
Simple line drawing of a U-shaped object with a small protrusion at the bottom (no text or symbols)External frame dimensions
210×210mm (8 ¼" × 8 ¼")
natural_image
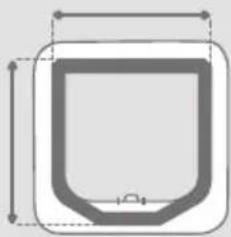
Pure technical diagram of a rectangular component with internal structure and dimension lines (no text or symbols)Flap opening dimensions
142 x 120mm (5 ^9/16 " x 4 ^3/4 ")
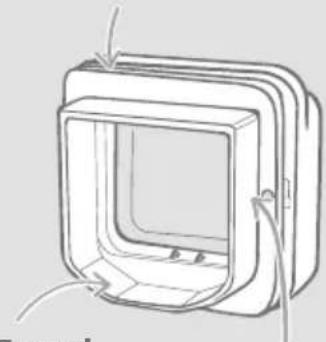
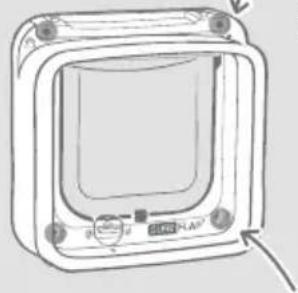
External frame
natural_image
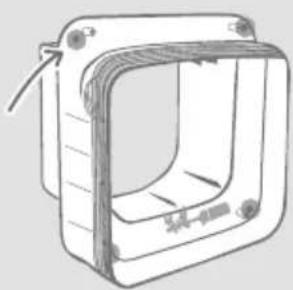
Line drawing of a rectangular device with a central screen and cable connectors (no text or symbols)Tunnel
External
screw holes
natural_image
Pure geometric diagram of a U-shaped container with dashed lines indicating dimensions (no text or symbols)External tunnel dimensions
165 x 171mm (6 12 " x 6 34 ")
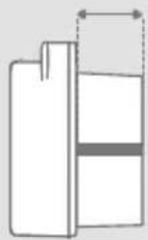
Tunnel depth
70mm (2 3/4")
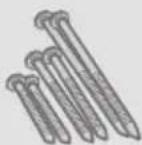
Screws

External
screw caps
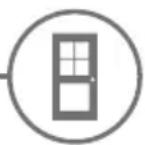
Fitting your Cat Flap in a door
Tools and supplies required
√ Ruler
√ Sharp pencil
√ Electric drill with a 6mm ( 14 ) drill bit
√ Spirit level
√ Electric jigsaw
√ Cross head screwdriver
√ Blu Tack
√ Protective eye-wear
√ The screws and caps provided

Installation video tutorials (English speaking) can be found at surepetcare.com/support
Step-by-step guide

Before you begin, have you added all your pets? If not, see page 9.
1
natural_image
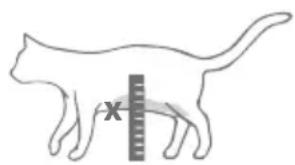
Silhouette of a cat with a ruler placed between its tail (no text or symbols)To ensure your cat has unhindered access through the Cat Flap, measure the height from their tummy to the floor. Mark this height on your door, as this is where the bottom of the hole should be cut through the door.
2
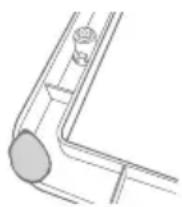
Attach a ball of Blu Tack (or similar adhesive putty) to each rear corner of the external frame so that you can stick it to the door and use it as a template.
3
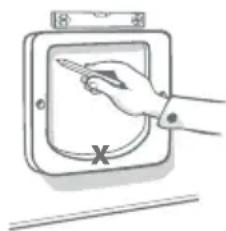
natural_image
Hand holding a pen inside a square electrical outlet with a cross mark and pointer (no text or symbols)Stick the external frame to the door using the mark you made for the height of your cat's tummy to align the bottom edge of the hole. Use a spirit level to ensure the frame is level, then run a sharp pencil around the inside edge of the frame.

When using power tools, please follow all safety instructions provided with the product.
4
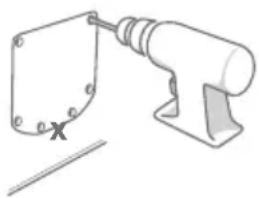
natural_image
Simple line drawing of a mechanical tool with a bracket and base, no text or symbols presentNow it's time to prepare for cutting. We strongly advise that you drill large holes in all the corners of the outline to make it easier to cut the hole with a jigsaw. Make sure these holes are touching the line and that they are big enough for the blade of the jigsaw to fit through.
5
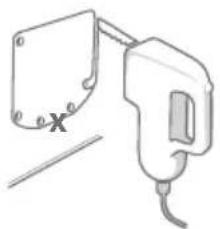
natural_image
Simple line drawing of a handheld device with a handle and label 'X' (no text or symbols on the device itself)Using the jigsaw, cut around the outer edge of the line you have marked. By doing this, the Cat Flap should fit through the hole first time. However, if you cut on, or inside the line, the hole is likely to be too small. If this is the case, please take the time to carefully file the hole until the Cat Flap fits through easily.

Once the main hole is cut, check whether there is any metal within your door. If you can see metal, go to page 21 and follow the instructions for fitting in a metal door.
6
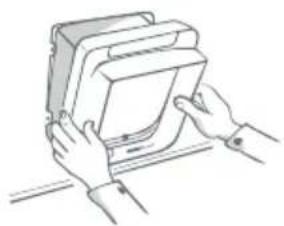
natural_image
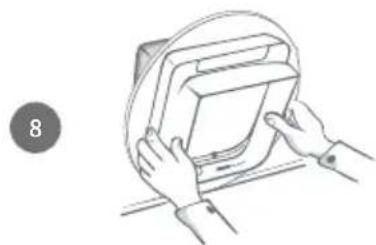
Line drawing of hands installing or adjusting a device (no text or symbols present)Now check that the Cat Flap fits through the hole. Remember the SureFlap logo must be inside the house. We advise that you have two people for this, one inside the house and one outside to help hold the product firmly in place.
7
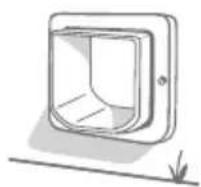
On the outside of the house, make sure the tunnel of the Cat Flap is securely pushed through the hole and then slide the external frame over it. When the external frame is in place, using a sharp pencil mark through the two holes.
8
natural_image
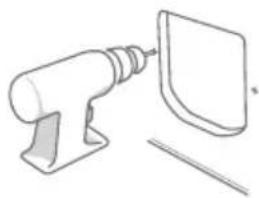
Simple line drawing of a tool and a separate object (no text or symbols)Remove the external frame and the Cat Flap from the door then drill the two screw holes using a 6mm (1/4") drill bit, remembering to hold the drill horizontally. We recommend that you choose the correct length of screw to attach the Cat Flap to your door at this stage. See the next step.
9
text_image
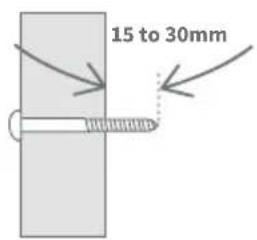
15 to 30mmTo choose the correct length of screw, from the sets provided you need to compare the screw lengths to the thickness of your door. The screw needs to be between 15 to 30mm ( ^19/_32 to 1316 ) longer than the thickness of your door.
10
natural_image
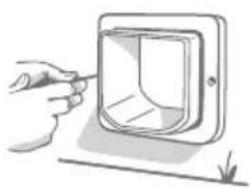
Illustration of a hand using a tool to clean or install an open electrical outlet (no text or symbols visible)Put the Cat Flap back through the door and slide the external frame over the tunnel. Holding the product firmly in place, use a cross head screwdriver and the screws you selected previously, to attach the external frame. Fasten the first screw until it is secure, but not too tight, then do the same to the last one. Once all the screws are secure, tighten them.
11
natural_image
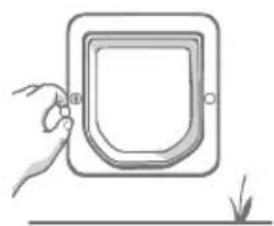
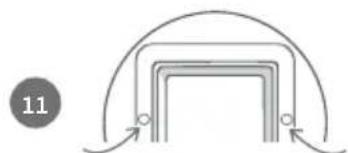
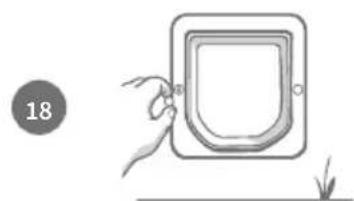
Simple line drawing of a hand holding a small object inside a square frame, with a ground line and arrow below (no text or symbols)Now, insert the two screw caps into the external frame.
Fitting your Cat Flap in glass
Tools and supplies required
√ Ruler
√ Cross head screwdriver
√ Cat Flap Mounting Adaptor
√ Glazier
√ Clear all-weather sealant
√ The screws and screw caps provided
SURE FLAP® accessory

Installation video tutorials (English speaking) can be found at surepetcare.com/support
Step-by-step guide for cutting the hole in glass

If you do not have a hole in your glass door to fit the Cat Flap you will need to contact a glazier to visit your home and measure up for the new pane of glass. In most cases it is not possible to cut a pane of glass in situ, especially if you have a double or triple glazed unit.

Before you begin, have you added all of your pets? If not, see page 9.

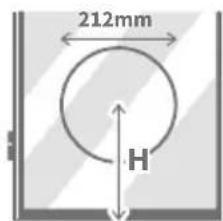
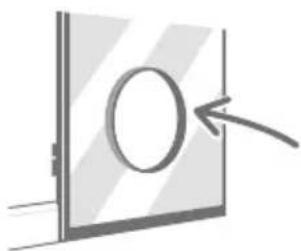
To fit your Cat Flap into glass, you will require a circular hole to be cut measuring 212 mm (8 ^3/8 ) in diameter.
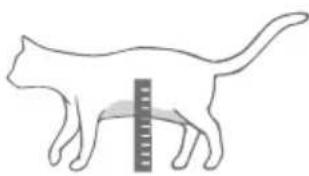
This will need to be done by a professional glazier. To ensure your cat has unhindered access through the Cat Flap, you will need to make sure that this circular hole is cut at the appropriate height. Do this by first measuring the height from your cat's tummy to the floor.
natural_image
Line drawing of a cat with a ruler for scale (no text or symbols)
Take this height and add 56mm (2 316 ") to it, this will give you the total distance from the floor to the centre of the circle you need cutting. Make sure this point is at least 200mm (7 78 ") from the bottom of the window frame to allow room for the mounting adaptor.
H= cat's tummy height + 56mm = the centre of the circle.
text_image
212mm H
If you are fitting in a double or triple glazed unit, the glazier should use a non-metallic spacer bar around the hole, as a metal spacer could affect the Cat Flap's ability to read microchips. (The spacer bar is needed to fill the gap between the panes of glass.)
natural_image
Simple line drawing of a door with an arrow pointing to the center (no text or symbols)
When working with cut glass always wear protective gloves as the edges may be sharp.
Step-by-step guide for fitting
text_image
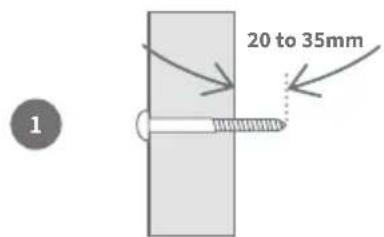
20 to 35mm 1Firstly, to select the correct length of screw from the sets provided, you need to compare the screw lengths to the thickness of your door. The screw length needs to be between 20 to 35mm ( ^25/_32 to 238 ) longer than the thickness of the glass.
natural_image
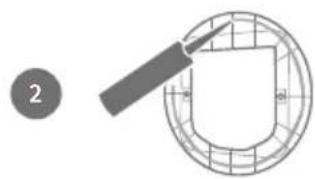
Simple line drawing of a pen inserted into a circular grid, no text or symbols presentWe advise that there are two people present for glass fitting; one person inside the house and one outside. Firstly, apply a strip of clear all-weather sealant to the back of both mounting adaptors, about 15mm ( ^9/_16 ) from the edge. Make sure your Cat Flap is nearby and ready to be fitted.
natural_image
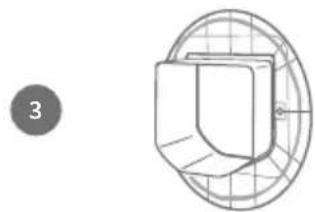
Pure technical diagram showing a 3D object inside a circular frame with grid lines, no text or symbols present.Place one of the mounting adaptors (it doesn't matter which) over the tunnel of the Cat Flap so that the side with the sealant is facing outwards and is not touching any surfaces.
natural_image
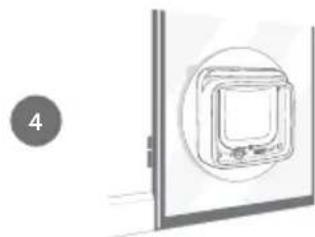
Diagram of a device with a circular inset showing a square component, labeled with number 4 (no text or symbols on the diagram itself)From inside the house, put the tunnel through the hole in the glass, making sure the Cat Flap is positioned centrally within the hole. Press firmly on both the Cat Flap and the mounting adaptor so that you compress the sealant against the glass. Remember the SureFlap logo must be inside the house.
natural_image
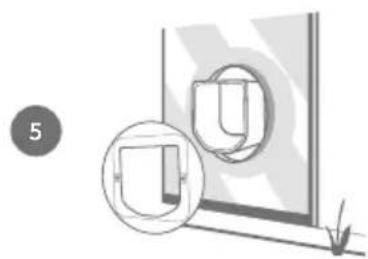
Diagram showing a door opening with a magnified inset view (no text or symbols)From the outside of the house, take the second mounting adaptor and slide it over the tunnel with the sealant facing the window. You may need the person on the inside of the house to keep pressure on the Cat Flap to make sure it stays in place.
natural_image
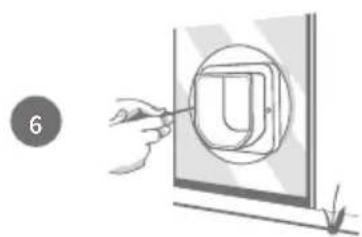
Illustration of a hand using a tool to insert a U-shaped component into a panel (no text or symbols)Next, slide the external frame over the tunnel. Using a cross head screwdriver and the screws you selected previously, secure the external frame in place. Fasten the first screw until it is secure, but not too tight, then do the same to the last one. Once all the screws are secure, tighten them.
natural_image
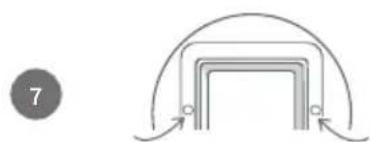
Simple line drawing of a tunnel entrance with arrows indicating direction (no text or symbols)Now, insert the two screw caps into the external frame.
Fitting your Cat Flap in a metal door
Before you begin
It's important to check whether your door contains a metal plate or thin metal foil before fitting because the presence of metal can affect the performance of the Cat Flap. This can be done by holding a magnet to the door, however some metals such as Aluminium cannot be detected this way so you may need to cut a small hole to check. Metal door handles or letter boxes should not cause a problem and for most cases any interference from doors containing metal will be unnoticeable. To reduce the risk of interference we recommend cutting a slightly bigger hole.

uPVC coated metal doors often look the same as standard uPVC doors and you may need to look carefully where the panel has been cut.
Tools and supplies required
√ Ruler
√ Sharp pencil
SURE FLAP® accessory
√ Cat Flap Mounting Adaptor
√ Spirit level
√ Electric jigsaw
√ Electric drill with a 6mm ( 14 ) drill bit
√ Blu Tack
√ Protective eye-wear
√ Cross head screwdriver
√ The screws and screw caps provided

Installation video tutorials (English speaking) can be found at surepetcare.com/support
Step-by-step guide

Before you begin, have you added all of your pets? If not, see page 9.
1
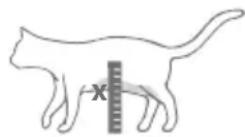
To ensure your cat has unhindered access through the Cat Flap, measure the height from their tummy to the floor. Mark this height on your door, as this will help you to align the hole.
2
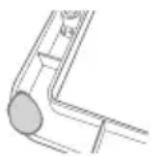
Attach a ball of Blu Tack (or similar adhesive putty) to each rear corner of the external frame so that you can attach it to the door and use it as a template.
3
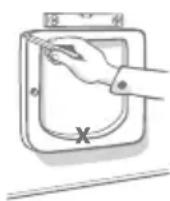
Stick the external frame to the door and use the mark you made for the height of your cat's tummy to align the inside bottom edge of external frame. Use a spirit level to ensure it is level, then run a sharp pencil around the outside of the frame.
4
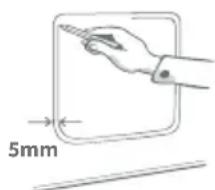
text_image
5mmNow mark your cutting line 5mm ( ^3/_16 ") inside the line you just traced. Once complete, rub out the original traced line if you can so that you don't get confused.
When using power tools, please follow all safety instructions provided with the product.
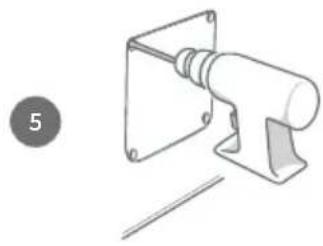
natural_image
Simple line drawing of a mechanical clamp or bracket with a cylindrical component inserted, no text or symbols present.Now it's time to prepare for cutting. We strongly advise that you drill large holes in all the corners of the outline to make it easier to cut the hole with a jigsaw. Make sure these holes are touching the line and that they are big enough for the blade of the jigsaw to fit through.
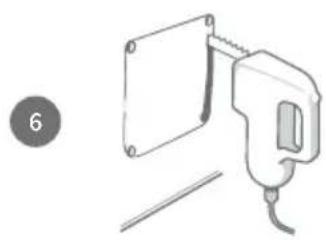
natural_image
Illustration of a hand tool next to a rectangular panel and a wire, with a numbered circle in the corner (no text or symbols on the diagram itself)Using a jigsaw, cut around the inner edge of the line you have marked. Once the hole is cut, to select the correct length of screw from the sets provided, you need to compare the screw lengths to the thickness of your door. The screw length needs to be between 20 to 35mm ( ^25/32 to 2^3/8 ) longer than the thickness of your door.
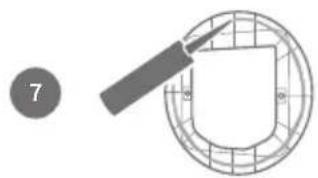
natural_image
Simple line drawing of a pen and a magnifying glass over a circular grid pattern (no text or symbols)Apply a line of clear all-weather sealant to the back of both mounting adaptors, about 15mm ( ^9/16 ") from the edge. Make sure your Cat Flap is nearby and ready to be fitted. Place one of the mounting adaptors (it doesn't matter which) over the tunnel of the Cat Flap so that the patterned side with the ribs is facing outwards and is not touching any surfaces.
natural_image
Illustration of hands installing or adjusting a device on a table (no text or symbols visible)We advise that there are two people present for this step; one person inside the house and one outside. From inside the house, put the tunnel through the hole in the door. Remember the SureFlap logo must be inside the house.
natural_image
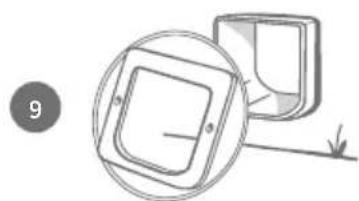
Simple line drawing of a square frame with a circular inset showing a separate view (no text or symbols)From the outside of the house, check that the tunnel is in the centre of the hole and not resting on the edge of the hole, then take the second mounting adaptor and side it over the tunnel with the sealant facing the door. You may need the person inside the house to keep pressure on the Cat Flap to make sure it stays in place.

natural_image
Illustration of a hand inserting a component into a square socket, with a numbered circle and arrow nearby (no text or symbols)Next, slide the external frame over the tunnel. The person on the inside of the house should keep pressure on the Cat Flap and hold it so that the tunnel is in the centre of the hole. Using a cross head screwdriver and the length of screw you'd chosen, secure the external frame in place. Fasten the first screw until it is secure, but not too tight, then do the same to the last one. Once all the screws are secure, tighten them.
natural_image
Simple line drawing of a curved structure with arrows indicating direction, no text or symbols presentNow, insert the two screw caps into the external frame.
Fitting your Cat Flap in a wall
Before you begin

Please contact a qualified builder to discuss the best location to fit your Cat Flap. Remember some walls can be structural or there may be electrical wires, gas or water pipes hidden within them which, if damaged, can cause serious problems.

We recommend that you do not attempt the work yourself unless you have relevant experience. The job will be messy so protective clothing and eye-wear is a must and when using power tools, please follow all safety instructions provided.
Tools and supplies required

Ruler
√ All-weather tape
SURE FLAP ^® accessory

Cat Flap tunnel extenders

Blu tack
√ Wall plugs & screws

Electric drill & masonry bits

Sharp pencil
√ Cross head screwdriver

Protective clothing & eye-wear

Vacuum cleaner
√ Clear all-weather sealant

Appropriate power tools for your wall
For wall installations, tunnel extenders can be stacked together to create a longer tunnel for the Cat Flap. The existing tunnel is 70mm (2 34 ) long. Each tunnel extender adds 50mm (2") to the length of the tunnel.
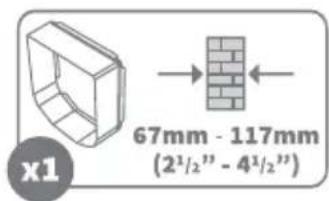
text_image
67mm - 117mm (2¹/₂" - 4¹/₂")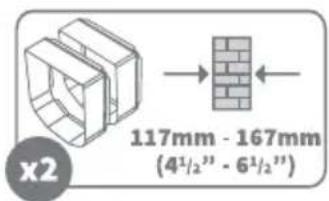
text_image
117mm - 167mm (4¹/₂" - 6¹/₂")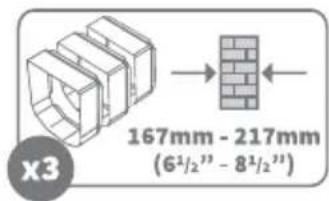
text_image
167mm - 217mm (6¹/₂" - 8¹/₂")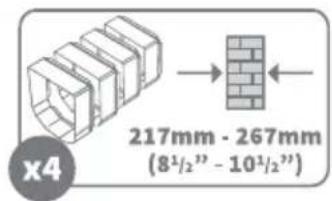
text_image
217mm - 267mm (8¹/²" - 10¹/²")
Installation video tutorials (English speaking) can be found at surepetcare.com/support
Wall fitting features
External frame
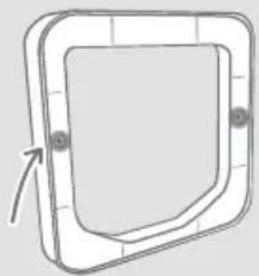
natural_image
Simple line drawing of a square frame with a curved top and side connectors (no text or symbols)2 External screw holes
Tunnel Front frame
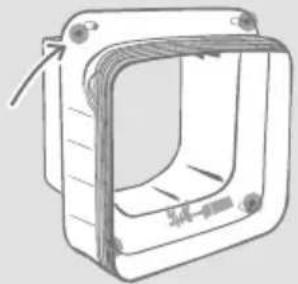
natural_image
Line drawing of a rectangular device with internal components and a scroll wheel (no text or symbols)4 Wall mounting screw holes
2 Internal screw holes
within the battery compartment
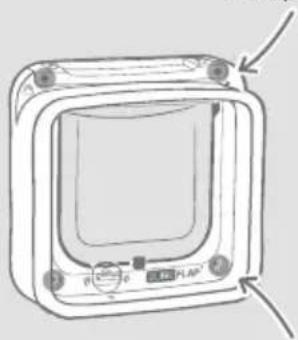
natural_image
Line drawing of a rectangular electronic device with control buttons and a display screen (no text or symbols)2 Internal screw holes
behind the internal screw covers
Step-by-step guide

Before you begin, have you added all of your pets? If not, see page 9.
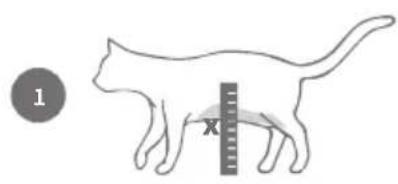
text_image
1To ensure your cat has unhindered access through the Cat Flap, measure the height from their tummy to the floor. Mark this height on your wall, as this is where the bottom of the hole should be cut through the wall. Note: If there is a large drop on the outside of the house you will need to place a step outside for your pet to access the tunnel.
natural_image
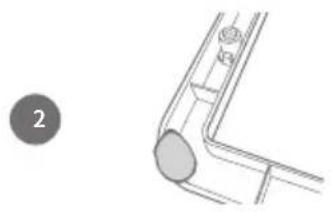
Technical line drawing of a mechanical component with a circular indicator labeled '2' (no text or symbols on the diagram itself)Attach a ball of Blu Tack (or similar adhesive putty) to each rear corner of the external frame so that you can stick it to the wall and use it as a template.
natural_image
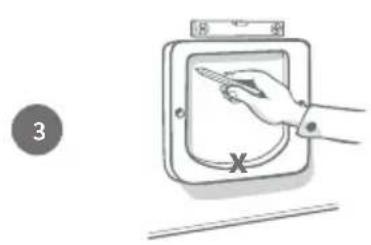
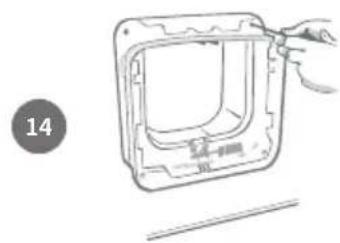
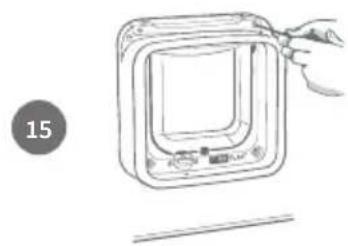
Illustration of a hand using a pen to interact with a device inside a square frame, no text or symbols present.Stick the external frame to the wall using the mark you made for the height of your cat's tummy to align the bottom edge of the hole. Use a spirit level to ensure the frame is level, then run a sharp pencil around the inside edge of the frame. Now mark the centre of the drawn area, this will be used as a reference point. Before you start to cut the hole remove the Cat Flap from the area to minimise the amount of dust the product is subjected to.
natural_image
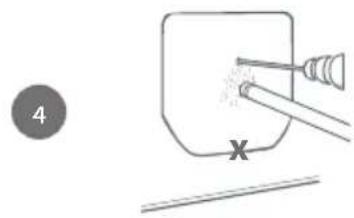
Diagram showing a tool interacting with a mechanical component, labeled with number 4 and cross mark (no text or symbols on the diagram itself)Using the appropriate power tool and drill bit for your wall (please consult a builder to identify the appropriate tools), drill a hole all the way through the wall at the centre point you marked. We advise you have somebody assisting you with a vacuum cleaner, so as not to fill the room with dust.
natural_image
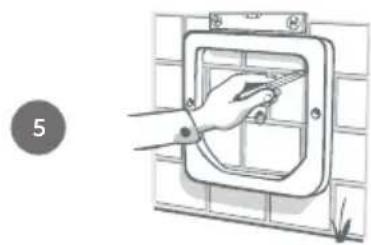
Illustration of a hand installing or adjusting a wall-mounted panel on a brick wall (no text or symbols)Now, from the outside of your house, use the drilled hole as a reference and stick the external frame to the wall. We advise that you stick the external frame a few millimetres lower than the inside to allow for any rain collected in the tunnel to run back outside.
natural_image
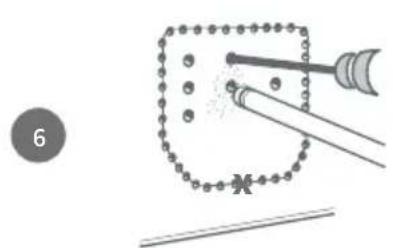
Illustration of a tool interacting with a dotted circular object, no text or symbols presentBack on the inside of the house; whether you are cutting through brick, wood, tiles or plaster, you should drill some pilot holes, firstly around the perimeter of the line you have drawn and then in the middle of the marked area. The holes around the perimeter should be touching the inside of the line and the holes in the centre should go all the way through the wall to help with the cutting process.
natural_image
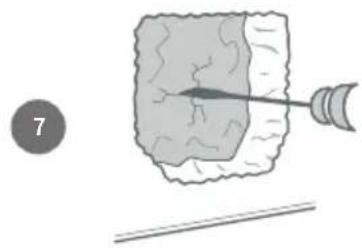
Diagram showing a mechanical or biological process with a pointed tool interacting with a textured block, no text or symbols present.Now remove all of the material in the centre using the most suitable tools for the material you're cutting. We do not recommend that you cut through to the outside in one go. Cut away material on the inside of the house first and then move outside to cut the remainder of the hole. Try to keep the hole within the outlined area otherwise it will be too big.
natural_image
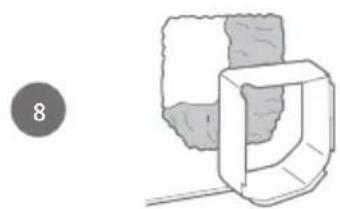
Simple line drawing of a 3D cube with a rectangular frame and a circular label containing the number 8 (no text or symbols on the diagram itself)We recommend using one of the tunnel extenders to make sure you have a clear path through the wall. Once this is the case, clear away any dust and debris.
text_image
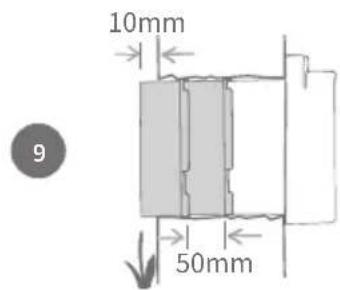
10mm 9 50mmTo extend the Cat Flap's tunnel through to the outside wall you need to use the tunnel extender accessories to make up this length. To calculate how many extenders you will need for the tunnel to reach the outside please go to page 23. It is important to remember that the end has to stick out by at least 10mm ( 38 ) for the external frame to rest on.
natural_image
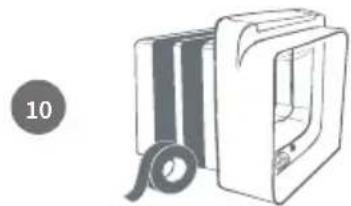
Illustration of a rolled-up hard drive next to a rectangular device (no text or symbols visible)Stack the tunnel extenders together and then attach them to the end of the Cat Flap's tunnel, using weatherproof tape between each join to hold them together. Do not glue the tunnel extenders or Cat Flap together.
natural_image
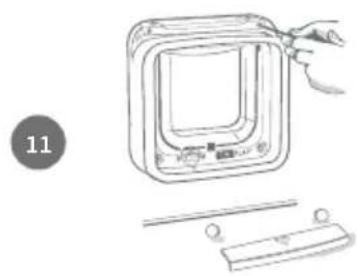
Illustration of a device with a handle, showing a square panel and two separate parts (no text or symbols)From the inside of the house, feed the extended tunnel into the hole in the wall until the Cat Flap is flush against the wall. If no adjustment to the hole shape or size is needed then you are at the point where you can attach the Cat Flap to the inside of the house.
natural_image
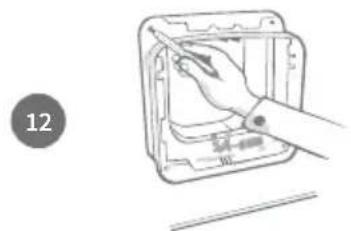
Line drawing of a hand inserting a component into a device (no text or symbols)The Cat Flap can be secured directly to your inside wall. To access the screw holes needed, you have to unscrew the front frame from the tunnel. To do this, first remove the battery cover and screw covers, then unscrew the four screws and lastly pull the tunnel and front frame apart.
Now locate the 4 screw holes, they are the larger holes in the corners of the Cat Flap. Mark the hole positions using a sharp pencil.
natural_image
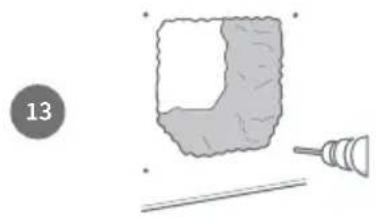
Simple line drawing of a tool and a textured block with a pointed tip, no text or symbols presentRemove the Cat Flap from the wall and place it away from the work area. Drill the four holes using the appropriate drill bits to suit the construction of your wall, being careful not to break through the edge of the main hole. Once drilled, put the wall plugs into each of the holes.
natural_image
Line drawing of a mechanical component with a hand adjusting it, no text or symbols presentReplace the Cat Flap, with its extended tunnel, back into the hole. Then, using the appropriate screws for your wall plugs, screw the Cat Flap to the wall - see the diagram.
natural_image
Line drawing of a square electronic device with a hand adjusting its top panel (no text or symbols)Screw the front frame back onto the tunnel. It is important that these parts are fitted together correctly, please ensure that the gap between the parts is no bigger than a credit card thickness. Once screwed together put battery cover and internal screw covers back onto your Cat Flap.
natural_image
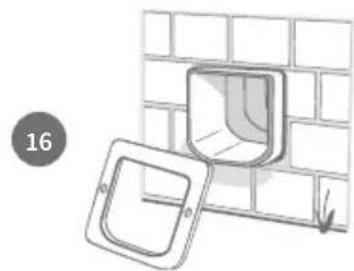
Diagram showing a wall-mounted square installation attached to a brick wall, with a magnified inset view (no text or symbols)Now you can move to the outside of the house. The extended tunnel should be poking out of the hole. Place the external frame over the tunnel.
natural_image
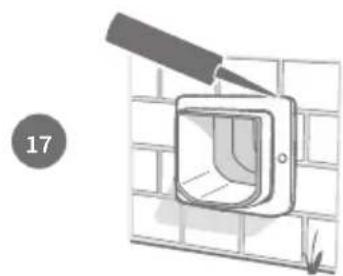
Illustration of a wall-mounted electrical socket mounted on a brick wall, with no visible text or symbols.Lastly, use an All-Weather sealant to seal the gap between the tunnel and the external frame. We also recommend putting some sealant around the join between the external frame and the wall.
natural_image
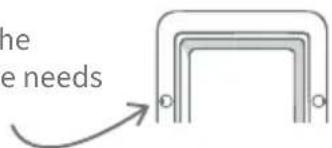
Illustration of a hand inserting a small object into a square frame, with no visible text or symbols.Now, insert the two screw caps into the external frame, noting that the groove needs to be facing away from the tunnel.
text_image
one ne needs4-way manual lock
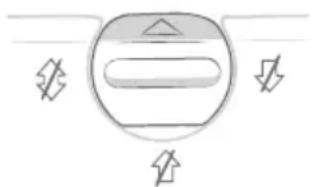
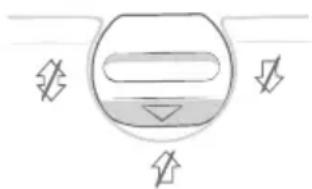
The manual lock has 4 positions which control the opening of the flap in either direction, allowing you to control the entry and exit of your cats. The flap must be closed and hanging vertically before changing the rotary lock position.

When using the Microchip Cat Flap Connect system, you can switch between locking modes easily by using the Sure Petcare mobile/web app as long as the the manual rotary lock is in Position 1. If the manual rotary lock is in a different position, this will override any locking modes present in your app.
natural_image
Simple diagram of a circular object with horizontal lines and symbols, no readable text or labelsPosition 1 – Standard mode
Authorised cats with outdoor access are allowed to enter & exit the house. Indoor only cats are kept inside.
natural_image
Simple line drawing of a circular object with internal shapes and no text or symbolsPosition 3 – Keep inside
Authorised cats with outdoor access are allowed to enter, but are prevented from exiting. Of course, indoor only cats are kept inside as well.
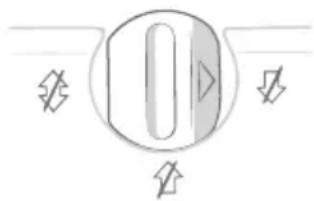
natural_image
Pure electrical circuit lines without any symbolsPosition 2 - Keep outside
Cats with outdoor access are allowed to exit the house, and all cats are prevented from entering (even an indoor only cat if it got out of an open window).
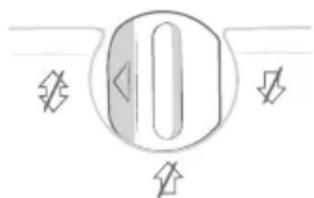
natural_image
Pure electrical circuit lines without any symbolsPosition 4 – Locked both ways
All cats are prevented from entering and exiting the house.

Curfew mode only via the Sure Petcare app
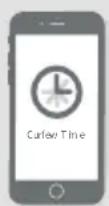
When using the Microchip Cat Flap Connect with the Sure Petcare app you can activate an additional curfew mode. This mode allows you to set a lock and unlock time for your Cat Flap, so that your cats (with outdoor access) can go outside only for a set period of the day. At the lock time, the Cat Flap will be set to the ‘Keep inside’ locking mode, so your cat will still be able to enter the house, but won’t be able to leave again.

Curfew mode does not apply for indoor only cats.

Once you've set a curfew time, your Microchip Cat Flap Connect will lock and unlock at these times everyday until you change or disable it.

However, please be aware that the Sure Petcare app and the manual rotary lock on the Cat Flap can't communicate with each other. Physically changing the rotary lock position will override any curfew times present in your app.
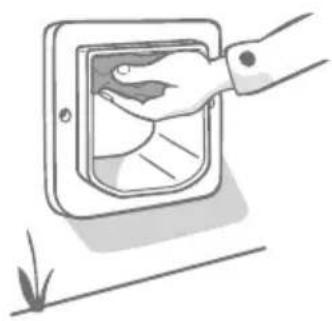
It is important you keep your Cat Flap clean and tidy to ensure it continues to function reliably. We recommend you give it a clean every couple of months to avoid the build up of excess mud, dirt, or cat hair. This way you can avoid any reliability issues dirt build up can cause.
Areas to keep clean
natural_image
Illustration of a hand opening a wall-mounted electrical outlet with a downward arrow indicating airflow or discharge (no text or symbols)The sensors
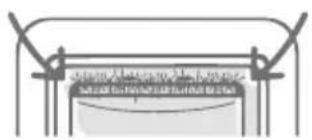
The Cat Flap's sensors, used to detect your cat, are located both on the ceiling of the front part of the product (the side with the SureFlap logo and the battery compartment) and on the ceiling of the tunnel. If they become obscured by dirt or cat hair, there is a risk that your product will not work correctly. Obscured sensors may result in abnormal locking functions that can lead to battery drainage. You should clean the sensors once a month or if you notice dirt build up.
text_image
Diagram showing a mechanical or electrical component with labeled parts and directional arrows, likely illustrating a system or process.The draught excluders
When cleaning your Cat Flap, also make sure to remove any build up of cat hair from the draught excluders surrounding the clear plastic door, as this can sometimes block the sensors.
natural_image
Illustration of a hand placing a component into an open electrical outlet (no text or symbols)The floor of the tunnel
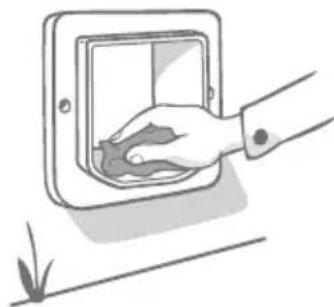
Operation of the sensors also relies on the reflectivity of the tunnel floor. This therefore should also be kept reasonably clean. We advise you clean the tunnel once a month or if you notice dirt build up.
Problem with your product?

If you notice any physical problems with your Microchip Cat Flap Connect, please do not attempt to fix these yourself. Our customer care team are very friendly and happy to offer you assistance or provide servicing if your product is damaged in any way. Please see the back cover for contact details.
Connection issues
1. Receiving multiple notifications via the app?
This is likely because the Hub or Microchip Cat Flap Connect keep losing their connection:
- Try relocating your Hub following the advice given on page 11. If that doesn't work, you will need to move your Hub closer to the Cat Flap - read below.
- In order to move your Hub closer try connecting it to your router using a longer Ethernet cable.
- If the above doesn't work, we recommend purchasing an ‘Ethernet over power adapter’. This will plug into a normal power socket and allow you to connect your Hub to the internet closer to your Cat Flap location.
2. Red flashing ears?
Your Hub has lost connection with the Microchip Cat Flap Connect.
- If you are seeing both ears flashing red during set up, please perform a factory reset by pressing the button on the base of your Hub for 10 seconds.
- If you are seeing both ears flashing red for prolonged periods after setup, try power cycling your Hub. Switch the power off at the socket, leave it for 30 seconds, and then turn it back on.
- You can also try moving your Hub closer to the Cat Flap. See point 1. of Connection issues.
3. Alternating flashing ears (red or green)?
Your Hub is having problems connecting to the Sure Petcare servers. This could be because of an unreliable internet connection.
- Try power cycling your Hub by switching the power off at the socket, leaving it for 30 seconds, and then turning it back on. At this point you will see the setup light sequence - see page 14. If the ears remain solid green for a few minutes, the Hub has reconnected.
- If the above doesn't work, make sure your internet router is turned on and that your internet connection is working correctly with other devices.
- If it isn't working with other devices, try switching your router off, leaving it for 30 seconds, and then turning it back on.
- If your internet router is working with other devices, try re-connecting the Ethernet cable into the router and the Hub. Make sure it is pushed in all the way, as it can easily appear connected when it isn't.
If you keep having connectivity issues please visit: surepetcare.com/hub-connectivity
Solid red ears
Your Hub is undergoing a firmware update.
- Be patient and wait for the Hub ears to turn green. This shouldn't take longer than 2 minutes.
- Once the firmware update is complete the Hub will need to reboot. At this point you will see the setup light sequence - see page 14.
Slow notifications
If you find some messages are slow to appear on your app, this is likely because your Hub is having to work hard to connect to your Cat Flap. To improve the speed of messages, try moving your Hub to a better location following the advice given on page 11.
Help & support - Microchip Cat Flap Connect
My cat won't use the Microchip Cat Flap Connect
- Try taping the clear plastic door open with some strong hold tape. Do this for a while so that your cat can move freely through the Cat Flap and become comfortable using it.
The Microchip Cat Flap Connect won't open for my cat
• Make sure your pet's microchip ID has been added successfully with the correct access - see page 9.
- Check that you used good quality alkaline batteries and that they are not running low - see page 8.
- Ensure your Cat Flap is clean and that there is no dirt or pet hair obscuring the sensors or the base of the tunnel - see page 28.
- Is your Cat Flap fitted in a metal door? Check your door specifications as this can cause interference - see page 21.
- Check that there are no obvious sources of electrical noise in the area e.g. faulty flickering lights, etc. If you suspect there is, please call our Customer Care team. See the back cover for details.
The Microchip Cat Flap Connect only works for my cat in one direction
• Make sure that the sensors are clean on both the inside and outside of the product - see page 28.
- Add your cat again making sure you are adding it to have outdoor access - see page 9.
Short battery life
- Ensure your Cat Flap is clean and that there is no dirt or pet hair obscuring the sensors or the base of the tunnel - see page 28.
• Make sure you have used good quality batteries and that they are fitted correctly - see page 8. - Check that there are no obvious sources of electrical noise in the area e.g. faulty flickering lights,etc. If you suspect there are, please call our Customer Care team. See the back cover for details.
Constant clicking sound
- This can be caused by faulty batteries, low quality batteries, or poor contact between the batteries and the Cat Flap. Clean the ends of the batteries and the connectors with a dry cloth.
- Also ensure your Cat Flap is clean and that there is no dirt or pet hair obscuring the sensors or the base of the tunnel - see page 28.
- If this doesn't solve the problem, replace the batteries using good quality alkaline ones - see page 8.
The locking mode set in the app doesn't seem to work
- This can be caused by the position of the rotary lock. Please set the manual rotary lock on the Cat Flap to position 1 because, if it is set to a different position, this will override any locking modes present in your app - see page 27.
Still in need of assistance?
- If you keep having connectivity issues please visit: surepetcare.com/hub-connectivity
- For more guidance, videos and customer help forums visit: surepetcare.com/support
- If you're having issues with your Sure Petcare app please visit: surepetcare.com/apphelp Or you can always contact our friendly customer care team. See the back cover for details.

Warranty: The SureFlap Microchip Cat Flap Connect carries a 3-year warranty from the date of purchase, subject to proof of purchase date. The warranty is restricted to any fault caused by defective materials, components or manufacture. This warranty does not apply to products whose defect has been caused by normal wear and tear, misuse, neglect or intentional damage. In the event of a part failure due to faulty parts or workmanship, the part will be replaced free of charge during the warranty period only. At the manufacturer's discretion, a replacement product may be provided free of charge in the case of a more serious malfunction. Your statutory rights are not affected.
Disclaimer: The SureFlap Microchip Cat Flap Connect and app report pet location and movement by the detection of a pet ID and measured movements of the clear plastic door. In most cases this will give reliable pet location information, however unexpected or unusual use of the Cat Flap (e.g. a pet sticking their head out of the Cat Flap, but not going through) may lead to unreliable pet location information. Sure Petcare cannot accept liability for any damage, harm or inconvenience which may be incurred as a result of incorrect reporting of pet location.
The SureFlap Microchip Cat Flap Connect incorporates selective entry and selective exit features which have been designed to minimise the risk of intruder pets entering your house and to keep some of your pets indoors only. However, it is not possible to fully guarantee the exclusion of all other animals in all circumstances.
In the rare event of an unauthorised animal gaining access to the house, or any pets experiencing an unintended exit, Sure Petcare cannot accept liability for any damage, harm or inconvenience which may be incurred.
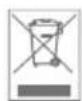
Disposal of Products and used Batteries: This icon will indicate products that will be subject to the following legislation:
The Waste Electrical and Electronic Equipment Directive 2012/19/EU (WEEE Directive) & The Battery Directive 2006/66/EC and Amendment 2013/56/EU places an obligation on households to dispose of the waste batteries and products that have reached the end of their life, in an environmentally responsible manner as this will reduce the impact the waste will have on the environment, therefore these cannot be placed in household waste bins and should be recycled at an appropriate recycling facility. Further information on recycling can be found at: www.recycle-more.co.uk
Ensure batteries are replaced before the expiry date shown on the packaging or battery itself, and disposed of safely and appropriately.
In case of battery leaks, wear appropriate protective clothing to protect yourself from any exposure to harmful chemicals before disposing of the batteries and cleaning any spillage. When cleaning a spillage, avoid contact with skin. Battery chemicals shouldn't be placed near the eyes or ingested. Contact a medical professional immediately if this should occur.
FCC warning: Changes or modification not expressly approved by the party responsible for compliance could void user's authority to operate the equipment.
Industry Canada Notice: This device complies with Industry Canada licence-exempt RSS standard(s). Operation is subject to the following two conditions:
(1) this device may not cause interference, and (2) this device must accept any interference, including interference that may cause undesired operation of the device.
Trademarks: Google Play and the Google Play logo are trademarks of Google Inc.
Apple, is a trademark of Apple Inc., registered in the U.S. and other countries. App Store is a service mark of Apple Inc., registered in the U.S. and other countries. IOS is a trademark or registered trademark of Cisco in the U.S. and other countries and is used under license.
natural_image
Simple gray line drawing of a smiling baby face with a bow (no text or symbols)natural_image
Simple icon of a smiling baby face inside a shield shape (no text or symbols)natural_image
Simple line drawing of two cats facing a vertical barrier, with no text or symbols present.natural_image
Simple line drawing of a cat with a cross mark and a lock icon next to stacked books (no text or symbols)natural_image
Simple line drawing of a vertical object with a lock on top, mounted on a base (no text or symbols)natural_image
Simple line drawing of a cat walking on a platform next to a vertical lock (no text or symbols)natural_image
Illustration of a cat using a lock inside a transparent enclosure (no text or symbols)flowchart
graph LR
    A["User scanning device"] --> B["User interacting with cat"]
    B --> C[Hand holding smartphone displaying 'YourPet Hotco node'
natural_image
Line drawing of a microwave oven with a door and control panel, showing a close-up of the lid (no text or symbols)natural_image
Diagram of a device rear panel with battery and switch components (no text or labels)natural_image
Diagram of a vehicle front panel with buttons and indicators (no text or symbols)
natural_image
Line drawing of a mechanical component or bracket with a circular detail on top (no text or symbols)
natural_image
Illustration of a hand adjusting a car's side panel with an arrow indicating rotation (no text or symbols present)natural_image
Diagram showing a curved road with a trash bin and a downward arrow, no text or symbols presentnatural_image
Simple line drawing of a roof with a sun icon above (no text or symbols)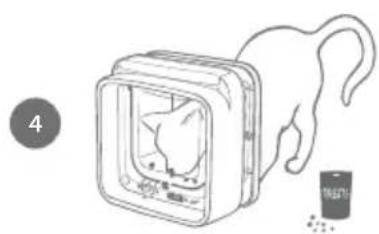
natural_image
Illustration of a cat emerging from a device with a battery nearby (no text or symbols)natural_image
Simple line drawing of a roof structure with no text or symbolsnatural_image
Diagram showing a curved track with blocks and an upward arrow, no text or symbols presentnatural_image
Diagram showing a medical device connected to a device with a cable, labeled '1' (no text or symbols on the diagram itself)natural_image
Diagram of a medical or laboratory device with a plug inserted into a bowl, showing internal components and a directional arrow (no text or symbols)natural_image
Simple line drawing of a cat-shaped object with a lit head and handle, no text or symbols presenttext_image
Sure Petcare Applnatural_image
Illustration of a cat on a table with an upward arrow and a checkmark, no text or symbols present.natural_image
Illustration of a mouse interacting with a fishbowl containing a fish, with a 'X' symbol nearby (no text or symbols present)natural_image
Illustration of a desk with a mobile phone, a cat, and a mouse (no text or symbols)natural_image
Simple line drawing of a kitchen counter with a bag and a scroll, next to an 'X' symbol (no text or labels)natural_image
Simple line drawing of a cat peeking from behind a brick wall, with a small X symbol nearby (no text or symbols)natural_image
Three identical cartoon-style cat head illustrations with radiating lines, no text or symbols presentnatural_image
Three identical cartoon cat head illustrations with radiating lines, no text or symbols presentnatural_image
Three cartoon cat head illustrations with different angles and shading, no text or symbols presentGrüne Ohren
natural_image
Line drawing of two wall-mounted home appliances with a small flower nearby (no text or symbols)natural_image
Illustration of a room with potted plants, a door, and a window (no text or symbols)natural_image
Pure technical line drawing of two interlocking mechanical parts (no text or symbols)natural_image
Simple line drawing of a U-shaped object inside a square frame (no text or symbols)natural_image
Pure technical diagram of a square component with dimension lines (no text or symbols)(5 9/16'' x 4 3/4'')
Außenrahmen
natural_image
Line drawing of a rectangular device with a central screen and cable connectors (no text or symbols)Tunnel
natural_image
Pure geometric diagram of a rounded rectangle with dashed lines indicating dimensions (no text or symbols)natural_image
Illustration of a cat with a ruler and X mark (no text or symbols)natural_image
Hand holding a pen inside a square electrical outlet with a cross mark, no text or symbols visiblenatural_image
Simple line drawing of a tool with a bracket and base, no text or symbols presentnatural_image
Simple line drawing of a hand holding a small object with a cross mark, next to an electrical plug (no text or symbols)natural_image
Illustration of hands installing or adjusting a rectangular device (no text or symbols visible)natural_image
Simple line drawing of a tool and a separate panel (no text or symbols)text_image
15 to 30mmnatural_image
Illustration of a hand using a tool to clean or install an open electrical outlet (no text or symbols visible)natural_image
Simple line drawing of a hand holding a U-shaped object with a small arrow below (no text or symbols)natural_image
Silhouette of a cat with a ruler placed between its tail (no text or symbols)
natural_image
Simple line drawing of a door with a circular opening and an arrow pointing to the handle (no text or symbols)
natural_image
Simple line drawing of a pen inserted into a circular grid, no text or symbols presentnatural_image
Technical diagram showing a 3D object inside a circular structure with grid lines, no text or symbols present.natural_image
Simple line drawing of a device with a circular frame and a central screen, no text or symbols present.natural_image
Diagram showing a wall-mounted device with a magnified inset view of its U-shaped component (no text or symbols)natural_image
Illustration of a hand inserting a U-shaped component into a wall, with no text or symbols present.natural_image
Simple line drawing of a curved arch structure with arrows indicating direction (no text or symbols)natural_image
Line drawing of a mechanical clamp or bracket assembly (no text or symbols)natural_image
Simple line drawing of a handheld electric tool with a rectangular panel and cable (no text or symbols)natural_image
Simple line drawing of a magnifying glass over a circular grid background (no text or symbols)natural_image
Line drawing of hands installing or adjusting a device on a surface (no text or symbols)natural_image
Simple line drawing of two overlapping square panels with a circular inset showing a magnified view (no text or symbols)natural_image
Illustration of a hand inserting a component into a circular housing (no text or symbols)natural_image
Pure diagram of a curved structure with internal layers and directional arrows, no text or symbols present.natural_image
Simple line drawing of a square frame with a rounded corner and a curved top edge, no text or symbols present.Tunnel
natural_image
Line drawing of a rectangular device with a curved internal structure and mounting points (no text or symbols)Frontrahmen
natural_image
Line drawing of a vintage flat-screen TV unit with control buttons and a scroll (no text or symbols)natural_image
Pure mechanical component diagram without any text, numbers, or symbolsnatural_image
Illustration of a hand using a tool to clean or install a device (no text or symbols visible)natural_image
Simple line drawing of a tool interacting with a mechanical component (no text or symbols)natural_image
Hand placing a wall-mounted component into a grid-patterned panel (no text or symbols visible)natural_image
Illustration of a paintbrush applying paint to a dotted square frame with dots and a star symbol (no text or symbols present)natural_image
Diagram showing a pointed object interacting with a textured surface, with a numbered circle and line below (no text or symbols)natural_image
Simple line drawing of a 3D cube with a textured surface and a numbered circle (8) in the corner, no text or symbols present.text_image
10mm 9 50mmnatural_image
Illustration of a hard drive with a tape and three stacked blocks, no text or symbols presentnatural_image
Illustration of a hand using a tool to adjust a square component with a ruler beside it (no text or symbols)natural_image
Illustration of a hand inserting a component into a device casing (no text or symbols visible)natural_image
Simple line drawing of a tool interacting with a textured block and a wire (no text or symbols)natural_image
Line drawing of a mechanical component with a hand adjusting it, no text or symbols presentnatural_image
Simple line drawing of a square device with a handle, no text or symbols presentnatural_image
Diagram showing a wall-mounted device mounted on a brick wall, with a magnified inset view (no text or symbols)natural_image
Illustration of a wall-mounted electrical switch mounted on a brick wall, with no visible text or symbols.natural_image
Illustration of a hand holding a square component with a downward arrow, no text or symbols presentnatural_image
Simple line drawing of a U-shaped structure with arrows indicating direction (no text or symbols)
Verriegelungsmodi
natural_image
Simple diagram of a circular object with horizontal lines and symbols, no readable text or labelsnatural_image
Simple line drawing of a circular object with internal shapes and directional arrows, no text or symbols present.natural_image
Pure electrical circuit lines without any symbolsnatural_image
Pure electrical circuit lines without any symbolsnatural_image
Illustration of a hand opening a wall-mounted electrical socket with a leaf symbol below (no text or symbols)natural_image
Simple line drawing of a mechanical or architectural component with no visible text, numbers, or symbols.Zugluftschutz
natural_image
Illustration of a hand placing a component into an open electrical outlet (no text or symbols)Tunnelboden
natural_image
Simple gray line drawing of a smiling baby face with a bow (no text or symbols)natural_image
Simple gray shield icon with a smiling face and bow (no text or symbols)natural_image
Illustration of two cats facing a wall with a sign and a cross symbol (no text or labels)natural_image
Simple line and icon set: a cat with a 'X' symbol, a lock on a stack of books (no text or symbols)natural_image
Simple line drawing of a vertical object with a lock and rectangular base (no text or symbols)natural_image
Simple line drawing of a cat next to a vertical lock and a horizontal line (no text or symbols)natural_image
Illustration of a cat peeking out of a window with a lock, no text or symbols presentflowchart
graph LR
    A["User with Wi-Fi"] --> B["Mouse on table"]
    B --> C["Hand holding smartphone displaying 'Your Pet handsome inside'"]
Application Sure Petcare
natural_image
Line drawing of a device with a door panel and a separate handle, showing no text or symbols.natural_image
Diagram of a device rear panel with battery and switch components (no text or labels)natural_image
Front view of a car dashboard with indicator lights and buttons (no text or symbols)
natural_image
Line drawing of a mechanical component or bracket with a circular detail (no text or symbols)
Témoin lumineux
natural_image
Diagram showing a connector inserted into a device with a cable, no text or symbols presentnatural_image
Diagram of a medical device with a plug inserted into a bowl, showing internal components and wiring (no text or labels)natural_image
Simple line drawing of a cat-shaped object with a lit tail and a handle, no text or symbols present.text_image
Sure Petcare Applnatural_image
Illustration of a mouse on a table with an upward arrow and a checkmark, no text or symbols present.natural_image
Illustration of a mouse interacting with a fishbowl containing a fish, with a small cross symbol nearby (no text or symbols)natural_image
Illustration of a desk with a remote phone, a mouse, and a cat (no text or symbols)natural_image
Simple line drawing of a kitchen counter with a bag and a door, next to a cross symbol (no text or labels)natural_image
Simple line drawing of a cat sitting on a bench with a 'X' symbol, no text or symbols presentnatural_image
Line drawing of a wall-mounted device with a highlighted screen (no text or symbols)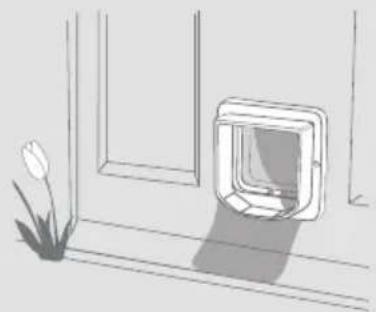
natural_image
Simple line drawing of a window with a square vent and a small flower nearby (no text or symbols)natural_image
Pure mechanical part diagram showing two interlocking parts (no text or symbols)text_image
Two circular symbols with pictograms: one without a diagonal line and another with a diagonal line and a lightning bolt, both crossed by a diagonal line.natural_image
Simple line drawing of a rounded rectangular frame with a small protrusion at the bottom (no text or symbols)natural_image
Pure technical diagram of a rectangular component with dimension lines (no text or symbols)natural_image
Line drawing of a rectangular device with a central screen and cable, no text or symbols presentnatural_image
Pure geometric diagram of a rounded rectangle with dashed lines indicating dimensions (no text or symbols)natural_image
Silhouette of a cat with a ruler placed between its tail (no text or symbols)natural_image
Hand holding a pen inside a square electrical outlet with a ruler nearby (no text or symbols visible)natural_image
Simple line drawing of a tool with a bracket and base, no text or symbols presentnatural_image
Simple line drawing of a hand holding a small electronic device with a label 'X' (no text or symbols on the device itself)natural_image
Line drawing of hands installing or adjusting a device (no text or symbols present)natural_image
Simple line drawing of a tool and a separate panel (no text or symbols)text_image
15 to 30mmnatural_image
Illustration of a hand using a tool to clean or install an open electrical outlet (no text or symbols visible)natural_image
Simple line drawing of a hand holding a U-shaped object with a downward arrow below (no text or symbols)natural_image
Silhouette of a cat with a ruler placed on its side (no text or symbols)2
natural_image
Simple line drawing of a door with an arrow pointing to the center (no text or symbols)!
text_image
20 to 35mm 1natural_image
Simple line drawing of a pen and a circular object with grid lines, no text or symbols present.natural_image
Diagram showing a 3D object inside a circular grid structure with a numbered circle (no text or symbols)natural_image
Simple line drawing of a door with a circular inset showing a device (no text or symbols)natural_image
Diagram showing a door lock mechanism with a magnified inset view (no text or symbols)natural_image
Illustration of a hand using a tool to cut or mark a U-shaped component on a wall, with no text or symbols present.natural_image
Simple line drawing of a curved arch structure with arrows indicating direction (no text or symbols)natural_image
Technical line drawing of a mechanical clamp or bracket assembly (no text or symbols)natural_image
Simple line drawing of a hand holding a small object next to a rectangular panel, with no text or symbols present.natural_image
Simple line drawing of a magnifying glass over a U-shaped object with a handle, no text or symbols present.natural_image
Illustration of hands installing or adjusting a rectangular device on a surface (no text or symbols visible)natural_image
Diagram showing a square component inside a circular frame and a separate 3D block with an arrow indicating direction (no text or symbols)natural_image
Illustration of a hand inserting a component into a circular housing (no text or symbols)natural_image
Simple line drawing of a curved structure with arrows indicating direction, no text or symbols presentnatural_image
Simple line drawing of a square frame with a curved top and side connectors (no text or symbols)Tunnel
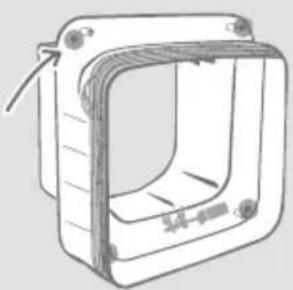
natural_image
Line drawing of a rectangular device with a curved internal structure and mounting points (no text or symbols)Cadre avant
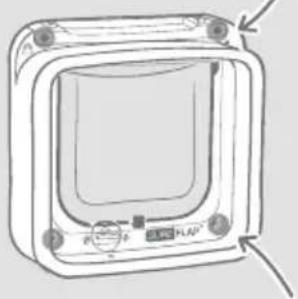
natural_image
Simple line drawing of a rectangular electronic device with mounting holes and a central screen (no text or symbols)natural_image
Technical line drawing of a mechanical component with a circular marker labeled '2' and a separate view showing a rounded feature (no text or symbols present)natural_image
Illustration of a hand using a pen to clean or install a wall-mounted device (no text or symbols visible)natural_image
Simple line drawing of a tool interacting with a device, no text or symbols presentnatural_image
Illustration of a hand installing or adjusting a wall-mounted panel (no text or symbols visible)natural_image
Illustration of a brush applying material to a dotted square frame, with no text or symbols present.natural_image
Diagram showing a pointed object inside a rectangular chamber with a ruler, next to a line and a numbered circle (no text or symbols)natural_image
Simple line drawing of a 3D cube with a circular label containing the number 8 (no text or symbols on the cube itself)text_image
10mm 50mm 9natural_image
Illustration of a rolled-up hard drive next to stacked rectangular blocks (no text or symbols)natural_image
Illustration of a device with a handle and two separate components (no text or symbols)natural_image
Line drawing of a hand inserting a component into a device (no text or symbols)natural_image
Simple line drawing of a tool tip next to a textured square object, with a numbered circle and line below (no text or symbols)natural_image
Line drawing of a mechanical component with a hand adjusting it, no text or symbols presentnatural_image
Line drawing of a square electronic device with a handle and control panel, no text or symbols presentnatural_image
Diagram of a wall-mounted electrical outlet with a square opening, showing internal structure and mounting bracket (no text or symbols)natural_image
Illustration of a wall-mounted electrical socket mounted on a brick wall, with no text or symbols present.natural_image
Illustration of a hand pressing a square button on a wall, with a numbered circle and arrow below (no text or symbols)natural_image
Simple line drawing of a U-shaped structure with arrows indicating direction (no text or symbols)
natural_image
Simple diagram with a circular shape containing an oval and a triangle, surrounded by four directional arrows (no text or symbols)Position 1 - Mode standard
natural_image
Simple line drawing of a circular object with internal shapes and directional arrows (no text or symbols)Position 3 - Confinement
natural_image
Pure electrical circuit lines without any symbolsPosition 2 - Entrée interdite
natural_image
Simple line drawing of a door with directional arrows and symbols, no text or labels presentPosition 4 - Infranchissable
natural_image
Illustration of a hand opening a wall-mounted electrical outlet with a leaf symbol below (no text or symbols)Les capteurs
natural_image
Simple line drawing of a mechanical or architectural component with no text, numbers, or symbolsnatural_image
Illustration of a hand placing a component into an electrical outlet (no text or symbols)Le sol du tunnel
natural_image
Simple gray line drawing of a smiling baby face with a bow (no text or symbols)natural_image
Simple gray shield icon with a smiling face and bow (no text or symbols)natural_image
Illustration of two cats facing a wall with smoke and a cross symbol (no text or labels)natural_image
Simple line drawings of a cat, a cross symbol, and a lock (no text or symbols)natural_image
Pure mechanical diagram showing a lock attached to a vertical component with a base, without any text, numbers, or symbols.text_image
Diagram showing a cat reacting with a magnified view of a test tube, likely illustrating a chemical or experimental procedure.natural_image
Simple line drawing of a cat next to a vertical lock, no text or symbols presentnatural_image
Illustration of a cat peeking out of a window with a lock, no text or symbols presentflowchart
graph LR
    A["User scanning WiFi"] --> B["User interacting cat"]
    B --> C["User interacting with smartphone"]
natural_image
Line drawing of a microwave oven with a door and control panel, showing a close-up of the lid (no text or symbols)natural_image
Diagram of a rear panel with battery and switch components (no text or labels)natural_image
Diagram of a car front panel with buttons and indicators (no text or symbols)
natural_image
Line drawing of a roof-mounted air conditioner unit (no text or symbols)
Waarschuwingslampje
natural_image
Illustration of hands adjusting a car door handle with an arrow indicating rotation (no text or symbols)natural_image
Simple line drawing of a vehicle on a slope with a downward arrow indicating motion (no text or symbols)natural_image
Simple line drawing of a roof with a sun icon above (no text or symbols)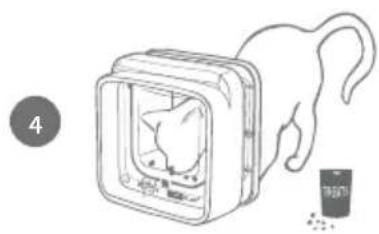
natural_image
Illustration of a cat inside a square chamber with a bag and scattered items nearby (no text or symbols)natural_image
Simple line drawing of a roof structure with no text or symbolsnatural_image
Diagram of a conveyor belt with moving blocks and an upward arrow, no text or symbols presentDownload in de App Store

ONTDEK HETOP Google Play

BESCHIKBAAR ONLINE surepetcare.io
natural_image
Diagram showing a medical device connected to a patient's ear with an arrow indicating insertion (no text or symbols present)natural_image
Diagram of a medical device with a plug inserted into a bowl, showing internal components and wiring (no text or labels)natural_image
Simple line drawing of a cat-shaped object emitting light, with no text or symbols present.text_image
Sure Petcare Applnatural_image
Illustration of a cat on a table with signal waves and a checkmark, no text or symbols presentnatural_image
Illustration of a mouse, a fishbowl with a fish, and a small cross symbol on a table (no text or labels)natural_image
Illustration of a desk with a remote control unit, a cat-shaped mouse, and a black X mark (no text or symbols)natural_image
Simple line drawing of a kitchen counter with a bag and directional arrow, next to a cross symbol (no text or labels)natural_image
Simple line drawing of a cat peeking from behind a brick wall, with a large X symbol nearby (no text or symbols)natural_image
Three identical cartoon-style cat head illustrations with radiating lines, no text or symbols presentnatural_image
Three identical cartoon-style cat head illustrations with glowing spots, no text or symbols presentnatural_image
Three cartoon cat head illustrations with different angles and shading, ending with a black checkmark (no text or symbols)Groene oren
natural_image
Line drawing of two square wall-mounted devices in a corner, one with a small flower nearby (no text or symbols)natural_image
Illustration of a room with potted plants, a door, and a window with plants (no text or symbols)natural_image
Technical line drawing of two interlocking mechanical parts (no text or symbols)natural_image
Simple line drawing of a U-shaped object with rounded corners and a small protrusion at the bottom (no text or symbols)natural_image
Simple line drawing of a square container with a side slot and top handle (no text or symbols)natural_image
Pure geometric diagram of a rounded rectangle with dashed lines indicating dimensions (no text or symbols)natural_image
Simple line drawing of a cat silhouette with a vertical ruler and cross mark (no text or symbols)natural_image
Hand holding a pen inside a square electrical switch (no text or symbols visible)natural_image
Simple line drawing of a mechanical tool with a bracket and base, no text or symbols presentnatural_image
Simple line drawing of a handheld device with a bracket and cable, no text or symbols presentnatural_image
Illustration of hands installing or adjusting a device with a tray (no text or symbols visible)natural_image
Simple line drawing of a wall-mounted device with a circular indicator and arrow, no text or symbols present.natural_image
Simple line drawing of a tool and a separate panel with a ruler, no text or symbols presenttext_image
15 to 30mm 9natural_image
Illustration of a hand using a tool to clean or install an open electrical outlet (no text or symbols)natural_image
Illustration of a hand holding a shield-shaped object with a small arrow below, next to a circular icon labeled '11' (no text or symbols on the diagram itself)natural_image
Silhouette of a cat with a ruler placed on its side (no text or symbols)
natural_image
Simple line drawing of a door with an arrow pointing to the center (no text or symbols)
text_image
20 to 35mm 1natural_image
Simple line drawing of a magnifying glass over a grid, no text or symbols presentnatural_image
Technical line drawing of a mechanical component with a circular base and grid pattern (no text or symbols)natural_image
Simple line drawing of a door with a circular inset showing a device, no text or symbols present.natural_image
Diagram showing a door opening with a magnified inset view of the door (no text or symbols)natural_image
Illustration of a hand using a tool to insert or mark a U-shaped component on a wall, with no text or symbols present.natural_image
Simple line drawing of a tunnel entrance with arrows indicating flow, no text or symbols presentnatural_image
Technical line drawing of a mechanical clamp or bracket assembly (no text or symbols)natural_image
Simple line drawing of a hand tool and a box, no text or symbols presentnatural_image
Simple line drawing of a magnifying glass over a circular grid, with no text or symbols present.natural_image
Illustration of hands installing or adjusting a rectangular device on a surface (no text or symbols)natural_image
Simple line drawing of a square frame and a rectangular box with an arrow, no text or symbols presentnatural_image
Illustration of a hand inserting a component into a circular housing, with no visible text or symbolsnatural_image
Simple line drawing of a curved structure with arrows, no text or symbols presentnatural_image
Simple line drawing of a square frame with a curved top edge and an arrow pointing to the bottom side (no text or symbols)natural_image
Line drawing of a rectangular device with internal components and mounting holes (no text or symbols)natural_image
Illustration of a hand holding a pen inside a square electronic device with a ruler beside it (no text or symbols)natural_image
Simple line drawing of a tool interacting with a rectangular object, no text or symbols presentnatural_image
Hand installing or adjusting a wall-mounted panel with a tool, against a brick wall background (no text or symbols visible)natural_image
Diagram showing a tool interacting with a dotted circular shape and a diagonal line, no text or symbols present.natural_image
Diagram showing a pointed object inside a rectangular chamber with a tool, no text or symbols presentnatural_image
Simple line drawing of a 3D cube with a gray block inside, next to a numbered circle (8) and a horizontal line (no text or symbols)text_image
10mm 9 50mmnatural_image
Illustration of a stack of books with a tape roll, no text or symbols presentnatural_image
Illustration of a hand adjusting a rectangular device with a handle, next to a separate bracket and a circular label (no text or symbols)natural_image
Illustration of a hand using a pen to write on a device inside a container (no text or symbols visible)natural_image
Simple line drawing of a tool interacting with a textured block and a wire (no text or symbols)natural_image
Line drawing of a mechanical component with a hand adjusting it, no text or symbols presentnatural_image
Simple line drawing of a square device with a handle and internal components, no text or symbols present.natural_image
Diagram of a wall-mounted electrical socket with a square opening, mounted on a brick wall (no text or symbols)natural_image
Illustration of a wall-mounted electrical socket mounted on a brick wall, with no text or symbols present.natural_image
Illustration of a hand holding a square component with a circular arrow and number 18 (no text or symbols on the diagram itself)natural_image
Simple diagram of a device with a central body and four directional arrows (no text or symbols)natural_image
Simple line drawing of a device with no text, numbers, or symbolsnatural_image
Pure electrical circuit lines without any symbolsnatural_image
Pure electrical circuit lines without any symbolsnatural_image
Illustration of a hand opening a wall-mounted device with a circular panel and arrow indicating direction (no text or symbols)De sensors
natural_image
Simple line drawing of a mechanical or architectural component with no visible text, numbers, or symbols.De tochtstrips
natural_image
Illustration of a hand placing a component into an electrical outlet (no text or symbols)OTHER COUNTRIES: +44(0)1954 211664 (Ext. 2) English speaking

surepetcare.com/support enquiries@surepetcare.com

facebook.com/surepetcare instagram.com/surepetcarepets

youtube.com/surepetcare twitter.com/surepetcare

SURE
PETCARE
Copyright © SureFlap Ltd, trading as Sure Petcare 7 The Irwin Centre, Scotland Road, Dry Drayton, Cambridge CB23 8AR United Kingdom
iDSCF
Mar 2018
01062-EU_03



Hereby, Sure Petcare as a trading name of SureFlap Ltd, declares that this Microchip Cat Flap Connect is in compliance with the essential requirements and other relevant provisions of EC Directives. The up-to-date Declaration of Conformity (DoC) may be consulted at surepetcare.com/ecdoc