KAF 41323 B - Air Conditioning Koenic - Free user manual and instructions
Find the device manual for free KAF 41323 B Koenic in PDF.


| Product type | Hot air fryer (Air fryer) |
| Brand | Koenic |
| Model | KAF 41323 B |
| Power supply | 220-240 V~, 50/60 Hz |
| Rated power | 1300 W |
| Basket capacity | 4.5 liters (approx) |
| Dimensions (L × W × H) | 30 × 30 × 35 cm (approx) |
| Weight | 5 kg (approx) |
| Adjustable temperature | 70 °C to 200 °C |
| Timer | Up to 60 minutes with auto shut-off |
| Preset cooking modes | Poultry, Meat, Fish, Pizza, Potatoes, Baking, Sausages, Defrost |
| Display | Digital control panel with LED screen |
| Material | Plastic and metal, non-stick basket |
| Safety | Auto shut-off when basket is removed, overheat protection, hot surface indicator |
| Care and cleaning | Basket and grill dishwasher safe, clean with damp cloth |
| Spare parts and repairability | Repair only by authorized service, no spare parts available retail |
| General information | Household use only, do not immerse, maintain safety distances (sides 10 cm, back 30 cm, top 30 cm) |
Frequently Asked Questions - KAF 41323 B Koenic
User questions about KAF 41323 B Koenic
0 question about this device. Answer the ones you know or ask your own.
Ask a new question about this device
Download the instructions for your Air Conditioning in PDF format for free! Find your manual KAF 41323 B - Koenic and take your electronic device back in hand. On this page are published all the documents necessary for the use of your device. KAF 41323 B by Koenic.
USER MANUAL KAF 41323 B Koenic
natural_image
Two electric air fryer units, one black and one white, displayed side by side (no visible text or symbols)Deutsch 3:10
(1) ACD = 1
1-450.25
Parque 27.34
1924.5.4
上证50指数
Kedelins 21-52
B+150-66
Pomie de 27-74
T190072 62 —
Immon GmbH
H
E:C3 Incentor
1.0% FTE/DCI
9.27A 01:48-14
[Non-Text]
M.K.P.41323E_0441328M_130703_408
CE
Sicherheitshinweise
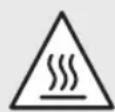
Caution! Hot surface! Risk of burning! Do
not touch the product's hot surfaces. Heat rises from the product during use.
- Do not operate the product by means of an external timer or separate remote control system.
- This product can be used by children aged from 8 years and above and persons with reduced physical, sensory or mental capabilities or lack of experience and knowledge if they are being supervised or have been given instructions concerning the use of the product in a safe way and understand the hazards involved.
• Children shall not play with the product. - Cleaning and user maintenance shall not be carried out by children unless they are older than 8 years and being supervised.
- Keep this product and its power cord out of reach of children under the age of 8 years.
- The product is to be connected to a socket-outlet having an earthing contact.
- The supply cord should be regularly examined for signs of damage, and if the cord is damaged, the product must not be used.
English
Safety instructions
- The product is designed for the preparation of normal household quantities in the home, or in household-like, non-commercial environments. Household-like environments include staff kitchens in shops, offices, agricultural and other small businesses or for use by guests at bed-and-breakfast establishments, small hotels and similar residential facilities.
- A damaged power cord may only be replaced by the authorised service agent in order to avoid hazards.
- Clean the product and all other accessories after each use.
- Follow the instructions in the chapter Cleaning and care.
Safety instructions
- Read this manual thoroughly before first use. It contains important information for your safety as well as for the use and maintenance of the equipment.
- Keep this manual for future reference and pass it on with the product.
- Pay particular attention to the warnings on the product and in this manual.
- Use the product only for its intended purpose. Improper use may lead to hazards.
- In the event of improper use or wrong operation, we do not accept any liability for resulting damages.
- The use of accessories and components not expressly recommended by the manufacturer may result in injuries or damages and voids the warranty.
- Never leave the product unsupervised while it is switched on.
- Do not place any objects on top of the product.
- Never immerse electrical parts of the product in water or any other fluid during cleaning or operation. Never hold the product under running water.
- Do not under any circumstances attempt to repair the product yourself. For servicing and repairs, please consult an authorised service agent.
- The mains voltage must match the information on the rating label of the product.
-
The power plug is used as the disconnect device. Please be sure that the power plug is in operable condition.
-
Only unplugging from the power socket can separate the product completely from the mains.
- Avoid damages to the power cord that may be caused by kinks or contact with sharp corners.
- Keep this product including its power cord and power plug away from all heat sources such as, ovens, hot plates and other heat-producing devices/objects.
- Only unplug from the power socket by the plug itself. Do not pull on the cord.
• Unplug the product ... - when the product is not being used,
- in case of malfunctions,
- before attaching / detaching accessories and
- before cleaning the product.
- If the power cord or the casing of the product have been damaged or if the product has been dropped, the product may not be used before it has been examined by an authorised service agent.
- Use this product in dry indoor areas only and never outdoors.
- Protect this product from extreme heat and cold as well as from direct sunlight and dust.
- In order to reduce the risk of fire and electric shock, do not expose the product to fire (fireplace, grill, candles, cigarettes and so on) or water (water drops, water splashes, vases, tubs, and so on).
English
Safety instructions
- Warning! Do not use this product near water or heavy moisture; e.g. in a damp basement or beside a swimming pool or bathtub.
- Use this product in temperate latitudes only. Avoid tropical and especially humid climatic regions.
- Protect this product from all moisture including spray water and humidity.
- Ensure sufficient air circulation. Therefore do not place any objects onto the appliance and keep clearances to all sides as given below:
- Sides: 10 cm
- Back: 30 cm
- Up: 30 cm
- The appliance shall not be built into furniture. The appliance must not be installed directly below a plate, cupboard or cabinet.
- The feet of the appliance shall not be removed.
- Place the appliance on a surface resistant to heat and splashes. Do not place the appliance on hot surfaces (e.g. cooktops) or open flames (e.g. gas stoves).
- The product may not come into contact with or be covered by highly flammable materials, such as curtains, textiles, wall cladding, etc. Please make sure that sufficient safety clearance is kept to flammable materials.
- Do not insert any objects into the product.
-
This product is not suitable for commercial use. It is designed for household use only.
-
Do not place the product on hotplates (gas, electric, coal stoves, etc.). Keep the product away from all open flames. Operate the product on an even, stable, clean, fireproof and dry surface.
- Fire hazard! Foodstuffs can burn! Do not use with foodstuffs with an excessively high fat or sugar content since this may cause fire. Never leave the product unattended.
- Risk of burning! Do not touch the product's hot surfaces. Touch the product only by its handle or at the display.
- Parts of the product become very hot. Let the product cool down well before cleaning or storing.
- Do not touch the heating element.
- Oil and grease is easily inflammable. Oil and grease must not get in contact with the heating element.
- Important! Check to ensure that the product is in a serviceable condition before use. The product shall not be used if it shows any signs of damage or if it's suspected to be defect.
Congratulations!
Thank you for your purchase of a KOENIC product. Please read this manual carefully and keep it for future reference.
Intended use
This product is suitable for preparing foods only. Any other use may result in damage to the product or injuries.
The Imtron GmbH assumes no liability for damage to the product, for property damage or for personal injury due to careless or improper usage of the product, or usage of the product, which does not meet the manufacturer's specified purpose.
Before first time use
Carefully take the product and its accessories out of the original packaging. Retain the original packaging in case you would like to store the product away or transport it at a later date. If you choose to dispose of the original packaging, then do so according to the applicable legal regulations.
Check the packaging contents for completeness and damages. Should the contents in the packaging not be complete or damaged, do not use the product. Return it to your retail outlet immediately.
After unpacking, please refer to chapter
Cleaning and care.
To remove production residue, run the product for approx. 10 minutes without foodstuffs. For doing so use the max. temperature. For setting follow chapter Operation. Make sure there is sufficient ventilation as a slight odor and some smoke may occur. This is harmless and will disappear shortly.
Content
1 x Hot air fryer
1 x Frying pan incl. grate
1 x Instruction manual
Technical Data
Rated voltage : 220 - 240 V\~
Rated input power : 1300 W
Rated frequency : 50/60 Hz
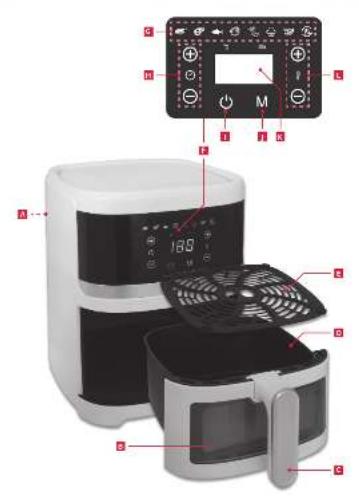
Controls and components
A Hot air outlet
B Window
C Handle
D Frying pan
E Grate
F Control panel with indicators
G Mode display
H Time selection buttons +/-
On/off button
J Mode selection button
κ Temperature and time display
L Temperature selection buttons +/-
Installation
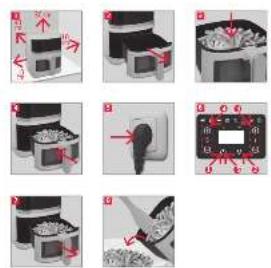
Fig. 1 Place the product on an even, solid and heat resistant surface. Consider the distance to the next socket outlet.
Note:
To ensure sufficient air circulation follow minimum clearances as given below:
Sides: 10 cm
Back: 30 cm
Up: 30 cm

Warning
The product must not be placed into furniture. The product must not be placed directly below a plate, cupboard or cabinet.
Note that hot air escapes from the rear hot air outlet. Make sure to keep the minimum clearances and keep heat-sensitive objects away.
English
Operation
Fig. 2 Pull the frying pan out of the appliance using the handle.
Fig. 3 Fill the food to be fried in the frying pan, but at maximum up to the upper edge.
Fig. 4 Put the frying pan back into the appliance. Make sure it is correctly inserted.
Fig. 5 Plug the mains plug into a suitable socket.
Fig. 6 Press the on/off button to turn on the device. Set the desired mode with the mode selection button. Please observe the symbols and the following deep frying table. If desired, set the temperature and time individually with the +/- buttons. The maximum temperature is 200°C, the maximum time is 60 min. The temperature and time or the remaining time are displayed alternately in the display. Press the on/off button again briefly to start the process. The heating element turns on and emits light in the frying pan.
The set temperature is reached after approx. 2 to 3 minutes. The heating element and therewith the light in the frying pan turns off.
Note:
The heating element and therewith the emitted light in the frying pan will turn on and off during the frying process. This is a normal occurrence and indicates that the set temperature is being kept.
The preset time expires. When the time is up, a beep sounds repeatedly and the unit turns off. To turn off the hot air fryer manually, press the on/off button.
Note:
- Before frying, mix fresh potatoes with a little cooking oil to achieve a crispy effect.
- Shake the fried food, especially fries, croquettes, etc., after 1/3 and 2/3 of the cooking time. Please note the information in the following frying table.
• To do this, pull the frying pan out of the appliance by the handle. The device switches off automatically. Place the frying pan on a level, heat-resistant surface. Shake the frying pan slightly or use a wooden spatula to turn the food over.
- Now slide the frying pan back into the appliance. The device switches itself on again automatically and continues to heat up.
Fig. 7 To remove the food to be fried, pull the frying pan out of the appliance by the handle. Place the frying pan on a flat and heat-resistant surface,
Fig. 8 Put the fried food in a suitable bowl or on a plate. If necessary, use a wooden spatula to empty the frying pan. When all parts have cooled down, clean the device as described under Cleaning and care.
Note:
The fat that leaked from the foods during the frying process will gather below the frying grate. Therefore remove the foods from the pan with a wooden spatula or spoon in order to avoid that this fat is poured on top of the foods.
Recommended frying times
The data in the following table is supposed to serve as reference. Since foodstuffs differ in terms of origin, consistency, weight and form the actually needed temperature and frying time may vary. Make sure that all prepared foods are well done before serving.
| Icons Preset Time Temperature | |||
 | Poultry 25 minutes 200 °C | ||
 | Meats 25 minutes 200 °C | ||
 | Fish 15 minutes 180 °C | ||
 | Pizza 12 minutes 180 °C | ||
 | Potato products 25 minutes 200 °C | ||
 | Baked goods 10 minutes 180 °C | ||
 | Sausages 10 minutes 200 °C | ||
 | Defrost 12 minutes 70 °C | ||
Note:
The above time is only for reference. The cooking time will vary according to the type/fat/weight of the food.
- Shake the fried food, especially French fries, croquettes, etc. after 1/3 and 2/3 of the cooking time. Please note the information in the frying table above. To do this, pull the frying pan out of the appliance by the handle. The device switches off automatically. Shake the frying pan a little or use a wooden spatula to turn the food over.
- Now slide the frying pan back into the appliance. The device then switches on again automatically and continues to heat up.
English
Tips for better results
- Always pay attention to the preparation recommendations on the packaging of the foods. Almost all foods that can be prepared in a regular oven, can also be prepared in an air fryer.
- If the air fryer is not pre-heated, add 2-3 min. to the overall frying time.
- For smaller foodstuffs a shorter frying time is usually sufficient. For bigger foodstuffs, a longer frying time is needed.
- Use primarily waxy potatoes for homemade fries. Rinse freshly cut fries with cold water to remove excess starch and dry the fries thoroughly afterwards. Then add oil and spices. The less moisture the fries contain, the crispier they will become. Oil multiplies this effect.
- Stacked / overlapping foods should be stirred / shaken multiple times to enhance an equal frying result. When properly shaken for 2-3 times, the result for e.g. fries or mini spring rolls will be the best. In addition, make sure not to overfill the frying pan.
- Make sure to remove the frying pan only for stirring / shaking of the goods and only for the least time necessary, to avoid an unnecessary loss of heat, which would impair the overall result.
- When baking fresh muffins or small cakes, keep in mind that the dough will extend. Always make sure that the dough does not touch the heating element. Risk of fire!
Cleaning and care

Caution
Always unplug the product from the power outlet and let it cool down before cleaning.
- Pull the frying grate out of the pan and wash and rinse off both. For heavy encrustations soak the baked residues with water. Re-assemble all parts in reverse order.
Note:
Alternative the frying pan and grate can also be cleaned in the dishwasher.
- When cleaning, never use solvents or abrasive materials, hard brushes, metallic or sharp objects. Solvents are harmful to human health and can attack plastic parts, while abrasive cleaning mechanisms and tools may scratch the surface(s).
Troubleshooting
If there are any problems during operation, please refer to the following table. If the problems cannot be solved as indicated under Solution, please contact your sales agent.
| Problem Possible causes Solution | ||
| Product does not work | Interrupted power supplyFrying pan not inserted correctly | Check the power supplyMake sure that the frying pan is properly inserted |
| Product does not heat | Thermostat is not setTimer is not setFrying pan not put in correctly | Adjust the thermostatSet a time with TimerPut in the frying pan correctly |
| Burned smell / smoke | Fat or food residues are stuck to the heating element | Always make sure that the heating element is clean and that no fat or foodstuffs get in contact with it |

- Sicherheitshinweise
- Caution! Hot surface! Risk of burning! Do
- English
- Safety instructions
- Congratulations!
- Intended use
- Before first time use
- Cleaning and care.
- Content
- Technical Data
- Controls and components
- Installation
- Note:
- Warning
- Operation
- Recommended frying times
- Tips for better results
- Cleaning and care
- Caution
- Troubleshooting
Brand : Koenic
Model : KAF 41323 B
Category : Air Conditioning